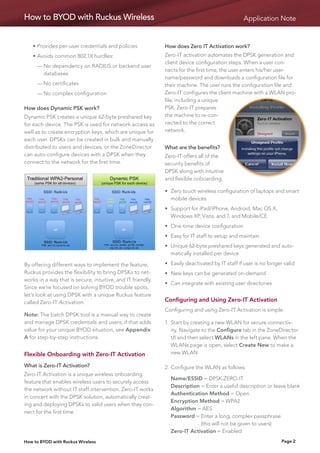
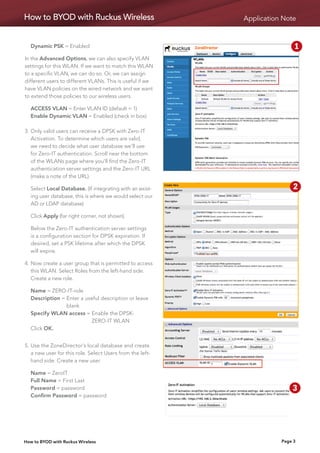
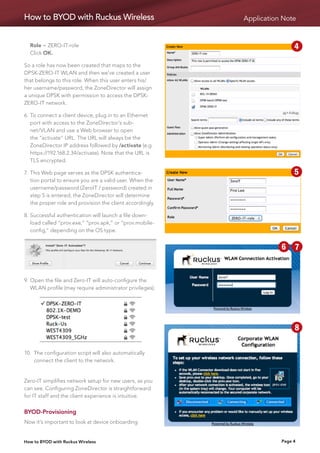
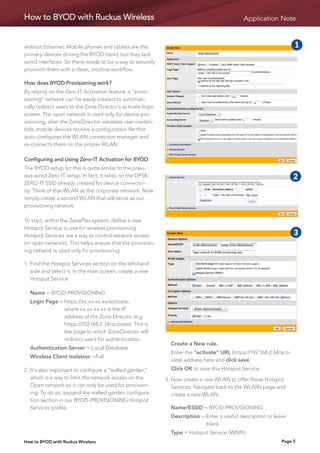
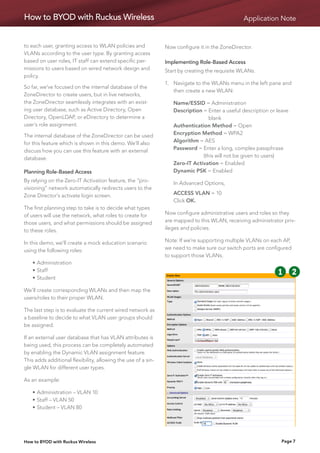
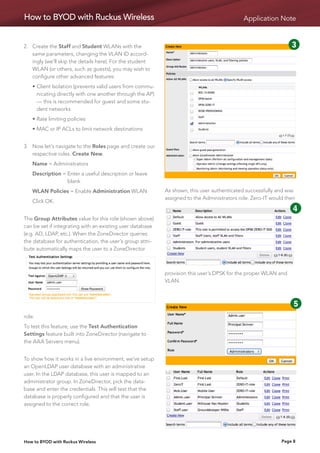
Ruckus provides a solution for BYOD implementations using Dynamic Pre-Shared Keys (DPSK) and Zero-IT Activation that simplifies setup while maintaining security. DPSK assigns unique credentials to each user/device instead of using a shared passphrase. Zero-IT Activation automates configuration of client devices upon first connection by generating and deploying DPSKs without IT intervention. A provisioning network can also be created to securely configure mobile devices on an open wireless network and then connect them to the corporate network.
1. U S E R G U I D E T O si m plif y i n g
BYOD with Ruckus
Introduction What are the benefits?
Like hot and cold, secure BYOD implementations and The traditional PSK model (WPA2-Personal) is great for
ease of use have traditionally been mutually exclusive. home networks and small offices with only a few users.
Some networking products are intuitive to IT admin- However, as organizations seek better security or differ-
istrators, but they lack the necessary features to solve entiated network policies for each user type, the limi-
problems or protect corporate users and data. Other tations of a shared PSK become evident pretty quickly.
products have all the advanced security, filtering, and Perhaps the most troublesome problem is passphrase
access control knobs a government agency could ask exposure, passphrase sharing, and change management
for, but no one can figure out how to use them. policies. If an employee leaves the organization, the pass-
phrase must be changed and all devices reconfigured.
This application note describes the technology used
and then outlines the steps for how to quickly and On the opposite side, WPA2-Enterprise is “recom-
easily configure our ZoneFlex system with the right mended,” but IT administrators have varying comfort lev-
blend of flexibility, security, and simplicity to support els with 802.1X and EAP. In turn, many businesses do not
BYOD. Instead of adding complexity, we’ve created implement it. Most companies would like to use 802.1X, but
smarter security and connectivity mechanisms that often avoid it because of:
ease management and implementation burdens, par-
ticularly for mobile devices. In this guide, we’ll outline • Lack of expertise
how the following features help streamline a BYOD • Lack of time
paradigm: • Lack of budget
1. ynamic Pre-Shared Key — Per-user credentials
D • ack of backend systems (e.g. AAA server, user
L
with WPA2-Personal — the best of both worlds database, certificate management)
2. ero-IT Activation — Easy, secure onboarding
Z • Failure to see technical advantages
and auto-configuration of client devices Many organizations don’t realize that there is a good
alternative to traditional PSKs and 802.1X. DPSK sits
3. ole-Based Access Control — Easy ways to man-
R
right in the happy middle with some of the best advan-
age user connectivity and network authorization.
tages of both WPA2-Personal and WPA2-Enterprise:
Strong Security with Dynamic Pre-Shared Key • asy to use and administer. Users understand
E
passphrases, but they don’t understand 802.1X.
What is DPSK? • PSKs are bound to a specific user/device. Even
D
In a traditional WPA2-Personal network, all users if PSKs are shared or exposed, they will not work
on the WLAN share the same passphrase. Dynamic with other devices.
PreShared Key (DPSK) is patented technology that
• Compromised DPSKs do not jeopardize all users.
enables unique PSK credentials for each user on the
same network. DPSK was developed to provide secure • ingle DPSKs can be revoked without impact on
S
wireless access while eliminating the burdens of man- the rest of the network.
ual device configuration and the security drawbacks of • PSKs prevent one valid user from decrypting
D
shared PSKs. traffic of other valid users.
2. How to BYOD with Ruckus Wireless Application Note
• Provides per-user credentials and policies How does Zero IT Activation work?
• Avoids common 802.1X hurdles: Zero-IT activation automates the DPSK generation and
client device configuration steps. When a user con-
— No dependency on RADIUS or backend user
nects for the first time, the user enters his/her user-
databases
name/password and downloads a configuration file for
— No certificates their machine. The user runs the configuration file and
— o complex configuration
N Zero-IT configures the client machine with a WLAN pro-
file, including a unique
How does Dynamic PSK work? PSK. Zero-IT prepares
Dynamic PSK creates a unique 62-byte preshared key the machine to re-con-
for each device. The PSK is used for network access as nected to the correct
well as to create encryption keys, which are unique for network.
each user. DPSKs can be created in bulk and manually
distributed to users and devices, or the ZoneDirector What are the benefits?
can auto-configure devices with a DPSK when they Zero-IT offers all of the
connect to the network for the first time. security benefits of
DPSK along with intuitive
and flexible onboarding:
• ero touch wireless configuration of laptops and smart
Z
mobile devices
• upport for iPad/iPhone, Android, Mac OS X,
S
Windows XP, Vista, and 7, and Mobile/CE
• One-time device configuration
• Easy for IT staff to setup and maintain
• nique 62-byte preshared keys generated and auto-
U
matically installed per device
By offering different ways to implement the feature, • Easily deactivated by IT staff if user is no longer valid
Ruckus provides the flexibility to bring DPSKs to net- • New keys can be generated on-demand
works in a way that is secure, intuitive, and IT friendly.
• Can integrate with existing user directories
Since we’re focused on solving BYOD trouble spots,
let’s look at using DPSK with a unique Ruckus feature
called Zero-IT Activation. Configuring and Using Zero-IT Activation
Configuring and using Zero-IT Activation is simple.
Note: The batch DPSK tool is a manual way to create
and manage DPSK credentials and users; if that adds 1. tart by creating a new WLAN for secure connectiv-
S
value for your unique BYOD situation, see Appendix ity. Navigate to the Configure tab in the ZoneDirector
A for step-by-step instructions. UI and then select WLANs in the left pane. When the
WLANs page is open, select Create New to make a
Flexible Onboarding with Zero-IT Activation new WLAN.
What is Zero-IT Activation? 2. Configure the WLAN as follows:
Zero-IT Activation is a unique wireless onboarding
Name/ESSID = DPSK-ZERO-IT
feature that enables wireless users to securely access
Description = Enter a useful description or leave blank
the network without IT staff intervention. Zero-IT works
Authentication Method = Open
in concert with the DPSK solution, automatically creat-
Encryption Method = WPA2
ing and deploying DPSKs to valid users when they con-
Algorithm = AES
nect for the first time.
Password = nter a long, complex passphrase
E
(this will not be given to users)
Zero-IT Activation = Enabled
How to BYOD with Ruckus Wireless Page 2
3. How to BYOD with Ruckus Wireless Application Note
Dynamic PSK = Enabled 1 2
In the Advanced Options, we can also specify VLAN
settings for this WLAN. If we want to match this WLAN 5 6
to a specific VLAN, we can do so. Or, we can assign
different users to different VLANs. This is useful if we
have VLAN policies on the wired network and we want 9 10
to extend those policies to our wireless users.
ACCESS VLAN = Enter VLAN ID (default = 1)
Enable Dynamic VLAN = Enabled (check in box)
3. nly valid users can receive a DPSK with Zero-IT
O
Activation. To determine which users are valid,
we need to decide what user database we’ll use
for Zero-IT authentication. Scroll near the bottom
of the WLANs page where you’ll find the Zero-IT
authentication server settings and the Zero-IT URL
(make a note of the URL).
Select Local Database. (If integrating with an exist- 1 2 3
ing user database, this is where we would select our
AD or LDAP database)
5 6 7
Click Apply (far right corner, not shown).
Below the Zero-IT authentication server settings 9 10
is a configuration section for DPSK expiration. If
desired, set a PSK lifetime after which the DPSK
will expire.
4. ow create a user group that is permitted to access
N
this WLAN. Select Roles from the left-hand side.
Create a new role.
Name = ZERO-IT-role
Description = nter a useful description or leave
E
blank
Specify WLAN access = nable the DPSK-
E
ZERO-IT WLAN
Click OK.
5. se the ZoneDirector’s local database and create
U
a new user for this role. Select Users from the left-
hand side. Create a new user.
Name = ZeroIT
Full Name = First Last
Password = password 1 2 3 4
Confirm Password = password
5 6 7 8
9 10
How to BYOD with Ruckus Wireless Page 3
4. How to BYOD with Ruckus Wireless Application Note
Role = ZERO-IT-role 1 2 3 4
Click OK.
So a role has now been created that maps to the 5 6 7 8
DPSK-ZERO-IT WLAN and then we’ve created a user
that belongs to this role. When this user enters his/
her username/password, the ZoneDirector will assign 9 10
a unique DPSK with permission to access the DPSK-
ZERO-IT network.
6. o connect a client device, plug in to an Ethernet
T
port with access to the ZoneDirector’s sub-
net/VLAN and use a Web browser to open
the “activate” URL. The URL will always be the
ZoneDirector IP address followed by /activate (e.g.
https://192.168.2.34/activate). Note that the URL is 1 2
TLS encrypted.
7. his Web page serves as the DPSK authentica-
T 5 6
tion portal to ensure you are a valid user. When the
username/password (ZeroIT / password) created in
step 5 is entered, the ZoneDirector will determine
9 10
the proper role and provision the client accordingly.
8. uccessful authentication will launch a file down-
S
load called “prov.exe,” “prov.apk,” or “prov.mobile-
config,” depending on the OS type. 11 22 33 44
55 66 77 88
9 9 10
10
9. pen the file and Zero-IT will auto-configure the
O
WLAN profile (may require administrator privileges).
1 2 3 4
5 6 7 8
9 10
10. The configuration script will also automatically
connect the client to the network.
Zero-IT simplifies network setup for new users, as you
can see. Configuring ZoneDirector is straightforward
for IT staff and the client experience is intuitive.
BYOD-Provisioning
Now it’s important to look at device onboarding
How to BYOD with Ruckus Wireless Page 4
5. How to BYOD with Ruckus Wireless Application Note
without Ethernet. Mobile phones and tablets are the 1 2
primary devices driving the BYOD trend, but they lack
wired interfaces. So there needs to be a way to securely
provision them with a clean, intuitive workflow.
5 6
How does BYOD Provisioning work? 9 10
By relying on the Zero-IT Activation feature, a “provi-
sioning” network can be easily created to automati-
cally redirect users to the Zone Director’s activate login 6b 6d
screen. The open network is used only for device pro-
visioning; after the ZoneDirector validates user creden-
tials, mobile devices receive a configuration file that
auto-configures the WLAN connection manager and
re-connects them on the proper WLAN.
Configuring and Using Zero-IT Activation for BYOD
The BYOD setup for this is quite similar to the previ-
ous wired Zero-IT setup. In fact, it relies on the DPSK- 1 2 3
ZERO-IT SSID already created for device connectiv-
ity. Think of that WLAN as the corporate network. Now
simply create a second WLAN that will serve as our 5 6 7
provisioning network.
9 10 6c
To start, within the ZoneFlex system, define a new
Hotspot Service to use for wireless provisioning.
Hotspot Services are a way to control network access 1 2
6b 3
6d 4
6e
on open networks. This helps ensure that the provision-
ing network is used only for provisioning.
5 6 7 8
1. ind the Hotspot Services section on the left-hand
F
side and select it. In the main screen, create a new 9 10 6c
Hotspot Service
Name = BYOD-PROVISIONING 6b 6d 6e
Login Page = ttps://xx.xx.xx.xx/activate,
h
where xx.xx.xx.xx is the IP
address of the Zone Director (e.g.
https://192.168.2.34/activate). This is
the page to which ZoneDirector will
redirect users for authentication.
Create a New rule.
Authentication Server = Local Database
Enter the “activate” URL (https://192.168.2.34/acti-
Wireless Client Isolation =Full
vate) address here and click save.
2. t’s also important to configure a “walled garden,”
I Click OK to save this Hotspot Service.
which is a way to limit the network access on the 3. ow create a new WLAN to offer these Hotspot
N
Open network so it can only be used for provision- Services. Navigate back to the WLANs page and
ing. To do so, expand the walled garden configura- create a new WLAN.
tion section in our BYOD-PROVISIONING Hotspot
Services profile. Name/ESSID = BYOD-PROVISIONING
Description = Enter a useful description or leave
blank
Type = Hotspot Service (WISPr)
How to BYOD with Ruckus Wireless Page 5
6. How to BYOD with Ruckus Wireless Application Note
1 2
Authentication Method = Open
1 2 3 4 5 6
Encryption Method = None
Hotspot Services = elect BYOD-PROVISIONING
S 5 6 7 18 2
9 3
10
from the list.
4. n the wired DPSK with Zero-IT demo, a Role titled
I 9 10 1 6c 25 36 46d
6b 7
ZERO-IT-role was already created. This role has per-
mission to access the DPSK-ZERO-IT SSID. Confirm
that this role is still present.
1 26b 3 6d 5 6e 69
4 7 86c
10
5. Now create a new mobile user in the local database
that will be a member of the Zero-IT role. 5 6 7 9
8 6b 6c
10 6d 6e
User Name = Mob.User
Full Name = Mobile User 9 10 6c 6b 6d 6e
Password = password
Confirm Password = password 1
6b 2
6d 3 1
6e 4 2 3 4
Role = ZERO-IT-role
5 6 7 5
8 6 7 8
6. ow everything is ready to onboard this user and
N
his/her devices.
a.
With a mobile device (iphone shown here), con-
9 10 6c 9 10 6c
nect to the BYOD-PROVISIONING SSID.
b. aunch the browser and the URL redirect will
L 6b 6d 6e 6b 6d 6e
occur, taking you to the connection activation
page.
c. ogin with the Mob.User user credentials created
L
in step 5.
d. uccessful login will launch the auto-configuration
S
profile. Install the profile.
e.
Now connect to the corporate WLAN
(i.e. DPSK-ZERO-IT)
7. sing the ZoneDirector’s Monitor tab, currently
U
active clients can be easily viewed to check on users.
Here, the connected iPhone, the MAC address bind-
wireless networks and get users connected. Now we’ll
examine how to use Zero-IT with role-based access to
grant network privileges and keep the network prop-
erly segmented.
ing, the user name of the connected user, and some
device specific information are all visible. Even with
Role-Based Access
a long list of users, it is easy to find specific clients
using the search field. In conjunction with Zero-IT Activation and DPSK,
Ruckus provides a straightforward way to apply roles
The Zero-IT tool creates a quick and easy way to deploy
How to BYOD with Ruckus Wireless Page 6
7. How to BYOD with Ruckus Wireless Application Note
to each user, granting access to WLAN policies and Now configure it in the ZoneDirector.
VLANs according to the user type. By granting access
based on user roles, IT staff can extend specific per- Implementing Role-Based Access
missions to users based on wired network design and Start by creating the requisite WLANs.
policy.
1. Navigate to the WLANs menu in the left pane and
So far, we’ve focused on the internal database of the
then create a new WLAN:
ZoneDirector to create users, but in live networks,
the ZoneDirector seamlessly integrates with an exist- Name/ESSID = Administration
ing user database, such as Active Directory, Open Description = nter a useful description or leave
E
Directory, OpenLDAP, or eDirectory to determine a blank
user’s role assignment. Authentication Method = Open
The internal database of the ZoneDirector can be used Encryption Method = WPA2
for this feature which is shown in this demo. We’ll also Algorithm = AES
discuss how you can use this feature with an external Password = nter a long, complex passphrase
E
database. (this will not be given to users)
Zero-IT Activation = Enabled
Planning Role-Based Access Dynamic PSK = Enabled
By relying on the Zero-IT Activation feature, the “pro- In Advanced Options,
visioning” network automatically redirects users to the
Zone Director’s activate login screen. ACCESS VLAN = 0
1
Click OK.
The first planning step to take is to decide what types
of users will use the network, what roles to create for Now configure administrative users and roles so they
those users, and what permissions should be assigned are mapped to this WLAN, receiving administrator priv-
to these roles. ileges and policies.
In this demo, we’ll create a mock education scenario Note: If we’re supporting multiple VLANs on each AP,
using the following roles: we need to make sure our switch ports are configured
to support those VLANs.
• Administration
• Staff
11 22 33
• Student
We’ll create corresponding WLANs and then map the
55 66 77
users/roles to their proper WLAN.
The last step is to evaluate the current wired network as 99 10
10
a baseline to decide to what VLAN user groups should
be assigned.
If an external user database that has VLAN attributes is
being used, this process can be completely automated
by enabling the Dynamic VLAN assignment feature.
This adds additional flexibility, allowing the use of a sin-
gle WLAN for different user types.
As an example:
• Administration – VLAN 10
• Staff – VLAN 50
• Student – VLAN 80
How to BYOD with Ruckus Wireless Page 7
8. How to BYOD with Ruckus Wireless Application Note
2. reate the Staff and Student WLANs with the
C 1 2 3 4
same parameters, changing the VLAN ID accord-
ingly (we’ll skip the details here). For the student
WLAN (or others, such as guests), you may wish to
5 6 7 8
configure other advanced features:
• lient Isolation (prevents valid users from commu-
C 9 10
nicating directly with one another through the AP)
— this is recommended for guest and some stu-
dent networks
• Rate limiting policies
• MAC or IP ACLs to limit network destinations
3. Now let’s navigate to the Roles page and create our
respective roles. Create New.
Name = Administrators
Description = Enter a useful description or leave
blank
WLAN Policies = Enable Administration WLAN As shown, this user authenticated successfully and was
assigned to the Administrators role. Zero-IT would then
Click OK.
1 2 3 4
The Group Attributes value for this role (shown above)
can be set if integrating with an existing user database
(e.g. AD, LDAP, etc.). When the ZoneDirector queries
5 6 7 8
the database for authentication, the user’s group attri-
bute automatically maps the user to a ZoneDirector 9 10
provision this user’s DPSK for the proper WLAN and
VLAN.
1 2
5 6
role.
To test this feature, use the Test Authentication 9 10
Settings feature built into ZoneDirector (navigate to
the AAA Servers menu).
To show how it works in a live environment, we’ve setup
an OpenLDAP user database with an administrative
user. In the LDAP database, this user is mapped to an
administrator group. In ZoneDirector, pick the data-
base and enter the credentials. This will test that the
database is properly configured and that the user is
assigned to the correct role.
How to BYOD with Ruckus Wireless Page 8
9. How to BYOD with Ruckus Wireless Application Note
4. Next, create the remaining roles. The role setup
should be similar to previous setups.
5. the local database, we need to create our users
In
next. Enter the name, password, and then select
the correct role.
user can be added for each of the roles (admin,
A
1 2 3 4
5 6 7 8
9 10
staff, student). The final user list will look similar to
this.
6. Now its important to test the authentication set-
tings for each user to ensure that users will be
placed in the proper role and WLAN during
authentication.
That’s it —role-based access control with Zero-IT acti-
vation. It’s easy for IT staff, easy for users, and provides
flexibility with user policies and segmentation.
Note: To explore this lab in greater detail, use a man-
aged switch and a DHCP server. Create the VLANs on
the switch and the DHCP scopes on the DHCP server
for each VLAN. Connect a device to each WLAN
(admin, staff, student) in turn. Observe the IP settings
and VLAN access granted to each user type.
Summary
For organizations trying to solve BYOD challenges, it
doesn’t have to be complex and cumbersome. With
easy to implement features like Zero-IT configura-
tion, Dynamic PSK, and simplified role-based access
How to BYOD with Ruckus Wireless Page 9
10. How to BYOD with Ruckus Wireless Application Note
control, enterprises can leverage their existing net- 1 2
work resources to extend policies to their wireless
users. Ruckus makes it painless to get users connected
and provisioned with the correct network permissions.
5 6
After that, we keep them happily connected with reli-
able RF performance. 9 10
Appendix A
Configuring and Using DPSK Batch Generation
The DPSK batch generation tool is a way to manually
control per-user PSKs. This method of implementing
DPSKs creates a DPSK file with multiple PSKs that can
be offered to users or pre-configured on their devices.
The onboarding process is similar to traditional WPA2-
Personal networks, but it provides the added flexibility
and security of DPSK.
1. Start by creating a new DPSK WLAN. Navigate to
the Configure tab in the ZoneDirector UI and then
select WLANs in the left pane. When the WLANs
page is open, select Create New to make a new 1 2 3
WLAN.
2. Configure the WLAN as follows:
5 6 7
Name/ESSID = DPSK-batch
Description = nter a useful description or leave
E 9 10
blank
Authentication Method = Open
Encryption Method = WPA2
Algorithm = AES
Password = nter a long, complex passphrase
E
(this will not be given to users)
Zero-IT Activation = Enabled
Dynamic PSK = Enabled
Click OK.
I
n the advanced options, VLAN settings for this WLAN
can also be specified. To match this WLAN to a spe-
cific VLAN or assign different users to different VLANs
is simple. This is useful if we have authorization policies
on the wired network and want to extend those poli-
cies to wireless users.
How to BYOD with Ruckus Wireless Page 10