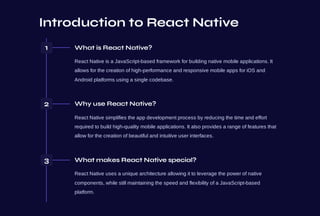
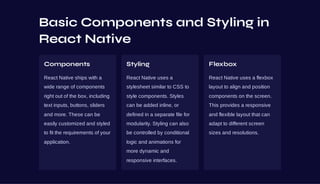
Creating Beautiful
Apps with React
Native
React Native is a powerful tool for cross-platform app development. In
this presentation, we'll cover the fundamentals of building beautiful and
responsive mobile applications using React Native.
by Vishal Kumar
VK
Introduction to React Native
1 What is React Native?
React Native is a JavaScript-based framework for building native mobile applications. It
allows for the creation of high-performance and responsive mobile apps for iOS and
Android platforms using a single codebase.
2 Why use React Native?
React Native simplifies the app development process by reducing the time and effort
required to build high-quality mobile applications. It also provides a range of features that
allow for the creation of beautiful and intuitive user interfaces.
3 What makes React Native special?
React Native uses a unique architecture allowing it to leverage the power of native
components, while still maintaining the speed and flexibility of a JavaScript-based
platform.
Advantages of React
Native
1 Cross-Platform
Compatibility
React Native simplifies the
process of creating apps
for both iOS and Android
platforms. It allows
developers to code once
and deploy on multiple
platforms, thus saving time
and reducing costs.
2 High
Performance
React Native's unique
architecture allows it to
provide extremely high
performance, with apps
running natively on the
target device. This results
in faster and more
responsive applications
that provide a better user
experience.
3 Intuitive and Customizable UI
React Native provides a range of customizable UI components,
allowing developers to build applications with beautiful and
intuitive interfaces that are tailored to the requirements of the
project.
Creating a New React Native
Project
Initializing a new
project
The first step in building a React
Native app is to create a new
project using the "react-native
init" command. This will create a
new project with all of the
necessary files and directories.
Project structure
React Native projects have a
clear and well-organized
structure, with separate folders for
code, assets and configuration
files. This makes it easy to
manage and maintain the project
as it grows in complexity.
Development Tools
React Native provides a range of
development tools such as React
DevTools, Redux DevTools and
more. These can be extremely
helpful in debugging and
developing your application.
Basic Components and Styling in
React Native
Components
React Native ships with a
wide range of components
right out of the box, including
text inputs, buttons, sliders
and more. These can be
easily customized and styled
to fit the requirements of your
application.
Styling
React Native uses a
stylesheet similar to CSS to
style components. Styles
can be added inline, or
defined in a separate file for
modularity. Styling can also
be controlled by conditional
logic and animations for
more dynamic and
responsive interfaces.
Flexbox
React Native uses a flexbox
layout to align and position
components on the screen.
This provides a responsive
and flexible layout that can
adapt to different screen
sizes and resolutions.
Using Redux for State
Management
1
What is Redux?
Redux is a library for managing the state of
complex applications in a predictable and
easy-to-understand way. It provides a central
store for all application data, which can be
updated using a set of standard actions and
reducers.
2
Why use Redux?
Redux can simplify application development by
providing a structured way to manage complex
state data. It also provides powerful debugging
and monitoring tools, allowing developers to
easily identify and resolve issues.
3
How to implement Redux
Redux is implemented in a simple three-step
process: define the store, define the actions,
and define the reducers. Once implemented,
the store can be accessed across the entire
application, providing a centralized location for
state management.
Debugging React Native Apps
Debugging Tools
React Native provides a range of
debugging tools like Chrome
DevTools, React DevTools and
more. These tools allow
developers to inspect and modify
the state and props of
components, as well as monitor
performance and debug issues
with ease.
Logging and Tracing
Logging and tracing can be
extremely helpful in tracking
down issues with React Native
apps. The console.log function
can be used in conjunction with
third-party tools like Crashlytics or
Sentry to provide detailed
debugging data.
Redux Debugging
Redux debugging tools like
Redux DevTools and Reactotron
allow developers to easily monitor
and modify the state of their
Redux store. This can be helpful
in identifying issues with state
management and debugging
complex data flows.
Deployment of React Native App
on iOS and Android Platforms
iOS
Deploying a React Native app on iOS requires an
Apple developer account, Xcode, and a
provisioning profile. Once these are in place, the
app can be built and uploaded to the App Store
using the Xcode application uploader.
Android
Deploying a React Native app on Android requires
an Android developer account and Android
Studio. Once these are in place, the app can be
built and uploaded to the Google Play Store, or
distributed as an APK file.

React Native

  • 1.
    Creating Beautiful Apps withReact Native React Native is a powerful tool for cross-platform app development. In this presentation, we'll cover the fundamentals of building beautiful and responsive mobile applications using React Native. by Vishal Kumar VK
  • 2.
    Introduction to ReactNative 1 What is React Native? React Native is a JavaScript-based framework for building native mobile applications. It allows for the creation of high-performance and responsive mobile apps for iOS and Android platforms using a single codebase. 2 Why use React Native? React Native simplifies the app development process by reducing the time and effort required to build high-quality mobile applications. It also provides a range of features that allow for the creation of beautiful and intuitive user interfaces. 3 What makes React Native special? React Native uses a unique architecture allowing it to leverage the power of native components, while still maintaining the speed and flexibility of a JavaScript-based platform.
  • 3.
    Advantages of React Native 1Cross-Platform Compatibility React Native simplifies the process of creating apps for both iOS and Android platforms. It allows developers to code once and deploy on multiple platforms, thus saving time and reducing costs. 2 High Performance React Native's unique architecture allows it to provide extremely high performance, with apps running natively on the target device. This results in faster and more responsive applications that provide a better user experience. 3 Intuitive and Customizable UI React Native provides a range of customizable UI components, allowing developers to build applications with beautiful and intuitive interfaces that are tailored to the requirements of the project.
  • 4.
    Creating a NewReact Native Project Initializing a new project The first step in building a React Native app is to create a new project using the "react-native init" command. This will create a new project with all of the necessary files and directories. Project structure React Native projects have a clear and well-organized structure, with separate folders for code, assets and configuration files. This makes it easy to manage and maintain the project as it grows in complexity. Development Tools React Native provides a range of development tools such as React DevTools, Redux DevTools and more. These can be extremely helpful in debugging and developing your application.
  • 5.
    Basic Components andStyling in React Native Components React Native ships with a wide range of components right out of the box, including text inputs, buttons, sliders and more. These can be easily customized and styled to fit the requirements of your application. Styling React Native uses a stylesheet similar to CSS to style components. Styles can be added inline, or defined in a separate file for modularity. Styling can also be controlled by conditional logic and animations for more dynamic and responsive interfaces. Flexbox React Native uses a flexbox layout to align and position components on the screen. This provides a responsive and flexible layout that can adapt to different screen sizes and resolutions.
  • 6.
    Using Redux forState Management 1 What is Redux? Redux is a library for managing the state of complex applications in a predictable and easy-to-understand way. It provides a central store for all application data, which can be updated using a set of standard actions and reducers. 2 Why use Redux? Redux can simplify application development by providing a structured way to manage complex state data. It also provides powerful debugging and monitoring tools, allowing developers to easily identify and resolve issues. 3 How to implement Redux Redux is implemented in a simple three-step process: define the store, define the actions, and define the reducers. Once implemented, the store can be accessed across the entire application, providing a centralized location for state management.
  • 7.
    Debugging React NativeApps Debugging Tools React Native provides a range of debugging tools like Chrome DevTools, React DevTools and more. These tools allow developers to inspect and modify the state and props of components, as well as monitor performance and debug issues with ease. Logging and Tracing Logging and tracing can be extremely helpful in tracking down issues with React Native apps. The console.log function can be used in conjunction with third-party tools like Crashlytics or Sentry to provide detailed debugging data. Redux Debugging Redux debugging tools like Redux DevTools and Reactotron allow developers to easily monitor and modify the state of their Redux store. This can be helpful in identifying issues with state management and debugging complex data flows.
  • 8.
    Deployment of ReactNative App on iOS and Android Platforms iOS Deploying a React Native app on iOS requires an Apple developer account, Xcode, and a provisioning profile. Once these are in place, the app can be built and uploaded to the App Store using the Xcode application uploader. Android Deploying a React Native app on Android requires an Android developer account and Android Studio. Once these are in place, the app can be built and uploaded to the Google Play Store, or distributed as an APK file.