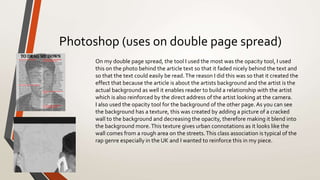
The document discusses various technologies and software tools learned through creating a magazine product in Photoshop. Photoshop tools for selecting, editing layers, blending modes, and filters were used to edit images. Presentation software like Emaze, Prezi, and SlideShare were used to create presentations, and tools in Windows Movie Maker like importing media and setting durations were used to create a video. Other tools mentioned include Bubbl.us for creating mind maps, SurveyMonkey for distributing questionnaires, and SLR cameras for capturing photos with different modes and settings.
Welcome to TechSoup New Member Orientation and Q&A (May 2024).pdfTechSoup
In this webinar you will learn how your organization can access TechSoup's wide variety of product discount and donation programs. From hardware to software, we'll give you a tour of the tools available to help your nonprofit with productivity, collaboration, financial management, donor tracking, security, and more.
Read| The latest issue of The Challenger is here! We are thrilled to announce that our school paper has qualified for the NATIONAL SCHOOLS PRESS CONFERENCE (NSPC) 2024. Thank you for your unwavering support and trust. Dive into the stories that made us stand out!
Francesca Gottschalk - How can education support child empowerment.pptxEduSkills OECD
Francesca Gottschalk from the OECD’s Centre for Educational Research and Innovation presents at the Ask an Expert Webinar: How can education support child empowerment?
Biological screening of herbal drugs: Introduction and Need for
Phyto-Pharmacological Screening, New Strategies for evaluating
Natural Products, In vitro evaluation techniques for Antioxidants, Antimicrobial and Anticancer drugs. In vivo evaluation techniques
for Anti-inflammatory, Antiulcer, Anticancer, Wound healing, Antidiabetic, Hepatoprotective, Cardio protective, Diuretics and
Antifertility, Toxicity studies as per OECD guidelines
The Roman Empire A Historical Colossus.pdfkaushalkr1407
The Roman Empire, a vast and enduring power, stands as one of history's most remarkable civilizations, leaving an indelible imprint on the world. It emerged from the Roman Republic, transitioning into an imperial powerhouse under the leadership of Augustus Caesar in 27 BCE. This transformation marked the beginning of an era defined by unprecedented territorial expansion, architectural marvels, and profound cultural influence.
The empire's roots lie in the city of Rome, founded, according to legend, by Romulus in 753 BCE. Over centuries, Rome evolved from a small settlement to a formidable republic, characterized by a complex political system with elected officials and checks on power. However, internal strife, class conflicts, and military ambitions paved the way for the end of the Republic. Julius Caesar’s dictatorship and subsequent assassination in 44 BCE created a power vacuum, leading to a civil war. Octavian, later Augustus, emerged victorious, heralding the Roman Empire’s birth.
Under Augustus, the empire experienced the Pax Romana, a 200-year period of relative peace and stability. Augustus reformed the military, established efficient administrative systems, and initiated grand construction projects. The empire's borders expanded, encompassing territories from Britain to Egypt and from Spain to the Euphrates. Roman legions, renowned for their discipline and engineering prowess, secured and maintained these vast territories, building roads, fortifications, and cities that facilitated control and integration.
The Roman Empire’s society was hierarchical, with a rigid class system. At the top were the patricians, wealthy elites who held significant political power. Below them were the plebeians, free citizens with limited political influence, and the vast numbers of slaves who formed the backbone of the economy. The family unit was central, governed by the paterfamilias, the male head who held absolute authority.
Culturally, the Romans were eclectic, absorbing and adapting elements from the civilizations they encountered, particularly the Greeks. Roman art, literature, and philosophy reflected this synthesis, creating a rich cultural tapestry. Latin, the Roman language, became the lingua franca of the Western world, influencing numerous modern languages.
Roman architecture and engineering achievements were monumental. They perfected the arch, vault, and dome, constructing enduring structures like the Colosseum, Pantheon, and aqueducts. These engineering marvels not only showcased Roman ingenuity but also served practical purposes, from public entertainment to water supply.
1. What have you learnt about
technologies from the process
of constructing this product?
2. Photoshop
What I’ve learnt from Photoshop is that there is a wide array of tools that help to create a
professional, realistic magazine.The tools aren’t always easy to find but when I searched how
to create a certain effect onGoogle and I found the answer.The more tools I discovered the
higher the quality of the magazine.The tool I used the most was the quick selection tools in
order to remove the background of the pictures, this tool also gave a good finish to the outline
of the photo as you could feather the edges and refine them however it was experimental
sometimes around the hair of the artist especially as it would sometimes leave chunks of
background. Another useful tool I discovered is when you double click on a layer a large
variety of editing and blending tools can be used including altering the opacity, gradient
overlays, color overlays and shadowing effects. I learnt also how to manipulate fonts and
texts, and how to use different editing options on text, I used this to my advantage to make
my masthead as prominent as possible.
3. Photoshop (uses on front cover)
As you can see both the main cover line and the masthead have black outlines to
make them bold on the front cover and to give the text definition.This tool is
called ‘stroke’ and is found when you double click on images and text to display
blending options, this tool was especially useful as it gave me the ability to make
all of my text throughout all 3 production pieces stand out. On the masthead the
colour goes from red to white, this technique is called ‘gradient overlay’ and is
available on the blending options as well.This was useful as it didn’t make the
masthead fit with the house style and colour scheme a bit better making all
conventions consistent
4. Photoshop (uses for front cover)
This is the centre of visual interest on my front cover, here you can see the picture before and
after editing.The tools I used to edit the photo was ‘filters’, I used this to apply a black and
white filter to the image to conform with the house style and colour scheme of the
production pieces. I also used ‘curves’ to adjust the lighting ratio on the black and white filter
to make it slightly lighter, this then allowed the picture have more definition when the
‘sharpness’ tool was applied making the overall picture have better quality thus increasing
the production values of the piece. I then also put red detailing on the picture which made
the brand name ‘ellesse’ (a well known tracksuit brand in the UK) stand out much more.This
therefore increased the UK association with the piece and the genre hybridisation between
the UK and USA.
5. Photoshop (uses on contents page)
On the contents page I used the ‘drop shadow’ tool found in the blending
options and applied a red drop shadow on the contents title, this was useful
as I felt before that the title didn’t have a prominent enough presence on the
page, but now you can see it stands out a lot more. I also wanted the image
to stand out more as well therefore I added a drop shadow to that as well.As
you can see the editing on the photo looks better and the edge looks more
smooth and refined, this I feel made the image stand out much more making
it more dominant within the page, which was essential for conforming to the
stereotype of male dominance within the rap genre.
6. Photoshop (uses on double page spread)
On my double page spread, the tool I used the most was the opacity tool, I used
this on the photo behind the article text so that it faded nicely behind the text and
so that the text could easily be read.The reason I did this was so that it created the
effect that because the article is about the artists background and the artist is the
actual background as well it enables reader to build a relationship with the artist
which is also reinforced by the direct address of the artist looking at the camera.
I also used the opacity tool for the background of the other page. As you can see
the background has a texture, this was created by adding a picture of a cracked
wall to the background and decreasing the opacity, therefore making it blend into
the background more.This texture gives urban connotations as it looks like the
wall comes from a rough area on the streets.This class association is typical of the
rap genre especially in the UK and I wanted to reinforce this in my piece.
7. Blogger
This was the platform we used to upload our progress, this was a good
platform to choose as I had the ability to upload images, videos and embed
different presentation softwares into a post. I could also choose themes of the
blog to make it more appealing and it was a good way to see my progress
when constructing my final piece.Therefore blogger was an essential tool to
the creation of my product as I could trace back and look and improve on my
product.We also had the ability to organise our posts into categories like ‘Main
Task’ and ‘Preliminary’ this help viewers locate what's most relevant to them
easier
8. SurveyMonkey
This was an online tool used to distribute our masthead questionnaire out to
our peers through email.The link would be clicked on then they would submit
their preference.We learnt that the results are live so we could see when
people stopped voting and we could track the results while they were being
submitted.This method was by far the most efficient and as it was so quick we
had time to properly analyse the results. We also had the ability to then
download the results and put them on our blog so we can access them easier.
9. SLR Cameras
We learnt that the SLR cameras had different modes in order to capture the
perfect photo we wanted to achieve. However we used automatic mode the
most when capturing images as this mode allowed the lens to adjust its focus
automatically depending on how far the artist was away from the camera. It
also adjusted automatically to light so we tried to take picture in different
environments to determine which was best.We also learned more about the
flash function and saw how it reacted with the image from different angle to
get the correct light exposure on the artist.
10. Emaze, Prezi and SlideShare
Emaze- Emaze was a presentation software I used frequently.This was a presentation format where I
learned that different themes can be applied to presentations to make them more appealing however
this was quite temperamental. Also I found that PowerPoint presentations can be upload to Emaze and
be converted to an Emaze format.Then once finished I could embed these presentations in my blog.
Prezi- Prezi was another presentation tool, in my opinion the most interactive in terms of creating and
viewing. I learnt I could use different themes for my Prezi presentations and arrange the way it
transitions from circle to circle. I also could import images to help with describing things. It can be put in
viewing mode straight form the internet so it can be accessed form anywhere with internet connection
which was helpful when editing.
SlideShare- SlideShare was the final presentation software I used, I learnt this is the quickest and
easiest way of converting PowerPoint presentation to a format where I could embed it on my blog.
When embedded arrows under the presentation are provided for quick and easy navigation.
11. Windows Movie Maker
When usingWindows Movie Maker I learnt that I could import sound files,
images and videos. I imported pre-recorded voice overs and matched them in
time with the images of our products we were talking about. I did this by
importing the voice recording and hovering my mouse over it to find the
duration then I matched this to the duration the image was on the screen for. I
discovered there are a lot more tools like filter and transitioning tools but I felt
this wasn’t necessary for the video I was making.
12. Bubbl.us
What Bubbl.us was good for is that it is a easy way to create large mind maps,
which was what I needed for my initial ideas mind map. I could separate each
category of ideas by changing the colour of the bubbles and I could also add
text to the bubble and changes the font size to make certain things more
prominent.