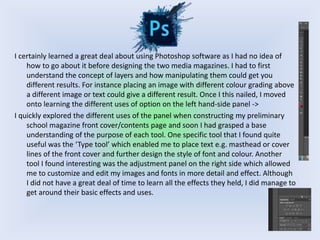
What have I learnt about
technologies from the process
of constructing this product?
I certainly learned a great deal about using Photoshop software as I had no idea of
how to go about it before designing the two media magazines. I had to first
understand the concept of layers and how manipulating them could get you
different results. For instance placing an image with different colour grading above
a different image or text could give a different result. Once I this nailed, I moved
onto learning the different uses of option on the left hand-side panel ->
I quickly explored the different uses of the panel when constructing my preliminary
school magazine front cover/contents page and soon I had grasped a base
understanding of the purpose of each tool. One specific tool that I found quite
useful was the ‘Type tool’ which enabled me to place text e.g. masthead or cover
lines of the front cover and further design the style of font and colour. Another
tool I found interesting was the adjustment panel on the right side which allowed
me to customize and edit my images and fonts in more detail and effect. Although
I did not have a great deal of time to learn all the effects they held, I did manage to
get around their basic effects and uses.
Canon DSLR 600D
When shooting for the hip-hop music magazine I used the Canon 600D DSLR. This is an
interesting camera that produced 18-megapixel resolution and the flip-out LCD
screen made shooting much easier. I used an 18-55mm standard kit lens and a
50mm lens for sharper quality images. I had some trouble setting the right settings
of the ISO and shutter speed through the menu on the camera as I wanted to
capture the image as crisp as possible but exclusive of any colour grading effects
built into the camera. Eventually I gave up and watched tutorials on YouTube which
explained how I could set the my intended settings. I learned that I had to be
careful with shutter speed as it also affected the amount of light which the camera
picked up but also it controlled how quick the shutter would capture the image. By
watching tutorials on YouTube I was able to utilise the DSLR to my preferred
settings to capture the image how I imagined it best. The DSLR was great as it
produced better quality than standard cameras.
Adobe Photoshop Lightroom
I also had the opportunity to use Adobe Lightroom which was a great tool for
editing and touching up raw images post-production. Using the spot removal tool
became very useful when using it to remove blotches or small objects that were
not necessary in the front cover image. For instance, I used it to remove dirt/dust
on the artist’s suit as it became apparent I had missed them during the shoot
which is why Lightroom became very useful.
Another key tool in Lightroom that I used extensively was the adjustment brush
which gave deep impact to the raw images that the DSLR was limited to doing.
The brush could be adjusted for size and it could be further used to
lighten/darken, give clarity to and saturate complete or whole parts of the
images. I used this tool to make the throne chair appear more vibrant in colour,
give the Doberman a darker shade of fur which gave depth to the image. But
most importantly to give clarity to the artist’s suit that brought out the ‘lined’
pattern on his suit. Other uses of the brush also enabled me to give the artist’s
face a more even look by softening it using the brush tool.
Prezi
Before presenting my preparation for designing the music magazine, I had no clue as
to how to use Prezi especially how well it suited contemporary audience with its
special effects in presentation. After watching a colleague at school use it, I had a
go at Prezi and the more I used it the more I became familiar with its layout and
how to use the small range of tools to support the special presentation. Since
understanding the positional or Prezi in my work, I have used it thoroughly in my
media work and it proved to make it appear far more interesting than paragraphs
of text that would bore anyone.
It was however difficult to choose the right templates relative to my work as they did
provide a large range of templates however I had no idea how to design my own
template. There is an option to start a template from scratch however I avoided
using that as it would be far too time-consuming. Nonetheless, I would set it as a
target for using Prezi the next opportunity to design my own templates as it would
relate to my work better in terms of effects and colour scheme.
Overall, Prezi certainly proved effective in presenting my work in a more stylish
context.

Q 6

  • 1.
    What have Ilearnt about technologies from the process of constructing this product?
  • 2.
    I certainly learneda great deal about using Photoshop software as I had no idea of how to go about it before designing the two media magazines. I had to first understand the concept of layers and how manipulating them could get you different results. For instance placing an image with different colour grading above a different image or text could give a different result. Once I this nailed, I moved onto learning the different uses of option on the left hand-side panel -> I quickly explored the different uses of the panel when constructing my preliminary school magazine front cover/contents page and soon I had grasped a base understanding of the purpose of each tool. One specific tool that I found quite useful was the ‘Type tool’ which enabled me to place text e.g. masthead or cover lines of the front cover and further design the style of font and colour. Another tool I found interesting was the adjustment panel on the right side which allowed me to customize and edit my images and fonts in more detail and effect. Although I did not have a great deal of time to learn all the effects they held, I did manage to get around their basic effects and uses.
  • 3.
    Canon DSLR 600D Whenshooting for the hip-hop music magazine I used the Canon 600D DSLR. This is an interesting camera that produced 18-megapixel resolution and the flip-out LCD screen made shooting much easier. I used an 18-55mm standard kit lens and a 50mm lens for sharper quality images. I had some trouble setting the right settings of the ISO and shutter speed through the menu on the camera as I wanted to capture the image as crisp as possible but exclusive of any colour grading effects built into the camera. Eventually I gave up and watched tutorials on YouTube which explained how I could set the my intended settings. I learned that I had to be careful with shutter speed as it also affected the amount of light which the camera picked up but also it controlled how quick the shutter would capture the image. By watching tutorials on YouTube I was able to utilise the DSLR to my preferred settings to capture the image how I imagined it best. The DSLR was great as it produced better quality than standard cameras.
  • 4.
    Adobe Photoshop Lightroom Ialso had the opportunity to use Adobe Lightroom which was a great tool for editing and touching up raw images post-production. Using the spot removal tool became very useful when using it to remove blotches or small objects that were not necessary in the front cover image. For instance, I used it to remove dirt/dust on the artist’s suit as it became apparent I had missed them during the shoot which is why Lightroom became very useful. Another key tool in Lightroom that I used extensively was the adjustment brush which gave deep impact to the raw images that the DSLR was limited to doing. The brush could be adjusted for size and it could be further used to lighten/darken, give clarity to and saturate complete or whole parts of the images. I used this tool to make the throne chair appear more vibrant in colour, give the Doberman a darker shade of fur which gave depth to the image. But most importantly to give clarity to the artist’s suit that brought out the ‘lined’ pattern on his suit. Other uses of the brush also enabled me to give the artist’s face a more even look by softening it using the brush tool.
  • 5.
    Prezi Before presenting mypreparation for designing the music magazine, I had no clue as to how to use Prezi especially how well it suited contemporary audience with its special effects in presentation. After watching a colleague at school use it, I had a go at Prezi and the more I used it the more I became familiar with its layout and how to use the small range of tools to support the special presentation. Since understanding the positional or Prezi in my work, I have used it thoroughly in my media work and it proved to make it appear far more interesting than paragraphs of text that would bore anyone. It was however difficult to choose the right templates relative to my work as they did provide a large range of templates however I had no idea how to design my own template. There is an option to start a template from scratch however I avoided using that as it would be far too time-consuming. Nonetheless, I would set it as a target for using Prezi the next opportunity to design my own templates as it would relate to my work better in terms of effects and colour scheme. Overall, Prezi certainly proved effective in presenting my work in a more stylish context.