Downloaded 1,242 times


![For QTP Scripts & Other Information visit: www.gcreddy.com
We use regular expressions whenever object’s properties values are changing
dynamically.
Navigation: Open object repository >select the object>select the property value>click
configure>check regular expression >enter expression [0-9] close repository.
Note:
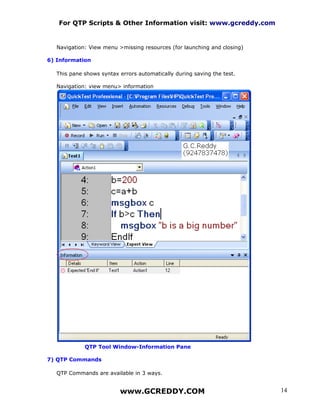
1. Always-regular expression we use brackets.
2. [A-Z]
3. [a-z]
4. [A-Z] [a-z] we can also use two expressions together
[0-9] for one to 9 digits this is how we use
[0-9]*for 2 digit numbers to be considered.
For example use fax order
Functions:
Functions are Vbscript features; we use these for reusing components.
Vbscript Procedures:
In Vbscript there are 2 kinds of procedures available.
1. Sub procedures
2. Function procedures
A. Sub Procedures: Sub procedure performs a task(s) but cannot return a value.
Syntax: SUB Name of the procedure(arguments)
Statements
End Sub
Note: Arguments are optional , We can give number of arguments by separating with
commas. Ex: (a,b,c)
Creating a Sub procedure
Open an editor (notepad)
Prepare test script
Save as Dot.vbs file
Ex:
Sub login
Invokeapplication "C:Program FilesHPQuickTest
Professionalsamplesflightappflight4a.exe"
dialog("text:=Login").Activate
dialog("text:=Login").Winedit("attached text:=Agent Name:").Set "asdf"
dialog("text:=Login").Winedit("attached text:=Password:").Set "mercury"
www.GCREDDY.COM 45](https://image.slidesharecdn.com/qtp10-00-100203035430-phpapp01/85/QTP-10-00-Guide-45-320.jpg)


The document provides an overview of QuickTest Professional (QTP) and its key features and functionality. It discusses QTP's basic features, the elements that make up the QTP tool window like the test pane, active screen, and data table. It also summarizes the QTP testing process which involves planning, generating tests through recording or programming, enhancing tests with checkpoints and parameters, debugging, running tests, and reporting results.