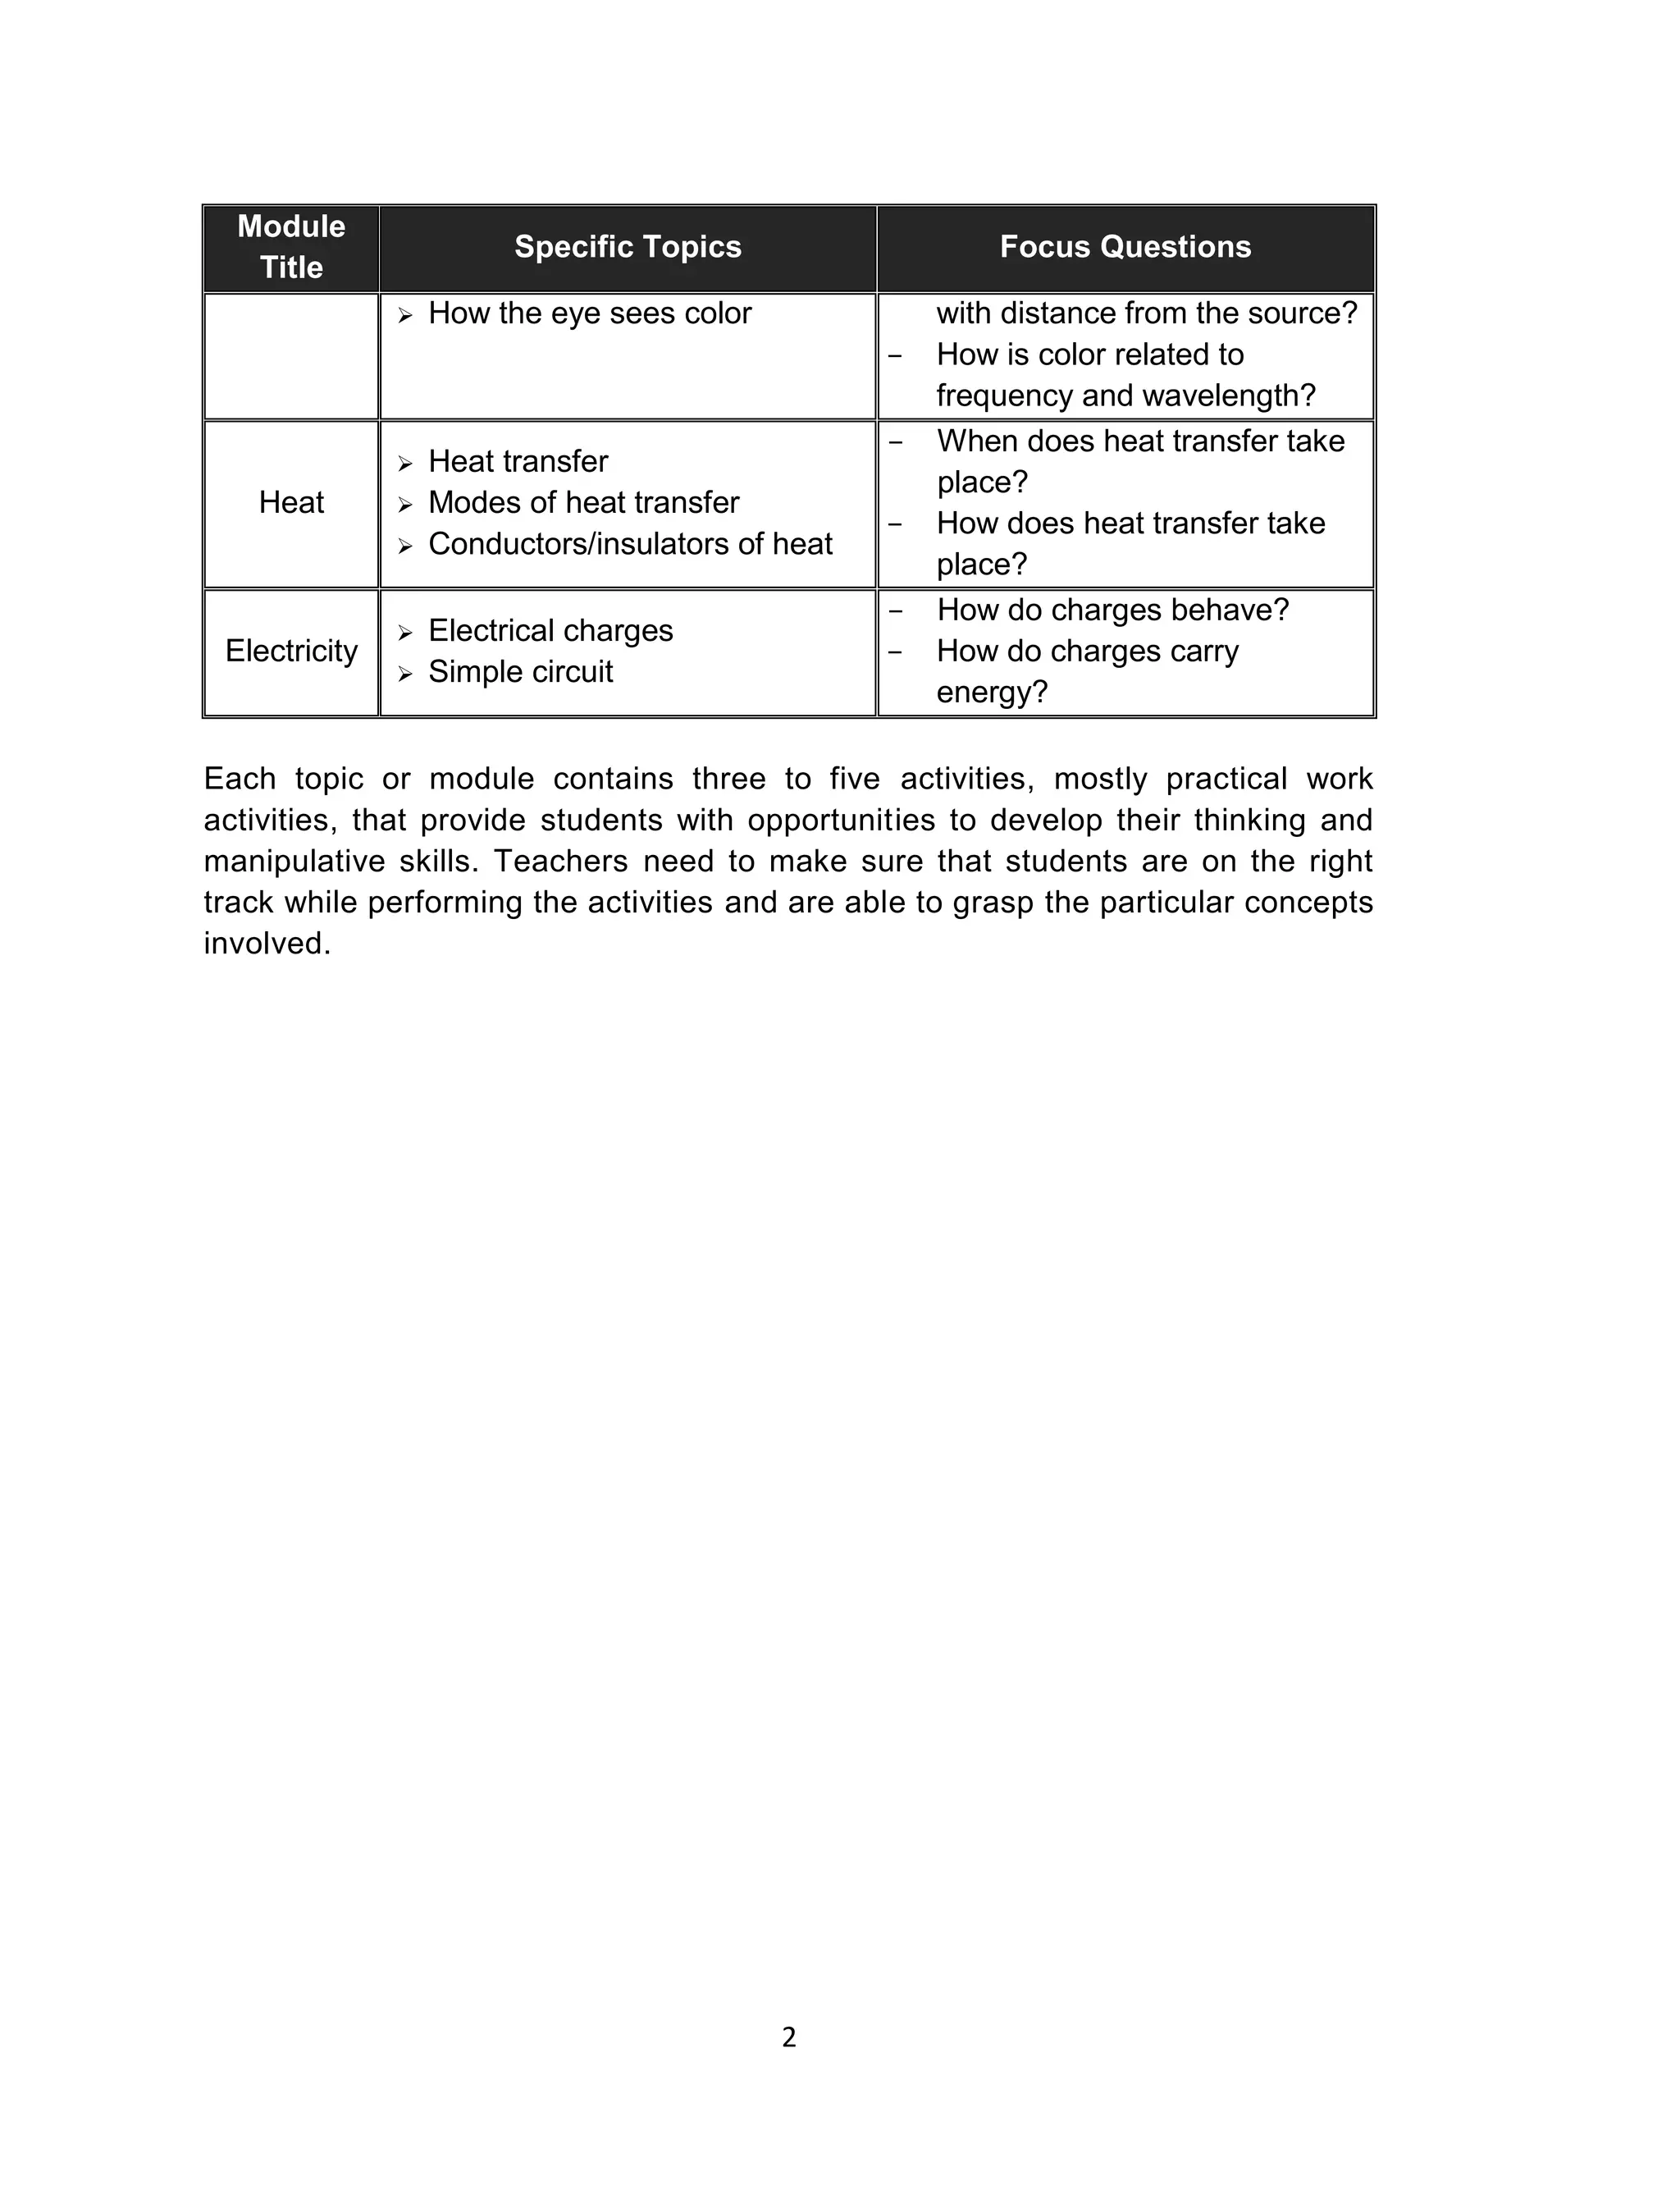
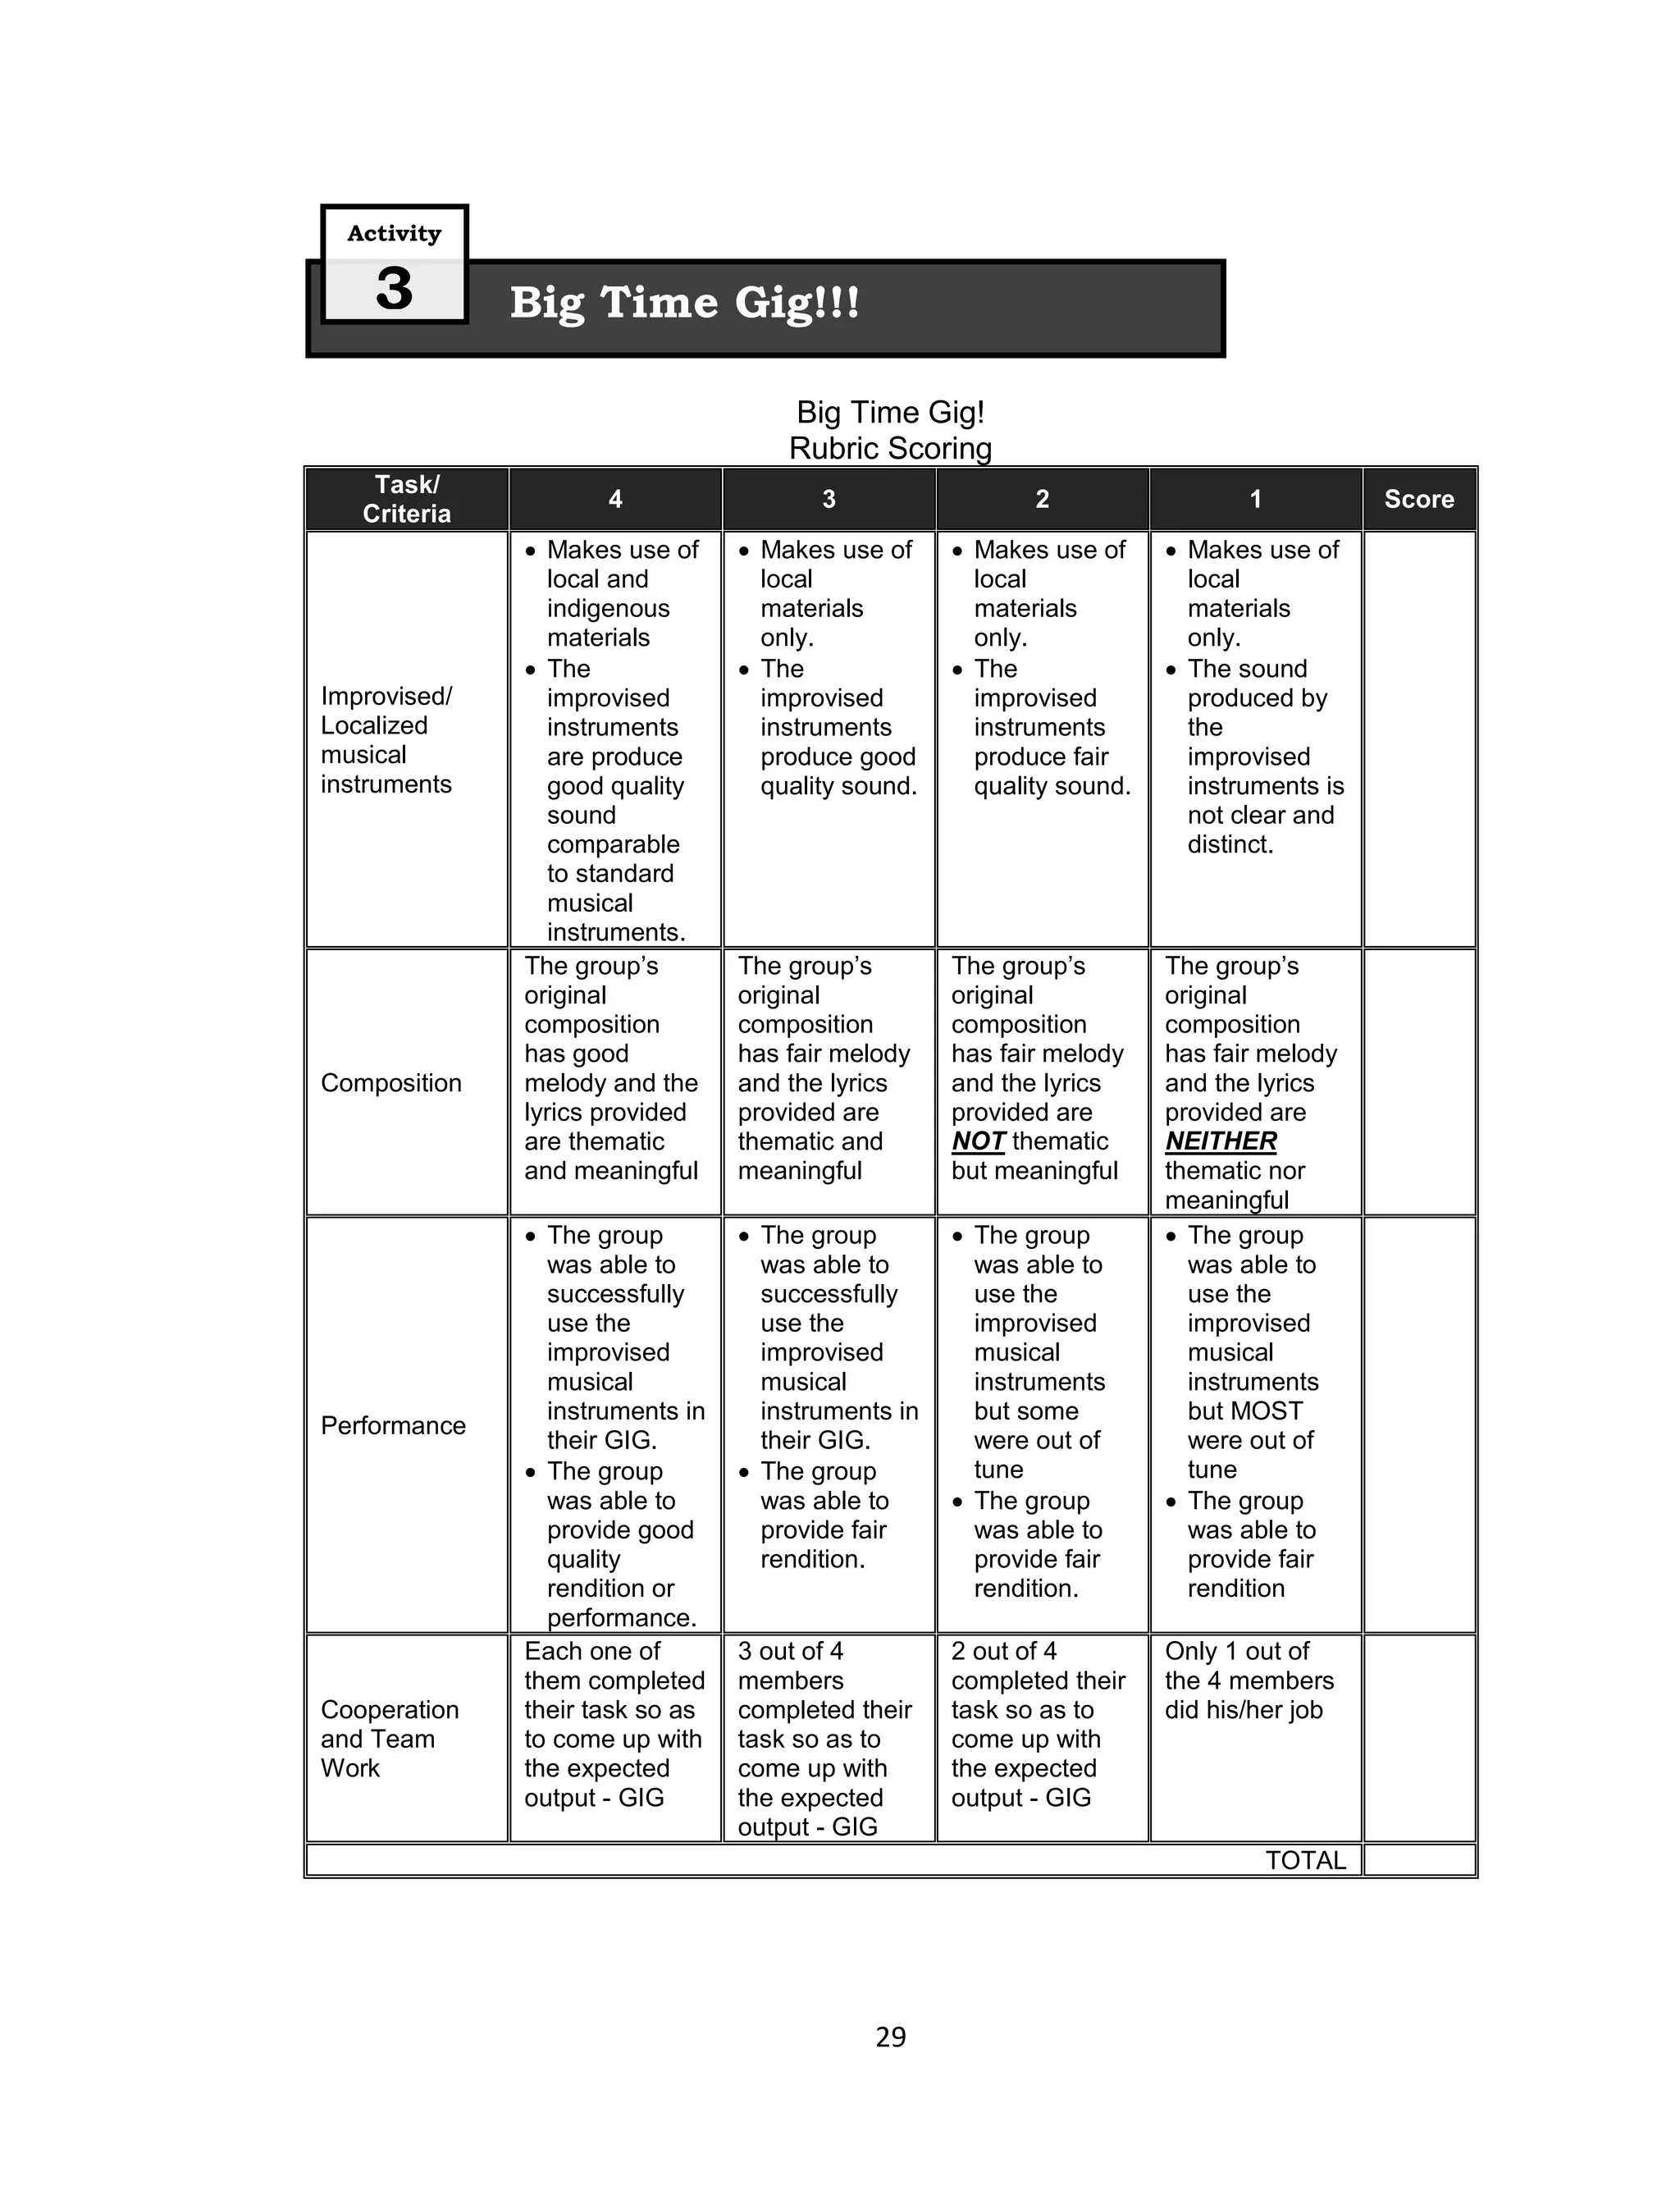
This document provides an overview of a 7th grade science unit on energy and motion. The unit covers key topics like uniform and accelerated motion, waves, sound, light, heat, and electricity. For each topic, specific concepts are introduced and example focus questions are provided. The unit aims to help students understand that energy exists in different forms, can transfer between objects, and that motion demonstrates the possession of energy. It focuses on sources of different energy forms and how energy transfers. Motion is the first topic as it concretely demonstrates energy, and its concepts aid understanding of waves, sound, and light. The unit utilizes hands-on activities to reinforce concepts and develop student thinking and skills.

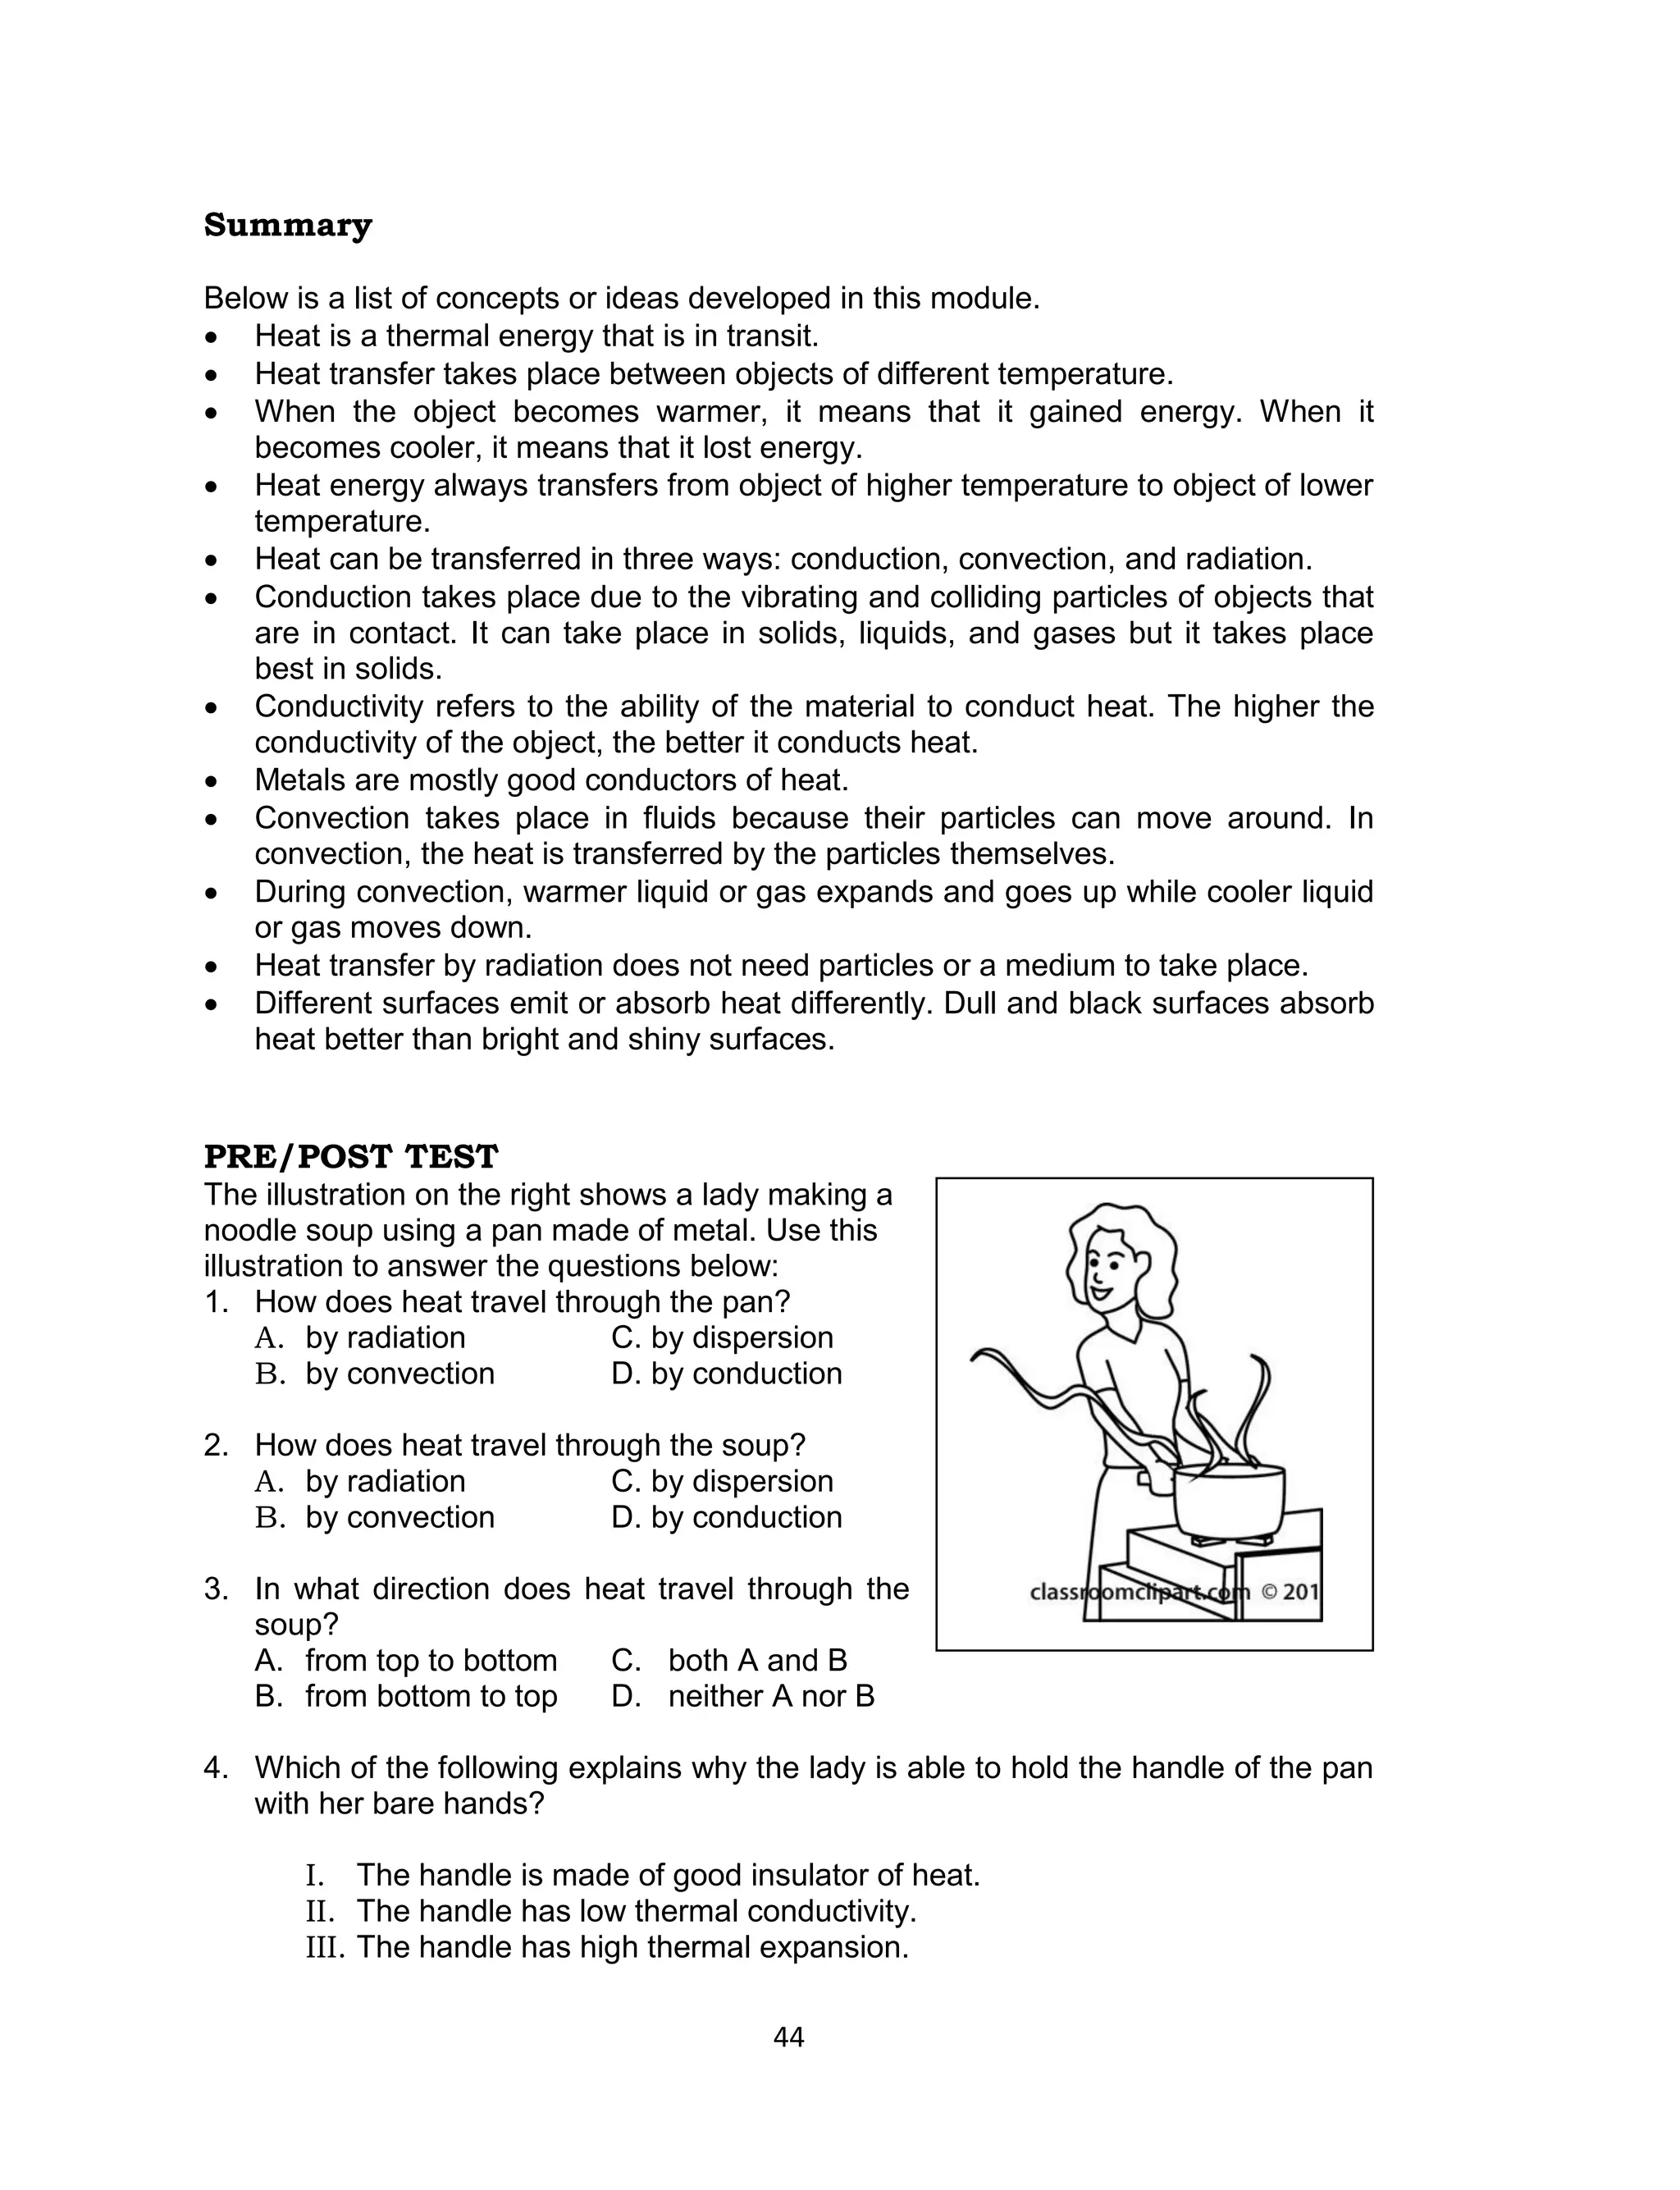
![It is best to choose three groups to present their findings on the different parts
of the activity (i.e. one representative will show the work of their group on Part A
only; representatives from other groups will talk about Part B and Part C
respectively.)
The teacher will conclude the meeting by answering the summary part of the
activity sheet with the class.
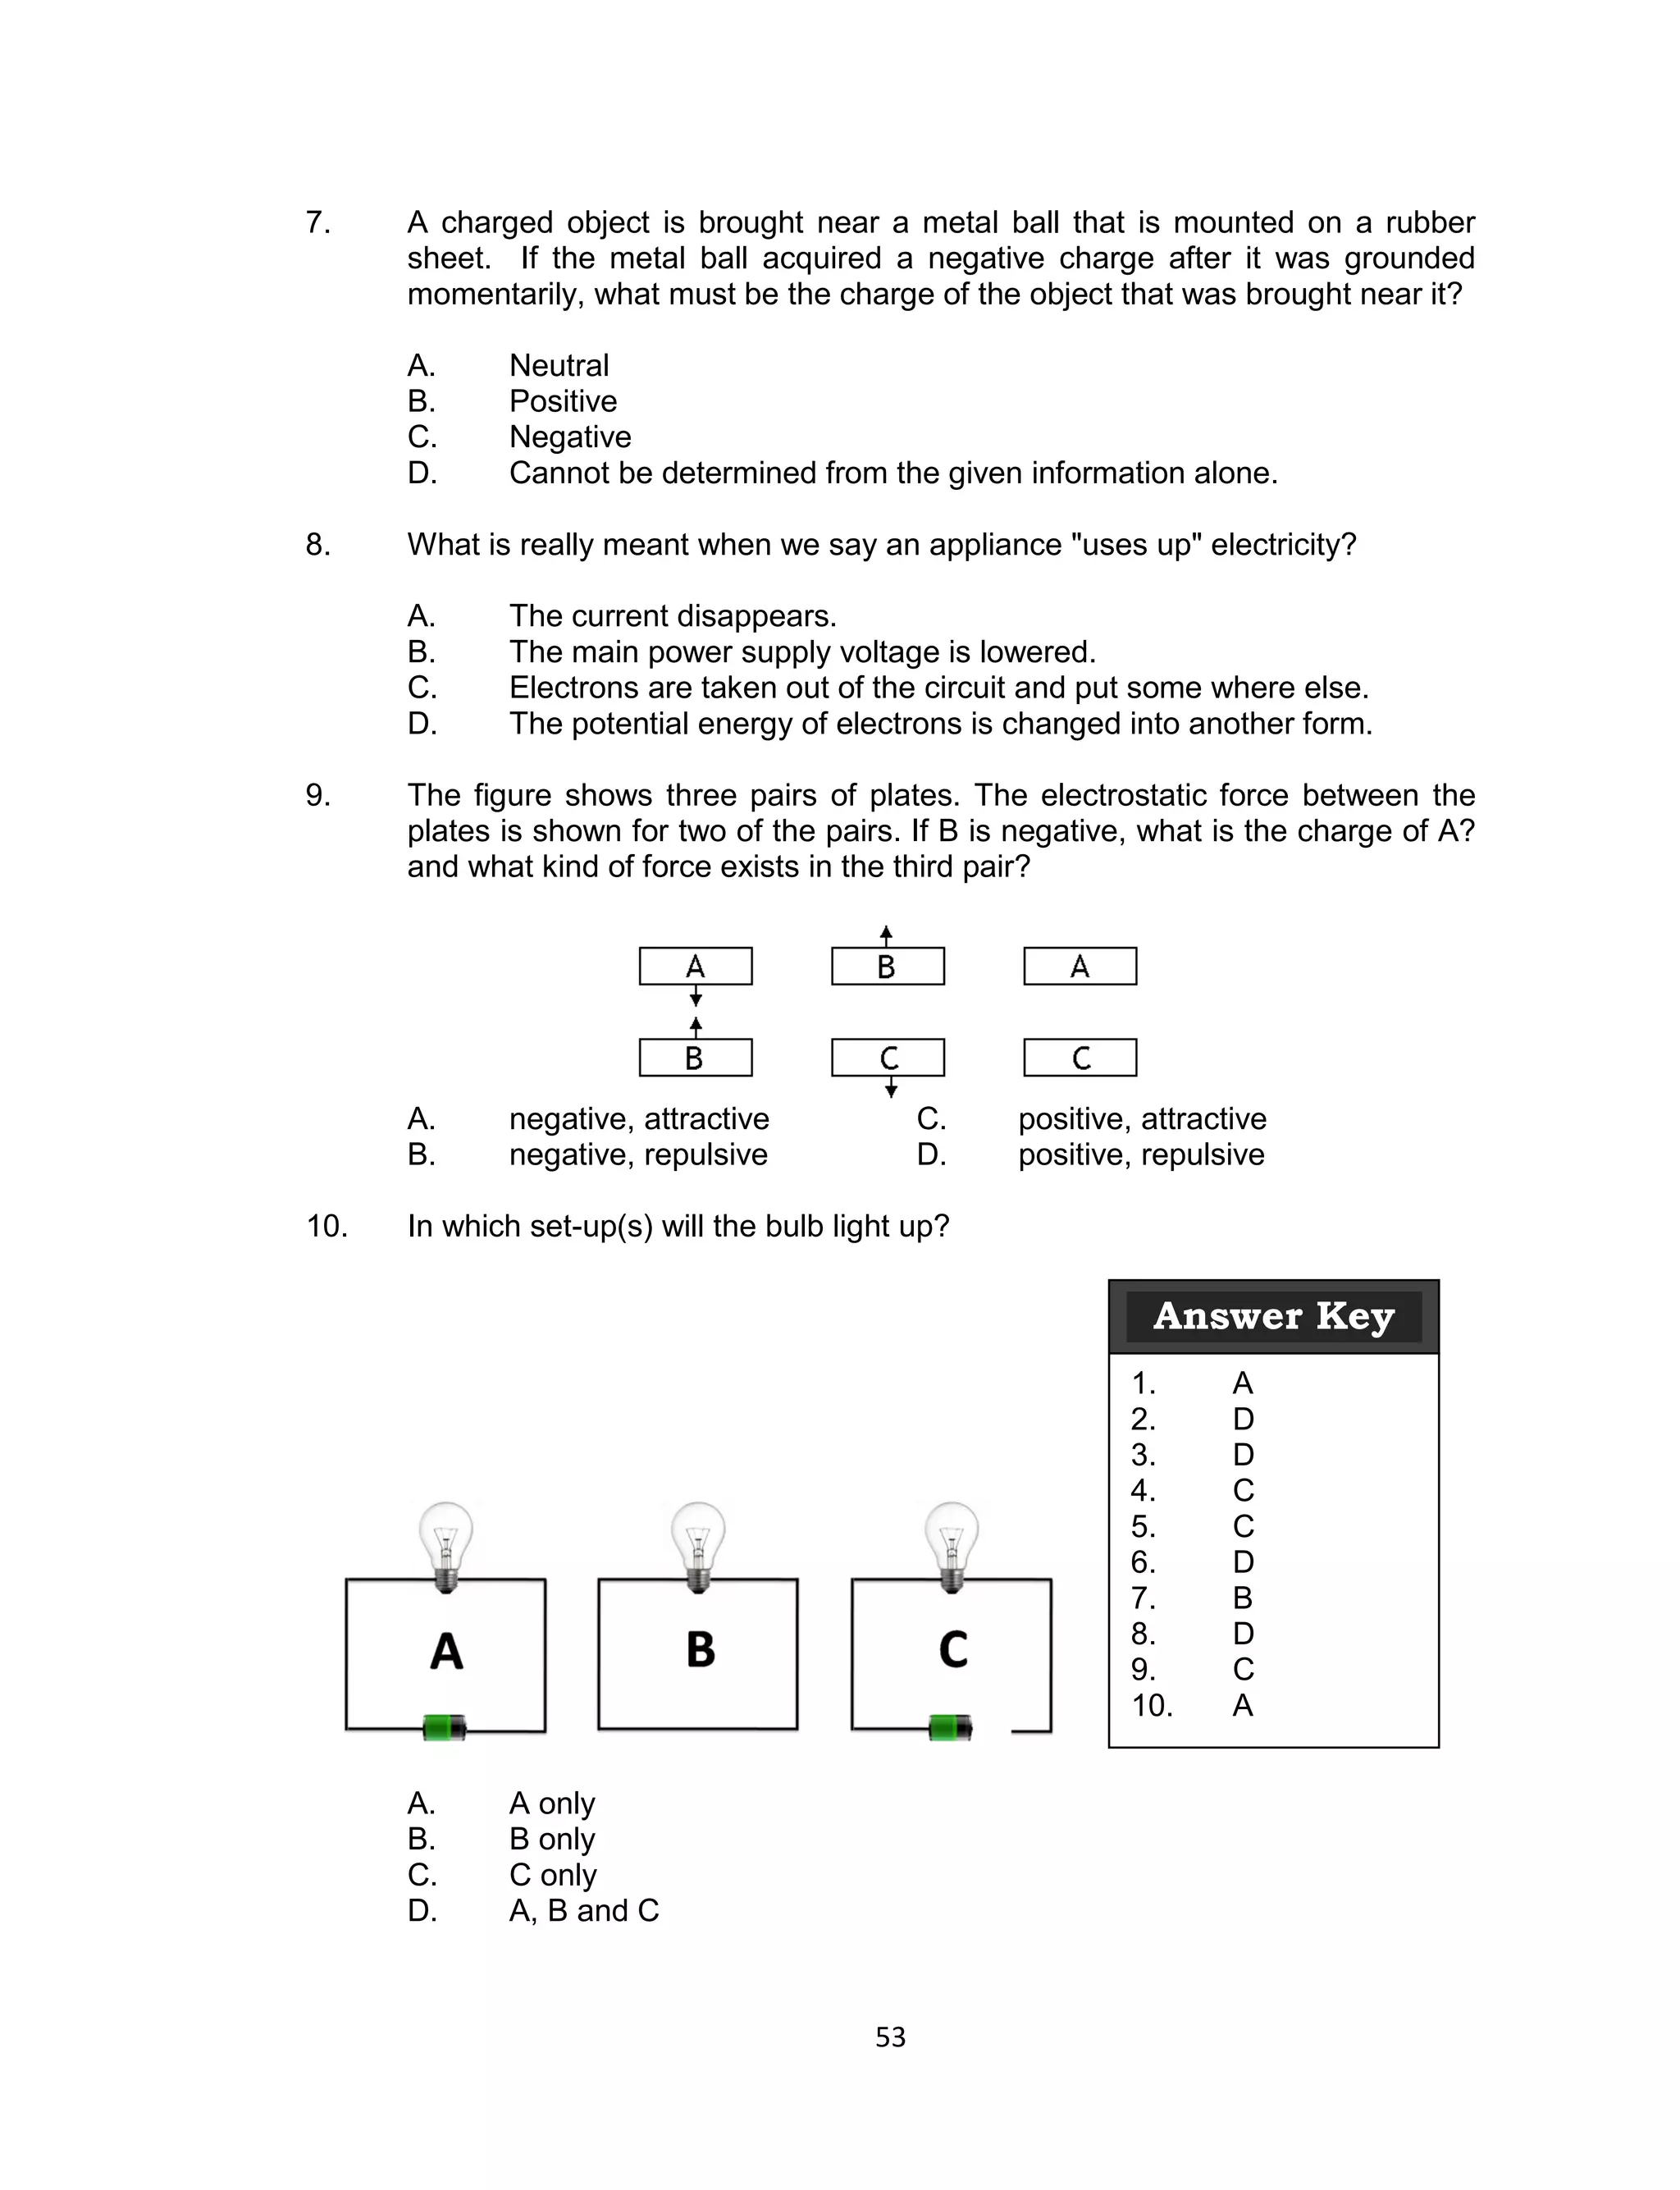
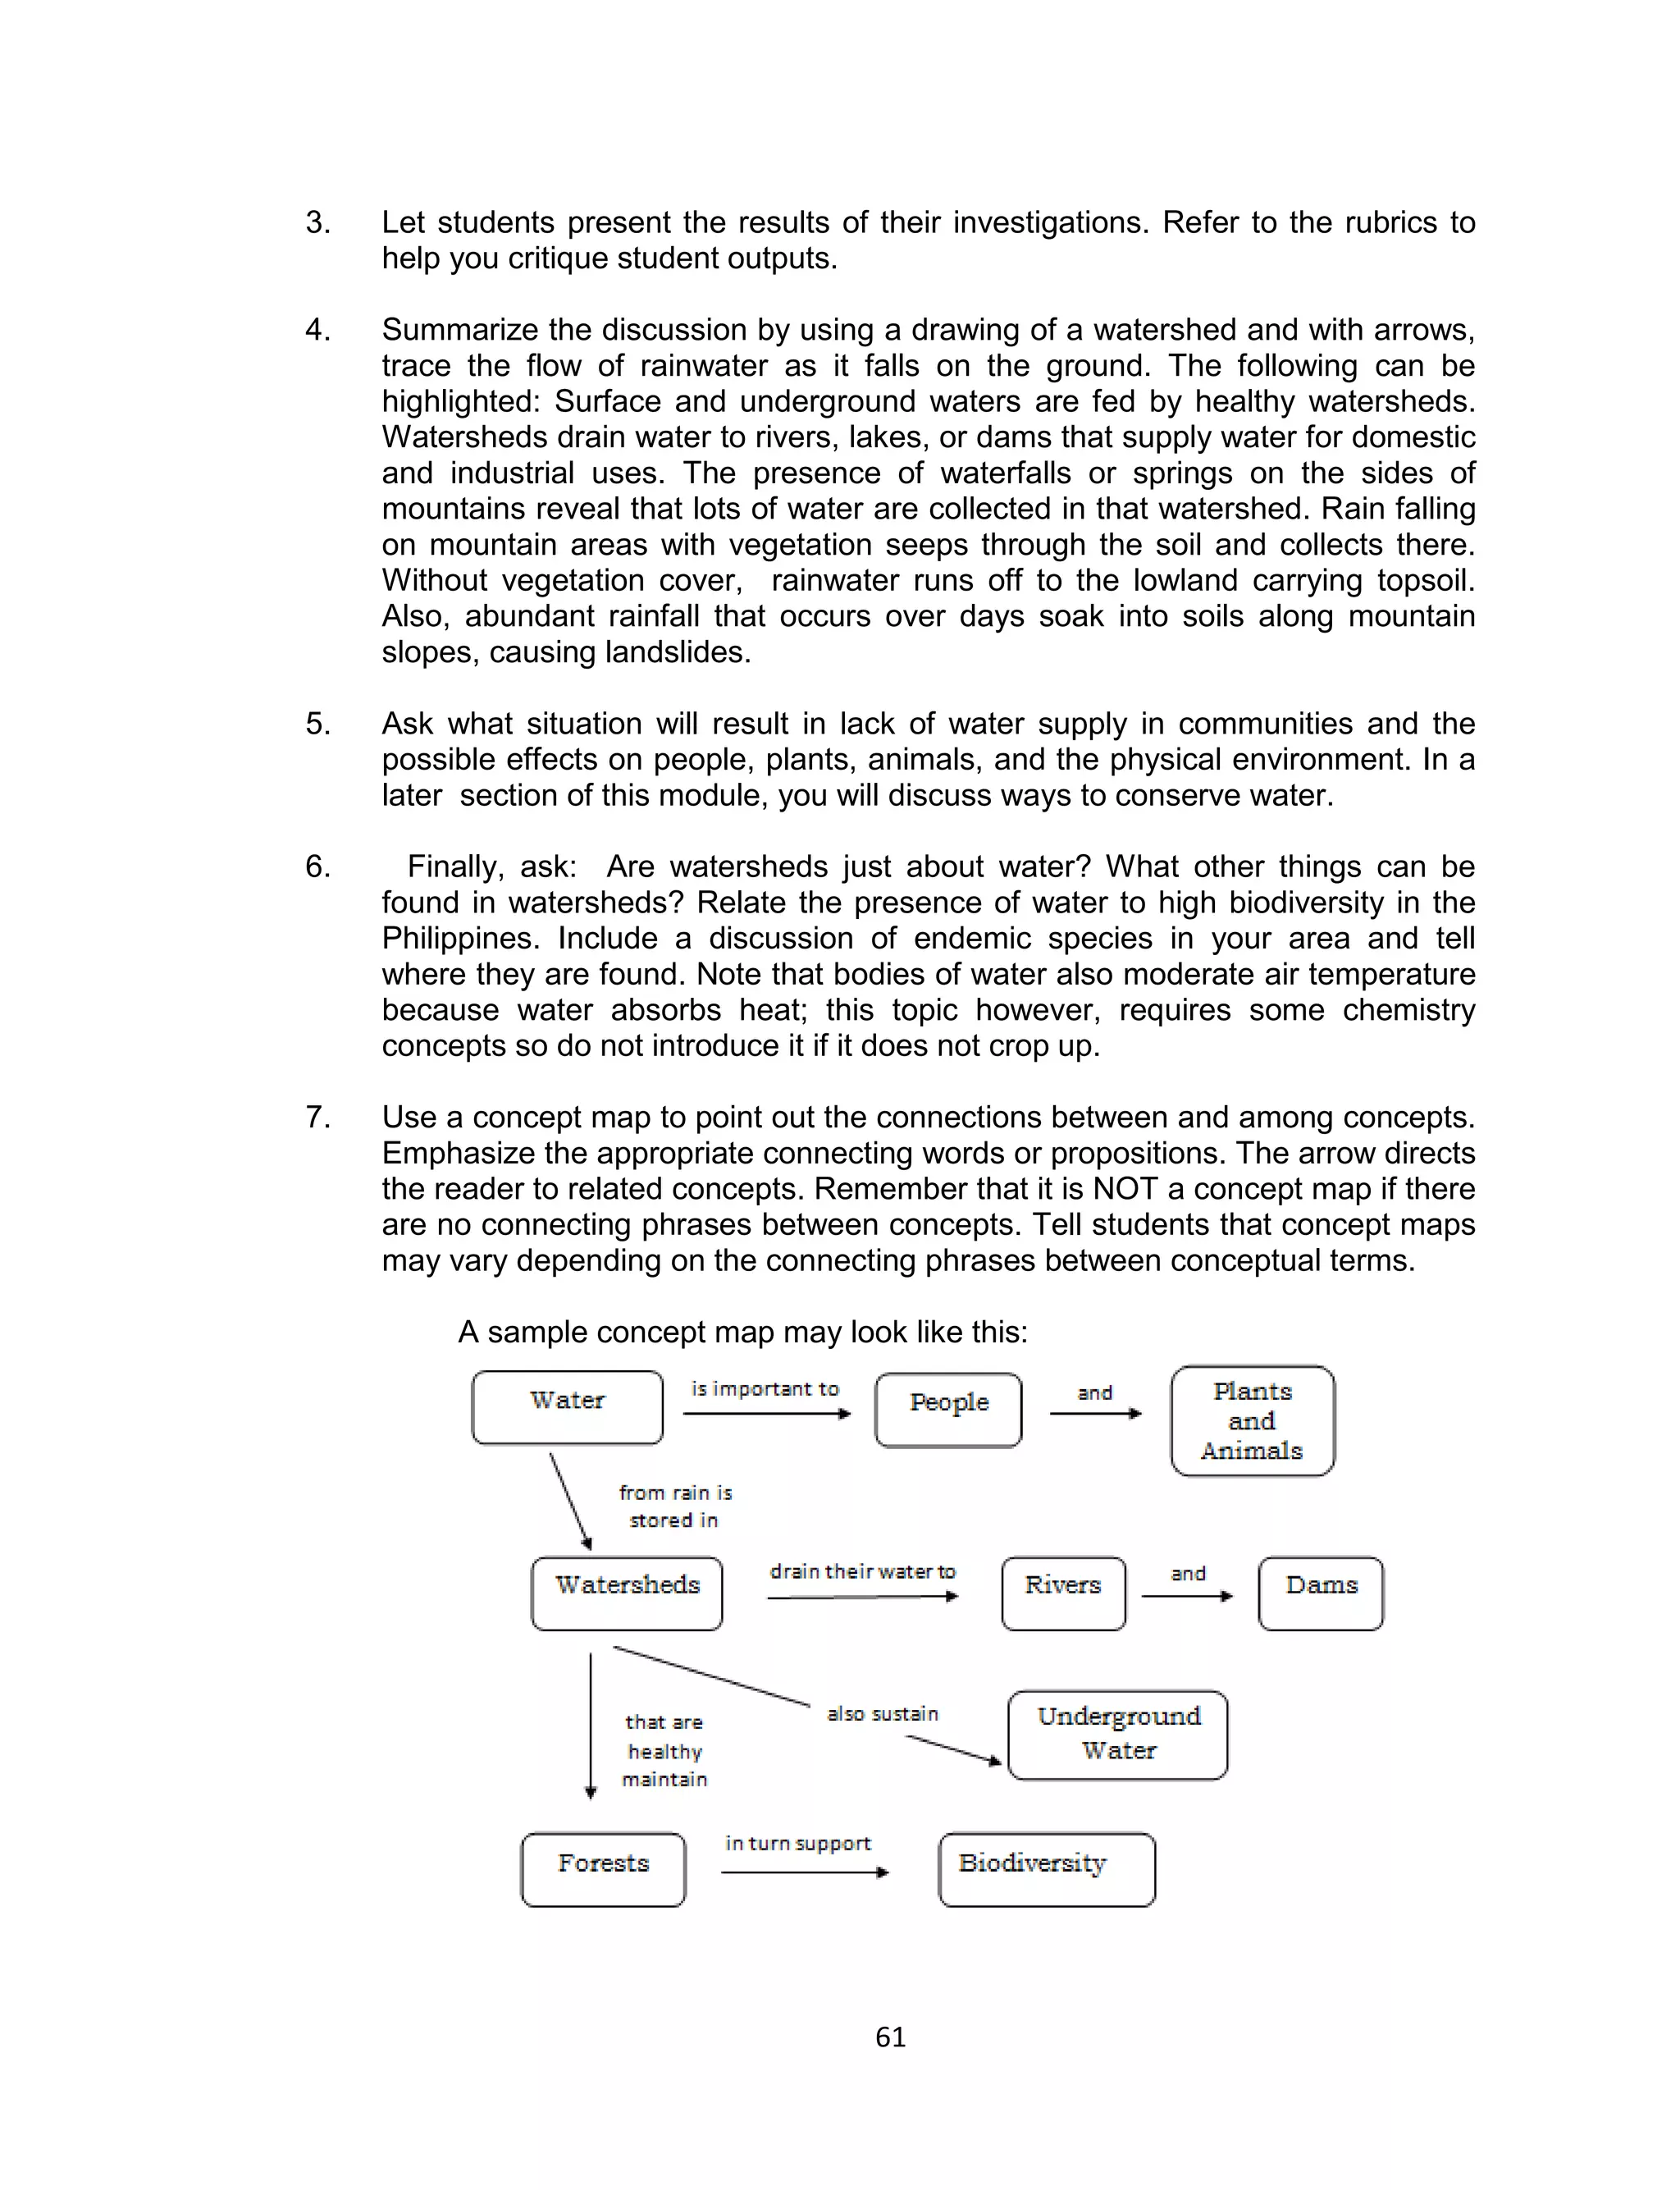
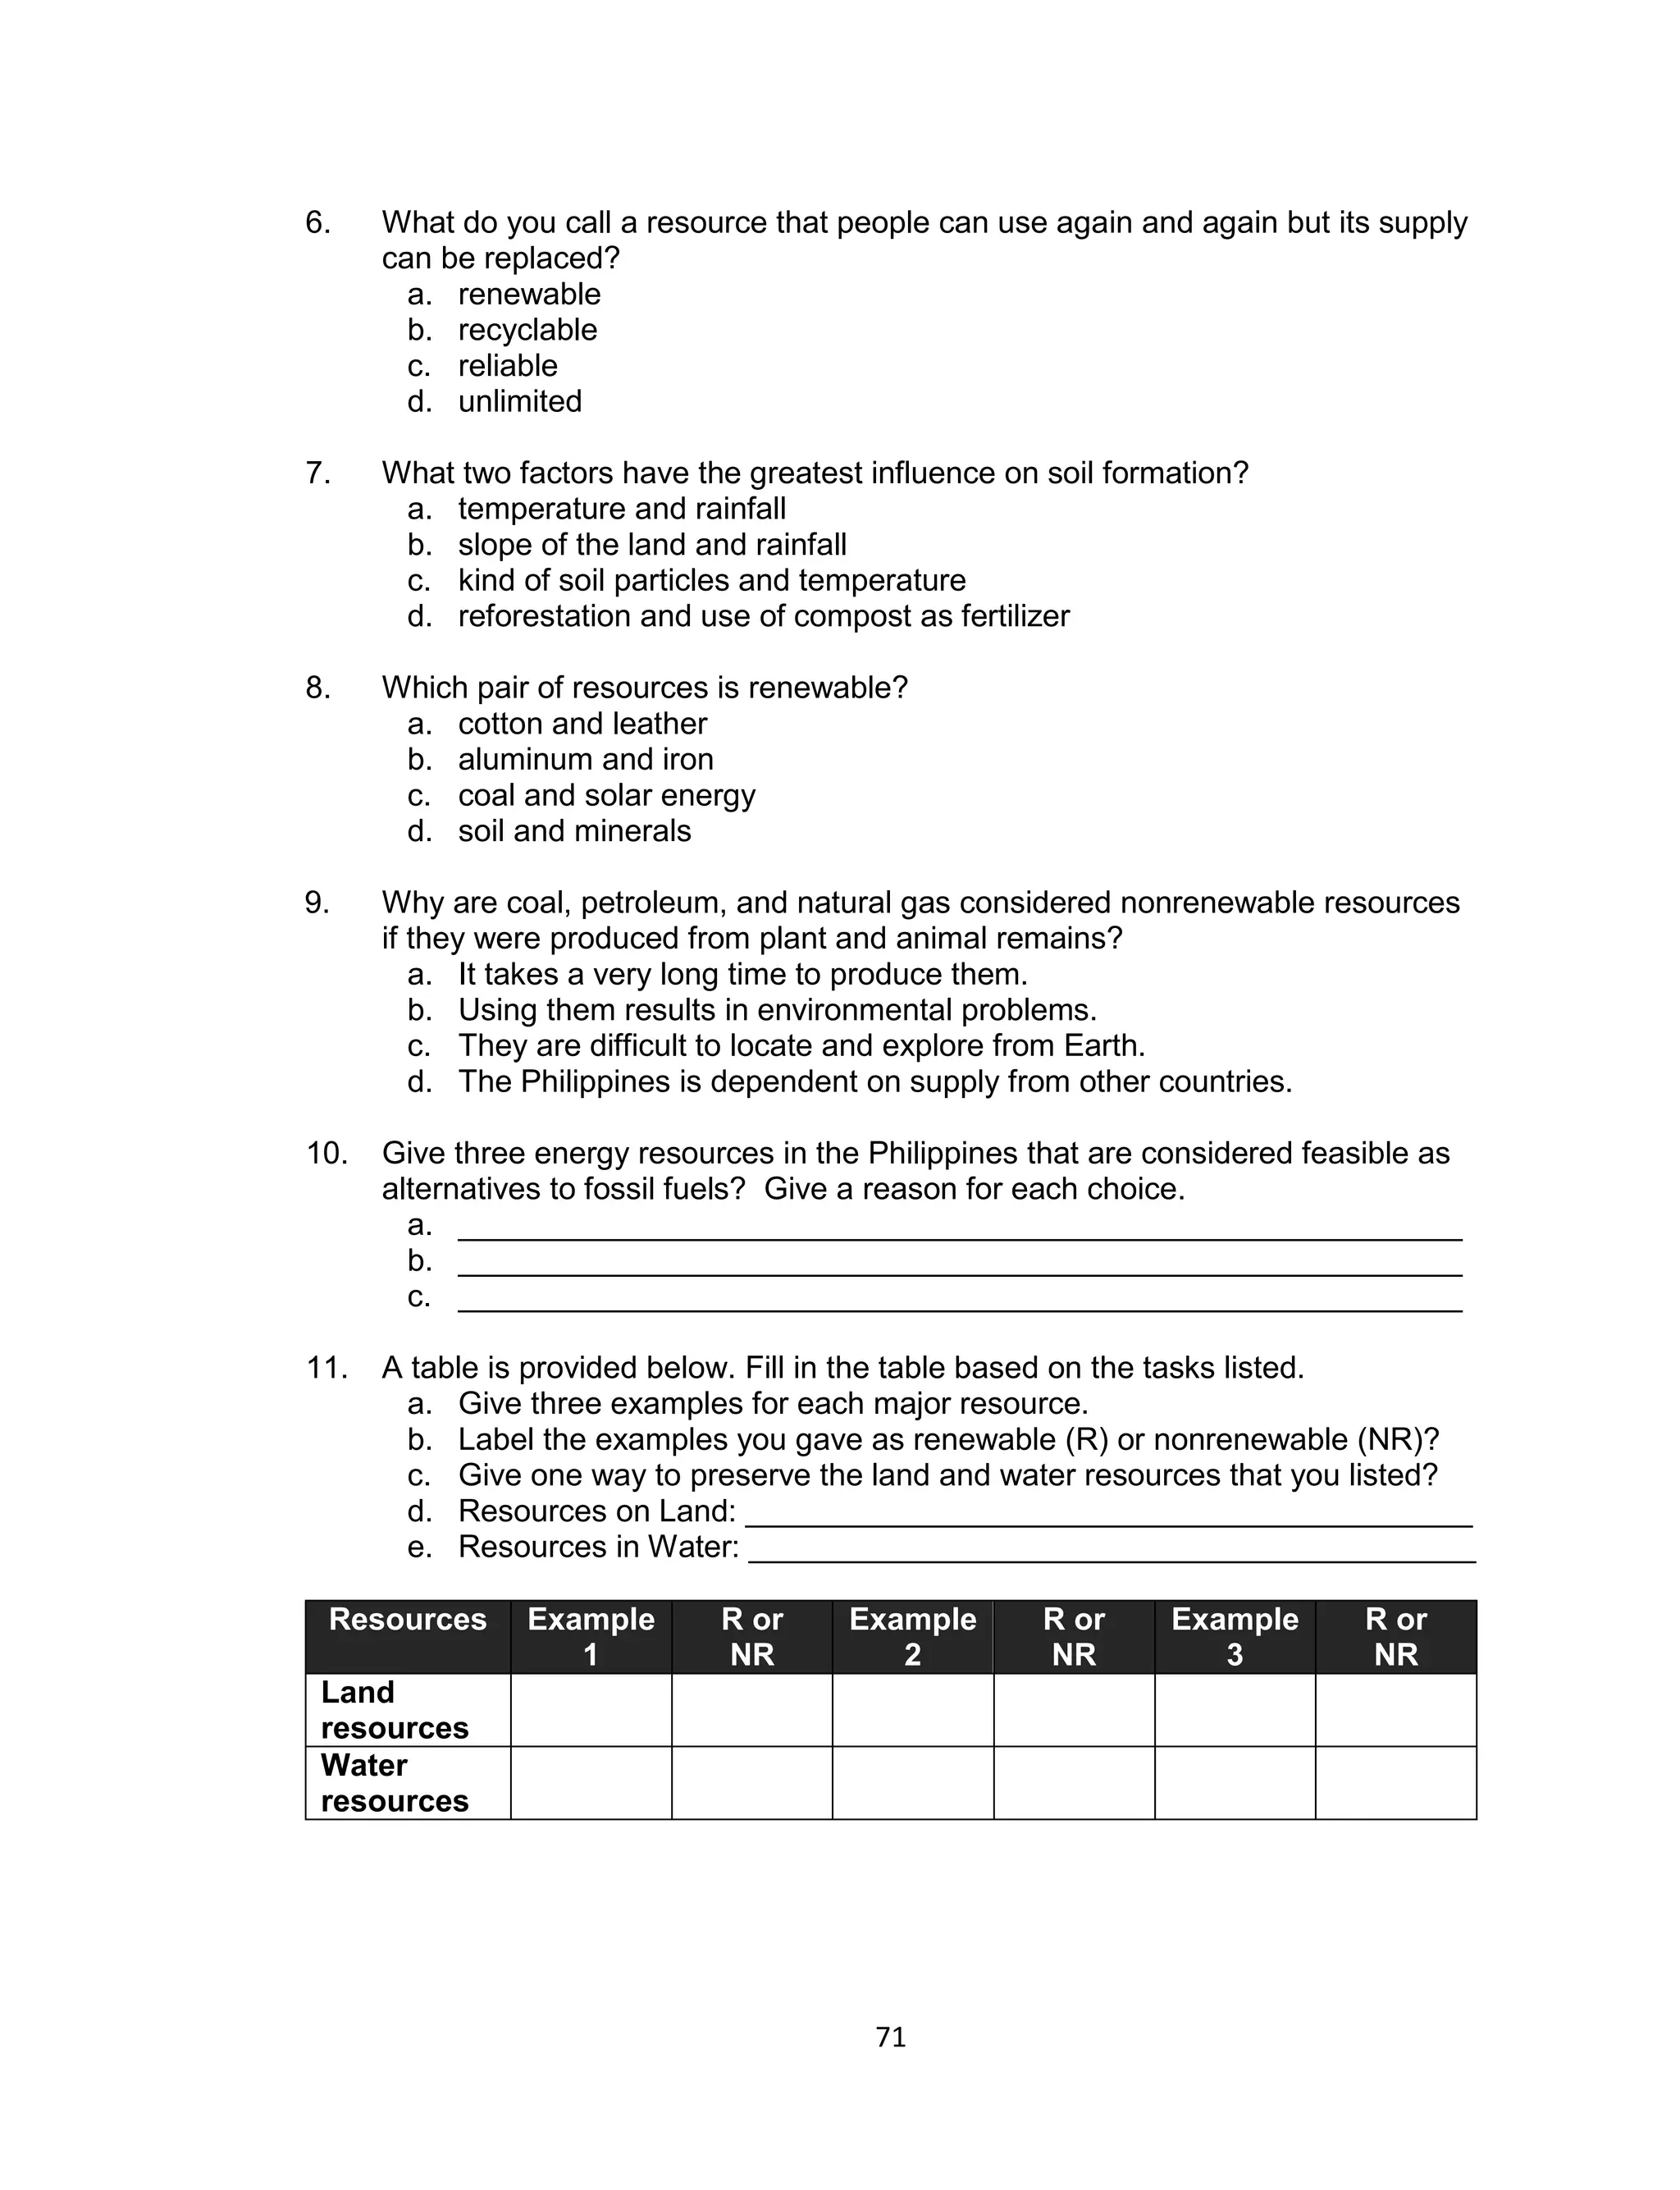
Answers to the Activity Sheet
What are transverse waves?
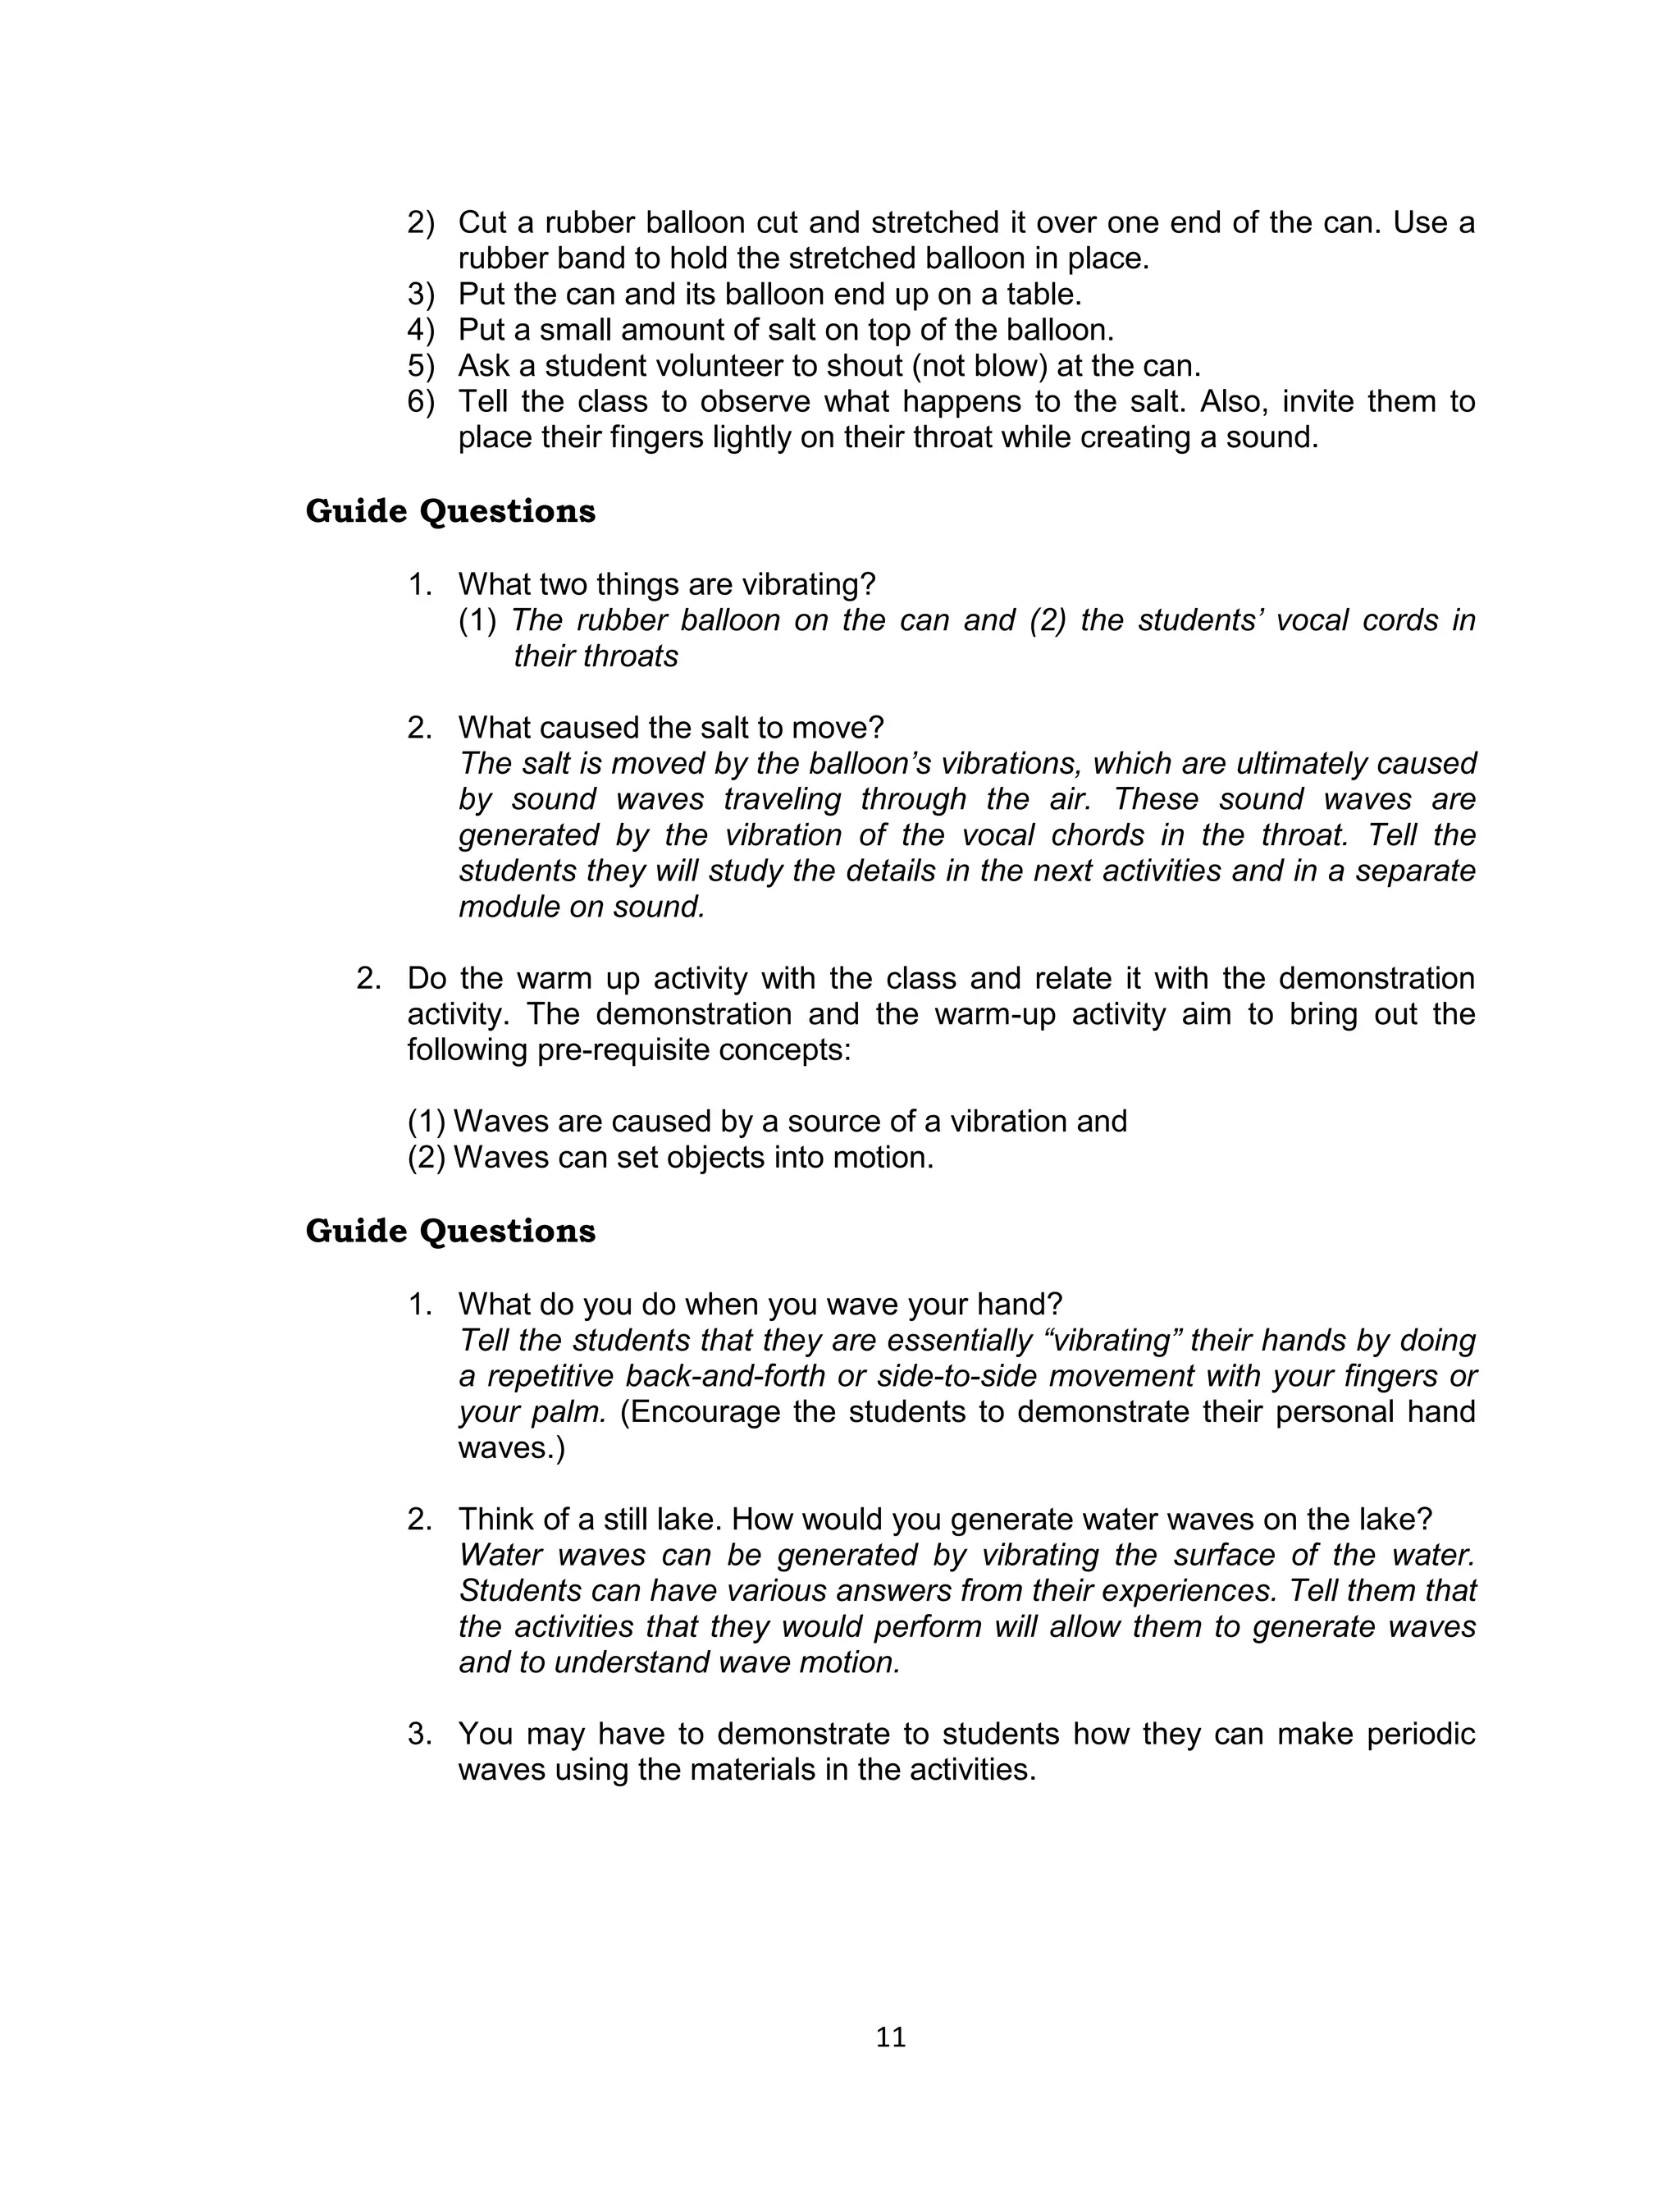
1. Sketches showing the motion of a wave pulse at three subsequent instances
(snapshots at three different times).
Time 1
Time 2
Time 3
a. What is the source of the wave pulse?
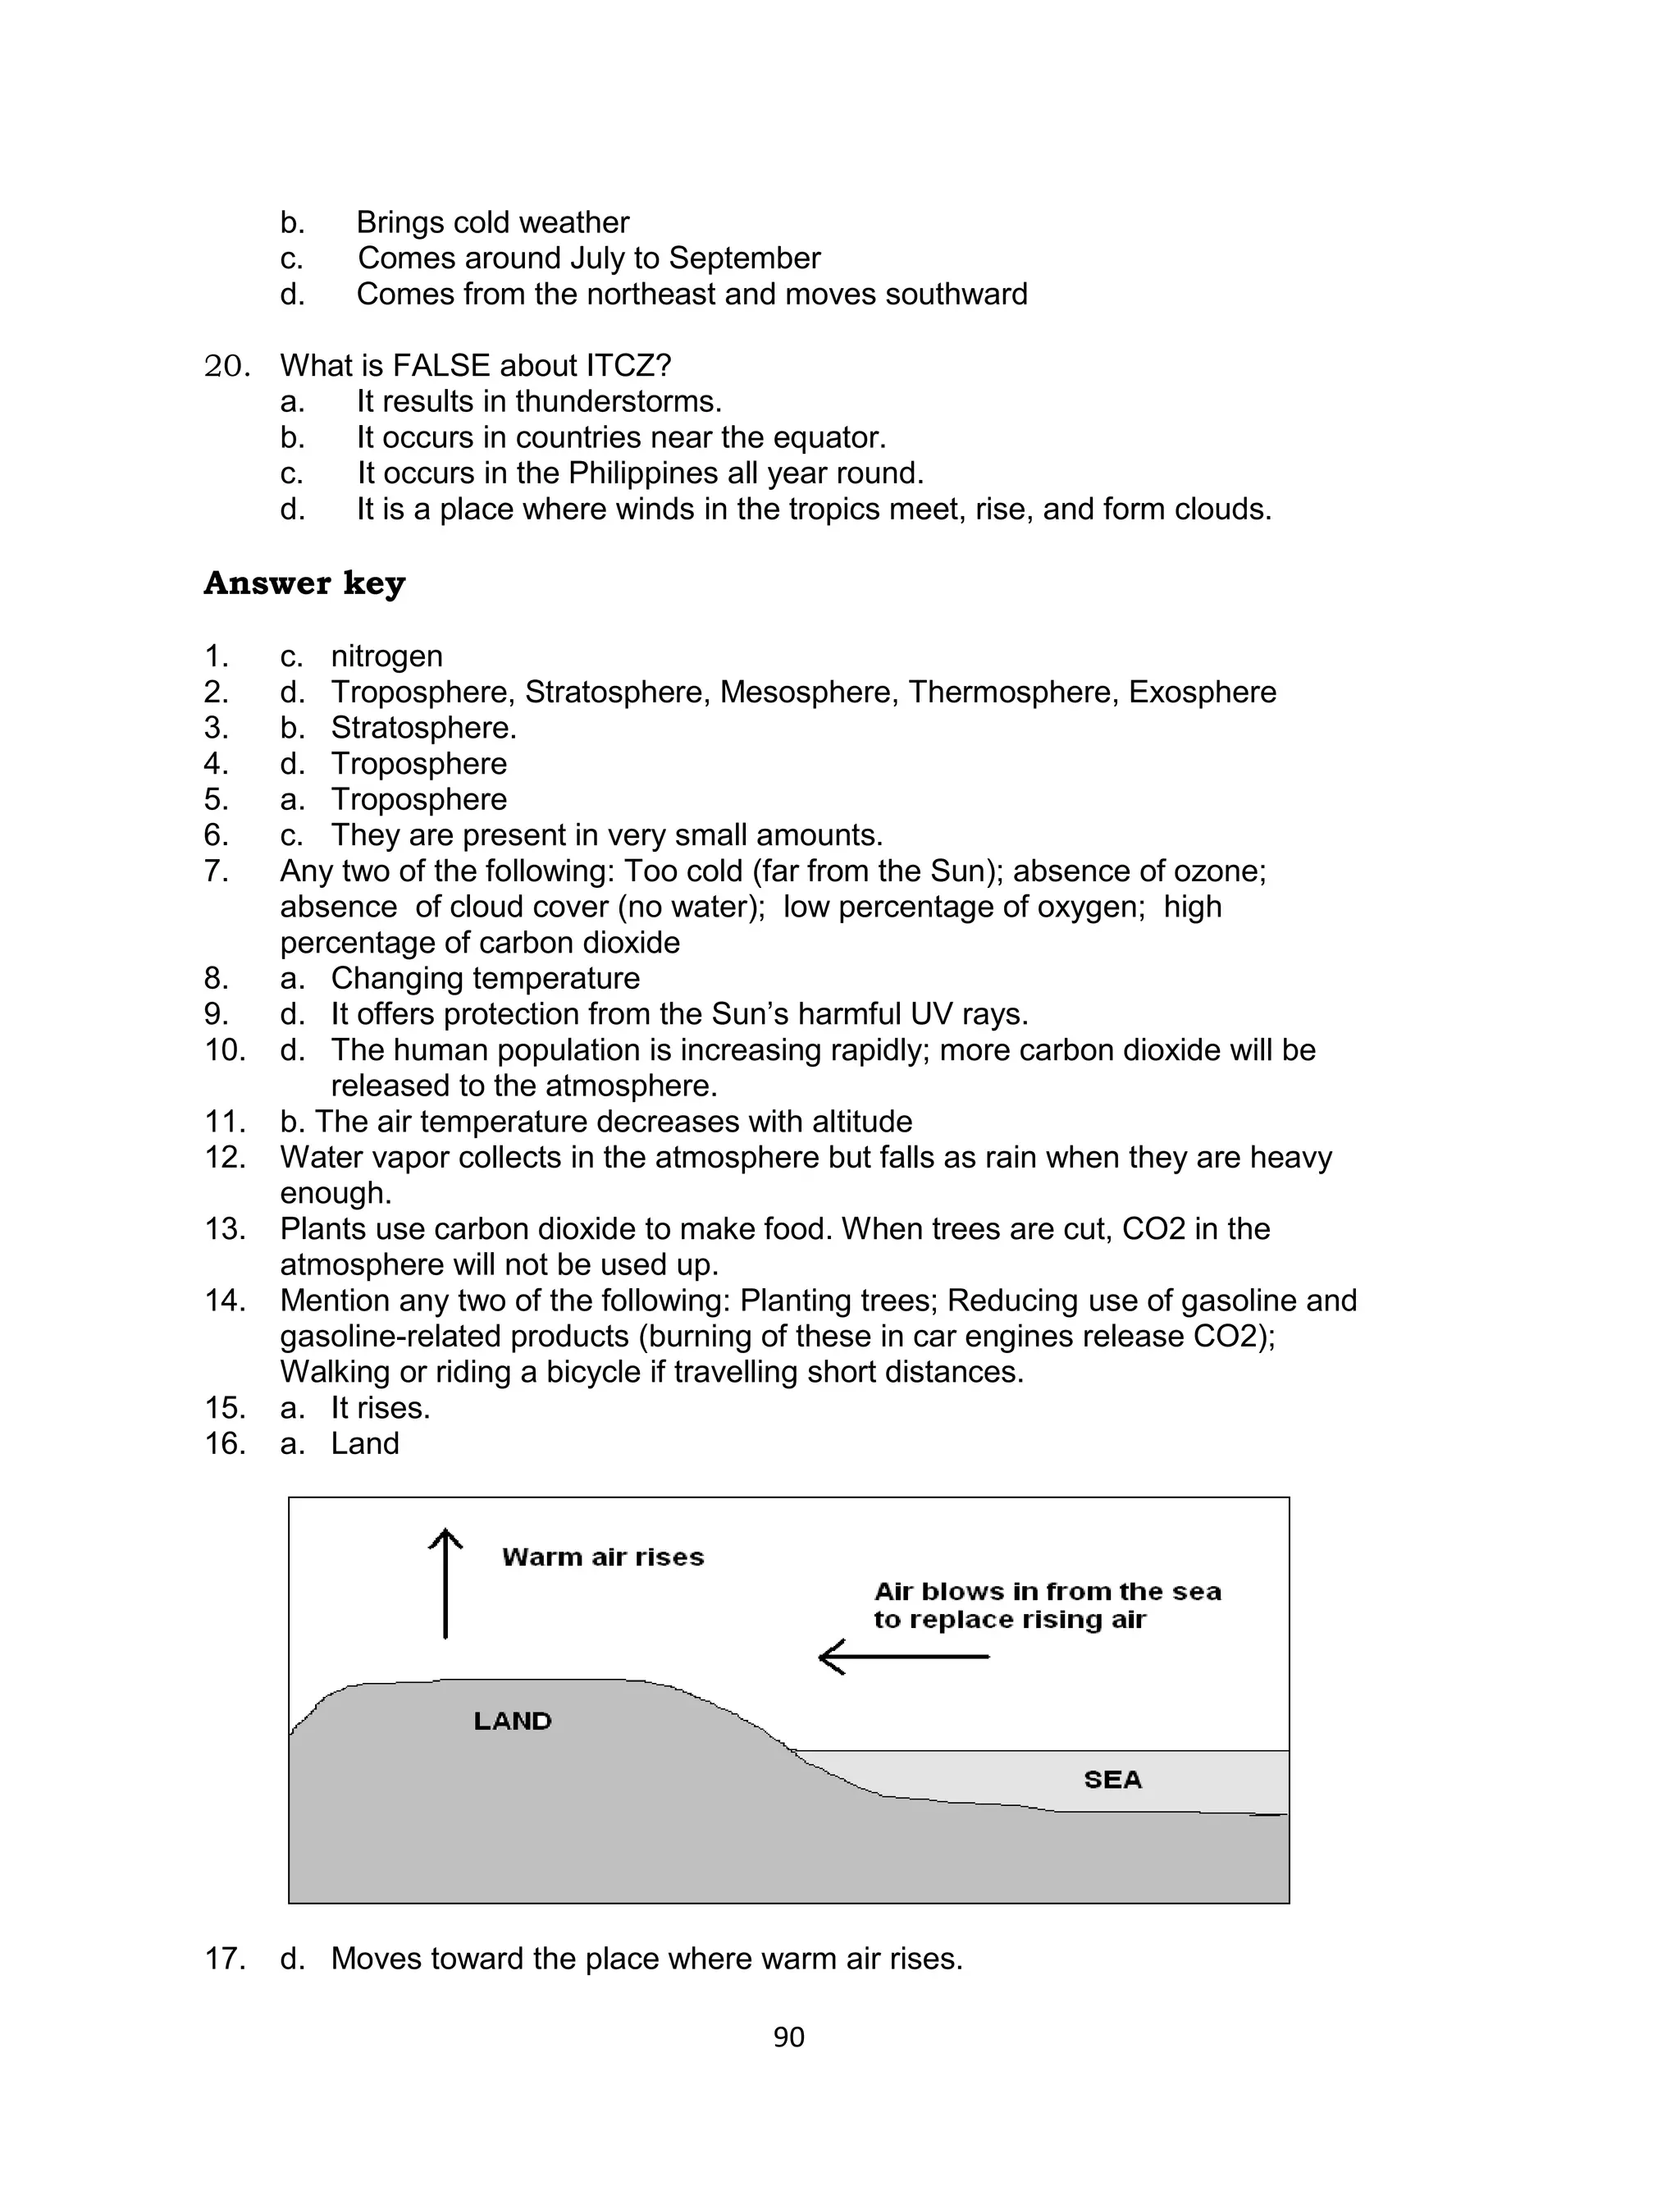
A vibration due to a quick shake at one end of the rope
b. Describe the motion of your hand as you create the pulse.
A quick up and down movement
c. Describe the motion of the pulse with respect to the source. The pulse
moved away from the source.
2. [Sketch of the waveform or the shape of the wave created by the students.]
13](https://image.slidesharecdn.com/q3-q4teachersguidev1-0-130109055608-phpapp01/75/Q3-q4-teachers-guide-v1-0-13-2048.jpg)
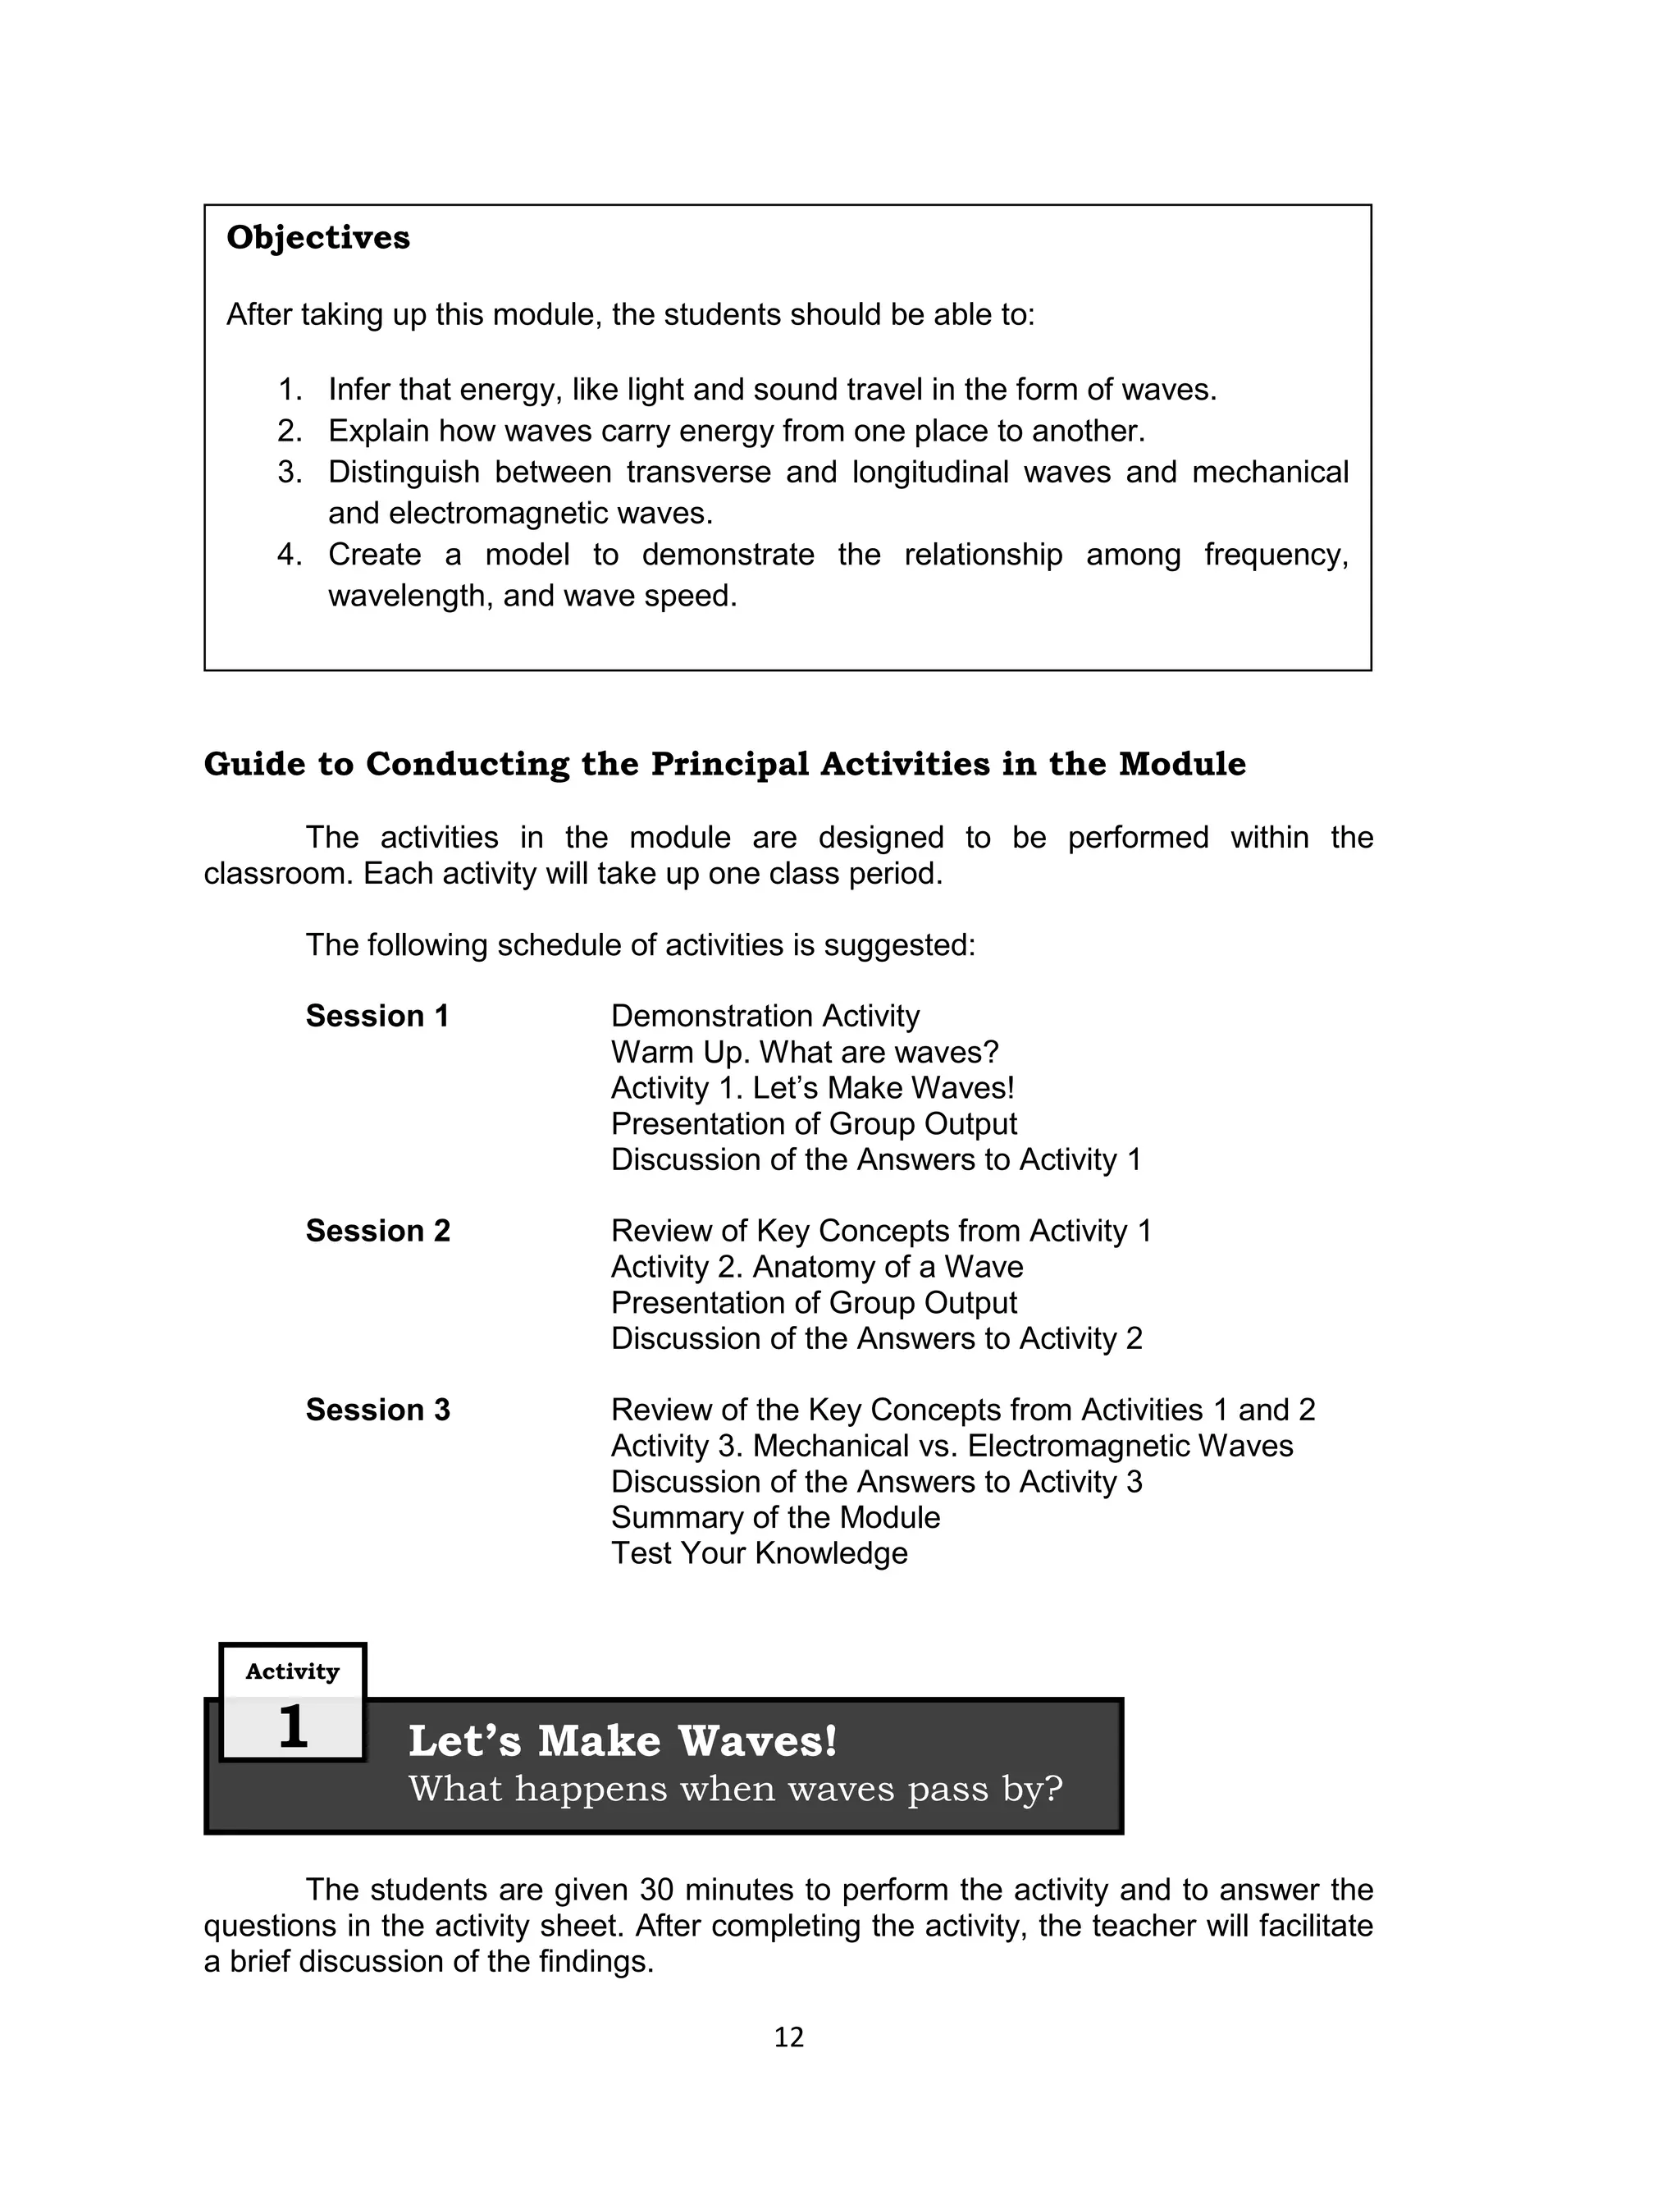
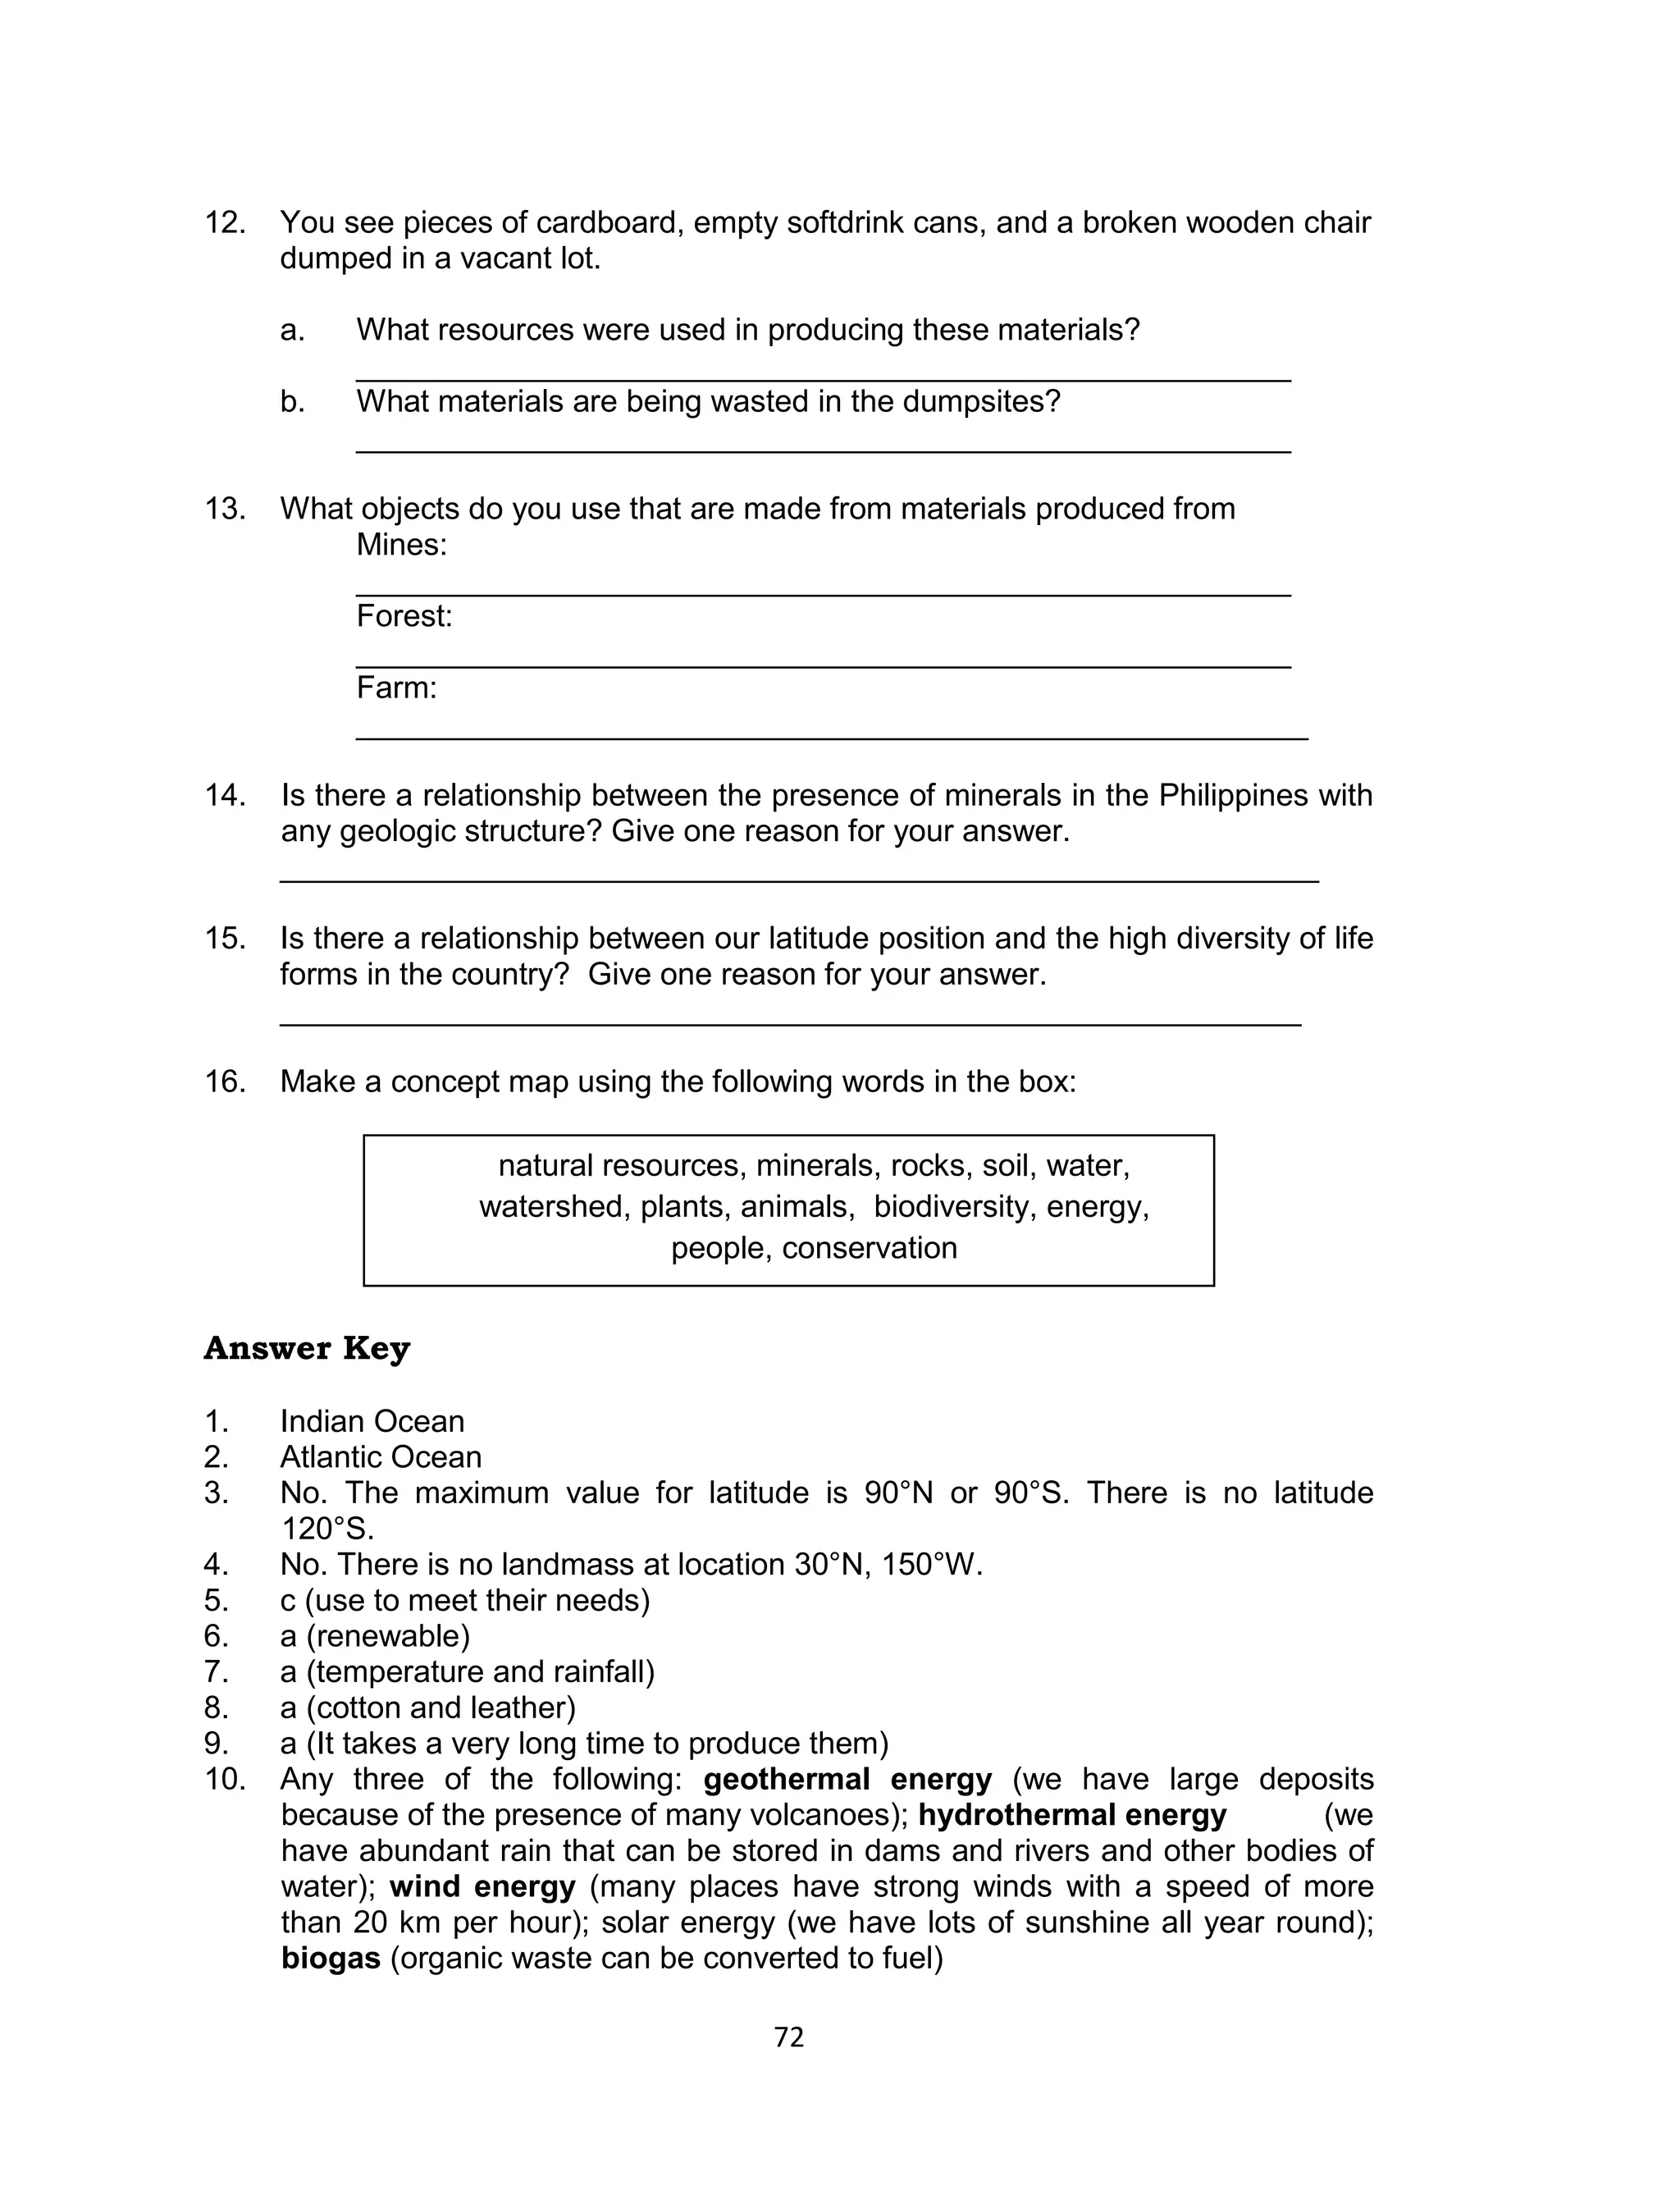
![a. Does the wave transport the colored ribbon from its original position to the
end of the rope?
No, it doesn’t.
b. Describe the vibration of the colored ribbon. How does it move as waves
pass by? Does it move in the same direction as the wave?
As the waves pass by, the colored ribbon moves up and down
repetitively. It does not move in the same direction as the passing waves.
Instead, it vibrates along the axis perpendicular to the direction of travel of
the passing waves.
What are longitudinal waves?
1. Sketch of longitudinal waves in a coil spring.
2. [Observations on the colored ribbon tied to the coil spring.]
a. Does the wave transport the colored ribbon from its original position to the
end of the rope?
No, it doesn’t.
b. Describe the vibration of the colored ribbon. How does it move as waves
pass by?
As the waves pass by, the colored ribbon moves back and forth
repetitively. It vibrates along the axis parallel to the direction of travel of
the passing waves.
What are surface waves?
1. [Sketch of the waves as seen from above the water basin.] The source of the
disturbance should be marked.
2. [Observation on the paper boat.]
a. Do the waves set the paper boat into motion? What is required to set an
object into motion?
Yes, the waves moved the paper boat. Energy is required to set and
object into motion.
b. If you exert more energy in creating periodic waves by tapping the
surface with greater strength, how does this affect the movement of the
paper boat?
The wave carried more energy causing the paper boat to vibrate strongly.
14](https://image.slidesharecdn.com/q3-q4teachersguidev1-0-130109055608-phpapp01/75/Q3-q4-teachers-guide-v1-0-14-2048.jpg)
![3. [Observations on the figure showing water waves.]
a. As shown in the figure, the passage of a wave across a surface of a body
of water involves the motion of particles following a circular pattern about
their original positions.
b. Does the wave transport water molecules from the source of the
vibration? Support your answer using the shown figure.
No, the water molecules are not transported from the source of the
vibration. The figure shows that the water particles merely move in
circular orbits about their original positions as waves pass by.
Summary
1. Waves can be typified according to the direction of motion of the vibrating
particles with respect to the direction in which the waves travel.
a. Waves in a rope are called transverse waves because the individual
segments of the rope vibrate perpendicular to the direction in which the
waves travel.
b. When each portion of a coil spring is alternatively compressed and
extended, longitudinal waves are produced.
c. Waves on the surface of a body of water are a combination of transverse
and longitudinal waves. Each water molecule moves in a circular pattern
as the waves pass by.
2. How do we know that waves carry energy?
Waves can set other objects into motion.
3. What happens when waves pass by?
Particles vibrate alternately to transport the energy of the wave.
Activity
2 Anatomy of a Wave
How can you describe waves?
The students are given 40 minutes to perform the activity and to answer the
questions in the activity sheet. After completing the activity, the teacher will facilitate
a brief discussion of the findings.
Before discussing the results of the activity to the class, it is useful to show a
large image of a sinusoidal wave and ask the class to name the parts of the wave.
The activity has three parts so the groups may be asked to assign a different
representative to discuss the result of their work to the class (i.e. those who have
been chosen as presenters in Activity 1 should not be assigned again).
15](https://image.slidesharecdn.com/q3-q4teachersguidev1-0-130109055608-phpapp01/75/Q3-q4-teachers-guide-v1-0-15-2048.jpg)
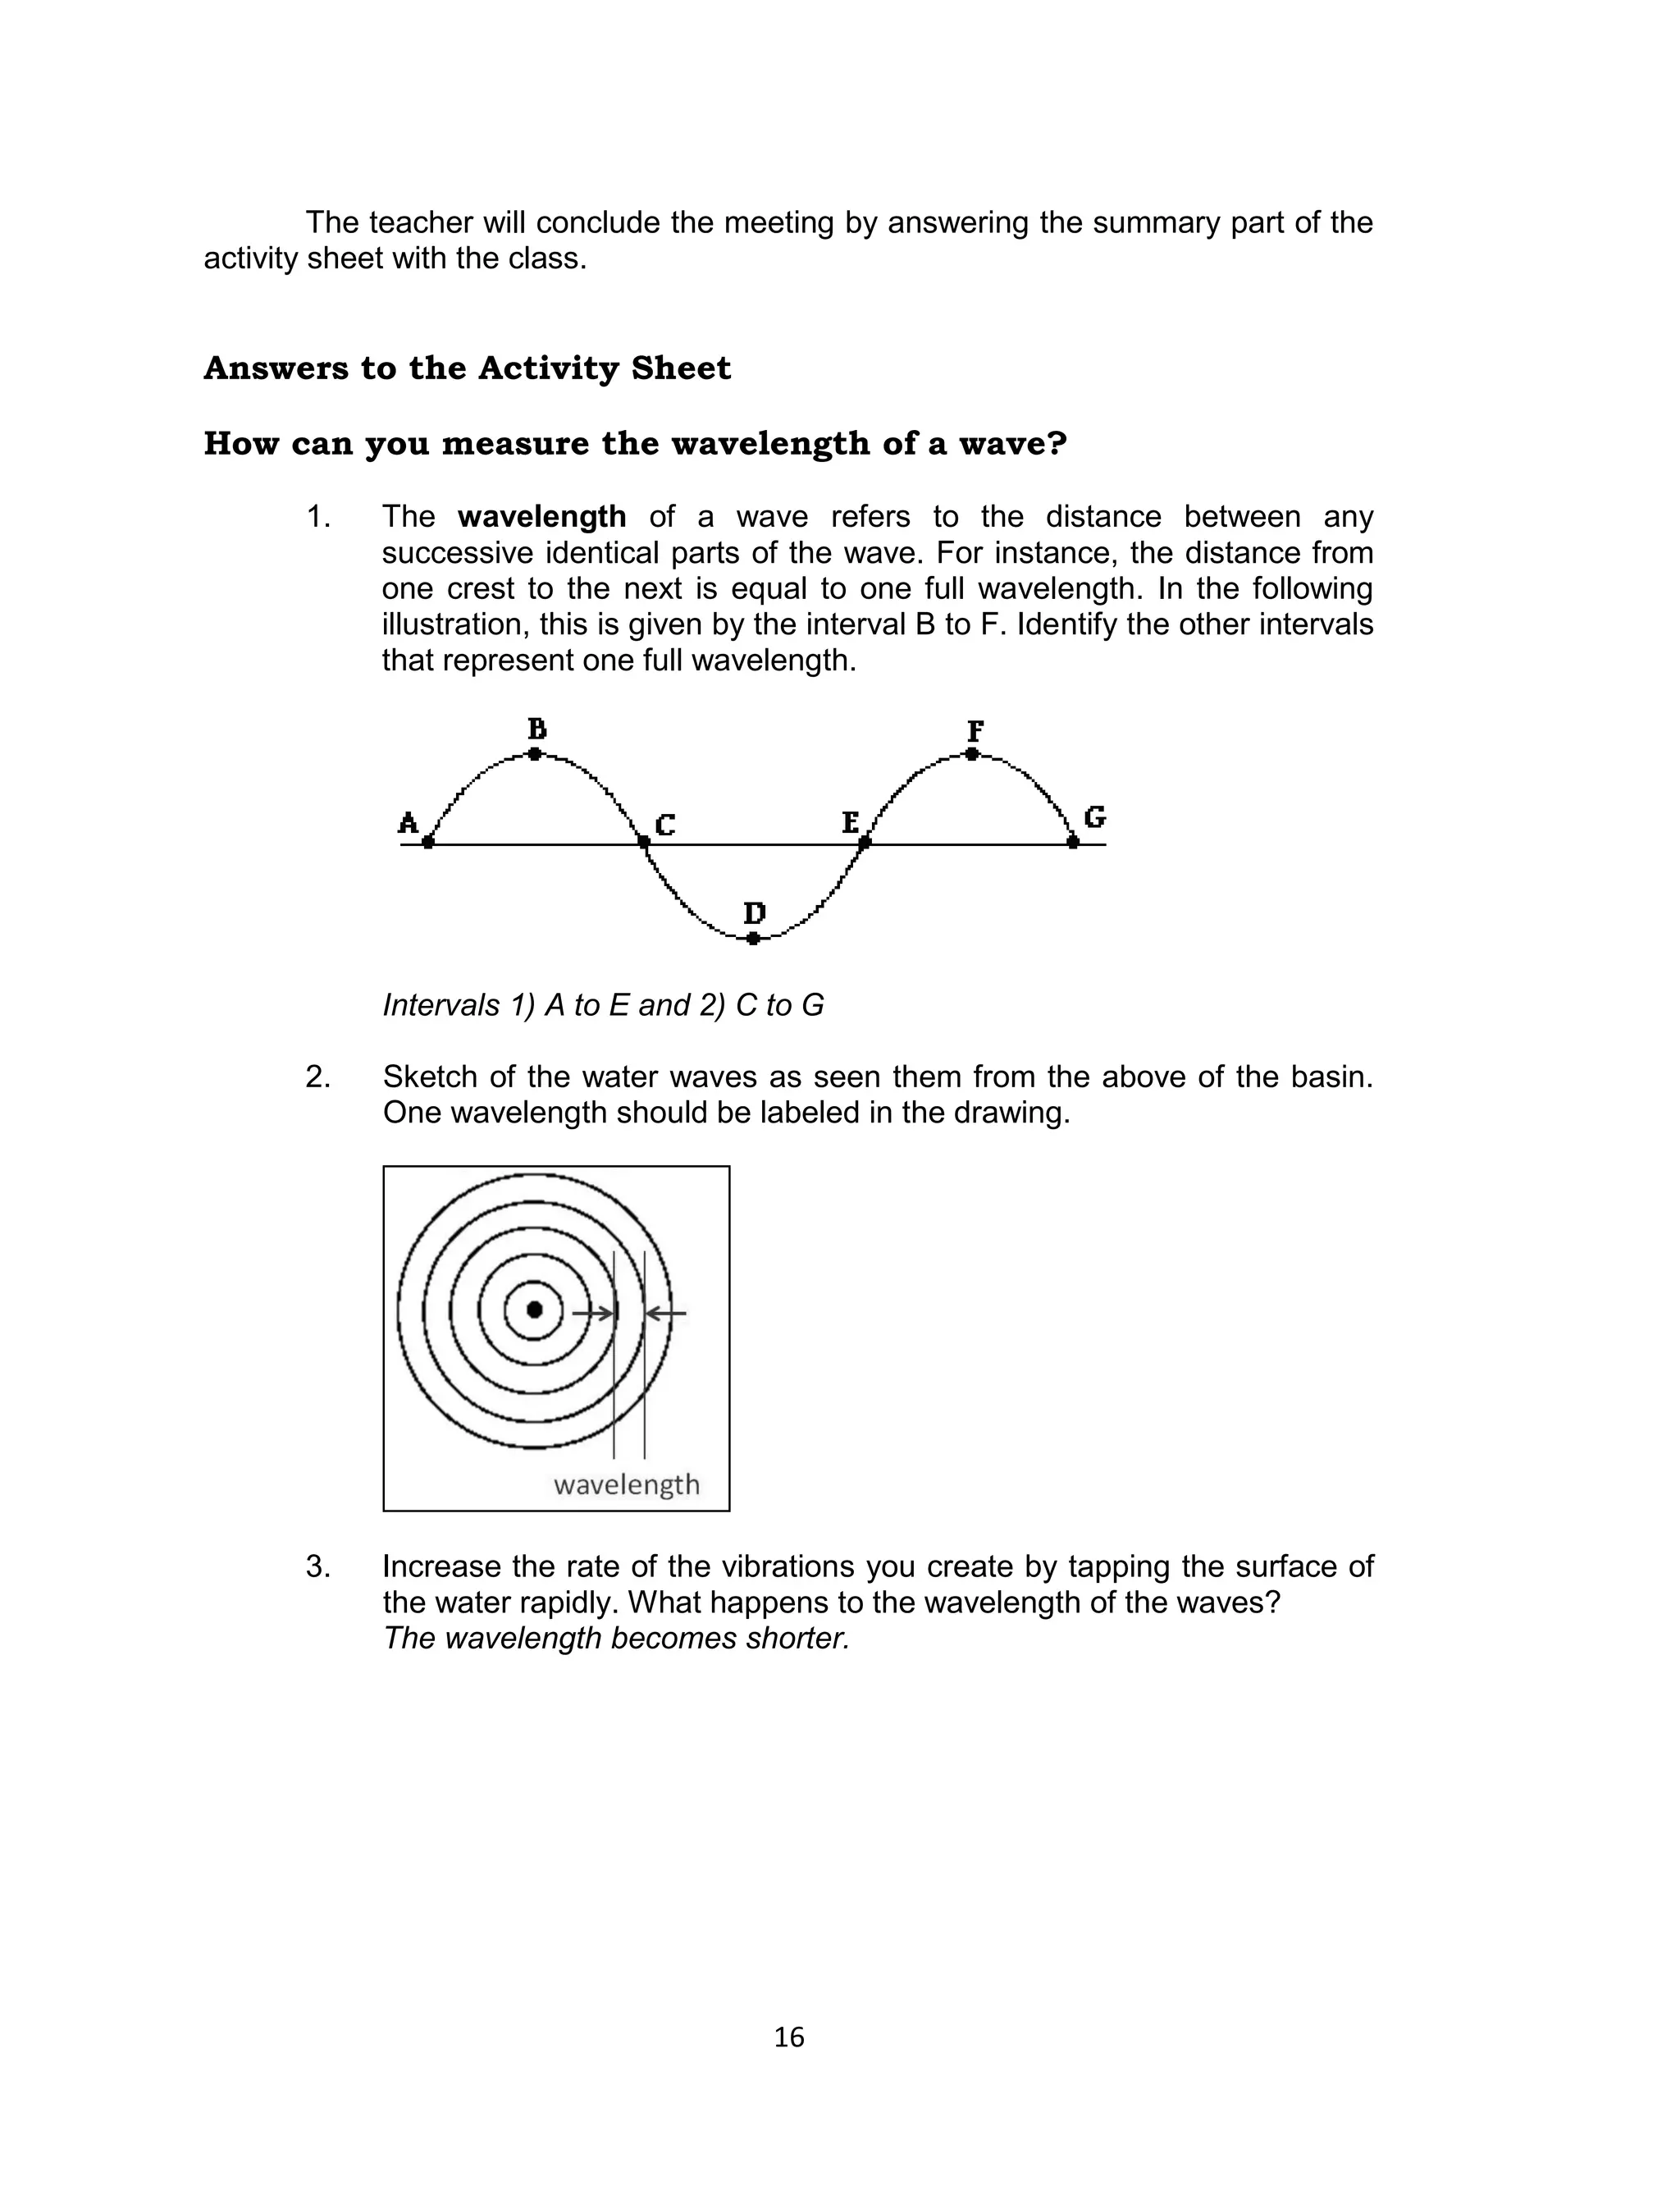
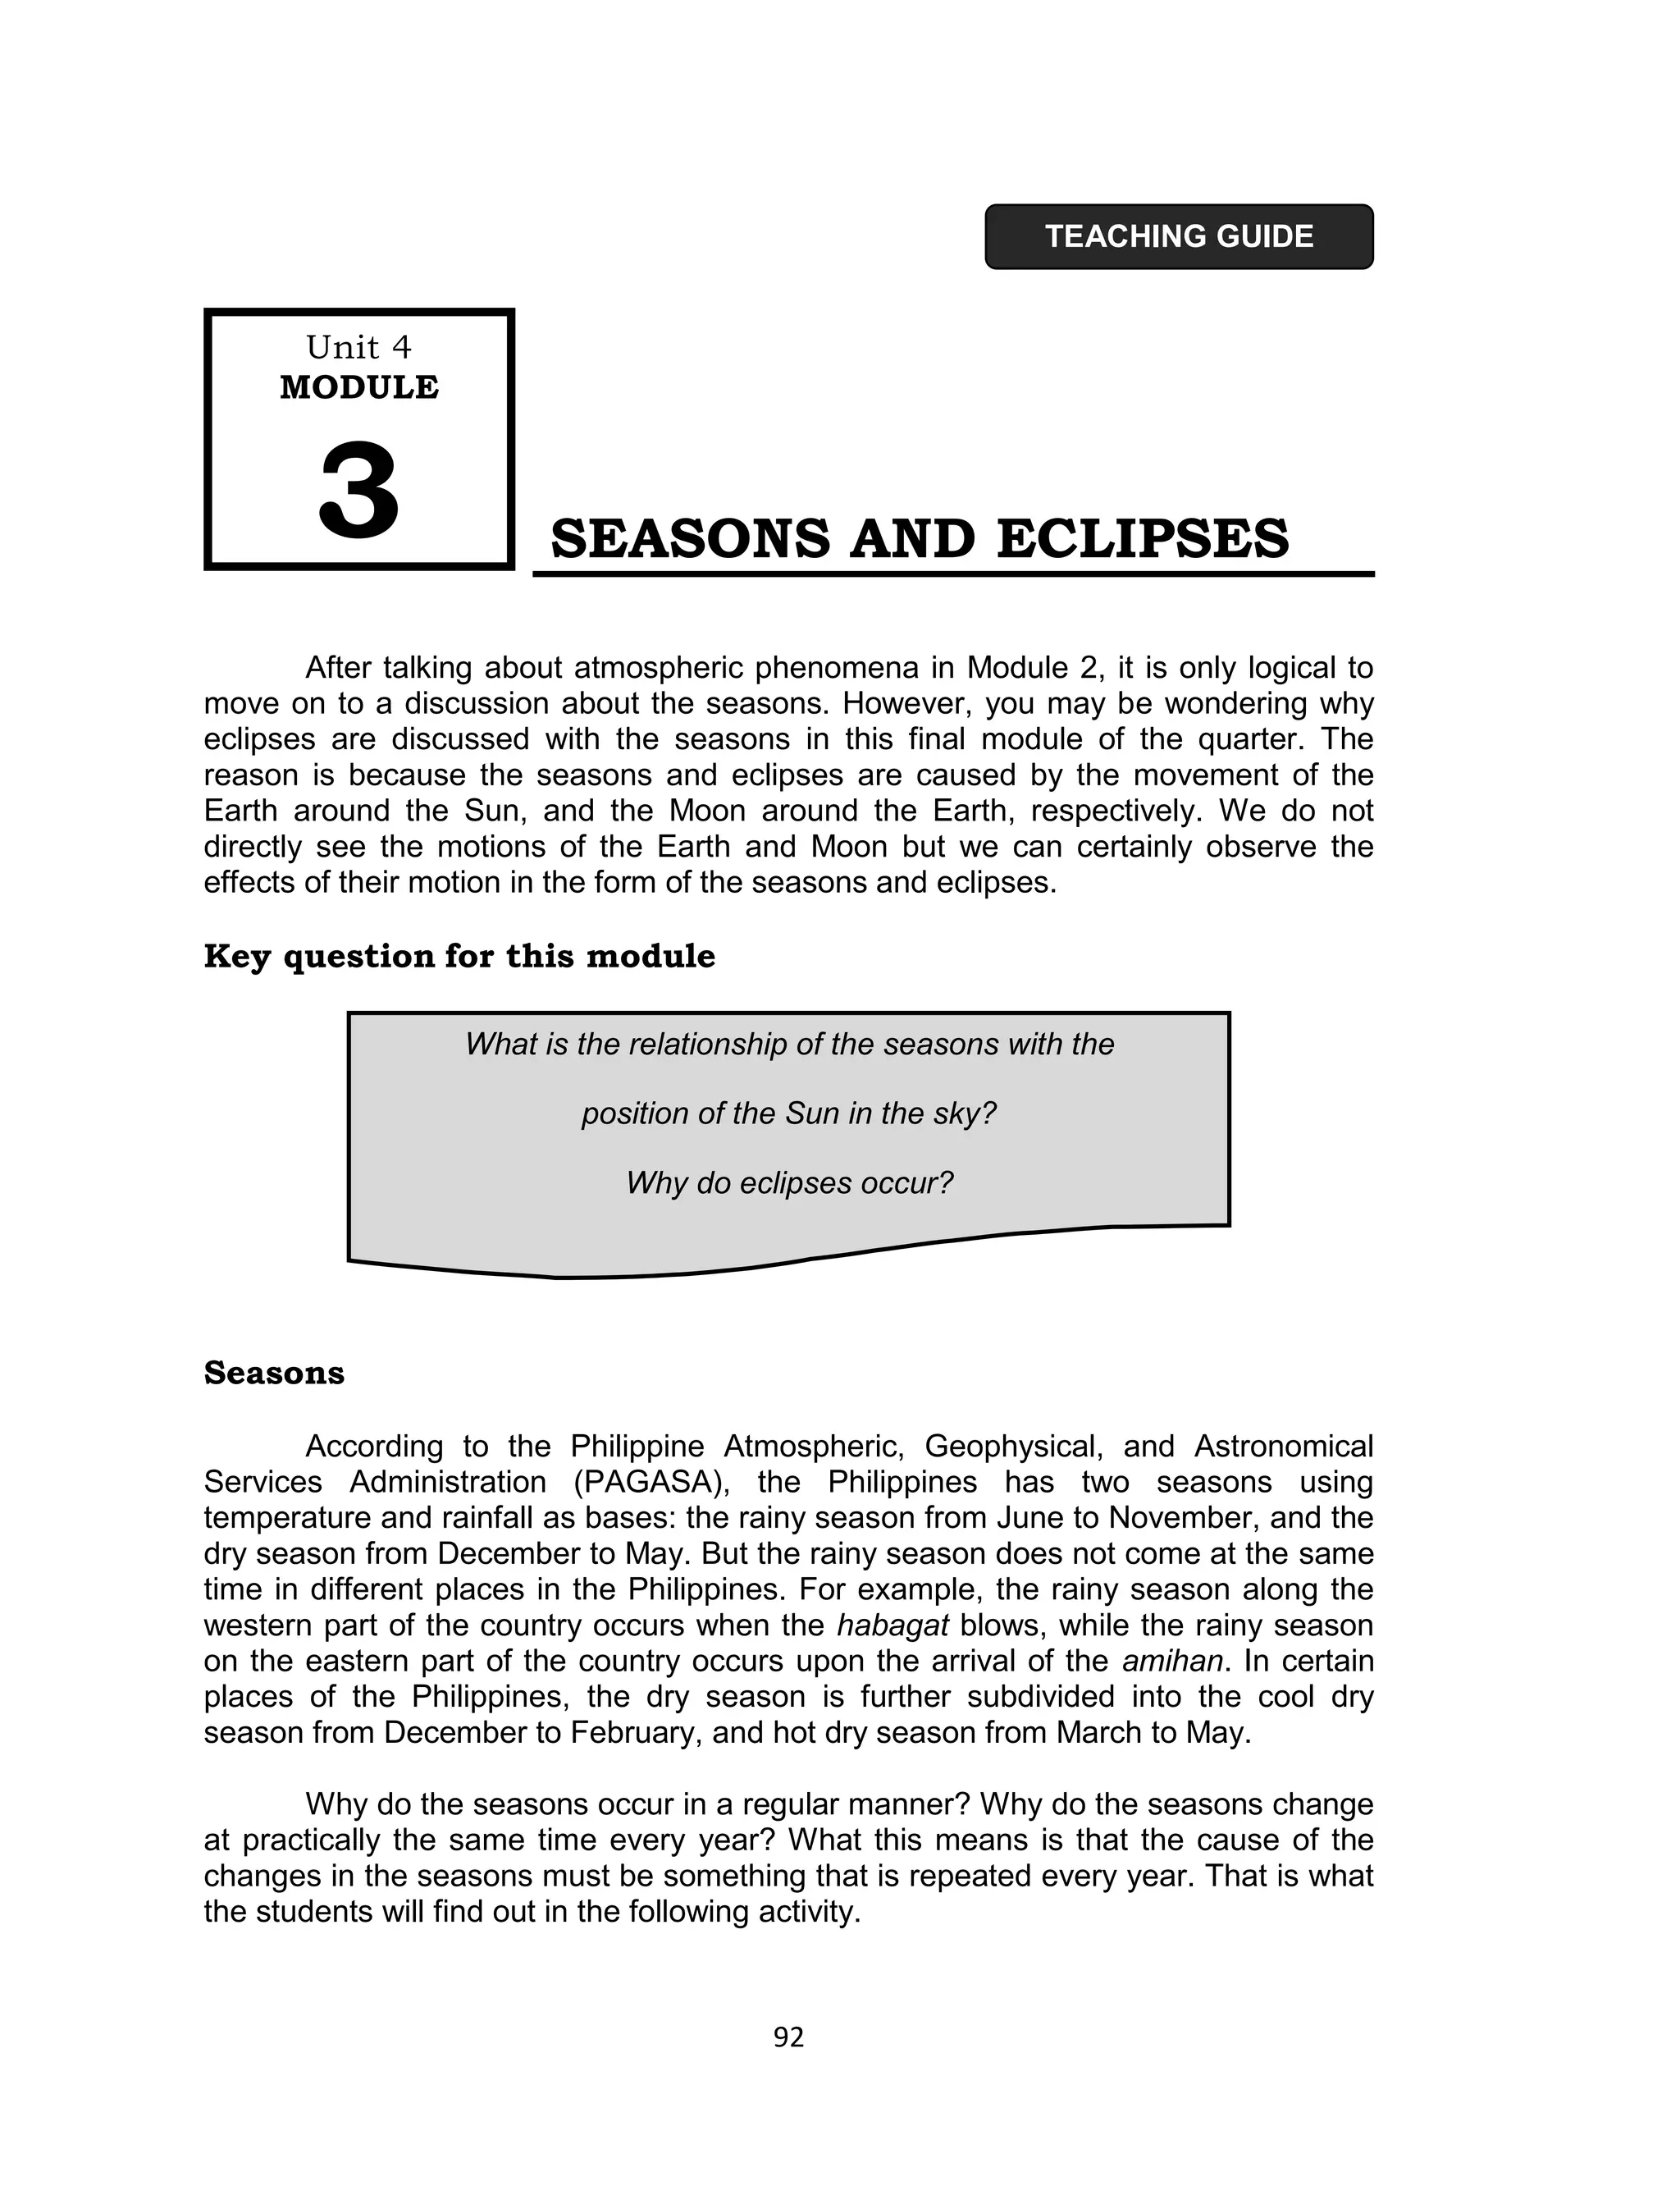
![[Sketch of the water waves as seen them from the top of the basin.
Compared to the drawing in number 2, this one has shorter
wavelengths.]
How can you measure the frequency of a wave?
1-3. Results are recorded in Table 1. Each group may have different
answers.
Table 1. Frequency and period of the wave
Number of waves Frequency
Period
(N cycles) that passed by of the waves
of the waves (seconds)
the ribbon in 10 seconds (N cycles/10 seconds)
Example
15 cycles 15 cycles/10s = 1.5 Hz 1/1.5 Hz = 0.67 s
4. If you increase the frequency of vibration by jerking the end of the rope
at a faster rate, what happens to the wavelength?
The wavelength becomes shorter.
How can you measure the speed of a wave?
1-2a. Results are recorded in Table 2. Each group may have different
answers.
Table 2. The speed of a wave
Number of waves
Frequency
Estimated (N cycles) that
of the waves Wave speed
wavelength passed by the
(N cycles/10 (meter/second)
(meters) ribbon in 10
seconds)
seconds
Example 15 cycles 15 cycles/10s (0.5m)*(1.5Hz)
0.5 m = 1.5 Hz = 0.8 m/s
17](https://image.slidesharecdn.com/q3-q4teachersguidev1-0-130109055608-phpapp01/75/Q3-q4-teachers-guide-v1-0-17-2048.jpg)
![Answers to the Activity Sheet
What are mechanical waves?
1. [Identifying the medium of wave propagation for mechanical waves]
a. In Activity 1 Part B, what is the medium of wave propagation?
Coil spring
b. In Activity 1 Part C, what is the medium of wave propagation?
Water
2. [Characteristics of mechanical waves]
a. How can you generate mechanical waves? They can be generated
by vibrating a medium. A medium is required because vibrating
particles are needed for the wave to travel.
3. [Application of the concept of mechanical waves to earthquakes]
a. What do you think is the source of earthquake waves? Earthquake
waves are caused by a vibration due to colliding tectonic plates.
b. What is the medium of propagation of earthquake waves?
The Earth
What are electromagnetic waves?
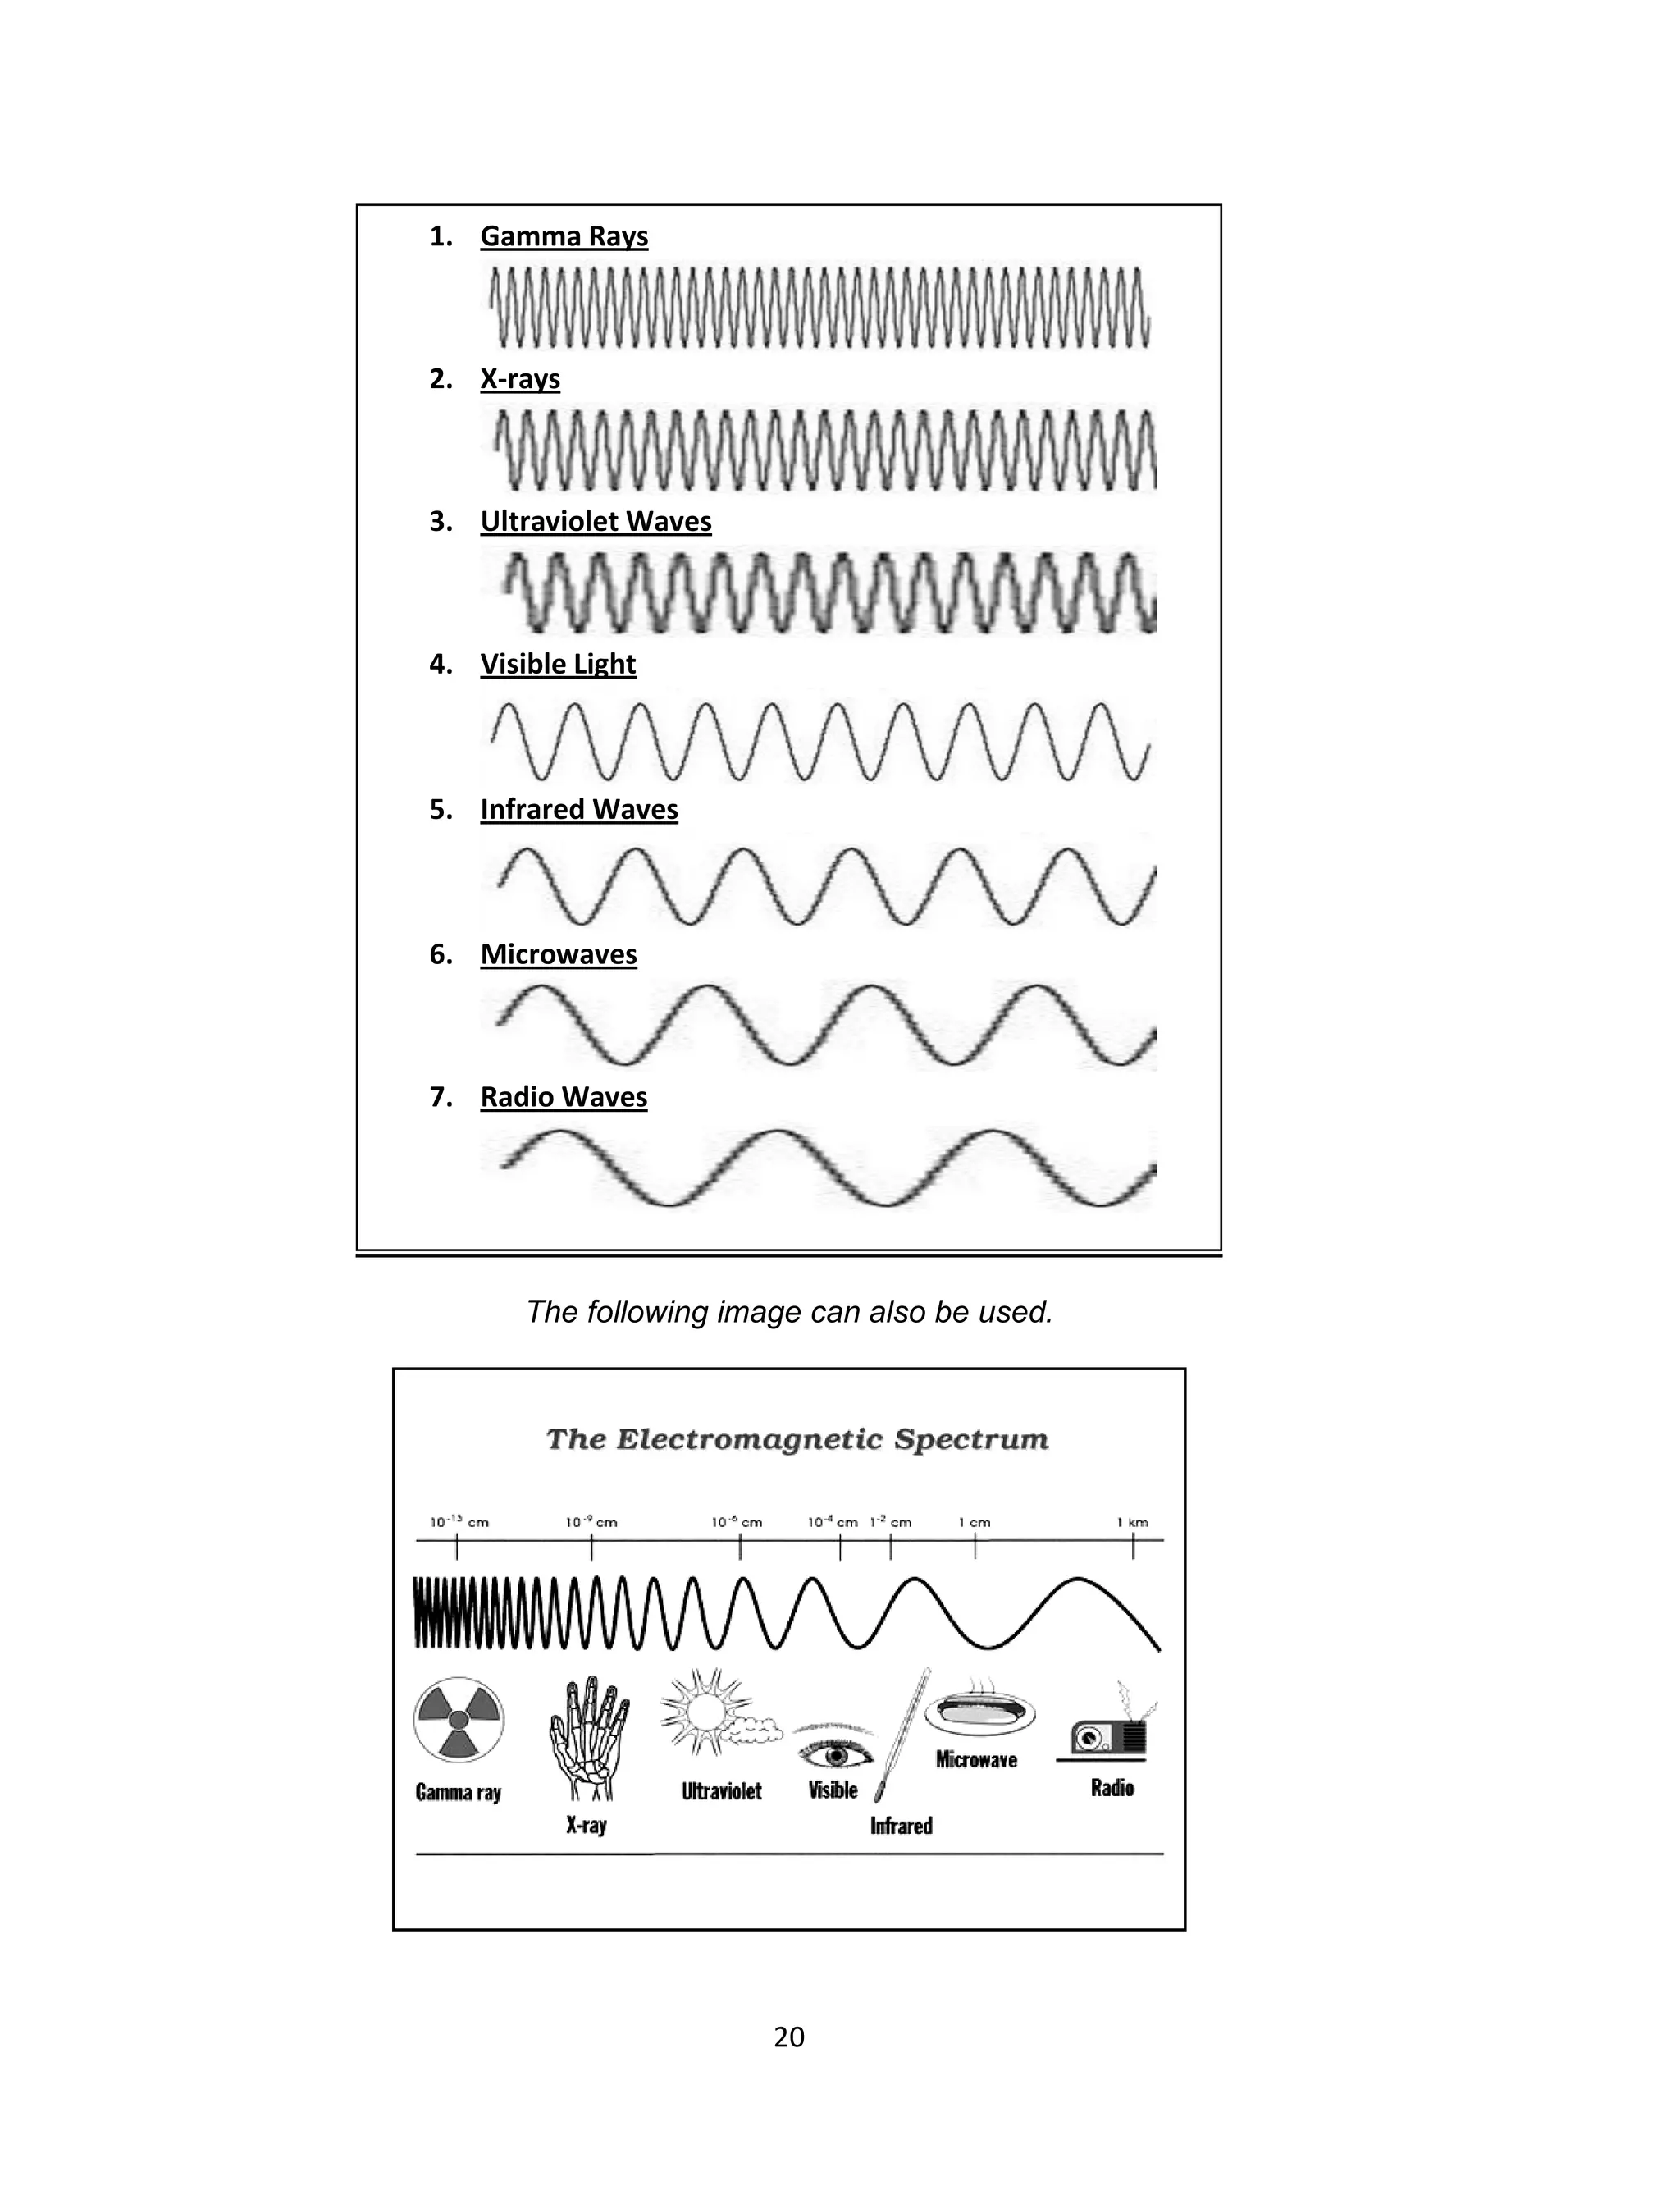
1. [Knowing the electromagnetic waves]
1) Radio waves 5) Ultraviolet waves
2) Microwaves 6) X-rays
3) Infrared waves 7) Gamma Rays
4) Visible light
2. [Some characteristics of electromagnetic waves]
a. Describe the relationship between frequency and wavelength of each
electromagnetic wave.
Among electromagnetic waves, the higher the frequency, the shorter
the wavelength.
b. Draw waves to represent each electromagnetic wave. Your
illustrations must represent the wavelength of a wave relative to the
others. For instance, gamma rays have a very small wavelength
compared to the other waves in the spectrum.
High energy electromagnetic waves have (high, low) frequency and
(long, short) wavelengths.
19](https://image.slidesharecdn.com/q3-q4teachersguidev1-0-130109055608-phpapp01/75/Q3-q4-teachers-guide-v1-0-19-2048.jpg)
![3. Among all the electromagnetic waves (EM), which has the highest
frequency?
a. Infrared radiation
b. Radio wave
c. Ultraviolet
d. Gamma rays
4. ROYGBIV is the basic component of white light. Which color of light carries
the most energy?
a. Blue
b. Green
c. Orange
d. Red
5. Light is an electromagnetic wave. Which characteristic is common in all
electromagnetic waves?
a. amplitude
b. frequency
c. speed
d. wavelength
Answer Key
Part A Part B Part C
1. D 1.C 1.C
2. D 2.B 2.A
3. A 3.B 3.D
4. D 4.A 4.A
5. B 5.D 5.C
6. B 6.A
7.D
References and Web Links
[1] Anatomy of an electromagnetic wave. Available at:
http://missionscience.nasa.gov/ems/02_anatomy.html
[2] Electromagnetic waves. Available at:
http://www.colorado.edu/physics/2000/waves_particles/
[3] Hewitt, P. (2006). Conceptual Physics 10th Ed. USA: Pearson Addison-Wesley.
[4] The anatomy of a wave. Available at:
http://www.physicsclassroom.com/class/waves/u10l2a.cfm
[5] The nature of a wave. Available at:
http://www.physicsclassroom.com/class/waves/u10l1c.cfm
25](https://image.slidesharecdn.com/q3-q4teachersguidev1-0-130109055608-phpapp01/75/Q3-q4-teachers-guide-v1-0-25-2048.jpg)


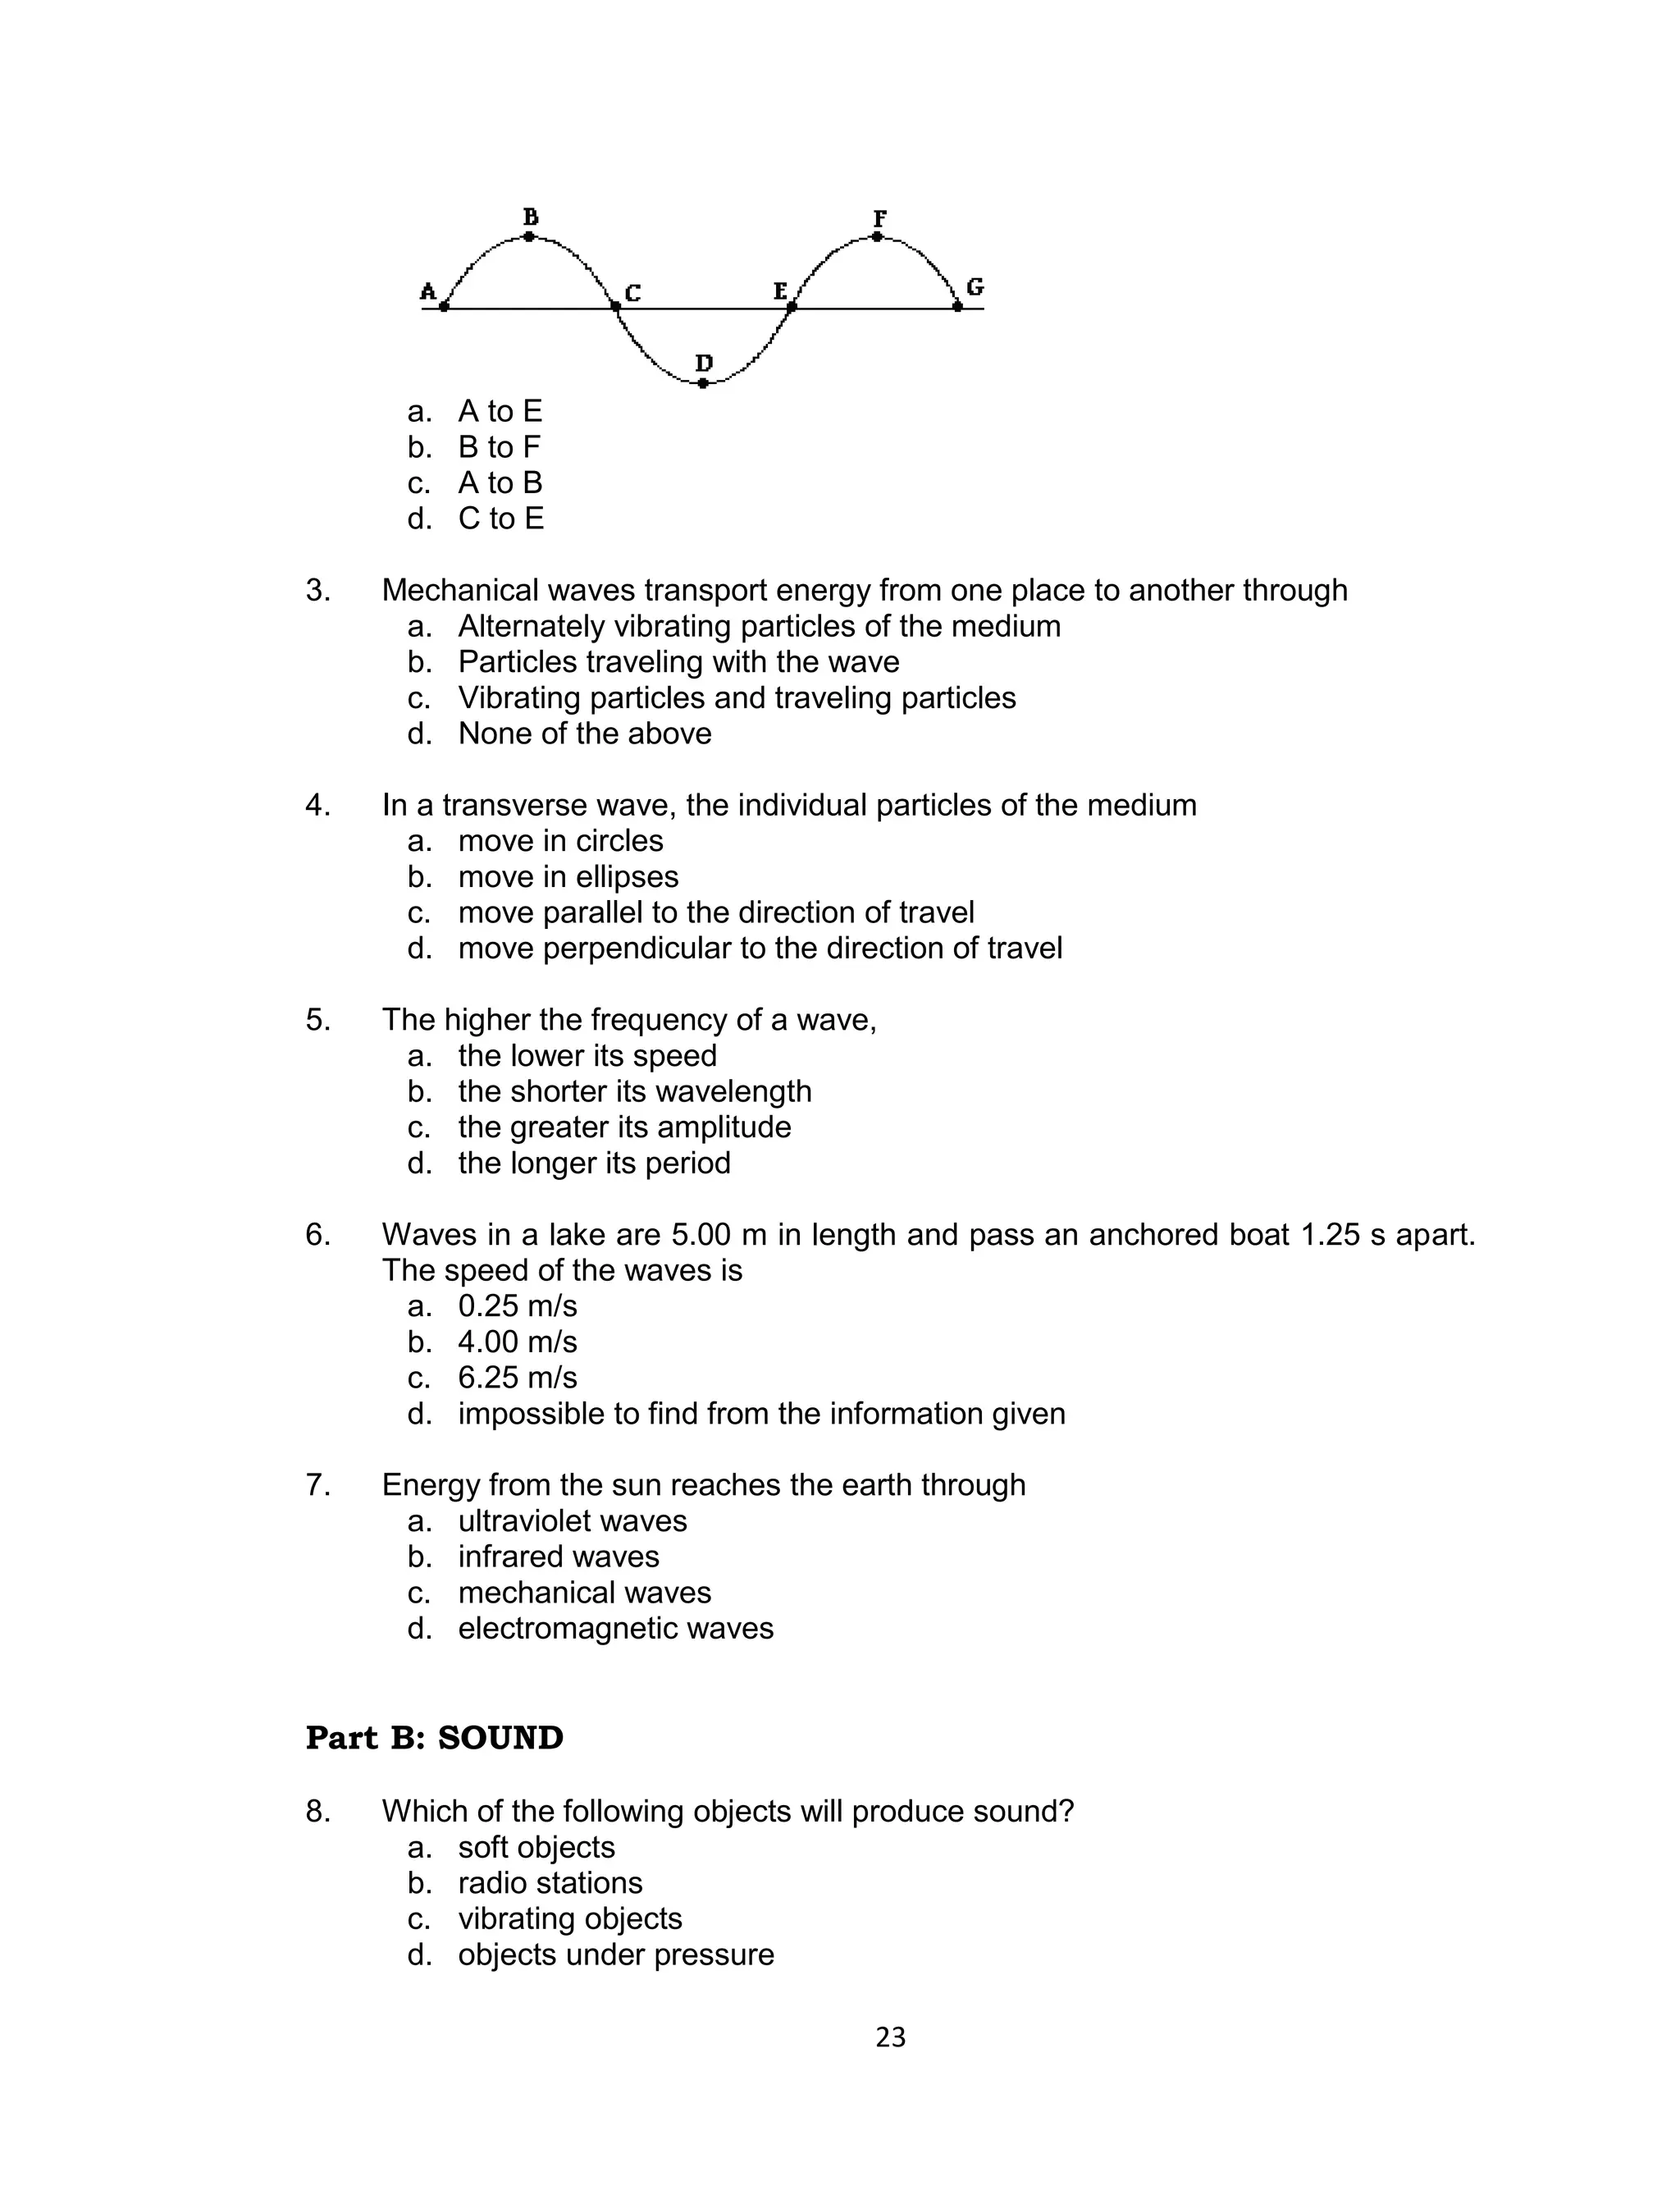
![A. I and II only C. II and III only
B. I and III only D. I, II, and III
5. Which of the following methods of heat transfer is NOT taking place in the given
situation?
A. Conduction C. Radiation
B. Convection D. None of them
Answer Key
1. D
2. B
3. B
4. A
5. D
Links and References
Classroom Clipart. "Marine Life." [Online image] 23 October 2003.
http://classroomclipart.com/cgi-
bin/kids/imageFolio.cgi?direct=Animals/Marine_Life
http://coolcosmos.ipac.caltech.edu/cosmic_classroom/light_lessons/ther
mal/transfer.html
45](https://image.slidesharecdn.com/q3-q4teachersguidev1-0-130109055608-phpapp01/75/Q3-q4-teachers-guide-v1-0-45-2048.jpg)


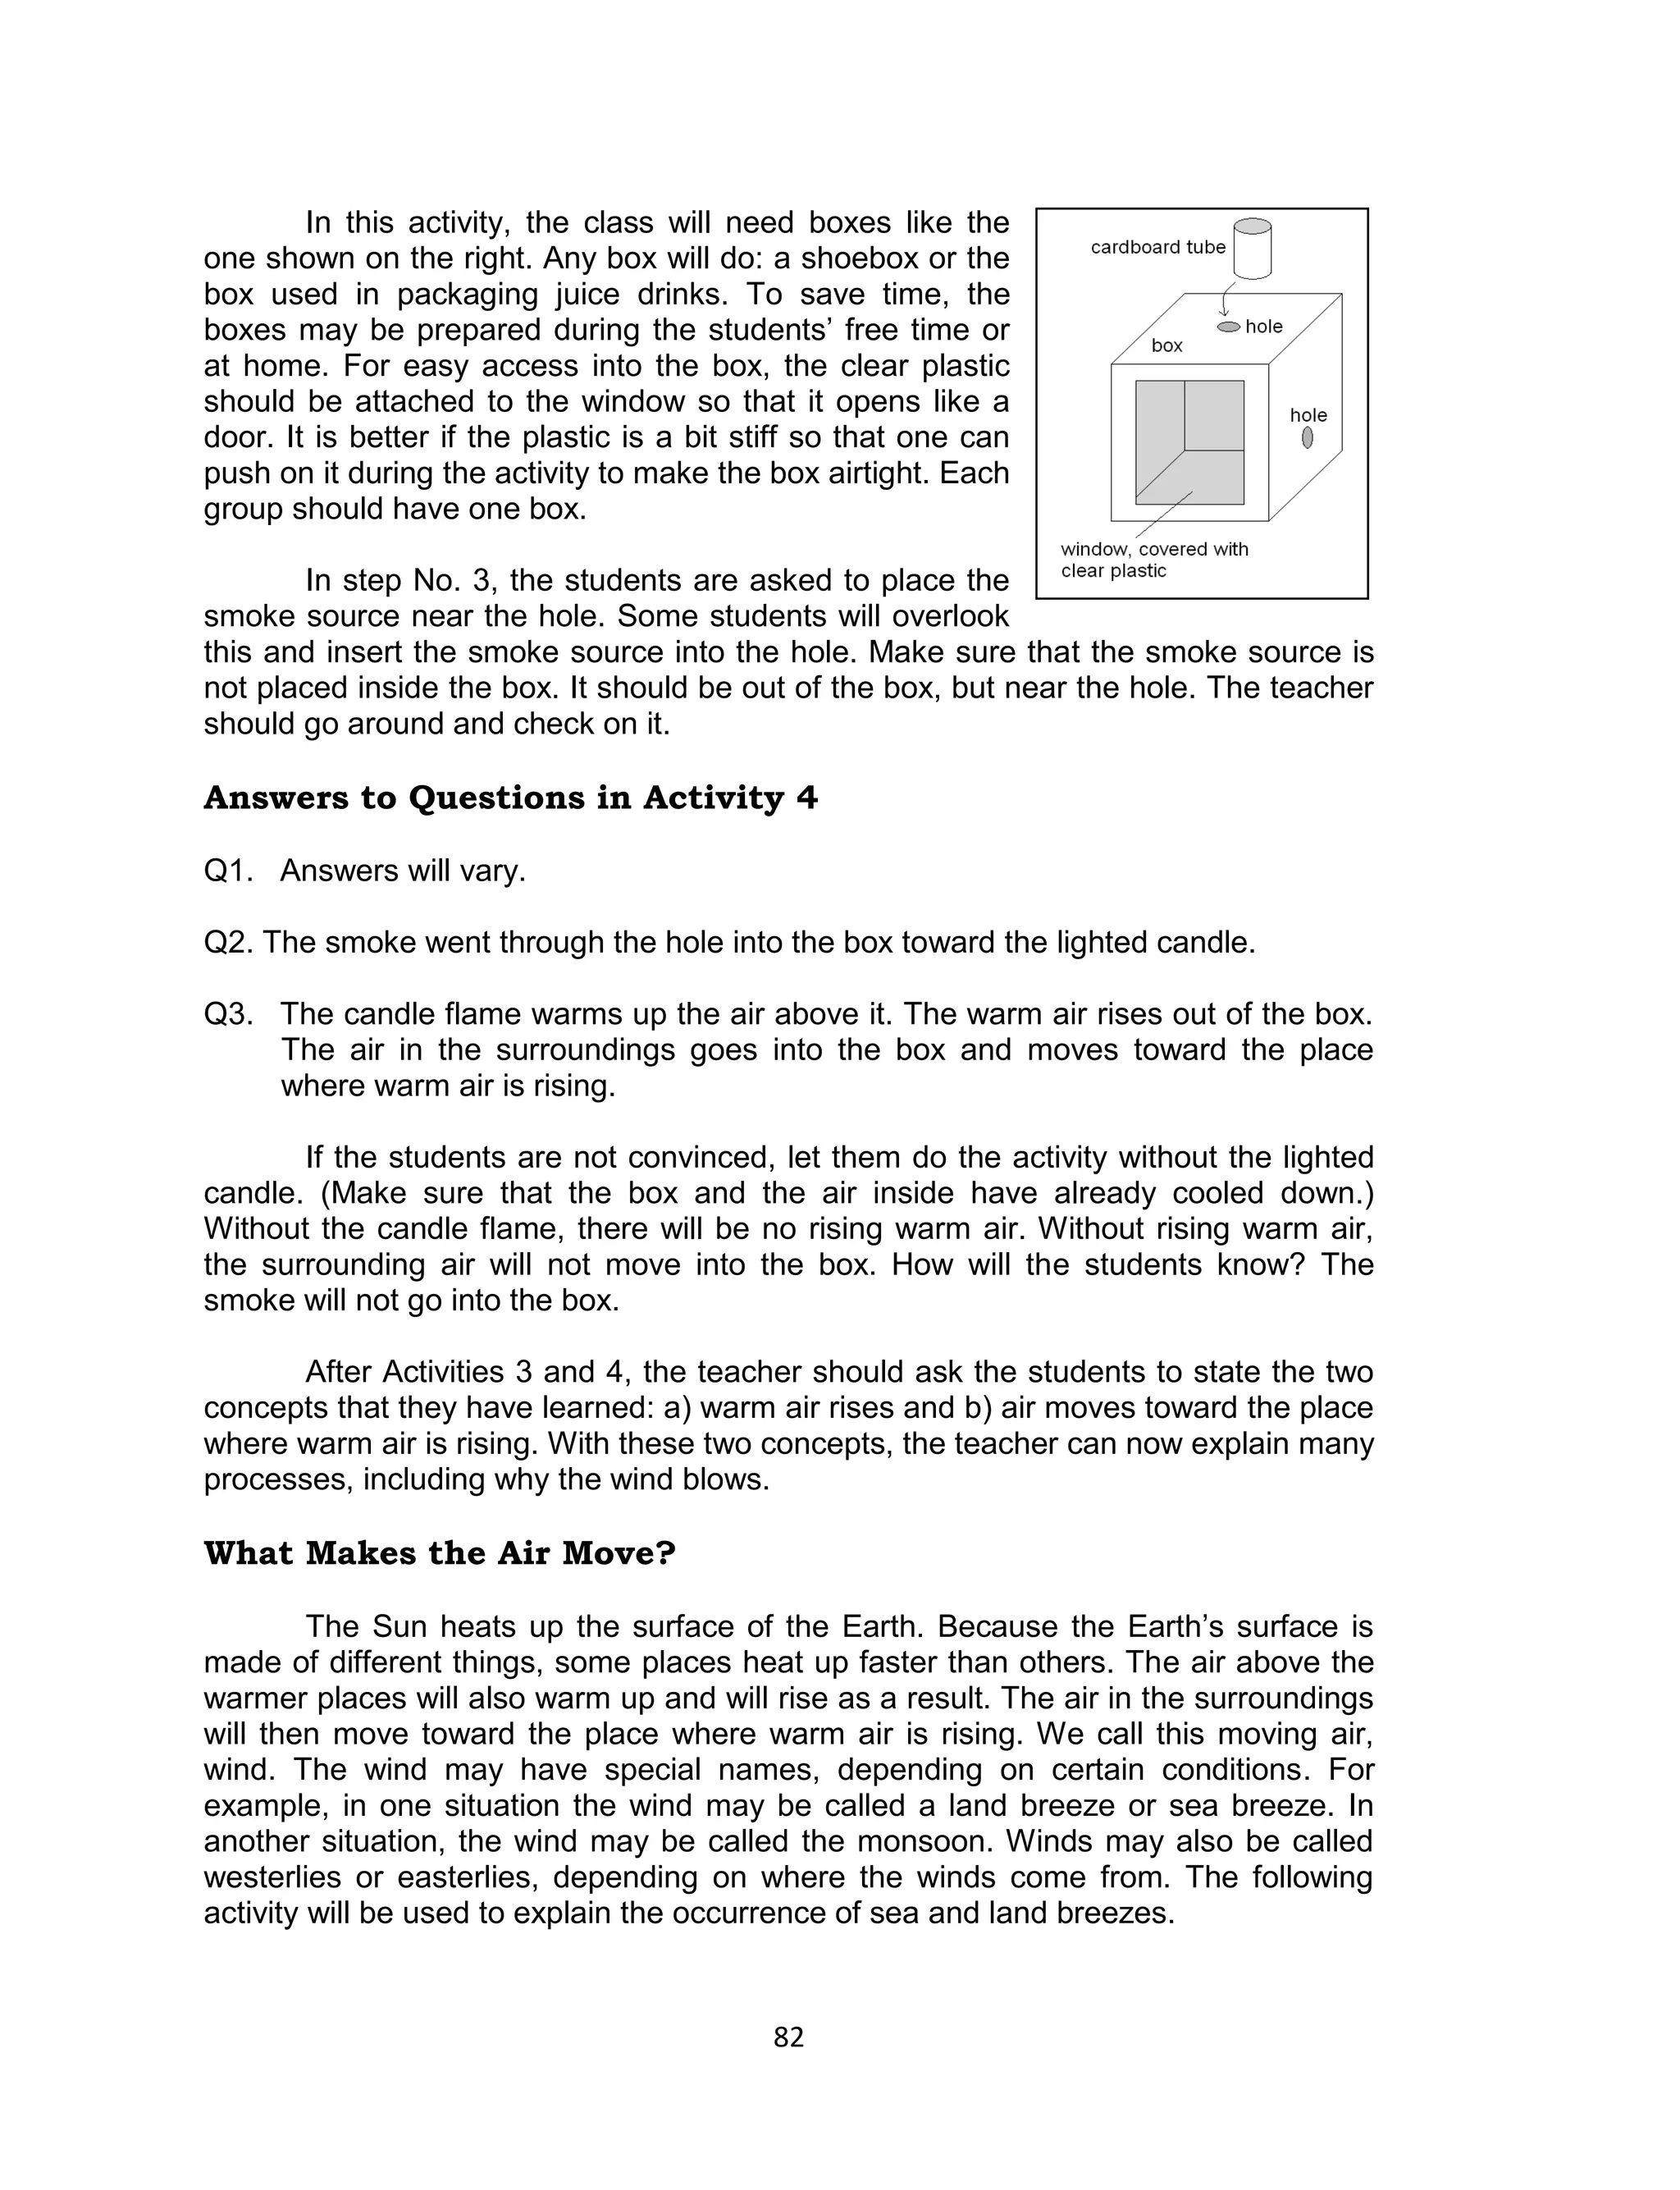
![Teacher: What does the candle flame do to the air in the bag?
Student: The flame heats the air inside the bag.
Teacher: What happens when air is heated?
Student: Air expands when it is heated. (If they do not know this, do the
following activity: Take a glass bottle and attach a balloon to its
mouth. If the bottle is placed in hot water, the air inside will
expand. One cannot see the expanding air but one can see its
effect: the balloon will become inflated.)
Teacher: If the air expands [meaning, the volume increases], where will
the expanding air go?
Student: Out of the bag.
Teacher: That means that there will be less air in the bag than before. Will
it become lighter or heavier?
Student: It will become lighter.
Teacher: So, will the bag sink or will it rise?
Student: It will rise.
Teacher: Okay. Will you please summarize what we just talked about?
This kind of question-and-answer interaction will help the students think and
come up with the explanation themselves.
Teaching Tips
1. For safety purposes and because of time constraints, the teacher may opt to
perform this activity as a demonstration.
2. The teacher should try out this activity before doing it in class. The stick should
not be too heavy; the rising bag may not be able to move it. The stick must be
balanced in a way so that it can move like a see-saw. If the stick is placed on a
flat surface, it will not budge at all.
3. Make sure that the air in the classroom is still. Turn off the electric fan and
close the windows if there is a strong breeze blowing into the room.
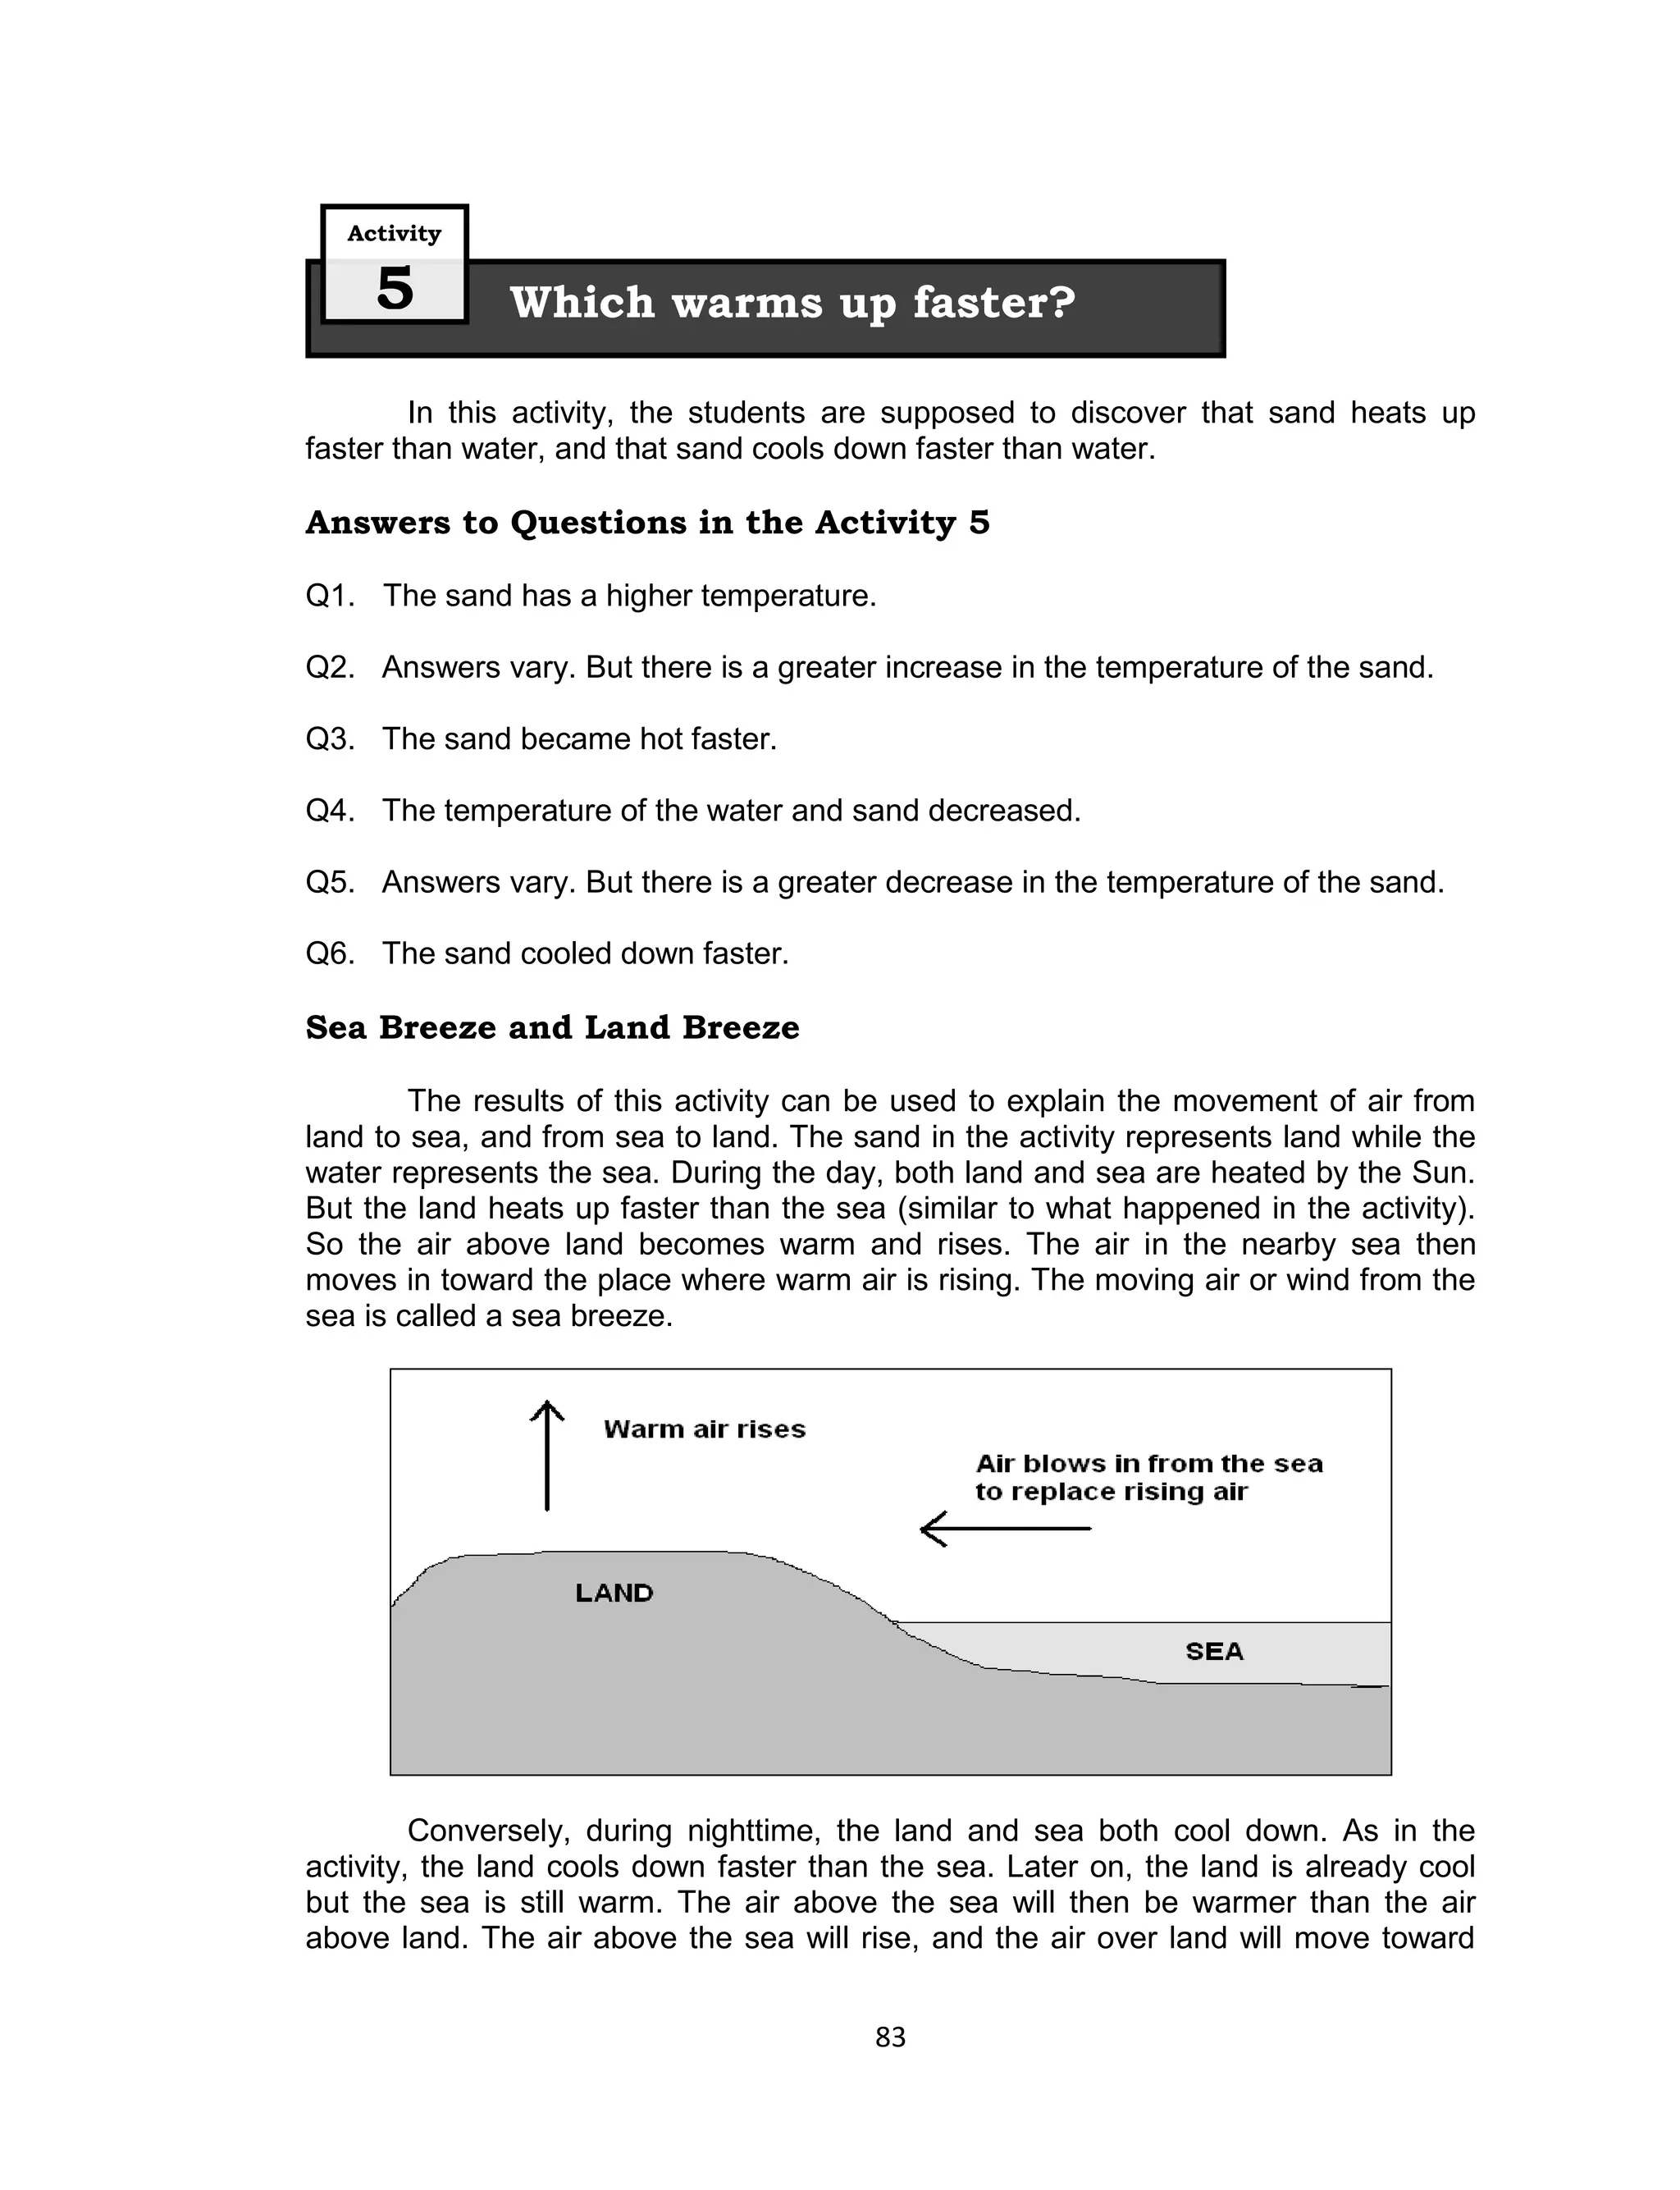
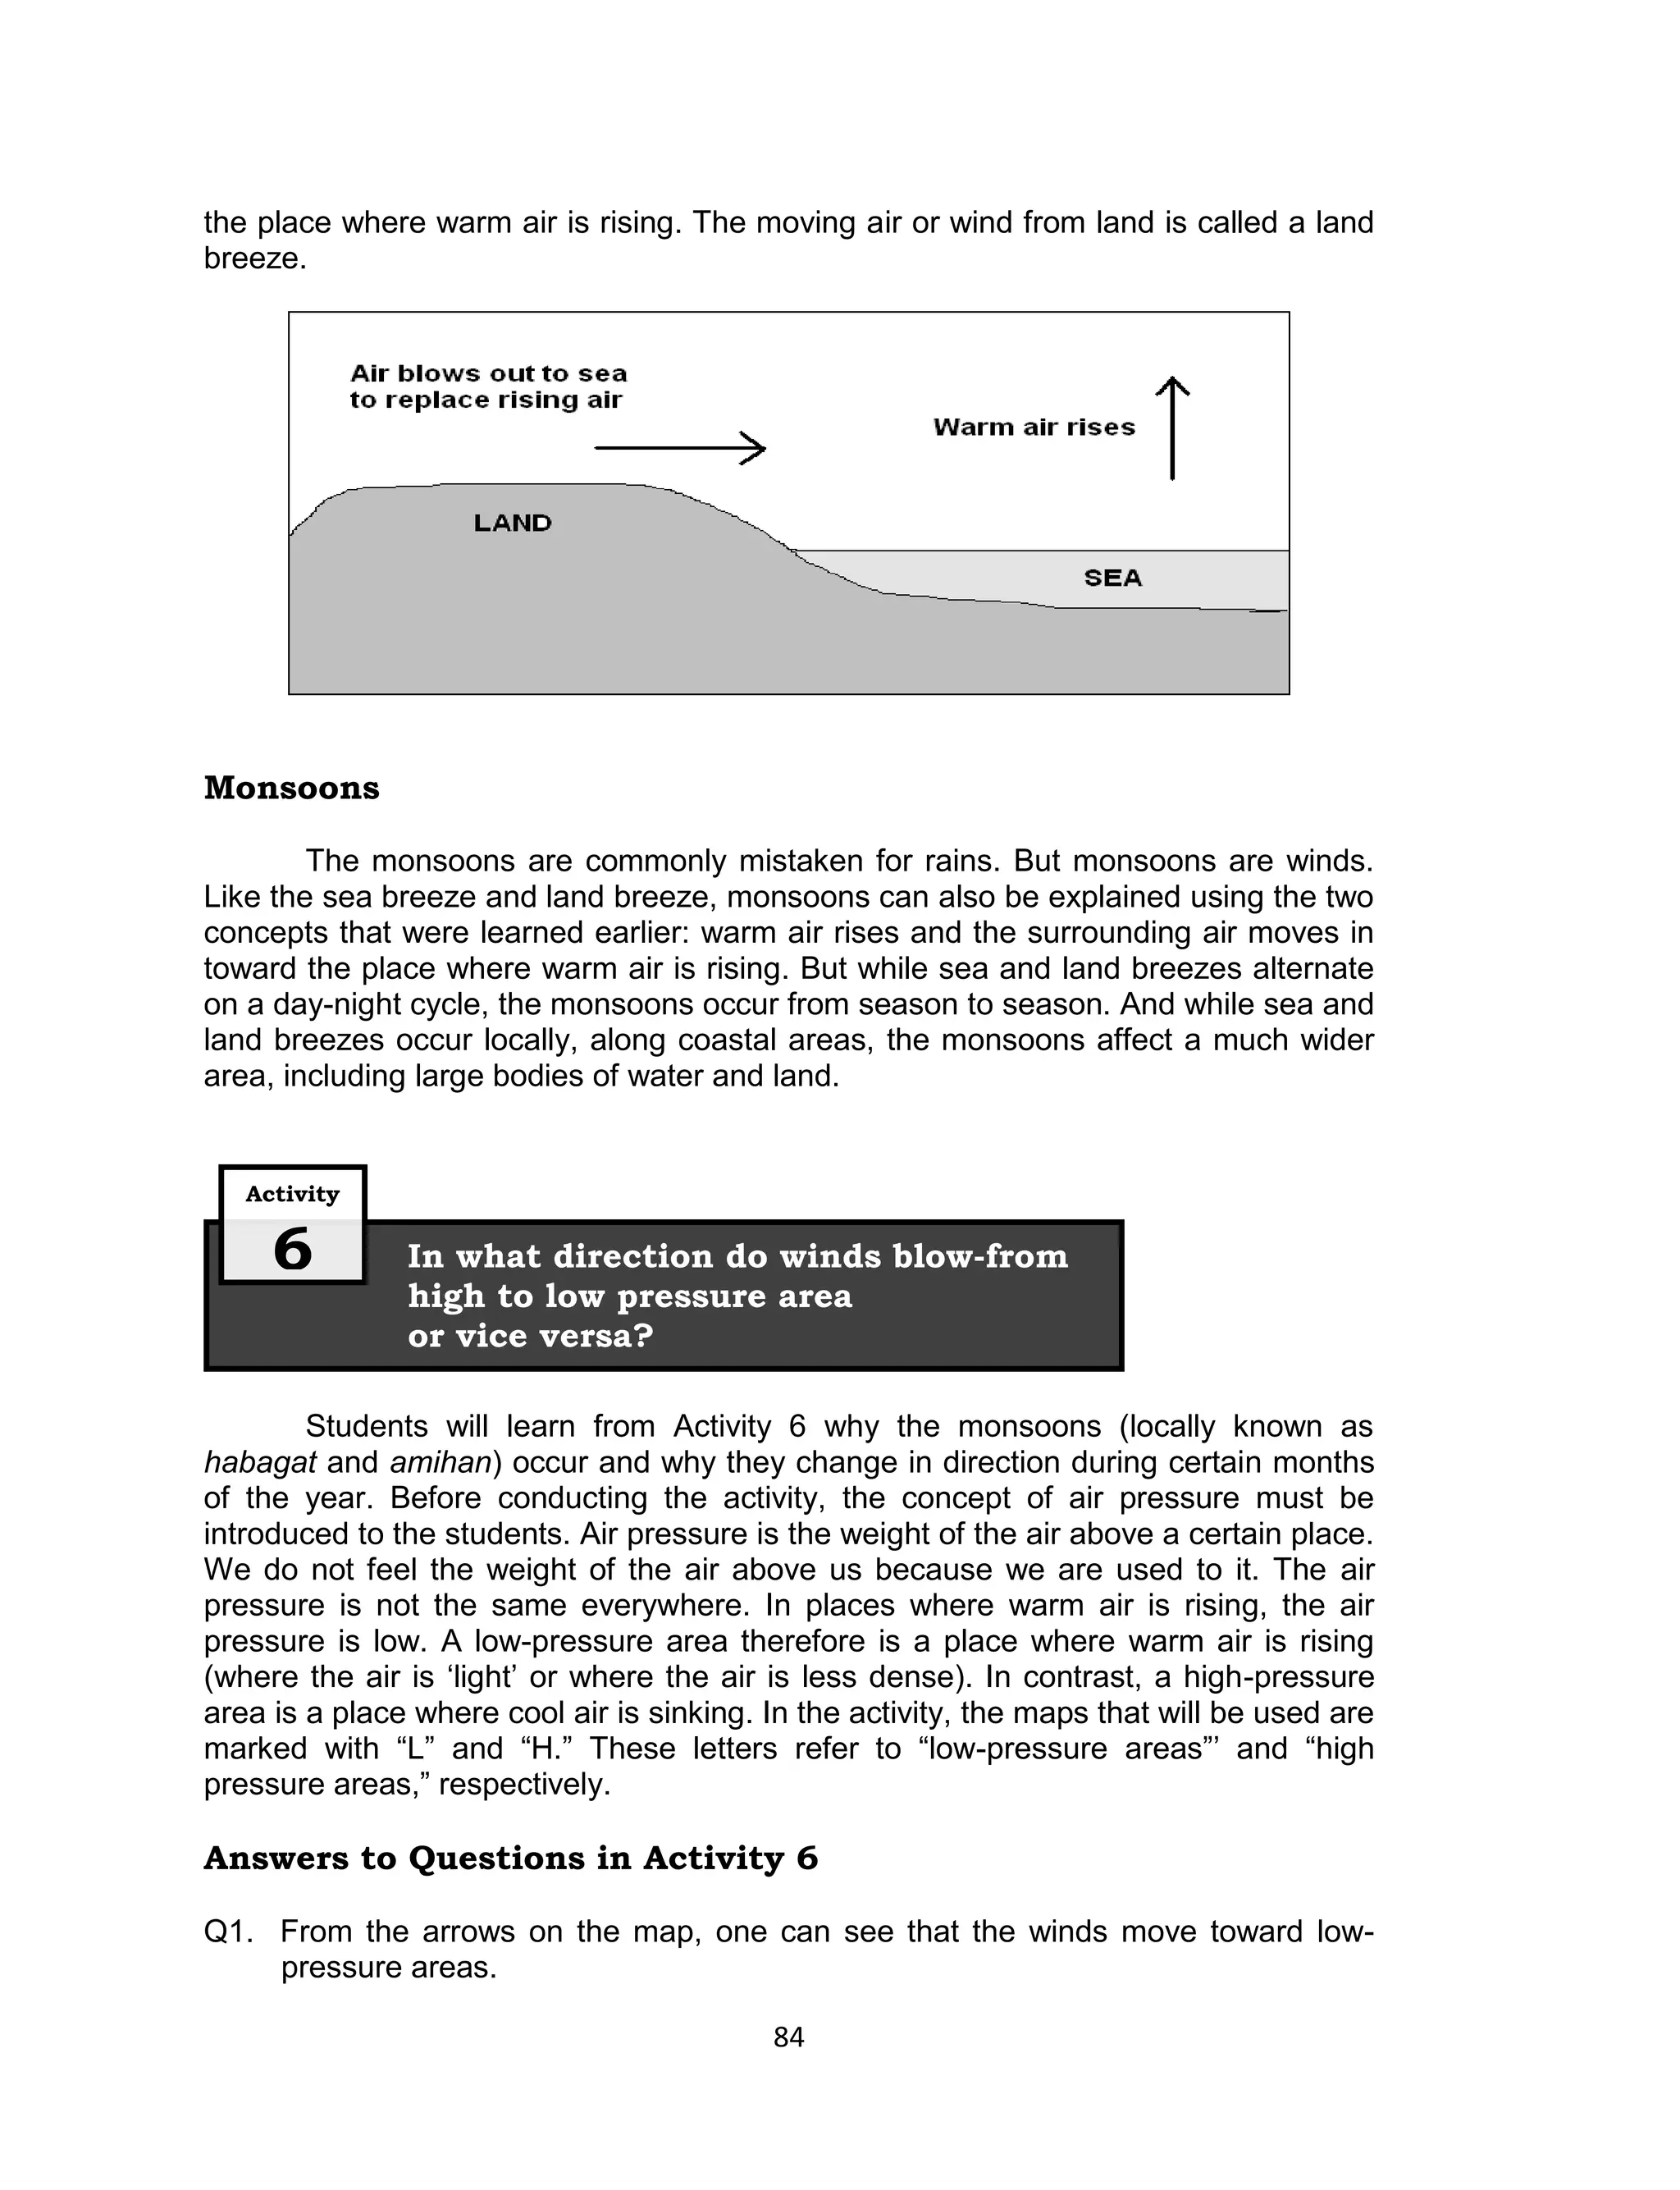
Now that the students know that warm air rises, the next question they should
investigate is, what is the effect of rising warm air on the air in the surroundings?
Activity
4 What happens to the air in the
surroundings as warm air rises?
In Activity 4, the students should come to the conclusion that the air in the
surroundings will move toward the place where warm air is rising.
81](https://image.slidesharecdn.com/q3-q4teachersguidev1-0-130109055608-phpapp01/75/Q3-q4-teachers-guide-v1-0-81-2048.jpg)