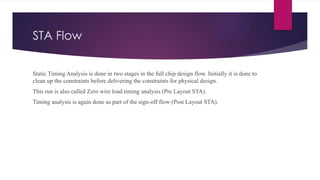
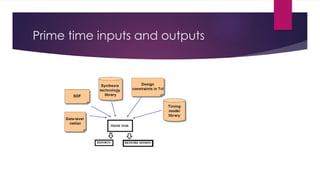
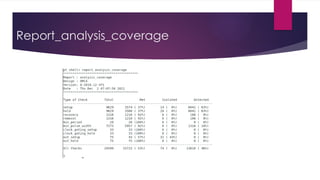
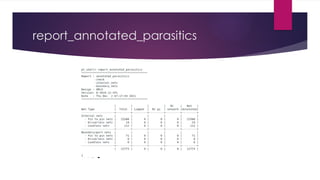
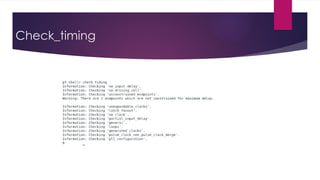
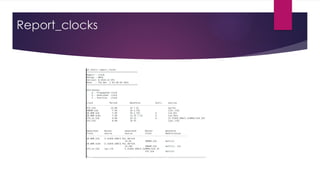
Prime time basic flow
BY ADITI ADKINE
STA Flow
Static Timing Analysis is done in two stages in the full chip design flow. Initially it is done to
clean up the constraints before delivering the constraints for physical design.
This run is also called Zero wire load timing analysis (Pre Layout STA).
Timing analysis is again done as part of the sign-off flow (Post Layout STA).
STA flow
Prime time inputs and outputs
Inputs
INPUTS FOR STA
1. Netlist – The netlist for all the required designs should be read. If we are doing the timing analysis at the top level, netlist for all the
partitions or subsystems should be read for the proper linking of the top design.
2. .libs for standard cell libraries – This contains the timing information for the standard cell libraries. Cell delays are taken from these for
the timing analysis.
3. .libs for hard macros like memory, analog blocks etc – This contains the timing information for the hard blocks. Hard blocks will be
already timing closed. We don’t need to check the timing inside the hard blocks. Only the interface timing needs to be checked. Separate .lib
files will be available for each operating corners like worst, best and cross corners. For specific STA corner, that particular .lib should be read.
This is the same case with standard cell .libs too.
4. SPEF/SDF for the interconnect – This parasitic file supplies the interconnect delay. Timing analysis with SPEF is more accurate than
with SDF. SPEF is extracted from the physical design database. Different SPEFs will be there for different extraction corners which should be
used accordingly for different corners of timing analysis. Parasitic annotation should happen correctly for accurate timing analysis. For Zero
wire load timing analysis, this input is not provided.
5. Constraints – Proper constraints should be fed for performing timing analysis. All clocks should be defined with correct frequencies. This
can be made sure by reviewing the no clock points. Exceptions like multicycle paths and false paths also should be provided to avoid seeing
unwanted violations.
outputs
1. Timing Reports
2. Restore Session
Linux commands
 Mkdir : make directories for eg mkdir mirafra1
 Cd : change the directory eg: cd mirafra1
 Pwd: present working directory
 Cp –rf : copy the all the file eg cp –rf /pdtools/workarea/backend/ . (source path destination path)
 History : to display the previously used commands
Prime time: Before ECO lab
Step1:
Go to this path: /pdtools/work_area/backend/ (change the directory using cd)
Step2:
Create your own directory above path(using mkdir ) and
Step3: go to your own directory (eg: aditi_ptlab)
Step : 4
Copy the prime time lab (using cp command) / /pdtools/work_area/backend/synopsys_labs/PT_Lab
Step :5
Enter into Before ECO lab(using cd)
Step : 6
To get started with prime time , enter in csh shell
Step: 7
Now source Source (space) /pdtools/synosys/source/source.sh
Step: 8
Enter pt_shell /
If you want to log file to generated use this command (pt_shell –help , you will find options with pt_shell command)
pt_shell –output_log_file file_name (eg: pt_shell -output_log_file my_log1)
 step: 9
source the common_setup.tcl
Step :10
Source pt_setup.tcl
Step11:
Source RUN.tcl
Start analysis
Report_analysis_coverage
report_annotated_parasitics
Check_timing
Report_clocks
THANK YOU

Prime time basics understanding for new joining.pptx

  • 1.
    Prime time basicflow BY ADITI ADKINE
  • 2.
    STA Flow Static TimingAnalysis is done in two stages in the full chip design flow. Initially it is done to clean up the constraints before delivering the constraints for physical design. This run is also called Zero wire load timing analysis (Pre Layout STA). Timing analysis is again done as part of the sign-off flow (Post Layout STA).
  • 3.
  • 4.
    Prime time inputsand outputs
  • 5.
    Inputs INPUTS FOR STA 1.Netlist – The netlist for all the required designs should be read. If we are doing the timing analysis at the top level, netlist for all the partitions or subsystems should be read for the proper linking of the top design. 2. .libs for standard cell libraries – This contains the timing information for the standard cell libraries. Cell delays are taken from these for the timing analysis. 3. .libs for hard macros like memory, analog blocks etc – This contains the timing information for the hard blocks. Hard blocks will be already timing closed. We don’t need to check the timing inside the hard blocks. Only the interface timing needs to be checked. Separate .lib files will be available for each operating corners like worst, best and cross corners. For specific STA corner, that particular .lib should be read. This is the same case with standard cell .libs too. 4. SPEF/SDF for the interconnect – This parasitic file supplies the interconnect delay. Timing analysis with SPEF is more accurate than with SDF. SPEF is extracted from the physical design database. Different SPEFs will be there for different extraction corners which should be used accordingly for different corners of timing analysis. Parasitic annotation should happen correctly for accurate timing analysis. For Zero wire load timing analysis, this input is not provided. 5. Constraints – Proper constraints should be fed for performing timing analysis. All clocks should be defined with correct frequencies. This can be made sure by reviewing the no clock points. Exceptions like multicycle paths and false paths also should be provided to avoid seeing unwanted violations.
  • 6.
  • 7.
    Linux commands  Mkdir: make directories for eg mkdir mirafra1  Cd : change the directory eg: cd mirafra1  Pwd: present working directory  Cp –rf : copy the all the file eg cp –rf /pdtools/workarea/backend/ . (source path destination path)  History : to display the previously used commands
  • 8.
    Prime time: BeforeECO lab Step1: Go to this path: /pdtools/work_area/backend/ (change the directory using cd) Step2: Create your own directory above path(using mkdir ) and Step3: go to your own directory (eg: aditi_ptlab) Step : 4 Copy the prime time lab (using cp command) / /pdtools/work_area/backend/synopsys_labs/PT_Lab Step :5 Enter into Before ECO lab(using cd) Step : 6 To get started with prime time , enter in csh shell
  • 9.
    Step: 7 Now sourceSource (space) /pdtools/synosys/source/source.sh Step: 8 Enter pt_shell / If you want to log file to generated use this command (pt_shell –help , you will find options with pt_shell command) pt_shell –output_log_file file_name (eg: pt_shell -output_log_file my_log1)  step: 9 source the common_setup.tcl Step :10 Source pt_setup.tcl Step11: Source RUN.tcl Start analysis
  • 10.
  • 11.
  • 12.
  • 13.
  • 14.