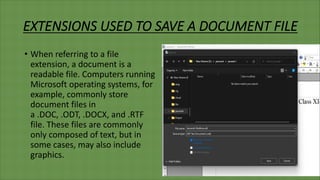
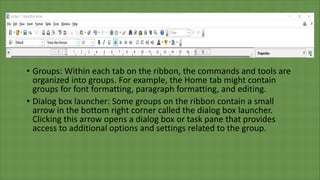
LEARNING ABOUT
MS WORD
WHAT IS DOCUMENT AND HOW TO CREATE?
• A document or document file
describes an electronic copy or
hard copy of reference material
for a product. To write and
create an electronic document
on a computer, use a word
processor or other text editor.
Once a document is created, it
can be made into a hard copy by
printing it.
EXTENSIONS USED TO SAVE A DOCUMENT FILE
• When referring to a file
extension, a document is a
readable file. Computers running
Microsoft operating systems, for
example, commonly store
document files in
a .DOC, .ODT, .DOCX, and .RTF
file. These files are commonly
only composed of text, but in
some cases, may also include
graphics.
WHAT IS DOCUMENTATION SOFTWARE?
• A documentation software is a
software which is used to create
text, image,video or audio
documents. There are some
documentation software
applications which are used to
create documents. For instance-:
MS Word,OpenOffice Writer etc.
INTERFACE OF MS WORD
• The Microsoft Word interface consists of several key parts that allow users to
access and use the various features and tools of the program. These parts
include:
• The file tab: The file tab is located in the top left corner of the interface and
provides access to the File menu. From the File menu, users can create, save, and
open documents, as well as access other options, such as print and save as.
• Ribbon tabs: The ribbon is a strip of tabs located at the top of the interface that
provides access to the various tools and features of Word. The ribbon is divided
into several tabs, such as Home, Insert, and Review, each of which contains a set
of related commands and tools.
• Groups: Within each tab on the ribbon, the commands and tools are
organized into groups. For example, the Home tab might contain
groups for font formatting, paragraph formatting, and editing.
• Dialog box launcher: Some groups on the ribbon contain a small
arrow in the bottom right corner called the dialog box launcher.
Clicking this arrow opens a dialog box or task pane that provides
access to additional options and settings related to the group.
HOW TO SETUP YOUR PAGE TO THE CORRECT SIZE
• Open Microsoft Word
• Type in your Page Size and click OK
• Click on Margins in the Page Set up Section (left side of screen)
• Click on Custom under the drop down of Margins
• Change all 4 margin settings to 0” (top, bottom, left, right) Click OK
• Click on the Tab Insert
• Click on the Tab under Insert labeled Pictures
• Your Libraries of your computer will pop up and you will need to find where the
picture is located on your computer and click okay.
• Once the picture loads on the page you will see a couple of different things
1.You will see 8 circles on the outside of the picture (3 on top and bottom and 1 on
each side). This will allow you to make your photo larger or smaller by dragging
thecorners.
2.You will see a circle with an arrow on it. This will allow you to rotate your picture
the direction you want it.
How to Add Pictures to your Ad
3.You can click on the picture and you should see a curser pop up with
4 arrows. Thisallows you to move the picture in a different place on the
page.
4.You will see a box that has frown with some lines through it. You can
use this tool to format if your text words will go through the picture or
if you would like the picture to be to the side of the text box.
FORMATTING THE LAYOUT OF THE PICTURE
• Once your picture has been placed on the page you will have a new
tab at the top pop up that reads Picture Tools Format.
• Click Picture under Picture Tools Format
• Click the Layout Tab.
• A drop down will appear and there you can decide how you would
like your picture to look on your page (Do you want the text on the
picture? Choose Behind Text) (Do you want your text to be around
your picture? Choose Square, Through, Tight, or Top & Bottom)
HOW TO ADD TEXT TO YOUR AD
• On the Top Tool Bar click on Insert (third tab from left)
• Click the Tab Text Box (on the far right)
• Choose the Option labeled Simple Text Box
• Depending on how you decided to have your Graphic displayed on
the page a text box will appear.
1.A New Tab will appear at the top of the Page labeled Drawing Tools
Format. This is
• where you can decide if you want your text box to have a border, etc.
• Next you will need to decide how you want your Text box to appear
on the ad. Click on the Tab across the top labeled Layout.
1. Click on the tab labeled Wrap Text
2. A drop down menu will appear.
3. Choose how you would like your Text box to appear on your ad (just
like you did for your photo)
the top that says Home. On the Home Tab you will be able to change
your Font Size,
• After you have decided on Appearance/Layout of the Text box click on
the Tab across the top that says Home. On the Home Tab you will be
able to change your Font Size,Font Color, Bold, etc.
• Click on the Tab labeled File
• A new screen will appear
• Click on Save As
• Your File should be Labeled as Follows
Cheerleadernamepagesizecompany
• SAVE YOUR FILE AS A PDF (not a doc. Or word file)
HOW TO SAVE YOUR AD
HOW TO CREATE A PHAPHLET
• Step 1: Open Word:Open Word on your computer. Click the File tab, and you'll
find the New tab in the list. Then click the New tab.
• Step 2: Search for templates:You'll see many pre-made templates under the New
tab. Since brochures and pamphlets are similar to each other, you can use
brochure templates to create a pamphlet in Word. To find brochure/pamphlet
templates in MS Word, type "brochure" in the search bar. You'll be directed to
templates after searching "Brochure" in the search bar.
• Step 3: Download your desired template:Double-click on any template you want
to use for making a pamphlet in Word. Once you download it, it will open in a
new window where you'll be able to edit the template to fir your requirements.
• Step 4: Edit the template:You can replace the content in the template.
For most templates, the placeholder text is editable, and you can
change it with your subject, product, or company
information.Moreover, you can add images, charts, graphics, tables to
your pamphlets. And you can also adjust sizes, styles, colors to your
liking!If you want to add pictures in the pamphlet, click the Insert tab,
tap on Picture and then choose the image that you want to add in the
pamphlet from the Insert picture window.You can edit the text in
placeholder text and change the font size, style, and color from the
Font menu.
• Step 5: Save your file

Presentation2.0.pdf

  • 1.
  • 2.
    WHAT IS DOCUMENTAND HOW TO CREATE? • A document or document file describes an electronic copy or hard copy of reference material for a product. To write and create an electronic document on a computer, use a word processor or other text editor. Once a document is created, it can be made into a hard copy by printing it.
  • 3.
    EXTENSIONS USED TOSAVE A DOCUMENT FILE • When referring to a file extension, a document is a readable file. Computers running Microsoft operating systems, for example, commonly store document files in a .DOC, .ODT, .DOCX, and .RTF file. These files are commonly only composed of text, but in some cases, may also include graphics.
  • 4.
    WHAT IS DOCUMENTATIONSOFTWARE? • A documentation software is a software which is used to create text, image,video or audio documents. There are some documentation software applications which are used to create documents. For instance-: MS Word,OpenOffice Writer etc.
  • 5.
    INTERFACE OF MSWORD • The Microsoft Word interface consists of several key parts that allow users to access and use the various features and tools of the program. These parts include: • The file tab: The file tab is located in the top left corner of the interface and provides access to the File menu. From the File menu, users can create, save, and open documents, as well as access other options, such as print and save as. • Ribbon tabs: The ribbon is a strip of tabs located at the top of the interface that provides access to the various tools and features of Word. The ribbon is divided into several tabs, such as Home, Insert, and Review, each of which contains a set of related commands and tools.
  • 6.
    • Groups: Withineach tab on the ribbon, the commands and tools are organized into groups. For example, the Home tab might contain groups for font formatting, paragraph formatting, and editing. • Dialog box launcher: Some groups on the ribbon contain a small arrow in the bottom right corner called the dialog box launcher. Clicking this arrow opens a dialog box or task pane that provides access to additional options and settings related to the group.
  • 7.
    HOW TO SETUPYOUR PAGE TO THE CORRECT SIZE • Open Microsoft Word • Type in your Page Size and click OK • Click on Margins in the Page Set up Section (left side of screen) • Click on Custom under the drop down of Margins • Change all 4 margin settings to 0” (top, bottom, left, right) Click OK
  • 8.
    • Click onthe Tab Insert • Click on the Tab under Insert labeled Pictures • Your Libraries of your computer will pop up and you will need to find where the picture is located on your computer and click okay. • Once the picture loads on the page you will see a couple of different things 1.You will see 8 circles on the outside of the picture (3 on top and bottom and 1 on each side). This will allow you to make your photo larger or smaller by dragging thecorners. 2.You will see a circle with an arrow on it. This will allow you to rotate your picture the direction you want it. How to Add Pictures to your Ad
  • 9.
    3.You can clickon the picture and you should see a curser pop up with 4 arrows. Thisallows you to move the picture in a different place on the page. 4.You will see a box that has frown with some lines through it. You can use this tool to format if your text words will go through the picture or if you would like the picture to be to the side of the text box.
  • 10.
    FORMATTING THE LAYOUTOF THE PICTURE • Once your picture has been placed on the page you will have a new tab at the top pop up that reads Picture Tools Format. • Click Picture under Picture Tools Format • Click the Layout Tab. • A drop down will appear and there you can decide how you would like your picture to look on your page (Do you want the text on the picture? Choose Behind Text) (Do you want your text to be around your picture? Choose Square, Through, Tight, or Top & Bottom)
  • 11.
    HOW TO ADDTEXT TO YOUR AD • On the Top Tool Bar click on Insert (third tab from left) • Click the Tab Text Box (on the far right) • Choose the Option labeled Simple Text Box • Depending on how you decided to have your Graphic displayed on the page a text box will appear. 1.A New Tab will appear at the top of the Page labeled Drawing Tools Format. This is • where you can decide if you want your text box to have a border, etc.
  • 12.
    • Next youwill need to decide how you want your Text box to appear on the ad. Click on the Tab across the top labeled Layout. 1. Click on the tab labeled Wrap Text 2. A drop down menu will appear. 3. Choose how you would like your Text box to appear on your ad (just like you did for your photo) the top that says Home. On the Home Tab you will be able to change your Font Size, • After you have decided on Appearance/Layout of the Text box click on the Tab across the top that says Home. On the Home Tab you will be able to change your Font Size,Font Color, Bold, etc.
  • 13.
    • Click onthe Tab labeled File • A new screen will appear • Click on Save As • Your File should be Labeled as Follows Cheerleadernamepagesizecompany • SAVE YOUR FILE AS A PDF (not a doc. Or word file) HOW TO SAVE YOUR AD
  • 14.
    HOW TO CREATEA PHAPHLET • Step 1: Open Word:Open Word on your computer. Click the File tab, and you'll find the New tab in the list. Then click the New tab. • Step 2: Search for templates:You'll see many pre-made templates under the New tab. Since brochures and pamphlets are similar to each other, you can use brochure templates to create a pamphlet in Word. To find brochure/pamphlet templates in MS Word, type "brochure" in the search bar. You'll be directed to templates after searching "Brochure" in the search bar. • Step 3: Download your desired template:Double-click on any template you want to use for making a pamphlet in Word. Once you download it, it will open in a new window where you'll be able to edit the template to fir your requirements.
  • 15.
    • Step 4:Edit the template:You can replace the content in the template. For most templates, the placeholder text is editable, and you can change it with your subject, product, or company information.Moreover, you can add images, charts, graphics, tables to your pamphlets. And you can also adjust sizes, styles, colors to your liking!If you want to add pictures in the pamphlet, click the Insert tab, tap on Picture and then choose the image that you want to add in the pamphlet from the Insert picture window.You can edit the text in placeholder text and change the font size, style, and color from the Font menu. • Step 5: Save your file