
Recommended
Recommended
More Related Content
What's hot
What's hot (20)
Similar to Plaxis Advanced Course, New Delhi, India, (2014).pdf
Similar to Plaxis Advanced Course, New Delhi, India, (2014).pdf (20)
Recently uploaded
Recently uploaded (20)
Plaxis Advanced Course, New Delhi, India, (2014).pdf
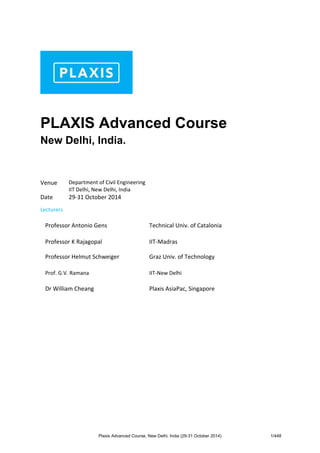
- 1. PLAXIS Advanced Course New Delhi, India. Venue Department of Civil Engineering IIT Delhi, New Delhi, India Date 29‐31 October 2014 Lecturers Professor Antonio Gens Technical Univ. of Catalonia Professor K Rajagopal IIT‐Madras Professor Helmut Schweiger Graz Univ. of Technology Prof. G.V. Ramana IIT‐New Delhi Dr William Cheang Plaxis AsiaPac, Singapore Plaxis Advanced Course, New Delhi, India (29-31 October 2014) 1/448
- 2. CONTENTS ADVANCED COMPUTATION GEOTECHNICS, NEW DELHI 2014 PAGE Session 1: Geotechnical Finite Element Analysis & Soil Behaviour 1 CG1 Geotechnical Finite Element Analysis 4 CG2 Elasto‐plasticity and Mohr‐Coulomb 22 CG3 Exercise 1: Foundation on Elasto‐plastic Soils 44 Session 2: Soil Behaviour 2 CG4 Critical State Soil Mechanics and Soft Soil Model 69 CG5 Hardening Soil and HS‐small Models 88 CG6 Exercise 2: Triaxial & Oedometer Simulation 119 Session 3: Modelling of Deep Excavations CG7 Modelling of Deep Excavations 143 CG8 Structural Elements in PLAXIS 169 CG9 Exercise 3: Modelling of an Anchored Retaining Wall in 2D 194 Session 4: Modelling of Groundwater, Undrained Conditions & Consolidation CG10 Modelling of Groundwater in PLAXIS 216 CG11 Drained and Undrained Analysis 251 CG12 Consolidation Analysis 272 CG13 Exercise 4: Modelling of an Strutted and Embedded Excavation in 3D 289 Session 5: Initial Stresses, Slope Stability & Unsaturated Soils CG14 Unsaturated Soils and Barcelona Basic Model 306 CG15 Initial Stresses and Slope Stability Analysis 337 CG16 Exercise 5: Slope Stability Analysis 375 Session 6: Modelling of Tunnels in Rock CG17 Hoek‐Brown and Rock Jointed Models 392 CG18 Modelling of Tunnels in 2D 416 CG19 Exercise 6: Tunnelling in Rock 437
- 3. PLAXIS ADVANCED COURSE 29‐31 October 2014, New Delhi, India. Time Wednesday 29 October 2014 Session 1: Geotechnical Finite Element Analysis & Soil Behaviour 1 9:00 10:00 CG1 Geotechnical Finite Element Analysis Gens 10:00 11:00 CG2 Elasto‐Plasticity and Mohr‐Coulomb Rajagopal 11:00 11:15 Break 11:15 1:00 CG3 Exercise 1: Foundation on Elasto‐Plastic Soils Cheang 1:00 2:00 Lunch Session 2: Soil Behaviour 2 2:00 3:00 CG4 Critical State Soil Mechanics and Soft Soil Model Schweiger 3:00 4:00 CG5 Hardening Soil and HS‐small Model Schweiger 4:00 4:15 Break 4:15 5:30 CG6 Exercise 2: Triaxial and Oedometer Cheang Time Thursday 30 October 2014 Session 3: Modelling of Deep Excavations 9:00 9:45 CG7 Modelling of Deep Excavations Gens 9:45 10:30 CG8 Structural Elements in Plaxis Rajagopal 10:30 10:45 Break 10:45 12:00 CG9 Exercise 3: Simulation of an Anchored Retaining Wall Cheang 12:00 1:00 Lunch Session 4: Modelling of Groundwater, Undrained Conditions and Consolidation 1:00 1:45 CG10 Modelling of Groundwater in Plaxis Cheang 1:45 2:30 CG11 Drained and Undrained Analysis Gens 2:30 3:15 Break 3:15 3:30 CG12 Consolidation Analysis Gens 3:30 5:00 CG13 Exercise 4: Dewatering in Excavation Siva Time Friday 31 October 2014 Session 5: Initial Stresses, Slope Stability and Unsaturated Soils 9:00 10:30 CG14 Unsaturated Soils and Barcelona Basic Model Gens 10:30 11:30 CG15 Initial Stresses and Slope Stability Analysis Schweiger 11:30 11:45 Break 11:45 1:30 CG16 Exercise 5: Slope Stabilised by Soil Nails Siva 1:30 2:30 Lunch Session 6: Modelling of Tunnels in Rock 2:30 3:30 CG17 Hoek‐Brown and Rock Jointed Models Schweiger 3:30 4:00 CG18 Modelling of Tunnels in 2D Schweiger 4:00 4:15 Break 4:15 5:30 CG19 Exercise 6: Tunnelling in Rock Cheang Plaxis Advanced Course, New Delhi, India (29-31 October 2014) 3/448
- 4. New Delhi Advanced 2014 Computation Geotechnics 1 Geotechnical Finite Element Analysis Professor Antonio Gens Plaxis Advanced Course, New Delhi, India (29-31 October 2014) 4/448
- 5. CG1: GEOTECHNICAL FINITE ELEMENT ANALYSIS Antonio Gens Technical University of Catalunya, Barcelona some of the slides were originally created by: Andrew Abbo (University of Newcastle) Cino Viggiani (Laboratoire 3S, Grenoble, France) Dennis Waterman (Plaxis) Outline Introduction • Design requirements in geotechnical engineering • Geotechnical methods of analysis • Geotechnical finite element analysis: some remarks The Finite Element Method • Introduction and general overview • Domain discretization • Element formulation • Constitutive law • Element stiffness matrix • Global equations: assembly and solution • Compute secondary variables Final remarks Plaxis Advanced Course, New Delhi, India (29-31 October 2014) 5/448
- 6. design requirements in geotechnical engineering • Stability (local and general) • Admissible deformation and displacements design requirements in geotechnical engineering • Flow problems • Sometimes flow and stability/deformation problems are solved together See tomorrow’s lecture on consolidation (CG12) Plaxis Advanced Course, New Delhi, India (29-31 October 2014) 6/448
- 7. geotechnical analysis: basic solution requirements • Equilibrium (3 equations) • Compatibility (6 equations) • Constitutive equation (6 equations) • Unknowns: 15 (6 stresses, 6 strains, 3 displacements) Potts & Zdravkovic (1999) • While the FEM has been used in many fields of engineering practice for over 40 years, it is only recently that it has begun to be widely used for analyzing geotechnical problems. This is probably because there are many complex issues which are specific to geotechnical engineering and which have been resolved relatively recently. • when properly used, this method can produce realistic results which are of value to practical soil engineering problems • A good analysis, which simulates real behaviour, allows the engineer to understand problems better. While an important part of the design process, analysis only provides the engineer with a tool to quantify effects once material properties and loading conditions have been set geotechnical methods of numerical analysis • methods for numerical analysis Finite difference method Boundary element method (BEM) Discrete element method (DEM) Finite element method (FEM) Others (meshless methods, material point method, particle methods…) Plaxis Advanced Course, New Delhi, India (29-31 October 2014) 7/448
- 8. • Objectives of the numerical (finite element) analysis Selection of design alternatives Quantitative predictions Backcalculations Understanding! Identification of critical mechanisms Identification of key parameters geotechnical finite element analysis • Advantages of numerical (finite element) analysis Simulation of complete construction history Interaction with water can be considered rigorously Complex geometries (2D-3D) can be modeled Structural elements can be introduced No failure mechanism needs to be postulated (it is an outcome of the analysis) geotechnical finite element analysis • (Nearly) unavoidable uncertainties Ground profile Initial conditions (initial stresses, pore water pressure…) Boundary conditions (mechanical, hydraulic) Appropriate model for soil behaviour Model parameters Plaxis Advanced Course, New Delhi, India (29-31 October 2014) 8/448
- 9. • Some requirements for successful numerical modelling Construction of an adequate conceptual model that includes the basic features of the model. The model should be as simple as possible but not simpler Selection of an appropriate constitutive model. It depends on: type of soil or rock goal of the analysis quality and quantity of available information Pay attention to patterns of behaviour and mechanisms rather than just to quantitative predictions Perform sensitivity analyses. Check robustness of solution Model calibration (using field results) should be a priority, especially of quantitative predictions are sought Check against alternative computations if available (even if simplified) geotechnical finite element analysis three final remarks 1. geotechnical engineering is complex. It is not because you’re using the FEM that it becomes simpler 2. the quality of a tool is important, yet the quality of a result also (mainly) depends on the user’s understanding of both the problem and the tool 3. the design process involves considerably more than analysis Borrowed from C. Viggiani, with thanks geotechnical finite element analysis Plaxis Advanced Course, New Delhi, India (29-31 October 2014) 9/448
- 10. The Finite Element Method: introduction and overview the FEM is a computational procedure that may be used to obtain an approximate solution to a boundary value problem the governing mathematical equations are approximated by a series of algebraic equations involving quantities that are evaluated at discrete points within the region of interest. The FE equations are formulated and solved in such a way as to minimize the error in the approximate solution Governing mathematical equation: (equilibrium) Algebraic equation: x xz xy x b z y x 1 1 2 12 1 11 c x a x a x a n n The FEM is a computational procedure that may be used to obtain an approximate solution to a boundary value problem What kind of problem? Apply load obtain displacements stiffness matrix Apply head obtain flow permeability matrix Though we would like to know our solution at any coordinates in our project, we will only calculate them in a certain amount of discrete points (nodes) and estimate our solution anywhere else The Finite Element Method: introduction and overview this lecture presents only a basic outline of the method attention is focused on the first problem using the "displacement based" FE approach Plaxis Advanced Course, New Delhi, India (29-31 October 2014) 10/448
- 11. The FEM involves the following steps (1/2) Elements discretization This is the process of modeling the geometry of the problem under investigation by an assemblage of small regions, termed finite elements. These elements have nodes defined on the element boundaries, or within the elements Primary variable approximation A primary variable must be selected (e.g., displacements) and rules as how it should vary over a finite element established. This variation is expressed in terms of nodal values A polynomial form is assumed, where the order of the polynomial depends on the number of nodes in the element The higher the number of nodes (the order of the polynomial), the more accurate are the results (the longer takes the computation!) The Finite Element Method: introduction and overview The FEM involves the following steps (2/2) Element equations Derive element equations: where is the element stiffness matrix, is the vector of nodal displacements and is the vector of nodal forces Global equations Combine (assemble) element equations to form global equations Boundary conditions Formulate boundary conditions and modify global equations. Loads affect P, while displacements affect U Solve the global equations to obtain the displacements at the nodes Compute additional (secondary) variables From nodal displacements secondary quantities (stresses, strain) are evaluated The Finite Element Method: introduction and overview Plaxis Advanced Course, New Delhi, India (29-31 October 2014) 11/448
- 12. Apply load obtain displacements stiffness matrix For soil we don’t have a direct relation between load and displacement, we have a relation between stress and strain. Displacements Strains Stresses Loads Differentiate Integrate Material model Bu D d F V T B DBd K V K F u Combine these steps: The Finite Element Method: introduction and overview Domain discretization Footing width = B Node Gauss point The first stage in any FE analysis is to generate a FE mesh A mesh consists of elements connected together at nodes We will calculate our solution in the nodes, and use some sort of mathematical equation to estimate the solution inside the elements. Plaxis Advanced Course, New Delhi, India (29-31 October 2014) 12/448
- 13. examples: embankment Domain discretization examples: multi-anchored diaphragm wall There is a whole zoo of different finite elements available! Domain discretization Plaxis Advanced Course, New Delhi, India (29-31 October 2014) 13/448
- 14. displacement interpolation two-dimensional analysis of continua is generally based on the use of either triangular or quadrilateral elements the most used elements are based on an iso-parametric approach Element formulation Displacement interpolation primary unknowns: values of the nodal displacements displacement within the element: expressed in terms of the nodal values using polynomial interpolation 1 ( ) ( ) , shapefunctionof node n i i i i u N u N i Element formulation Plaxis Advanced Course, New Delhi, India (29-31 October 2014) 14/448
- 15. Shape function of node i Is a function that has value “1” in node i and value “0” in all other n-1 nodes of the element Shape functions for 3-node line element 1 2 3 1 1 (1 ) , (1 )(1 ) , (1 ) 2 2 N N N Element formulation Shape functions for 5-node line element Illustration for the six-noded triangular element 12 coefficients, depending on the values of the 12 nodal displacements u v x y 1 2 3 4 5 6 quadratic interpolation 2 2 0 1 2 3 4 5 2 2 0 1 2 3 4 5 ( , ) ( , ) u x y a a x a y a x a xy a y v x y b b x b y b x b xy b y e NU u Element formulation Plaxis Advanced Course, New Delhi, India (29-31 October 2014) 15/448
- 16. Illustration for the six-noded triangular element Strains may be derived within the element using the standard definitions 1 3 4 2 4 5 1 2 4 3 5 4 2 2 ( ) ( 2 ) (2 ) xx yy xy u a a x a y x v b b x b y y u v b a a b x a b y y x e e ε Lu LNU BU e ε BU ε Lu Element formulation Constitutive relation (elasticity) Elasticity: one-to-one relationship between stress and strain in a FE context, stresses and strains are written in vector form the stress-strain relationship is then expressed as: = D material stiffness matrix linear isotropic elasticity in plane strain 2 2 1 0 0 0 1 0 1 ) 1 )( 2 1 ( v v v v v v v E D in this case the coefficients of the matrix are constants, which means that (for linear kinematics) the resulting F.E. equations are linear Constitutive law Plaxis Advanced Course, New Delhi, India (29-31 October 2014) 16/448
- 17. Advantage with elasticity: the coefficients of the matrix are constants, the resulting F.E. equations are linear, hence the problem may be solved by applying all of the external loads in a single calculation step soils usually do not behave elastically with D depending on the current and past stress history It is necessary to apply the external load in separate increments and to adopt a suitable non-linear solution scheme What happens with inelastic constitutive relations? D Constitutive law Element stiffness matrix body forces and surface tractions applied to the element may be generalized into a set of forces acting at the nodes (vector of nodal forces) y x y x y x P P P P P P 6 6 2 2 1 1 e P 1 2 3 4 5 6 P1x P1y D material stiffness matrix B matrix relating nodal displacements to strains dv B D B K T e Ke element stiffness matrix recall nodal forces may be related to the nodal displacements by: e e e P U K Element stiffness matrix Plaxis Advanced Course, New Delhi, India (29-31 October 2014) 17/448
- 18. Apply load obtain displacements stiffness matrix For soil we don’t have a direct relation between load and displacement, we have a relation between stress and strain. Displacements Strains Stresses Loads Differentiate Integrate Material model Bu D d F V T B DBd K V K F u Combine these steps: The Finite Element Method: introduction and overview Gauss points dv B D B K T e To evaluate Ke, integration must be performed for each element A numerical integration scheme must be employed (Gaussian integration) Essentially, the integral of a function is replaced by a weighted sum of the function evaluated at a number of integration points Element stiffness matrix Plaxis Advanced Course, New Delhi, India (29-31 October 2014) 18/448
- 19. Global stiffness matrix (1) The stiffness matrix for the complete mesh is evaluated by combining the individual element stiffness matrixes (assembly) This produces a square matrix K of dimension equal to the number of degrees-of-freedom in the mesh • in 2D number of d.o.f = 2 x number of nodes • in 3D number of d.o.f = 3 x number of nodes The global vector of nodal forces P is obtained in a similar way by assembling the element nodal force vectors The assembled stiffness matrix and force vector are related by: where vector U contains the displacements at all the nodes in the mesh P KU Global equations: assembly and solution Global stiffness matrix (2) The global stiffness matrix generally contains many terms that are zero if the node numbering scheme is efficient then all of the non-zero terms are clustered in a band along the leading diagonal assembly storage solution schemes for take into account its sym and banded structure if D is symmetric (elasticity), then Ke and hence K will be symmetric number of dofs Global equations: assembly and solution Plaxis Advanced Course, New Delhi, India (29-31 October 2014) 19/448
- 20. Solution of the global stiffness equations Once the global stiffness equations have been established (and the boundary conditions added), they mathematically form a large system of symultaneous (algebraic) equations These have to be solved to give values for the nodal displacements It is advantageous to adopt special techniques to reduce computation time (e.g. bandwidth and frontal techniques) Detailed discussion of such techniques is beyond the scope of this lecture P KU Global equations: assembly and solution Compute additional (secondary) values Computation of secondary variables once the nodal displacements have been obtained from the inversion of the matrix K The complete displacement field can be obtained: e KU P Strains and stresses are computed at the Gauss points: 1 ( , ) ( , ) , shapefunctionof node n i i i i u x y N x y u N i Δσ = DΔε e ε BU Plaxis Advanced Course, New Delhi, India (29-31 October 2014) 20/448
- 21. some practical issues 1. A good finite element mesh is important. A poor mesh will give a poor (inaccurate) solution. 2. Post processing – Stress are computed at Guass points only. Contour plots of stresses involve further processing of the results. 3. Do the results make sense? 4. FEA can be very time consuming! Final remarks Plaxis Advanced Course, New Delhi, India (29-31 October 2014) 21/448
- 22. New Delhi Advanced 2014 Computation Geotechnics 2 Elasto-plasticity and Mohr-Coulomb Professor K.Rajagopal Plaxis Advanced Course, New Delhi, India (29-31 October 2014) 22/448
- 23. CG2: ELASTO-PLASTICTY AND MOHR COULOMB some of the slides were originally created by: Cino Viggiani (Laboratoire 3S, Grenoble, France) Antonio Gens (UPC, Spain) S.W. Lee (GCG Asia – Golder Associates) Helmut Schweiger (Technical University of Graz, Austria) K. Rajagopal (IIT Madras) – additional slides September 2013 Professor K Rajagopal IIT Madras • A quick reminder of (linear isotropic) Elasticity • Motivations for plasticity (elasticity vs. plasticity) • Basic ingredients of any elastoplastic model elastic properties (how much recoverable deformation?) yield surface (is plastic deformation occurring?) plastic potential (direction of plastic strain increment?) consistency condition (magnitude of plastic strain increment?) hardening rule (changes of yield surface?) • Element tests: (drained) simple shear & triaxial tests • Tips and tricks • Advantages and limitations Contents Plaxis Advanced Course, New Delhi, India (29-31 October 2014) 23/448
- 24. Constitutive models Linear-elastic Non-linear elastic Δσ = DΔε Constitutive models provide us with a relationship with stresses and strains expressed as: Elasticity σ = Dε xx yy zz xy yz zx xx yy zz xy yz zx E 1 1 0 0 0 1 0 0 0 1 0 0 0 0 0 0 2 2 0 0 0 0 0 0 2 2 0 0 0 0 0 0 2 2 Hooke’s law ε Cσ Plaxis Advanced Course, New Delhi, India (29-31 October 2014) 24/448
- 25. Two parameters: - Young’s modulus E - Poisson’s ratio Meaning (axial compr.): d d 3 1 - d1 d3 - 1 - 1 3 E 1 1 Model parameters in Hooke’s law: d1 E d d 1 1 0 ; -1 0.5 E Shear modulus: dxy dxy K dp d E v 3 1 2 Bulk modulus: dp dv Alternative parameters in Hooke’s law: G d d E xy xy 2 1 9 3 K G E G K 3 2 6 2 K G v K G 1/ 0 0 1/ 3 v s K p G q In spherical and deviatoric stress / strain components: 1 1 2 3 3 p 2 2 2 1 2 2 3 3 1 1 ( ) ( ) ( ) 2 q Plaxis Advanced Course, New Delhi, India (29-31 October 2014) 25/448
- 26. xx yy zz xy yz zx xx yy zz xy yz zx E ( )( ) 1 1 2 1 0 0 0 1 0 0 0 1 0 0 0 0 0 0 0 0 0 0 0 0 0 0 0 0 0 0 1 2 1 2 1 2 Inverse: Hooke’s law σ = Dε 4 2 2 0 0 0 3 3 3 2 4 2 0 0 0 3 3 3 2 2 4 0 0 0 3 3 3 0 0 0 0 0 0 0 0 0 0 0 0 0 0 0 xx xx yy yy zz zz xy xy yz yz zx zx G G G K K K G G G K K K G G G K K K G G G Hooke’s law 4 2 0 3 3 1 0 2 4 1 0 0 (1 )(1 2 ) 3 3 1 2 0 0 0 0 2 G G K K E G G K K G D σ = Dε 4 2 2 0 1 0 3 3 3 2 4 2 1 0 0 3 3 3 1 0 (1 )(1 2 ) 2 2 4 1 2 0 0 0 0 3 3 3 2 0 0 0 G G G K K K G G G K K K E G G G K K K G D Plane strain Axisymmetry Plaxis Advanced Course, New Delhi, India (29-31 October 2014) 26/448
- 27. Elasticity vs. Plasticity (1) In elasticity, there is a one-to-one relationship between stress and strain. Such a relationship may be linear or non-linear. An essential feature is that the application and removal of a stress leaves the material in its original condition Elasticity vs. Plasticity (2) for elastic materials, the mechanism of deformation depends on the stress increment for plastic materials which are yielding, the mechanism of (plastic) deformation depends on the stress reversible = elastic irreversible = plastic Plaxis Advanced Course, New Delhi, India (29-31 October 2014) 27/448
- 28. Plasticity: some definitions (1) One-dimensional IMPORTANT: yield stress = failure stress for perfect plasticity p e p e General three-dimensional stress state Y0 = yield stress LINEAR ELASTIC - PERFECTLY PLASTIC Plasticity: some definitions (2) One-dimensional IMPORTANT: yield stress failure stress p e p e General three-dimensional stress state Y0 = yield stress YF = failure stress LINEAR ELASTIC – PLASTIC HARDENING Plaxis Advanced Course, New Delhi, India (29-31 October 2014) 28/448
- 29. Plasticity: some definitions (3) One-dimensional Y0 = yield stress YF = failure stress LINEAR ELASTIC - PLASTIC WITH SOFTENING yield function (1) when building up an elastic-plastic model, the first ingredient that we need is a yield surface (is plastic deformation occurring?) Plaxis Advanced Course, New Delhi, India (29-31 October 2014) 29/448
- 30. yield function (2) The yield surface bounds all elastically attainable states (a generalized preconsolidation pressure) F = 0 represents surface in stress space stress state is elastic 0 f 0 f stress state is plastic stress state not admissible 3 2 1 , , f f 0 f yield function (5) changes of stress which remain inside the yield surface are associated with stiff response and recoverable deformations, whereas on the yield surface a less stiff response is obtained and irrecoverable deformations are developed Basically: Where do we get this function f ? The dominant effect leading to irrecoverable changes in particle arrangement is the stress ratio, or mobilized friction The mean normal effective stress p ’ is of primary importance. The range of values of q for stiff elastic response is markedly dependent on p ’ Tresca & Von Mises yield functions are not appropriate Plaxis Advanced Course, New Delhi, India (29-31 October 2014) 30/448
- 31. Mohr-Coulomb Model, yield function To most engineers the phrase “strength of soils” conjures up images of Mohr-Coulomb failure criteria Classical notions of Mohr-Coulomb failure can be reconciled with the patterns of response that we are modeling here as elasto-plastic behavior frictional resistance independent of normal stress Mohr-Coulomb Model, yield function 1 and 3 : major and minor principal stresses Plaxis Advanced Course, New Delhi, India (29-31 October 2014) 31/448
- 32. MC criterion: t*c’ cos’ - s* sin’ t* = ½(’3 - ’1) s* = ½(’3+’1) ' sin ' ' ' cos ' ' ' 1 3 2 1 1 3 2 1 c 3 1 ' ' sin 1 ' sin 1 ' sin 1 ' cos ' 2 ' c Note: Compression is negative, and ’1: major, ’2: intermediate, ’3: minor principal stress The Mohr-Coulomb failure criterion 19 Mohr-Coulomb Model, yield function f < 0 Elasticity f = 0 Plasticity f > 0 Not acceptable -1 -3 -2 MOHR COULOMB IN 3D STRESS SPACE ' cos ' ' sin ' ' ' ' c f 3 1 2 1 3 1 2 1 Plaxis Advanced Course, New Delhi, India (29-31 October 2014) 32/448
- 33. plastic potential (1) Summing up: Plastic strain increment arises if: 1) the stress state is located on the yield surface (f = 0) AND 2) the stress state remains on the yield surface after a stress increment knowledge of function f tells us whether plastic strain is occurring or not But, this is only one part of the story: We would also like to know direction and magnitude of plastic strain • will we get plastic volume changes? • and plastic distortion? for that, we need another concept (another function: g) plastic potential (2) flow rule we have now two functions, f and g the question is: where do we get g ? Recall: plastic deformations depend on the stress state at which yielding is occurring, rather than on the route by which that stress is reached Plaxis Advanced Course, New Delhi, India (29-31 October 2014) 33/448
- 34. associated and non associated flow rules it would be clearly a great advantage if, for a given material, yield locus and plastic potential could be assumed to be the same f = g only 1 function has to be generated to describe plastic response also advantageous for FE computations: • the solution of the equations that emerge in the analyses is faster • the validity of the numerical predictions can be more easily guaranteed is f = g a reasonable assumption? for metals, it turns out that YES, it is for geomaterials, NOT Where is the problem? The assumption of normality of plastic strain vectors to the yield locus would result in much greater plastic volumetric dilation than actually observed Mohr-Coulomb Model, plastic potential dilatancy angle Plaxis Advanced Course, New Delhi, India (29-31 October 2014) 34/448
- 35. plastic dilatancy how to understand dilatancy i.e., why do we get volume changes when applying shear stresses? = + i the apparent externally mobilized angle of friction on horizontal planes () is larger than the angle of friction resisting sliding on the inclined planes (i) strength = friction + dilatancy consistency condition Plaxis Advanced Course, New Delhi, India (29-31 October 2014) 35/448
- 36. Parameters of MC model E Young’s modulus [kN/m2] Poisson’s ratio [-] c’ (effective) cohesion [kN/m2] ’ (effective) friction angle [º] Dilatancy angle [º] MC model for element tests xy yy tan sin sin 1 cos sin max n Plaxis Advanced Course, New Delhi, India (29-31 October 2014) 36/448
- 37. MC model for element tests MC model for element tests Plaxis Advanced Course, New Delhi, India (29-31 October 2014) 37/448
- 38. limitations of MC model (1) limitations of MC model (2) Plaxis Advanced Course, New Delhi, India (29-31 October 2014) 38/448
- 39. warning for dense sands Tension cut-off Compression zone Tension zone Tension cut-off Tension cut-off: if c>o, MC model allows tensile stresses to be developed Plaxis Advanced Course, New Delhi, India (29-31 October 2014) 39/448
- 40. Simple Shear Test • Given: • Initialconditions: • Boundaryconditions: • Implicitstress increment : • With Dep evaluated at the beginning of each step (using σold) o o 0 yy o xx xy σ' K σ' 0, τ o yy xy σ , γ ψ, , ' , c' , ν' , E' 0 Δε 0, Δσ xx yy ε D σ σ σ σ ep old new ' ' 1 ' 3 ' 3 ' 1 ' 2 45 At failure for simple shear test Dilatancy For simple shear is positive – volume increase in shear - Dilatancy ψ is negative – volume decrease in shear - Contractancy p xy p yy 2 p xy 2 p yy p yy γ ε tan ψ γ ε ε sin ψ 0 ε and 0 ε ε ε Since, e xx p xx e xx xx 0 ε p xx ψ p yy ε p xy τ σyy sinψ γ ε ε ε ε γ ε 2 p xy 2 p yy p xx p yy p xx p p v Plastic volumetric strain Plastic sheardistortion Plaxis Advanced Course, New Delhi, India (29-31 October 2014) 40/448
- 41. Results of undrained simple shear test Non-associated plasticity, f ≠ g Parameter Value Bulk unit weight of soil,γ 0 kN/m3 Effectiveangle of internal friction, ′ 43o Effectivecohesion, c′ 0 kPa Poisson’s ratio, υ′ 0.20 Young’s modulus, E′ 45000 kN/m2 Angle of dilation , ψ -3o ,0o ,15o Bulk modulus of soil, Ke = Kw/n 1.86 * 106 kN/m2 Bulk unit weight of gravityelements,γ 20 kN/m3 Normal stress in y-direction, σyy 100 kN/m2 Shear strain, γxy 0.025 Ko 0.25 Comparison between drained and undrained results Property Value Bulk unit weight of soil, γ 0 kN/m3 Effective angle of internal friction, ′ 35o Effective cohesion, c′ 0 kPa Poisson’s ratio, υ′ 0.30 Young’s modulus, E′ 26000 kPa Angle of dilation , ψ -3o, 0o, 5o Bulk modulus of soil, Ke = Kw/n 1.85* 106 kN/m2 Bulk unit weight of gravity elements, γ 20 kN/m3 Normal stress in y- direction, σyy 100 kN/m2 Shear strain, γxy 0.025 Plaxis Advanced Course, New Delhi, India (29-31 October 2014) 41/448
- 42. Influence of dilation angle on behaviour of circular footing -0.45 -0.4 -0.35 -0.3 -0.25 -0.2 -0.15 -0.1 -0.05 0 0 500 1000 1500 2000 2500 3000 3500 settlement (m) Pressure (kPa) psi =0 psi=3 psi=6 psi=10 E = 35000 kPa ν = 0.3 c = 1 kPa φ =35 Diameter=4m Possibilities and limitations of the Linear Elastic- Perfectly Plastic (LEPP) Mohr-Coulomb model Possibilities and advantages – Simple and clear model – First order approach of soil behaviour in general – Suitable for a good number of practical applications (not for deep excavations and tunnels) – Limited number and clear parameters – Good representation of failure behaviour (drained) – Dilatancy can be included 1 3 2 40 Plaxis Advanced Course, New Delhi, India (29-31 October 2014) 42/448
- 43. Limitations and disadvantages – Isotropic and homogeneous behaviour – Until failure linear elastic behaviour – No stress/stress-path/strain-dependent stiffness – No distinction between primary loading and unloading or reloading – Dilatancy continues for ever (no critical state) – Be careful with undrained behaviour – No time-dependency (creep) 1 3 2 41 Possibilities and limitations of the Linear Elastic- Perfectly Plastic (LEPP) Mohr- Coulomb model Plaxis Advanced Course, New Delhi, India (29-31 October 2014) 43/448
- 44. New Delhi Advanced 2014 Computation Geotechnics 3 Exercise 1: Shallow Foundation on Elasto-plastic Soil Dr William Cheang Plaxis Advanced Course, New Delhi, India (29-31 October 2014) 44/448
- 45. Elastoplastic analysis of a footing ELASTOPLASTIC ANALYSIS OF A FOOTING Computational Geotechnics 1 Plaxis Advanced Course, New Delhi, India (29-31 October 2014) 45/448
- 46. Elastoplastic analysis of a footing INTRODUCTION One of the simplest forms of a foundation is the shallow foundation. In this exercise we will model such a shallow foundation with a width of 2 meters and a length that is sufficiently long in order to assume the model to be a plane strain model. The foundation is put on top of a 4m thick clay layer. The clay layer has a saturated weight of 18 kN/m3 and an angle of internal friction of 200 . Figure 1: Geometry of the shallow foundation. The foundation carries a small building that is being modelled with a vertical point force. Additionally a horizontal point force is introduced in order to simulate any horizontal loads acting on the building, for instance wind loads. Taking into account that in future additional floors may be added to the building the maximum vertical load (failure load) is assessed. For the determination of the failure load of a strip footing analytical solutions are available from for instance Vesic, Brinch Hansen and Meyerhof: Qf B = c ∗ Nc + 1 2 γ0 B ∗ Nγ Nq = eπ tan ϕ0 tan2 (45 + 1 2 ϕ0 ) Nc = (Nq − 1) cot ϕ0 Nγ = 2(Nq + 1) tan ϕ0 (V esic) 1.5(Nq − 1) tan ϕ0 (Brinch Hansen) (Nq − 1) tan(1.4 ϕ0 ) (Meyerhof) This leads to a failure load of 117 kN/m2 (Vesic), 98 kN/m2 (Brinch Hansen) or 97 kN/m2 (Meyerhof) respectively. 2 Computational Geotechnics Plaxis Advanced Course, New Delhi, India (29-31 October 2014) 46/448
- 47. Elastoplastic analysis of a footing SCHEME OF OPERATIONS This exercise illustrates the basic idea of a finite element deformation analysis. In order to keep the problem as simple as possible, only elastic perfectly-plastic behaviour is considered. Besides the procedure to generate the finite element mesh, attention is paid to the input of boundary conditions, material properties, the actual calculation and inspection of some output results. Aims • Input – Start new project – Soil mode * Create soil layers * Create and assign soil material sets – Structures mode * Create footing * Create load – Mesh mode * Generate mesh – Staged construction mode * Determine initial situation * Calculation of vertical load representing the building weight * Calculation of vertical and horizontal load representing building weight and wind force * Calculation of vertical failure load. • Output – Inspect deformations – Inspect failure mechanism – Inspect load-displacement curve Computational Geotechnics 3 Plaxis Advanced Course, New Delhi, India (29-31 October 2014) 47/448
- 48. Elastoplastic analysis of a footing INPUT Introduction Start PLAXIS 2D by double-clicking the icon of the PLAXIS 2D Input program. The Quick select dialog box will appear in which you can select to start an new project or open an existing one. Choose Start a new project (see Figure 2). Now the Project properties window appears, consisting of the two tabsheets Project and Model (see Figure 3 and Figure 4). Figure 2: Quick select dialog Project properties The first step in every analysis is to set the basic parameters of the finite element model. This is done in the Project properties window. These settings include the description of the problem, the type of analysis, the basic type of elements, the basic units and the size of the drawing area. Project tabsheet In the Project tabsheet, enter “Exercise 1” in the Title box and type “Elasto-plastic analysis of a drained footing” or any other text in the Comments box. Model tabsheet In the Model tabsheet several model specific parameters can be specified • In the Type box the type of the analysis (Model) and the basic element type (Elements) are specified. As this exercise concerns a strip footing, choose Plane strain from the Model combo box. Select 15-node from the Elements combo box. 4 Computational Geotechnics Plaxis Advanced Course, New Delhi, India (29-31 October 2014) 48/448
- 49. Elastoplastic analysis of a footing Figure 3: Project tabsheet of the Project Properties window Figure 4: Model tabsheet of the Project properties window • The Units box defines the units for length, force and time that have to be used in this project. There is a choice for several units, both metric and emperial. For this project use the default units (Length = m; Force = kN; Time = day). • In the Contour box the size of the considered geometry must be entered. The values entered here determine the size of subsoil input window. PLAXIS will automatically add a small margin so that the geometry will fit well within the draw area. Enter xmin=0.00, xmax=14.00, ymin=0.00 and ymax=4.25, see figure 4 • Click on the OK button below the tabsheets to close the Project properties window. Hint: In the case of a mistake or for any other reason that the project properties should be changed, you can access the Project properties window by selecting the Project properties option from the File menu. Computational Geotechnics 5 Plaxis Advanced Course, New Delhi, India (29-31 October 2014) 49/448
- 50. Elastoplastic analysis of a footing Soil Mode The program is now in Soil mode in which the subsoil should be created. As shown in figure 1 the subsoil consist of a single 4m thick clay layer and creating this layer is done in 2 steps: first the soil layer is defined through the definition of a borehole, after which the material set representing the clay is defined and assigned to the appropriate layer. Create soil layer • Select the button Create borehole ( ) and click in the drawing area on the origin to indicate a borehole should be created there. The Modify soil layers window opens, see figure 5. Intially this window is empty as no boreholes have been defined yet for this project. Figure 5: The initial Modify soil layers window • Now click the Add button in order to add a layer to the borehole. • On the Soil layers tabsheet the different soil layers present in the borehole must be defined. In this exercise there is only 1 soil layer with the Top at 4.0m and the Bottom at 0.0m, see figure 6. • On the left side of the Modify soil layers window there is a graphical representation of the borehole. Note that the soil layer does not have a soil material assigned yet. • Above the borehole the Head option specifies the position of the global water level in this borehole. In this exercise it is assumed that the phreatic level is at groundlevel, so the Head must be set equal to 4.0 to indicate that the phreatic level is at ground level. • Now press the <OK> button to close the Modify soil layers window. The drawing area now shows a grey rectangular subsoil. 6 Computational Geotechnics Plaxis Advanced Course, New Delhi, India (29-31 October 2014) 50/448
- 51. Elastoplastic analysis of a footing Figure 6: The Modify soil layers window with 1 borehole containing 1 soil layer Create and assign material sets In this exercise 2 material sets will be used: one material set for the clay layer, and the second material set will be used to model the concrete footing. To create the material sets, follow these steps: • Select the Materials button ( ) - the Material sets window will open. The list of material sets available for this project is still empty. • Click on the New button at the lower side of the Material Sets window. A new dialog box will appear with five tabsheets: General, Parameters, Flow parameters, Interfaces and Initial (see figure 7). • In the Material Set box of the General tabsheet, write “Clay” in the Identification box. • Select Mohr-Coulomb from the Material model combo box and Drained from the Material type combo box. • Enter the proper values for the weights in the General properties box according to the material properties listed in table 1 • Click on either the Next button or click on the Parameters tabsheet to proceed with the input of model parameters. The parameters appearing on the Parameters tabsheet depend on the selected material model (in this case the Mohr-Coulomb model). • Enter the model parameters of table 1 in the corresponding edit boxes of the Parameters tabsheet. The parameters in the Alternatives and Velocities group are automatically calculated from the parameters entered earlier. • See also figure 8. In this figure the Advanced parameters part has been collapsed. Computational Geotechnics 7 Plaxis Advanced Course, New Delhi, India (29-31 October 2014) 51/448
- 52. Elastoplastic analysis of a footing Figure 7: General tabsheet of the soil and interface data set window for Clay • Since the geometry model does not include groundwater flow or interfaces, the third and fourth tabsheet can be skipped. Click on the OK button to confirm the input of the current material data set. • Now the created data set will appear in the tree view of the Material Sets window. Table 1: Material properties of the clay layer and the concrete footing. Parameter Symbol Clay Concrete Unit Material model Model Mohr-Coulomb Linear elastic — Type of behaviour Type Drained Non-porous — Weight above phreatic level γunsat 16.0 24.0 kN/m3 Weight below phreatic level γsat 18.0 — kN/m3 Young’s modulus E0 5.0·103 2.0·107 kN/m2 Poisson’s ratio ν0 0.35 0.15 — Cohesion c0 ref 5.0 — kN/m2 Friction angle ϕ0 20 — ° Dilatancy angle ψ 0 — ° For the concrete of the footing repeat the procedure, but choose a Linear Elastic material behaviour and enter the properties for concrete as shown in table 1 (see also figures 9 and 10). 8 Computational Geotechnics Plaxis Advanced Course, New Delhi, India (29-31 October 2014) 52/448
- 53. Elastoplastic analysis of a footing Figure 8: Parameters tabsheet of the soil and interface data set window for Clay Figure 9: General tabsheet of the soil and interface data set window for Concrete Computational Geotechnics 9 Plaxis Advanced Course, New Delhi, India (29-31 October 2014) 53/448
- 54. Elastoplastic analysis of a footing Figure 10: Parameters tabsheet of the soil and interface data set window for Concrete • Now from the Material sets window drag the Clay material set with the mouse over the grey subsoil and drop it. The subsoil should now get the colour of the material set, see figure 11. Figure 11: Subsoil before (left) and after (right) assigning the Clay material set This ends the creation of the subsoil in Soil mode. By clicking on the Structures tabsheet now move to Structures mode. 10 Computational Geotechnics Plaxis Advanced Course, New Delhi, India (29-31 October 2014) 54/448
- 55. Elastoplastic analysis of a footing Structures mode Introduction In Structures mode the footing as well as the point load acting on the footing will be created. However, first an adjustment to the snapping interval must be made in order to be able to draw the 0.25m thick footing. By default, the snapping interval is set to 1m. • From the vertical toolbar select the Snapping options button ( ). The Snapping window now opens. • Make sure the options Enable snapping and Show grid are selected • Leave the Spacing to 1 m • Set the Number of snap intervals to 4. This means that every spacing of 1 meter is divided in 4, hence the snapping distance will be 0.25m. • Click the <OK> button to confirm the new settings and close the window. Create footing 1. Select the Create soil button ( ) and from the drop-down list that opens now select the Create soil rectangle button ( ). 2. Move the mouse cursor to the coordinates (x y) = (6 4) and single-click the left mouse button 3. Now move the mouse cursor to the coordinates (x y) = (8 4.25) and single-click the left mouse button again. We have now created the footing. 4. Select the Show materials button ( ), the Material sets window will open. 5. Drag-and-drop the Concrete material set onto the footing. Create load 1. Select the Create load button ( ) and from the drop-down list that opens select the Create point load option ( ). 2. Move the mouse cursor to the coordinates (x y) = (7 4.25) and single-click the left mouse button to insert the point load. This concludes the creation of the footing and loads. By clicking on the Mesh tabsheet now move to Mesh mode. Computational Geotechnics 11 Plaxis Advanced Course, New Delhi, India (29-31 October 2014) 55/448
- 56. Elastoplastic analysis of a footing Mesh mode In Mesh mode the user can specify necessary mesh refinements and generate the mesh. In this exercises no additional mesh refinement will be used. • Select the Generate mesh button ( ). The Mesh options window will open. • Leave the Element distribution to Medium and press <OK> to start mesh generation • If mesh generation finished succesfully this will be confirmed in the Command explorer with the message "Generated XX elements, YY nodes" where XX and YY stand for the amount of elements and nodes respectively. • Select the View mesh button in order to view the generated mesh, see figure 12. Figure 12: Generated mesh Close the mesh window by selecting the green <Close> button. This ends the Mesh mode. As no water levels will be used in this exercise, the Water levels mode can be skipped and we can move directly to Staged construction mode to define the calculation phases. Staged construction mode In Staged construction mode all calculation phases will be defined. In this exercise we will use 5 calculation phases, which includes the initial phase. Initial phase The initial phase represents the field conditions that exist at the moment our project starts. This means that only the subsoil exists in the initial conditions whereas the footing should be deactivated. 12 Computational Geotechnics Plaxis Advanced Course, New Delhi, India (29-31 October 2014) 56/448
- 57. Elastoplastic analysis of a footing • Right-click on the footing. The footing will become red (indicating it is selected) and a drop-down menu appears. • From the drop-down menu select the option Deactivate in order to deactivate the footing. Phase 1: Construction of the footing • In the Phase explorer select the Add phase button ( ) so that a new phase will be added. • Right-click on the footing and from the drop-down menu that appears select the option Activate to activate the footing, see figure 13. Figure 13: Geometry configuration for the initial phase (left) and phase 1 (right) Phase 2: Apply vertical load • In the Phase explorer select the Add phase button ( ) so that a new phase will be added. • Click on the point on which the load acts so that it becomes red. On the left side the data of the load now appears in the Selection explorer. • Activate the point load and set the value of the vertical component, Fy,ref = -50 kN (= downwards), see figure 14. Phase 3: Add horizontal load • In the Phase explorer select the Add phase button ( ) so that a new phase will be added. • Click on the point on which the load acts so that it becomes red. On the left side the data of the load again appears in the Selection explorer. • Set the value of the vertical component of the point load, Fx,ref = 20 kN, see figure 14. Computational Geotechnics 13 Plaxis Advanced Course, New Delhi, India (29-31 October 2014) 57/448
- 58. Elastoplastic analysis of a footing Figure 14: Activating and changing the point load through the Selection explorer in phase 2 (left) and phase 3 (right) Phase 4: Vertical failure load In this phase we will calculate the vertical failure load as if no horizontal load has been applied. This means that phase 4 must be a continuation of applying the vertical load in phase 2. • In the Phase explorer select phase 2 so that it will show in bold letter type • Now select the Add phase button ( ) so that a new phase will be added that follows on phase 2 rather than on phase 3. • Click on the point on which the load acts so that it becomes red. On the left side the data of the load again appears in the Selection explorer. • Set the value of the vertical component of the point load, Fy,ref = -500 kN. Note that Fx,ref should remain 0 (zero). This finishes the definition of the calculation phases for this project. Calculation Load-displacement curves As a calculation result we would like to draw a load-settlement curve for the footing. In order to do so, the user must select one or more points for which Plaxis has to gather data during the calculation: • Select the Select points for curves button ( ). The output program now opens, showing the mesh with all nodes. 14 Computational Geotechnics Plaxis Advanced Course, New Delhi, India (29-31 October 2014) 58/448
- 59. Elastoplastic analysis of a footing • Select the node in the middle underneath the footing, hence at or very close to (x y) = (7 4). The node will appear in the Select points list, see figure 15. • Close Plaxis Output by clicking the green <Update> button. Figure 15: Selecting points for node displacement curves Calculate Press the Calculate button ( ) to start the calculation. Note that the last calculation phase fails: the intended vertical load of 500 kN cannot be fully applied due to failure of the subsoil underneath the footing. Computational Geotechnics 15 Plaxis Advanced Course, New Delhi, India (29-31 October 2014) 59/448
- 60. Elastoplastic analysis of a footing RESULTS Output After the calculation finishes, click the View calculation results button ( ). Plaxis Output will open, showing the calculation results of the last calculation phase. By default Plaxis Output will show the Defomed mesh, see figure 16. If this is not the case the Deformed mesh can be shown by choosing the menu Deformations → Deformed mesh |u|. Figure 16: Deformed mesh after phase 4 Now choose the menu option Deformations→ Incremental displacements→|∆u|, see figure 17. The incremental displacements is the change in displacements in the current calculation step (here that is the last calculation step of the phase 4). Under working conditions the change of displacement per calculation step is quite small, but in case of failure, the change of displacements can be large inside the failure zone. Therefore the Incremental displacements graph can be very suitable for detecting whether failure occurs and what the failure zone may look like. Figure 17 shows the typical Prandtl-like failure zone. Figure 17: Incremental displacements for the final calculation step of phase 4 Finally, we will inspect the load-settlement curve and determine the failure load. To do so, follow these steps: 16 Computational Geotechnics Plaxis Advanced Course, New Delhi, India (29-31 October 2014) 60/448
- 61. Elastoplastic analysis of a footing • From the button bar select the Curves manager button ( ). The Curves manager will open. • In the Curves manager select the <New> button in order to generate a new curve. Now the Curve generation window opens. • In the Curve generation window, select for the x-axis data from point A (instead of Project data) from the drop down list. • Now in the tree below, select Deformations → Total displacements→ |u| • For the y-axis we will plot a Project value, and that is the Multiplier ΣMstage. • Press <OK>. A curve as can be seen in figure 18 will show. Figure 18: Load-settlement curve In a Plaxis calculation any change made in a construction phase leads to a so-called unbalance, that is a disturbance between the total of the internal stresses and the external load. This unbalance is gradually solved using the ΣMstage multiplier. The ΣMstage multiplier indicates how much of the unbalance has been solved, where ΣMstage = 0 indicates that no unbalance was solved and ΣMstage = 1 that the full unbalance has been solved. In the curve shown in figure 18 the lines at the left indicate the variation of ΣMstage for the first 3 calculation phases, where as the long curved line shows the variation of ΣMstage during the final phase. It shows that at failure occurs when ΣMstage = 0.38, hence 38% of the unbalance was solved. In this case the unbalance applied was the increase of the vertical load from 50 kN/m to 500 kN/m. Hence, at failure the total load applied is the load at the beginning of the phase (50 kN/m) plus 38% of the change of load that could be applied: Fmax = 50+0.38·(500−50) = 221 kPa The exact value of the ΣMstage multiplier can be inspected by moving the mouse cursor over the plotted line. A tooltip box will show up with the data of the current location. Computational Geotechnics 17 Plaxis Advanced Course, New Delhi, India (29-31 October 2014) 61/448
- 62. Elastoplastic analysis of a footing Comparison In addition to the mesh used in this exercise calculations were performed using a very coarse mesh with a local refinement at the bottom of the footing and a very fine mesh. Fine meshes will normally give more accurate results than coarse meshes. Instead of refining the whole mesh, it is generally better to refine the most important parts of the mesh, in order to reduce computing time. Here we see that the differences are small (when considering 15-noded elements), which means that we are close to the exact solution. The accuracy of the 15- noded element is superior to the 6-noded element, especially for the calculation of failure loads. Hint: In plane strain calculations, but even more significant in axi-symmetric calculations, for failure loads, the use of 15-noded elements is recommended. The 6-noded elements are known to overestimate the failure load, but are ok for deformations at serviceability states. Table 2: Results for the maximum load reached on a strip footing on the drained sub-soil for different 2D meshes Mesh size Element type Nr. of elements Max. load Failure load [kN/m] [kN/m2 ] Medium mesh 15-noded 212 221 117 Very coarse mesh 6-noded 84 281 147 Medium mesh 6-noded 212 246 129 Very fine mesh 6-noded 626 245 129 Very coarse mesh 15-noded 84 224 118 Very fine mesh 15-noded 626 221 117 Analytical solutions of: - Vesic - Brinch Hansen - Meyerhof 117 98 97 In this table the failure load has been calculated as: Qu B = Maximum force B + γconcrete ∗ d = Maximum force 2 + 6 From the above results it is clear that fine FE meshes give more accurate results. On the other hand the performance of the 15-noded elements is superior over the performance of the lower order 6-noded elements. Needless to say that computation times are also influenced by the number and type of elements. 18 Computational Geotechnics Plaxis Advanced Course, New Delhi, India (29-31 October 2014) 62/448
- 63. Elastoplastic analysis of a footing ADDITIONAL EXERCISE: UNDRAINED FOOTING Computational Geotechnics 19 Plaxis Advanced Course, New Delhi, India (29-31 October 2014) 63/448
- 64. Elastoplastic analysis of a footing INTRODUCTION When saturated soils are loaded rapidly, the soil body will behave in an undrained manner, i.e. excess pore pressures are being generated. In this exercise the special PLAXIS feature for the treatment of undrained soils is demonstrated. SCHEME OF OPERATIONS In PLAXIS, one generally enters effective soil properties and this is retained in an undrained analysis. In order to make the behaviour undrained one has to select ‘undrained A’ as the type of drainage. Please note that this is a special PLAXIS option as most other FE-codes require the input of undrained parameters e.g. Eu and νu. Aims • The understanding and application of undrained soil behaviour • How to deal with excess pore pressures. • Use previous input file and ave as new data file • Soil mode – Change material properties, undrained behaviour for clay • Mesh mode – Mesh generation, global mesh refinement B) • Staged construction mode – Re-run existing calculation phases • Output – Inspect excess pore pressures Soil mode 20 Computational Geotechnics Plaxis Advanced Course, New Delhi, India (29-31 October 2014) 64/448
- 65. Elastoplastic analysis of a footing INPUT Use previous input file If PLAXIS Input is no longer open, start PLAXIS by clicking on the icon of the Input program and select the existing project file from the last exercise (drained footing). From the File menu select Save As and save the existing project under a new file name (e.g. ‘exercise 1b’). Change material properties • Change material properties by selecting the Show materials button ( ). Please note that this button is only available in Soil mode, Structures mode and Staged construction mode. • From the Material sets window, select the ’Clay’ and click on the <Edit> button. • In the Soil window that opened on the first tab sheet (General) change the Drainage type to "Undrained A" and close the data set. Mesh generation The mesh generator in PLAXIS allows for several degrees of refinement. In this example we will globally refine the mesh, resulting in an increased number of finite elements to be distributed along the geometry lines: • Go to the Mesh mode • Select the Generate mesh button ( ) and in the Mesh settings window choose Fine for the Elements distribution. Calculation • Go to the Staged construction mode. All phases are indicated by (blue arrows) After mesh (re)generation, staged construction settings remain and phase information is rewritten automatically for the newly generated mesh. However, this is not the case for points for load displacement curves due to the new numbering of the mesh nodes. • Click on the Select points for curves button ( ) in the toolbar. Reselect the node located in the centre directly underneath the footing Computational Geotechnics 21 Plaxis Advanced Course, New Delhi, India (29-31 October 2014) 65/448
- 66. Elastoplastic analysis of a footing • Click on the Calculate button ( ) to recalculate the analysis. Due to undrained behaviour of the soil there will be failure in the 3rd and 4th calculation phase. OUTPUT As mentioned in the introduction of this example, the compressibility of water is taken into account by assigning ’undrained’ behaviour to the clay layer. This normally results, after loading, in excess pore pressures. The excess pore pressures may be viewed in the output window by selecting: • Select in the Phases explorer the phase for which you would like to see output results. • Start the output program by clicking the View calculation results button ( ). • In PLAXIS Output, select from the Stresses menu the option Pore pressures and then pexcess, this results in figure 19. The excess pore pressures may be viewed as contour lines ( ), shadings ( ), stress crosses ( ) or as tabulated output ( ). If, in general, stresses are tensile stresses the principal directions are drawn with arrow points. It can be seen that after phase 3 on the left side of the footing there are excess pore tensions due to the horizontal movement of the footing. The total pore pressures are visualised using the option of active pore pressures. These are the sum of the steady state pore pressures as generated from the phreatic level and the excess pore pressures as generated from undrained loading. Figure 19: Excess pore pressures at the end of the 3rd phase • Select from the Stresses menu the option Pore pressures and then pactive. The results are given in figure . 22 Computational Geotechnics Plaxis Advanced Course, New Delhi, India (29-31 October 2014) 66/448
- 67. Elastoplastic analysis of a footing From the load displacement curve it can be seen that the failure load in the last phase is considerably lower for this undrained case compared to the drained situation, as expected. For the undrained case the failure load is just under 70 kPa. Figure 20: Active pore pressures at the end of the 3rd phase Computational Geotechnics 23 Plaxis Advanced Course, New Delhi, India (29-31 October 2014) 67/448
- 68. Elastoplastic analysis of a footing APPENDIX A: BEARING CAPACITY CALCULATION Given the formula for bearing capacity of a strip footing: Qf B = c · Nc + 1 2 γ0 B · Nγ Nq = eπ tan ϕ0 tan2 (45 + 1 2 ϕ0 ) Nc = (Nq − 1) cot ϕ0 Nγ = 2(Nq + 1) tan ϕ0 (V esic) 1.5(Nq − 1) tan ϕ0 (Brinch Hansen) (Nq − 1) tan(1.4 ϕ0 ) (Meyerhof) Filling in given soil data: Nq = eπ tan(20) tan2 (55) = 6.4 Nc = (6.4 − 1) cot(20) = 14.84 Nγ = 2(6.4 + 1) tan(20) = 5.39 (V esic) 1.5(6.4 − 1) tan(20) = 2.95 (Brinch Hansen) (6.4 − 1) tan(28) = 2.97 (Meyerhof) The effective weight of the soil: γ0 = γw − 10 kN/m3 = 18 − 10 = 8 kN/m3 For a strip foundation this gives: Qf B = c · Nc + 1 2 γ0 B · Nγ = 5 ∗ 14.83 + 1 2 ∗ 8 ∗ 2 ∗ 5.39 ≈ 117 kN/m2 (V esic) 5 ∗ 14.83 + 1 2 ∗ 8 ∗ 2 ∗ 2.95 ≈ 98 kN/m2 (Brinch Hansen) 5 ∗ 14.83 + 1 2 ∗ 8 ∗ 2 ∗ 2.87 ≈ 97 kN/m2 (Meyerhof) 24 Computational Geotechnics Plaxis Advanced Course, New Delhi, India (29-31 October 2014) 68/448
- 69. New Delhi Advanced 2014 Computation Geotechnics 4 Critical State Soil Mechanics and Soft Soil Model Professor Helmut Schweiger Plaxis Advanced Course, New Delhi, India (29-31 October 2014) 69/448
- 70. 1 CG 04 CRITICAL STATE SOIL MECHANICS SOFT SOIL MODEL Helmut F. Schweiger Computational Geotechnics Group Institute for Soil Mechanics and Foundation Engineering Graz University of Technology Advanced Course on Computational Geotechnics, New Delhi, India, 29 - 31 October 2014 S C I E N C E P A S S I O N T E C H N O L O G Y Critical State / Plaxis Soft Soil model 2 Advanced Course on Computational Geotechnics, New Delhi, India, 29 - 31 October 2014 Direct shear test Triaxial tests Critical state line Modified Cam Clay model (MCC) Drained and undrained triaxial stress paths (NC / OC) Plaxis Soft Soil model Possible enhancements of Critical State Models CONTENTS Direct Shear Test | Triaxial Test | Critical State Line | Modified Cam Clay | Stress Paths | Plaxis Soft Soil | Possible Enhancements Plaxis Advanced Course, New Delhi, India (29-31 October 2014) 70/448
- 71. 2 Critical State / Plaxis Soft Soil model 3 Advanced Course on Computational Geotechnics, New Delhi, India, 29 - 31 October 2014 DIRECT SHEAR TEST v’ Direct Shear Box (DSB) v’ Direct Simple Shear (DSS) s Slow Direct Shear Tests on Triassic Clay,NC 0 20 40 60 80 100 120 140 0 1 2 3 4 5 6 7 8 9 10 Displacement, (mm) Shear Stress, (kPa) n' (kPa)= 214.5 135.0 45.1 Slow Direct Shear Tests on Triassic Clay, Raleigh, NC 0 20 40 60 80 100 120 140 0 50 100 150 200 250 Effective Normal Stress, n' (kPa) Shear Stress, (kPa) 0.491 = tan ' Strength Parameters: c' = 0; ' = 26.1 o Peak Peak Peak Mayne, 2006 Direct Shear Test | Triaxial Test | Critical State Line | Modified Cam Clay | Stress Paths | Plaxis Soft Soil | Possible Enhancements Critical State / Plaxis Soft Soil model 4 Advanced Course on Computational Geotechnics, New Delhi, India, 29 - 31 October 2014 Log v' Effective stress v' Shear stress Void Ratio, e NC CC tan' CSL NC CSL CSSM Premise: “All stress paths fail on the critical state line (CSL)” CSL c=0 Mayne, 2006 Direct Shear Test | Triaxial Test | Critical State Line | Modified Cam Clay | Stress Paths | Plaxis Soft Soil | Possible Enhancements Plaxis Advanced Course, New Delhi, India (29-31 October 2014) 71/448
- 72. 3 Critical State / Plaxis Soft Soil model 5 Advanced Course on Computational Geotechnics, New Delhi, India, 29 - 31 October 2014 Log v' Effective stress v' Shear stress Void Ratio, e NC NC CC tan' CSL CSL CSL STRESS PATH No.1 NC Drained Soil Given: e0, vo’, NC (OCR=1) e0 vo vo Drained Path: u = 0 max = c + tan ef e Volume Change is Contractive: vol = e/(1+e0) < 0 c’=0 Mayne, 2006 Direct Shear Test | Triaxial Test | Critical State Line | Modified Cam Clay | Stress Paths | Plaxis Soft Soil | Possible Enhancements Critical State / Plaxis Soft Soil model 6 Advanced Course on Computational Geotechnics, New Delhi, India, 29 - 31 October 2014 NC NC CC tan' CSL CSL CSL STRESS PATH No.2 NC Undrained Soil Given: e0, vo’, NC (OCR=1) e0 vo vo Undrained Path: V/V0 = 0 +u = Positive Excess Porewater Pressures vf vf u max = cu = su Effective stress v' Shear stress Void Ratio, e Log v' Mayne, 2006 Direct Shear Test | Triaxial Test | Critical State Line | Modified Cam Clay | Stress Paths | Plaxis Soft Soil | Possible Enhancements Plaxis Advanced Course, New Delhi, India (29-31 October 2014) 72/448
- 73. 4 Critical State / Plaxis Soft Soil model 7 Advanced Course on Computational Geotechnics, New Delhi, India, 29 - 31 October 2014 NC NC CC tan' CSL CSL CSL CS p' p' OC Overconsolidated States: e0, vo’, and OCR = p’/vo’ where p’ = vmax’ = Pc’ = preconsolidation stress; OCR = overconsolidation ratio Effective stress v' Shear stress Void Ratio, e Log v' Mayne, 2006 Direct Shear Test | Triaxial Test | Critical State Line | Modified Cam Clay | Stress Paths | Plaxis Soft Soil | Possible Enhancements Critical State / Plaxis Soft Soil model 8 Advanced Course on Computational Geotechnics, New Delhi, India, 29 - 31 October 2014 NC NC CC tan' CSL CSL CSL CS OC Stress Path No. 3 Undrained OC Soil: e0, vo’, and OCR vo' e0 vo' Stress Path: V/V0 = 0 Negative Excess u vf' u Effective stress v' Shear stress Void Ratio, e Log v' Mayne, 2006 Direct Shear Test | Triaxial Test | Critical State Line | Modified Cam Clay | Stress Paths | Plaxis Soft Soil | Possible Enhancements Plaxis Advanced Course, New Delhi, India (29-31 October 2014) 73/448
- 74. 5 Critical State / Plaxis Soft Soil model 9 Advanced Course on Computational Geotechnics, New Delhi, India, 29 - 31 October 2014 NC NC CC tan' CSL CSL CSL CS OC Stress Path No. 4 Drained OC Soil: e0, vo’, and OCR Stress Path: u = 0 Dilatancy: V/V0 > 0 vo' e0 vo' Mayne, 2006 Effective stress v' Void Ratio, e Log v' Direct Shear Test | Triaxial Test | Critical State Line | Modified Cam Clay | Stress Paths | Plaxis Soft Soil | Possible Enhancements Critical State / Plaxis Soft Soil model 10 Advanced Course on Computational Geotechnics, New Delhi, India, 29 - 31 October 2014 Typical results from drained (a) and undrained (b) triaxial tests on normally consolidated soils (from Atkinson & Bransby, 1978) a) b) Direct Shear Test | Triaxial Test | Critical State Line | Modified Cam Clay | Stress Paths | Plaxis Soft Soil | Possible Enhancements Plaxis Advanced Course, New Delhi, India (29-31 October 2014) 74/448
- 75. 6 Critical State / Plaxis Soft Soil model 11 Advanced Course on Computational Geotechnics, New Delhi, India, 29 - 31 October 2014 Typical results from drained (a) and undrained (b) triaxial tests on overconsolidated soils (from Atkinson & Bransby, 1978) a) b) Direct Shear Test | Triaxial Test | Critical State Line | Modified Cam Clay | Stress Paths | Plaxis Soft Soil | Possible Enhancements Critical State / Plaxis Soft Soil model 12 Advanced Course on Computational Geotechnics, New Delhi, India, 29 - 31 October 2014 1+e DRAINED TRIAXIAL TEST (NC) Direct Shear Test | Triaxial Test | Critical State Line | Modified Cam Clay | Stress Paths | Plaxis Soft Soil | Possible Enhancements Plaxis Advanced Course, New Delhi, India (29-31 October 2014) 75/448
- 76. 7 Critical State / Plaxis Soft Soil model 13 Advanced Course on Computational Geotechnics, New Delhi, India, 29 - 31 October 2014 UNDRAINED TRIAXIAL TEST (NC) Direct Shear Test | Triaxial Test | Critical State Line | Modified Cam Clay | Stress Paths | Plaxis Soft Soil | Possible Enhancements Critical State / Plaxis Soft Soil model 14 Advanced Course on Computational Geotechnics, New Delhi, India, 29 - 31 October 2014 Direct Shear Test | Triaxial Test | Critical State Line | Modified Cam Clay | Stress Paths | Plaxis Soft Soil | Possible Enhancements Plaxis Advanced Course, New Delhi, India (29-31 October 2014) 76/448
- 77. 8 Critical State / Plaxis Soft Soil model 15 Advanced Course on Computational Geotechnics, New Delhi, India, 29 - 31 October 2014 NCL AND CSL IN p-q-v - SPACE Direct Shear Test | Triaxial Test | Critical State Line | Modified Cam Clay | Stress Paths | Plaxis Soft Soil | Possible Enhancements Critical State / Plaxis Soft Soil model 16 Advanced Course on Computational Geotechnics, New Delhi, India, 29 - 31 October 2014 UNDRAINED PLANES Direct Shear Test | Triaxial Test | Critical State Line | Modified Cam Clay | Stress Paths | Plaxis Soft Soil | Possible Enhancements Plaxis Advanced Course, New Delhi, India (29-31 October 2014) 77/448
- 78. 9 Critical State / Plaxis Soft Soil model 17 Advanced Course on Computational Geotechnics, New Delhi, India, 29 - 31 October 2014 DRAINED PLANES Direct Shear Test | Triaxial Test | Critical State Line | Modified Cam Clay | Stress Paths | Plaxis Soft Soil | Possible Enhancements Critical State / Plaxis Soft Soil model 18 Advanced Course on Computational Geotechnics, New Delhi, India, 29 - 31 October 2014 STATE BOUNDARY SURFACE Direct Shear Test | Triaxial Test | Critical State Line | Modified Cam Clay | Stress Paths | Plaxis Soft Soil | Possible Enhancements Plaxis Advanced Course, New Delhi, India (29-31 October 2014) 78/448
- 79. 10 Critical State / Plaxis Soft Soil model 19 Advanced Course on Computational Geotechnics, New Delhi, India, 29 - 31 October 2014 OCR is very important for soil behaviour OVERCONSOLIDATION Direct Shear Test | Triaxial Test | Critical State Line | Modified Cam Clay | Stress Paths | Plaxis Soft Soil | Possible Enhancements Critical State / Plaxis Soft Soil model 20 Advanced Course on Computational Geotechnics, New Delhi, India, 29 - 31 October 2014 Direct Shear Test | Triaxial Test | Critical State Line | Modified Cam Clay | Stress Paths | Plaxis Soft Soil | Possible Enhancements Right from the M-line (“wet side”): q < M p’ 0, 0 p p v s d d (contraction, hardening) Left from the M-line (“dry side”): q > M p’ 0, 0 p p v s d d (dilatancy, softening) On the ellipse top: q = M p’ 0, p v p s d d Failure! f=0 M 1 CSL Plaxis Advanced Course, New Delhi, India (29-31 October 2014) 79/448
- 80. 11 Critical State / Plaxis Soft Soil model 21 Advanced Course on Computational Geotechnics, New Delhi, India, 29 - 31 October 2014 B-C-D-E-F: slope of yield locus becomes flatter ratio distortional/volumetric strain becomes larger D. Muir Wood, 1990 normally consolidated drained compression Stiffness: primary loading Direct Shear Test | Triaxial Test | Critical State Line | Modified Cam Clay | Stress Paths | Plaxis Soft Soil | Possible Enhancements Critical State / Plaxis Soft Soil model 22 Advanced Course on Computational Geotechnics, New Delhi, India, 29 - 31 October 2014 lightly overconsolidated drained compression D. Muir Wood, 1990 Stiffness: - unloading / reloading - primary loading Direct Shear Test | Triaxial Test | Critical State Line | Modified Cam Clay | Stress Paths | Plaxis Soft Soil | Possible Enhancements Plaxis Advanced Course, New Delhi, India (29-31 October 2014) 80/448
- 81. 12 Critical State / Plaxis Soft Soil model 23 Advanced Course on Computational Geotechnics, New Delhi, India, 29 - 31 October 2014 heavily overconsolidated drained compression D. Muir Wood, 1990 Direct Shear Test | Triaxial Test | Critical State Line | Modified Cam Clay | Stress Paths | Plaxis Soft Soil | Possible Enhancements Critical State / Plaxis Soft Soil model 24 Advanced Course on Computational Geotechnics, New Delhi, India, 29 - 31 October 2014 v normally consolidated undrained compression D. Muir Wood, 1990 due to change of stress due to plastic soil behaviour Direct Shear Test | Triaxial Test | Critical State Line | Modified Cam Clay | Stress Paths | Plaxis Soft Soil | Possible Enhancements Plaxis Advanced Course, New Delhi, India (29-31 October 2014) 81/448
- 82. 13 Critical State / Plaxis Soft Soil model 25 Advanced Course on Computational Geotechnics, New Delhi, India, 29 - 31 October 2014 lightly overconsolidated undrained compression D. Muir Wood, 1990 due to change of stress due to plastic soil behaviour due to change of stress due to plastic soil behaviour Direct Shear Test | Triaxial Test | Critical State Line | Modified Cam Clay | Stress Paths | Plaxis Soft Soil | Possible Enhancements Critical State / Plaxis Soft Soil model 26 Advanced Course on Computational Geotechnics, New Delhi, India, 29 - 31 October 2014 heavily overconsolidated undrained compression D. Muir Wood, 1990 due to change of stress due to plastic soil behaviour Direct Shear Test | Triaxial Test | Critical State Line | Modified Cam Clay | Stress Paths | Plaxis Soft Soil | Possible Enhancements Plaxis Advanced Course, New Delhi, India (29-31 October 2014) 82/448
- 83. 14 Critical State / Plaxis Soft Soil model 27 Advanced Course on Computational Geotechnics, New Delhi, India, 29 - 31 October 2014 Elastic deformation is generated according to: unloading/reloading Total deformation is generated according to: primary compression e = void ratio = swelling index = compression index 0 0 ' ln e e p e e p 0 0 ' ln p e e p Direct Shear Test | Triaxial Test | Critical State Line | Modified Cam Clay | Stress Paths | Plaxis Soft Soil | Possible Enhancements Critical State / Plaxis Soft Soil model 28 Advanced Course on Computational Geotechnics, New Delhi, India, 29 - 31 October 2014 Generally we prefer notation in strains: 0 * * 0 0 * * * 0 ' ln , 1 ' ( ) ln , 1 e e v v p p v v p p e p p e εv = volumetric strain * = modified swelling index * = modified compression index Direct Shear Test | Triaxial Test | Critical State Line | Modified Cam Clay | Stress Paths | Plaxis Soft Soil | Possible Enhancements Plaxis Advanced Course, New Delhi, India (29-31 October 2014) 83/448
- 84. 15 Critical State / Plaxis Soft Soil model 29 Advanced Course on Computational Geotechnics, New Delhi, India, 29 - 31 October 2014 pp q p’ M 1 α K0 NC Soft Soil model: • Mohr-Coulomb failure surface for strength • M-line for determining K0 NC (no longer acts as CSL, only determines shape of cap) MC-line PLAXIS SOFT SOIL MODEL Direct Shear Test | Triaxial Test | Critical State Line | Modified Cam Clay | Stress Paths | Plaxis Soft Soil | Possible Enhancements Critical State / Plaxis Soft Soil model 30 Advanced Course on Computational Geotechnics, New Delhi, India, 29 - 31 October 2014 “MODIFIED CAM CLAY” WITH MOHR COULOMB Direct Shear Test | Triaxial Test | Critical State Line | Modified Cam Clay | Stress Paths | Plaxis Soft Soil | Possible Enhancements Plaxis Advanced Course, New Delhi, India (29-31 October 2014) 84/448
- 85. 16 Critical State / Plaxis Soft Soil model 31 Advanced Course on Computational Geotechnics, New Delhi, India, 29 - 31 October 2014 Input Parameters: * = / 1+e …….. Modified compression index * = / 1+e …….. Modified swelling index c ………………… Cohesion ………………… Friction angle ………………… Dilatancy angle ur ……………….. Poisson's ratio for unloading K0 nc ………………. Coefficient of lateral earth pressure in normal consolidation M …………………. K0 nc parameter p * * Direct Shear Test | Triaxial Test | Critical State Line | Modified Cam Clay | Stress Paths | Plaxis Soft Soil | Possible Enhancements Critical State / Plaxis Soft Soil model 32 Advanced Course on Computational Geotechnics, New Delhi, India, 29 - 31 October 2014 -600 -500 -400 -300 -200 -100 0 -0.5 -0.4 -0.3 -0.2 -0.1 0 vertical stress [kN/m2] vertical strain Chart 1 SS MC vertical stress vs vertical strain SS vs MC MODEL - OEDOMETER TEST Direct Shear Test | Triaxial Test | Critical State Line | Modified Cam Clay | Stress Paths | Plaxis Soft Soil | Possible Enhancements Plaxis Advanced Course, New Delhi, India (29-31 October 2014) 85/448
- 86. 17 Critical State / Plaxis Soft Soil model 33 Advanced Course on Computational Geotechnics, New Delhi, India, 29 - 31 October 2014 -350 -300 -250 -200 -150 -100 -50 0 -600 -500 -400 -300 -200 -100 0 horizontal stress [kN/m2] vertical stress [kN/m2] Chart 1 SS MC horizontal stress vs vertical stress SS vs MC MODEL - OEDOMETER TEST Direct Shear Test | Triaxial Test | Critical State Line | Modified Cam Clay | Stress Paths | Plaxis Soft Soil | Possible Enhancements Critical State / Plaxis Soft Soil model 34 Advanced Course on Computational Geotechnics, New Delhi, India, 29 - 31 October 2014 Stiffness: primary loading Stiffness: unloading / reloading Stiffness: unloading / reloading PRIMARY LOADING - UNLOADING / RELOADING elastic region current yield surface Direct Shear Test | Triaxial Test | Critical State Line | Modified Cam Clay | Stress Paths | Plaxis Soft Soil | Possible Enhancements Plaxis Advanced Course, New Delhi, India (29-31 October 2014) 86/448
- 87. 18 Critical State / Plaxis Soft Soil model 35 Advanced Course on Computational Geotechnics, New Delhi, India, 29 - 31 October 2014 MCC-MODEL - FURTHER DEVELOPMENTS "Bubble models" with kinematic hardening e.g. 3-SKH Model (Baudet & Stallebrass, 2004) Anisotropic models based on Modified Cam Clay (rotated yield surfaces) e.g. Wheeler, Näätänen, Karstunen & Lojander (2003) Direct Shear Test | Triaxial Test | Critical State Line | Modified Cam Clay | Stress Paths | Plaxis Soft Soil | Possible Enhancements Critical State / Plaxis Soft Soil model 36 Advanced Course on Computational Geotechnics, New Delhi, India, 29 - 31 October 2014 e.g. Leroueil & Vaughan (1990) Atkinson & Sallfors (1991) MCC-MODEL - FURTHER DEVELOPMENTS Direct Shear Test | Triaxial Test | Critical State Line | Modified Cam Clay | Stress Paths | Plaxis Soft Soil | Possible Enhancements Plaxis Advanced Course, New Delhi, India (29-31 October 2014) 87/448
- 88. New Delhi Advanced 2014 Computation Geotechnics 5 Hardening Soil and HS-small Models Professor Helmut Schweiger Plaxis Advanced Course, New Delhi, India (29-31 October 2014) 88/448
- 89. 1 S C I E N C E ■ P A S S I O N ■ T E C H N O L O G Y Computational Geotechnics Group Institute for Soil Mechanics and Foundation Engineering Graz University of Technology Helmut F. Schweiger CG5 HARDENING SOIL SMALL MODEL Advanced Course on Computational Geotechnics, New Delhi, India, 29 - 31 October 2014 2 CG5 - Hardening Soil Small Model Advanced Course on Computational Geotechnics, New Delhi, India, 29 -31 October 2014 CONTENTS Introduction (why advanced model?) Short description of Hardening Soil Model Parameters of Hardening Soil Model Comparison with experimental data Influence of important parameters Extension to account for small strain stiffness (HS-Small) Summary Introduction | Description of HS-Model | Parameters | Comparison with Experiments | Influence of Parameters | HS-small | Summary Plaxis Advanced Course, New Delhi, India (29-31 October 2014) 89/448
- 90. 2 3 CG5 - Hardening Soil Small Model Advanced Course on Computational Geotechnics, New Delhi, India, 29 -31 October 2014 Soil behaviour includes: difference in behaviour for primary loading – reloading/unloading nonlinear behaviour well below failure conditions stress dependent stiffness plastic deformation for isotropic or K0-stress paths dilatancy is not constant small strain stiffness (at very low strains and upon stress reversal) influence of density on strength and stiffness cannot be accounted for with simple elastic-perfectly plastic constitutive models Introduction | Description of HS-Model | Parameters | Comparison with Experiments | Influence of Parameters | HS-small | Summary 4 CG5 - Hardening Soil Small Model Advanced Course on Computational Geotechnics, New Delhi, India, 29 -31 October 2014 HS oedometer test 1- MC Introduction | Description of HS-Model | Parameters | Comparison with Experiments | Influence of Parameters | HS-small | Summary Plaxis Advanced Course, New Delhi, India (29-31 October 2014) 90/448
- 91. 3 5 CG5 - Hardening Soil Small Model Advanced Course on Computational Geotechnics, New Delhi, India, 29 -31 October 2014 0 0.01 0.02 0.03 0.04 0.05 0 50 100 150 200 250 eps_axial q [kN/m2] Mohr Coulomb Model HS-Model Introduction | Description of HS-Model | Parameters | Comparison with Experiments | Influence of Parameters | HS-small | Summary 6 CG5 - Hardening Soil Small Model Advanced Course on Computational Geotechnics, New Delhi, India, 29 -31 October 2014 -0,2 0 0,2 0,4 0,6 0,8 1 0 3 6 9 12 15 distance [m] s / s max [-] Linear Elastic Mohr Coulomb Hardening Soil Model smax [mm] LE 33 MC 36 HS 60 • All models calculate settlements • Differences in shape of trough and maximum values Introduction | Description of HS-Model | Parameters | Comparison with Experiments | Influence of Parameters | HS-small | Summary Plaxis Advanced Course, New Delhi, India (29-31 October 2014) 91/448
- 92. 4 7 CG5 - Hardening Soil Small Model Advanced Course on Computational Geotechnics, New Delhi, India, 29 -31 October 2014 Example for vertical displacements behind a retaining wall Typical vertical displacements behind a retaining wall (sheet pile wall in clay) -40 -20 0 20 40 60 80 100 120 0 5 10 15 20 distance from wall [m] vertical displacements [mm] Mohr Coulomb Hard. Soil > Hardening Soil Model calculates Settlements > Mohr-Coulomb Model calculates Heave Introduction | Description of HS-Model | Parameters | Comparison with Experiments | Influence of Parameters | HS-small | Summary 8 CG5 - Hardening Soil Small Model Advanced Course on Computational Geotechnics, New Delhi, India, 29 -31 October 2014 TRIAXIAL TEST q = failure value f q = residual value r 1 3 1 qf qr dense soil loose 3 1 q isotropic loading 1 1 = constant 1 3 3 Applied stress path and results for standard drained triaxial test 1 vol dense loose 3 2 1 volumetric vol Introduction | Description of HS-Model | Parameters | Comparison with Experiments | Influence of Parameters | HS-small | Summary Plaxis Advanced Course, New Delhi, India (29-31 October 2014) 92/448
- 93. 5 9 CG5 - Hardening Soil Small Model Advanced Course on Computational Geotechnics, New Delhi, India, 29 -31 October 2014 HYPERBOLIC APPROXIMATION OF STANDARD DRAINED TEST = reference modulus for primary loading at 50% of strength ref 50 E 3 1 σ σ q 1 1 E50 50% 50% Hyperbola q q q E 2 q ε a 50 a 1 m ref 3 ref 50 50 a p a σ E E msand 0.5 ; mclay 1 Introduction | Description of HS-Model | Parameters | Comparison with Experiments | Influence of Parameters | HS-small | Summary 10 CG5 - Hardening Soil Small Model Advanced Course on Computational Geotechnics, New Delhi, India, 29 -31 October 2014 hyperbolic for q < qf cot c a sin 1 sin 2 a q 3 f 1 Asymptote Hyperbola 3 1 σ σ q qf otherwise q = qf f f a R q q 0.9 Rf MC failure criterion HYPERBOLIC APPROXIMATION OF STANDARD DRAINED TEST Introduction | Description of HS-Model | Parameters | Comparison with Experiments | Influence of Parameters | HS-small | Summary Plaxis Advanced Course, New Delhi, India (29-31 October 2014) 93/448
- 94. 6 11 CG5 - Hardening Soil Small Model Advanced Course on Computational Geotechnics, New Delhi, India, 29 -31 October 2014 1 Asymptote Hyperbola 3 1 σ σ q a q q q q E 2 q a 50 a 1 3 1 ε 2 3 ε ε strain shear γ q q q E q 4 3 a 50 a γ HYPERBOLIC APPROXIMATION OF STANDARD DRAINED TEST Introduction | Description of HS-Model | Parameters | Comparison with Experiments | Influence of Parameters | HS-small | Summary 12 CG5 - Hardening Soil Small Model Advanced Course on Computational Geotechnics, New Delhi, India, 29 -31 October 2014 SHEAR STRAIN CONTOURS IN P-Q-PLANE q p´ 05 . 0 01 . 0 a 50 a q q q E 4 q 3 m ref 3 ref 50 50 a p a σ E E a a 3 a φ sin 1 sinφ 2 a) σ ( q lines curved 0.5 m : sands p´ q 0 c lines straight 1 m : clays Introduction | Description of HS-Model | Parameters | Comparison with Experiments | Influence of Parameters | HS-small | Summary Plaxis Advanced Course, New Delhi, India (29-31 October 2014) 94/448
- 95. 7 13 CG5 - Hardening Soil Small Model Advanced Course on Computational Geotechnics, New Delhi, India, 29 -31 October 2014 LINES OF EQUAL SHEAR STRAINS IN TRIAXIAL TEST Ref. : Ishihara, Tatsuoka and Yasuda (1975). “Undrained deformation and liquefaction of sand under cyclic stresses“. Soils and Foundations, Vol. 15, No. 1. Introduction | Description of HS-Model | Parameters | Comparison with Experiments | Influence of Parameters | HS-small | Summary 14 CG5 - Hardening Soil Small Model Advanced Course on Computational Geotechnics, New Delhi, India, 29 -31 October 2014 3 50 50 'cos ' ' sin ' 'cos ' sin ' m ref ref c E E c p 3 'cos ' ' sin ' 'cos ' sin ' m ref ur ur ref c E E c p Note: Stress-dependent stiffness based on 3’ 3 2 'cos ' 2 ' sin ' 1 sin ' f a c R q Failure according to MC criterion Introduction | Description of HS-Model | Parameters | Comparison with Experiments | Influence of Parameters | HS-small | Summary Plaxis Advanced Course, New Delhi, India (29-31 October 2014) 95/448
- 96. 8 15 CG5 - Hardening Soil Small Model Advanced Course on Computational Geotechnics, New Delhi, India, 29 -31 October 2014 DEFINITION OF E50 kPa 3 1 300 kPa 600 3́ 0 0.1 0.2 0.3 500 1500 100 E50, reference pressure = 200 kPa E50, reference pressure = 100 kPa Introduction | Description of HS-Model | Parameters | Comparison with Experiments | Influence of Parameters | HS-small | Summary 16 CG5 - Hardening Soil Small Model Advanced Course on Computational Geotechnics, New Delhi, India, 29 -31 October 2014 STIFFNESS IN UNLOADING-RELOADING Triaxial tests: Unloading is purely elastic in HS model Introduction | Description of HS-Model | Parameters | Comparison with Experiments | Influence of Parameters | HS-small | Summary Plaxis Advanced Course, New Delhi, India (29-31 October 2014) 96/448
- 97. 9 17 CG5 - Hardening Soil Small Model Advanced Course on Computational Geotechnics, New Delhi, India, 29 -31 October 2014 LINES OF EQUAL VOLUMETRIC STRAINS IN TRIAXIAL TEST Biarez, J. & Hicher, P.-Y. (1994), Elementary Mechanics of Soil Behaviour, Balkema - Publishers. Introduction | Description of HS-Model | Parameters | Comparison with Experiments | Influence of Parameters | HS-small | Summary 18 CG5 - Hardening Soil Small Model Advanced Course on Computational Geotechnics, New Delhi, India, 29 -31 October 2014 LINES OF EQUAL VOLUMETRIC STRAINS IN TRIAXIAL TEST q [MN/m²] 0.25 vol 0.20 vol 0.14 0.07 p’ [MN/m²] Introduction | Description of HS-Model | Parameters | Comparison with Experiments | Influence of Parameters | HS-small | Summary Plaxis Advanced Course, New Delhi, India (29-31 October 2014) 97/448
- 98. 10 19 CG5 - Hardening Soil Small Model Advanced Course on Computational Geotechnics, New Delhi, India, 29 -31 October 2014 DENSITY HARDENING IN THE HS MODEL 1 'cot ' 1 'cot ' m p p v ref c p m c p is determined by K0 nc is determined by Eoed ref p’ q MC failure line pp pp Cap Introduction | Description of HS-Model | Parameters | Comparison with Experiments | Influence of Parameters | HS-small | Summary 20 CG5 - Hardening Soil Small Model Advanced Course on Computational Geotechnics, New Delhi, India, 29 -31 October 2014 DEFINITION OF Eoed m ref ref oed oed p c c E E cot cot 1 holds strictly for K0-stress paths only Introduction | Description of HS-Model | Parameters | Comparison with Experiments | Influence of Parameters | HS-small | Summary Plaxis Advanced Course, New Delhi, India (29-31 October 2014) 98/448
- 99. 11 21 CG5 - Hardening Soil Small Model Advanced Course on Computational Geotechnics, New Delhi, India, 29 -31 October 2014 ELASTIC REGION f < 0 + fc < 0 REGION 1 no yield surface active > elastic f fc pc 1 p q p‘ = (‘1 + ‘2 + ‘3) / 3 q = 1 - 3 Introduction | Description of HS-Model | Parameters | Comparison with Experiments | Influence of Parameters | HS-small | Summary 22 CG5 - Hardening Soil Small Model Advanced Course on Computational Geotechnics, New Delhi, India, 29 -31 October 2014 SHEAR HARDENING REGION 2 shear hardening surface active f > 0 + fc < 0 2 p q f fc pc Introduction | Description of HS-Model | Parameters | Comparison with Experiments | Influence of Parameters | HS-small | Summary Plaxis Advanced Course, New Delhi, India (29-31 October 2014) 99/448
- 100. 12 23 CG5 - Hardening Soil Small Model Advanced Course on Computational Geotechnics, New Delhi, India, 29 -31 October 2014 SHEAR AND VOLUMETRIC HARDENING REGION 3 shear hardening and volumetric hardening surfaces active f > 0 + fc > 0 3 p q f fc pc Introduction | Description of HS-Model | Parameters | Comparison with Experiments | Influence of Parameters | HS-small | Summary 24 CG5 - Hardening Soil Small Model Advanced Course on Computational Geotechnics, New Delhi, India, 29 -31 October 2014 VOLUMETRIC HARDENING REGION 4 volumetric hardening surface active f < 0 + fc > 0 4 f pc p q Introduction | Description of HS-Model | Parameters | Comparison with Experiments | Influence of Parameters | HS-small | Summary Plaxis Advanced Course, New Delhi, India (29-31 October 2014) 100/448
- 101. 13 25 CG5 - Hardening Soil Small Model Advanced Course on Computational Geotechnics, New Delhi, India, 29 -31 October 2014 HARDENING SOIL MODEL IN PRINCIPAL STRESS SPACE Introduction | Description of HS-Model | Parameters | Comparison with Experiments | Influence of Parameters | HS-small | Summary 26 CG5 - Hardening Soil Small Model Advanced Course on Computational Geotechnics, New Delhi, India, 29 -31 October 2014 FLOW RULE Volumetric behaviour "stress dilatancy theory" (Rowe, 1962) p m p v sin cv m cv m m sin sin 1 sin sin sin cot 2 sin ' 3 ' 1 ' 3 ' 1 c m sin sin 1 sin sin sin cv dilatancy angle > non-associated flow rule Introduction | Description of HS-Model | Parameters | Comparison with Experiments | Influence of Parameters | HS-small | Summary Plaxis Advanced Course, New Delhi, India (29-31 October 2014) 101/448
- 102. 14 27 CG5 - Hardening Soil Small Model Advanced Course on Computational Geotechnics, New Delhi, India, 29 -31 October 2014 FLOW RULE q p' cv mob mobilized dilatancy angle for = 35° mobilized friction angle [°] 0 5 10 15 20 25 30 35 mobilized dilatancy angle [°] -35 -30 -25 -20 -15 -10 -5 0 5 10 15 20 25 30 35 = 0 = 5 = 20 = 35 cv cv dilation contraction negative values of are cut-off in Plaxis Introduction | Description of HS-Model | Parameters | Comparison with Experiments | Influence of Parameters | HS-small | Summary Note: flow rule in HS-small model is slightly different > undrained shear strength predicted is different (lower) 28 CG5 - Hardening Soil Small Model Advanced Course on Computational Geotechnics, New Delhi, India, 29 -31 October 2014 FLOW RULE q p' cv cv m cv m m sin sin 1 sin sin sin m < cv = negative > contraction m = cv = 0 m > cv = positive > dilation plastic potential Q x x x x Volumetric behaviour "stress dilatancy theory" (Rowe, 1962) Introduction | Description of HS-Model | Parameters | Comparison with Experiments | Influence of Parameters | HS-small | Summary Plaxis Advanced Course, New Delhi, India (29-31 October 2014) 102/448
- 103. 15 29 CG5 - Hardening Soil Small Model Advanced Course on Computational Geotechnics, New Delhi, India, 29 -31 October 2014 horizontal stress [kN/m2 ] -350 -300 -250 -200 -150 -100 -50 0 vertical stress [kN/m 2 ] -600 -550 -500 -450 -400 -350 -300 -250 -200 -150 -100 -50 0 Hardening Soil Model Soft Soil Model Mohr Coulomb Model Mohr-Coulomb model: ratio 3/1 determined by Hardening (Soft) Soil model: ratio 3/1 determined by K0 nc Unloading: ur OEDOMETER TEST - COMPARISON MC / SS / HS Introduction | Description of HS-Model | Parameters | Comparison with Experiments | Influence of Parameters | HS-small | Summary 30 CG5 - Hardening Soil Small Model Advanced Course on Computational Geotechnics, New Delhi, India, 29 -31 October 2014 vertikal stress [kN/m2 ] -600 -500 -400 -300 -200 -100 0 vertical strain -0.5 -0.4 -0.3 -0.2 -0.1 0.0 Hardening Soil Model Soft Soil Model Mohr Coulomb Model OEDOMETER TEST - COMPARISON MC / SS / HS Introduction | Description of HS-Model | Parameters | Comparison with Experiments | Influence of Parameters | HS-small | Summary Plaxis Advanced Course, New Delhi, India (29-31 October 2014) 103/448
- 104. 16 31 CG5 - Hardening Soil Small Model Advanced Course on Computational Geotechnics, New Delhi, India, 29 -31 October 2014 OVERCONSOLIDATION IN HS-MODEL p’ q pp pp Cap position based on previous stress history (p*, q*) Stress point due to current initial stress state (p*,q*) Initial pre-consolidation pressure pp0 relates to initial p0 Calculation of p0 based on: • OCR (Over-Consolidation Ratio) • POP (Pre-Overburden Pressure) pP = Isotropic pre-cons. pressure p = Vertical pre-cons. pressure 0 , ' p yy p 0 0 , , 0 ' ' nc p xx p zz p K 0 0 0 1 , , , 3 0 0 , , 2 2 *= ' ' ' * | ' ' | * ( *) xx p yy p zz p xx p yy p p p q q p p Introduction | Description of HS-Model | Parameters | Comparison with Experiments | Influence of Parameters | HS-small | Summary 32 CG5 - Hardening Soil Small Model Advanced Course on Computational Geotechnics, New Delhi, India, 29 -31 October 2014 OVERCONSOLIDATION Calculation of p0 based on OCR: Calculation of p0 based on POP: POP ' yy0 p0 σ σ OCR ' yy0 σ ' yy0 σ p0 σ p0 σ 0 0 'yy p OCR POP yy p 0 0 ' Introduction | Description of HS-Model | Parameters | Comparison with Experiments | Influence of Parameters | HS-small | Summary Plaxis Advanced Course, New Delhi, India (29-31 October 2014) 104/448
- 105. 17 33 CG5 - Hardening Soil Small Model Advanced Course on Computational Geotechnics, New Delhi, India, 29 -31 October 2014 PLASTIC POINTS -σ3 -σ1 Mohr-Coulomb point f<0 Cap point Hardening point Cap & Hardening point -σ3 -σ1 Tension point Tension cut-off: Principal tensile stress is set to zero Introduction | Description of HS-Model | Parameters | Comparison with Experiments | Influence of Parameters | HS-small | Summary 34 CG5 - Hardening Soil Small Model Advanced Course on Computational Geotechnics, New Delhi, India, 29 -31 October 2014 PLASTIC POINTS elastic elastic-plastic double hardening Introduction | Description of HS-Model | Parameters | Comparison with Experiments | Influence of Parameters | HS-small | Summary Plaxis Advanced Course, New Delhi, India (29-31 October 2014) 105/448