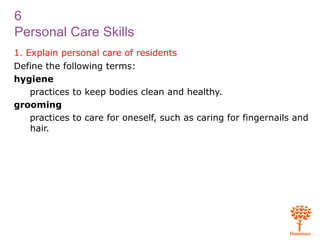
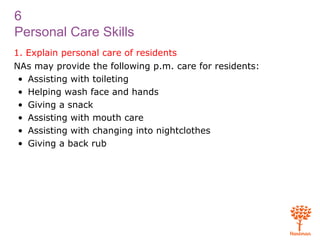
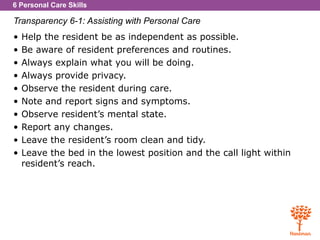
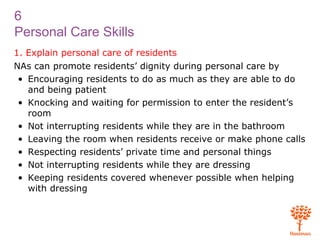
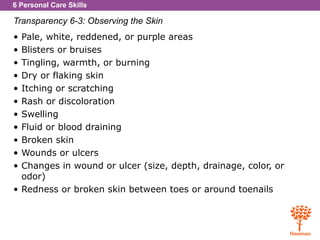
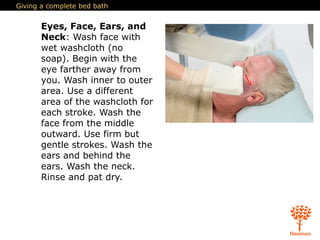
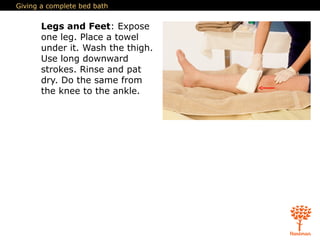
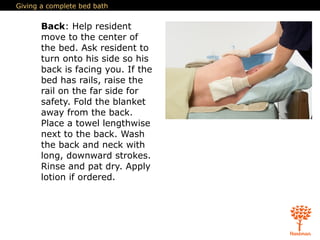
6
Personal Care Skills
1. Explain personal care of residents
Define the following terms:
hygiene
practices to keep bodies clean and healthy.
grooming
practices to care for oneself, such as caring for fingernails and
hair.
6
Personal Care Skills
1. Explain personal care of residents
NAs may provide the following a.m. care for residents:
• Assisting with toileting
• Helping wash face and hands
• Assisting with hair care, dressing, and shaving
• Assisting with mouth care
6
Personal Care Skills
1. Explain personal care of residents
NAs may provide the following p.m. care for residents:
• Assisting with toileting
• Helping wash face and hands
• Giving a snack
• Assisting with mouth care
• Assisting with changing into nightclothes
• Giving a back rub
6 Personal Care Skills
Transparency 6-1: Assisting with Personal Care
• Help the resident be as independent as possible.
• Be aware of resident preferences and routines.
• Always explain what you will be doing.
• Always provide privacy.
• Observe the resident during care.
• Note and report signs and symptoms.
• Observe resident’s mental state.
• Report any changes.
• Leave the resident’s room clean and tidy.
• Leave the bed in the lowest position and the call light within
resident’s reach.
6
Personal Care Skills
1. Explain personal care of residents
NAs can promote residents’ dignity during personal care by
• Encouraging residents to do as much as they are able to do
and being patient
• Knocking and waiting for permission to enter the resident’s
room
• Not interrupting residents while they are in the bathroom
• Leaving the room when residents receive or make phone calls
• Respecting residents’ private time and personal things
• Not interrupting residents while they are dressing
• Keeping residents covered whenever possible when helping
with dressing
6
Personal Care Skills
1. Explain personal care of residents
Think about these questions:
How else can NAs help promote privacy, respect, and dignity
during personal care?
What else do you think can be accomplished while providing
personal care?
6
Personal Care Skills
1. Explain personal care of residents
While providing personal care NAs should observe for and report
the following:
• Skin color, temperature, or reddened areas
• Mobility
• Flexibility
• Comfort or pain level
• Strength and ability to perform ADLs
• Mental and emotional state
• Complaints
6
Personal Care Skills
2. Identify guidelines for providing skin care and preventing
pressure ulcers
Define the following terms:
pressure points
areas of the body that bear much of its weight.
bony prominences
areas of the body where the bone lies close to the skin.
pressure ulcer
a serious wound resulting from skin breakdown; also called
pressure sore, bed sore, or decubitus ulcer.
6
Personal Care Skills
2. Identify guidelines for providing skin care and preventing
pressure ulcers
Define the following terms:
shearing
rubbing or friction that results from the skin moving one way
and the bone underneath it remaining fixed or moving in the
opposite direction.
draw sheet
an extra sheet placed on top of the bottom sheet; used for
moving residents in bed.
6
Personal Care Skills
2. Identify guidelines for providing skin care and preventing
pressure ulcers
Define the following terms:
foot drop
a weakness of muscles in the feet and ankles that causes
problems with the ability to flex the ankles and walk
normally.
orthotic device, or orthosis
a device that helps support and align a limb and improve its
functioning.
6
Personal Care Skills
2. Identify guidelines for providing skin care and preventing
pressure ulcers
REMEMBER:
Prevention is the key to skin health. Once a pressure ulcer forms,
it can get bigger and deeper and become infected. Pressure
ulcers are painful and difficult to heal.
6 Personal Care Skills
Transparency 6-2: Pressure Ulcer Danger Zones
6 Personal Care Skills
Transparency 6-3: Observing the Skin
• Pale, white, reddened, or purple areas
• Blisters or bruises
• Tingling, warmth, or burning
• Dry or flaking skin
• Itching or scratching
• Rash or discoloration
• Swelling
• Fluid or blood draining
• Broken skin
• Wounds or ulcers
• Changes in wound or ulcer (size, depth, drainage, color, or
odor)
• Redness or broken skin between toes or around toenails
6 Personal Care Skills
Transparency 6-3: Observing the Skin
In darker complexions, also look for
• Any change in feel of the tissue
• Any change in appearance of the skin, such as an “orange-
peel” look
• Purplish hue
• Extremely dry, crust-like areas that might be covering a tissue
break
6
Personal Care Skills
2. Identify guidelines for providing skin care and preventing
pressure ulcers
NAs should remember these guidelines for skin care:
• Report changes in residents’ skin.
• Provide regular skin care.
• Reposition often, at least every two hours.
• Give skin care often for incontinent residents. Change clothing
and linen often.
• Avoid scratching or irritating skin; report blisters or sores on
feet.
6
Personal Care Skills
2. Identify guidelines for providing skin care and preventing
pressure ulcers
Guidelines for skin care (cont’d):
• Massage skin frequently. Do not massage white, red, or
purple areas.
• Avoid pulling or tearing skin.
• In overweight residents, pay special attention to skin under
folds.
• Encourage residents to eat well-balanced meals.
• Keep plastic or rubber materials from coming into contact
with skin.
• Follow the care plan and nurse’s instructions.
6
Personal Care Skills
2. Identify guidelines for providing skin care and preventing
pressure ulcers
Bed-bound residents are at a high risk for pressure ulcers. When
caring for these residents NAs should
• Keep bottom sheet tight and wrinkle-free.
• Avoid shearing.
• Place sheepskin, chamois skin, or bed pad under back and
buttocks.
• Relieve pressure under bony prominences.
• Make bed or chair softer with flotation pads.
• Use bed cradle to keep top sheets from rubbing skin.
• Reposition residents seated in chairs or wheelchairs at least
every hour if they cannot change positions easily themselves.
6
Personal Care Skills
2. Identify guidelines for providing skin care and preventing
pressure ulcers
All of these positioning devices can help keep residents
comfortable and reduce the risk of skin breakdown:
• Backrests
• Bed cradles
• Draw sheets
• Footboards
• Hand rolls
• Orthotic devices
• Trochanter rolls
• Pillows
6
Personal Care Skills
3. Describe guidelines for assisting with bathing
Define the following terms:
partial bath
a bath given on days when a complete bath or shower is not
done; includes washing the face, hands, underarms, and
perineum.
perineum
the genital and anal area.
6
Personal Care Skills
3. Describe guidelines for assisting with bathing
Remember these guidelines for bathing:
• Baths are for health and relaxation.
• The face, hands, underarms, and perineum should be washed
every day. Complete baths are necessary every other day or
less often.
• Use facility-approved products.
• Keep room temperature comfortable.
• Be familiar with safety and assistive devices.
6
Personal Care Skills
3. Describe guidelines for assisting with bathing
Guidelines for bathing (cont’d):
• Gather supplies beforehand so a resident is not left alone
while bathing.
• Make sure water temperature is safe and comfortable. Have
resident test water temperature.
• Remove all soap from the skin.
• Keep a record of bathing schedules.
Giving a complete bed bath
Equipment: bath blanket, bath basin, soap, bath
thermometer, 2-4 washcloths, 2-4 bath towels, bed pads,
clean clothes, 2 pairs of gloves, orangewood stick or nail
brush, lotion, deodorant, brush or comb
When bathing, move resident’s body gently and naturally.
Avoid force and over-extension of limbs and joints.
1. Identify yourself by name. Identify the resident by name.
Resident has right to know identity of his or her
caregiver. Identifying resident by name shows respect
and establishes correct identification.
2. Wash your hands.
Provides for infection prevention.
3. Explain procedure to the resident. Speak clearly, slowly,
and directly. Maintain face-to-face contact whenever
possible.
Promotes understanding and independence.
Giving a complete bed bath
4. Provide for resident’s privacy with curtain, screen, or
door. Be sure the room is at a comfortable temperature
and there are no drafts.
Maintains resident’s right to privacy and dignity.
5. Adjust bed to a safe level, usually waist high. Lock bed
wheels.
Prevents injury to you and to resident.
Giving a complete bed bath
6. Place a bath blanket or
towel over resident. Ask
him to hold onto it as
you remove or fold back
top bedding. Remove
gown, while keeping
resident covered with
bath blanket (or top
sheet). Place gown in
proper container.
Giving a complete bed bath
7. Fill the basin with warm water. Test water temperature
with thermometer or against the inside of your wrist.
Water temperature should not be over 105°F. Have
resident check water temperature to see if it is
comfortable. Adjust if necessary. The water will cool
quickly. Change the water when it becomes too cool,
soapy, or dirty.
Resident’s sense of touch may be different than yours;
therefore, resident is best able to identify a comfortable
water temperature.
8. Put on gloves.
Protects you from contact with body fluids.
9. Ask the resident to participate in washing. Help him do
this when needed.
Promotes independence.
Giving a complete bed bath
10. Uncover only one part of the body at a time. Place a
towel or bed pad under the part being washed.
Promotes resident’s dignity and right to privacy. Also
helps keep resident warm.
11. Wash, rinse, and dry one part of the body at a time.
Start at the head. Work down, and complete the front
first. When washing, use a clean area of the washcloth
for each stroke.
Giving a complete bed bath
Eyes, Face, Ears, and
Neck: Wash face with
wet washcloth (no
soap). Begin with the
eye farther away from
you. Wash inner to outer
area. Use a different
area of the washcloth for
each stroke. Wash the
face from the middle
outward. Use firm but
gentle strokes. Wash the
ears and behind the
ears. Wash the neck.
Rinse and pat dry.
Giving a complete bed bath
Arms and Axillae:
Remove top clothing.
Cover with bath blanket.
Remove one arm from
under the towel. With a
soapy washcloth, wash
the upper arm and
underarm. Use long
strokes from the
shoulder down to the
wrist. Rinse and pat dry.
Repeat for the other
arm.
Giving a complete bed bath
Hands: Wash one hand
in a basin. Clean under
the nails with an
orangewood stick or nail
brush. Rinse and pat
dry. Give nail care (see
procedure later in this
chapter). Repeat for the
other hand. Put lotion on
the resident’s elbows
and hands.
Giving a complete bed bath
Chest: Place the towel across the resident’s chest. Pull
the blanket down to the waist. Lift the towel only enough
to wash the chest. Rinse it and pat dry. For a female
resident, wash, rinse, and dry breasts and under breasts.
Check the skin in this area for signs of irritation.
Abdomen: Keep towel across chest. Fold the blanket
down so that it still covers the pubic area. Wash the
abdomen, rinse, and pat dry. If the resident has an
ostomy, give skin care around the opening (Chapter 4).
Cover with the towel. Pull the cotton blanket up to the
resident’s chin. Remove the towel.
Giving a complete bed bath
Legs and Feet: Expose
one leg. Place a towel
under it. Wash the thigh.
Use long downward
strokes. Rinse and pat
dry. Do the same from
the knee to the ankle.
Giving a complete bed bath
Place another towel
under the foot. Move the
basin to the towel. Place
the foot into the basin.
Wash the foot and
between the toes. Rinse
foot and pat dry. Make
sure areas between toes
are dry. Apply lotion to
the foot if ordered,
especially at the heels.
Do not apply lotion
between the toes.
Repeat steps for the
other leg and foot.
Giving a complete bed bath
Back: Help resident
move to the center of
the bed. Ask resident to
turn onto his side so his
back is facing you. If the
bed has rails, raise the
rail on the far side for
safety. Fold the blanket
away from the back.
Place a towel lengthwise
next to the back. Wash
the back and neck with
long, downward strokes.
Rinse and pat dry. Apply
lotion if ordered.
Giving a complete bed bath
12. Place the towel under the buttocks and upper thighs.
Help the resident turn onto his back. If the resident is
able to wash his perineal area, place a basin of clean,
warm water, a washcloth, and towel within reach. Hand
items to the resident as needed. If the resident wants
you to leave the room, remove and discard gloves. Wash
your hands. Leave supplies and the call light within
reach.
13. If the resident cannot provide perineal care, you will do
it. Remove and discard your gloves. Wash your hands
and put on clean gloves. Provide privacy at all times.
14. Perineal area and buttocks: Change the bath water.
Place a towel or bed pad under the perineal area. Wash,
rinse, and dry perineal area. Work from front to back
(clean to dirty).
Giving a complete bed bath
For a female resident:
Using water and a small
amount of soap, wash
the perineum from front
to back. Use single
strokes. Do not wash
from the back to the
front. This may cause
infection. Use a clean
area of washcloth or a
clean washcloth for each
stroke.
Giving a complete bed bath
First spread the labia majora, the outside folds of
perineal skin that protect the urinary meatus and the
vaginal opening. Wipe from front to back on one side
with a clean washcloth. Then wipe the other side from
front to back, using a clean part of the washcloth. Clean
the perineum (area between vagina and anus) last with a
front to back motion. Rinse the area thoroughly in the
same way. Make sure all soap is removed.
Dry entire perineal area. Move from front to back, using
a blotting motion with towel. Ask resident to turn on her
side. Wash, rinse, and dry buttocks and anal area. Clean
the anal area without contaminating the perineal area.
Giving a complete bed bath
For a male resident: If
the resident is
uncircumcised, pull back
the foreskin first. Gently
push skin toward the
base of penis. Hold the
penis by the shaft. Wash
in a circular motion from
the tip down to the base.
Use a clean area of
washcloth or clean
washcloth for each
stroke.
Giving a complete bed bath
Thoroughly rinse the penis and pat dry. If resident is
uncircumcised, gently return foreskin to normal position.
Then wash the scrotum and groin. The groin is the area
from the pubis (area around the penis and scrotum) to
the upper thighs. Rinse and pat dry. Ask the resident to
turn on his side. Wash, rinse, and dry buttocks and anal
area. Clean the anal area without contaminating the
perineal area.
15. Cover the resident with the blanket.
16. Empty, rinse, and dry bath basin. Place basin in
designated dirty supply area or return to storage,
depending on facility policy.
17. Place soiled clothing and linens in proper containers.
18. Remove and discard gloves.
19. Wash your hands.
Giving a complete bed bath
20. Provide deodorant. Brush or comb the resident’s hair (see
procedure later in this chapter). Help resident put on
clean clothing. Help resident into comfortable position
with proper body alignment.
21. Return bed to lowest position. Remove privacy measures.
Lowering the bed provides for safety.
22. Place call light within resident’s reach.
Allows resident to communicate with staff as necessary.
23. Wash your hands.
Provides for infection prevention.
24. Report any changes in resident to the nurse.
Provides nurse with information to assess resident.
25. Document procedure using facility guidelines.
If you do not document the care, legally it did not
happen.
Giving a back rub
Equipment: cotton blanket or towel, lotion
1. Identify yourself by name. Identify the resident by name.
Resident has right to know identity of his or her
caregiver. Addressing resident by name shows respect
and establishes correct identification.
2. Wash your hands.
Provides for infection prevention.
3. Explain procedure to resident. Speak clearly, slowly, and
directly. Maintain face-to-face contact whenever possible.
Promotes understanding and independence.
4. Provide for resident’s privacy with curtain, screen, or
door.
Maintains resident’s right to privacy and dignity.
5. Adjust bed to a safe level, usually waist high. Lower the
head of the bed. Lock bed wheels.
Prevents injury to you and to resident.
Giving a back rub
6. Position resident lying on his side or stomach. Cover
resident with a cotton blanket or towel. Fold back bed
covers. Expose the back to the top of the buttocks. Back
rubs can also be given with the resident sitting up.
7. Warm lotion by putting bottle in warm water for five
minutes. Run your hands under warm water. Pour lotion
on your hands. Rub them together. Always put lotion on
your hands first, rather than on the resident’s skin.
Increases resident’s comfort.
Giving a back rub
8. Place hands on each side
of upper part of the
buttocks. Use the full
palm of each hand. Make
long, smooth upward
strokes with both hands.
Move along each side of
the spine, up to the
shoulders. Circle your
hands outward. Move
back along outer edges
of the back. At buttocks,
make another circle.
Giving a back rub
Move your hands back
up to the shoulders.
Without taking your
hands off resident’s skin,
repeat this motion for
three to five minutes.
Long upward strokes
release muscle tension;
circular strokes increase
circulation in muscle
areas.
Giving a back rub
9. Knead with the first two fingers and thumb of each hand.
Place them at base of the spine. Move upward together
along each side of the spine. Apply gentle downward
pressure with fingers and thumbs. Follow the same
direction as with the long smooth strokes, circling at
shoulders and buttocks.
10. Gently massage bony areas (spine, shoulder blades, hip
bones). Use circular motions of your fingertips. If any of
these areas are pale, white, or red, massage around
them rather than on them.
Redness indicates that skin is already irritated and
fragile. Include this information in your report to the
nurse.
11. Let the resident know when you are almost through.
Finish with some long, smooth strokes.
12. Dry the back if extra lotion remains on it.
13. Remove blanket or towel.
Giving a back rub
14. Help the resident get dressed. Help resident into
comfortable position.
15. Store supplies. Place soiled clothing and linens in proper
containers.
16. Return bed to lowest position. Remove privacy measures.
Provides for resident’s safety.
17. Place call light within resident’s reach.
Allows resident to communicate with staff as necessary.
18. Wash your hands.
Provides for infection prevention.
19. Report any changes in resident to the nurse.
Provides nurse with information to assess resident.
20. Document procedure using facility guidelines.
If you do not document the care, legally it did not
happen.
Shampooing hair in bed
Equipment: shampoo, hair
conditioner (if requested), 2
bath towels, washcloth, bath
thermometer, pitcher or
handheld shower or sink
attachment, waterproof pad,
bath blanket, trough and
catch basin, comb and brush,
hair dryer
1. Identify yourself by
name. Identify the
resident by name.
Resident has right to
know identity of his or
her caregiver.
Addressing resident by
name shows respect and
establishes correct
identification.
Shampooing hair in bed
2. Wash your hands.
Provides for infection prevention.
3. Explain procedure to resident. Speak clearly, slowly, and
directly. Maintain face-to-face contact whenever possible.
Promotes understanding and independence.
4. Provide for resident’s privacy with curtain, screen, or
door. Be sure room is at a comfortable temperature and
there are no drafts.
Maintains resident’s right to privacy and dignity.
5. Arrange the supplies within reach.
6. Test water temperature with thermometer or against the
inside of your wrist. Water temperature should be no
higher than 105°F. Have resident check water
temperature. Adjust if necessary.
Resident’s sense of touch may be different than yours;
therefore, resident is best able to identify a
comfortable water temperature.
Shampooing hair in bed
7. Remove all pillows and place the resident in a flat
position. Adjust bed to a safe level, usually waist high.
Lock bed wheels.
Prevents injury to you and to resident.
8. Place the waterproof pad under the resident’s head and
shoulders. Cover the resident with the bath blanket. Fold
back the top sheet and regular blankets.
Protects bed linen.
9. Place the trough under resident’s head. Connect trough
to the catch basin. Place one towel across the resident’s
shoulders.
10. Protect resident’s eyes with dry washcloth.
11. Use pitcher or attachment to wet hair thoroughly. Apply a
small amount of shampoo to your hands and rub them
together.
Shampooing hair in bed
12. Lather and massage
scalp with fingertips (not
fingernails). Use a
circular motion from
front to back. Do not
scratch the scalp.
13. Rinse hair until water
runs clear. Use
conditioner if resident
wants it. Rinse as
directed on container. Be
sure to rinse the hair
thoroughly to prevent
the scalp from getting
dry and itchy.
14. Wrap resident’s hair in a
clean towel. Dry his face
and neck with the
washcloth.
Shampooing hair in bed
15. Remove trough and waterproof pad.
16. Raise the head of bed.
17. Gently rub the scalp and hair with the towel.
18. Comb or brush hair. Dry hair with a hair dryer on low
setting if facility allows this. Style hair as resident
prefers.
19. Return bed to lowest position. Remove privacy measures.
Lowering the bed provides for safety.
20. Place call light within resident’s reach.
Allows resident to communicate with staff as necessary.
21. Empty, rinse, and wipe bath basin/pitcher. Take to proper
area.
22. Clean comb or brush. Return hair dryer and comb or
brush to proper storage.
23. Place soiled linen in proper container.
Shampooing hair in bed
24. Wash your hands.
Provides for infection prevention.
25. Report any changes in resident to nurse.
Provides nurse with information to assess resident.
26. Document procedure using facility guidelines.
If you do not document the care, legally it did not
happen.
6
Personal Care Skills
3. Describe guidelines for assisting with bathing
REMEMBER:
It is very important to check the temperature of the water and
have the resident check the temperature of the water before
bathing. Bath water should be changed when it becomes too
cool, soapy, or dirty.
6
Personal Care Skills
3. Describe guidelines for assisting with bathing
REMEMBER:
NAs must protect residents’ privacy and dignity by keeping body
parts covered with towels and bath blankets. This also helps the
resident stay warm.
6
Personal Care Skills
3. Describe guidelines for assisting with bathing
NAs should remember these safety guidelines for showers and
tub baths:
• Clean tub or shower before and after use.
• Be sure floor is dry.
• Be familiar with and use assistive devices as necessary.
• Have resident use safety bars to get into or out of tub or
shower.
• Place items within reach.
• Do not leave resident alone.
• Do not use bath oils, lotions, or powders.
• Test water temperature to make sure it is safe and
comfortable.
Giving a shower or a tub bath
Equipment: bath blanket, soap, shampoo, bath thermometer,
2-4 washcloths, 2-4 bath towels, clean clothes, nonskid
footwear, 2 pairs of gloves, lotion, deodorant, hair dryer
1. Wash your hands.
Provides for infection prevention.
2. Place equipment in shower or tub room. Put on gloves.
Clean shower or tub area and shower chair. Place bucket
under shower chair (in case resident has a bowel
movement). Turn on heat lamp to warm the room, if
available.
Cleaning reduces pathogens and prevents the spread of
infection.
3. Remove and discard gloves. Wash your hands.
Provides for infection prevention.
Giving a shower or a tub bath
4. Go to resident’s room. Identify yourself by name. Identify
the resident by name.
Resident has right to know identity of his or her
caregiver. Addressing resident by name shows respect
and establishes correct identification.
5. Wash your hands.
Provides for infection prevention.
6. Explain procedure to resident. Speak clearly, slowly, and
directly. Maintain face-to-face contact whenever possible.
Promotes understanding and independence.
7. Provide for resident’s privacy with curtain, screen, or
door.
Maintains resident’s right to privacy and dignity.
8. Help resident to put on nonskid footwear. Transport
resident to shower or tub room.
Nonskid footwear helps lessen the risk of falls.
Giving a shower or a tub bath
9. Put on clean gloves.
10. Help resident remove
clothing and shoes.
For a shower:
11. If using a shower chair,
place it close to resident.
Lock wheels (Fig. 6-21).
Safely transfer resident
into shower chair.
Chair may slide if
resident attempts to get
up.
Giving a shower or a tub bath
12. Turn on water. Test water temperature with thermometer
or against the inside of your wrist. Water temperature
should be no higher than 105°F. Have resident check
water temperature. Adjust if necessary. Check
temperature throughout the shower.
Resident’s sense of touch may be different than yours;
therefore, resident is best able to identify a comfortable
water temperature.
13. Unlock the shower chair and move it into the shower
stall. Lock wheels.
14. Stay with resident during procedure.
Provides for resident’s safety.
15. Let resident wash as much as possible. Help to wash his
or her face.
Encourages resident to be independent.
16. Help resident shampoo and rinse hair.
Giving a shower or a tub bath
17. Using soap, help to wash and rinse the entire body. Move
from head to toe (clean to dirty).
18. Turn off water. Unlock shower chair wheels. Roll resident
out of shower.
For a tub bath:
11. Residents may need help to get into the bath, depending
on their level of mobility. Safely transfer resident onto
chair or tub lift, or help resident into bath.
12. Fill the tub halfway with warm water. Test water
temperature with thermometer or against the inside of
your wrist. Water temperature should be no higher than
105°F. Have resident check water temperature. Adjust if
necessary.
13. Stay with resident during procedure.
Provides for resident’s safety.
Giving a shower or a tub bath
14. Let resident wash as much as possible. Help to wash his
or her face.
Encourages resident to be independent.
15. Help resident shampoo and rinse hair.
16. Using soap, help to wash and rinse the entire body. Move
from head to toe (clean to dirty).
17. Drain the tub. Cover resident with bath blanket while the
tub drains.
Maintains resident’s dignity and right to privacy by not
exposing body. Keeps resident warm.
18. Help resident out of tub and onto a chair.
Remaining steps for either procedure:
19. Give resident towel(s) and help to pat dry. Pat dry under
the breasts, between skin folds, in the perineal area, and
between toes.
Patting dry prevents skin tears and reduces chafing.
Giving a shower or a tub bath
20. Apply lotion and deodorant as needed.
21. Place soiled clothing and linens in proper containers.
22. Remove and discard gloves.
23. Wash your hands.
Provides for infection prevention.
24. Help resident dress and comb hair before leaving shower
or tub room. Offer a hair dryer if needed. Put on nonskid
footwear. Return resident to room.
Combing hair in shower room allows resident to maintain
dignity when returning to room.
25. Make sure resident is comfortable.
26. Place call light within resident’s reach.
Allows resident to communicate with staff as necessary.
27. Report any changes in resident to nurse.
Provides nurse with information to assess resident.
Giving a shower or a tub bath
28. Document procedure using facility guidelines.
If you do not document the care, legally it did not
happen.
6
Personal Care Skills
4. Describe guidelines for assisting with
grooming
Define the following terms:
pediculosis
an infestation of lice.
safety razor
a type of razor that has a sharp blade with a special safety
casing to help prevent cuts; requires the use of shaving
cream or soap.
6
Personal Care Skills
4. Describe guidelines for assisting with
grooming
Define the following terms:
disposable razor
type of razor that is discarded after one use; requires the use
of shaving cream or soap.
electric razor
type of razor that runs on electricity; does not require the use
of soap or shaving cream.
6 Personal Care Skills
Transparency 6-4: Assisting with Grooming
• Residents should do as much for themselves as they can.
• Let residents make as many choices as possible.
• Be sensitive, professional, and respectful.
• Do not use same nail equipment on more than one resident.
• Keep feet clean and dry, and observe residents’ feet carefully.
• Wear gloves when shaving residents.
• Be gentle when handling residents’ hair.
Providing fingernail care
Equipment: orangewood stick, emery board, lotion, basin,
soap, washcloth, 2 towels, bath thermometer, gloves
1. Identify yourself by name. Identify the resident by name.
Resident has right to know identity of his or her
caregiver. Addressing resident by name shows respect
and establishes correct identification.
2. Wash your hands.
Provides for infection prevention.
3. Explain procedure to resident. Speak clearly, slowly, and
directly. Maintain face-to-face contact whenever possible.
Promotes understanding and independence.
4. Provide for resident’s privacy with curtain, screen, or
door.
Maintains resident’s right to privacy and dignity.
Providing fingernail care
5. If resident is in bed, adjust bed to a safe level, usually
waist high. Lock bed wheels.
Prevents injury to you and to resident.
6. Fill the basin halfway with warm water. Test water
temperature with thermometer or against the inside of
your wrist. Ensure it is safe. Water temperature should
be no higher than 105°F. Have resident check water
temperature. Adjust if necessary. Place basin at a
comfortable level for the resident.
Resident’s sense of touch may be different than yours;
therefore, resident is best able to identify a comfortable
water temperature.
7. Put on gloves.
8. Soak the resident’s hands and nails in the basin of water.
Soak all 10 fingertips for at least five minutes.
Nail care is easier if nails are first softened.
Providing fingernail care
9. Remove hands from
water. Wash hands with
soapy washcloth. Rinse.
Pat hands dry with
towel, including between
fingers. Remove the
hand basin.
10. Place resident’s hands
on the towel. Gently
clean under each
fingernail with
orangewood stick.
Most pathogens on
hands come from
beneath the nails.
Providing fingernail care
11. Wipe orangewood stick on towel after each nail. Wash
resident’s hands again. Dry them thoroughly, especially
between fingers.
12. Shape nails with an emery board or file. File in a curve.
Finish with nails smooth and free of rough edges.
Filing in a curve smoothes nails and eliminates edges,
which may catch on clothes or tear skin.
13. Apply lotion from fingertips to wrists. Remove excess, if
any, with a towel.
14. Empty, rinse, and dry basin. Place basin in designated
dirty supply area or return to storage, depending on
facility policy.
15. Place soiled clothing and linens in proper containers.
16. Remove and discard gloves. Wash your hands.
Provides for infection prevention.
Providing fingernail care
17. Return bed to lowest position. Remove privacy measures.
Lowering the bed provides for safety.
18. Place call light within resident’s reach.
Allows resident to communicate with staff as necessary.
19. Report any changes in resident to the nurse.
Provides nurse with information to assess resident.
20. Document procedure using facility guidelines.
If you do not document the care, legally it did not
happen.
6
Personal Care Skills
4. Describe guidelines for assisting with grooming
NAs should observe for and report the following when providing
foot care:
• Dry, flaking skin
• Non-intact or broken skin
• Discoloration of the feet
• Blisters
• Bruises
• Blood or drainage
6
Personal Care Skills
4. Describe guidelines for assisting with grooming
Observe and report when providing foot care (cont’d):
• Long, ragged toenails
• Ingrown toenails
• Swelling
• Soft, fragile, or reddened heels
• Differences in temperature of the feet
Providing foot care
Equipment: basin, bath mat, soap, lotion, washcloth, 2 bath
towels, bath thermometer, clean socks, gloves
1. Identify yourself by name. Identify the resident by name.
Resident has right to know identity of his or her
caregiver. Addressing resident by name shows respect
and establishes correct identification.
2. Wash your hands.
Provides for infection prevention.
3. Explain procedure to resident. Speak clearly, slowly, and
directly. Maintain face-to-face contact whenever possible.
Promotes understanding and independence.
4. Provide for resident’s privacy with curtain, screen, or
door.
Maintains resident’s right to privacy and dignity.
5. If the resident is in bed, adjust bed to a safe level,
usually waist high. Lock bed wheels.
Prevents injury to you and to resident.
Providing foot care
6. Fill the basin halfway with warm water. Test water
temperature with thermometer or against the inside of
your wrist. Ensure it is safe. Water temperature should
be no higher than 105° F. Have resident check water
temperature. Adjust if necessary.
Resident’s sense of touch may be different than yours;
therefore, resident is best able to identify a comfortable
water temperature.
7. Place basin on the bath mat or bath towel on the floor (if
the resident is sitting in a chair) or on a towel at the foot
of the bed (if the resident is in bed). Make sure basin is
in a comfortable position for resident. Support the foot
and ankle throughout the procedure.
8. Put on gloves.
9. Remove resident’s socks. Completely submerge resident’s
feet in water. Soak the feet for 10 to 20 minutes. Add
warm water to basin as necessary.
Providing foot care
10. Put soap on wet
washcloth. Remove one
foot from water. Wash
entire foot, including
between the toes and
around nail beds.
11. Rinse entire foot,
including between the
toes.
12. Dry entire foot, including
between the toes.
13. Repeat steps 10 through
12 for the other foot.
Providing foot care
14. Put lotion in hand. Warm lotion by rubbing hands
together. Massage lotion into entire foot (top and
bottom), except between the toes. Remove excess, if
any, with a towel.
15. Help resident put on clean socks.
16. Empty, rinse, and dry basin. Place basin in designated
dirty supply area or return to storage, depending on
facility policy.
17. Place soiled clothing and linens in proper containers.
18. Remove and discard gloves. Wash your hands.
Provides for infection prevention.
19. Return bed to lowest position. Remove privacy measures.
Lowering the bed provides for safety.
20. Place call light within resident’s reach.
Allows resident to communicate with staff as necessary.
Providing foot care
21. Report any changes in resident to the nurse.
Provides nurse with information to assess resident.
22. Document procedure using facility guidelines.
If you do not document the care, legally it did not
happen.
6
Personal Care Skills
4. Describe guidelines for assisting with grooming
Remember these points when combing or brushing residents’
hair:
• Let residents choose their own hairstyles.
• Do not style residents’ hair in a childish manner.
• Handle hair gently.
Combing or brushing hair
Equipment: comb, brush, towel, mirror, hair care items
requested by resident
Use hair care products that the resident prefers for his or her
type of hair.
1. Identify yourself by name. Identify the resident by name.
Resident has right to know identity of his or her
caregiver. Addressing resident by name shows respect
and establishes correct identification.
2. Wash your hands.
Provides for infection prevention.
3. Explain procedure to resident. Speak clearly, slowly, and
directly. Maintain face-to-face contact whenever possible.
Promotes understanding and independence.
4. Provide for resident’s privacy with curtain, screen, or
door.
Maintains resident’s right to privacy and dignity.
Combing or brushing hair
5. If resident is in bed, adjust bed to a safe level, usually
waist high. Raise head of bed so resident is sitting up.
Lock bed wheels.
Prevents injury to you and to resident. Sitting upright
puts resident in more natural position.
6. Place a towel under the head or around the shoulders.
7. Remove any hair pins, hair ties or clips.
8. Remove tangles first by dividing hair into small sections.
Hold lock of hair just above the tangle so you do not pull
at the scalp. Gently comb or brush through the tangle.
Reduces hair breakage, scalp pain, and irritation.
Combing or brushing hair
9. After tangles are
removed, brush two-inch
sections of hair at a
time. Gently brush from
roots to ends.
10. Neatly style hair as
resident prefers. Avoid
childish hairstyles. Each
resident may prefer
different styles. Offer
mirror to the resident.
Each resident has the
right to choose.
Promotes resident’s
independence.
Combing or brushing hair
11. Return supplies to proper storage. Clean hair from comb
or brush. Clean comb or brush.
12. Dispose of soiled linen in the proper container.
13. Return bed to lowest position. Remove privacy measures.
Lowering the bed provides for safety.
14. Place call light within resident’s reach.
Allows resident to communicate with staff as necessary.
15. Wash your hands.
Provides for infection prevention.
16. Report any changes in resident to nurse.
Provides nurse with information to assess resident.
17. Document procedure using facility guidelines.
If you do not document the care, legally it did not
happen.
6
Personal Care Skills
4. Describe guidelines for assisting with grooming
Remember these points when assisting with shaving:
• Respect personal preferences regarding shaving.
• Wear gloves.
• Do not share razors between residents.
• Soften hair on face first if using disposable or safety razor.
• Shave in direction of hair growth.
• Use after-shave if desired.
• Discard disposable shaving products properly.
• Do not use electric razors near water or oxygen.
Shaving a resident
Equipment: razor, basin filled halfway with warm water (if
using a safety or disposable razor), 2 towels, washcloth,
mirror, shaving cream or soap (if using a safety or disposable
razor), after-shave lotion, gloves
1. Identify yourself by name. Identify the resident by name.
Resident has right to know identity of his or her
caregiver. Addressing resident by name shows respect
and establishes correct identification.
2. Wash your hands.
Provides for infection prevention.
3. Explain procedure to resident. Speak clearly, slowly, and
directly. Maintain face-to-face contact whenever possible.
Promotes understanding and independence.
4. Provide for resident’s privacy with curtain, screen, or
door.
Maintains resident’s right to privacy and dignity.
Shaving a resident
5. If resident is in bed, adjust bed to a safe level, usually
waist high. Lock bed wheels.
Prevents injury to you and to resident.
6. Raise head of bed so resident is sitting up. Place towel
across the resident’s chest, under his chin.
Sitting upright puts resident in a more natural position.
Towel protects resident’s clothing and bed linen.
7. Put on gloves.
Shaving may cause bleeding. Wearing gloves promotes
infection prevention and follows Standard Precautions.
Shaving using a safety or disposable razor:
8. Soften the beard with a warm, wet washcloth on the face
for a few minutes before shaving. Lather the face with
shaving cream or soap and warm water.
Warm water and lather soften skin and hair and make
shaving more comfortable.
Shaving a resident
9. Hold skin taut. Shave in
the direction of hair
growth. Shave beard in
downward strokes on
face and upward strokes
on neck (Fig. 6-26).
Rinse the blade often in
the basin to keep it
clean and wet.
Maximizes hair removal
by shaving in the
direction of hair growth.
Shaving a resident
10. When you have finished, wash and rinse the resident’s
face with a warm, wet washcloth. If he is able, let him
use the washcloth himself. Use the towel to dry his face.
Offer a mirror to resident.
Removes soap, which may cause irritation. Promotes
independence.
Shaving using an electric razor:
8. Use a small brush to clean the razor. Do not use an
electric razor near any water source or when oxygen is in
use.
Electricity near water may cause electrocution. Electricity
near oxygen may cause an explosion.
Shaving a resident
9. Turn on the razor and
hold skin taut. Shave
with smooth, even
movements (Fig. 6-27).
Shave beard with back
and forth motion in
direction of beard
growth with foil shaver.
Shave beard in circular
motion with three-head
shaver. Shave the chin
and under the chin.
10. Offer a mirror to
resident.
Promotes independence.
Shaving a resident
Final steps:
11. Apply after-shave lotion if resident wants it.
Improves resident’s self-esteem.
12. Remove the towel. Place the towel and washcloth in
proper container.
13. Clean the equipment and store it. For safety razor, rinse
the razor. For disposable razor, dispose of it in a sharps
container. For electric razor, clean head of razor. Remove
whiskers from razor. Recap shaving head and return
razor to case.
14. Remove and discard gloves. Wash your hands.
Provides for infection prevention.
15. Make sure that resident and environment are free of
loose hairs.
16. Return bed to lowest position. Remove privacy measures.
Lowering the bed provides for safety.
Shaving a resident
17. Place call light within resident’s reach.
Allows resident to communicate with staff as necessary.
18. Report any changes in resident to the nurse.
Provides nurse with information to assess resident.
19. Document procedure using facility guidelines.
If you do not document the care, legally it did not
happen.
6
Personal Care Skills
5. List guidelines for assisting with dressing
Define the following terms:
affected side
a weakened side from a stroke or injury; also called weaker
or involved side.
involved
term used to refer to the weaker, or affected, side of the body
after a stroke or injury.
6
Personal Care Skills
5. List guidelines for assisting with dressing
Define the following terms:
Intravenous (IV)
into a vein.
embolism
an obstruction of a blood vessel, usually by a blood clot.
6
Personal Care Skills
5. List guidelines for assisting with dressing
REMEMBER:
Do not refer to a resident’s affected or involved side as a “bad
side” or a “bad” leg or arm.
6 Personal Care Skills
Transparency 6-5: Assisting with Dressing
• Refer to affected side as weaker or involved.
• Preferences should be followed. Allow residents to choose
clothing.
• Encourage residents to dress in regular clothes during the
daytime.
• Let residents do as much as possible to dress themselves. Use
assistive devices as directed.
• Provide privacy.
• Roll or fold down socks before putting them on.
• Front-fastening bras are easier for residents to fasten by
themselves.
• Put back-fastening bras on waist and fasten in front first before
rotating around.
• When dressing, start with the weaker arm or leg first. When
undressing, start with the stronger side.
Dressing a resident with an affected (weak) right arm
Equipment: clean clothes of resident’s choice, nonskid
footwear
When putting on items, move resident’s body gently and
naturally. Avoid force and over-extension of limbs and joints.
1. Identify yourself by name. Identify the resident by name.
Resident has right to know identity of his or her
caregiver. Addressing resident by name shows respect
and establishes correct identification.
2. Wash your hands.
Provides for infection prevention.
3. Explain procedure to resident. Speak clearly, slowly, and
directly. Maintain face-to-face contact whenever possible.
Promotes understanding and independence.
4. Provide for resident’s privacy with curtain, screen, or
door.
Maintains resident’s right to privacy and dignity.
Dressing a resident with an affected (weak) right arm
5. Ask resident what she would like to wear. Dress her in
outfit of choice.
Promotes resident’s right to choose.
6. Remove resident’s gown or top. Do not completely
expose resident. Take clothes off the stronger side first
when undressing. Then remove from weaker side. Place
gown in proper container.
Maintains resident’s dignity and right to privacy.
7. Help resident put the right (affected/weaker) arm
through the right sleeve of the shirt, sweater, or slip
before placing garment on left (unaffected/stronger)
arm.
8. Help resident put on skirt, pants, or dress. Put the
weaker leg through the skirt or pants first. Then place
the stronger leg through the skirt or pants.
9. Place bed at the lowest position. Lock bed wheels.
Dressing a resident with an affected (weak) right arm
10. Have resident sit down. Help to put on socks and nonskid
footwear. Tie laces.
Promotes resident’s safety.
11. Finish with resident dressed appropriately. Make sure
clothing is right-side-out and zippers and buttons are
fastened.
12. Place gown in soiled linen container.
13. Keep bed in lowest position. Remove privacy measures.
14. Place call light within resident’s reach.
Allows resident to communicate with staff as necessary.
15. Wash your hands.
Provides for infection prevention.
Dressing a resident with an affected (weak) right arm
16. Report any changes in resident to the nurse.
Provides nurse with information to assess resident.
17. Document procedure using facility guidelines.
If you do not document the care, legally it did not
happen.
6
Personal Care Skills
5. List guidelines for assisting with dressing
When dressing a resident with an IV an NA should remember the
following:
• Never disconnect IV lines or turn off the pump.
• Always keep the IV bag higher than the IV site
• on the body.
• First remove clothing from the side without the IV. Then
gather the clothing on the side with the IV. Lift clothing over
the IV site. Move it up the tubing toward the IV bag. Lift the
IV bag off its pole. Carefully slide the clothing over the bag.
Place the bag back on the pole.
6
Personal Care Skills
5. List guidelines for assisting with dressing
Dressing a resident with an IV (cont’d):
• Apply clean clothing first to side with the IV. Slide the correct
arm opening over the bag, then over the tubing and the
resident’s IV arm. Place the IV bag back on the pole.
• Check that the IV is dripping properly. Make sure none of the
tubing is dislodged. Check to see that the IV site dressing is in
place.
6
Personal Care Skills
5. List guidelines for assisting with dressing
REMEMBER:
Anti-embolic stockings can help prevent swelling and blood clots
and aid circulation. They should be applied in the morning,
before the resident gets out of bed, so there is less swelling in
the legs.
Applying knee-high elastic stockings
Equipment: elastic stockings
1. Identify yourself by name. Identify resident by name.
Resident has right to know identity of his or her
caregiver. Addressing resident by name shows respect
and establishes correct identification.
2. Wash your hands.
Provides for infection prevention.
3. Explain procedure to resident. Speak clearly, slowly, and
directly. Maintain face-to-face contact whenever possible.
Promotes understanding and independence.
4. Provide for resident’s privacy with curtain, screen, or
door.
Maintains resident’s right to privacy and dignity.
Applying knee-high elastic stockings
5. The resident should be
in the supine position
(on her back) in bed.
With resident lying
down, remove her socks,
shoes, or slippers, and
expose one leg. Expose
no more than one leg at
a time.
6. Turn stocking inside-out
at least to heel area.
Applying knee-high elastic stockings
7. Gently place foot of
stocking over toes, foot,
and heel. Make sure the
heel is in the right place
(heel of foot should be in
heel of stocking).
8. Gently pull top of
stocking over foot, heel,
and leg.
Applying knee-high elastic stockings
9. Make sure there are no
twists or wrinkles in
stocking after it is on. It
must fit smoothly and be
comfortable. Make sure
the heel of stocking is
over the heel of foot. If
the stocking has an
opening in the toe area,
make sure the opening
is either over or under
the toe area. This
depends on the
manufacturer’s
instructions. Adjust if
needed.
10. Repeat for other leg.
Applying knee-high elastic stockings
11. Place call light within resident’s reach.
Allows resident to communicate with staff as necessary.
12. Wash your hands.
Provides for infection prevention.
13. Report any changes in resident to nurse.
Provides nurse with information to assess resident.
14. Document procedure using facility guidelines.
If you do not document the care, legally it did not
happen.
6
Personal Care Skills
6. Identify guidelines for proper oral hygiene
Define the following terms:
oral care
care of the mouth, teeth, and gums.
aspiration
the inhalation of food, fluid or foreign material into the lungs.
dentures
artificial teeth.
6
Personal Care Skills
6. Identify guidelines for proper oral hygiene
REMEMBER:
Oral care involves brushing the teeth, tongue, and gums, flossing
the teeth with dental floss, caring for lips, and providing denture
care.
6
Personal Care Skills
6. Identify guidelines for proper oral hygiene
NAs should observe for and report the following when providing
oral care:
• Irritation
• Raised areas
• Coated or swollen tongue
• Ulcers
• Flaky, white spots
• Dry, cracked, bleeding, or chapped lips
• Loose, chipped, broken, or decayed teeth
• Swollen, irritated, bleeding, or whitish gums
• Bad or fruity breath
• Reports of mouth pain
6
Personal Care Skills
6. Identify guidelines for proper oral hygiene
When providing oral care for an unconscious resident NAs must
remember the following:
• Regular oral care keeps the mouth clean and moist.
• Use as little liquid as possible and turn residents on their sides
to avoid aspiration.
• Squeeze swabs after dipping them in solution to remove
excess liquid.
Providing oral care
Equipment: toothbrush, toothpaste, emesis basin, gloves,
clothing protector or towel, glass of water, lip moisturizer
1. Identify yourself by name. Identify the resident by name.
Resident has right to know identity of his or her
caregiver. Addressing resident by name shows respect
and establishes correct identification.
2. Wash your hands.
Provides for infection prevention.
3. Explain procedure to resident. Speak clearly, slowly, and
directly. Maintain face-to-face contact whenever possible.
Promotes understanding and independence.
4. Provide for resident’s privacy with curtain, screen, or
door.
Maintains resident’s right to privacy and dignity.
Providing oral care
5. If resident is in bed, adjust bed to a safe level, usually
waist high. Raise the head of the bed to have resident in
an upright sitting position. Lock bed wheels.
Prevents injury to you and to resident. Prevents fluids
from running down resident’s throat, causing choking.
6. Put on gloves.
Brushing may cause gums to bleed.
7. Place a clothing protector or towel across resident’s
chest.
Protects resident’s clothing and bed linen.
8. Wet toothbrush. Put on small amount of toothpaste.
Water helps distribute toothpaste.
Providing oral care
9. Clean entire mouth, including tongue and all surfaces of
teeth and the gumline. Use gentle strokes. First brush
inner, outer, and chewing surfaces of the upper teeth.
Then do the same with the lower teeth. Use short
strokes. Brush back and forth. Brush tongue.
Brushing upper teeth first lessens production of saliva in
lower part of mouth.
Providing oral care
10. Give the resident water
to rinse the mouth. Place
emesis basin under the
resident’s chin, with the
inward curve under the
chin. Have resident spit
water into emesis basin.
Wipe resident’s mouth
and remove towel. Apply
lip moisturizer.
11. Rinse toothbrush and
place in proper
container. Empty, rinse,
and dry basin. Place
basin and toothbrush in
designated dirty supply
area or return to
storage, depending on
facility policy.
Providing oral care
12. Place soiled clothing and linens in proper containers.
13. Remove and discard gloves. Wash your hands.
Provides for infection prevention.
14. Return bed to lowest position. Remove privacy measures.
Lowering the bed provides for safety.
15. Place call light within resident’s reach.
Allows resident to communicate with staff as necessary.
16. Report any problems with teeth, mouth, tongue, and lips
to nurse. This includes odor, cracking, sores, bleeding,
and any discoloration.
Provides nurse with information to assess resident.
17. Document procedure using facility guidelines.
If you do not document the care, legally it did not
happen.
Providing oral care for the unconscious resident
Equipment: sponge swabs, tongue depressor, towel, emesis
basin, gloves, glass of water, lip moisturizer, cleaning solution
(check the care plan)
1. Identify yourself by name. Identify the resident by name.
Even residents who are unconscious may be able to hear
you. Always speak to them as you would to any resident.
Resident has right to know identity of his or her
caregiver. Addressing resident by name shows respect
and establishes correct identification.
2. Wash your hands.
Provides for infection prevention.
3. Explain procedure to resident. Speak clearly, slowly, and
directly. Maintain face-to-face contact whenever possible.
Promotes understanding. The resident may be able to
hear and understand even though he is unconscious.
Providing oral care for the unconscious resident
4. Provide for resident’s privacy with curtain, screen, or
door.
Maintains resident’s right to privacy and dignity.
5. Adjust bed to a safe level, usually waist high. Lock bed
wheels.
Prevents injury to you and to resident.
6. Put on gloves.
Protects you from coming into contact with body fluids.
7. Turn resident on his side or turn his head to the side.
Place a towel under his cheek and chin. Place an emesis
basin next to the cheek and chin for excess fluid.
Protects resident’s clothing and bed linen.
8. Hold mouth open with tongue depressor.
Enables you to safely clean mouth.
Providing oral care for the unconscious resident
9. Dip sponge swab in
cleaning solution.
Squeeze excess solution
to prevent aspiration.
Wipe teeth, gums,
tongue, and inside
surfaces of mouth.
Remove debris with the
swab. Change swab
often. Repeat this until
the mouth is clean.
Stimulates gums and
removes mucus.
10. Rinse with clean swab
dipped in water. Squeeze
swab first to remove
excess water.
Removes solution from
mouth.
Providing oral care for the unconscious resident
11. Remove the towel and basin. Pat lips or face dry if
needed. Apply lip moisturizer.
Prevents lips from drying and cracking. Improves
resident’s comfort.
12. Empty, rinse, and dry basin. Place basin in designated
dirty supply area or return to storage, depending on
facility policy.
13. Place soiled linens in the proper container.
14. Remove and discard gloves. Wash your hands.
Provides for infection prevention.
15. Return bed to lowest position. Remove privacy measures.
Lowering the bed provides for safety.
16. Place call light within resident’s reach.
Allows resident to communicate with staff as necessary.
Providing oral care for the unconscious resident
17. Report any problems with teeth, mouth, tongue, and lips
to nurse. This includes odor, cracking, sores, bleeding,
and any discoloration.
Provides nurse with information to assess resident.
18. Document procedure using facility guidelines.
If you do not document the care, legally it did not
happen.
Flossing teeth
Equipment: dental floss, glass of water, emesis basin, gloves,
towel
1. Identify yourself by name. Identify the resident by name.
Resident has right to know identity of his or her
caregiver. Addressing resident by name shows respect
and establishes correct identification.
2. Wash your hands.
Provides for infection prevention.
3. Explain procedure to resident. Speak clearly, slowly, and
directly. Maintain face-to-face contact whenever possible.
Promotes understanding and independence.
4. Provide for resident’s privacy with curtain, screen, or
door.
Maintains resident’s right to privacy and dignity.
Flossing teeth
5. If resident is in bed,
adjust bed to a safe
level, usually waist high.
Raise the head of the
bed to have resident in
an upright sitting
position. Lock bed
wheels.
Prevents fluids from
running down resident’s
throat, causing choking.
6. Put on gloves.
Flossing may cause
gums to bleed.
7. Wrap the ends of floss
securely around each
index finger.
Flossing teeth
8. Start with the back
teeth. Place floss
between teeth. Move it
down the surface of the
tooth. Use a gentle
sawing motion.
Continue to the gum
line. At the gum line,
curve the floss. Slip it
gently into the space
between the gum and
tooth. Then go back up,
scraping that side of the
tooth. Repeat this on the
side of the other tooth.
Removes food and
prevents tooth decay.
Flossing teeth
9. After every two teeth, unwind floss from your fingers.
Move it so you are using a clean area. Floss all teeth.
10. Offer water to rinse the mouth. Ask the resident to spit it
into the basin.
Flossing loosens food. Rinsing removes it.
11. Offer resident a face towel when done flossing all teeth.
Promotes dignity.
12. Discard floss. Discard water and rinse and dry the basin.
Place basin in designated dirty supply area or return to
storage, depending on facility policy.
13. Place soiled linen in the proper container.
14. Remove and discard gloves. Wash your hands.
Provides for infection prevention.
15. Return bed to lowest position. Remove privacy measures.
Lowering the bed provides for safety.
Flossing teeth
16. Place call light within resident’s reach.
Allows resident to communicate with staff as necessary.
17. Report any problems with teeth, mouth, tongue, and lips
to nurse. This includes odor, cracking, sores, bleeding,
and any discoloration.
Provides nurse with information to assess resident.
18. Document procedure using facility guidelines.
If you do not document the care, legally it did not
happen.
6
Personal Care Skills
6. Identify guidelines for proper oral hygiene
NAs should remember the following guidelines about denture
care:
• Dentures are expensive and should be handled carefully.
• Wear gloves when cleaning dentures.
• Report problems with dentures to the nurse.
• Do not use hot water to clean dentures because it may
damage them.
• Place dentures in labeled cup or return them immediately to
the resident.
Cleaning and storing dentures
Equipment: denture brush or toothbrush, denture cleanser or
toothpaste, labeled denture cup, 2 towels, gloves
1. Wash your hands.
Provides for infection prevention.
2. Put on gloves.
Prevents you from coming into contact with body fluids.
3. Line the sink or basin with a towel(s) and partially fill
sink with water.
Prevents dentures from breaking if dropped.
4. Handle dentures carefully. Hold them over the sink. Rinse
dentures in moderate temperature running water before
brushing them. Do not use hot water.
Hot water may warp dentures.
5. Apply toothpaste or denture cleanser to brush.
Cleaning and storing dentures
6. Brush dentures on all
surfaces. This includes
the inner, outer, and
chewing surfaces of
dentures, as well as the
groove that will touch
gum surfaces.
7. Rinse all surfaces of
dentures under
moderate temperature
running water. Do not
use hot water.
Hot water may warp
dentures.
8. Rinse denture cup before
placing clean dentures in
the cup.
Removes pathogens.
Cleaning and storing dentures
9. Place dentures in clean, labeled denture cup with solution
or moderate temperature water. Place lid on cup. Return
denture cup to storage. Some residents will want to wear
dentures all of the time. They will only remove them for
cleaning. If the resident wants to continue wearing
dentures, return them to him or her. Do not place them
in the denture cup.
10. Rinse brush. Dry and return equipment to storage. Drain
sink. Place soiled linens in the proper container.
11. Remove and discard gloves. Wash your hands.
Provides for infection prevention.
12. Document procedure using facility guidelines. Report any
change in appearance of dentures to the nurse.
If you do not document the care, legally it did not
happen.
6
Personal Care Skills
7. Explain guidelines for assisting with toileting
Define the following terms:
fracture pan
a bedpan that is flatter than a regular bedpan.
portable commode
a chair with a toilet seat and a removable container
underneath that is used for elimination; also called bedside
commode.
6
Personal Care Skills
7. Explain guidelines for assisting with toileting
REMEMBER:
A standard bedpan should be positioned with the wider end
aligned with the resident’s buttocks. A fracture pan should be
positioned with the handle toward the foot of the bed.
6
Personal Care Skills
7. Explain guidelines for assisting with toileting
REMEMBER:
It is very important that NAs promote dignity and provide privacy
while assisting residents with toileting.
Assisting resident with use of bedpan
Equipment: bedpan, bedpan cover, protective pad, bath
blanket, toilet paper, disposable wipes, towel, 2 pairs of
gloves
1. Identify yourself by name. Identify the resident by name.
Resident has right to know identity of his or her
caregiver. Addressing resident by name shows respect
and establishes correct identification.
2. Wash your hands.
Provides for infection prevention.
3. Explain procedure to resident. Speak clearly, slowly, and
directly. Maintain face-to-face contact whenever possible.
Promotes understanding and independence.
4. Provide for resident’s privacy with curtain, screen, or
door.
Maintains resident’s right to privacy and dignity.
Assisting resident with use of bedpan
5. Adjust bed to a safe level, usually waist high. Before
placing bedpan, lower the head of the bed. Lock bed
wheels.
When bed is flat, resident can be moved without working
against gravity.
6. Put on gloves.
Prevents contact with body fluids.
7. Cover the resident with the bath blanket. Ask him to hold
it while you pull down the top covers underneath. Do not
expose more of the resident than you need to.
Maintains resident’s right to privacy and dignity.
Assisting resident with use of bedpan
8. Place a protective pad under the resident’s buttocks and
hips. To do this, have the resident roll toward you. If the
resident cannot do this, you must turn him toward you
(see later in this chapter). Be sure resident cannot roll off
the bed. Move to empty side of bed. Place protective pad
on the area where the resident will lie on his back. The
side of protective pad nearest the resident should be
fanfolded (folded several times into pleats) and tucked
under the resident.
(cont’d)
Assisting resident with use of bedpan
Ask resident to roll onto
his back, or roll him as
you did before. Unfold
rest of protective pad so
it completely covers area
under and around the
resident’s hips.
Prevents linen from
being soiled.
9. Ask resident to remove
undergarments or help
him do so.
Promotes independence.
Assisting resident with use of bedpan
10. Place bedpan near his hips in the correct position. A
standard bedpan should be positioned with the wider end
aligned with the resident’s buttocks. A fracture pan
should be positioned with handle toward foot of bed.
Assisting resident with use of bedpan
11. If resident is able, ask
him to raise hips by
pushing with feet and
hands at the count of
three (Fig. 6-43). Slide
the bedpan under his
hips.
If a resident cannot help
you in any way, keep the
bed flat and roll the
resident away from you.
Slip the bedpan under
his hips and gently roll
the resident back onto
the bedpan. Keep the
bedpan centered
underneath.
Assisting resident with use of bedpan
12. Remove and discard gloves. Wash your hands.
Provides for infection prevention.
13. Raise the head of the bed. Prop the resident into a semi-
sitting position using pillows.
Puts resident in comfortable position for voiding.
14. Make sure the bath blanket is still covering the resident.
Place toilet paper and disposable wipes within resident’s
reach. Ask resident to clean his hands with a wipe when
finished if he is able.
15. Place the call light within resident’s reach. Ask resident to
signal when done. Leave the room and close the door.
Ensures ability to communicate need for help.
16. When called by the resident, return and put on clean
gloves.
Assisting resident with use of bedpan
17. Lower the head of the bed. Make sure resident is still
covered.
Places resident in proper position to remove pan.
Promotes dignity.
18. Remove bedpan carefully and cover bedpan.
Promotes infection prevention and odor control. Provides
dignity for resident.
19. Give perineal care if help is needed. Wipe female
residents from front to back. Dry the perineal area with a
towel. Help the resident put on undergarment. Cover the
resident and remove the bath blanket.
Wiping from front to back prevents spread of pathogens
that may cause urinary tract infection.
20. Place the towel and bath blanket in a hamper or bag.
Remove and discard protective pad and disposable
supplies.
Assisting resident with use of bedpan
21. Take bedpan to the bathroom. Empty bedpan carefully
into the toilet unless a specimen is needed or urine is
being measured for intake/output monitoring. Note color,
odor, and consistency of contents before flushing. If you
notice anything unusual about the stool or urine (for
example, the presence of blood), do not discard it.
Inform the nurse.
Changes may be the first sign of a medical problem.
22. Turn the faucet on with a paper towel. Rinse the bedpan
with cold water and empty it into the toilet. Flush the
toilet. Place bedpan in proper area for cleaning or clean it
according to policy.
23. Remove and discard gloves. Wash your hands.
Provides for infection prevention.
24. Return bed to lowest position. Remove privacy measures.
Lowering the bed provides for resident’s safety.
Assisting resident with use of bedpan
25. Place call light within resident’s reach.
Allows resident to communicate with staff as necessary.
26. Report any changes in resident to the nurse.
Provides nurse with information to assess resident.
27. Document procedure using facility guidelines.
If you do not document the care, legally it did not
happen.
Assisting a male resident with a urinal
Equipment: urinal, protective pad, disposable wipes, 2 pairs of
gloves
1. Identify yourself by name. Identify the resident by name.
Resident has right to know identity of his or her
caregiver. Addressing resident by name shows respect
and establishes correct identification.
2. Wash your hands.
Provides for infection prevention.
3. Explain procedure to resident. Speak clearly, slowly, and
directly. Maintain face-to-face contact whenever possible.
Promotes understanding and independence.
4. Provide for resident’s privacy with curtain, screen, or
door.
Maintains resident’s right to privacy and dignity.
Assisting a male resident with a urinal
5. Adjust bed to a safe level, usually waist high. Lock bed
wheels.
Prevents injury to you and to resident.
6. Put on gloves.
Prevents you from coming into contact with body fluids.
7. Place a protective pad under the resident’s buttocks and
hips, as in earlier procedure.
Prevents linen from being soiled.
Assisting a male resident with a urinal
8. Hand the urinal to the
resident. If the resident
is not able to help
himself, place urinal
between his legs and
position the penis inside
the urinal. Replace
covers.
Promotes independence,
dignity and privacy.
9. Remove and discard
gloves. Wash your
hands.
Assisting a male resident with a urinal
10. Place disposable wipes within resident’s reach. Ask the
resident to clean his hands with a hand wipe when
finished if he is able. Place the call light within resident’s
reach. Ask resident to signal when done. Leave the room
and close the door.
Ensures ability to communicate need for help.
11. When called by the resident, return and put on clean
gloves.
12. Discard disposable wipes.
13. Remove urinal or have resident hand it to you. Empty
contents into toilet unless specimen is needed or urine is
being measured for intake/output monitoring. Note color,
odor, and qualities (for example, cloudiness) of contents.
Changes may be the first sign of medical problem.
Assisting a male resident with a urinal
14. Turn the faucet on with a paper towel. Rinse the urinal
with cold water. Empty rinse water into the toilet. Flush
the toilet. Place urinal in proper area for cleaning or clean
it according to facility policy.
15. Remove and discard protective pad. Remove and discard
gloves. Wash your hands.
16. Return bed to lowest position. Remove privacy measures.
Lowering the bed provides for resident’s safety.
17. Place call light within resident’s reach.
Allows resident to communicate with staff as necessary.
18. Report any changes in resident to the nurse.
Provides nurse with information to assess resident.
19. Document procedure using facility guidelines.
If you do not document the care, legally it did not
happen.
Assisting a resident to use a portable commode or toilet
Equipment: portable commode with basin, toilet paper,
disposable wipes, towel, 3 pairs of gloves
1. Identify yourself by name. Identify the resident by name.
Resident has right to know identity of his or her
caregiver. Addressing resident by name shows respect
and establishes correct identification.
2. Wash your hands.
Provides for infection prevention.
3. Explain procedure to resident. Speak clearly, slowly, and
directly. Maintain face-to-face contact whenever possible.
Promotes understanding and independence.
4. Provide for resident’s privacy with curtain, screen, or
door.
Maintains resident’s right to privacy and dignity.
Assisting a resident to use a portable commode or toilet
5. Lock bed wheels. Make sure resident is wearing nonskid
shoes and that the laces are tied. Help resident out of
bed and to the portable commode or bathroom.
6. Put on gloves.
Prevents contact with body fluids.
7. If needed, help resident remove clothing and sit
comfortably on toilet seat. Put toilet paper and disposable
wipes within reach. Ask resident to clean his hands with a
wipe when finished if he is able.
8. Remove and discard gloves. Wash your hands.
9. Provide privacy. Place the call light within resident’s
reach. Ask resident to signal when done. Leave the room
and close the door.
Ensures ability to communicate need for help.
Assisting a resident to use a portable commode or toilet
10. When called by the resident, return and put on clean
gloves. Give perineal care if help is needed. Wipe female
residents from front to back. Dry the perineal area with a
towel. Help the resident put on clothing.
Wiping from front to back prevents spread of pathogens
that may cause urinary tract infection.
11. Place the towel in a hamper or bag. Discard disposable
supplies.
12. Remove and discard gloves. Wash your hands.
13. Help resident back to bed.
14. Put on clean gloves.
15. Remove waste container. Empty into toilet unless a
specimen is needed or the urine is being measured for
intake/output monitoring. Note color, odor, and
consistency of contents.
Changes may be first sign of medical problem.
Assisting a resident to use a portable commode or toilet
16. Turn the faucet on with a paper towel. Rinse the
container with cold water. Empty rinse water into the
toilet. Flush the toilet. Place container in proper area for
cleaning or clean it according to facility policy.
17. Remove and discard gloves. Wash your hands.
Provides for infection prevention.
18. Make sure bed is in lowest position. Remove privacy
measures.
19. Place call light within resident’s reach.
Allows resident to communicate with staff as necessary.
20. Report any changes in resident to the nurse.
Provides nurse with information to assess resident.
21. Document procedure using facility guidelines.
If you do not document the care, legally it did not
happen.
6 Personal Care Skills
Handout 6-1: Giving a Cleansing Enema
Giving a cleansing enema
Equipment: bath blanket, IV pole, enema solution, tubing and
clamp, protective pad, bedpan, lubricating jelly, bath
thermometer, tape measure, toilet paper, disposable wipes,
robe, non-skid footwear, towel, supplies for perineal care, paper
towel, 2 pairs of gloves
1. Identify yourself by name. Identify the resident by name.
Resident has right to know identity of his or her caregiver.
Addressing resident by name shows respect and establishes
correct identification.
2. Wash your hands.
Provides for infection prevention.
3. Explain procedure to the resident. Speak clearly, slowly, and
directly. Maintain face-to-face contact whenever possible.
Promotes understanding and independence.
6 Personal Care Skills
Handout 6-1: Giving a Cleansing Enema (cont’d)
4. Provide for resident’s privacy with curtain, screen, or door.
Maintains resident’s right to privacy and dignity.
5. Adjust bed to a safe level, usually waist high. Lock bed
wheels.
Prevents injury to you and to resident.
6. Help resident into left side-lying Sims’ position. Cover with a
bath blanket.
7. Place the IV pole beside the bed.
8. Clamp the enema tube. Prepare the enema solution. Fill bag
with 500-1000 mL of warm water (105°F), and mix the
solution. Check water temperature with bath thermometer.
9. Unclamp the tube. Let a small amount of solution run
through the tubing. Re-clamp the tube.
6 Personal Care Skills
Handout 6-1: Giving a Cleansing Enema (cont’d)
10. Hang the bag on IV pole. Using the tape measure, make sure
the bottom of the enema bag is not more than 12 inches
above the resident’s anus.
Provides for resident’s safety.
6 Personal Care Skills
Handout 6-1: Giving a Cleansing Enema (cont’d)
11. Put on gloves.
Protects you from body fluids.
12. Place bed protector under resident. Ask resident to remove
undergarments or help him do so. Place bedpan close to
resident’s body.
Bed protector protects linen from getting soiled.
13. Lubricate tip of tubing with lubricating jelly.
14. Ask the resident to breathe deeply. This relieves cramps
during procedure.
15. Place one hand on the upper buttock. Lift to expose the
anus. Ask the resident to take a deep breath and exhale.
Using other hand, gently insert the tip of the tubing two to
four inches into the rectum. Stop immediately if you feel
resistance or if the resident complains of pain. If this
happens, clamp the tubing. Tell the nurse immediately.
6 Personal Care Skills
Handout 6-1: Giving a Cleansing Enema (cont’d)
16. Unclamp the tubing. Allow the solution to flow slowly into the
rectum. Ask resident to take slow, deep breaths. If resident
complains of cramping, clamp the tubing and stop for a
couple of minutes. Encourage him to take as much of the
solution as possible.
17. Clamp the tubing before the bag is empty when the solution
is almost gone. Gently remove the tip from the rectum. Place
the tip into the enema bag. Do not contaminate yourself, the
resident, or the bed linens.
18. Ask the resident to hold the solution inside as long as
possible.
19. Help resident to use bedpan, commode, or get to the
bathroom. If the resident uses a commode or toilet, put on
robe and nonskid footwear. Lower the bed to its lowest
position before the resident gets up.
20. Remove and discard gloves. Wash your hands.
Provides for infection prevention.
6 Personal Care Skills
Handout 6-1: Giving a Cleansing Enema (cont’d)
21. Place toilet paper and disposable wipes within resident’s
reach. Ask the resident to clean his hands with the hand wipe
when finished if he is able. If the resident is using the toilet,
ask him not to flush it when finished.
22. Place the call light within resident’s reach. Ask resident to
signal when done. Leave the room and close the door.
Ensures ability to communicate need for assistance. Leaving
the room promotes resident’s right to privacy.
23. When called by the resident, return and put on clean gloves.
24. Lower the head of the bed. Make sure resident is still
covered.
25. Remove bedpan carefully and cover bedpan.
26. Provide perineal care if help is needed. Wipe female residents
from front to back. Dry the perineal area with a towel. Help
the resident put on undergarment. Cover the resident and
remove the bath blanket.
6 Personal Care Skills
Handout 6-1: Giving a Cleansing Enema (cont’d)
27. Place the towel and bath blanket in a hamper or bag, and
discard disposable supplies.
28. Take bedpan to the bathroom. Call the nurse to observe
enema results. Empty the contents of bedpan carefully into
the toilet.
Changes may be the first sign of a medical problem.
29. Turn the faucet on with a paper towel. Rinse the bedpan with
cold water first and empty it into the toilet. Flush the toilet.
Place bedpan in proper area for cleaning or clean it according
to facility policy.
30. Remove and discard gloves.
31. Wash your hands.
Provides for infection prevention.
32. Make resident comfortable.
6 Personal Care Skills
Handout 6-1: Giving a Cleansing Enema (cont’d)
33. Return bed to lowest position. Remove privacy measures.
Lowering bed provides for safety.
34. Place call light within resident’s reach.
Allows resident to communicate with staff as necessary.
35. Report any changes in resident to the nurse.
Provides nurse with information to assess resident.
36. Document procedure using facility guidelines.
If you do not document the care you gave, legally it did not
happen.
6 Personal Care Skills
Handout 6-2: Giving a Rectal Suppository
Giving a rectal suppository
Equipment: gloves, suppository, lubricant, bath blanket, toilet
paper or disposable wipes
1. Identify yourself by name. Identify the resident by name.
Resident has right to know identity of his or her caregiver.
Addressing resident by name shows respect and establishes
correct identification.
2. Wash your hands.
Provides for infection prevention.
3. Explain procedure to the resident. Speak clearly, slowly,
and directly. Maintain face-to-face contact whenever possible.
Promotes understanding and independence.
4. Provide for resident’s privacy with curtain, screen, or door.
Maintains resident’s right to privacy and dignity.
6 Personal Care Skills
Handout 6-2: Giving a Rectal Suppository (cont’d)
5. Adjust bed to a safe level, usually waist high. Lock bed
wheels.
Prevents injury to you and to resident.
6. Help resident into left-sided Sims’ position. Cover with a bath
blanket.
7. Uncover resident enough to expose buttocks only.
8. Unwrap the suppository.
9. Put on gloves.
Protects you from body fluids.
10. Lubricate suppository as needed.
11. Spread buttocks to expose anal area.
12. Insert the suppository, using your index finger. Place the
suppository past the rectal sphincter, against the wall of the
colon.
6 Personal Care Skills
Handout 6-2: Giving a Rectal Suppository (cont’d)
13. Ask the resident to take deep breaths, as it will help him
relax and retain the suppository.
14. Withdraw the finger and briefly hold toilet paper or a wipe
against the anus.
15. Remove and discard gloves.
16. Wash your hands.
Provides for infection prevention.
17. Remove bath blanket and cover the resident. Ask the
resident to retain the suppository as long as possible. Make
resident comfortable.
18. Provide a bedpan or assistance to the bathroom when
needed.
19. Return bed to lowest position. Remove privacy measures.
Lowering bed provides for safety.
6 Personal Care Skills
Handout 6-2: Giving a Rectal Suppository (cont’d)
20. Place call light within resident’s reach.
Allows resident to communicate with staff as necessary.
21. Report any changes in resident to the nurse.
Provides nurse with information to assess resident.
22. Document procedure using facility guidelines.
If you do not document the care you gave, legally it did not
happen.
6
Personal Care Skills
8. Explain the guidelines for safely positioning and moving
residents
Define the following terms:
positioning
the act of helping people into positions that promote comfort
and health.
supine
body position in which a person lies flat on his back.
lateral
body position in which a person is lying on either side.
prone
body position in which a person is lying on his stomach, or
front side of the body.
6
Personal Care Skills
8. Explain the guidelines for safely positioning and moving
residents
Define the following terms:
Fowler’s
a semi-sitting body position in which a person’s head and
shoulders are elevated 45 to 60 degrees.
Sims’
body position in which a person is lying on his left side with
the upper knee flexed and raised toward the chest.
logrolling
moving a person as a unit, without disturbing the alignment
of the body.
dangle
to sit up with the legs hanging over the side of the bed in
order to regain balance and stabilize blood pressure.
6 Personal Care Skills
Transparency 6-6: Five Basic Positions
Moving a resident up in bed
1. Identify yourself by name. Identify the resident by name.
Resident has right to know identity of his or her
caregiver. Addressing resident by name shows respect
and establishes correct identification.
2. Wash your hands.
Provides for infection prevention.
3. Explain procedure to resident. Speak clearly, slowly, and
directly. Maintain face-to-face contact whenever possible.
Promotes understanding and independence.
4. Provide for resident’s privacy with curtain, screen, or
door.
Maintains resident’s right to privacy and dignity.
5. Adjust bed to a safe level, usually waist high. Lock bed
wheels.
Prevents injury to you and to resident.
Moving a resident up in bed
6. Lower the head of bed to make it flat. Move pillow to the
head of the bed.
When bed is flat, resident can be moved without working
against gravity. Pillow prevents injury should resident hit
the head of bed.
7. If the bed has side rails, raise the rail on the far side of
the bed.
8. Stand by bed with feet apart. Face the resident.
9. Place one arm under resident’s shoulder blades. Place
other arm under resident’s thighs. Use good body
mechanics.
Putting your arm under resident’s neck could cause
injury.
Moving a resident up in bed
10. Ask resident to bend her
knees, place her feet on
the mattress, and push
her feet and hands on
the count of three.
Enables resident to help
as much as possible and
reduces strain on you.
11. On three, shift your
body weight. Help move
resident while she
pushes with her feet.
Communicating helps
resident help you.
12. Place pillow under
resident’s head.
Provides for resident’s
comfort.
Moving a resident up in bed
13. Return bed to lowest position. Remove privacy measures.
Lowering the bed provides for resident’s safety.
14. Place call light within resident’s reach.
Allows resident to communicate with staff as necessary.
15. Wash your hands.
Provides for infection prevention.
16. Report any changes in resident to the nurse.
Provides nurse with information to assess resident.
17. Document procedure using facility guidelines.
If you do not document the care, legally it did not
happen.
Moving a resident to the side of the bed
Equipment: draw sheet
1. Identify yourself by name. Identify the resident by name.
Resident has right to know identity of his or her
caregiver. Addressing resident by name shows respect
and establishes correct identification.
2. Wash your hands.
Provides for infection prevention.
3. Explain procedure to resident. Speak clearly, slowly, and
directly. Maintain face-to-face contact whenever possible.
Promotes understanding and independence.
4. Provide for resident’s privacy with curtain, screen, or
door.
Maintains resident’s right to privacy and dignity.
5. Adjust the bed to a safe level, usually waist high. Lock
bed wheels.
Prevents injury to you and to resident.
Moving a resident to the side of the bed
6. Lower the head of bed.
When bed is flat, resident can be moved without working
against gravity.
7. Stand on the same side of the bed to where you are
moving the resident. Stand with feet apart and knees
bent.
8. With a draw sheet: Roll the draw sheet up to the
resident’s side and grasp the sheet with your palms up.
One hand should be at the resident’s shoulders, the other
about level with the resident’s hips. Apply one knee
against the side of the bed, and lean back with your
body. On the count of three, slowly pull the draw sheet
and resident toward you.
Moving a resident to the side of the bed
Without a draw sheet:
Gently slide your hands
under the resident’s
head and shoulders and
move them toward you.
Gently slide your hands
under her midsection
and move it toward you.
Gently slide your hands
under the hips and legs
and move them toward
you.
Being gentle while
sliding helps protect
resident’s skin.
Moving a resident to the side of the bed
9. Return bed to lowest position. Remove privacy measures.
Lowering the bed provides for resident’s safety.
10. Place call light within resident’s reach.
Allows resident to communicate with staff as necessary.
11. Wash your hands.
Provides for infection prevention.
12. Report any changes in resident to the nurse.
Provides nurse with information to assess resident.
13. Document procedure using facility guidelines.
If you do not document the care, legally it did not
happen.
Turning a resident
1. Identify yourself by name. Identify the resident by name.
Resident has right to know identity of his or her
caregiver. Addressing resident by name shows respect
and establishes correct identification.
2. Wash your hands.
Provides for infection prevention.
3. Explain procedure to resident. Speak clearly, slowly, and
directly. Maintain face-to-face contact whenever possible.
Promotes understanding and independence.
4. Provide for resident’s privacy with curtain, screen, or
door.
Maintains resident’s right to privacy and dignity.
5. Adjust bed to a safe level, usually waist high. Lock bed
wheels.
Prevents injury to you and to resident.
Turning a resident
6. Lower the head of bed.
When bed is flat, resident can be moved without working
against gravity.
7. Stand on side of bed opposite where resident will be
turned. If the bed has side rails, raise the far side rail.
Lower side rail nearest you if it is up.
8. Move resident to side of bed nearest you using previous
procedure.
Positions resident for turn.
Turning a resident
9. Turning resident away
from you:
In some cases, if there is
another person present or the
bed has side rails, you can
turn the resident away from
you. Follow facility policy.
a. Cross resident’s arm
over her chest. Move
arm on side resident is
being turned to out of
the way. Cross leg
nearest you over the far
leg.
Turning a resident
b. Stand with feet shoulder-
width apart, with one foot
slightly in front of the
other. Bend your knees.
Reduces your risk of
injury. Promotes proper
body mechanics.
c. Place one hand on the
resident’s shoulder. Place
the other hand on the
resident’s nearest hip.
d. Gently roll resident onto
side as one unit, toward
the other side of bed
(toward raised side rail if
present). Shift your
weight from your back leg
to your front leg.
Turning a resident
Turning resident toward you:
a. Cross resident’s arm over his chest. Move arm on side
resident is being turned to out of the way. Cross leg
furthest from you over the near leg.
b. Stand with feet shoulder-width apart. Bend your knees.
Reduces your risk of injury. Promotes proper body
mechanics.
c. Place one hand on the resident’s far shoulder. Place the
other hand on the far hip.
Turning a resident
d. Gently roll the resident
onto side as one unit,
toward you. Your body
will block resident and
help prevent him from
rolling out of bed.
10. Position the resident
properly:
• Head supported by
pillow (resident’s face
should not be
obstructed by pillow)
• Shoulder adjusted so
resident is not lying on
arm or hand
• Top arm supported by
pillow
Turning a resident
• Back supported by supportive device
• Top knee flexed
• Supportive device between legs with top knee flexed;
knee and ankle supported
11. Return bed to lowest position. Remove privacy measures.
Lowering the bed provides for resident’s safety.
12. Place call light within resident’s reach.
Allows resident to communicate with staff as necessary.
13. Wash your hands.
Provides for infection prevention.
14. Report any changes in resident to the nurse.
Provides nurse with information to assess resident.
15. Document procedure using facility guidelines.
If you do not document the care, legally it did not
happen.
Logrolling a resident
Equipment: draw sheet, coworker
1. Identify yourself by name. Identify the resident by name.
Resident has right to know identity of his or her
caregiver. Addressing resident by name shows respect
and establishes correct identification.
2. Wash your hands.
Provides for infection prevention.
3. Explain procedure to resident. Speak clearly, slowly, and
directly. Maintain face-to-face contact whenever possible.
Promotes understanding and independence.
4. Provide for resident’s privacy with curtain, screen, or
door.
Maintains resident’s right to privacy and dignity.
5. Adjust bed to a safe level, usually waist high. Lock bed
wheels.
Prevents injury to you and to resident.
Logrolling a resident
6. Lower the head of bed.
When bed is flat, resident can be moved without working
against gravity.
7. Both people stand on the same side of the bed. One
person stands at the resident’s head and shoulders. The
other stands near the resident’s midsection.
8. Place the resident’s arms across his chest. Place a pillow
between the knees.
9. Stand with feet shoulder-width apart. Bend your knees.
Reduces your risk of injury. Promotes good body
mechanics.
Logrolling a resident
10. Grasp the draw sheet on
the far side.
11. On the count of three,
gently roll the resident
toward you. Turn the
resident as a unit. Your
bodies will block resident
and help prevent him
from rolling out of bed.
Work together for your
safety and the
resident’s.
Logrolling a resident
12. Reposition resident comfortably.
Maintains alignment.
13. Return bed to lowest position.
Lowering the bed provides for resident’s safety.
14. Place call light within resident’s reach.
Allows resident to communicate with staff as necessary.
15. Wash your hands.
Provides for infection prevention.
16. Report any changes in resident to the nurse.
Provides nurse with information to assess resident.
17. Document procedure using facility guidelines.
If you do not document the care, legally it did not
happen.
Assisting resident to sit up on side of bed: dangling
1. Identify yourself by name. Identify the resident by name.
Resident has right to know identity of his or her
caregiver. Addressing resident by name shows respect
and establishes correct identification.
2. Wash your hands.
Provides for infection prevention.
3. Explain procedure to resident. Speak clearly, slowly, and
directly. Maintain face-to-face contact whenever possible.
Promotes understanding and independence.
4. Provide for resident’s privacy with curtain, screen, or
door.
Maintains resident’s right to privacy and dignity.
5. Adjust bed height to lowest position. Lock bed wheels.
Allows resident’s feet to touch floor when sitting.
Reduces chance of injury if resident falls.
Assisting resident to sit up on side of bed: dangling
6. Raise the head of bed to
sitting position.
Resident can move
without working against
gravity.
7. Stand with feet shoulder-
width apart. Bend your
knees.
Reduces your risk of
injury. Promotes proper
body mechanics.
8. Place one arm under the
resident’s shoulder blades.
Place the other arm under
the resident’s thighs.
Placing your arm under
the resident’s neck may
cause injury.
Assisting resident to sit up on side of bed: dangling
9. On the count of three,
slowly turn resident into
sitting position with legs
dangling over side of bed.
Communicating helps
resident help you.
10. Ask resident to hold onto
edge of mattress with
both hands. Assist
resident to put on nonskid
shoes or slippers.
Prevents sliding on floor
and protects resident’s
feet from contamination.
Assisting resident to sit up on side of bed: dangling
11. Have resident dangle as long as ordered. The care plan
may direct you to allow the resident to dangle for several
minutes and then return him to lying down, or it may
direct you to allow the resident to dangle in preparation
for walking or a transfer. Follow the care plan. Do not
leave the resident alone. If the resident is dizzy for more
than a minute, have him lie down again and report to the
nurse.
Change of position may cause dizziness due to a drop in
blood pressure.
12. Take vital signs as ordered (Chapter 7).
13. Remove slippers or shoes.
14. Gently assist resident back into bed. Place one arm
around resident’s shoulders. Place the other arm under
resident’s knees. Slowly swing resident’s legs onto bed.
15. Leave bed in lowest position. Remove privacy measures.
Lowering the bed provides for resident’s safety.
Assisting resident to sit up on side of bed: dangling
16. Place call light within resident’s reach.
Allows resident to communicate with staff as necessary.
17. Wash your hands.
Provides for infection prevention.
18. Report any changes in resident to the nurse.
Provides nurse with information to assess resident.
19. Document procedure using facility guidelines.
If you do not document the care, legally it did not
happen.
6
Personal Care Skills
8. Explain the guidelines for safely positioning and moving
residents
Define the following terms:
ergonomics
the science of designing equipment, areas, and work tasks to
make them safer and to suit the worker’s abilities.
transfer/gait belt
a belt made of canvas or other heavy material that is used to
help people who are weak, unsteady, or uncoordinated to
stand, sit, or walk; also called gait belt.
6
Personal Care Skills
8. Explain the guidelines for safely positioning and moving
residents
REMEMBER:
Many facilities have adopted no-lift, zero-lift, or lift-free policies.
NAs must know their facilty’s policies and follow them carefully.
6
Personal Care Skills
8. Explain the guidelines for safely positioning and moving
residents
REMEMBER:
When assisting a resident the NA must know which side is
stronger and which is weaker and move the stronger side first.
6
Personal Care Skills
8. Explain the guidelines for safely positioning and moving
residents
REMEMBER:
Transfer belts must be applied over clothing and not on bare
skin. NAs should make sure skin is not caught in the belt.
6
Personal Care Skills
8. Explain the guidelines for safely positioning and moving
residents
Remember these guidelines for working with wheelchairs:
• Know how to use brake, armrests, and footrests.
• Lock before transfer; unlock after.
• Open by pulling on both sides. Close by lifting center of seat.
• Remove armrests by releasing lock.
• Remove footrests by pulling back on lever and swinging out
toward side of chair.
• Lift or lower footrest by squeezing lever and pulling up or
pushing down.
6
Personal Care Skills
8. Explain the guidelines for safely positioning and moving
residents
Guidelines for working with wheelchairs (cont’d):
• Resident must use side of body that can bear weight and lift
side that cannot.
• Resident must be wearing nonskid footwear before
transferring.
• Keep resident safe and comfortable during transfers.
• Assist resident as needed by having chair close and wheels
locked. Use transfer belt and check alignment in chair.
• Reposition resident at least every hour.
6 Personal Care Skills
Transparency 6-7: Assisting a Falling Resident
• Widen stance.
• Bring resident’s body close.
• Bend knees and support resident.
• Lower resident to floor.
• Do not try to stop the fall.
• Call for help.
• Do not attempt to get resident up.
6
Personal Care Skills
8. Explain the guidelines for safely positioning and moving
residents
NAs should know these guidelines for the safe use of mechanical
lifts:
• It is safer for two people to transfer with these lifts and
facility may require this.
• Keep chair or wheelchair near bed to only move resident a
short distance.
• Make sure valves are working.
• Use the correct sling for the correct lift.
6
Personal Care Skills
8. Explain the guidelines for safely positioning and moving
residents
Guidelines for the safe use of mechanical lifts (cont’d):
• Check sling and straps for tears or fraying. Do not use
mechanical lift if there are tears or holes.
• Open legs of stand to widest position before helping resident
into lift.
• Pump up lift only to the point where the resident’s body clears
the bed or chair.
Transferring a resident from bed to wheelchair
Equipment: wheelchair, transfer belt, nonskid footwear, lap
robe or folded blanket
1. Identify yourself by name. Identify the resident by name.
Resident has right to know identity of his or her
caregiver. Addressing resident by name shows respect
and establishes correct identification.
2. Wash your hands.
Provides for infection prevention.
3. Explain procedure to resident. Speak clearly, slowly, and
directly. Maintain face-to-face contact whenever possible.
Promotes understanding and independence.
4. Provide for resident’s privacy with curtain, screen, or
door. Check the area to be certain it is uncluttered and
safe.
Maintains resident’s right to privacy and dignity. Keeping
area free from clutter promotes safety.
Transferring a resident from bed to wheelchair
5. Place wheelchair at the head of the bed, facing foot of
the bed, or at the foot of bed, facing head of bed. The
arm of the wheelchair should be almost touching the bed.
It should be placed on resident’s stronger, or unaffected,
side.
Unaffected side supports weight.
6. Remove both wheelchair footrests close to the bed.
7. Lock wheelchair wheels.
Wheel locks prevent chair from moving.
8. Raise the head of the bed. Adjust bed level to lowest
position. Lock bed wheels.
Prevents injury to you and to resident.
9. Assist resident to sitting position with feet flat on the
floor. Let resident sit for a few minutes to adjust to
change in position.
10. Put nonskid footwear on resident and fasten securely.
Promotes resident’s safety. Reduces risk of falls.
Transferring a resident from bed to wheelchair
11. Stand in front of resident. Stand with feet about
shoulder-width apart. Bend your knees.
Reduces your risk of injury. Promotes proper body
mechanics.
12. Place the transfer belt around resident’s waist over
clothing (not on bare skin). Tighten the buckle until it is
snug. Leave enough room to insert flat fingers/hand
comfortably under the belt. Check to make sure that skin
or skin folds (for example, breasts) are not caught under
the belt. Grasp the belt securely on both sides, with
hands in upward position.
13. Provide instructions to allow resident to help with
transfer. Instructions may include: “When you start to
stand, push with your hands against the bed.” “Once
standing, if you’re able, you can take small steps in the
direction of the chair.” “Once standing, reach for the chair
with your stronger hand.”
Transferring a resident from bed to wheelchair
14. With your legs, brace
(support) resident’s
lower legs to prevent
slipping. This can be
done by placing one or
both of your knees in
front of the resident’s
knees.
15. Count to three to alert
resident. On three, with
hands still grasping the
transfer belt on both
sides and moving
upward, slowly help
resident to stand.
Communicating helps
resident help you.
Transferring a resident from bed to wheelchair
16. Tell the resident to take
small steps in the
direction of the chair
while turning his back
toward it. If more help is
needed, help the
resident pivot (turn) to
stand in front of
wheelchair with back of
resident’s legs against
wheelchair.
Pivoting is safer than
twisting.
Transferring a resident from bed to wheelchair
17. Ask the resident to put hands on wheelchair armrests if
able. When the chair is touching the back of the
resident’s legs, help him lower himself into the chair.
18. Reposition resident so that his hips touch the back of the
wheelchair seat.
Using full seat of chair is safest.
19. Attach footrests. Place the resident’s feet on the
footrests. Check that the resident is in proper alignment.
Gently remove the transfer belt. Place a folded blanket
over the resident’s lap as appropriate.
Protects feet and ankles.
20. Remove privacy measures.
21. Place call light within resident’s reach.
Allows resident to communicate with staff as necessary.
22. Wash your hands.
Provides for infection prevention.
Transferring a resident from bed to wheelchair
23. Report any changes in resident to the nurse.
Provides nurse with information to assess resident.
24. Document procedure using facility guidelines.
If you do not document the care, legally it did not
happen.
Transferring a resident using a mechanical lift
Equipment: wheelchair or chair, coworker, mechanical or
hydraulic lift
This is a basic procedure for transferring using a mechanical
lift. Ask someone to help you before starting.
1. Identify yourself by name. Identify the resident by name.
Resident has right to know identity of his or her
caregiver. Addressing resident by name shows respect
and establishes correct identification.
2. Wash your hands.
Provides for infection prevention.
3. Explain procedure to resident. Speak clearly, slowly, and
directly. Maintain face-to-face contact whenever possible.
Promotes understanding and independence.
4. Provide for resident’s privacy with curtain, screen, or
door.
Maintains resident’s right to privacy and dignity.
Transferring a resident using a mechanical lift
5. Lock bed wheels.
Wheel locks prevent bed from moving.
6. Position wheelchair next to bed. Lock brakes.
Wheel locks prevent chair from moving.
7. Help the resident turn to one side of the bed. Position the
sling under the resident, with the edge next to the
resident’s back. Fanfold if necessary. Make the bottom of
the sling even with the resident’s knees. Help the
resident roll back to the middle of the bed. Spread out
the fanfolded edge of the sling.
8. Roll the mechanical lift to bedside. Make sure the base is
opened to its widest point. Push the base of the lift under
the bed.
9. Place the overhead bar directly over the resident.
Transferring a resident using a mechanical lift
10. With the resident lying
on his back, attach one
set of straps to each side
of the sling. Attach one
set of straps to the
overhead bar. Have
coworker support the
resident at the head,
shoulders, and knees
while being lifted. The
resident’s arms should
be folded across his
chest. If the device has
S hooks, they should
face away from resident.
Make sure all straps are
connected properly and
are smooth and straight.
Transferring a resident using a mechanical lift
11. Following manufacturer’s instructions, raise the resident
two inches above the bed. Pause a moment for the
resident to gain balance.
12. Have coworker help support and guide the resident’s
body. You can then roll the lift so that the resident is
positioned over the chair or wheelchair.
Having another person help promotes safety during the
transfer and lessens chance of injury.
13. Slowly lower the resident into the chair or wheelchair.
Push down gently on the resident’s knees to help the
resident into a sitting, rather than reclining, position.
14. Undo the straps from the overhead bar to the sling.
Remove sling or leave in place; follow facility policy.
15. Be sure the resident is seated comfortably and correctly
in the chair or wheelchair. Remove privacy measures.
Transferring a resident using a mechanical lift
16. Place call light within resident’s reach.
Allows resident to communicate with staff as necessary.
17. Wash your hands.
Provides for infection prevention.
18. Report any changes in resident to the nurse.
Provides nurse with information to assess resident.
19. Document procedure using facility guidelines.
If you do not document the care, legally it did not
happen.
6 Personal Care Skills
Handout 6-3: Transferring a Resident to Bed from Wheelchair
Transferring a resident to bed from wheelchair
1. Identify yourself by name. Identify the resident by name.
Resident has right to know identity of his or her caregiver.
Addressing resident by name shows respect and establishes
correct identification.
2. Wash your hands.
Provides for infection prevention.
3. Explain procedure to resident. Speak clearly, slowly, and
directly. Maintain face-to-face contact whenever possible.
Promotes understanding and independence.
4. Provide for resident’s privacy with curtain, screen, or door.
Check the area to be certain it is uncluttered and safe.
Maintains resident’s right to privacy and dignity. Keeping area
free from clutter promotes safety.
5. Remove both wheelchair footrests close to the bed.
6 Personal Care Skills
Handout 6-3: Transferring a Resident to Bed from Wheelchair (cont’d)
6. Place wheelchair at the head of the bed, facing foot of the
bed, or at the foot of bed, facing head of bed. The arm of
the wheelchair should be almost touching the bed. It should
be placed on resident’s stronger, or unaffected, side.
Unaffected side supports weight.
7. Lock wheelchair wheels.
Wheel locks prevent chair from moving.
8. Adjust bed level. The height of the bed should be equal to or
slightly lower than the chair. Lock bed wheels.
Prevents injury to you and to resident.
6 Personal Care Skills
Handout 6-3: Transferring a Resident to Bed from Wheelchair (cont’d)
9. Place the transfer belt around resident’s waist over clothing
(not on bare skin). Tighten the buckle until it is snug. Leave
enough room to insert flat fingers/hand comfortably under
the belt. Check to make sure that skin or skin folds (for
example, breasts) are not caught under the belt. Grasp the
belt securely on both sides, with hands in upward position.
10. Provide instructions to allow resident to help with transfer.
11. With your legs, brace (support) resident’s lower extremities.
This can be done by placing one or both of your knees
against the resident’s knee(s).
12. Count to three to alert resident. On three, with hands still
grasping the transfer belt on both sides and moving upward,
slowly help resident to stand.
6 Personal Care Skills
Handout 6-3: Transferring a Resident to Bed from Wheelchair (cont’d)
13. Tell the resident to take small steps in the direction of the
bed while turning her back toward the bed. Or, if more help
is needed, help the resident pivot to stand in front of bed
with back of her legs against bed. When she feels the bed,
help her sit down on the side of the bed.
14. Make resident comfortable. Remove transfer belt.
15. Return bed to lowest position. Remove privacy measures.
Lowering bed provides for safety.
16. Place call light within resident’s reach.
Allows resident to communicate with staff as necessary.
17. Wash your hands.
Provides for infection prevention.
6 Personal Care Skills
Handout 6-3: Transferring a Resident to Bed from Wheelchair (cont’d)
18. Report any changes in resident to the nurse.
Provides nurse with information to assess resident.
19. Document procedure using facility guidelines.
If you do not document the care you gave, legally it did not
happen.

Personal care skills

  • 1.
    6 Personal Care Skills 1.Explain personal care of residents Define the following terms: hygiene practices to keep bodies clean and healthy. grooming practices to care for oneself, such as caring for fingernails and hair.
  • 2.
    6 Personal Care Skills 1.Explain personal care of residents NAs may provide the following a.m. care for residents: • Assisting with toileting • Helping wash face and hands • Assisting with hair care, dressing, and shaving • Assisting with mouth care
  • 3.
    6 Personal Care Skills 1.Explain personal care of residents NAs may provide the following p.m. care for residents: • Assisting with toileting • Helping wash face and hands • Giving a snack • Assisting with mouth care • Assisting with changing into nightclothes • Giving a back rub
  • 4.
    6 Personal CareSkills Transparency 6-1: Assisting with Personal Care • Help the resident be as independent as possible. • Be aware of resident preferences and routines. • Always explain what you will be doing. • Always provide privacy. • Observe the resident during care. • Note and report signs and symptoms. • Observe resident’s mental state. • Report any changes. • Leave the resident’s room clean and tidy. • Leave the bed in the lowest position and the call light within resident’s reach.
  • 5.
    6 Personal Care Skills 1.Explain personal care of residents NAs can promote residents’ dignity during personal care by • Encouraging residents to do as much as they are able to do and being patient • Knocking and waiting for permission to enter the resident’s room • Not interrupting residents while they are in the bathroom • Leaving the room when residents receive or make phone calls • Respecting residents’ private time and personal things • Not interrupting residents while they are dressing • Keeping residents covered whenever possible when helping with dressing
  • 6.
    6 Personal Care Skills 1.Explain personal care of residents Think about these questions: How else can NAs help promote privacy, respect, and dignity during personal care? What else do you think can be accomplished while providing personal care?
  • 7.
    6 Personal Care Skills 1.Explain personal care of residents While providing personal care NAs should observe for and report the following: • Skin color, temperature, or reddened areas • Mobility • Flexibility • Comfort or pain level • Strength and ability to perform ADLs • Mental and emotional state • Complaints
  • 8.
    6 Personal Care Skills 2.Identify guidelines for providing skin care and preventing pressure ulcers Define the following terms: pressure points areas of the body that bear much of its weight. bony prominences areas of the body where the bone lies close to the skin. pressure ulcer a serious wound resulting from skin breakdown; also called pressure sore, bed sore, or decubitus ulcer.
  • 9.
    6 Personal Care Skills 2.Identify guidelines for providing skin care and preventing pressure ulcers Define the following terms: shearing rubbing or friction that results from the skin moving one way and the bone underneath it remaining fixed or moving in the opposite direction. draw sheet an extra sheet placed on top of the bottom sheet; used for moving residents in bed.
  • 10.
    6 Personal Care Skills 2.Identify guidelines for providing skin care and preventing pressure ulcers Define the following terms: foot drop a weakness of muscles in the feet and ankles that causes problems with the ability to flex the ankles and walk normally. orthotic device, or orthosis a device that helps support and align a limb and improve its functioning.
  • 11.
    6 Personal Care Skills 2.Identify guidelines for providing skin care and preventing pressure ulcers REMEMBER: Prevention is the key to skin health. Once a pressure ulcer forms, it can get bigger and deeper and become infected. Pressure ulcers are painful and difficult to heal.
  • 12.
    6 Personal CareSkills Transparency 6-2: Pressure Ulcer Danger Zones
  • 13.
    6 Personal CareSkills Transparency 6-3: Observing the Skin • Pale, white, reddened, or purple areas • Blisters or bruises • Tingling, warmth, or burning • Dry or flaking skin • Itching or scratching • Rash or discoloration • Swelling • Fluid or blood draining • Broken skin • Wounds or ulcers • Changes in wound or ulcer (size, depth, drainage, color, or odor) • Redness or broken skin between toes or around toenails
  • 14.
    6 Personal CareSkills Transparency 6-3: Observing the Skin In darker complexions, also look for • Any change in feel of the tissue • Any change in appearance of the skin, such as an “orange- peel” look • Purplish hue • Extremely dry, crust-like areas that might be covering a tissue break
  • 15.
    6 Personal Care Skills 2.Identify guidelines for providing skin care and preventing pressure ulcers NAs should remember these guidelines for skin care: • Report changes in residents’ skin. • Provide regular skin care. • Reposition often, at least every two hours. • Give skin care often for incontinent residents. Change clothing and linen often. • Avoid scratching or irritating skin; report blisters or sores on feet.
  • 16.
    6 Personal Care Skills 2.Identify guidelines for providing skin care and preventing pressure ulcers Guidelines for skin care (cont’d): • Massage skin frequently. Do not massage white, red, or purple areas. • Avoid pulling or tearing skin. • In overweight residents, pay special attention to skin under folds. • Encourage residents to eat well-balanced meals. • Keep plastic or rubber materials from coming into contact with skin. • Follow the care plan and nurse’s instructions.
  • 17.
    6 Personal Care Skills 2.Identify guidelines for providing skin care and preventing pressure ulcers Bed-bound residents are at a high risk for pressure ulcers. When caring for these residents NAs should • Keep bottom sheet tight and wrinkle-free. • Avoid shearing. • Place sheepskin, chamois skin, or bed pad under back and buttocks. • Relieve pressure under bony prominences. • Make bed or chair softer with flotation pads. • Use bed cradle to keep top sheets from rubbing skin. • Reposition residents seated in chairs or wheelchairs at least every hour if they cannot change positions easily themselves.
  • 18.
    6 Personal Care Skills 2.Identify guidelines for providing skin care and preventing pressure ulcers All of these positioning devices can help keep residents comfortable and reduce the risk of skin breakdown: • Backrests • Bed cradles • Draw sheets • Footboards • Hand rolls • Orthotic devices • Trochanter rolls • Pillows
  • 19.
    6 Personal Care Skills 3.Describe guidelines for assisting with bathing Define the following terms: partial bath a bath given on days when a complete bath or shower is not done; includes washing the face, hands, underarms, and perineum. perineum the genital and anal area.
  • 20.
    6 Personal Care Skills 3.Describe guidelines for assisting with bathing Remember these guidelines for bathing: • Baths are for health and relaxation. • The face, hands, underarms, and perineum should be washed every day. Complete baths are necessary every other day or less often. • Use facility-approved products. • Keep room temperature comfortable. • Be familiar with safety and assistive devices.
  • 21.
    6 Personal Care Skills 3.Describe guidelines for assisting with bathing Guidelines for bathing (cont’d): • Gather supplies beforehand so a resident is not left alone while bathing. • Make sure water temperature is safe and comfortable. Have resident test water temperature. • Remove all soap from the skin. • Keep a record of bathing schedules.
  • 22.
    Giving a completebed bath Equipment: bath blanket, bath basin, soap, bath thermometer, 2-4 washcloths, 2-4 bath towels, bed pads, clean clothes, 2 pairs of gloves, orangewood stick or nail brush, lotion, deodorant, brush or comb When bathing, move resident’s body gently and naturally. Avoid force and over-extension of limbs and joints. 1. Identify yourself by name. Identify the resident by name. Resident has right to know identity of his or her caregiver. Identifying resident by name shows respect and establishes correct identification. 2. Wash your hands. Provides for infection prevention. 3. Explain procedure to the resident. Speak clearly, slowly, and directly. Maintain face-to-face contact whenever possible. Promotes understanding and independence.
  • 23.
    Giving a completebed bath 4. Provide for resident’s privacy with curtain, screen, or door. Be sure the room is at a comfortable temperature and there are no drafts. Maintains resident’s right to privacy and dignity. 5. Adjust bed to a safe level, usually waist high. Lock bed wheels. Prevents injury to you and to resident.
  • 24.
    Giving a completebed bath 6. Place a bath blanket or towel over resident. Ask him to hold onto it as you remove or fold back top bedding. Remove gown, while keeping resident covered with bath blanket (or top sheet). Place gown in proper container.
  • 25.
    Giving a completebed bath 7. Fill the basin with warm water. Test water temperature with thermometer or against the inside of your wrist. Water temperature should not be over 105°F. Have resident check water temperature to see if it is comfortable. Adjust if necessary. The water will cool quickly. Change the water when it becomes too cool, soapy, or dirty. Resident’s sense of touch may be different than yours; therefore, resident is best able to identify a comfortable water temperature. 8. Put on gloves. Protects you from contact with body fluids. 9. Ask the resident to participate in washing. Help him do this when needed. Promotes independence.
  • 26.
    Giving a completebed bath 10. Uncover only one part of the body at a time. Place a towel or bed pad under the part being washed. Promotes resident’s dignity and right to privacy. Also helps keep resident warm. 11. Wash, rinse, and dry one part of the body at a time. Start at the head. Work down, and complete the front first. When washing, use a clean area of the washcloth for each stroke.
  • 27.
    Giving a completebed bath Eyes, Face, Ears, and Neck: Wash face with wet washcloth (no soap). Begin with the eye farther away from you. Wash inner to outer area. Use a different area of the washcloth for each stroke. Wash the face from the middle outward. Use firm but gentle strokes. Wash the ears and behind the ears. Wash the neck. Rinse and pat dry.
  • 28.
    Giving a completebed bath Arms and Axillae: Remove top clothing. Cover with bath blanket. Remove one arm from under the towel. With a soapy washcloth, wash the upper arm and underarm. Use long strokes from the shoulder down to the wrist. Rinse and pat dry. Repeat for the other arm.
  • 29.
    Giving a completebed bath Hands: Wash one hand in a basin. Clean under the nails with an orangewood stick or nail brush. Rinse and pat dry. Give nail care (see procedure later in this chapter). Repeat for the other hand. Put lotion on the resident’s elbows and hands.
  • 30.
    Giving a completebed bath Chest: Place the towel across the resident’s chest. Pull the blanket down to the waist. Lift the towel only enough to wash the chest. Rinse it and pat dry. For a female resident, wash, rinse, and dry breasts and under breasts. Check the skin in this area for signs of irritation. Abdomen: Keep towel across chest. Fold the blanket down so that it still covers the pubic area. Wash the abdomen, rinse, and pat dry. If the resident has an ostomy, give skin care around the opening (Chapter 4). Cover with the towel. Pull the cotton blanket up to the resident’s chin. Remove the towel.
  • 31.
    Giving a completebed bath Legs and Feet: Expose one leg. Place a towel under it. Wash the thigh. Use long downward strokes. Rinse and pat dry. Do the same from the knee to the ankle.
  • 32.
    Giving a completebed bath Place another towel under the foot. Move the basin to the towel. Place the foot into the basin. Wash the foot and between the toes. Rinse foot and pat dry. Make sure areas between toes are dry. Apply lotion to the foot if ordered, especially at the heels. Do not apply lotion between the toes. Repeat steps for the other leg and foot.
  • 33.
    Giving a completebed bath Back: Help resident move to the center of the bed. Ask resident to turn onto his side so his back is facing you. If the bed has rails, raise the rail on the far side for safety. Fold the blanket away from the back. Place a towel lengthwise next to the back. Wash the back and neck with long, downward strokes. Rinse and pat dry. Apply lotion if ordered.
  • 34.
    Giving a completebed bath 12. Place the towel under the buttocks and upper thighs. Help the resident turn onto his back. If the resident is able to wash his perineal area, place a basin of clean, warm water, a washcloth, and towel within reach. Hand items to the resident as needed. If the resident wants you to leave the room, remove and discard gloves. Wash your hands. Leave supplies and the call light within reach. 13. If the resident cannot provide perineal care, you will do it. Remove and discard your gloves. Wash your hands and put on clean gloves. Provide privacy at all times. 14. Perineal area and buttocks: Change the bath water. Place a towel or bed pad under the perineal area. Wash, rinse, and dry perineal area. Work from front to back (clean to dirty).
  • 35.
    Giving a completebed bath For a female resident: Using water and a small amount of soap, wash the perineum from front to back. Use single strokes. Do not wash from the back to the front. This may cause infection. Use a clean area of washcloth or a clean washcloth for each stroke.
  • 36.
    Giving a completebed bath First spread the labia majora, the outside folds of perineal skin that protect the urinary meatus and the vaginal opening. Wipe from front to back on one side with a clean washcloth. Then wipe the other side from front to back, using a clean part of the washcloth. Clean the perineum (area between vagina and anus) last with a front to back motion. Rinse the area thoroughly in the same way. Make sure all soap is removed. Dry entire perineal area. Move from front to back, using a blotting motion with towel. Ask resident to turn on her side. Wash, rinse, and dry buttocks and anal area. Clean the anal area without contaminating the perineal area.
  • 37.
    Giving a completebed bath For a male resident: If the resident is uncircumcised, pull back the foreskin first. Gently push skin toward the base of penis. Hold the penis by the shaft. Wash in a circular motion from the tip down to the base. Use a clean area of washcloth or clean washcloth for each stroke.
  • 38.
    Giving a completebed bath Thoroughly rinse the penis and pat dry. If resident is uncircumcised, gently return foreskin to normal position. Then wash the scrotum and groin. The groin is the area from the pubis (area around the penis and scrotum) to the upper thighs. Rinse and pat dry. Ask the resident to turn on his side. Wash, rinse, and dry buttocks and anal area. Clean the anal area without contaminating the perineal area. 15. Cover the resident with the blanket. 16. Empty, rinse, and dry bath basin. Place basin in designated dirty supply area or return to storage, depending on facility policy. 17. Place soiled clothing and linens in proper containers. 18. Remove and discard gloves. 19. Wash your hands.
  • 39.
    Giving a completebed bath 20. Provide deodorant. Brush or comb the resident’s hair (see procedure later in this chapter). Help resident put on clean clothing. Help resident into comfortable position with proper body alignment. 21. Return bed to lowest position. Remove privacy measures. Lowering the bed provides for safety. 22. Place call light within resident’s reach. Allows resident to communicate with staff as necessary. 23. Wash your hands. Provides for infection prevention. 24. Report any changes in resident to the nurse. Provides nurse with information to assess resident. 25. Document procedure using facility guidelines. If you do not document the care, legally it did not happen.
  • 40.
    Giving a backrub Equipment: cotton blanket or towel, lotion 1. Identify yourself by name. Identify the resident by name. Resident has right to know identity of his or her caregiver. Addressing resident by name shows respect and establishes correct identification. 2. Wash your hands. Provides for infection prevention. 3. Explain procedure to resident. Speak clearly, slowly, and directly. Maintain face-to-face contact whenever possible. Promotes understanding and independence. 4. Provide for resident’s privacy with curtain, screen, or door. Maintains resident’s right to privacy and dignity. 5. Adjust bed to a safe level, usually waist high. Lower the head of the bed. Lock bed wheels. Prevents injury to you and to resident.
  • 41.
    Giving a backrub 6. Position resident lying on his side or stomach. Cover resident with a cotton blanket or towel. Fold back bed covers. Expose the back to the top of the buttocks. Back rubs can also be given with the resident sitting up. 7. Warm lotion by putting bottle in warm water for five minutes. Run your hands under warm water. Pour lotion on your hands. Rub them together. Always put lotion on your hands first, rather than on the resident’s skin. Increases resident’s comfort.
  • 42.
    Giving a backrub 8. Place hands on each side of upper part of the buttocks. Use the full palm of each hand. Make long, smooth upward strokes with both hands. Move along each side of the spine, up to the shoulders. Circle your hands outward. Move back along outer edges of the back. At buttocks, make another circle.
  • 43.
    Giving a backrub Move your hands back up to the shoulders. Without taking your hands off resident’s skin, repeat this motion for three to five minutes. Long upward strokes release muscle tension; circular strokes increase circulation in muscle areas.
  • 44.
    Giving a backrub 9. Knead with the first two fingers and thumb of each hand. Place them at base of the spine. Move upward together along each side of the spine. Apply gentle downward pressure with fingers and thumbs. Follow the same direction as with the long smooth strokes, circling at shoulders and buttocks. 10. Gently massage bony areas (spine, shoulder blades, hip bones). Use circular motions of your fingertips. If any of these areas are pale, white, or red, massage around them rather than on them. Redness indicates that skin is already irritated and fragile. Include this information in your report to the nurse. 11. Let the resident know when you are almost through. Finish with some long, smooth strokes. 12. Dry the back if extra lotion remains on it. 13. Remove blanket or towel.
  • 45.
    Giving a backrub 14. Help the resident get dressed. Help resident into comfortable position. 15. Store supplies. Place soiled clothing and linens in proper containers. 16. Return bed to lowest position. Remove privacy measures. Provides for resident’s safety. 17. Place call light within resident’s reach. Allows resident to communicate with staff as necessary. 18. Wash your hands. Provides for infection prevention. 19. Report any changes in resident to the nurse. Provides nurse with information to assess resident. 20. Document procedure using facility guidelines. If you do not document the care, legally it did not happen.
  • 46.
    Shampooing hair inbed Equipment: shampoo, hair conditioner (if requested), 2 bath towels, washcloth, bath thermometer, pitcher or handheld shower or sink attachment, waterproof pad, bath blanket, trough and catch basin, comb and brush, hair dryer 1. Identify yourself by name. Identify the resident by name. Resident has right to know identity of his or her caregiver. Addressing resident by name shows respect and establishes correct identification.
  • 47.
    Shampooing hair inbed 2. Wash your hands. Provides for infection prevention. 3. Explain procedure to resident. Speak clearly, slowly, and directly. Maintain face-to-face contact whenever possible. Promotes understanding and independence. 4. Provide for resident’s privacy with curtain, screen, or door. Be sure room is at a comfortable temperature and there are no drafts. Maintains resident’s right to privacy and dignity. 5. Arrange the supplies within reach. 6. Test water temperature with thermometer or against the inside of your wrist. Water temperature should be no higher than 105°F. Have resident check water temperature. Adjust if necessary. Resident’s sense of touch may be different than yours; therefore, resident is best able to identify a comfortable water temperature.
  • 48.
    Shampooing hair inbed 7. Remove all pillows and place the resident in a flat position. Adjust bed to a safe level, usually waist high. Lock bed wheels. Prevents injury to you and to resident. 8. Place the waterproof pad under the resident’s head and shoulders. Cover the resident with the bath blanket. Fold back the top sheet and regular blankets. Protects bed linen. 9. Place the trough under resident’s head. Connect trough to the catch basin. Place one towel across the resident’s shoulders. 10. Protect resident’s eyes with dry washcloth. 11. Use pitcher or attachment to wet hair thoroughly. Apply a small amount of shampoo to your hands and rub them together.
  • 49.
    Shampooing hair inbed 12. Lather and massage scalp with fingertips (not fingernails). Use a circular motion from front to back. Do not scratch the scalp. 13. Rinse hair until water runs clear. Use conditioner if resident wants it. Rinse as directed on container. Be sure to rinse the hair thoroughly to prevent the scalp from getting dry and itchy. 14. Wrap resident’s hair in a clean towel. Dry his face and neck with the washcloth.
  • 50.
    Shampooing hair inbed 15. Remove trough and waterproof pad. 16. Raise the head of bed. 17. Gently rub the scalp and hair with the towel. 18. Comb or brush hair. Dry hair with a hair dryer on low setting if facility allows this. Style hair as resident prefers. 19. Return bed to lowest position. Remove privacy measures. Lowering the bed provides for safety. 20. Place call light within resident’s reach. Allows resident to communicate with staff as necessary. 21. Empty, rinse, and wipe bath basin/pitcher. Take to proper area. 22. Clean comb or brush. Return hair dryer and comb or brush to proper storage. 23. Place soiled linen in proper container.
  • 51.
    Shampooing hair inbed 24. Wash your hands. Provides for infection prevention. 25. Report any changes in resident to nurse. Provides nurse with information to assess resident. 26. Document procedure using facility guidelines. If you do not document the care, legally it did not happen.
  • 52.
    6 Personal Care Skills 3.Describe guidelines for assisting with bathing REMEMBER: It is very important to check the temperature of the water and have the resident check the temperature of the water before bathing. Bath water should be changed when it becomes too cool, soapy, or dirty.
  • 53.
    6 Personal Care Skills 3.Describe guidelines for assisting with bathing REMEMBER: NAs must protect residents’ privacy and dignity by keeping body parts covered with towels and bath blankets. This also helps the resident stay warm.
  • 54.
    6 Personal Care Skills 3.Describe guidelines for assisting with bathing NAs should remember these safety guidelines for showers and tub baths: • Clean tub or shower before and after use. • Be sure floor is dry. • Be familiar with and use assistive devices as necessary. • Have resident use safety bars to get into or out of tub or shower. • Place items within reach. • Do not leave resident alone. • Do not use bath oils, lotions, or powders. • Test water temperature to make sure it is safe and comfortable.
  • 55.
    Giving a showeror a tub bath Equipment: bath blanket, soap, shampoo, bath thermometer, 2-4 washcloths, 2-4 bath towels, clean clothes, nonskid footwear, 2 pairs of gloves, lotion, deodorant, hair dryer 1. Wash your hands. Provides for infection prevention. 2. Place equipment in shower or tub room. Put on gloves. Clean shower or tub area and shower chair. Place bucket under shower chair (in case resident has a bowel movement). Turn on heat lamp to warm the room, if available. Cleaning reduces pathogens and prevents the spread of infection. 3. Remove and discard gloves. Wash your hands. Provides for infection prevention.
  • 56.
    Giving a showeror a tub bath 4. Go to resident’s room. Identify yourself by name. Identify the resident by name. Resident has right to know identity of his or her caregiver. Addressing resident by name shows respect and establishes correct identification. 5. Wash your hands. Provides for infection prevention. 6. Explain procedure to resident. Speak clearly, slowly, and directly. Maintain face-to-face contact whenever possible. Promotes understanding and independence. 7. Provide for resident’s privacy with curtain, screen, or door. Maintains resident’s right to privacy and dignity. 8. Help resident to put on nonskid footwear. Transport resident to shower or tub room. Nonskid footwear helps lessen the risk of falls.
  • 57.
    Giving a showeror a tub bath 9. Put on clean gloves. 10. Help resident remove clothing and shoes. For a shower: 11. If using a shower chair, place it close to resident. Lock wheels (Fig. 6-21). Safely transfer resident into shower chair. Chair may slide if resident attempts to get up.
  • 58.
    Giving a showeror a tub bath 12. Turn on water. Test water temperature with thermometer or against the inside of your wrist. Water temperature should be no higher than 105°F. Have resident check water temperature. Adjust if necessary. Check temperature throughout the shower. Resident’s sense of touch may be different than yours; therefore, resident is best able to identify a comfortable water temperature. 13. Unlock the shower chair and move it into the shower stall. Lock wheels. 14. Stay with resident during procedure. Provides for resident’s safety. 15. Let resident wash as much as possible. Help to wash his or her face. Encourages resident to be independent. 16. Help resident shampoo and rinse hair.
  • 59.
    Giving a showeror a tub bath 17. Using soap, help to wash and rinse the entire body. Move from head to toe (clean to dirty). 18. Turn off water. Unlock shower chair wheels. Roll resident out of shower. For a tub bath: 11. Residents may need help to get into the bath, depending on their level of mobility. Safely transfer resident onto chair or tub lift, or help resident into bath. 12. Fill the tub halfway with warm water. Test water temperature with thermometer or against the inside of your wrist. Water temperature should be no higher than 105°F. Have resident check water temperature. Adjust if necessary. 13. Stay with resident during procedure. Provides for resident’s safety.
  • 60.
    Giving a showeror a tub bath 14. Let resident wash as much as possible. Help to wash his or her face. Encourages resident to be independent. 15. Help resident shampoo and rinse hair. 16. Using soap, help to wash and rinse the entire body. Move from head to toe (clean to dirty). 17. Drain the tub. Cover resident with bath blanket while the tub drains. Maintains resident’s dignity and right to privacy by not exposing body. Keeps resident warm. 18. Help resident out of tub and onto a chair. Remaining steps for either procedure: 19. Give resident towel(s) and help to pat dry. Pat dry under the breasts, between skin folds, in the perineal area, and between toes. Patting dry prevents skin tears and reduces chafing.
  • 61.
    Giving a showeror a tub bath 20. Apply lotion and deodorant as needed. 21. Place soiled clothing and linens in proper containers. 22. Remove and discard gloves. 23. Wash your hands. Provides for infection prevention. 24. Help resident dress and comb hair before leaving shower or tub room. Offer a hair dryer if needed. Put on nonskid footwear. Return resident to room. Combing hair in shower room allows resident to maintain dignity when returning to room. 25. Make sure resident is comfortable. 26. Place call light within resident’s reach. Allows resident to communicate with staff as necessary. 27. Report any changes in resident to nurse. Provides nurse with information to assess resident.
  • 62.
    Giving a showeror a tub bath 28. Document procedure using facility guidelines. If you do not document the care, legally it did not happen.
  • 63.
    6 Personal Care Skills 4.Describe guidelines for assisting with grooming Define the following terms: pediculosis an infestation of lice. safety razor a type of razor that has a sharp blade with a special safety casing to help prevent cuts; requires the use of shaving cream or soap.
  • 64.
    6 Personal Care Skills 4.Describe guidelines for assisting with grooming Define the following terms: disposable razor type of razor that is discarded after one use; requires the use of shaving cream or soap. electric razor type of razor that runs on electricity; does not require the use of soap or shaving cream.
  • 65.
    6 Personal CareSkills Transparency 6-4: Assisting with Grooming • Residents should do as much for themselves as they can. • Let residents make as many choices as possible. • Be sensitive, professional, and respectful. • Do not use same nail equipment on more than one resident. • Keep feet clean and dry, and observe residents’ feet carefully. • Wear gloves when shaving residents. • Be gentle when handling residents’ hair.
  • 66.
    Providing fingernail care Equipment:orangewood stick, emery board, lotion, basin, soap, washcloth, 2 towels, bath thermometer, gloves 1. Identify yourself by name. Identify the resident by name. Resident has right to know identity of his or her caregiver. Addressing resident by name shows respect and establishes correct identification. 2. Wash your hands. Provides for infection prevention. 3. Explain procedure to resident. Speak clearly, slowly, and directly. Maintain face-to-face contact whenever possible. Promotes understanding and independence. 4. Provide for resident’s privacy with curtain, screen, or door. Maintains resident’s right to privacy and dignity.
  • 67.
    Providing fingernail care 5.If resident is in bed, adjust bed to a safe level, usually waist high. Lock bed wheels. Prevents injury to you and to resident. 6. Fill the basin halfway with warm water. Test water temperature with thermometer or against the inside of your wrist. Ensure it is safe. Water temperature should be no higher than 105°F. Have resident check water temperature. Adjust if necessary. Place basin at a comfortable level for the resident. Resident’s sense of touch may be different than yours; therefore, resident is best able to identify a comfortable water temperature. 7. Put on gloves. 8. Soak the resident’s hands and nails in the basin of water. Soak all 10 fingertips for at least five minutes. Nail care is easier if nails are first softened.
  • 68.
    Providing fingernail care 9.Remove hands from water. Wash hands with soapy washcloth. Rinse. Pat hands dry with towel, including between fingers. Remove the hand basin. 10. Place resident’s hands on the towel. Gently clean under each fingernail with orangewood stick. Most pathogens on hands come from beneath the nails.
  • 69.
    Providing fingernail care 11.Wipe orangewood stick on towel after each nail. Wash resident’s hands again. Dry them thoroughly, especially between fingers. 12. Shape nails with an emery board or file. File in a curve. Finish with nails smooth and free of rough edges. Filing in a curve smoothes nails and eliminates edges, which may catch on clothes or tear skin. 13. Apply lotion from fingertips to wrists. Remove excess, if any, with a towel. 14. Empty, rinse, and dry basin. Place basin in designated dirty supply area or return to storage, depending on facility policy. 15. Place soiled clothing and linens in proper containers. 16. Remove and discard gloves. Wash your hands. Provides for infection prevention.
  • 70.
    Providing fingernail care 17.Return bed to lowest position. Remove privacy measures. Lowering the bed provides for safety. 18. Place call light within resident’s reach. Allows resident to communicate with staff as necessary. 19. Report any changes in resident to the nurse. Provides nurse with information to assess resident. 20. Document procedure using facility guidelines. If you do not document the care, legally it did not happen.
  • 71.
    6 Personal Care Skills 4.Describe guidelines for assisting with grooming NAs should observe for and report the following when providing foot care: • Dry, flaking skin • Non-intact or broken skin • Discoloration of the feet • Blisters • Bruises • Blood or drainage
  • 72.
    6 Personal Care Skills 4.Describe guidelines for assisting with grooming Observe and report when providing foot care (cont’d): • Long, ragged toenails • Ingrown toenails • Swelling • Soft, fragile, or reddened heels • Differences in temperature of the feet
  • 73.
    Providing foot care Equipment:basin, bath mat, soap, lotion, washcloth, 2 bath towels, bath thermometer, clean socks, gloves 1. Identify yourself by name. Identify the resident by name. Resident has right to know identity of his or her caregiver. Addressing resident by name shows respect and establishes correct identification. 2. Wash your hands. Provides for infection prevention. 3. Explain procedure to resident. Speak clearly, slowly, and directly. Maintain face-to-face contact whenever possible. Promotes understanding and independence. 4. Provide for resident’s privacy with curtain, screen, or door. Maintains resident’s right to privacy and dignity. 5. If the resident is in bed, adjust bed to a safe level, usually waist high. Lock bed wheels. Prevents injury to you and to resident.
  • 74.
    Providing foot care 6.Fill the basin halfway with warm water. Test water temperature with thermometer or against the inside of your wrist. Ensure it is safe. Water temperature should be no higher than 105° F. Have resident check water temperature. Adjust if necessary. Resident’s sense of touch may be different than yours; therefore, resident is best able to identify a comfortable water temperature. 7. Place basin on the bath mat or bath towel on the floor (if the resident is sitting in a chair) or on a towel at the foot of the bed (if the resident is in bed). Make sure basin is in a comfortable position for resident. Support the foot and ankle throughout the procedure. 8. Put on gloves. 9. Remove resident’s socks. Completely submerge resident’s feet in water. Soak the feet for 10 to 20 minutes. Add warm water to basin as necessary.
  • 75.
    Providing foot care 10.Put soap on wet washcloth. Remove one foot from water. Wash entire foot, including between the toes and around nail beds. 11. Rinse entire foot, including between the toes. 12. Dry entire foot, including between the toes. 13. Repeat steps 10 through 12 for the other foot.
  • 76.
    Providing foot care 14.Put lotion in hand. Warm lotion by rubbing hands together. Massage lotion into entire foot (top and bottom), except between the toes. Remove excess, if any, with a towel. 15. Help resident put on clean socks. 16. Empty, rinse, and dry basin. Place basin in designated dirty supply area or return to storage, depending on facility policy. 17. Place soiled clothing and linens in proper containers. 18. Remove and discard gloves. Wash your hands. Provides for infection prevention. 19. Return bed to lowest position. Remove privacy measures. Lowering the bed provides for safety. 20. Place call light within resident’s reach. Allows resident to communicate with staff as necessary.
  • 77.
    Providing foot care 21.Report any changes in resident to the nurse. Provides nurse with information to assess resident. 22. Document procedure using facility guidelines. If you do not document the care, legally it did not happen.
  • 78.
    6 Personal Care Skills 4.Describe guidelines for assisting with grooming Remember these points when combing or brushing residents’ hair: • Let residents choose their own hairstyles. • Do not style residents’ hair in a childish manner. • Handle hair gently.
  • 79.
    Combing or brushinghair Equipment: comb, brush, towel, mirror, hair care items requested by resident Use hair care products that the resident prefers for his or her type of hair. 1. Identify yourself by name. Identify the resident by name. Resident has right to know identity of his or her caregiver. Addressing resident by name shows respect and establishes correct identification. 2. Wash your hands. Provides for infection prevention. 3. Explain procedure to resident. Speak clearly, slowly, and directly. Maintain face-to-face contact whenever possible. Promotes understanding and independence. 4. Provide for resident’s privacy with curtain, screen, or door. Maintains resident’s right to privacy and dignity.
  • 80.
    Combing or brushinghair 5. If resident is in bed, adjust bed to a safe level, usually waist high. Raise head of bed so resident is sitting up. Lock bed wheels. Prevents injury to you and to resident. Sitting upright puts resident in more natural position. 6. Place a towel under the head or around the shoulders. 7. Remove any hair pins, hair ties or clips. 8. Remove tangles first by dividing hair into small sections. Hold lock of hair just above the tangle so you do not pull at the scalp. Gently comb or brush through the tangle. Reduces hair breakage, scalp pain, and irritation.
  • 81.
    Combing or brushinghair 9. After tangles are removed, brush two-inch sections of hair at a time. Gently brush from roots to ends. 10. Neatly style hair as resident prefers. Avoid childish hairstyles. Each resident may prefer different styles. Offer mirror to the resident. Each resident has the right to choose. Promotes resident’s independence.
  • 82.
    Combing or brushinghair 11. Return supplies to proper storage. Clean hair from comb or brush. Clean comb or brush. 12. Dispose of soiled linen in the proper container. 13. Return bed to lowest position. Remove privacy measures. Lowering the bed provides for safety. 14. Place call light within resident’s reach. Allows resident to communicate with staff as necessary. 15. Wash your hands. Provides for infection prevention. 16. Report any changes in resident to nurse. Provides nurse with information to assess resident. 17. Document procedure using facility guidelines. If you do not document the care, legally it did not happen.
  • 83.
    6 Personal Care Skills 4.Describe guidelines for assisting with grooming Remember these points when assisting with shaving: • Respect personal preferences regarding shaving. • Wear gloves. • Do not share razors between residents. • Soften hair on face first if using disposable or safety razor. • Shave in direction of hair growth. • Use after-shave if desired. • Discard disposable shaving products properly. • Do not use electric razors near water or oxygen.
  • 84.
    Shaving a resident Equipment:razor, basin filled halfway with warm water (if using a safety or disposable razor), 2 towels, washcloth, mirror, shaving cream or soap (if using a safety or disposable razor), after-shave lotion, gloves 1. Identify yourself by name. Identify the resident by name. Resident has right to know identity of his or her caregiver. Addressing resident by name shows respect and establishes correct identification. 2. Wash your hands. Provides for infection prevention. 3. Explain procedure to resident. Speak clearly, slowly, and directly. Maintain face-to-face contact whenever possible. Promotes understanding and independence. 4. Provide for resident’s privacy with curtain, screen, or door. Maintains resident’s right to privacy and dignity.
  • 85.
    Shaving a resident 5.If resident is in bed, adjust bed to a safe level, usually waist high. Lock bed wheels. Prevents injury to you and to resident. 6. Raise head of bed so resident is sitting up. Place towel across the resident’s chest, under his chin. Sitting upright puts resident in a more natural position. Towel protects resident’s clothing and bed linen. 7. Put on gloves. Shaving may cause bleeding. Wearing gloves promotes infection prevention and follows Standard Precautions. Shaving using a safety or disposable razor: 8. Soften the beard with a warm, wet washcloth on the face for a few minutes before shaving. Lather the face with shaving cream or soap and warm water. Warm water and lather soften skin and hair and make shaving more comfortable.
  • 86.
    Shaving a resident 9.Hold skin taut. Shave in the direction of hair growth. Shave beard in downward strokes on face and upward strokes on neck (Fig. 6-26). Rinse the blade often in the basin to keep it clean and wet. Maximizes hair removal by shaving in the direction of hair growth.
  • 87.
    Shaving a resident 10.When you have finished, wash and rinse the resident’s face with a warm, wet washcloth. If he is able, let him use the washcloth himself. Use the towel to dry his face. Offer a mirror to resident. Removes soap, which may cause irritation. Promotes independence. Shaving using an electric razor: 8. Use a small brush to clean the razor. Do not use an electric razor near any water source or when oxygen is in use. Electricity near water may cause electrocution. Electricity near oxygen may cause an explosion.
  • 88.
    Shaving a resident 9.Turn on the razor and hold skin taut. Shave with smooth, even movements (Fig. 6-27). Shave beard with back and forth motion in direction of beard growth with foil shaver. Shave beard in circular motion with three-head shaver. Shave the chin and under the chin. 10. Offer a mirror to resident. Promotes independence.
  • 89.
    Shaving a resident Finalsteps: 11. Apply after-shave lotion if resident wants it. Improves resident’s self-esteem. 12. Remove the towel. Place the towel and washcloth in proper container. 13. Clean the equipment and store it. For safety razor, rinse the razor. For disposable razor, dispose of it in a sharps container. For electric razor, clean head of razor. Remove whiskers from razor. Recap shaving head and return razor to case. 14. Remove and discard gloves. Wash your hands. Provides for infection prevention. 15. Make sure that resident and environment are free of loose hairs. 16. Return bed to lowest position. Remove privacy measures. Lowering the bed provides for safety.
  • 90.
    Shaving a resident 17.Place call light within resident’s reach. Allows resident to communicate with staff as necessary. 18. Report any changes in resident to the nurse. Provides nurse with information to assess resident. 19. Document procedure using facility guidelines. If you do not document the care, legally it did not happen.
  • 91.
    6 Personal Care Skills 5.List guidelines for assisting with dressing Define the following terms: affected side a weakened side from a stroke or injury; also called weaker or involved side. involved term used to refer to the weaker, or affected, side of the body after a stroke or injury.
  • 92.
    6 Personal Care Skills 5.List guidelines for assisting with dressing Define the following terms: Intravenous (IV) into a vein. embolism an obstruction of a blood vessel, usually by a blood clot.
  • 93.
    6 Personal Care Skills 5.List guidelines for assisting with dressing REMEMBER: Do not refer to a resident’s affected or involved side as a “bad side” or a “bad” leg or arm.
  • 94.
    6 Personal CareSkills Transparency 6-5: Assisting with Dressing • Refer to affected side as weaker or involved. • Preferences should be followed. Allow residents to choose clothing. • Encourage residents to dress in regular clothes during the daytime. • Let residents do as much as possible to dress themselves. Use assistive devices as directed. • Provide privacy. • Roll or fold down socks before putting them on. • Front-fastening bras are easier for residents to fasten by themselves. • Put back-fastening bras on waist and fasten in front first before rotating around. • When dressing, start with the weaker arm or leg first. When undressing, start with the stronger side.
  • 95.
    Dressing a residentwith an affected (weak) right arm Equipment: clean clothes of resident’s choice, nonskid footwear When putting on items, move resident’s body gently and naturally. Avoid force and over-extension of limbs and joints. 1. Identify yourself by name. Identify the resident by name. Resident has right to know identity of his or her caregiver. Addressing resident by name shows respect and establishes correct identification. 2. Wash your hands. Provides for infection prevention. 3. Explain procedure to resident. Speak clearly, slowly, and directly. Maintain face-to-face contact whenever possible. Promotes understanding and independence. 4. Provide for resident’s privacy with curtain, screen, or door. Maintains resident’s right to privacy and dignity.
  • 96.
    Dressing a residentwith an affected (weak) right arm 5. Ask resident what she would like to wear. Dress her in outfit of choice. Promotes resident’s right to choose. 6. Remove resident’s gown or top. Do not completely expose resident. Take clothes off the stronger side first when undressing. Then remove from weaker side. Place gown in proper container. Maintains resident’s dignity and right to privacy. 7. Help resident put the right (affected/weaker) arm through the right sleeve of the shirt, sweater, or slip before placing garment on left (unaffected/stronger) arm. 8. Help resident put on skirt, pants, or dress. Put the weaker leg through the skirt or pants first. Then place the stronger leg through the skirt or pants. 9. Place bed at the lowest position. Lock bed wheels.
  • 97.
    Dressing a residentwith an affected (weak) right arm 10. Have resident sit down. Help to put on socks and nonskid footwear. Tie laces. Promotes resident’s safety. 11. Finish with resident dressed appropriately. Make sure clothing is right-side-out and zippers and buttons are fastened. 12. Place gown in soiled linen container. 13. Keep bed in lowest position. Remove privacy measures. 14. Place call light within resident’s reach. Allows resident to communicate with staff as necessary. 15. Wash your hands. Provides for infection prevention.
  • 98.
    Dressing a residentwith an affected (weak) right arm 16. Report any changes in resident to the nurse. Provides nurse with information to assess resident. 17. Document procedure using facility guidelines. If you do not document the care, legally it did not happen.
  • 99.
    6 Personal Care Skills 5.List guidelines for assisting with dressing When dressing a resident with an IV an NA should remember the following: • Never disconnect IV lines or turn off the pump. • Always keep the IV bag higher than the IV site • on the body. • First remove clothing from the side without the IV. Then gather the clothing on the side with the IV. Lift clothing over the IV site. Move it up the tubing toward the IV bag. Lift the IV bag off its pole. Carefully slide the clothing over the bag. Place the bag back on the pole.
  • 100.
    6 Personal Care Skills 5.List guidelines for assisting with dressing Dressing a resident with an IV (cont’d): • Apply clean clothing first to side with the IV. Slide the correct arm opening over the bag, then over the tubing and the resident’s IV arm. Place the IV bag back on the pole. • Check that the IV is dripping properly. Make sure none of the tubing is dislodged. Check to see that the IV site dressing is in place.
  • 101.
    6 Personal Care Skills 5.List guidelines for assisting with dressing REMEMBER: Anti-embolic stockings can help prevent swelling and blood clots and aid circulation. They should be applied in the morning, before the resident gets out of bed, so there is less swelling in the legs.
  • 102.
    Applying knee-high elasticstockings Equipment: elastic stockings 1. Identify yourself by name. Identify resident by name. Resident has right to know identity of his or her caregiver. Addressing resident by name shows respect and establishes correct identification. 2. Wash your hands. Provides for infection prevention. 3. Explain procedure to resident. Speak clearly, slowly, and directly. Maintain face-to-face contact whenever possible. Promotes understanding and independence. 4. Provide for resident’s privacy with curtain, screen, or door. Maintains resident’s right to privacy and dignity.
  • 103.
    Applying knee-high elasticstockings 5. The resident should be in the supine position (on her back) in bed. With resident lying down, remove her socks, shoes, or slippers, and expose one leg. Expose no more than one leg at a time. 6. Turn stocking inside-out at least to heel area.
  • 104.
    Applying knee-high elasticstockings 7. Gently place foot of stocking over toes, foot, and heel. Make sure the heel is in the right place (heel of foot should be in heel of stocking). 8. Gently pull top of stocking over foot, heel, and leg.
  • 105.
    Applying knee-high elasticstockings 9. Make sure there are no twists or wrinkles in stocking after it is on. It must fit smoothly and be comfortable. Make sure the heel of stocking is over the heel of foot. If the stocking has an opening in the toe area, make sure the opening is either over or under the toe area. This depends on the manufacturer’s instructions. Adjust if needed. 10. Repeat for other leg.
  • 106.
    Applying knee-high elasticstockings 11. Place call light within resident’s reach. Allows resident to communicate with staff as necessary. 12. Wash your hands. Provides for infection prevention. 13. Report any changes in resident to nurse. Provides nurse with information to assess resident. 14. Document procedure using facility guidelines. If you do not document the care, legally it did not happen.
  • 107.
    6 Personal Care Skills 6.Identify guidelines for proper oral hygiene Define the following terms: oral care care of the mouth, teeth, and gums. aspiration the inhalation of food, fluid or foreign material into the lungs. dentures artificial teeth.
  • 108.
    6 Personal Care Skills 6.Identify guidelines for proper oral hygiene REMEMBER: Oral care involves brushing the teeth, tongue, and gums, flossing the teeth with dental floss, caring for lips, and providing denture care.
  • 109.
    6 Personal Care Skills 6.Identify guidelines for proper oral hygiene NAs should observe for and report the following when providing oral care: • Irritation • Raised areas • Coated or swollen tongue • Ulcers • Flaky, white spots • Dry, cracked, bleeding, or chapped lips • Loose, chipped, broken, or decayed teeth • Swollen, irritated, bleeding, or whitish gums • Bad or fruity breath • Reports of mouth pain
  • 110.
    6 Personal Care Skills 6.Identify guidelines for proper oral hygiene When providing oral care for an unconscious resident NAs must remember the following: • Regular oral care keeps the mouth clean and moist. • Use as little liquid as possible and turn residents on their sides to avoid aspiration. • Squeeze swabs after dipping them in solution to remove excess liquid.
  • 111.
    Providing oral care Equipment:toothbrush, toothpaste, emesis basin, gloves, clothing protector or towel, glass of water, lip moisturizer 1. Identify yourself by name. Identify the resident by name. Resident has right to know identity of his or her caregiver. Addressing resident by name shows respect and establishes correct identification. 2. Wash your hands. Provides for infection prevention. 3. Explain procedure to resident. Speak clearly, slowly, and directly. Maintain face-to-face contact whenever possible. Promotes understanding and independence. 4. Provide for resident’s privacy with curtain, screen, or door. Maintains resident’s right to privacy and dignity.
  • 112.
    Providing oral care 5.If resident is in bed, adjust bed to a safe level, usually waist high. Raise the head of the bed to have resident in an upright sitting position. Lock bed wheels. Prevents injury to you and to resident. Prevents fluids from running down resident’s throat, causing choking. 6. Put on gloves. Brushing may cause gums to bleed. 7. Place a clothing protector or towel across resident’s chest. Protects resident’s clothing and bed linen. 8. Wet toothbrush. Put on small amount of toothpaste. Water helps distribute toothpaste.
  • 113.
    Providing oral care 9.Clean entire mouth, including tongue and all surfaces of teeth and the gumline. Use gentle strokes. First brush inner, outer, and chewing surfaces of the upper teeth. Then do the same with the lower teeth. Use short strokes. Brush back and forth. Brush tongue. Brushing upper teeth first lessens production of saliva in lower part of mouth.
  • 114.
    Providing oral care 10.Give the resident water to rinse the mouth. Place emesis basin under the resident’s chin, with the inward curve under the chin. Have resident spit water into emesis basin. Wipe resident’s mouth and remove towel. Apply lip moisturizer. 11. Rinse toothbrush and place in proper container. Empty, rinse, and dry basin. Place basin and toothbrush in designated dirty supply area or return to storage, depending on facility policy.
  • 115.
    Providing oral care 12.Place soiled clothing and linens in proper containers. 13. Remove and discard gloves. Wash your hands. Provides for infection prevention. 14. Return bed to lowest position. Remove privacy measures. Lowering the bed provides for safety. 15. Place call light within resident’s reach. Allows resident to communicate with staff as necessary. 16. Report any problems with teeth, mouth, tongue, and lips to nurse. This includes odor, cracking, sores, bleeding, and any discoloration. Provides nurse with information to assess resident. 17. Document procedure using facility guidelines. If you do not document the care, legally it did not happen.
  • 116.
    Providing oral carefor the unconscious resident Equipment: sponge swabs, tongue depressor, towel, emesis basin, gloves, glass of water, lip moisturizer, cleaning solution (check the care plan) 1. Identify yourself by name. Identify the resident by name. Even residents who are unconscious may be able to hear you. Always speak to them as you would to any resident. Resident has right to know identity of his or her caregiver. Addressing resident by name shows respect and establishes correct identification. 2. Wash your hands. Provides for infection prevention. 3. Explain procedure to resident. Speak clearly, slowly, and directly. Maintain face-to-face contact whenever possible. Promotes understanding. The resident may be able to hear and understand even though he is unconscious.
  • 117.
    Providing oral carefor the unconscious resident 4. Provide for resident’s privacy with curtain, screen, or door. Maintains resident’s right to privacy and dignity. 5. Adjust bed to a safe level, usually waist high. Lock bed wheels. Prevents injury to you and to resident. 6. Put on gloves. Protects you from coming into contact with body fluids. 7. Turn resident on his side or turn his head to the side. Place a towel under his cheek and chin. Place an emesis basin next to the cheek and chin for excess fluid. Protects resident’s clothing and bed linen. 8. Hold mouth open with tongue depressor. Enables you to safely clean mouth.
  • 118.
    Providing oral carefor the unconscious resident 9. Dip sponge swab in cleaning solution. Squeeze excess solution to prevent aspiration. Wipe teeth, gums, tongue, and inside surfaces of mouth. Remove debris with the swab. Change swab often. Repeat this until the mouth is clean. Stimulates gums and removes mucus. 10. Rinse with clean swab dipped in water. Squeeze swab first to remove excess water. Removes solution from mouth.
  • 119.
    Providing oral carefor the unconscious resident 11. Remove the towel and basin. Pat lips or face dry if needed. Apply lip moisturizer. Prevents lips from drying and cracking. Improves resident’s comfort. 12. Empty, rinse, and dry basin. Place basin in designated dirty supply area or return to storage, depending on facility policy. 13. Place soiled linens in the proper container. 14. Remove and discard gloves. Wash your hands. Provides for infection prevention. 15. Return bed to lowest position. Remove privacy measures. Lowering the bed provides for safety. 16. Place call light within resident’s reach. Allows resident to communicate with staff as necessary.
  • 120.
    Providing oral carefor the unconscious resident 17. Report any problems with teeth, mouth, tongue, and lips to nurse. This includes odor, cracking, sores, bleeding, and any discoloration. Provides nurse with information to assess resident. 18. Document procedure using facility guidelines. If you do not document the care, legally it did not happen.
  • 121.
    Flossing teeth Equipment: dentalfloss, glass of water, emesis basin, gloves, towel 1. Identify yourself by name. Identify the resident by name. Resident has right to know identity of his or her caregiver. Addressing resident by name shows respect and establishes correct identification. 2. Wash your hands. Provides for infection prevention. 3. Explain procedure to resident. Speak clearly, slowly, and directly. Maintain face-to-face contact whenever possible. Promotes understanding and independence. 4. Provide for resident’s privacy with curtain, screen, or door. Maintains resident’s right to privacy and dignity.
  • 122.
    Flossing teeth 5. Ifresident is in bed, adjust bed to a safe level, usually waist high. Raise the head of the bed to have resident in an upright sitting position. Lock bed wheels. Prevents fluids from running down resident’s throat, causing choking. 6. Put on gloves. Flossing may cause gums to bleed. 7. Wrap the ends of floss securely around each index finger.
  • 123.
    Flossing teeth 8. Startwith the back teeth. Place floss between teeth. Move it down the surface of the tooth. Use a gentle sawing motion. Continue to the gum line. At the gum line, curve the floss. Slip it gently into the space between the gum and tooth. Then go back up, scraping that side of the tooth. Repeat this on the side of the other tooth. Removes food and prevents tooth decay.
  • 124.
    Flossing teeth 9. Afterevery two teeth, unwind floss from your fingers. Move it so you are using a clean area. Floss all teeth. 10. Offer water to rinse the mouth. Ask the resident to spit it into the basin. Flossing loosens food. Rinsing removes it. 11. Offer resident a face towel when done flossing all teeth. Promotes dignity. 12. Discard floss. Discard water and rinse and dry the basin. Place basin in designated dirty supply area or return to storage, depending on facility policy. 13. Place soiled linen in the proper container. 14. Remove and discard gloves. Wash your hands. Provides for infection prevention. 15. Return bed to lowest position. Remove privacy measures. Lowering the bed provides for safety.
  • 125.
    Flossing teeth 16. Placecall light within resident’s reach. Allows resident to communicate with staff as necessary. 17. Report any problems with teeth, mouth, tongue, and lips to nurse. This includes odor, cracking, sores, bleeding, and any discoloration. Provides nurse with information to assess resident. 18. Document procedure using facility guidelines. If you do not document the care, legally it did not happen.
  • 126.
    6 Personal Care Skills 6.Identify guidelines for proper oral hygiene NAs should remember the following guidelines about denture care: • Dentures are expensive and should be handled carefully. • Wear gloves when cleaning dentures. • Report problems with dentures to the nurse. • Do not use hot water to clean dentures because it may damage them. • Place dentures in labeled cup or return them immediately to the resident.
  • 127.
    Cleaning and storingdentures Equipment: denture brush or toothbrush, denture cleanser or toothpaste, labeled denture cup, 2 towels, gloves 1. Wash your hands. Provides for infection prevention. 2. Put on gloves. Prevents you from coming into contact with body fluids. 3. Line the sink or basin with a towel(s) and partially fill sink with water. Prevents dentures from breaking if dropped. 4. Handle dentures carefully. Hold them over the sink. Rinse dentures in moderate temperature running water before brushing them. Do not use hot water. Hot water may warp dentures. 5. Apply toothpaste or denture cleanser to brush.
  • 128.
    Cleaning and storingdentures 6. Brush dentures on all surfaces. This includes the inner, outer, and chewing surfaces of dentures, as well as the groove that will touch gum surfaces. 7. Rinse all surfaces of dentures under moderate temperature running water. Do not use hot water. Hot water may warp dentures. 8. Rinse denture cup before placing clean dentures in the cup. Removes pathogens.
  • 129.
    Cleaning and storingdentures 9. Place dentures in clean, labeled denture cup with solution or moderate temperature water. Place lid on cup. Return denture cup to storage. Some residents will want to wear dentures all of the time. They will only remove them for cleaning. If the resident wants to continue wearing dentures, return them to him or her. Do not place them in the denture cup. 10. Rinse brush. Dry and return equipment to storage. Drain sink. Place soiled linens in the proper container. 11. Remove and discard gloves. Wash your hands. Provides for infection prevention. 12. Document procedure using facility guidelines. Report any change in appearance of dentures to the nurse. If you do not document the care, legally it did not happen.
  • 130.
    6 Personal Care Skills 7.Explain guidelines for assisting with toileting Define the following terms: fracture pan a bedpan that is flatter than a regular bedpan. portable commode a chair with a toilet seat and a removable container underneath that is used for elimination; also called bedside commode.
  • 131.
    6 Personal Care Skills 7.Explain guidelines for assisting with toileting REMEMBER: A standard bedpan should be positioned with the wider end aligned with the resident’s buttocks. A fracture pan should be positioned with the handle toward the foot of the bed.
  • 132.
    6 Personal Care Skills 7.Explain guidelines for assisting with toileting REMEMBER: It is very important that NAs promote dignity and provide privacy while assisting residents with toileting.
  • 133.
    Assisting resident withuse of bedpan Equipment: bedpan, bedpan cover, protective pad, bath blanket, toilet paper, disposable wipes, towel, 2 pairs of gloves 1. Identify yourself by name. Identify the resident by name. Resident has right to know identity of his or her caregiver. Addressing resident by name shows respect and establishes correct identification. 2. Wash your hands. Provides for infection prevention. 3. Explain procedure to resident. Speak clearly, slowly, and directly. Maintain face-to-face contact whenever possible. Promotes understanding and independence. 4. Provide for resident’s privacy with curtain, screen, or door. Maintains resident’s right to privacy and dignity.
  • 134.
    Assisting resident withuse of bedpan 5. Adjust bed to a safe level, usually waist high. Before placing bedpan, lower the head of the bed. Lock bed wheels. When bed is flat, resident can be moved without working against gravity. 6. Put on gloves. Prevents contact with body fluids. 7. Cover the resident with the bath blanket. Ask him to hold it while you pull down the top covers underneath. Do not expose more of the resident than you need to. Maintains resident’s right to privacy and dignity.
  • 135.
    Assisting resident withuse of bedpan 8. Place a protective pad under the resident’s buttocks and hips. To do this, have the resident roll toward you. If the resident cannot do this, you must turn him toward you (see later in this chapter). Be sure resident cannot roll off the bed. Move to empty side of bed. Place protective pad on the area where the resident will lie on his back. The side of protective pad nearest the resident should be fanfolded (folded several times into pleats) and tucked under the resident. (cont’d)
  • 136.
    Assisting resident withuse of bedpan Ask resident to roll onto his back, or roll him as you did before. Unfold rest of protective pad so it completely covers area under and around the resident’s hips. Prevents linen from being soiled. 9. Ask resident to remove undergarments or help him do so. Promotes independence.
  • 137.
    Assisting resident withuse of bedpan 10. Place bedpan near his hips in the correct position. A standard bedpan should be positioned with the wider end aligned with the resident’s buttocks. A fracture pan should be positioned with handle toward foot of bed.
  • 138.
    Assisting resident withuse of bedpan 11. If resident is able, ask him to raise hips by pushing with feet and hands at the count of three (Fig. 6-43). Slide the bedpan under his hips. If a resident cannot help you in any way, keep the bed flat and roll the resident away from you. Slip the bedpan under his hips and gently roll the resident back onto the bedpan. Keep the bedpan centered underneath.
  • 139.
    Assisting resident withuse of bedpan 12. Remove and discard gloves. Wash your hands. Provides for infection prevention. 13. Raise the head of the bed. Prop the resident into a semi- sitting position using pillows. Puts resident in comfortable position for voiding. 14. Make sure the bath blanket is still covering the resident. Place toilet paper and disposable wipes within resident’s reach. Ask resident to clean his hands with a wipe when finished if he is able. 15. Place the call light within resident’s reach. Ask resident to signal when done. Leave the room and close the door. Ensures ability to communicate need for help. 16. When called by the resident, return and put on clean gloves.
  • 140.
    Assisting resident withuse of bedpan 17. Lower the head of the bed. Make sure resident is still covered. Places resident in proper position to remove pan. Promotes dignity. 18. Remove bedpan carefully and cover bedpan. Promotes infection prevention and odor control. Provides dignity for resident. 19. Give perineal care if help is needed. Wipe female residents from front to back. Dry the perineal area with a towel. Help the resident put on undergarment. Cover the resident and remove the bath blanket. Wiping from front to back prevents spread of pathogens that may cause urinary tract infection. 20. Place the towel and bath blanket in a hamper or bag. Remove and discard protective pad and disposable supplies.
  • 141.
    Assisting resident withuse of bedpan 21. Take bedpan to the bathroom. Empty bedpan carefully into the toilet unless a specimen is needed or urine is being measured for intake/output monitoring. Note color, odor, and consistency of contents before flushing. If you notice anything unusual about the stool or urine (for example, the presence of blood), do not discard it. Inform the nurse. Changes may be the first sign of a medical problem. 22. Turn the faucet on with a paper towel. Rinse the bedpan with cold water and empty it into the toilet. Flush the toilet. Place bedpan in proper area for cleaning or clean it according to policy. 23. Remove and discard gloves. Wash your hands. Provides for infection prevention. 24. Return bed to lowest position. Remove privacy measures. Lowering the bed provides for resident’s safety.
  • 142.
    Assisting resident withuse of bedpan 25. Place call light within resident’s reach. Allows resident to communicate with staff as necessary. 26. Report any changes in resident to the nurse. Provides nurse with information to assess resident. 27. Document procedure using facility guidelines. If you do not document the care, legally it did not happen.
  • 143.
    Assisting a maleresident with a urinal Equipment: urinal, protective pad, disposable wipes, 2 pairs of gloves 1. Identify yourself by name. Identify the resident by name. Resident has right to know identity of his or her caregiver. Addressing resident by name shows respect and establishes correct identification. 2. Wash your hands. Provides for infection prevention. 3. Explain procedure to resident. Speak clearly, slowly, and directly. Maintain face-to-face contact whenever possible. Promotes understanding and independence. 4. Provide for resident’s privacy with curtain, screen, or door. Maintains resident’s right to privacy and dignity.
  • 144.
    Assisting a maleresident with a urinal 5. Adjust bed to a safe level, usually waist high. Lock bed wheels. Prevents injury to you and to resident. 6. Put on gloves. Prevents you from coming into contact with body fluids. 7. Place a protective pad under the resident’s buttocks and hips, as in earlier procedure. Prevents linen from being soiled.
  • 145.
    Assisting a maleresident with a urinal 8. Hand the urinal to the resident. If the resident is not able to help himself, place urinal between his legs and position the penis inside the urinal. Replace covers. Promotes independence, dignity and privacy. 9. Remove and discard gloves. Wash your hands.
  • 146.
    Assisting a maleresident with a urinal 10. Place disposable wipes within resident’s reach. Ask the resident to clean his hands with a hand wipe when finished if he is able. Place the call light within resident’s reach. Ask resident to signal when done. Leave the room and close the door. Ensures ability to communicate need for help. 11. When called by the resident, return and put on clean gloves. 12. Discard disposable wipes. 13. Remove urinal or have resident hand it to you. Empty contents into toilet unless specimen is needed or urine is being measured for intake/output monitoring. Note color, odor, and qualities (for example, cloudiness) of contents. Changes may be the first sign of medical problem.
  • 147.
    Assisting a maleresident with a urinal 14. Turn the faucet on with a paper towel. Rinse the urinal with cold water. Empty rinse water into the toilet. Flush the toilet. Place urinal in proper area for cleaning or clean it according to facility policy. 15. Remove and discard protective pad. Remove and discard gloves. Wash your hands. 16. Return bed to lowest position. Remove privacy measures. Lowering the bed provides for resident’s safety. 17. Place call light within resident’s reach. Allows resident to communicate with staff as necessary. 18. Report any changes in resident to the nurse. Provides nurse with information to assess resident. 19. Document procedure using facility guidelines. If you do not document the care, legally it did not happen.
  • 148.
    Assisting a residentto use a portable commode or toilet Equipment: portable commode with basin, toilet paper, disposable wipes, towel, 3 pairs of gloves 1. Identify yourself by name. Identify the resident by name. Resident has right to know identity of his or her caregiver. Addressing resident by name shows respect and establishes correct identification. 2. Wash your hands. Provides for infection prevention. 3. Explain procedure to resident. Speak clearly, slowly, and directly. Maintain face-to-face contact whenever possible. Promotes understanding and independence. 4. Provide for resident’s privacy with curtain, screen, or door. Maintains resident’s right to privacy and dignity.
  • 149.
    Assisting a residentto use a portable commode or toilet 5. Lock bed wheels. Make sure resident is wearing nonskid shoes and that the laces are tied. Help resident out of bed and to the portable commode or bathroom. 6. Put on gloves. Prevents contact with body fluids. 7. If needed, help resident remove clothing and sit comfortably on toilet seat. Put toilet paper and disposable wipes within reach. Ask resident to clean his hands with a wipe when finished if he is able. 8. Remove and discard gloves. Wash your hands. 9. Provide privacy. Place the call light within resident’s reach. Ask resident to signal when done. Leave the room and close the door. Ensures ability to communicate need for help.
  • 150.
    Assisting a residentto use a portable commode or toilet 10. When called by the resident, return and put on clean gloves. Give perineal care if help is needed. Wipe female residents from front to back. Dry the perineal area with a towel. Help the resident put on clothing. Wiping from front to back prevents spread of pathogens that may cause urinary tract infection. 11. Place the towel in a hamper or bag. Discard disposable supplies. 12. Remove and discard gloves. Wash your hands. 13. Help resident back to bed. 14. Put on clean gloves. 15. Remove waste container. Empty into toilet unless a specimen is needed or the urine is being measured for intake/output monitoring. Note color, odor, and consistency of contents. Changes may be first sign of medical problem.
  • 151.
    Assisting a residentto use a portable commode or toilet 16. Turn the faucet on with a paper towel. Rinse the container with cold water. Empty rinse water into the toilet. Flush the toilet. Place container in proper area for cleaning or clean it according to facility policy. 17. Remove and discard gloves. Wash your hands. Provides for infection prevention. 18. Make sure bed is in lowest position. Remove privacy measures. 19. Place call light within resident’s reach. Allows resident to communicate with staff as necessary. 20. Report any changes in resident to the nurse. Provides nurse with information to assess resident. 21. Document procedure using facility guidelines. If you do not document the care, legally it did not happen.
  • 152.
    6 Personal CareSkills Handout 6-1: Giving a Cleansing Enema Giving a cleansing enema Equipment: bath blanket, IV pole, enema solution, tubing and clamp, protective pad, bedpan, lubricating jelly, bath thermometer, tape measure, toilet paper, disposable wipes, robe, non-skid footwear, towel, supplies for perineal care, paper towel, 2 pairs of gloves 1. Identify yourself by name. Identify the resident by name. Resident has right to know identity of his or her caregiver. Addressing resident by name shows respect and establishes correct identification. 2. Wash your hands. Provides for infection prevention. 3. Explain procedure to the resident. Speak clearly, slowly, and directly. Maintain face-to-face contact whenever possible. Promotes understanding and independence.
  • 153.
    6 Personal CareSkills Handout 6-1: Giving a Cleansing Enema (cont’d) 4. Provide for resident’s privacy with curtain, screen, or door. Maintains resident’s right to privacy and dignity. 5. Adjust bed to a safe level, usually waist high. Lock bed wheels. Prevents injury to you and to resident. 6. Help resident into left side-lying Sims’ position. Cover with a bath blanket. 7. Place the IV pole beside the bed. 8. Clamp the enema tube. Prepare the enema solution. Fill bag with 500-1000 mL of warm water (105°F), and mix the solution. Check water temperature with bath thermometer. 9. Unclamp the tube. Let a small amount of solution run through the tubing. Re-clamp the tube.
  • 154.
    6 Personal CareSkills Handout 6-1: Giving a Cleansing Enema (cont’d) 10. Hang the bag on IV pole. Using the tape measure, make sure the bottom of the enema bag is not more than 12 inches above the resident’s anus. Provides for resident’s safety.
  • 155.
    6 Personal CareSkills Handout 6-1: Giving a Cleansing Enema (cont’d) 11. Put on gloves. Protects you from body fluids. 12. Place bed protector under resident. Ask resident to remove undergarments or help him do so. Place bedpan close to resident’s body. Bed protector protects linen from getting soiled. 13. Lubricate tip of tubing with lubricating jelly. 14. Ask the resident to breathe deeply. This relieves cramps during procedure. 15. Place one hand on the upper buttock. Lift to expose the anus. Ask the resident to take a deep breath and exhale. Using other hand, gently insert the tip of the tubing two to four inches into the rectum. Stop immediately if you feel resistance or if the resident complains of pain. If this happens, clamp the tubing. Tell the nurse immediately.
  • 156.
    6 Personal CareSkills Handout 6-1: Giving a Cleansing Enema (cont’d) 16. Unclamp the tubing. Allow the solution to flow slowly into the rectum. Ask resident to take slow, deep breaths. If resident complains of cramping, clamp the tubing and stop for a couple of minutes. Encourage him to take as much of the solution as possible. 17. Clamp the tubing before the bag is empty when the solution is almost gone. Gently remove the tip from the rectum. Place the tip into the enema bag. Do not contaminate yourself, the resident, or the bed linens. 18. Ask the resident to hold the solution inside as long as possible. 19. Help resident to use bedpan, commode, or get to the bathroom. If the resident uses a commode or toilet, put on robe and nonskid footwear. Lower the bed to its lowest position before the resident gets up. 20. Remove and discard gloves. Wash your hands. Provides for infection prevention.
  • 157.
    6 Personal CareSkills Handout 6-1: Giving a Cleansing Enema (cont’d) 21. Place toilet paper and disposable wipes within resident’s reach. Ask the resident to clean his hands with the hand wipe when finished if he is able. If the resident is using the toilet, ask him not to flush it when finished. 22. Place the call light within resident’s reach. Ask resident to signal when done. Leave the room and close the door. Ensures ability to communicate need for assistance. Leaving the room promotes resident’s right to privacy. 23. When called by the resident, return and put on clean gloves. 24. Lower the head of the bed. Make sure resident is still covered. 25. Remove bedpan carefully and cover bedpan. 26. Provide perineal care if help is needed. Wipe female residents from front to back. Dry the perineal area with a towel. Help the resident put on undergarment. Cover the resident and remove the bath blanket.
  • 158.
    6 Personal CareSkills Handout 6-1: Giving a Cleansing Enema (cont’d) 27. Place the towel and bath blanket in a hamper or bag, and discard disposable supplies. 28. Take bedpan to the bathroom. Call the nurse to observe enema results. Empty the contents of bedpan carefully into the toilet. Changes may be the first sign of a medical problem. 29. Turn the faucet on with a paper towel. Rinse the bedpan with cold water first and empty it into the toilet. Flush the toilet. Place bedpan in proper area for cleaning or clean it according to facility policy. 30. Remove and discard gloves. 31. Wash your hands. Provides for infection prevention. 32. Make resident comfortable.
  • 159.
    6 Personal CareSkills Handout 6-1: Giving a Cleansing Enema (cont’d) 33. Return bed to lowest position. Remove privacy measures. Lowering bed provides for safety. 34. Place call light within resident’s reach. Allows resident to communicate with staff as necessary. 35. Report any changes in resident to the nurse. Provides nurse with information to assess resident. 36. Document procedure using facility guidelines. If you do not document the care you gave, legally it did not happen.
  • 160.
    6 Personal CareSkills Handout 6-2: Giving a Rectal Suppository Giving a rectal suppository Equipment: gloves, suppository, lubricant, bath blanket, toilet paper or disposable wipes 1. Identify yourself by name. Identify the resident by name. Resident has right to know identity of his or her caregiver. Addressing resident by name shows respect and establishes correct identification. 2. Wash your hands. Provides for infection prevention. 3. Explain procedure to the resident. Speak clearly, slowly, and directly. Maintain face-to-face contact whenever possible. Promotes understanding and independence. 4. Provide for resident’s privacy with curtain, screen, or door. Maintains resident’s right to privacy and dignity.
  • 161.
    6 Personal CareSkills Handout 6-2: Giving a Rectal Suppository (cont’d) 5. Adjust bed to a safe level, usually waist high. Lock bed wheels. Prevents injury to you and to resident. 6. Help resident into left-sided Sims’ position. Cover with a bath blanket. 7. Uncover resident enough to expose buttocks only. 8. Unwrap the suppository. 9. Put on gloves. Protects you from body fluids. 10. Lubricate suppository as needed. 11. Spread buttocks to expose anal area. 12. Insert the suppository, using your index finger. Place the suppository past the rectal sphincter, against the wall of the colon.
  • 162.
    6 Personal CareSkills Handout 6-2: Giving a Rectal Suppository (cont’d) 13. Ask the resident to take deep breaths, as it will help him relax and retain the suppository. 14. Withdraw the finger and briefly hold toilet paper or a wipe against the anus. 15. Remove and discard gloves. 16. Wash your hands. Provides for infection prevention. 17. Remove bath blanket and cover the resident. Ask the resident to retain the suppository as long as possible. Make resident comfortable. 18. Provide a bedpan or assistance to the bathroom when needed. 19. Return bed to lowest position. Remove privacy measures. Lowering bed provides for safety.
  • 163.
    6 Personal CareSkills Handout 6-2: Giving a Rectal Suppository (cont’d) 20. Place call light within resident’s reach. Allows resident to communicate with staff as necessary. 21. Report any changes in resident to the nurse. Provides nurse with information to assess resident. 22. Document procedure using facility guidelines. If you do not document the care you gave, legally it did not happen.
  • 164.
    6 Personal Care Skills 8.Explain the guidelines for safely positioning and moving residents Define the following terms: positioning the act of helping people into positions that promote comfort and health. supine body position in which a person lies flat on his back. lateral body position in which a person is lying on either side. prone body position in which a person is lying on his stomach, or front side of the body.
  • 165.
    6 Personal Care Skills 8.Explain the guidelines for safely positioning and moving residents Define the following terms: Fowler’s a semi-sitting body position in which a person’s head and shoulders are elevated 45 to 60 degrees. Sims’ body position in which a person is lying on his left side with the upper knee flexed and raised toward the chest. logrolling moving a person as a unit, without disturbing the alignment of the body. dangle to sit up with the legs hanging over the side of the bed in order to regain balance and stabilize blood pressure.
  • 166.
    6 Personal CareSkills Transparency 6-6: Five Basic Positions
  • 167.
    Moving a residentup in bed 1. Identify yourself by name. Identify the resident by name. Resident has right to know identity of his or her caregiver. Addressing resident by name shows respect and establishes correct identification. 2. Wash your hands. Provides for infection prevention. 3. Explain procedure to resident. Speak clearly, slowly, and directly. Maintain face-to-face contact whenever possible. Promotes understanding and independence. 4. Provide for resident’s privacy with curtain, screen, or door. Maintains resident’s right to privacy and dignity. 5. Adjust bed to a safe level, usually waist high. Lock bed wheels. Prevents injury to you and to resident.
  • 168.
    Moving a residentup in bed 6. Lower the head of bed to make it flat. Move pillow to the head of the bed. When bed is flat, resident can be moved without working against gravity. Pillow prevents injury should resident hit the head of bed. 7. If the bed has side rails, raise the rail on the far side of the bed. 8. Stand by bed with feet apart. Face the resident. 9. Place one arm under resident’s shoulder blades. Place other arm under resident’s thighs. Use good body mechanics. Putting your arm under resident’s neck could cause injury.
  • 169.
    Moving a residentup in bed 10. Ask resident to bend her knees, place her feet on the mattress, and push her feet and hands on the count of three. Enables resident to help as much as possible and reduces strain on you. 11. On three, shift your body weight. Help move resident while she pushes with her feet. Communicating helps resident help you. 12. Place pillow under resident’s head. Provides for resident’s comfort.
  • 170.
    Moving a residentup in bed 13. Return bed to lowest position. Remove privacy measures. Lowering the bed provides for resident’s safety. 14. Place call light within resident’s reach. Allows resident to communicate with staff as necessary. 15. Wash your hands. Provides for infection prevention. 16. Report any changes in resident to the nurse. Provides nurse with information to assess resident. 17. Document procedure using facility guidelines. If you do not document the care, legally it did not happen.
  • 171.
    Moving a residentto the side of the bed Equipment: draw sheet 1. Identify yourself by name. Identify the resident by name. Resident has right to know identity of his or her caregiver. Addressing resident by name shows respect and establishes correct identification. 2. Wash your hands. Provides for infection prevention. 3. Explain procedure to resident. Speak clearly, slowly, and directly. Maintain face-to-face contact whenever possible. Promotes understanding and independence. 4. Provide for resident’s privacy with curtain, screen, or door. Maintains resident’s right to privacy and dignity. 5. Adjust the bed to a safe level, usually waist high. Lock bed wheels. Prevents injury to you and to resident.
  • 172.
    Moving a residentto the side of the bed 6. Lower the head of bed. When bed is flat, resident can be moved without working against gravity. 7. Stand on the same side of the bed to where you are moving the resident. Stand with feet apart and knees bent. 8. With a draw sheet: Roll the draw sheet up to the resident’s side and grasp the sheet with your palms up. One hand should be at the resident’s shoulders, the other about level with the resident’s hips. Apply one knee against the side of the bed, and lean back with your body. On the count of three, slowly pull the draw sheet and resident toward you.
  • 173.
    Moving a residentto the side of the bed Without a draw sheet: Gently slide your hands under the resident’s head and shoulders and move them toward you. Gently slide your hands under her midsection and move it toward you. Gently slide your hands under the hips and legs and move them toward you. Being gentle while sliding helps protect resident’s skin.
  • 174.
    Moving a residentto the side of the bed 9. Return bed to lowest position. Remove privacy measures. Lowering the bed provides for resident’s safety. 10. Place call light within resident’s reach. Allows resident to communicate with staff as necessary. 11. Wash your hands. Provides for infection prevention. 12. Report any changes in resident to the nurse. Provides nurse with information to assess resident. 13. Document procedure using facility guidelines. If you do not document the care, legally it did not happen.
  • 175.
    Turning a resident 1.Identify yourself by name. Identify the resident by name. Resident has right to know identity of his or her caregiver. Addressing resident by name shows respect and establishes correct identification. 2. Wash your hands. Provides for infection prevention. 3. Explain procedure to resident. Speak clearly, slowly, and directly. Maintain face-to-face contact whenever possible. Promotes understanding and independence. 4. Provide for resident’s privacy with curtain, screen, or door. Maintains resident’s right to privacy and dignity. 5. Adjust bed to a safe level, usually waist high. Lock bed wheels. Prevents injury to you and to resident.
  • 176.
    Turning a resident 6.Lower the head of bed. When bed is flat, resident can be moved without working against gravity. 7. Stand on side of bed opposite where resident will be turned. If the bed has side rails, raise the far side rail. Lower side rail nearest you if it is up. 8. Move resident to side of bed nearest you using previous procedure. Positions resident for turn.
  • 177.
    Turning a resident 9.Turning resident away from you: In some cases, if there is another person present or the bed has side rails, you can turn the resident away from you. Follow facility policy. a. Cross resident’s arm over her chest. Move arm on side resident is being turned to out of the way. Cross leg nearest you over the far leg.
  • 178.
    Turning a resident b.Stand with feet shoulder- width apart, with one foot slightly in front of the other. Bend your knees. Reduces your risk of injury. Promotes proper body mechanics. c. Place one hand on the resident’s shoulder. Place the other hand on the resident’s nearest hip. d. Gently roll resident onto side as one unit, toward the other side of bed (toward raised side rail if present). Shift your weight from your back leg to your front leg.
  • 179.
    Turning a resident Turningresident toward you: a. Cross resident’s arm over his chest. Move arm on side resident is being turned to out of the way. Cross leg furthest from you over the near leg. b. Stand with feet shoulder-width apart. Bend your knees. Reduces your risk of injury. Promotes proper body mechanics. c. Place one hand on the resident’s far shoulder. Place the other hand on the far hip.
  • 180.
    Turning a resident d.Gently roll the resident onto side as one unit, toward you. Your body will block resident and help prevent him from rolling out of bed. 10. Position the resident properly: • Head supported by pillow (resident’s face should not be obstructed by pillow) • Shoulder adjusted so resident is not lying on arm or hand • Top arm supported by pillow
  • 181.
    Turning a resident •Back supported by supportive device • Top knee flexed • Supportive device between legs with top knee flexed; knee and ankle supported 11. Return bed to lowest position. Remove privacy measures. Lowering the bed provides for resident’s safety. 12. Place call light within resident’s reach. Allows resident to communicate with staff as necessary. 13. Wash your hands. Provides for infection prevention. 14. Report any changes in resident to the nurse. Provides nurse with information to assess resident. 15. Document procedure using facility guidelines. If you do not document the care, legally it did not happen.
  • 182.
    Logrolling a resident Equipment:draw sheet, coworker 1. Identify yourself by name. Identify the resident by name. Resident has right to know identity of his or her caregiver. Addressing resident by name shows respect and establishes correct identification. 2. Wash your hands. Provides for infection prevention. 3. Explain procedure to resident. Speak clearly, slowly, and directly. Maintain face-to-face contact whenever possible. Promotes understanding and independence. 4. Provide for resident’s privacy with curtain, screen, or door. Maintains resident’s right to privacy and dignity. 5. Adjust bed to a safe level, usually waist high. Lock bed wheels. Prevents injury to you and to resident.
  • 183.
    Logrolling a resident 6.Lower the head of bed. When bed is flat, resident can be moved without working against gravity. 7. Both people stand on the same side of the bed. One person stands at the resident’s head and shoulders. The other stands near the resident’s midsection. 8. Place the resident’s arms across his chest. Place a pillow between the knees. 9. Stand with feet shoulder-width apart. Bend your knees. Reduces your risk of injury. Promotes good body mechanics.
  • 184.
    Logrolling a resident 10.Grasp the draw sheet on the far side. 11. On the count of three, gently roll the resident toward you. Turn the resident as a unit. Your bodies will block resident and help prevent him from rolling out of bed. Work together for your safety and the resident’s.
  • 185.
    Logrolling a resident 12.Reposition resident comfortably. Maintains alignment. 13. Return bed to lowest position. Lowering the bed provides for resident’s safety. 14. Place call light within resident’s reach. Allows resident to communicate with staff as necessary. 15. Wash your hands. Provides for infection prevention. 16. Report any changes in resident to the nurse. Provides nurse with information to assess resident. 17. Document procedure using facility guidelines. If you do not document the care, legally it did not happen.
  • 186.
    Assisting resident tosit up on side of bed: dangling 1. Identify yourself by name. Identify the resident by name. Resident has right to know identity of his or her caregiver. Addressing resident by name shows respect and establishes correct identification. 2. Wash your hands. Provides for infection prevention. 3. Explain procedure to resident. Speak clearly, slowly, and directly. Maintain face-to-face contact whenever possible. Promotes understanding and independence. 4. Provide for resident’s privacy with curtain, screen, or door. Maintains resident’s right to privacy and dignity. 5. Adjust bed height to lowest position. Lock bed wheels. Allows resident’s feet to touch floor when sitting. Reduces chance of injury if resident falls.
  • 187.
    Assisting resident tosit up on side of bed: dangling 6. Raise the head of bed to sitting position. Resident can move without working against gravity. 7. Stand with feet shoulder- width apart. Bend your knees. Reduces your risk of injury. Promotes proper body mechanics. 8. Place one arm under the resident’s shoulder blades. Place the other arm under the resident’s thighs. Placing your arm under the resident’s neck may cause injury.
  • 188.
    Assisting resident tosit up on side of bed: dangling 9. On the count of three, slowly turn resident into sitting position with legs dangling over side of bed. Communicating helps resident help you. 10. Ask resident to hold onto edge of mattress with both hands. Assist resident to put on nonskid shoes or slippers. Prevents sliding on floor and protects resident’s feet from contamination.
  • 189.
    Assisting resident tosit up on side of bed: dangling 11. Have resident dangle as long as ordered. The care plan may direct you to allow the resident to dangle for several minutes and then return him to lying down, or it may direct you to allow the resident to dangle in preparation for walking or a transfer. Follow the care plan. Do not leave the resident alone. If the resident is dizzy for more than a minute, have him lie down again and report to the nurse. Change of position may cause dizziness due to a drop in blood pressure. 12. Take vital signs as ordered (Chapter 7). 13. Remove slippers or shoes. 14. Gently assist resident back into bed. Place one arm around resident’s shoulders. Place the other arm under resident’s knees. Slowly swing resident’s legs onto bed. 15. Leave bed in lowest position. Remove privacy measures. Lowering the bed provides for resident’s safety.
  • 190.
    Assisting resident tosit up on side of bed: dangling 16. Place call light within resident’s reach. Allows resident to communicate with staff as necessary. 17. Wash your hands. Provides for infection prevention. 18. Report any changes in resident to the nurse. Provides nurse with information to assess resident. 19. Document procedure using facility guidelines. If you do not document the care, legally it did not happen.
  • 191.
    6 Personal Care Skills 8.Explain the guidelines for safely positioning and moving residents Define the following terms: ergonomics the science of designing equipment, areas, and work tasks to make them safer and to suit the worker’s abilities. transfer/gait belt a belt made of canvas or other heavy material that is used to help people who are weak, unsteady, or uncoordinated to stand, sit, or walk; also called gait belt.
  • 192.
    6 Personal Care Skills 8.Explain the guidelines for safely positioning and moving residents REMEMBER: Many facilities have adopted no-lift, zero-lift, or lift-free policies. NAs must know their facilty’s policies and follow them carefully.
  • 193.
    6 Personal Care Skills 8.Explain the guidelines for safely positioning and moving residents REMEMBER: When assisting a resident the NA must know which side is stronger and which is weaker and move the stronger side first.
  • 194.
    6 Personal Care Skills 8.Explain the guidelines for safely positioning and moving residents REMEMBER: Transfer belts must be applied over clothing and not on bare skin. NAs should make sure skin is not caught in the belt.
  • 195.
    6 Personal Care Skills 8.Explain the guidelines for safely positioning and moving residents Remember these guidelines for working with wheelchairs: • Know how to use brake, armrests, and footrests. • Lock before transfer; unlock after. • Open by pulling on both sides. Close by lifting center of seat. • Remove armrests by releasing lock. • Remove footrests by pulling back on lever and swinging out toward side of chair. • Lift or lower footrest by squeezing lever and pulling up or pushing down.
  • 196.
    6 Personal Care Skills 8.Explain the guidelines for safely positioning and moving residents Guidelines for working with wheelchairs (cont’d): • Resident must use side of body that can bear weight and lift side that cannot. • Resident must be wearing nonskid footwear before transferring. • Keep resident safe and comfortable during transfers. • Assist resident as needed by having chair close and wheels locked. Use transfer belt and check alignment in chair. • Reposition resident at least every hour.
  • 197.
    6 Personal CareSkills Transparency 6-7: Assisting a Falling Resident • Widen stance. • Bring resident’s body close. • Bend knees and support resident. • Lower resident to floor. • Do not try to stop the fall. • Call for help. • Do not attempt to get resident up.
  • 198.
    6 Personal Care Skills 8.Explain the guidelines for safely positioning and moving residents NAs should know these guidelines for the safe use of mechanical lifts: • It is safer for two people to transfer with these lifts and facility may require this. • Keep chair or wheelchair near bed to only move resident a short distance. • Make sure valves are working. • Use the correct sling for the correct lift.
  • 199.
    6 Personal Care Skills 8.Explain the guidelines for safely positioning and moving residents Guidelines for the safe use of mechanical lifts (cont’d): • Check sling and straps for tears or fraying. Do not use mechanical lift if there are tears or holes. • Open legs of stand to widest position before helping resident into lift. • Pump up lift only to the point where the resident’s body clears the bed or chair.
  • 200.
    Transferring a residentfrom bed to wheelchair Equipment: wheelchair, transfer belt, nonskid footwear, lap robe or folded blanket 1. Identify yourself by name. Identify the resident by name. Resident has right to know identity of his or her caregiver. Addressing resident by name shows respect and establishes correct identification. 2. Wash your hands. Provides for infection prevention. 3. Explain procedure to resident. Speak clearly, slowly, and directly. Maintain face-to-face contact whenever possible. Promotes understanding and independence. 4. Provide for resident’s privacy with curtain, screen, or door. Check the area to be certain it is uncluttered and safe. Maintains resident’s right to privacy and dignity. Keeping area free from clutter promotes safety.
  • 201.
    Transferring a residentfrom bed to wheelchair 5. Place wheelchair at the head of the bed, facing foot of the bed, or at the foot of bed, facing head of bed. The arm of the wheelchair should be almost touching the bed. It should be placed on resident’s stronger, or unaffected, side. Unaffected side supports weight. 6. Remove both wheelchair footrests close to the bed. 7. Lock wheelchair wheels. Wheel locks prevent chair from moving. 8. Raise the head of the bed. Adjust bed level to lowest position. Lock bed wheels. Prevents injury to you and to resident. 9. Assist resident to sitting position with feet flat on the floor. Let resident sit for a few minutes to adjust to change in position. 10. Put nonskid footwear on resident and fasten securely. Promotes resident’s safety. Reduces risk of falls.
  • 202.
    Transferring a residentfrom bed to wheelchair 11. Stand in front of resident. Stand with feet about shoulder-width apart. Bend your knees. Reduces your risk of injury. Promotes proper body mechanics. 12. Place the transfer belt around resident’s waist over clothing (not on bare skin). Tighten the buckle until it is snug. Leave enough room to insert flat fingers/hand comfortably under the belt. Check to make sure that skin or skin folds (for example, breasts) are not caught under the belt. Grasp the belt securely on both sides, with hands in upward position. 13. Provide instructions to allow resident to help with transfer. Instructions may include: “When you start to stand, push with your hands against the bed.” “Once standing, if you’re able, you can take small steps in the direction of the chair.” “Once standing, reach for the chair with your stronger hand.”
  • 203.
    Transferring a residentfrom bed to wheelchair 14. With your legs, brace (support) resident’s lower legs to prevent slipping. This can be done by placing one or both of your knees in front of the resident’s knees. 15. Count to three to alert resident. On three, with hands still grasping the transfer belt on both sides and moving upward, slowly help resident to stand. Communicating helps resident help you.
  • 204.
    Transferring a residentfrom bed to wheelchair 16. Tell the resident to take small steps in the direction of the chair while turning his back toward it. If more help is needed, help the resident pivot (turn) to stand in front of wheelchair with back of resident’s legs against wheelchair. Pivoting is safer than twisting.
  • 205.
    Transferring a residentfrom bed to wheelchair 17. Ask the resident to put hands on wheelchair armrests if able. When the chair is touching the back of the resident’s legs, help him lower himself into the chair. 18. Reposition resident so that his hips touch the back of the wheelchair seat. Using full seat of chair is safest. 19. Attach footrests. Place the resident’s feet on the footrests. Check that the resident is in proper alignment. Gently remove the transfer belt. Place a folded blanket over the resident’s lap as appropriate. Protects feet and ankles. 20. Remove privacy measures. 21. Place call light within resident’s reach. Allows resident to communicate with staff as necessary. 22. Wash your hands. Provides for infection prevention.
  • 206.
    Transferring a residentfrom bed to wheelchair 23. Report any changes in resident to the nurse. Provides nurse with information to assess resident. 24. Document procedure using facility guidelines. If you do not document the care, legally it did not happen.
  • 207.
    Transferring a residentusing a mechanical lift Equipment: wheelchair or chair, coworker, mechanical or hydraulic lift This is a basic procedure for transferring using a mechanical lift. Ask someone to help you before starting. 1. Identify yourself by name. Identify the resident by name. Resident has right to know identity of his or her caregiver. Addressing resident by name shows respect and establishes correct identification. 2. Wash your hands. Provides for infection prevention. 3. Explain procedure to resident. Speak clearly, slowly, and directly. Maintain face-to-face contact whenever possible. Promotes understanding and independence. 4. Provide for resident’s privacy with curtain, screen, or door. Maintains resident’s right to privacy and dignity.
  • 208.
    Transferring a residentusing a mechanical lift 5. Lock bed wheels. Wheel locks prevent bed from moving. 6. Position wheelchair next to bed. Lock brakes. Wheel locks prevent chair from moving. 7. Help the resident turn to one side of the bed. Position the sling under the resident, with the edge next to the resident’s back. Fanfold if necessary. Make the bottom of the sling even with the resident’s knees. Help the resident roll back to the middle of the bed. Spread out the fanfolded edge of the sling. 8. Roll the mechanical lift to bedside. Make sure the base is opened to its widest point. Push the base of the lift under the bed. 9. Place the overhead bar directly over the resident.
  • 209.
    Transferring a residentusing a mechanical lift 10. With the resident lying on his back, attach one set of straps to each side of the sling. Attach one set of straps to the overhead bar. Have coworker support the resident at the head, shoulders, and knees while being lifted. The resident’s arms should be folded across his chest. If the device has S hooks, they should face away from resident. Make sure all straps are connected properly and are smooth and straight.
  • 210.
    Transferring a residentusing a mechanical lift 11. Following manufacturer’s instructions, raise the resident two inches above the bed. Pause a moment for the resident to gain balance. 12. Have coworker help support and guide the resident’s body. You can then roll the lift so that the resident is positioned over the chair or wheelchair. Having another person help promotes safety during the transfer and lessens chance of injury. 13. Slowly lower the resident into the chair or wheelchair. Push down gently on the resident’s knees to help the resident into a sitting, rather than reclining, position. 14. Undo the straps from the overhead bar to the sling. Remove sling or leave in place; follow facility policy. 15. Be sure the resident is seated comfortably and correctly in the chair or wheelchair. Remove privacy measures.
  • 211.
    Transferring a residentusing a mechanical lift 16. Place call light within resident’s reach. Allows resident to communicate with staff as necessary. 17. Wash your hands. Provides for infection prevention. 18. Report any changes in resident to the nurse. Provides nurse with information to assess resident. 19. Document procedure using facility guidelines. If you do not document the care, legally it did not happen.
  • 212.
    6 Personal CareSkills Handout 6-3: Transferring a Resident to Bed from Wheelchair Transferring a resident to bed from wheelchair 1. Identify yourself by name. Identify the resident by name. Resident has right to know identity of his or her caregiver. Addressing resident by name shows respect and establishes correct identification. 2. Wash your hands. Provides for infection prevention. 3. Explain procedure to resident. Speak clearly, slowly, and directly. Maintain face-to-face contact whenever possible. Promotes understanding and independence. 4. Provide for resident’s privacy with curtain, screen, or door. Check the area to be certain it is uncluttered and safe. Maintains resident’s right to privacy and dignity. Keeping area free from clutter promotes safety. 5. Remove both wheelchair footrests close to the bed.
  • 213.
    6 Personal CareSkills Handout 6-3: Transferring a Resident to Bed from Wheelchair (cont’d) 6. Place wheelchair at the head of the bed, facing foot of the bed, or at the foot of bed, facing head of bed. The arm of the wheelchair should be almost touching the bed. It should be placed on resident’s stronger, or unaffected, side. Unaffected side supports weight. 7. Lock wheelchair wheels. Wheel locks prevent chair from moving. 8. Adjust bed level. The height of the bed should be equal to or slightly lower than the chair. Lock bed wheels. Prevents injury to you and to resident.
  • 214.
    6 Personal CareSkills Handout 6-3: Transferring a Resident to Bed from Wheelchair (cont’d) 9. Place the transfer belt around resident’s waist over clothing (not on bare skin). Tighten the buckle until it is snug. Leave enough room to insert flat fingers/hand comfortably under the belt. Check to make sure that skin or skin folds (for example, breasts) are not caught under the belt. Grasp the belt securely on both sides, with hands in upward position. 10. Provide instructions to allow resident to help with transfer. 11. With your legs, brace (support) resident’s lower extremities. This can be done by placing one or both of your knees against the resident’s knee(s). 12. Count to three to alert resident. On three, with hands still grasping the transfer belt on both sides and moving upward, slowly help resident to stand.
  • 215.
    6 Personal CareSkills Handout 6-3: Transferring a Resident to Bed from Wheelchair (cont’d) 13. Tell the resident to take small steps in the direction of the bed while turning her back toward the bed. Or, if more help is needed, help the resident pivot to stand in front of bed with back of her legs against bed. When she feels the bed, help her sit down on the side of the bed. 14. Make resident comfortable. Remove transfer belt. 15. Return bed to lowest position. Remove privacy measures. Lowering bed provides for safety. 16. Place call light within resident’s reach. Allows resident to communicate with staff as necessary. 17. Wash your hands. Provides for infection prevention.
  • 216.
    6 Personal CareSkills Handout 6-3: Transferring a Resident to Bed from Wheelchair (cont’d) 18. Report any changes in resident to the nurse. Provides nurse with information to assess resident. 19. Document procedure using facility guidelines. If you do not document the care you gave, legally it did not happen.