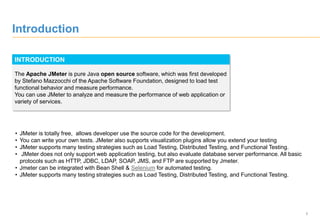
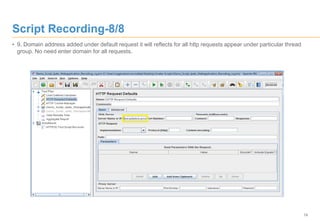
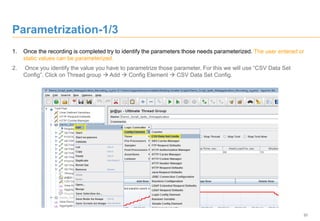
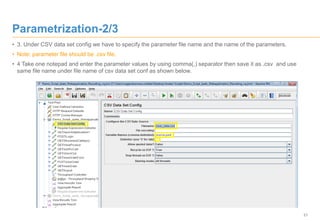
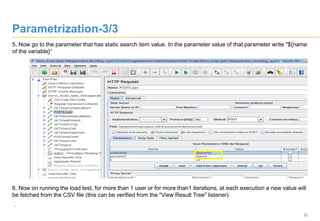
2. 2
Contents
• Introduction
• Architecture
• Installation
• Certificate Installation
• Proxy Setup
• Scripting
Script Recording
Parameterization
Correlation
• Web Services
• Mobile App Scripting
– Mobile Proxy Setup
• Execution
• Result Analysis
3. 3
Introduction
INTRODUCTION
The Apache JMeter is pure Java open source software, which was first developed
by Stefano Mazzocchi of the Apache Software Foundation, designed to load test
functional behavior and measure performance.
You can use JMeter to analyze and measure the performance of web application or
variety of services.
• JMeter is totally free, allows developer use the source code for the development.
• You can write your own tests. JMeter also supports visualization plugins allow you extend your testing
• JMeter supports many testing strategies such as Load Testing, Distributed Testing, and Functional Testing.
• JMeter does not only support web application testing, but also evaluate database server performance. All basic
protocols such as HTTP, JDBC, LDAP, SOAP, JMS, and FTP are supported by Jmeter.
• Jmeter can be integrated with Bean Shell & Selenium for automated testing.
• JMeter supports many testing strategies such as Load Testing, Distributed Testing, and Functional Testing.
5. 5
Download and Install JMETER
To download the JMETER Software go to apache website using the below link we can download.
URL Link :- http://jmeter.apache.org/download_jmeter.cgi
Try to download the archive file from the binaries section based on your OS.
For windows : apache-jmeter-<ver>.<minor-ver>. zip file
For Linux : apache-jmeter-<ver>.<minor-ver>.tar.gz file
Example: - http://jmeter.apache.org/download_jmeter.cgi
Before installing JMETER in your targeted machine make sure had the latest JDK is installed.
Latest JDK version is : - JDK 1.8. Download from oracle site. Don’t use open JDK.
Because some features are not works as expected
Installation :- There is no special installation procedure for JMETER simply unzip the JMETER archive file
Jmeter Installation
6. 6
Certificate Installation-1/3
Once the Jmeter installed success fully, before start recording we have to install certificate into browser which one
we are going to use for record script.
Mozilla Firefox is the preferred browser, so we are installing certificate in Mozilla Firefox.
• Open Mozilla Firefox browser Go to Tools Options
• Go to Advanced options ->View Certificates
• Authorities -> Import
• Browse to the JMeter launch directory, and click on the file ApacheJMeterTemporaryRootCA.crt, press Open
• Click View and check that the certificate details agree with the ones displayed by the JMeter Test Script Recorder
• If OK, select "Trust this CA to identify web sites", and press OK
9. 9
Proxy Setup-1/2
Before starting recording using JMETER we need to setup the proxy by performing following steps.
1.Start web browser, but do not close JMETER.
2.For example if the browser is Mozilla Firefox go to “Edit -> Preferences. This should bring up the options.
3.Click on “Advanced Tab” and from their click on “Network” tab;
4.Click on “settings” button.
10. 10
Proxy Setup-2/2
5. On the new pop-up, check “Manual proxy configuration”. The address and port fields should be enabled now.
6.Address – enter the IP address of your system
7. Enter port number. For ex:8888
Note: Jmeter 3.0 changed port number from 8080 to 8888.
8. Check “Use this proxy server for all protocols”.
9. Press “OK” buttons to close all open windows.
12. 12
To start JMETER go to installation location and go to bin folder from their start the JMETER by executing the
jmeter.bat (For windows) (or) jmeter.sh(For Linux) based on your OS. It will launch the application which looks like
below.
Script Recording-1/8
13. 13
Script Recording-2/8
To record application in JMETER use following steps.
1.Select “Test Plan” and Right Click on it and add new thread group : Add->Thread->Thread Group (or) we can also
add Ultimate Thread group by adding external plugins.
Note:- In JMETER we are call Vusers as Threads.
15. 15
Script Recording-4/8
4. Second option if we are planning to start from specific time give start time, end time , duration and start-up
delay in seconds.
5. Existing Template can be used for record a script as shown below. no need to add thread group and
http defaulter….for record a script.
17. 17
Script Recording-6/8
• 7. By clicking on start we can start the recording by launching browser and give url and do some actions then click
on stop button.
18. 18
Script Recording-7/8
• 8. Once the recording is done we can the recorded steps under recording controller as shown below.
19. 19
Script Recording-8/8
• 9. Domain address added under default request it will reflects for all http requests appear under particular thread
group. No need enter domain for all requests.
20. 20
Parametrization-1/3
1. Once the recording is completed try to identify the parameters those needs parameterized. The user entered or
static values can be parameterized.
2. Once you identify the value you have to parametrize those parameter. For this we will use “CSV Data Set
Config”. Click on Thread group Add Config Element CSV Data Set Config.
21. 21
Parametrization-2/3
• 3. Under CSV data set config we have to specify the parameter file name and the name of the parameters.
• Note: parameter file should be .csv file.
• 4 Take one notepad and enter the parameter values by using comma(,) separator then save it as .csv and use
same file name under file name of csv data set conf as shown below.
22. 22
Parametrization-3/3
5. Now go to the parameter that has static search item value. In the parameter value of that parameter write "${name
of the variable}“
6. Now on running the load test, for more than 1 user or for more than1 iterations, at each execution a new value will
be fetched from the CSV file (this can be verified from the "View Result Tree" listener)
.
23. 23
Correlation-1/3
1. Dynamic values or the server generated values like Session Id can be correlated.
2. In Jmeter Regular expression can be used for correlate the dynamic values.
3. Find the dynamic value take the prefix of that values and specify the reg exp to capture that value.
4. Correlation can be done by adding Regular expression extractor as below.
Note: Regular Expression Extractor should add one step before the request hitting.
5. For identifying dynamic values script should run twice and then under view result tree select the request and then
select response on right side pan search for dynamic value then pic the prefix of dynamic value and add Regexp.
24. 24
Correlation-2/3
6. After Adding regular expression extractor. Add reference name so that it will create variable with reference name
and it captures the session value generated by the http request.
25. 25
Correlation-3/3
• 7. Once the variable created we have replace the dynamic value with the variable.
• 8. Once replaced then run test plan again and check if the dynamic value replacing or not some cases it will not we
have to check carefully.
27. 27
Web Services-1/4
1.Open Jmeter and Right click on test plan add->Threads->threadgroup for single user and for more users choose
add->Threads->Ultimate Thread group
• 2. We can change the name of thread group like Demo_script
28. 28
Web Services-2/4
3. Add the Http request Add->Sampler->Http Request. Here we can change the name like thread group.
29. 29
Web Services-3/4 incomplete
4. We have to give the URL of service into two cases one is server name and other is path eg http://red-
petstore.proonto.com/jpetstore/shop/newOrderForm.shtml This url is distributed as red-petstore.proonto.com as
server name and /jpetstore/shop/newOrderForm.shtml as path under the protocol we have to give because our url
includes.
5. Method should mention like Get/Post… and protocol type http/https of the service request.
31. 31
Mobile Proxy Setup
• Before starting mobile recording in Jmeter mobile proxy settings are required.
• Note: Jmeter tool running network and the mobile network should be same.
• Made a long click on Wi-Fi and select manage n/w.
• Under proxy choose manual and give the ip address of Jmeter running system and the port of Jmeter and save it.
32. 32
Mobile App Recording-3/3
• Once the proxy setup done we have to add the recording template then click on workbench->HTTP Test Script
Recorder and click on start button and perform some actions and stop recording.
• If the recording done successfully find the steps as shown below.
34. 34
Execution-1/2
• We can run more than one thread at a time.
• If We are running more than one user then we should give thread count, initial delay, startup time(ramp-up) ,
hold load for sec(Duration) and shutdown time(ramp-down). As shown below.
35. 35
Execution-2/2
• We have to add the view result tree by clicking on Test plan ->add ->Listener->view result tree.
• We can check the response ,request passing and Sampler result of the service by clicking on View result tree from
left pan and select the particular request and click which ever we require on right pane as shown below.
• We can also check error requests through view result tree.
• The green requests represents the success and red represents the failure request.
37. 37
RESULT ANALYSIS-1/3
• For analyzing results in Jmeter we have to add some graphs and reports whatever we require.
• We can add the aggregate report for capture the performance KPI’s those are Response time and Throughput.
• The results can be saved by giving url where we have to save or by clicking on save table data.
38. 38
RESULT ANALYSIS-2/3
• We can also add Response time graph for viewing the response times in graphical format as shown below.
IDC Press Release: IDC Finds Worldwide Smartphone Shipments on Pace to Grow Nearly 40% in 2013 While Average Selling Prices Decline More Than 12%, November 2013
IDC Press Release: Tablet Shipments Forecast to Top Total PC Shipments in the Fourth Quarter of 2013 and Annually by 2016, According to IDC, September 2013
Intel Infographic: Intelligent Systems for a More Connected World, 2013
InformationWeek mHealth Market (Mobile Health) is Expected to Reach USD 10.2 Billion Globally by 2018, November 2013
GSMA Connected Car Forecast: Global Connected Car Market to Grow Threefold Within Five Years February, May 2013
Ovum: M2M Connections and Service Revenues Forecast: 2013–18, October 2013