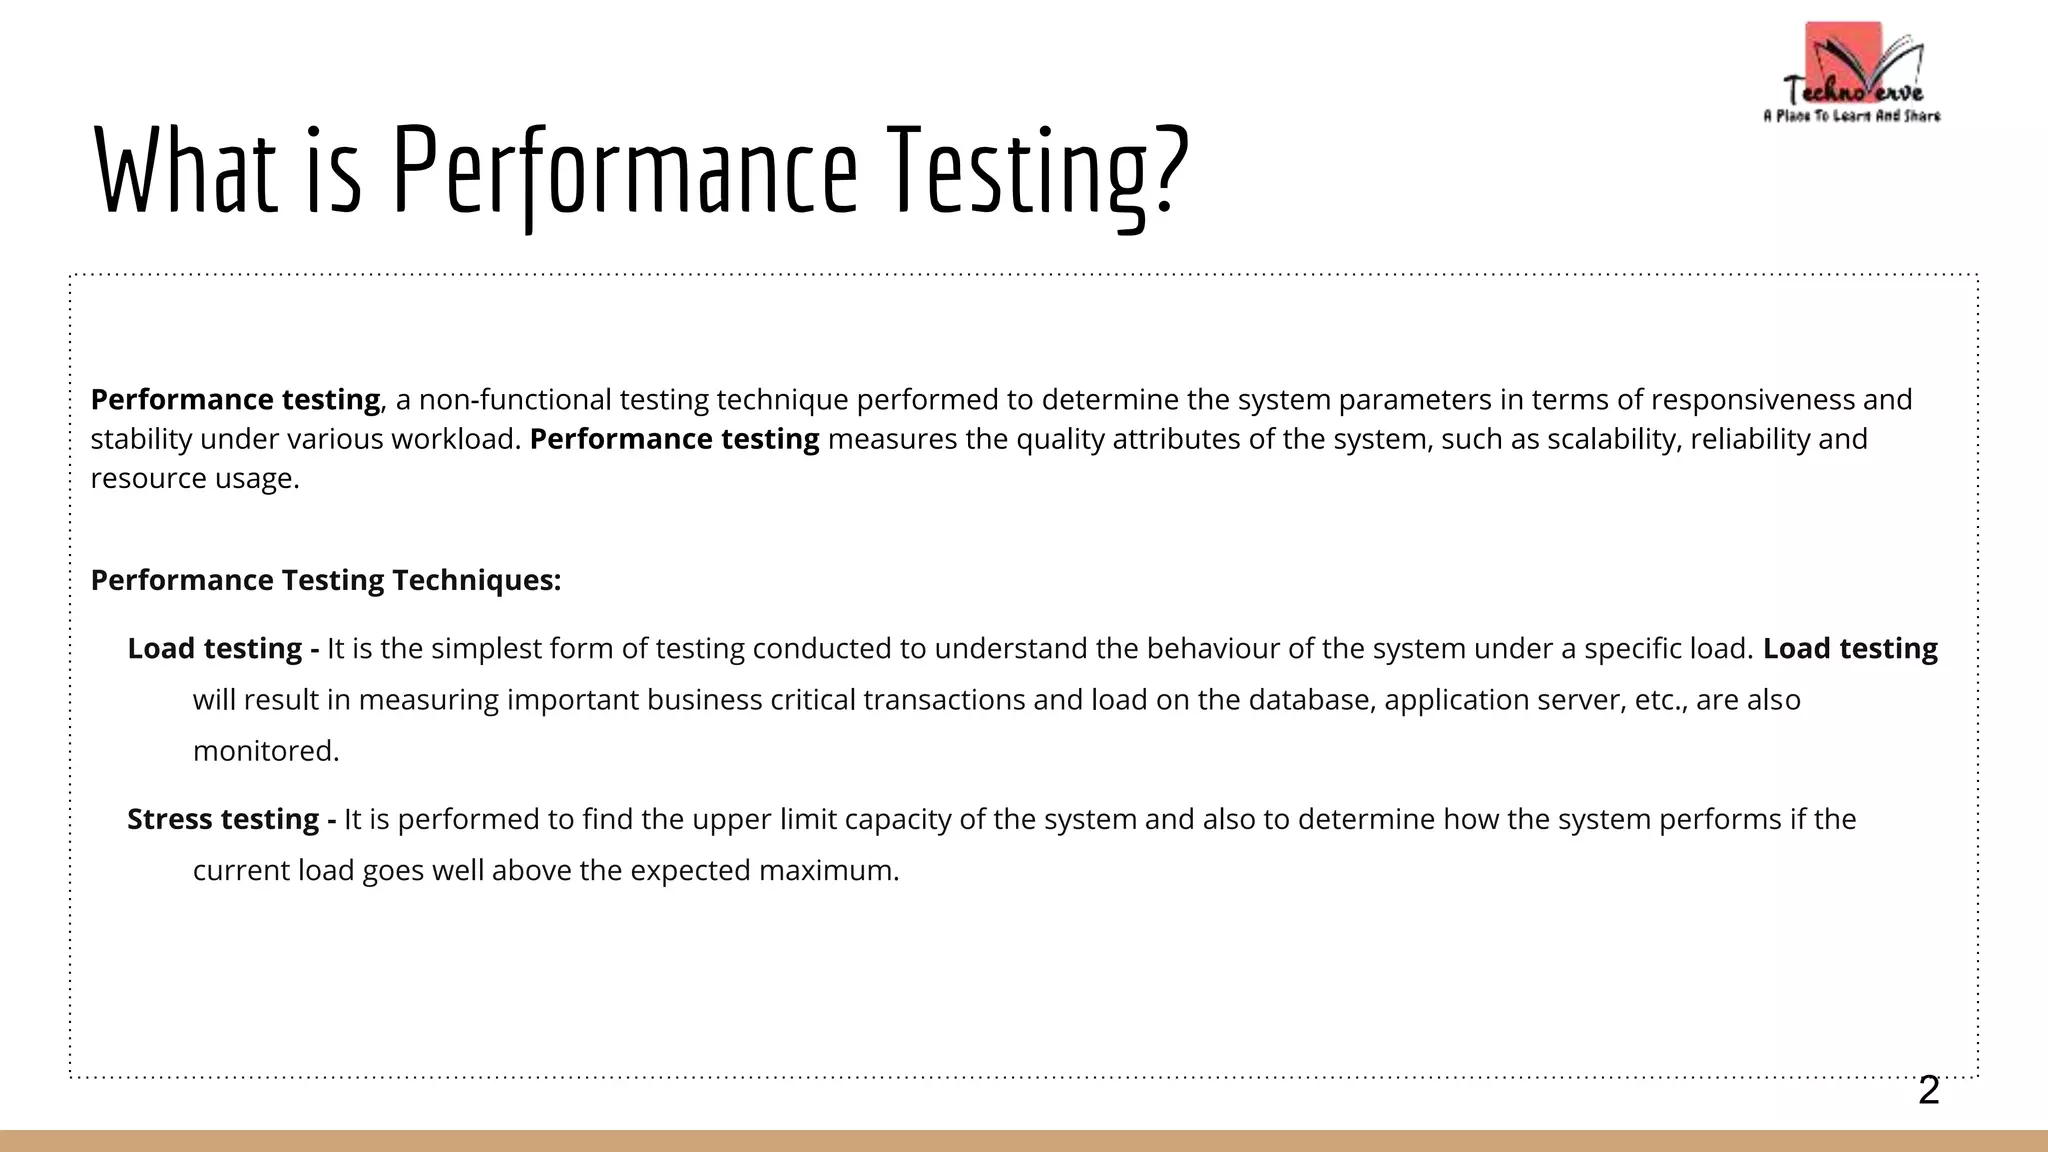
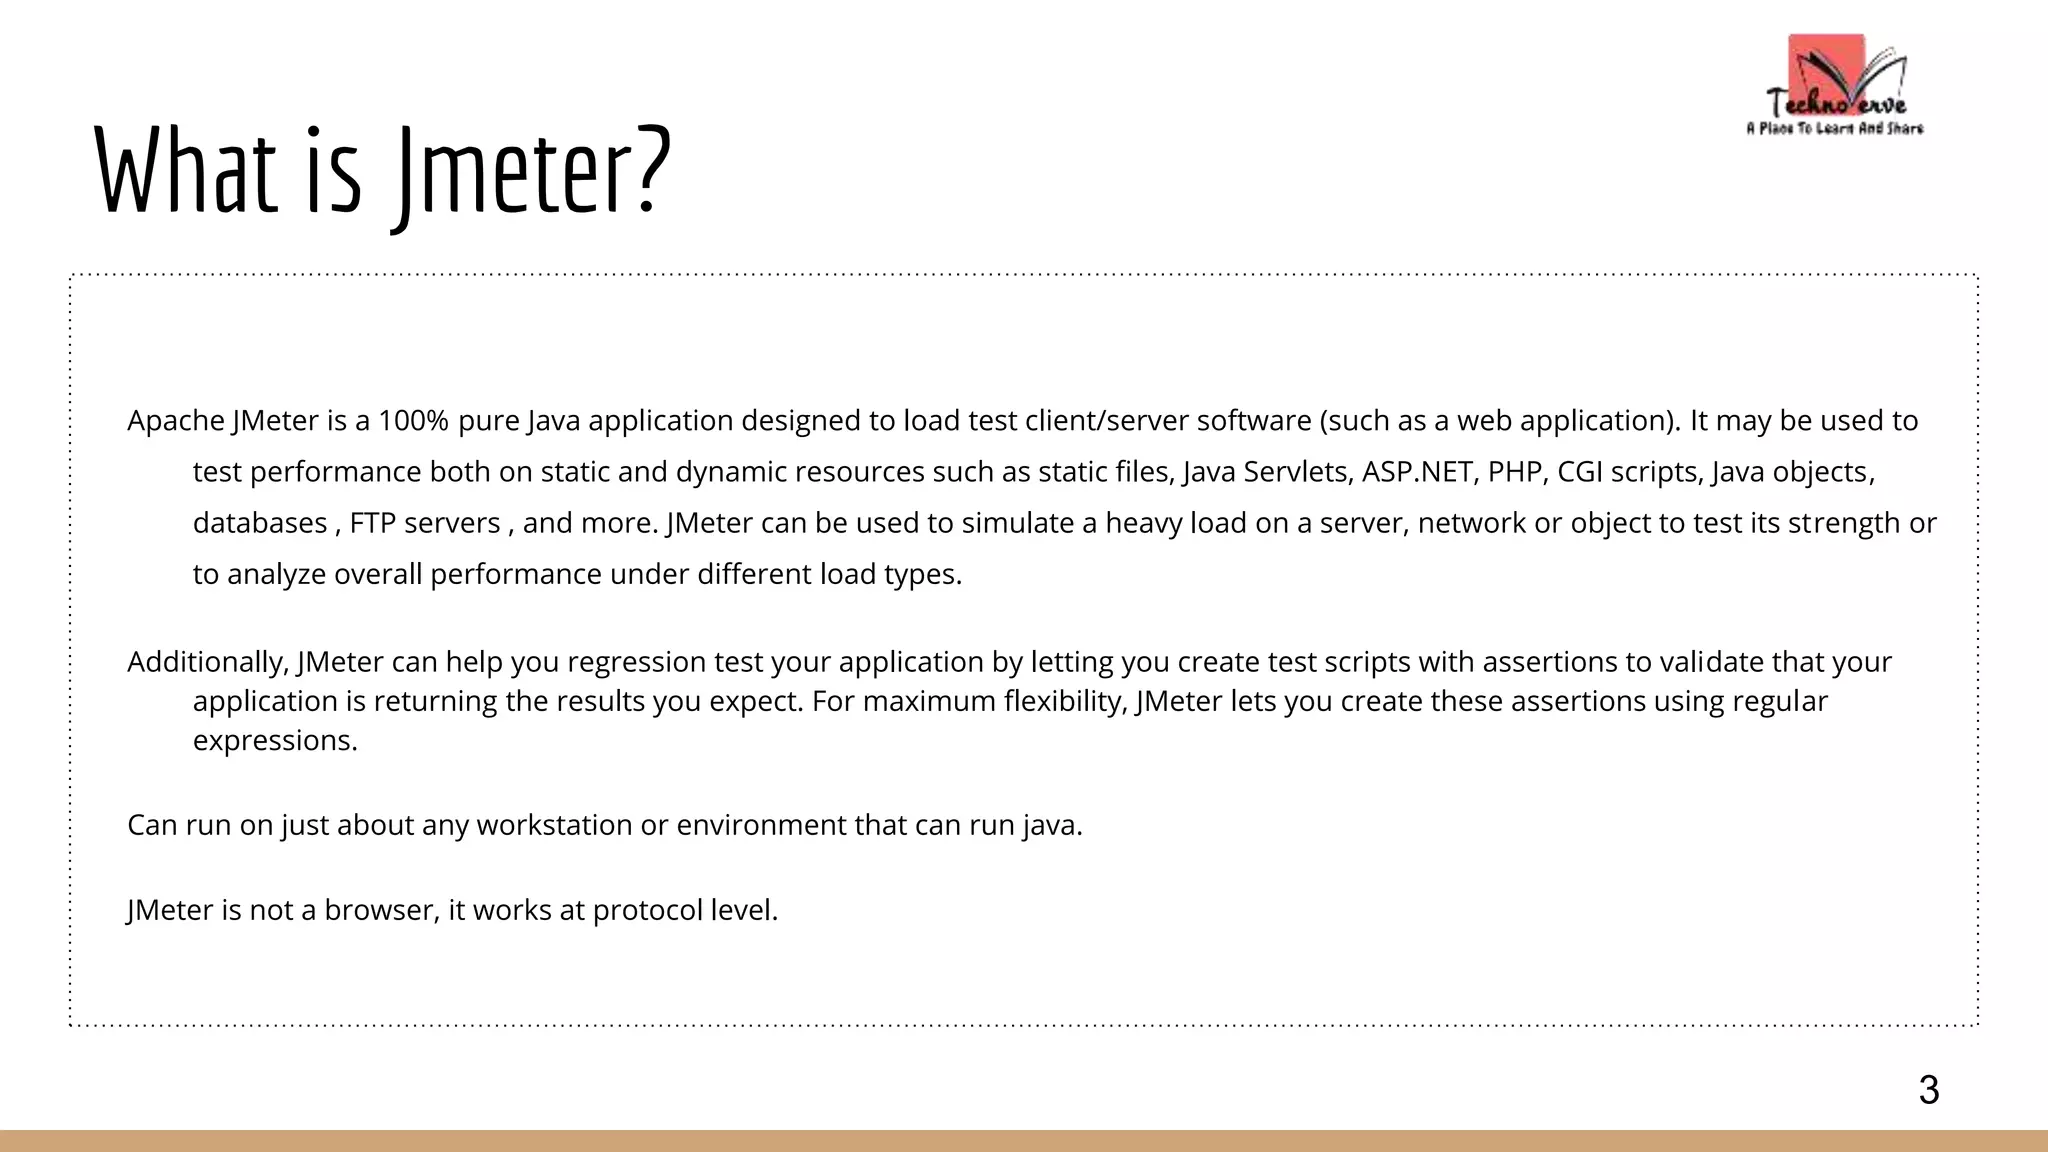
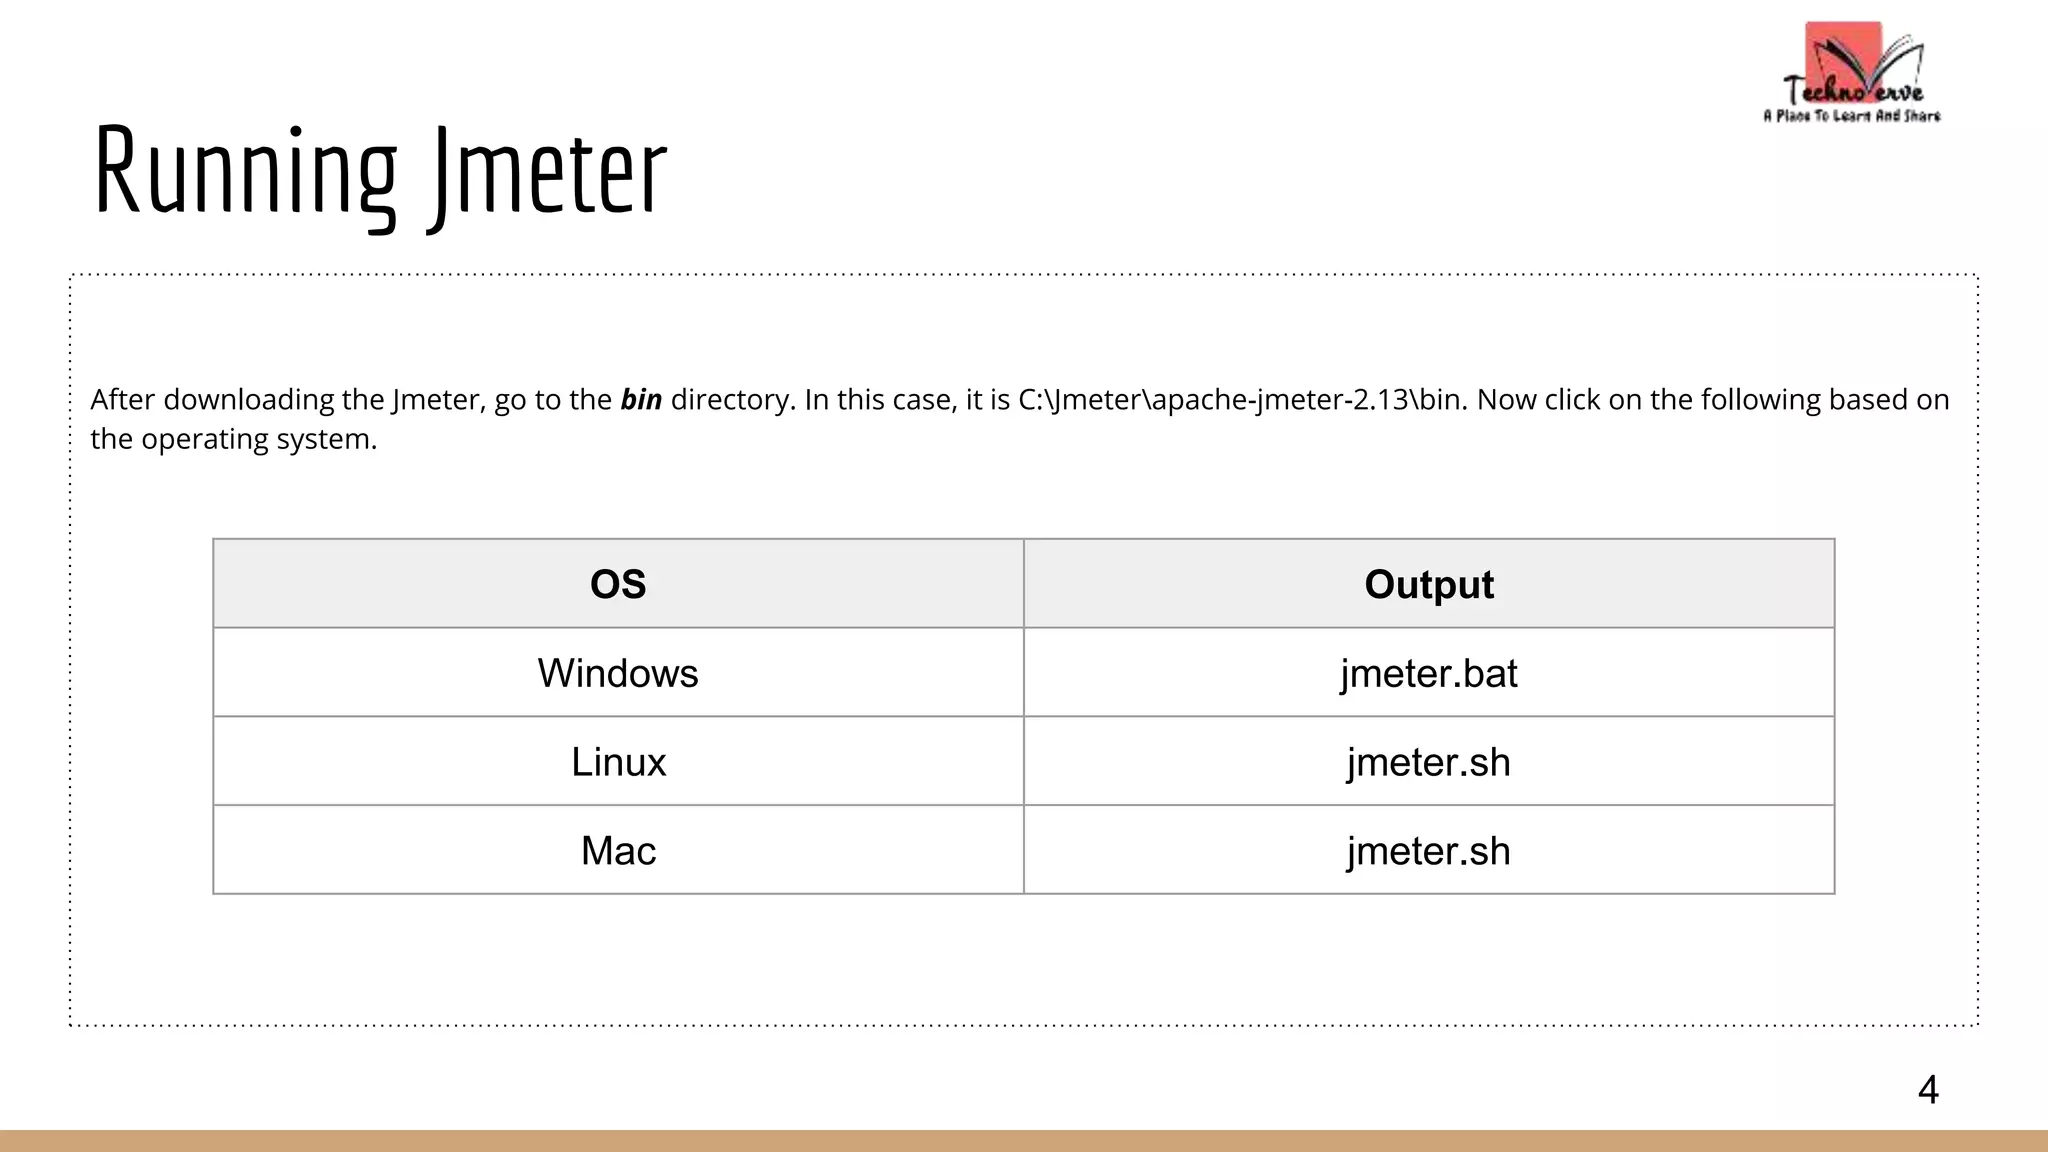
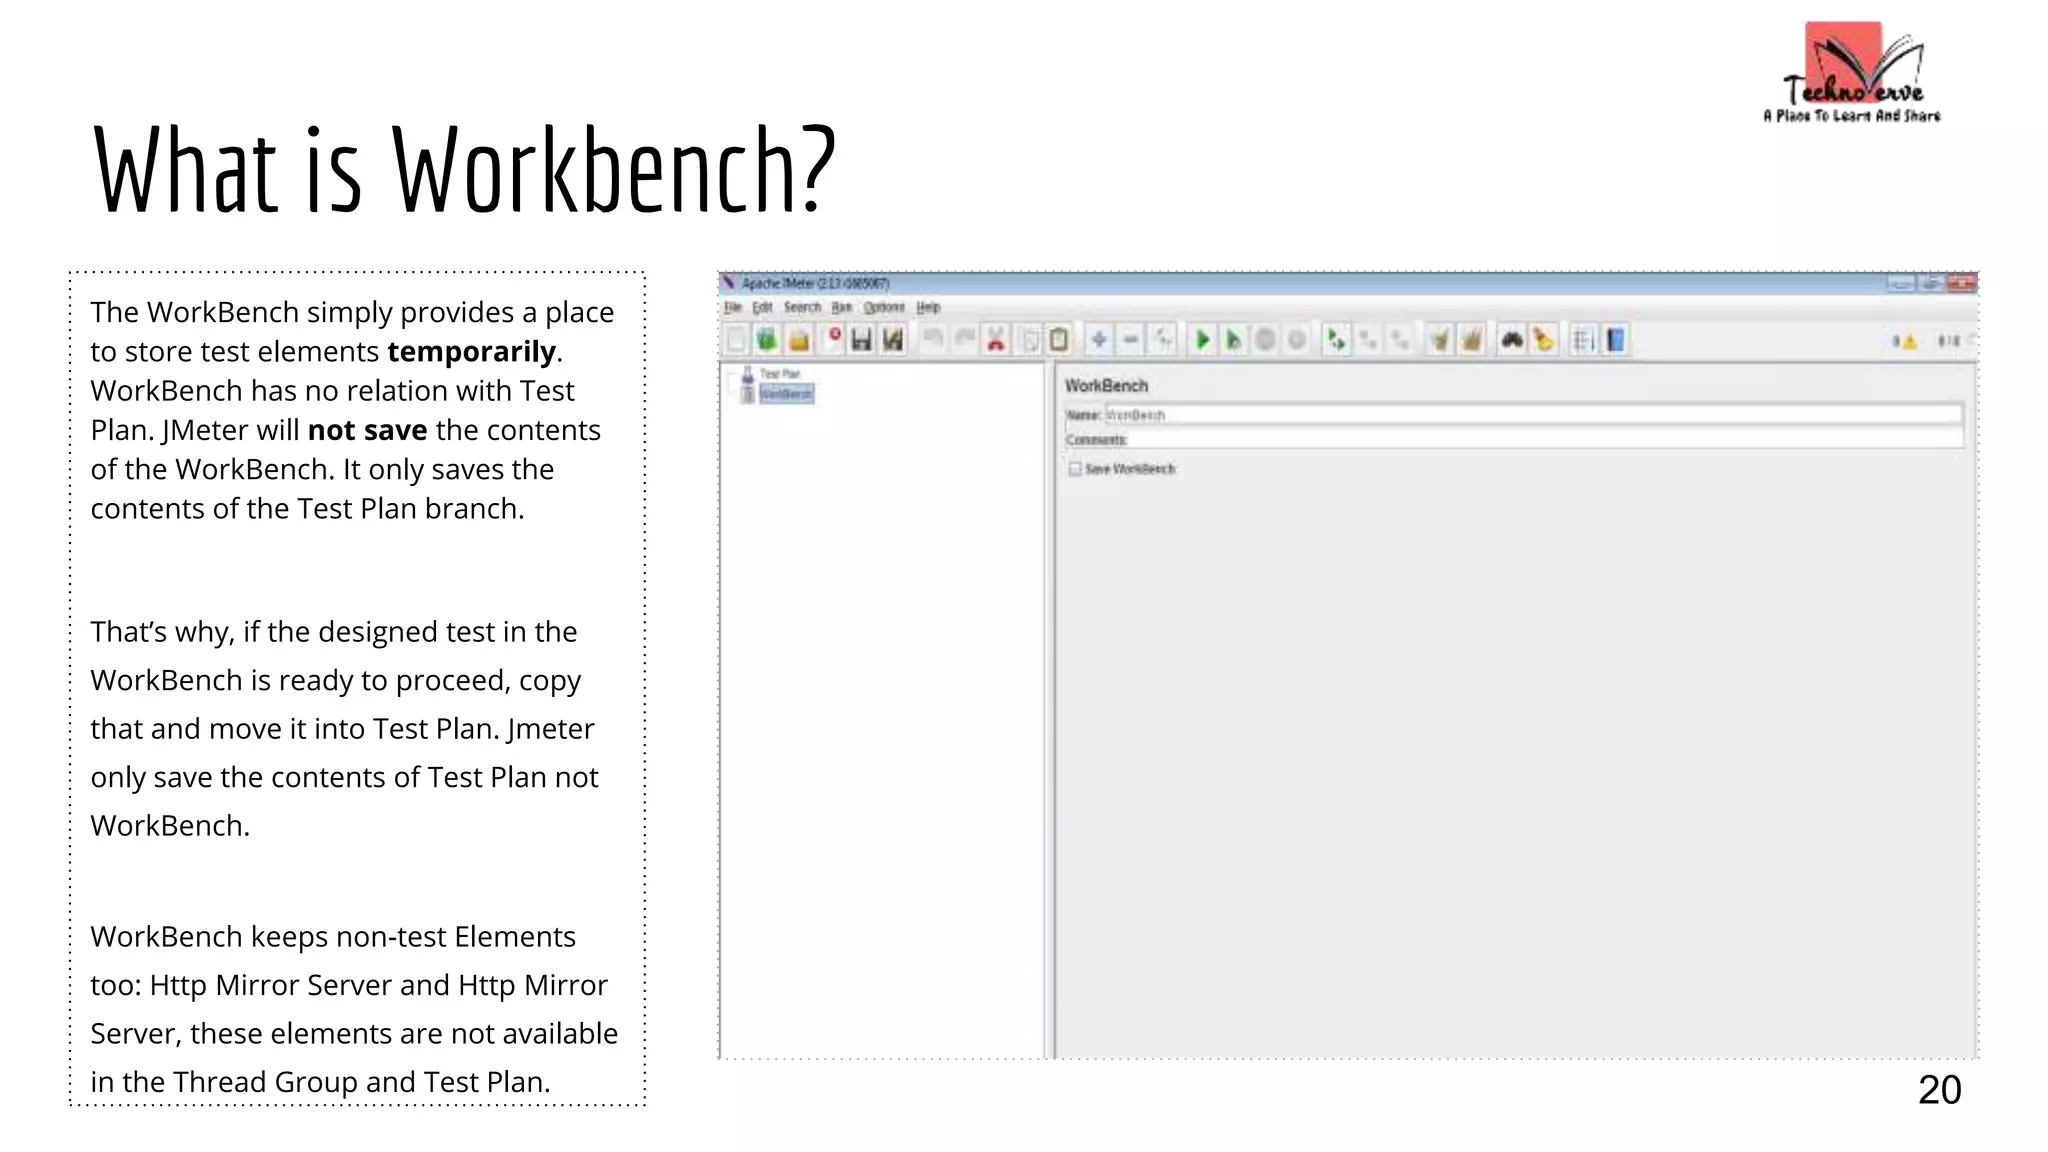
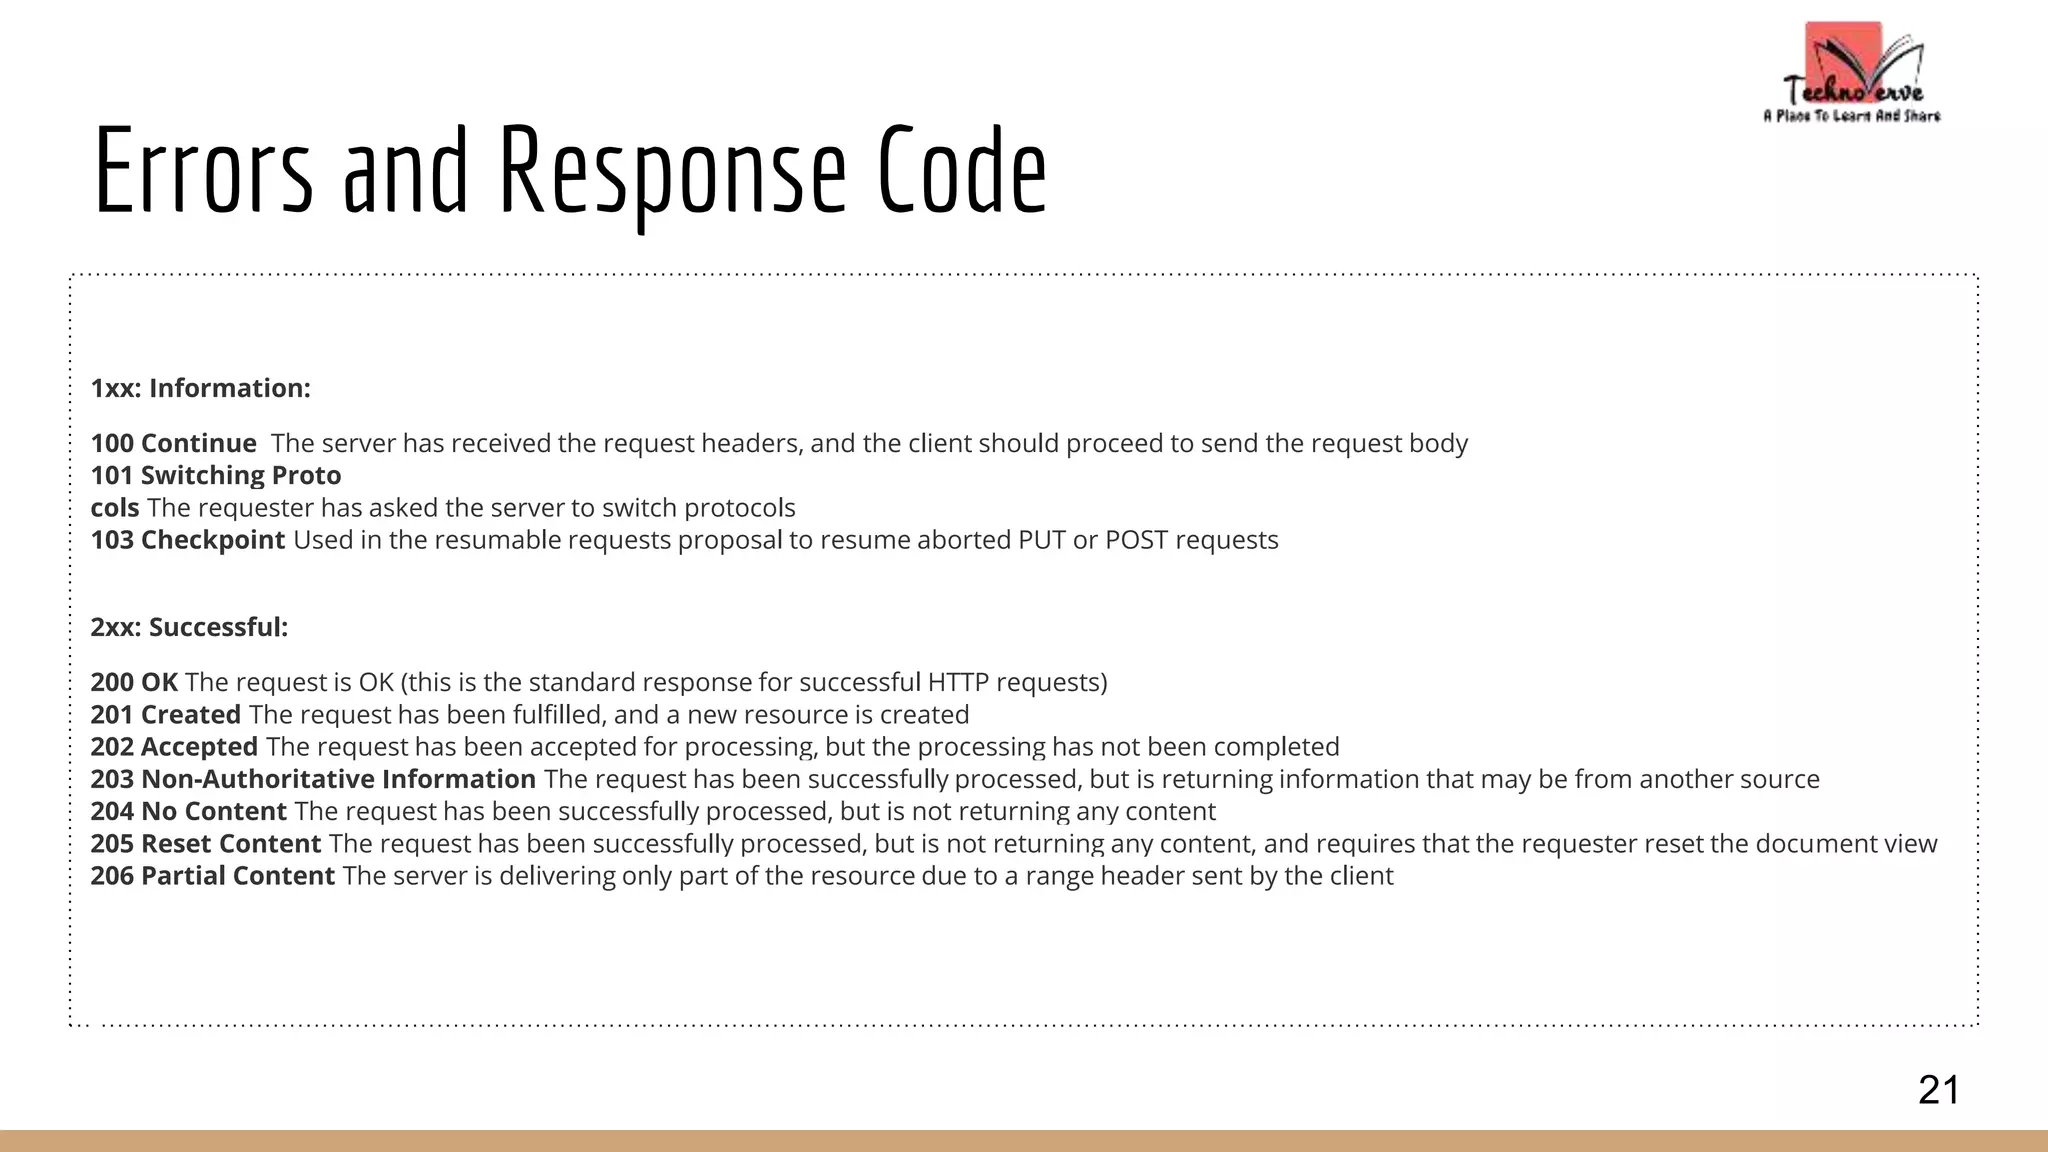
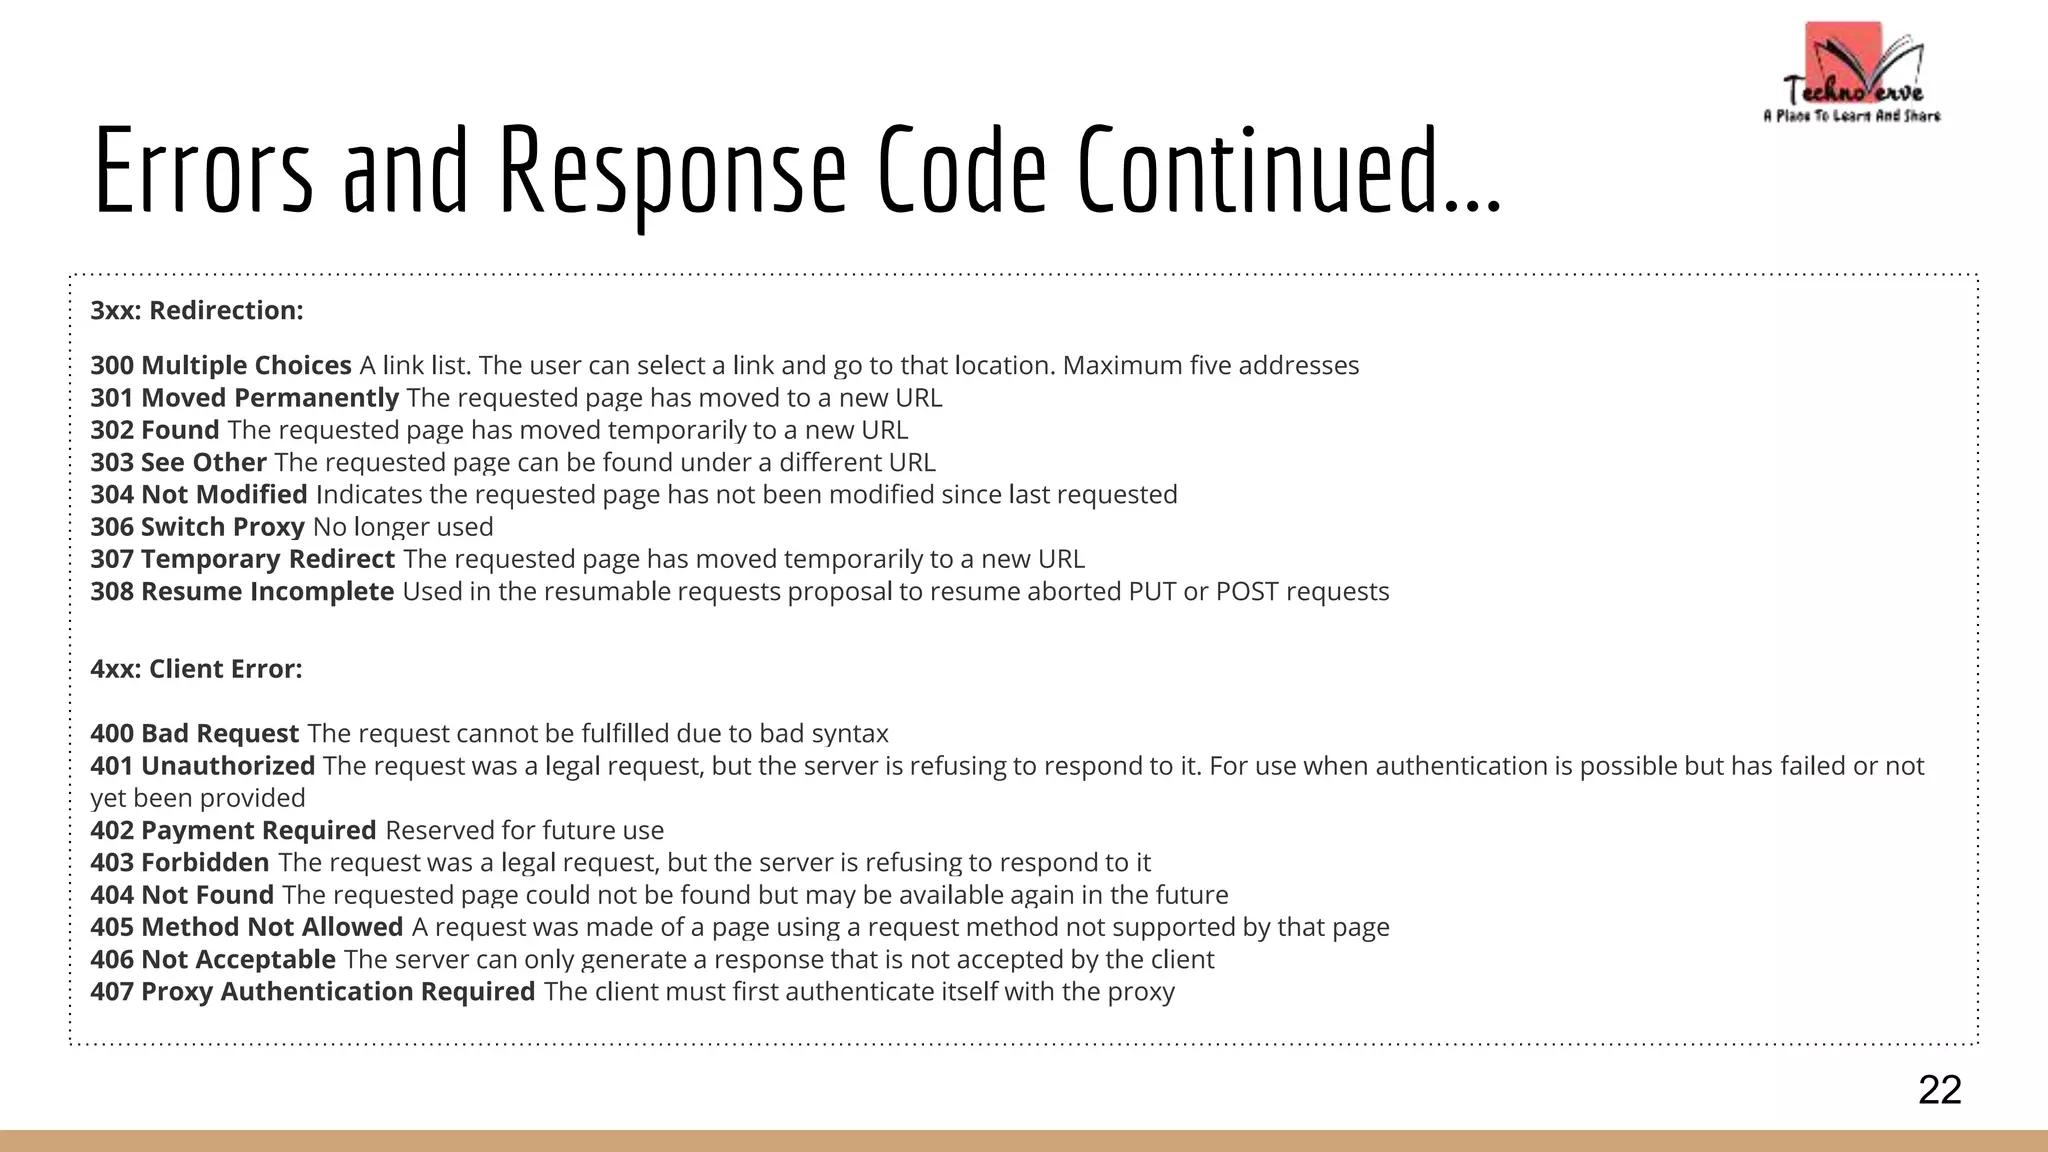
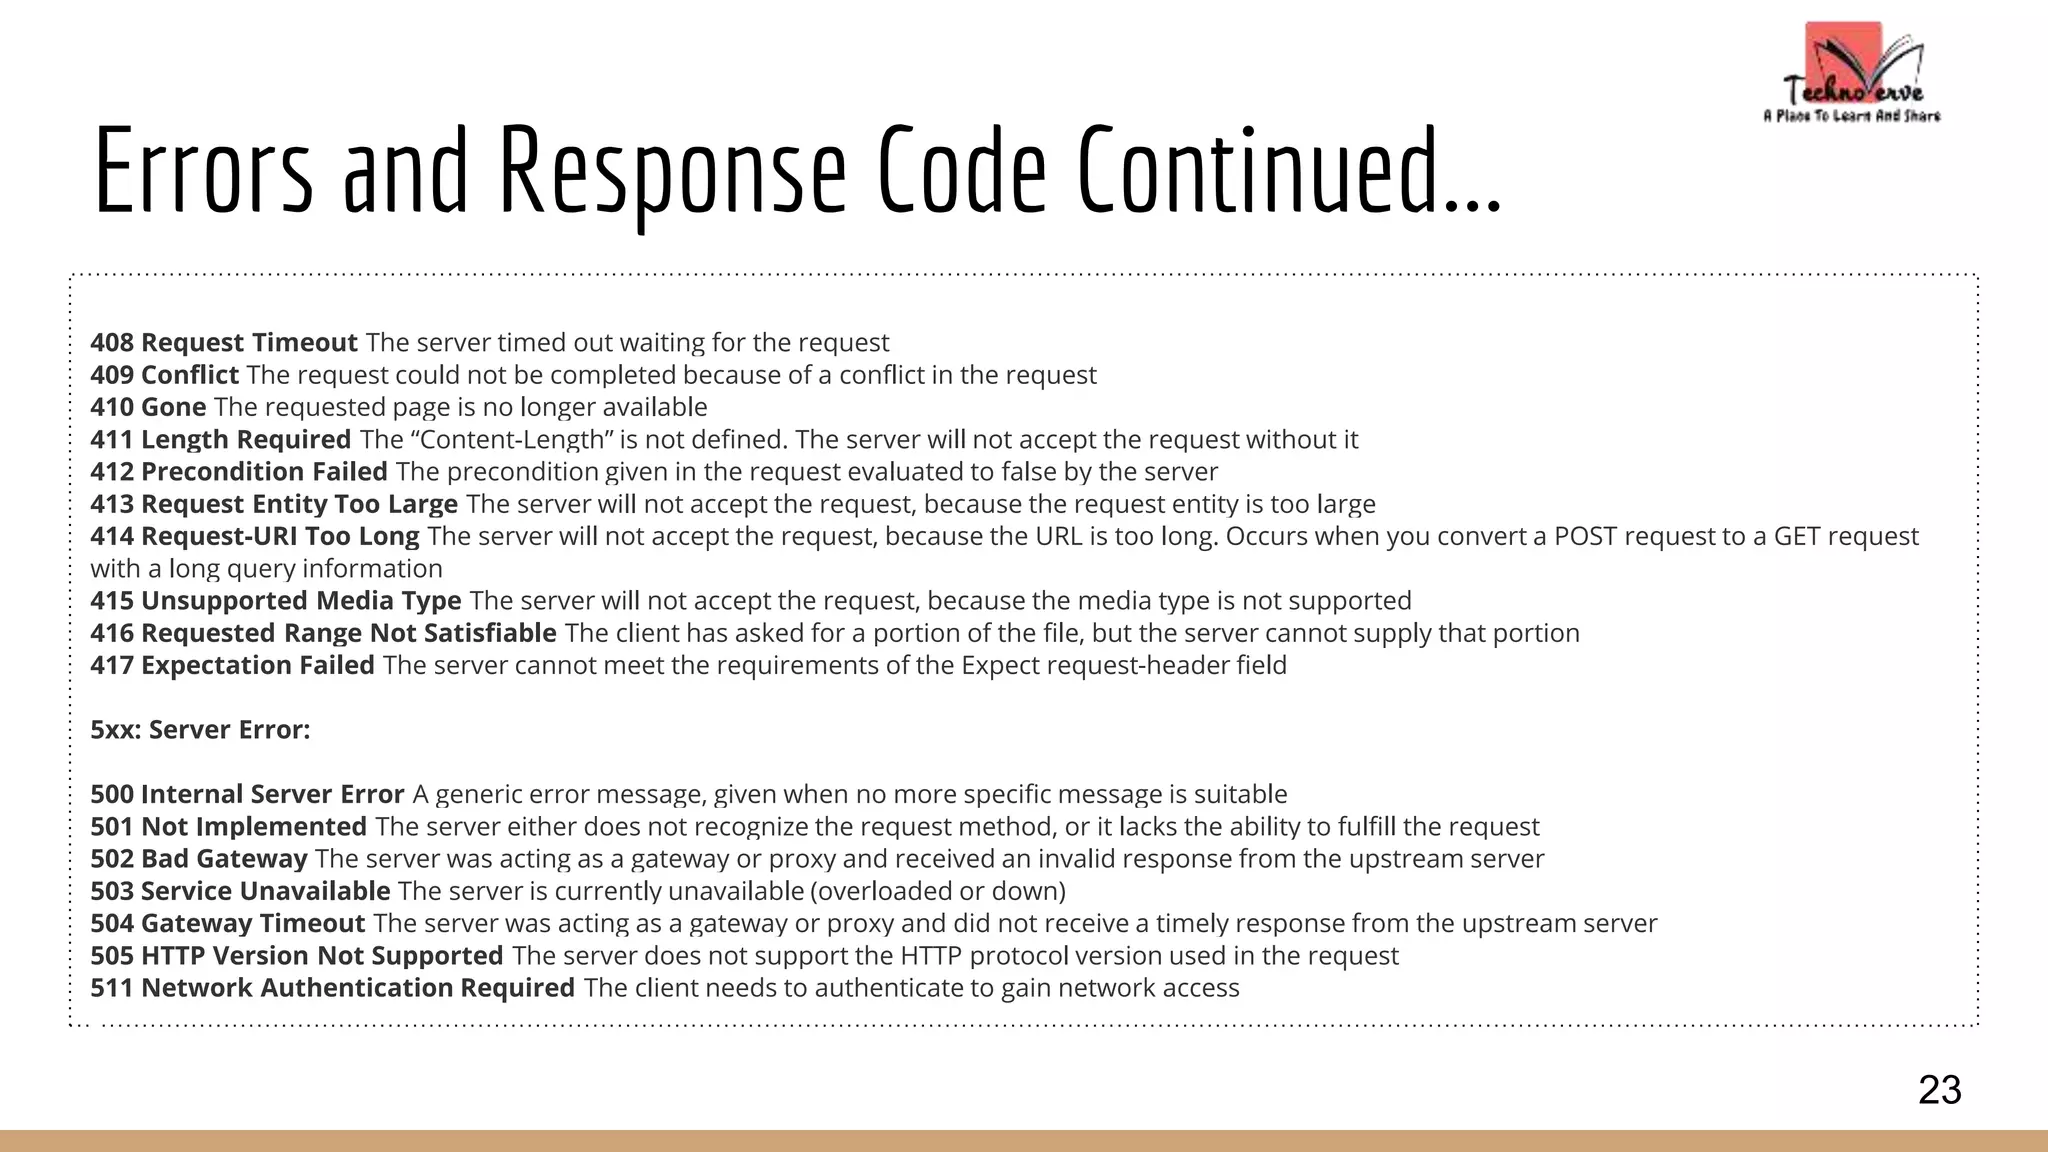
Load Testing With JMeter
By Manoj.Shankaramanchi
manoj@technoverve.com
1
What is Performance Testing?
Performance testing, a non-functional testing technique performed to determine the system parameters in terms of responsiveness and
stability under various workload. Performance testing measures the quality attributes of the system, such as scalability, reliability and
resource usage.
Performance Testing Techniques:
Load testing - It is the simplest form of testing conducted to understand the behaviour of the system under a specific load. Load testing
will result in measuring important business critical transactions and load on the database, application server, etc., are also
monitored.
Stress testing - It is performed to find the upper limit capacity of the system and also to determine how the system performs if the
current load goes well above the expected maximum.
2
What is Jmeter?
Apache JMeter is a 100% pure Java application designed to load test client/server software (such as a web application). It may be used to
test performance both on static and dynamic resources such as static files, Java Servlets, ASP.NET, PHP, CGI scripts, Java objects,
databases , FTP servers , and more. JMeter can be used to simulate a heavy load on a server, network or object to test its strength or
to analyze overall performance under different load types.
Additionally, JMeter can help you regression test your application by letting you create test scripts with assertions to validate that your
application is returning the results you expect. For maximum flexibility, JMeter lets you create these assertions using regular
expressions.
Can run on just about any workstation or environment that can run java.
JMeter is not a browser, it works at protocol level.
3
Running Jmeter
After downloading the Jmeter, go to the bin directory. In this case, it is C:Jmeterapache-jmeter-2.13bin. Now click on the following based on
the operating system.
4
OS Output
Windows jmeter.bat
Linux jmeter.sh
Mac jmeter.sh
How Jmeter Works?
JMeter simulates a group of users sending requests to a target server, and returns statistics that show the performance/functionality of the
target server/application via tables, graphs, etc.
Start Create requests to target servers and simulates a number of users End
Jmeter gathers data to calculate statistical info Server Responds Reports
Jmeter Saves all responses
5
Jmeter Elements
Test Plan Elements:
1. Threads(Users)
2. Test Fragment
3. Config Element
4. Timer
5. Pre Processors
6. Post Processors
7. Assertions
8. Listeners
WorkBench Elements:
1. Non-Test Elements
2. Logic Controllers
3. Config Elements
4. Timer
5. Pre Processors
6. Sampler
7. Post Processors
8. Assertions
9. Listeners
6
What is a Test Plan?
Test Plan is where you add elements required for your JMeter Test. A test plan describes a series of steps JMeter will execute when run. A
complete test plan will consist of one or more Thread Groups, logic controllers, sample generating controllers, listeners, timers, assertions,
and configuration elements.
7
Building a Test Plan
Adding and Removing Elements
Adding elements to a test plan can be done by right-
clicking on an element in the tree, and choosing a new
element from the "add" list. Alternatively, elements can
be loaded from file and added by choosing the "merge"
or "open" option.
To remove an element, make sure the element is
selected, right-click on the element, and choose the
"remove" option.
Loading and Saving Elements
To load an element from file, right click on the existing
tree elements to which you want to add the loaded
element, and select the "merge" option. Choose the
file where your elements are saved. JMeter will merge
the elements into the tree.
8
Building a Test Plan Continued...
Saving the Test Plan
Test Plan consists of one or many elements. To save the Test Plan,
select "Save" or "Save Test Plan As ..." from the File menu or right
click on an element and choose the "Save Selection As ..." option.
JMeter will save the element selected, plus all child elements
beneath it. In this way, you can save test tree fragments and
individual elements for later use.
● When you save your Test Plan, all those elements in the
plan are saved.
Saving an Element
Element is a basic component of JMeter.
When you save your elements, only one element is saved.
Running a Test Plan
To run your test plan, choose "Start" (Control + r) from the "Run"
menu item. When JMeter is running, it shows a small green box
at the right hand end of the section just under the menu bar.
You can also check the "Run" menu. If "Start" is disabled, and
"Stop" is enabled, then JMeter is running your test plan (or, at
least, it thinks it is).
The numbers to the left of the green box are the number of
active threads / total number of threads. These only apply to a
locally run test; they do not include any threads started on
remote systems when using client-server mode.
9
Building a Test Plan Continued...
Stopping a Test
There are two types of stop command available from the menu:
Stop (Control + '.')/Shutdown (Control + ',')
Shutdown - stops the threads immediately if possible.
StopTestNow - requests the threads to stop at the end of any current work.
10
Building a Test Plan Continued...
Error Reporting
JMeter reports warnings and errors to the
jmeter.log file, as well as some information on
the test run itself.
JMeter shows at the right hand end of its
window, the number of warnings/errors found
in jmeter.log file next to the warning icon. Click
on the warning icon to show the jmeter.log file
at the bottom of JMeter's window.
Just occasionally there may be some errors that
JMeter is unable to trap and log; these will
appear on the command console. If a test is not
behaving as you expect, please check the log file
in case any errors have been reported.
11
Thread Group
Thread group elements are the beginning points of any test plan. All
controllers and samplers must be under a thread group. Other
elements, e.g. Listeners, may be placed directly under the test plan, in
which case they will apply to all the thread groups. As the name implies,
the thread group element controls the number of threads JMeter will
use to execute your test. The controls for a thread group allow you to:
Set the number of threads
Set the ramp-up period
Set the number of times to execute the
test(Loop Count)
Each thread will execute the test plan in its entirety and completely
independently of other test threads. Multiple threads are used to
simulate concurrent connections to your server application.
The number of threads tells Jmeter how many users need to be
connected to the server at a certain time.
The ramp-up period tells JMeter how long to take to "ramp-up" to the
full number of threads chosen.
Loop count tells Jmeter how many number of times to perform the test
case for each thread.
Action to be taken after a Sampler error contains following
options
Continue
Start Next Thread Loop
Stop Thread
Stop Test
Stop Test Now
Delay Thread creation until needed
Scheduler: If we check the option it asks us to enter the particular time
to start a test.
12
Config Elements
A configuration element works closely with a Sampler. Although it does not send
requests (except for HTTP(S) Test Script Recorder ), it can add to or modify requests.
A configuration element is accessible from only inside the tree
branch where you place the element. For example, if you place
An HTTP Cookie Manager inside a Simple Logic Controller, the
Cookie Manager will only be accessible to HTTP Request
Controllers you place inside the Simple Logic Controller . The
Cookie Manager is accessible to the HTTP requests
"Web Page 1" and "Web Page 2", but not "Web Page 3".
Config Elements:
1. Counter
2. CSV Data Set Config
3. DNS Cache Manager
4. FTP Request Defaults
5. HTTP Authorization Manager
6. HTTP Cache Manager
7. HTTP Cookie Manager
8. HTTP Header Manager
9. HTTP Request Defaults
10. Java Request Defaults
11. JDBC Connection Configuration
12. Keystore Configuration
13. LDAP Extended Request Defaults
14. LDAP Request Defaults
15. Login Config Element
16. MongoDB Source Config
17. Random Variable
18. Simple Config Element
19. TCP Sampler Config
20. User Defined Variables
13
Controllers
Jmeter has two types of controllers:
Sampler and Logical Controllers.
Sampler: Samplers tell JMeter to send
requests to a server and wait for a
response. They are processed in the
order they appear in the tree.
Controllers can be used to modify the
number of repetitions of a sampler.
Logic Controllers: Logic Controllers let
you customize the logic that JMeter
uses to decide when to send requests.
Logic Controllers can change the order
of requests coming from their child
elements. They can modify the requests
themselves, cause JMeter to repeat
requests, etc.
Logic Controller Elements:
1. Critical Section Controller
2. ForEach Controller
3. If Controller
4. Include Controller
5. Interleave Controller
6. Loop Controller
7. Module Controller
8. Once Only Controller
9. Random Controller
10. Random Order Controller
11. Recording Controller
12. Runtime Controller
13. Simple Controller
14. Switch Controller
15. Throughput Controller
16. Transaction Controller
17. While Controller
14
Sampler Elements:
1. Access Log Sampler
2. AJP/1.3 Sampler
3. BeanShell Sampler
4. BSF Sampler
5. Debug Sampler
6. FTP Request
7. HTTP Request
8. Java Request
9. JDBC Request
10. JMS Point-to-Point
11. JMS Publisher
12. JMS Subscriber
13. JSR223 Sampler
14. JUnit Request
15. LDAP Extended Request
16. LDAP Request
17. Mail Reader Sampler
18. MongoDB Script
19. OS Process Sampler
20. SMTP Sampler
21. SOAP/XML-RPC Request
22. TCP Sampler
23. Test Action
Timer
By default, a JMeter thread sends requests without pausing between each request. We
recommend that you specify a delay by adding one of the available timers to your Thread Group.
If you do not add a delay, JMeter could overwhelm your server by making too many requests in a
very short amount of time.
The timer will cause JMeter to delay a certain amount of time before each sampler which is in its
scope .
If you choose to add more than one timer to a Thread Group, JMeter takes the sum of the timers
and pauses for that amount of time before executing the samplers to which the timers apply.
Timers can be added as children of samplers or controllers in order to restrict the samplers to
which they are applied.
Timer Elements:
1. BeanShell Timer
2. BSF Timer
3. Constant Throughput
Timer
4. Constant Timer
5. Gaussian Random Timer
6. JSR223 Timer
7. Poisson Random Timer
8. Synchronizing Timer
9. Uniform Random Timer
15
Pre Processors
A Pre-Processor executes some action prior to a Sampler Request being made. If a Pre-Processor is attached to a Sampler element, then it
will execute just prior to that sampler element running. A Pre-Processor is most often used to modify the settings of a Sample Request just
before it runs, or to update variables that aren't extracted from response text.
Pre Processors Elements:
1. BeanShell PreProcessor
2. BSF PreProcessor
3. HTML Link Parser
4. HTTP URL Re-writing Modifier
5. JDBC PreProcessor
6. JSR223 PreProcessor
7. RegEx User Parameters
8. User Parameters
16
Post Processors
A Post-Processor executes some action after a Sampler Request has been made. If a Post-Processor is attached to a Sampler element, then it
will execute just after that sampler element runs. A Post-Processor is most often used to process the response data, often to extract values
from it.
Post Processor Elements:
1. BeanShell PostProcessor
2. BSF PostProcessor
3. CSS/JQuery Extractor
4. Debug PostProcessor
5. JDBC PostProcessor
6. JSR223 PostProcessor
7. Regular Expression Extractor
8. Result Status Action Handler
9. XPath Extractor
17
Assertions
Assertions allow you to assert facts about responses received from the server being tested. Using an
assertion, you can essentially "test" that your application is returning the results you expect it to.
For instance, you can assert that the response to a query will contain some particular text. The text you
specify can be a Perl-style regular expression, and you can indicate that the response is to contain the
text, or that it should match the whole response.
You can add an assertion to any Sampler. For example, you can add an assertion to a HTTP Request
that checks for the text, "</HTML>". JMeter will then check that the text is present in the HTTP
response. If JMeter cannot find the text, then it will mark this as a failed request.
Note that assertions apply to all samplers which are in its scope . To restrict the assertion to a single
sampler, add the assertion as a child of the sampler.
To view the assertion results, add an Assertion Listener to the Thread Group. Failed Assertions will also
show up in the Tree View and Table Listeners, and will count towards the error %age for example in the
Aggregate and Summary reports.
18
Assertion Elements:
1. BeanShell Assertion
2. BSF Assertion
3. Compare Assertion
4. Duration Assertion
5. HTML Assertion
6. JSR223 Assertion
7. MD5Hex Assertion
8. Response Assertion
9. Size Assertion
10. SMIME Assertion
11. XML Assertion
12. XML Schema Assertion
13. XPath Assertion
Listeners
Listeners provide access to the information JMeter gathers about the
test cases while JMeter runs. The Graph Results listener plots the
response times on a graph. The "View Results Tree" Listener shows
details of sampler requests and responses, and can display basic HTML
and XML representations of the response. Other listeners provide
summary or aggregation information.
Additionally, listeners can direct the data to a file for later use. Every
listener in JMeter provides a field to indicate the file to store data to.
There is also a Configuration button which can be used to choose which
fields to save, and whether to use CSV or XML format. Note that all
Listeners save the same data; the only difference is in the way the
data is presented on the screen.
Listeners can be added anywhere in the test, including directly under
the test plan. They will collect data only from elements at or below their
level.
There are several listeners that come with JMeter.
Listener Elements:
1. Aggregate Graph
2. Aggregate Report
3. Assertion Results
4. Backend Listener
5. BeanShell Listener
6. BSF Listener
7. Comparison Assertion Visualizer
8. Distribution Graph (alpha)
9. Generate Summary Results
10. Graph Results
11. JSR223 Listener
12. Mailer Visualizer
13. Monitor Results
14. Response Time Graph
15. Save Responses to a file
16. Simple Data Writer
17. Spline Visualizer
18. Summary Report
19. View Results in Table
20. View Results Tree
19
What is Workbench?
The WorkBench simply provides a place
to store test elements temporarily.
WorkBench has no relation with Test
Plan. JMeter will not save the contents
of the WorkBench. It only saves the
contents of the Test Plan branch.
That’s why, if the designed test in the
WorkBench is ready to proceed, copy
that and move it into Test Plan. Jmeter
only save the contents of Test Plan not
WorkBench.
WorkBench keeps non-test Elements
too: Http Mirror Server and Http Mirror
Server, these elements are not available
in the Thread Group and Test Plan. 20
Errors and Response Code
1xx: Information:
100 Continue The server has received the request headers, and the client should proceed to send the request body
101 Switching Proto
cols The requester has asked the server to switch protocols
103 Checkpoint Used in the resumable requests proposal to resume aborted PUT or POST requests
2xx: Successful:
200 OK The request is OK (this is the standard response for successful HTTP requests)
201 Created The request has been fulfilled, and a new resource is created
202 Accepted The request has been accepted for processing, but the processing has not been completed
203 Non-Authoritative Information The request has been successfully processed, but is returning information that may be from another source
204 No Content The request has been successfully processed, but is not returning any content
205 Reset Content The request has been successfully processed, but is not returning any content, and requires that the requester reset the document view
206 Partial Content The server is delivering only part of the resource due to a range header sent by the client
21
Errors and Response Code Continued...
3xx: Redirection:
300 Multiple Choices A link list. The user can select a link and go to that location. Maximum five addresses
301 Moved Permanently The requested page has moved to a new URL
302 Found The requested page has moved temporarily to a new URL
303 See Other The requested page can be found under a different URL
304 Not Modified Indicates the requested page has not been modified since last requested
306 Switch Proxy No longer used
307 Temporary Redirect The requested page has moved temporarily to a new URL
308 Resume Incomplete Used in the resumable requests proposal to resume aborted PUT or POST requests
4xx: Client Error:
400 Bad Request The request cannot be fulfilled due to bad syntax
401 Unauthorized The request was a legal request, but the server is refusing to respond to it. For use when authentication is possible but has failed or not
yet been provided
402 Payment Required Reserved for future use
403 Forbidden The request was a legal request, but the server is refusing to respond to it
404 Not Found The requested page could not be found but may be available again in the future
405 Method Not Allowed A request was made of a page using a request method not supported by that page
406 Not Acceptable The server can only generate a response that is not accepted by the client
407 Proxy Authentication Required The client must first authenticate itself with the proxy
22
Errors and Response Code Continued...
408 Request Timeout The server timed out waiting for the request
409 Conflict The request could not be completed because of a conflict in the request
410 Gone The requested page is no longer available
411 Length Required The “Content-Length” is not defined. The server will not accept the request without it
412 Precondition Failed The precondition given in the request evaluated to false by the server
413 Request Entity Too Large The server will not accept the request, because the request entity is too large
414 Request-URI Too Long The server will not accept the request, because the URL is too long. Occurs when you convert a POST request to a GET request
with a long query information
415 Unsupported Media Type The server will not accept the request, because the media type is not supported
416 Requested Range Not Satisfiable The client has asked for a portion of the file, but the server cannot supply that portion
417 Expectation Failed The server cannot meet the requirements of the Expect request-header field
5xx: Server Error:
500 Internal Server Error A generic error message, given when no more specific message is suitable
501 Not Implemented The server either does not recognize the request method, or it lacks the ability to fulfill the request
502 Bad Gateway The server was acting as a gateway or proxy and received an invalid response from the upstream server
503 Service Unavailable The server is currently unavailable (overloaded or down)
504 Gateway Timeout The server was acting as a gateway or proxy and did not receive a timely response from the upstream server
505 HTTP Version Not Supported The server does not support the HTTP protocol version used in the request
511 Network Authentication Required The client needs to authenticate to gain network access
23
Thank You
24

Load testing with J meter

  • 1.
    Load Testing WithJMeter By Manoj.Shankaramanchi manoj@technoverve.com 1
  • 2.
    What is PerformanceTesting? Performance testing, a non-functional testing technique performed to determine the system parameters in terms of responsiveness and stability under various workload. Performance testing measures the quality attributes of the system, such as scalability, reliability and resource usage. Performance Testing Techniques: Load testing - It is the simplest form of testing conducted to understand the behaviour of the system under a specific load. Load testing will result in measuring important business critical transactions and load on the database, application server, etc., are also monitored. Stress testing - It is performed to find the upper limit capacity of the system and also to determine how the system performs if the current load goes well above the expected maximum. 2
  • 3.
    What is Jmeter? ApacheJMeter is a 100% pure Java application designed to load test client/server software (such as a web application). It may be used to test performance both on static and dynamic resources such as static files, Java Servlets, ASP.NET, PHP, CGI scripts, Java objects, databases , FTP servers , and more. JMeter can be used to simulate a heavy load on a server, network or object to test its strength or to analyze overall performance under different load types. Additionally, JMeter can help you regression test your application by letting you create test scripts with assertions to validate that your application is returning the results you expect. For maximum flexibility, JMeter lets you create these assertions using regular expressions. Can run on just about any workstation or environment that can run java. JMeter is not a browser, it works at protocol level. 3
  • 4.
    Running Jmeter After downloadingthe Jmeter, go to the bin directory. In this case, it is C:Jmeterapache-jmeter-2.13bin. Now click on the following based on the operating system. 4 OS Output Windows jmeter.bat Linux jmeter.sh Mac jmeter.sh
  • 5.
    How Jmeter Works? JMetersimulates a group of users sending requests to a target server, and returns statistics that show the performance/functionality of the target server/application via tables, graphs, etc. Start Create requests to target servers and simulates a number of users End Jmeter gathers data to calculate statistical info Server Responds Reports Jmeter Saves all responses 5
  • 6.
    Jmeter Elements Test PlanElements: 1. Threads(Users) 2. Test Fragment 3. Config Element 4. Timer 5. Pre Processors 6. Post Processors 7. Assertions 8. Listeners WorkBench Elements: 1. Non-Test Elements 2. Logic Controllers 3. Config Elements 4. Timer 5. Pre Processors 6. Sampler 7. Post Processors 8. Assertions 9. Listeners 6
  • 7.
    What is aTest Plan? Test Plan is where you add elements required for your JMeter Test. A test plan describes a series of steps JMeter will execute when run. A complete test plan will consist of one or more Thread Groups, logic controllers, sample generating controllers, listeners, timers, assertions, and configuration elements. 7
  • 8.
    Building a TestPlan Adding and Removing Elements Adding elements to a test plan can be done by right- clicking on an element in the tree, and choosing a new element from the "add" list. Alternatively, elements can be loaded from file and added by choosing the "merge" or "open" option. To remove an element, make sure the element is selected, right-click on the element, and choose the "remove" option. Loading and Saving Elements To load an element from file, right click on the existing tree elements to which you want to add the loaded element, and select the "merge" option. Choose the file where your elements are saved. JMeter will merge the elements into the tree. 8
  • 9.
    Building a TestPlan Continued... Saving the Test Plan Test Plan consists of one or many elements. To save the Test Plan, select "Save" or "Save Test Plan As ..." from the File menu or right click on an element and choose the "Save Selection As ..." option. JMeter will save the element selected, plus all child elements beneath it. In this way, you can save test tree fragments and individual elements for later use. ● When you save your Test Plan, all those elements in the plan are saved. Saving an Element Element is a basic component of JMeter. When you save your elements, only one element is saved. Running a Test Plan To run your test plan, choose "Start" (Control + r) from the "Run" menu item. When JMeter is running, it shows a small green box at the right hand end of the section just under the menu bar. You can also check the "Run" menu. If "Start" is disabled, and "Stop" is enabled, then JMeter is running your test plan (or, at least, it thinks it is). The numbers to the left of the green box are the number of active threads / total number of threads. These only apply to a locally run test; they do not include any threads started on remote systems when using client-server mode. 9
  • 10.
    Building a TestPlan Continued... Stopping a Test There are two types of stop command available from the menu: Stop (Control + '.')/Shutdown (Control + ',') Shutdown - stops the threads immediately if possible. StopTestNow - requests the threads to stop at the end of any current work. 10
  • 11.
    Building a TestPlan Continued... Error Reporting JMeter reports warnings and errors to the jmeter.log file, as well as some information on the test run itself. JMeter shows at the right hand end of its window, the number of warnings/errors found in jmeter.log file next to the warning icon. Click on the warning icon to show the jmeter.log file at the bottom of JMeter's window. Just occasionally there may be some errors that JMeter is unable to trap and log; these will appear on the command console. If a test is not behaving as you expect, please check the log file in case any errors have been reported. 11
  • 12.
    Thread Group Thread groupelements are the beginning points of any test plan. All controllers and samplers must be under a thread group. Other elements, e.g. Listeners, may be placed directly under the test plan, in which case they will apply to all the thread groups. As the name implies, the thread group element controls the number of threads JMeter will use to execute your test. The controls for a thread group allow you to: Set the number of threads Set the ramp-up period Set the number of times to execute the test(Loop Count) Each thread will execute the test plan in its entirety and completely independently of other test threads. Multiple threads are used to simulate concurrent connections to your server application. The number of threads tells Jmeter how many users need to be connected to the server at a certain time. The ramp-up period tells JMeter how long to take to "ramp-up" to the full number of threads chosen. Loop count tells Jmeter how many number of times to perform the test case for each thread. Action to be taken after a Sampler error contains following options Continue Start Next Thread Loop Stop Thread Stop Test Stop Test Now Delay Thread creation until needed Scheduler: If we check the option it asks us to enter the particular time to start a test. 12
  • 13.
    Config Elements A configurationelement works closely with a Sampler. Although it does not send requests (except for HTTP(S) Test Script Recorder ), it can add to or modify requests. A configuration element is accessible from only inside the tree branch where you place the element. For example, if you place An HTTP Cookie Manager inside a Simple Logic Controller, the Cookie Manager will only be accessible to HTTP Request Controllers you place inside the Simple Logic Controller . The Cookie Manager is accessible to the HTTP requests "Web Page 1" and "Web Page 2", but not "Web Page 3". Config Elements: 1. Counter 2. CSV Data Set Config 3. DNS Cache Manager 4. FTP Request Defaults 5. HTTP Authorization Manager 6. HTTP Cache Manager 7. HTTP Cookie Manager 8. HTTP Header Manager 9. HTTP Request Defaults 10. Java Request Defaults 11. JDBC Connection Configuration 12. Keystore Configuration 13. LDAP Extended Request Defaults 14. LDAP Request Defaults 15. Login Config Element 16. MongoDB Source Config 17. Random Variable 18. Simple Config Element 19. TCP Sampler Config 20. User Defined Variables 13
  • 14.
    Controllers Jmeter has twotypes of controllers: Sampler and Logical Controllers. Sampler: Samplers tell JMeter to send requests to a server and wait for a response. They are processed in the order they appear in the tree. Controllers can be used to modify the number of repetitions of a sampler. Logic Controllers: Logic Controllers let you customize the logic that JMeter uses to decide when to send requests. Logic Controllers can change the order of requests coming from their child elements. They can modify the requests themselves, cause JMeter to repeat requests, etc. Logic Controller Elements: 1. Critical Section Controller 2. ForEach Controller 3. If Controller 4. Include Controller 5. Interleave Controller 6. Loop Controller 7. Module Controller 8. Once Only Controller 9. Random Controller 10. Random Order Controller 11. Recording Controller 12. Runtime Controller 13. Simple Controller 14. Switch Controller 15. Throughput Controller 16. Transaction Controller 17. While Controller 14 Sampler Elements: 1. Access Log Sampler 2. AJP/1.3 Sampler 3. BeanShell Sampler 4. BSF Sampler 5. Debug Sampler 6. FTP Request 7. HTTP Request 8. Java Request 9. JDBC Request 10. JMS Point-to-Point 11. JMS Publisher 12. JMS Subscriber 13. JSR223 Sampler 14. JUnit Request 15. LDAP Extended Request 16. LDAP Request 17. Mail Reader Sampler 18. MongoDB Script 19. OS Process Sampler 20. SMTP Sampler 21. SOAP/XML-RPC Request 22. TCP Sampler 23. Test Action
  • 15.
    Timer By default, aJMeter thread sends requests without pausing between each request. We recommend that you specify a delay by adding one of the available timers to your Thread Group. If you do not add a delay, JMeter could overwhelm your server by making too many requests in a very short amount of time. The timer will cause JMeter to delay a certain amount of time before each sampler which is in its scope . If you choose to add more than one timer to a Thread Group, JMeter takes the sum of the timers and pauses for that amount of time before executing the samplers to which the timers apply. Timers can be added as children of samplers or controllers in order to restrict the samplers to which they are applied. Timer Elements: 1. BeanShell Timer 2. BSF Timer 3. Constant Throughput Timer 4. Constant Timer 5. Gaussian Random Timer 6. JSR223 Timer 7. Poisson Random Timer 8. Synchronizing Timer 9. Uniform Random Timer 15
  • 16.
    Pre Processors A Pre-Processorexecutes some action prior to a Sampler Request being made. If a Pre-Processor is attached to a Sampler element, then it will execute just prior to that sampler element running. A Pre-Processor is most often used to modify the settings of a Sample Request just before it runs, or to update variables that aren't extracted from response text. Pre Processors Elements: 1. BeanShell PreProcessor 2. BSF PreProcessor 3. HTML Link Parser 4. HTTP URL Re-writing Modifier 5. JDBC PreProcessor 6. JSR223 PreProcessor 7. RegEx User Parameters 8. User Parameters 16
  • 17.
    Post Processors A Post-Processorexecutes some action after a Sampler Request has been made. If a Post-Processor is attached to a Sampler element, then it will execute just after that sampler element runs. A Post-Processor is most often used to process the response data, often to extract values from it. Post Processor Elements: 1. BeanShell PostProcessor 2. BSF PostProcessor 3. CSS/JQuery Extractor 4. Debug PostProcessor 5. JDBC PostProcessor 6. JSR223 PostProcessor 7. Regular Expression Extractor 8. Result Status Action Handler 9. XPath Extractor 17
  • 18.
    Assertions Assertions allow youto assert facts about responses received from the server being tested. Using an assertion, you can essentially "test" that your application is returning the results you expect it to. For instance, you can assert that the response to a query will contain some particular text. The text you specify can be a Perl-style regular expression, and you can indicate that the response is to contain the text, or that it should match the whole response. You can add an assertion to any Sampler. For example, you can add an assertion to a HTTP Request that checks for the text, "</HTML>". JMeter will then check that the text is present in the HTTP response. If JMeter cannot find the text, then it will mark this as a failed request. Note that assertions apply to all samplers which are in its scope . To restrict the assertion to a single sampler, add the assertion as a child of the sampler. To view the assertion results, add an Assertion Listener to the Thread Group. Failed Assertions will also show up in the Tree View and Table Listeners, and will count towards the error %age for example in the Aggregate and Summary reports. 18 Assertion Elements: 1. BeanShell Assertion 2. BSF Assertion 3. Compare Assertion 4. Duration Assertion 5. HTML Assertion 6. JSR223 Assertion 7. MD5Hex Assertion 8. Response Assertion 9. Size Assertion 10. SMIME Assertion 11. XML Assertion 12. XML Schema Assertion 13. XPath Assertion
  • 19.
    Listeners Listeners provide accessto the information JMeter gathers about the test cases while JMeter runs. The Graph Results listener plots the response times on a graph. The "View Results Tree" Listener shows details of sampler requests and responses, and can display basic HTML and XML representations of the response. Other listeners provide summary or aggregation information. Additionally, listeners can direct the data to a file for later use. Every listener in JMeter provides a field to indicate the file to store data to. There is also a Configuration button which can be used to choose which fields to save, and whether to use CSV or XML format. Note that all Listeners save the same data; the only difference is in the way the data is presented on the screen. Listeners can be added anywhere in the test, including directly under the test plan. They will collect data only from elements at or below their level. There are several listeners that come with JMeter. Listener Elements: 1. Aggregate Graph 2. Aggregate Report 3. Assertion Results 4. Backend Listener 5. BeanShell Listener 6. BSF Listener 7. Comparison Assertion Visualizer 8. Distribution Graph (alpha) 9. Generate Summary Results 10. Graph Results 11. JSR223 Listener 12. Mailer Visualizer 13. Monitor Results 14. Response Time Graph 15. Save Responses to a file 16. Simple Data Writer 17. Spline Visualizer 18. Summary Report 19. View Results in Table 20. View Results Tree 19
  • 20.
    What is Workbench? TheWorkBench simply provides a place to store test elements temporarily. WorkBench has no relation with Test Plan. JMeter will not save the contents of the WorkBench. It only saves the contents of the Test Plan branch. That’s why, if the designed test in the WorkBench is ready to proceed, copy that and move it into Test Plan. Jmeter only save the contents of Test Plan not WorkBench. WorkBench keeps non-test Elements too: Http Mirror Server and Http Mirror Server, these elements are not available in the Thread Group and Test Plan. 20
  • 21.
    Errors and ResponseCode 1xx: Information: 100 Continue The server has received the request headers, and the client should proceed to send the request body 101 Switching Proto cols The requester has asked the server to switch protocols 103 Checkpoint Used in the resumable requests proposal to resume aborted PUT or POST requests 2xx: Successful: 200 OK The request is OK (this is the standard response for successful HTTP requests) 201 Created The request has been fulfilled, and a new resource is created 202 Accepted The request has been accepted for processing, but the processing has not been completed 203 Non-Authoritative Information The request has been successfully processed, but is returning information that may be from another source 204 No Content The request has been successfully processed, but is not returning any content 205 Reset Content The request has been successfully processed, but is not returning any content, and requires that the requester reset the document view 206 Partial Content The server is delivering only part of the resource due to a range header sent by the client 21
  • 22.
    Errors and ResponseCode Continued... 3xx: Redirection: 300 Multiple Choices A link list. The user can select a link and go to that location. Maximum five addresses 301 Moved Permanently The requested page has moved to a new URL 302 Found The requested page has moved temporarily to a new URL 303 See Other The requested page can be found under a different URL 304 Not Modified Indicates the requested page has not been modified since last requested 306 Switch Proxy No longer used 307 Temporary Redirect The requested page has moved temporarily to a new URL 308 Resume Incomplete Used in the resumable requests proposal to resume aborted PUT or POST requests 4xx: Client Error: 400 Bad Request The request cannot be fulfilled due to bad syntax 401 Unauthorized The request was a legal request, but the server is refusing to respond to it. For use when authentication is possible but has failed or not yet been provided 402 Payment Required Reserved for future use 403 Forbidden The request was a legal request, but the server is refusing to respond to it 404 Not Found The requested page could not be found but may be available again in the future 405 Method Not Allowed A request was made of a page using a request method not supported by that page 406 Not Acceptable The server can only generate a response that is not accepted by the client 407 Proxy Authentication Required The client must first authenticate itself with the proxy 22
  • 23.
    Errors and ResponseCode Continued... 408 Request Timeout The server timed out waiting for the request 409 Conflict The request could not be completed because of a conflict in the request 410 Gone The requested page is no longer available 411 Length Required The “Content-Length” is not defined. The server will not accept the request without it 412 Precondition Failed The precondition given in the request evaluated to false by the server 413 Request Entity Too Large The server will not accept the request, because the request entity is too large 414 Request-URI Too Long The server will not accept the request, because the URL is too long. Occurs when you convert a POST request to a GET request with a long query information 415 Unsupported Media Type The server will not accept the request, because the media type is not supported 416 Requested Range Not Satisfiable The client has asked for a portion of the file, but the server cannot supply that portion 417 Expectation Failed The server cannot meet the requirements of the Expect request-header field 5xx: Server Error: 500 Internal Server Error A generic error message, given when no more specific message is suitable 501 Not Implemented The server either does not recognize the request method, or it lacks the ability to fulfill the request 502 Bad Gateway The server was acting as a gateway or proxy and received an invalid response from the upstream server 503 Service Unavailable The server is currently unavailable (overloaded or down) 504 Gateway Timeout The server was acting as a gateway or proxy and did not receive a timely response from the upstream server 505 HTTP Version Not Supported The server does not support the HTTP protocol version used in the request 511 Network Authentication Required The client needs to authenticate to gain network access 23
  • 24.

Editor's Notes

  • #2 This Presentation is all about the Jmeter tool.