This document provides an installation guide for OpenStack on Ubuntu 14.04. It describes installing and configuring the core OpenStack services including Identity, Compute, Image, Block Storage, Object Storage, Networking, Dashboard, Orchestration, and Telemetry. The guide walks through setting up the basic environment, installing each service on controller and compute nodes, and verifying their operation. It also discusses legacy networking and provides next steps after the initial installation.


![Kilo- Kilo- Kilo- Kilo- Kilo- Kilo- Kilo- Kilo- Kilo- Kilo- Kilo- Kilo- Kilo- Kilo- Kilo- Kil OpenStack Installation Guide for
Ubuntu 14.04
August 27, 2015 kilo
3
Example architectures
OpenStack is highly configurable to meet different needs with various compute, network-
ing, and storage options. This guide enables you to choose your own OpenStack adventure
using a combination of core and optional services. This guide uses the following example ar-
chitectures:
• Three-node architecture with OpenStack Networking (neutron) and optional nodes for
Block Storage and Object Storage services.
• The controller node runs the Identity service, Image Service, management portions of
Compute and Networking, Networking plug-in, and the dashboard. It also includes
supporting services such as a SQL database, message queue, and Network Time Proto-
col (NTP).
Optionally, the controller node runs portions of Block Storage, Object Storage, Orches-
tration, Telemetry, Database, and Data processing services. These components provide
additional features for your environment.
• The network node runs the Networking plug-in and several agents that provision ten-
ant networks and provide switching, routing, NAT, and DHCP services. This node also
handles external (Internet) connectivity for tenant virtual machine instances.
• The compute node runs the hypervisor portion of Compute that operates tenant virtual
machines or instances. By default, Compute uses KVM as the hypervisor. The compute
node also runs the Networking plug-in and an agent that connect tenant networks to
instances and provide firewalling (security groups) services. You can run more than one
compute node.
Optionally, the compute node runs a Telemetry agent to collect meters. Also, it can
contain a third network interface on a separate storage network to improve perfor-
mance of storage services.
• The optional Block Storage node contains the disks that the Block Storage service
provisions for tenant virtual machine instances. You can run more than one of these
nodes.
Optionally, the Block Storage node runs a Telemetry agent to collect meters. Also, it
can contain a second network interface on a separate storage network to improve per-
formance of storage services.
• The optional Object Storage nodes contain the disks that the Object Storage service us-
es for storing accounts, containers, and objects. You can run more than two of these
nodes. However, the minimal architecture example requires two nodes.
Optionally, these nodes can contain a second network interface on a separate storage
network to improve performance of storage services.
Note
When you implement this architecture, skip the section called “Legacy net-
working (nova-network)” [91] in Chapter 6, “Add a networking compo-](https://image.slidesharecdn.com/openstack-install-guide-apt-kilo-150924070714-lva1-app6891/85/Openstack-install-guide-apt-kilo-10-320.jpg)
![Kilo- Kilo- Kilo- Kilo- Kilo- Kilo- Kilo- Kilo- Kilo- Kilo- Kilo- Kilo- Kilo- Kilo- Kilo- Kil OpenStack Installation Guide for
Ubuntu 14.04
August 27, 2015 kilo
4
nent” [66]. Optional services might require additional nodes or additional
resources on existing nodes.
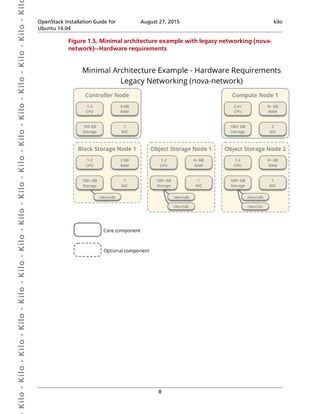
Figure 1.2. Minimal architecture example with OpenStack Networking
(neutron)—Hardware requirements](https://image.slidesharecdn.com/openstack-install-guide-apt-kilo-150924070714-lva1-app6891/85/Openstack-install-guide-apt-kilo-11-320.jpg)


![Kilo- Kilo- Kilo- Kilo- Kilo- Kilo- Kilo- Kilo- Kilo- Kilo- Kilo- Kilo- Kilo- Kilo- Kilo- Kil OpenStack Installation Guide for
Ubuntu 14.04
August 27, 2015 kilo
7
Optionally, the compute node runs a Telemetry agent to collect meters. Also, it can
contain a third network interface on a separate storage network to improve perfor-
mance of storage services.
• The optional Block Storage node contains the disks that the Block Storage service
provisions for tenant virtual machine instances. You can run more than one of these
nodes.
Optionally, the Block Storage node runs a Telemetry agent to collect meters. Also, it
can contain a second network interface on a separate storage network to improve per-
formance of storage services.
• The optional Object Storage nodes contain the disks that the Object Storage service us-
es for storing accounts, containers, and objects. You can run more than two of these
nodes. However, the minimal architecture example requires two nodes.
Optionally, these nodes can contain a second network interface on a separate storage
network to improve performance of storage services.
Note
When you implement this architecture, skip the section called “OpenStack
Networking (neutron)” [66] in Chapter 6, “Add a networking compo-
nent” [66]. To use optional services, you might need to build additional
nodes, as described in subsequent chapters.](https://image.slidesharecdn.com/openstack-install-guide-apt-kilo-150924070714-lva1-app6891/85/Openstack-install-guide-apt-kilo-14-320.jpg)


![Kilo- Kilo- Kilo- Kilo- Kilo- Kilo- Kilo- Kilo- Kilo- Kilo- Kilo- Kilo- Kilo- Kilo- Kilo- Kil OpenStack Installation Guide for
Ubuntu 14.04
August 27, 2015 kilo
11
2. Basic environment
Table of Contents
Before you begin .......................................................................................................... 11
Security ......................................................................................................................... 12
Networking ................................................................................................................... 13
Network Time Protocol (NTP) ........................................................................................ 25
OpenStack packages ..................................................................................................... 27
SQL database ................................................................................................................ 28
Message queue ............................................................................................................. 30
Note
The trunk version of this guide focuses on the future Kilo release and will not
work for the current Juno release. If you want to install Juno, you must use the
Juno version of this guide instead.
This chapter explains how to configure each node in the example architectures including
the two-node architecture with legacy networking and three-node architecture with Open-
Stack Networking (neutron).
Note
Although most environments include Identity, Image service, Compute, at least
one networking service, and the dashboard, the Object Storage service can op-
erate independently. If your use case only involves Object Storage, you can skip
to Chapter 9, “Add Object Storage” [109] after configuring the appropriate
nodes for it. However, the dashboard requires at least the Image service and
Compute.
Note
You must use an account with administrative privileges to configure each node.
Either run the commands as the root user or configure the sudo utility.
Note
The systemctl enable call on openSUSE outputs a warning message when the
service uses SysV Init scripts instead of native systemd files. This warning can be
ignored.
Before you begin
For best performance, we recommend that your environment meets or exceeds the hard-
ware requirements in Figure 1.2, “Minimal architecture example with OpenStack Network-
ing (neutron)—Hardware requirements” [4] or Figure 1.5, “Minimal architecture example](https://image.slidesharecdn.com/openstack-install-guide-apt-kilo-150924070714-lva1-app6891/85/Openstack-install-guide-apt-kilo-18-320.jpg)
![Kilo- Kilo- Kilo- Kilo- Kilo- Kilo- Kilo- Kilo- Kilo- Kilo- Kilo- Kilo- Kilo- Kilo- Kilo- Kil OpenStack Installation Guide for
Ubuntu 14.04
August 27, 2015 kilo
12
with legacy networking (nova-network)—Hardware requirements” [8]. However, Open-
Stack does not require a significant amount of resources and the following minimum re-
quirements should support a proof-of-concept environment with core services and several
CirrOS instances:
• Controller Node: 1 processor, 2 GB memory, and 5 GB storage
• Network Node: 1 processor, 512 MB memory, and 5 GB storage
• Compute Node: 1 processor, 2 GB memory, and 10 GB storage
To minimize clutter and provide more resources for OpenStack, we recommend a minimal
installation of your Linux distribution. Also, we strongly recommend that you install a 64-
bit version of your distribution on at least the compute node. If you install a 32-bit version
of your distribution on the compute node, attempting to start an instance using a 64-bit im-
age will fail.
Note
A single disk partition on each node works for most basic installations. Howev-
er, you should consider Logical Volume Manager (LVM) for installations with op-
tional services such as Block Storage.
Many users build their test environments on virtual machines (VMs). The primary benefits of
VMs include the following:
• One physical server can support multiple nodes, each with almost any number of net-
work interfaces.
• Ability to take periodic "snap shots" throughout the installation process and "roll back" to
a working configuration in the event of a problem.
However, VMs will reduce performance of your instances, particularly if your hypervisor
and/or processor lacks support for hardware acceleration of nested VMs.
Note
If you choose to install on VMs, make sure your hypervisor permits promiscuous
mode and disables MAC address filtering on the external network.
For more information about system requirements, see the OpenStack Operations Guide.
Security
OpenStack services support various security methods including password, policy, and en-
cryption. Additionally, supporting services including the database server and message bro-
ker support at least password security.
To ease the installation process, this guide only covers password security where applicable.
You can create secure passwords manually, generate them using a tool such as pwgen, or
by running the following command:](https://image.slidesharecdn.com/openstack-install-guide-apt-kilo-150924070714-lva1-app6891/85/Openstack-install-guide-apt-kilo-19-320.jpg)


![Kilo- Kilo- Kilo- Kilo- Kilo- Kilo- Kilo- Kilo- Kilo- Kilo- Kilo- Kilo- Kilo- Kilo- Kilo- Kil OpenStack Installation Guide for
Ubuntu 14.04
August 27, 2015 kilo
28
Note
If the upgrade process includes a new kernel, reboot your system to acti-
vate it.
SQL database
Most OpenStack services use an SQL database to store information. The database typically
runs on the controller node. The procedures in this guide use MariaDB or MySQL depend-
ing on the distribution. OpenStack services also support other SQL databases including Post-
greSQL.
To install and configure the database server
1. Install the packages:
Note
The Python MySQL library is compatible with MariaDB.
# apt-get install mariadb-server python-mysqldb
2. Choose a suitable password for the database root account.
3. Create and edit the /etc/mysql/conf.d/mysqld_openstack.cnf file and com-
plete the following actions:
a. In the [mysqld] section, set the bind-address key to the management IP ad-
dress of the controller node to enable access by other nodes via the management
network:
[mysqld]
...
bind-address = 10.0.0.11
b. In the [mysqld] section, set the following keys to enable useful options and the
UTF-8 character set:
[mysqld]
...
default-storage-engine = innodb
innodb_file_per_table
collation-server = utf8_general_ci
init-connect = 'SET NAMES utf8'
character-set-server = utf8
To finalize installation
1. Restart the database service:
# service mysql restart
2. Secure the database service:
# mysql_secure_installation](https://image.slidesharecdn.com/openstack-install-guide-apt-kilo-150924070714-lva1-app6891/85/Openstack-install-guide-apt-kilo-35-320.jpg)
![Kilo- Kilo- Kilo- Kilo- Kilo- Kilo- Kilo- Kilo- Kilo- Kilo- Kilo- Kilo- Kilo- Kilo- Kilo- Kil OpenStack Installation Guide for
Ubuntu 14.04
August 27, 2015 kilo
29
NOTE: RUNNING ALL PARTS OF THIS SCRIPT IS RECOMMENDED FOR ALL MariaDB
SERVERS IN PRODUCTION USE! PLEASE READ EACH STEP CAREFULLY!
In order to log into MariaDB to secure it, we'll need the current
password for the root user. If you've just installed MariaDB, and
you haven't set the root password yet, the password will be blank,
so you should just press enter here.
Enter current password for root (enter for none):
OK, successfully used password, moving on...
Setting the root password ensures that nobody can log into the MariaDB
root user without the proper authorisation.
Set root password? [Y/n] Y
New password:
Re-enter new password:
Password updated successfully!
Reloading privilege tables..
... Success!
By default, a MariaDB installation has an anonymous user, allowing anyone
to log into MariaDB without having to have a user account created for
them. This is intended only for testing, and to make the installation
go a bit smoother. You should remove them before moving into a
production environment.
Remove anonymous users? [Y/n] Y
... Success!
Normally, root should only be allowed to connect from 'localhost'. This
ensures that someone cannot guess at the root password from the network.
Disallow root login remotely? [Y/n] Y
... Success!
By default, MariaDB comes with a database named 'test' that anyone can
access. This is also intended only for testing, and should be removed
before moving into a production environment.
Remove test database and access to it? [Y/n] Y
- Dropping test database...
... Success!
- Removing privileges on test database...
... Success!
Reloading the privilege tables will ensure that all changes made so far
will take effect immediately.
Reload privilege tables now? [Y/n] Y
... Success!
Cleaning up...
All done! If you've completed all of the above steps, your MariaDB
installation should now be secure.
Thanks for using MariaDB!](https://image.slidesharecdn.com/openstack-install-guide-apt-kilo-150924070714-lva1-app6891/85/Openstack-install-guide-apt-kilo-36-320.jpg)


![Kilo- Kilo- Kilo- Kilo- Kilo- Kilo- Kilo- Kilo- Kilo- Kilo- Kilo- Kilo- Kilo- Kilo- Kilo- Kil OpenStack Installation Guide for
Ubuntu 14.04
August 27, 2015 kilo
34
IDENTIFIED BY 'KEYSTONE_DBPASS';
Replace KEYSTONE_DBPASS with a suitable password.
d. Exit the database access client.
2. Generate a random value to use as the administration token during initial configura-
tion:
$ openssl rand -hex 10
To install and configure the Identity service components
Note
Default configuration files vary by distribution. You might need to add these
sections and options rather than modifying existing sections and options. Also,
an ellipsis (...) in the configuration snippets indicates potential default configu-
ration options that you should retain.
Note
In Kilo, the keystone project deprecates Eventlet in favor of a WSGI server. This
guide uses the Apache HTTP server with mod_wsgi to serve keystone requests
on ports 5000 and 35357. By default, the keystone service still listens on ports
5000 and 35357. Therefore, this guide disables the keystone service.
1. Disable the keystone service from starting automatically after installation:
# echo "manual" > /etc/init/keystone.override
2. Run the following command to install the packages:
# apt-get install keystone python-openstackclient apache2 libapache2-mod-
wsgi memcached python-memcache
3. Edit the /etc/keystone/keystone.conf file and complete the following actions:
a. In the [DEFAULT] section, define the value of the initial administration token:
[DEFAULT]
...
admin_token = ADMIN_TOKEN
Replace ADMIN_TOKEN with the random value that you generated in a previous
step.
b. In the [database] section, configure database access:
[database]
...
connection = mysql://keystone:KEYSTONE_DBPASS@controller/keystone
Replace KEYSTONE_DBPASS with the password you chose for the database.
c. In the [memcache] section, configure the Memcache service:](https://image.slidesharecdn.com/openstack-install-guide-apt-kilo-150924070714-lva1-app6891/85/Openstack-install-guide-apt-kilo-41-320.jpg)
![Kilo- Kilo- Kilo- Kilo- Kilo- Kilo- Kilo- Kilo- Kilo- Kilo- Kilo- Kilo- Kilo- Kilo- Kilo- Kil OpenStack Installation Guide for
Ubuntu 14.04
August 27, 2015 kilo
35
[memcache]
...
servers = localhost:11211
d. In the [token] section, configure the UUID token provider and Memcached driv-
er:
[token]
...
provider = keystone.token.providers.uuid.Provider
driver = keystone.token.persistence.backends.memcache.Token
e. In the [revoke] section, configure the SQL revocation driver:
[revoke]
...
driver = keystone.contrib.revoke.backends.sql.Revoke
f. (Optional) To assist with troubleshooting, enable verbose logging in the [DE-
FAULT] section:
[DEFAULT]
...
verbose = True
4. Populate the Identity service database:
# su -s /bin/sh -c "keystone-manage db_sync" keystone
To configure the Apache HTTP server
1. Edit the /etc/apache2/apache2.conf file and configure the ServerName option
to reference the controller node:
ServerName controller
2. Create the /etc/apache2/sites-available/wsgi-keystone.conf file with
the following content:
Listen 5000
Listen 35357
<VirtualHost *:5000>
WSGIDaemonProcess keystone-public processes=5 threads=1 user=keystone
display-name=%{GROUP}
WSGIProcessGroup keystone-public
WSGIScriptAlias / /var/www/cgi-bin/keystone/main
WSGIApplicationGroup %{GLOBAL}
WSGIPassAuthorization On
<IfVersion >= 2.4>
ErrorLogFormat "%{cu}t %M"
</IfVersion>
LogLevel info
ErrorLog /var/log/apache2/keystone-error.log
CustomLog /var/log/apache2/keystone-access.log combined
</VirtualHost>
<VirtualHost *:35357>](https://image.slidesharecdn.com/openstack-install-guide-apt-kilo-150924070714-lva1-app6891/85/Openstack-install-guide-apt-kilo-42-320.jpg)

![Kilo- Kilo- Kilo- Kilo- Kilo- Kilo- Kilo- Kilo- Kilo- Kilo- Kilo- Kilo- Kilo- Kilo- Kilo- Kil OpenStack Installation Guide for
Ubuntu 14.04
August 27, 2015 kilo
37
you created in the section called “Install and configure” [33] to initialize the service enti-
ty and API endpoint for the Identity service.
You must pass the value of the authentication token to the openstack command with the
--os-token parameter or set the OS_TOKEN environment variable. Similarly, you must al-
so pass the value of the Identity service URL to the openstack command with the --os-
url parameter or set the OS_URL environment variable. This guide uses environment vari-
ables to reduce command length.
Warning
For security reasons, do not use the temporary authentication token for longer
than necessary to initialize the Identity service.
1. Configure the authentication token:
$ export OS_TOKEN=ADMIN_TOKEN
Replace ADMIN_TOKEN with the authentication token that you generated in the sec-
tion called “Install and configure” [33]. For example:
$ export OS_TOKEN=294a4c8a8a475f9b9836
2. Configure the endpoint URL:
$ export OS_URL=http://controller:35357/v2.0
To create the service entity and API endpoint
1. The Identity service manages a catalog of services in your OpenStack environment. Ser-
vices use this catalog to determine the other services available in your environment.
Create the service entity for the Identity service:
$ openstack service create
--name keystone --description "OpenStack Identity" identity
+-------------+----------------------------------+
| Field | Value |
+-------------+----------------------------------+
| description | OpenStack Identity |
| enabled | True |
| id | 4ddaae90388b4ebc9d252ec2252d8d10 |
| name | keystone |
| type | identity |
+-------------+----------------------------------+
Note
OpenStack generates IDs dynamically, so you will see different values in the
example command output.
2. The Identity service manages a catalog of API endpoints associated with the services in
your OpenStack environment. Services use this catalog to determine how to communi-
cate with other services in your environment.](https://image.slidesharecdn.com/openstack-install-guide-apt-kilo-150924070714-lva1-app6891/85/Openstack-install-guide-apt-kilo-44-320.jpg)


![Kilo- Kilo- Kilo- Kilo- Kilo- Kilo- Kilo- Kilo- Kilo- Kilo- Kilo- Kilo- Kilo- Kilo- Kilo- Kil OpenStack Installation Guide for
Ubuntu 14.04
August 27, 2015 kilo
41
$ openstack role add --project demo --user demo user
+-------+----------------------------------+
| Field | Value |
+-------+----------------------------------+
| id | 9fe2ff9ee4384b1894a90878d3e92bab |
| name | user |
+-------+----------------------------------+
Note
You can repeat this procedure to create additional projects and users.
Verify operation
Verify operation of the Identity service before installing other services.
1. For security reasons, disable the temporary authentication token mechanism:
Edit the /etc/keystone/keystone-paste.ini file and re-
move admin_token_auth from the [pipeline:public_api],
[pipeline:admin_api], and [pipeline:api_v3] sections.
2. Unset the temporary OS_TOKEN and OS_URL environment variables:
$ unset OS_TOKEN OS_URL
3. As the admin user, request an authentication token from the Identity version 2.0 API:
$ openstack --os-auth-url http://controller:35357
--os-project-name admin --os-username admin --os-auth-type password
token issue
Password:
+------------+----------------------------------+
| Field | Value |
+------------+----------------------------------+
| expires | 2015-03-24T18:55:01Z |
| id | ff5ed908984c4a4190f584d826d75fed |
| project_id | cf12a15c5ea84b019aec3dc45580896b |
| user_id | 4d411f2291f34941b30eef9bd797505a |
+------------+----------------------------------+
Note
This command uses the password for the admin user.
4. The Identity version 3 API adds support for domains that contain projects and users.
Projects and users can use the same names in different domains. Therefore, in order
to use the version 3 API, requests must also explicitly contain at least the default do-
main or use IDs. For simplicity, this guide explicitly uses the default domain so exam-
ples can use names instead of IDs.
$ openstack --os-auth-url http://controller:35357
--os-project-domain-id default --os-user-domain-id default
--os-project-name admin --os-username admin --os-auth-type password
token issue](https://image.slidesharecdn.com/openstack-install-guide-apt-kilo-150924070714-lva1-app6891/85/Openstack-install-guide-apt-kilo-48-320.jpg)
![Kilo- Kilo- Kilo- Kilo- Kilo- Kilo- Kilo- Kilo- Kilo- Kilo- Kilo- Kilo- Kilo- Kilo- Kilo- Kil OpenStack Installation Guide for
Ubuntu 14.04
August 27, 2015 kilo
42
Password:
+------------+----------------------------------+
| Field | Value |
+------------+----------------------------------+
| expires | 2015-03-24T18:55:01Z |
| id | ff5ed908984c4a4190f584d826d75fed |
| project_id | cf12a15c5ea84b019aec3dc45580896b |
| user_id | 4d411f2291f34941b30eef9bd797505a |
+------------+----------------------------------+
Note
This command uses the password for the admin user.
5. As the admin user, list projects to verify that the admin user can execute admin-only
CLI commands and that the Identity service contains the projects that you created in
the section called “Create projects, users, and roles” [38]:
$ openstack --os-auth-url http://controller:35357
--os-project-name admin --os-username admin --os-auth-type password
project list
Password:
+----------------------------------+---------+
| ID | Name |
+----------------------------------+---------+
| 55cbd79c0c014c8a95534ebd16213ca1 | service |
| ab8ea576c0574b6092bb99150449b2d3 | demo |
| cf12a15c5ea84b019aec3dc45580896b | admin |
+----------------------------------+---------+
Note
This command uses the password for the admin user.
6. As the admin user, list users to verify that the Identity service contains the users that
you created in the section called “Create projects, users, and roles” [38]:
$ openstack --os-auth-url http://controller:35357
--os-project-name admin --os-username admin --os-auth-type password
user list
Password:
+----------------------------------+-------+
| ID | Name |
+----------------------------------+-------+
| 4d411f2291f34941b30eef9bd797505a | admin |
| 3a81e6c8103b46709ef8d141308d4c72 | demo |
+----------------------------------+-------+
Note
This command uses the password for the admin user.
7. As the admin user, list roles to verify that the Identity service contains the role that
you created in the section called “Create projects, users, and roles” [38]:
$ openstack --os-auth-url http://controller:35357
--os-project-name admin --os-username admin --os-auth-type password
role list](https://image.slidesharecdn.com/openstack-install-guide-apt-kilo-150924070714-lva1-app6891/85/Openstack-install-guide-apt-kilo-49-320.jpg)


![Kilo- Kilo- Kilo- Kilo- Kilo- Kilo- Kilo- Kilo- Kilo- Kilo- Kilo- Kilo- Kilo- Kilo- Kilo- Kil OpenStack Installation Guide for
Ubuntu 14.04
August 27, 2015 kilo
45
4. Add the Image service
Table of Contents
OpenStack Image service ............................................................................................... 45
Install and configure ..................................................................................................... 46
Verify operation ............................................................................................................ 51
The OpenStack Image service (glance) enables users to discover, register, and retrieve vir-
tual machine images. It offers a REST API that enables you to query virtual machine im-
age metadata and retrieve an actual image. You can store virtual machine images made
available through the Image service in a variety of locations, from simple file systems to ob-
ject-storage systems like OpenStack Object Storage.
Important
For simplicity, this guide describes configuring the Image service to use the
file back end, which uploads and stores in a directory on the controller node
hosting the Image service. By default, this directory is /var/lib/glance/im-
ages/.
Before you proceed, ensure that the controller node has at least several giga-
bytes of space available in this directory.
For information on requirements for other back ends, see Configuration Refer-
ence.
OpenStack Image service
The OpenStack Image service is central to Infrastructure-as-a-Service (IaaS) as shown in Fig-
ure 1.1, “Conceptual architecture” [2]. It accepts API requests for disk or server images, and
image metadata from end users or OpenStack Compute components. It also supports the
storage of disk or server images on various repository types, including OpenStack Object
Storage.
A number of periodic processes run on the OpenStack Image service to support caching.
Replication services ensure consistency and availability through the cluster. Other periodic
processes include auditors, updaters, and reapers.
The OpenStack Image service includes the following components:
glance-api Accepts Image API calls for image discovery, retrieval,
and storage.
glance-registry Stores, processes, and retrieves metadata about images.
Metadata includes items such as size and type.](https://image.slidesharecdn.com/openstack-install-guide-apt-kilo-150924070714-lva1-app6891/85/Openstack-install-guide-apt-kilo-52-320.jpg)
![Kilo- Kilo- Kilo- Kilo- Kilo- Kilo- Kilo- Kilo- Kilo- Kilo- Kilo- Kilo- Kilo- Kilo- Kilo- Kil OpenStack Installation Guide for
Ubuntu 14.04
August 27, 2015 kilo
46
Security note
The registry is a private internal service
meant for use by OpenStack Image service.
Do not disclose it to users.
Database Stores image metadata and you can choose your
database depending on your preference. Most deploy-
ments use MySQL or SQLite.
Storage repository for image
files
Various repository types are supported including nor-
mal file systems, Object Storage, RADOS block devices,
HTTP, and Amazon S3. Note that some repositories will
only support read-only usage.
Install and configure
This section describes how to install and configure the Image service, code-named glance,
on the controller node. For simplicity, this configuration stores images on the local file sys-
tem.
Note
This section assumes proper installation, configuration, and operation of the
Identity service as described in the section called “Install and configure” [33]
and the section called “Verify operation” [41] as well as setup of the ad-
min-openrc.sh script as described in the section called “Create OpenStack
client environment scripts” [43].
To configure prerequisites
Before you install and configure the Image service, you must create a database, service cre-
dentials, and API endpoint.
1. To create the database, complete these steps:
a. Use the database access client to connect to the database server as the root user:
$ mysql -u root -p
b. Create the glance database:
CREATE DATABASE glance;
c. Grant proper access to the glance database:
GRANT ALL PRIVILEGES ON glance.* TO 'glance'@'localhost'
IDENTIFIED BY 'GLANCE_DBPASS';
GRANT ALL PRIVILEGES ON glance.* TO 'glance'@'%'
IDENTIFIED BY 'GLANCE_DBPASS';
Replace GLANCE_DBPASS with a suitable password.](https://image.slidesharecdn.com/openstack-install-guide-apt-kilo-150924070714-lva1-app6891/85/Openstack-install-guide-apt-kilo-53-320.jpg)

![Kilo- Kilo- Kilo- Kilo- Kilo- Kilo- Kilo- Kilo- Kilo- Kilo- Kilo- Kilo- Kilo- Kilo- Kilo- Kil OpenStack Installation Guide for
Ubuntu 14.04
August 27, 2015 kilo
48
| adminurl | http://controller:9292 |
| id | 805b1dbc90ab47479111102bc6423313 |
| internalurl | http://controller:9292 |
| publicurl | http://controller:9292 |
| region | RegionOne |
| service_id | 178124d6081c441b80d79972614149c6 |
| service_name | glance |
| service_type | image |
+--------------+----------------------------------+
To install and configure the Image service components
Note
Default configuration files vary by distribution. You might need to add these
sections and options rather than modifying existing sections and options. Also,
an ellipsis (...) in the configuration snippets indicates potential default configu-
ration options that you should retain.
1. Install the packages:
# apt-get install glance python-glanceclient
2. Edit the /etc/glance/glance-api.conf file and complete the following actions:
a. In the [database] section, configure database access:
[database]
...
connection = mysql://glance:GLANCE_DBPASS@controller/glance
Replace GLANCE_DBPASS with the password you chose for the Image service
database.
b. In the [keystone_authtoken] and [paste_deploy] sections, configure
Identity service access:
[keystone_authtoken]
...
auth_uri = http://controller:5000
auth_url = http://controller:35357
auth_plugin = password
project_domain_id = default
user_domain_id = default
project_name = service
username = glance
password = GLANCE_PASS
[paste_deploy]
...
flavor = keystone
Replace GLANCE_PASS with the password you chose for the glance user in the
Identity service.](https://image.slidesharecdn.com/openstack-install-guide-apt-kilo-150924070714-lva1-app6891/85/Openstack-install-guide-apt-kilo-55-320.jpg)
![Kilo- Kilo- Kilo- Kilo- Kilo- Kilo- Kilo- Kilo- Kilo- Kilo- Kilo- Kilo- Kilo- Kilo- Kilo- Kil OpenStack Installation Guide for
Ubuntu 14.04
August 27, 2015 kilo
49
Note
Comment out or remove any other options in the
[keystone_authtoken] section.
c. In the [glance_store] section, configure the local file system store and loca-
tion of image files:
[glance_store]
...
default_store = file
filesystem_store_datadir = /var/lib/glance/images/
d. In the [DEFAULT] section, configure the noop notification driver to disable notifi-
cations because they only pertain to the optional Telemetry service:
[DEFAULT]
...
notification_driver = noop
The Telemetry chapter provides an Image service configuration that enables notifi-
cations.
e. (Optional) To assist with troubleshooting, enable verbose logging in the [DE-
FAULT] section:
[DEFAULT]
...
verbose = True
3. Edit the /etc/glance/glance-registry.conf file and complete the following
actions:
a. In the [database] section, configure database access:
[database]
...
connection = mysql://glance:GLANCE_DBPASS@controller/glance
Replace GLANCE_DBPASS with the password you chose for the Image service
database.
b. In the [keystone_authtoken] and [paste_deploy] sections, configure
Identity service access:](https://image.slidesharecdn.com/openstack-install-guide-apt-kilo-150924070714-lva1-app6891/85/Openstack-install-guide-apt-kilo-56-320.jpg)
![Kilo- Kilo- Kilo- Kilo- Kilo- Kilo- Kilo- Kilo- Kilo- Kilo- Kilo- Kilo- Kilo- Kilo- Kilo- Kil OpenStack Installation Guide for
Ubuntu 14.04
August 27, 2015 kilo
50
[keystone_authtoken]
...
auth_uri = http://controller:5000
auth_url = http://controller:35357
auth_plugin = password
project_domain_id = default
user_domain_id = default
project_name = service
username = glance
password = GLANCE_PASS
[paste_deploy]
...
flavor = keystone
Replace GLANCE_PASS with the password you chose for the glance user in the
Identity service.
Note
Comment out or remove any other options in the
[keystone_authtoken] section.
c. In the [DEFAULT] section, configure the noop notification driver to disable notifi-
cations because they only pertain to the optional Telemetry service:
[DEFAULT]
...
notification_driver = noop
The Telemetry chapter provides an Image service configuration that enables notifi-
cations.
d. (Optional) To assist with troubleshooting, enable verbose logging in the [DE-
FAULT] section:
[DEFAULT]
...
verbose = True
4. Populate the Image service database:
# su -s /bin/sh -c "glance-manage db_sync" glance
To finalize installation
1. Restart the Image service services:
# service glance-registry restart
# service glance-api restart
2. By default, the Ubuntu packages create an SQLite database.
Because this configuration uses a SQL database server, you can remove the SQLite
database file:
# rm -f /var/lib/glance/glance.sqlite](https://image.slidesharecdn.com/openstack-install-guide-apt-kilo-150924070714-lva1-app6891/85/Openstack-install-guide-apt-kilo-57-320.jpg)
![Kilo- Kilo- Kilo- Kilo- Kilo- Kilo- Kilo- Kilo- Kilo- Kilo- Kilo- Kilo- Kilo- Kilo- Kilo- Kil OpenStack Installation Guide for
Ubuntu 14.04
August 27, 2015 kilo
51
Verify operation
Verify operation of the Image service using CirrOS, a small Linux image that helps you test
your OpenStack deployment.
For more information about how to download and build images, see OpenStack Virtual Ma-
chine Image Guide. For information about how to manage images, see the OpenStack User
Guide.
1. In each client environment script, configure the Image service client to use API version
2.0:
$ echo "export OS_IMAGE_API_VERSION=2" | tee -a admin-openrc.sh demo-
openrc.sh
2. Source the admin credentials to gain access to admin-only CLI commands:
$ source admin-openrc.sh
3. Create a temporary local directory:
$ mkdir /tmp/images
4. Download the source image into it:
$ wget -P /tmp/images http://download.cirros-cloud.net/0.3.4/cirros-0.3.4-
x86_64-disk.img
5. Upload the image to the Image service using the QCOW2 disk format, bare container
format, and public visibility so all projects can access it:
$ glance image-create --name "cirros-0.3.4-x86_64" --file /tmp/images/
cirros-0.3.4-x86_64-disk.img
--disk-format qcow2 --container-format bare --visibility public --
progress
[=============================>] 100%
+------------------+--------------------------------------+
| Property | Value |
+------------------+--------------------------------------+
| checksum | 133eae9fb1c98f45894a4e60d8736619 |
| container_format | bare |
| created_at | 2015-03-26T16:52:10Z |
| disk_format | qcow2 |
| id | 38047887-61a7-41ea-9b49-27987d5e8bb9 |
| min_disk | 0 |
| min_ram | 0 |
| name | cirros-0.3.4-x86_64 |
| owner | ae7a98326b9c455588edd2656d723b9d |
| protected | False |
| size | 13200896 |
| status | active |
| tags | [] |
| updated_at | 2015-03-26T16:52:10Z |
| virtual_size | None |
| visibility | public |
+------------------+--------------------------------------+
For information about the glance image-create parameters, see Image service com-
mand-line client in the OpenStack Command-Line Interface Reference.](https://image.slidesharecdn.com/openstack-install-guide-apt-kilo-150924070714-lva1-app6891/85/Openstack-install-guide-apt-kilo-58-320.jpg)


![Kilo- Kilo- Kilo- Kilo- Kilo- Kilo- Kilo- Kilo- Kilo- Kilo- Kilo- Kilo- Kilo- Kilo- Kilo- Kil OpenStack Installation Guide for
Ubuntu 14.04
August 27, 2015 kilo
58
# apt-get install nova-api nova-cert nova-conductor nova-consoleauth
nova-novncproxy nova-scheduler python-novaclient
2. Edit the /etc/nova/nova.conf file and complete the following actions:
a. Add a [database] section, and configure database access:
[database]
...
connection = mysql://nova:NOVA_DBPASS@controller/nova
Replace NOVA_DBPASS with the password you chose for the Compute database.
b. In the [DEFAULT] and [oslo_messaging_rabbit] sections, configure Rabbit-
MQ message queue access:
[DEFAULT]
...
rpc_backend = rabbit
[oslo_messaging_rabbit]
...
rabbit_host = controller
rabbit_userid = openstack
rabbit_password = RABBIT_PASS
Replace RABBIT_PASS with the password you chose for the openstack account
in RabbitMQ.
c. In the [DEFAULT] and [keystone_authtoken] sections, configure Identity
service access:
[DEFAULT]
...
auth_strategy = keystone
[keystone_authtoken]
...
auth_uri = http://controller:5000
auth_url = http://controller:35357
auth_plugin = password
project_domain_id = default
user_domain_id = default
project_name = service
username = nova
password = NOVA_PASS
Replace NOVA_PASS with the password you chose for the nova user in the Identi-
ty service.
Note
Comment out or remove any other options in the
[keystone_authtoken] section.
d. In the [DEFAULT] section, configure the my_ip option to use the management
interface IP address of the controller node:](https://image.slidesharecdn.com/openstack-install-guide-apt-kilo-150924070714-lva1-app6891/85/Openstack-install-guide-apt-kilo-65-320.jpg)
![Kilo- Kilo- Kilo- Kilo- Kilo- Kilo- Kilo- Kilo- Kilo- Kilo- Kilo- Kilo- Kilo- Kilo- Kilo- Kil OpenStack Installation Guide for
Ubuntu 14.04
August 27, 2015 kilo
59
[DEFAULT]
...
my_ip = 10.0.0.11
e. In the [DEFAULT] section, configure the VNC proxy to use the management in-
terface IP address of the controller node:
[DEFAULT]
...
vncserver_listen = 10.0.0.11
vncserver_proxyclient_address = 10.0.0.11
f. In the [glance] section, configure the location of the Image service:
[glance]
...
host = controller
g. In the [oslo_concurrency] section, configure the lock path:
[oslo_concurrency]
...
lock_path = /var/lib/nova/tmp
h. (Optional) To assist with troubleshooting, enable verbose logging in the [DE-
FAULT] section:
[DEFAULT]
...
verbose = True
3. Populate the Compute database:
# su -s /bin/sh -c "nova-manage db sync" nova
To finalize installation
1. Restart the Compute services:
# service nova-api restart
# service nova-cert restart
# service nova-consoleauth restart
# service nova-scheduler restart
# service nova-conductor restart
# service nova-novncproxy restart
2. By default, the Ubuntu packages create an SQLite database.
Because this configuration uses a SQL database server, you can remove the SQLite
database file:
# rm -f /var/lib/nova/nova.sqlite
Install and configure a compute node
This section describes how to install and configure the Compute service on a compute
node. The service supports several hypervisors to deploy instances or VMs. For simplicity,](https://image.slidesharecdn.com/openstack-install-guide-apt-kilo-150924070714-lva1-app6891/85/Openstack-install-guide-apt-kilo-66-320.jpg)
![Kilo- Kilo- Kilo- Kilo- Kilo- Kilo- Kilo- Kilo- Kilo- Kilo- Kilo- Kilo- Kilo- Kilo- Kilo- Kil OpenStack Installation Guide for
Ubuntu 14.04
August 27, 2015 kilo
60
this configuration uses the QEMU hypervisor with the KVM extension on compute nodes
that support hardware acceleration for virtual machines. On legacy hardware, this config-
uration uses the generic QEMU hypervisor. You can follow these instructions with minor
modifications to horizontally scale your environment with additional compute nodes.
Note
This section assumes that you are following the instructions in this guide step-
by-step to configure the first compute node. If you want to configure addition-
al compute nodes, prepare them in a similar fashion to the first compute node
in the example architectures section using the same networking service as your
existing environment. For either networking service, follow the NTP configu-
ration and OpenStack packages instructions. For OpenStack Networking (neu-
tron), also follow the OpenStack Networking compute node instructions. For
legacy networking (nova-network), also follow the legacy networking compute
node instructions. Each additional compute node requires unique IP addresses.
To install and configure the Compute hypervisor components
Note
Default configuration files vary by distribution. You might need to add these
sections and options rather than modifying existing sections and options. Also,
an ellipsis (...) in the configuration snippets indicates potential default configu-
ration options that you should retain.
1. Install the packages:
# apt-get install nova-compute sysfsutils
2. Edit the /etc/nova/nova.conf file and complete the following actions:
a. In the [DEFAULT] and [oslo_messaging_rabbit] sections, configure Rabbit-
MQ message queue access:
[DEFAULT]
...
rpc_backend = rabbit
[oslo_messaging_rabbit]
...
rabbit_host = controller
rabbit_userid = openstack
rabbit_password = RABBIT_PASS
Replace RABBIT_PASS with the password you chose for the openstack account
in RabbitMQ.
b. In the [DEFAULT] and [keystone_authtoken] sections, configure Identity
service access:](https://image.slidesharecdn.com/openstack-install-guide-apt-kilo-150924070714-lva1-app6891/85/Openstack-install-guide-apt-kilo-67-320.jpg)
![Kilo- Kilo- Kilo- Kilo- Kilo- Kilo- Kilo- Kilo- Kilo- Kilo- Kilo- Kilo- Kilo- Kilo- Kilo- Kil OpenStack Installation Guide for
Ubuntu 14.04
August 27, 2015 kilo
61
[DEFAULT]
...
auth_strategy = keystone
[keystone_authtoken]
...
auth_uri = http://controller:5000
auth_url = http://controller:35357
auth_plugin = password
project_domain_id = default
user_domain_id = default
project_name = service
username = nova
password = NOVA_PASS
Replace NOVA_PASS with the password you chose for the nova user in the Identi-
ty service.
Note
Comment out or remove any other options in the
[keystone_authtoken] section.
c. In the [DEFAULT] section, configure the my_ip option:
[DEFAULT]
...
my_ip = MANAGEMENT_INTERFACE_IP_ADDRESS
Replace MANAGEMENT_INTERFACE_IP_ADDRESS with the IP address of the
management network interface on your compute node, typically 10.0.0.31 for the
first node in the example architecture.
d. In the [DEFAULT] section, enable and configure remote console access:
[DEFAULT]
...
vnc_enabled = True
vncserver_listen = 0.0.0.0
vncserver_proxyclient_address = MANAGEMENT_INTERFACE_IP_ADDRESS
novncproxy_base_url = http://controller:6080/vnc_auto.html
The server component listens on all IP addresses and the proxy component only lis-
tens on the management interface IP address of the compute node. The base URL
indicates the location where you can use a web browser to access remote consoles
of instances on this compute node.
Replace MANAGEMENT_INTERFACE_IP_ADDRESS with the IP address of the
management network interface on your compute node, typically 10.0.0.31 for the
first node in the example architecture.
Note
If the web browser to access remote consoles resides on a host that
cannot resolve the controller hostname, you must replace con-](https://image.slidesharecdn.com/openstack-install-guide-apt-kilo-150924070714-lva1-app6891/85/Openstack-install-guide-apt-kilo-68-320.jpg)
![Kilo- Kilo- Kilo- Kilo- Kilo- Kilo- Kilo- Kilo- Kilo- Kilo- Kilo- Kilo- Kilo- Kilo- Kilo- Kil OpenStack Installation Guide for
Ubuntu 14.04
August 27, 2015 kilo
62
troller with the management interface IP address of the controller
node.
e. In the [glance] section, configure the location of the Image service:
[glance]
...
host = controller
f. In the [oslo_concurrency] section, configure the lock path:
[oslo_concurrency]
...
lock_path = /var/lib/nova/tmp
g. (Optional) To assist with troubleshooting, enable verbose logging in the [DE-
FAULT] section:
[DEFAULT]
...
verbose = True
To finalize installation
1. Determine whether your compute node supports hardware acceleration for virtual ma-
chines:
$ egrep -c '(vmx|svm)' /proc/cpuinfo
If this command returns a value of one or greater, your compute node supports hard-
ware acceleration which typically requires no additional configuration.
If this command returns a value of zero, your compute node does not support hard-
ware acceleration and you must configure libvirt to use QEMU instead of KVM.
• Edit the [libvirt] section in the /etc/nova/nova-compute.conf file as fol-
lows:
[libvirt]
...
virt_type = qemu
2. Restart the Compute service:
# service nova-compute restart
3. By default, the Ubuntu packages create an SQLite database.
Because this configuration uses a SQL database server, you can remove the SQLite
database file:
# rm -f /var/lib/nova/nova.sqlite
Verify operation
Verify operation of the Compute service.](https://image.slidesharecdn.com/openstack-install-guide-apt-kilo-150924070714-lva1-app6891/85/Openstack-install-guide-apt-kilo-69-320.jpg)


![Kilo- Kilo- Kilo- Kilo- Kilo- Kilo- Kilo- Kilo- Kilo- Kilo- Kilo- Kilo- Kilo- Kilo- Kilo- Kil OpenStack Installation Guide for
Ubuntu 14.04
August 27, 2015 kilo
69
c. Create the neutron service entity:
$ openstack service create --name neutron
--description "OpenStack Networking" network
+-------------+----------------------------------+
| Field | Value |
+-------------+----------------------------------+
| description | OpenStack Networking |
| enabled | True |
| id | f71529314dab4a4d8eca427e701d209e |
| name | neutron |
| type | network |
+-------------+----------------------------------+
4. Create the Networking service API endpoint:
$ openstack endpoint create
--publicurl http://controller:9696
--adminurl http://controller:9696
--internalurl http://controller:9696
--region RegionOne
network
+--------------+----------------------------------+
| Field | Value |
+--------------+----------------------------------+
| adminurl | http://controller:9696 |
| id | 04a7d3c1de784099aaba83a8a74100b3 |
| internalurl | http://controller:9696 |
| publicurl | http://controller:9696 |
| region | RegionOne |
| service_id | f71529314dab4a4d8eca427e701d209e |
| service_name | neutron |
| service_type | network |
+--------------+----------------------------------+
To install the Networking components
• # apt-get install neutron-server neutron-plugin-ml2 python-neutronclient
To configure the Networking server component
The Networking server component configuration includes the database, authentication
mechanism, message queue, topology change notifications, and plug-in.
Note
Default configuration files vary by distribution. You might need to add these
sections and options rather than modifying existing sections and options. Also,
an ellipsis (...) in the configuration snippets indicates potential default configu-
ration options that you should retain.
• Edit the /etc/neutron/neutron.conf file and complete the following actions:
a. In the [database] section, configure database access:](https://image.slidesharecdn.com/openstack-install-guide-apt-kilo-150924070714-lva1-app6891/85/Openstack-install-guide-apt-kilo-76-320.jpg)
![Kilo- Kilo- Kilo- Kilo- Kilo- Kilo- Kilo- Kilo- Kilo- Kilo- Kilo- Kilo- Kilo- Kilo- Kilo- Kil OpenStack Installation Guide for
Ubuntu 14.04
August 27, 2015 kilo
70
[database]
...
connection = mysql://neutron:NEUTRON_DBPASS@controller/neutron
Replace NEUTRON_DBPASS with the password you chose for the database.
b. In the [DEFAULT] and [oslo_messaging_rabbit] sections, configure Rabbit-
MQ message queue access:
[DEFAULT]
...
rpc_backend = rabbit
[oslo_messaging_rabbit]
...
rabbit_host = controller
rabbit_userid = openstack
rabbit_password = RABBIT_PASS
Replace RABBIT_PASS with the password you chose for the openstack account
in RabbitMQ.
c. In the [DEFAULT] and [keystone_authtoken] sections, configure Identity
service access:
[DEFAULT]
...
auth_strategy = keystone
[keystone_authtoken]
...
auth_uri = http://controller:5000
auth_url = http://controller:35357
auth_plugin = password
project_domain_id = default
user_domain_id = default
project_name = service
username = neutron
password = NEUTRON_PASS
Replace NEUTRON_PASS with the password you chose for the neutron user in
the Identity service.
Note
Comment out or remove any other options in the
[keystone_authtoken] section.
d. In the [DEFAULT] section, enable the Modular Layer 2 (ML2) plug-in, router ser-
vice, and overlapping IP addresses:
[DEFAULT]
...
core_plugin = ml2
service_plugins = router
allow_overlapping_ips = True](https://image.slidesharecdn.com/openstack-install-guide-apt-kilo-150924070714-lva1-app6891/85/Openstack-install-guide-apt-kilo-77-320.jpg)
![Kilo- Kilo- Kilo- Kilo- Kilo- Kilo- Kilo- Kilo- Kilo- Kilo- Kilo- Kilo- Kilo- Kilo- Kilo- Kil OpenStack Installation Guide for
Ubuntu 14.04
August 27, 2015 kilo
71
e. In the [DEFAULT] and [nova] sections, configure Networking to notify Com-
pute of network topology changes:
[DEFAULT]
...
notify_nova_on_port_status_changes = True
notify_nova_on_port_data_changes = True
nova_url = http://controller:8774/v2
[nova]
...
auth_url = http://controller:35357
auth_plugin = password
project_domain_id = default
user_domain_id = default
region_name = RegionOne
project_name = service
username = nova
password = NOVA_PASS
Replace NOVA_PASS with the password you chose for the nova user in the Identi-
ty service.
f. (Optional) To assist with troubleshooting, enable verbose logging in the [DE-
FAULT] section:
[DEFAULT]
...
verbose = True
To configure the Modular Layer 2 (ML2) plug-in
The ML2 plug-in uses the Open vSwitch (OVS) mechanism (agent) to build the virtual net-
working framework for instances. However, the controller node does not need the OVS
components because it does not handle instance network traffic.
• Edit the /etc/neutron/plugins/ml2/ml2_conf.ini file and complete the fol-
lowing actions:
a. In the [ml2] section, enable the flat, VLAN, generic routing encapsulation (GRE),
and virtual extensible LAN (VXLAN) network type drivers, GRE tenant networks,
and the OVS mechanism driver:
[ml2]
...
type_drivers = flat,vlan,gre,vxlan
tenant_network_types = gre
mechanism_drivers = openvswitch
Warning
Once you configure the ML2 plug-in, changing values in the
type_drivers option can lead to database inconsistency.
b. In the [ml2_type_gre] section, configure the tunnel identifier (id) range:](https://image.slidesharecdn.com/openstack-install-guide-apt-kilo-150924070714-lva1-app6891/85/Openstack-install-guide-apt-kilo-78-320.jpg)
![Kilo- Kilo- Kilo- Kilo- Kilo- Kilo- Kilo- Kilo- Kilo- Kilo- Kilo- Kilo- Kilo- Kilo- Kilo- Kil OpenStack Installation Guide for
Ubuntu 14.04
August 27, 2015 kilo
72
[ml2_type_gre]
...
tunnel_id_ranges = 1:1000
c. In the [securitygroup] section, enable security groups, enable ipset, and con-
figure the OVS iptables firewall driver:
[securitygroup]
...
enable_security_group = True
enable_ipset = True
firewall_driver = neutron.agent.linux.iptables_firewall.
OVSHybridIptablesFirewallDriver
To configure Compute to use Networking
By default, distribution packages configure Compute to use legacy networking. You must
reconfigure Compute to manage networks through Networking.
• Edit the /etc/nova/nova.conf file on the controller node and complete the follow-
ing actions:
a. In the [DEFAULT] section, configure the APIs and drivers:
[DEFAULT]
...
network_api_class = nova.network.neutronv2.api.API
security_group_api = neutron
linuxnet_interface_driver = nova.network.linux_net.
LinuxOVSInterfaceDriver
firewall_driver = nova.virt.firewall.NoopFirewallDriver
Note
By default, Compute uses an internal firewall ser-
vice. Since Networking includes a firewall service, you
must disable the Compute firewall service by using the
nova.virt.firewall.NoopFirewallDriver firewall driver.
b. In the [neutron] section, configure access parameters:
[neutron]
...
url = http://controller:9696
auth_strategy = keystone
admin_auth_url = http://controller:35357/v2.0
admin_tenant_name = service
admin_username = neutron
admin_password = NEUTRON_PASS
Replace NEUTRON_PASS with the password you chose for the neutron user in
the Identity service.
To finalize installation
1. Populate the database:](https://image.slidesharecdn.com/openstack-install-guide-apt-kilo-150924070714-lva1-app6891/85/Openstack-install-guide-apt-kilo-79-320.jpg)

![Kilo- Kilo- Kilo- Kilo- Kilo- Kilo- Kilo- Kilo- Kilo- Kilo- Kilo- Kilo- Kilo- Kilo- Kilo- Kil OpenStack Installation Guide for
Ubuntu 14.04
August 27, 2015 kilo
74
To configure prerequisites
Before you install and configure OpenStack Networking, you must configure certain kernel
networking parameters.
1. Edit the /etc/sysctl.conf file to contain the following parameters:
net.ipv4.ip_forward=1
net.ipv4.conf.all.rp_filter=0
net.ipv4.conf.default.rp_filter=0
2. Implement the changes:
# sysctl -p
To install the Networking components
• # apt-get install neutron-plugin-ml2 neutron-plugin-openvswitch-agent
neutron-l3-agent neutron-dhcp-agent neutron-metadata-agent
To configure the Networking common components
The Networking common component configuration includes the authentication mecha-
nism, message queue, and plug-in.
Note
Default configuration files vary by distribution. You might need to add these
sections and options rather than modifying existing sections and options. Also,
an ellipsis (...) in the configuration snippets indicates potential default configu-
ration options that you should retain.
• Edit the /etc/neutron/neutron.conf file and complete the following actions:
a. In the [database] section, comment out any connection options because net-
work nodes do not directly access the database.
b. In the [DEFAULT] and [oslo_messaging_rabbit] sections, configure Rabbit-
MQ message queue access:
[DEFAULT]
...
rpc_backend = rabbit
[oslo_messaging_rabbit]
...
rabbit_host = controller
rabbit_userid = openstack
rabbit_password = RABBIT_PASS
Replace RABBIT_PASS with the password you chose for the openstack account
in RabbitMQ.
c. In the [DEFAULT] and [keystone_authtoken] sections, configure Identity
service access:](https://image.slidesharecdn.com/openstack-install-guide-apt-kilo-150924070714-lva1-app6891/85/Openstack-install-guide-apt-kilo-81-320.jpg)
![Kilo- Kilo- Kilo- Kilo- Kilo- Kilo- Kilo- Kilo- Kilo- Kilo- Kilo- Kilo- Kilo- Kilo- Kilo- Kil OpenStack Installation Guide for
Ubuntu 14.04
August 27, 2015 kilo
75
[DEFAULT]
...
auth_strategy = keystone
[keystone_authtoken]
...
auth_uri = http://controller:5000
auth_url = http://controller:35357
auth_plugin = password
project_domain_id = default
user_domain_id = default
project_name = service
username = neutron
password = NEUTRON_PASS
Replace NEUTRON_PASS with the password you chose or the neutron user in the
Identity service.
Note
Comment out or remove any other options in the
[keystone_authtoken] section.
d. In the [DEFAULT] section, enable the Modular Layer 2 (ML2) plug-in, router ser-
vice, and overlapping IP addresses:
[DEFAULT]
...
core_plugin = ml2
service_plugins = router
allow_overlapping_ips = True
e. (Optional) To assist with troubleshooting, enable verbose logging in the [DE-
FAULT] section:
[DEFAULT]
...
verbose = True
To configure the Modular Layer 2 (ML2) plug-in
The ML2 plug-in uses the Open vSwitch (OVS) mechanism (agent) to build the virtual net-
working framework for instances.
• Edit the /etc/neutron/plugins/ml2/ml2_conf.ini file and complete the fol-
lowing actions:
a. In the [ml2] section, enable the flat, VLAN, generic routing encapsulation (GRE),
and virtual extensible LAN (VXLAN) network type drivers, GRE tenant networks,
and the OVS mechanism driver:
[ml2]
...
type_drivers = flat,vlan,gre,vxlan
tenant_network_types = gre
mechanism_drivers = openvswitch](https://image.slidesharecdn.com/openstack-install-guide-apt-kilo-150924070714-lva1-app6891/85/Openstack-install-guide-apt-kilo-82-320.jpg)
![Kilo- Kilo- Kilo- Kilo- Kilo- Kilo- Kilo- Kilo- Kilo- Kilo- Kilo- Kilo- Kilo- Kilo- Kilo- Kil OpenStack Installation Guide for
Ubuntu 14.04
August 27, 2015 kilo
76
b. In the [ml2_type_flat] section, configure the external flat provider network:
[ml2_type_flat]
...
flat_networks = external
c. In the [ml2_type_gre] section, configure the tunnel identifier (id) range:
[ml2_type_gre]
...
tunnel_id_ranges = 1:1000
d. In the [securitygroup] section, enable security groups, enable ipset, and con-
figure the OVS iptables firewall driver:
[securitygroup]
...
enable_security_group = True
enable_ipset = True
firewall_driver = neutron.agent.linux.iptables_firewall.
OVSHybridIptablesFirewallDriver
e. In the [ovs] section, enable tunnels, configure the local tunnel endpoint, and
map the external flat provider network to the br-ex external network bridge:
[ovs]
...
local_ip = INSTANCE_TUNNELS_INTERFACE_IP_ADDRESS
bridge_mappings = external:br-ex
Replace INSTANCE_TUNNELS_INTERFACE_IP_ADDRESS with the IP address of
the instance tunnels network interface on your network node.
f. In the [agent] section, enable GRE tunnels:
[agent]
...
tunnel_types = gre
To configure the Layer-3 (L3) agent
The Layer-3 (L3) agent provides routing services for virtual networks.
• Edit the /etc/neutron/l3_agent.ini file and complete the following actions:
a. In the [DEFAULT] section, configure the interface driver, external network
bridge, and enable deletion of defunct router namespaces:
[DEFAULT]
...
interface_driver = neutron.agent.linux.interface.OVSInterfaceDriver
external_network_bridge =
router_delete_namespaces = True](https://image.slidesharecdn.com/openstack-install-guide-apt-kilo-150924070714-lva1-app6891/85/Openstack-install-guide-apt-kilo-83-320.jpg)
![Kilo- Kilo- Kilo- Kilo- Kilo- Kilo- Kilo- Kilo- Kilo- Kilo- Kilo- Kilo- Kilo- Kilo- Kilo- Kil OpenStack Installation Guide for
Ubuntu 14.04
August 27, 2015 kilo
77
Note
The external_network_bridge option intentionally lacks a value
to enable multiple external networks on a single agent.
b. (Optional) To assist with troubleshooting, enable verbose logging in the [DE-
FAULT] section:
[DEFAULT]
...
verbose = True
To configure the DHCP agent
The DHCP agent provides DHCP services for virtual networks.
1. Edit the /etc/neutron/dhcp_agent.ini file and complete the following actions:
a. In the [DEFAULT] section, configure the interface and DHCP drivers and enable
deletion of defunct DHCP namespaces:
[DEFAULT]
...
interface_driver = neutron.agent.linux.interface.OVSInterfaceDriver
dhcp_driver = neutron.agent.linux.dhcp.Dnsmasq
dhcp_delete_namespaces = True
b. (Optional) To assist with troubleshooting, enable verbose logging in the [DE-
FAULT] section:
[DEFAULT]
...
verbose = True
2. (Optional)
Tunneling protocols such as GRE include additional packet headers that increase over-
head and decrease space available for the payload or user data. Without knowledge of
the virtual network infrastructure, instances attempt to send packets using the default
Ethernet maximum transmission unit (MTU) of 1500 bytes. Internet protocol (IP) net-
works contain the path MTU discovery (PMTUD) mechanism to detect end-to-end MTU
and adjust packet size accordingly. However, some operating systems and networks
block or otherwise lack support for PMTUD causing performance degradation or con-
nectivity failure.
Ideally, you can prevent these problems by enabling jumbo frames on the physical net-
work that contains your tenant virtual networks. Jumbo frames support MTUs up to
approximately 9000 bytes which negates the impact of GRE overhead on virtual net-
works. However, many network devices lack support for jumbo frames and OpenStack
administrators often lack control over network infrastructure. Given the latter compli-
cations, you can also prevent MTU problems by reducing the instance MTU to account
for GRE overhead. Determining the proper MTU value often takes experimentation,
but 1454 bytes works in most environments. You can configure the DHCP server that
assigns IP addresses to your instances to also adjust the MTU.](https://image.slidesharecdn.com/openstack-install-guide-apt-kilo-150924070714-lva1-app6891/85/Openstack-install-guide-apt-kilo-84-320.jpg)
![Kilo- Kilo- Kilo- Kilo- Kilo- Kilo- Kilo- Kilo- Kilo- Kilo- Kilo- Kilo- Kilo- Kilo- Kilo- Kil OpenStack Installation Guide for
Ubuntu 14.04
August 27, 2015 kilo
78
Note
Some cloud images ignore the DHCP MTU option in which case you should
configure it using metadata, a script, or another suitable method.
a. Edit the /etc/neutron/dhcp_agent.ini file and complete the following ac-
tion:
• In the [DEFAULT] section, enable the dnsmasq configuration file:
[DEFAULT]
...
dnsmasq_config_file = /etc/neutron/dnsmasq-neutron.conf
b. Create and edit the /etc/neutron/dnsmasq-neutron.conf file and com-
plete the following action:
• Enable the DHCP MTU option (26) and configure it to 1454 bytes:
dhcp-option-force=26,1454
c. Kill any existing dnsmasq processes:
# pkill dnsmasq
To configure the metadata agent
The metadata agent provides configuration information such as credentials to instances.
1. Edit the /etc/neutron/metadata_agent.ini file and complete the following ac-
tions:
a. In the [DEFAULT] section, configure access parameters:
[DEFAULT]
...
auth_uri = http://controller:5000
auth_url = http://controller:35357
auth_region = RegionOne
auth_plugin = password
project_domain_id = default
user_domain_id = default
project_name = service
username = neutron
password = NEUTRON_PASS
Replace NEUTRON_PASS with the password you chose for the neutron user in
the Identity service.
b. In the [DEFAULT] section, configure the metadata host:
[DEFAULT]
...
nova_metadata_ip = controller
c. In the [DEFAULT] section, configure the metadata proxy shared secret:](https://image.slidesharecdn.com/openstack-install-guide-apt-kilo-150924070714-lva1-app6891/85/Openstack-install-guide-apt-kilo-85-320.jpg)
![Kilo- Kilo- Kilo- Kilo- Kilo- Kilo- Kilo- Kilo- Kilo- Kilo- Kilo- Kilo- Kilo- Kilo- Kilo- Kil OpenStack Installation Guide for
Ubuntu 14.04
August 27, 2015 kilo
79
[DEFAULT]
...
metadata_proxy_shared_secret = METADATA_SECRET
Replace METADATA_SECRET with a suitable secret for the metadata proxy.
d. (Optional) To assist with troubleshooting, enable verbose logging in the [DE-
FAULT] section:
[DEFAULT]
...
verbose = True
2. On the controller node, edit the /etc/nova/nova.conf file and complete the fol-
lowing action:
• In the [neutron] section, enable the metadata proxy and configure the secret:
[neutron]
...
service_metadata_proxy = True
metadata_proxy_shared_secret = METADATA_SECRET
Replace METADATA_SECRET with the secret you chose for the metadata proxy.
3. On the controller node, restart the Compute API service:
# service nova-api restart
To configure the Open vSwitch (OVS) service
The OVS service provides the underlying virtual networking framework for instances. The
integration bridge br-int handles internal instance network traffic within OVS. The exter-
nal bridge br-ex handles external instance network traffic within OVS. The external bridge
requires a port on the physical external network interface to provide instances with exter-
nal network access. In essence, this port connects the virtual and physical external networks
in your environment.
1. Restart the OVS service:
# service openvswitch-switch restart
2. Add the external bridge:
# ovs-vsctl add-br br-ex
3. Add a port to the external bridge that connects to the physical external network inter-
face:
Replace INTERFACE_NAME with the actual interface name. For example, eth2 or
ens256.
# ovs-vsctl add-port br-ex INTERFACE_NAME](https://image.slidesharecdn.com/openstack-install-guide-apt-kilo-150924070714-lva1-app6891/85/Openstack-install-guide-apt-kilo-86-320.jpg)

![Kilo- Kilo- Kilo- Kilo- Kilo- Kilo- Kilo- Kilo- Kilo- Kilo- Kilo- Kilo- Kilo- Kilo- Kilo- Kil OpenStack Installation Guide for
Ubuntu 14.04
August 27, 2015 kilo
81
To configure prerequisites
Before you install and configure OpenStack Networking, you must configure certain kernel
networking parameters.
1. Edit the /etc/sysctl.conf file to contain the following parameters:
net.ipv4.conf.all.rp_filter=0
net.ipv4.conf.default.rp_filter=0
net.bridge.bridge-nf-call-iptables=1
net.bridge.bridge-nf-call-ip6tables=1
2. Implement the changes:
# sysctl -p
To install the Networking components
• # apt-get install neutron-plugin-ml2 neutron-plugin-openvswitch-agent
To configure the Networking common components
The Networking common component configuration includes the authentication mecha-
nism, message queue, and plug-in.
Note
Default configuration files vary by distribution. You might need to add these
sections and options rather than modifying existing sections and options. Also,
an ellipsis (...) in the configuration snippets indicates potential default configu-
ration options that you should retain.
• Edit the /etc/neutron/neutron.conf file and complete the following actions:
a. In the [database] section, comment out any connection options because
compute nodes do not directly access the database.
b. In the [DEFAULT] and [oslo_messaging_rabbit] sections, configure Rabbit-
MQ message queue access:
[DEFAULT]
...
rpc_backend = rabbit
[oslo_messaging_rabbit]
...
rabbit_host = controller
rabbit_userid = openstack
rabbit_password = RABBIT_PASS
Replace RABBIT_PASS with the password you chose for the openstack account
in RabbitMQ.
c. In the [DEFAULT] and [keystone_authtoken] sections, configure Identity
service access:](https://image.slidesharecdn.com/openstack-install-guide-apt-kilo-150924070714-lva1-app6891/85/Openstack-install-guide-apt-kilo-88-320.jpg)
![Kilo- Kilo- Kilo- Kilo- Kilo- Kilo- Kilo- Kilo- Kilo- Kilo- Kilo- Kilo- Kilo- Kilo- Kilo- Kil OpenStack Installation Guide for
Ubuntu 14.04
August 27, 2015 kilo
82
[DEFAULT]
...
auth_strategy = keystone
[keystone_authtoken]
...
auth_uri = http://controller:5000
auth_url = http://controller:35357
auth_plugin = password
project_domain_id = default
user_domain_id = default
project_name = service
username = neutron
password = NEUTRON_PASS
Replace NEUTRON_PASS with the password you chose or the neutron user in the
Identity service.
Note
Comment out or remove any other options in the
[keystone_authtoken] section.
d. In the [DEFAULT] section, enable the Modular Layer 2 (ML2) plug-in, router ser-
vice, and overlapping IP addresses:
[DEFAULT]
...
core_plugin = ml2
service_plugins = router
allow_overlapping_ips = True
e. (Optional) To assist with troubleshooting, enable verbose logging in the [DE-
FAULT] section:
[DEFAULT]
...
verbose = True
To configure the Modular Layer 2 (ML2) plug-in
The ML2 plug-in uses the Open vSwitch (OVS) mechanism (agent) to build the virtual net-
working framework for instances.
• Edit the /etc/neutron/plugins/ml2/ml2_conf.ini file and complete the fol-
lowing actions:
a. In the [ml2] section, enable the flat, VLAN, generic routing encapsulation (GRE),
and virtual extensible LAN (VXLAN) network type drivers, GRE tenant networks,
and the OVS mechanism driver:
[ml2]
...
type_drivers = flat,vlan,gre,vxlan
tenant_network_types = gre
mechanism_drivers = openvswitch](https://image.slidesharecdn.com/openstack-install-guide-apt-kilo-150924070714-lva1-app6891/85/Openstack-install-guide-apt-kilo-89-320.jpg)
![Kilo- Kilo- Kilo- Kilo- Kilo- Kilo- Kilo- Kilo- Kilo- Kilo- Kilo- Kilo- Kilo- Kilo- Kilo- Kil OpenStack Installation Guide for
Ubuntu 14.04
August 27, 2015 kilo
83
b. In the [ml2_type_gre] section, configure the tunnel identifier (id) range:
[ml2_type_gre]
...
tunnel_id_ranges = 1:1000
c. In the [securitygroup] section, enable security groups, enable ipset, and con-
figure the OVS iptables firewall driver:
[securitygroup]
...
enable_security_group = True
enable_ipset = True
firewall_driver = neutron.agent.linux.iptables_firewall.
OVSHybridIptablesFirewallDriver
d. In the [ovs] section, enable tunnels and configure the local tunnel endpoint:
[ovs]
...
local_ip = INSTANCE_TUNNELS_INTERFACE_IP_ADDRESS
Replace INSTANCE_TUNNELS_INTERFACE_IP_ADDRESS with the IP address of
the instance tunnels network interface on your compute node.
e. In the [agent] section, enable GRE tunnels:
[agent]
...
tunnel_types = gre
To configure the Open vSwitch (OVS) service
The OVS service provides the underlying virtual networking framework for instances.
• Restart the OVS service:
# service openvswitch-switch restart
To configure Compute to use Networking
By default, distribution packages configure Compute to use legacy networking. You must
reconfigure Compute to manage networks through Networking.
• Edit the /etc/nova/nova.conf file and complete the following actions:
a. In the [DEFAULT] section, configure the APIs and drivers:
[DEFAULT]
...
network_api_class = nova.network.neutronv2.api.API
security_group_api = neutron
linuxnet_interface_driver = nova.network.linux_net.
LinuxOVSInterfaceDriver
firewall_driver = nova.virt.firewall.NoopFirewallDriver](https://image.slidesharecdn.com/openstack-install-guide-apt-kilo-150924070714-lva1-app6891/85/Openstack-install-guide-apt-kilo-90-320.jpg)
![Kilo- Kilo- Kilo- Kilo- Kilo- Kilo- Kilo- Kilo- Kilo- Kilo- Kilo- Kilo- Kilo- Kilo- Kilo- Kil OpenStack Installation Guide for
Ubuntu 14.04
August 27, 2015 kilo
84
Note
By default, Compute uses an internal firewall ser-
vice. Since Networking includes a firewall service, you
must disable the Compute firewall service by using the
nova.virt.firewall.NoopFirewallDriver firewall driver.
b. In the [neutron] section, configure access parameters:
[neutron]
...
url = http://controller:9696
auth_strategy = keystone
admin_auth_url = http://controller:35357/v2.0
admin_tenant_name = service
admin_username = neutron
admin_password = NEUTRON_PASS
Replace NEUTRON_PASS with the password you chose for the neutron user in
the Identity service.
To finalize the installation
1. Restart the Compute service:
# service nova-compute restart
2. Restart the Open vSwitch (OVS) agent:
# service neutron-plugin-openvswitch-agent restart
Verify operation
Note
Perform these commands on the controller node.
1. Source the admin credentials to gain access to admin-only CLI commands:
$ source admin-openrc.sh
2. List agents to verify successful launch of the neutron agents:
$ neutron agent-list
+--------------------------------------+--------------------+----------
+-------+----------------+---------------------------+
| id | agent_type | host |
alive | admin_state_up | binary |
+--------------------------------------+--------------------+----------
+-------+----------------+---------------------------+
| 30275801-e17a-41e4-8f53-9db63544f689 | Metadata agent | network
| :-) | True | neutron-metadata-agent |
| 4bd8c50e-7bad-4f3b-955d-67658a491a15 | Open vSwitch agent | network
| :-) | True | neutron-openvswitch-agent |
| 756e5bba-b70f-4715-b80e-e37f59803d20 | L3 agent | network
| :-) | True | neutron-l3-agent |](https://image.slidesharecdn.com/openstack-install-guide-apt-kilo-150924070714-lva1-app6891/85/Openstack-install-guide-apt-kilo-91-320.jpg)
![Kilo- Kilo- Kilo- Kilo- Kilo- Kilo- Kilo- Kilo- Kilo- Kilo- Kilo- Kilo- Kilo- Kilo- Kilo- Kil OpenStack Installation Guide for
Ubuntu 14.04
August 27, 2015 kilo
85
| 9c45473c-6d6d-4f94-8df1-ebd0b6838d5f | DHCP agent | network
| :-) | True | neutron-dhcp-agent |
| a5a49051-05eb-4b4f-bfc7-d36235fe9131 | Open vSwitch agent | compute1
| :-) | True | neutron-openvswitch-agent |
+--------------------------------------+--------------------+----------
+-------+----------------+---------------------------+
Note
This output should indicate four agents alive on the network node and one
agent alive on the compute node.
Create initial networks
Before launching your first instance, you must create the necessary virtual network infras-
tructure to which the instances connect, including the external network and tenant net-
work. See Figure 6.1, “Initial networks” [86]. After creating this infrastructure, we rec-
ommend that you verify connectivity and resolve any issues before proceeding further. Fig-
ure 6.1, “Initial networks” [86] provides a basic architectural overview of the compo-
nents that Networking implements for the initial networks and shows how network traffic
flows from the instance to the external network or Internet.](https://image.slidesharecdn.com/openstack-install-guide-apt-kilo-150924070714-lva1-app6891/85/Openstack-install-guide-apt-kilo-92-320.jpg)


![Kilo- Kilo- Kilo- Kilo- Kilo- Kilo- Kilo- Kilo- Kilo- Kilo- Kilo- Kilo- Kilo- Kilo- Kilo- Kil OpenStack Installation Guide for
Ubuntu 14.04
August 27, 2015 kilo
91
rtt min/avg/max/mdev = 0.165/0.297/0.619/0.187 ms
Legacy networking (nova-network)
Configure controller node
Legacy networking primarily involves compute nodes. However, you must configure the
controller node to use legacy networking.
To configure legacy networking
1. Edit the /etc/nova/nova.conf file and complete the following actions:
• In the [DEFAULT] section, configure the network and security group APIs:
[DEFAULT]
...
network_api_class = nova.network.api.API
security_group_api = nova
2. Restart the Compute services:
# service nova-api restart
# service nova-scheduler restart
# service nova-conductor restart
Configure compute node
This section covers deployment of a simple flat network that provides IP addresses to your
instances via DHCP. If your environment includes multiple compute nodes, the multi-host
feature provides redundancy by spreading network functions across compute nodes.
To install legacy networking components
• # apt-get install nova-network nova-api-metadata
To configure legacy networking
1. Edit the /etc/nova/nova.conf file and complete the following actions:
• In the [DEFAULT] section, configure the network parameters:
[DEFAULT]
...
network_api_class = nova.network.api.API
security_group_api = nova
firewall_driver = nova.virt.libvirt.firewall.IptablesFirewallDriver
network_manager = nova.network.manager.FlatDHCPManager
network_size = 254
allow_same_net_traffic = False
multi_host = True
send_arp_for_ha = True
share_dhcp_address = True
force_dhcp_release = True
flat_network_bridge = br100](https://image.slidesharecdn.com/openstack-install-guide-apt-kilo-150924070714-lva1-app6891/85/Openstack-install-guide-apt-kilo-98-320.jpg)


![Kilo- Kilo- Kilo- Kilo- Kilo- Kilo- Kilo- Kilo- Kilo- Kilo- Kilo- Kilo- Kilo- Kilo- Kilo- Kil OpenStack Installation Guide for
Ubuntu 14.04
August 27, 2015 kilo
95
Note
To use the VNC client with the dashboard, the browser must support HTML5
Canvas and HTML5 WebSockets.
For details about browsers that support noVNC, see https://github.com/kana-
ka/noVNC/blob/master/README.md, and https://github.com/kanaka/noVNC/
wiki/Browser-support, respectively.
Install and configure
This section describes how to install and configure the dashboard on the controller node.
Before you proceed, verify that your system meets the requirements in the section called
“System requirements” [94]. Also, the dashboard relies on functional core services in-
cluding Identity, Image service, Compute, and either Networking (neutron) or legacy net-
working (nova-network). Environments with stand-alone services such as Object Storage
cannot use the dashboard. For more information, see the developer documentation.
This section assumes proper installation, configuration, and operation of the Identity ser-
vice using the Apache HTTP server and Memcached as described in the section called “In-
stall and configure” [33].
To install the dashboard components
• Install the packages:
# apt-get install openstack-dashboard
Note
Ubuntu installs the openstack-dashboard-ubuntu-theme package as a de-
pendency. Some users reported issues with this theme in previous releases.
If you encounter issues, remove this package to restore the original Open-
Stack theme.
To configure the dashboard
• Edit the /etc/openstack-dashboard/local_settings.py file and complete
the following actions:
a. Configure the dashboard to use OpenStack services on the controller node:
OPENSTACK_HOST = "controller"
b. Allow all hosts to access the dashboard:
ALLOWED_HOSTS = '*'
c. Configure the memcached session storage service:](https://image.slidesharecdn.com/openstack-install-guide-apt-kilo-150924070714-lva1-app6891/85/Openstack-install-guide-apt-kilo-102-320.jpg)


![Kilo- Kilo- Kilo- Kilo- Kilo- Kilo- Kilo- Kilo- Kilo- Kilo- Kilo- Kilo- Kilo- Kilo- Kilo- Kil OpenStack Installation Guide for
Ubuntu 14.04
August 27, 2015 kilo
100
| region | RegionOne |
| service_id | 1e494c3e22a24baaafcaf777d4d467eb |
| service_name | cinder |
| service_type | volume |
+--------------+-----------------------------------------+
$ openstack endpoint create
--publicurl http://controller:8776/v2/%(tenant_id)s
--internalurl http://controller:8776/v2/%(tenant_id)s
--adminurl http://controller:8776/v2/%(tenant_id)s
--region RegionOne
volumev2
+--------------+-----------------------------------------+
| Field | Value |
+--------------+-----------------------------------------+
| adminurl | http://controller:8776/v2/%(tenant_id)s |
| id | 097b4a6fc8ba44b4b10d4822d2d9e076 |
| internalurl | http://controller:8776/v2/%(tenant_id)s |
| publicurl | http://controller:8776/v2/%(tenant_id)s |
| region | RegionOne |
| service_id | 16e038e449c94b40868277f1d801edb5 |
| service_name | cinderv2 |
| service_type | volumev2 |
+--------------+-----------------------------------------+
To install and configure Block Storage controller components
1. Install the packages:
# apt-get install cinder-api cinder-scheduler python-cinderclient
2. Edit the /etc/cinder/cinder.conf file and complete the following actions:
a. In the [database] section, configure database access:
[database]
...
connection = mysql://cinder:CINDER_DBPASS@controller/cinder
Replace CINDER_DBPASS with the password you chose for the Block Storage
database.
b. In the [DEFAULT] and [oslo_messaging_rabbit] sections, configure Rabbit-
MQ message queue access:
[DEFAULT]
...
rpc_backend = rabbit
[oslo_messaging_rabbit]
...
rabbit_host = controller
rabbit_userid = openstack
rabbit_password = RABBIT_PASS
Replace RABBIT_PASS with the password you chose for the openstack account
in RabbitMQ.](https://image.slidesharecdn.com/openstack-install-guide-apt-kilo-150924070714-lva1-app6891/85/Openstack-install-guide-apt-kilo-107-320.jpg)
![Kilo- Kilo- Kilo- Kilo- Kilo- Kilo- Kilo- Kilo- Kilo- Kilo- Kilo- Kilo- Kilo- Kilo- Kilo- Kil OpenStack Installation Guide for
Ubuntu 14.04
August 27, 2015 kilo
101
c. In the [DEFAULT] and [keystone_authtoken] sections, configure Identity
service access:
[DEFAULT]
...
auth_strategy = keystone
[keystone_authtoken]
...
auth_uri = http://controller:5000
auth_url = http://controller:35357
auth_plugin = password
project_domain_id = default
user_domain_id = default
project_name = service
username = cinder
password = CINDER_PASS
Replace CINDER_PASS with the password you chose for the cinder user in the
Identity service.
Note
Comment out or remove any other options in the
[keystone_authtoken] section.
d. In the [DEFAULT] section, configure the my_ip option to use the management
interface IP address of the controller node:
[DEFAULT]
...
my_ip = 10.0.0.11
e. In the [oslo_concurrency] section, configure the lock path:
[oslo_concurrency]
...
lock_path = /var/lock/cinder
f. (Optional) To assist with troubleshooting, enable verbose logging in the [DE-
FAULT] section:
[DEFAULT]
...
verbose = True
3. Populate the Block Storage database:
# su -s /bin/sh -c "cinder-manage db sync" cinder
To finalize installation
1. Restart the Block Storage services:
# service cinder-scheduler restart
# service cinder-api restart
2. By default, the Ubuntu packages create an SQLite database.](https://image.slidesharecdn.com/openstack-install-guide-apt-kilo-150924070714-lva1-app6891/85/Openstack-install-guide-apt-kilo-108-320.jpg)
![Kilo- Kilo- Kilo- Kilo- Kilo- Kilo- Kilo- Kilo- Kilo- Kilo- Kilo- Kilo- Kilo- Kilo- Kilo- Kil OpenStack Installation Guide for
Ubuntu 14.04
August 27, 2015 kilo
102
Because this configuration uses a SQL database server, you can remove the SQLite
database file:
# rm -f /var/lib/cinder/cinder.sqlite
Install and configure a storage node
This section describes how to install and configure storage nodes for the Block Storage
service. For simplicity, this configuration references one storage node with an empty local
block storage device /dev/sdb that contains a suitable partition table with one partition
/dev/sdb1 occupying the entire device. The service provisions logical volumes on this de-
vice using the LVM driver and provides them to instances via iSCSI transport. You can follow
these instructions with minor modifications to horizontally scale your environment with ad-
ditional storage nodes.
To configure prerequisites
You must configure the storage node before you install and configure the volume service
on it. Similar to the controller node, the storage node contains one network interface on
the management network. The storage node also needs an empty block storage device of
suitable size for your environment. For more information, see Chapter 2, “Basic environ-
ment” [11].
1. Configure the management interface:
IP address: 10.0.0.41
Network mask: 255.255.255.0 (or /24)
Default gateway: 10.0.0.1
2. Set the hostname of the node to block1.
3. Copy the contents of the /etc/hosts file from the controller node to the storage
node and add the following to it:
# block1
10.0.0.41 block1
Also add this content to the /etc/hosts file on all other nodes in your environment.
4. Install and configure NTP using the instructions in the section called “Other
nodes” [26].
5. If you intend to use non-raw image types such as QCOW2 and VMDK, install the QEMU
support package:
# apt-get install qemu
6. Install the LVM packages:
# apt-get install lvm2](https://image.slidesharecdn.com/openstack-install-guide-apt-kilo-150924070714-lva1-app6891/85/Openstack-install-guide-apt-kilo-109-320.jpg)
![Kilo- Kilo- Kilo- Kilo- Kilo- Kilo- Kilo- Kilo- Kilo- Kilo- Kilo- Kilo- Kilo- Kilo- Kilo- Kil OpenStack Installation Guide for
Ubuntu 14.04
August 27, 2015 kilo
103
Note
Some distributions include LVM by default.
7. Create the LVM physical volume /dev/sdb1:
# pvcreate /dev/sdb1
Physical volume "/dev/sdb1" successfully created
Note
If your system uses a different device name, adjust these steps accordingly.
8. Create the LVM volume group cinder-volumes:
# vgcreate cinder-volumes /dev/sdb1
Volume group "cinder-volumes" successfully created
The Block Storage service creates logical volumes in this volume group.
9. Only instances can access Block Storage volumes. However, the underlying operating
system manages the devices associated with the volumes. By default, the LVM volume
scanning tool scans the /dev directory for block storage devices that contain volumes.
If projects use LVM on their volumes, the scanning tool detects these volumes and at-
tempts to cache them which can cause a variety of problems with both the underly-
ing operating system and project volumes. You must reconfigure LVM to scan only
the devices that contain the cinder-volume volume group. Edit the /etc/lvm/
lvm.conf file and complete the following actions:
• In the devices section, add a filter that accepts the /dev/sdb device and rejects
all other devices:
devices {
...
filter = [ "a/sdb/", "r/.*/"]
Each item in the filter array begins with a for accept or r for reject and includes a
regular expression for the device name. The array must end with r/.*/ to reject
any remaining devices. You can use the vgs -vvvv command to test filters.
Warning
If your storage nodes use LVM on the operating system disk, you must
also add the associated device to the filter. For example, if the /dev/
sda device contains the operating system:
filter = [ "a/sda/", "a/sdb/", "r/.*/"]
Similarly, if your compute nodes use LVM on the operating system
disk, you must also modify the filter in the /etc/lvm/lvm.conf file
on those nodes to include only the operating system disk. For exam-
ple, if the /dev/sda device contains the operating system:
filter = [ "a/sda/", "r/.*/"]](https://image.slidesharecdn.com/openstack-install-guide-apt-kilo-150924070714-lva1-app6891/85/Openstack-install-guide-apt-kilo-110-320.jpg)
![Kilo- Kilo- Kilo- Kilo- Kilo- Kilo- Kilo- Kilo- Kilo- Kilo- Kilo- Kilo- Kilo- Kilo- Kilo- Kil OpenStack Installation Guide for
Ubuntu 14.04
August 27, 2015 kilo
104
Install and configure Block Storage volume components
1. Install the packages:
# apt-get install cinder-volume python-mysqldb
2. Edit the /etc/cinder/cinder.conf file and complete the following actions:
a. In the [database] section, configure database access:
[database]
...
connection = mysql://cinder:CINDER_DBPASS@controller/cinder
Replace CINDER_DBPASS with the password you chose for the Block Storage
database.
b. In the [DEFAULT] and [oslo_messaging_rabbit] sections, configure Rabbit-
MQ message queue access:
[DEFAULT]
...
rpc_backend = rabbit
[oslo_messaging_rabbit]
...
rabbit_host = controller
rabbit_userid = openstack
rabbit_password = RABBIT_PASS
Replace RABBIT_PASS with the password you chose for the openstack account
in RabbitMQ.
c. In the [DEFAULT] and [keystone_authtoken] sections, configure Identity
service access:
[DEFAULT]
...
auth_strategy = keystone
[keystone_authtoken]
...
auth_uri = http://controller:5000
auth_url = http://controller:35357
auth_plugin = password
project_domain_id = default
user_domain_id = default
project_name = service
username = cinder
password = CINDER_PASS
Replace CINDER_PASS with the password you chose for the cinder user in the
Identity service.
Note
Comment out or remove any other options in the
[keystone_authtoken] section.](https://image.slidesharecdn.com/openstack-install-guide-apt-kilo-150924070714-lva1-app6891/85/Openstack-install-guide-apt-kilo-111-320.jpg)
![Kilo- Kilo- Kilo- Kilo- Kilo- Kilo- Kilo- Kilo- Kilo- Kilo- Kilo- Kilo- Kilo- Kilo- Kilo- Kil OpenStack Installation Guide for
Ubuntu 14.04
August 27, 2015 kilo
105
d. In the [DEFAULT] section, configure the my_ip option:
[DEFAULT]
...
my_ip = MANAGEMENT_INTERFACE_IP_ADDRESS
Replace MANAGEMENT_INTERFACE_IP_ADDRESS with the IP address of the
management network interface on your storage node, typically 10.0.0.41 for the
first node in the example architecture.
e. In the [lvm] section, configure the LVM back end with the LVM driver, cin-
der-volumes volume group, iSCSI protocol, and appropriate iSCSI service:
[lvm]
...
volume_driver = cinder.volume.drivers.lvm.LVMVolumeDriver
volume_group = cinder-volumes
iscsi_protocol = iscsi
iscsi_helper = tgtadm
f. In the [DEFAULT] section, enable the LVM back end:
[DEFAULT]
...
enabled_backends = lvm
Note
Back-end names are arbitrary. As an example, this guide uses the
name of the driver as the name of the back end.
g. In the [DEFAULT] section, configure the location of the Image service:
[DEFAULT]
...
glance_host = controller
h. In the [oslo_concurrency] section, configure the lock path:
[oslo_concurrency]
...
lock_path = /var/lock/cinder
i. (Optional) To assist with troubleshooting, enable verbose logging in the [DE-
FAULT] section:
[DEFAULT]
...
verbose = True
To finalize installation
1. Restart the Block Storage volume service including its dependencies:
# service tgt restart
# service cinder-volume restart](https://image.slidesharecdn.com/openstack-install-guide-apt-kilo-150924070714-lva1-app6891/85/Openstack-install-guide-apt-kilo-112-320.jpg)
![Kilo- Kilo- Kilo- Kilo- Kilo- Kilo- Kilo- Kilo- Kilo- Kilo- Kilo- Kilo- Kilo- Kilo- Kilo- Kil OpenStack Installation Guide for
Ubuntu 14.04
August 27, 2015 kilo
106
2. By default, the Ubuntu packages create an SQLite database. Because this configuration
uses a SQL database server, remove the SQLite database file:
# rm -f /var/lib/cinder/cinder.sqlite
Verify operation
This section describes how to verify operation of the Block Storage service by creating a vol-
ume.
For more information about how to manage volumes, see the OpenStack User Guide.
Note
Perform these commands on the controller node.
1. In each client environment script, configure the Block Storage client to use API version
2.0:
$ echo "export OS_VOLUME_API_VERSION=2" | tee -a admin-openrc.sh demo-
openrc.sh
2. Source the admin credentials to gain access to admin-only CLI commands:
$ source admin-openrc.sh
3. List service components to verify successful launch of each process:
$ cinder service-list
+------------------+------------+------+---------+-------
+----------------------------+-----------------+
| Binary | Host | Zone | Status | State |
Updated_at | Disabled Reason |
+------------------+------------+------+---------+-------
+----------------------------+-----------------+
| cinder-scheduler | controller | nova | enabled | up |
2014-10-18T01:30:54.000000 | None |
| cinder-volume | block1@lvm | nova | enabled | up |
2014-10-18T01:30:57.000000 | None |
+------------------+------------+------+---------+-------
+----------------------------+-----------------+
4. Source the demo credentials to perform the following steps as a non-administrative
project:
$ source demo-openrc.sh
5. Create a 1 GB volume:
$ cinder create --name demo-volume1 1
+---------------------------------------
+--------------------------------------+
| Property | Value
|
+---------------------------------------
+--------------------------------------+
| attachments | []
|](https://image.slidesharecdn.com/openstack-install-guide-apt-kilo-150924070714-lva1-app6891/85/Openstack-install-guide-apt-kilo-113-320.jpg)


![Kilo- Kilo- Kilo- Kilo- Kilo- Kilo- Kilo- Kilo- Kilo- Kilo- Kilo- Kilo- Kilo- Kilo- Kilo- Kil OpenStack Installation Guide for
Ubuntu 14.04
August 27, 2015 kilo
110
Install and configure the controller node
This section describes how to install and configure the proxy service that handles requests
for the account, container, and object services operating on the storage nodes. For simplici-
ty, this guide installs and configures the proxy service on the controller node. However, you
can run the proxy service on any node with network connectivity to the storage nodes. Ad-
ditionally, you can install and configure the proxy service on multiple nodes to increase per-
formance and redundancy. For more information, see the Deployment Guide.
To configure prerequisites
The proxy service relies on an authentication and authorization mechanism such as the
Identity service. However, unlike other services, it also offers an internal mechanism that al-
lows it to operate without any other OpenStack services. However, for simplicity, this guide
references the Identity service in Chapter 3, “Add the Identity service” [31]. Before you con-
figure the Object Storage service, you must create service credentials and an API endpoint.
Note
The Object Storage service does not use a SQL database on the controller node.
Instead, it uses distributed SQLite databases on each storage node.
1. Source the admin credentials to gain access to admin-only CLI commands:
$ source admin-openrc.sh
2. To create the Identity service credentials, complete these steps:
a. Create the swift user:
$ openstack user create --password-prompt swift
User Password:
Repeat User Password:
+----------+----------------------------------+
| Field | Value |
+----------+----------------------------------+
| email | None |
| enabled | True |
| id | d535e5cbd2b74ac7bfb97db9cced3ed6 |
| name | swift |
| username | swift |
+----------+----------------------------------+
b. Add the admin role to the swift user:
$ openstack role add --project service --user swift admin
+-------+----------------------------------+
| Field | Value |
+-------+----------------------------------+
| id | cd2cb9a39e874ea69e5d4b896eb16128 |
| name | admin |
+-------+----------------------------------+
c. Create the swift service entity:](https://image.slidesharecdn.com/openstack-install-guide-apt-kilo-150924070714-lva1-app6891/85/Openstack-install-guide-apt-kilo-117-320.jpg)

![Kilo- Kilo- Kilo- Kilo- Kilo- Kilo- Kilo- Kilo- Kilo- Kilo- Kilo- Kilo- Kilo- Kilo- Kilo- Kil OpenStack Installation Guide for
Ubuntu 14.04
August 27, 2015 kilo
112
# curl -o /etc/swift/proxy-server.conf
https://git.openstack.org/cgit/openstack/swift/plain/etc/proxy-server.
conf-sample?h=stable/kilo
4. Edit the /etc/swift/proxy-server.conf file and complete the following actions:
a. In the [DEFAULT] section, configure the bind port, user, and configuration direc-
tory:
[DEFAULT]
...
bind_port = 8080
user = swift
swift_dir = /etc/swift
b. In the [pipeline:main] section, enable the appropriate modules:
[pipeline:main]
pipeline = catch_errors gatekeeper healthcheck proxy-logging cache
container_sync bulk ratelimit authtoken keystoneauth container-quotas
account-quotas slo dlo proxy-logging proxy-server
Note
For more information on other modules that enable additional fea-
tures, see the Deployment Guide.
c. In the [app:proxy-server] section, enable automatic account creation:
[app:proxy-server]
...
account_autocreate = true
d. In the [filter:keystoneauth] section, configure the operator roles:
[filter:keystoneauth]
use = egg:swift#keystoneauth
...
operator_roles = admin,user
e. In the [filter:authtoken] section, configure Identity service access:
[filter:authtoken]
paste.filter_factory = keystonemiddleware.auth_token:filter_factory
...
auth_uri = http://controller:5000
auth_url = http://controller:35357
auth_plugin = password
project_domain_id = default
user_domain_id = default
project_name = service
username = swift
password = SWIFT_PASS
delay_auth_decision = true
Replace SWIFT_PASS with the password you chose for the swift user in the
Identity service.](https://image.slidesharecdn.com/openstack-install-guide-apt-kilo-150924070714-lva1-app6891/85/Openstack-install-guide-apt-kilo-119-320.jpg)
![Kilo- Kilo- Kilo- Kilo- Kilo- Kilo- Kilo- Kilo- Kilo- Kilo- Kilo- Kilo- Kilo- Kilo- Kilo- Kil OpenStack Installation Guide for
Ubuntu 14.04
August 27, 2015 kilo
113
Note
Comment out or remove any other options in the
[filter:authtoken] section.
f. In the [filter:cache] section, configure the memcached location:
[filter:cache]
...
memcache_servers = 127.0.0.1:11211
Install and configure the storage nodes
This section describes how to install and configure storage nodes that operate the account,
container, and object services. For simplicity, this configuration references two storage
nodes, each containing two empty local block storage devices. Each of the devices, /dev/
sdb and /dev/sdc, must contain a suitable partition table with one partition occupying
the entire device. Although the Object Storage service supports any file system with extend-
ed attributes (xattr), testing and benchmarking indicate the best performance and reliabili-
ty on XFS. For more information on horizontally scaling your environment, see the Deploy-
ment Guide.
To configure prerequisites
You must configure each storage node before you install and configure the Object Storage
service on it. Similar to the controller node, each storage node contains one network inter-
face on the management network. Optionally, each storage node can contain a second net-
work interface on a separate network for replication. For more information, see Chapter 2,
“Basic environment” [11].
1. Configure unique items on the first storage node:
a. Configure the management interface:
IP address: 10.0.0.51
Network mask: 255.255.255.0 (or /24)
Default gateway: 10.0.0.1
b. Set the hostname of the node to object1.
2. Configure unique items on the second storage node:
a. Configure the management interface:
IP address: 10.0.0.52
Network mask: 255.255.255.0 (or /24)
Default gateway: 10.0.0.1
b. Set the hostname of the node to object2.](https://image.slidesharecdn.com/openstack-install-guide-apt-kilo-150924070714-lva1-app6891/85/Openstack-install-guide-apt-kilo-120-320.jpg)
![Kilo- Kilo- Kilo- Kilo- Kilo- Kilo- Kilo- Kilo- Kilo- Kilo- Kilo- Kilo- Kilo- Kilo- Kilo- Kil OpenStack Installation Guide for
Ubuntu 14.04
August 27, 2015 kilo
114
3. Configure shared items on both storage nodes:
a. Copy the contents of the /etc/hosts file from the controller node and add the
following to it:
# object1
10.0.0.51 object1
# object2
10.0.0.52 object2
Also add this content to the /etc/hosts file on all other nodes in your environ-
ment.
b. Install and configure NTP using the instructions in the section called “Other
nodes” [26].
c. Install the supporting utility packages:
# apt-get install xfsprogs rsync
d. Format the /dev/sdb1 and /dev/sdc1 partitions as XFS:
# mkfs.xfs /dev/sdb1
# mkfs.xfs /dev/sdc1
e. Create the mount point directory structure:
# mkdir -p /srv/node/sdb1
# mkdir -p /srv/node/sdc1
f. Edit the /etc/fstab file and add the following to it:
/dev/sdb1 /srv/node/sdb1 xfs noatime,nodiratime,nobarrier,logbufs=8 0
2
/dev/sdc1 /srv/node/sdc1 xfs noatime,nodiratime,nobarrier,logbufs=8 0
2
g. Mount the devices:
# mount /srv/node/sdb1
# mount /srv/node/sdc1
4. Edit the /etc/rsyncd.conf file and add the following to it:
uid = swift
gid = swift
log file = /var/log/rsyncd.log
pid file = /var/run/rsyncd.pid
address = MANAGEMENT_INTERFACE_IP_ADDRESS
[account]
max connections = 2
path = /srv/node/
read only = false
lock file = /var/lock/account.lock
[container]
max connections = 2](https://image.slidesharecdn.com/openstack-install-guide-apt-kilo-150924070714-lva1-app6891/85/Openstack-install-guide-apt-kilo-121-320.jpg)
![Kilo- Kilo- Kilo- Kilo- Kilo- Kilo- Kilo- Kilo- Kilo- Kilo- Kilo- Kilo- Kilo- Kilo- Kilo- Kil OpenStack Installation Guide for
Ubuntu 14.04
August 27, 2015 kilo
115
path = /srv/node/
read only = false
lock file = /var/lock/container.lock
[object]
max connections = 2
path = /srv/node/
read only = false
lock file = /var/lock/object.lock
Replace MANAGEMENT_INTERFACE_IP_ADDRESS with the IP address of the manage-
ment network on the storage node.
Note
The rsync service requires no authentication, so consider running it on a
private network.
5. Edit the /etc/default/rsync file and enable the rsync service:
RSYNC_ENABLE=true
6. Start the rsync service:
# service rsync start
Install and configure storage node components
Note
Default configuration files vary by distribution. You might need to add these
sections and options rather than modifying existing sections and options. Also,
an ellipsis (...) in the configuration snippets indicates potential default configu-
ration options that you should retain.
Note
Perform these steps on each storage node.
1. Install the packages:
# apt-get install swift swift-account swift-container swift-object
2. Obtain the accounting, container, object, container-reconciler, and object-expirer ser-
vice configuration files from the Object Storage source repository:
# curl -o /etc/swift/account-server.conf
https://git.openstack.org/cgit/openstack/swift/plain/etc/account-server.
conf-sample?h=stable/kilo
# curl -o /etc/swift/container-server.conf
https://git.openstack.org/cgit/openstack/swift/plain/etc/container-
server.conf-sample?h=stable/kilo
# curl -o /etc/swift/object-server.conf
https://git.openstack.org/cgit/openstack/swift/plain/etc/object-server.
conf-sample?h=stable/kilo](https://image.slidesharecdn.com/openstack-install-guide-apt-kilo-150924070714-lva1-app6891/85/Openstack-install-guide-apt-kilo-122-320.jpg)
![Kilo- Kilo- Kilo- Kilo- Kilo- Kilo- Kilo- Kilo- Kilo- Kilo- Kilo- Kilo- Kilo- Kilo- Kilo- Kil OpenStack Installation Guide for
Ubuntu 14.04
August 27, 2015 kilo
116
# curl -o /etc/swift/container-reconciler.conf
https://git.openstack.org/cgit/openstack/swift/plain/etc/container-
reconciler.conf-sample?h=stable/kilo
# curl -o /etc/swift/object-expirer.conf
https://git.openstack.org/cgit/openstack/swift/plain/etc/object-expirer.
conf-sample?h=stable/kilo
3. Edit the /etc/swift/account-server.conf file and complete the following ac-
tions:
a. In the [DEFAULT] section, configure the bind IP address, bind port, user, configu-
ration directory, and mount point directory:
[DEFAULT]
...
bind_ip = MANAGEMENT_INTERFACE_IP_ADDRESS
bind_port = 6002
user = swift
swift_dir = /etc/swift
devices = /srv/node
Replace MANAGEMENT_INTERFACE_IP_ADDRESS with the IP address of the
management network on the storage node.
b. In the [pipeline:main] section, enable the appropriate modules:
[pipeline:main]
pipeline = healthcheck recon account-server
Note
For more information on other modules that enable additional fea-
tures, see the Deployment Guide.
c. In the [filter:recon] section, configure the recon (metrics) cache directory:
[filter:recon]
...
recon_cache_path = /var/cache/swift
4. Edit the /etc/swift/container-server.conf file and complete the following
actions:
a. In the [DEFAULT] section, configure the bind IP address, bind port, user, configu-
ration directory, and mount point directory:
[DEFAULT]
...
bind_ip = MANAGEMENT_INTERFACE_IP_ADDRESS
bind_port = 6001
user = swift
swift_dir = /etc/swift
devices = /srv/node
Replace MANAGEMENT_INTERFACE_IP_ADDRESS with the IP address of the
management network on the storage node.](https://image.slidesharecdn.com/openstack-install-guide-apt-kilo-150924070714-lva1-app6891/85/Openstack-install-guide-apt-kilo-123-320.jpg)
![Kilo- Kilo- Kilo- Kilo- Kilo- Kilo- Kilo- Kilo- Kilo- Kilo- Kilo- Kilo- Kilo- Kilo- Kilo- Kil OpenStack Installation Guide for
Ubuntu 14.04
August 27, 2015 kilo
117
b. In the [pipeline:main] section, enable the appropriate modules:
[pipeline:main]
pipeline = healthcheck recon container-server
Note
For more information on other modules that enable additional fea-
tures, see the Deployment Guide.
c. In the [filter:recon] section, configure the recon (metrics) cache directory:
[filter:recon]
...
recon_cache_path = /var/cache/swift
5. Edit the /etc/swift/object-server.conf file and complete the following ac-
tions:
a. In the [DEFAULT] section, configure the bind IP address, bind port, user, configu-
ration directory, and mount point directory:
[DEFAULT]
...
bind_ip = MANAGEMENT_INTERFACE_IP_ADDRESS
bind_port = 6000
user = swift
swift_dir = /etc/swift
devices = /srv/node
Replace MANAGEMENT_INTERFACE_IP_ADDRESS with the IP address of the
management network on the storage node.
b. In the [pipeline:main] section, enable the appropriate modules:
[pipeline:main]
pipeline = healthcheck recon object-server
Note
For more information on other modules that enable additional fea-
tures, see the Deployment Guide.
c. In the [filter:recon] section, configure the recon (metrics) cache and lock di-
rectories:
[filter:recon]
...
recon_cache_path = /var/cache/swift
recon_lock_path = /var/lock
6. Ensure proper ownership of the mount point directory structure:
# chown -R swift:swift /srv/node
7. Create the recon directory and ensure proper ownership of it:](https://image.slidesharecdn.com/openstack-install-guide-apt-kilo-150924070714-lva1-app6891/85/Openstack-install-guide-apt-kilo-124-320.jpg)
![Kilo- Kilo- Kilo- Kilo- Kilo- Kilo- Kilo- Kilo- Kilo- Kilo- Kilo- Kilo- Kilo- Kilo- Kilo- Kil OpenStack Installation Guide for
Ubuntu 14.04
August 27, 2015 kilo
118
# mkdir -p /var/cache/swift
# chown -R swift:swift /var/cache/swift
Create initial rings
Before starting the Object Storage services, you must create the initial account, contain-
er, and object rings. The ring builder creates configuration files that each node uses to de-
termine and deploy the storage architecture. For simplicity, this guide uses one region and
zone with 2^10 (1024) maximum partitions, 3 replicas of each object, and 1 hour minimum
time between moving a partition more than once. For Object Storage, a partition indicates
a directory on a storage device rather than a conventional partition table. For more infor-
mation, see the Deployment Guide.
Account ring
The account server uses the account ring to maintain lists of containers.
To create the ring
Note
Perform these steps on the controller node.
1. Change to the /etc/swift directory.
2. Create the base account.builder file:
# swift-ring-builder account.builder create 10 3 1
Note
This command provides no output.
3. Add each storage node to the ring:
# swift-ring-builder account.builder
add
r1z1-STORAGE_NODE_MANAGEMENT_INTERFACE_IP_ADDRESS:6002/DEVICE_NAME DEVICE_WEIGHT
Replace STORAGE_NODE_MANAGEMENT_INTERFACE_IP_ADDRESS with the IP ad-
dress of the management network on the storage node. Replace DEVICE_NAME with
a storage device name on the same storage node. For example, using the first storage
node in the section called “Install and configure the storage nodes” [113] with the /
dev/sdb1 storage device and weight of 100:
# swift-ring-builder account.builder add r1z1-10.0.0.51:6002/sdb1 100
Repeat this command for each storage device on each storage node. In the example
architecture, use the command in four variations:
# swift-ring-builder account.builder add r1z1-10.0.0.51:6002/sdb1 100
Device d0r1z1-10.0.0.51:6002R10.0.0.51:6002/sdb1_"" with 100.0 weight got
id 0](https://image.slidesharecdn.com/openstack-install-guide-apt-kilo-150924070714-lva1-app6891/85/Openstack-install-guide-apt-kilo-125-320.jpg)

![Kilo- Kilo- Kilo- Kilo- Kilo- Kilo- Kilo- Kilo- Kilo- Kilo- Kilo- Kilo- Kilo- Kilo- Kilo- Kil OpenStack Installation Guide for
Ubuntu 14.04
August 27, 2015 kilo
120
# swift-ring-builder container.builder
add
r1z1-STORAGE_NODE_MANAGEMENT_INTERFACE_IP_ADDRESS:6001/DEVICE_NAME DEVICE_WEIGHT
Replace STORAGE_NODE_MANAGEMENT_INTERFACE_IP_ADDRESS with the IP ad-
dress of the management network on the storage node. Replace DEVICE_NAME with
a storage device name on the same storage node. For example, using the first storage
node in the section called “Install and configure the storage nodes” [113] with the /
dev/sdb1 storage device and weight of 100:
# swift-ring-builder container.builder add r1z1-10.0.0.51:6001/sdb1 100
Repeat this command for each storage device on each storage node. In the example
architecture, use the command in four variations:
# swift-ring-builder container.builder add r1z1-10.0.0.51:6001/sdb1 100
Device d0r1z1-10.0.0.51:6001R10.0.0.51:6001/sdb1_"" with 100.0 weight got
id 0
# swift-ring-builder container.builder add r1z2-10.0.0.51:6001/sdc1 100
Device d1r1z2-10.0.0.51:6001R10.0.0.51:6001/sdc1_"" with 100.0 weight got
id 1
# swift-ring-builder container.builder add r1z3-10.0.0.52:6001/sdb1 100
Device d2r1z3-10.0.0.52:6001R10.0.0.52:6001/sdb1_"" with 100.0 weight got
id 2
# swift-ring-builder container.builder add r1z4-10.0.0.52:6001/sdc1 100
Device d3r1z4-10.0.0.52:6001R10.0.0.52:6001/sdc1_"" with 100.0 weight got
id 3
4. Verify the ring contents:
# swift-ring-builder container.builder
container.builder, build version 4
1024 partitions, 3.000000 replicas, 1 regions, 4 zones, 4 devices, 100.00
balance, 0.00 dispersion
The minimum number of hours before a partition can be reassigned is 1
The overload factor is 0.00% (0.000000)
Devices: id region zone ip address port replication ip
replication port name weight partitions balance meta
0 1 1 10.0.0.51 6001 10.0.0.51
6001 sdb1 100.00 0 -100.00
1 1 2 10.0.0.51 6001 10.0.0.51
6001 sdc1 100.00 0 -100.00
2 1 3 10.0.0.52 6001 10.0.0.52
6001 sdb1 100.00 0 -100.00
3 1 4 10.0.0.52 6001 10.0.0.52
6001 sdc1 100.00 0 -100.00
5. Rebalance the ring:
# swift-ring-builder container.builder rebalance
Reassigned 1024 (100.00%) partitions. Balance is now 0.00. Dispersion is
now 0.00
Object ring
The object server uses the object ring to maintain lists of object locations on local devices.](https://image.slidesharecdn.com/openstack-install-guide-apt-kilo-150924070714-lva1-app6891/85/Openstack-install-guide-apt-kilo-127-320.jpg)
![Kilo- Kilo- Kilo- Kilo- Kilo- Kilo- Kilo- Kilo- Kilo- Kilo- Kilo- Kilo- Kilo- Kilo- Kilo- Kil OpenStack Installation Guide for
Ubuntu 14.04
August 27, 2015 kilo
121
To create the ring
Note
Perform these steps on the controller node.
1. Change to the /etc/swift directory.
2. Create the base object.builder file:
# swift-ring-builder object.builder create 10 3 1
Note
This command provides no output.
3. Add each storage node to the ring:
# swift-ring-builder object.builder
add
r1z1-STORAGE_NODE_MANAGEMENT_INTERFACE_IP_ADDRESS:6000/DEVICE_NAME DEVICE_WEIGHT
Replace STORAGE_NODE_MANAGEMENT_INTERFACE_IP_ADDRESS with the IP ad-
dress of the management network on the storage node. Replace DEVICE_NAME with
a storage device name on the same storage node. For example, using the first storage
node in the section called “Install and configure the storage nodes” [113] with the /
dev/sdb1 storage device and weight of 100:
# swift-ring-builder object.builder add r1z1-10.0.0.51:6000/sdb1 100
Repeat this command for each storage device on each storage node. In the example
architecture, use the command in four variations:
# swift-ring-builder object.builder add r1z1-10.0.0.51:6000/sdb1 100
Device d0r1z1-10.0.0.51:6000R10.0.0.51:6000/sdb1_"" with 100.0 weight got
id 0
# swift-ring-builder object.builder add r1z2-10.0.0.51:6000/sdc1 100
Device d1r1z2-10.0.0.51:6000R10.0.0.51:6000/sdc1_"" with 100.0 weight got
id 1
# swift-ring-builder object.builder add r1z3-10.0.0.52:6000/sdb1 100
Device d2r1z3-10.0.0.52:6000R10.0.0.52:6000/sdb1_"" with 100.0 weight got
id 2
# swift-ring-builder object.builder add r1z4-10.0.0.52:6000/sdc1 100
Device d3r1z4-10.0.0.52:6000R10.0.0.52:6000/sdc1_"" with 100.0 weight got
id 3
4. Verify the ring contents:
# swift-ring-builder object.builder
object.builder, build version 4
1024 partitions, 3.000000 replicas, 1 regions, 4 zones, 4 devices, 100.00
balance, 0.00 dispersion
The minimum number of hours before a partition can be reassigned is 1
The overload factor is 0.00% (0.000000)
Devices: id region zone ip address port replication ip
replication port name weight partitions balance meta
0 1 1 10.0.0.51 6000 10.0.0.51
6000 sdb1 100.00 0 -100.00](https://image.slidesharecdn.com/openstack-install-guide-apt-kilo-150924070714-lva1-app6891/85/Openstack-install-guide-apt-kilo-128-320.jpg)
![Kilo- Kilo- Kilo- Kilo- Kilo- Kilo- Kilo- Kilo- Kilo- Kilo- Kilo- Kilo- Kilo- Kilo- Kilo- Kil OpenStack Installation Guide for
Ubuntu 14.04
August 27, 2015 kilo
122
1 1 2 10.0.0.51 6000 10.0.0.51
6000 sdc1 100.00 0 -100.00
2 1 3 10.0.0.52 6000 10.0.0.52
6000 sdb1 100.00 0 -100.00
3 1 4 10.0.0.52 6000 10.0.0.52
6000 sdc1 100.00 0 -100.00
5. Rebalance the ring:
# swift-ring-builder object.builder rebalance
Reassigned 1024 (100.00%) partitions. Balance is now 0.00. Dispersion is
now 0.00
Distribute ring configuration files
Copy the account.ring.gz, container.ring.gz, and object.ring.gz files to the
/etc/swift directory on each storage node and any additional nodes running the proxy
service.
Finalize installation
Configure hashes and default storage policy
Note
Default configuration files vary by distribution. You might need to add these
sections and options rather than modifying existing sections and options. Also,
an ellipsis (...) in the configuration snippets indicates potential default configu-
ration options that you should retain.
1. Obtain the /etc/swift/swift.conf file from the Object Storage source reposito-
ry:
# curl -o /etc/swift/swift.conf
https://git.openstack.org/cgit/openstack/swift/plain/etc/swift.conf-
sample?h=stable/kilo
2. Edit the /etc/swift/swift.conf file and complete the following actions:
a. In the [swift-hash] section, configure the hash path prefix and suffix for your
environment.
[swift-hash]
...
swift_hash_path_suffix = HASH_PATH_PREFIX
swift_hash_path_prefix = HASH_PATH_SUFFIX
Replace HASH_PATH_PREFIX and HASH_PATH_SUFFIX with unique values.
Warning
Keep these values secret and do not change or lose them.
b. In the [storage-policy:0] section, configure the default storage policy:](https://image.slidesharecdn.com/openstack-install-guide-apt-kilo-150924070714-lva1-app6891/85/Openstack-install-guide-apt-kilo-129-320.jpg)
![Kilo- Kilo- Kilo- Kilo- Kilo- Kilo- Kilo- Kilo- Kilo- Kilo- Kilo- Kilo- Kilo- Kilo- Kilo- Kil OpenStack Installation Guide for
Ubuntu 14.04
August 27, 2015 kilo
123
[storage-policy:0]
...
name = Policy-0
default = yes
3. Copy the swift.conf file to the /etc/swift directory on each storage node and
any additional nodes running the proxy service.
4. On all nodes, ensure proper ownership of the configuration directory:
# chown -R swift:swift /etc/swift
5. On the controller node and any other nodes running the proxy service, restart the Ob-
ject Storage proxy service including its dependencies:
# service memcached restart
# service swift-proxy restart
6. On the storage nodes, start the Object Storage services:
# swift-init all start
Note
The storage node runs many Object Storage services and the swift-init
command makes them easier to manage. You can ignore errors from ser-
vices not running on the storage node.
Verify operation
This section describes how to verify operation of the Object Storage service.
Note
The swift client requires the -V 3 parameter to use the Identity version 3
API.
Note
Perform these steps on the controller node.
1. Source the demo credentials:
$ source demo-openrc.sh
2. Show the service status:
$ swift -V 3 stat
Account: AUTH_c75cafb58f5049b8a976506737210756
Containers: 0
Objects: 0
Bytes: 0
X-Put-Timestamp: 1429736713.92936
X-Timestamp: 1429736713.92936
X-Trans-Id: txdea07add01ca4dbdb49a2-0055380d09](https://image.slidesharecdn.com/openstack-install-guide-apt-kilo-150924070714-lva1-app6891/85/Openstack-install-guide-apt-kilo-130-320.jpg)
![Kilo- Kilo- Kilo- Kilo- Kilo- Kilo- Kilo- Kilo- Kilo- Kilo- Kilo- Kilo- Kilo- Kilo- Kilo- Kil OpenStack Installation Guide for
Ubuntu 14.04
August 27, 2015 kilo
124
Content-Type: text/plain; charset=utf-8
3. Upload a test file:
$ swift -V 3 upload demo-container1 FILE
FILE
Replace FILE with the name of a local file to upload to the demo-container1 con-
tainer.
4. List containers:
$ swift -V 3 list
demo-container1
5. Download a test file:
$ swift -V 3 download demo-container1 FILE
FILE [auth 0.295s, headers 0.339s, total 0.339s, 0.005 MB/s]
Replace FILE with the name of the file uploaded to the demo-container1 contain-
er.
Next steps
Your OpenStack environment now includes Object Storage. You can launch an instance or
add more services to your environment in the following chapters.](https://image.slidesharecdn.com/openstack-install-guide-apt-kilo-150924070714-lva1-app6891/85/Openstack-install-guide-apt-kilo-131-320.jpg)


![Kilo- Kilo- Kilo- Kilo- Kilo- Kilo- Kilo- Kilo- Kilo- Kilo- Kilo- Kilo- Kilo- Kilo- Kilo- Kil OpenStack Installation Guide for
Ubuntu 14.04
August 27, 2015 kilo
128
| enabled | True |
| id | 297740d74c0a446bbff867acdccb33fa |
| name | heat-cfn |
| type | cloudformation |
+-------------+----------------------------------+
4. Create the Orchestration service API endpoints:
$ openstack endpoint create
--publicurl http://controller:8004/v1/%(tenant_id)s
--internalurl http://controller:8004/v1/%(tenant_id)s
--adminurl http://controller:8004/v1/%(tenant_id)s
--region RegionOne
orchestration
+--------------+-----------------------------------------+
| Field | Value |
+--------------+-----------------------------------------+
| adminurl | http://controller:8004/v1/%(tenant_id)s |
| id | f41225f665694b95a46448e8676b0dc2 |
| internalurl | http://controller:8004/v1/%(tenant_id)s |
| publicurl | http://controller:8004/v1/%(tenant_id)s |
| region | RegionOne |
| service_id | 031112165cad4c2bb23e84603957de29 |
| service_name | heat |
| service_type | orchestration |
+--------------+-----------------------------------------+
$ openstack endpoint create
--publicurl http://controller:8000/v1
--internalurl http://controller:8000/v1
--adminurl http://controller:8000/v1
--region RegionOne
cloudformation
+--------------+----------------------------------+
| Field | Value |
+--------------+----------------------------------+
| adminurl | http://controller:8000/v1 |
| id | f41225f665694b95a46448e8676b0dc2 |
| internalurl | http://controller:8000/v1 |
| publicurl | http://controller:8000/v1 |
| region | RegionOne |
| service_id | 297740d74c0a446bbff867acdccb33fa |
| service_name | heat-cfn |
| service_type | cloudformation |
+--------------+----------------------------------+
To install and configure the Orchestration components
1. Run the following commands to install the packages:
# apt-get install heat-api heat-api-cfn heat-engine python-heatclient
2. Edit the /etc/heat/heat.conf file and complete the following actions:
a. In the [database] section, configure database access:
[database]
...
connection = mysql://heat:HEAT_DBPASS@controller/heat](https://image.slidesharecdn.com/openstack-install-guide-apt-kilo-150924070714-lva1-app6891/85/Openstack-install-guide-apt-kilo-135-320.jpg)
![Kilo- Kilo- Kilo- Kilo- Kilo- Kilo- Kilo- Kilo- Kilo- Kilo- Kilo- Kilo- Kilo- Kilo- Kilo- Kil OpenStack Installation Guide for
Ubuntu 14.04
August 27, 2015 kilo
129
Replace HEAT_DBPASS with the password you chose for the Orchestration
database.
b. In the [DEFAULT] and [oslo_messaging_rabbit] sections, configure Rabbit-
MQ message queue access:
[DEFAULT]
...
rpc_backend = rabbit
[oslo_messaging_rabbit]
...
rabbit_host = controller
rabbit_userid = openstack
rabbit_password = RABBIT_PASS
Replace RABBIT_PASS with the password you chose for the openstack account
in RabbitMQ.
c. In the [keystone_authtoken] and [ec2authtoken] sections, configure
Identity service access:
[keystone_authtoken]
...
auth_uri = http://controller:5000/v2.0
identity_uri = http://controller:35357
admin_tenant_name = service
admin_user = heat
admin_password = HEAT_PASS
[ec2authtoken]
...
auth_uri = http://controller:5000/v2.0
Replace HEAT_PASS with the password you chose for the heat user in the Identi-
ty service.
Note
Comment out any auth_host, auth_port, and auth_protocol
options because the identity_uri option replaces them.
d. In the [DEFAULT] section, configure the metadata and wait condition URLs:
[DEFAULT]
...
heat_metadata_server_url = http://controller:8000
heat_waitcondition_server_url = http://controller:8000/v1/
waitcondition
e. In the [DEFAULT] section, configure information about the heat Identity service
domain:](https://image.slidesharecdn.com/openstack-install-guide-apt-kilo-150924070714-lva1-app6891/85/Openstack-install-guide-apt-kilo-136-320.jpg)
![Kilo- Kilo- Kilo- Kilo- Kilo- Kilo- Kilo- Kilo- Kilo- Kilo- Kilo- Kilo- Kilo- Kilo- Kilo- Kil OpenStack Installation Guide for
Ubuntu 14.04
August 27, 2015 kilo
130
[DEFAULT]
...
stack_domain_admin = heat_domain_admin
stack_domain_admin_password = HEAT_DOMAIN_PASS
stack_user_domain_name = heat_user_domain
Replace HEAT_DOMAIN_PASS with the password you chose for the admin user of
the heat user domain in the Identity service.
f. (Optional) To assist with troubleshooting, enable verbose logging in the [DE-
FAULT] section:
[DEFAULT]
...
verbose = True
3. a. Source the admin credentials to gain access to admin-only CLI commands:
$ source admin-openrc.sh
b. Create the heat domain in Identity service:
$ heat-keystone-setup-domain
--stack-user-domain-name heat_user_domain
--stack-domain-admin heat_domain_admin
--stack-domain-admin-password HEAT_DOMAIN_PASS
Replace HEAT_DOMAIN_PASS with a suitable password.
4. Populate the Orchestration database:
# su -s /bin/sh -c "heat-manage db_sync" heat
To finalize installation
1. Restart the Orchestration services:
# service heat-api restart
# service heat-api-cfn restart
# service heat-engine restart
2. By default, the Ubuntu packages create a SQLite database.
Because this configuration uses a SQL database server, you can remove the SQLite
database file:
# rm -f /var/lib/heat/heat.sqlite
Verify operation
This section describes how to verify operation of the Orchestration module (heat).
1. Source the admin tenant credentials:
$ source admin-openrc.sh
2. The Orchestration module uses templates to describe stacks. To learn about the tem-
plate language, see the Template Guide in the Heat developer documentation.](https://image.slidesharecdn.com/openstack-install-guide-apt-kilo-150924070714-lva1-app6891/85/Openstack-install-guide-apt-kilo-137-320.jpg)
![Kilo- Kilo- Kilo- Kilo- Kilo- Kilo- Kilo- Kilo- Kilo- Kilo- Kilo- Kilo- Kilo- Kilo- Kilo- Kil OpenStack Installation Guide for
Ubuntu 14.04
August 27, 2015 kilo
131
Create a test template in the test-stack.yml file with the following content:
heat_template_version: 2014-10-16
description: A simple server.
parameters:
ImageID:
type: string
description: Image use to boot a server
NetID:
type: string
description: Network ID for the server
resources:
server:
type: OS::Nova::Server
properties:
image: { get_param: ImageID }
flavor: m1.tiny
networks:
- network: { get_param: NetID }
outputs:
private_ip:
description: IP address of the server in the private network
value: { get_attr: [ server, first_address ] }
3. Use the heat stack-create command to create a stack from the template:
$ NET_ID=$(nova net-list | awk '/ demo-net / { print $2 }')
$ heat stack-create -f test-stack.yml
-P "ImageID=cirros-0.3.4-x86_64;NetID=$NET_ID" testStack
+--------------------------------------+------------+--------------------
+----------------------+
| id | stack_name | stack_status |
creation_time |
+--------------------------------------+------------+--------------------
+----------------------+
| 477d96b4-d547-4069-938d-32ee990834af | testStack | CREATE_IN_PROGRESS |
2014-04-06T15:11:01Z |
+--------------------------------------+------------+--------------------
+----------------------+
4. Use the heat stack-list command to verify successful creation of the stack:
$ heat stack-list
+--------------------------------------+------------+-----------------
+----------------------+
| id | stack_name | stack_status |
creation_time |
+--------------------------------------+------------+-----------------
+----------------------+
| 477d96b4-d547-4069-938d-32ee990834af | testStack | CREATE_COMPLETE |
2014-04-06T15:11:01Z |
+--------------------------------------+------------+-----------------
+----------------------+](https://image.slidesharecdn.com/openstack-install-guide-apt-kilo-150924070714-lva1-app6891/85/Openstack-install-guide-apt-kilo-138-320.jpg)


![Kilo- Kilo- Kilo- Kilo- Kilo- Kilo- Kilo- Kilo- Kilo- Kilo- Kilo- Kilo- Kilo- Kilo- Kilo- Kil OpenStack Installation Guide for
Ubuntu 14.04
August 27, 2015 kilo
135
3. Create the ceilometer database:
# mongo --host controller --eval '
db = db.getSiblingDB("ceilometer");
db.addUser({user: "ceilometer",
pwd: "CEILOMETER_DBPASS",
roles: [ "readWrite", "dbAdmin" ]})'
MongoDB shell version: 2.4.x
connecting to: controller:27017/test
{
"user" : "ceilometer",
"pwd" : "72f25aeee7ad4be52437d7cd3fc60f6f",
"roles" : [
"readWrite",
"dbAdmin"
],
"_id" : ObjectId("5489c22270d7fad1ba631dc3")
}
Replace CEILOMETER_DBPASS with a suitable password.
4. Source the admin credentials to gain access to admin-only CLI commands:
$ source admin-openrc.sh
5. To create the service credentials, complete these steps:
a. Create the ceilometer user:
$ openstack user create --password-prompt ceilometer
User Password:
Repeat User Password:
+----------+----------------------------------+
| Field | Value |
+----------+----------------------------------+
| email | None |
| enabled | True |
| id | b7657c9ea07a4556aef5d34cf70713a3 |
| name | ceilometer |
| username | ceilometer |
+----------+----------------------------------+
b. Add the admin role to the ceilometer user.
$ openstack role add --project service --user ceilometer admin
+-------+----------------------------------+
| Field | Value |
+-------+----------------------------------+
| id | cd2cb9a39e874ea69e5d4b896eb16128 |
| name | admin |
+-------+----------------------------------+
c. Create the ceilometer service entity:
$ openstack service create --name ceilometer
--description "Telemetry" metering
+-------------+----------------------------------+
| Field | Value |
+-------------+----------------------------------+](https://image.slidesharecdn.com/openstack-install-guide-apt-kilo-150924070714-lva1-app6891/85/Openstack-install-guide-apt-kilo-142-320.jpg)
![Kilo- Kilo- Kilo- Kilo- Kilo- Kilo- Kilo- Kilo- Kilo- Kilo- Kilo- Kilo- Kilo- Kilo- Kilo- Kil OpenStack Installation Guide for
Ubuntu 14.04
August 27, 2015 kilo
136
| description | Telemetry |
| enabled | True |
| id | 3405453b14da441ebb258edfeba96d83 |
| name | ceilometer |
| type | metering |
+-------------+----------------------------------+
6. Create the Telemetry module API endpoint:
$ openstack endpoint create
--publicurl http://controller:8777
--internalurl http://controller:8777
--adminurl http://controller:8777
--region RegionOne
metering
+--------------+----------------------------------+
| Field | Value |
+--------------+----------------------------------+
| adminurl | http://controller:8777 |
| id | d3716d85b10d4e60a67a52c6af0068cd |
| internalurl | http://controller:8777 |
| publicurl | http://controller:8777 |
| region | RegionOne |
| service_id | 3405453b14da441ebb258edfeba96d83 |
| service_name | ceilometer |
| service_type | metering |
+--------------+----------------------------------+
To install and configure the Telemetry module components
1. Install the packages:
# apt-get install ceilometer-api ceilometer-collector ceilometer-agent-
central
ceilometer-agent-notification ceilometer-alarm-evaluator ceilometer-
alarm-notifier
python-ceilometerclient
2. Generate a random value to use as the telemetry secret:
$ openssl rand -hex 10
3. Edit the /etc/ceilometer/ceilometer.conf file and complete the following ac-
tions:
a. In the [database] section, configure database access:
[database]
...
connection = mongodb://ceilometer:CEILOMETER_DBPASS@controller:27017/
ceilometer
Replace CEILOMETER_DBPASS with the password you chose for the Telemetry
module database. You must escape special characters such as ':', '/', '+', and '@' in
the connection string in accordance with RFC2396.
b. In the [DEFAULT] and [oslo_messaging_rabbit] sections, configure Rabbit-
MQ message queue access:](https://image.slidesharecdn.com/openstack-install-guide-apt-kilo-150924070714-lva1-app6891/85/Openstack-install-guide-apt-kilo-143-320.jpg)
![Kilo- Kilo- Kilo- Kilo- Kilo- Kilo- Kilo- Kilo- Kilo- Kilo- Kilo- Kilo- Kilo- Kilo- Kilo- Kil OpenStack Installation Guide for
Ubuntu 14.04
August 27, 2015 kilo
137
[DEFAULT]
...
rpc_backend = rabbit
[oslo_messaging_rabbit]
...
rabbit_host = controller
rabbit_userid = openstack
rabbit_password = RABBIT_PASS
Replace RABBIT_PASS with the password you chose for the openstack account
in RabbitMQ.
c. In the [DEFAULT] and [keystone_authtoken] sections, configure Identity
service access:
[DEFAULT]
...
auth_strategy = keystone
[keystone_authtoken]
...
auth_uri = http://controller:5000/v2.0
identity_uri = http://controller:35357
admin_tenant_name = service
admin_user = ceilometer
admin_password = CEILOMETER_PASS
Replace CEILOMETER_PASS with the password you chose for the celiometer
user in the Identity service.
Note
Comment out any auth_host, auth_port, and auth_protocol
options because the identity_uri option replaces them.
d. In the [service_credentials] section, configure service credentials:
[service_credentials]
...
os_auth_url = http://controller:5000/v2.0
os_username = ceilometer
os_tenant_name = service
os_password = CEILOMETER_PASS
os_endpoint_type = internalURL
os_region_name = RegionOne
Replace CEILOMETER_PASS with the password you chose for the ceilometer
user in the Identity service.
e. In the [publisher] section, configure the telemetry secret:
[publisher]
...
telemetry_secret = TELEMETRY_SECRET](https://image.slidesharecdn.com/openstack-install-guide-apt-kilo-150924070714-lva1-app6891/85/Openstack-install-guide-apt-kilo-144-320.jpg)
![Kilo- Kilo- Kilo- Kilo- Kilo- Kilo- Kilo- Kilo- Kilo- Kilo- Kilo- Kilo- Kilo- Kilo- Kilo- Kil OpenStack Installation Guide for
Ubuntu 14.04
August 27, 2015 kilo
138
Replace TELEMETRY_SECRET with the telemetry secret that you generated in a
previous step.
f. (Optional) To assist with troubleshooting, enable verbose logging in the [DE-
FAULT] section:
[DEFAULT]
...
verbose = True
To finalize installation
• Restart the Telemetry services:
# service ceilometer-agent-central restart
# service ceilometer-agent-notification restart
# service ceilometer-api restart
# service ceilometer-collector restart
# service ceilometer-alarm-evaluator restart
# service ceilometer-alarm-notifier restart
Configure the Compute service
Telemetry uses a combination of notifications and an agent to collect Compute metrics. Per-
form these steps on each compute node.
To install and configure the agent
1. Install the packages:
# apt-get install ceilometer-agent-compute
2. Edit the /etc/ceilometer/ceilometer.conf file and complete the following ac-
tions:
a. In the [publisher] section, configure the telemetry secret:
[publisher]
...
telemetry_secret = TELEMETRY_SECRET
Replace TELEMETRY_SECRET with the telemetry secret you chose for the Teleme-
try module.
b. In the [DEFAULT] and [oslo_messaging_rabbit] sections, configure Rabbit-
MQ message queue access:
[DEFAULT]
...
rpc_backend = rabbit
[oslo_messaging_rabbit]
...
rabbit_host = controller
rabbit_userid = openstack
rabbit_password = RABBIT_PASS](https://image.slidesharecdn.com/openstack-install-guide-apt-kilo-150924070714-lva1-app6891/85/Openstack-install-guide-apt-kilo-145-320.jpg)
![Kilo- Kilo- Kilo- Kilo- Kilo- Kilo- Kilo- Kilo- Kilo- Kilo- Kilo- Kilo- Kilo- Kilo- Kilo- Kil OpenStack Installation Guide for
Ubuntu 14.04
August 27, 2015 kilo
139
Replace RABBIT_PASS with the password you chose for the openstack account
in RabbitMQ.
c. In the [keystone_authtoken] section, configure Identity service access:
[keystone_authtoken]
...
auth_uri = http://controller:5000/v2.0
identity_uri = http://controller:35357
admin_tenant_name = service
admin_user = ceilometer
admin_password = CEILOMETER_PASS
Replace CEILOMETER_PASS with the password you chose for the Telemetry mod-
ule database.
Note
Comment out any auth_host, auth_port, and auth_protocol
options because the identity_uri option replaces them.
d. In the [service_credentials] section, configure service credentials:
[service_credentials]
...
os_auth_url = http://controller:5000/v2.0
os_username = ceilometer
os_tenant_name = service
os_password = CEILOMETER_PASS
os_endpoint_type = internalURL
os_region_name = RegionOne
Replace CEILOMETER_PASS with the password you chose for the ceilometer
user in the Identity service.
e. (Optional) To assist with troubleshooting, enable verbose logging in the [DE-
FAULT] section:
[DEFAULT]
...
verbose = True
To configure notifications
Configure the Compute service to send notifications to the message bus.
• Edit the /etc/nova/nova.conf file and configure notifications in the [DEFAULT]
section:
[DEFAULT]
...
instance_usage_audit = True
instance_usage_audit_period = hour
notify_on_state_change = vm_and_task_state
notification_driver = messagingv2](https://image.slidesharecdn.com/openstack-install-guide-apt-kilo-150924070714-lva1-app6891/85/Openstack-install-guide-apt-kilo-146-320.jpg)
![Kilo- Kilo- Kilo- Kilo- Kilo- Kilo- Kilo- Kilo- Kilo- Kilo- Kilo- Kilo- Kilo- Kilo- Kilo- Kil OpenStack Installation Guide for
Ubuntu 14.04
August 27, 2015 kilo
140
To finalize installation
1. Restart the agent:
# service ceilometer-agent-compute restart
2. Restart the Compute service:
# service nova-compute restart
Configure the Image service
To retrieve image-oriented events and samples, configure the Image service to send notifi-
cations to the message bus. Perform these steps on the controller node.
Edit the /etc/glance/glance-api.conf and /etc/glance/glance-
registry.conf files and complete the following actions:
1. In the [DEFAULT] section, configure notifications and RabbitMQ message broker ac-
cess:
[DEFAULT]
...
notification_driver = messagingv2
rpc_backend = rabbit
rabbit_host = controller
rabbit_userid = openstack
rabbit_password = RABBIT_PASS
Replace RABBIT_PASS with the password you chose for the openstack account in
RabbitMQ.
2. Restart the Image service:
# service glance-registry restart
# service glance-api restart
Configure the Block Storage service
To retrieve volume-oriented events and samples, you must configure the Block Storage ser-
vice to send notifications to the message bus. Perform these steps on the controller and
storage nodes.
To configure prerequisites
Edit the /etc/cinder/cinder.conf file and complete the following actions:
1. In the [DEFAULT] section, configure notifications:
[DEFAULT]
...
control_exchange = cinder
notification_driver = messagingv2
2. Restart the Block Storage services on the controller node:](https://image.slidesharecdn.com/openstack-install-guide-apt-kilo-150924070714-lva1-app6891/85/Openstack-install-guide-apt-kilo-147-320.jpg)
![Kilo- Kilo- Kilo- Kilo- Kilo- Kilo- Kilo- Kilo- Kilo- Kilo- Kilo- Kilo- Kilo- Kilo- Kilo- Kil OpenStack Installation Guide for
Ubuntu 14.04
August 27, 2015 kilo
141
# service cinder-api restart
# service cinder-scheduler restart
3. Restart the Block Storage services on the storage nodes:
# service cinder-volume restart
4. Use the cinder-volume-usage-audit command to retrieve metrics on demand. For more
information, see Block Storage audit script setup to get notifications.
Configure the Object Storage service
To retrieve storage-oriented events and samples, configure the Object Storage service to
send notifications to the message bus.
To configure prerequisites
The Telemetry service requires access to the Object Storage service using the Reseller-
Admin role. Perform these steps on the controller node.
1. Source the admin credentials to gain access to admin-only CLI commands.
$ source admin-openrc.sh
2. Create the ResellerAdmin role:
$ openstack role create ResellerAdmin
+-------+----------------------------------+
| Field | Value |
+-------+----------------------------------+
| id | 462fa46c13fd4798a95a3bfbe27b5e54 |
| name | ResellerAdmin |
+-------+----------------------------------+
3. Add the ResellerAdmin role to the service tenant and ceilometer user:
$ openstack role add --project service --user ceilometer ResellerAdmin
+-------+----------------------------------+
| Field | Value |
+-------+----------------------------------+
| id | 462fa46c13fd4798a95a3bfbe27b5e54 |
| name | ResellerAdmin |
+-------+----------------------------------+
To configure notifications
Perform these steps on the controller and any other nodes that run the Object Storage
proxy service.
1. Edit the /etc/swift/proxy-server.conf file and complete the following actions:
a. In the [filter:keystoneauth] section, add the ResellerAdmin role:
[filter:keystoneauth]
...
operator_roles = admin,user,ResellerAdmin](https://image.slidesharecdn.com/openstack-install-guide-apt-kilo-150924070714-lva1-app6891/85/Openstack-install-guide-apt-kilo-148-320.jpg)
![Kilo- Kilo- Kilo- Kilo- Kilo- Kilo- Kilo- Kilo- Kilo- Kilo- Kilo- Kilo- Kilo- Kilo- Kilo- Kil OpenStack Installation Guide for
Ubuntu 14.04
August 27, 2015 kilo
142
b. In the [pipeline:main] section, add ceilometer:
[pipeline:main]
...
pipeline = authtoken cache healthcheck keystoneauth proxy-logging
ceilometer proxy-server
c. In the [filter:ceilometer] section, configure notifications:
[filter:ceilometer]
...
paste.filter_factory = ceilometermiddleware.swift:filter_factory
control_exchange = swift
url = rabbit://openstack:RABBIT_PASS@controller:5672/
driver = messagingv2
topic = notifications
log_level = WARN
Replace RABBIT_PASS with the password you chose for the openstack account
in RabbitMQ.
2. Add the swift system user to the ceilometer system group to permit access to the
Telemetry configuration files by the Object Storage service:
# usermod -a -G ceilometer swift
3. Restart the Object Storage proxy service:
# service swift-proxy restart
Verify the Telemetry installation
This section describes how to verify operation of the Telemetry module.
Note
Perform these steps on the controller node.
1. Source the admin credentials to gain access to admin-only CLI commands:
$ source admin-openrc.sh
2. List available meters:
$ ceilometer meter-list
+--------------+-------+-------+--------------------------------------
+---------+----------------------------------+
| Name | Type | Unit | Resource ID |
User ID | Project ID |
+--------------+-------+-------+--------------------------------------
+---------+----------------------------------+
| image | gauge | image | acafc7c0-40aa-4026-9673-b879898e1fc2 |
None | cf12a15c5ea84b019aec3dc45580896b |
| image.size | gauge | B | acafc7c0-40aa-4026-9673-b879898e1fc2 |
None | cf12a15c5ea84b019aec3dc45580896b |
| image.update | delta | image | acafc7c0-40aa-4026-9673-b879898e1fc2 |
None | cf12a15c5ea84b019aec3dc45580896b |](https://image.slidesharecdn.com/openstack-install-guide-apt-kilo-150924070714-lva1-app6891/85/Openstack-install-guide-apt-kilo-149-320.jpg)


![Kilo- Kilo- Kilo- Kilo- Kilo- Kilo- Kilo- Kilo- Kilo- Kilo- Kilo- Kilo- Kilo- Kilo- Kilo- Kil OpenStack Installation Guide for
Ubuntu 14.04
August 27, 2015 kilo
145
12. Launch an instance
Table of Contents
Launch an instance with OpenStack Networking (neutron) .......................................... 145
Launch an instance with legacy networking (nova-network) ........................................ 153
An instance is a VM that OpenStack provisions on a compute node. This guide shows you
how to launch a minimal instance using the CirrOS image that you added to your environ-
ment in the Chapter 4, “Add the Image service” [45] chapter. In these steps, you use the
command-line interface (CLI) on your controller node or any system with the appropriate
OpenStack client libraries. To use the dashboard, see the OpenStack User Guide.
Launch an instance using OpenStack Networking (neutron) or legacy networking (no-
va-network) . For more information, see the OpenStack User Guide.
Note
These steps reference example components created in previous chapters. You
must adjust certain values such as IP addresses to match your environment.
Launch an instance with OpenStack Networking
(neutron)
To generate a key pair
Most cloud images support public key authentication rather than conventional user name/
password authentication. Before launching an instance, you must generate a public/private
key pair.
1. Source the demo tenant credentials:
$ source demo-openrc.sh
2. Generate and add a key pair:
$ nova keypair-add demo-key
3. Verify addition of the key pair:
$ nova keypair-list
+----------+-------------------------------------------------+
| Name | Fingerprint |
+----------+-------------------------------------------------+
| demo-key | 6c:74:ec:3a:08:05:4e:9e:21:22:a6:dd:b2:62:b8:28 |
+----------+-------------------------------------------------+
To launch an instance
To launch an instance, you must at least specify the flavor, image name, network, security
group, key, and instance name.](https://image.slidesharecdn.com/openstack-install-guide-apt-kilo-150924070714-lva1-app6891/85/Openstack-install-guide-apt-kilo-152-320.jpg)

![Kilo- Kilo- Kilo- Kilo- Kilo- Kilo- Kilo- Kilo- Kilo- Kilo- Kilo- Kilo- Kilo- Kilo- Kilo- Kil OpenStack Installation Guide for
Ubuntu 14.04
August 27, 2015 kilo
148
| flavor | m1.tiny (1)
|
| hostId |
|
| id |
05682b91-81a1-464c-8f40-8b3da7ee92c5 |
| image | cirros-0.3.4-x86_64
(acafc7c0-40aa-4026-9673-b879898e1fc2) |
| key_name | demo-key
|
| metadata | {}
|
| name | demo-instance1
|
| os-extended-volumes:volumes_attached | []
|
| progress | 0
|
| security_groups | default
|
| status | BUILD
|
| tenant_id | 7cf50047f8df4824bc76c2fdf66d11ec
|
| updated | 2014-04-09T19:24:27Z
|
| user_id | 0e47686e72114d7182f7569d70c519c9
|
+--------------------------------------
+------------------------------------------------------------+
6. Check the status of your instance:
$ nova list
+--------------------------------------+----------------+--------
+------------+-------------+-------------------------+
| ID | Name | Status | Task
State | Power State | Networks |
+--------------------------------------+----------------+--------
+------------+-------------+-------------------------+
| 05682b91-81a1-464c-8f40-8b3da7ee92c5 | demo-instance1 | ACTIVE | -
| Running | demo-net=192.168.1.3 |
+--------------------------------------+----------------+--------
+------------+-------------+-------------------------+
The status changes from BUILD to ACTIVE when your instance finishes the build pro-
cess.
To access your instance using a virtual console
• Obtain a Virtual Network Computing (VNC) session URL for your instance and access it
from a web browser:
$ nova get-vnc-console demo-instance1 novnc
+-------
+------------------------------------------------------------------------------------
+
| Type | Url
|](https://image.slidesharecdn.com/openstack-install-guide-apt-kilo-150924070714-lva1-app6891/85/Openstack-install-guide-apt-kilo-155-320.jpg)


![Kilo- Kilo- Kilo- Kilo- Kilo- Kilo- Kilo- Kilo- Kilo- Kilo- Kilo- Kilo- Kilo- Kilo- Kilo- Kil OpenStack Installation Guide for
Ubuntu 14.04
August 27, 2015 kilo
155
Your first instance uses the default security group. By default, this security group im-
plements a firewall that blocks remote access to instances. If you would like to permit
remote access to your instance, launch it and then configure remote access.
5. Launch the instance:
Replace DEMO_NET_ID with the ID of the demo-net tenant network.
$ nova boot --flavor m1.tiny --image cirros-0.3.4-x86_64 --nic net-
id=DEMO_NET_ID
--security-group default --key-name demo-key demo-instance1
+--------------------------------------
+------------------------------------------------------------+
| Property | Value
|
+--------------------------------------
+------------------------------------------------------------+
| OS-DCF:diskConfig | MANUAL
|
| OS-EXT-AZ:availability_zone | nova
|
| OS-EXT-STS:power_state | 0
|
| OS-EXT-STS:task_state | scheduling
|
| OS-EXT-STS:vm_state | building
|
| OS-SRV-USG:launched_at | -
|
| OS-SRV-USG:terminated_at | -
|
| accessIPv4 |
|
| accessIPv6 |
|
| adminPass | ThZqrg7ach78
|
| config_drive |
|
| created | 2014-04-10T00:09:16Z
|
| flavor | m1.tiny (1)
|
| hostId |
|
| id | 45ea195c-
c469-43eb-83db-1a663bbad2fc |
| image | cirros-0.3.4-x86_64
(acafc7c0-40aa-4026-9673-b879898e1fc2) |
| key_name | demo-key
|
| metadata | {}
|
| name | demo-instance1
|
| os-extended-volumes:volumes_attached | []
|
| progress | 0
|](https://image.slidesharecdn.com/openstack-install-guide-apt-kilo-150924070714-lva1-app6891/85/Openstack-install-guide-apt-kilo-162-320.jpg)