This document provides instructions for installing OpenStack on three servers - a controller node, compute node, and network node. It describes configuring the network interfaces on each node, installing NTP for time synchronization, and setting various passwords that will be used during the OpenStack installation process. The core components that will be installed include the Identity, Image, Compute, Dashboard, and Block Storage services. Detailed steps are provided for configuring the primary OpenStack environment, including the database, message broker, and individual service installations.


![OpenStack – Final report
INN694 – Project Page |3/43|
1 - Introduction
OpenStack is a worldwide association of developers and cloud computing technologists, managed by the
OpenStack Foundation, that produce the omnipresent open source computing platform for public and private
clouds [1]. Cloud computing is about sharing resource such as RAM, CPU and other among several machine.
For instance, if you have two computers, one with 2 core CPU, 4GB of RAM and 100GB of storage and this
other one has 4 core CPU, 16GB of RAM and 500GB of storage, it will summarised the resources and the use
will perceive it as one server of 6 core CPU, 20GB of RAM and 600GB of storage (in theory). In this case, the
OpenStack was installed on three computer provided by QUT, the specification of those computer will be
listed later on the report.
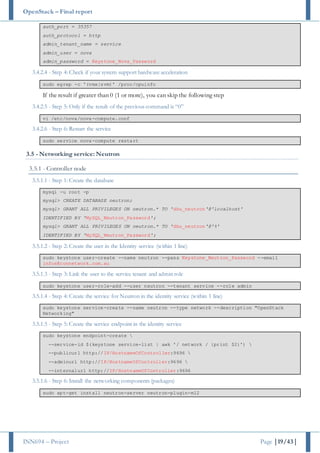
OpenStack is an open-source software cloud computing platform mainly focused on IaaS (Infrastructure
as a Service). It can control a big pools of compute, storage and networking resources of an entire datacentre
using a single web-based dashboard.
Figure 1 - OpenStack overview [1]
2 - OpenStack environment
The environment of OpenStack is highly scalable and depend on the needs of each companies. The
OpenStack scalability will probably always differ from one company to another according to the need of this
company and “no one Solution meet everyone’s scalability goals [2]. For instance, some companies will need
to have a plethora of big instancesthatneed a lot of VPCU and RAM but lessstorage whereasother companies
will need only small instances using few VCPU and RAM but need a huge amount of storage. OpenStack has
been designed to be horizontally scalable in order to suit the cloud paradigm [2]. It means that after the initial
installation of OpenStack, it is possible to add more power of or storable simply by adding another server on
the cloud
OpenStack can be install in a virtual machine using software like VMware or VirtualBox for experiment
purposes in order to run few smallinstances asitcan be installedina multinationalenterprisecanrun thousands
of instances, small or big, such as Amazon with it Amazon Cloud Services.](https://image.slidesharecdn.com/518aace8-3d27-4009-99c7-393f6de8e3b2-160503112732/85/INN694-2014-OpenStack-installation-process-V5-4-320.jpg)
![OpenStack – Final report
INN694 – Project Page |10/43|
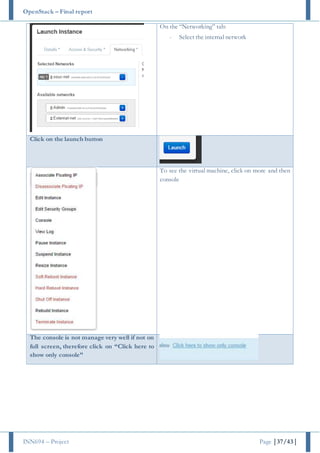
# ...
# Authorise your own network to communicate with the server.
restrict 192.168.1.0 mask 255.255.255.224 nomodify notrap
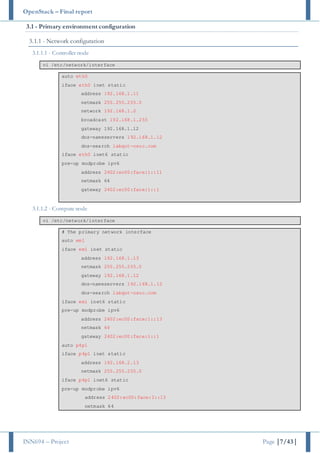
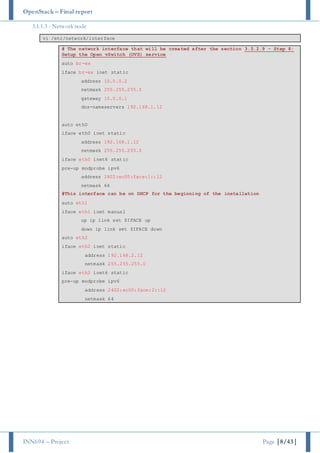
3.1.2.4 - Step 4: Setup the client(s)
sudo vi /etc/ntp.conf
#comment the line that start with "server"
#server 0.ubuntu.pool.ntp.org
#server 1.ubuntu.pool.ntp.org
#server 2.ubuntu.pool.ntp.org
#server 3.ubuntu.pool.ntp.org
server IP/HostnameOfController iburst
#Leave the fallback, which is the Ubuntu's ntp server in case of your server break down
server ntp.ubuntu.com
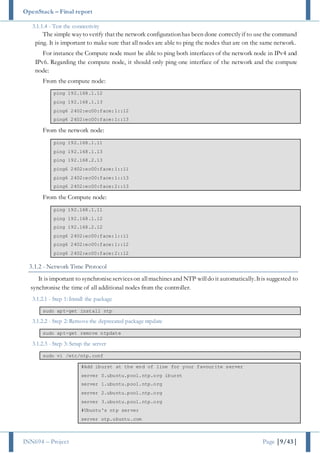
3.1.2.5 - Test
The synchronisation of the time can be test by running the command “date” on all server within one
or two second of delay.
3.1.3 - Database
3.1.3.1 - Step 1: Install the packages
sudo apt-get install python-mysqldb mysql-server
3.1.3.2 - Step 2: Adapt MySQL to work with OpenStack
sudo vi /etc/mysql/my.conf
[mysqld]
...
#Allow other nodes to connect to the local database
bind-address = IP/HostnameOfMySQLServer
...
#enable InnoDB, UTF-8 character set, and UTF-8 collation by default
default-storage-engine = innodb
innodb_file_per_table
collation-server = utf8_general_ci
init-connect = 'SET NAMES utf8'
character-set-server = utf8
3.1.3.3 - Step 3: Restart MySQL
sudo service mysql restart
3.1.3.4 - Step 4: Delete the anonymous users (some connection problems might happen if still present)
sudo mysql_install_db (Optional: to be usedif the next command fail)
sudo mysql_secure_installation (Answer "Yes" to all question unless you have a good reason to answerno)
3.1.3.5 - Step 5: Install the MySQL Python library on the additional nodes (Optional)
sudo apt-get install python-mysqldb](https://image.slidesharecdn.com/518aace8-3d27-4009-99c7-393f6de8e3b2-160503112732/85/INN694-2014-OpenStack-installation-process-V5-11-320.jpg)
![OpenStack – Final report
INN694 – Project Page |11/43|
3.1.4 - OpenStack packages
The latest version of OpenStack packages can be downloaded through the Ubuntu Cloud Archive,
which is a special repository.
3.1.4.1 - Step 1: Install python software
sudo apt-get install python-software-properties
Remark: The following steps are not require for Ubuntu 14.04.
3.1.4.2 - Step 2: Add the Ubuntu Cloud archive for Icehouse (optional)
sudo add-apt-repository cloud-archive:icehouse
3.1.4.3 - Step 3: Update the packages list and upgrade the system (optional)
sudo apt-get update
sudo apt-get dist-upgrade
3.1.4.4 - Step 3: Install “Backported Linux Kernel” (Only for Ubuntu 12.04: improve the stability)
sudo apt-get install linux-image-generic-lts-saucy linux-headers-generic-lts-saucy
3.1.4.5 - Step 4: Restart the system
sudo reboot
3.1.5 - Messaging server
This documentationdo not explainallthe option of RabbitMQ, for more information about RabbitMQ
access control please follow the website provided in the reference [7].
3.1.5.1 - Step 1: Install the package
sudo apt-get install rabbitmq-server
3.1.5.2 - Step 2: Change default password of the existing user (guest/guest)
Remark: it is strongly recommended to change the password for the guest user for security purpose.
sudo rabbitmqctl change_password guest Rabbit_Guest_Password
3.1.5.3 - Step 3: Create a unique account
Remark: it is possible to use the guest user-name and password for each OpenStack service, but it is
not recommended.
sudo rabbitmqctl add_user YourUserName StrongPassword
3.1.5.4 - Step 4: Set up the access control
sudo rabbitmqctl add_vhost NameVHost
sudo rabbitmqctl set_user_tags NameVHost administrator
rabbitmqctl set_permissions -p /NameVHost YourUserName ".*" ".*" ".*"
3.2 - Identity service
3.2.1 - Installation of Keystone
3.2.1.1 - Step 1: Install the package
sudo apt-get install keystone
3.2.1.2 - Step 2: Connect keystone to the MySQL database
sudo vi /etc/keystone/keystone.conf](https://image.slidesharecdn.com/518aace8-3d27-4009-99c7-393f6de8e3b2-160503112732/85/INN694-2014-OpenStack-installation-process-V5-12-320.jpg)
![OpenStack – Final report
INN694 – Project Page |12/43|
[database]
# The SQLAlchemy connection string used to connect to the database
connection =
mysql://dbu_keystone:MySQL_Keystone_Password@IP/HostnameOfController/keystone
3.2.1.3 - Step 3: Create the database and the user with MySQL
mysql -u root -p
mysql> CREATE DATABASE keystone;
mysql> GRANT ALL PRIVILEGES ON keystone.* TO 'dbu_keystone'@'localhost'
IDENTIFIED BY 'MySQL_Keystone_Password';
mysql> GRANT ALL PRIVILEGES ON keystone.* TO 'dbu_keystone'@'%'
IDENTIFIED BY 'MySQL_Keystone_Password';
mysql> exit
3.2.1.4 - Step 4: Create the tables
su -s /bin/sh -c "keystone-manage db_sync" keystone
3.2.1.5 - Step 5: Define the authorization token to communicate between the Identity Service and other OpenStack
services and the log
The following command generate a random shared key and should be usedto generateallthe password
use for OpenStack services:
openssl rand -hex 10
Result: 3856bdace7abac9cfc78
sudo vi /etc/keystone/keystone.conf
[DEFAULT]
admin_token = 3856bdace7abac9cfc78
log_dir = /var/log/keystone
3.2.1.6 - Step 6: Restart the service
sudo service keystone restart
3.2.1.7 - Step 7: Purge the expired token every hours
The identity service save all expired tokens in the local database without erase them at any time. This
could be helpful for auditing in production environment but it will increase the size of the databaseas well
as affect the performance of other services. It is recommended to purge the expired token every hour
using cron.
(crontab -l -u keystone 2>&1 | grep -q token_flush) ||
echo '@hourly /usr/bin/keystone-manage token_flush >/var/log/keystone/keystone-
tokenflush.log 2>&1' >> /var/spool/cron/crontabs/keystone
3.2.2 - Set environment variable
In order to use the command related to OpenStack command-line such as “Keystone”, “Neutron” and
other, you need to provide the address of the identity service (–os-auth-url), an username (–os-username)
and a password (–os-password). However, when it is the first time to use the identity service, so there is no
user yet. Therefore, you need to connect to the service using the token generate before and export the
following variable:](https://image.slidesharecdn.com/518aace8-3d27-4009-99c7-393f6de8e3b2-160503112732/85/INN694-2014-OpenStack-installation-process-V5-13-320.jpg)
![OpenStack – Final report
INN694 – Project Page |14/43|
3.2.4 - Service and endpoints
3.2.4.1 - Step 1: Create a service entry for the Identity Service (within 1 line)
sudo keystone service-create --name=keystone --type=identity --description="OpenStack
Identity"
3.2.4.2 - Step 2: Specify a API endpoint for the Identity service
sudo keystone endpoint-create
--service-id=$(keystone service-list | awk '/ identity / {print $2}')
--publicurl=http://IP/HostnameOfController:5000/v2.0
--internalurl=http://IP/HostnameOfController:5000/v2.0
--adminurl=http://IP/HostnameOfController:35357/v2.0
3.3 - Image service: Glance
3.3.1 - Step 1: Install the packages
sudo apt-get install glance python-glanceclient
3.3.2 - Step 2: Add the database section in the file glance-api.conf and glance-registry.conf
sudo vi /etc/glance/glance-api.conf
...
[database]
connection = mysql://dbu_glance:MySQL_Glance_Password@IP/HostnameOfController/glance
sudo vi /etc/glance/glance-registry.conf
...
[database]
connection = mysql://dbu_glance:MySQL_Glance_Password@IP/HostnameOfController/glance
3.3.3 - Step 3: Add the information about the message broker in the file glance-api.conf
sudo vi /etc/glance/glance-api.conf
[DEFAULT]
rpc_backend = rabbit
rabbit_host = IP/HostnameOfController
rabbit_port = 5672
rabbit_use_ssl = false
rabbit_userid = YourUserName
rabbit_password = StrongPassword
rabbit_virtual_host = NameVHost
rabbit_notification_exchange = glance
rabbit_notification_topic = notifications
rabbit_durable_queues = False
3.3.4 - Step 4: Delete the default database
sudo rm /var/lib/glance/glance.sqlite
3.3.5 - Step 5: Create the Database and the user using MySQL
sudo mysql -u root -p](https://image.slidesharecdn.com/518aace8-3d27-4009-99c7-393f6de8e3b2-160503112732/85/INN694-2014-OpenStack-installation-process-V5-15-320.jpg)
![OpenStack – Final report
INN694 – Project Page |15/43|
mysql> CREATE DATABASE glance;
mysql> GRANT ALL PRIVILEGES ON glance.* TO 'dbu_glance'@'localhost'
IDENTIFIED BY 'MySQL_Glance_Password';
mysql> GRANT ALL PRIVILEGES ON glance.* TO 'dbu_glance'@'%'
IDENTIFIED BY 'MySQL_Glance_Password';
3.3.6 - Step 6: Create tables
su -s /bin/sh -c "glance-manage db_sync" glance
3.3.7 - Step 7: Create the user “glance” in the Identity service
sudo keystone user-create --name=glance --pass=Keystone_Glance_Password --
email=infos@connetwork.com.au
sudo keystone user-role-add --user=glance --tenant=service --role=admin
3.3.8 - Step 8: Add the authentication for the Identity Service in the file glance-api.conf and glance-
registry.conf
sudo vi /etc/glance/glance-api.conf
[keystone_authtoken]
auth_uri = http://IP/HostnameOfController:5000
auth_host =IP/HostnameOfController
auth_port = 35357
auth_protocol = http
admin_tenant_name = service
admin_user = glance
admin_password = Keystone_Glance_Password
...
[paste_deploy]
...
flavor = keystone
sudo vi /etc/glance/glance-registry.conf
[keystone_authtoken]
auth_uri = http://IP/HostnameOfController:5000
auth_host =IP/HostnameOfController
auth_port = 35357
auth_protocol = http a
dmin_tenant_name = service
admin_user = glance
admin_password = Keystone_Glance_Password
...
[paste_deploy]
...
flavor = keystone
3.3.9 - Step 9: Register the Image Service with the Identity service (within 1 line for the first command)
sudo keystone service-create --name=glance --type=image --description="OpenStack Image
Service"
sudo keystone endpoint-create](https://image.slidesharecdn.com/518aace8-3d27-4009-99c7-393f6de8e3b2-160503112732/85/INN694-2014-OpenStack-installation-process-V5-16-320.jpg)
![OpenStack – Final report
INN694 – Project Page |16/43|
--service-id=$(keystone service-list | awk '/ image / {print $2}')
--publicurl=http://IP/HostnameOfController:9292
--internalurl=http://IP/HostnameOfController:9292
--adminurl=http://IP/HostnameOfController:9292
3.3.10 - Step 10: Restart the services
sudo service glance-registry restart
sudo service glance-api restart
3.3.11 - Verify the installation
In order to verify the installation of glance, it is necessary to download at leastone virtual machine image
into the server using any method such as “wget”, “scp” or other. This example will assume that the server
has an internet connection and download a CirrOS image.
3.3.11.1 - Step 1: create a temporary folder
mkdir /home/iso
3.3.11.2 - Step 2: change the directory
cd /home/iso
3.3.11.3 - Step 3: Download the image
wget http://cdn.download.cirros-cloud.net/0.3.2/cirros-0.3.2-x86_64-disk.img
3.3.11.4 - Source OpenStack RC file
source /home/NameOfProject-openrc.sh
3.3.11.5 - Add the image into glance
sudo glance image-create --name "cirros-0.3.2-x86_64" --disk-format qcow2
--container-format bare --is-public True --progress < cirros-0.3.2-x86_64-disk.img
3.3.11.6 - Check if the image has been successfully added to glance:
sudo glance image-list
3.4 - Compute service: Nova
3.4.1 - Service
3.4.1.1 - Step 1: Install the packages (within 1 line)
sudo apt-get install nova-api nova-cert nova-conductor nova-consoleauth nova-novncproxy
nova-scheduler python-novaclient
3.4.1.2 - Step 2: Add the MySQL connection on the file “nova.conf” as well as setup RabbitMQ
sudo vi /etc/nova/nova.conf
[DEFAULT]
#Use the Identity service (keystone) for authentication
auth_strategy = keystone
#Set up the message broker
rpc_backend = rabbit
rabbit_host = IP/HotsnameOfController
rabbit_userid = YourUserName
rabbit_password = StrongPassword](https://image.slidesharecdn.com/518aace8-3d27-4009-99c7-393f6de8e3b2-160503112732/85/INN694-2014-OpenStack-installation-process-V5-17-320.jpg)
![OpenStack – Final report
INN694 – Project Page |17/43|
rabbit_virtual_host = NameVHost
auth_strategy = keystone
my_ip = IP/HostnameOfController
vncserver_listen = IP/HostnameOfController
vncserver_proxyclient_address = IP/HostnameOfController
[database]
connection = mysql://dbu_nova:MySQL_Nova_Password@IP/HostnameOfController/nova
[keystone_authtoken]
auth_uri = http://IP/HostnameOfController:5000
auth_host = IP/HostnameOfController
auth_port = 35357
auth_protocol = http
admin_tenant_name = service
admin_user = nova
admin_password = Keystone_Nova_Password
3.4.1.3 - Step 3: Create the database and user
mysql -u root -p
mysql> CREATE DATABASE nova;
mysql> GRANT ALL PRIVILEGES ON nova.* TO 'dbu_nova'@'localhost'
IDENTIFIED BY 'MySQL_Nova_Password';
mysql> GRANT ALL PRIVILEGES ON nova.* TO 'dbu_nova'@'%'
IDENTIFIED BY 'MySQL_Nova_Password';
3.4.1.4 - Step 4: Create the tables
su -s /bin/sh -c "nova-manage db sync" nova
3.4.1.5 - Step 5: Create user on the Identity service
sudo keystone user-create --name=nova --pass=Keystone_Nova_Password --
email=infos@connetwork.com.au
sudo keystone user-role-add --user=nova --tenant=service --role=admin
3.4.1.6 - Step 6: Create the service and endpoint
sudo keystone service-create --name=nova --type=compute --description="OpenStack
Compute"
sudo keystone endpoint-create
--service-id=$(keystone service-list | awk '/ compute / {print $2}')
--publicurl=http://IP/HostnameOfController:8774/v2/%(tenant_id)s
--internalurl=http://IP/HostnameOfController:8774/v2/%(tenant_id)s
--adminurl=http://IP/HostnameOfController:8774/v2/%(tenant_id)s
3.4.1.7 - Step 7: Restart all nova service
sudo service nova-api restart
sudo service nova-cert restart
sudo service nova-consoleauth restart
sudo service nova-scheduler restart
sudo service nova-conductor restart
sudo service nova-novncproxy restart](https://image.slidesharecdn.com/518aace8-3d27-4009-99c7-393f6de8e3b2-160503112732/85/INN694-2014-OpenStack-installation-process-V5-18-320.jpg)
![OpenStack – Final report
INN694 – Project Page |18/43|
3.4.2 - Compute node
The compute node can be install in the same server as the controller. However, it is recommended to
install it in another server.
3.4.2.1 - Step 1: Install the packages
sudo apt-get install nova-compute-kvm python-guestfs libguestfs-tools qemu-system
3.4.2.2 - Step 2: Make the kernel readable by any hypervisor services such as qemu or libguestfs
The kernelis not readableby defaultfor basicuser and for securityreason, but hypervisor servicesneed
to read it in order to work better
dpkg-statoverride --update --add root root 0644 /boot/vmlinuz-$(uname -r)
The previous command makes the kernel readable, yet it is not permanent as when the kernel will be
updated it will not be readable anymore. Therefore, you need to create a file to overwrite all upcoming
update
vi /etc/kernel/postinst.d/statoverride
#!/bin/sh
version="$1"
# passing the kernel version is required
[ -z "${version}" ] && exit 0
dpkg-statoverride --update --add root root 0644 /boot/vmlinuz-${version}
3.4.2.3 - Step 3: Edit the nova.conf
vi /etc/nova/nova.conf
[DEFAULT]
#Use the Identity service (keystone) for authentication
auth_strategy = keystone
#Set up the message broker
rpc_backend = rabbit
rabbit_host = IP/HotsnameOfController
rabbit_userid = YourUserName
rabbit_password = StrongPassword
rabbit_virtual_host = NameVHost
auth_strategy = keystone
#Interface for the console
my_ip = IP/HostnameOfController
vnc_enabled = True
vncserver_listen = 0.0.0.0
vncserver_proxyclient_address = IP/HostnameOfController
novncproxy_base_url = http://IP/HostnameOfController:6080/vnc_auto.html
#Location of the image service (Glance)
glance_host = IP/HostnameOfController
[database]
connection = mysql://dbu_nova:MySQL_Nova_Password@IP/HostnameOfController/nova
[keystone_authtoken]
auth_uri = http://IP/HostnameOfController:5000
auth_host = IP/HostnameOfController](https://image.slidesharecdn.com/518aace8-3d27-4009-99c7-393f6de8e3b2-160503112732/85/INN694-2014-OpenStack-installation-process-V5-19-320.jpg)
![OpenStack – Final report
INN694 – Project Page |20/43|
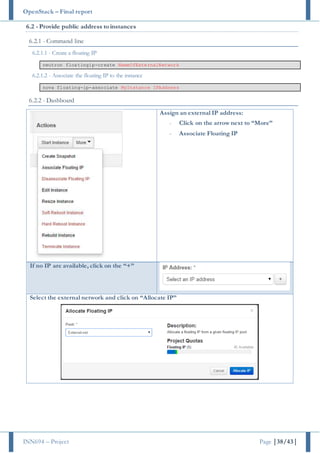
3.5.1.7 - Step 7: Get the service tenant identifier (SERVICE_TENANT_ID)
sudo keystone tenant-get service
Example:
+-------------+----------------------------------+
| Property | Value |
+-------------+----------------------------------+
| description | Service Tenant |
| enabled | True |
| id | 032ff6f1056a4d82b51a87ff106c8185 |
| name | service |
+-------------+----------------------------------+
3.5.1.8 - Step 8: Edit neutron configuration file (neutron.conf)
sudo vi /etc/neutron/neutron.conf
[DEFAULT]
#Rabbit information
rabbit_host = IP/HostnameOfController
rabbit_port = 5672
rabbit_use_ssl = false
rabbit_userid = YourUserName
rabbit_password = StrongPassword
rabbit_virtual_host = /NameVHost
rabbit_notification_exchange = neutron
rabbit_notification_topic = notifications
#type of authentication
auth_strategy = keystone
#communication with the service nova
notify_nova_on_port_status_changes = True
notify_nova_on_port_data_changes = True
nova_url = http://IP/HostnameOfController:8774/v2
nova_admin_username = nova
nova_admin_tenant_id = SERVICE_TENANT_ID
nova_admin_password = Keystone_Nova_Password
nova_admin_auth_url = http://IP/HostnameOfController:35357/v2.0
#Configuration of the Modular Layer 2 (ML2)
core_plugin = ml2
service_plugins = router
allow_overlapping_ips = True
#connection to the database
[database]
connection =
mysql://dbu_neutron:MySQL_Neutron_Password@IP/HostnameOfController/neutron
[keystone_authtoken]
#Authentication information:
auth_uri = http://IP/HostnameOfController:5000
auth_host = IP/HostnameOfController](https://image.slidesharecdn.com/518aace8-3d27-4009-99c7-393f6de8e3b2-160503112732/85/INN694-2014-OpenStack-installation-process-V5-21-320.jpg)
![OpenStack – Final report
INN694 – Project Page |21/43|
auth_port = 35357
auth_protocol = http
admin_tenant_name = service
admin_user = neutron
admin_password = Keystone_Neutron_Password
3.5.1.9 - Step 9: Edit the nova.conf to configure compute to use Networking
sudo vi /etc/nova/nova.conf
[DEFAULT]
...
network_api_class = nova.network.neutronv2.api.API
neutron_url = http://IP/HostnameOfController:9696
neutron_auth_strategy = keystone
neutron_admin_tenant_name = service
neutron_admin_username = neutron
neutron_admin_password = Keystone_Neutron_Password
neutron_admin_auth_url = http://IP/HostnameOfController:35357/v2.0
linuxnet_interface_driver = nova.network.linux_net.LinuxOVSInterfaceDriver
firewall_driver = nova.virt.firewall.NoopFirewallDriver
security_group_api = neutron
3.5.1.10 - Step 10: Restart the necessary services
sudo service nova-api restart
sudo service nova-scheduler restart
sudo service nova-conductor restart
sudo service neutron-server restart
3.5.2 - Network node
3.5.2.1 - Pre-step: Enable few networking function
sudo vi /etc/sysctl.conf
net.ipv4.ip_forward=1
net.ipv4.conf.all.rp_filter=0
net.ipv4.conf.default.rp_filter=0
Update the changes
sudo sysctl -p
3.5.2.2 - Step 1: Install the networking components (packages) (within 1 line)
apt-get install neutron-plugin-ml2 neutron-plugin-openvswitch-agent openvswitch-
datapath-dkms neutron-l3-agent neutron-dhcp-agent
3.5.2.3 - Step 2: Edit neutron configuration file (neutron.conf)
sudo vi /etc/neutron/neutron.conf
[DEFAULT]
#Rabbit information
rabbit_host = IP/HostnameOfController
rabbit_port = 5672
rabbit_use_ssl = false](https://image.slidesharecdn.com/518aace8-3d27-4009-99c7-393f6de8e3b2-160503112732/85/INN694-2014-OpenStack-installation-process-V5-22-320.jpg)
![OpenStack – Final report
INN694 – Project Page |22/43|
rabbit_userid = YourUserName
rabbit_password = StrongPassword
rabbit_virtual_host = /NameVHost
rabbit_virtual_host = qutlab-osuc
rabbit_notification_exchange = neutron
rabbit_notification_topic = notifications
#type of authentication
auth_strategy = keystone
#Configuration of the Modular Layer 2 (ML2)
core_plugin = ml2
service_plugins = router
allow_overlapping_ips = True
[keystone_authtoken]
auth_uri = http:// IP/HostnameOfController:5000
auth_host = IP/HostnameOfController
auth_port = 35357
auth_protocol = http
admin_tenant_name = service
admin_user = neutron
admin_password = Keystone_Neutron_Password
3.5.2.4 - Step 3: Setup the Layer-3 (L3) Agent
vi /etc/neutron/l3_agent.ini
[DEFAULT]
interface_driver = neutron.agent.linux.interface.OVSInterfaceDriver
use_namespaces = True
3.5.2.5 - Step 4: Setup the DHCP Agent
vi /etc/neutron/dhcp_agent.ini
[DEFAULT]
interface_driver = neutron.agent.linux.interface.OVSInterfaceDriver
dhcp_driver = neutron.agent.linux.dhcp.Dnsmasq
use_namespaces = True
3.5.2.6 - Step 5: Setup the metadata Agent
vi /etc/neutron/metadata_agent.ini
[DEFAULT]
auth_url = http:// IP/HostnameOfController:5000/v2.0
auth_region = regionOne
admin_tenant_name = service
admin_user = neutron
admin_password = Keystone_Neutron_Password
nova_metadata_ip = IP/HostnameOfController
metadata_proxy_shared_secret = Metadata_Secret_Key
#Uncomment the next line for troubleshooting
#verbose = True](https://image.slidesharecdn.com/518aace8-3d27-4009-99c7-393f6de8e3b2-160503112732/85/INN694-2014-OpenStack-installation-process-V5-23-320.jpg)
![OpenStack – Final report
INN694 – Project Page |23/43|
3.5.2.7 - Step 6: Setup the nova service to inform about the metadata proxy information
Remark: this part need to be done on the controller-node and the Metadata_Secret_Key must
be the same as the previous step on the file “metadata_agent.ini”.
sudo vi /etc/nova/nova.conf
[DEFAULT]
...
#Metadata proxy information between Neutron and Nova
service_neutron_metadata_proxy = true
neutron_metadata_proxy_shared_secret = Metadata_Secret_Key
3.5.2.8 - Step 7: Setup the Modular Layer 2 (ML2) plug-in
sudo vi /etc/neutron/plugins/ml2/ml2_conf.ini
[ml2]
type_drivers = gre
tenant_network_types = gre
mechanism_drivers = openvswitch
[ml2_type_gre]
tunnel_id_ranges = 1:1000
[securitygroup]
firewall_driver =
neutron.agent.linux.iptables_firewall.OVSHybridIptablesFirewallDriver
enable_security_group = True
[ovs]
local_ip = INSTANCE_TUNNELS_INTERFACE_IP_ADDRESS #the local ip address of the
network interface or the hostname that can resolve the address of the instance
network
tunnel_type = gre
enable_tunneling = True
3.5.2.9 - Step 8: Setup the Open vSwitch (OVS) service
The OVS service provide the virtual networking framework for instances. It create a virtual bridge
between the external network (e.g.: Internet) and the internal network (e.g.: Used for instances). The
externalbridge (namedbr-ex on thistutorial)need to be connectedto a physicalnetwork interfacein order
to communicate with the external network.
Restart the service:
sudo service openvswitch-switch restart
Add the integration bridge:
sudo ovs-vsctl add-br br-int
Add the external bridge:
sudo ovs-vsctl add-br br-ex
Add a physical network interface to the external bridge (Ex: eth0, eth1 …)
sudo ovs-vsctl add-port br-ex INTERFACE_NAME](https://image.slidesharecdn.com/518aace8-3d27-4009-99c7-393f6de8e3b2-160503112732/85/INN694-2014-OpenStack-installation-process-V5-24-320.jpg)
![OpenStack – Final report
INN694 – Project Page |24/43|
3.5.2.10 - Step 9: Restart the necessary services
sudo service neutron-plugin-openvswitch-agent restart
sudo service neutron-l3-agent restart
sudo service neutron-dhcp-agent restart
sudo service neutron-metadata-agent restart
3.5.3 - Compute node
3.5.3.1 - Pre-step: Enable few networking function
sudo vi /etc/sysctl.conf
net.ipv4.conf.all.rp_filter=0
net.ipv4.conf.default.rp_filter=0
Update the changes
sudo sysctl -p
3.5.3.2 - Step 1: Install the networking components (packages) (within 1 line)
sudo apt-get install neutron-common neutron-plugin-ml2 neutron-plugin-openvswitch-agent
openvswitch-datapath-dkms
3.5.3.3 - Step 2: Edit neutron configuration file (neutron.conf)
sudo vi /etc/neutron/neutron.conf
[DEFAULT]
#Rabbit information
rabbit_host = IP/HostnameOfController
rabbit_port = 5672
rabbit_use_ssl = false
rabbit_userid = YourUserName
rabbit_password = StrongPassword
rabbit_virtual_host = /NameVHost
rabbit_notification_exchange = neutron
rabbit_notification_topic = notifications
#type of authentication
auth_strategy = keystone
#Configuration of the Modular Layer 2 (ML2)
core_plugin = ml2
service_plugins = router
allow_overlapping_ips = True
[keystone_authtoken]
#Authentication information:
auth_uri = http://IP/HostnameOfController:5000
auth_host = IP/HostnameOfController
auth_port = 35357
auth_protocol = http
admin_tenant_name = service
admin_user = neutron
admin_password = Keystone_Neutron_Password](https://image.slidesharecdn.com/518aace8-3d27-4009-99c7-393f6de8e3b2-160503112732/85/INN694-2014-OpenStack-installation-process-V5-25-320.jpg)
![OpenStack – Final report
INN694 – Project Page |25/43|
3.5.3.4 - Step 3: Edit the nova.conf to configure compute to use Networking
sudo vi /etc/nova/nova.conf
[DEFAULT]
...
network_api_class = nova.network.neutronv2.api.API
neutron_url = http://IP/HostnameOfController:9696
neutron_auth_strategy = keystone
neutron_admin_tenant_name = service
neutron_admin_username = neutron
neutron_admin_password = Keystone_Neutron_Password
neutron_admin_auth_url = http://IP/HostnameOfController:35357/v2.0
linuxnet_interface_driver = nova.network.linux_net.LinuxOVSInterfaceDriver
firewall_driver = nova.virt.firewall.NoopFirewallDriver
security_group_api = neutron
3.5.3.5 - Step 4: Setup the Modular Layer 2 (ML2) plug-in
sudo vi /etc/neutron/plugins/ml2/ml2_conf.ini
[ml2]
type_drivers = gre
tenant_network_types = gre
mechanism_drivers = openvswitch
[ml2_type_gre]
tunnel_id_ranges = 1:1000
[securitygroup]
firewall_driver =
neutron.agent.linux.iptables_firewall.OVSHybridIptablesFirewallDriver
enable_security_group = True
[ovs]
local_ip = INSTANCE_TUNNELS_INTERFACE_IP_ADDRESS #the ip address of the network
interface or the hostname that can resolve the address of the instance network
tunnel_type = gre
enable_tunneling = True
3.5.3.6 - Step 5: Setup the Open vSwitch (OVS)service
sudo service openvswitch-switch restart
sudo ovs-vsctl add-br br-int
3.5.3.7 - Step 16: Restart the necessary services
sudo service nova-compute restart
sudo service neutron-plugin-openvswitch-agent restart](https://image.slidesharecdn.com/518aace8-3d27-4009-99c7-393f6de8e3b2-160503112732/85/INN694-2014-OpenStack-installation-process-V5-26-320.jpg)
![OpenStack – Final report
INN694 – Project Page |27/43|
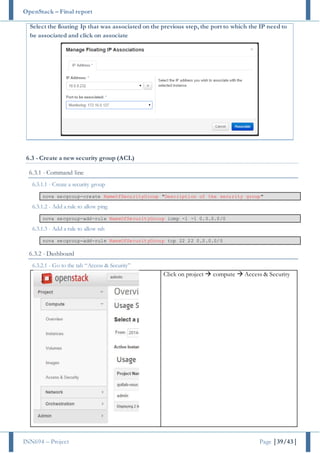
3.6.2 - Step 2: Change the “LOCATION” value to match the one on the file /etc/memcached.conf
Vi /etc/openstack-dashboard/local_settings.py
CACHES = {
'default': {
'BACKEND' : 'django.core.cache.backends.memcached.MemcachedCache',
'LOCATION' : '127.0.0.1:11211'
}
}
3.6.3 - Step 3: Update the ALLOWED_HOSTS to include your computer (only if you wish to access the
dashboard from a specific list of computer) and the address of the controller
Vi /etc/openstack-dashboard/local_settings.py
ALLOWED_HOSTS = ['localhost', 'Your-computer']
OPENSTACK_HOST = "IP/HostnameOfController"
3.6.4 - Step 4: Restart the service
service apache2 restart
service memcached restart
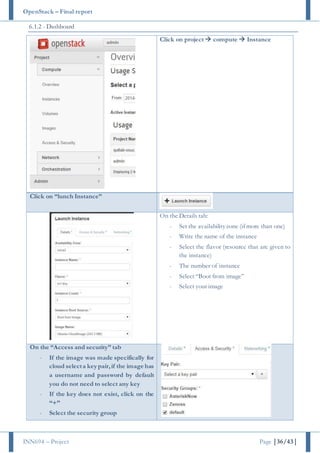
3.6.5 - Step 5: Access the dashboard with your favourite web browser
“http://IP/HostnameOfController/horizon”
Figure 3 - Dashboard login](https://image.slidesharecdn.com/518aace8-3d27-4009-99c7-393f6de8e3b2-160503112732/85/INN694-2014-OpenStack-installation-process-V5-28-320.jpg)
![OpenStack – Final report
INN694 – Project Page |28/43|
3.7 - Block storage: Cinder
3.7.1 - On the controller
3.7.1.1 - Step 1: Install the packages
sudo apt-get install cinder-api cinder-scheduler
3.7.1.2 - Step 2: Set up the connection to the database
vi /etc/cinder/cinder.conf
[database]
connection =
mysql://dbu_nova:MySQL_Cinder_Password@IP/HostnameOfController/cinder
3.7.1.3 - Step 3: Create the database and user
mysql> CREATE DATABASE cinder;
mysql> GRANT ALL PRIVILEGES ON cinder.* TO 'dbu_cinder'@'localhost'
IDENTIFIED BY 'MySQL_Cinder_Password';
mysql> GRANT ALL PRIVILEGES ON cinder.* TO 'dbu_cinder'@'%'
IDENTIFIED BY 'MySQL_Cinder_Password';
3.7.1.4 - Step 4: Create the tables
su -s /bin/sh -c "cinder-manage db sync" cinder
3.7.1.5 - Step 5: Create user on the Identity service
keystone user-create --name=cinder --pass= Keystone_Cinder_Password --
email=cinder@connetwork.com.au
keystone user-role-add --user=cinder --tenant=service --role=admin
3.7.1.6 - Step 6: Add information about the identity service and the message broker
vi /etc/cinder/cinder.conf
[DEFAULT]
#Set up the message broker
rpc_backend = rabbit
rabbit_host = IP/HotsnameOfController
rabbit_userid = YourUserName
rabbit_password = StrongPassword
rabbit_virtual_host = NameVHost
#add the persmission to connect to the identity service;
[keystone_authtoken]
auth_uri = http://IP/HostnameOfController:5000
auth_host = IP/HostnameOfController
auth_port = 35357
auth_protocol = http
admin_tenant_name = service
admin_user = cinder
admin_password = Keystone_Cinder_Password](https://image.slidesharecdn.com/518aace8-3d27-4009-99c7-393f6de8e3b2-160503112732/85/INN694-2014-OpenStack-installation-process-V5-29-320.jpg)
![OpenStack – Final report
INN694 – Project Page |29/43|
3.7.1.7 - Step 7: Create the service and endpoint
keystone service-create --name=cinder --type=volume --description="OpenStack Block
Storage"
keystone endpoint-create
--service-id=$(keystone service-list | awk '/ volume / {print $2}')
--publicurl=http://IP/HostnameOfController:8776/v1/%(tenant_id)s
--internalurl=http://IP/HostnameOfController:8776/v1/%(tenant_id)s
--adminurl=http://IP/HostnameOfController:8776/v1/%(tenant_id)s
3.7.1.8 - Step 8: Create the service and endpoint for the version 2
keystone service-create --name=cinderv2 --type=volumev2 --description="OpenStack Block
Storage v2"
keystone endpoint-create
--service-id=$(keystone service-list | awk '/ volumev2 / {print $2}')
--publicurl=http://IP/HostnameOfController:8776/v2/%(tenant_id)s
--internalurl=http://IP/HostnameOfController:8776/v2/%(tenant_id)s
--adminurl=http://IP/HostnameOfController:8776/v2/%(tenant_id)s
3.7.1.9 - Step 9: Restart all necessary services
service cinder-scheduler restart
service cinder-api restart
3.7.2 - On a storage node (Can be done in any machine)
This part assume that the type of partition of sda3 it LVM
3.7.2.1 - Step 1:Install the LVM package
apt-get install lvm2
3.7.2.2 - Step 2:Create a physical volume
pvcreate /dev/sda3
3.7.2.3 - Step 3:Create a volume group call “cinder-volume”
Note: if cinder is install on more than one host, the name of the logical should be different in every
host
vgcreate cinder-volumes /dev/sda3
3.7.2.4 - Step 4:Change the configuration of LVM
vi /etc/lvm/lvm.conf
devices {
...
filter = [ "a/sda1/", "a/sda3/", "r/.*/"]
...
}
3.7.2.5 - Step 5:Test the configuration
pvdisplay
3.7.2.6 - Step 6: Install the packages
apt-get install cinder-volume](https://image.slidesharecdn.com/518aace8-3d27-4009-99c7-393f6de8e3b2-160503112732/85/INN694-2014-OpenStack-installation-process-V5-30-320.jpg)
![OpenStack – Final report
INN694 – Project Page |30/43|
3.7.2.7 - Step 7: Add information about the identity service and the message broker
vi /etc/cinder/cinder.conf
[DEFAULT]
#Set up the message broker
rpc_backend = rabbit
rabbit_host = IP/HotsnameOfController
rabbit_userid = YourUserName
rabbit_password = StrongPassword
rabbit_virtual_host = NameVHost
#add the persmission to connect to the identity service;
enabled_backends=lvmdriver-NameOfDriver
[lvmdriver-NameOfDriver]
volume_group= NameOfVolumeGroup
volume_driver=cinder.volume.drivers.lvm.LVMISCSIDriver
volume_backend_name= NameOfBackEnd
[keystone_authtoken]
auth_uri = http://IP/HostnameOfController:5000
auth_host = IP/HostnameOfController
auth_port = 35357
auth_protocol = http
admin_tenant_name = service
admin_user = cinder
admin_password = Keystone_Cinder_Password
glance_host = controller IP/HotsnameOfController
[database]
connection =
mysql://dbu_nova:MySQL_Cinder_Password@IP/HostnameOfController/cinder
3.7.2.8 - Step8: Restart all nova service
service cinder-volume restart
service tgt restart
3.8 - Orchestration: Heat
3.8.1 - Step 1: Install the packages
apt-get install heat-api heat-api-cfn heat-engine
3.8.2 - Step 2: Set up the connection to the database
vi /etc/heat/heat.conf
[database]
connection = mysql://dbu_heat:Keystone_Heat_Password@IP/HostnameOfController /heat
3.8.3 - Step 3: Create the database and user
mysql -u root -p
mysql> CREATE DATABASE heat;
mysql> GRANT ALL PRIVILEGES ON heat.* TO 'dbu_heat'@'localhost'
IDENTIFIED BY 'Keystone_Heat_Password';](https://image.slidesharecdn.com/518aace8-3d27-4009-99c7-393f6de8e3b2-160503112732/85/INN694-2014-OpenStack-installation-process-V5-31-320.jpg)
![OpenStack – Final report
INN694 – Project Page |31/43|
mysql> GRANT ALL PRIVILEGES ON heat.* TO 'dbu_heat'@'%'
IDENTIFIED BY 'Keystone_Heat_Password';
3.8.4 - Step 4: Create the tables
su -s /bin/sh -c "heat-manage db_sync" heat
3.8.5 - Step 5: Change the configuration file
vi /etc/heat/heat.conf
#logging
verbose = True
log_dir=/var/log/heat
#Rabbit information
rpc_backend = rabbit
rabbit_host = IP/HotsnameOfController
rabbit_userid = YourUserName
rabbit_password = StrongPassword
rabbit_virtual_host = NameVHost
[keystone_authtoken]
auth_host = IP/HotsnameOfController
auth_port = 35357
auth_protocol = http
auth_uri = http://IP/HotsnameOfController:5000/v2.0
admin_tenant_name = service
admin_user = heat
admin_password = Keystone_Heat_Password
[ec2authtoken]
auth_uri = http://IP/HotsnameOfController:5000/v2.0
3.8.6 - Step 6: Create user on the Identity service
keystone user-create --name=heat --pass=Keystone_Heat_Password --
email=heat@connetwork.com.au
keystone user-role-add --user=heat --tenant=service --role=admin
3.8.7 - Step 7: Create the service and endpoint
keystone service-create --name=heat --type=orchestration --description="Orchestration"
keystone endpoint-create
--service-id=$(keystone service-list | awk '/ orchestration / {print $2}')
--publicurl=http://IP/HotsnameOfController:8004/v1/%(tenant_id)s
--internalurl=http://IP/HotsnameOfController:8004/v1/%(tenant_id)s
--adminurl=http://IP/HotsnameOfController:8004/v1/%(tenant_id)s
keystone service-create --name=heat-cfn --type=cloudformation
--description="Orchestration CloudFormation"
keystone endpoint-create
--service-id=$(keystone service-list | awk '/ cloudformation / {print $2}')
--publicurl=http://IP/HotsnameOfController:8000/v1
--internalurl=http://IP/HotsnameOfController:8000/v1](https://image.slidesharecdn.com/518aace8-3d27-4009-99c7-393f6de8e3b2-160503112732/85/INN694-2014-OpenStack-installation-process-V5-32-320.jpg)
![OpenStack – Final report
INN694 – Project Page |32/43|
--adminurl=http://IP/HotsnameOfController:8000/v1
3.8.8 - Step 8: Create the heat_stack_user role.
This role is used as the default role for users created by the Orchestration module.
keystone role-create --name heat_stack_user
3.8.9 - Step 9: Setup the URL of the metadata server
vi /etc/heat/heat.conf
[DEFAULT]
...
# URL of the Heat metadata server. (string value)
heat_metadata_server_url = http://IP/HotsnameOfController:8000
# URL of the Heat waitcondition server. (string value)
heat_waitcondition_server_url = http:/
IP/HotsnameOfController:8000/v1/waitcondition
3.8.10 - Step 10: Restart all necessary services
service heat-api restart
service heat-api-cfn restart
service heat-engine restart](https://image.slidesharecdn.com/518aace8-3d27-4009-99c7-393f6de8e3b2-160503112732/85/INN694-2014-OpenStack-installation-process-V5-33-320.jpg)
![OpenStack – Final report
INN694 – Project Page |34/43|
5 - Useful command
5.1 - General command
Command Description
openssl rand –hex 10 Generate a random password
ping:
-s NUMBER
Test the connectivity
Specify the size of the packet (MTU)
tail -f Show the end of a file and any upcoming update
rabbitmqctl list_users RabbitMQ: List of user
5.2 - Keystone
Argument Option Description
user-create --name Name of the user
--pass Password
--email Email of the user
endpoint-list List of endpoint
endpoint-get NameOfEndpoint Information of one endpoint
role-list List of role
role-get NameOfrole Information of one role
service-list List of service
service-get NameOfservice Information of one service
tenant-list List of tenant
tenant-get NameOfTenant Information of one tenant
user-list List of User
user-get NameOfUser Information of one User
5.3 - Glance
The “glance” command is used to manage virtual image by command line. A list of possible options and
arguments are listed below:
Argument Option Description
image-create --name
Name of the image for OpenStack
--disk-format
Format of the image file:
qcow2, raw, vhd, vmdk, vdi, iso, aki, ari, and ami
--container-format
Format of the container1:
Bare, ovf, aki and ami
--is-public
< LocationOfTheImage
Example sudo glance image-create --name "cirros-0.3.2-x86_64" --
disk-format qcow2
--container-format bare --is-public True --progress <
cirros-0.3.2-x86_64-disk.img
1 Specify bare to indicate that the image file is not in a file format that contains metadata about the virtual machine. Although this
field is currently required, it is not actually used by any of the OpenStack services and has no effect on system behaviour. Because
the value is not used anywhere, it is safe to always specify bare as the container format [8].](https://image.slidesharecdn.com/518aace8-3d27-4009-99c7-393f6de8e3b2-160503112732/85/INN694-2014-OpenStack-installation-process-V5-35-320.jpg)

![OpenStack – Final report
INN694 – Project Page |41/43|
6.4 - Force the MTU of the virtual machine
6.4.1 - Setup the DHCP agent :
vi /etc/neutron/dhcp_agent.ini
[DEFAULT]
...
#add the following line
dnsmasq_config_file=/etc/neutron/dnsmasq/dnsmasq-neutron.conf
6.4.2 - Create the dnsmasq-neutron.conf
vi /etc/neutron/dnsmasq/dnsmasq-neutron.conf
dhcp-option-force=26, 1400
7 - Table of figures
Figure 1 - OpenStack overview [1] ............................................................................................................................................................................ 3
Figure 4 - Network topology..................................................................................................................................................................................... 6
Figure 4 - Dashboard login..................................................................................................................................................................................... 27
8 - Table of tables
Table 1 - Hardware requirement ............................................................................................................................................................................... 4
Table 2 - List of password ........................................................................................................................................................................................ 5](https://image.slidesharecdn.com/518aace8-3d27-4009-99c7-393f6de8e3b2-160503112732/85/INN694-2014-OpenStack-installation-process-V5-42-320.jpg)
![OpenStack – Final report
INN694 – Project Page |42/43|
9 - References
1. OpenStack. [Online].Availablefrom: https://www.openstack.org/.
2. OpenStack Foundation. OpenStack documentation - Chapter 5. Scaling.[Online].Availablefrom:
http://docs.openstack.org/openstack-ops/content/scaling.html.
3. rabbitmqctl(1) manual page. [Online].Availablefrom: http://www.rabbitmq.com/man/rabbitmqctl.1.man.html.
4. Verify the Image Serviceinstallation.[Online].Availablefrom: http://docs.openstack.org/icehouse/install-
guide/install/apt/content/glance-verify.html.](https://image.slidesharecdn.com/518aace8-3d27-4009-99c7-393f6de8e3b2-160503112732/85/INN694-2014-OpenStack-installation-process-V5-43-320.jpg)


![[OpenStack Day in Korea 2015] Track 3-6 - Archiectural Overview of the Open S...](https://cdn.slidesharecdn.com/ss_thumbnails/36-150213070342-conversion-gate02-thumbnail.jpg?width=640&height=640&fit=bounds)


