This document provides an overview of installing Oracle Data Integrator (ODI), including its main applications like ODI Studio, repositories, and standalone agent, as well as different installation types; it outlines the installation roadmap and process flow, and summarizes ODI's topology with the components that can be installed and their purposes.


![Configuring ODI Studio, Repositories, and the Standalone Agent
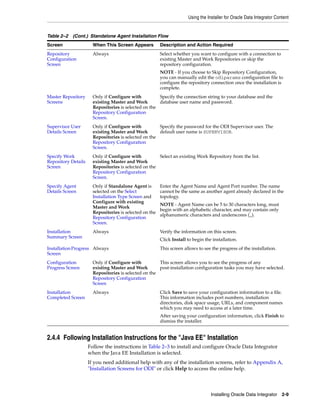
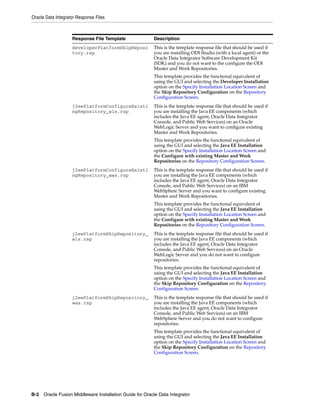
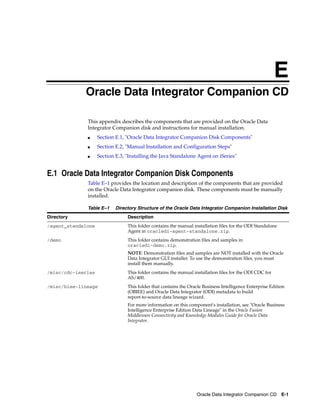
2. Configure the agent manually by editing the odiparams.bat/sh file to point to
the correct repository. The odiparams file is pre-configured if you installed your
standalone agent using Oracle Universal Installer and selected to configure a
repository connection during installation. See Table 3–1 for the list of these
parameters.
Table 3–1 Repository Connection Information
Parameter Description
ODI_MASTER_DRIVER JDBC driver used to connect the Master Repository.
ODI_MASTER_URL JDBC URL used to connect the Master Repository.
ODI_MASTER_USER Database account used to connect the Master
Repository.
ODI_MASTER_ENCODED_PASS Database account password. The password must be
encoded with the encode.[sh|bat]
<password> command.
ODI_SECU_WORK_REP Name of the Work Repository to connect to. This
Work Repository is the default repository into which
the scenarios are started.
ODI_SUPERVISOR Name of an ODI supervisor user. This Supervisor
user is used by the agent to connect the Master
Repository.
ODI_SUPERVISOR_ENCODED_PASS This user’s password. The password must be
encoded with the encode.[sh|bat]
<password> command.
ODI_USER Name of an ODI user used to start scenarios. This
user’s credentials are used when starting a scenario
from a command line.
ODI_ENCODED_PASS This ODI user password
ODI_CONNECTION_RETRY_COUNT The number of retries to establish the connection in
the event that a repository connection fails. If set to
0, no retry will be performed. Default is 10.
NOTE: The RETRY parameters allow the agent to
continue sessions if the repository fails and is
temporarily unavailable. This scenario applies
primarily to Oracle RAC configurations.
ODI_CONNECTION_RETRY_DELAY Time in milliseconds between repository connection
retries. Default is 1000.
The following example shows a modified odiparams.bat/sh file:
ODI_MASTER_DRIVER=oracle.jdbc.driver.OracleDriver
ODI_MASTER_URL=jdbc:oracle:thin:@ours:1521:ORA9
ODI_MASTER_USER=ODI_11G
ODI_MASTER_ENCODED_PASS=gxfpqkz074jeaCpL4XSEFzxoj8E0p
ODI_SECU_WORK_REP=WORKREP
ODI_SUPERVISOR=SUPERVISOR
ODI_SUPERVISOR_ENCODED_PASS=fJya.vR5kvNcu9TtV,jVZEt
See Also: For more information on how to work with a standalone
agent, a Java EE agent and how to handle load balancing, see
"Managing Agents" in the Oracle Fusion Middleware Developer's Guide
for Oracle Data Integrator.
3-6 Oracle Fusion Middleware Installation Guide for Oracle Data Integrator](https://image.slidesharecdn.com/odiinstallationguide-120606031534-phpapp01/85/Odi-installation-guide-36-320.jpg)


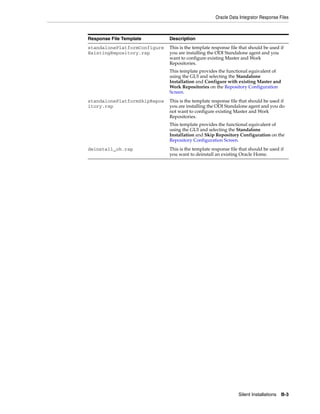

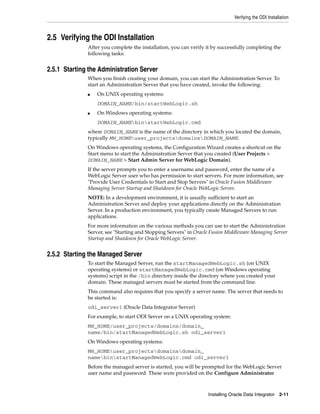
![Deinstallation Instructions
Table C–1 Removing Your Oracle Data Integrator Home
Number Screen Description and Action Required
1 Welcome Screen Click Next to continue.
2 Deinstall Oracle Home Screen Select Deinstall Oracle Home.
Verify the Oracle home directory that is
about the be deinstalled.
Click Deinstall to continue.
3 Deinstallation Progress Screen This screen shows the progress and status
of the deinstallation.
4 Deinstallation Complete Screen Click Finish to dismiss the screen.
C.1.6 Removing the Oracle Common Home
This section describes how to remove the Oracle Fusion Middleware home’s
/oracle_common directory. This directory contains its own Deinstaller in /oui/bin
(on UNIX operating systems) or ouibin (on Windows operating systems), just like
any other Oracle home directory.
To start the Deinstaller, navigate to the MW_HOME/oracle_common/oui/bin (on
UNIX operating systems) or MW_HOMEoracle_commonouibin (on Windows
operating systems) directory and start the Deinstaller.
The Deinstaller requires the location of a Java Runtime Environment (JRE) on your
system. When you installed Oracle WebLogic Server, a JRE was installed on your
system. You can use this location (the location of the JRE directory) to start the
installer. The default location for the JRE is MW_HOME/jdk160 (on UNIX operating
systems) or MW_HOMEjdk160 (on Windows operating systems), where MW_HOME is
the Oracle Fusion Middleware Home directory.
On 64-bit platforms, the JRE location is the JAVA_HOME you used to install Oracle
WebLogic Server.
On UNIX operating systems:
./runInstaller -deinstall -jreLoc [JRE_LOCATION]
On Windows operating systems:
setup.exe -deinstall -jreLoc [JRE_LOCATION]
You must specify the absolute path to your JRE_LOCATION; relative paths will not
work.
After the Deinstaller is started, follow the instructions in Table C–1 to remove the
Oracle Common home.
C.1.7 Removing Oracle WebLogic Server
Refer to "Uninstalling the Software" in Oracle Fusion Middleware Installation Guide for
Oracle WebLogic Server for instructions on how to remove Oracle WebLogic Server.
After you have removed the Oracle WebLogic Server, you must manually remove the
Oracle Fusion Middleware home directory. For example, if your Oracle Fusion
Middleware home directory was /home/Oracle/Middleware on a UNIX operating
system:
> cd /home/Oracle
> rm -rf Middleware
C-4 Oracle Fusion Middleware Installation Guide for Oracle Data Integrator](https://image.slidesharecdn.com/odiinstallationguide-120606031534-phpapp01/85/Odi-installation-guide-70-320.jpg)


![G
Customizing the ODI Credential Map Name
G
The Oracle Data Integrator Java EE Agent and Oracle Data Integrator Console use a
credential map to store usernames and passwords. The default credential map name is
oracle.odi.credmap. In rare situations, ODI users may need to change the default
to a different credential map name for the ODI Java EE Agent and ODI Console.
G.1 What is stored in Credential Store?
ODI runtime uses credential store for the ODI Java EE Agent and ODI Console.
■ ODI Java EE Agent boot AppId and Password
■ ODI Console boot AppId and Password
In most usage scenarios, ODI uses the credential map name oracle.odi.credmap.
In certain environments, however, the credential map name is decided at a global level
and all components are required to use that credential map name. For example, an
Oracle Fusion Middleware application may use the oracle.apps.security
credential map name instead of the standard oracle.odi.credmap. In this case, the
credential map name needs to be customized for the environment.
G.2 Executing the updateCredMapInEar Script
You can modify the credential map name specified in the Oracle Data Integrator
templates by running the script updateCredMapInEar.[sh|bat]. If you execute the
script with the -EARFILE parameter, you are able to modify a specific ear file and
update the default credential map. You must execute this script before creating and
deploying ODI Java EE Agent ear and before deploying ODI Console ear to a
WebLogic Domain. After executing this script, all generated ODI Java EE Agent ears
will carry the changed credential map name.
Usage:
updateCredMapInEar.sh -MAPNAME=<credential_map_name>
[-EARFILE=<ear_file_to_update>
Where:
■ MAPNAME: User supplied credential map name.
■ EARFILE: This is optional parameter. If specified, the credential map inside the
specified ear file will be modified.
If not specified, the credential map name in the default templates for ODI Java EE
Agent (oraclediagent.ear) and ODI Console (odiconsole.ear) will be
modified.
Customizing the ODI Credential Map Name G-1](https://image.slidesharecdn.com/odiinstallationguide-120606031534-phpapp01/85/Odi-installation-guide-89-320.jpg)
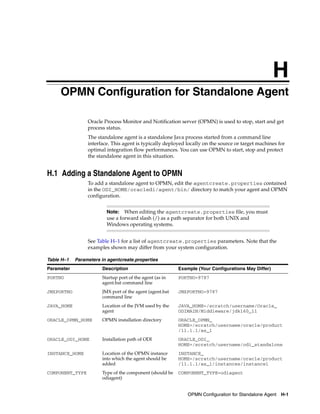
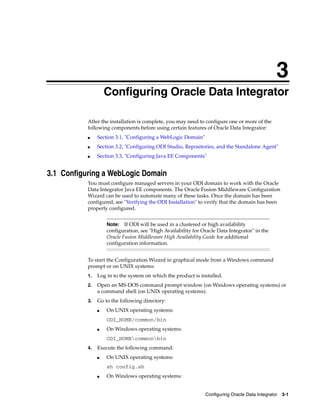
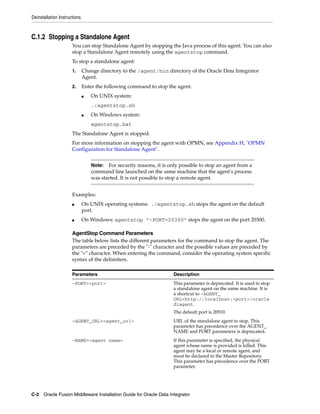
![Stopping the Agent
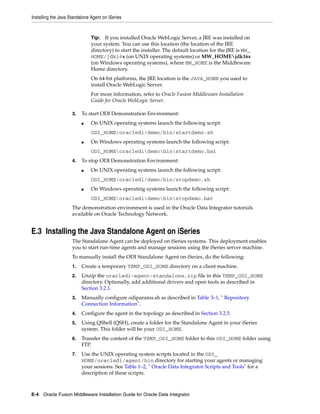
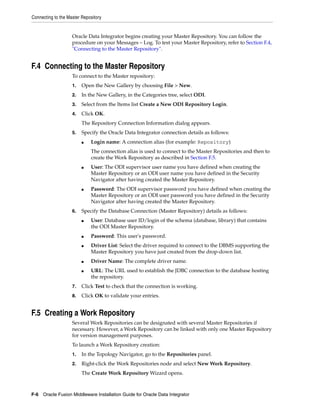
Table H–1 (Cont.) Parameters in agentcreate.properties
Parameter Description Example (Your Configurations May Differ)
COMPONENT_NAME Name of the agent to add. This COMPONENT_NAME=INTERFACE
will be its identification in OPMN
ODI_MASTER_DRIVER JDBC driver used to connect the ODI_MASTER_
Master Repository. DRIVER=oracle.jdbc.OracleDriver
ODI_MASTER_URL JDBC URL used to connect the ODI_MASTER_
Master Repository. URL=jdbc:oracle:thin:adc6260039:1521:
orcl
ODI_MASTER_USER Database account used to connect ODI_MASTER_USER=SUPERVISOR
the Master Repository.
ODI_MASTER_ Database account password. The ODI_MASTER_ENCODED_
ENCODED_PASS password must be encoded with PASS=hpfatLEoMR6zAK3T1PoP5LXDS
the "encode.[sh|bat] <password>"
command.
ODI_SECU_WORK_REPO Name of the Work Repository to ODI_SECU_WORK_REPO=WORKREP
connect. This Work Repository
must be attached to the master
repository.
ODI_SUPERVISOR_ OracleDI supervisor user ODI_SUPERVISOR_ENCODED_
ENCODED_PASS password. The password must be PASS=hpfatLEoMR6zAK3T1PoP5LXDS
encoded with the "encode.[sh|bat]
<password>" command.
Run the following script to add this agent to the OPMN configuration.
For UNIX operating systems:
ODI_HOME/oracledi/agent/bin/odi_opmn_addagent.sh
For Windows operating systems:
ODI_HOME/oracledi/agent/bin/odi_opmn_addagent.bat
H.2 Stopping the Agent
To stop all agent components in an Oracle instance using opmnctl
opmnctl stopproc process-type= odiagent
To stop a specific agent component, such as odiagent1, using opmnctl
opmnctl stopproc ias-component= odiagent1
H.3 Starting the Agent and Agent Components
To start all agent components in an Oracle instance using opmnctl:
opmnctl startproc process-type= odiagent
To start a specific agent component, such as odiagent1, using opmnctl:
opmnctl startproc ias-component=odiagent1
H.4 Determining the Status of Oracle HTTP Server
You can determine the status of Oracle HTTP Server using opmnctl:
H-2 Oracle Fusion Middleware Installation Guide for Oracle Data Integrator](https://image.slidesharecdn.com/odiinstallationguide-120606031534-phpapp01/85/Odi-installation-guide-92-320.jpg)