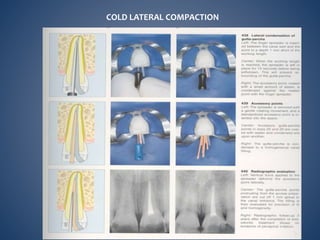
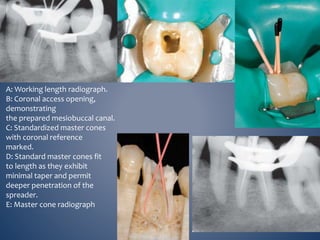
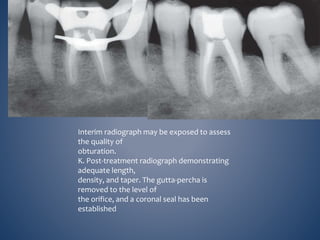
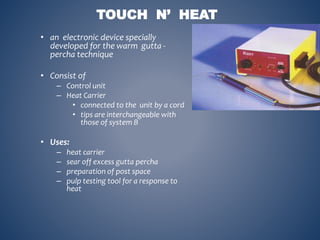
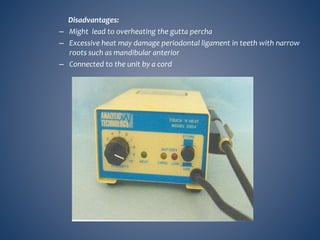
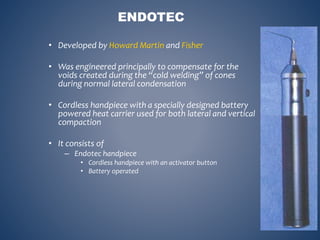
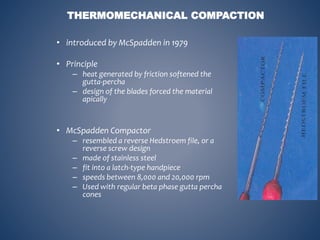
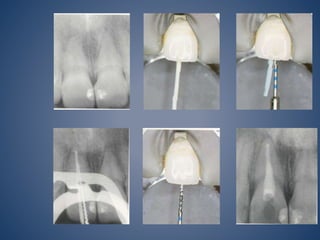
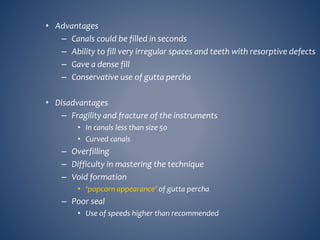
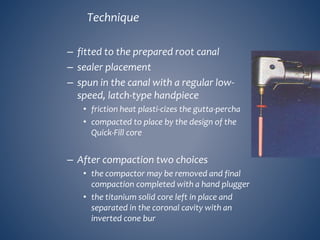
2. • INTRODUCTION
• RATIONALE FOR OBTURATION
• OBJECTIVES OF OBTURATION
• CLASSIFICATION OF ROOT CANAL FILLING MATERIALS
• REQUIREMENTS OF IDEAL OBTURATING MATERIAL
• SOLID – CORE MATERIALS
• IDEAL REQUIREMENTS OF SEALER
• CLASSIFICATION OF SEALERS
• OBTURATION TECHNIQUES
• CONCLUSION
3. INTRODUCTION
Obturation is the final step in endodontic treatment and it involves
complete obliteration of the radicular space with an inert material.
Success in pulp space therapy is by sealing the apical and coronal areas of
potential leakage after meticulous cleaning and shaping.
However the pulp space system consists of fins, lateral and accessory canals
which are difficult to obturate using traditional techniques.
Approximately 60% of all endodontic treatment fails due to incomplete
obturation, thus the development of obturation materials & techniques has
gained more importance than ever.
4. • Substitution of an inert filling in the space previously occupied by the pulp
tissue
• To eliminate all avenues of leakage from the oral cavity or the periradicular
tissues into the root canal system (i.e. to attain a three dimensional fluid
impervious seal apicaly, laterally and coronally within the confines of the
root canal system)
Mid 1960’s Hermetic seal Grossman
1970’s-1980’s Three dimensional filling Schilder 1967
1980’s Fluid impervious seal Ramsey 1982
• To seal within the system any irritants that cannot be fully removed during
canal cleaning and shaping procedures
• To adequately seal iatrogenic causes such perforations, ledges and zipped
apices
OBJECTIVES OF OBTURATION
5. Radiographically
– To attain a radiographic appearance of a dense three
dimensional filling which extends as close as possible to
the cemento dentinal junction without gross over
extension or under filling in the presence of a patent canal
– Obturated root canal should reflect a shape that is
approximately the same shape as the root morphology
– Shape of the obturated canal should reflect a continuously
tapering funnel preparation without excess removal of
tooth structure at any level of the canal system
7. ISO GROUPING
– Group I :
• Hand use only
– Files
– Reamers
– Broaches
– Pluggers
– Spreaders
– Group II :
• Engine driven latch type
– Same design as group I but made to be attached to a handpiece
– Paste fillers
– Group III :
• Engine driven latch type
– Drills or reamers
» Gates – Glidden, Peeso
– Group IV :
• Root canal points
– Gutta-percha points
– Silver points
– Paper points
8.
9.
10. REQUISITES FOR IDEAL PULP SPACE FILLING MATERIALS
Grossman (1940)
1. Easily introduced in pulp space
2. Seals laterally and apically
3. Not shrinkable
4. Impervious to moisture
5. Bacteriostatic
6. Radiopaque
7. Should not stain tooth
8. Should not irritate peri-radicular tissues.
9. Should be sterile or be easily/quickly sterilized
10.Must be easy to remove if necessary
11. CLASSIFICATION OF OBTURATION TECHNIQUES
(GUTMANN AND WHITHERSPOON, 2002)
I. Solid core Gutta percha with sealants
A. Cold Gutta percha points
• Lateral compaction
• Variations of lateral compaction
B. Chemically plasticized cold gutta percha
C. Canal warmed gutta percha
• Vertical compaction
• System B compaction
• Sectional Compaction
• Lateral / vertical compaction
• Thermo-mechanical compaction
D. Thermoplasticized gutta percha
• Syringe insertion
• Solid – core carrier insertion
II. Apical third filling
III. Injection or “Spiral” filling
13. •This technique provides for length
control during
compaction.
• A disadvantage is that the technique
may not fill
canal irregularities as well as warm
vertical
compaction or thermoplastic techniques.
14. A: Working length radiograph.
B: Coronal access opening,
demonstrating
the prepared mesiobuccal canal.
C: Standardized master cones
with coronal reference
marked.
D: Standard master cones fit
to length as they exhibit
minimal taper and permit
deeper penetration of the
spreader.
E: Master cone radiograph
15. •This “master cone” is measured and grasped with
forceps so that the distance from the cone tip to
the forceps is equal to the prepared length.
•A reference point on the cone can be made by
pinching the cone.
•The cone is placed in the canal, and if an
appropriate size is selected, there will be
resistance to displacement or “tug back.”*
16. •The master cone placement is confirmed with a
radiograph.
•The canal is irrigated and dried with paper
points.
•Sealer is applied to the canal walls, and a
spreader is prefitted so as to allow it to be
inserted to within 1.0 to 2.0 mm from working
length.
•Appropriate accessory points are also selected
to closely match the size of the spreader.*
17. F. Finger spreader in place.
G. Fine-medium accessory cone placed in the
space created by the
spreader
H. Accessory cones placed in the space
vacated by the instrument,
repeating the process until the spreader no
longer goes beyond
the coronal one third of the canal.
I. The cones are then removed at the orifice
with heat, and the
18. Interim radiograph may be exposed to assess
the quality of
obturation.
K. Post-treatment radiograph demonstrating
adequate length,
density, and taper. The gutta-percha is
removed to the level of
the orifice, and a coronal seal has been
established
19. Potential Drawbacks
•Lateral compaction does not
produce a homogeneous mass.
•The accessory and master cones are
laminated and remain separate,
hoping that the space between the
cones is filled with sealer.
•The method also predisposes to root
fracture
23. • by Stephen Buchanan in 1996.
• Also called the “Continuous wave of obturation Technique”
• Variation of warm gutta percha vertical compaction techniques using an
electrical heart carrier
SYSTEM B TECHNIQUE
Consists of –
System B Heat source:
Thermostatically controlled
Electric device that supplies heat.
It has continuous /touch mode
Temperature: 200C
Period of time - determined by the
operator.
24. • Handpiece
– holds the tips
– connected to the heat source by a cord
– has a ring switch “which is pressed to activate the handpiece
• Pluggers /Tips
– available in standardized sizes as well
as non standardized sizes
– medium system B tip 0.06 taper
– medium /fine system B tip 0.04 taper
25. • Cone fit:
– Appropriate sized gutta percha cone selected
– Must fit in last 1 mm and to full length
– Minimal outback 0f 0.5 mm of apical tip of gutta percha cone
Technique:3 stages
• Plugger fit in
– Plugger must stop at about 5-7 mm short of working length (binding
point)
– Stop attachment adjusted at coronal reference points
– Plugger removed and attached to heat sources
• Requirements
– a smooth tapering funnel
– a apical constriction
– appropriate master cone adaptation.
26. • Down pack technique:
– Primary point coated with sealer and pushed to place.
– Heat source preset at 200C (power dial at 10)
– The tip is activated by pressing the ring switch on the hand piece
– Cone is seared off at orifice
– Preheated plugger driven smoothly through gutta percha to within 3-4 mm
of binding point in 2 sec
– Heat switch is released.
– Plugger continues to move apically
– Cold plugger held for additional 10 seconds under sustained pressure
– To remove plugger
• Heat switch activated for 1 second followed by 1 second pause.
• Cold pluger then quickly withdrawn.
• Radiographic confirmation
Back fill technique:
Same gutta percha cone coated with sealer and positioned in back fill space
• system B with the same plugger inset at 100C for ¼ second only.
immediately plunge plugger into backfill cone and hold in place for 3-5
seconds. Another cone placed and procedure repeated.
• Final plugging with a large cold regular plugger
27. • Advantages:
– Clinician can control the amount of heat in the heat carrier by use of
thermostat
– Heat once activated is constant and is concentrated at the tip.
– Hence can soften gutta percha and apply vertical pressure in one continue
one motion (continuous wave of condensation)
– Faster than traditional warm vertical condensation
– More accurate
– Temperature at the tip of heat carrier plugger is monitored
Disadvantages:
Potential for extrusion
Potential for thermal damage to periodontal ligament and supporting
alveolar bone.
28. System-B/Elements Obturation Unit
• coupled with a revolutionary
motorized extruder that makes the
backfill easy
• Buchanan Pluggers are available in
tapers of .04, .06, .08, .10 and .12, to
correspond with the shapes created
by GT Files.
29. TOUCH N’ HEAT
• an electronic device specially
developed for the warm gutta -
percha technique
• Consist of
– Control unit
– Heat Carrier
• connected to the unit by a cord
• tips are interchangeable with
those of system B
• Uses:
– heat carrier
– sear off excess gutta percha
– preparation of post space
– pulp testing tool for a response to
heat
30. Disadvantages:
– Might lead to overheating the gutta percha
– Excessive heat may damage periodontal ligament in teeth with narrow
roots such as mandibular anterior
– Connected to the unit by a cord
31. ENDOTEC
• Developed by Howard Martin and Fisher
• Was engineered principally to compensate for the
voids created during the “cold welding” of cones
during normal lateral condensation
• Cordless handpiece with a specially designed battery
powered heat carrier used for both lateral and vertical
compaction
• It consists of
– Endotec handpiece
• Cordless handpiece with an activator button
• Battery operated
32. – Endotec tips
• quick changeable tips
• 21mm long
• 2 sizes
– larger tip (No.45)
– small tip (No.30)
• Autoclavable
• May be adjusted to any access
angulation
• Silicone stops can be placed on tips
for length control
• Temperature
– 1700 C along the apical 16mm of the
tip in 5 seconds
– Takes 2 sec to cool down
33. USES
– Warm lateral condensation
– Gutta percha removal during retreatment or post preparation
– Elimination of voids created during normal lateral condensation
– Zap and tap technique
• For obturating mandibular molars with C –shaped canals.
• Technique
– Preheating Endotec plugger for 4-5 seconds
– Insertion (Zap)
– Then moving the hot instrument in and out in short continuous
strokes (Taps) 10-15 times
– Plugger removed while still hot
– Followed by insertion of a cold spreader
– Insertion of additional accessory points
34. • ADVANTAGES:-
– Combines the best of the 2 techniques
• Lateral compaction – relative simplicity (ease and speed)
• Vertical compaction – superior density
– Tip can be used as both a plugger or spreader
– Heated tip is able to advance apically with minimum exertion because of
softening of master cone and mass of gutta percha
– Creates less stress on root structure than does cold lateral condensation
• DISADVANTAGES:-
– Increased time needed for obturation
– Spreader breakage and kinking
– Heaviness of the handpiece
35. SECTIONAL GP TECHNIQUE
• by Coolidge 1946, Also called “Chicago technique”
• One of the earliest modification of vertical
compaction method
36. • Technique:
– Plugger should fit the prepared tapered canal loosely and extend to within
3 mm of the working length
– Primary gutta percha point is blunted and carried to place, to fit 1 mm short
of working length
– 3 mm of the tip of the point is clearly excised with a scalpel
– This small piece is then luted to the end of the warmed plugger
– Canal lined with sealer
– Gutta percha tip is warmed by passing through alcohol flame and then
carried to place
– Vertical compaction
• Variation
– Soften in chloroform or halothane
– Backfilling – using thermoplastized gutta percha
38. THERMOMECHANICAL COMPACTION
• introduced by McSpadden in 1979
• Principle
– heat generated by friction softened the
gutta-percha
– design of the blades forced the material
apically
• McSpadden Compactor
– resembled a reverse Hedstroem file, or a
reverse screw design
– made of stainless steel
– fit into a latch-type handpiece
– speeds between 8,000 and 20,000 rpm
– Used with regular beta phase gutta percha
cones
39.
40. • Advantages
– Canals could be filled in seconds
– Ability to fill very irregular spaces and teeth with resorptive defects
– Gave a dense fill
– Conservative use of gutta percha
• Disadvantages
– Fragility and fracture of the instruments
• In canals less than size 50
• Curved canals
– Overfilling
– Difficulty in mastering the technique
– Void formation
• ‘popcorn appearance’ of gutta percha
– Poor seal
• Use of speeds higher than recommended
41. J.S. Quick-Fill
• Uses precoated compactors
– titanium core devices
• resemble latch-type endodontic drills
– in ISO sizes 15 to 60
– coated with alpha-phase gutta-percha
• Advantages
– Does not need to be heated
– Neat
– Easy to use
• Disadvantages
– Tendency for voids
42. Technique
– fitted to the prepared root canal
– sealer placement
– spun in the canal with a regular low-
speed, latch-type handpiece
• friction heat plasti-cizes the gutta-percha
• compacted to place by the design of the
Quick-Fill core
– After compaction two choices
• the compactor may be removed and final
compaction completed with a hand plugger
• the titanium solid core left in place and
separated in the coronal cavity with an
inverted cone bur
43. ULTRASONIC PLASTICIZING
• first suggested by Moreno from Mexico
– Cavitron ultrasonic scaler
– Comes with a PR30 insert
– it could be used only in the anterior mouth
– place gutta-percha points to virtually fill
the canal
– then insert the attached endodontic
instrument into the mass
– activate the ultrasonic instrument
(without the liquid coolant)
– the gutta-percha is plasticized by friction
and advanced it to the measured root
length
– final vertical compaction with hand or
finger pluggers
44. LASERS
• To warm gutta percha by laser heat energy
– Argon
– Nd:YAG
– Carbon dioxide
• Anic and Matsumoto (1995)
– sectioned gutta percha segements
– pulsed Nd: YA G laser
– vertical condensation
Disadvantages
• required to much time
• Significant temperature increases on the external rot surfaces
45. THERMOPLASTICIZED GP TECHNIQUES
SYRINGE
INSERTION
SOLID –CORE
CARRIER INSERTION
Without
gun
With gun
- Inject-R-Fill
Beta- Phase Alpha- Phase
- Obtura
- Obtura II
- Ultrafil
Pre coated carriers
- Thermafil and Denfil
- Soft core and Three Dee GP
- One Step Obturator
Operator coated
- Alpha Seal
- Succesfil
Trifecta Modified Trifecta
Lateral
Compaction
46. • Also called the “ High heat technique”
• Has an electrical control unit with pistol grip syringe & specially
designed GP pellets which are heated to approx 365-390oF
Indications – straight/slightly curved roots
Backfilling of canals
Internal resorption/perforation
Applicator tip is inserted near junction between middle and apical 1/3rd and GP
is injected passively till orifice, after which compaction with plugger is done.
OBTURA II
47. Obtura
• warmed at 160 C
• no digital display
• needle size-18 gauge
• uses gutta percha pellets
Obtura II
• digitally controlled temperature
160-200oC
• digital display of temperature
reading
• disposable silver needles reduced to
– 20 gauge (approach 60 size file)
– 23 guage (approx 40 size file)
– 25 gauge
• availability of gutta percha pellets
that can flow at lower temperature.
49. ULTRAFIL 3D
• Is a ‘low heat’ injectable gutta percha system
• Consists of
– heating unit
– Metal syringe
– Cannules prefilled with gutta percha
50. • CANNULES
– Prefilled with gutta percha
– Has attached needles of 22 gauge (0.7 mm diameter)
– Disposable
– Contains enough gutta percha to fill at least one molar
– Available in 3 colours
• WHITE (Regular set)
– Setting time – 30 min
– Low viscosity, compaction not required
• BLUE – (Firm set)
– Setting time – 4 min
– Condensation possible but not required
• GREEN – (Endoset)
– Setting time – 2min
– Highest viscosity
– Must be condensed
51. ULTRAFIL 3D OBTURA II
Low temperature High temperature
Gun has no heating element,
separate oven
Gun with heating
element
No digital readout Digital display of
temperature
Uses 22 gauge needles Needles – 18, 20,
22 and 25 gauge
Working time of less than 1
min
Remains soft for
3min
52. INJECT – R FILL
• By James B. Roane at the University of
Oklahoma in 1994
• Thermal GP injection device
• Method of backfilling once apical 1/3rd
is sealed
• Consists of
– A miniature – sized metal tube containing
gutta percha
– Plunger
ADVANTAGES –
Useful in rapid delivery
Fill s canal irregularities
C-shaped canals
Minimizes over extension
53. PRINCIPLE
Gutta percha
Superior to silver
cores for sealing
Better tolerated
by the body
Silver cones
Ability to traverse
through small
canals more
easily
Better length
control
W. Ben Johnson
1978
(Baylor University)
Original hand made gutta-percha obturator
Thermoplasticized alpha-phase gutta percha on an endodontic file
CORE CARRIER GP TECHNIQUES
54. THERMAFIL
• A patented endodontic obturator
• Consisting of a flexible central carrier uniformly coated with a layer of refined and
tested alpha-phase gutta percha
• Carriers
– Made of
• Stainless steel (initially)
• Titanium (later)
• Plastic
– Have ISO standard dimension
with matching color coding
– Comes in sizes of 20-140
– Plastic carrier
• Made of special synthetic resin
– Liquid plastic crystal
– Polysulphone polymer
55. • Thermafil plus obturators
– Redesigned with a slight groove along
600 of the circumference
– Allows for the backflow of excess gutta
percha
– Provides a pilot point / space for carrier
retrieval if retreatment is necessary
• Thermafil Plus size verifiers
– Available in nickel titanium
– Can be heat-sterilized for reuse
– Redesigned with flutes, making them
excellent for minor apical shaping
56. • ThermaSeal Plus endodontic sealer
– lubricating and adhesive qualities
– improved paste:paste formula is easier to use.
Therma prep oven
Was needed with introduction of plastic carrier
Advantages
•Enables operator to have a consistently reliable
temperature of the obturator
•Better chance for smooth complete placement
Consists of
On / off button
Dial
Heater
57. SuccessFil
• Consists of
– SuccessFil solid-core carriers
• Titanium cores
• Radiopaque plastics
– SuccessFil syringes
• Contain high viscosity alpha phase gutta
percha
• Heated in special heater owen
• It sets in 2 minutes
– SuccessFil heater
58. Technique
– The gutta percha syringe is warmed
– The carriers are inserted to the measured
depth into the gutta-percha in the syringe and
then extruded by forcing the plunger
• Rapid withdrawl
– Creates a tapered shape
• Slower withdrawl
– creates a cylinder shape
– Inserted into the canal
– Core is separated by holding the handle and
severing the core shaft 2mm above the orifice
59. • A method to block the apex and
prevent extrusion
– A plug of gutta percha at the
apical foramen
• SuccessFil
– remainder of canal
• Ultrafil
Technique
•2-3mm of warm, plasticized gutta-percha is retrieved from a SuccessFil
syringe on the tip of a sterile endodontic file one size smaller than the last
enlarging file used at the apex
•File rotated counterclockwise and retrieved
•Plugger is used to compact
•Sectional injections of Ultrafil is used to fill the rest of the canal and
compacted
Trifecta system
60. APICAL THIRD FILLING
WITH GUTTA PERCHA WITHOUT GUTTA PERCHA
- Lightspeed Simplifill obturator
- Fibrefill obturator
- Dentin chips
- Calcium hydroxide
- Mineral Trioxide aggregate
61. SIMPLIFILL
• Senia et al created it using LightSpeed
instruments to complement canal shape
• 5mm of GP is carried into the apical portion by a
stainless steel ‘Apical GP Plug Carrier”
• Then a specially designed syringe backfills the
remaining portion of canal with Ketac Endo
sealer and accessory cones.
62. Dentin Chip Apical Filling
• Based on premise
– dentin fillings will stimulate osteo or cementogenesis
• Advantages
– Prevents overfilling and confining the irrigating solutions and filling
materials to the canal space (El Deeb et al)
– lead to quicker healing, minimal inflammation, and apical cementum
deposition, even when the apex is perforated (Oswald et al)
• Disadvantage
– dentin chips, if infected, are a serious deterrent to healing (Holland
et al)
63. Dentin Chip Technique
– the canal is totally debrided and shaped
– Gates-Glidden drill or Hedstroem file is
used to produce dentin powder in the
central position of the canal
– These dentin chips may then be pushed
apically with the butt end of a paper
point and then the blunted tip of a
paper point
– They are finally packed into place at the
apex using a premeasured file one size
larger than the last apical enlarging
instrument
64. – One to 2mm of chips should block the
foramen
– Completeness of density is tested by
resistance to perforation by a No. 15 or
20 file
– The final gutta-percha obturation is
then compacted against the plug
65. Calcium Hydroxide Apical Filling
• Cementogenesis, which is stimulated by dentin filings, appears
to be replicated by calcium hydroxide as well
• calcium hydroxide resorbs away from the apex faster than do
dentin chips
• Method of Use
– Calcium hydroxide can be placed as an apical plug in either a dry or
moist state
– Dry calcium hydroxide powder
• May be deposited in the coronal orifice from a sterilized amalgam carrier
• The bolus may then be forced apically with a premeasured plugger
• Tapped to place with the last size apical file that was used
• One to 2 mm must be well condensed to block the foramen
• Blockage should be tested with a file that is one size smaller
66. Moist calcium hydroxide
• can be placed in a number of ways
– amalgam carrier and plugger
– Lentulo spiral
– injection from one of the commercial syringes loaded with calcium
hydroxide
» Calasept (J.S. Dental Prod., Sweden/USA)
» TempCanal (Pulpdent Corp.; Boston Mass.)
– calcium hydroxide deposit should be thick enough and well condensed
– serve not only as a stimulant to cemental growth but also as a barrier to
extrusion of well compacted gutta-percha obturation
67. GuttaFlow
• Is a new self-curing filling system for
root canals that combines two
products in one capsule
– gutta-percha in particle form (less
than 30 µm)
– Sealer
• Injectable system
– time-saving obturation
• The capsule
– is activated by compression
– mixed for only 30 seconds in a
standard triturator.
– is designed for single use mixing
• (one capsule can fill up to 3-4 canals)
– No contamination can occur
68. Advantages
– Easier and faster to use
• no condensation required
– Radiopaque
– Dimensionally stable
• No heat – No shrinkage
• Better seal
– Biocompatible
– Easily removed for retreatment or post preparation, no plastic carriers
– Economical
• no heating unit required
69. During the past 15 years, great efforts have been made to enhance the
manipulative properties of gutta-percha by thermoplastcizing or thermo
softening it.
It is important to realize that no filling material will be effective without
thorough cleaning & shaping.
There is no single material that fulfills all the criteria but success is more if
they are used with proper case selection.
One should remember that there is no material that guarantees a ‘leak proof
canal’.
CONCLUSION