Download as PDF, PPTX


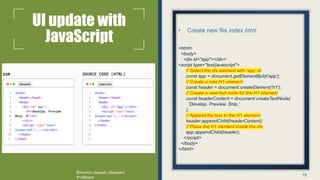


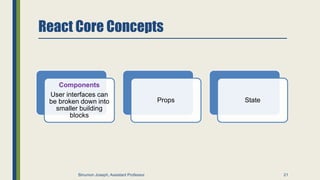

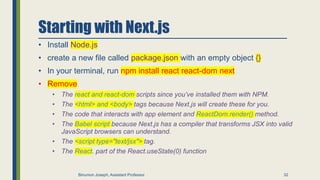
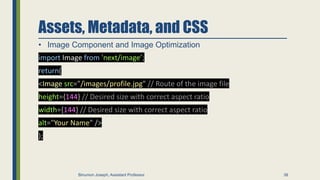
![Iterating through
lists
• It’s common to have data that you
need to show as a list. You can use
array methods to manipulate your data
and generate UI elements that are
identical in style but hold different
pieces of information.
function HomePage() {
const names = ['Ada Lovelace', 'Grace Hopper',
'Margaret Hamilton’];
return (
<div>
<Header title="Develop. Preview. Ship. " />
<ul>
{names.map((name) => (
<li key={name}>{name}</li>
))}
</ul>
</div>
);
}
28
Binumon Joseph, Assistant Professor](https://image.slidesharecdn.com/next-230524050805-d1e22a49/85/NEXT-JS-28-320.jpg)
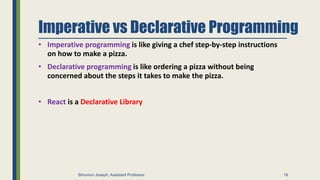
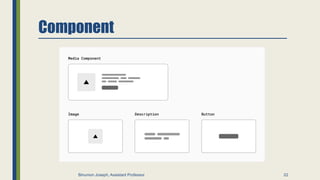
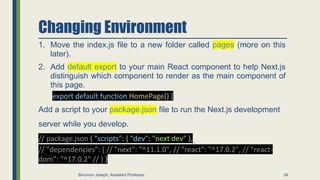
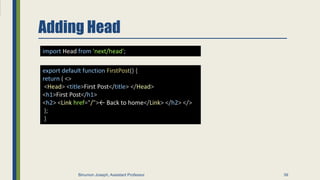
![State
• Listening to Events
• Handling Events
• State and Hooks
function HomePage() {
const [likes, setLikes] = React.useState(0);
function handleClick() {
setLikes(likes + 1);
}
return ( <div> {/* ... */}
<button onClick={handleClick}>Likes
({likes})</button>
</div> );
}
30
Binumon Joseph, Assistant Professor](https://image.slidesharecdn.com/next-230524050805-d1e22a49/85/NEXT-JS-30-320.jpg)
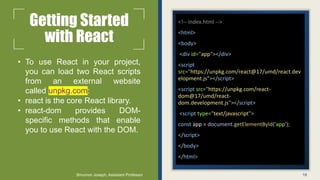
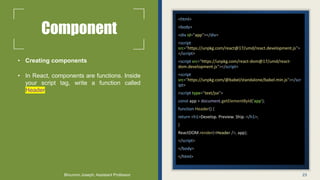
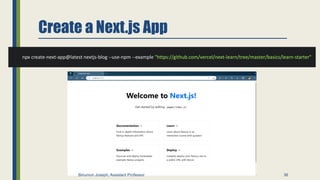
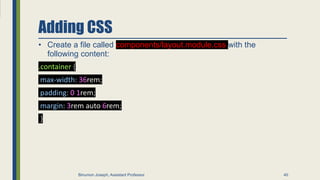
![// index.html
import { useState } from 'react’;
function Header({ title }) {
return <h1>{title ? title : 'Default
title'}</h1>;
}
function HomePage() {
const names = ['Ada Lovelace', 'Grace
Hopper', 'Margaret Hamilton’];
const [likes, setLikes] = useState(0);
function handleClick() {
setLikes(likes + 1);
}
return ( <div> <Header title="Develop.
Preview. Ship. " />
<ul>
{names.map((name) => (
<li key={name}>{name}</li>
))}
</ul>
<button onClick={handleClick}>Like
({likes})</button> </div>
);
}
33
Binumon Joseph, Assistant Professor](https://image.slidesharecdn.com/next-230524050805-d1e22a49/85/NEXT-JS-33-320.jpg)
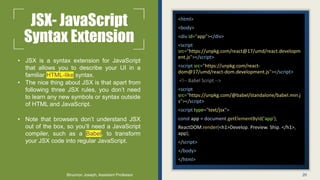
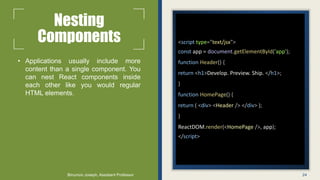
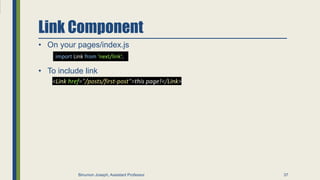
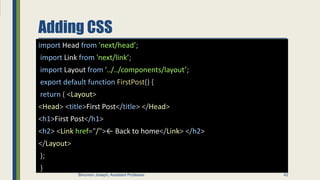
![Running the development server
import { useState } from 'react’;
function Header({ title }) {
return <h1>{title ? title : 'Default title'}</h1>;
}
export default function HomePage() {
const names = ['Ada Lovelace', 'Grace Hopper', 'Margaret Hamilton’];
const [likes, setLikes] = useState(0);
function handleClick() {
setLikes(likes + 1);
}
return ( <div> <Header title="Develop. Preview. Ship. " />
<ul>
{names.map((name) => (
<li key={name}>{name}</li>
))}
</ul>
<button onClick={handleClick}>Like ({likes})</button>
</div> );
}
npm run dev
35
Binumon Joseph, Assistant Professor](https://image.slidesharecdn.com/next-230524050805-d1e22a49/85/NEXT-JS-35-320.jpg)


Next.js is a flexible React framework designed for building fast web applications using server-side rendering (SSR), which enhances SEO and user experience. The tutorial covers how to get started with Next.js, including installation, creating pages, and deploying applications, as well as details on components, props, and state management. Users can leverage built-in features such as dynamic routing and image optimization while deploying their apps easily to platforms like Vercel.


![[Final] ReactJS presentation](https://cdn.slidesharecdn.com/ss_thumbnails/65cfd4f9-740f-4f41-b769-b496b6e60802-170119143904-thumbnail.jpg?width=640&height=640&fit=bounds)


![Full Stack React Workshop [CSSC x GDSC]](https://cdn.slidesharecdn.com/ss_thumbnails/fullstackreactworkshopcsscxgdsc-230221003415-b512c1cf-thumbnail.jpg?width=640&height=640&fit=bounds)


