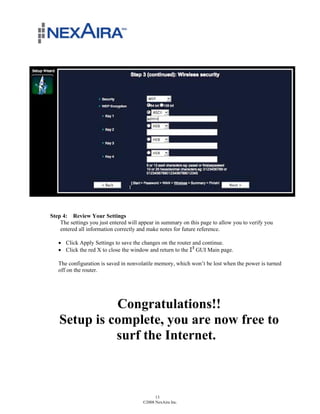
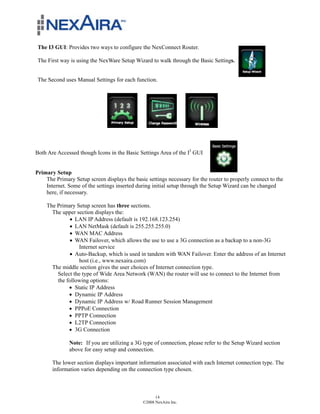
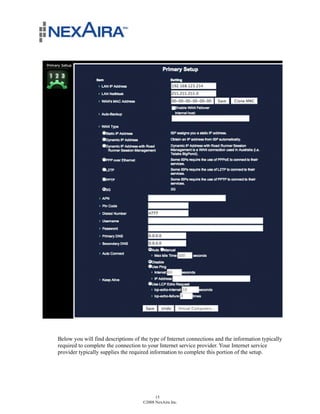
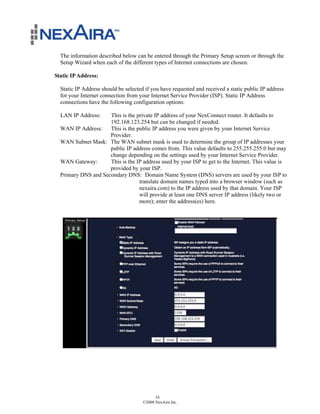
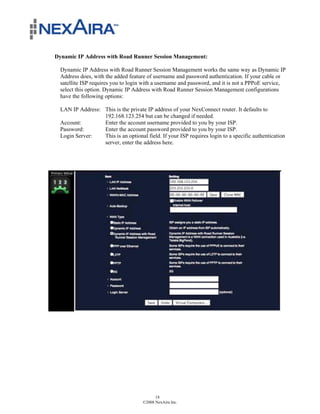
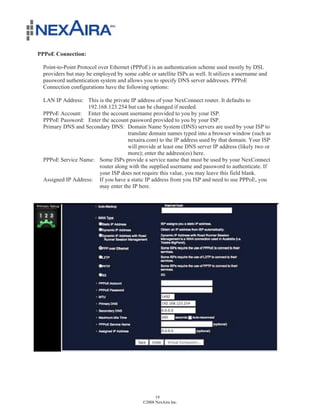
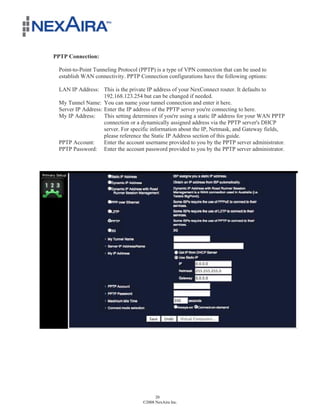
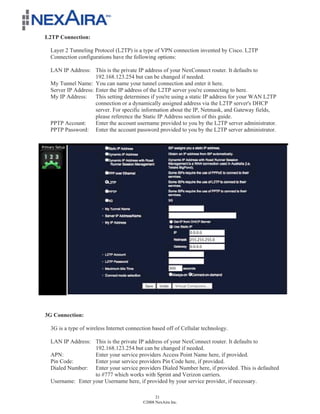
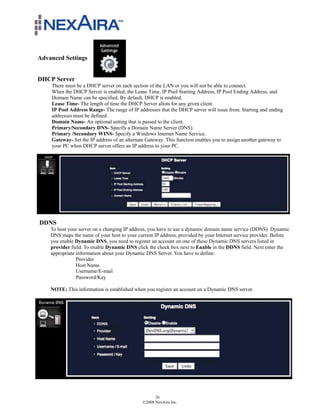
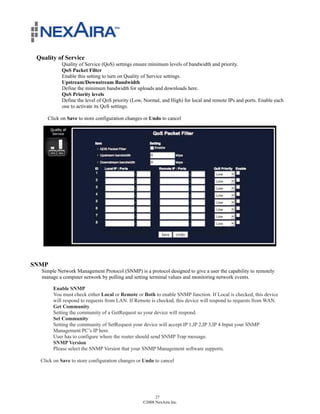
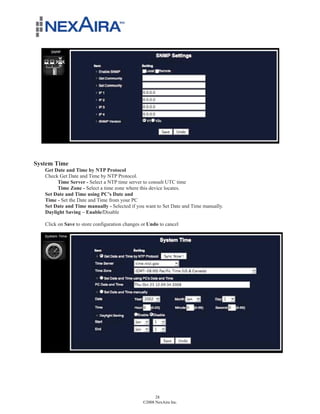
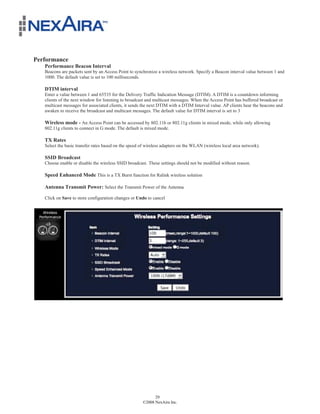
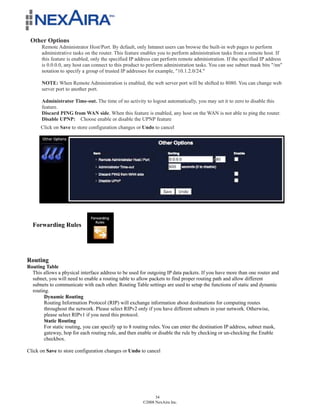
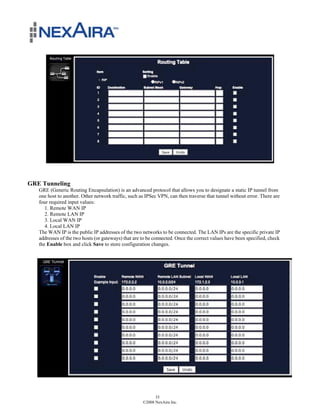
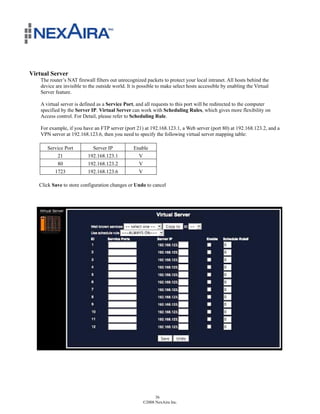
SlideShare a Scribd company logo
NexConnect
                  3G/4G SOHO Router
                    User Manual


P OW E R E D BY


NEXAIRA
ARIAXEN
User Guide


    i
Copyright

The content of this publication may not be reproduced in any part or as a whole, stored,
transcribed in an information retrieval system, translated into any language, or transmitted in any
form or by any means, mechanical, magnetic, electronic, optical, photocopying, manual, or
otherwise, without prior written permission.


Trademarks
All products, company, brand names are trademarks or registered trademarks of their respective
companies. They are used for identification purposes only. Specifications are subject to be
changed without prior notice.


FCC Interference Statement
This equipment has been tested and found to comply with the limits for a Class B digital device
pursuant to Part 15 of the FCC Rules. These limits are designed to provide reasonable protection
against radio interference in a commercial environment. This equipment can generate, use and
radiate radio frequency energy and, if not installed and used in accordance with the instructions
in this manual, may cause harmful interference to radio communications. Operation of this
equipment in a residential area is likely to cause interference, in which case the user, at his own
expense, will be required to take whatever measures are necessary to correct the interference.


CE Declaration of Conformity
This equipment complies with the requirements relating to electromagnetic compatibility,
EN 55022/A1 Class B.


                                                ii
Table of Contents
Introduction ..................................................................................................................................... 1!
      Features ................................................................................................................................... 1!
      Package Contents .................................................................................................................... 2!
      System Requirements.............................................................................................................. 2!
      Wi-Fi Requirements ................................................................................................................ 2!
Hardware Overview ........................................................................................................................ 3!
Default Router Settings ................................................................................................................... 4!
Hardware Setup ............................................................................................................................... 7!
      Wi-Fi Connection .................................................................................................................... 6!
Initial Setup ..................................................................................................................................... 8!
      Setup Wizard ............................................................................................................................8!
      Basic Settings ...........................................................................................................................9!
           Status .............................................................................................................................9!
           NexWare Setup Wizard ...............................................................................................10!
           Primary Setup................................................................................................................ 14
           Change Password .......................................................................................................... 22
           Wireless ......................................................................................................................... 23
      Toolbox ................................................................................................................................. 24!
           System Log ................................................................................................................... 24
           System Info ................................................................................................................... 24
           Firmware Upgrade ........................................................................................................ 25
           Backup Settings ............................................................................................................ 25
           Reset to Defaults ........................................................................................................... 25
           Reboot ........................................................................................................................... 25
      Advanced Settings ................................................................................................................ 26
           DHCP Server................................................................................................................. 26
           DDNS............................................................................................................................ 26
           Quality of Service ......................................................................................................... 27
           SNMP............................................................................................................................ 27
           System Time ................................................................................................................. 28
           Performance .................................................................................................................. 29!
           Scheduling..................................................................................................................... 30
           Wake on LAN ............................................................................................................... 30
      Security Settings ................................................................................................................... 31
           Packet Filters ................................................................................................................. 31!
           Domain Filters .............................................................................................................. 32!
           URL Blocking ............................................................................................................... 33!
           Mac Control .................................................................................................................. 33
           Other Options ................................................................................................................ 34!
      Forwarding Rules .................................................................................................................. 34!
           Routing.......................................................................................................................... 34
           GRE Tunneling ............................................................................................................. 35!
           Virtual Server ................................................................................................................ 36
           Special Applications...................................................................................................... 37!
           DMZ Host ..................................................................................................................... 37!


                                                                        iii
Troubleshooting ............................................................................................................................ 38
Technical Support ......................................................................................................................... 42!
Technical Specifications ............................................................................................................... 42!
Glossary of Definitions ................................................................................................................. 43!


                                                                      iv
Introduction

The NexConnect 3G Wireless Broadband Router with NexWare Firmware and the !" Graphical User
Interface (GUI) is a high-performance device that supports wireless networking at home, work, or in a public
place. Supporting 16-bit and 32-bit Type II PCMCIA cards, USB 2.0 mobile broadband modems, and
Express Cards with a universal caddy, the NexConnect 3G Wireless Broadband Router works with both
EVDO and HSDPA technologies. The NexConnect 3G Wireless Broadband Router supports wireless data
transfers up to 54 Mbps and wired data transfers up to 100 Mbps. The Router is also compatible with
industry-standard security features such as Stateful Packet Inspection (SPI) firewall, Wireless Encryption
Protocol (WEP)/Wi-Fi Protected Access (WPA) security settings, and Media Access Control (MAC).

  Features
   ! NexWare quick and easy setup allows you to go where wires cannot, outside the home or
      office.
   ! Automatic connection failover to 3G connection if Ethernet WAN connection fails.
   ! Fully compatible with the 802.11g IEEE standard to provide a wireless data transfer rate of
      up to 54Mbps.
   ! Backwards compatible with the 802.11b IEEE standard to provide a wireless data rate of up
      to 11Mbps.
   ! Operates in the 2.4GHz frequency range.
   ! Advanced Firewall features.
   ! Supports NAT with VPN pass-through, as well as the following security features:
            "   MAC Filtering
            "   IP Filtering
            "   Port Scheduling
    !   DHCP server enables all networked computers to automatically receive IP addresses.
    !   Access Control for managing users on the network
    !   !" ( Interactive Intuitive Iconic) GUI Web-based configuration pages for easy setup and
        management.


    !   User-friendly configuration and diagnostic utilities.
    !   Supports special applications that require multiple connections.
    !   Equipped with two 10/100 Ethernet ports for LAN and WAN access, a Type II PC card (16-
        and 32-Bit) Slot, and a USB port for 3G network connections. Express Cards with a
        universal caddy are also compatible.
    !   Connects multiple computers to the Internet via a broadband EVDO, HSDPA network
        connection or via cable/DSL connection. Please consult your service provider for more
        detailed information on wireless network standards.


                                                   1
                                             ©2008 NexAira Inc.
Package Contents

  Important: Check the contents of the box first.

  The NexConnect 3G Wireless Broadband Router package should contain the items listed
  below. If any of the items are missing, please contact your reseller.

     (1) NexConnect NEXUSB07 Router
     (1) CD-ROM
     (1) RJ-45 Ethernet Cable
     (1) 5V 3.0A Power Adapter
     (1) Desk Cradle

  Caution: Using a power supply with a different voltage rating other than the one included
  with the NexConnect 3G Wireless Broadband Router will cause damage and void the warranty
  for this product.

System Requirements
     ! Compatible 16-bit or 32-bit PCMCIA or USB 3G modem card with activated service.*
       NOTE: Subject to terms available from your carrier.
     ! Computer with Windows 2000, XP, Vista, Macintosh, or Linux-based operating system
       with an integrated Ethernet adapter or Wireless Wi-Fi 802.11 G interface.
     ! Internet Explorer Version 6.0 and above or Netscape Navigator™ Version 7.0 and above
       (for accessing web-based configuration settings).


Wi-Fi Requirements
    ! IEEE 802.11b/g adapter.


 *PCMCIA, USB modems and ExpressCard w/adapter need to be activated through your
 cellular service provider and activated on their network through the connection manager
 provided by your carrier prior to insertion into the NexConnect 3G Wireless Broadband Router.


                                             2
                                       ©2008 NexAira Inc.
Hardware Overview

       Receptors and Ports (Rear View)

WiFi Antenna:
Allows WiFi connection
from a distance


                                                           USB Port:
                                                           Allows connection with a
                                                           3G USB modem


                                                                                                           Power receptor:
                                                                                                           Compatible with
                                                                                                           included 5V
                                                                                                           3.0A adapter


                          LAN/WAN Ports:                                     Reset Button:
                          Automatically senses WAN and LAN                   Resets the
                          types when connecting to Ethernet                  NEXUSB07 to
                                                                             factory default
                                                                             settings
            LEDs (Front View)


                                                LAN LED:
                                                Lights up green when a local
                                                Ethernet cable is connected
                                                and blinks to indicate activity


                                                                                               WiFi LED:
                                                                                               Lights up green when a
                                                                                               connection to the WLAN
                                                                                               is available
                                   3G LED:                          WAN LED:
                                   Lights up green                  Lights up green when
                                   when power is on                 WAN is connected.


                                                     3
                                               ©2008 NexAira Inc.
Default Router Settings
Main Menu - Login Password                        admin
Internet Connection - Type                        3G
Router Menu - URL or IP Address                   192.168.123.254
Wireless - Wi-Fi                                  Enabled
   WMM Capable                                             Disabled
SSID / Wi-Fi - Name                               Nexaira
    Channel                                                11
Wi-Fi Security - WEP Encryption                   WEP / 64 Bit (ASCII)
Wi-Fi WEP - Key 1 Password                        admin
   Wireless Bridging (WDS Settings)                        Disabled
   System Log                                              Disabled
DHCP Server                                       Enabled
  DDNS                                                     Disabled
  QoS Packet Filtering                                     Not Enabled
  SNMP Settings                                            Not Enabled
  System Time                                              NTP Protocol from time.nist.gov
                                                           (GMT-08:00)
  Wireless Performance
       • Beacon Interval                                   • 100
       • DTIM Interval                                     • 3
       • Wireless Mode                                     • mixed mode
       • TX Rates                                          • Auto
       • SSID Broadcast                                    • Enabled
       • Speed Enhanced Mode                               • Enabled
       • Antenna Transmit Power                            • 100% (17dBM)
  Scheduling                                               Not Enabled
  Wake on LAN (MAC Address)                                00-00-00-00-00-00
  Packet Filters                                           Not Enabled
  Domain Filters / Log DNS Query                           Not Enabled / Not Enabled
  URL Blocking                                             Not Enabled
  MAC Address Control                                      Not Enabled
  Other Options                                            Not Enabled
  Routing Table                                            Not Enabled
  GRE Tunnel                                               Not Enabled
  Virtual Server                                           No Selection
  Special Applications                                     No Selection
  DMZ Host                                                 Not Enabled

Note: Changing bolded settings may impact router access and ability to function correctly.


                                            4
                                      ©2008 NexAira Inc.
Hardware Setup

  The NexConnect 3G Wireless Broadband Router allows you to access your
  network using a wireless connection from virtually anywhere within its
  operating range. Please note that location placement of the router could
  affect the wireless signal and range limits.

  Typical ranges also vary depending on the types of materials and background RF (Radio Frequency)
  noise present in your networking environment.

  To maximize your wireless range, please follow these guidelines:

      1. Choose the right location in your environment for the NexConnect 3G Wireless Broadband
         Router. The WLAN transmitters are radios; their signals radiate out from the antenna, and
         degrade as they go through walls, floors, and obstacles like tubs full of water (almost
         impenetrable), stone, or concrete. So for best reception, place your gateway centrally to the
         rooms in which you expect to use WLAN the most. Each wall or ceiling can reduce the
         NexConnect 3G Wireless Broadband Router’s range by as much as 90 feet (27 meters).
         NOTE: The same considerations apply to your carriers 3G broadband carrier’s connection.
      2. Keep your product away from electrical devices (such as microwaves, air conditioners, cordless
         phones, refrigerators and televisions) that emit large quantities of RFI (Radio Frequency
         Interference).

        NOTE: DO NOT connect the NexConnect 3G Wireless Broadband
               Router to power before following the installation steps below!

NexConnect NEXUSB07 Router Setup

  1. Attach the antenna.
      a. Remove the antenna from its plastic wrapper.
      b. Screw the antenna in a clockwise direction to the back panel of the unit.
      c. Once secured, position the antenna upward at its connecting joint. This will ensure optimal
          reception.


                                                 5
                                           ©2008 NexAira Inc.
2(i). PCMCIA, Express Card with a universal caddy, or USB connection:
       a. Remove the protective PCMCIA insert from the PCMCIA opening.
       b. Insert an activated Type II PCMCIA card or ExpressCard with adapter into the PCMCIA card
            slot.
       c. Alternatively, insert an activated USB modem into the USB slot.


             a.                                       b.


2(ii). Ethernet connection:
     a. Insert one end of an Ethernet cable into the LAN Port on the back panel of the router. Insert the
          other end into an available Ethernet port of the network adapter in the computer that will be used
          to configure the unit.
     b. LAN LED should be on when connected. If not, check the connection between the router and
          computer.

    NOTE: The NexConnect 3G Wireless Broadband Router LAN Port is “Auto-MDI/MDIX”, so
          Any Standard Ethernet Cable will work.


                                                6
                                          ©2008 NexAira Inc.
3. Power connection.
     a. Connect the power adapter to the receptor on
     the back panel of the router. Plug the other end
     of the power adapter into a wall outlet or power
     strip.
     b. The 3G LED will turn ON and occasionally
     flash, indicating that the unit is powered on.
     c. The 3G, LAN, and Wi-Fi LED’s on the front
     of the router will flash ON and OFF as it
     performs initialization and Internet connection
     processes. This will take a few minutes.

  NOTES:
     1.   An uninterruptable power supply (UPS) is recommended for power surges and/or outages. At a minimum,
          a surge protector should always be used to protect the equipment from being damaged by electrical spikes
          and transients.
     2.   The WAN light will only come on if connected to an Internet source other than 3G.


Wi-Fi Connection
If you are connecting wirelessly to the NexConnect 3G Wireless Broadband Router, you must
ensure that the security settings on the connecting PC are the same as those on the router.

By default, the router broadcasts a secure WiFi signal with WEP encryption:
•      SSID / WiFi Signal Name is set to “Nexaira”
•      Channel is set to 11
•      Security is set to WEP
•      Encryption is set to 64 Bit
•      WEP Key 1 (password) is set to “admin”

It is recommended, for security reasons, that the security settings on the router be changed during
initial setup through the setup wizard, which can be accessed by utilizing the provided CD.

Please refer to your computer’s Wi-Fi adapter documentation for additional information.


                                                      7
                                                ©2008 NexAira Inc.
Initial Setup
  Setup Wizard

    Initial setup of the NexConnect 3G Wireless Broadband Router is assisted by the provided Setup CD.
    Insert the provided Setup CD into the computer attached to the router (see Hardware Setup above) and
    follow the instructions.

    If difficulties occur or a connection to the Internet is not established, please refer to the Troubleshooting
    section at the end of this User Guide.

    The next few sections of the User Guide provide similar step by step installation and configuration
    instructions found on the CD.

Connecting to the Router Main Page for Installation and
Configuration Settings
To access the NexAira I3 GUI to perform installation and configure settings:

    1. Open a web-browser on your computer connected to the router’s LAN port by an Ethernet cable.
    2. Enter the IP address of the NexConnect 3G Wireless Broadband Router in the URL line:

                  http://192.168.123.254

         NOTE: If you have changed the router’s default IP address, enter that address instead of the one
         above.

    3. Type “admin” in the System Password field. If you have changed the password, enter the new one
       in this field.
    4. Click “Login” button.

  Note: As a security precaution, the router, will time out after a short period of inactivity. An Authorization
  Required Page will appear with a login button. By clicking the Login Button, will provide the Login
  prompt for password resubmission.


                                                     8
                                               ©2008 NexAira Inc.
Basic Settings


Status:


    The Status Icon displays the Router’s present status of the:
        ! Internet connection
        ! Type of connection established
        ! Signal strength (if using a cellular broadband connection)

    Selecting the Status Icon will display the detail status page, which provides a good reference of the
    Router’s present condition with four main areas:

    Wide Area Network (WAN) Status displays the Internet connection information. Normally set
                            automatically and all but the connection time and Sidenote are assigned
                            and configured by the ISP.
       ! IP Address         (Used as identification for every device connected to the Internet)
       ! Subnet Mask        (Defines additional information on how to read the IP Address)
       ! Gateway            (IP address of the Internet Service Provider’s connecting device)
       ! Domain Name Server (IP address of a device that translates names to IP addresses)
       ! Connection         (Duration of time for the current Internet connection HR:MIN:SEC)
       ! Sidenote           (Current Internet WAN connection type in use)

    Wireless Local Area Network (WLAN) Status displays five wireless configuration elements:
        ! Wireless Mode         (Enabled or Disabled through the Setup wizard or Wireless Icons)
        ! SSID                  (Wireless Name or Service Set Identifier, user definable in Setup)
        ! Channel               (Wireless Devices may use multiple channels to avoid congestion)
        ! Security              (Type of Security used, selected through Setup Wizard or Wireless Icon)
        ! MAC Address           (All communications devices are manufactured with a MAC address)

    Broadband Modem Status is provided automatically by the router:
        ! Card Info            (Provides Broadband Modem Vendor Information)
        ! Link Status          (The Status of the Cellular Broadband Link to the Internet)
        ! Signal Strength      (Percentage of Cellular Broadband Signal Strength)

    Statistical Information associated with the Internet connection can be very useful in determining
    service performance. Errors with drops are usually characteristics of a poor network connection. No
    errors or drops with lots of packets in both inbound and outbound is usually a sign the router and
    network are working properly.


                                                   9
                                             ©2008 NexAira Inc.
The I3 GUI: provides two ways to configure the NexConnect Router.

             1.    Use the NexWare Setup Wizard to walk through the Basic Settings.

             2.    Manual Settings for each function.


Both are accessed though Icons in the Basic Settings area of the I3 GUI


NexWare Setup Wizard:


     Choose the NexWare Setup Wizard option to quickly and easily configure the router’s basic settings.
     The NexWare Setup Wizard configures the router in three steps:
        1. Login Password (default is admin but it is a security risk not to assign new passwords)
        2. WAN Settings (the connection to the Internet, i.e. 3G, DSL, Cable etc.)
        3. Wireless Settings (SSID or Name and password ( highly recommended password for access)

     Each of the three steps will now be covered in more detail:

     Step 1: Change Your Login Password (default is admin)
      It is highly recommended that you change the router’s login password immediately upon first
      configuring. The NexWare Wizard Change your Password page guides you through the process
      of changing the Router’s password.

          ! Enter your previous password in the Current Password field. If this is your first time accessing
          these menus, the default password is “admin.”

          ! Enter a new password in the New Password field.

          ! Re-enter the new password in the Reconfirm field.

          ! Click Save to keep your changes.


                                                        10
                                                  ©2008 NexAira Inc.
Step 2: Choose Type of Internet
  Select the type of Wide Area Network (WAN) the router will use to connect to the Internet.

    NOTE: Step 2 automatically configures the WAN if the Router detects a Cellular Broadband Card
    or USB Modem installed and will ask you for acceptance of 3G as the choice of primary
    connection to the Internet.

      Choose “Yes” if this is your primary or only Internet connection.

      If you are using the 3G as a secondary Internet connection or for WAN failover, then choose
        “No” and continue with the Setup Wizard.


Step 2 (continued): If you are not using 3G as the primary connection to the Internet.

  NexWare supports seven different types of connection configurations or protocals as specified by the
  Internet Service Provider. The first six types allow for connections to DSL, Cable, Dedicated and
  Satelite ISP providers and services.

  The final connection, 3G is a cellular broadband selection which accommodate both EVDO and
  HSDPA carriers, including but not limited to AT&T, Bell Canada, Sprint, T Moble and Verizon
  Wireless broadband data networks.

    ! Chose the type as defined by the ISP

    ! Click Next to move to the detail WAN configuration page and enter the information provided by
       the ISP.


Please refer to the Primary Setup page for more details on Wan configuration.


                                               11
                                         ©2008 NexAira Inc.
Step 3: Configure Your Wireless Network:
  It is highly recommended that you use Wi-Fi Wireless Encryption and Passwords. If not, anyone in
  the local area could have access to private and confidential data, resident on the devices connected to
  the wireless network through the Router.

    ! Select Enable or Disable to turn the Router’s Wireless Wi-Fi service ON or OFF

    ! The Network ID or Service Set Identifier (SSID) is the broadcasted name of your wireless
       network seen by other users. The default name is NexAira. The SSID may be changed to a new
       name up to 32 characters in length.

    ! The Channel of this router, which is set to 11 by default, can be changed to avoid conflicts with
       other wireless transmitting devices (i.e. phones, baby monitors), or to otherwise customize the
       wireless network.

    ! Click Next to continue to the Wireless Security page.


 Step 3: (continued) Wireless Security
     Again, it is highly recommended that you use Wi-Fi Wireless Encryption and Passwords.
     Encryption is a way of hiding or protecting the data from being seen by anyone other than the
     intended recipient. Passwords are used to ensure only those who know the passwords may access
     the wireless network.

     The security settings listed in this menu correspond to different types of encryption. Most devices
     support WEP or WPA-PSK. For more information on wireless encryption, please refer to the
     Wireless section in the Basic Settings section below.

     ! Select the form of encryption. (WEP most common)

     ! Select 64 or 128 bit encryption. (increases difficulty to crack and router workload)

     ! Select ASCII or HEX characters. (ASCII is alphabetical and usually easier to remember)

     ! Selection of four keys allowed. (Hex uses Hex numbers vs. Decimal numbering)


                                                  12
                                            ©2008 NexAira Inc.
Step 4: Review Your Settings
    The settings you just entered will appear in summary on this page to allow you to verify you
    entered all information correctly and make notes for future reference.

   ! Click Apply Settings to save the changes on the router and continue.
   ! Click the red X to close the window and return to the !" GUI Main page.

   The configuration is saved in nonvolatile memory, which won’t be lost when the power is turned
   off on the router.


             Congratulations!!
   Setup is complete, you are now free to
             surf the Internet.


                                             13
                                       ©2008 NexAira Inc.
The I3 GUI: Provides two ways to configure the NexConnect Router.

 The First way is using the NexWare Setup Wizard to walk through the Basic Settings.


 The Second uses Manual Settings for each function.


Both Are Accessed though Icons in the Basic Settings Area of the I3 GUI


Primary Setup
    The Primary Setup screen displays the basic settings necessary for the router to properly connect to the
    Internet. Some of the settings inserted during initial setup through the Setup Wizard can be changed
    here, if necessary.

    The Primary Setup screen has three sections.
      The upper section displays the:
             ! LAN IP Address (default is 192.168.123.254)
             ! LAN NetMask (default is 255.255.255.0)
             ! WAN MAC Address
             ! WAN Failover, which allows the use to use a 3G connection as a backup to a non-3G
                 Internet service
             ! Auto-Backup, which is used in tandem with WAN Failover. Enter the address of an Internet
                 host (i.e., www.nexaira.com)
      The middle section gives the user choices of Internet connection type.
        Select the type of Wide Area Network (WAN) the router will use to connect to the Internet from
        the following options:
             ! Static IP Address
             ! Dynamic IP Address
             ! Dynamic IP Address w/ Road Runner Session Management
             ! PPPoE Connection
             ! PPTP Connection
             ! L2TP Connection
             ! 3G Connection

              Note: If you are utilizing a 3G type of connection, please refer to the Setup Wizard section
              above for easy setup and connection.

       The lower section displays important information associated with each Internet connection type. The
       information varies depending on the connection type chosen.


                                                    14
                                              ©2008 NexAira Inc.
Below you will find descriptions of the type of Internet connections and the information typically
required to complete the connection to your Internet service provider. Your Internet service
provider typically supplies the required information to complete this portion of the setup.


                                           15
                                     ©2008 NexAira Inc.
The information described below can be entered through the Primary Setup screen or through the
  Setup Wizard when each of the different types of Internet connections are chosen.

Static IP Address:

  Static IP Address should be selected if you have requested and received a static public IP address
  for your Internet connection from your Internet Service Provider (ISP). Static IP Address
  connections have the following configuration options:

  LAN IP Address:    This is the private IP address of your NexConnect router. It defaults to
                     192.168.123.254 but can be changed if needed.
  WAN IP Address:    This is the public IP address you were given by your Internet Service
                     Provider.
  WAN Subnet Mask: The WAN subnet mask is used to determine the group of IP addresses your
                     public IP address comes from. This value defaults to 255.255.255.0 but may
                     change depending on the settings used by your Internet Service Provider.
  WAN Gateway:       This is the IP address used by your ISP to get to the Internet. This value is
                     provided by your ISP.
  Primary DNS and Secondary DNS: Domain Name System (DNS) servers are used by your ISP to
                                  translate domain names typed into a browser window (such as
                                  nexaira.com) to the IP address used by that domain. Your ISP
                                  will provide at least one DNS server IP address (likely two or
                                  more); enter the address(es) here.


                                            16
                                      ©2008 NexAira Inc.
Dynamic IP Address:

  Dynamic IP Address should be selected for most cable and satellite users. If your ISP account
  came with a username and password, select either Dynamic IP Address w/ Road Runner Session
  Management or PPPoE (consult with your ISP documentation to determine which type you should
  use). Dynamic IP Address means your NexConnect router will obtain its public IP address
  automatically via DHCP from your ISP. Dynamic IP Address configurations have the following
  options:

  LAN IP Address: This is the private IP address of your NexConnect router. It defaults to
                  192.168.123.254 but, can be changed if needed.
  Host Name:      If your network requires a unique name for your NexConnect router, you can
                  enter it here. This is an optional feature and will not harm your network if left
                  blank.
  WAN's MAC Address: Your NexConnect router's WAN port has a Media Access Control (MAC)
                     hardware address. Some cable and satellite ISP networks require that the
                     MAC address be registered with the ISP for authentication. If your computer
                     or other device is registered and your NexConnect router cannot connect,
                     you can use the Clone MAC feature to give the NexConnect WAN port the
                     same MAC address as your registered device. If your ISP does not require
                     MAC authentication, you can leave this field unchanged.


                                                  17
                                            ©2008 NexAira Inc.
Dynamic IP Address with Road Runner Session Management:

  Dynamic IP Address with Road Runner Session Management works the same way as Dynamic IP
  Address does, with the added feature of username and password authentication. If your cable or
  satellite ISP requires you to login with a username and password, and it is not a PPPoE service,
  select this option. Dynamic IP Address with Road Runner Session Management configurations
  have the following options:

  LAN IP Address: This is the private IP address of your NexConnect router. It defaults to
                  192.168.123.254 but can be changed if needed.
  Account:        Enter the account username provided to you by your ISP.
  Password:       Enter the account password provided to you by your ISP.
  Login Server:   This is an optional field. If your ISP requires login to a specific authentication
                  server, enter the address here.


                                           18
                                     ©2008 NexAira Inc.
PPPoE Connection:

 Point-to-Point Protocol over Ethernet (PPPoE) is an authentication scheme used mostly by DSL
 providers but may be employed by some cable or satellite ISPs as well. It utilizes a username and
 password authentication system and allows you to specify DNS server addresses. PPPoE
 Connection configurations have the following options:

 LAN IP Address: This is the private IP address of your NexConnect router. It defaults to
                   192.168.123.254 but can be changed if needed.
 PPPoE Account: Enter the account username provided to you by your ISP.
 PPPoE Password: Enter the account password provided to you by your ISP.
 Primary DNS and Secondary DNS: Domain Name System (DNS) servers are used by your ISP to
                                   translate domain names typed into a browser window (such as
                                   nexaira.com) to the IP address used by that domain. Your ISP
                                   will provide at least one DNS server IP address (likely two or
                                   more); enter the address(es) here.
 PPPoE Service Name: Some ISPs provide a service name that must be used by your NexConnect
                       router along with the supplied username and password to authenticate. If
                       your ISP does not require this value, you may leave this field blank.
 Assigned IP Address: If you have a static IP address from you ISP and need to use PPPoE, you
                       may enter the IP here.


                                                  19
                                            ©2008 NexAira Inc.
PPTP Connection:

 Point-to-Point Tunneling Protocol (PPTP) is a type of VPN connection that can be used to
 establish WAN connectivity. PPTP Connection configurations have the following options:

 LAN IP Address: This is the private IP address of your NexConnect router. It defaults to
                    192.168.123.254 but can be changed if needed.
 My Tunnel Name: You can name your tunnel connection and enter it here.
 Server IP Address: Enter the IP address of the PPTP server you're connecting to here.
 My IP Address:     This setting determines if you're using a static IP address for your WAN PPTP
                    connection or a dynamically assigned address via the PPTP server's DHCP
                    server. For specific information about the IP, Netmask, and Gateway fields,
                    please reference the Static IP Address section of this guide.
 PPTP Account:      Enter the account username provided to you by the PPTP server administrator.
 PPTP Password: Enter the account password provided to you by the PPTP server administrator.


                                          20
                                    ©2008 NexAira Inc.
L2TP Connection:

  Layer 2 Tunneling Protocol (L2TP) is a type of VPN connection invented by Cisco. L2TP
  Connection configurations have the following options:

  LAN IP Address: This is the private IP address of your NexConnect router. It defaults to
                     192.168.123.254 but can be changed if needed.
  My Tunnel Name: You can name your tunnel connection and enter it here.
  Server IP Address: Enter the IP address of the L2TP server you're connecting to here.
  My IP Address:     This setting determines if you're using a static IP address for your WAN L2TP
                     connection or a dynamically assigned address via the L2TP server's DHCP
                     server. For specific information about the IP, Netmask, and Gateway fields,
                     please reference the Static IP Address section of this guide.
  PPTP Account:      Enter the account username provided to you by the L2TP server administrator.
  PPTP Password: Enter the account password provided to you by the L2TP server administrator.


3G Connection:

  3G is a type of wireless Internet connection based off of Cellular technology.

  LAN IP Address: This is the private IP address of your NexConnect router. It defaults to
                   192.168.123.254 but can be changed if needed.
  APN:             Enter your service providers Access Point Name here, if provided.
  Pin Code:        Enter your service providers Pin Code here, if provided.
  Dialed Number: Enter your service providers Dialed Number here, if provided. This is defaulted
                   to #777 which works with Sprint and Verizon carriers.
  Username: Enter your Username here, if provided by your service provider, if necessary.

                                                21
                                          ©2008 NexAira Inc.
Password: Enter your password provided to your service provider, if necessary.


     !
Change Password
    You can change the router’s password here. It is highly recommended that you change the router’s
    administration password immediately during initial configuration.
      1. Enter your previous password in the Current Password field. If this is your first time accessing these
           menus, the default password is “admin”.
      2. Enter a new password in the New Password field.
      3. Re-enter the new password in the Reconfirm field.

     Click Save to keep your changes.


                                                         22
                                                   ©2008 NexAira Inc.
Wireless
      Wireless- Choose En ab le to broadcast a wireless network from your router.
      WMM Capable - Choose En able to apply WiFi MultiMedia certification (a type of Quality of Service) to this
            wireless connection.
      SSID- Service Set Identifier (SSID) is the name designated for a specific wireless local area network (WLAN).
      The SSID's default setting is Nexaira . The SSID can be changed to establish a new wireless network. SSID
      names may contain up to 32 ASCII characters.
      Channel- Channel 11 is the default . Devices on the network must share the same channel.
       (NOTE : Wireless adapters automatically scan and match the wireless settings)
      Security- You may select from six levels of encryption to secure your wireless network:
      No Encryption, WEP.802.1x , WPA-P SK, WPA, WPA2-P SK, or WPA2.

 Securi ty- WEP Encryption is the default setting (as shown in the screen below).
    WEP Security : Select the data privacy algorithm you want. Enabling the security can protect your data while
    it is transferred from one station to another. The standardized IEEE 802.11 WEP (128 or 64-bit) is used here.
    WEP is the most commonly security setting used and provides a minimum level of security.
    WEP Key 1, 2, 3 or 4 : When you enable the 128 or 64 bit WEP key security, please select one WEP key to
    be used and input 26 characters or 10 hexadecimal (0, 1, 2…8, 9, A, B…F) digits.
    802.1X: Used to switch the function of the 802.1X for external RADIUS server.
    WPA-PSK/WPA-PSK2 : Encryption options for WPA-PSK-TKIP and WPA-PSK2-ADE . Enter a password
    in the WPA-PSK /WPA-PSK2 field between 8 and 63 characters long for ASCII.64 characters (0~9,a~f) for HEX.
    WPA/WPA2 The users have to get a access from a RADIUS server which provides user authentication. Enter the IP
                   :
    address and port number of Radius server and RADIUS Shared Key.
    WDS: Wireless Distribution System allows the user to distribute the wireless network without the need for a
    wired connection between access points (additional routers).

              By default, the router broadcasts a secure WiFi signal with WEP encryption:
              •       SSID / WiFi Signal Name is set to “Nexaira”
              •       Channel is set to 11
              •       Security is set to WEP
              •       Encryption is set to 64 Bit
              •       WEP Key 1 (password) is set to “admin”


   Click on Save to store your settings.


                                                         23
                                                   ©2008 NexAira Inc.
Toolbox

System Log
    This page supports two methods to export system logs to specific destination by means of syslog (UDP) and
    SMTP (TCP).
    IP Address for Syslog. Host IP of destination where syslog will be sent to. Check Enable to enable this function.
    E-mail Alert Enable. Check if you want to enable Email alert (send syslog via email).
    SMTP Server IP and Port. Enter the SMTP server IP and port with a ':'. The default port value is 25.
    For example: "mail.your_url.com" or "192.168.1.100:26".
    Send E-mail alert to. The recipients who will receive these logs, you can assign more than 1 recipient, using ';' or
    ',' to separate email addresses.
    E-mail Subject. The subject of email alert, this setting is optional.
    View Log. This button directs the user to the system log.
    Send E-mail. This button allows the user to forward the current system log to the specified email address..

    Click on Save to store configuration changes or Undo to cancel


System Info
 You can view the System log, Routing Table information in this page


                                                       24
                                                 ©2008 NexAira Inc.
Firmware Upgrade
    You can upgrade firmware by clicking the Browser button to find the firmware file on the hard drive of the local
    computer then clicking Firmware “Upgrade” button.
  For more detailed Firmware upgrade Instructions go to http://www.nexaira.com


Backup Settings
    You can backup your settings by clicking the Backup Setting button and save it as a bin file. Once you want to
    restore these settings, please click Firmware Upgrade button and use the bin file you saved


Reset to Defaults
    You can also reset this product to factory default by clicking the Reset to default button


Reboot
    You can also reboot this product by clicking the Reboot button


                                                         25
                                                   ©2008 NexAira Inc.
Advanced Settings


DHCP Server
    There must be a DHCP server on each section of the LAN or you will not be able to connect.
    When the DHCP Server is enabled, the Lease Time, IP Pool Starting Address, IP Pool Ending Address, and
    Domain Name can be specified. By default, DHCP is enabled.
    Lease Time- The length of time the DHCP Server allots for any given client.
    IP Pool Address Range- The range of IP addresses that the DHCP server will issue from. Starting and ending
    addresses must be defined.
    Domain Name- An optional setting that is passed to the client.
    Primary/Secondary DNS- Specify a Domain Name Server (DNS).
    Primary /Secondary WINS- Specify a Windows Internet Name Service.
    Gateway- Set the IP address of an alternate Gateway. This function enables you to assign another gateway to
    your PC when DHCP server offers an IP address to your PC.


DDNS
    To host your server on a changing IP address, you have to use a dynamic domain name service (DDNS). Dynamic
    DNS maps the name of your host to your current IP address, provided by your Internet service provider. Before
    you enable Dynamic DNS, you need to register an account on one of these Dynamic DNS servers listed in
    provider field. To enable Dynamic DNS click the check box next to Enable in the DDNS field. Next enter the
    appropriate information about your Dynamic DNS Server. You have to define:
                Provider
                Host Name
                Username/E-mail
                Password/Key

    NOTE: This information is established when you register an account on a Dynamic DNS server.

    Click on Save to store configuration changes or Undo to cancel


                                                    26
                                              ©2008 NexAira Inc.
Quality of Service
           Quality of Service (QoS) settings ensure minimum levels of bandwidth and priority.
           QoS Packet Filter
           Enable this setting to turn on Quality of Service settings.
           Upstream/Downstream Bandwidth
           Define the minimum bandwidth for uploads and downloads here.
           QoS Priority levels
           Define the level of QoS priority (Low, Normal, and High) for local and remote IPs and ports. Enable each
           one to activate its QoS settings.

     Click on Save to store configuration changes or Undo to cancel


SNMP
  Simple Network Management Protocol (SNMP) is a protocol designed to give a user the capability to remotely
  manage a computer network by polling and setting terminal values and monitoring network events.

       Enable SNMP
       You must check either Local or Remote or Both to enable SNMP function. If Local is checked, this device
       will respond to requests from LAN. If Remote is checked, this device will respond to requests from WAN.
       Get Community
       Setting the community of a GetRequest so your device will respond.
       Set Community
       Setting the community of SetRequest your device will accept.IP 1,IP 2,IP 3,IP 4 Input your SNMP
       Management PC’s IP here.
       User has to configure where the router should send SNMP Trap message.
       SNMP Version
       Please select the SNMP Version that your SNMP Management software supports.

  Click on Save to store configuration changes or Undo to cancel


                                                       27
                                                 ©2008 NexAira Inc.
System Time
   Get Date and Time by NTP Protocol
   Check Get Date and Time by NTP Protocol.
        Time Server - Select a NTP time server to consult UTC time
        Time Zone - Select a time zone where this device locates.
   Set Date and Time using PC’s Date and
   Time - Set the Date and Time from your PC
   Set Date and Time manually - Selected if you want to Set Date and Time manually.
   Daylight Saving – Enable/Disable

   Click on Save to store configuration changes or Undo to cancel


                                                      28
                                                ©2008 NexAira Inc.
Performance
   Performance Beacon Interval
   Beacons are packets sent by an Access Point to synchronize a wireless network. Specify a Beacon interval value between 1 and
   1000. The default value is set to 100 milliseconds.

   DTIM interval
   Enter a value between 1 and 65535 for the Delivery Traffic Indication Message (DTIM). A DTIM is a countdown informing
   clients of the next window for listening to broadcast and multicast messages. When the Access Point has buffered broadcast or
   multicast messages for associated clients, it sends the next DTIM with a DTIM Interval value. AP clients hear the beacons and
   awaken to receive the broadcast and multicast messages. The default value for DTIM interval is set to 3

   Wireless mode - An Access Point can be accessed by 802.11b or 802.11g clients in mixed mode, while only allowing
   802.11g clients to connect in G mode. The default is mixed mode.

   TX Rates
   Select the basic transfer rates based on the speed of wireless adapters on the WLAN (wireless local area network).

   SSID Broadcast
   Choose enable or disable the wireless SSID broadcast. These settings should not be modified without reason.

   Speed Enhanced Mode This is a TX Burst function for Ralink wireless solution

   Antenna Transmit Power: Select the Transmit Power of the Antenna

   Click on Save to store configuration changes or Undo to cancel


                                                             29
                                                       ©2008 NexAira Inc.
Scheduling
   You can set the schedule time to decide which service will be turned on or off. Select the Enable item. Click Add
   New Rule…You can write a rule name and set which day and what time to schedule from “Start Time” to “End
   Time”. Example: Configure “FTP Disabled” as everyday 14:10 to 16:20

   Click on Save to store configuration changes or Undo to cancel


Wake on LAN
   Wake-on-LAN is a technology that enables you to power up a networked device remotely. In order to use this
   feature, the target device must be Wake-on-LAN enabled and you have to know the MAC address of this device,
   For Example; MAC 00-11-22-33-44-55. Clicking "Wake up" button the router will send a wake-up frame to the
   target device immediately.

   Click on Save to store configuration changes or Undo to cancel.


                                                            30
                                                      ©2008 NexAira Inc.
Security Settings


Packet Filters
    Packet Filters enable you to control what packets are allowed to pass through the router. Outbound filter applies on
    all outbound packets. However, inbound filters apply on packets that are destined to Virtual Servers or DMZ hosts
    only. You can select one of the two filtering policies:
           1. Allow all to pass except those match the specified rules
           2. Deny all to pass except those match the specified rules
    You can specify 48 rules for each direction: inbound or outbound. For each rule, you can define the following:
           ! Source IP address
           ! Source port
           ! Destination IP address
           ! Destination port
           ! Protocol: TCP or UDP or both.
           ! Use Schedule Rule #

    For source or destination IP address, you can define a single IP address.

    For example: (192.168.123.200) or a range of IP addresses for example: (192.168.123.200 – 192.168.123.253).
    A blank field implies all IP addresses. For source or destination port, you can define a single port (80) or a range
    of ports (1000-1999). Add prefix "T" or "U" to specify TCP or UDP protocol. For example, T80, U53,
    U2000-2999, no prefix indicates both TCP and UDP are defined. An empty implies all port addresses. Packet
    Filter can work with Scheduling Rules, providing users with more flexibility on access control. For details,
    please refer to Scheduling Rules. Each rule can be enabled or disabled individually.

    Inbound Filter: To enable Inbound Packet Filter check the box next to Enable in the Inbound Packet Filter field

    Click on Save to store configuration changes or Undo to cancel.


                                                        31
                                                  ©2008 NexAira Inc.
Domain Filters
   Domain filters allow users to prevent users of the router from accessing specific URLs.
   Domain Filters Enable
   Check if you want to enable Domain Filter.
   Log DNS Query
   Check if you want to log the action when someone accesses the specific URLs.
   Privilege IP Address Range
   Setting a group of hosts and privilege these hosts to access network without restriction.
   Domain Suffix
   A suffix of URL to be restricted (For example:".com", "xxx.com")
   Action
   When someone is accessing a URL that matches the specified domain-suffix, what kind of action you want carried
   out.
   Check “drop” to block the access. Check “log” to log the access.
   Enable
   Check to enable each rule.

   Click Save to store configuration changes or Undo to cancel.


                                                   32
                                             ©2008 NexAira Inc.
URL Blocking
   URL Blocking will block LAN computers from connecting to pre-defined Websites. The major difference
   between “Domain filter” and “URL Blocking” is Domain filters require a suffix (like .com or .org, etc), while
   URL Blocking requires a keyword only. The Domain filter can block a specific website, while URL Blocking can
   block hundreds of websites by a keyword.
   URL Blocking Enable
   Check if you want to enable URL Blocking.
   URL
   If any part of the Website's URL matches the pre-defined word, the connection will be blocked. For example, you
   can use pre-defined word "pancake" to block all websites if their URLs contain the pre-defined word "pancake."
   Enable Check to enable each rule.

   Click Save to store configuration changes or Undo to cancel


MAC Control
   MAC Address Control allows you to assign different access rights for different users and to assign a specific IP
   address to a certain MAC address.
   MAC Address Control. Check Enable to enable MAC Address Control. All of the settings in this page will take
   effect only when Enable is checked.Connection control. Check Connection control to control which wired and
   wireless clients can connect to this device. If a client is denied a connection to the router, it also can't access the
   Internet. Choose allow or deny to enable or disable the clients whose MAC addresses are not in the Control table
   to connect to this device. Association control. Check Association control to enable the controlling of wireless
   client association to the wireless LAN. If a client is denied an associate to the wireless LAN, it means the client
   can't send or receive any data via the router. Choose allow or deny to allow or deny the clients whose MAC
   addresses are not in the Control table to associate to the wireless LAN

   Click on Next Page to go down or Previous page back to last page.

   Click on Save to store configuration changes or Undo to cancel.


                                                          33
                                                    ©2008 NexAira Inc.
Other Options
       Remote Administrator Host/Port. By default, only Intranet users can browse the built-in web pages to perform
       administrative tasks on the router. This feature enables you to perform administration tasks from a remote host. If
       this feature is enabled, only the specified IP address can perform remote administration. If the specified IP address
       is 0.0.0.0, any host can connect to this product to perform administration tasks. You can use subnet mask bits "/nn"
       notation to specify a group of trusted IP addresses for example, "10.1.2.0/24."

       NOTE: When Remote Administration is enabled, the web server port will be shifted to 8080. You can change web
       server port to another port.

       Administrator Time-out. The time of no activity to logout automatically, you may set it to zero to disable this
       feature.
       Discard PING from WAN side. When this feature is enabled, any host on the WAN is not able to ping the router.
       Disable UPNP: Choose enable or disable the UPNP feature
      Click on Save to store configuration changes or Undo to cancel


  Forwarding Rules


Routing
Routing Table
  This allows a physical interface address to be used for outgoing IP data packets. If you have more than one router and
  subnet, you will need to enable a routing table to allow packets to find proper routing path and allow different
  subnets to communicate with each other. Routing Table settings are used to setup the functions of static and dynamic
  routing.
        Dynamic Routing
        Routing Information Protocol (RIP) will exchange information about destinations for computing routes
        throughout the network. Please select RIPv2 only if you have different subnets in your network. Otherwise,
        please select RIPv1 if you need this protocol.
        Static Routing
        For static routing, you can specify up to 8 routing rules. You can enter the destination IP address, subnet mask,
        gateway, hop for each routing rule, and then enable or disable the rule by checking or un-checking the Enable
        checkbox.

Click on Save to store configuration changes or Undo to cancel


                                                              34
                                                        ©2008 NexAira Inc.
GRE Tunneling
   GRE (Generic Routing Encapsulation) is an advanced protocol that allows you to designate a static IP tunnel from
   one host to another. Other network traffic, such as IPSec VPN, can then traverse that tunnel without error. There are
   four required input values:
      1. Remote WAN IP
      2. Remote LAN IP
      3. Local WAN IP
      4. Local LAN IP
   The WAN IP is the public IP addresses of the two networks to be connected. The LAN IPs are the specific private IP
   addresses of the two hosts (or gateways) that are to be connected. Once the correct values have been specified, check
   the Enable box and click Save to store configuration changes.


                                                           35
                                                     ©2008 NexAira Inc.
Virtual Server
    The router’s NAT firewall filters out unrecognized packets to protect your local intranet. All hosts behind the
    device are invisible to the outside world. It is possible to make select hosts accessible by enabling the Virtual
    Server feature.

    A virtual server is defined as a Service Port, and all requests to this port will be redirected to the computer
    specified by the Server IP. Virtual Server can work with Scheduling Rules, which gives more flexibility on
    Access control. For Detail, please refer to Scheduling Rule.

    For example, if you have an FTP server (port 21) at 192.168.123.1, a Web server (port 80) at 192.168.123.2, and a
    VPN server at 192.168.123.6, then you need to specify the following virtual server mapping table:

       Service Port          Server IP            Enable
           21              192.168.123.1            V
           80              192.168.123.2            V
          1723             192.168.123.6            V

   Click Save to store configuration changes or Undo to cancel


                                                            36
                                                      ©2008 NexAira Inc.
Special Applications
    Some applications require multiple connections, like Internet games, video conferencing, Internet telephony, etc.
    Because of the firewall function, these applications cannot work with a pure NAT router. The Special
    Applications feature allows some of these applications to work with this device. If the mechanism of Special
    Applications fails to make an application work, try setting your computer as the DMZ host instead.

    Trigger: the outbound port number issued by the application.

    Incoming Ports: when the trigger packet is detected, the inbound packets sent to the specified port numbers are
    allowed to pass through the firewall. The router provides some predefined settings. Pull down the application from
    the menu and click Copy to for the defined settings to take place.

    NOTE: At any given time, only one PC can use each Special Applications tunnel.

    Click on Save to store configuration changes or Undo to cancel


DMZ Host
   DMZ (Demilitarized Zone) Host is a host without the protection of firewall. It allows a computer to be exposed to
   unrestricted 2-way communication for Internet games, Video conferencing, Internet telephony and other special
   applications.

   Specify the IP address of the device to be placed in the DMZ.

   Click on Save to store configuration changes or Undo to cancel

   NOTE: This feature should be enabled only when needed or in use.


                                                        37
                                                  ©2008 NexAira Inc.
Troubleshooting

This section provides an overview of common issues, with solutions for the installation and operation of the
NexConnect 3G Wireless Broadband Router.

1. I am unable to access the Configuration Menu when I use my computer to configure the router.
      It is recommended that you use an Ethernet connection to configure the NexConnect 3G Wireless Broadband
      Router.
      Ensure that the LAN LED on the NexConnect 3G Wireless Broadband Routeris Green.
      If the LAN is NOT green, check to ensure if the cable for the Ethernet connection is securely inserted.
      Ensure that the IP Address assigned to the computer is in the same range and subnet as the NexConnect 3G
      Wireless Broadband Router. NOTE: The default IP Address of the NexConnect 3G Wireless Broadband Router is
      192.168.123.254. All computers on the network must have a unique IP Address within the same range (e.g.,
     192.168.123.x). Any computer that has an identical IP Addresses will not be visible on the network. All computers
     must also have the same subnet mask (e.g., 255.255.255.0).
     Do a Ping test to 192.168.123.254 to make sure that the NexConnect 3G Wireless Broadband Router is
     responding.
                   Go to Start > Run
                   1:Type cmd
                   2:Select Enter
                   3:Type ping 192.168.123.254 (A successful ping shows four replies).
                   Note: If you have changed the default IP Address, ensure you ping the correct IP Address assigned to
                   the NexConnect 3G Wireless Broadband Router.

    Ensure that your Ethernet Adapter is working properly, and that all network drivers are installed properly.
           NOTE: Network adapter names will vary depending on your specific adapter. The installation steps listed
           below are applicable for all network adapters.
           1. Go to Start > My Computer > Properties.
           2. Select the Hardware Tab.
           3. Click Device Manager.
           4. Double-click on “Network Adapters”.
           5. Right-click on Wireless Cardbus Adapter, or your specific network adapter.
           6. Select Properties to ensure that all drivers are installed properly.
           7. Look under Device Status to see if the device is working properly.
           8. Click “OK”


2. My wireless client can’t access the Internet.
    If you select either WEP or WPA-PSK encryption on NexConnect 3G Wireless Broadband Router, ensure
    encryption settings match your WiFi settings on the computer. Please refer to your WiFi adapter documentation for
    additional information.
    Ensure that the wireless client is associated and joined with the correct Access Point.
    To check this connection, follow the steps below:
    1. Right-click on the Wireless Network Connection icon in the Windows taskbar.
    2. Select View Available Wireless Networks in Wireless Configure. The Connect to Wireless Network screen
    appears. Ensure you have selected the correct available network.
    Ensure the IP Address assigned to the wireless adapter is within the same subnet as the Access Point and gateway.
    The NexConnect 3G Wireless Broadband Router has an IP Address of 192.168.123.254. Wireless adapters must
    have an IP Address in the same range (e.g., 192.168.123.x). The subnet mask must be the same for all the
    computers on the network, but two devices may have the same IP Address. Therefore, each device must have a
    unique IP Address.
    To check the IP Address assigned to the wireless adapter, follow the steps below:
      1. Enter ipconfig /all in command mode.
      2. Enter ping 192.168.123.254 to check if you can access the Wireless WAN Mobile Broadband Router.


                                                         38
                                                   ©2008 NexAira Inc.
3. The wireless connection keeps dropping.
    Antenna Orient ation.
    1: Tr     erent antenna orientatio ns for the NexConne ct 3G Wireless Broadband Router.
    2: Try to keep the antenna at least 6 inchs away from the wall or other objects.
                                             e
    Try changing the channel on the NexConnect 3G Wireless Broadband Router, your Access Point and Wireless
                                               terference.
    Keep the NexConnect 3G Wireless Broadband Router away (at least 3-6 feet) from electrical devices that generate
    RF noise, like microwaves, m onitors, electric motors, etc.
    Move away from ot her s

4. I am unable to achieve a wireless connection.
NOTE: An Etherne t connection is required to troubleshoot th e NexConnect 3G Wireless Broadband Router.
If you have enabled Encryption o n the NexConnect 3G Wireless Broadband Router, you must also enable encryption on
all wireless clients in order to establish a wireless connection.
     For 802.11g, the encryption settings are: 64 or 128 bit. Ensure that the encryption bit level is the same for both the
     NexConnect 3G Wireless Broadband Router and your Wireless Client.
     Ensure that the SSID (Service Set Identifier) on the NexConnect 3G Wireless Broadband Router and the Wireless
     Client are exactly the same. If they are not, your wireless connection will not be established.
     Move the NexConnect 3G Wireless Broadband Router and the wireless client into the same room, and then test the
     wireless connection.
     Disable all security settings such as WEP, and MAC Address Control.
     Turn off the NexConnect 3G Wireless Broadband Router and the client. Turn the NexConnect 3G Wireless
     Broadband Router back on, and then turn on the client.
     Ensure that all devices are set to Infrastructure mode.
     Ensure that the LED indicators are indicating normal activity. If not, ensure that the AC power and Ethernet cables
     are firmly connected.
     Ensure that the IP Address, subnet mask, gateway and DNS settings are correctly entered for the network.
     If you are using 2.4GHz cordless phones, X-10 equipment, or other home security systems, ceiling fans, or lights,
     your wireless connection may degrade dramatically or drop altogether.
     To avoid interference, change the Channel on the NexConnect 3G Wireless Broadband Router and all devices in
     your network.
     Keep your product at least 3-6 feet away from electrical devices that generate RF noise. Examples include:
     microwaves, monitors, electric motors, and so forth.

 5. I just do not remember my encryption key.
      If you forgot your encryption key, the WiFi card will be unable to establish a proper connection.
       If an encryption key setting has been set for the NexConnect 3G Wireless Broadband Router, it must also be set for
       the WiFi card that will connect to the NexConnect 3G Wireless Broadband Router.
       To reset the encryption key(s), login to the NexConnect 3G Wireless Broadband Router using a wired connection.
       (Please refer to “Basic > Wireless (Security–No Encryption)” on page 10, for additional information).

 6. Reset the NexConnect 3G Wireless Broadband Router to its factory default settings.
     If other troubleshooting methods have failed, you may choose to Reset the NexConnect 3G Wireless Broadband
     Routerto its factory default settings.
     To hard-reset the NexConnect 3G Wireless Broadband Router to its factory default settings, follow the steps listed
     below:
     1. Ensure the NexConnect 3G Wireless Broadband Router is powered on.
     2. Locate the Reset button on the back of the Wireless WAN Mobile Broadband Router.
     3. Use a paper clip to press the Reset button.
     4. Hold for 10 seconds and then release.
     5. After the NexConnect 3G Wireless Broadband Router re-boots, it is reset to the factory default settings.
     NOTE: Please note that this process will take a few minutes.


                                                         39
                                                   ©2008 NexAira Inc.
7. What is VPN?
    VPN stands for “Virtual Private Networking.” VPNs create a "tunnel" through an existing Internet connection
    using PPTP (Point-to-Point Tunneling Protocol) or IPSec (IP Security) protocols with various encryption schemes
    including Microsoft Challenge Handshake Authentication Protocol (MS-CHAP) .
    This feature allows you to use your existing Internet connection to connect to a remote site with added security. If
    your VPN connection is not functional, verify that your VPN dial-up configuration is correct.
    NOTE: This information should be provided to you from your VPN provider.

8. My Ethernet cable does not work properly.
    Ensure that there is a solid cable connection between the Ethernet port on the Router and your NIC (Network
    Interface Card).
    Ensure that the settings on your NIC adapter are “Enabled” and set to accept an IP address from the DHCP.
    If settings appear to be correct, ensure that you are not using a crossover Ethernet cable. Although the NexConnect
    3G Wireless Broadband Router is MDI/MDIX compatible, not all NICs are. Therefore, it is recommended that you
    use a patch cable when possible.


                                                          40
                                                    ©2008 NexAira Inc.
9. My NexConnect is powered on and my 3G card is inserted into the modem. I have connected to the router
via an Ethernet cable or a WiFi connection, but I am unable to connect to the Internet.
To connect to the Internet, you must have an activated 3G card and your service provider's settings must be properly
entered into the router's configuration pages. First, call your service provider to confirm that your card is activated.
If it is, then do the following: connect to the router via an Ethernet cable, open a web browser, and enter
"192.168.123.254" into the address bar.

Enter the router's password (originally it is "default") and press Enter. Choose Advanced Setup. To the left, click
Primary Setup. Scroll down and confirm that 3G is selected. Below that, enter your service provider's settings in the
fields provided.. Here are some common settings for a number of providers:

Sprint:   Dial Number: #777

Verizon: Dial Number: #777

AT&T: APN: isp.cingular
     Dial Number: *99#
     Username: isp@cingulargprs.com
     Password: CINGULAR1

Alltel: Dial Number: #777
        Username: XXXXXXXXXX@alltel.net
                    (replace “XXXXXXXXXX” with the access number provided by Alltel)
        Password: Alltel

T-mobile: APN: wap.voicestream.com
        Dial Number: *99***1#

MobiPCS Hawaii: Dial Number: #777
       Username: (MVN)@mobipcs.com
       Password: mobipcs

Once the correct settings are entered, click Save Settings. When the web browser returns to the initial login page, the
settings are saved. Power off your router and card, wait 10 seconds, and power them back on.


                                                         41
                                                   ©2008 NexAira Inc.
Technical Support
  NexAira Inc. provides free technical support for customers worldwide for the warranty period of one year on this
  product.

   NexAira Technical Support:
   Phone Support:
   (888) 377-8239
   Monday through Friday 8:00am - 5:00pm PST
   Email Support: routers@nexaira.com

  When contacting technical support, please provide the following information:
  NOTE: All numbers referenced below can be found on the bottom of the router.

     Model number or product name. This is the ten-digit “TX” number.
     Serial number of the unit.
     Date code
     Firmware version
     Defaulted IP
   NOTE: The firmware version can be found by logging into the router and viewing the status page.

Technical Specifications
    3G Access                1*PC card Type II Slot
                             1*USB port
    Standards                IEEE 802.11b/g
                             IEEE 802.3
                             IEEE 802.3u
    Wireless
       Standard              IEEE 802.11b/g Turbo
    Data Rate                54, 48, 36, 24, 18, 12, 9, and 6 Mbps per channel, Auto Fall-Back
    Frequency                2.4 – 2.462 GHz, CCK
                             Tx/Rx power 18dbm/Per Cell
    Range Coverage           indoors approx. 35-100 meters;
                             outdoors up to 100-300 meters
                             1-11 for N. America (FCC);1-11 for Canada (DOC)
    # of Channels            1-13 Europe (Except Spain and France) (ETSI)
                             1-14 Japan (TELEC);
    Security                 64-bit and 128-bit WEP Encryption; WPA encryption
    Antenna                  3dB Detachable Antenna
                             IP Filtering
    Firewall                 NAT (Network Address Translation) with VPN Pass through
                             MAC Filtering
    Supported WAN type       3G, Static IP, Dynamic IP, PPPoE,PPTP,L2TP
    Connection Scheme        Connect-on-demand, Auto-Disconnect
    NAT function             Class C ;One-to-Many; Max 253 Users; Virtual Server; DMZ Host
    VPN                      PPTP, L2TP and IPSec Pass Through
    Config.& Management      Web-Based IE, Nevigator browser and SNMP
                             DHCP Server and Client
    Working Environment      Temperature: 0~40oC, Humidity 10%~90% non-condensing
    OS supported             Windows 95/98/ME/NT/2000/XP; Linux, MAC
    Power                    Switching 5V 3.0A


                                                       42
                                                 ©2008 NexAira Inc.
Glossary of Definitions
DHCP - Dynamic Host Configuration Protocol is a protocol used by networked devices (clients) to obtain the
parameters necessary for operation in an Internet Protocol network. This protocol reduces system administration
workload, allowing devices to be added to the network with little or no manual configuration.

IP – Internet Protocol is a protocol used for communicating data across a packet-switched Internetwork using
the Internet Protocol Suite (TCP/IP).

LAN – Local Area Network is a computer network covering a small physical area, like a home, office, or small group
of buildings, such as a school, or an airport. The defining characteristics of LANs, in contrast to wide-area networks
(WANs), include their usually higher data-transfer rates, smaller geographic range, and lack of a need for leased
telecommunication lines.

LAN IP– Local Area Network Internet Protocol varies depending on the hardware configuration. If the NexConnect
router is setup independently, not associated with other routers or other network hardware, the default settings are
preferred. If the NexConnect router is setup as part of a larger networking system, please refer to your system
administrator for proper settings.

MAC - a Media Access Control address (MAC address) or Ethernet Hardware Address (EHA), hardware
address, adapter address or physical address is a quasi-unique identifier assigned to most network adapters or
network interface cards (NICs) by the manufacturer for identification. If assigned by the manufacturer, a MAC address
usually encodes the manufacturer's registered identification number.

NexConnect – NexAira 3G Router which provides universal access to keep you connected anywhere on any network.
Check Email, surf web, share music and photo files anytime. The NexAira NexConnect 3G Wireless Router supports
16-bit and 32-bit Type II mobile broadband cards on EVDO and HSDPA networks. Integrated 802.11 b/g wireless data
transfers with speeds up to 54 Mbps and wired data transfers up to 100 Mbps. Equipped with two Ethernet ports for
LAN and WAN access, Type II PC card slot and USB port for 3G network connections. For ExpressCards, a Universal
adapter is available.

NexWaresm (The NexAira in Communications Firmware and Software Management) – Provides a user with ease of
use with its Industry defining Graphical User Interface (GUI). An Intuitive Iconic Interactive (I3) GUI.

PoE - Power over Ethernet technology describes a system to transfer electrical power, along with data, to remote
devices over standard twisted-pair cable in an Ethernet network. This technology is useful for powering IP telephones,
wireless LAN access points, network cameras, remote network switches, embedded computers, and other appliances
where it would be inconvenient, expensive (wiring must often be done by qualified and/or licensed electricians for legal
or insurance reasons) or infeasible to supply power separately.

QoS – Quality of Service, High QoS of performance or achieved service quality, for example high bit rate, low latency
and low bit error probability.

Setup Wizard – Useful end user feature for advanced hardware configurations.

UPnP – Universal Plug and Play which allows the router to connect seamlessly and to simplify the implementation of
networks in the home (data sharing, communications, and entertainment) and corporate environments. UPnP achieves
this by defining and publishing UPnP device control protocols built upon open, Internet-based communication
standards.


                                                        43
                                                  ©2008 NexAira Inc.
VPN – Virtual Private Network is a computer network in which some of the links between nodes are carried by open
connections or virtual circuits in some larger network (e.g., the Internet) instead of by physical wires. The link-layer
protocols of the virtual network are said to be tunneled through the larger network when this is the case. One common
application is secure communications through the public Internet, but a VPN need not have explicit security features,
such as authentication or content encryption.

WAN – Wide Area Network are used to connect LANs and other types of networks together, so that users and
computers in one location can communicate with users and computers in other locations.

WAN IP – Wide Area Network Internet Protocol can vary depending on hardware configuration. If the NexConnect
router is setup independently, not associated with other routers or other network hardware, the default settings are
preferred. If the NexConnect router is setup as part of a larger networking system, please refer to your system
administrator for proper settings.

WAP – Wireless Application Protocol is an open international standard for application layer network communications
in a wireless communication environment. Its main use is to enable access to the Internet (HTTP) from a mobile phone
or PDA.

WEP – Wired Equivalent Privacy is a deprecated algorithm to secure IEEE 802.11 wireless networks. Wireless
networks broadcast messages using radio and are thus more susceptible to eavesdropping than wired networks.


                                                        44
                                                  ©2008 NexAira Inc.

More Related Content

What's hot

Nokia engineer basic_training_session_v1
Nokia engineer basic_training_session_v1Nokia engineer basic_training_session_v1
Nokia engineer basic_training_session_v1
mohameddawood35
 
02 opti x rtn 900 v100r002 system hardware-20100223-a
02 opti x rtn 900 v100r002 system hardware-20100223-a02 opti x rtn 900 v100r002 system hardware-20100223-a
02 opti x rtn 900 v100r002 system hardware-20100223-a
Waheed Ali
 
Huawei GSM Principles
Huawei GSM PrinciplesHuawei GSM Principles
Huawei GSM Principles
Achmad Fauzi
 
Zxmw nr8250 v1.00 commissioning guide ¸±±¾
Zxmw nr8250 v1.00 commissioning guide   ¸±±¾Zxmw nr8250 v1.00 commissioning guide   ¸±±¾
Zxmw nr8250 v1.00 commissioning guide ¸±±¾
Gratien Niyitegeka
 
240243228 huawei-bts-3900-training
240243228 huawei-bts-3900-training240243228 huawei-bts-3900-training
240243228 huawei-bts-3900-training
Shelton Siziba
 
Ericsson RBS 6000
Ericsson RBS 6000Ericsson RBS 6000
Ericsson RBS 6000
ibrahimnabil17
 
Comparison between bts 312, 3012 and 3900 by usman zulfqar
Comparison between bts 312, 3012 and 3900 by usman zulfqarComparison between bts 312, 3012 and 3900 by usman zulfqar
Comparison between bts 312, 3012 and 3900 by usman zulfqar
usman zulfqar
 
A glance over cellular Communication systems and BSS network equipment
A glance over cellular Communication systems and BSS network equipmentA glance over cellular Communication systems and BSS network equipment
A glance over cellular Communication systems and BSS network equipment
Ahmed Nabeeh
 
Rectifiers and Back up Batteries at Telecom Sites
Rectifiers and Back up Batteries at Telecom SitesRectifiers and Back up Batteries at Telecom Sites
Rectifiers and Back up Batteries at Telecom Sites
ibrahimnabil17
 
Huaweigsmgrfuintroduction 141128151840-conversion-gate02
Huaweigsmgrfuintroduction 141128151840-conversion-gate02Huaweigsmgrfuintroduction 141128151840-conversion-gate02
Huaweigsmgrfuintroduction 141128151840-conversion-gate02
moussaCoulibaly22
 
Mobilink 2G3G Swap Guide V1.8 20150406 (1)
Mobilink 2G3G Swap Guide V1.8 20150406 (1)Mobilink 2G3G Swap Guide V1.8 20150406 (1)
Mobilink 2G3G Swap Guide V1.8 20150406 (1)Abdul Mateen Rahim
 
ALU 7360 5520_gpon_basic_configuration
ALU  7360 5520_gpon_basic_configurationALU  7360 5520_gpon_basic_configuration
ALU 7360 5520_gpon_basic_configuration
Wahyu Nasution
 
Emua quick installation manual for bts3900 l
Emua quick installation manual for bts3900 lEmua quick installation manual for bts3900 l
Emua quick installation manual for bts3900 lalex natel
 
83092299 rru3804-overview
83092299 rru3804-overview83092299 rru3804-overview
83092299 rru3804-overview
Serik123
 
Huawei node b technical-description
Huawei node b technical-descriptionHuawei node b technical-description
Huawei node b technical-description
Yasir Jami
 

What's hot (19)

Nokia engineer basic_training_session_v1
Nokia engineer basic_training_session_v1Nokia engineer basic_training_session_v1
Nokia engineer basic_training_session_v1
 
02 opti x rtn 900 v100r002 system hardware-20100223-a
02 opti x rtn 900 v100r002 system hardware-20100223-a02 opti x rtn 900 v100r002 system hardware-20100223-a
02 opti x rtn 900 v100r002 system hardware-20100223-a
 
Huawei GSM Principles
Huawei GSM PrinciplesHuawei GSM Principles
Huawei GSM Principles
 
Zxmw nr8250 v1.00 commissioning guide ¸±±¾
Zxmw nr8250 v1.00 commissioning guide   ¸±±¾Zxmw nr8250 v1.00 commissioning guide   ¸±±¾
Zxmw nr8250 v1.00 commissioning guide ¸±±¾
 
240243228 huawei-bts-3900-training
240243228 huawei-bts-3900-training240243228 huawei-bts-3900-training
240243228 huawei-bts-3900-training
 
Ericsson RBS 6000
Ericsson RBS 6000Ericsson RBS 6000
Ericsson RBS 6000
 
Comparison between bts 312, 3012 and 3900 by usman zulfqar
Comparison between bts 312, 3012 and 3900 by usman zulfqarComparison between bts 312, 3012 and 3900 by usman zulfqar
Comparison between bts 312, 3012 and 3900 by usman zulfqar
 
A glance over cellular Communication systems and BSS network equipment
A glance over cellular Communication systems and BSS network equipmentA glance over cellular Communication systems and BSS network equipment
A glance over cellular Communication systems and BSS network equipment
 
Ome201102 huawei bts3012 hardware structure issue2.0
Ome201102 huawei bts3012 hardware structure issue2.0Ome201102 huawei bts3012 hardware structure issue2.0
Ome201102 huawei bts3012 hardware structure issue2.0
 
Rectifiers and Back up Batteries at Telecom Sites
Rectifiers and Back up Batteries at Telecom SitesRectifiers and Back up Batteries at Telecom Sites
Rectifiers and Back up Batteries at Telecom Sites
 
Huaweigsmgrfuintroduction 141128151840-conversion-gate02
Huaweigsmgrfuintroduction 141128151840-conversion-gate02Huaweigsmgrfuintroduction 141128151840-conversion-gate02
Huaweigsmgrfuintroduction 141128151840-conversion-gate02
 
Mobilink 2G3G Swap Guide V1.8 20150406 (1)
Mobilink 2G3G Swap Guide V1.8 20150406 (1)Mobilink 2G3G Swap Guide V1.8 20150406 (1)
Mobilink 2G3G Swap Guide V1.8 20150406 (1)
 
ALU 7360 5520_gpon_basic_configuration
ALU  7360 5520_gpon_basic_configurationALU  7360 5520_gpon_basic_configuration
ALU 7360 5520_gpon_basic_configuration
 
Emua quick installation manual for bts3900 l
Emua quick installation manual for bts3900 lEmua quick installation manual for bts3900 l
Emua quick installation manual for bts3900 l
 
83092299 rru3804-overview
83092299 rru3804-overview83092299 rru3804-overview
83092299 rru3804-overview
 
3G Product Summary
3G Product Summary3G Product Summary
3G Product Summary
 
Huawei node b technical-description
Huawei node b technical-descriptionHuawei node b technical-description
Huawei node b technical-description
 
ENGR M FAHIM IQBAL CV
ENGR M FAHIM IQBAL CVENGR M FAHIM IQBAL CV
ENGR M FAHIM IQBAL CV
 
BTS
BTSBTS
BTS
 

Similar to Nexaira Nexconnect Router User Guide (quantum-wireless.com)

Ke8220 e
Ke8220 eKe8220 e
Ke8220 ehome
 
Gvp 201 &-gvp-201_w_user's_manual_2011_v1.21 backup
Gvp 201 &-gvp-201_w_user's_manual_2011_v1.21 backupGvp 201 &-gvp-201_w_user's_manual_2011_v1.21 backup
Gvp 201 &-gvp-201_w_user's_manual_2011_v1.21 backupWeb Technology
 
Wn3000 rp
Wn3000 rpWn3000 rp
Wn3000 rp
pdvgpl
 
Eb1304%20 Net%20 En
Eb1304%20 Net%20 EnEb1304%20 Net%20 En
Eb1304%20 Net%20 Enguestcce874d
 
Beetle i8A operating manual (english)
Beetle i8A operating manual (english)Beetle i8A operating manual (english)
Beetle i8A operating manual (english)
Nguyễn Việt Hồng (wincor.com.vn)
 
Motorola solutions ap6522 m access point installation guide wing 5.5 versio...
Motorola solutions ap6522 m access point installation guide   wing 5.5 versio...Motorola solutions ap6522 m access point installation guide   wing 5.5 versio...
Motorola solutions ap6522 m access point installation guide wing 5.5 versio...Advantec Distribution
 
Motorola solutions ap7131 access point installation guide wi ng 5.5 version...
Motorola solutions ap7131 access point installation guide   wi ng 5.5 version...Motorola solutions ap7131 access point installation guide   wi ng 5.5 version...
Motorola solutions ap7131 access point installation guide wi ng 5.5 version...Advantec Distribution
 
Motorola ap 8232 access point installation guide mn000032 a01
Motorola ap 8232 access point installation guide mn000032 a01Motorola ap 8232 access point installation guide mn000032 a01
Motorola ap 8232 access point installation guide mn000032 a01Advantec Distribution
 
scarlett2i4-user-guide.pdf
scarlett2i4-user-guide.pdfscarlett2i4-user-guide.pdf
scarlett2i4-user-guide.pdf
ssusera78a1c
 
Instruction Manual | Flir Scout BTS Thermal BI-Ocular | Optics Trade
Instruction Manual | Flir Scout BTS Thermal BI-Ocular | Optics TradeInstruction Manual | Flir Scout BTS Thermal BI-Ocular | Optics Trade
Instruction Manual | Flir Scout BTS Thermal BI-Ocular | Optics Trade
Optics-Trade
 
Motorola ap650 access point installation guide (part no. 72 e 131207-01 rev. d )
Motorola ap650 access point installation guide (part no. 72 e 131207-01 rev. d )Motorola ap650 access point installation guide (part no. 72 e 131207-01 rev. d )
Motorola ap650 access point installation guide (part no. 72 e 131207-01 rev. d )Advantec Distribution
 
Ap650 installation guide_72_e-131207-01_revd
Ap650 installation guide_72_e-131207-01_revdAp650 installation guide_72_e-131207-01_revd
Ap650 installation guide_72_e-131207-01_revdAdvantec Distribution
 
Ap650 installation guide_72_e-131207-01_revd
Ap650 installation guide_72_e-131207-01_revdAp650 installation guide_72_e-131207-01_revd
Ap650 installation guide_72_e-131207-01_revdAdvantec Distribution
 
Motorola ap650 access point installation guide (part no. 72 e 131207-01 rev. d )
Motorola ap650 access point installation guide (part no. 72 e 131207-01 rev. d )Motorola ap650 access point installation guide (part no. 72 e 131207-01 rev. d )
Motorola ap650 access point installation guide (part no. 72 e 131207-01 rev. d )Advantec Distribution
 
Motorola ap 8222 access point installation guide mn000046 a01
Motorola ap 8222 access point installation guide mn000046 a01Motorola ap 8222 access point installation guide mn000046 a01
Motorola ap 8222 access point installation guide mn000046 a01Advantec Distribution
 
Juniper netscreen 25
Juniper netscreen 25Juniper netscreen 25
Juniper netscreen 25rikvar
 
Beetle M-II operating manual (english)
Beetle M-II operating manual (english)Beetle M-II operating manual (english)
Beetle M-II operating manual (english)
Nguyễn Việt Hồng (wincor.com.vn)
 
Motorola solutions wing 4.4 ap7131 n access point product reference guide (pa...
Motorola solutions wing 4.4 ap7131 n access point product reference guide (pa...Motorola solutions wing 4.4 ap7131 n access point product reference guide (pa...
Motorola solutions wing 4.4 ap7131 n access point product reference guide (pa...Advantec Distribution
 

Similar to Nexaira Nexconnect Router User Guide (quantum-wireless.com) (20)

Ke8220 e
Ke8220 eKe8220 e
Ke8220 e
 
Gvp 201 &-gvp-201_w_user's_manual_2011_v1.21 backup
Gvp 201 &-gvp-201_w_user's_manual_2011_v1.21 backupGvp 201 &-gvp-201_w_user's_manual_2011_v1.21 backup
Gvp 201 &-gvp-201_w_user's_manual_2011_v1.21 backup
 
Wn3000 rp
Wn3000 rpWn3000 rp
Wn3000 rp
 
Eb1304%20 Net%20 En
Eb1304%20 Net%20 EnEb1304%20 Net%20 En
Eb1304%20 Net%20 En
 
Beetle i8A operating manual (english)
Beetle i8A operating manual (english)Beetle i8A operating manual (english)
Beetle i8A operating manual (english)
 
Motorola solutions ap6522 m access point installation guide wing 5.5 versio...
Motorola solutions ap6522 m access point installation guide   wing 5.5 versio...Motorola solutions ap6522 m access point installation guide   wing 5.5 versio...
Motorola solutions ap6522 m access point installation guide wing 5.5 versio...
 
Motorola solutions ap7131 access point installation guide wi ng 5.5 version...
Motorola solutions ap7131 access point installation guide   wi ng 5.5 version...Motorola solutions ap7131 access point installation guide   wi ng 5.5 version...
Motorola solutions ap7131 access point installation guide wi ng 5.5 version...
 
Motorola ap 8232 access point installation guide mn000032 a01
Motorola ap 8232 access point installation guide mn000032 a01Motorola ap 8232 access point installation guide mn000032 a01
Motorola ap 8232 access point installation guide mn000032 a01
 
scarlett2i4-user-guide.pdf
scarlett2i4-user-guide.pdfscarlett2i4-user-guide.pdf
scarlett2i4-user-guide.pdf
 
Instruction Manual | Flir Scout BTS Thermal BI-Ocular | Optics Trade
Instruction Manual | Flir Scout BTS Thermal BI-Ocular | Optics TradeInstruction Manual | Flir Scout BTS Thermal BI-Ocular | Optics Trade
Instruction Manual | Flir Scout BTS Thermal BI-Ocular | Optics Trade
 
Motorola ap650 access point installation guide (part no. 72 e 131207-01 rev. d )
Motorola ap650 access point installation guide (part no. 72 e 131207-01 rev. d )Motorola ap650 access point installation guide (part no. 72 e 131207-01 rev. d )
Motorola ap650 access point installation guide (part no. 72 e 131207-01 rev. d )
 
Ap650 installation guide_72_e-131207-01_revd
Ap650 installation guide_72_e-131207-01_revdAp650 installation guide_72_e-131207-01_revd
Ap650 installation guide_72_e-131207-01_revd
 
Ap650 installation guide_72_e-131207-01_revd
Ap650 installation guide_72_e-131207-01_revdAp650 installation guide_72_e-131207-01_revd
Ap650 installation guide_72_e-131207-01_revd
 
Motorola ap650 access point installation guide (part no. 72 e 131207-01 rev. d )
Motorola ap650 access point installation guide (part no. 72 e 131207-01 rev. d )Motorola ap650 access point installation guide (part no. 72 e 131207-01 rev. d )
Motorola ap650 access point installation guide (part no. 72 e 131207-01 rev. d )
 
Motorola ap 8222 access point installation guide mn000046 a01
Motorola ap 8222 access point installation guide mn000046 a01Motorola ap 8222 access point installation guide mn000046 a01
Motorola ap 8222 access point installation guide mn000046 a01
 
Juniper netscreen 25
Juniper netscreen 25Juniper netscreen 25
Juniper netscreen 25
 
Beetle M-II operating manual (english)
Beetle M-II operating manual (english)Beetle M-II operating manual (english)
Beetle M-II operating manual (english)
 
Beetle m ii_operating_manual_english-1
Beetle m ii_operating_manual_english-1Beetle m ii_operating_manual_english-1
Beetle m ii_operating_manual_english-1
 
Jands
JandsJands
Jands
 
Motorola solutions wing 4.4 ap7131 n access point product reference guide (pa...
Motorola solutions wing 4.4 ap7131 n access point product reference guide (pa...Motorola solutions wing 4.4 ap7131 n access point product reference guide (pa...
Motorola solutions wing 4.4 ap7131 n access point product reference guide (pa...
 

More from Ari Zoldan

Cradle Point (Mbr1200) (Quantum-Wireless.com)
Cradle Point (Mbr1200) (Quantum-Wireless.com)Cradle Point (Mbr1200) (Quantum-Wireless.com)
Cradle Point (Mbr1200) (Quantum-Wireless.com)Ari Zoldan
 
Top Global 3G Phoebus Wireless Router (MB6000) (Quantum-Wireless.com)
Top Global 3G Phoebus Wireless Router (MB6000) (Quantum-Wireless.com)Top Global 3G Phoebus Wireless Router (MB6000) (Quantum-Wireless.com)
Top Global 3G Phoebus Wireless Router (MB6000) (Quantum-Wireless.com)Ari Zoldan
 
Escort Entourage CIS - GPS Vehicle Security Recovery and Tracking System (Qua...
Escort Entourage CIS - GPS Vehicle Security Recovery and Tracking System (Qua...Escort Entourage CIS - GPS Vehicle Security Recovery and Tracking System (Qua...
Escort Entourage CIS - GPS Vehicle Security Recovery and Tracking System (Qua...Ari Zoldan
 
Globesurfer III (Quantum-Wireless.com)
Globesurfer III (Quantum-Wireless.com)Globesurfer III (Quantum-Wireless.com)
Globesurfer III (Quantum-Wireless.com)Ari Zoldan
 
Globesurferx.1 (Quantum-Wireless.com)
Globesurferx.1 (Quantum-Wireless.com)Globesurferx.1 (Quantum-Wireless.com)
Globesurferx.1 (Quantum-Wireless.com)Ari Zoldan
 
What Is Wimax ? A Tutorial from Quantum Networks, LLC
What Is Wimax ? A Tutorial from Quantum Networks, LLCWhat Is Wimax ? A Tutorial from Quantum Networks, LLC
What Is Wimax ? A Tutorial from Quantum Networks, LLC
Ari Zoldan
 
Wimax Around The World (Quantum Networks, LLC)
Wimax Around The World (Quantum Networks, LLC)Wimax Around The World (Quantum Networks, LLC)
Wimax Around The World (Quantum Networks, LLC)
Ari Zoldan
 
Tranzeo TR- SL Series (quantumwimax.com)
Tranzeo TR- SL Series (quantumwimax.com)Tranzeo TR- SL Series (quantumwimax.com)
Tranzeo TR- SL Series (quantumwimax.com)Ari Zoldan
 
Tranzeo TR – SL9 Series (quantumwimax.com)
Tranzeo TR – SL9 Series (quantumwimax.com)Tranzeo TR – SL9 Series (quantumwimax.com)
Tranzeo TR – SL9 Series (quantumwimax.com)Ari Zoldan
 
Tranzeo TR – SL5 Series (quantumwimax.com)
Tranzeo TR – SL5 Series (quantumwimax.com)Tranzeo TR – SL5 Series (quantumwimax.com)
Tranzeo TR – SL5 Series (quantumwimax.com)Ari Zoldan
 
Tranzeo TR – SL2 Series (quantumwimax.com)
Tranzeo TR – SL2 Series (quantumwimax.com)Tranzeo TR – SL2 Series (quantumwimax.com)
Tranzeo TR – SL2 Series (quantumwimax.com)Ari Zoldan
 
Tranzeo TR – FDD Series (quantumwimax.com)
Tranzeo TR – FDD Series (quantumwimax.com)Tranzeo TR – FDD Series (quantumwimax.com)
Tranzeo TR – FDD Series (quantumwimax.com)Ari Zoldan
 
Tranzeo TR – CPQ Series (quantumwimax.com)
Tranzeo TR – CPQ Series (quantumwimax.com)Tranzeo TR – CPQ Series (quantumwimax.com)
Tranzeo TR – CPQ Series (quantumwimax.com)Ari Zoldan
 
Tranzeo TR – 6000 Series (quantumwimax.com)
Tranzeo TR – 6000 Series (quantumwimax.com)Tranzeo TR – 6000 Series (quantumwimax.com)
Tranzeo TR – 6000 Series (quantumwimax.com)Ari Zoldan
 
Tranzeo TR – 902 Series (quantumwimax.com)
Tranzeo TR – 902 Series (quantumwimax.com)Tranzeo TR – 902 Series (quantumwimax.com)
Tranzeo TR – 902 Series (quantumwimax.com)Ari Zoldan
 
Tranzeo TR – 600 Series (quantumwimax.com)
Tranzeo TR – 600 Series (quantumwimax.com)Tranzeo TR – 600 Series (quantumwimax.com)
Tranzeo TR – 600 Series (quantumwimax.com)Ari Zoldan
 
Tranzeo TR – 500 Series (quantumwimax.com)
Tranzeo TR – 500 Series (quantumwimax.com)Tranzeo TR – 500 Series (quantumwimax.com)
Tranzeo TR – 500 Series (quantumwimax.com)Ari Zoldan
 
Tranzeo TR – 49 Series (quantumwimax.com)
Tranzeo TR – 49 Series (quantumwimax.com)Tranzeo TR – 49 Series (quantumwimax.com)
Tranzeo TR – 49 Series (quantumwimax.com)Ari Zoldan
 
Tranzeo TR – 5plus Series (quantumwimax.com)
Tranzeo TR – 5plus Series (quantumwimax.com)Tranzeo TR – 5plus Series (quantumwimax.com)
Tranzeo TR – 5plus Series (quantumwimax.com)Ari Zoldan
 
Tranzeo TR-5amp Series (quantumwimax.com)
Tranzeo TR-5amp Series (quantumwimax.com)Tranzeo TR-5amp Series (quantumwimax.com)
Tranzeo TR-5amp Series (quantumwimax.com)Ari Zoldan
 

More from Ari Zoldan (20)

Cradle Point (Mbr1200) (Quantum-Wireless.com)
Cradle Point (Mbr1200) (Quantum-Wireless.com)Cradle Point (Mbr1200) (Quantum-Wireless.com)
Cradle Point (Mbr1200) (Quantum-Wireless.com)
 
Top Global 3G Phoebus Wireless Router (MB6000) (Quantum-Wireless.com)
Top Global 3G Phoebus Wireless Router (MB6000) (Quantum-Wireless.com)Top Global 3G Phoebus Wireless Router (MB6000) (Quantum-Wireless.com)
Top Global 3G Phoebus Wireless Router (MB6000) (Quantum-Wireless.com)
 
Escort Entourage CIS - GPS Vehicle Security Recovery and Tracking System (Qua...
Escort Entourage CIS - GPS Vehicle Security Recovery and Tracking System (Qua...Escort Entourage CIS - GPS Vehicle Security Recovery and Tracking System (Qua...
Escort Entourage CIS - GPS Vehicle Security Recovery and Tracking System (Qua...
 
Globesurfer III (Quantum-Wireless.com)
Globesurfer III (Quantum-Wireless.com)Globesurfer III (Quantum-Wireless.com)
Globesurfer III (Quantum-Wireless.com)
 
Globesurferx.1 (Quantum-Wireless.com)
Globesurferx.1 (Quantum-Wireless.com)Globesurferx.1 (Quantum-Wireless.com)
Globesurferx.1 (Quantum-Wireless.com)
 
What Is Wimax ? A Tutorial from Quantum Networks, LLC
What Is Wimax ? A Tutorial from Quantum Networks, LLCWhat Is Wimax ? A Tutorial from Quantum Networks, LLC
What Is Wimax ? A Tutorial from Quantum Networks, LLC
 
Wimax Around The World (Quantum Networks, LLC)
Wimax Around The World (Quantum Networks, LLC)Wimax Around The World (Quantum Networks, LLC)
Wimax Around The World (Quantum Networks, LLC)
 
Tranzeo TR- SL Series (quantumwimax.com)
Tranzeo TR- SL Series (quantumwimax.com)Tranzeo TR- SL Series (quantumwimax.com)
Tranzeo TR- SL Series (quantumwimax.com)
 
Tranzeo TR – SL9 Series (quantumwimax.com)
Tranzeo TR – SL9 Series (quantumwimax.com)Tranzeo TR – SL9 Series (quantumwimax.com)
Tranzeo TR – SL9 Series (quantumwimax.com)
 
Tranzeo TR – SL5 Series (quantumwimax.com)
Tranzeo TR – SL5 Series (quantumwimax.com)Tranzeo TR – SL5 Series (quantumwimax.com)
Tranzeo TR – SL5 Series (quantumwimax.com)
 
Tranzeo TR – SL2 Series (quantumwimax.com)
Tranzeo TR – SL2 Series (quantumwimax.com)Tranzeo TR – SL2 Series (quantumwimax.com)
Tranzeo TR – SL2 Series (quantumwimax.com)
 
Tranzeo TR – FDD Series (quantumwimax.com)
Tranzeo TR – FDD Series (quantumwimax.com)Tranzeo TR – FDD Series (quantumwimax.com)
Tranzeo TR – FDD Series (quantumwimax.com)
 
Tranzeo TR – CPQ Series (quantumwimax.com)
Tranzeo TR – CPQ Series (quantumwimax.com)Tranzeo TR – CPQ Series (quantumwimax.com)
Tranzeo TR – CPQ Series (quantumwimax.com)
 
Tranzeo TR – 6000 Series (quantumwimax.com)
Tranzeo TR – 6000 Series (quantumwimax.com)Tranzeo TR – 6000 Series (quantumwimax.com)
Tranzeo TR – 6000 Series (quantumwimax.com)
 
Tranzeo TR – 902 Series (quantumwimax.com)
Tranzeo TR – 902 Series (quantumwimax.com)Tranzeo TR – 902 Series (quantumwimax.com)
Tranzeo TR – 902 Series (quantumwimax.com)
 
Tranzeo TR – 600 Series (quantumwimax.com)
Tranzeo TR – 600 Series (quantumwimax.com)Tranzeo TR – 600 Series (quantumwimax.com)
Tranzeo TR – 600 Series (quantumwimax.com)
 
Tranzeo TR – 500 Series (quantumwimax.com)
Tranzeo TR – 500 Series (quantumwimax.com)Tranzeo TR – 500 Series (quantumwimax.com)
Tranzeo TR – 500 Series (quantumwimax.com)
 
Tranzeo TR – 49 Series (quantumwimax.com)
Tranzeo TR – 49 Series (quantumwimax.com)Tranzeo TR – 49 Series (quantumwimax.com)
Tranzeo TR – 49 Series (quantumwimax.com)
 
Tranzeo TR – 5plus Series (quantumwimax.com)
Tranzeo TR – 5plus Series (quantumwimax.com)Tranzeo TR – 5plus Series (quantumwimax.com)
Tranzeo TR – 5plus Series (quantumwimax.com)
 
Tranzeo TR-5amp Series (quantumwimax.com)
Tranzeo TR-5amp Series (quantumwimax.com)Tranzeo TR-5amp Series (quantumwimax.com)
Tranzeo TR-5amp Series (quantumwimax.com)
 

Recently uploaded

FIDO Alliance Osaka Seminar: Passkeys at Amazon.pdf
FIDO Alliance Osaka Seminar: Passkeys at Amazon.pdfFIDO Alliance Osaka Seminar: Passkeys at Amazon.pdf
FIDO Alliance Osaka Seminar: Passkeys at Amazon.pdf
FIDO Alliance
 
Monitoring Java Application Security with JDK Tools and JFR Events
Monitoring Java Application Security with JDK Tools and JFR EventsMonitoring Java Application Security with JDK Tools and JFR Events
Monitoring Java Application Security with JDK Tools and JFR Events
Ana-Maria Mihalceanu
 
GraphRAG is All You need? LLM & Knowledge Graph
GraphRAG is All You need? LLM & Knowledge GraphGraphRAG is All You need? LLM & Knowledge Graph
GraphRAG is All You need? LLM & Knowledge Graph
Guy Korland
 
Leading Change strategies and insights for effective change management pdf 1.pdf
Leading Change strategies and insights for effective change management pdf 1.pdfLeading Change strategies and insights for effective change management pdf 1.pdf
Leading Change strategies and insights for effective change management pdf 1.pdf
OnBoard
 
Key Trends Shaping the Future of Infrastructure.pdf
Key Trends Shaping the Future of Infrastructure.pdfKey Trends Shaping the Future of Infrastructure.pdf
Key Trends Shaping the Future of Infrastructure.pdf
Cheryl Hung
 
FIDO Alliance Osaka Seminar: FIDO Security Aspects.pdf
FIDO Alliance Osaka Seminar: FIDO Security Aspects.pdfFIDO Alliance Osaka Seminar: FIDO Security Aspects.pdf
FIDO Alliance Osaka Seminar: FIDO Security Aspects.pdf
FIDO Alliance
 
The Art of the Pitch: WordPress Relationships and Sales
The Art of the Pitch: WordPress Relationships and SalesThe Art of the Pitch: WordPress Relationships and Sales
The Art of the Pitch: WordPress Relationships and Sales
Laura Byrne
 
State of ICS and IoT Cyber Threat Landscape Report 2024 preview
State of ICS and IoT Cyber Threat Landscape Report 2024 previewState of ICS and IoT Cyber Threat Landscape Report 2024 preview
State of ICS and IoT Cyber Threat Landscape Report 2024 preview
Prayukth K V
 
Bits & Pixels using AI for Good.........
Bits & Pixels using AI for Good.........Bits & Pixels using AI for Good.........
Bits & Pixels using AI for Good.........
Alison B. Lowndes
 
Transcript: Selling digital books in 2024: Insights from industry leaders - T...
Transcript: Selling digital books in 2024: Insights from industry leaders - T...Transcript: Selling digital books in 2024: Insights from industry leaders - T...
Transcript: Selling digital books in 2024: Insights from industry leaders - T...
BookNet Canada
 
PHP Frameworks: I want to break free (IPC Berlin 2024)
PHP Frameworks: I want to break free (IPC Berlin 2024)PHP Frameworks: I want to break free (IPC Berlin 2024)
PHP Frameworks: I want to break free (IPC Berlin 2024)
Ralf Eggert
 
FIDO Alliance Osaka Seminar: Passkeys and the Road Ahead.pdf
FIDO Alliance Osaka Seminar: Passkeys and the Road Ahead.pdfFIDO Alliance Osaka Seminar: Passkeys and the Road Ahead.pdf
FIDO Alliance Osaka Seminar: Passkeys and the Road Ahead.pdf
FIDO Alliance
 
When stars align: studies in data quality, knowledge graphs, and machine lear...
When stars align: studies in data quality, knowledge graphs, and machine lear...When stars align: studies in data quality, knowledge graphs, and machine lear...
When stars align: studies in data quality, knowledge graphs, and machine lear...
Elena Simperl
 
Dev Dives: Train smarter, not harder – active learning and UiPath LLMs for do...
Dev Dives: Train smarter, not harder – active learning and UiPath LLMs for do...Dev Dives: Train smarter, not harder – active learning and UiPath LLMs for do...
Dev Dives: Train smarter, not harder – active learning and UiPath LLMs for do...
UiPathCommunity
 
LF Energy Webinar: Electrical Grid Modelling and Simulation Through PowSyBl -...
LF Energy Webinar: Electrical Grid Modelling and Simulation Through PowSyBl -...LF Energy Webinar: Electrical Grid Modelling and Simulation Through PowSyBl -...
LF Energy Webinar: Electrical Grid Modelling and Simulation Through PowSyBl -...
DanBrown980551
 
Le nuove frontiere dell'AI nell'RPA con UiPath Autopilot™
Le nuove frontiere dell'AI nell'RPA con UiPath Autopilot™Le nuove frontiere dell'AI nell'RPA con UiPath Autopilot™
Le nuove frontiere dell'AI nell'RPA con UiPath Autopilot™
UiPathCommunity
 
Builder.ai Founder Sachin Dev Duggal's Strategic Approach to Create an Innova...
Builder.ai Founder Sachin Dev Duggal's Strategic Approach to Create an Innova...Builder.ai Founder Sachin Dev Duggal's Strategic Approach to Create an Innova...
Builder.ai Founder Sachin Dev Duggal's Strategic Approach to Create an Innova...
Ramesh Iyer
 
Generative AI Deep Dive: Advancing from Proof of Concept to Production
Generative AI Deep Dive: Advancing from Proof of Concept to ProductionGenerative AI Deep Dive: Advancing from Proof of Concept to Production
Generative AI Deep Dive: Advancing from Proof of Concept to Production
Aggregage
 
Elevating Tactical DDD Patterns Through Object Calisthenics
Elevating Tactical DDD Patterns Through Object CalisthenicsElevating Tactical DDD Patterns Through Object Calisthenics
Elevating Tactical DDD Patterns Through Object Calisthenics
Dorra BARTAGUIZ
 
The Future of Platform Engineering
The Future of Platform EngineeringThe Future of Platform Engineering
The Future of Platform Engineering
Jemma Hussein Allen
 

Recently uploaded (20)

FIDO Alliance Osaka Seminar: Passkeys at Amazon.pdf
FIDO Alliance Osaka Seminar: Passkeys at Amazon.pdfFIDO Alliance Osaka Seminar: Passkeys at Amazon.pdf
FIDO Alliance Osaka Seminar: Passkeys at Amazon.pdf
 
Monitoring Java Application Security with JDK Tools and JFR Events
Monitoring Java Application Security with JDK Tools and JFR EventsMonitoring Java Application Security with JDK Tools and JFR Events
Monitoring Java Application Security with JDK Tools and JFR Events
 
GraphRAG is All You need? LLM & Knowledge Graph
GraphRAG is All You need? LLM & Knowledge GraphGraphRAG is All You need? LLM & Knowledge Graph
GraphRAG is All You need? LLM & Knowledge Graph
 
Leading Change strategies and insights for effective change management pdf 1.pdf
Leading Change strategies and insights for effective change management pdf 1.pdfLeading Change strategies and insights for effective change management pdf 1.pdf
Leading Change strategies and insights for effective change management pdf 1.pdf
 
Key Trends Shaping the Future of Infrastructure.pdf
Key Trends Shaping the Future of Infrastructure.pdfKey Trends Shaping the Future of Infrastructure.pdf
Key Trends Shaping the Future of Infrastructure.pdf
 
FIDO Alliance Osaka Seminar: FIDO Security Aspects.pdf
FIDO Alliance Osaka Seminar: FIDO Security Aspects.pdfFIDO Alliance Osaka Seminar: FIDO Security Aspects.pdf
FIDO Alliance Osaka Seminar: FIDO Security Aspects.pdf
 
The Art of the Pitch: WordPress Relationships and Sales
The Art of the Pitch: WordPress Relationships and SalesThe Art of the Pitch: WordPress Relationships and Sales
The Art of the Pitch: WordPress Relationships and Sales
 
State of ICS and IoT Cyber Threat Landscape Report 2024 preview
State of ICS and IoT Cyber Threat Landscape Report 2024 previewState of ICS and IoT Cyber Threat Landscape Report 2024 preview
State of ICS and IoT Cyber Threat Landscape Report 2024 preview
 
Bits & Pixels using AI for Good.........
Bits & Pixels using AI for Good.........Bits & Pixels using AI for Good.........
Bits & Pixels using AI for Good.........
 
Transcript: Selling digital books in 2024: Insights from industry leaders - T...
Transcript: Selling digital books in 2024: Insights from industry leaders - T...Transcript: Selling digital books in 2024: Insights from industry leaders - T...
Transcript: Selling digital books in 2024: Insights from industry leaders - T...
 
PHP Frameworks: I want to break free (IPC Berlin 2024)
PHP Frameworks: I want to break free (IPC Berlin 2024)PHP Frameworks: I want to break free (IPC Berlin 2024)
PHP Frameworks: I want to break free (IPC Berlin 2024)
 
FIDO Alliance Osaka Seminar: Passkeys and the Road Ahead.pdf
FIDO Alliance Osaka Seminar: Passkeys and the Road Ahead.pdfFIDO Alliance Osaka Seminar: Passkeys and the Road Ahead.pdf
FIDO Alliance Osaka Seminar: Passkeys and the Road Ahead.pdf
 
When stars align: studies in data quality, knowledge graphs, and machine lear...
When stars align: studies in data quality, knowledge graphs, and machine lear...When stars align: studies in data quality, knowledge graphs, and machine lear...
When stars align: studies in data quality, knowledge graphs, and machine lear...
 
Dev Dives: Train smarter, not harder – active learning and UiPath LLMs for do...
Dev Dives: Train smarter, not harder – active learning and UiPath LLMs for do...Dev Dives: Train smarter, not harder – active learning and UiPath LLMs for do...
Dev Dives: Train smarter, not harder – active learning and UiPath LLMs for do...
 
LF Energy Webinar: Electrical Grid Modelling and Simulation Through PowSyBl -...
LF Energy Webinar: Electrical Grid Modelling and Simulation Through PowSyBl -...LF Energy Webinar: Electrical Grid Modelling and Simulation Through PowSyBl -...
LF Energy Webinar: Electrical Grid Modelling and Simulation Through PowSyBl -...
 
Le nuove frontiere dell'AI nell'RPA con UiPath Autopilot™
Le nuove frontiere dell'AI nell'RPA con UiPath Autopilot™Le nuove frontiere dell'AI nell'RPA con UiPath Autopilot™
Le nuove frontiere dell'AI nell'RPA con UiPath Autopilot™
 
Builder.ai Founder Sachin Dev Duggal's Strategic Approach to Create an Innova...
Builder.ai Founder Sachin Dev Duggal's Strategic Approach to Create an Innova...Builder.ai Founder Sachin Dev Duggal's Strategic Approach to Create an Innova...
Builder.ai Founder Sachin Dev Duggal's Strategic Approach to Create an Innova...
 
Generative AI Deep Dive: Advancing from Proof of Concept to Production
Generative AI Deep Dive: Advancing from Proof of Concept to ProductionGenerative AI Deep Dive: Advancing from Proof of Concept to Production
Generative AI Deep Dive: Advancing from Proof of Concept to Production
 
Elevating Tactical DDD Patterns Through Object Calisthenics
Elevating Tactical DDD Patterns Through Object CalisthenicsElevating Tactical DDD Patterns Through Object Calisthenics
Elevating Tactical DDD Patterns Through Object Calisthenics
 
The Future of Platform Engineering
The Future of Platform EngineeringThe Future of Platform Engineering
The Future of Platform Engineering
 

Nexaira Nexconnect Router User Guide (quantum-wireless.com)

  • 1. NexConnect 3G/4G SOHO Router User Manual P OW E R E D BY NEXAIRA ARIAXEN
  • 3. Copyright The content of this publication may not be reproduced in any part or as a whole, stored, transcribed in an information retrieval system, translated into any language, or transmitted in any form or by any means, mechanical, magnetic, electronic, optical, photocopying, manual, or otherwise, without prior written permission. Trademarks All products, company, brand names are trademarks or registered trademarks of their respective companies. They are used for identification purposes only. Specifications are subject to be changed without prior notice. FCC Interference Statement This equipment has been tested and found to comply with the limits for a Class B digital device pursuant to Part 15 of the FCC Rules. These limits are designed to provide reasonable protection against radio interference in a commercial environment. This equipment can generate, use and radiate radio frequency energy and, if not installed and used in accordance with the instructions in this manual, may cause harmful interference to radio communications. Operation of this equipment in a residential area is likely to cause interference, in which case the user, at his own expense, will be required to take whatever measures are necessary to correct the interference. CE Declaration of Conformity This equipment complies with the requirements relating to electromagnetic compatibility, EN 55022/A1 Class B. ii
  • 4. Table of Contents Introduction ..................................................................................................................................... 1! Features ................................................................................................................................... 1! Package Contents .................................................................................................................... 2! System Requirements.............................................................................................................. 2! Wi-Fi Requirements ................................................................................................................ 2! Hardware Overview ........................................................................................................................ 3! Default Router Settings ................................................................................................................... 4! Hardware Setup ............................................................................................................................... 7! Wi-Fi Connection .................................................................................................................... 6! Initial Setup ..................................................................................................................................... 8! Setup Wizard ............................................................................................................................8! Basic Settings ...........................................................................................................................9! Status .............................................................................................................................9! NexWare Setup Wizard ...............................................................................................10! Primary Setup................................................................................................................ 14 Change Password .......................................................................................................... 22 Wireless ......................................................................................................................... 23 Toolbox ................................................................................................................................. 24! System Log ................................................................................................................... 24 System Info ................................................................................................................... 24 Firmware Upgrade ........................................................................................................ 25 Backup Settings ............................................................................................................ 25 Reset to Defaults ........................................................................................................... 25 Reboot ........................................................................................................................... 25 Advanced Settings ................................................................................................................ 26 DHCP Server................................................................................................................. 26 DDNS............................................................................................................................ 26 Quality of Service ......................................................................................................... 27 SNMP............................................................................................................................ 27 System Time ................................................................................................................. 28 Performance .................................................................................................................. 29! Scheduling..................................................................................................................... 30 Wake on LAN ............................................................................................................... 30 Security Settings ................................................................................................................... 31 Packet Filters ................................................................................................................. 31! Domain Filters .............................................................................................................. 32! URL Blocking ............................................................................................................... 33! Mac Control .................................................................................................................. 33 Other Options ................................................................................................................ 34! Forwarding Rules .................................................................................................................. 34! Routing.......................................................................................................................... 34 GRE Tunneling ............................................................................................................. 35! Virtual Server ................................................................................................................ 36 Special Applications...................................................................................................... 37! DMZ Host ..................................................................................................................... 37! iii
  • 5. Troubleshooting ............................................................................................................................ 38 Technical Support ......................................................................................................................... 42! Technical Specifications ............................................................................................................... 42! Glossary of Definitions ................................................................................................................. 43! iv
  • 6. Introduction The NexConnect 3G Wireless Broadband Router with NexWare Firmware and the !" Graphical User Interface (GUI) is a high-performance device that supports wireless networking at home, work, or in a public place. Supporting 16-bit and 32-bit Type II PCMCIA cards, USB 2.0 mobile broadband modems, and Express Cards with a universal caddy, the NexConnect 3G Wireless Broadband Router works with both EVDO and HSDPA technologies. The NexConnect 3G Wireless Broadband Router supports wireless data transfers up to 54 Mbps and wired data transfers up to 100 Mbps. The Router is also compatible with industry-standard security features such as Stateful Packet Inspection (SPI) firewall, Wireless Encryption Protocol (WEP)/Wi-Fi Protected Access (WPA) security settings, and Media Access Control (MAC). Features ! NexWare quick and easy setup allows you to go where wires cannot, outside the home or office. ! Automatic connection failover to 3G connection if Ethernet WAN connection fails. ! Fully compatible with the 802.11g IEEE standard to provide a wireless data transfer rate of up to 54Mbps. ! Backwards compatible with the 802.11b IEEE standard to provide a wireless data rate of up to 11Mbps. ! Operates in the 2.4GHz frequency range. ! Advanced Firewall features. ! Supports NAT with VPN pass-through, as well as the following security features: " MAC Filtering " IP Filtering " Port Scheduling ! DHCP server enables all networked computers to automatically receive IP addresses. ! Access Control for managing users on the network ! !" ( Interactive Intuitive Iconic) GUI Web-based configuration pages for easy setup and management. ! User-friendly configuration and diagnostic utilities. ! Supports special applications that require multiple connections. ! Equipped with two 10/100 Ethernet ports for LAN and WAN access, a Type II PC card (16- and 32-Bit) Slot, and a USB port for 3G network connections. Express Cards with a universal caddy are also compatible. ! Connects multiple computers to the Internet via a broadband EVDO, HSDPA network connection or via cable/DSL connection. Please consult your service provider for more detailed information on wireless network standards. 1 ©2008 NexAira Inc.
  • 7. Package Contents Important: Check the contents of the box first. The NexConnect 3G Wireless Broadband Router package should contain the items listed below. If any of the items are missing, please contact your reseller. (1) NexConnect NEXUSB07 Router (1) CD-ROM (1) RJ-45 Ethernet Cable (1) 5V 3.0A Power Adapter (1) Desk Cradle Caution: Using a power supply with a different voltage rating other than the one included with the NexConnect 3G Wireless Broadband Router will cause damage and void the warranty for this product. System Requirements ! Compatible 16-bit or 32-bit PCMCIA or USB 3G modem card with activated service.* NOTE: Subject to terms available from your carrier. ! Computer with Windows 2000, XP, Vista, Macintosh, or Linux-based operating system with an integrated Ethernet adapter or Wireless Wi-Fi 802.11 G interface. ! Internet Explorer Version 6.0 and above or Netscape Navigator™ Version 7.0 and above (for accessing web-based configuration settings). Wi-Fi Requirements ! IEEE 802.11b/g adapter. *PCMCIA, USB modems and ExpressCard w/adapter need to be activated through your cellular service provider and activated on their network through the connection manager provided by your carrier prior to insertion into the NexConnect 3G Wireless Broadband Router. 2 ©2008 NexAira Inc.
  • 8. Hardware Overview Receptors and Ports (Rear View) WiFi Antenna: Allows WiFi connection from a distance USB Port: Allows connection with a 3G USB modem Power receptor: Compatible with included 5V 3.0A adapter LAN/WAN Ports: Reset Button: Automatically senses WAN and LAN Resets the types when connecting to Ethernet NEXUSB07 to factory default settings LEDs (Front View) LAN LED: Lights up green when a local Ethernet cable is connected and blinks to indicate activity WiFi LED: Lights up green when a connection to the WLAN is available 3G LED: WAN LED: Lights up green Lights up green when when power is on WAN is connected. 3 ©2008 NexAira Inc.
  • 9. Default Router Settings Main Menu - Login Password admin Internet Connection - Type 3G Router Menu - URL or IP Address 192.168.123.254 Wireless - Wi-Fi Enabled WMM Capable Disabled SSID / Wi-Fi - Name Nexaira Channel 11 Wi-Fi Security - WEP Encryption WEP / 64 Bit (ASCII) Wi-Fi WEP - Key 1 Password admin Wireless Bridging (WDS Settings) Disabled System Log Disabled DHCP Server Enabled DDNS Disabled QoS Packet Filtering Not Enabled SNMP Settings Not Enabled System Time NTP Protocol from time.nist.gov (GMT-08:00) Wireless Performance • Beacon Interval • 100 • DTIM Interval • 3 • Wireless Mode • mixed mode • TX Rates • Auto • SSID Broadcast • Enabled • Speed Enhanced Mode • Enabled • Antenna Transmit Power • 100% (17dBM) Scheduling Not Enabled Wake on LAN (MAC Address) 00-00-00-00-00-00 Packet Filters Not Enabled Domain Filters / Log DNS Query Not Enabled / Not Enabled URL Blocking Not Enabled MAC Address Control Not Enabled Other Options Not Enabled Routing Table Not Enabled GRE Tunnel Not Enabled Virtual Server No Selection Special Applications No Selection DMZ Host Not Enabled Note: Changing bolded settings may impact router access and ability to function correctly. 4 ©2008 NexAira Inc.
  • 10. Hardware Setup The NexConnect 3G Wireless Broadband Router allows you to access your network using a wireless connection from virtually anywhere within its operating range. Please note that location placement of the router could affect the wireless signal and range limits. Typical ranges also vary depending on the types of materials and background RF (Radio Frequency) noise present in your networking environment. To maximize your wireless range, please follow these guidelines: 1. Choose the right location in your environment for the NexConnect 3G Wireless Broadband Router. The WLAN transmitters are radios; their signals radiate out from the antenna, and degrade as they go through walls, floors, and obstacles like tubs full of water (almost impenetrable), stone, or concrete. So for best reception, place your gateway centrally to the rooms in which you expect to use WLAN the most. Each wall or ceiling can reduce the NexConnect 3G Wireless Broadband Router’s range by as much as 90 feet (27 meters). NOTE: The same considerations apply to your carriers 3G broadband carrier’s connection. 2. Keep your product away from electrical devices (such as microwaves, air conditioners, cordless phones, refrigerators and televisions) that emit large quantities of RFI (Radio Frequency Interference). NOTE: DO NOT connect the NexConnect 3G Wireless Broadband Router to power before following the installation steps below! NexConnect NEXUSB07 Router Setup 1. Attach the antenna. a. Remove the antenna from its plastic wrapper. b. Screw the antenna in a clockwise direction to the back panel of the unit. c. Once secured, position the antenna upward at its connecting joint. This will ensure optimal reception. 5 ©2008 NexAira Inc.
  • 11. 2(i). PCMCIA, Express Card with a universal caddy, or USB connection: a. Remove the protective PCMCIA insert from the PCMCIA opening. b. Insert an activated Type II PCMCIA card or ExpressCard with adapter into the PCMCIA card slot. c. Alternatively, insert an activated USB modem into the USB slot. a. b. 2(ii). Ethernet connection: a. Insert one end of an Ethernet cable into the LAN Port on the back panel of the router. Insert the other end into an available Ethernet port of the network adapter in the computer that will be used to configure the unit. b. LAN LED should be on when connected. If not, check the connection between the router and computer. NOTE: The NexConnect 3G Wireless Broadband Router LAN Port is “Auto-MDI/MDIX”, so Any Standard Ethernet Cable will work. 6 ©2008 NexAira Inc.
  • 12. 3. Power connection. a. Connect the power adapter to the receptor on the back panel of the router. Plug the other end of the power adapter into a wall outlet or power strip. b. The 3G LED will turn ON and occasionally flash, indicating that the unit is powered on. c. The 3G, LAN, and Wi-Fi LED’s on the front of the router will flash ON and OFF as it performs initialization and Internet connection processes. This will take a few minutes. NOTES: 1. An uninterruptable power supply (UPS) is recommended for power surges and/or outages. At a minimum, a surge protector should always be used to protect the equipment from being damaged by electrical spikes and transients. 2. The WAN light will only come on if connected to an Internet source other than 3G. Wi-Fi Connection If you are connecting wirelessly to the NexConnect 3G Wireless Broadband Router, you must ensure that the security settings on the connecting PC are the same as those on the router. By default, the router broadcasts a secure WiFi signal with WEP encryption: • SSID / WiFi Signal Name is set to “Nexaira” • Channel is set to 11 • Security is set to WEP • Encryption is set to 64 Bit • WEP Key 1 (password) is set to “admin” It is recommended, for security reasons, that the security settings on the router be changed during initial setup through the setup wizard, which can be accessed by utilizing the provided CD. Please refer to your computer’s Wi-Fi adapter documentation for additional information. 7 ©2008 NexAira Inc.
  • 13. Initial Setup Setup Wizard Initial setup of the NexConnect 3G Wireless Broadband Router is assisted by the provided Setup CD. Insert the provided Setup CD into the computer attached to the router (see Hardware Setup above) and follow the instructions. If difficulties occur or a connection to the Internet is not established, please refer to the Troubleshooting section at the end of this User Guide. The next few sections of the User Guide provide similar step by step installation and configuration instructions found on the CD. Connecting to the Router Main Page for Installation and Configuration Settings To access the NexAira I3 GUI to perform installation and configure settings: 1. Open a web-browser on your computer connected to the router’s LAN port by an Ethernet cable. 2. Enter the IP address of the NexConnect 3G Wireless Broadband Router in the URL line: http://192.168.123.254 NOTE: If you have changed the router’s default IP address, enter that address instead of the one above. 3. Type “admin” in the System Password field. If you have changed the password, enter the new one in this field. 4. Click “Login” button. Note: As a security precaution, the router, will time out after a short period of inactivity. An Authorization Required Page will appear with a login button. By clicking the Login Button, will provide the Login prompt for password resubmission. 8 ©2008 NexAira Inc.
  • 14. Basic Settings Status: The Status Icon displays the Router’s present status of the: ! Internet connection ! Type of connection established ! Signal strength (if using a cellular broadband connection) Selecting the Status Icon will display the detail status page, which provides a good reference of the Router’s present condition with four main areas: Wide Area Network (WAN) Status displays the Internet connection information. Normally set automatically and all but the connection time and Sidenote are assigned and configured by the ISP. ! IP Address (Used as identification for every device connected to the Internet) ! Subnet Mask (Defines additional information on how to read the IP Address) ! Gateway (IP address of the Internet Service Provider’s connecting device) ! Domain Name Server (IP address of a device that translates names to IP addresses) ! Connection (Duration of time for the current Internet connection HR:MIN:SEC) ! Sidenote (Current Internet WAN connection type in use) Wireless Local Area Network (WLAN) Status displays five wireless configuration elements: ! Wireless Mode (Enabled or Disabled through the Setup wizard or Wireless Icons) ! SSID (Wireless Name or Service Set Identifier, user definable in Setup) ! Channel (Wireless Devices may use multiple channels to avoid congestion) ! Security (Type of Security used, selected through Setup Wizard or Wireless Icon) ! MAC Address (All communications devices are manufactured with a MAC address) Broadband Modem Status is provided automatically by the router: ! Card Info (Provides Broadband Modem Vendor Information) ! Link Status (The Status of the Cellular Broadband Link to the Internet) ! Signal Strength (Percentage of Cellular Broadband Signal Strength) Statistical Information associated with the Internet connection can be very useful in determining service performance. Errors with drops are usually characteristics of a poor network connection. No errors or drops with lots of packets in both inbound and outbound is usually a sign the router and network are working properly. 9 ©2008 NexAira Inc.
  • 15. The I3 GUI: provides two ways to configure the NexConnect Router. 1. Use the NexWare Setup Wizard to walk through the Basic Settings. 2. Manual Settings for each function. Both are accessed though Icons in the Basic Settings area of the I3 GUI NexWare Setup Wizard: Choose the NexWare Setup Wizard option to quickly and easily configure the router’s basic settings. The NexWare Setup Wizard configures the router in three steps: 1. Login Password (default is admin but it is a security risk not to assign new passwords) 2. WAN Settings (the connection to the Internet, i.e. 3G, DSL, Cable etc.) 3. Wireless Settings (SSID or Name and password ( highly recommended password for access) Each of the three steps will now be covered in more detail: Step 1: Change Your Login Password (default is admin) It is highly recommended that you change the router’s login password immediately upon first configuring. The NexWare Wizard Change your Password page guides you through the process of changing the Router’s password. ! Enter your previous password in the Current Password field. If this is your first time accessing these menus, the default password is “admin.” ! Enter a new password in the New Password field. ! Re-enter the new password in the Reconfirm field. ! Click Save to keep your changes. 10 ©2008 NexAira Inc.
  • 16. Step 2: Choose Type of Internet Select the type of Wide Area Network (WAN) the router will use to connect to the Internet. NOTE: Step 2 automatically configures the WAN if the Router detects a Cellular Broadband Card or USB Modem installed and will ask you for acceptance of 3G as the choice of primary connection to the Internet. Choose “Yes” if this is your primary or only Internet connection. If you are using the 3G as a secondary Internet connection or for WAN failover, then choose “No” and continue with the Setup Wizard. Step 2 (continued): If you are not using 3G as the primary connection to the Internet. NexWare supports seven different types of connection configurations or protocals as specified by the Internet Service Provider. The first six types allow for connections to DSL, Cable, Dedicated and Satelite ISP providers and services. The final connection, 3G is a cellular broadband selection which accommodate both EVDO and HSDPA carriers, including but not limited to AT&T, Bell Canada, Sprint, T Moble and Verizon Wireless broadband data networks. ! Chose the type as defined by the ISP ! Click Next to move to the detail WAN configuration page and enter the information provided by the ISP. Please refer to the Primary Setup page for more details on Wan configuration. 11 ©2008 NexAira Inc.
  • 17. Step 3: Configure Your Wireless Network: It is highly recommended that you use Wi-Fi Wireless Encryption and Passwords. If not, anyone in the local area could have access to private and confidential data, resident on the devices connected to the wireless network through the Router. ! Select Enable or Disable to turn the Router’s Wireless Wi-Fi service ON or OFF ! The Network ID or Service Set Identifier (SSID) is the broadcasted name of your wireless network seen by other users. The default name is NexAira. The SSID may be changed to a new name up to 32 characters in length. ! The Channel of this router, which is set to 11 by default, can be changed to avoid conflicts with other wireless transmitting devices (i.e. phones, baby monitors), or to otherwise customize the wireless network. ! Click Next to continue to the Wireless Security page. Step 3: (continued) Wireless Security Again, it is highly recommended that you use Wi-Fi Wireless Encryption and Passwords. Encryption is a way of hiding or protecting the data from being seen by anyone other than the intended recipient. Passwords are used to ensure only those who know the passwords may access the wireless network. The security settings listed in this menu correspond to different types of encryption. Most devices support WEP or WPA-PSK. For more information on wireless encryption, please refer to the Wireless section in the Basic Settings section below. ! Select the form of encryption. (WEP most common) ! Select 64 or 128 bit encryption. (increases difficulty to crack and router workload) ! Select ASCII or HEX characters. (ASCII is alphabetical and usually easier to remember) ! Selection of four keys allowed. (Hex uses Hex numbers vs. Decimal numbering) 12 ©2008 NexAira Inc.
  • 18. Step 4: Review Your Settings The settings you just entered will appear in summary on this page to allow you to verify you entered all information correctly and make notes for future reference. ! Click Apply Settings to save the changes on the router and continue. ! Click the red X to close the window and return to the !" GUI Main page. The configuration is saved in nonvolatile memory, which won’t be lost when the power is turned off on the router. Congratulations!! Setup is complete, you are now free to surf the Internet. 13 ©2008 NexAira Inc.
  • 19. The I3 GUI: Provides two ways to configure the NexConnect Router. The First way is using the NexWare Setup Wizard to walk through the Basic Settings. The Second uses Manual Settings for each function. Both Are Accessed though Icons in the Basic Settings Area of the I3 GUI Primary Setup The Primary Setup screen displays the basic settings necessary for the router to properly connect to the Internet. Some of the settings inserted during initial setup through the Setup Wizard can be changed here, if necessary. The Primary Setup screen has three sections. The upper section displays the: ! LAN IP Address (default is 192.168.123.254) ! LAN NetMask (default is 255.255.255.0) ! WAN MAC Address ! WAN Failover, which allows the use to use a 3G connection as a backup to a non-3G Internet service ! Auto-Backup, which is used in tandem with WAN Failover. Enter the address of an Internet host (i.e., www.nexaira.com) The middle section gives the user choices of Internet connection type. Select the type of Wide Area Network (WAN) the router will use to connect to the Internet from the following options: ! Static IP Address ! Dynamic IP Address ! Dynamic IP Address w/ Road Runner Session Management ! PPPoE Connection ! PPTP Connection ! L2TP Connection ! 3G Connection Note: If you are utilizing a 3G type of connection, please refer to the Setup Wizard section above for easy setup and connection. The lower section displays important information associated with each Internet connection type. The information varies depending on the connection type chosen. 14 ©2008 NexAira Inc.
  • 20. Below you will find descriptions of the type of Internet connections and the information typically required to complete the connection to your Internet service provider. Your Internet service provider typically supplies the required information to complete this portion of the setup. 15 ©2008 NexAira Inc.
  • 21. The information described below can be entered through the Primary Setup screen or through the Setup Wizard when each of the different types of Internet connections are chosen. Static IP Address: Static IP Address should be selected if you have requested and received a static public IP address for your Internet connection from your Internet Service Provider (ISP). Static IP Address connections have the following configuration options: LAN IP Address: This is the private IP address of your NexConnect router. It defaults to 192.168.123.254 but can be changed if needed. WAN IP Address: This is the public IP address you were given by your Internet Service Provider. WAN Subnet Mask: The WAN subnet mask is used to determine the group of IP addresses your public IP address comes from. This value defaults to 255.255.255.0 but may change depending on the settings used by your Internet Service Provider. WAN Gateway: This is the IP address used by your ISP to get to the Internet. This value is provided by your ISP. Primary DNS and Secondary DNS: Domain Name System (DNS) servers are used by your ISP to translate domain names typed into a browser window (such as nexaira.com) to the IP address used by that domain. Your ISP will provide at least one DNS server IP address (likely two or more); enter the address(es) here. 16 ©2008 NexAira Inc.
  • 22. Dynamic IP Address: Dynamic IP Address should be selected for most cable and satellite users. If your ISP account came with a username and password, select either Dynamic IP Address w/ Road Runner Session Management or PPPoE (consult with your ISP documentation to determine which type you should use). Dynamic IP Address means your NexConnect router will obtain its public IP address automatically via DHCP from your ISP. Dynamic IP Address configurations have the following options: LAN IP Address: This is the private IP address of your NexConnect router. It defaults to 192.168.123.254 but, can be changed if needed. Host Name: If your network requires a unique name for your NexConnect router, you can enter it here. This is an optional feature and will not harm your network if left blank. WAN's MAC Address: Your NexConnect router's WAN port has a Media Access Control (MAC) hardware address. Some cable and satellite ISP networks require that the MAC address be registered with the ISP for authentication. If your computer or other device is registered and your NexConnect router cannot connect, you can use the Clone MAC feature to give the NexConnect WAN port the same MAC address as your registered device. If your ISP does not require MAC authentication, you can leave this field unchanged. 17 ©2008 NexAira Inc.
  • 23. Dynamic IP Address with Road Runner Session Management: Dynamic IP Address with Road Runner Session Management works the same way as Dynamic IP Address does, with the added feature of username and password authentication. If your cable or satellite ISP requires you to login with a username and password, and it is not a PPPoE service, select this option. Dynamic IP Address with Road Runner Session Management configurations have the following options: LAN IP Address: This is the private IP address of your NexConnect router. It defaults to 192.168.123.254 but can be changed if needed. Account: Enter the account username provided to you by your ISP. Password: Enter the account password provided to you by your ISP. Login Server: This is an optional field. If your ISP requires login to a specific authentication server, enter the address here. 18 ©2008 NexAira Inc.
  • 24. PPPoE Connection: Point-to-Point Protocol over Ethernet (PPPoE) is an authentication scheme used mostly by DSL providers but may be employed by some cable or satellite ISPs as well. It utilizes a username and password authentication system and allows you to specify DNS server addresses. PPPoE Connection configurations have the following options: LAN IP Address: This is the private IP address of your NexConnect router. It defaults to 192.168.123.254 but can be changed if needed. PPPoE Account: Enter the account username provided to you by your ISP. PPPoE Password: Enter the account password provided to you by your ISP. Primary DNS and Secondary DNS: Domain Name System (DNS) servers are used by your ISP to translate domain names typed into a browser window (such as nexaira.com) to the IP address used by that domain. Your ISP will provide at least one DNS server IP address (likely two or more); enter the address(es) here. PPPoE Service Name: Some ISPs provide a service name that must be used by your NexConnect router along with the supplied username and password to authenticate. If your ISP does not require this value, you may leave this field blank. Assigned IP Address: If you have a static IP address from you ISP and need to use PPPoE, you may enter the IP here. 19 ©2008 NexAira Inc.
  • 25. PPTP Connection: Point-to-Point Tunneling Protocol (PPTP) is a type of VPN connection that can be used to establish WAN connectivity. PPTP Connection configurations have the following options: LAN IP Address: This is the private IP address of your NexConnect router. It defaults to 192.168.123.254 but can be changed if needed. My Tunnel Name: You can name your tunnel connection and enter it here. Server IP Address: Enter the IP address of the PPTP server you're connecting to here. My IP Address: This setting determines if you're using a static IP address for your WAN PPTP connection or a dynamically assigned address via the PPTP server's DHCP server. For specific information about the IP, Netmask, and Gateway fields, please reference the Static IP Address section of this guide. PPTP Account: Enter the account username provided to you by the PPTP server administrator. PPTP Password: Enter the account password provided to you by the PPTP server administrator. 20 ©2008 NexAira Inc.
  • 26. L2TP Connection: Layer 2 Tunneling Protocol (L2TP) is a type of VPN connection invented by Cisco. L2TP Connection configurations have the following options: LAN IP Address: This is the private IP address of your NexConnect router. It defaults to 192.168.123.254 but can be changed if needed. My Tunnel Name: You can name your tunnel connection and enter it here. Server IP Address: Enter the IP address of the L2TP server you're connecting to here. My IP Address: This setting determines if you're using a static IP address for your WAN L2TP connection or a dynamically assigned address via the L2TP server's DHCP server. For specific information about the IP, Netmask, and Gateway fields, please reference the Static IP Address section of this guide. PPTP Account: Enter the account username provided to you by the L2TP server administrator. PPTP Password: Enter the account password provided to you by the L2TP server administrator. 3G Connection: 3G is a type of wireless Internet connection based off of Cellular technology. LAN IP Address: This is the private IP address of your NexConnect router. It defaults to 192.168.123.254 but can be changed if needed. APN: Enter your service providers Access Point Name here, if provided. Pin Code: Enter your service providers Pin Code here, if provided. Dialed Number: Enter your service providers Dialed Number here, if provided. This is defaulted to #777 which works with Sprint and Verizon carriers. Username: Enter your Username here, if provided by your service provider, if necessary. 21 ©2008 NexAira Inc.
  • 27. Password: Enter your password provided to your service provider, if necessary. ! Change Password You can change the router’s password here. It is highly recommended that you change the router’s administration password immediately during initial configuration. 1. Enter your previous password in the Current Password field. If this is your first time accessing these menus, the default password is “admin”. 2. Enter a new password in the New Password field. 3. Re-enter the new password in the Reconfirm field. Click Save to keep your changes. 22 ©2008 NexAira Inc.
  • 28. Wireless Wireless- Choose En ab le to broadcast a wireless network from your router. WMM Capable - Choose En able to apply WiFi MultiMedia certification (a type of Quality of Service) to this wireless connection. SSID- Service Set Identifier (SSID) is the name designated for a specific wireless local area network (WLAN). The SSID's default setting is Nexaira . The SSID can be changed to establish a new wireless network. SSID names may contain up to 32 ASCII characters. Channel- Channel 11 is the default . Devices on the network must share the same channel. (NOTE : Wireless adapters automatically scan and match the wireless settings) Security- You may select from six levels of encryption to secure your wireless network: No Encryption, WEP.802.1x , WPA-P SK, WPA, WPA2-P SK, or WPA2. Securi ty- WEP Encryption is the default setting (as shown in the screen below). WEP Security : Select the data privacy algorithm you want. Enabling the security can protect your data while it is transferred from one station to another. The standardized IEEE 802.11 WEP (128 or 64-bit) is used here. WEP is the most commonly security setting used and provides a minimum level of security. WEP Key 1, 2, 3 or 4 : When you enable the 128 or 64 bit WEP key security, please select one WEP key to be used and input 26 characters or 10 hexadecimal (0, 1, 2…8, 9, A, B…F) digits. 802.1X: Used to switch the function of the 802.1X for external RADIUS server. WPA-PSK/WPA-PSK2 : Encryption options for WPA-PSK-TKIP and WPA-PSK2-ADE . Enter a password in the WPA-PSK /WPA-PSK2 field between 8 and 63 characters long for ASCII.64 characters (0~9,a~f) for HEX. WPA/WPA2 The users have to get a access from a RADIUS server which provides user authentication. Enter the IP : address and port number of Radius server and RADIUS Shared Key. WDS: Wireless Distribution System allows the user to distribute the wireless network without the need for a wired connection between access points (additional routers). By default, the router broadcasts a secure WiFi signal with WEP encryption: • SSID / WiFi Signal Name is set to “Nexaira” • Channel is set to 11 • Security is set to WEP • Encryption is set to 64 Bit • WEP Key 1 (password) is set to “admin” Click on Save to store your settings. 23 ©2008 NexAira Inc.
  • 29. Toolbox System Log This page supports two methods to export system logs to specific destination by means of syslog (UDP) and SMTP (TCP). IP Address for Syslog. Host IP of destination where syslog will be sent to. Check Enable to enable this function. E-mail Alert Enable. Check if you want to enable Email alert (send syslog via email). SMTP Server IP and Port. Enter the SMTP server IP and port with a ':'. The default port value is 25. For example: "mail.your_url.com" or "192.168.1.100:26". Send E-mail alert to. The recipients who will receive these logs, you can assign more than 1 recipient, using ';' or ',' to separate email addresses. E-mail Subject. The subject of email alert, this setting is optional. View Log. This button directs the user to the system log. Send E-mail. This button allows the user to forward the current system log to the specified email address.. Click on Save to store configuration changes or Undo to cancel System Info You can view the System log, Routing Table information in this page 24 ©2008 NexAira Inc.
  • 30. Firmware Upgrade You can upgrade firmware by clicking the Browser button to find the firmware file on the hard drive of the local computer then clicking Firmware “Upgrade” button. For more detailed Firmware upgrade Instructions go to http://www.nexaira.com Backup Settings You can backup your settings by clicking the Backup Setting button and save it as a bin file. Once you want to restore these settings, please click Firmware Upgrade button and use the bin file you saved Reset to Defaults You can also reset this product to factory default by clicking the Reset to default button Reboot You can also reboot this product by clicking the Reboot button 25 ©2008 NexAira Inc.
  • 31. Advanced Settings DHCP Server There must be a DHCP server on each section of the LAN or you will not be able to connect. When the DHCP Server is enabled, the Lease Time, IP Pool Starting Address, IP Pool Ending Address, and Domain Name can be specified. By default, DHCP is enabled. Lease Time- The length of time the DHCP Server allots for any given client. IP Pool Address Range- The range of IP addresses that the DHCP server will issue from. Starting and ending addresses must be defined. Domain Name- An optional setting that is passed to the client. Primary/Secondary DNS- Specify a Domain Name Server (DNS). Primary /Secondary WINS- Specify a Windows Internet Name Service. Gateway- Set the IP address of an alternate Gateway. This function enables you to assign another gateway to your PC when DHCP server offers an IP address to your PC. DDNS To host your server on a changing IP address, you have to use a dynamic domain name service (DDNS). Dynamic DNS maps the name of your host to your current IP address, provided by your Internet service provider. Before you enable Dynamic DNS, you need to register an account on one of these Dynamic DNS servers listed in provider field. To enable Dynamic DNS click the check box next to Enable in the DDNS field. Next enter the appropriate information about your Dynamic DNS Server. You have to define: Provider Host Name Username/E-mail Password/Key NOTE: This information is established when you register an account on a Dynamic DNS server. Click on Save to store configuration changes or Undo to cancel 26 ©2008 NexAira Inc.
  • 32. Quality of Service Quality of Service (QoS) settings ensure minimum levels of bandwidth and priority. QoS Packet Filter Enable this setting to turn on Quality of Service settings. Upstream/Downstream Bandwidth Define the minimum bandwidth for uploads and downloads here. QoS Priority levels Define the level of QoS priority (Low, Normal, and High) for local and remote IPs and ports. Enable each one to activate its QoS settings. Click on Save to store configuration changes or Undo to cancel SNMP Simple Network Management Protocol (SNMP) is a protocol designed to give a user the capability to remotely manage a computer network by polling and setting terminal values and monitoring network events. Enable SNMP You must check either Local or Remote or Both to enable SNMP function. If Local is checked, this device will respond to requests from LAN. If Remote is checked, this device will respond to requests from WAN. Get Community Setting the community of a GetRequest so your device will respond. Set Community Setting the community of SetRequest your device will accept.IP 1,IP 2,IP 3,IP 4 Input your SNMP Management PC’s IP here. User has to configure where the router should send SNMP Trap message. SNMP Version Please select the SNMP Version that your SNMP Management software supports. Click on Save to store configuration changes or Undo to cancel 27 ©2008 NexAira Inc.
  • 33. System Time Get Date and Time by NTP Protocol Check Get Date and Time by NTP Protocol. Time Server - Select a NTP time server to consult UTC time Time Zone - Select a time zone where this device locates. Set Date and Time using PC’s Date and Time - Set the Date and Time from your PC Set Date and Time manually - Selected if you want to Set Date and Time manually. Daylight Saving – Enable/Disable Click on Save to store configuration changes or Undo to cancel 28 ©2008 NexAira Inc.
  • 34. Performance Performance Beacon Interval Beacons are packets sent by an Access Point to synchronize a wireless network. Specify a Beacon interval value between 1 and 1000. The default value is set to 100 milliseconds. DTIM interval Enter a value between 1 and 65535 for the Delivery Traffic Indication Message (DTIM). A DTIM is a countdown informing clients of the next window for listening to broadcast and multicast messages. When the Access Point has buffered broadcast or multicast messages for associated clients, it sends the next DTIM with a DTIM Interval value. AP clients hear the beacons and awaken to receive the broadcast and multicast messages. The default value for DTIM interval is set to 3 Wireless mode - An Access Point can be accessed by 802.11b or 802.11g clients in mixed mode, while only allowing 802.11g clients to connect in G mode. The default is mixed mode. TX Rates Select the basic transfer rates based on the speed of wireless adapters on the WLAN (wireless local area network). SSID Broadcast Choose enable or disable the wireless SSID broadcast. These settings should not be modified without reason. Speed Enhanced Mode This is a TX Burst function for Ralink wireless solution Antenna Transmit Power: Select the Transmit Power of the Antenna Click on Save to store configuration changes or Undo to cancel 29 ©2008 NexAira Inc.
  • 35. Scheduling You can set the schedule time to decide which service will be turned on or off. Select the Enable item. Click Add New Rule…You can write a rule name and set which day and what time to schedule from “Start Time” to “End Time”. Example: Configure “FTP Disabled” as everyday 14:10 to 16:20 Click on Save to store configuration changes or Undo to cancel Wake on LAN Wake-on-LAN is a technology that enables you to power up a networked device remotely. In order to use this feature, the target device must be Wake-on-LAN enabled and you have to know the MAC address of this device, For Example; MAC 00-11-22-33-44-55. Clicking "Wake up" button the router will send a wake-up frame to the target device immediately. Click on Save to store configuration changes or Undo to cancel. 30 ©2008 NexAira Inc.
  • 36. Security Settings Packet Filters Packet Filters enable you to control what packets are allowed to pass through the router. Outbound filter applies on all outbound packets. However, inbound filters apply on packets that are destined to Virtual Servers or DMZ hosts only. You can select one of the two filtering policies: 1. Allow all to pass except those match the specified rules 2. Deny all to pass except those match the specified rules You can specify 48 rules for each direction: inbound or outbound. For each rule, you can define the following: ! Source IP address ! Source port ! Destination IP address ! Destination port ! Protocol: TCP or UDP or both. ! Use Schedule Rule # For source or destination IP address, you can define a single IP address. For example: (192.168.123.200) or a range of IP addresses for example: (192.168.123.200 – 192.168.123.253). A blank field implies all IP addresses. For source or destination port, you can define a single port (80) or a range of ports (1000-1999). Add prefix "T" or "U" to specify TCP or UDP protocol. For example, T80, U53, U2000-2999, no prefix indicates both TCP and UDP are defined. An empty implies all port addresses. Packet Filter can work with Scheduling Rules, providing users with more flexibility on access control. For details, please refer to Scheduling Rules. Each rule can be enabled or disabled individually. Inbound Filter: To enable Inbound Packet Filter check the box next to Enable in the Inbound Packet Filter field Click on Save to store configuration changes or Undo to cancel. 31 ©2008 NexAira Inc.
  • 37. Domain Filters Domain filters allow users to prevent users of the router from accessing specific URLs. Domain Filters Enable Check if you want to enable Domain Filter. Log DNS Query Check if you want to log the action when someone accesses the specific URLs. Privilege IP Address Range Setting a group of hosts and privilege these hosts to access network without restriction. Domain Suffix A suffix of URL to be restricted (For example:".com", "xxx.com") Action When someone is accessing a URL that matches the specified domain-suffix, what kind of action you want carried out. Check “drop” to block the access. Check “log” to log the access. Enable Check to enable each rule. Click Save to store configuration changes or Undo to cancel. 32 ©2008 NexAira Inc.
  • 38. URL Blocking URL Blocking will block LAN computers from connecting to pre-defined Websites. The major difference between “Domain filter” and “URL Blocking” is Domain filters require a suffix (like .com or .org, etc), while URL Blocking requires a keyword only. The Domain filter can block a specific website, while URL Blocking can block hundreds of websites by a keyword. URL Blocking Enable Check if you want to enable URL Blocking. URL If any part of the Website's URL matches the pre-defined word, the connection will be blocked. For example, you can use pre-defined word "pancake" to block all websites if their URLs contain the pre-defined word "pancake." Enable Check to enable each rule. Click Save to store configuration changes or Undo to cancel MAC Control MAC Address Control allows you to assign different access rights for different users and to assign a specific IP address to a certain MAC address. MAC Address Control. Check Enable to enable MAC Address Control. All of the settings in this page will take effect only when Enable is checked.Connection control. Check Connection control to control which wired and wireless clients can connect to this device. If a client is denied a connection to the router, it also can't access the Internet. Choose allow or deny to enable or disable the clients whose MAC addresses are not in the Control table to connect to this device. Association control. Check Association control to enable the controlling of wireless client association to the wireless LAN. If a client is denied an associate to the wireless LAN, it means the client can't send or receive any data via the router. Choose allow or deny to allow or deny the clients whose MAC addresses are not in the Control table to associate to the wireless LAN Click on Next Page to go down or Previous page back to last page. Click on Save to store configuration changes or Undo to cancel. 33 ©2008 NexAira Inc.
  • 39. Other Options Remote Administrator Host/Port. By default, only Intranet users can browse the built-in web pages to perform administrative tasks on the router. This feature enables you to perform administration tasks from a remote host. If this feature is enabled, only the specified IP address can perform remote administration. If the specified IP address is 0.0.0.0, any host can connect to this product to perform administration tasks. You can use subnet mask bits "/nn" notation to specify a group of trusted IP addresses for example, "10.1.2.0/24." NOTE: When Remote Administration is enabled, the web server port will be shifted to 8080. You can change web server port to another port. Administrator Time-out. The time of no activity to logout automatically, you may set it to zero to disable this feature. Discard PING from WAN side. When this feature is enabled, any host on the WAN is not able to ping the router. Disable UPNP: Choose enable or disable the UPNP feature Click on Save to store configuration changes or Undo to cancel Forwarding Rules Routing Routing Table This allows a physical interface address to be used for outgoing IP data packets. If you have more than one router and subnet, you will need to enable a routing table to allow packets to find proper routing path and allow different subnets to communicate with each other. Routing Table settings are used to setup the functions of static and dynamic routing. Dynamic Routing Routing Information Protocol (RIP) will exchange information about destinations for computing routes throughout the network. Please select RIPv2 only if you have different subnets in your network. Otherwise, please select RIPv1 if you need this protocol. Static Routing For static routing, you can specify up to 8 routing rules. You can enter the destination IP address, subnet mask, gateway, hop for each routing rule, and then enable or disable the rule by checking or un-checking the Enable checkbox. Click on Save to store configuration changes or Undo to cancel 34 ©2008 NexAira Inc.
  • 40. GRE Tunneling GRE (Generic Routing Encapsulation) is an advanced protocol that allows you to designate a static IP tunnel from one host to another. Other network traffic, such as IPSec VPN, can then traverse that tunnel without error. There are four required input values: 1. Remote WAN IP 2. Remote LAN IP 3. Local WAN IP 4. Local LAN IP The WAN IP is the public IP addresses of the two networks to be connected. The LAN IPs are the specific private IP addresses of the two hosts (or gateways) that are to be connected. Once the correct values have been specified, check the Enable box and click Save to store configuration changes. 35 ©2008 NexAira Inc.
  • 41. Virtual Server The router’s NAT firewall filters out unrecognized packets to protect your local intranet. All hosts behind the device are invisible to the outside world. It is possible to make select hosts accessible by enabling the Virtual Server feature. A virtual server is defined as a Service Port, and all requests to this port will be redirected to the computer specified by the Server IP. Virtual Server can work with Scheduling Rules, which gives more flexibility on Access control. For Detail, please refer to Scheduling Rule. For example, if you have an FTP server (port 21) at 192.168.123.1, a Web server (port 80) at 192.168.123.2, and a VPN server at 192.168.123.6, then you need to specify the following virtual server mapping table: Service Port Server IP Enable 21 192.168.123.1 V 80 192.168.123.2 V 1723 192.168.123.6 V Click Save to store configuration changes or Undo to cancel 36 ©2008 NexAira Inc.
  • 42. Special Applications Some applications require multiple connections, like Internet games, video conferencing, Internet telephony, etc. Because of the firewall function, these applications cannot work with a pure NAT router. The Special Applications feature allows some of these applications to work with this device. If the mechanism of Special Applications fails to make an application work, try setting your computer as the DMZ host instead. Trigger: the outbound port number issued by the application. Incoming Ports: when the trigger packet is detected, the inbound packets sent to the specified port numbers are allowed to pass through the firewall. The router provides some predefined settings. Pull down the application from the menu and click Copy to for the defined settings to take place. NOTE: At any given time, only one PC can use each Special Applications tunnel. Click on Save to store configuration changes or Undo to cancel DMZ Host DMZ (Demilitarized Zone) Host is a host without the protection of firewall. It allows a computer to be exposed to unrestricted 2-way communication for Internet games, Video conferencing, Internet telephony and other special applications. Specify the IP address of the device to be placed in the DMZ. Click on Save to store configuration changes or Undo to cancel NOTE: This feature should be enabled only when needed or in use. 37 ©2008 NexAira Inc.
  • 43. Troubleshooting This section provides an overview of common issues, with solutions for the installation and operation of the NexConnect 3G Wireless Broadband Router. 1. I am unable to access the Configuration Menu when I use my computer to configure the router. It is recommended that you use an Ethernet connection to configure the NexConnect 3G Wireless Broadband Router. Ensure that the LAN LED on the NexConnect 3G Wireless Broadband Routeris Green. If the LAN is NOT green, check to ensure if the cable for the Ethernet connection is securely inserted. Ensure that the IP Address assigned to the computer is in the same range and subnet as the NexConnect 3G Wireless Broadband Router. NOTE: The default IP Address of the NexConnect 3G Wireless Broadband Router is 192.168.123.254. All computers on the network must have a unique IP Address within the same range (e.g., 192.168.123.x). Any computer that has an identical IP Addresses will not be visible on the network. All computers must also have the same subnet mask (e.g., 255.255.255.0). Do a Ping test to 192.168.123.254 to make sure that the NexConnect 3G Wireless Broadband Router is responding. Go to Start > Run 1:Type cmd 2:Select Enter 3:Type ping 192.168.123.254 (A successful ping shows four replies). Note: If you have changed the default IP Address, ensure you ping the correct IP Address assigned to the NexConnect 3G Wireless Broadband Router. Ensure that your Ethernet Adapter is working properly, and that all network drivers are installed properly. NOTE: Network adapter names will vary depending on your specific adapter. The installation steps listed below are applicable for all network adapters. 1. Go to Start > My Computer > Properties. 2. Select the Hardware Tab. 3. Click Device Manager. 4. Double-click on “Network Adapters”. 5. Right-click on Wireless Cardbus Adapter, or your specific network adapter. 6. Select Properties to ensure that all drivers are installed properly. 7. Look under Device Status to see if the device is working properly. 8. Click “OK” 2. My wireless client can’t access the Internet. If you select either WEP or WPA-PSK encryption on NexConnect 3G Wireless Broadband Router, ensure encryption settings match your WiFi settings on the computer. Please refer to your WiFi adapter documentation for additional information. Ensure that the wireless client is associated and joined with the correct Access Point. To check this connection, follow the steps below: 1. Right-click on the Wireless Network Connection icon in the Windows taskbar. 2. Select View Available Wireless Networks in Wireless Configure. The Connect to Wireless Network screen appears. Ensure you have selected the correct available network. Ensure the IP Address assigned to the wireless adapter is within the same subnet as the Access Point and gateway. The NexConnect 3G Wireless Broadband Router has an IP Address of 192.168.123.254. Wireless adapters must have an IP Address in the same range (e.g., 192.168.123.x). The subnet mask must be the same for all the computers on the network, but two devices may have the same IP Address. Therefore, each device must have a unique IP Address. To check the IP Address assigned to the wireless adapter, follow the steps below: 1. Enter ipconfig /all in command mode. 2. Enter ping 192.168.123.254 to check if you can access the Wireless WAN Mobile Broadband Router. 38 ©2008 NexAira Inc.
  • 44. 3. The wireless connection keeps dropping. Antenna Orient ation. 1: Tr erent antenna orientatio ns for the NexConne ct 3G Wireless Broadband Router. 2: Try to keep the antenna at least 6 inchs away from the wall or other objects. e Try changing the channel on the NexConnect 3G Wireless Broadband Router, your Access Point and Wireless terference. Keep the NexConnect 3G Wireless Broadband Router away (at least 3-6 feet) from electrical devices that generate RF noise, like microwaves, m onitors, electric motors, etc. Move away from ot her s 4. I am unable to achieve a wireless connection. NOTE: An Etherne t connection is required to troubleshoot th e NexConnect 3G Wireless Broadband Router. If you have enabled Encryption o n the NexConnect 3G Wireless Broadband Router, you must also enable encryption on all wireless clients in order to establish a wireless connection. For 802.11g, the encryption settings are: 64 or 128 bit. Ensure that the encryption bit level is the same for both the NexConnect 3G Wireless Broadband Router and your Wireless Client. Ensure that the SSID (Service Set Identifier) on the NexConnect 3G Wireless Broadband Router and the Wireless Client are exactly the same. If they are not, your wireless connection will not be established. Move the NexConnect 3G Wireless Broadband Router and the wireless client into the same room, and then test the wireless connection. Disable all security settings such as WEP, and MAC Address Control. Turn off the NexConnect 3G Wireless Broadband Router and the client. Turn the NexConnect 3G Wireless Broadband Router back on, and then turn on the client. Ensure that all devices are set to Infrastructure mode. Ensure that the LED indicators are indicating normal activity. If not, ensure that the AC power and Ethernet cables are firmly connected. Ensure that the IP Address, subnet mask, gateway and DNS settings are correctly entered for the network. If you are using 2.4GHz cordless phones, X-10 equipment, or other home security systems, ceiling fans, or lights, your wireless connection may degrade dramatically or drop altogether. To avoid interference, change the Channel on the NexConnect 3G Wireless Broadband Router and all devices in your network. Keep your product at least 3-6 feet away from electrical devices that generate RF noise. Examples include: microwaves, monitors, electric motors, and so forth. 5. I just do not remember my encryption key. If you forgot your encryption key, the WiFi card will be unable to establish a proper connection. If an encryption key setting has been set for the NexConnect 3G Wireless Broadband Router, it must also be set for the WiFi card that will connect to the NexConnect 3G Wireless Broadband Router. To reset the encryption key(s), login to the NexConnect 3G Wireless Broadband Router using a wired connection. (Please refer to “Basic > Wireless (Security–No Encryption)” on page 10, for additional information). 6. Reset the NexConnect 3G Wireless Broadband Router to its factory default settings. If other troubleshooting methods have failed, you may choose to Reset the NexConnect 3G Wireless Broadband Routerto its factory default settings. To hard-reset the NexConnect 3G Wireless Broadband Router to its factory default settings, follow the steps listed below: 1. Ensure the NexConnect 3G Wireless Broadband Router is powered on. 2. Locate the Reset button on the back of the Wireless WAN Mobile Broadband Router. 3. Use a paper clip to press the Reset button. 4. Hold for 10 seconds and then release. 5. After the NexConnect 3G Wireless Broadband Router re-boots, it is reset to the factory default settings. NOTE: Please note that this process will take a few minutes. 39 ©2008 NexAira Inc.
  • 45. 7. What is VPN? VPN stands for “Virtual Private Networking.” VPNs create a "tunnel" through an existing Internet connection using PPTP (Point-to-Point Tunneling Protocol) or IPSec (IP Security) protocols with various encryption schemes including Microsoft Challenge Handshake Authentication Protocol (MS-CHAP) . This feature allows you to use your existing Internet connection to connect to a remote site with added security. If your VPN connection is not functional, verify that your VPN dial-up configuration is correct. NOTE: This information should be provided to you from your VPN provider. 8. My Ethernet cable does not work properly. Ensure that there is a solid cable connection between the Ethernet port on the Router and your NIC (Network Interface Card). Ensure that the settings on your NIC adapter are “Enabled” and set to accept an IP address from the DHCP. If settings appear to be correct, ensure that you are not using a crossover Ethernet cable. Although the NexConnect 3G Wireless Broadband Router is MDI/MDIX compatible, not all NICs are. Therefore, it is recommended that you use a patch cable when possible. 40 ©2008 NexAira Inc.
  • 46. 9. My NexConnect is powered on and my 3G card is inserted into the modem. I have connected to the router via an Ethernet cable or a WiFi connection, but I am unable to connect to the Internet. To connect to the Internet, you must have an activated 3G card and your service provider's settings must be properly entered into the router's configuration pages. First, call your service provider to confirm that your card is activated. If it is, then do the following: connect to the router via an Ethernet cable, open a web browser, and enter "192.168.123.254" into the address bar. Enter the router's password (originally it is "default") and press Enter. Choose Advanced Setup. To the left, click Primary Setup. Scroll down and confirm that 3G is selected. Below that, enter your service provider's settings in the fields provided.. Here are some common settings for a number of providers: Sprint: Dial Number: #777 Verizon: Dial Number: #777 AT&T: APN: isp.cingular Dial Number: *99# Username: isp@cingulargprs.com Password: CINGULAR1 Alltel: Dial Number: #777 Username: XXXXXXXXXX@alltel.net (replace “XXXXXXXXXX” with the access number provided by Alltel) Password: Alltel T-mobile: APN: wap.voicestream.com Dial Number: *99***1# MobiPCS Hawaii: Dial Number: #777 Username: (MVN)@mobipcs.com Password: mobipcs Once the correct settings are entered, click Save Settings. When the web browser returns to the initial login page, the settings are saved. Power off your router and card, wait 10 seconds, and power them back on. 41 ©2008 NexAira Inc.
  • 47. Technical Support NexAira Inc. provides free technical support for customers worldwide for the warranty period of one year on this product. NexAira Technical Support: Phone Support: (888) 377-8239 Monday through Friday 8:00am - 5:00pm PST Email Support: routers@nexaira.com When contacting technical support, please provide the following information: NOTE: All numbers referenced below can be found on the bottom of the router. Model number or product name. This is the ten-digit “TX” number. Serial number of the unit. Date code Firmware version Defaulted IP NOTE: The firmware version can be found by logging into the router and viewing the status page. Technical Specifications 3G Access 1*PC card Type II Slot 1*USB port Standards IEEE 802.11b/g IEEE 802.3 IEEE 802.3u Wireless Standard IEEE 802.11b/g Turbo Data Rate 54, 48, 36, 24, 18, 12, 9, and 6 Mbps per channel, Auto Fall-Back Frequency 2.4 – 2.462 GHz, CCK Tx/Rx power 18dbm/Per Cell Range Coverage indoors approx. 35-100 meters; outdoors up to 100-300 meters 1-11 for N. America (FCC);1-11 for Canada (DOC) # of Channels 1-13 Europe (Except Spain and France) (ETSI) 1-14 Japan (TELEC); Security 64-bit and 128-bit WEP Encryption; WPA encryption Antenna 3dB Detachable Antenna IP Filtering Firewall NAT (Network Address Translation) with VPN Pass through MAC Filtering Supported WAN type 3G, Static IP, Dynamic IP, PPPoE,PPTP,L2TP Connection Scheme Connect-on-demand, Auto-Disconnect NAT function Class C ;One-to-Many; Max 253 Users; Virtual Server; DMZ Host VPN PPTP, L2TP and IPSec Pass Through Config.& Management Web-Based IE, Nevigator browser and SNMP DHCP Server and Client Working Environment Temperature: 0~40oC, Humidity 10%~90% non-condensing OS supported Windows 95/98/ME/NT/2000/XP; Linux, MAC Power Switching 5V 3.0A 42 ©2008 NexAira Inc.
  • 48. Glossary of Definitions DHCP - Dynamic Host Configuration Protocol is a protocol used by networked devices (clients) to obtain the parameters necessary for operation in an Internet Protocol network. This protocol reduces system administration workload, allowing devices to be added to the network with little or no manual configuration. IP – Internet Protocol is a protocol used for communicating data across a packet-switched Internetwork using the Internet Protocol Suite (TCP/IP). LAN – Local Area Network is a computer network covering a small physical area, like a home, office, or small group of buildings, such as a school, or an airport. The defining characteristics of LANs, in contrast to wide-area networks (WANs), include their usually higher data-transfer rates, smaller geographic range, and lack of a need for leased telecommunication lines. LAN IP– Local Area Network Internet Protocol varies depending on the hardware configuration. If the NexConnect router is setup independently, not associated with other routers or other network hardware, the default settings are preferred. If the NexConnect router is setup as part of a larger networking system, please refer to your system administrator for proper settings. MAC - a Media Access Control address (MAC address) or Ethernet Hardware Address (EHA), hardware address, adapter address or physical address is a quasi-unique identifier assigned to most network adapters or network interface cards (NICs) by the manufacturer for identification. If assigned by the manufacturer, a MAC address usually encodes the manufacturer's registered identification number. NexConnect – NexAira 3G Router which provides universal access to keep you connected anywhere on any network. Check Email, surf web, share music and photo files anytime. The NexAira NexConnect 3G Wireless Router supports 16-bit and 32-bit Type II mobile broadband cards on EVDO and HSDPA networks. Integrated 802.11 b/g wireless data transfers with speeds up to 54 Mbps and wired data transfers up to 100 Mbps. Equipped with two Ethernet ports for LAN and WAN access, Type II PC card slot and USB port for 3G network connections. For ExpressCards, a Universal adapter is available. NexWaresm (The NexAira in Communications Firmware and Software Management) – Provides a user with ease of use with its Industry defining Graphical User Interface (GUI). An Intuitive Iconic Interactive (I3) GUI. PoE - Power over Ethernet technology describes a system to transfer electrical power, along with data, to remote devices over standard twisted-pair cable in an Ethernet network. This technology is useful for powering IP telephones, wireless LAN access points, network cameras, remote network switches, embedded computers, and other appliances where it would be inconvenient, expensive (wiring must often be done by qualified and/or licensed electricians for legal or insurance reasons) or infeasible to supply power separately. QoS – Quality of Service, High QoS of performance or achieved service quality, for example high bit rate, low latency and low bit error probability. Setup Wizard – Useful end user feature for advanced hardware configurations. UPnP – Universal Plug and Play which allows the router to connect seamlessly and to simplify the implementation of networks in the home (data sharing, communications, and entertainment) and corporate environments. UPnP achieves this by defining and publishing UPnP device control protocols built upon open, Internet-based communication standards. 43 ©2008 NexAira Inc.
  • 49. VPN – Virtual Private Network is a computer network in which some of the links between nodes are carried by open connections or virtual circuits in some larger network (e.g., the Internet) instead of by physical wires. The link-layer protocols of the virtual network are said to be tunneled through the larger network when this is the case. One common application is secure communications through the public Internet, but a VPN need not have explicit security features, such as authentication or content encryption. WAN – Wide Area Network are used to connect LANs and other types of networks together, so that users and computers in one location can communicate with users and computers in other locations. WAN IP – Wide Area Network Internet Protocol can vary depending on hardware configuration. If the NexConnect router is setup independently, not associated with other routers or other network hardware, the default settings are preferred. If the NexConnect router is setup as part of a larger networking system, please refer to your system administrator for proper settings. WAP – Wireless Application Protocol is an open international standard for application layer network communications in a wireless communication environment. Its main use is to enable access to the Internet (HTTP) from a mobile phone or PDA. WEP – Wired Equivalent Privacy is a deprecated algorithm to secure IEEE 802.11 wireless networks. Wireless networks broadcast messages using radio and are thus more susceptible to eavesdropping than wired networks. 44 ©2008 NexAira Inc.