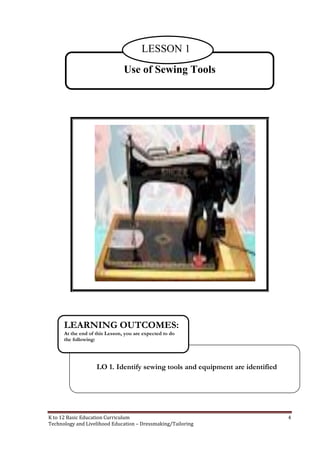
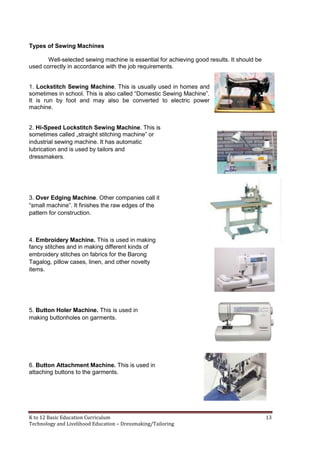
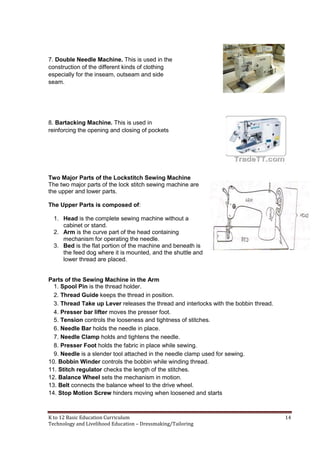
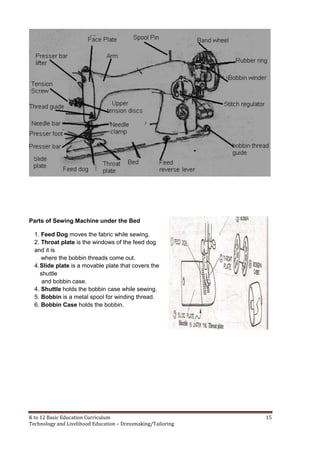
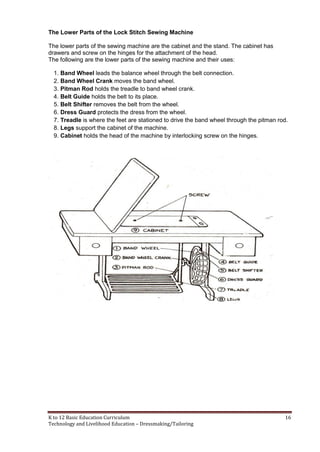
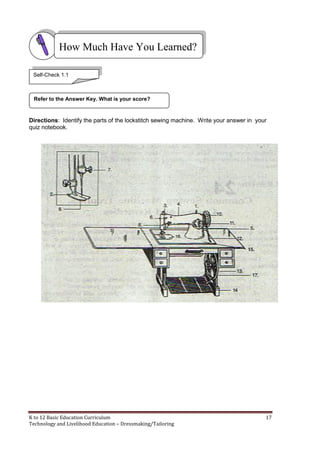
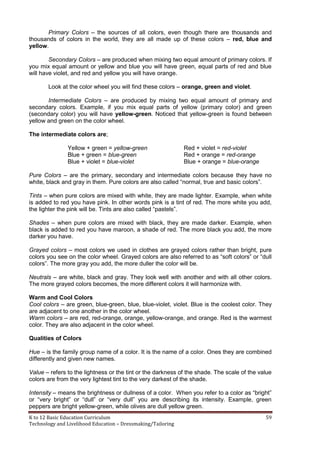
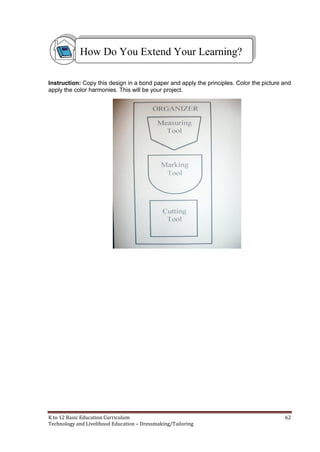
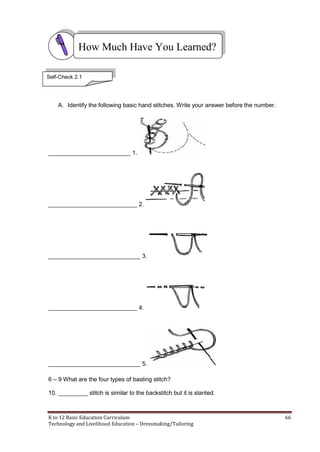
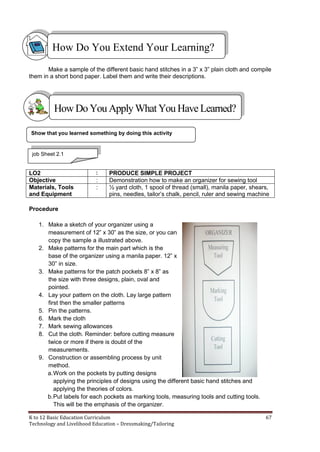
The document is a learning module that provides information about dressmaking and tailoring as an exploratory course for grades 7 and 8. It covers five lessons: (1) use of sewing tools, (2) measurements and calculations, (3) creating designs for simple projects, (4) basic maintenance, and (5) occupational safety and health. Lesson 1 defines various sewing tools and their uses, including measuring tools, cutting tools, marking tools, and sewing machines. It provides information on different types of sewing machines and their functions.
K-12 Module in T.L.E. Grade 8 Second Grading (Handicrafts)Daniel Manaog
==========================================
K-12 Module in A.P. Grade 8 Second Grading!
Want to Download?
Click Here => http://www.slideshare.net/danielmanaog14/savedfiles?s_title=1-27-pages&user_login=danielmanaog14
==========================================
This Module is an exploratory course which leads you to Mechanical Drafting
National Certificate Level II ( NC II)1. It covers the 4 common competencies that a Grade 7
/ Grade 8 Technology and Livelihood Education (TLE) student like you ought to possess,
namely:
1. Prepare Drafting Materials and Tools/Drawing Instruments
2. Perform Basic Mensuration and Calculation
3. Interpret Working Plans and Sketches
4. Apply Safety Practices
A workshop that is meant to clarifying an organizations goal. By build ownership across the team members defining the accurate objectives to reach the dedicated goals. By using de Bonos Six Thinking Hats you will manage to steer your members to a lateral thinking. Some team building exercises and icebreakers exercises that can help build a good judgment across the teams and helping them to find the team in teamwork.
Slack (or Teams) Automation for Bonterra Impact Management (fka Social Soluti...Jeffrey Haguewood
Sidekick Solutions uses Bonterra Impact Management (fka Social Solutions Apricot) and automation solutions to integrate data for business workflows.
We believe integration and automation are essential to user experience and the promise of efficient work through technology. Automation is the critical ingredient to realizing that full vision. We develop integration products and services for Bonterra Case Management software to support the deployment of automations for a variety of use cases.
This video focuses on the notifications, alerts, and approval requests using Slack for Bonterra Impact Management. The solutions covered in this webinar can also be deployed for Microsoft Teams.
Interested in deploying notification automations for Bonterra Impact Management? Contact us at sales@sidekicksolutionsllc.com to discuss next steps.
UiPath Test Automation using UiPath Test Suite series, part 4DianaGray10
Welcome to UiPath Test Automation using UiPath Test Suite series part 4. In this session, we will cover Test Manager overview along with SAP heatmap.
The UiPath Test Manager overview with SAP heatmap webinar offers a concise yet comprehensive exploration of the role of a Test Manager within SAP environments, coupled with the utilization of heatmaps for effective testing strategies.
Participants will gain insights into the responsibilities, challenges, and best practices associated with test management in SAP projects. Additionally, the webinar delves into the significance of heatmaps as a visual aid for identifying testing priorities, areas of risk, and resource allocation within SAP landscapes. Through this session, attendees can expect to enhance their understanding of test management principles while learning practical approaches to optimize testing processes in SAP environments using heatmap visualization techniques
What will you get from this session?
1. Insights into SAP testing best practices
2. Heatmap utilization for testing
3. Optimization of testing processes
4. Demo
Topics covered:
Execution from the test manager
Orchestrator execution result
Defect reporting
SAP heatmap example with demo
Speaker:
Deepak Rai, Automation Practice Lead, Boundaryless Group and UiPath MVP
GDG Cloud Southlake #33: Boule & Rebala: Effective AppSec in SDLC using Deplo...James Anderson
Effective Application Security in Software Delivery lifecycle using Deployment Firewall and DBOM
The modern software delivery process (or the CI/CD process) includes many tools, distributed teams, open-source code, and cloud platforms. Constant focus on speed to release software to market, along with the traditional slow and manual security checks has caused gaps in continuous security as an important piece in the software supply chain. Today organizations feel more susceptible to external and internal cyber threats due to the vast attack surface in their applications supply chain and the lack of end-to-end governance and risk management.
The software team must secure its software delivery process to avoid vulnerability and security breaches. This needs to be achieved with existing tool chains and without extensive rework of the delivery processes. This talk will present strategies and techniques for providing visibility into the true risk of the existing vulnerabilities, preventing the introduction of security issues in the software, resolving vulnerabilities in production environments quickly, and capturing the deployment bill of materials (DBOM).
Speakers:
Bob Boule
Robert Boule is a technology enthusiast with PASSION for technology and making things work along with a knack for helping others understand how things work. He comes with around 20 years of solution engineering experience in application security, software continuous delivery, and SaaS platforms. He is known for his dynamic presentations in CI/CD and application security integrated in software delivery lifecycle.
Gopinath Rebala
Gopinath Rebala is the CTO of OpsMx, where he has overall responsibility for the machine learning and data processing architectures for Secure Software Delivery. Gopi also has a strong connection with our customers, leading design and architecture for strategic implementations. Gopi is a frequent speaker and well-known leader in continuous delivery and integrating security into software delivery.
Neuro-symbolic is not enough, we need neuro-*semantic*Frank van Harmelen
Neuro-symbolic (NeSy) AI is on the rise. However, simply machine learning on just any symbolic structure is not sufficient to really harvest the gains of NeSy. These will only be gained when the symbolic structures have an actual semantics. I give an operational definition of semantics as “predictable inference”.
All of this illustrated with link prediction over knowledge graphs, but the argument is general.
Search and Society: Reimagining Information Access for Radical FuturesBhaskar Mitra
The field of Information retrieval (IR) is currently undergoing a transformative shift, at least partly due to the emerging applications of generative AI to information access. In this talk, we will deliberate on the sociotechnical implications of generative AI for information access. We will argue that there is both a critical necessity and an exciting opportunity for the IR community to re-center our research agendas on societal needs while dismantling the artificial separation between the work on fairness, accountability, transparency, and ethics in IR and the rest of IR research. Instead of adopting a reactionary strategy of trying to mitigate potential social harms from emerging technologies, the community should aim to proactively set the research agenda for the kinds of systems we should build inspired by diverse explicitly stated sociotechnical imaginaries. The sociotechnical imaginaries that underpin the design and development of information access technologies needs to be explicitly articulated, and we need to develop theories of change in context of these diverse perspectives. Our guiding future imaginaries must be informed by other academic fields, such as democratic theory and critical theory, and should be co-developed with social science scholars, legal scholars, civil rights and social justice activists, and artists, among others.
Accelerate your Kubernetes clusters with Varnish CachingThijs Feryn
A presentation about the usage and availability of Varnish on Kubernetes. This talk explores the capabilities of Varnish caching and shows how to use the Varnish Helm chart to deploy it to Kubernetes.
This presentation was delivered at K8SUG Singapore. See https://feryn.eu/presentations/accelerate-your-kubernetes-clusters-with-varnish-caching-k8sug-singapore-28-2024 for more details.
"Impact of front-end architecture on development cost", Viktor TurskyiFwdays
I have heard many times that architecture is not important for the front-end. Also, many times I have seen how developers implement features on the front-end just following the standard rules for a framework and think that this is enough to successfully launch the project, and then the project fails. How to prevent this and what approach to choose? I have launched dozens of complex projects and during the talk we will analyze which approaches have worked for me and which have not.
State of ICS and IoT Cyber Threat Landscape Report 2024 previewPrayukth K V
The IoT and OT threat landscape report has been prepared by the Threat Research Team at Sectrio using data from Sectrio, cyber threat intelligence farming facilities spread across over 85 cities around the world. In addition, Sectrio also runs AI-based advanced threat and payload engagement facilities that serve as sinks to attract and engage sophisticated threat actors, and newer malware including new variants and latent threats that are at an earlier stage of development.
The latest edition of the OT/ICS and IoT security Threat Landscape Report 2024 also covers:
State of global ICS asset and network exposure
Sectoral targets and attacks as well as the cost of ransom
Global APT activity, AI usage, actor and tactic profiles, and implications
Rise in volumes of AI-powered cyberattacks
Major cyber events in 2024
Malware and malicious payload trends
Cyberattack types and targets
Vulnerability exploit attempts on CVEs
Attacks on counties – USA
Expansion of bot farms – how, where, and why
In-depth analysis of the cyber threat landscape across North America, South America, Europe, APAC, and the Middle East
Why are attacks on smart factories rising?
Cyber risk predictions
Axis of attacks – Europe
Systemic attacks in the Middle East
Download the full report from here:
https://sectrio.com/resources/ot-threat-landscape-reports/sectrio-releases-ot-ics-and-iot-security-threat-landscape-report-2024/
The Art of the Pitch: WordPress Relationships and SalesLaura Byrne
Clients don’t know what they don’t know. What web solutions are right for them? How does WordPress come into the picture? How do you make sure you understand scope and timeline? What do you do if sometime changes?
All these questions and more will be explored as we talk about matching clients’ needs with what your agency offers without pulling teeth or pulling your hair out. Practical tips, and strategies for successful relationship building that leads to closing the deal.
Dev Dives: Train smarter, not harder – active learning and UiPath LLMs for do...UiPathCommunity
💥 Speed, accuracy, and scaling – discover the superpowers of GenAI in action with UiPath Document Understanding and Communications Mining™:
See how to accelerate model training and optimize model performance with active learning
Learn about the latest enhancements to out-of-the-box document processing – with little to no training required
Get an exclusive demo of the new family of UiPath LLMs – GenAI models specialized for processing different types of documents and messages
This is a hands-on session specifically designed for automation developers and AI enthusiasts seeking to enhance their knowledge in leveraging the latest intelligent document processing capabilities offered by UiPath.
Speakers:
👨🏫 Andras Palfi, Senior Product Manager, UiPath
👩🏫 Lenka Dulovicova, Product Program Manager, UiPath
Key Trends Shaping the Future of Infrastructure.pdfCheryl Hung
Keynote at DIGIT West Expo, Glasgow on 29 May 2024.
Cheryl Hung, ochery.com
Sr Director, Infrastructure Ecosystem, Arm.
The key trends across hardware, cloud and open-source; exploring how these areas are likely to mature and develop over the short and long-term, and then considering how organisations can position themselves to adapt and thrive.
DevOps and Testing slides at DASA ConnectKari Kakkonen
My and Rik Marselis slides at 30.5.2024 DASA Connect conference. We discuss about what is testing, then what is agile testing and finally what is Testing in DevOps. Finally we had lovely workshop with the participants trying to find out different ways to think about quality and testing in different parts of the DevOps infinity loop.
Epistemic Interaction - tuning interfaces to provide information for AI supportAlan Dix
Paper presented at SYNERGY workshop at AVI 2024, Genoa, Italy. 3rd June 2024
https://alandix.com/academic/papers/synergy2024-epistemic/
As machine learning integrates deeper into human-computer interactions, the concept of epistemic interaction emerges, aiming to refine these interactions to enhance system adaptability. This approach encourages minor, intentional adjustments in user behaviour to enrich the data available for system learning. This paper introduces epistemic interaction within the context of human-system communication, illustrating how deliberate interaction design can improve system understanding and adaptation. Through concrete examples, we demonstrate the potential of epistemic interaction to significantly advance human-computer interaction by leveraging intuitive human communication strategies to inform system design and functionality, offering a novel pathway for enriching user-system engagements.
LF Energy Webinar: Electrical Grid Modelling and Simulation Through PowSyBl -...DanBrown980551
Do you want to learn how to model and simulate an electrical network from scratch in under an hour?
Then welcome to this PowSyBl workshop, hosted by Rte, the French Transmission System Operator (TSO)!
During the webinar, you will discover the PowSyBl ecosystem as well as handle and study an electrical network through an interactive Python notebook.
PowSyBl is an open source project hosted by LF Energy, which offers a comprehensive set of features for electrical grid modelling and simulation. Among other advanced features, PowSyBl provides:
- A fully editable and extendable library for grid component modelling;
- Visualization tools to display your network;
- Grid simulation tools, such as power flows, security analyses (with or without remedial actions) and sensitivity analyses;
The framework is mostly written in Java, with a Python binding so that Python developers can access PowSyBl functionalities as well.
What you will learn during the webinar:
- For beginners: discover PowSyBl's functionalities through a quick general presentation and the notebook, without needing any expert coding skills;
- For advanced developers: master the skills to efficiently apply PowSyBl functionalities to your real-world scenarios.
LF Energy Webinar: Electrical Grid Modelling and Simulation Through PowSyBl -...
dressmaking
1. K to 12 Basic Education Curriculum
Technology and Livelihood Education
Learning Module
DRESSMAKING/
TAILORING
EXPLORATORY COURSE
Grade 7 and Grade 8
Republic of the Philippines
DEPARTMENT OF EDUCATION
2. K to 12 Basic Education Curriculum 1
Technology and Livelihood Education – Dressmaking/Tailoring
TABLE OF CONTENTS
Page
What is this Module About? .............................................................................................. 2
How do you Use this Module ............................................................................................ 3
LESSON 1 – Use of Sewing Tools............................................................................... 4-22
LESSON 2 – Carry Out Measurements and Calculations.......................................... 23-51
LESSON 3 – Create Design for a Simple Project .............................................. 52-73
LESSON 4 – Perform Basic Maintenance........................................................74-102
LESSON 5- Practice Occupational Safety and Health................................. 103-123
Answer Keys.............................................................................................................124-130
Acknowledgment ............................................................................................................. 131
3. K to 12 Basic Education Curriculum 2
Technology and Livelihood Education – Dressmaking/Tailoring
Welcome to the world of Dressmaking/Tailoring!
This Module is an exploratory and introductory course on Dressmaking and/or Tailoring
which leads you to Dressmaking/Tailoring National Certificate Level II (NC II)1
. It
covers 5 common competencies in Dressmaking/Tailoring that a Grade 7/Grade 8
Technology and Livelihood Education ( TLE) student like you ought to possess, namely:
1) Use of sewing tools;
2) Carry out measurements and calculations;
3) Create design for simple project;
4) Perform basic maintenance, and
5) Practice occupational safety and health
These 5 common competencies are covered separately in 5 Lessons. As shown below, each
Lesson is directed to the attainment of one or more learning outcomes:
Lesson 1 – Use of sewing tools
Learning Outcomes (LO) 1 Identify sewing tools and equipment and their uses
Lesson 2 –Carry out measurements and calculations
Learning Outcomes (LO) 1 Obtain measurements
Learning Outcomes (LO) 2 Perform simple calculations
Learning Outcomes (LO) 3 Estimate appropriate quantities
Lesson 3 –Create design for simple project
Learning Outcomes (LO) 1 Sketch simple project design
Learning Outcomes (LO) 2 Produce simple project
Lesson 4 –Perform basic maintenance
Learning Outcomes (LO) 1 Operate machine and assess its performance
Learning Outcomes (LO) 2 Clean and lubricate machine
Lesson 5 –Practice Occupational Safety and Health
Learning Outcomes (LO) 1 Identify and evaluate hazards and risks
Learning Outcomes (LO) 2 Control hazards and Risks
1NATIONAL CERTIFICATE (NC) is a certification issued to individuals who achieved all the required units of competency for a national
qualification as defined under the Training Regulations. NCs are aligned to specific levels within the PTQF. (TESDA Board Resolution
No. 2004-13, Training Regulations Framework)
NATIONAL CERTIFICATE LEVEL refers to the four (4) qualification levels defined in the Philippine TVET Qualifications Framework
(PTQF) Where the worker in:
a. NC I performs a routine and predictable tasks; has little judgment; and, works under supervision;
b. NC II performs prescribe range of functions involving known routines and procedures; has limited choice and complexity of
functions, and has little accountability;
What Is This Module About?
4. K to 12 Basic Education Curriculum 3
Technology and Livelihood Education – Dressmaking/Tailoring
This Module has 5 Lessons. Each Lesson has the following:
Learning Outcomes
Performance Standards
Materials/Resources
Definition of Terms
What Do You Already Know?
What Do You Need to Know?
How Much Have You Learned?
How Do You Apply What You Learned?
How Well Did You Perform? ( Scoring Rubric )
What is your Score?
How Do You Extend Your Learning?
References
To get the most from this Module, you need to do the following:
1. Begin by reading and understanding the Learning Outcome/s and Performance
Standards. These tell you what you should know and be able to do at the end of this
Module.
2. Find out what you already know by taking the Pretest then check your answer
against the Answer Key. If you get 99 to 100% of the items correctly, you may
proceed to the next Lesson. This means that you need not go through the Lesson
because you already know what it is about. If you failed to get 99 to 100% correctly,
go through the Lesson again and review especially those items which you failed to
get.
Do the required Learning Activities. They begin with one or more Information
Sheets. An Information Sheet contains important notes or basic information that you
need to know. After reading the Information Sheet, test yourself on how much you
learned by means of the Self-check. Refer to the Answer Key for correction. Do not
hesitate to go back to the Information Sheet when you do not get all test items
correctly. This will ensure your mastery of basic information.
3. It is not enough that you acquire content or information. You must be able to
demonstrate what you learned by doing what the Activity / Operation /Job Sheet
directs you to do. In other words, you must be able to apply what you have learned in
real life.
4. How well did you perform? Accomplish the Scoring Rubrics.
Each Lesson also provides you with references and definition of key terms for your guide.
They can be of great help. Use them fully
If you have questions, don’t hesitate to ask your teacher for assistance.
How Do You Use This Module?
5. K to 12 Basic Education Curriculum 4
Technology and Livelihood Education – Dressmaking/Tailoring
Use of Sewing Tools
LESSON 1
LO 1. Identify sewing tools and equipment are identified
LEARNING OUTCOMES:
At the end of this Lesson, you are expected to do
the following:
6. K to 12 Basic Education Curriculum 5
Technology and Livelihood Education – Dressmaking/Tailoring
Altering - changing portion of a garment so that it fits the body.
Cutting tools - a cutting implement; a tool for cutting.
Fabric - the cloth used in making garments.
Measuring tools - an instruments used for obtaining quantities, dimensions or forces of
real world objects.
Sewing Machine - a textile machine used to stitch fabric, cards and other material
with thread.
Sewing Tools - instruments that aid in accomplishing a sewing task
Definition of Terms
7. K to 12 Basic Education Curriculum 6
Technology and Livelihood Education – Dressmaking/Tailoring
Measuring Tools
Cutting Tools
Pinning Tools
Marking Tools
Sewing Machines
Fabrics
Thread
Materials
Identify sewing tools and equipment and their uses
LEARNING OUTCOME 1
Sewing tools and equipment are identified
Types of sewing machines are classified and their uses are
identified
PERFORMANCE STANDARDS
8. K to 12 Basic Education Curriculum 7
Technology and Livelihood Education – Dressmaking/Tailoring
Direction: Read each item carefully and choose the letter of the best answer from the
choices below. Write your answer in your quiz notebook.
1. A machine that is run by foot which may also be converted to electric power machine is
known as __________.
a. hemmer machine b. high speed over edger
c. lockstitch machine d. over edging machine
2. The mechanism that sets the sewing machine in motion.
a. balance wheel b. belt
c. feed dog d. stitch regulator
3. The part of the sewing machine that controls the looseness and tightness of Stitches.
a. bobbin b. thread guide
c. presser foot d. upper tension
4. The appropriate cutting tool used in cutting fabrics.
a. Trimming shears b. Pinking shears
c. Dressmaker bent handled shears d. buttonhole scissors
5. A flexible tape with different type of measurements essential for taking body
measurements.
a. ruler b. tape measure
c. yard stick d. hem gauge
6. It measures 12 -18 inches and can be used for drawing straight lines and cutting lines
a. yardstick b. button hole scissor
c. ruler d. French curve
7. This is used to shape the depth of the neckhole and arrmhole of the pattern.
a. French curve b. ruler
c. tape measure d. trimming scissor
8. This is also called “Domestic Sewing Machine”.
a. Lockstitch sewing machine b. Double needle sewing machine
c.. Hi-speed sewing machined. d. Button holer machine
9. A small hard pitted cup worn for protection on the finger that pushes the needle
in sewing.
a. thimble b. sewing gauge
c. seam ripper d. fabric
10. This is used in reinforcing the opening and closing of pockets
a. Bartacking machine b. Embroidery machine
c. Hi-speed locked machine d. Sewing machine
What Do You Already Know?
Let us determine how much you already know about the use of sewing tools and
equipment. Take this test.
Pretest LO 1
9. K to 12 Basic Education Curriculum 8
Technology and Livelihood Education – Dressmaking/Tailoring
Sewing Tools and Equipment
Sewing equipment different tools are used in
garment construction. The skillful use of the different
sewing equipment will help take body measurement and
drafting pattern with accuracy and speed.
Success in sewing calls for the right tools at the
right time. All tools must be appropriate in a proper
order and one must know how to use them to save time
and produce the best result.
This lesson will provide knowledge and skills of the different tools and equipment
which are necessary in sewing. A complete set of sewing tools and equipment are presented
to help the students work faster.
MEASURING TOOLS
Tape Measure
A flexible measuring device used in taking body measurements.
The front has the measurement of 150 centimeters and 60 inches on
the other side. Fiberglass tape is commonly used by dressmakers.
Sewing Gauge
A small ruler with a sliding guide and is about six inches long. This
gauge is used for measurements at hem lines, button holes and areas
where other small measurements require checking, such as pleats and
tucks. The gauge is usually made of metal or plastic.
Rulers
A ruler measuring 12 inches or even 18 inches, either clear or
solid. It is a useful tool to have for measuring and drawing straight seam
lines and cutting lines. It also aids in connecting lines. A clear ruler is
also a good tool for marking buttonholes.
What Do You Need To Know?
Read the Information Sheet 1.1 very well then find out how much you can
remember and how much you learned by doing Self-check 1.1.
Information Sheet 1.1
10. K to 12 Basic Education Curriculum 9
Technology and Livelihood Education – Dressmaking/Tailoring
Yardstick
A yardstick is made of smooth, shellacked hardwood or
metal. It is used for marking hemlines and checking grainlines when
laying out the pattern.
L-square
The tailor square or "L" is used to transfer measurements to
the draft pattern. It also divides the garment into the desired
measurement. It has perfect squares and is useful in making straight
lines and numbers. It can also function as a tape
measure.
It has two arms connected perpendicularly.
a.The longer arm is twenty-four (24) inches long.
b. The shorter arm is fourteen (14) inches long.
French Curve
This is used to shape the depth of the neckhole and
armhole of the pattern.
CUTTING TOOLS
Cutting tools are instruments that serve well if properly maintained. Sharp cutting
tools make clean cuts and well-defined notches and they do not damage fabric. On the other
hand, dull tools slow the cutting process, and make your hand and wrist tire easily. Sewing
cutting tools should not be used for other household task. Cutting tools must be sharpened
regularly and the joints are oiled occasionally for better use.
Bent-handled dressmaker’s shears
These are made of quality steel and hold a sharp cutting edge.
The blades move easily and cut smoothly along the entire length and
the points should come together. Shears have the length of 7- 12
inches and are satisfactory for most apparel fabrics.
a. All steels, chrome-plated shears are for heavy duty cutting
b. Stainless steel blades and plastic handles are fine for lightweight
fabrics
c. A serrated edge shears give maximum cutting control and
is used for synthetic fibers and slippery knits
Pinking Shears
This is popular in zigzagging or scalloped edge or
for seam finishes. This is used to finish seams and raw
edges and to create decorative edges on many types of
fabric. It cuts a ravel-resistant edge. This is not satisfactory
11. K to 12 Basic Education Curriculum 10
Technology and Livelihood Education – Dressmaking/Tailoring
for straight cutting.
Cutting scissors
a. Trimming scissor
It is 3-4 inches long. It is used for trimmings, clipping threads
and snipping slashes.
b. Embroidery scissor
It has 4-5 inches finely tapered blades. Both points are sharp for
use in working with fine details in delicate fabrics and in
embroidery work.
c. Buttonhole scissor
This is intended for making buttonholes.
Thread Clippers
Thread clippers are a handy little spring loaded cutting tool
that allows for the snipping of threads. These clippers are
specifically used to snip threads and they are not designed to
cut fabric.
Seam Ripper
Seam rippers are specifically designed for ripping
out stitches from seams, either as a result of an error or
during alterations. They should be used carefully to prevent
damage to the fabric.
Rotary Cutter and Mat
It is an adaptation of the giant rotary cutter used
by the garment industry. It works like a pizza cutter and
can be used by left or right-handed sewers. The rotary
cutter is available in different sizes with different blades.
When using a rotary cutter, work on a cutting mat to
protect the blade and the cutting surface.
12. K to 12 Basic Education Curriculum 11
Technology and Livelihood Education – Dressmaking/Tailoring
MARKING TOOLS
Marking tools are required for transferring pattern
markings to garment fabric pieces and for making
alterations on garments.
Chalk Pencils/Dressmaker pencil
This is available in white or pastel shades.
This chalk pencil is used to make fine lines on fabric.
It has an erasing brush at one end.
Liquid Marking Pen
Liquid marking pens come in two types. There
is one that washes out and one that fades after 48 hours.
Those that wash out should not be used on fabric
that show water marks. The mark should be removed
before pressing the fabric.
Tailor’s Chalk
This is essential as a marker for use on materials.
Tailor’s chalk is available in a range of colors and is
Removed by brushing.
Wax chalk
This is available in black or white and is used
for woolen fabrics. Wax can be removed by pressing.
Tracing Wheel
There are two types of tracing wheels, those with a serrated edge
and those with a smooth edge. The serrated edge wheel produces dots on
the fabric and is suitable for most types of fabrics. The smooth edge wheel
is best for delicate fabrics and unlike the serrated edge will not pierce more
delicate fabrics. The smooth edge wheel creates a solid line.
Dressmaker’s Carbon Paper
Dressmaker’s carbon paper also called dressmaker’s tracing
paper is a specially waxed carbon paper that transfer’s the tracing
wheel’s markings to the fabric. A color of tracing paper should be
chosen that is close to the color of the fabric. Different brands of
13. K to 12 Basic Education Curriculum 12
Technology and Livelihood Education – Dressmaking/Tailoring
tracing paper have different instructions; therefore, the instructions for the particular brand
that is purchased should be followed.
PINNING AND SEWING TOOL
Pincushion
A pincushion holds the straight pins and needles while
working to prevent accidents.
Hand Needle
Used in making temporary stitches and buttonholes.
Sizes of 7 to 10 are for general hand sewing.
Sewing Needle Threader
It aids in putting the thread to the needle. It consists of two
parts. The handle and the wire. The end of the wire that is away from
the holder is folded. Place the folded wire of the needle threader
through the eye of the sewing needle.
Thimble
A small hard pitted cup worn for protection on the finger that
pushes the needle in sewing.
MATERIALS
Fabric
The Fabric is the cloth used in making garments. The plain
cotton fabrics, flour sack or catcha is the most appropriate material
for beginners because these are very easy to handle.
Thread
The thread is used in assembling or constructing the parts
of the garment. Threads vary in sizes. Heavy fabrics need stronger
threads. Threads should have the same color with that of the fabric
used.
14. K to 12 Basic Education Curriculum 13
Technology and Livelihood Education – Dressmaking/Tailoring
Types of Sewing Machines
Well-selected sewing machine is essential for achieving good results. It should be
used correctly in accordance with the job requirements.
1. Lockstitch Sewing Machine. This is usually used in homes and
sometimes in school. This is also called “Domestic Sewing Machine”.
It is run by foot and may also be converted to electric power
machine.
2. Hi-Speed Lockstitch Sewing Machine. This is
sometimes called „straight stitching machine” or
industrial sewing machine. It has automatic
lubrication and is used by tailors and
dressmakers.
3. Over Edging Machine. Other companies call it
“small machine”. It finishes the raw edges of the
pattern for construction.
4. Embroidery Machine. This is used in making
fancy stitches and in making different kinds of
embroidery stitches on fabrics for the Barong
Tagalog, pillow cases, linen, and other novelty
items.
5. Button Holer Machine. This is used in
making buttonholes on garments.
6. Button Attachment Machine. This is used in
attaching buttons to the garments.
15. K to 12 Basic Education Curriculum 14
Technology and Livelihood Education – Dressmaking/Tailoring
7. Double Needle Machine. This is used in the
construction of the different kinds of clothing
especially for the inseam, outseam and side
seam.
8. Bartacking Machine. This is used in
reinforcing the opening and closing of pockets
Two Major Parts of the Lockstitch Sewing Machine
The two major parts of the lock stitch sewing machine are
the upper and lower parts.
The Upper Parts is composed of:
1. Head is the complete sewing machine without a
cabinet or stand.
2. Arm is the curve part of the head containing
mechanism for operating the needle.
3. Bed is the flat portion of the machine and beneath is
the feed dog where it is mounted, and the shuttle and
lower thread are placed.
Parts of the Sewing Machine in the Arm
1. Spool Pin is the thread holder.
2. Thread Guide keeps the thread in position.
3. Thread Take up Lever releases the thread and interlocks with the bobbin thread.
4. Presser bar lifter moves the presser foot.
5. Tension controls the looseness and tightness of stitches.
6. Needle Bar holds the needle in place.
7. Needle Clamp holds and tightens the needle.
8. Presser Foot holds the fabric in place while sewing.
9. Needle is a slender tool attached in the needle clamp used for sewing.
10. Bobbin Winder controls the bobbin while winding thread.
11. Stitch regulator checks the length of the stitches.
12. Balance Wheel sets the mechanism in motion.
13. Belt connects the balance wheel to the drive wheel.
14. Stop Motion Screw hinders moving when loosened and starts
16. K to 12 Basic Education Curriculum 15
Technology and Livelihood Education – Dressmaking/Tailoring
Parts of Sewing Machine under the Bed
1. Feed Dog moves the fabric while sewing.
2. Throat plate is the windows of the feed dog
and it is
where the bobbin threads come out.
4.Slide plate is a movable plate that covers the
shuttle
and bobbin case.
4. Shuttle holds the bobbin case while sewing.
5. Bobbin is a metal spool for winding thread.
6. Bobbin Case holds the bobbin.
17. K to 12 Basic Education Curriculum 16
Technology and Livelihood Education – Dressmaking/Tailoring
The Lower Parts of the Lock Stitch Sewing Machine
The lower parts of the sewing machine are the cabinet and the stand. The cabinet has
drawers and screw on the hinges for the attachment of the head.
The following are the lower parts of the sewing machine and their uses:
1. Band Wheel leads the balance wheel through the belt connection.
2. Band Wheel Crank moves the band wheel.
3. Pitman Rod holds the treadle to band wheel crank.
4. Belt Guide holds the belt to its place.
5. Belt Shifter removes the belt from the wheel.
6. Dress Guard protects the dress from the wheel.
7. Treadle is where the feet are stationed to drive the band wheel through the pitman rod.
8. Legs support the cabinet of the machine.
9. Cabinet holds the head of the machine by interlocking screw on the hinges.
18. K to 12 Basic Education Curriculum 17
Technology and Livelihood Education – Dressmaking/Tailoring
Directions: Identify the parts of the lockstitch sewing machine. Write your answer in your
quiz notebook.
How Much Have You Learned?
Refer to the Answer Key. What is your score?
Self-Check 1.1
19. K to 12 Basic Education Curriculum 18
Technology and Livelihood Education – Dressmaking/Tailoring
Directions: Draw the following tools in your lecture notebook.
1. Measuring Tools
2. Marking Tools
3. Cutting Tools
4. Drafting Tools
5. Pinning Tools
Points Criteria
10
8
6
4
All tools were properly drawn and labeled correctly.
Almost all of the tools were properly drawn and labeled correctly
Some of the items were properly drawn and labeled correctly
Most of the items were improperly drawn and labeled incorrectly.
Show that you learned something by doing this activity
How Well Did You Perform?
Find out by accomplishing the Scoring Rubric honestly and sincerely. Remember it is
your learning at stake!
HowDo YouApplyWhatYou HaveLearned?
Activity Sheet 1.1
20. K to 12 Basic Education Curriculum 19
Technology and Livelihood Education – Dressmaking/Tailoring
After learning the tools and equipment in sewing, produce a sewing kit
with the following:
Create a Sewing Kit
A. Measuring tools
French curve
Ruler
Tape measure
B. Cutting Tools
Shears
Pinking shears
Scissors
Ripping or thread clip scissors
Trimming Scissors
Ripper
C. Marking Tools
Tailor Chalk
Pencil with eraser
Tracing wheel
Tracing Paper
Thread
Pins
D. Drafting Tools
Pattern paper
Measuring and shaping tools
E. Pinning and Sewing Tools
Pins
Weights
Hand Needle
Thimble
Pin Cushion
Points Criteria
10 20-22 tools inside the sewing kit.
8 15-19 tools inside the sewing kit.
6 10-14 tools inside the sewing kit.
4 5-9 tools inside the sewing kit.
2 1-4 tools inside the sewing kit.
How Well Did You Perform?
Find out by accomplishing the Scoring Rubric honestly and sincerely. Remember it is
your learning at stake!
Activity Sheet 1.2
21. K to 12 Basic Education Curriculum 20
Technology and Livelihood Education – Dressmaking/Tailoring
Objective: Identify and use sewing tools properly.
Materials, Tools and Equipment
Pattern Paper Marking tools
Measuring tools Drafting tools
Cutting tools Pinning and Sewing tools
Task I
Procedure:
Your teacher will choose three (3) of the following tools:
a. measuring tools
b. marking tools,
c. cutting tools
d .drafting tools
e. pinning tools
You will be asked to identify the uses and characteristics of each tool and
demonstrate how to use them properly.
Your teacher will put a check (/) in the appropriate column if you have clearly
identified and used the tools properly.
Sewing Tools Uses Characteristics Tools Used Properly
A. Measuring Tools
1.
2.
3.
B. Marking Tools
1.
2.
3.
C. Cutting Tools
1.
2.
3.
D. Drafting Tools
1.
2.
3.
E. Pinning Tools
1.
2.
3.
Activity Sheet 1.3
22. K to 12 Basic Education Curriculum 21
Technology and Livelihood Education – Dressmaking/Tailoring
Points Criteria
10
8
6
4
All tools were properly identified and used properly.
Almost all of the tools were properly identified and used properly
Some of the items were properly identified and used properly
Most of the items were improperly identified and used.
Objective: Obtain sewing materials appropriate for beginners.
Visit 2 or more dress shops near your place. Ask for swatches
of fabrics appropriate for beginners like you. Examine, analyze
and classify the textures and quality of different fabrics. Make a table of
comparison and submit it to your teacher.
Put a check (√) after each item Yes No
1. Did I visit 2 or more dress shops in the place?
2. Did I list down the different kinds of fabrics they are
using?
3. Did I classify the different fabrics?
4. Was I able to get swatches of different fabrics for samples?
5. Did I make the necessary examination on the fabrics,
write it down, and submit my report to my teacher?
How Well Did You Perform?
Find out by accomplishing the Scoring Rubric honestly and sincerely. Remember it is
your learning at stake!
How Do You Extend Your Learning?
23. K to 12 Basic Education Curriculum 22
Technology and Livelihood Education – Dressmaking/Tailoring
Hilario, Carmelita B for Clothing Technology Made Easy with Lesson Plan. Valenzuela City
Philippines. 24K Printing Co., Inc.,2001
Competency- Based Learning Material, 4th
Year
Complete Guide to Sewing. www.sewing guide.com
REFERENCES
Congratulations! You did a great job! Rest
and relax a while then move on to the next
lesson. Good luck!
24. K to 12 Basic Education Curriculum 23
Technology and Livelihood Education – Dressmaking/Tailoring
Carry out measurements and calculations
LESSON 2
LO 1. Obtain measurements;
LO 2. Perform simple calculations; and
LO 3. Estimate appropriate quantities.
LEARNING OUTCOMES:
At the end of this Lesson you are expected to do the
following:
25. K to 12 Basic Education Curriculum 24
Technology and Livelihood Education – Dressmaking/Tailoring
Accuracy – the exactness of a measured distance or circumference
Calculation – the process or an act of calculating
Calculator – an electronic device used for speed computation
Conversion – a change of figures like changing from centimeters to inches and vice
versa
Cost – the amount paid or charge for something that is acquired
English System – the English system has inches for its basic unit
Grain – the direction of fabric threads
Hemline – the marked line at the bottom of the garment where the hem is turned
IMC – Individual Measurement Chart
Length – the longer or longest dimension of an object to measure
Measurement – a systematic procedure of determining the quantity or extent of the
entire measurable dimension
Metric System – a decimal system of physical units based on a unit of length known as
the meter (Greek metron, “measure”)
Pattern – a piece of paper usually one-half of the body parts used as a guide in cutting
the garments
Width – measurement taken at the shortest dimension of the object to measure
Definition of Terms
26. K to 12 Basic Education Curriculum 25
Technology and Livelihood Education – Dressmaking/Tailoring
- Model
- Tape measure
- Sewing gauge
- Ruler
- French curve
Materials
Obtain measurements
LEARNING OUTCOME 1
Parts of the body are measured
Appropriate measuring tools are selected for job.
Reading of measurements is practiced with accuracy.
Accurate measurements are obtained.
PERFORMANCE STANDARDS
27. K to 12 Basic Education Curriculum 26
Technology and Livelihood Education – Dressmaking/Tailoring
1. The foundation of pattern drafting is:
a. Mensuration
b. Measurement
c. Body Parts
d. English System
2. This measurement is taken from the left of the figure to the right
a. Horizontal measurement
b. Vertical measurement
c. Circumferential measurement
d. None of the above
3. Which of the following is used as a set of standard in measurement
a. Metric System
b. English System
c. Metric and English System
d. Tape Measure
4. This kind of measurement is taken around the body
a. Vertical
b. Circumferential
c. Horizontal
d. English system
5. A 60” long tape with metal tips, made of a material that will not stretch
a. Yardstick
b. Ruler
c. Tape Measure
d. T-square
6. It measures around the torso directly under the bustline
a. Bust to bust b. Waist
c. Lower bust d. Bust
7. It measures from under the arm. Start at the armpit to the wrist.
a. Armpit b. Hips c. Underarm d. shoulder
8. Measure around the shoulder under the armpit.
a. Sleevehole b. Bust c. Waist d. torso
9. The ______measurement is taken from the left of the figure to the right
a. Vertical b. Horizontal
b. Circumferential d. Curved
10. Circumferential measurement is taken around the body.
a. True b. false c. maybe d. Yes
What Do You Already Know?
Let us determine how much you already know about carrying out measurements
and calculations. Take this test.
Pretest LO 1
28. K to 12 Basic Education Curriculum 27
Technology and Livelihood Education – Dressmaking/Tailoring
Parts of body to be measured can be taken in:
Horizontal measurement
Vertical measurement
Circumferential measurement
1. The horizontal measurement is taken from the left of the figure to the right.
2. The vertical measurement is taken from the top of the body figure to its base.
3. Circumferential measurement is taken around the body.
What Do You Need To Know?
Read the Information Sheet 1.1 very well then find out how much you can
remember and how much you learned by doing Self-check 1.1.
Information Sheet 1.1
29. K to 12 Basic Education Curriculum 28
Technology and Livelihood Education – Dressmaking/Tailoring
Neck - Loosely measure around the circumference at the base of your neck.
Bust - Lift your arms to the side.
Measure around your body crossing over the fullest part of
your bust. (The tape measure must run directly over your
nipples and across your shoulder blades on your back).
Bust to Bust - Measure from your one nipple to your other
nipple.
Upper Bust - Measure around the torso directly above the
bust line. From armhole to armhole +- 8cm down from neck.
Lower Bust - Measure around the torso directly under the
bustline.
Waist - Measure around the waist at the narrowest natural
waistline point, allowing 2 fingers between your waist and tape
measure.
Hips - Measure around the fullest part of your hips. As a guide,
this is often 20cm below your natural waistline. Stand with your
knees together.
Shoulder to Bust - Measure from tip of the shoulder to the
centre of bust (nipple).
Front Shoulder to Waist - Measure from tip of shoulder over
bust to natural waistline.
Shoulder to Shoulder - Measure across the back of neck
from socket of one shoulder to socket of the other shoulder.
Shoulder to Neck - Measure from base of neck along top of
shoulder to the shoulder socket.
Down Center Back - Measure from nape of neck to natural
waist.
30. K to 12 Basic Education Curriculum 29
Technology and Livelihood Education – Dressmaking/Tailoring
Back Shoulder to Waist - Measure from tip of shoulder to
natural waist line.
Across Back - Measure from armhole across back to armhole
positioning tape measure + - 8cm down from nape of neck.
Full Back - Measure from side seam, under armpits to side
seam across back, positioning tape measure +- 4cm down
under armpit.
Sleeve Hole - Measure around the shoulder under the armpit.
Bicep - Measure around the fullest part of the upper arm.
Elbow - Do a fairly loose measurement around the bent elbow.
Under Arm - Measure from under the arm. Start at the armpit
to the wrist.
Over Arm - Measure from outer shoulder socket on outside of
arm, with a bent arm, to the wrist.
Side Seam - Measure from under armpit to natural waistline
down.
Upper Arm – Measure from the outer shoulder socket on
outside of arm to crook of elbow.
31. K to 12 Basic Education Curriculum 30
Technology and Livelihood Education – Dressmaking/Tailoring
MEN’S APPAREL
(Measurement)
A. Vertical Measurement
Shirt length - taken from the nape down the center
back to the desired length.
Sleeve length - taken from the shoulder tip point
down to the desired sleeve length.
Length of pants or shorts – measures along the
side below the waist band to the desired length of the pants.
Crotch or Rise – measured by placing
a ruler under the crotch then measuring
below the waistband down to the top of
the level of the ruler.
32. K to 12 Basic Education Curriculum 31
Technology and Livelihood Education – Dressmaking/Tailoring
B. Horizontal Measurements
Shoulder - taken from one shoulder point to the
other.
Bust/Breast - taken around the body with the tape
measure passing over the fullest
part of the shoulder blade at the
back and over to the apex.
Upper arm girth - taken around the fullest part of
the arm in line with the armpit.
Lower arm girth or sleeve width - taken around the
arm two to three inches below the
armpit.
Neck measure – taken around the neckline.
33. K to 12 Basic Education Curriculum 32
Technology and Livelihood Education – Dressmaking/Tailoring
Waist (w) - taken around the smallest
part of the waistline. Insert two fingers
under the tape measure for ease
or allowance.
Hip or seat (H) - taken around the
fullest part of the hip (buttocks)
with two fingers inserted
under the tape measure.
Desired Bottom or Hem Circumference
or leg hole – taken around the fullest
part of the bottom.
C. Vertical Measurement
Shirt length - taken from the nape down the center
back to the desired length.
Sleeve length - taken from the shoulder tip point
down to the desired sleeve length.
34. K to 12 Basic Education Curriculum 33
Technology and Livelihood Education – Dressmaking/Tailoring
Length of pants or shorts–
measured along the side below the waist
band to the desired length of the pants.
Crotch or Rise – measured by placing
a ruler under the crotch then measuring
below the waistband down to the top of
the level of the ruler.
D. Horizontal Measurements
Shoulder - taken from one shoulder point to the
other.
35. K to 12 Basic Education Curriculum 34
Technology and Livelihood Education – Dressmaking/Tailoring
Bust/Breast - taken around the body with the tape
measure passing over the fullest
part of the shoulder blade at the
back and over to the apex.
Upper arm girth - taken around the fullest part of
the arm in line with the armpit.
Lower arm girth or sleeve width - taken around the
arm two to three inches below the
armpit.
Neck measure – taken around the neckline.
Waist (w) - taken around the smallest
part of the waistline. Insert two fingers
under the tape measure for ease
or allowance.
Hip or seat (H) - taken around the
fullest part of the hip (buttocks)
with two fingers inserted
under the tape measure.
Desired Bottom or Hem Circumference
or leg hole – taken around the fullest
part of the bottom.
36. K to 12 Basic Education Curriculum 35
Technology and Livelihood Education – Dressmaking/Tailoring
A. Choose the letter of the correct answer. Write your answers in your quiz
Notebook.
1. The system where the unit of measurement is centimeter
a. Metric System
b. English System
c. SI Measurement System
d. Decimal System
2. It measures across the back of neck from socket of one shoulder to socket of the
other shoulder
a. Shoulder
b. Shoulder to Shoulder
c. Shoulder to Neck
d. Shoulder to Back
3. Measure around your body crossing over the fullest part of your bust.
a. Waist
b. Bust
c. Upper Bust
d. Arm Hole
4. A 60” long tape. One side has inches one is metric with crotch piece or without
crotch piece.
a. Tailors Square or L-Square
b Use Dressmakers Ruler
c. Tape Measure
d. Meter Stick
5. It is used on lapel, pants and skirt contours calibrated on both sides.
a. Tape Measure
b. Aluminum Tailors Curve
c Tailors Square or L-Square
d. Use Dressmakers Ruler
B. Fill in each blank to complete each statement.
1. Shirt length is taken from the nape down the center back to the_______.
2. _____ taken around the body with the tape measure passing over the fullest part of
the _____ at the back and over to the apex.
3. Upper _____ is taken around the fullest part of the arm in line with the armpit.
4. ______ is taken around the fullest part of the bottom.
5. Hip or _____ taken around the fullest part of the hip (buttocks) with two fingers
inserted under the tape measure.
How Much Have You Learned?
Refer to the Answer Key. What is your score?
Self-Check 1.1
37. K to 12 Basic Education Curriculum 36
Technology and Livelihood Education – Dressmaking/Tailoring
Objective: Students will be able answer the questions based on their knowledge about
obtaining measurements and advanced study in basic calculations in
dressmaking.
Instruction: Answer the following questions briefly.
1. Which measuring device is used to take the circumference of the body?
___________________________________________________________________
_______________________________________________________________
2. What are the types of measurements?
___________________________________________________________________
_______________________________________________________________
3. What are the tools used in obtaining measurements?
___________________________________________________________________
_______________________________________________________________
4. How will you convert inches length of fabric into centimeters.
___________________________________________________________________
_______________________________________________________________
5. What are the four fundamental of operations?
___________________________________________________________________
_______________________________________________________________
Objective: Students will be able to get their measurement thru a paired activity using
English and Metric System
Materials, Tools and Equipment: Measuring Tools
Procedure: Record all your measurements according to the following system.
Show that you learned something by doing this activity
How Do You Extend Your Learning?
HowDo YouApplyWhatYou HaveLearned?
Activity Sheet 1.1
38. K to 12 Basic Education Curriculum 37
Technology and Livelihood Education – Dressmaking/Tailoring
My Measurements
NAME ___________________________
MEASUREMENT ENGLISH SYSTEM METRIC SYSTEM
Bust
Lower Bust
Shoulder to Bust
Front Shoulder to Waist
Waist
Shoulder to Shoulder
Across Back
Bicep
Elbow
Over Arm
Waist Circumference
Hip Circumference
Bottom Circumference
Crotch
Length of shorts
Objective:
At the end of this practice, the learner/trainee should be able to:
1. measure the length and the width of a cloth for table napkin
2. sew simple table napkin
Materials
• Fabric
• Pins
• Thread
Tools
• Tape measure
• Scissor
Equipment
• Sewing machine
Instructions:
Choose the perfect fabric.
I suggest using linen (perfect for a more formal table), cotton, or a blend of the two. Synthetic
fibers, like polyester, make ironing easier, but it’s very hard to remove stains from poly and
poly blends—and napkins will definitely get stains. For more casual napkins, check out your
Operation Sheet 1.1
39. K to 12 Basic Education Curriculum 38
Technology and Livelihood Education – Dressmaking/Tailoring
local quilt shop for some great cotton holiday prints. You can skip the embellishment with a
print, but a mitered hem is a great finishing touch on both solid and printed fabric.
Cut accurately.
1. Determine the size of the finished napkins. Measure some you have that seem just right
or use the dimensions I used for my cocktail and dinner napkins: The cocktail napkins are 9
inches x 9 inches finished and the generous dinner napkins are 21 inches x 21 inches
finished.
2. It’s important that you start by finding the exact grain on the fabric. Do this by pulling a
thread across the width at one end or square up a line from the selvage. Tearing across the
width of cotton fabric will also give the straight grain.
3. Cut a square for each napkin, using the established grainline as a guide, that’s 1 inch
larger on each edge than the finished napkin size. (For a 9-inch cocktail napkin, cut an 11-
inch square). To form the hem, turn in and press 1 inch all around. Then press under 1/4
inch on each edge.
Turn in a 1-inch hem,
then turn in the raw
edge 1/4 inch.
Miter the corners.
1. Mark the point where the inner folded edges intersect with two pins.
With two pins, mark
the point where the
hem edges intersect
at the inside corner.
2.Open the hem, keeping the 1/4-inch fold in place, and turn right sides together, matching
pin marks.
40. K to 12 Basic Education Curriculum 39
Technology and Livelihood Education – Dressmaking/Tailoring
3.Mark a line from the outside corner of the hem to the pins (the inside corner) and pin the
two layers together.
Draw a line from the
outside corner to the
inside corner (the
point where the hem
edges intersect).
4. Stitch diagonally along the marked line.
Sew along the line.
5. Turn the corner to the right side to check that the miter fits.
Always check to be
sure the miter is just
right before trimming
away the excess
fabric.
41. K to 12 Basic Education Curriculum 40
Technology and Livelihood Education – Dressmaking/Tailoring
6. Turn inside out again, then trim away the excess fabric, making a 1/4-inch seam
allowance.
Trim the seam
allowance to 1/4
inch.
7. Press this seam open. Turn right side out and press.
Press the seam
open. (This is the
perfect time to use a
point presser and
pounding block that I
wrote about last
week).
8. Sew the hem in place along the inner fold and admire your miter!
42. K to 12 Basic Education Curriculum 41
Technology and Livelihood Education – Dressmaking/Tailoring
Excellent
5
Very
Satisfactory
3
Satisfactory
1
Score
Use appropriate
Fabric
Manipulated Tools and
Equipment
Work Habits
Finished w/in the time
target
TOTAL
How Well Did You Perform?
Find out by accomplishing the Scoring Rubric honestly and sincerely. Remember it is
your learning at stake!
43. K to 12 Basic Education Curriculum 42
Technology and Livelihood Education – Dressmaking/Tailoring
- Conversion Chart
- Calculator
- Paper and Pencil
Materials
Perform simple calculations
LEARNING OUTCOME 2
English and Metric systems of measurement are identified and applied.
Simple calculations are performed based on the job requirement.
Reading of measurements is practiced with accuracy.
PERFORMANCE STANDARDS
44. K to 12 Basic Education Curriculum 43
Technology and Livelihood Education – Dressmaking/Tailoring
A. Read each question carefully and choose your answer.
1. An electronic device used for speed computation
a. Computer b. Calculator c. Cellphone d. Camera
2. The amount paid or charge for something that is acquired
a. Cost c. Computation c. Payment d. Total Cost
3. A change of figures like changing from centimeters to inches and vice versa
a. Calculate b. Converted c. Conversion d. Computation
4. How many centimeters are there in one inch?
a. 1.905 Centimeters b. 2.54 Centimeters
c. 3.81 Centimeters d. 5.08 Centimeters
5. How many yards are there in 4.572 meters?
a. 2 Yards b. 3 Yards c. 4 Yards d. 5 Yards
B. Convert the following:
6. 5 inches = ___ centimeters
7. 0.25 centimeters = ___ inch
8. 9 inches = ___centimeters
9. 0.9144 meters = ___ yards
10. 5 yards = ___meters
What Do You Already Know?
Let us determine how much you already know about the use farm tools and
equipment. Take this test.
Pretest LO 2
45. K to 12 Basic Education Curriculum 44
Technology and Livelihood Education – Dressmaking/Tailoring
METRIC CONVERSION CHART
Simple calculation is an easy mathematical application used to determine the
accurate measurement of body parts, length and width of materials and cost needed to
create an apparel.
This is the process in which the four fundamental of operations (MDAS) is involved.
Length and Width of Materials
In measuring the length and width of materials needed such as fabrics, we also need
the use of the Metric measurement system.
Metric Conversion Chart for Fabric and Sewing
1/4 Inch = 0.25 Centimeters
1/2 Inch = 1.27 Centimeters
5/8 Inch = 1.59 Centimeters
3/4 Inch = 1.905 Centimeters
1 Inch = 2.54 Centimeters
1.5 Inches = 3.81 Centimeters
2 Inches = 5.08 Centimeters
2.5 Inches = 6.35 Centimeters
3 Inches = 7.62 Centimeters
3.5 Inches = 8.89 Centimeters
4 Inches = 10.16 Centimeters
4.5 Inches = 11.43 Centimeters
5 Inches = 12.7 Centimeters
5.5 Inches = 13.97 Centimeters
6 Inches = 15.24 Centimeters
6.5 Inches = 16.51 Centimeters
7 Inches = 17.78 Centimeters
7.5 Inches = 19.05 Centimeters
8 Inches = 20.32 Centimeters
8.5 Inches = 21.59 Centimeters
9 Inches = 22.86 Centimeters
9.5 Inches = 24.13 Centimeters
10 Inches = 25.4 Centimeters
10.5 Inches = 26.67 Centimeters
11 Inches = 27.94 Centimeters
What Do You Need To Know?
Read the Information Sheet 2.1 very well then find out how much you can
remember and how much you learned by doing Self-check 2.1.
Information Sheet 2.1
46. K to 12 Basic Education Curriculum 45
Technology and Livelihood Education – Dressmaking/Tailoring
11 Inches = 27.94 Centimeters
12 Inches = 30.48 Centimeters
1 Yard = 0.9144 Meters
2 Yards = 1.8288 Meters
3 Yards = 2.7432 Meters
4 Yards = 3.6576 Meters
5 Yards = 4.572 Meters
Example:
1. How many inches are there in a 100 centimeters width of fabric?
2. How many centimeters are there in a 60 inches length of fabric?
Answer:
a. Given: 1 inch = 2.54 cm
Width of fabric = 100 cm
Equivalent of an inch to cm = 2.54
Calculation: 100 cm = 39.37 inches
2.54 cm
b. Given: 1 inch = 2.54 cm
Length of fabric = 60 inches
Equivalent of a cm to an inch = 2.54 cm
Calculation: 60 inches
X 2.54 cm
152.4 cm
Cost Needed
Example:
You need to buy a 60 inches length of fabric to be used in making a dress to
your customer. You have known that the cost of the fabric that you are going to use
is P5.00 per centimeter. How much will you need to buy it?
Step I – Convert the 60 inches length of fabric into centimeters.
60 inches
X 2.54 cm
152.4 cm
Step II – Multiply the cost per centimeter to the length of fabric converted.
152.4 cm
X Php 5.00
Php 777.00
47. K to 12 Basic Education Curriculum 46
Technology and Livelihood Education – Dressmaking/Tailoring
Sample Computations for fabric, thread, buttons and other supplies in Sewing
QUANTITY UNIT DESCRIPTION
OF MATERIALS
UNIT COST TOTAL COST
3
1
6
10
¼
yrds
spool
pcs
pcs
yds
POLYESTER
COTTON (60”
WIDTH)
RED THREAD
PATTERN
PAPER
BUTTONS
PELLON
PHP 25.00
PHP 15.00
PHP 2.50
PHP 3.00
PHP 10.00
PHP 75.00
PHP 15.00
PHP 12.50
PHP 30.00
PHP 5.00
TOTAL PHP 133.00
A. Directions: Read and understand the question. Write your answer in your quiz
notebook.
1. How many inches are there in 6.35 centimeters?
_______________________________________
2. What are the four fundamentals of operation?
_______________________________________
3. How many centimeters are there in 2 inches?
_______________________________________
4. The dressmaker needs to buy 100 inches length of fabric that cost Php15.00 per
centimeter. Find the total cost of the fabric.
_______________________________________
5. An electronic device used for speed computation.
_______________________________________
How Much Have You Learned?
Refer to the Answer Key. What is your score?
Self-Check 2.1
48. K to 12 Basic Education Curriculum 47
Technology and Livelihood Education – Dressmaking/Tailoring
1. Write the measurements of equivalents of the following:
6. 3’ = _______ yards
7. 4. 27” = _______ yards
8. 18” = _______ yards
9. 5. 72” = _______ yards
10. 1 ½ meter = _______ inches
Objective: Students will be able answer the questions based on their knowledge about
simple calculations in dressmaking.
Instruction: Answer the following questions briefly.
1. How are body measurements taken?
___________________________________________________________________
_______________________________________________________________
2. Why is accurate body measurement important?
___________________________________________________________________
_______________________________________________________________
3. What body measurements should be taken in drafting a skirt pattern?
___________________________________________________________________
_______________________________________________________________
49. K to 12 Basic Education Curriculum 48
Technology and Livelihood Education – Dressmaking/Tailoring
Objective: Students will be able to record Individual Body Measurement
Convert measurements from inches to centimeters
Materials, Tools and Equipment:
Measuring Tools
Pencil
Individual Measurement Chart
Name: ____________________________________________________
Date:_____________________________
Body Parts
Actual Body Measure
Inches Centimeters
Bust
Bust to Bust
Upper Bust
Under Bust
Waist
Hips
Shoulder to Bust
Front Shoulder to
Waist
Shoulder to Shoulder
Shoulder to Neck
Down Center Back
Back Shoulder to
Waist
Across Back
Full Back
Sleeve Hole
Bicep
Elbow
Underarm
Over arm
Side Seam
Upper Arm Length
Show that you learned something by doing this activity
HowDo YouApplyWhatYou HaveLearned?
Activity Sheet 1.1
50. K to 12 Basic Education Curriculum 49
Technology and Livelihood Education – Dressmaking/Tailoring
- Calculator
- Reading measurements
- Conversion table
Materials
Estimate Appropriate Quantities
LEARNING OUTCOME 3
Reading of measurement is practiced with accuracy
The fundamentals of arithmetic operations are practiced with accuracy
Cost of project materials are estimated based on current price
PERFORMANCE STANDARDS
51. K to 12 Basic Education Curriculum 50
Technology and Livelihood Education – Dressmaking/Tailoring
ESTIMATE APPROPRIATE QUANTITIES
In planning a project, it is important to estimate the quantity of materials to be used
and the cost involved. Doing estimates will help you to make the right decisions so that there
won’t be any effort, money and time wasted.
Estimating of Materials
In estimating you should know the size and the number of product to be made and
the size of the cloth if it is 36”, 45” or 60” width. For example, an organizer measuring 12” x
30” with three patch pockets of different designs. For one yard of a 45 width cacha cloth you
can make two organizers. So for one organizer you can use ½ yard of a cacha cloth.
Estimated cost of the cloth is Php60.00.
The table below shows a sample of materials estimated and the cost good for one
project.
Quantity Materials Unit Price Total Cost
½ yard Cacha (45” width) 60.00 30.00
¼ Manila paper 7.00 2.00
1spool Thread (small) 5.00 5.00
Total Cost = 37.00
The table below shows a sample of materials estimated and the cost good for twelve
products to be produced.
Quantity Materials Unit Price Total Cost
12 yards Cacha (45” width) 60.00 720.00
3 pcs. Manila paper 7.00 21.00
1 spool Thread (big) 35.00 35.00
Total Cost = 776.00
What Do You Already Know?
Information Sheet 3.1
Let us determine how much you already know about the use farm tools and
equipment. Take this test.
52. K to 12 Basic Education Curriculum 51
Technology and Livelihood Education – Dressmaking/Tailoring
Direction: Use tables in your estimation for the materials and the cost.
1. You will are to make an organizer of the following given prices. You use a cloth that
costs Php55. Manila paper, Php7, spool of thread, Php5. Estimate materials and
cost. How much will you spent?
2. You and your three friends agreed that you will share to make your organizer as your
project to save money. You will buy your materials at the same time. Estimate your
materials and cost for the project.
1.
Quantity Materials Unit Price Total Cost
Total Cost =
2.
Quantity Materials Unit Price Total Cost
Total Cost =
Congratulations! You did a great job! Rest and
relax a while then move on to the next lesson.
Good luck!
Refer to the Answer Key. What is your score?
How Much Have You Learned?
Self-Check 3.1
Navarro, Leticia S. Homemaking for You and Me (Clothing Construction)
Quenzon City, Philippines. Abida Publishing House, Inc., 1985
Hilario, Carmelita B., Clothing Technology Made Easy, Publisher
National Bookstore Printed 24k Printing Corp., Valenzuela City
www.singermachines.co.uk/dress-form-inform
REFERENCES
53. K to 12 Basic Education Curriculum 52
Technology and Livelihood Education – Dressmaking/Tailoring
Create design for a simple project
LESSON 3
LO 1. Sketch simple project design; and
LO 2. Produce simple project;
LEARNING OUTCOMES:
At the end of this Lesson you are expected to do the
following:
54. K to 12 Basic Education Curriculum 53
Technology and Livelihood Education – Dressmaking/Tailoring
Asymmetrical - having no balance or symmetry.
Balance - a state of equilibrium or parity characterized by cancellation of all forces by
Cacha - a kind of cotton cloth good for beginner sewer for project making.
Colorfast – do not fade easily
Design – a blueprint
Emphasis - a special attention or effort directed toward something.
equal opposing forces.
Harmony - means a relationship of different portion of a design
Hue – the family group name of a color
Intensity – means the brightness or dullness of a color
Primary Colors – the sources of all colors
Proportion - part considered in relation to the whole.
Proportion – is the pleasing relationship of all parts of the object with one another.
Rhythm – these are smooth movement repeated again and again
Secondary Colors – are produced when mixing two equal amount of primary colors
sides of a dividing line or plane or about a center or an axis.
Symmetry - exact correspondence of form and constituent configuration on opposite
Definition of Terms
55. K to 12 Basic Education Curriculum 54
Technology and Livelihood Education – Dressmaking/Tailoring
- Pictures
- Catalogue
- Different kind of designs
Materials
Sketch simple project design
LEARNING OUTCOME 1
Design for a simple project is sketched applying the principles of
design and applying the color harmonies
PERFORMANCE STANDARDS
56. K to 12 Basic Education Curriculum 55
Technology and Livelihood Education – Dressmaking/Tailoring
Direction: Choose your answer in the box. Write your answer in your notebook.
proportion emphasis formal balance informal balance rhythm
harmony
balance gradation repetition radiation
A.
1. It is the pleasing relationship of all parts of the object with one another.
2. It can be described as having equal "weight" on equal sides of a centrally
placed like a see saw.
3. When the structure decoration and accessories are different both sides from
the centre of the design.
4. It refers to the relative size and scale of the various elements in a design. The
issue is the relationship between objects, or parts, of a whole.
5. This is an easy way of balancing but such balance lends monotony to the
dress.
6. It is the center of interest.
7. These are smooth movement repeated again and again.
8. A kind of rhythm can also be created by the use of radiated lines.
9. It means a relationship of different portion of a design.
10.Eyes can move easily from one part to the other on the small lines created by
gathers.
B. Identify the following;
1. Primary colors are blue, yellow and _________.
2. Yellow mix with red is ________.
3. Red mix with violet is ________.
4. Tint or red is _______.
5. Maroon is ________ of red.
6. Analogous or adjacent color of green is _______ and ______.
7. Complement of orange is ________.
8. Split complement of red is _______ and _______.
9. Triad of violet is _______ and ________.
10.Neutral colors are ______, _______ and _______.
What Do You Already Know?
Let us determine how much you already know about the sketching simple project
design. Take this test.
Pretest LO 1
57. K to 12 Basic Education Curriculum 56
Technology and Livelihood Education – Dressmaking/Tailoring
PRINCIPLES OF DESIGN
The principles of designs are concepts used to organize or arrange the structural
elements of design. These the ways in which these principles are applied the affects the
expressive content, or the message of the work.
Principles
Balance - According to this principle, from the centered of the dress, design should be
identified on both sides may be achieved ways:
a. Symmetrically or the formal balance - can be described
as having equal "weight" on equal sides of a centrally placed
like a see saw. This is an easy way of balancing but such
balance lends monotony to the design.
b. Asymmetrically or the informal balance – When
The structure decoration and accessories are different
both sides from the center of the design. In this design
attraction both sides is created by using different
accessories.
c. Proportion - is the pleasing relationship of all parts of
the object with one another. Proportion refers to the
relative size and scale of the various elements in a design.
The issue is the relationship between objects, or parts, of
a whole.
What Do You Need To Know?
Read the Information Sheet 1.1 very well then find out how much you can
remember and how much you learned by doing Self-check 1.1.
Information Sheet 1.1
58. K to 12 Basic Education Curriculum 57
Technology and Livelihood Education – Dressmaking/Tailoring
Emphasis – every pleasing design has one part
that is more interesting than any other. This is the
emphasis or the center of interest.
Rhythm – these are smooth movement repeated
again and again. Rhythm is an important principle of
art. It is created by repeated use of the design. If
there is rhythm in a design, the eye would move
easily from one part to the other.
Rhythm can be created in three ways in a design:
a. Repetition of lines, colors, or accessories.
Parallel lines are formed by the use of seams,
buttons, embroidery, lace, etc. which helps
uninterrupted eye movement.
Radiation. Rhythm can also be created by the
radiated lines. These lines are created by
gathers Eyes can move easily from one part to
the other on the small lines created by gathers.
Such lines can be seen in gathers on neckline,
arm and
skirt.
Gradation. Rhythm can be created by gradual
change of lines, shape or shade of the color.
Harmony - means a relationship of
different portion of a design. Harmony
should be achieved through judicious use
of color, shape, and texture to give a
feeling of oneness.
59. K to 12 Basic Education Curriculum 58
Technology and Livelihood Education – Dressmaking/Tailoring
Identification: Write your answer on the space provided for.
_______________ 1. A pants with a pocket on both sides with the same style, size and
shape.
_______________ 2. A large hat on a small boy is out of proportion to his size.
_______________ 3. It may be a pretty collar, an attractive bow or a lovely pin.
_______________ 4. A kind of rhythm can be created by gradual change of lines, shape
or shade of the color.
_______________ 5. It is a relationship of different portion of a dress.
COLOR THEORY
The first thing you usually notice about clothes or anything is their color. Before you
start studying which colors look best together, you should learn the meaning of color terms
and the rules that apply to colors.
The Color Wheel
photobucket.com/images/color%20wheel/
Refer to the Answer Key. What is your score?
Read the Information Sheet 1.2 very well then find out how much you can
remember and how much you learned by doing Self-check 1.2.
Information Sheet 1.2
How Much Have You Learned?
Self-Check 1.1
60. K to 12 Basic Education Curriculum 59
Technology and Livelihood Education – Dressmaking/Tailoring
Primary Colors – the sources of all colors, even though there are thousands and
thousands of colors in the world, they are all made up of these colors – red, blue and
yellow.
Secondary Colors – are produced when mixing two equal amount of primary colors. If
you mix equal amount or yellow and blue you will have green, equal parts of red and blue
will have violet, and red and yellow you will have orange.
Look at the color wheel you will find these colors – orange, green and violet.
Intermediate Colors – are produced by mixing two equal amount of primary and
secondary colors. Example, if you mix equal parts of yellow (primary color) and green
(secondary color) you will have yellow-green. Noticed that yellow-green is found between
yellow and green on the color wheel.
The intermediate colors are;
Yellow + green = yellow-green Red + violet = red-violet
Blue + green = blue-green Red + orange = red-orange
Blue + violet = blue-violet Blue + orange = blue-orange
Pure Colors – are the primary, secondary and intermediate colors because they have no
white, black and gray in them. Pure colors are also called “normal, true and basic colors”.
Tints – when pure colors are mixed with white, they are made lighter. Example, when white
is added to red you have pink. In other words pink is a tint of red. The more white you add,
the lighter the pink will be. Tints are also called “pastels”.
Shades – when pure colors are mixed with black, they are made darker. Example, when
black is added to red you have maroon, a shade of red. The more black you add, the more
darker you have.
Grayed colors – most colors we used in clothes are grayed colors rather than bright, pure
colors you see on the color wheel. Grayed colors are also referred to as “soft colors” or “dull
colors”. The more gray you add, the more duller the color will be.
Neutrals – are white, black and gray. They look well with another and with all other colors.
The more grayed colors becomes, the more different colors it will harmonize with.
Warm and Cool Colors
Cool colors – are green, blue-green, blue, blue-violet, violet. Blue is the coolest color. They
are adjacent to one another in the color wheel.
Warm colors – are red, red-orange, orange, yellow-orange, and orange. Red is the warmest
color. They are also adjacent in the color wheel.
Qualities of Colors
Hue – is the family group name of a color. It is the name of a color. Ones they are combined
differently and given new names.
Value – refers to the lightness or the tint or the darkness of the shade. The scale of the value
colors are from the very lightest tint to the very darkest of the shade.
Intensity – means the brightness or dullness of a color. When you refer to a color as “bright”
or “very bright” or “dull” or “very dull” you are describing its intensity. Example, green
peppers are bright yellow-green, while olives are dull yellow green.
61. K to 12 Basic Education Curriculum 60
Technology and Livelihood Education – Dressmaking/Tailoring
Color Schemes
The beauty of any color scheme depends upon how well the colors harmonize. To
harmonize, colors must appear to belong together.
1. One-color harmony (monochromatic color) – the easiest color scheme to follow is
one that uses the same color in different values and intensity. Example, dark blue
suit with very dark blue accessories and a light blue blouse.
2. Adjacent color harmony – or analogous color harmony. Since they are near each
other on the color wheel, neighbor color harmony. Example, yellow-orange, orange,
and yellow green are next to each other on the color wheel; therefore, a pleasing
adjacent color harmony may be made from them.
3. Complementary Color Harmony – these are colors that are opposite in the color
wheel. Using these colors may be very pleasing.
a. Complementary colors – directly opposite in the color wheel. Example, red
and green, blue and orange, yellow and violet.
b. Split complementary colors – a variation of the complementary color scheme.
In addition to the base color, it uses the two colors adjacent to its
complement.
62. K to 12 Basic Education Curriculum 61
Technology and Livelihood Education – Dressmaking/Tailoring
www.tigercolor.com/color-lab/color-theory/color-harmonies.htm
c. Triad - A triadic color scheme uses colors that are evenly spaced around the
color wheel. Triadic color harmonies tend to be quite vibrant, even if you use
pale or unsaturated versions of your hues.
Identify the following;
1. Primary colors are red, yellow and _________.
2. _______ is a color formed by mixing yellow and blue.
3. When red is mix with orange, the color is ________.
4. Tint of red is _______.
5. Maroon is ________ of red.
6. Analogous or adjacent color of blue is _______ and ______.
7. Complement of red is ________.
8. Split complement of yellow is _______ and _______.
9. Triad of orange is _______ and ________.
10. Neutral colors are ______, _______ and _______.
Refer to the Answer Key. What is your score?
How Much Have You Learned?
Self-Check 1.2
63. K to 12 Basic Education Curriculum 62
Technology and Livelihood Education – Dressmaking/Tailoring
Instruction: Copy this design in a bond paper and apply the principles. Color the picture and
apply the color harmonies. This will be your project.
How Do You Extend Your Learning?
64. K to 12 Basic Education Curriculum 63
Technology and Livelihood Education – Dressmaking/Tailoring
Sewing Tools
- Needle
- Plain cloth (any color)
- Thread (any color)
Produce simple project
LEARNING OUTCOME 2
Project produced in accordance to the specifications of designs
PERFORMANCE STANDARDS
Materials
65. K to 12 Basic Education Curriculum 64
Technology and Livelihood Education – Dressmaking/Tailoring
Direction: Identify the different pictures
1. ___________________ 5. _______________
2. ______________ 6. _________________
3. _______________ 7. _________________
4. ___________________
B. Arrange the steps in assembling the organizer by numbering.
_____ Remove hanging threads.
_____ Zigzag raw edges of the pockets.
_____ Fold and baste of the organizer before sewing in the sewing machine.
_____ Press.
_____ Lay the pockets, pin, baste then machine stitch.
_____ Put labels for each pockets as marking tools, measuring tools and
cutting tools.
_____ Sew the handles for hanging.
_____ Work on the pockets by putting designs applying the principles of
designs.
What Do You Already Know?
Pretest LO 2
Let us determine how much you already know about the use farm tools and
equipment. Take this test.
66. K to 12 Basic Education Curriculum 65
Technology and Livelihood Education – Dressmaking/Tailoring
BASIC HAND STITCHES
Sewing the basic hand stitches are very easy if you learn each step thoroughly
before you start practicing the next step. Sewing by hand is a skill that most, if not all, people
should probably attempt to master at some point.
Back Stitch
Make one running stitch, then take a back stitch to the beginning of
the first stitch, thus overlapping each running stitch. Resembles
machine stitching and is used to strengthen a seam made by hand.
Basting
Basting is quite important in successful sewing. This is used to hold
fabric temporarily in place, until permanently stitched. There are four
types of basting; hand basting, machine basting, pin basting and
basting edges with an iron.
Running Stitch
To make this stitch, push point of needle in and out of fabric until you
have several stitches on the needle. Hold fabric taut with left hand,
pull the needle through. Practice until you make fine even stitches.
Outline Stitch
This stitch is similar to the back stitch but it is slanted. Make one
slanted backstitch in front of another letting each one overlap the
one before it just a little bit, until the design is filled.
Blanket Stitch
Put your needle in 1/4 inch from the edge of the fabric, put the thread
under the point of the needle and pull through.
Catch Stitch
This is used for a flat finish next to fabric, such as seam binding on a
hem. Hold open hem edge away from you, work from left to right,
Take a stitch in the hem, then a tiny stitch to the right just beyond
edge of hem with the point of needle to the left. This makes diagonal
lined that cross each other.
Chain Stitch
Insert the needle in and out of the fabric (as in the running stitch).
Bring the thread under the tip of the needle while still in the fabric,
then pull the needle through.
What Do You Need To Know?
Read the Information Sheet 2.1 very well then find out how much you can
remember and how much you learned by doing Self-check 2.1.
Information Sheet 2.1
67. K to 12 Basic Education Curriculum 66
Technology and Livelihood Education – Dressmaking/Tailoring
A. Identify the following basic hand stitches. Write your answer before the number.
_________________________ 1.
___________________________ 2.
____________________________ 3.
___________________________ 4.
____________________________ 5.
6 – 9 What are the four types of basting stitch?
10. _________ stitch is similar to the backstitch but it is slanted.
How Much Have You Learned?
Self-Check 2.1
68. K to 12 Basic Education Curriculum 67
Technology and Livelihood Education – Dressmaking/Tailoring
Make a sample of the different basic hand stitches in a 3” x 3” plain cloth and compile
them in a short bond paper. Label them and write their descriptions.
LO2 : PRODUCE SIMPLE PROJECT
Objective : Demonstration how to make an organizer for sewing tool
Materials, Tools
and Equipment
: ½ yard cloth, 1 spool of thread (small), manila paper, shears,
pins, needles, tailor’s chalk, pencil, ruler and sewing machine
Procedure
1. Make a sketch of your organizer using a
measurement of 12” x 30” as the size, or you can
copy the sample a illustrated above.
2. Make patterns for the main part which is the
base of the organizer using a manila paper. 12” x
30” in size.
3. Make patterns for the patch pockets 8” x 8” as
the size with three designs, plain, oval and
pointed.
4. Lay your pattern on the cloth. Lay large pattern
first then the smaller patterns
5. Pin the patterns.
6. Mark the cloth
7. Mark sewing allowances
8. Cut the cloth. Reminder: before cutting measure
twice or more if there is doubt of the
measurements.
9. Construction or assembling process by unit
method.
a.Work on the pockets by putting designs
applying the principles of designs using the different basic hand stitches and
applying the theories of colors.
b.Put labels for each pockets as marking tools, measuring tools and cutting tools.
This will be the emphasis of the organizer.
Show that you learned something by doing this activity
How Do You Extend Your Learning?
HowDo YouApplyWhatYou HaveLearned?
job Sheet 2.1
69. K to 12 Basic Education Curriculum 68
Technology and Livelihood Education – Dressmaking/Tailoring
c.Zigzag raw edges of the pockets to make it durable and edges will not ravel.
d.Sew the handles for hanging.
e.Work on the base as the main part of the organizer by folding the sides. Baste folds
before sewing in the sewing machine.
f. Lay the pockets, pin, baste then machine stitch.
g.Remove hanging threads.
h.Press.
Rubric in Drafting the Pattern for the Organizer
Item 3 2 1 Score
Weighted
Score
Tools
(10%)
Tools were
complete,
appropriate and
correctly used.
Lack of one tool,
some are
appropriate and
correctly used.
Lack of two or
more tools, some
are appropriate
and not correctly
used.
Procedure
(60%)
Used the correct
method.
Procedures
correctly
followed.
Used the correct
method.
Procedures
incorrectly
followed.
Failed to use the
correct method.
Procedures not
followed.
Pattern
(20%)
All pattern
details were
correctly
measured and
accurately
drafted.
Some pattern
details were
inaccurately
drafted.
All pattern details
are not drafted
correctly and
accurately.
Speed
(10%)
Finished the
pattern ahead of
time.
Finished the
pattern on time.
Finished the
pattern more
than the allotted
time.
Total
Legend:
Weighted Score: = Score x Item (weight)
Score Percentage = Total weighted score x 30 + 70
Perfect score (3)
Example:
3 x 10% = .3
2 x 60% = 1.2
2 x 20% = .4
Find out by accomplishing the Scoring Rubric honestly and sincerely. Remember it is
your learning at stake!
How Well Did You Perform?
70. K to 12 Basic Education Curriculum 69
Technology and Livelihood Education – Dressmaking/Tailoring
3 x 10% = .3
______
Total weighted score = 2.2
Score Percentage
= 2.2 x 50 + 50
3
Grade = 87
Rubric in Constructing the Organizer
Item 3 2 1 Score
Weighted
Score
Threads
(10%)
Correct shade of
thread matches
the color of the
fabric.
Correct kind,
and color but
does not match
the shade of the
fabric.
Incorrect and
does not match
the color of the
fabric.
Machine
stitching
(70%)
Stitches are
even and proper
length followed
the sewing line.
Some stitches
are crooked, did
not follow the
sewing line.
Uneven stitches,
crooked and did
not follow the
sewing lines
Speed
(20%)
Finished the
organizer
ahead of time.
Finished the
organizer on
time.
Finished the
organizer more
than the allotted
time.
Total
Example:
3 x 10% = .3
2 x 70% = 1.4
2 x 20% = .4
______
Total weighted score = 2.1
Score Percentage
= 2.1 x 50 + 50
3
Grade = 85
Note: If you want to consider a higher grade of your students adjust score percentage, you
can change it to 40 + 60.
71. K to 12 Basic Education Curriculum 70
Technology and Livelihood Education – Dressmaking/Tailoring
Arrange the steps in sewing the organizer for sewing tools by putting the number in their
proper order. Write your answer on the space provided before the number.
_____ Remove hanging threads.
_____ Zigzag raw edges of the pockets.
_____ Fold and baste of the organizer before sewing in the sewing machine.
_____ Press.
_____ Lay the pockets, pin, baste then machine stitch.
_____ Put labels for each pockets as marking tools, measuring tools and
cutting tools.
_____ Sew the handles for hanging.
_____ Work on the pockets by putting designs applying the principles of
designs.
Objective: Sew an apron with creative patch pocket.
Materials, Tools and Equipment:
1 yard of fabric
Piece of coordinating fabric for the pocket
7/8" ribbon
Apron Pattern
Show that you learned something by doing this activity
Refer to the Answer Key. What is your score?
Self-Check 2.2
Job Sheet 2.2
72. K to 12 Basic Education Curriculum 71
Technology and Livelihood Education – Dressmaking/Tailoring
Instructions:
1. Place the apron pattern on the folded fabric and cut out.
2. Fold the rectangle of coordinating fabric in half with right
sides together. Stitch around three sides of the pocket using a
1/2" seam allowance, leaving a 3" opening at the bottom. Clip
the corners.
( Pattern for patch pocket may vary depending on the
design).
3. Turn the pocket right side out and push out the corners of
the pocket with an item like a chopstick. (Don't use something
too sharp or you will poke a hole through the fabric.) Press the
pocket flat, folding in the raw edges of the opening. Topstitch
along the fold, which will be the top of your pocket.
4.Place the pocket on the center of the apron approximately
12" from the top. Stitch the sides and bottom of the pocket to
the apron.
(Placement of the pocket may vary).
5. Using a double fold hem (folding fabric in 1/2", pressing,
then folding 1/2" again and pressing for a 1" hem), pin and
stitch the sides and bottom of the apron.
73. K to 12 Basic Education Curriculum 72
Technology and Livelihood Education – Dressmaking/Tailoring
6.Using a double fold hem (folding fabric in 5/16", pressing,
then folding 5/16" again and pressing for a 5/8" hem), pin and
stitch the curved side of the apron.
7. Fold down 1/4" along top and press. Fold 1" again and
press. Stitch facing down.
8.Stitch 28" piece of ribbon to top left of apron. Finish raw
edge of ribbon by folding over twice and stitching.
9.Stitch 24" long piece of ribbon at the top of the straight side.
Repeat for the other side. Finish raw edge of ribbon by folding
over twice and stitching.
74. K to 12 Basic Education Curriculum 73
Technology and Livelihood Education – Dressmaking/Tailoring
ITEMS
Outstanding
(10)
Very Good
(7)
Good
(5)
Score
A. Construction
Process
All steps were
followed in the
correct sequence
Most of the steps
were followed
correctly.
Some of the steps
were followed
correctly
B. Manipulated
Tools and
equipment
properly
Most of the time Sometimes Not at all
C. Work Habits:
Organized, clean
and systematic
Most of the time Sometimes Not at all
D. Work within the
time target
Finished ahead of
time
Finished just in
time
Late by 1 day
Congratulations! You did a great job! Rest and
relax a while then move on to the next lesson.
Good luck!
Find out by accomplishing the Scoring Rubric honestly and sincerely. Remember it is
your learning at stake!
How Well Did You Perform?
LO1
Author, copyright year, title, place of publication: publishing house
LO 2
How You Look and Dress by Byrta Carson
www.karensvariety.com/ARTICLES/Sewing/BasicHandStitches.htm
photobucket.com/images/color%20wheel/
www.preservearticles.com
www.goshen.edu/art/ed/Compose.htm
www.scribd.com/doc/3224103/Principles-of-Design
REFERENCES
75. K to 12 Basic Education Curriculum 74
Technology and Livelihood Education – Dressmaking/Tailoring
Perform Basic Maintenance
LESSON 4
LO 1. Operate machine and assess its performance;
LO 2. Clean and lubricate machine; and
LEARNING OUTCOMES:
At the end of this Lesson you are expected to do the
following:
76. K to 12 Basic Education Curriculum 75
Technology and Livelihood Education – Dressmaking/Tailoring
Absorbent – a material property that sucks-up or takes in the manner of sponge.
Adjust – change present setting as in adjusting tensions.
Balance wheel – the wheel at the right of the arm that sets the mechanism in motion.
Band wheel – the wheel below the upper mechanism that leads the balance wheel through
the belt connection
Band wheel crank – moves the band wheel.
Bent – a change of shape or angle caused by pulling or pricking to a harder part such as
machine needle driven out of throat plate slot.
Blunt – refers to an unsharp or dull needlepoint that is irreplaceable.
Damp cloth – a cloth applied with moisture on water.
Entangle – forming knots like thread entangled in the bobbin case.
Feed dog – the toothed part mounted on the throat plate that helps move the fabric against
the presser foot.
Fault – something is wrong with the machine, system, design etc, which prevents it from
working properly.
Gummy – a thick of sticky quality such as oiled accumulated dust on sewing machine part.
Jam – to cause a machine to stuck fast so that it cannot work.
Lift – moving upward as in a presser foot lifter.
Lubricant – a material capable of reducing friction when applied between moving parts.
Lubricate – the act of applying a lubricating agent between moving parts to reduce friction
and preventing the form of rust.
Manipulation – the act of managing or operating manually or mechanically a given tool or
equipment.
Posture - the correct working body position for a given task.
Pucker – wrinkling of fabric caused by very tight stitches.
Replace – putting something new in the place of an old or damaged part.
Rewind – winding again or repeat winding.
Definition of Terms
77. K to 12 Basic Education Curriculum 76
Technology and Livelihood Education – Dressmaking/Tailoring
Stitch length – the length of each individual stitch.
Stitch regulator – the part of a sewing machine that controls the stroke of the feed dog and
regulates the length of stitches.
Treadle – this is where the feet rest to drive the band wheel through the pitman rod.
Tension – the force that is applied by the machine on your thread.
Trend – a general tendency in the way a situation in changing or developing.
Vital – extremely important and necessary for something to succeed or exist.
78. K to 12 Basic Education Curriculum 77
Technology and Livelihood Education – Dressmaking/Tailoring
Set of sewing machines
Materials
Operate Machine and Assess Its Performance
LEARNING OUTCOME 1
Proper handling of machine is observed.
Correct procedures in machine operation are identified.
Common machine troubles are resolved.
PERFORMANCE STANDARDS
79. K to 12 Basic Education Curriculum 78
Technology and Livelihood Education – Dressmaking/Tailoring
Directions: Read and analyze each item carefully and choose the letter of the best
answer from the options below. Write your answers in your quiz notebook
1. The upper part of the sewing machine head being driven by hand when starting the
machine
a. balance sheet
b. band wheel
c. stop motion screw
d. treadle
2. The control of sewing machine lies on the:
a. balance sheet
b. band wheel
c. belt
d. treadle
3. The part of the sewing machine that controls the looseness and tightness of stitches
is:
a. bobbin
b. presser foot
c. thread guide
d. upper tension
4. A machine problem when there is incorrect size of needle or thread is:
a. fabric jams
b. needle break
c. seam pucker
d. skipped stitches
5. The part of the sewing machine that controls the stroke of the fee dog is:
a. face plate
b. feed dog
c. slide pucker
d. stitch regulator
6. The oil that lubricates and gives the machine longer life .
a. baby oil
b. coconut oil
c. crude oil
d. machine oil
7. The correct cloth used in wiping spilled oils during cleaning .
a. damp cloth
b. dry cloth
c. oiled cloth
What Do You Already Know?
Let us determine how much you already know about the use farm tools and
equipment. Take this test.
Pretest LO 1
80. K to 12 Basic Education Curriculum 79
Technology and Livelihood Education – Dressmaking/Tailoring
d. any of the above
8. The part of the sewing machine that should be avoided during the application of oil.
a. bobbin winder
b. rubber ring
c. stitch regulator
d. stop motion screw
9. The cleaning material that maintains moving parts of a sewing machine in smooth
operation.
a. absorbent cloth
b. lint brush
c. lubricant
d. water
1. A good practice of cleaning and lubricating the sewing machine .
a. every two weeks
b. once a week
c. once a month
d. twice a week
Setting of Sewing Machine and Its Troubles
A treadle sewing machine works by foot action and doesn't require any electricity. If taken
care of properly, an antique treadle sewing machine can sew a better stitch than its modern
counterpart can. It takes some practice to keep your treadle machine sewing smoothly, but
once you've mastered the foot action, you can enjoy sewing and getting a little exercise at
the same time
What Do You Need To Know?
Read the Information Sheet 1.1 very well then find out how much you can
remember and how much you learned by doing Self-check 1.1.
Information Sheet 1.1
81. K to 12 Basic Education Curriculum 80
Technology and Livelihood Education – Dressmaking/Tailoring
Treadle Sewing Machine Picture Tour
View of the cabinet with the machine closed.
Cabinet open and the machine in the up
position
The machine for more details be sure to see
the manual.
Close up of the bobbin winder. Note the
heavy brass and the number of connections
in this mechanism, compared to today's
machines.
View of the end of the machine. Tension
mechanism and tread guides.
View of the back of the machine
Close up of the back access panel. This has
been damaged by rust but shows the detail.
Close up of the decal. Note the area in the
red circle. The japanning has remained in
tack but the decal has peeled away leaving
bare metal.
Metal Singer emblem and the machine serial
number.
SETTING OF SEWING MACHINES
Perfect machine stitching is easy to achieve if you set the machine properly.
This involves threading the upper and lower parts of the sewing machine. The beginner
In dressmaking must learn how to thread the head of the sewing machine as one of the
first steps in becoming a competent operator.
82. K to 12 Basic Education Curriculum 81
Technology and Livelihood Education – Dressmaking/Tailoring
THREADING THE MACHINE
Each part of the threading mechanism on the head of a sewing machine has
a definite purpose in guiding the thread from the spool to the needle. The thread must pass
through the various guides in a given order so that the machine will sew properly
the formed stitches.
A. ORDER OF THREADING IN THE UPPER PART
1. Spool Pin
2. Upper thread guide
3. Between metal disc of tension
4. Thread take up lever
5. Lower thread guide
6. Needle
STEPS:
1. Put the spool of thread on the spool pin.
2. Bring the thread to the thread guide .
3. Pull the thread between the metal disc of the tension.
4. Bring the thread up to the thread take up lever and raise it as it
goes.
5. Pull the thread down to the thread guide.
6. Pull it through the lower thread guide.
7. Thread the needle.
B. THREADING THE LOWER PART OF LOCKSTITCH SEWING MACHINE/ or
TREADLE SEWING MACHINE
STEPS:
1. Remove the bobbin case by pulling on the bobbin case latch.
2. Remove the bobbin from the case and wind the thread .
3. Put the bobbin back to the bobbin case and pull the thread through
the little slot at least 4 inches.
4. Be sure that you hear the bobbin case inside the shuttle.
5. Start the mechanism by rolling the balance wheel forward to get
the thread of the bobbin through the needle.
6. Pull the upper and lower thread together by 4 inches.
As you enjoy using your sewing machine , problems cannot be avoided , but
knowing its causes is another challenging skill to develop. How can you classify these
problems or troubles ?
CLASSIFICATIONS OF SEWING MACHINE TROUBLES
If the sewing machine in your laboratory are kept in good condition and are
carefully adjusted and properly threaded , not too many things can go wrong. But there
are certain difficulties that occur during an operation so often , so you should know these
minor and common problems their causes and remedies. There are two classifications
of sewing machine troubles, namely :
1. Minor sewing machine trouble
This refers to problems that arise involving incorrectly attached
accessories or supplies , unadjusted tensions , or that requires a little
dusting or oiling.
2. Major sewing machine trouble
This involves replacing or removing damage spare parts that made
the sewing machine not totally functioning.
83. K to 12 Basic Education Curriculum 82
Technology and Livelihood Education – Dressmaking/Tailoring
COMMON SEWING MACHINE TROUBLES
Machine Troubles Causes Remedies
1. Machine runs noisily insufficient oil
loose screw
thread or dust
clogged in the shuttle
race.
oil the sewing
machine
tighten loose screw
clean the shuttle race
before oiling
2. Machine rotates
heavily
too tight belt
insufficient oil
bearings or shuttle
race is clogged with
dust or thread
change belt if already
old
oil the arm shaft
clean the shuttle race
and bearing , then oil
3. Needle thread breaks improper threading
tight tension
thread too coarse
needle blunt set
incorrectly
presser foot not
properly adjusted
poor quality thread
seam maybe too thick
or heavy
bobbin case turns
fabric is pulled forcibly
needle may be bent
size of needle
tension
check the threading ,
change the texture of
thread and attach the
needle properly to the
needle bar (flat side
of the needle should
face the needle bar) .
use correct presser
foot, check if presser
foot is secured and
properly fastened
if seam is too heavy
change needle to
correct size
check the position of
the bobbin case,
reset the shuttle race
assembly
change the bent
needle
to avoid needle
bending, pull the
upper and lower
threads toward the
rear of the presser
foot after stitching
and cut the threads
don’t force the fabric,
just guide it
change the size of
needle
adjust tension
4. Stitches skip bent needle , dull
needle or wrongly
attached needle
unmatched size of
needle or thread to
the texture of fabric
no enough pressure
on the presser foot
change the needle or
correct positioning
change needle size
and thread
increase pressure on
the presser foot
check the threading
84. K to 12 Basic Education Curriculum 83
Technology and Livelihood Education – Dressmaking/Tailoring
threading maybe
incorrect
5. Stitches loop dull needle
improper threading
unbalance tension
of the upper and
lower threads
defective thread take
up lever
use blunt needle
check the threading;
if loops appear under
the fabric, check the
upper threading;
adjust the upper
tension regulator; if
the loops appear on
top of the fabric,
check the lower
threading; the thread
may be inserted in
the tension groove of
the bobbin ; check
also the latch spring
of the bobbin case.
balance the tension
of both threads
change the thread
take up lever spring.
6. Upper thread breaks Improper threading
Improperly attached
needle
Bent or dull needle
Tight upper thread
poor quality thread
unmatched needle
correct threading
attached the needle
correctly
change to blunt
needle
reset the upper
tension regulator
use good quality
thread and thread
size or texture
7. Lower or under
thread breaks
improper winding of
the thread in the
bobbin
bent or dull needle
poor quality thread
incorrectly set feed
dog
bobbin does not freely
turn
too tight bobbin case
spring
winding the thread in
the bobbin uniformly
change the needle
use good quality
thread
lower the feed dog if
the fabric is thin;
raise the feed dog if
the fabric is thick
check if bobbin is
clogged with dirt or
thread
loosen the adjusting
screw of the bobbin
case or adjusting the
tension of the upper
thread
85. K to 12 Basic Education Curriculum 84
Technology and Livelihood Education – Dressmaking/Tailoring
8. Seams Pucker too long stitch length
for the fabric
tension is too tight
size of needle and
thread do not match
too high feed dog
adjustment
too heavy pressure
on the presser foot
adjust stitch regulator
to correct length
adjust the upper and
lower tension
regulator
use appropriate size
of needle and thread
adjust the height of
the feed dog
depending on the
thickness or thinness
of the fabric
lessen pressure on
the presser foot
9. Fabric does not move feed dog not in proper
sewing position
stitch regulator not set
on zero
too tight pressure on
presser foot
adjust the feed dog to
proper sewing
position
adjust stitch regulator
to desired stitch
length
add pressure to
presser foot by
adjusting the
pressure regulator
screw
10. Fabric jams in
machine
Needle may be too
big
Throat plate
Change the size of
needle
Needs round hole
plate
STANDARDS FOR SEWING MACHINE OPERATIONS
Observe while using / running sewing machine and list the things that you have
noticed. By following correct procedures you will make your work easier, more interesting
and challenging. Here are some pointers that you have to follow in the manipulation of your
sewing machine:
1. Start with the right tools and supplies.
Have your needle, thread, screw driver,
pins and scissors ready for use. With
tools at hand, you can start working
continuously on your machine.
.
2. Always maintain good working posture.
Sit on your back slightly leaning forward.
It can prevent body pains after working
on your machine.
86. K to 12 Basic Education Curriculum 85
Technology and Livelihood Education – Dressmaking/Tailoring
3. Thread the sewing machine correctly. You
can follow the guide book if you have. This
will save your time to get a correct threading.
Refer to someone to check if you have
threaded it properly.
4. Be sure that the needle is properly set accor-
ding to the directions for specific models. A
properly attached needle will make your work
without any trouble.
5. Set the stitch regulator according to project
specifications and test the stitches for
possible adjustments.
6. Check tension dials and adjust according to
project requirement of the stitches. A correct
adjustment on the tension dials will make
perfectly sewn garment.
7. Turn power off (for motorized/electric machines )
when the sewing machine is not in use. This
will save electricity and avoid possible minor
accidents.
87. K to 12 Basic Education Curriculum 86
Technology and Livelihood Education – Dressmaking/Tailoring
8. Keep sewing tools. Dust the sewing machine then
put a little amount of machine oil in slots. This will
make the sewing machine available for the next
user
Note:
The control of the sewing machine lie on your feet not in your hand so learn to
start and stop the sewing machine instantly at a given point using this control. Lower
the presser foot while sewing but be sure to insert a piece of paper or fabric swatches
so that the feed dog will not be worn out.
Getting to stitch
Before you start, make sure the two threads are back between the two toes of the
presser foot .
CHARACTERISTICS OF GOOD STITCHES
1. The length of stitch is proportioned to the texture of the fabric.
2. The stitches are the same in length.
3. The stitches appear the same on both right and wrong sides of the fabric.
4. The stitching follows the intended line smoothly and accurately.
5. There are no skipped or broken gaps in stitching.
6. When retraced, it appears as one line of stitching.
7. The stitching has no tangles.
HOW TO MAKE ADJUSTMENT ON THE MACHINE
There are two tension adjustments on the sewing machine the upper and the
lower. The upper tension controls the thread from the needle, while the lower tension
controls the thread from the bobbin case. These tensions must be adjusted to suit
various fabrics. If the tensions on both threads are properly adjusted, the threads will
lock at the center of the material and form a correct stitch.
The size of the stitches varies with the type of work being sewed. Thin
materials require a short stitch, a light thread, a fine needle, and a tight tension.
Heavier materials require a longer stitch, a coarser thread, a larger needle, and less
tension.
Sewing machine needles become dull through hard usage and also through
ordinary wear; sometimes, they become bent by improper use. The condition of the
needle should be checked when sewing difficulties occur. A defective needle should be
replaced by a new needle of proper size. A dull needle will show a flat shiny spot at the
very tip when rotated between the fingers. The straight of a needle can be tested by
88. K to 12 Basic Education Curriculum 87
Technology and Livelihood Education – Dressmaking/Tailoring
rolling the larger end on a flat surface; bent needles will wobble and straight needles
will roll true.
A. HOW TO ADJUST TENSION ON THE NEEDLE THREAD
The stitch tension control determines the amount of tension on the
thread as they pass through the machine.
1. Correcting a Loose Top Stitch
When the needle thread tension is too tight, the thread will lie straight
along the upper surface.
Lower the presser foot
Turn the small thumb nut at the front of the tension discs to the
left ( counter clockwise ) to decrease the tension.
2. Correcting a Loose Bottom Stitch
When the needle tension is too loose , the thread will lie along the
underside of the material.
Lower the presser foot
Check to make sure that the thread is between the tension
discs.
Turn the small thumb nut at the front of the tension disc
(clockwise ) to increase the tension.
Check the stitch on pieces of scrap material.
B. HOW TO ADJUST TENSION ON BOBBIN THREAD
1. Checking Bobbin Case
Remove the bobbin from the bobbin case.
Clean the inside of the bobbin case.
Remove all particles of lint and dust with
a small point stick.
Note : If the tension spring is bent away from the
bobbin case , or if the ends of the spring near
the delivery eye are damaged, they should be
replaced. Consult your teacher if defective
parts are discovered.
2. Adjusting Tension Spring on Bobbin Case
The tension on the bobbin thread is controlled
by adjusting the tension spring on the outside of
the bobbin case. It is seldom necessary to change
this adjustment once the tension has been properly
set . The operator will usually be able to correct
89. K to 12 Basic Education Curriculum 88
Technology and Livelihood Education – Dressmaking/Tailoring
the stitch by varying the tension on the needle thread
a. Correcting a loose bobbin thread
If the tension on the bobbin thread is too loose, the needle thread will
lie straight along the upper surface of the material.
Tighten the tension
Turn the regulating screw in the tension spring to the right.
Test the tension. Thread the bobbin case. Hold the end of the
thread and allow the case to hang freely.
Check stitch on pieces of scrap material
b. Correcting a Tight Bobbin Thread
If the tension on the bobbin thread will
lie straight along the underside of the material.
Loosen the tension. Turn the regulating
Screw in the tension spring slightly to the
left.
Thread the bobbin case and test the tension.
Check stitches on pieces of scrap material.
HOW TO REGULATE THE LENGTH OF THE STITCH
The length of the stitch is regulated by the stitch regulator on the front side of
the head.
Move the stitch regulator downward to lengthen
stitch
Move the stitch regulator upward to shorten stitch.
Check the length of stitch on pieces of scrap
material.
Note: For normal stitching, set the regulator at 10 to 12 stitches per inch, or
at the number 3 for metric scale machines.
HOW TO REGULATE THE PRESSURE ON THE MATERIAL
The pressure on the material is regulated by adjusting screw on the top of the machine.
Turn the adjusting screw to the right
to increase the pressure.
Turn the adjusting screw to the left to
decrease the pressure.
Check the pressure by stitching on pieces
of scrap material of the same weight .
90. K to 12 Basic Education Curriculum 89
Technology and Livelihood Education – Dressmaking/Tailoring
Note: A pressure that is too heavy will cause the machine to run hard
and will leave the print of the feed on fine materials.
I .Directions: Write check ( y ) if the statement is a good characteristic of stitches and
cross ( X ) if it is not. Write your answer in your quiz notebook.
________1. The stitches have no tangles.
________ 2. The stitching follows the intended line smoothly and accurately.
________ 3. The length of stitch is not proportioned
________ 4. There are skipped or broken gaps in stitching.
________ 5. The stitches appear on both right and wrong sides of the fabric.
II. Directions: Arrange the steps in threading the upper and lower parts of the sewing
machine. Write number 1 for the first step, 2 for the second step, and so
on. Write your answer in your quiz notebook.
A. STEPS IN THREADING THE UPPER PART
_____ Thread the needle
_____ Pull it through the lower thread guide
_____ Pull the thread down on the thread guide.
_____ Bring thread to the thread guide.
_____ Pull the thread between the metal disc of the tension.
_____ Bring the thread up to the lower thread take up lever and raise it as it
goes.
How Much Have You Learned?
Self-Check 1.1