May túi đựng máy may(English)
•Download as DOCX, PDF•
0 likes•531 views

May túi đựng máy may(English), hướng dẫn may túi rất đẹp, tiện dụng để đựng đồ, máy may. Tham gia fanspage: http://facebook.com/maymaymininhat Mua máy may mini gia đình tại : http://muangay123.com/may-khau

Recommended
More Related Content
What's hot
What's hot (20)
Similar to May túi đựng máy may(English)
Similar to May túi đựng máy may(English) (20)
Recently uploaded
Recently uploaded (20)
May túi đựng máy may(English)
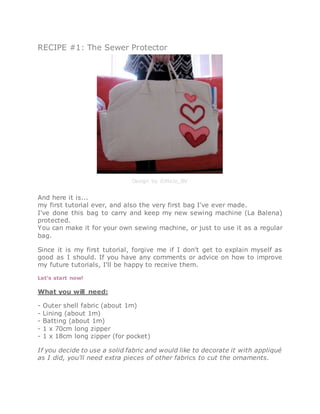
- 1. RECIPE #1: The Sewer Protector Design by ©MaJo_BV And here it is... my first tutorial ever, and also the very first bag I've ever made. I've done this bag to carry and keep my new sewing machine (La Balena) protected. You can make it for your own sewing machine, or just to use it as a regular bag. Since it is my first tutorial, forgive me if I don't get to explain myself as good as I should. If you have any comments or advice on how to improve my future tutorials, I'll be happy to receive them. Let's start now! What you will need: - Outer shell fabric (about 1m) - Lining (about 1m) - Batting (about 1m) - 1 x 70cm long zipper - 1 x 18cm long zipper (for pocket) If you decide to use a solid fabric and would like to decorate it with appliqué as I did, you'll need extra pieces of other fabrics to cut the ornaments.
- 2. I did not use any fusing to make my bag more rigid, but of course if you would like it to be stiffer, just add some fusing. 1. Cutting Diagram Follow the colors in the diagram to know how many pieces to cut in each fabric for each pattern. (I used the same fabric for outer shell and lining only because I didn't have other fabric available when I started the tutorial.) Download the pattern here. 2. About the snippet To be able to know which is the body's top and bottom, make a mark by cutting 1 or two snippets at the top edge.
- 3. 3. How to place the bottom pattern when cutting? As you have noticed, the bottom pattern has two sides that have to be placed on folds to cut it. Well, there's no mystery to do this. You simply fold the fabric twice as shown in the pictures and place the pattern in the straight angle. 4. Appliqué If you have decided to decorate your bag with appliqué, read this step. Otherwise, skip to the third step. - Cut the shapes. Use some stencils if you find that easier. - Place the shapes wherever you want them to be and fix them momentarily with pins or with a couple of hand stitches. - Sew around the edges with zigzag stitch, or a decorative one if your sewing machine allows you.
- 4. Stitched appliqué 5. Quilting - Take each shell piece (except the handles) and it's corresponding batting piece.
- 5. - Sew them together with whatever quilting design you choose. I kept it simple by quilting some pieces with vertical lines and others with horizontal lines. 6. Making the handles I didn't know how to make handles, so I read two Sew, Mama, Sew!'s tutorials: Quilted Garden Toteand the Bag Straps, a Variation. Then, I mixed and matched the instructions to suit my needs. With the pattern I gave you, follow the instructions you'll find below, or search for the original tutorials and choose the instructions you feel more comfortable with.
- 7. 7. Attaching the handles
- 8. Once the handles are ready, take the quilted body patterns and attach them centered at 19cm apart from each other. 8. Attach the sides to the top Take both quilted sides and tops and attach them together. Remember to leave the 2cm seam at the center to attach the zipper later.
- 9. 9. The pockets The bag has three side pocket. One of them is zippered. Before assembling the pockets, take both shell pieces and sew the pleats for 3cm. Zippered pocket: - Put one shell pocket over one of the three side linings you've cut. Both must be facing up. Sew along the sides. - Attach the zipper leaving 1cm ease at each side- If you want, use a decorative stitch to embellish the edge. Regular pocket: - Hem the other shell pocket's top edge with a simple stitch or with a decorative stitch if you would like to embellish it. - Put it over one of the quilted sides both facing up, and sew them together along the sides
- 10. 10. The zippered pocket Attach the zippered pocket to the remaining quilted side by sewing around the edges. On this side of the bag, you'll have two pockets! 11. Start building the bag Attach the quilted bottom to quilted body 12. And it starts taking shape...
- 11. Sew the sides and top to the body and bottom. 13. Now the lining Repeat steps #8, #11 and #12 to sew the lining together. 14. Almost done
- 12. - Put the lining inside the bag, (remember you shouldn't turn it right side out), and pin the zipper to one side. - Attach the pinned side with the sewing machine. - Repeat the steps on the other side. 15. Voilà Finally the bag is done! Now you can put your sewing machine to rest, (for now). 16. FINISHED BAG Design by ©MaJo_BV You also have 3 useful pockets to keep the pedal, manual and accessories always at your reach.