Scrub Caps Printable Pattern and How To DIY Tutorial (version 2) - Learn To Sew A Surgeon Scrub Cap

Want a digital copy of the pattern to scale so you can print it and cut out? Send an email - larissa.fontenot@gmail.com or get it on https://Etsy.me/2AFBiOZ Scrub caps if they are custom made are a huge deal for surgeons. So as my daughter was about to start general surgery residency, she asked me if I could make a custom scrub cap for her - I used to sew for people for 20 years back in Russia. I still love to sew, I am creative like that. So I went searching on the internet to find a pattern to make a scrub cap she wanted: really tight fit, with elastic band in the back and, of course, I know she is going to pull on those ties, so seams might break. That's where zigzag stitch comes in handy. I found bits and pieces online, and made up my own pattern. Decided to create a video tutorial too. Enjoy making scrub caps for your surgeon!

Recommended
Recommended
More Related Content
Similar to Scrub Caps Printable Pattern and How To DIY Tutorial (version 2) - Learn To Sew A Surgeon Scrub Cap
Similar to Scrub Caps Printable Pattern and How To DIY Tutorial (version 2) - Learn To Sew A Surgeon Scrub Cap (20)
Recently uploaded
Recently uploaded (20)
Scrub Caps Printable Pattern and How To DIY Tutorial (version 2) - Learn To Sew A Surgeon Scrub Cap
- 1. Surgeon’s Scrub Cap – DIY Step By Step Tutorial (Want a digital copy of a pattern to scale so you can print it & cut out? Send me an email larissa.fontenot@gmail.com)
- 2. You will need: Paper to make the pattern – all measurements are in inches 9 inches of cotton fabric – standard 44 inch width 3 inches of elastic band 39 inches of bias tape Black and orange thread Please wash, dry and iron fabric before you start cutting – it will shrink
- 3. Make Your Paper Pattern Using Measurements In Inches
- 4. Place side of the cap pattern on folded fabric Fold fabric along this edge 2 layers of fabric 1 layer of fabric Place top of the cap pattern on single layer of fabric
- 5. After you cut the fabric, use hot iron to fold the bottom of top part of your cap first one time, then the second time to create a tube for elastic band Iron to fold one time Iron again to fold the second time
- 6. Use straight stitch to make a tube for elastic band
- 7. Cut 3 inches of elastic band and attach a safety pin to one end of it – next step is to secure elastic band inside the tube of fabric
- 8. Stick elastic band (safety pin first) into the fabric tube and move it toward the other end. When the end of elastic will align with end of your fabric tube, secure it with a pin When your safety pin is out of the fabric tube and the second end of elastic band aligns with the end of fabric tube, secure elastic band with a pin Once both edges of your elastic band are secured with pins, remove safety pin
- 9. Fold the top of your cap part in two length wise, find the middle and mark it with a pin Then fold the side part of your cap in two width wise, find the middle and mark it with a pin
- 10. Put the top of cap part and the side of cap part together face to face and align the middle pins. Pin top part and side parts of your cap together in that point.
- 11. With side part of your cap being on top, pin it to the top part of your cap. Pins should be ¾ of an inch apart.
- 12. Use straight stitch ¼ inch from the fabric edge to connect the top part of your cap and the side part together – side part is on top. Pull pins out before they reach the needle. Use your fingers to hold fabric in place and together.
- 13. When you finish the straight stitch, flip the cap over, change settings to zigzag and stitch around the top of cap – keep your needle on the fabric
- 14. Do zigzag stitch all the way around the connection of top and side parts of the cap, then use hot iron to iron the seam toward the side part of your cap .
- 15. Starting at elastic band, make a decorative finishing stitch along the seam which connects top part of the cap to the side part of your cap.
- 16. Use hot iron to fold edges of bias tape so they interlock and folds are hidden
- 17. Find middles of the side part of your cap and bias tape and mark them with pins. Now pin bias tape to the side part starting with the middle pins.
- 18. Starting at elastic band, pin one side of bias tape to the side part of your cap, pins should be ½ inch apart
- 19. Now you are ready to make a zigzag stitch along the edge of bias tape. I use zigzag stitch to ensure my seams don’t break when my surgeon pulls on ends of cap in a hurry.
- 20. Start your zigzag stitch at the end of one tie, go all the way around the edge of your scrub cap and finish at the end of the other tie.
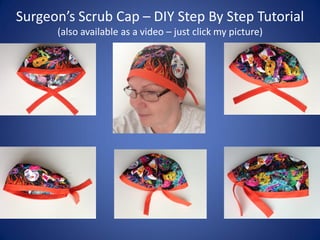
- 21. Congratulations! This is your finished cap – this is how the back of your cap looks with ends tied together – zigzag seam looks really nice.
- 22. This is how my cap looks in the front. This cap is for sale – message me in comments.