SlideShare a Scribd company logo
POS Management Console
Quick Start Guide
September 10, 2015
Introduction . . . . . . . . . . . . . . . . . . . . . . . . . . . . . . . . . . . . . . . . . . . . . . . . . . . . . . . . . . . 3
Logging on to the Management Console. . . . . . . . . . . . . . . . . . . . . . . . . . . . . . . . . . 3
Overview . . . . . . . . . . . . . . . . . . . . . . . . . . . . . . . . . . . . . . . . . . . . . . . . . . . . . . . . . . . . . 3
Icons. . . . . . . . . . . . . . . . . . . . . . . . . . . . . . . . . . . . . . . . . . . . . . . . . . . . . . . . . . . . . . 4
Employees . . . . . . . . . . . . . . . . . . . . . . . . . . . . . . . . . . . . . . . . . . . . . . . . . . . . . . . . . . . . 5
Employee Icons . . . . . . . . . . . . . . . . . . . . . . . . . . . . . . . . . . . . . . . . . . . . . . . . . . . . . 5
Adding an Employee . . . . . . . . . . . . . . . . . . . . . . . . . . . . . . . . . . . . . . . . . . . . . . . . . 6
Editing an Employee. . . . . . . . . . . . . . . . . . . . . . . . . . . . . . . . . . . . . . . . . . . . . . . . . . 6
Deactivating an Employee . . . . . . . . . . . . . . . . . . . . . . . . . . . . . . . . . . . . . . . . . . . . . 6
Schedules . . . . . . . . . . . . . . . . . . . . . . . . . . . . . . . . . . . . . . . . . . . . . . . . . . . . . . . . . . . . 7
Creating Shift Schedules . . . . . . . . . . . . . . . . . . . . . . . . . . . . . . . . . . . . . . . . . . . . . . 8
Products . . . . . . . . . . . . . . . . . . . . . . . . . . . . . . . . . . . . . . . . . . . . . . . . . . . . . . . . . . . . . 8
Product Icons. . . . . . . . . . . . . . . . . . . . . . . . . . . . . . . . . . . . . . . . . . . . . . . . . . . . . . . 9
Adding a Category, Subcategory, and Product. . . . . . . . . . . . . . . . . . . . . . . . . . . . . 9
Editing a Product . . . . . . . . . . . . . . . . . . . . . . . . . . . . . . . . . . . . . . . . . . . . . . . . 10
Deactivating a Product . . . . . . . . . . . . . . . . . . . . . . . . . . . . . . . . . . . . . . . . . . . . 10
Taxes . . . . . . . . . . . . . . . . . . . . . . . . . . . . . . . . . . . . . . . . . . . . . . . . . . . . . . . . . . . . . . . 10
Creating a Prevailing Tax Group . . . . . . . . . . . . . . . . . . . . . . . . . . . . . . . . . . . . . . . 10
Receipts. . . . . . . . . . . . . . . . . . . . . . . . . . . . . . . . . . . . . . . . . . . . . . . . . . . . . . . . . . . . . 11
Designing the Receipt . . . . . . . . . . . . . . . . . . . . . . . . . . . . . . . . . . . . . . . . . . . . . . . 12
Payments. . . . . . . . . . . . . . . . . . . . . . . . . . . . . . . . . . . . . . . . . . . . . . . . . . . . . . . . . . . . 12
Troubleshooting. . . . . . . . . . . . . . . . . . . . . . . . . . . . . . . . . . . . . . . . . . . . . . . . . . . . . . . 12
Contents
SoftwareRelease1525
7/14/15 3
INTRODUCTION
This document is an overview of Revel Systems POS Management Console and includes basic instructions on
how to perform tasks required to setup and start using the system. For detailed information about configuring
and operating Revel Systems’ POS, refer to the POS Management Console Operation Manual.
To install the hardware refer to the installation manual shipped with the product.
Logging on to the Management Console
NOTE: Revel Systems will send an email with the details on how to log on to the Management Console. This infor-
mation includes the user login and password.
1. Open the Web browser.
2. Enter the URL in the address bar of the Web browser. The Revel Systems login screen opens.
3. Enter the user login.
4. Enter the password.
5. Click the LOGIN button, the Overview page of the management console opens in the browser.
OVERVIEW
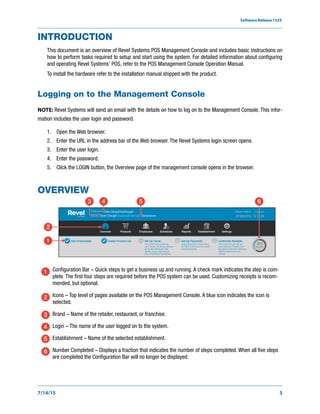
Configuration Bar – Quick steps to get a business up and running. A check mark indicates the step is com-
plete. The first four steps are required before the POS system can be used. Customizing receipts is recom-
mended, but optional.
Icons – Top level of pages available on the POS Management Console. A blue icon indicates the icon is
selected.
Brand – Name of the retailer, restaurant, or franchise.
Login – The name of the user logged on to the system.
Establishment – Name of the selected establishment.
Number Completed – Displays a fraction that indicates the number of steps completed. When all five steps
are completed the Configuration Bar will no longer be displayed.
Doe’s Dough
John Doe@DoeDough
Downtown
4 53
2
6
1
1
2
3
4
5
6
Software Release 15.25
4 7/14/15
Icons
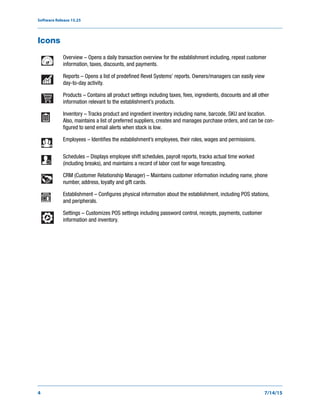
Overview – Opens a daily transaction overview for the establishment including, repeat customer
information, taxes, discounts, and payments.
Reports – Opens a list of predefined Revel Systems’ reports. Owners/managers can easily view
day-to-day activity.
Products – Contains all product settings including taxes, fees, ingredients, discounts and all other
information relevant to the establishment’s products.
Inventory – Tracks product and ingredient inventory including name, barcode, SKU and location.
Also, maintains a list of preferred suppliers, creates and manages purchase orders, and can be con-
figured to send email alerts when stock is low.
Employees – Identifies the establishment’s employees, their roles, wages and permissions.
Schedules – Displays employee shift schedules, payroll reports, tracks actual time worked
(including breaks), and maintains a record of labor cost for wage forecasting.
CRM (Customer Relationship Manager) – Maintains customer information including name, phone
number, address, loyalty and gift cards.
Establishment – Configures physical information about the establishment, including POS stations,
and peripherals.
Settings – Customizes POS settings including password control, receipts, payments, customer
information and inventory.
SoftwareRelease1525
7/14/15 5
EMPLOYEES
Employee Icons
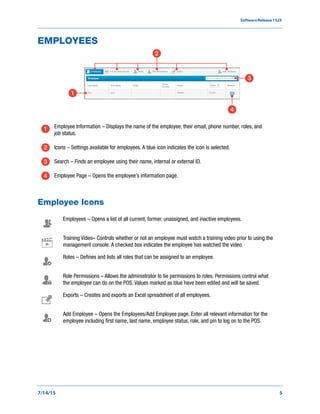
Employee Information – Displays the name of the employee, their email, phone number, roles, and
job status.
Icons – Settings available for employees. A blue icon indicates the icon is selected.
Search – Finds an employee using their name, internal or external ID.
Employee Page – Opens the employee’s information page.
Employees – Opens a list of all current, former, unassigned, and inactive employees.
Training Video– Controls whether or not an employee must watch a training video prior to using the
management console. A checked box indicates the employee has watched the video.
Roles – Defines and lists all roles that can be assigned to an employee.
Role Permissions – Allows the administrator to tie permissions to roles. Permissions control what
the employee can do on the POS. Values marked as blue have been edited and will be saved.
Exports – Creates and exports an Excel spreadsheet of all employees.
Add Employee – Opens the Employees/Add Employee page. Enter all relevant information for the
employee including first name, last name, employee status, role, and pin to log on to the POS.
1
3
4
2
1
2
3
4
Software Release 15.25
6 7/14/15
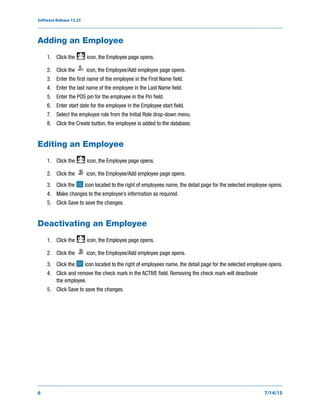
Adding an Employee
1. Click the icon, the Employee page opens.
2. Click the icon, the Employee/Add employee page opens.
3. Enter the first name of the employee in the First Name field.
4. Enter the last name of the employee in the Last Name field.
5. Enter the POS pin for the employee in the Pin field.
6. Enter start date for the employee in the Employee start field.
7. Select the employee role from the Initial Role drop-down menu.
8. Click the Create button, the employee is added to the database.
Editing an Employee
1. Click the icon, the Employee page opens.
2. Click the icon, the Employee/Add employee page opens.
3. Click the icon located to the right of employees name, the detail page for the selected employee opens.
4. Make changes to the employee’s information as required.
5. Click Save to save the changes.
Deactivating an Employee
1. Click the icon, the Employee page opens.
2. Click the icon, the Employee/Add employee page opens.
3. Click the icon located to the right of employees name, the detail page for the selected employee opens.
4. Click and remove the check mark in the ACTIVE field. Removing the check mark will deactivate
the employee.
5. Click Save to save the changes.
SoftwareRelease1525
7/14/15 7
SCHEDULES
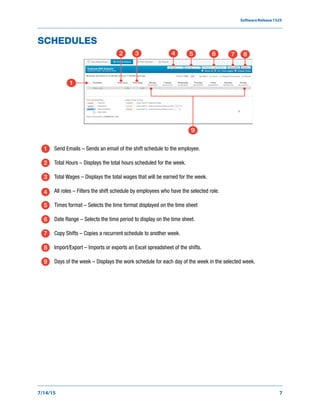
Send Emails – Sends an email of the shift schedule to the employee.
Total Hours – Displays the total hours scheduled for the week.
Total Wages – Displays the total wages that will be earned for the week.
All roles – Filters the shift schedule by employees who have the selected role.
Times format – Selects the time format displayed on the time sheet
Date Range – Selects the time period to display on the time sheet.
Copy Shifts – Copies a recurrent schedule to another week.
Import/Export – Imports or exports an Excel spreadsheet of the shifts.
Days of the week – Displays the work schedule for each day of the week in the selected week.
2 3 4 5 6 7 8
1
9
1
2
3
4
5
6
7
8
9
Software Release 15.25
8 7/14/15
Creating Shift Schedules
1. Click the icon, the Schedule page opens.
2. Select an employee from the list and click on a day of the week, a schedule opens for the
selected employee.
3. Enter the start time in the Start Time field.
4. Enter and end time in the End Time field.
5. Select how the shift will end from the End Status drop-down menu.
6. Select the employee role from the Role drop-down menu.
7. Click Save, the start and end time are added to the day of the week for the employee.
PRODUCTS
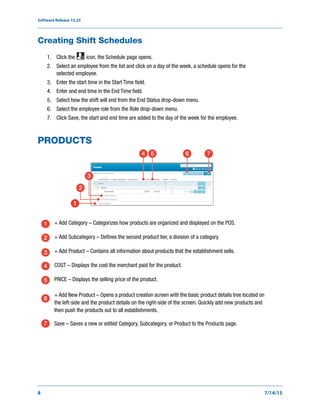
+ Add Category – Categorizes how products are organized and displayed on the POS.
+ Add Subcategory – Defines the second product tier, a division of a category.
+ Add Product – Contains all information about products that the establishment sells.
COST – Displays the cost the merchant paid for the product.
PRICE – Displays the selling price of the product.
+ Add New Product – Opens a product creation screen with the basic product details tree located on
the left-side and the product details on the right-side of the screen. Quickly add new products and
then push the products out to all establishments.
Save – Saves a new or edited Category, Subcategory, or Product to the Products page.
1
2
3
4 5 6 7
1
2
3
4
5
6
7
SoftwareRelease1525
7/14/15 9
Product Icons
Adding a Category, Subcategory, and Product
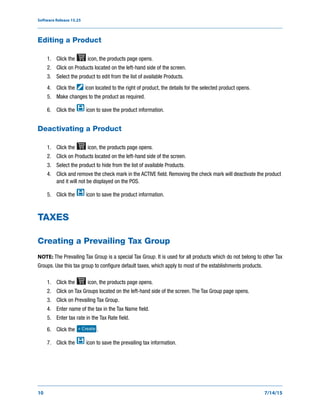
1. Click the icon, the products page opens.
2. Click on Products located on the left-hand side of the screen.
3. Click +Add Category and enter a name in the blank category field.
4. Click the icon next to a category to expand and view the subcategory list.
5. Click +Add Subcategory and enter name in the blank subcategory field.
6. Click the icon next to a subcategory to expand and view the product list.
7. Click +Add Product and enter name in the blank product field.
8. Enter the cost of the product in COST field.
9. Enter retail sales price of the product in the PRICE field.
10. Click the icon to save the product information.
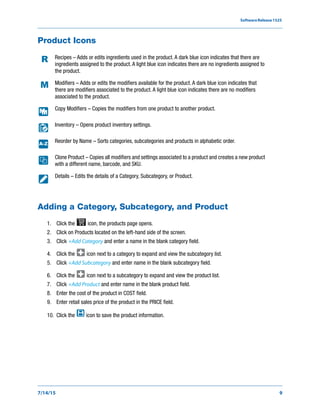
Recipes – Adds or edits ingredients used in the product. A dark blue icon indicates that there are
ingredients assigned to the product. A light blue icon indicates there are no ingredients assigned to
the product.
Modifiers – Adds or edits the modifiers available for the product. A dark blue icon indicates that
there are modifiers associated to the product. A light blue icon indicates there are no modifiers
associated to the product.
Copy Modifiers – Copies the modifiers from one product to another product.
Inventory – Opens product inventory settings.
Reorder by Name – Sorts categories, subcategories and products in alphabetic order.
Clone Product – Copies all modifiers and settings associated to a product and creates a new product
with a different name, barcode, and SKU.
Details – Edits the details of a Category, Subcategory, or Product.
A-Z
Software Release 15.25
10 7/14/15
Editing a Product
1. Click the icon, the products page opens.
2. Click on Products located on the left-hand side of the screen.
3. Select the product to edit from the list of available Products.
4. Click the icon located to the right of product, the details for the selected product opens.
5. Make changes to the product as required.
6. Click the icon to save the product information.
Deactivating a Product
1. Click the icon, the products page opens.
2. Click on Products located on the left-hand side of the screen.
3. Select the product to hide from the list of available Products.
4. Click and remove the check mark in the ACTIVE field. Removing the check mark will deactivate the product
and it will not be displayed on the POS.
5. Click the icon to save the product information.
TAXES
Creating a Prevailing Tax Group
NOTE: The Prevailing Tax Group is a special Tax Group. It is used for all products which do not belong to other Tax
Groups. Use this tax group to configure default taxes, which apply to most of the establishments products.
1. Click the icon, the products page opens.
2. Click on Tax Groups located on the left-hand side of the screen. The Tax Group page opens.
3. Click on Prevailing Tax Group.
4. Enter name of the tax in the Tax Name field.
5. Enter tax rate in the Tax Rate field.
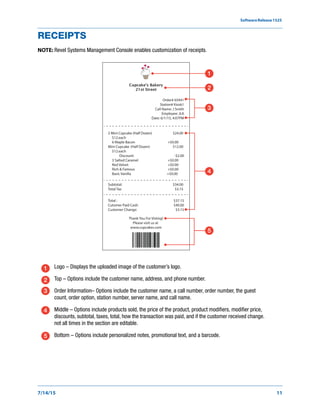
6. Click the .
7. Click the icon to save the prevailing tax information.
+ Create
SoftwareRelease1525
7/14/15 11
RECEIPTS
NOTE: Revel Systems Management Console enables customization of receipts.
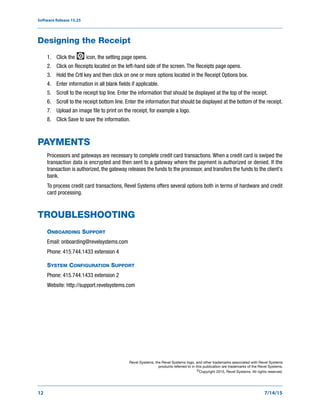
Logo – Displays the uploaded image of the customer’s logo.
Top – Options include the customer name, address, and phone number.
Order Information– Options include the customer name, a call number, order number, the guest
count, order option, station number, server name, and call name.
Middle – Options include products sold, the price of the product, product modifiers, modifier price,
discounts, subtotal, taxes, total, how the transaction was paid, and if the customer received change.
not all times in the section are editable.
Bottom – Options include personalized notes, promotional text, and a barcode.
Order# 65941
Station# Kiosk1
Call Name: J Smith
Employee: JLK
Date: 6/1/15, 4:07PM
2 Mini Cupcake (Half Dozen)
$12.each
6 Maple Bacon
Mini Cupcake (Half Dozen)
$12.each
Discount:
3 Salted Caramel
Red Velvet
Rich & Famous
Basic Vanilla
$24.00
+$0.00
$12.00
-$2.00
+$0.00
+$0.00
+$0.00
+$0.00
Subtotal:
Total Tax
$34.00
$3.15
Total :
Cutomer Paid Cash:
Customer Change:
$37.15
$40.00
$3.15
Thank You For Visting!
Please visit us at
www.cupcakes.com
Cupcake’s Bakery
21st Street
4
5
1
2
3
1
2
3
4
5
Software Release 15.25
12 7/14/15
Designing the Receipt
1. Click the icon, the setting page opens.
2. Click on Receipts located on the left-hand side of the screen. The Receipts page opens.
3. Hold the Crtl key and then click on one or more options located in the Receipt Options box.
4. Enter information in all blank fields if applicable.
5. Scroll to the receipt top line. Enter the information that should be displayed at the top of the receipt.
6. Scroll to the receipt bottom line. Enter the information that should be displayed at the bottom of the receipt.
7. Upload an image file to print on the receipt, for example a logo.
8. Click Save to save the information.
PAYMENTS
Processors and gateways are necessary to complete credit card transactions. When a credit card is swiped the
transaction data is encrypted and then sent to a gateway where the payment is authorized or denied. If the
transaction is authorized, the gateway releases the funds to the processor, and transfers the funds to the client's
bank.
To process credit card transactions, Revel Systems offers several options both in terms of hardware and credit
card processing.
TROUBLESHOOTING
ONBOARDING SUPPORT
Email: onboarding@revelsystems.com
Phone: 415.744.1433 extension 4
SYSTEM CONFIGURATION SUPPORT
Phone: 415.744.1433 extension 2
Website: http://support.revelsystems.com
Revel Systems, the Revel Systems logo, and other trademarks associated with Revel Systems
products referred to in this publication are trademarks of the Revel Systems.
©Copyright 2015, Revel Systems. All rights reserved.

More Related Content

What's hot

OpenERP Book 6.0
OpenERP Book 6.0OpenERP Book 6.0
OpenERP Book 6.0
openerpwiki
 
Lync server2010licensingguide en-us
Lync server2010licensingguide en-usLync server2010licensingguide en-us
Lync server2010licensingguide en-us
allegra601
 
Configuring Parallel Approvers Notification
Configuring Parallel Approvers NotificationConfiguring Parallel Approvers Notification
Configuring Parallel Approvers Notification
Feras Ahmad
 
Microsoft excel 2010 product guide final
Microsoft excel 2010 product guide finalMicrosoft excel 2010 product guide final
Microsoft excel 2010 product guide final
Carol de la Plaza
 
4 jobs and_position_(sit_s___eit_s)_part_4
4 jobs and_position_(sit_s___eit_s)_part_44 jobs and_position_(sit_s___eit_s)_part_4
4 jobs and_position_(sit_s___eit_s)_part_4
Oracle HRMS Functional Consultant
 
Moss2007
Moss2007Moss2007
Moss2007
LiquidHub
 
ISVForce Guide NEW
ISVForce Guide NEWISVForce Guide NEW
ISVForce Guide NEW
Adriana Martini
 
Getting started with sales logix
Getting started with sales logixGetting started with sales logix
Getting started with sales logix
Solar2012
 
Hfm install
Hfm installHfm install
Hfm install
Raghuram Pavuluri
 
Pinnacle Cart Manual v3.6
Pinnacle Cart Manual v3.6Pinnacle Cart Manual v3.6
Pinnacle Cart Manual v3.6
ericssonjohn1
 
Oracle Web Conferencing - Release 2.0.4
Oracle Web Conferencing - Release 2.0.4Oracle Web Conferencing - Release 2.0.4
Oracle Web Conferencing - Release 2.0.4
Mehul Sanghavi
 
Seu purchase requisition management system
Seu purchase requisition management systemSeu purchase requisition management system
Seu purchase requisition management system
Saifur Rahman
 
BR100 Oracle AP Setup
BR100 Oracle AP SetupBR100 Oracle AP Setup
BR100 Oracle AP Setup
Baker Khader Abdallah, PMP
 
10 quick pay_part_10
10 quick pay_part_1010 quick pay_part_10
10 quick pay_part_10
Oracle HRMS Functional Consultant
 
Getting started with licensing | Tally.NET Services | Tally Intergation | Tal...
Getting started with licensing | Tally.NET Services | Tally Intergation | Tal...Getting started with licensing | Tally.NET Services | Tally Intergation | Tal...
Getting started with licensing | Tally.NET Services | Tally Intergation | Tal...
stannventures.Pvt.Ltd
 
Admm crp oracle payroll
Admm crp oracle payrollAdmm crp oracle payroll
Admm crp oracle payroll
Feras Ahmad
 
8.1 fast formula_method_1_using_default_hours_and_amount
8.1 fast formula_method_1_using_default_hours_and_amount8.1 fast formula_method_1_using_default_hours_and_amount
8.1 fast formula_method_1_using_default_hours_and_amount
Oracle HRMS Functional Consultant
 
En clipboard app quick_reference_guide
En clipboard app quick_reference_guideEn clipboard app quick_reference_guide
En clipboard app quick_reference_guide
shivamagarwal223
 

What's hot (18)

OpenERP Book 6.0
OpenERP Book 6.0OpenERP Book 6.0
OpenERP Book 6.0
 
Lync server2010licensingguide en-us
Lync server2010licensingguide en-usLync server2010licensingguide en-us
Lync server2010licensingguide en-us
 
Configuring Parallel Approvers Notification
Configuring Parallel Approvers NotificationConfiguring Parallel Approvers Notification
Configuring Parallel Approvers Notification
 
Microsoft excel 2010 product guide final
Microsoft excel 2010 product guide finalMicrosoft excel 2010 product guide final
Microsoft excel 2010 product guide final
 
4 jobs and_position_(sit_s___eit_s)_part_4
4 jobs and_position_(sit_s___eit_s)_part_44 jobs and_position_(sit_s___eit_s)_part_4
4 jobs and_position_(sit_s___eit_s)_part_4
 
Moss2007
Moss2007Moss2007
Moss2007
 
ISVForce Guide NEW
ISVForce Guide NEWISVForce Guide NEW
ISVForce Guide NEW
 
Getting started with sales logix
Getting started with sales logixGetting started with sales logix
Getting started with sales logix
 
Hfm install
Hfm installHfm install
Hfm install
 
Pinnacle Cart Manual v3.6
Pinnacle Cart Manual v3.6Pinnacle Cart Manual v3.6
Pinnacle Cart Manual v3.6
 
Oracle Web Conferencing - Release 2.0.4
Oracle Web Conferencing - Release 2.0.4Oracle Web Conferencing - Release 2.0.4
Oracle Web Conferencing - Release 2.0.4
 
Seu purchase requisition management system
Seu purchase requisition management systemSeu purchase requisition management system
Seu purchase requisition management system
 
BR100 Oracle AP Setup
BR100 Oracle AP SetupBR100 Oracle AP Setup
BR100 Oracle AP Setup
 
10 quick pay_part_10
10 quick pay_part_1010 quick pay_part_10
10 quick pay_part_10
 
Getting started with licensing | Tally.NET Services | Tally Intergation | Tal...
Getting started with licensing | Tally.NET Services | Tally Intergation | Tal...Getting started with licensing | Tally.NET Services | Tally Intergation | Tal...
Getting started with licensing | Tally.NET Services | Tally Intergation | Tal...
 
Admm crp oracle payroll
Admm crp oracle payrollAdmm crp oracle payroll
Admm crp oracle payroll
 
8.1 fast formula_method_1_using_default_hours_and_amount
8.1 fast formula_method_1_using_default_hours_and_amount8.1 fast formula_method_1_using_default_hours_and_amount
8.1 fast formula_method_1_using_default_hours_and_amount
 
En clipboard app quick_reference_guide
En clipboard app quick_reference_guideEn clipboard app quick_reference_guide
En clipboard app quick_reference_guide
 

Viewers also liked

BASE DE DATOS
BASE DE DATOSBASE DE DATOS
BASE DE DATOS
angie pabon quezda
 
Management_Console_User_Guide
Management_Console_User_GuideManagement_Console_User_Guide
Management_Console_User_Guide
Jana Chambers
 
Seminar Pecutan Awal Cemerlang (PT3/SPM)
Seminar Pecutan Awal Cemerlang (PT3/SPM)Seminar Pecutan Awal Cemerlang (PT3/SPM)
Seminar Pecutan Awal Cemerlang (PT3/SPM)
Hilter Yew
 
Expressive eng
Expressive engExpressive eng
Expressive eng
Nata Emelya
 
Map7 nov2012-fr
Map7 nov2012-frMap7 nov2012-fr
Map7 nov2012-frroofishigh
 
Metals and non metals
Metals and non metalsMetals and non metals
Metals and non metals
indianeducation
 
Eco orga entreprises_biffé
Eco orga entreprises_bifféEco orga entreprises_biffé
Eco orga entreprises_bifféhassan1488
 
Penetapan Kadar Cu dalam Kupri Sulfat
Penetapan Kadar Cu dalam Kupri SulfatPenetapan Kadar Cu dalam Kupri Sulfat
Penetapan Kadar Cu dalam Kupri Sulfat
Ridwan Ajipradana
 
PCI DSS Hizmetler Sunumu
PCI DSS Hizmetler SunumuPCI DSS Hizmetler Sunumu
PCI DSS Hizmetler Sunumu
ATEŞ SÜNBÜL
 
Ooluk Data Dictionary Manager
Ooluk Data Dictionary ManagerOoluk Data Dictionary Manager
Ooluk Data Dictionary Manager
Siddhesh Prabhu
 
Big Data Webinar
Big Data WebinarBig Data Webinar
Big Data Webinar
Pactera_US
 
Hadoop vs. RDBMS for Advanced Analytics
Hadoop vs. RDBMS for Advanced AnalyticsHadoop vs. RDBMS for Advanced Analytics
Hadoop vs. RDBMS for Advanced Analytics
joshwills
 
Diseño presentacion
Diseño presentacionDiseño presentacion
Diseño presentacion
Ilia E. Lopez-Jimenez
 
New Microsoft PowerPoint Presentation (2)
New Microsoft PowerPoint Presentation (2)New Microsoft PowerPoint Presentation (2)
New Microsoft PowerPoint Presentation (2)
jaweria Akram
 
Examen de power point
Examen de power pointExamen de power point
Examen de power point
haydeeseb
 
Form 4 Chapter 4
Form 4 Chapter 4Form 4 Chapter 4
Form 4 Chapter 4Ahmad Rizal
 
Etude Olfeo 2016 : La réalité de l'utilisation d'Internet au bureau
Etude Olfeo 2016 : La réalité de l'utilisation d'Internet au bureauEtude Olfeo 2016 : La réalité de l'utilisation d'Internet au bureau
Etude Olfeo 2016 : La réalité de l'utilisation d'Internet au bureau
Olfeo Nom de famille
 

Viewers also liked (18)

Costa Cruising Certificate.PDF
Costa Cruising  Certificate.PDFCosta Cruising  Certificate.PDF
Costa Cruising Certificate.PDF
 
BASE DE DATOS
BASE DE DATOSBASE DE DATOS
BASE DE DATOS
 
Management_Console_User_Guide
Management_Console_User_GuideManagement_Console_User_Guide
Management_Console_User_Guide
 
Seminar Pecutan Awal Cemerlang (PT3/SPM)
Seminar Pecutan Awal Cemerlang (PT3/SPM)Seminar Pecutan Awal Cemerlang (PT3/SPM)
Seminar Pecutan Awal Cemerlang (PT3/SPM)
 
Expressive eng
Expressive engExpressive eng
Expressive eng
 
Map7 nov2012-fr
Map7 nov2012-frMap7 nov2012-fr
Map7 nov2012-fr
 
Metals and non metals
Metals and non metalsMetals and non metals
Metals and non metals
 
Eco orga entreprises_biffé
Eco orga entreprises_bifféEco orga entreprises_biffé
Eco orga entreprises_biffé
 
Penetapan Kadar Cu dalam Kupri Sulfat
Penetapan Kadar Cu dalam Kupri SulfatPenetapan Kadar Cu dalam Kupri Sulfat
Penetapan Kadar Cu dalam Kupri Sulfat
 
PCI DSS Hizmetler Sunumu
PCI DSS Hizmetler SunumuPCI DSS Hizmetler Sunumu
PCI DSS Hizmetler Sunumu
 
Ooluk Data Dictionary Manager
Ooluk Data Dictionary ManagerOoluk Data Dictionary Manager
Ooluk Data Dictionary Manager
 
Big Data Webinar
Big Data WebinarBig Data Webinar
Big Data Webinar
 
Hadoop vs. RDBMS for Advanced Analytics
Hadoop vs. RDBMS for Advanced AnalyticsHadoop vs. RDBMS for Advanced Analytics
Hadoop vs. RDBMS for Advanced Analytics
 
Diseño presentacion
Diseño presentacionDiseño presentacion
Diseño presentacion
 
New Microsoft PowerPoint Presentation (2)
New Microsoft PowerPoint Presentation (2)New Microsoft PowerPoint Presentation (2)
New Microsoft PowerPoint Presentation (2)
 
Examen de power point
Examen de power pointExamen de power point
Examen de power point
 
Form 4 Chapter 4
Form 4 Chapter 4Form 4 Chapter 4
Form 4 Chapter 4
 
Etude Olfeo 2016 : La réalité de l'utilisation d'Internet au bureau
Etude Olfeo 2016 : La réalité de l'utilisation d'Internet au bureauEtude Olfeo 2016 : La réalité de l'utilisation d'Internet au bureau
Etude Olfeo 2016 : La réalité de l'utilisation d'Internet au bureau
 

Similar to Management_Console_Quick_Start_Guide

Payroll
PayrollPayroll
Payroll
ravi78
 
Mail chimp for-designers
Mail chimp for-designersMail chimp for-designers
Mail chimp for-designers
Jacques Bouchard
 
Implementation of payroll in tally erp 9
Implementation of payroll in tally erp 9Implementation of payroll in tally erp 9
Implementation of payroll in tally erp 9
Rupchand Jawale
 
Implementation of payroll in tally erp 9 | Tally Customization services | Fix...
Implementation of payroll in tally erp 9 | Tally Customization services | Fix...Implementation of payroll in tally erp 9 | Tally Customization services | Fix...
Implementation of payroll in tally erp 9 | Tally Customization services | Fix...
stannventures.Pvt.Ltd
 
PayrollAdmin - Attendance and Payroll Management ERP Software
PayrollAdmin - Attendance and Payroll Management ERP SoftwarePayrollAdmin - Attendance and Payroll Management ERP Software
PayrollAdmin - Attendance and Payroll Management ERP Software
Ranganath Shivaram
 
Qs2 um en_02_procure_to_pay
Qs2 um en_02_procure_to_payQs2 um en_02_procure_to_pay
Qs2 um en_02_procure_to_pay
khayer
 
Rewards_User_Guide
Rewards_User_GuideRewards_User_Guide
Rewards_User_Guide
Jana Chambers
 
Jobportal 130815001657-phpapp01
Jobportal 130815001657-phpapp01Jobportal 130815001657-phpapp01
Jobportal 130815001657-phpapp01
Areef Khan
 
2010 quick books for beginners manual as of april 2010 a
2010 quick books for beginners manual as of april 2010 a2010 quick books for beginners manual as of april 2010 a
2010 quick books for beginners manual as of april 2010 a
Nick Saldaña
 
School software
School softwareSchool software
School software
Ranganath Shivaram
 
Ax50 enus wn_app
Ax50 enus wn_appAx50 enus wn_app
Ax50 enus wn_app
DynamicsTutor
 
Robot job scheduler handbook
Robot job scheduler handbookRobot job scheduler handbook
Robot job scheduler handbook
Prabhu Subramanian
 
Ice Cream Dreams - Bussiness Plan Sample
Ice Cream Dreams - Bussiness Plan SampleIce Cream Dreams - Bussiness Plan Sample
Ice Cream Dreams - Bussiness Plan Sample
Pradeep Subedi
 
Management_Console_User_Guide
Management_Console_User_GuideManagement_Console_User_Guide
Management_Console_User_Guide
Jana Chambers
 
Business objects51en
Business objects51enBusiness objects51en
Business objects51en
Chandan Behura
 
online job portal system
online job portal systemonline job portal system
online job portal system
Krishna Ranjan
 
Qs2 en initial_interview
Qs2 en initial_interviewQs2 en initial_interview
Qs2 en initial_interview
khayer
 
SPi Global Services Overview
SPi Global Services OverviewSPi Global Services Overview
SPi Global Services Overview
bloevens
 
CustomerEngagement-en
CustomerEngagement-enCustomerEngagement-en
CustomerEngagement-en
Jose Aleman
 
Tally.erp 9 release notes
Tally.erp 9 release notesTally.erp 9 release notes
Tally.erp 9 release notes
Tdasolanki
 

Similar to Management_Console_Quick_Start_Guide (20)

Payroll
PayrollPayroll
Payroll
 
Mail chimp for-designers
Mail chimp for-designersMail chimp for-designers
Mail chimp for-designers
 
Implementation of payroll in tally erp 9
Implementation of payroll in tally erp 9Implementation of payroll in tally erp 9
Implementation of payroll in tally erp 9
 
Implementation of payroll in tally erp 9 | Tally Customization services | Fix...
Implementation of payroll in tally erp 9 | Tally Customization services | Fix...Implementation of payroll in tally erp 9 | Tally Customization services | Fix...
Implementation of payroll in tally erp 9 | Tally Customization services | Fix...
 
PayrollAdmin - Attendance and Payroll Management ERP Software
PayrollAdmin - Attendance and Payroll Management ERP SoftwarePayrollAdmin - Attendance and Payroll Management ERP Software
PayrollAdmin - Attendance and Payroll Management ERP Software
 
Qs2 um en_02_procure_to_pay
Qs2 um en_02_procure_to_payQs2 um en_02_procure_to_pay
Qs2 um en_02_procure_to_pay
 
Rewards_User_Guide
Rewards_User_GuideRewards_User_Guide
Rewards_User_Guide
 
Jobportal 130815001657-phpapp01
Jobportal 130815001657-phpapp01Jobportal 130815001657-phpapp01
Jobportal 130815001657-phpapp01
 
2010 quick books for beginners manual as of april 2010 a
2010 quick books for beginners manual as of april 2010 a2010 quick books for beginners manual as of april 2010 a
2010 quick books for beginners manual as of april 2010 a
 
School software
School softwareSchool software
School software
 
Ax50 enus wn_app
Ax50 enus wn_appAx50 enus wn_app
Ax50 enus wn_app
 
Robot job scheduler handbook
Robot job scheduler handbookRobot job scheduler handbook
Robot job scheduler handbook
 
Ice Cream Dreams - Bussiness Plan Sample
Ice Cream Dreams - Bussiness Plan SampleIce Cream Dreams - Bussiness Plan Sample
Ice Cream Dreams - Bussiness Plan Sample
 
Management_Console_User_Guide
Management_Console_User_GuideManagement_Console_User_Guide
Management_Console_User_Guide
 
Business objects51en
Business objects51enBusiness objects51en
Business objects51en
 
online job portal system
online job portal systemonline job portal system
online job portal system
 
Qs2 en initial_interview
Qs2 en initial_interviewQs2 en initial_interview
Qs2 en initial_interview
 
SPi Global Services Overview
SPi Global Services OverviewSPi Global Services Overview
SPi Global Services Overview
 
CustomerEngagement-en
CustomerEngagement-enCustomerEngagement-en
CustomerEngagement-en
 
Tally.erp 9 release notes
Tally.erp 9 release notesTally.erp 9 release notes
Tally.erp 9 release notes
 

Management_Console_Quick_Start_Guide

  • 1. POS Management Console Quick Start Guide September 10, 2015
  • 2. Introduction . . . . . . . . . . . . . . . . . . . . . . . . . . . . . . . . . . . . . . . . . . . . . . . . . . . . . . . . . . . 3 Logging on to the Management Console. . . . . . . . . . . . . . . . . . . . . . . . . . . . . . . . . . 3 Overview . . . . . . . . . . . . . . . . . . . . . . . . . . . . . . . . . . . . . . . . . . . . . . . . . . . . . . . . . . . . . 3 Icons. . . . . . . . . . . . . . . . . . . . . . . . . . . . . . . . . . . . . . . . . . . . . . . . . . . . . . . . . . . . . . 4 Employees . . . . . . . . . . . . . . . . . . . . . . . . . . . . . . . . . . . . . . . . . . . . . . . . . . . . . . . . . . . . 5 Employee Icons . . . . . . . . . . . . . . . . . . . . . . . . . . . . . . . . . . . . . . . . . . . . . . . . . . . . . 5 Adding an Employee . . . . . . . . . . . . . . . . . . . . . . . . . . . . . . . . . . . . . . . . . . . . . . . . . 6 Editing an Employee. . . . . . . . . . . . . . . . . . . . . . . . . . . . . . . . . . . . . . . . . . . . . . . . . . 6 Deactivating an Employee . . . . . . . . . . . . . . . . . . . . . . . . . . . . . . . . . . . . . . . . . . . . . 6 Schedules . . . . . . . . . . . . . . . . . . . . . . . . . . . . . . . . . . . . . . . . . . . . . . . . . . . . . . . . . . . . 7 Creating Shift Schedules . . . . . . . . . . . . . . . . . . . . . . . . . . . . . . . . . . . . . . . . . . . . . . 8 Products . . . . . . . . . . . . . . . . . . . . . . . . . . . . . . . . . . . . . . . . . . . . . . . . . . . . . . . . . . . . . 8 Product Icons. . . . . . . . . . . . . . . . . . . . . . . . . . . . . . . . . . . . . . . . . . . . . . . . . . . . . . . 9 Adding a Category, Subcategory, and Product. . . . . . . . . . . . . . . . . . . . . . . . . . . . . 9 Editing a Product . . . . . . . . . . . . . . . . . . . . . . . . . . . . . . . . . . . . . . . . . . . . . . . . 10 Deactivating a Product . . . . . . . . . . . . . . . . . . . . . . . . . . . . . . . . . . . . . . . . . . . . 10 Taxes . . . . . . . . . . . . . . . . . . . . . . . . . . . . . . . . . . . . . . . . . . . . . . . . . . . . . . . . . . . . . . . 10 Creating a Prevailing Tax Group . . . . . . . . . . . . . . . . . . . . . . . . . . . . . . . . . . . . . . . 10 Receipts. . . . . . . . . . . . . . . . . . . . . . . . . . . . . . . . . . . . . . . . . . . . . . . . . . . . . . . . . . . . . 11 Designing the Receipt . . . . . . . . . . . . . . . . . . . . . . . . . . . . . . . . . . . . . . . . . . . . . . . 12 Payments. . . . . . . . . . . . . . . . . . . . . . . . . . . . . . . . . . . . . . . . . . . . . . . . . . . . . . . . . . . . 12 Troubleshooting. . . . . . . . . . . . . . . . . . . . . . . . . . . . . . . . . . . . . . . . . . . . . . . . . . . . . . . 12 Contents
  • 3. SoftwareRelease1525 7/14/15 3 INTRODUCTION This document is an overview of Revel Systems POS Management Console and includes basic instructions on how to perform tasks required to setup and start using the system. For detailed information about configuring and operating Revel Systems’ POS, refer to the POS Management Console Operation Manual. To install the hardware refer to the installation manual shipped with the product. Logging on to the Management Console NOTE: Revel Systems will send an email with the details on how to log on to the Management Console. This infor- mation includes the user login and password. 1. Open the Web browser. 2. Enter the URL in the address bar of the Web browser. The Revel Systems login screen opens. 3. Enter the user login. 4. Enter the password. 5. Click the LOGIN button, the Overview page of the management console opens in the browser. OVERVIEW Configuration Bar – Quick steps to get a business up and running. A check mark indicates the step is com- plete. The first four steps are required before the POS system can be used. Customizing receipts is recom- mended, but optional. Icons – Top level of pages available on the POS Management Console. A blue icon indicates the icon is selected. Brand – Name of the retailer, restaurant, or franchise. Login – The name of the user logged on to the system. Establishment – Name of the selected establishment. Number Completed – Displays a fraction that indicates the number of steps completed. When all five steps are completed the Configuration Bar will no longer be displayed. Doe’s Dough John Doe@DoeDough Downtown 4 53 2 6 1 1 2 3 4 5 6
  • 4. Software Release 15.25 4 7/14/15 Icons Overview – Opens a daily transaction overview for the establishment including, repeat customer information, taxes, discounts, and payments. Reports – Opens a list of predefined Revel Systems’ reports. Owners/managers can easily view day-to-day activity. Products – Contains all product settings including taxes, fees, ingredients, discounts and all other information relevant to the establishment’s products. Inventory – Tracks product and ingredient inventory including name, barcode, SKU and location. Also, maintains a list of preferred suppliers, creates and manages purchase orders, and can be con- figured to send email alerts when stock is low. Employees – Identifies the establishment’s employees, their roles, wages and permissions. Schedules – Displays employee shift schedules, payroll reports, tracks actual time worked (including breaks), and maintains a record of labor cost for wage forecasting. CRM (Customer Relationship Manager) – Maintains customer information including name, phone number, address, loyalty and gift cards. Establishment – Configures physical information about the establishment, including POS stations, and peripherals. Settings – Customizes POS settings including password control, receipts, payments, customer information and inventory.
  • 5. SoftwareRelease1525 7/14/15 5 EMPLOYEES Employee Icons Employee Information – Displays the name of the employee, their email, phone number, roles, and job status. Icons – Settings available for employees. A blue icon indicates the icon is selected. Search – Finds an employee using their name, internal or external ID. Employee Page – Opens the employee’s information page. Employees – Opens a list of all current, former, unassigned, and inactive employees. Training Video– Controls whether or not an employee must watch a training video prior to using the management console. A checked box indicates the employee has watched the video. Roles – Defines and lists all roles that can be assigned to an employee. Role Permissions – Allows the administrator to tie permissions to roles. Permissions control what the employee can do on the POS. Values marked as blue have been edited and will be saved. Exports – Creates and exports an Excel spreadsheet of all employees. Add Employee – Opens the Employees/Add Employee page. Enter all relevant information for the employee including first name, last name, employee status, role, and pin to log on to the POS. 1 3 4 2 1 2 3 4
  • 6. Software Release 15.25 6 7/14/15 Adding an Employee 1. Click the icon, the Employee page opens. 2. Click the icon, the Employee/Add employee page opens. 3. Enter the first name of the employee in the First Name field. 4. Enter the last name of the employee in the Last Name field. 5. Enter the POS pin for the employee in the Pin field. 6. Enter start date for the employee in the Employee start field. 7. Select the employee role from the Initial Role drop-down menu. 8. Click the Create button, the employee is added to the database. Editing an Employee 1. Click the icon, the Employee page opens. 2. Click the icon, the Employee/Add employee page opens. 3. Click the icon located to the right of employees name, the detail page for the selected employee opens. 4. Make changes to the employee’s information as required. 5. Click Save to save the changes. Deactivating an Employee 1. Click the icon, the Employee page opens. 2. Click the icon, the Employee/Add employee page opens. 3. Click the icon located to the right of employees name, the detail page for the selected employee opens. 4. Click and remove the check mark in the ACTIVE field. Removing the check mark will deactivate the employee. 5. Click Save to save the changes.
  • 7. SoftwareRelease1525 7/14/15 7 SCHEDULES Send Emails – Sends an email of the shift schedule to the employee. Total Hours – Displays the total hours scheduled for the week. Total Wages – Displays the total wages that will be earned for the week. All roles – Filters the shift schedule by employees who have the selected role. Times format – Selects the time format displayed on the time sheet Date Range – Selects the time period to display on the time sheet. Copy Shifts – Copies a recurrent schedule to another week. Import/Export – Imports or exports an Excel spreadsheet of the shifts. Days of the week – Displays the work schedule for each day of the week in the selected week. 2 3 4 5 6 7 8 1 9 1 2 3 4 5 6 7 8 9
  • 8. Software Release 15.25 8 7/14/15 Creating Shift Schedules 1. Click the icon, the Schedule page opens. 2. Select an employee from the list and click on a day of the week, a schedule opens for the selected employee. 3. Enter the start time in the Start Time field. 4. Enter and end time in the End Time field. 5. Select how the shift will end from the End Status drop-down menu. 6. Select the employee role from the Role drop-down menu. 7. Click Save, the start and end time are added to the day of the week for the employee. PRODUCTS + Add Category – Categorizes how products are organized and displayed on the POS. + Add Subcategory – Defines the second product tier, a division of a category. + Add Product – Contains all information about products that the establishment sells. COST – Displays the cost the merchant paid for the product. PRICE – Displays the selling price of the product. + Add New Product – Opens a product creation screen with the basic product details tree located on the left-side and the product details on the right-side of the screen. Quickly add new products and then push the products out to all establishments. Save – Saves a new or edited Category, Subcategory, or Product to the Products page. 1 2 3 4 5 6 7 1 2 3 4 5 6 7
  • 9. SoftwareRelease1525 7/14/15 9 Product Icons Adding a Category, Subcategory, and Product 1. Click the icon, the products page opens. 2. Click on Products located on the left-hand side of the screen. 3. Click +Add Category and enter a name in the blank category field. 4. Click the icon next to a category to expand and view the subcategory list. 5. Click +Add Subcategory and enter name in the blank subcategory field. 6. Click the icon next to a subcategory to expand and view the product list. 7. Click +Add Product and enter name in the blank product field. 8. Enter the cost of the product in COST field. 9. Enter retail sales price of the product in the PRICE field. 10. Click the icon to save the product information. Recipes – Adds or edits ingredients used in the product. A dark blue icon indicates that there are ingredients assigned to the product. A light blue icon indicates there are no ingredients assigned to the product. Modifiers – Adds or edits the modifiers available for the product. A dark blue icon indicates that there are modifiers associated to the product. A light blue icon indicates there are no modifiers associated to the product. Copy Modifiers – Copies the modifiers from one product to another product. Inventory – Opens product inventory settings. Reorder by Name – Sorts categories, subcategories and products in alphabetic order. Clone Product – Copies all modifiers and settings associated to a product and creates a new product with a different name, barcode, and SKU. Details – Edits the details of a Category, Subcategory, or Product. A-Z
  • 10. Software Release 15.25 10 7/14/15 Editing a Product 1. Click the icon, the products page opens. 2. Click on Products located on the left-hand side of the screen. 3. Select the product to edit from the list of available Products. 4. Click the icon located to the right of product, the details for the selected product opens. 5. Make changes to the product as required. 6. Click the icon to save the product information. Deactivating a Product 1. Click the icon, the products page opens. 2. Click on Products located on the left-hand side of the screen. 3. Select the product to hide from the list of available Products. 4. Click and remove the check mark in the ACTIVE field. Removing the check mark will deactivate the product and it will not be displayed on the POS. 5. Click the icon to save the product information. TAXES Creating a Prevailing Tax Group NOTE: The Prevailing Tax Group is a special Tax Group. It is used for all products which do not belong to other Tax Groups. Use this tax group to configure default taxes, which apply to most of the establishments products. 1. Click the icon, the products page opens. 2. Click on Tax Groups located on the left-hand side of the screen. The Tax Group page opens. 3. Click on Prevailing Tax Group. 4. Enter name of the tax in the Tax Name field. 5. Enter tax rate in the Tax Rate field. 6. Click the . 7. Click the icon to save the prevailing tax information. + Create
  • 11. SoftwareRelease1525 7/14/15 11 RECEIPTS NOTE: Revel Systems Management Console enables customization of receipts. Logo – Displays the uploaded image of the customer’s logo. Top – Options include the customer name, address, and phone number. Order Information– Options include the customer name, a call number, order number, the guest count, order option, station number, server name, and call name. Middle – Options include products sold, the price of the product, product modifiers, modifier price, discounts, subtotal, taxes, total, how the transaction was paid, and if the customer received change. not all times in the section are editable. Bottom – Options include personalized notes, promotional text, and a barcode. Order# 65941 Station# Kiosk1 Call Name: J Smith Employee: JLK Date: 6/1/15, 4:07PM 2 Mini Cupcake (Half Dozen) $12.each 6 Maple Bacon Mini Cupcake (Half Dozen) $12.each Discount: 3 Salted Caramel Red Velvet Rich & Famous Basic Vanilla $24.00 +$0.00 $12.00 -$2.00 +$0.00 +$0.00 +$0.00 +$0.00 Subtotal: Total Tax $34.00 $3.15 Total : Cutomer Paid Cash: Customer Change: $37.15 $40.00 $3.15 Thank You For Visting! Please visit us at www.cupcakes.com Cupcake’s Bakery 21st Street 4 5 1 2 3 1 2 3 4 5
  • 12. Software Release 15.25 12 7/14/15 Designing the Receipt 1. Click the icon, the setting page opens. 2. Click on Receipts located on the left-hand side of the screen. The Receipts page opens. 3. Hold the Crtl key and then click on one or more options located in the Receipt Options box. 4. Enter information in all blank fields if applicable. 5. Scroll to the receipt top line. Enter the information that should be displayed at the top of the receipt. 6. Scroll to the receipt bottom line. Enter the information that should be displayed at the bottom of the receipt. 7. Upload an image file to print on the receipt, for example a logo. 8. Click Save to save the information. PAYMENTS Processors and gateways are necessary to complete credit card transactions. When a credit card is swiped the transaction data is encrypted and then sent to a gateway where the payment is authorized or denied. If the transaction is authorized, the gateway releases the funds to the processor, and transfers the funds to the client's bank. To process credit card transactions, Revel Systems offers several options both in terms of hardware and credit card processing. TROUBLESHOOTING ONBOARDING SUPPORT Email: onboarding@revelsystems.com Phone: 415.744.1433 extension 4 SYSTEM CONFIGURATION SUPPORT Phone: 415.744.1433 extension 2 Website: http://support.revelsystems.com Revel Systems, the Revel Systems logo, and other trademarks associated with Revel Systems products referred to in this publication are trademarks of the Revel Systems. ©Copyright 2015, Revel Systems. All rights reserved.