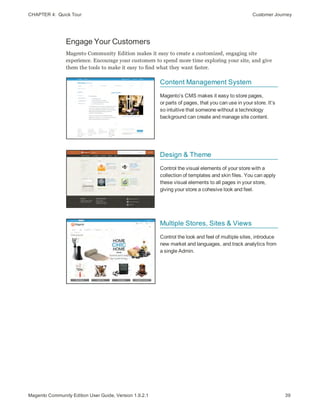
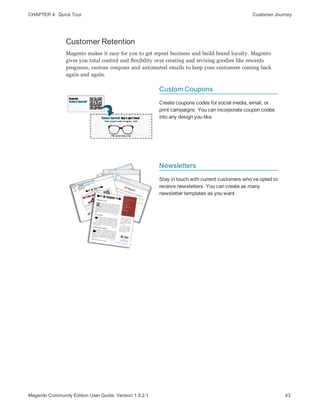
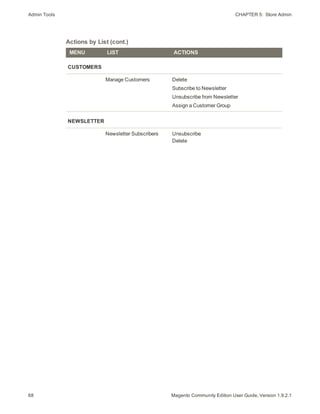
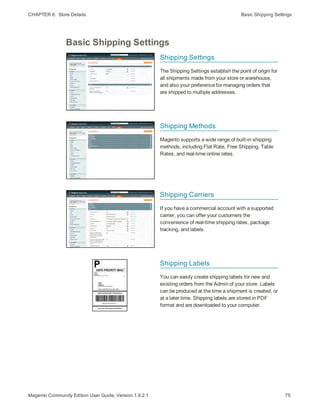
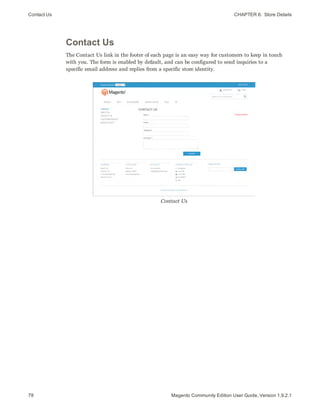
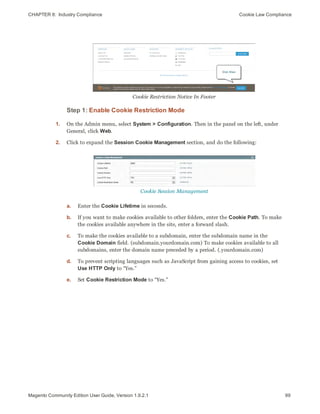
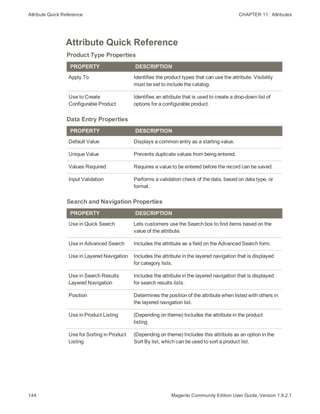
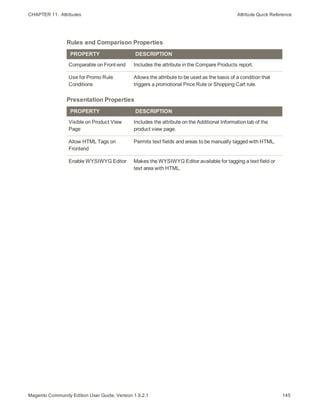
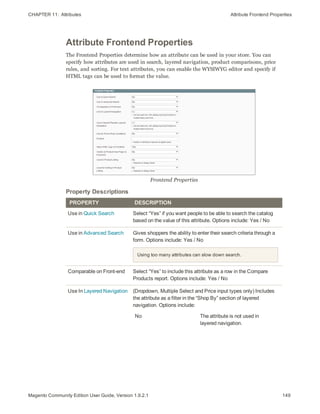
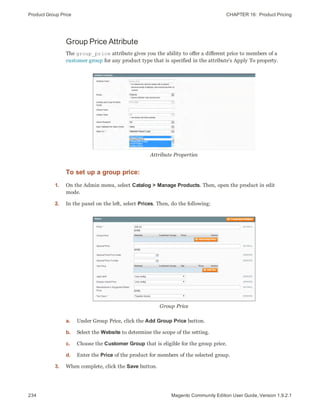
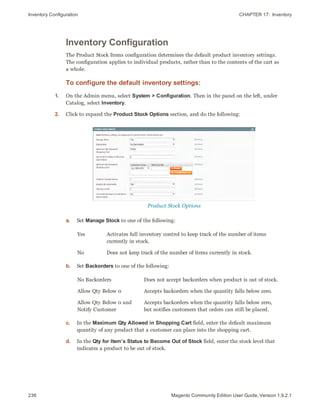
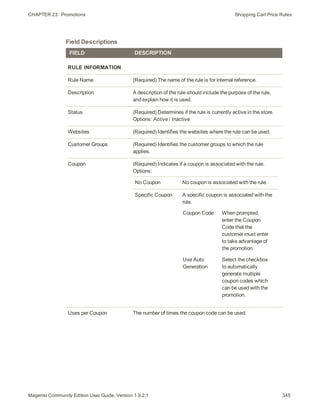
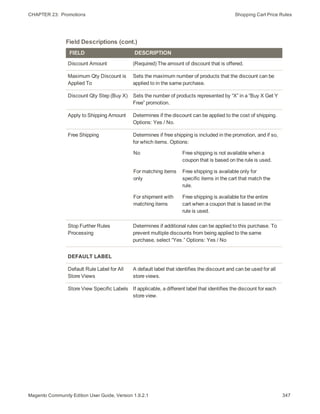
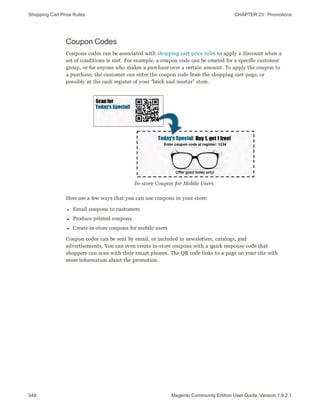
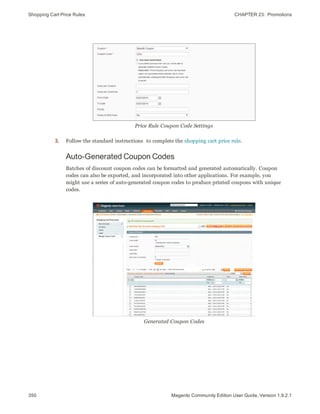
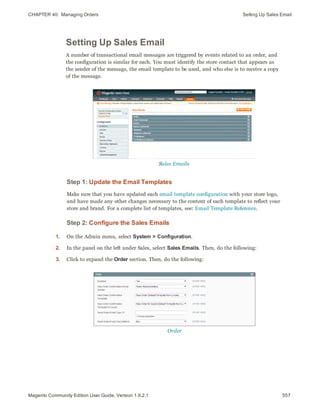
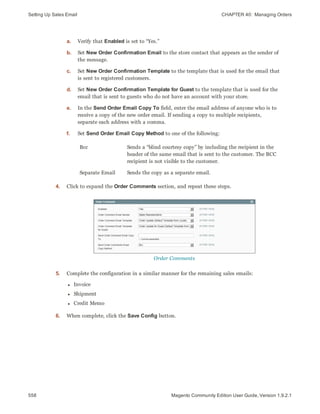
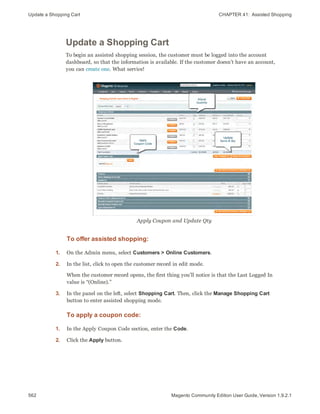
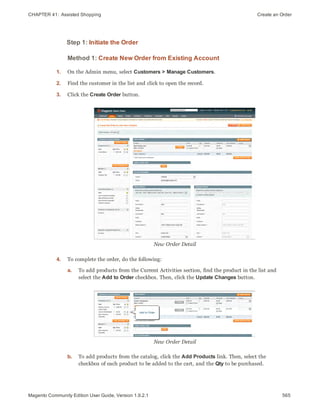
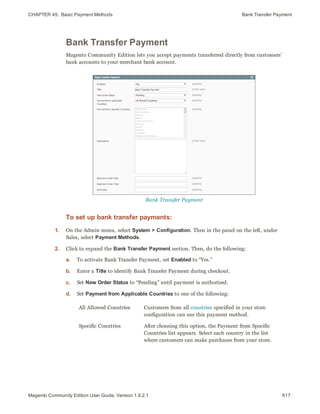
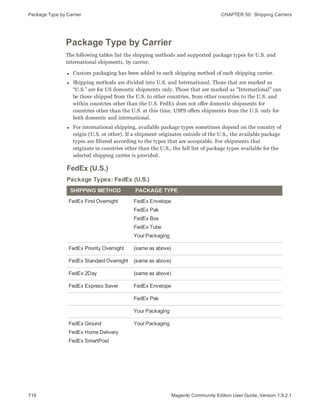
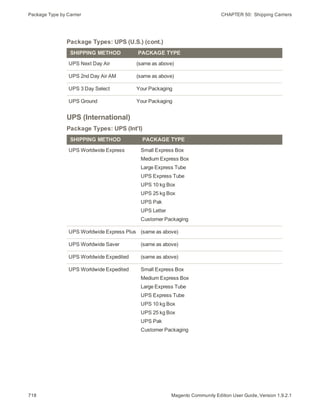
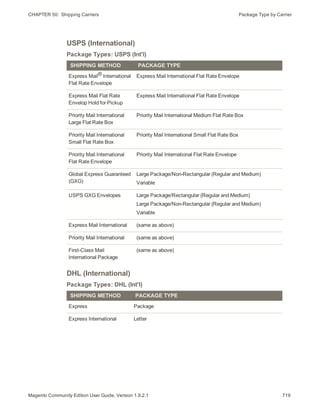
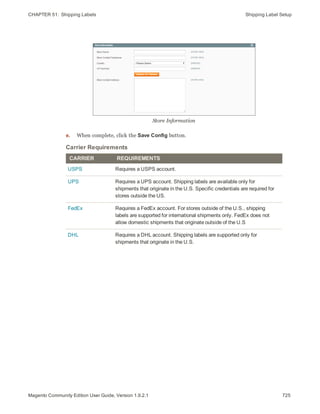
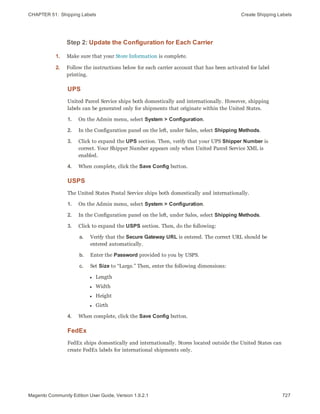
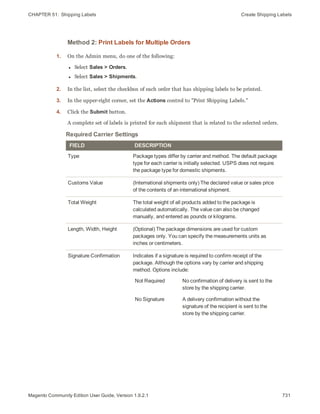
This document is a user guide for Magento Community Edition version 1.9.2.1. It contains 60 chapters covering Magento installation, configuration, products, sales, marketing and other store management topics. The guide provides instructions and best practices for setting up and using the Magento platform.


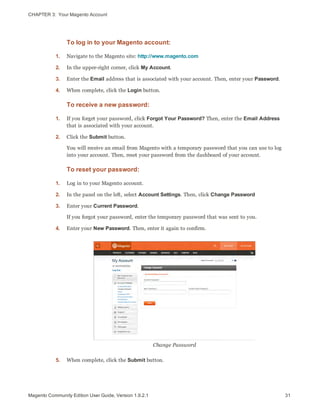
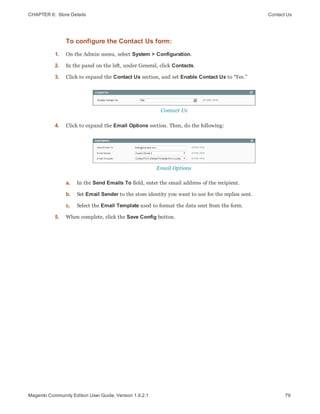
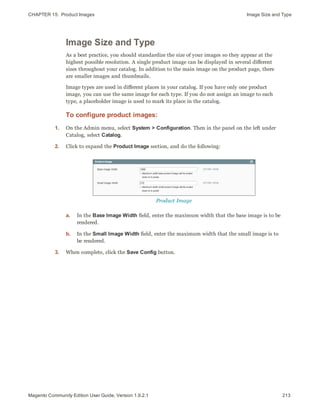
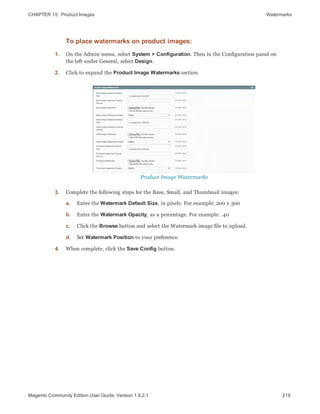
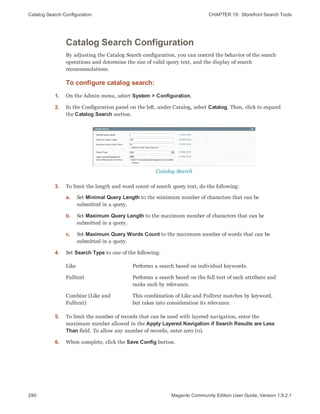
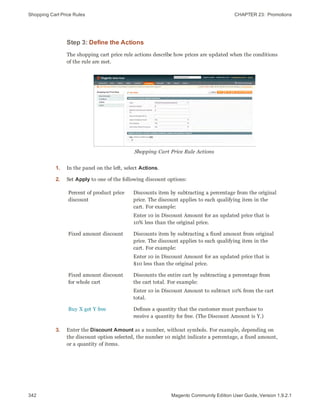
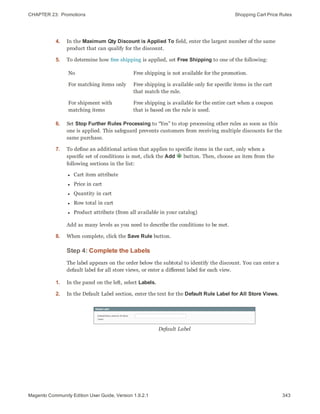
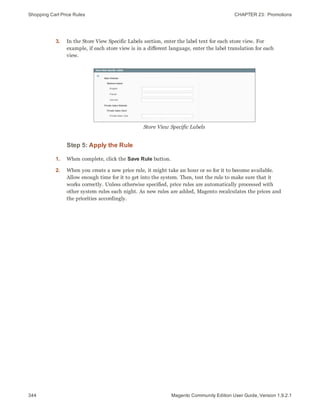
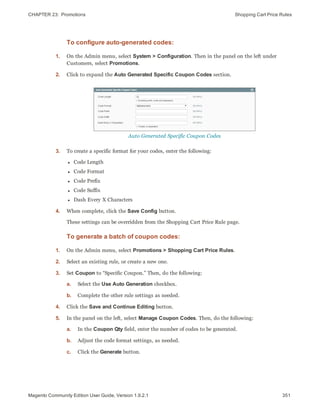
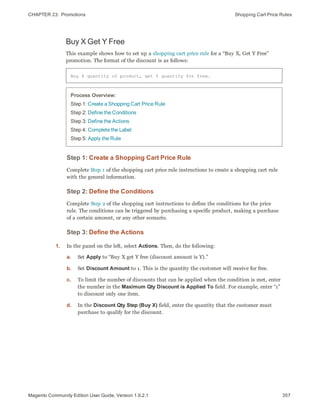
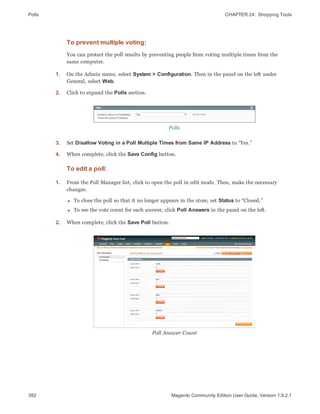
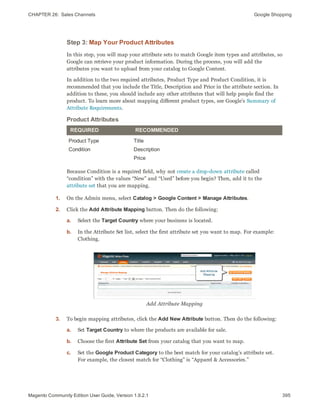
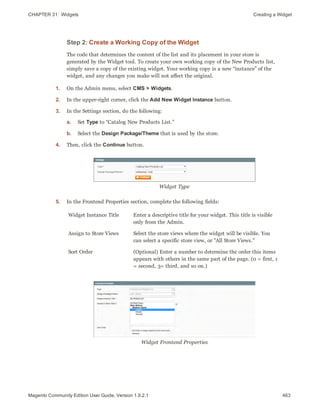
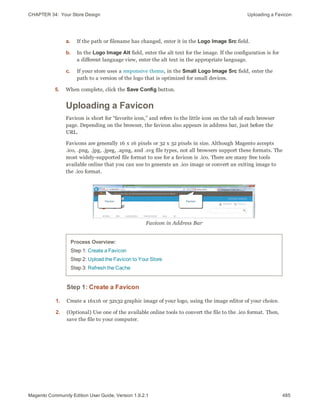
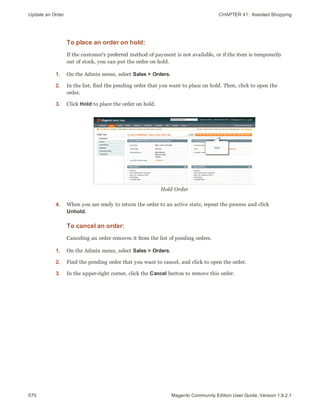
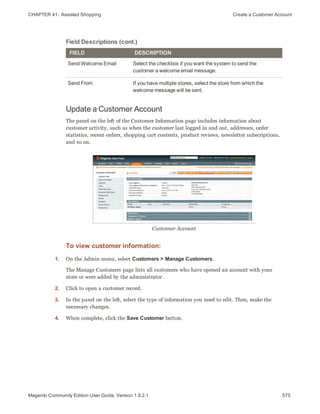
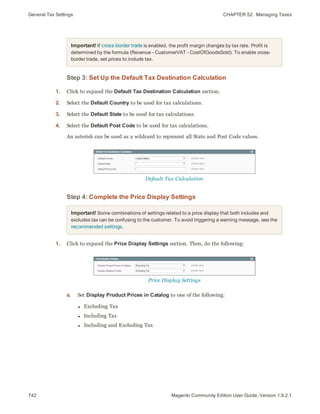
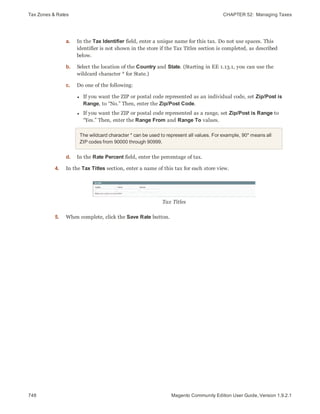
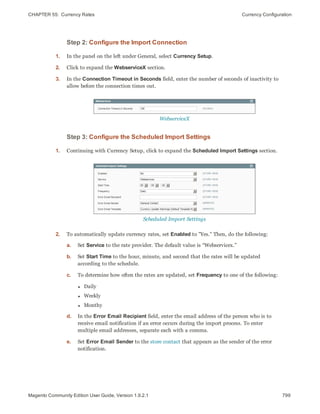
![CHAPTER 2: About This Release Installing Magento
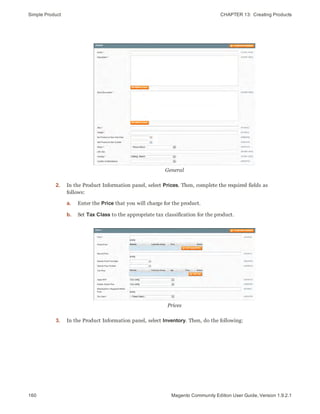
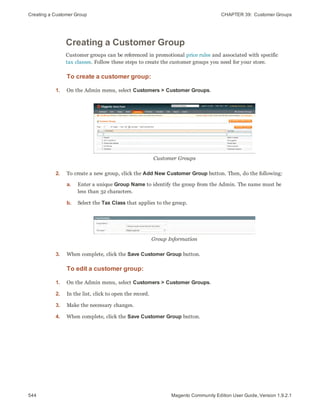
Step 1: Run Setup
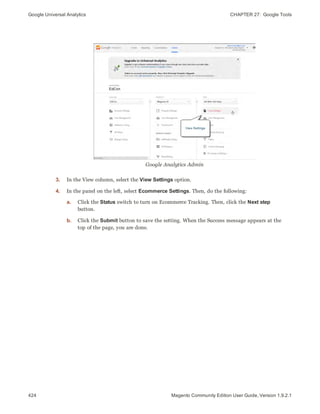
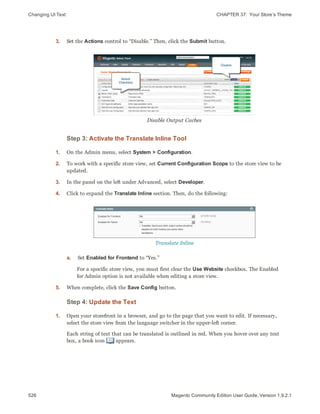
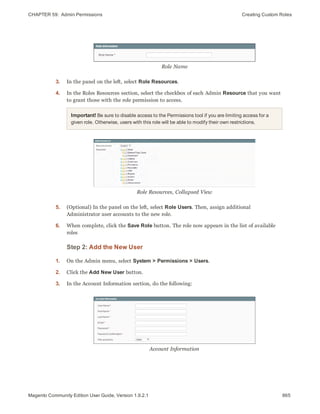
From your browser, enter the path to your Magento installation. Depending on the
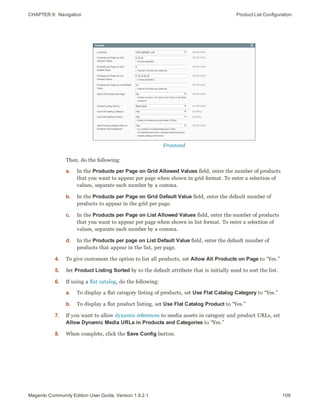
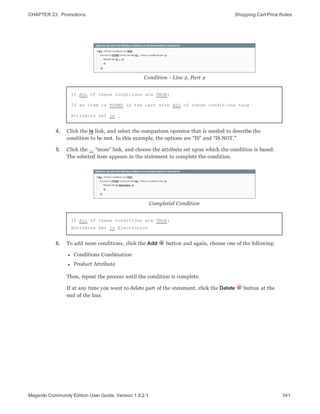
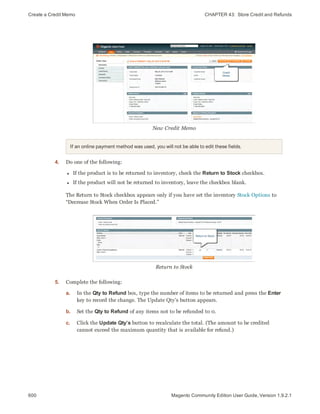
installation location, it is similar to one of the following:
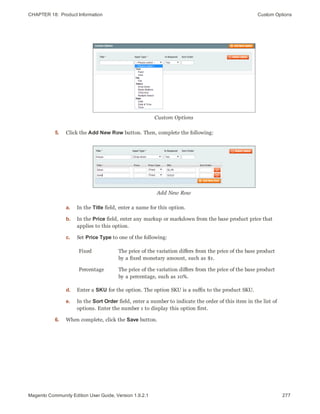
http://[your_domain]/magento
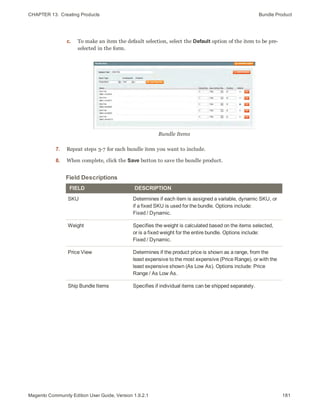
http://www.[your_domain]/magento
http://www.[your_domain]/[directory]/magento
Step 2: License Agreement
Read the terms of the Magento Community Edition End User License Agreement. If you
agree to the terms, click the Continue button.
License
Step 3: Localization
Select the default localization settings for your Magento CE installation. The values can be
changed later for specific stores, store views, and websites.
l Locale
l Time Zone
l Default Currency
21Magento Community Edition User Guide, Version 1.9.2.1](https://image.slidesharecdn.com/ypijvzifqyxwky6f1phz-signature-7e479c195258b6f3aa8e31480588ea71dc7b7dd96ed152bc88b163148596a2ba-poli-160413095347/85/Magento-community-edition-user-guide-43-320.jpg)


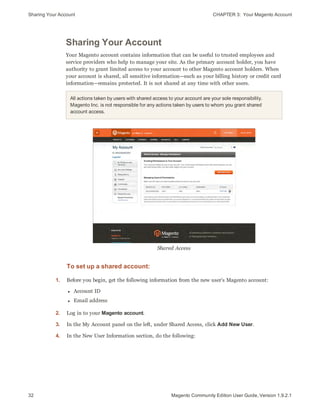


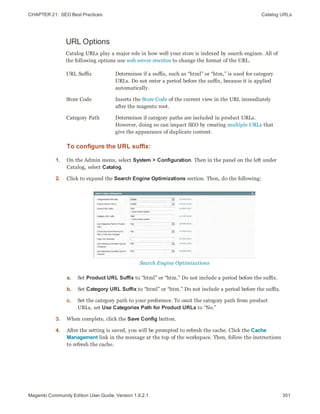
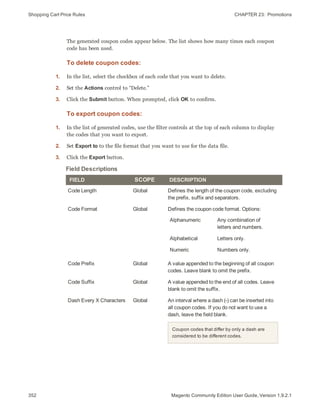
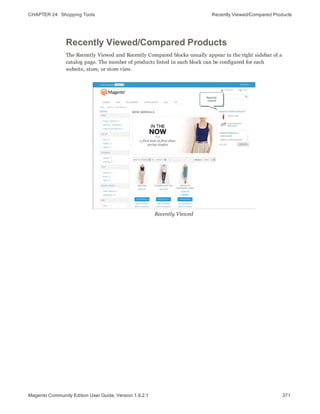
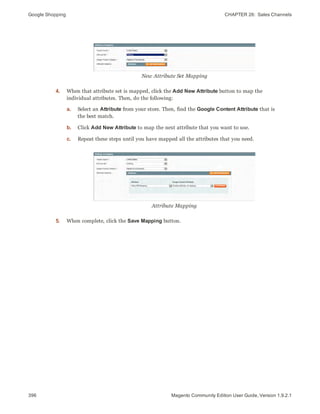
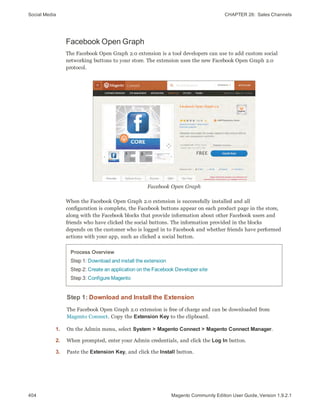
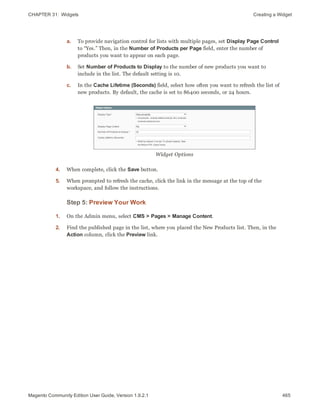
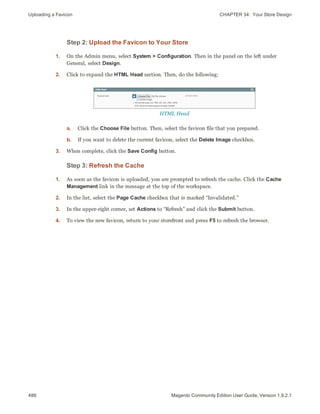
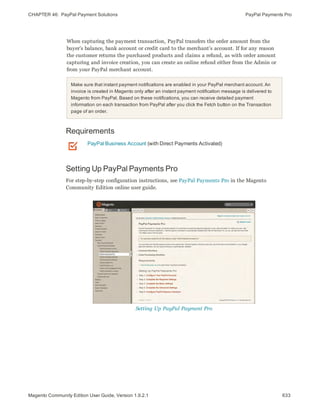
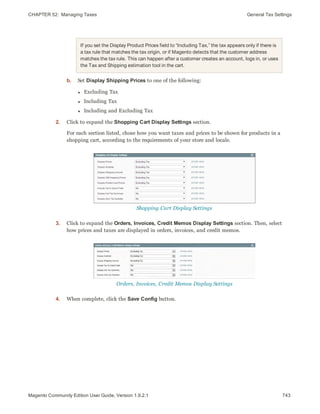
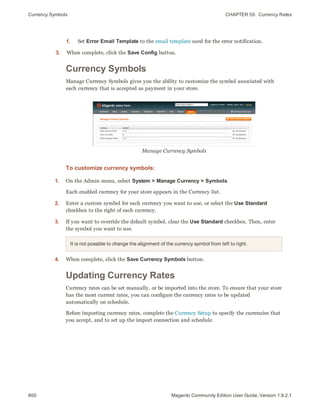
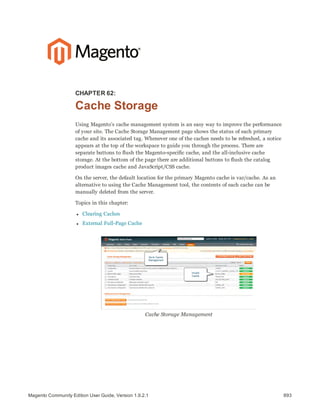
![Configuration Scope CHAPTER 7: Websites, Stores & Views
84 Magento Community Edition User Guide, Version 1.9.2.1
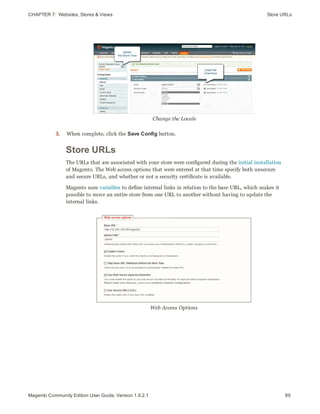
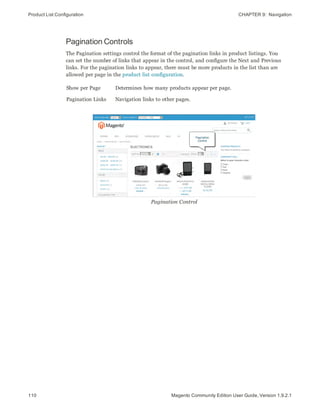
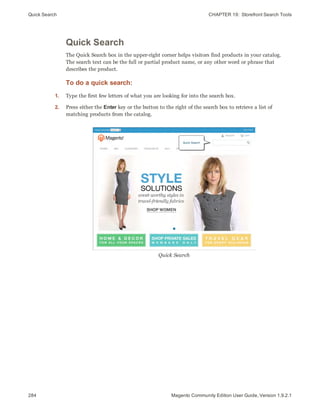
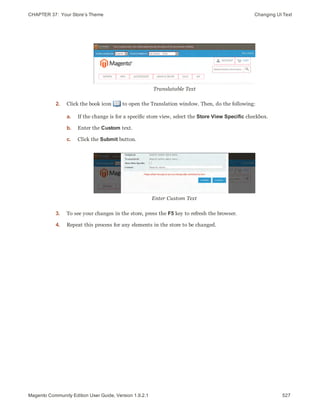
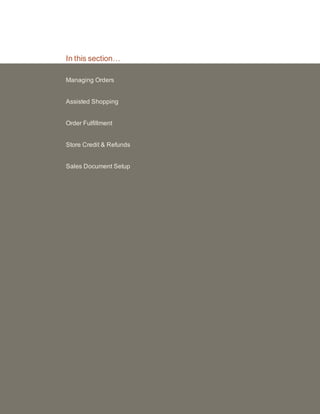
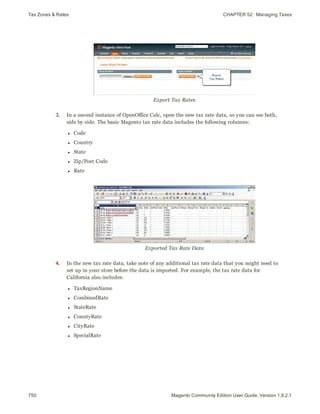
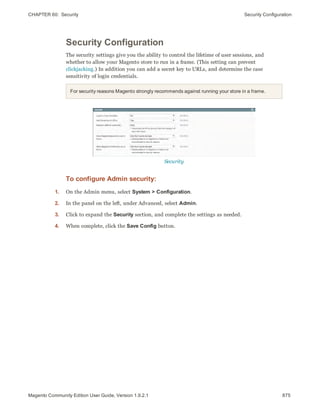
Configuration Scope
If your Magento installation has multiple websites, stores, or views, you can set the scope
of a configuration parameter to apply to a specific part of your installation. The Current
Configuration Scope box in the upper-left corner of the Admin workspace determines the
scope of the current settings. By default, the configuration scope is set to “Default Config.”
For Admin users with restricted access, the list includes only the areas where the user is
granted permission to access.
The configuration scope applies to products categories, attributes, customer management
setting, and so on. The scope of each item appears in brackets after the field to indicate the
range of the setting.
Current Configuration Scope
If your installation includes multiple websites, stores or views, you should always set the
scope to identify where you want the settings to apply. The possible settings are: [STORE],
[WEBSITE], and [GLOBAL].
Any item with the scope of [STORE] can be set differently for each view. For example,
because the scope of a product name and description is [STORE], the fields can have a
different value for each language. However, some configuration settings—such as postal
code—are [GLOBAL] because the same setting applies throughout the system. The
[WEBSITE] scope also applies to the entire site, including all views.](https://image.slidesharecdn.com/ypijvzifqyxwky6f1phz-signature-7e479c195258b6f3aa8e31480588ea71dc7b7dd96ed152bc88b163148596a2ba-poli-160413095347/85/Magento-community-edition-user-guide-106-320.jpg)


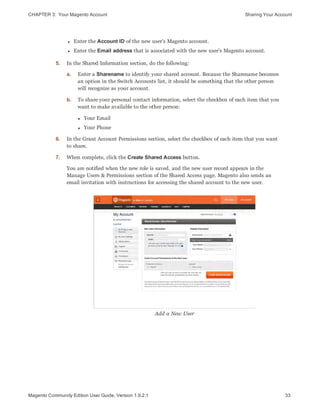
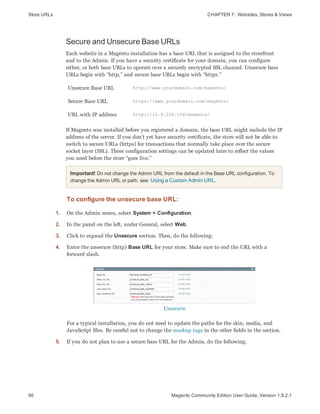
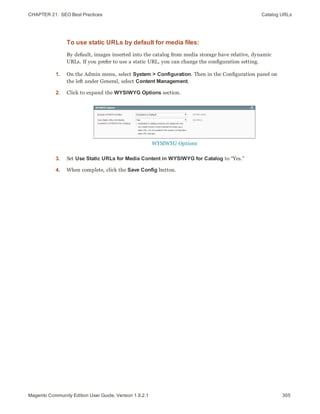
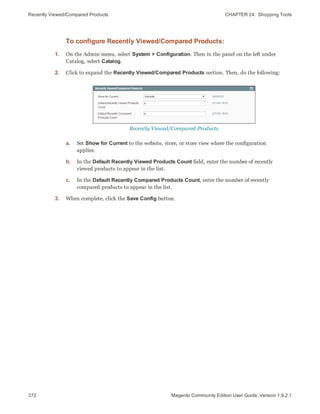
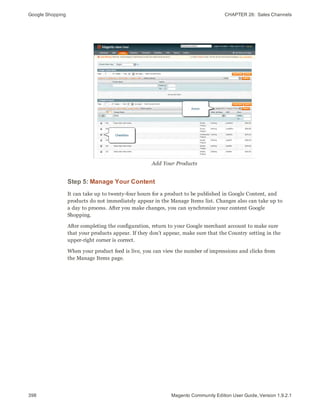
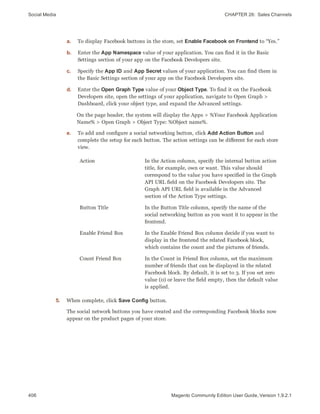
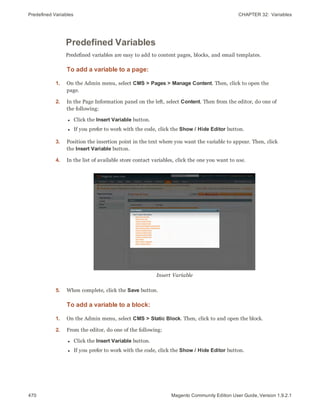
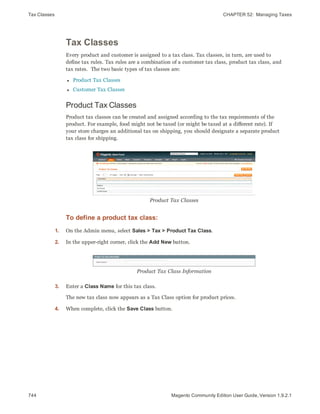
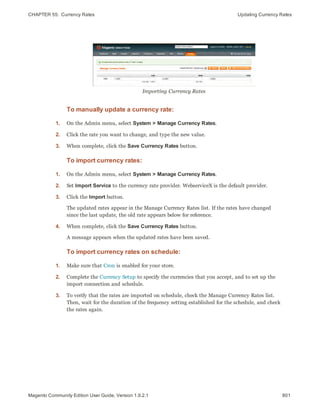
![CHAPTER 7: Websites, Stores & Views Adding a Language
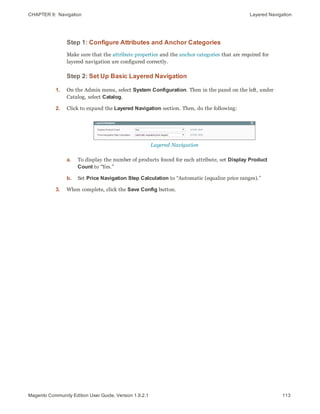
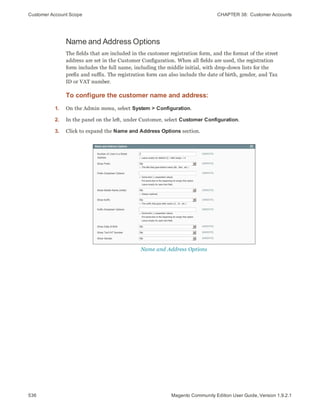
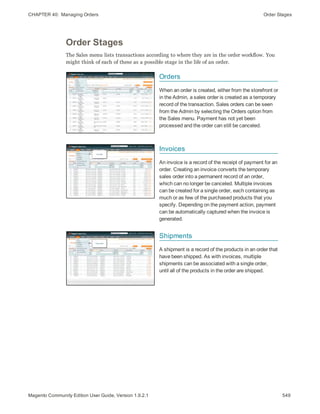
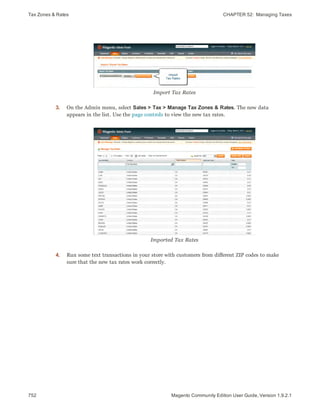
4. Return to the Admin of your store. Then on the Admin menu, select System > Magento
Connect > Magento Connect Manager.
5. When prompted, log in to Magento Connect Manager. Then, do the following:
a. In the Install New Extensions section, paste your extension key.
b. Click the Install button. The language pack you have chosen appears below.
Install Language Pack
c. When ready to begin, click the Proceed button.
You can follow the progress in the output frame. During the installation, the language
pack is uploaded to the following folder on your server:
[magento]/app/locale
Output Frame
6. To return to your store, click the Return to Admin link at the top of the page.
87Magento Community Edition User Guide, Version 1.9.2.1](https://image.slidesharecdn.com/ypijvzifqyxwky6f1phz-signature-7e479c195258b6f3aa8e31480588ea71dc7b7dd96ed152bc88b163148596a2ba-poli-160413095347/85/Magento-community-edition-user-guide-109-320.jpg)


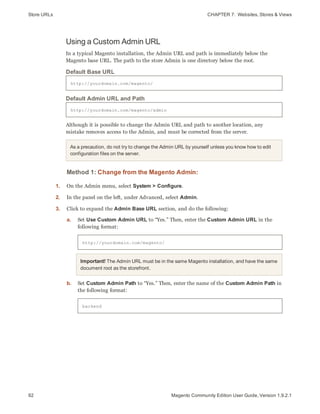
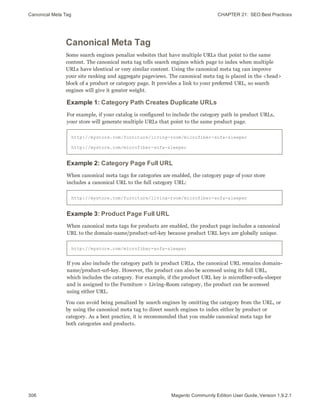
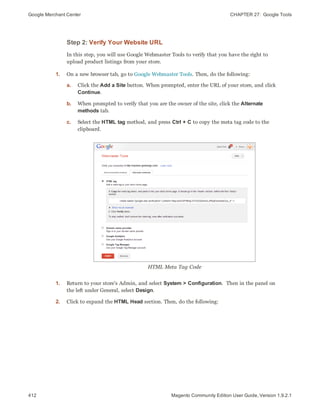
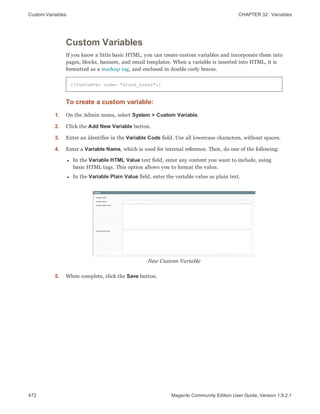
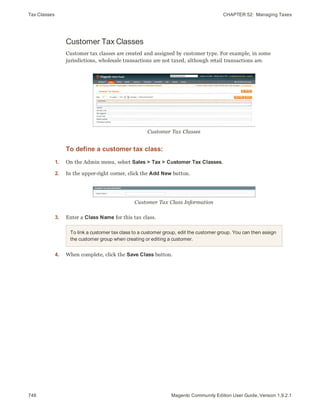
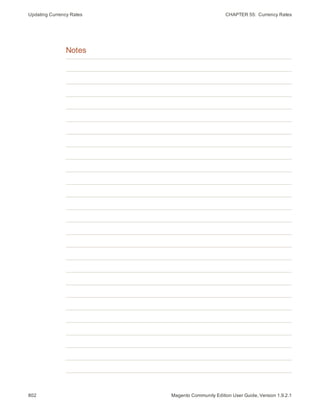
![CHAPTER 7: Websites, Stores & Views Store URLs
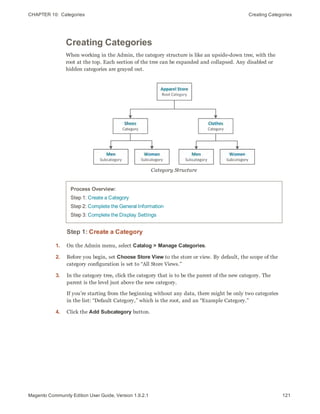
Admin Base URL
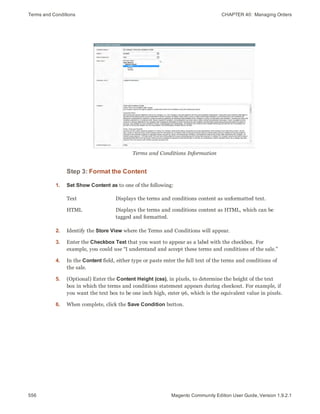
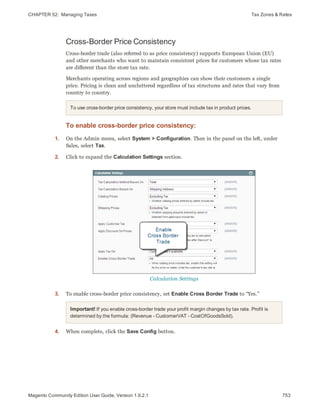
4. When complete, click the Save Config button.
After the changes are saved, you must log in to the Admin using the new Admin URL and
path.
Method 2: Change from the Server Command Line
1. Open the app/etc/local.xml file in a text editor, and change the name of the [admin]
path. Make sure to use only lowercase characters. Then, save the file.
On the server, the admin path is located in the app/etc/local.xml file. Look for the
<adminhtml> argument in the <admin> section:
# <frontName><![CDATA[admin]]></frontName>
Default Admin Path
# <frontName><![CDATA[backend]]></frontName>
New Admin Path
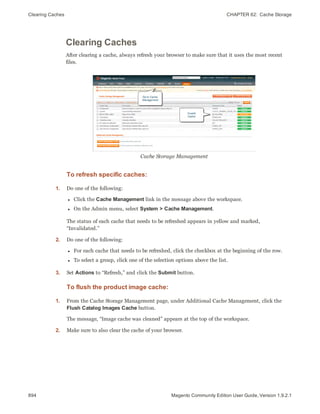
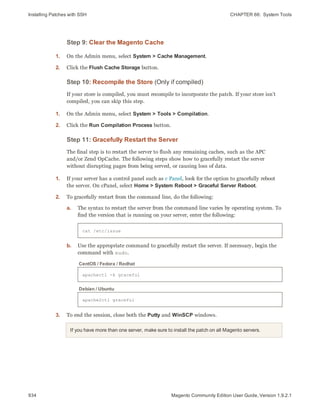
2. Do one of the following methods to clear the Magento cache:
l On the Admin menu, select System > Cache Management. Then, click the Flush
Magento Cache button.
l On the server, navigate to the var/cache folder, and delete the contents of the cache
folder.
93Magento Community Edition User Guide, Version 1.9.2.1](https://image.slidesharecdn.com/ypijvzifqyxwky6f1phz-signature-7e479c195258b6f3aa8e31480588ea71dc7b7dd96ed152bc88b163148596a2ba-poli-160413095347/85/Magento-community-edition-user-guide-115-320.jpg)


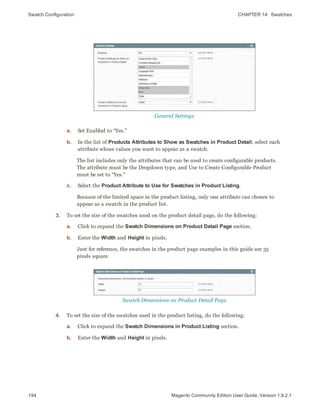


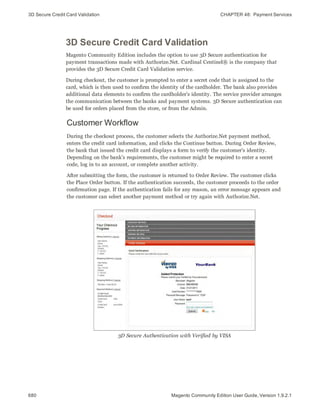
![CHAPTER 14: Swatches Preparing Swatch Images
Method 1: Upload Swatches to Media Storage
Before uploading swatch images, make sure that the file names exactly match the
corresponding attribute values. For example, if you upload a file named “gray.png,” it will
match the attribute value “Gray,” but not “Grey.”
All file names are converted to lowercase. In addition, any characters other than a-z and 0-
9 are replaced with a hyphen. Therefore, the swatch name “Royal Blue” becomes “royal-
blue.”
If you have access to the server, swatch files can be uploaded to the following location:
[Magento install directory]/media/wysiwyg/swatches
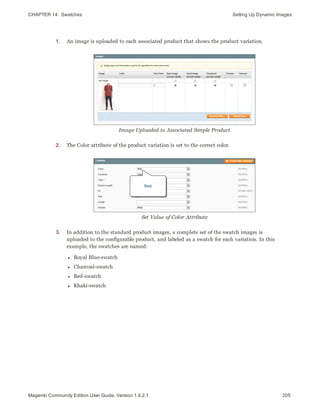
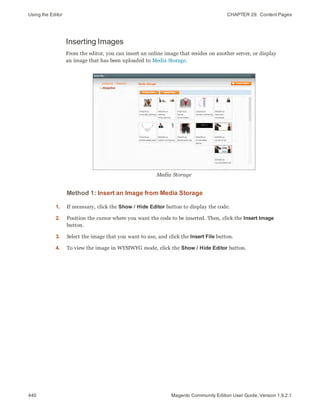
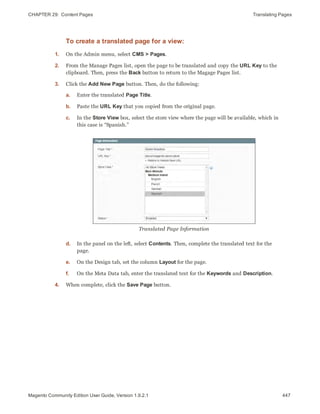
1. On the Admin menu, select CMS > Pages > Manage Content.
2. In the list, click to open any page in edit mode.
The purpose of this step is to launch the editor. Media Storage can be accessed from any
place the editor is used.
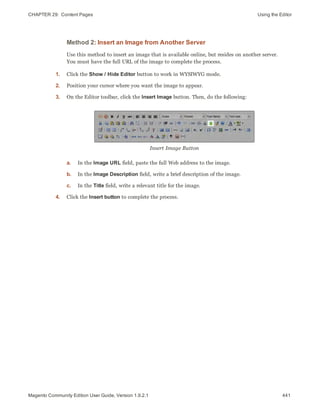
3. In the panel on the left, select Content.
4. From the editor, click the Insert Image button. In the directory tree on the left, click the
swatches folder, and do the following:
a. Click the Browse button, and locate the swatch image files that you want to upload.
You can upload individual images, or multiple images at the same time.
b. Click the Upload Files button to copy the file to Media Storage.
Newly uploaded images appear at the bottom of the list.
199Magento Community Edition User Guide, Version 1.9.2.1](https://image.slidesharecdn.com/ypijvzifqyxwky6f1phz-signature-7e479c195258b6f3aa8e31480588ea71dc7b7dd96ed152bc88b163148596a2ba-poli-160413095347/85/Magento-community-edition-user-guide-221-320.jpg)


![Clearing the Swatch Cache CHAPTER 14: Swatches
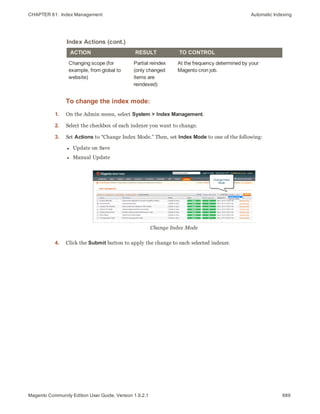
210 Magento Community Edition User Guide, Version 1.9.2.1
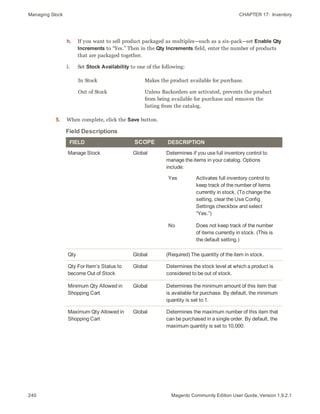
Clearing the Swatch Cache
Swatch images are resized and cached before they are used. Swatch images are stored on
the server in the Magento installation directory, at the following location:
[Magento install directory]/media/catalog/swatches/
Whenever changes are made to existing swatch images, the swatch cache must be flushed
before the changes can be seen in the store.
To flush the swatch cache:
1. On the Admin menu, select System > Cache Management.
2. In the Additional Cache Management Section, click the Flush Swatch Images Cache
button.
Flush Swatch Images Cache](https://image.slidesharecdn.com/ypijvzifqyxwky6f1phz-signature-7e479c195258b6f3aa8e31480588ea71dc7b7dd96ed152bc88b163148596a2ba-poli-160413095347/85/Magento-community-edition-user-guide-232-320.jpg)


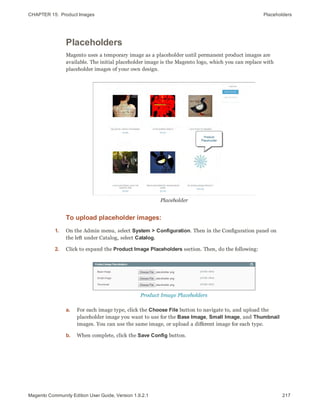


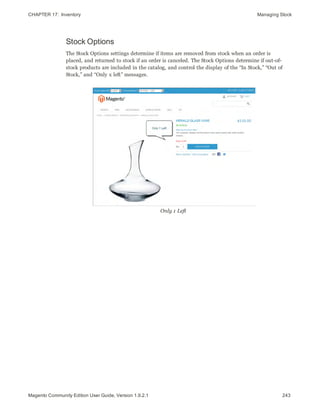


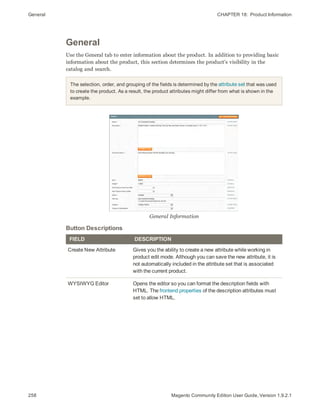
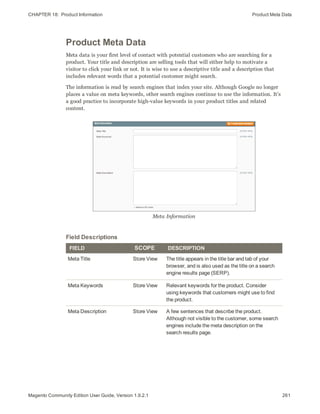


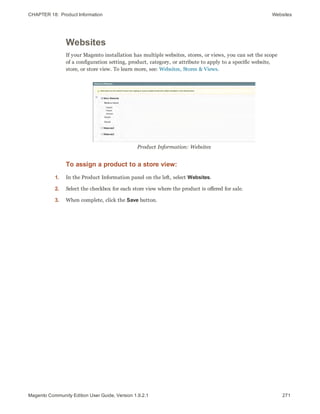
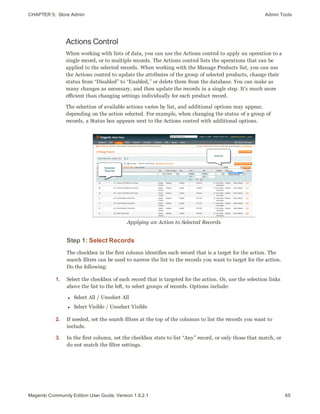
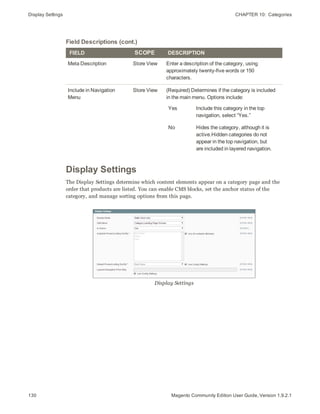
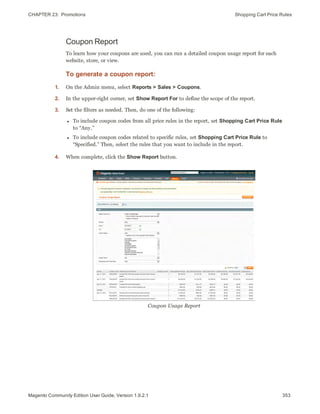
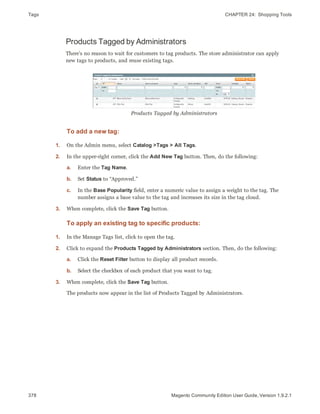
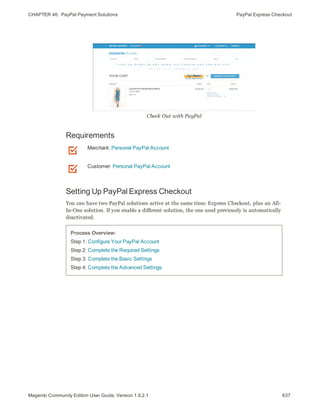
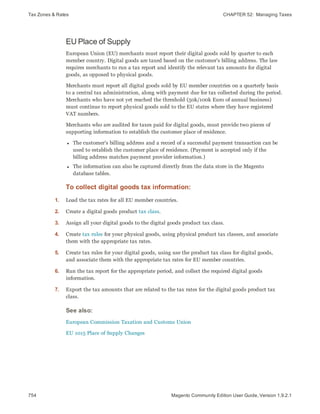
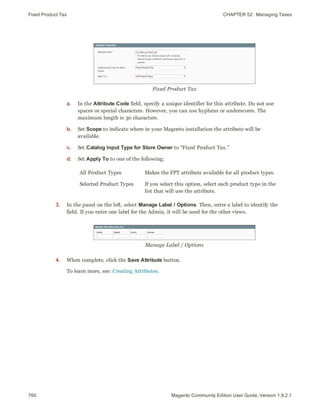
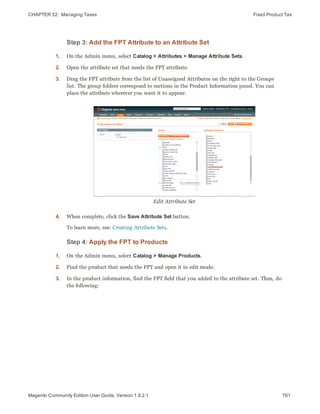
![Categories CHAPTER 18: Product Information
272 Magento Community Edition User Guide, Version 1.9.2.1
Categories
Every product in your catalog must be assigned to at least one category. Before you can
add products to your catalog, you must first establish its basic category structure. A
product cannot be saved until after it has been assigned to at least one category.
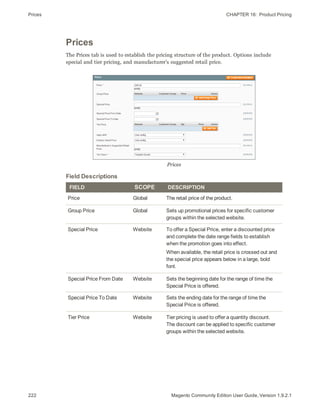
Product Categories
To set up the product categories:
1. In the Product Information panel on the left, select Categories.
2. In the category tree, select the checkbox of each category to which you want to associate the
product. Click the plus [+] icon to show any available subcategories.
A single product can be assigned to more than one category.
3. When complete, click the Save button.](https://image.slidesharecdn.com/ypijvzifqyxwky6f1phz-signature-7e479c195258b6f3aa8e31480588ea71dc7b7dd96ed152bc88b163148596a2ba-poli-160413095347/85/Magento-community-edition-user-guide-294-320.jpg)

![Translating Products CHAPTER 18: Product Information
278 Magento Community Edition User Guide, Version 1.9.2.1
Translating Products
If your store has multiple views in different languages, the same products are available in
each store view. You can use the same basic product information, such as SKU, price, and
inventory level, regardless of language. Then, translate only the product name, description
fields, and meta data as needed for each language.
Change the Product Scope to Store View
Step 1: Translate Product Fields
1. On the Admin menu, select Catalog > Manage Products.
2. In the list, find the product and click Edit to open.
3. In the upper-left corner set Choose Store View to the view where the changes you make
will be visible. When prompted to confirm, click OK.
Only fields with a scope of [STORE VIEW] can be edited separately for each view or
language.
4. For each field to be edited, do the following:
a. Clear the Use Default Value checkbox to the right of the field.
b. Either paste or type the translated text into the field.
5. When complete, click the Save button.](https://image.slidesharecdn.com/ypijvzifqyxwky6f1phz-signature-7e479c195258b6f3aa8e31480588ea71dc7b7dd96ed152bc88b163148596a2ba-poli-160413095347/85/Magento-community-edition-user-guide-300-320.jpg)


![CHAPTER 35: Page Layout Layout Updates
core/text
A core/text block can be used to enter free form text directly into the template.
ACTION DESCRIPTION
addText($textContent) Specifies text to be rendered as the block's content. After
the text is specified, the layout update instructions must
continue to be a valid XML statement. If you use HTML
tags as part of the text, it is recommended to use:
<![CDATA[...]]>
Syntax
?
<!--...-->
<reference name="content">
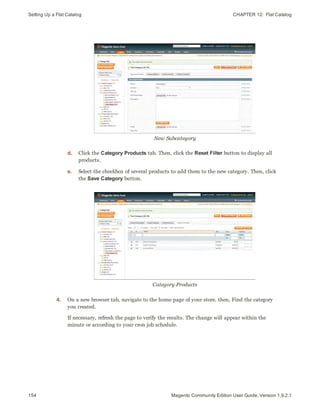
<block type="core/text" name="test.block">
<action method="addText">
<txt><![CDATA[<h2>ATTENTION!</h2><p>Check your options
carefully before you submit.</p>]]></txt>
</action>
</block>
</reference>
<!-- -->
page/html_welcome
This block can be used to duplicate the “Welcome, <USERNAME>!” message that appears in
the header block. When the user is not logged in, the welcome message specified in the
configuration appears.
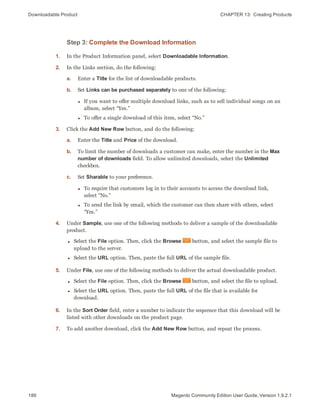
507Magento Community Edition User Guide, Version 1.9.2.1](https://image.slidesharecdn.com/ypijvzifqyxwky6f1phz-signature-7e479c195258b6f3aa8e31480588ea71dc7b7dd96ed152bc88b163148596a2ba-poli-160413095347/85/Magento-community-edition-user-guide-529-320.jpg)


![Theme Assets CHAPTER 37: Your Store’s Theme
518 Magento Community Edition User Guide, Version 1.9.2.1
Theme Assets
The assets associated with a theme are organized in the skin folder. JavaScript libraries
which are shared across themes, are placed in the js/ directory at the Magento root.
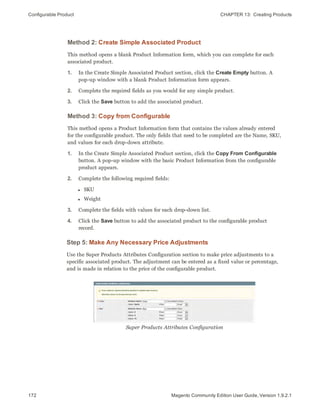
FILE TYPE DESCRIPTION
CSS Directory that contains the CSS files that control the visual styling that is
associated with the skin. Location on server:
[magento]/skin/frontend/[designPackage]/[theme]/css
Images Directory that contains all images used by the theme, including buttons,
background textures, and so on. Location on server:
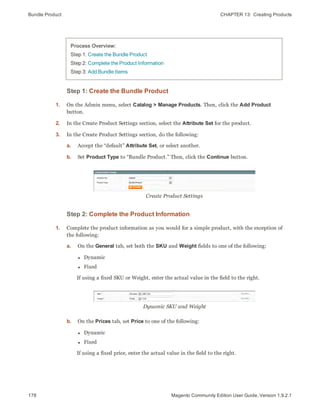
[magento]/skin/frontend/[designPackage]/[theme]/images
JS Directory that contains theme-specific JavaScript routines and callable
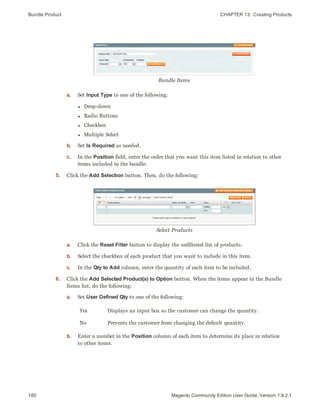
functions. Location on server:
[magento]/skin/frontend/[designPackage]/[theme]/ja](https://image.slidesharecdn.com/ypijvzifqyxwky6f1phz-signature-7e479c195258b6f3aa8e31480588ea71dc7b7dd96ed152bc88b163148596a2ba-poli-160413095347/85/Magento-community-edition-user-guide-540-320.jpg)


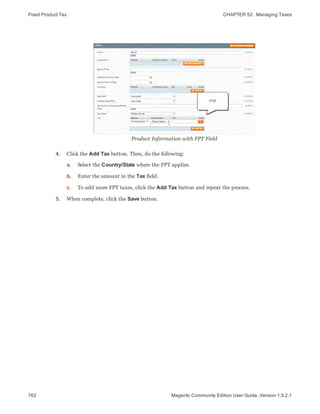
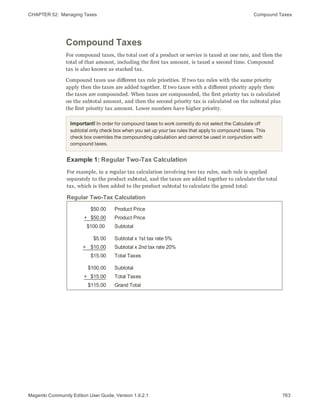
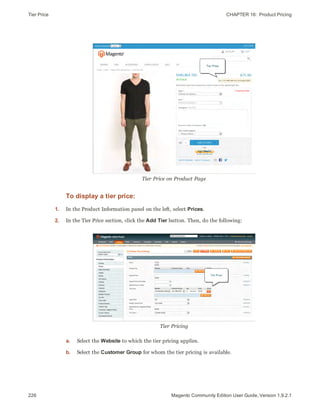
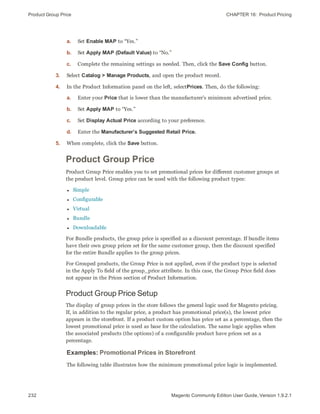
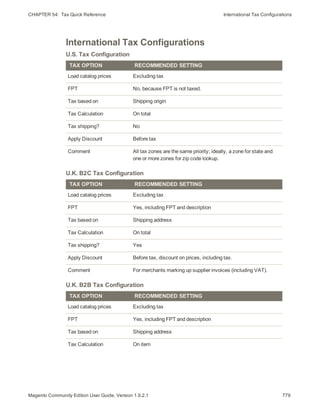
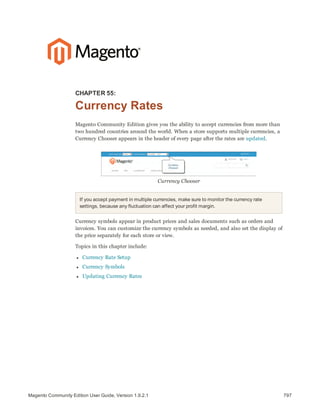
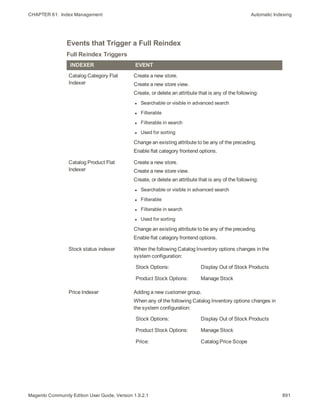
![Compound Taxes CHAPTER 52: Managing Taxes
764 Magento Community Edition User Guide, Version 1.9.2.1
Example 2: Compound Tax Calculation
With compound taxes, the first tax is added to the product subtotal, and the second tax is
applied to that total:
$50.00
+ $50.00
$100.00
Product Price
Product Price
Subtotal
$5.00
+ $10.50
$15.50
Subtotal x 1st tax rate 5%
[Subtotal + (Subtotal x 1st rate)] x 2nd tax rate: $105 x 10%
Total Taxes
$100.00
+ $15.50
$115.50
Subtotal
Total Taxes
Grand Total
Compound Tax Calculation
To set up compound taxes:
1. Set up all the tax rates that will be used in your compound tax rule. See: Tax Zones &
Rates.
2. Set up the first tax rule for compounding. For the first tax rule, be sure that you set a
higher priority than you will set for the next tax rule, which will be compounded on top of
this first tax rule. Lower numbers are used for higher priority. Use 0 for the highest priority.
See: Tax Rules.
3. Set up the second tax rule for compounding. For the second rule, be sure that you set a
lower priority (use a higher number) than you set for the first tax rule.](https://image.slidesharecdn.com/ypijvzifqyxwky6f1phz-signature-7e479c195258b6f3aa8e31480588ea71dc7b7dd96ed152bc88b163148596a2ba-poli-160413095347/85/Magento-community-edition-user-guide-786-320.jpg)


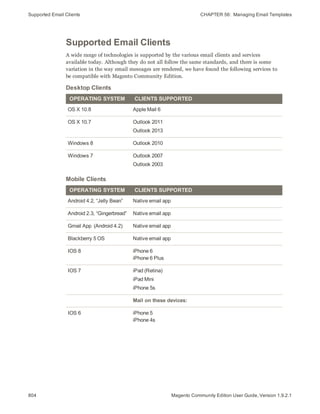

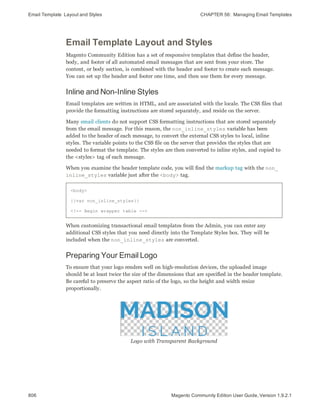

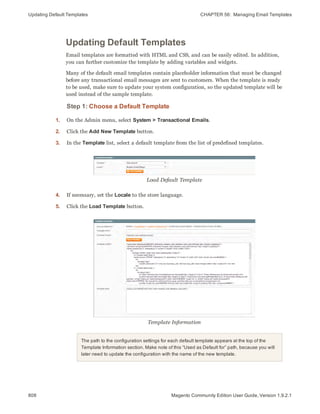


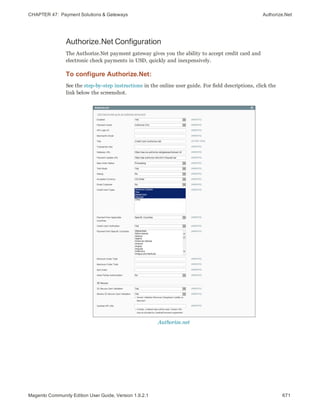
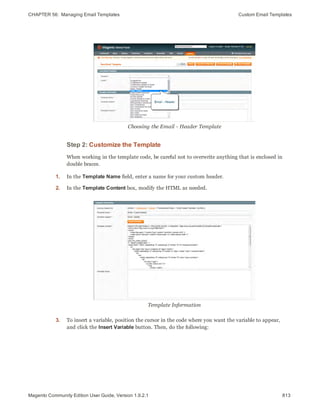
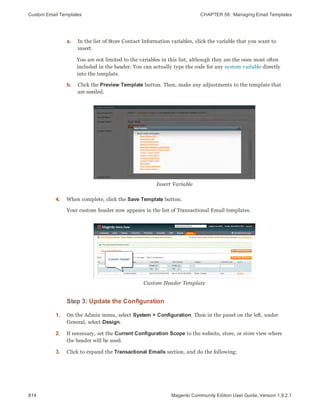
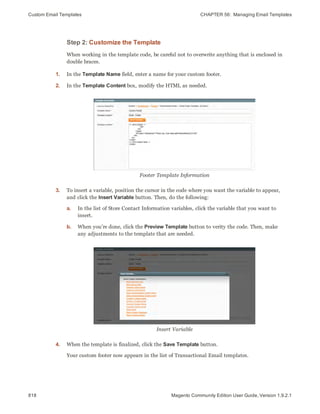
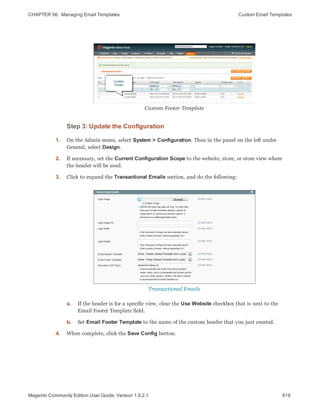
![Custom Email Templates CHAPTER 56: Managing Email Templates
812 Magento Community Edition User Guide, Version 1.9.2.1
Custom Email Templates
Magento includes a default email template for the body section of each message that is
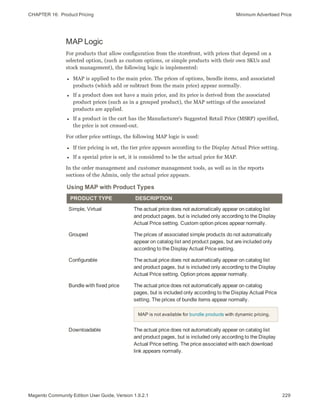
sent by the system. Each template with the body content is combined with the header and
footer templates to create the complete message. The content is formatted with HTML and
CSS, and can be easily edited, and customized by adding variables and widgets.
The default templates already include your logo and store information and can be used as
they are, without further customization. As a best practice, you should view each default
email template and verify any changes you make before sending them to customers.
When a custom template is ready to be used, make sure to update your system
configuration, so the custom template will be used instead of the default template. Email
templates can be customized for each website, store, or store view. For detailed
instructions, see the following topics:
l Header Template
l Footer Template
l Content Templates
Email Header
The default header includes your email logo that is linked to your store. You can easily
insert variables to add store contact information to the header. To make more extensive
changes requires a working knowledge of both HTML and CSS. On the server, the header
template is located at:
[Magento install dir]/app/locale/en_US/template/email/html/header.
Process Overview:
Step 1: Load the Template
Step 2: Customize the Template
Step 3: Update the Configuration
Step 1: Load the Template
1. On the Admin menu, select System > Transactional Emails.
2. Click the Add New Template button. Then, do the following:
a. Set Template to “Email - Header.”
b. Set Locale to the language of the email recipients.
3. Click the Load Template button.](https://image.slidesharecdn.com/ypijvzifqyxwky6f1phz-signature-7e479c195258b6f3aa8e31480588ea71dc7b7dd96ed152bc88b163148596a2ba-poli-160413095347/85/Magento-community-edition-user-guide-834-320.jpg)
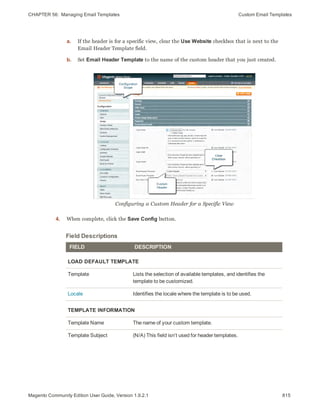

![CHAPTER 56: Managing Email Templates Custom Email Templates
Email Footer
The footer contains the closing and signature line of the email message. You can change the
closing to fit your style, and add additional information, such as the company name and
address below your name. To make more extensive changes requires a working knowledge of
both HTML and CSS. On the server, you will find the footer template in the following
location:
[Magento install dir]/app/locale/en_US/template/email/html/header.html
Process Overview:
Step 1: Load the Template
Step 2: Customize the Template
Step 3: Update the Configuration
Step 1: Load the Template
1. On the Admin menu, select System > Transactional Emails.
2. Click the Add New Template button. Then, do the following:
a. Set Template to “Email - Footer.”
b. Set Locale to the language of the email recipients.
3. Click the Load Template button.
Choosing the Email - Footer Template
817Magento Community Edition User Guide, Version 1.9.2.1](https://image.slidesharecdn.com/ypijvzifqyxwky6f1phz-signature-7e479c195258b6f3aa8e31480588ea71dc7b7dd96ed152bc88b163148596a2ba-poli-160413095347/85/Magento-community-edition-user-guide-839-320.jpg)


![CHAPTER 56: Managing Email Templates Email Template Configuration
a. To upload your prepared Logo Image, click the Browse button. Find the file on your
computer, and click to copy the path to the field.
b. In the Logo Image Alt field, enter the alternate text to identify the image.
If you uploaded a logo image, enter the Logo Width and Logo Height in pixels. Enter
each value as a number, without the “px” abbreviation. These values refer to the
display dimensions of the logo in the header, and not to the actual size of the image.
Step 2: Select the Header and Footer Templates
If you have custom header and footer templates for your store, or for different stores, you
can specify which templates should be used for each, according to the scope of the
configuration.
1. Select the Email Header Template to be used for all transactional email messages.
2. Select the Email Footer Template to be used for all transactional email messages.
Step 3: Choose the CSS File(s)
In the Non-inline CSS File(s) field, enter the name of each CSS file that is needed to
format the content of your transactional email messages. Separate the names of multiple
files with a comma. On the server, the CSS files reside in the following location:
[magento install dir]/skin/frontend/[package]/[theme]/css/
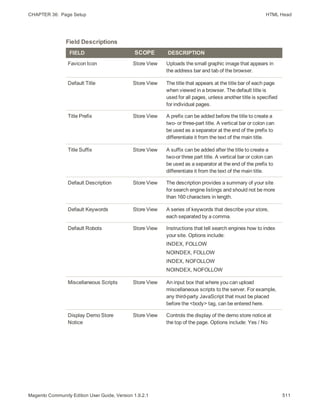
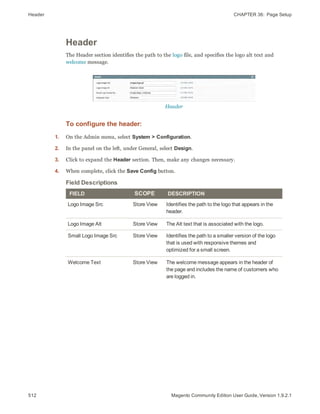
FIELD SCOPE DESCRIPTION
Logo Image Store View Identifies the logo file that appears in the header of
transactional email messages. To support high-
resolution displays, upload an image that is twice
the size that is needed. For example, if the actual
display dimensions of the logo are 100 pixels high
and 200 pixels wide, you should upload an image
that is 200 pixels high and 400 pixels wide.
To delete the current image and upload another,
select the Delete Image checkbox. Then, browse
to select the new image.
Allowed file types:
.jpg / .jpeg
.gif
.png
Field Descriptions
825Magento Community Edition User Guide, Version 1.9.2.1](https://image.slidesharecdn.com/ypijvzifqyxwky6f1phz-signature-7e479c195258b6f3aa8e31480588ea71dc7b7dd96ed152bc88b163148596a2ba-poli-160413095347/85/Magento-community-edition-user-guide-847-320.jpg)
![Email Template Configuration CHAPTER 56: Managing Email Templates
826 Magento Community Edition User Guide, Version 1.9.2.1
FIELD SCOPE DESCRIPTION
Logo Image Alt Store View Enter alternative text that appears if the logo
image is not available.
Logo Width Store View Enter the display width of the image in pixels, as a
number. Do not include the “px” abbreviation. It is
important to specify both width and height to
preserve the aspect ratio when the image is
rendered at different sizes.
Logo Height Store View Enter the display height of the image in pixels, as
a number. Do not include the “px” abbreviation. It
is important to specify both width and height to
preserve the aspect ratio when the image is
rendered at different sizes.
Email Header Template Store View Select the template to be used for the header of all
transactional email messages.
Email Footer Template Store View Select the template to be used for the footer of all
transactional email messages.
Non-inline CSS File(s) Store View Because many mail clients do not support
separate CSS files, Magento uses the non_inline_
styles variable to convert CSS styles to inline
style declarations that reside in the <style> tag of
the template.
The markup tag is enclosed in double braces, and
includes a variable that contains the name of the
external CSS file.
{{var non_inline_styles}}
The location of the CSS file on the server is
relative to the following path:
skin/frontend/[package]/[theme]/css/
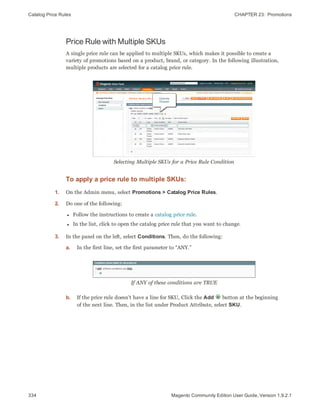
Field Descriptions (cont.)](https://image.slidesharecdn.com/ypijvzifqyxwky6f1phz-signature-7e479c195258b6f3aa8e31480588ea71dc7b7dd96ed152bc88b163148596a2ba-poli-160413095347/85/Magento-community-edition-user-guide-848-320.jpg)


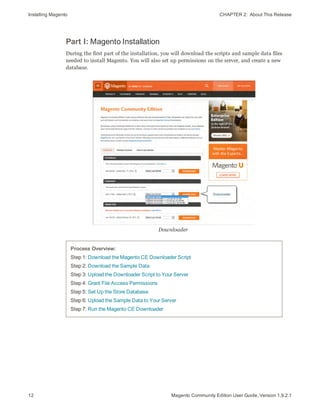
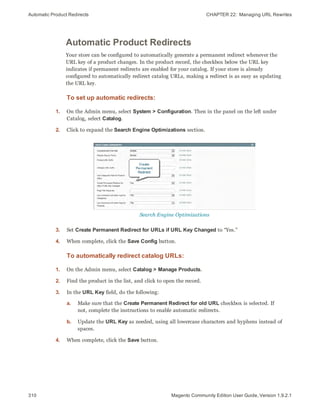
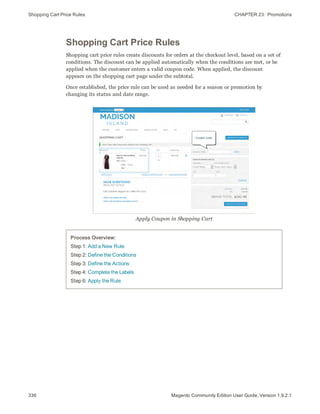
![Importing Data CHAPTER 57: Managing Data Transfer
836 Magento Community Edition User Guide, Version 1.9.2.1
Importing Product Images
Multiple product images of each type can be imported into Magento, and associated with a
specific product. The path and file name of each product image is entered in the CSV file,
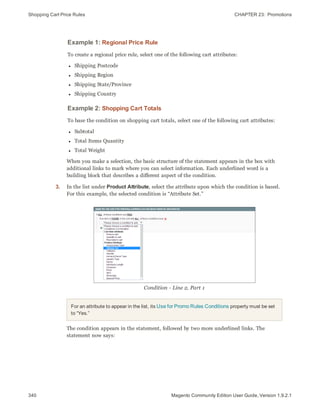
and the image files to be imported are uploaded to the corresponding path on the Magento
server or external server, or uploaded to Media Storage.
Magento creates its own directory structure for product images that is organized
alphabetically. When you export product data to a CSV file, you can see the alphabetized
path before the file name of each image. However, when you import images, you typically
don’t need to specify a path, because Magento manages the directory structure
automatically. All you need to do is enter a forward slash before the file name of each image
to be imported, and let Magento take care of the rest.
Review the steps in the import method that you want to use, and run through the process
with a few products. After you understand how it works, you’ll feel confident importing
large quantities of images.
Important! We recommend that you use a program that supports UTF-8 encoding to edit CSV
files, such as Notepad++ or OpenOffice Calc. Microsoft Excel inserts additional characters into
the column header of the CSV file, which can prevent the data from being imported back into
Magento.
Method 1: Import Images to Default Path
The easiest way to import product images is to use Dataflow, and let Magento manage the
directory structure. For complete instructions, see Dataflow.
Method 2: Import Images to Specific Path
1. To import image files into a specific path, you must first create the required directory
structure in the media/import folder. The import folder is located on the server in the
following location:
[magento installation folder]/media/import
2. Create the directory structure as follows:
a. Create the parent folder, named for the first character of the image file name.
b. Create a subfolder, named for the second character of the image file name. For
example, the import path for filename.jpg would be as follows:
[magento installation folder]/media/import/f/i/filename.jpg
c. Set the following permissions for all image folders and files:](https://image.slidesharecdn.com/ypijvzifqyxwky6f1phz-signature-7e479c195258b6f3aa8e31480588ea71dc7b7dd96ed152bc88b163148596a2ba-poli-160413095347/85/Magento-community-edition-user-guide-858-320.jpg)


![Dataflow CHAPTER 57: Managing Data Transfer
842 Magento Community Edition User Guide, Version 1.9.2.1
Run Profile
5. To begin the process, click the Run Profile in Popup button.
Run Profile in Popup
6. Wait a few moments for the profile to begin execution. The length of time it takes to
complete the process depends on the size of the database. Do not close the window.
Profile Execution
7. When the process is complete,you can find the exported CSV file in the following location
on the server:
[magento-install-dir]/var/export/export_all_products.csv
Here’s how the exported data file looks from the command line of the server:](https://image.slidesharecdn.com/ypijvzifqyxwky6f1phz-signature-7e479c195258b6f3aa8e31480588ea71dc7b7dd96ed152bc88b163148596a2ba-poli-160413095347/85/Magento-community-edition-user-guide-864-320.jpg)

![Dataflow CHAPTER 57: Managing Data Transfer
844 Magento Community Edition User Guide, Version 1.9.2.1
Exported Product Data in OpenOffice Calc
Step 2: Copy the Product Images to the Server
The CSV file contains a path to each product image, but the actual image files must be
uploaded to the server. To make the images available to import, place them in the
media/import directory.
[magento-install-dir]/media/import
Use your SFTP utility to copy the product images that you want to import to the
media/import folder.
Copy Images to media/import Folder
Step 3: Edit the CSV File
1. Edit the data as needed.
2. Save your changes to the CSV file.
For this example, we will add three new images to SKU #hdb005. Because this is the only
product record that we’re going to update, the others can be deleted from the CSV file.](https://image.slidesharecdn.com/ypijvzifqyxwky6f1phz-signature-7e479c195258b6f3aa8e31480588ea71dc7b7dd96ed152bc88b163148596a2ba-poli-160413095347/85/Magento-community-edition-user-guide-866-320.jpg)


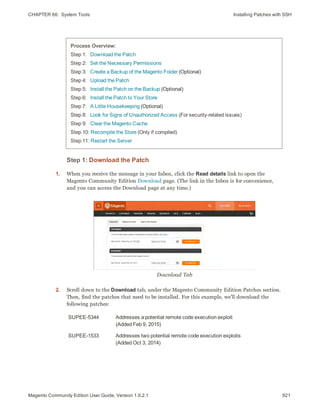
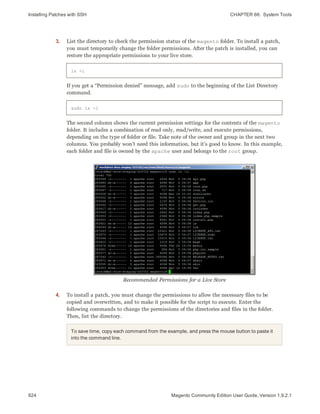
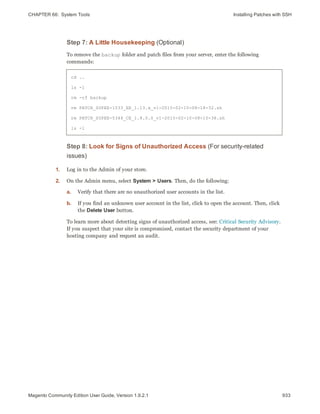
![CHAPTER 66: System Tools SOLUTION SERIES: Installing Magento Patches
Step 4: Install the Patch
Method 1: Use SSH
Secure Shell (SSH) is the recommended way to install a patch. If you don’t know how to
set up SSH, contact your hosting provider. For detailed instructions, see: Installing
Patches with SSH.
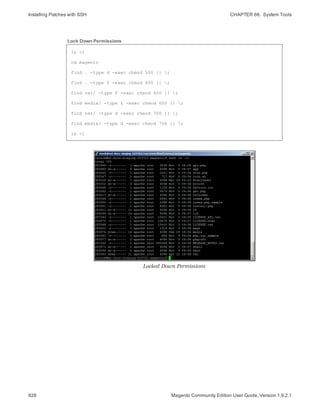
1. Upload the patch files to the root of your [magento] installation folder.
2. If the store is compiled, make sure the compiler is disabled.
3. In the SSH console, run the following commands according to the patch extension:
sh patch_file_name.sh
.sh extension
patch --p0<patch_file_name.patch
.patch extension
4. Use either of the following methods to verify that the patch was installed:
l Download or view the file: app/etc/applied.patches.list.
applied.patches.list
l From the command line, run the patch file with the --list argument for a report of all
patch installations.
--list argument
917Magento Community Edition User Guide, Version 1.9.2.1](https://image.slidesharecdn.com/ypijvzifqyxwky6f1phz-signature-7e479c195258b6f3aa8e31480588ea71dc7b7dd96ed152bc88b163148596a2ba-poli-160413095347/85/Magento-community-edition-user-guide-939-320.jpg)
![SOLUTION SERIES: Installing Magento Patches CHAPTER 66: System Tools
918 Magento Community Edition User Guide, Version 1.9.2.1
Method 2: Run a Script
The following example shows how to install the SUPEE_5344.sh patch. Make sure to
replace the patch name in the example with the name of the patch file to be installed.
1. Upload the patch files to the root of your [magento] installation folder.
2. If the store is compiled, make sure the compiler is disabled.
3. From your desktop, do the following:
a. Use a text editor to create a file named patch.php that contains the following script.
<?php
print("<PRE>");
passthru("/bin/bash PATCH_SUPEE-5344.sh");
print("</PRE>");
echo "Done";
?>
b. Upload the patch.php file to the root of your [magento] installation folder.
4. Run the script from your browser.
http://www.[yourstore.com]/patch.php
Then, look for the following message:
Checking if patch can be applied/reverted successfully...
Patch was applied/reverted successfully.
Done
5. After the patch is successfully installed, delete the patch.php file from your server.
If you receive the following error, either ask your hosting provider to install the missing
tools, or try one of the other methods.
“Error! Some required system tools, that are utilized in this sh script, are not installed; Tool
(s) “patch” is (are) missed, please install it(them).
6. Refresh your cache from the Magento Admin, Don’t forget to refresh your OPcode or APC
cache as well.
7. If your store is compiled, rerun the compiler.](https://image.slidesharecdn.com/ypijvzifqyxwky6f1phz-signature-7e479c195258b6f3aa8e31480588ea71dc7b7dd96ed152bc88b163148596a2ba-poli-160413095347/85/Magento-community-edition-user-guide-940-320.jpg)


![CHAPTER 66: System Tools Installing Patches with SSH
4. To install the patch, use the appropriate syntax for the type of patch, and substitute the
file name of the patch to be installed. There are two command formats, depending on the
patch file name extension. To avoid typos, copy the patch file name from Putty, and paste
it into Notepad. Then, add the required command syntax, paste it into the command line,
and press Enter.
EXTENSION COMMAND SYNTAX
.sh sh [patch_filename.sh]
.patch patch –p0 < [patch_filename.patch]
sh PATCH_SUPEE-1533_EE_1.13.x_v1-2015-02-10-08-18-32.sh
sh PATCH_SUPEE-5344_CE_1.8.0.0_v1-2015-02-10-08-10-38.sh
The following message appears if the installation succeeds:
Patch was applied/reverted successfully.
If the patch is already installed on your computer, an error message appears. You don’t
need to install it again.
So that’s really all there is to it. It might seem rather anticlimactic after so much
preparation, but it’s important to understand the process before you apply the patch to
your store.
5. The next step is to change directories to the magento folder, and reset the permissions so
the patch can be copied and installed to your live store. Then, you will copy the patch file
to the magento folder.
cd ..
ls -l
cd magento
find . -type d -exec chmod 700 {} ;
find . -type f -exec chmod 600 {} ;
cd ..
cp PATCH_SUPEE-1533_EE_1.13.x_v1-2015-02-10-08-18-32.sh magento
cp PATCH_SUPEE-5344_CE_1.8.0.0_v1-2015-02-10-08-10-38.sh magento
cd magento
ls -l
931Magento Community Edition User Guide, Version 1.9.2.1](https://image.slidesharecdn.com/ypijvzifqyxwky6f1phz-signature-7e479c195258b6f3aa8e31480588ea71dc7b7dd96ed152bc88b163148596a2ba-poli-160413095347/85/Magento-community-edition-user-guide-953-320.jpg)
![Installing Patches with SSH CHAPTER 66: System Tools
932 Magento Community Edition User Guide, Version 1.9.2.1
Step 6: Install the Patch to Your Store
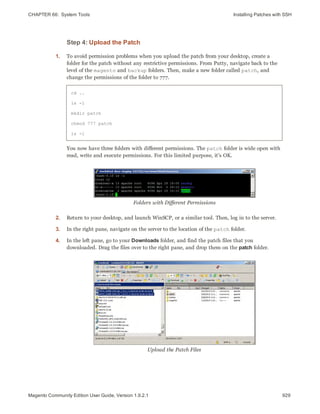
1. From your magento folder, enter the appropriate command to install the patch, and press
Enter.
EXTENSION COMMAND SYNTAX
.sh sh [patch_filename.sh]
.patch patch –p0 < [patch_filename.patch]
To avoid typos, copy the name of the patch file from your Downloads folder and paste it into
Notepad. Complete the required command syntax, and copy it to the clipboard. Then, press the
mouse button to paste it into the command line.
sh PATCH_SUPEE-1533_EE_1.13.x_v1-2015-02-10-08-18-32.sh
sh PATCH_SUPEE-5344_CE_1.8.0.0_v1-2015-02-10-08-10-38.sh
2. When the process is complete, remove the patch files from the magento folder.
rm PATCH_SUPEE-1533_EE_1.13.x_v1-2015-02-10-08-18-32.sh
rm PATCH_SUPEE-5344_CE_1.8.0.0_v1-2015-02-10-08-10-38.sh
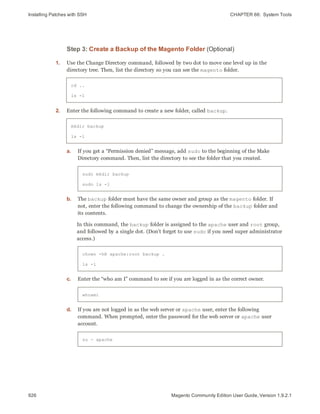
3. Enter the following commands to lock down permissions to the magento folder.
find . -type d -exec chmod 500 {} ;
find . -type f -exec chmod 400 {} ;
find var/ -type f -exec chmod 600 {} ;
find media/ -type f -exec chmod 600 {} ;
find var/ -type d -exec chmod 700 {} ;
find media/ -type d -exec chmod 700 {} ;
ls -l
Lock Down Permissions](https://image.slidesharecdn.com/ypijvzifqyxwky6f1phz-signature-7e479c195258b6f3aa8e31480588ea71dc7b7dd96ed152bc88b163148596a2ba-poli-160413095347/85/Magento-community-edition-user-guide-954-320.jpg)


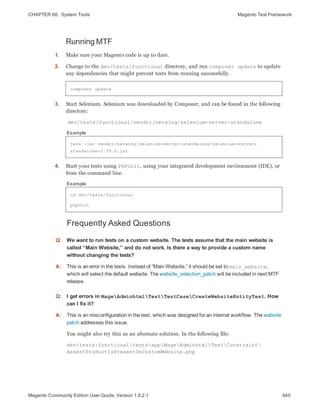
![CHAPTER 66: System Tools Magento Test Framework
Installation
1. Download Composer for UNIX or Windows. Then, follow the instructions to install
Composer.
2. Run Composer from the [Magento install]/dev/tests/functional directory as
follows:
composer install
If you cannot run composer from the command line, do the following:
a. Copy composer.phar to the same directory where composer.json is located. The
typical location is:
[Magento install dir]/dev/tests/functional
The composer.json file contains dependency information and settings for PHPUnit,
Selenium server, libraries, and so on, and is required to start MTF. It checks out MTF from
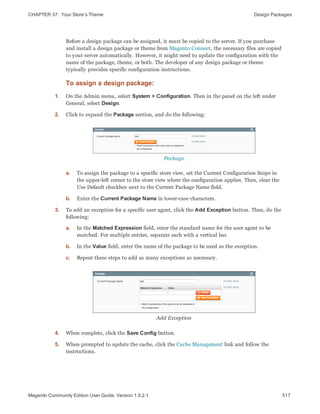
a separate repository.
b. Run Composer as follows:
php composer.phar install
A new directory named vendor is created with the checked-out MTF. The vendor
directory contains:
l An MTF framework directory ( magento/mtf )
l bin
l composer
l netwing
l phpunit
l symfony
l autoload.php (file)
3. To run the generator, do one of the following:
l Use your browser to navigate to the following location:
[Magento install dir]/dev/tests/functional/utils/generate.php
l Execute the following from the command line:
php utils/generate/factory.php
941Magento Community Edition User Guide, Version 1.9.2.1](https://image.slidesharecdn.com/ypijvzifqyxwky6f1phz-signature-7e479c195258b6f3aa8e31480588ea71dc7b7dd96ed152bc88b163148596a2ba-poli-160413095347/85/Magento-community-edition-user-guide-963-320.jpg)
![Magento Test Framework CHAPTER 66: System Tools
942 Magento Community Edition User Guide, Version 1.9.2.1
The generator tool creates generated directories with factories for pages, blocks, handlers,
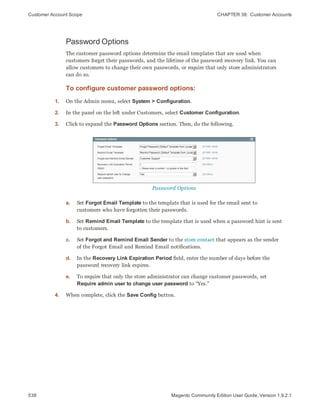
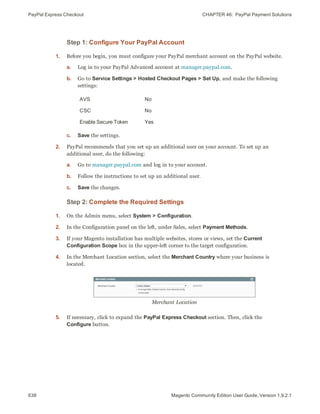
fixtures and repositories. After MTF is initialized, the factories are pre-generated to
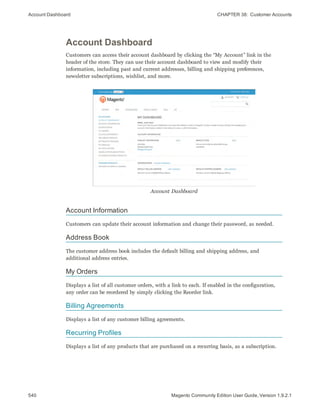
facilitate creating and running tests.
Configuration
Non-Firefox Browsers
If using a browser other than Firefox, you must first download drivers that are compatible
with Selenium. Then, add the following declaration to the config.xml file. The file is is
located at:
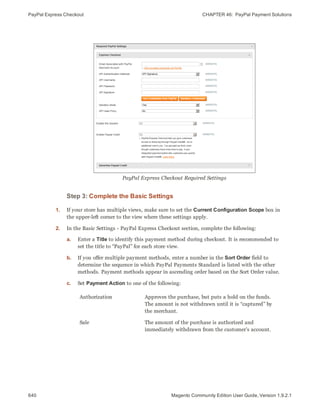
[Magento install]/dev/tests/functional/etc/config.xml
<server>
<item name="selenium" type="default" browser="Google Chrome"
browserName="chrome" host="localhost" port="4444"
seleniumServerRequestsTimeout="90" sessionStrategy="shared">
<desiredCapabilities>
<platform>ANY</platform>
</desiredCapabilities>
</item>
</server>
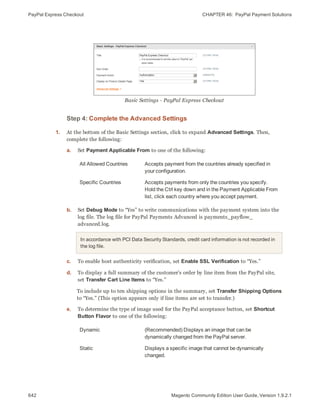
To learn more, see the Selenium Documentation.
Magento URLs
Update the phpunit.xml file with the URLs of your storefront and Magento Admin as
follows:
<env name="app_frontend_url"
value="http://localhost/magento2/index.php/"/>
<env name="app_backend_url"
value="http://localhost/magento2/index.php/backend/"/>](https://image.slidesharecdn.com/ypijvzifqyxwky6f1phz-signature-7e479c195258b6f3aa8e31480588ea71dc7b7dd96ed152bc88b163148596a2ba-poli-160413095347/85/Magento-community-edition-user-guide-964-320.jpg)
![CHAPTER 66: System Tools Magento Test Framework
Configuration Reference
This reference provides information about each MTF configuration section located at:
[Magento install dir]/dev/tests/functional/etc/config.xml
application
Provides the login credentials for the Magento Admin.
<application>
<reopenBrowser>testCase</reopenBrowser>
<backendLogin>admin</backendLogin>
<backendPassword>123123q</backendPassword>
<backendLoginUrl>admin/auth/login</backendLoginUrl>
</application>
Sample
ELEMENT DESCRIPTION
reopenBrowser Determines if the browser is reopened either before every test,
or before every test case. The default behavior is for the
browser to open before every test case.
backendLogin The user name of the Magento Admin administrator.
backendPassword The password of the Magento Admin administrator.
backendLoginUrl The URL of the Magento Admin Login page.
isolation
Specifies the isolation strategies for tests, cases, and suites.
<isolation>
<resetUrlPath>dev/tests/mtf/isolation.php</resetUrlPath>
<testSuite>before</testSuite>
<testCase>none</testCase>
<test>none</test>
</isolation>
Sample
943Magento Community Edition User Guide, Version 1.9.2.1](https://image.slidesharecdn.com/ypijvzifqyxwky6f1phz-signature-7e479c195258b6f3aa8e31480588ea71dc7b7dd96ed152bc88b163148596a2ba-poli-160413095347/85/Magento-community-edition-user-guide-965-320.jpg)


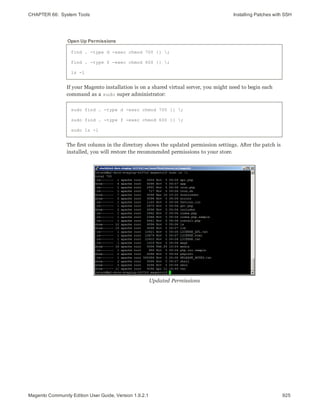
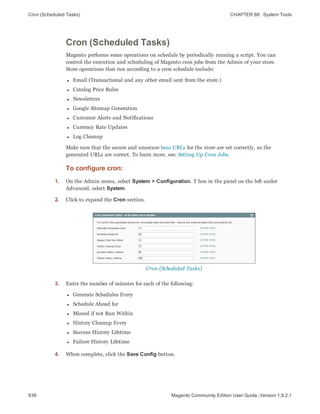
![CHAPTER 66: System Tools Database Repair Tool
l Upload the archived file to your server, and extract it to any folder.
l Extract the archive. Then, upload the file, magento-db-repair-tool-1.2.php to
any folder on your server.
Step 4: Back Up and Clone Your Database
1. Back up your existing database that has the problem, so it can be restored in the event of a
problem. We’ll call it “database1.”
2. Clone “database1” as the new “database2” on the same server.
3. Create a new empty database, “database3.”
4. Do one of the following:
l Copy the entire Magento folder (without the cache and sessions) to a new location, and
install “database3.” Then, update the local.xml file with the database credentials.
l Since access to the site is restricted, you can update the database credentials to
“database3” for the current Magento instance. Then, clean the cache and launch
Magento. The new database will be installed automatically.
You now have “database2,” which is a clone of your original database, and a Magento
installation with the empty “database3.”
Step 5: Run DB Repair
1. Enter the following in the address bar of your browser to launch the DB Repair tool:
http://[your-domain]/[path-to-folder]/magento-db-repair-tool-1.2.php
2. Under Corrupted Database Connection, complete the following information for “database2:”
This information is the same as what is entered during the Configuration step of the
Magento Setup.
a. In the Host field, enter the server's fully qualified host name or IP address. If your
database server is on the same host as your web server, enter “localhost.”
b. Enter the following credentials for the MySQL database that has the problem:
l Database Name
l User Name
l User Password
c. If there are multiple instances of Magento that share the same database, enter the
Table Prefix.
3. Under Reference Database Connection, enter the database credentials for the empty
“database3.”
949Magento Community Edition User Guide, Version 1.9.2.1](https://image.slidesharecdn.com/ypijvzifqyxwky6f1phz-signature-7e479c195258b6f3aa8e31480588ea71dc7b7dd96ed152bc88b163148596a2ba-poli-160413095347/85/Magento-community-edition-user-guide-971-320.jpg)


![Index
[
[GLOBAL] 84
[STORE] 84
[WEBSITE] 84
1
1 Column Layout 132, 492, 494
2
2 Columns
with Left Bar 133, 492, 495
with Right Bar 133, 493
3
3 Column Layout 493, 496
3D Secure Credit Card Validation 680
4
404 Page Not Found 433-434
5
503 Service Unavailable 433
A
Abandoned carts 576
report 858
About Us page 432
Account
customer information 540
Magento 29
share 32
Actions
control 61, 65
Add
Exception, theme 524
New User 865
Root Category 125
to Wishlist 366
Address
Book, customer 540
Address format 611
Address templates 611
Admin 49, 65
CAPTCHA 876
login 50
menu 58
Notifications 57
permissions 861
role 862
role, create 863
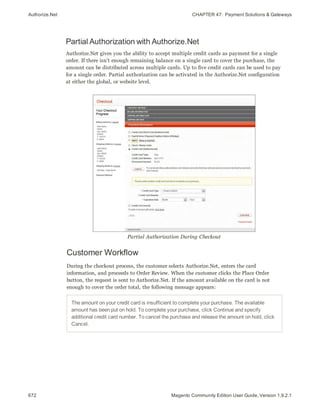
role, custom 864
security 867, 875
Startup Page 852
user 862
977Magento Community Edition User Guide, Version 1.9.2.1](https://image.slidesharecdn.com/ypijvzifqyxwky6f1phz-signature-7e479c195258b6f3aa8e31480588ea71dc7b7dd96ed152bc88b163148596a2ba-poli-160413095347/85/Magento-community-edition-user-guide-999-320.jpg)