
More Related Content
Viewers also liked
Viewers also liked (16)
Similar to Mac2
Similar to Mac2 (20)
Recently uploaded
Recently uploaded (18)
Mac2
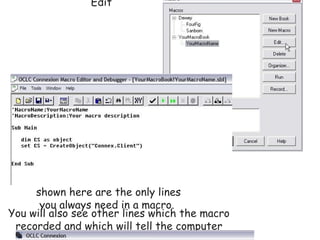
- 1. Writing Simple OCLC Connexion Client Macros Mini-tutorial Before you begin, decide which repetitive task you will be automating with your macro. Then, follow the steps below to create your macro. Step 1: next Select Tools, Macros, Manage Step 2: prev next Click the New Book button Step 3: prev next Type a name for your new macro book. Step 4: prev next With the new macro book name highlighted, click on the Record button. Step 5: prev next Type a name and a description for your new macro. You can skip entering a description, but you must enter a name. (Keep the name short, no spaces or punctuation.) Step 6: prev next Go through all the steps you would normally go through in the repetitive task. You can even begin by logging in and searching for a record. When you have completed the steps in the repetitive task, click the red macro Stop button. Step 7: prev next To see the syntax of your new macro, select Tools, Macros, Manage again. Then, with your macro name highlighted, click Edit You will see how your macro is constructed. The lines shown here are the only lines you always need in a macro. You will also see other lines which the macro recorded and which will tell the computer what you want it to do when you run your macro. Step 8: prev next To run your macro: Select Tools, Macros, Manage Then, with your macro name highlighted, click Run. Step 9: prev You can make running your macros easier by assigning them to keys. You can assign macros to keys two different ways. One way is to assign macros to keys using the Tools, Options method. If you use this method, the assigned keys will remain assigned unless you change them. To see steps for assigning your macros to keys this way click here . OR ... you can create a logon macro and add the following line of code for each macro you want to assign to a key. Sub Main dim CS as object set CS = CreateObject("Connex.Client") CS.Logon "", "", "" CS.AssignMacroToKey "F3", "YourMacroBook.mbk!YourMacroName", True End Sub If you use this method, you must run your logon macro to assign the macros to the keys. The word "True" in the line above causes your macro key assignment to override the default assignment for the key. Wasn't that simple? Of course, you can do more. For instance, you can create variables the simple way ... If you want to see more, click here
- 2. Writing Simple OCLC Connexion Client Macros Mini-tutorial Before you begin, decide which repetitive task you will be automating with your macro. Then, follow the steps below to create your macro. Step 1: next Select Tools, Macros, Manage Step 2: prev next Click the New Book button Step 3: prev next Type a name for your new macro book. Step 4: prev next With the new macro book name highlighted, click on the Record button. Step 5: prev next Type a name and a description for your new macro. You can skip entering a description, but you must enter a name. (Keep the name short, no spaces or punctuation.) Step 6: prev next Go through all the steps you would normally go through in the repetitive task. You can even begin by logging in and searching for a record. When you have completed the steps in the repetitive task, click the red macro Stop button. Step 7: prev next To see the syntax of your new macro, select Tools, Macros, Manage again. Then, with your macro name highlighted, click Edit You will see how your macro is constructed. The lines shown here are the only lines you always need in a macro. You will also see other lines which the macro recorded and which will tell the computer what you want it to do when you run your macro. Step 8: prev next To run your macro: Select Tools, Macros, Manage Then, with your macro name highlighted, click Run. Step 9: prev You can make running your macros easier by assigning them to keys. You can assign macros to keys two different ways. One way is to assign macros to keys using the Tools, Options method. If you use this method, the assigned keys will remain assigned unless you change them. To see steps for assigning your macros to keys this way click here . OR ... you can create a logon macro and add the following line of code for each macro you want to assign to a key. Sub Main dim CS as object set CS = CreateObject("Connex.Client") CS.Logon "", "", "" CS.AssignMacroToKey "F3", "YourMacroBook.mbk!YourMacroName", True End Sub If you use this method, you must run your logon macro to assign the macros to the keys. The word "True" in the line above causes your macro key assignment to override the default assignment for the key. Wasn't that simple? Of course, you can do more. For instance, you can create variables the simple way ... If you want to see more, click here
- 3. Writing Simple OCLC Connexion Client Macros Mini-tutorial Before you begin, decide which repetitive task you will be automating with your macro. Then, follow the steps below to create your macro. Step 1: next Select Tools, Macros, Manage Step 2: prev next Click the New Book button Step 3: prev next Type a name for your new macro book. Step 4: prev next With the new macro book name highlighted, click on the Record button. Step 5: prev next Type a name and a description for your new macro. You can skip entering a description, but you must enter a name. (Keep the name short, no spaces or punctuation.) Step 6: prev next Go through all the steps you would normally go through in the repetitive task. You can even begin by logging in and searching for a record. When you have completed the steps in the repetitive task, click the red macro Stop button. Step 7: prev next To see the syntax of your new macro, select Tools, Macros, Manage again. Then, with your macro name highlighted, click Edit You will see how your macro is constructed. The lines shown here are the only lines you always need in a macro. You will also see other lines which the macro recorded and which will tell the computer what you want it to do when you run your macro. Step 8: prev next To run your macro: Select Tools, Macros, Manage Then, with your macro name highlighted, click Run. Step 9: prev You can make running your macros easier by assigning them to keys. You can assign macros to keys two different ways. One way is to assign macros to keys using the Tools, Options method. If you use this method, the assigned keys will remain assigned unless you change them. To see steps for assigning your macros to keys this way click here . OR ... you can create a logon macro and add the following line of code for each macro you want to assign to a key. Sub Main dim CS as object set CS = CreateObject("Connex.Client") CS.Logon "", "", "" CS.AssignMacroToKey "F3", "YourMacroBook.mbk!YourMacroName", True End Sub If you use this method, you must run your logon macro to assign the macros to the keys. The word "True" in the line above causes your macro key assignment to override the default assignment for the key. Wasn't that simple? Of course, you can do more. For instance, you can create variables the simple way ... If you want to see more, click here
- 4. Writing Microsoft Excel Macros the simple way! In most cases, short, simple macros can instruct Microsoft Excel to perform the same complex operations that long, complex macros do. Simple macros tell Excel to do only what you want it to do and nothing more . But, if you are a macro-writing beginner, you will soon discover that finding simple Excel macro samples to study is not easy. The macro example below appears in several online Excel macro-writing tutorials. It inserts a worksheet and names it "NewName". Sub AddSheetsTutorialExample() Dim newSheetName As String newSheetName = "NewName" Sheets.Add Type:="Worksheet" With ActiveSheet .Move after:=Worksheets(Worksheets.Count) .Name = newSheetName End With End Sub But even this relatively short macro has unnecessary lines. My, shorter, simpler version works equally well! Sub AddSheetsTutorialExampleRevised() With ActiveSheet .Move after:=Worksheets(Worksheets.Count) .Name = "NewName" End With End Sub My macro-writing motto is: If you don't need it, DELETE it! Short, simple macros save macro error-checking time, a few bytes of computer space, and a couple of nanoseconds of macro runtime. But, even more important is the fact that learning to write simple macros is much easier, and much more fun! Why boggle your mind if you don't have to?