This document provides instructions for assembling and preparing various LG TV models. It lists the included accessories for different TV sizes and models. These include items like remote controls, batteries, stands, screws, cables and 3D glasses. The document provides illustrations and instructions for unpacking the TV and included items. It also provides safety information and cautions when assembling the TV.


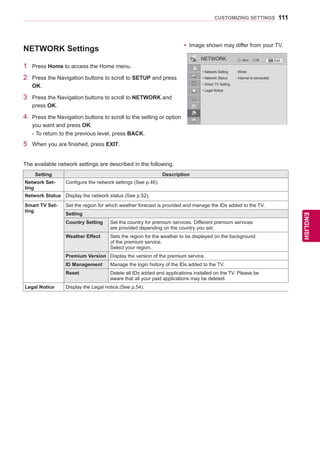
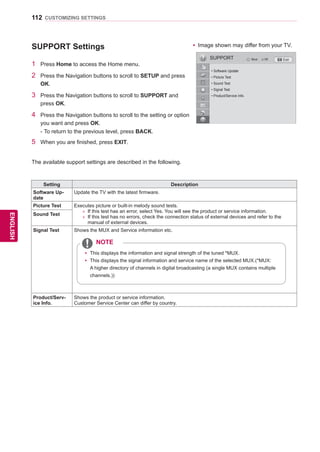
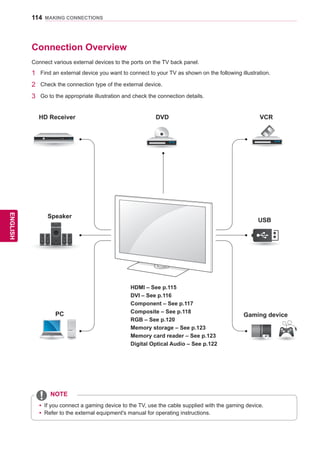
![10
ENGENGLISH
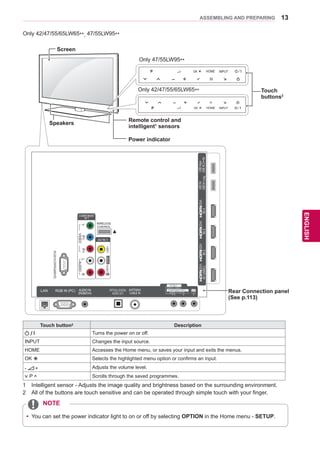
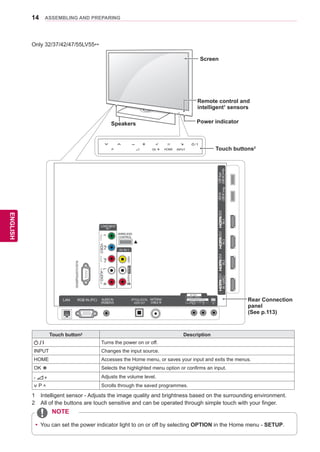
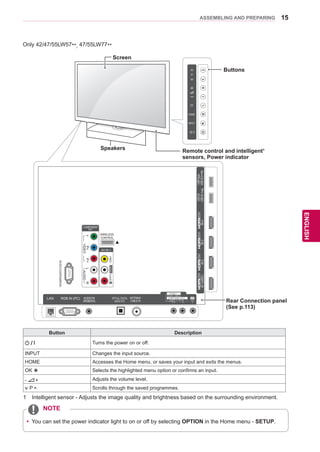
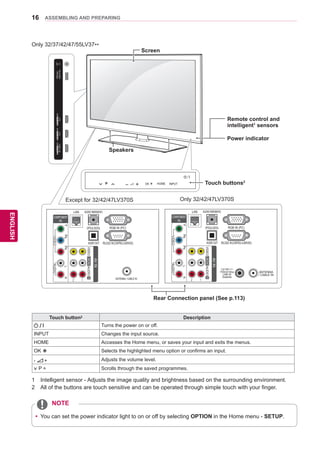
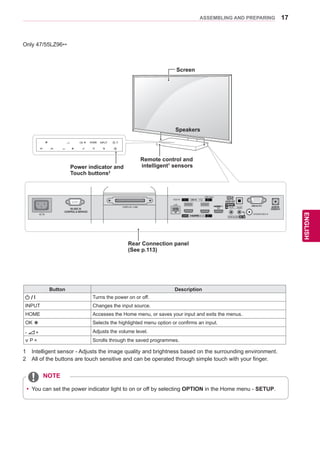
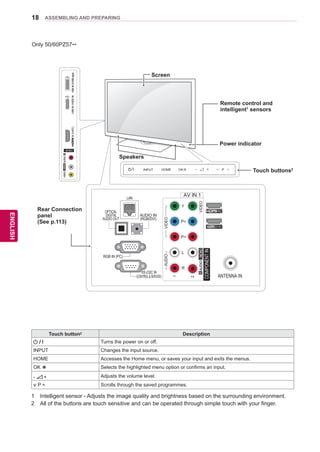
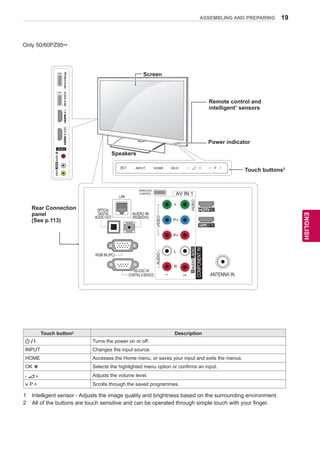
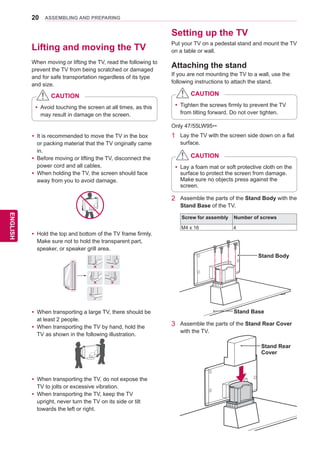
ASSEMBLING AND PREPARING
NOTE
yy Do not use any unapproved items to ensure the safety and product life span.
yy Any damages or injuries by using unapproved items are not covered by the warranty.
CAUTION
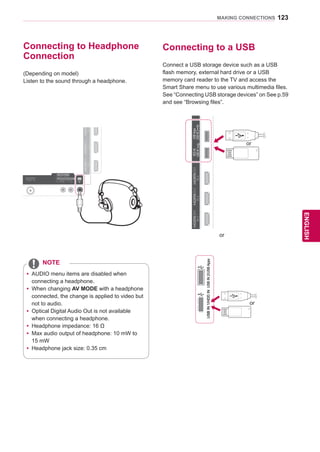
[to an External device]
[Figure 1]
[to the TV]
(Gray)
[Cross Section of
Ferrite Core]
10 mm(+ / - 5 mm)
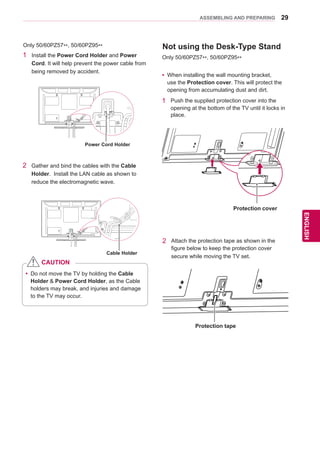
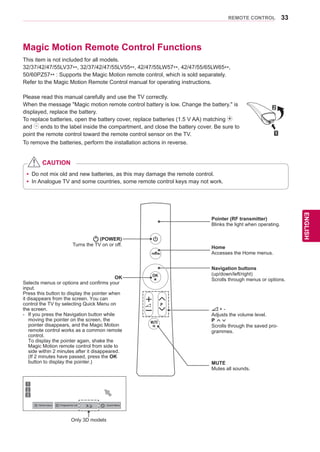
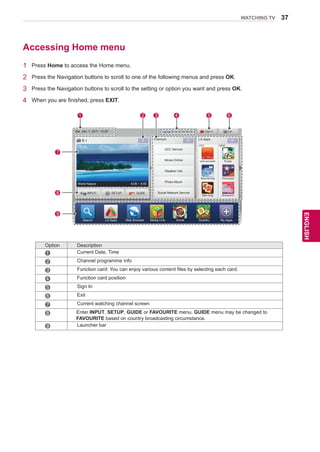
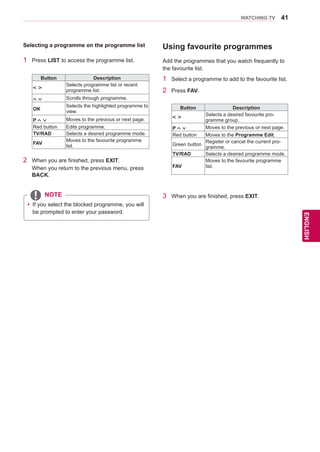
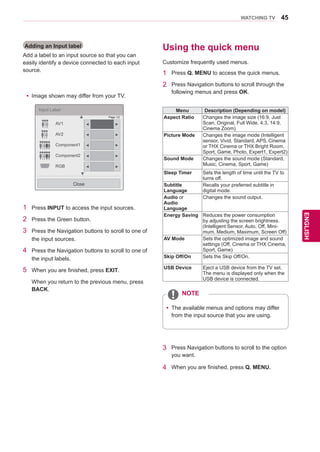
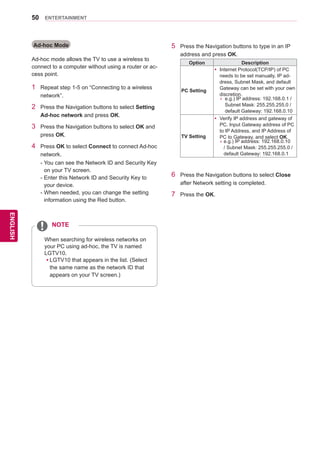
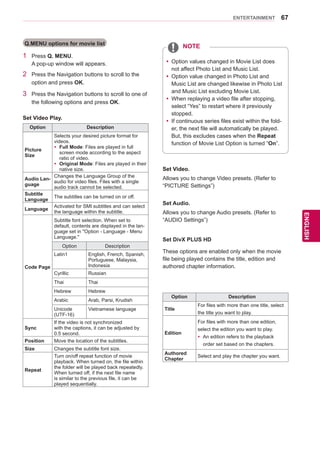
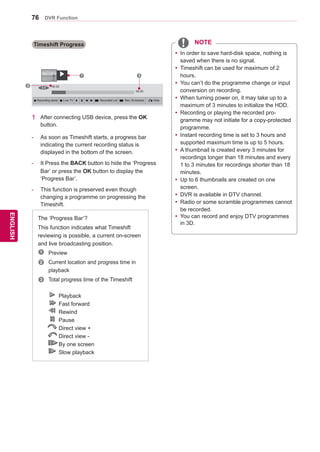
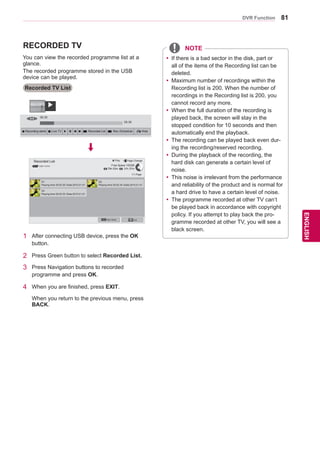
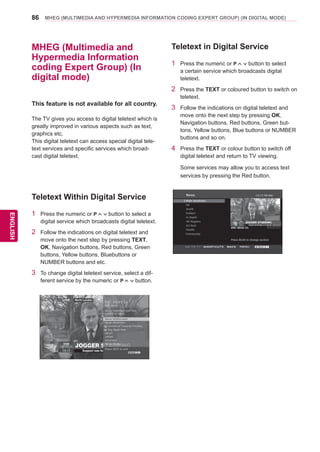
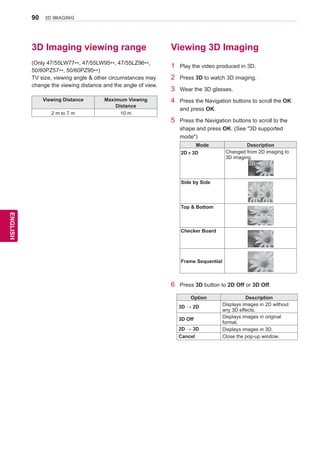
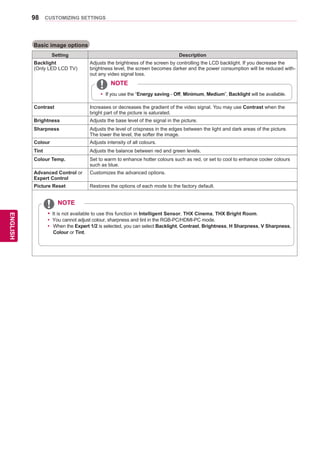
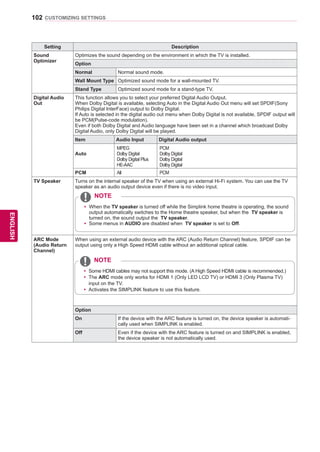
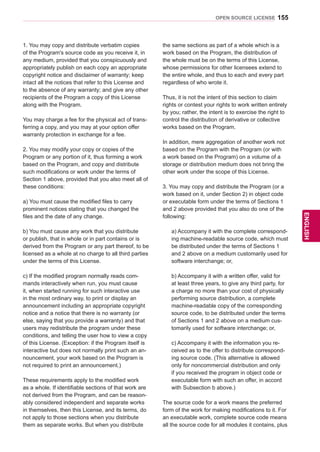
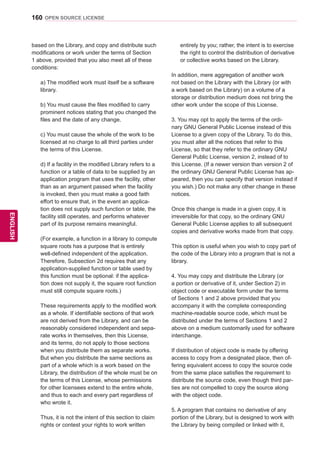
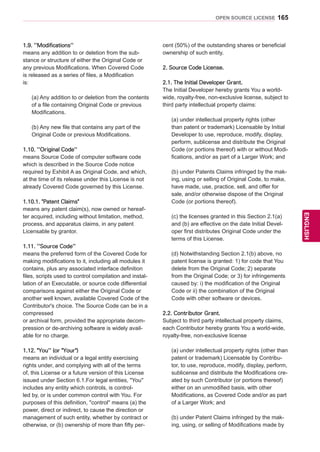
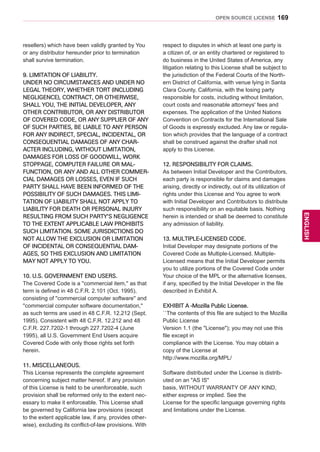
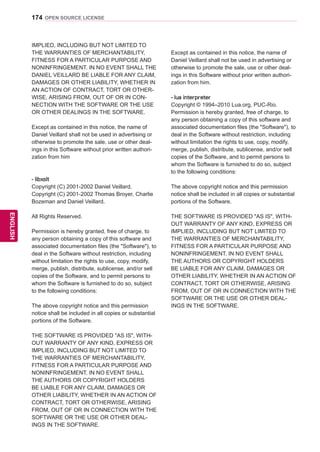
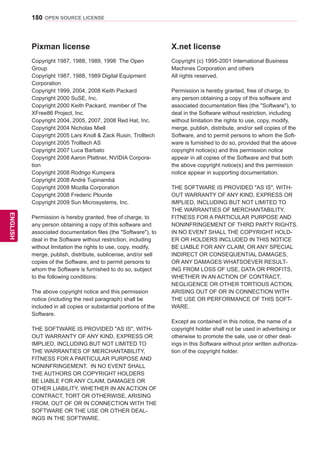
2 Use the ferrite core to reduce the electromagnetic interference in the power cable.
Wind the power cable on the ferrite core once. Place the ferrite core close to the TV and a wall plug.
[to a wall plug] [to the TV]
(Black)
[Cross Section of
Ferrite Core]
[Figure 2]
3 Use the ferrite core to reduce the electromagnetic interference in the LAN cable. Wind the
LAN cable once on the small ferrite core and thrice on the big ferrite core. Place the
ferrite core close to the TV.
[to an External
device] [to the TV]
A B
[Figure 3]
yy For an optimal connection, HDMI cables and USB devices should have bezels less than 10 mm thick
and 18 mm width. (Depending on model)
B
A A
B
*A 10 mm
*B 18 mm
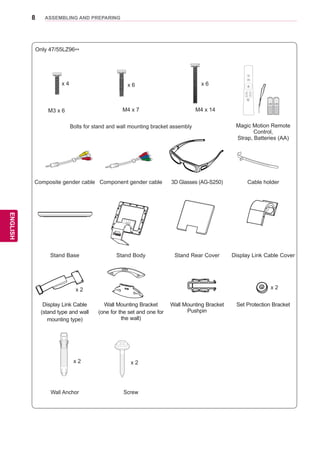
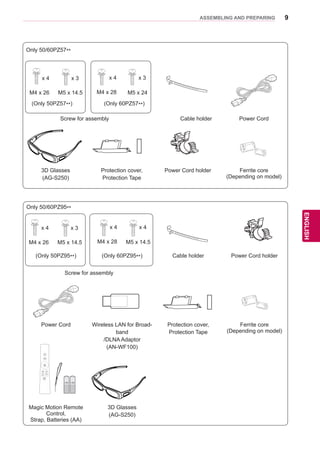
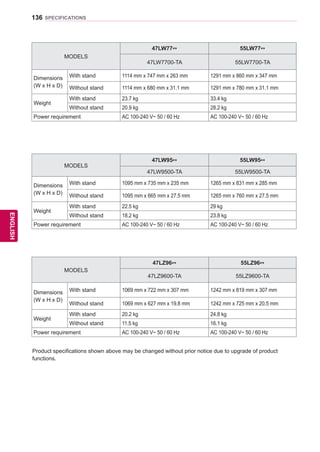
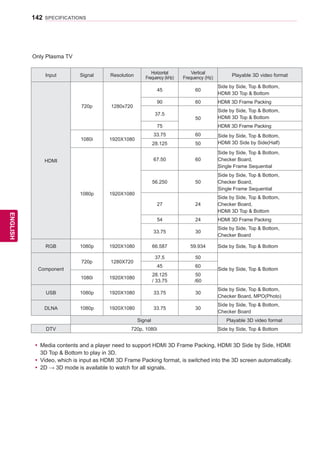
yy The items supplied with your product may vary depending on the model.
yy Product specifications or contents of this manual may be changed without prior notice due to upgrade
of product functions.
yy How to use the ferrite core (Only Plasma TV)
1 Use the ferrite core to reduce the electromagnetic interference in the PC audio cable.
Wind the PC audio cable on the ferrite core thrice. Place the ferrite core close to the TV.
- If there are two ferrite cores, follow as shown in Figures 3(1).
- If there are three ferrite cores, follow as shown in Figures 1 and 3(1).
- If there are six ferrite cores, follow as shown in Figures 1, 2 and 3(2).
A (Gray) B(Gray)
[Cross Section of
Ferrite Core]
A
(1)
(2)](https://image.slidesharecdn.com/lwlveng-150710011208-lva1-app6891/85/LW-LV-Eng-10-320.jpg)
![49
ENGENGLISH
ENTERTAINMENT
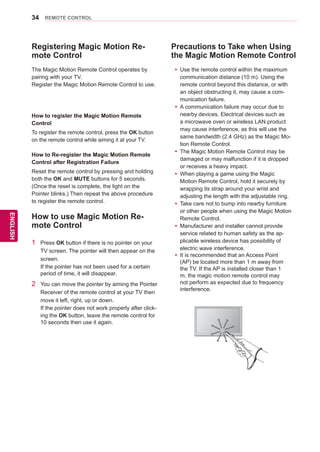
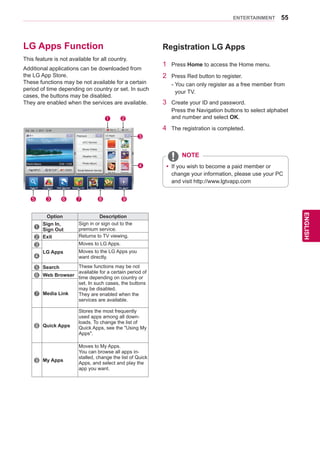
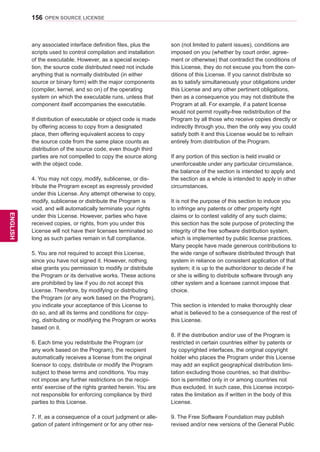
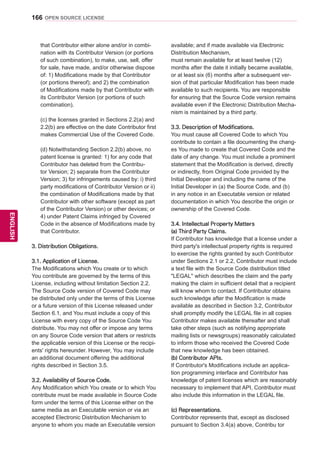
When a security code is already
set
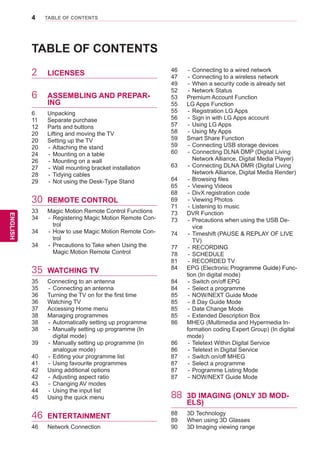
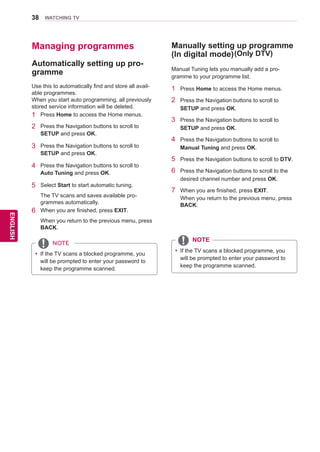
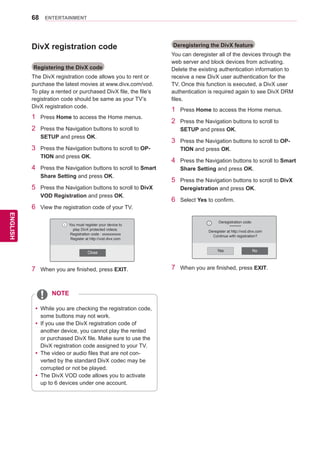
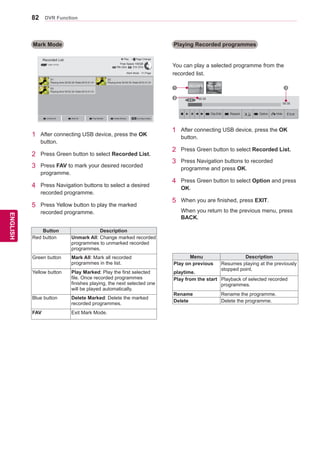
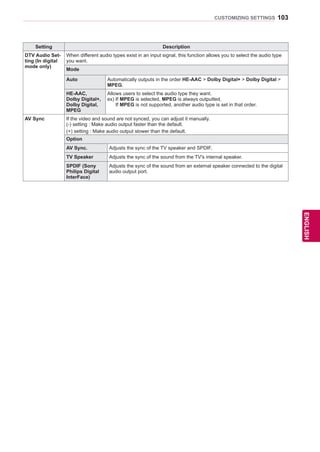
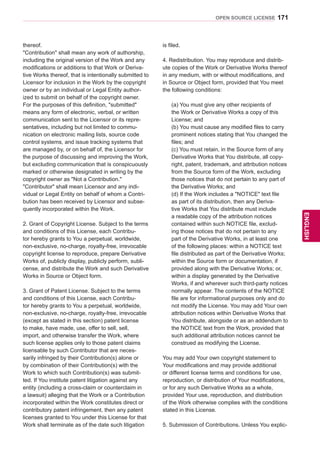
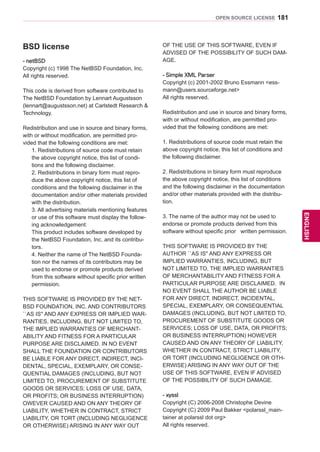
PIN (Personal Identification Number)
If your router is set to use a PIN, use the following
instructions.
1 Repeat step 1-7 on “Connecting to a wireless
network”.
2 Press the Red button to connect the access
point with PIN mode.
3 You can see the Network ID and Security Key
on your TV screen.
Enter the PIN number to your device.
PIN number is the unique 8 digit number of the
dongle.
4 Press OK to select Connect.
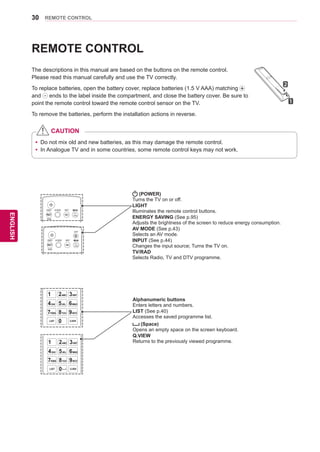
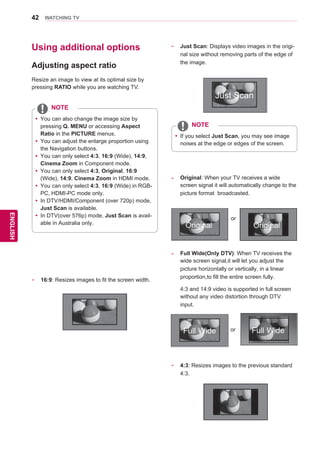
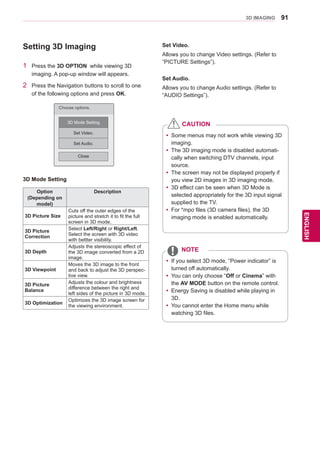
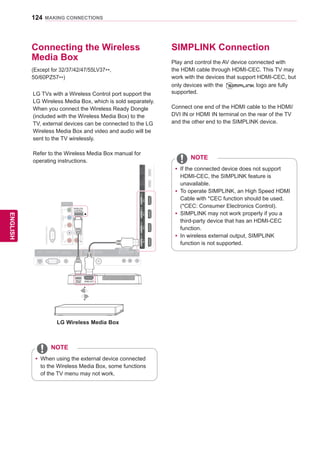
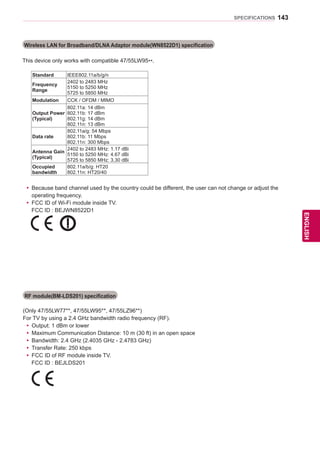
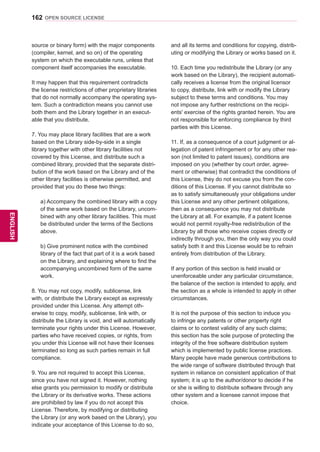
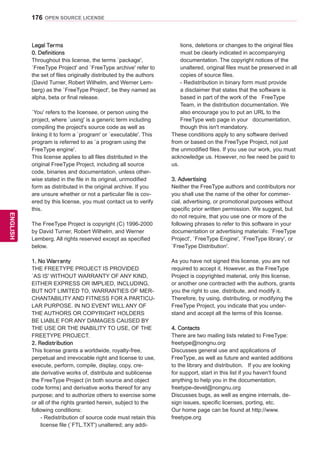
WPS (Wi-Fi Protected Setup)
If your router or AP has a WPS button, it is the
easiest connection method. You simply press the
button on the router and then select the WPS on
the TV within 120 seconds.
1 Repeat step 1-7 on “Connecting to a wireless
network”.
2 Press the Navigation buttons to select the
Simple setting (WPS-button mode).
3 Press the WPS button on your router.
4 Go back to the TV and select Connect.
5 Repeat step 6-7 on “Connecting to a wired
network”.
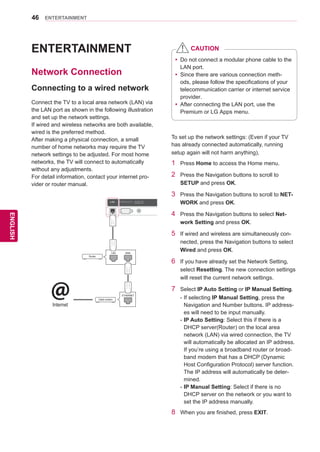
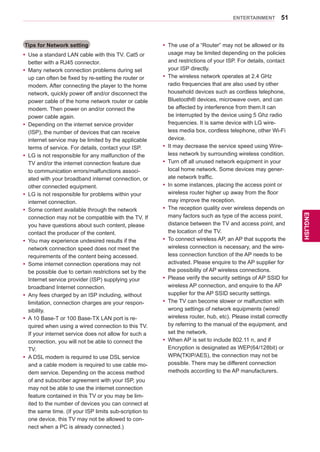
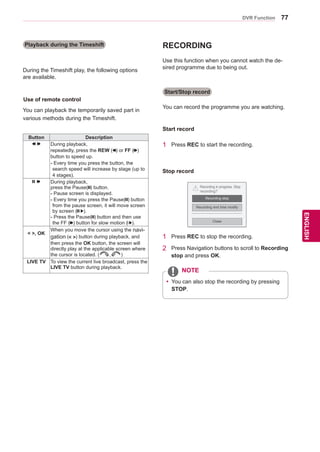
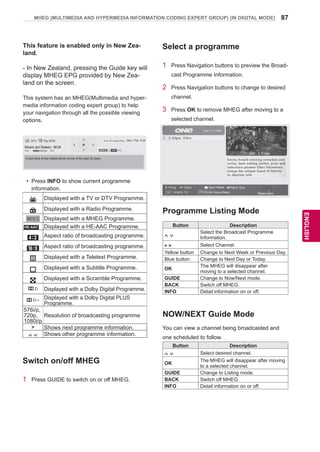
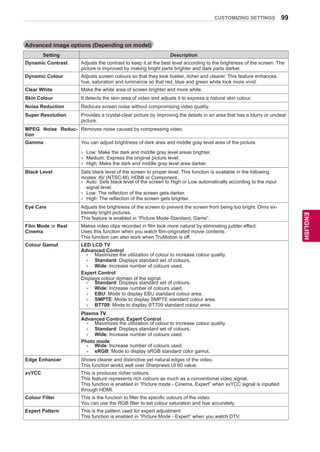
Connecting with PIN mode
Insert PIN number at the AP webpage and
press [Connect] button.
PIN NUMBER : 12345670
Connect
ꕉ Previous
For more information, check the AP manual.
ꕯ Exit
ꔉ Next
5 Repeat step 6-7 on “Connecting to a wired
network”.](https://image.slidesharecdn.com/lwlveng-150710011208-lva1-app6891/85/LW-LV-Eng-49-320.jpg)

![69
ENGENGLISH
ENTERTAINMENT
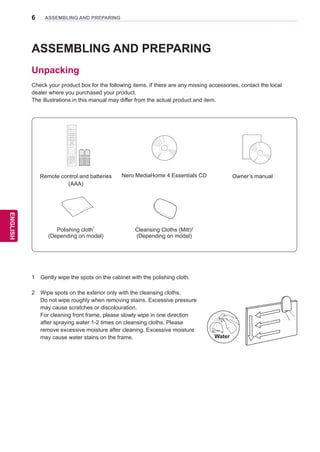
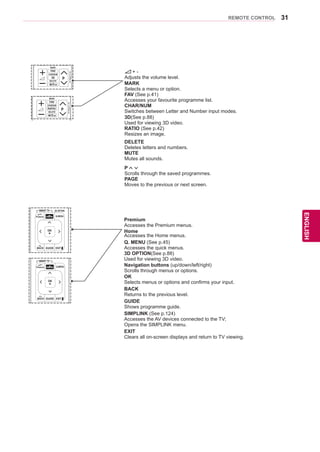
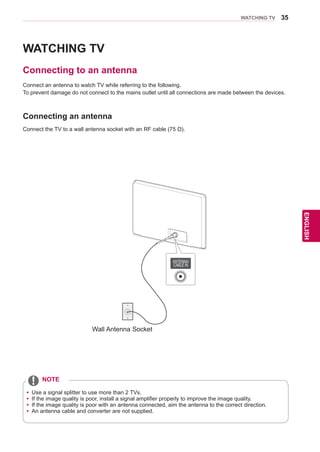
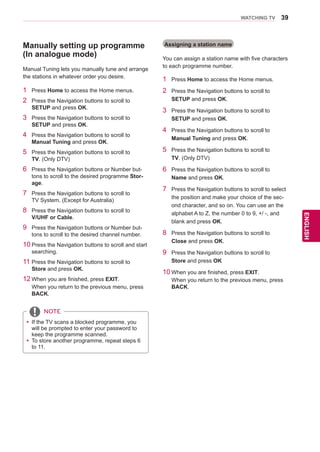
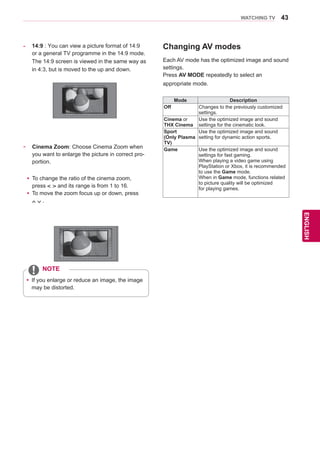
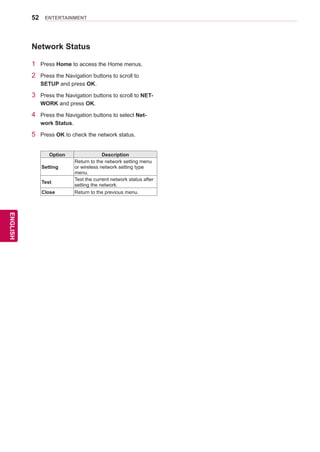
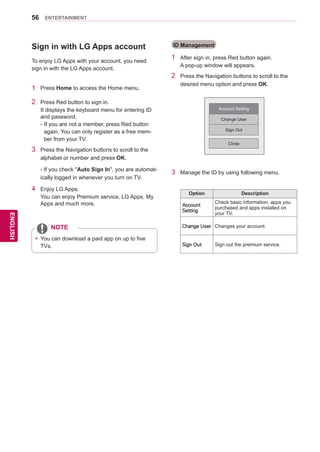
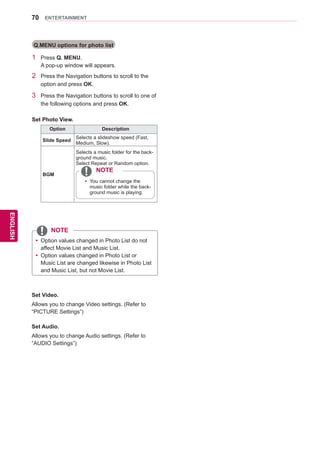
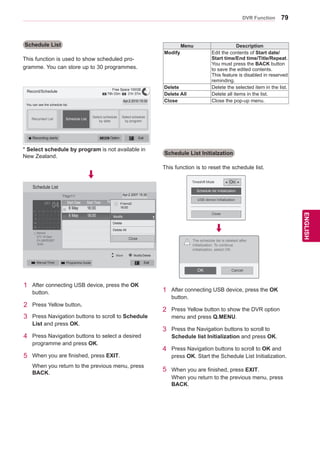
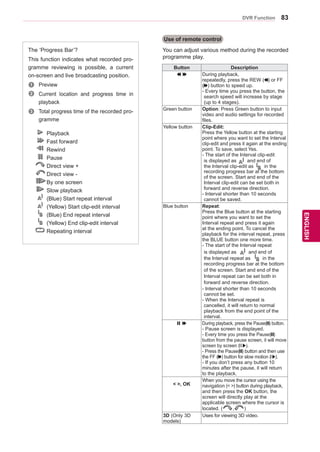
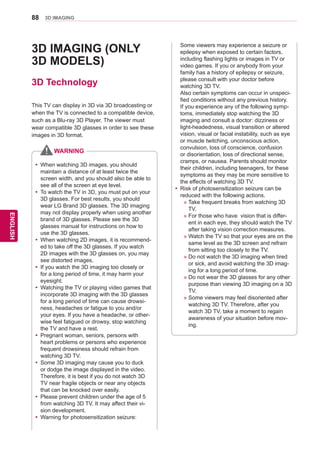
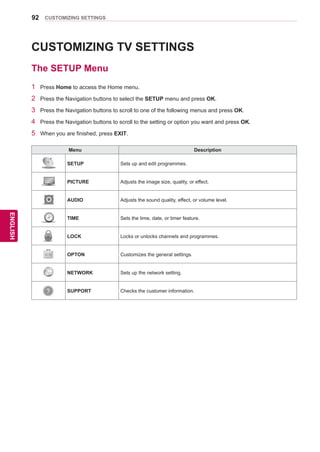
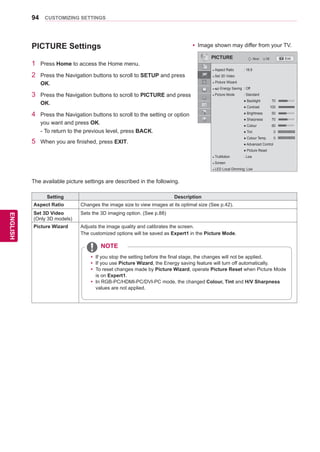
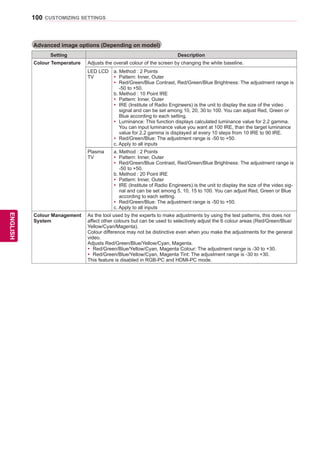
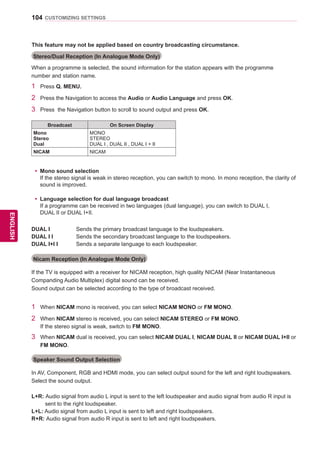
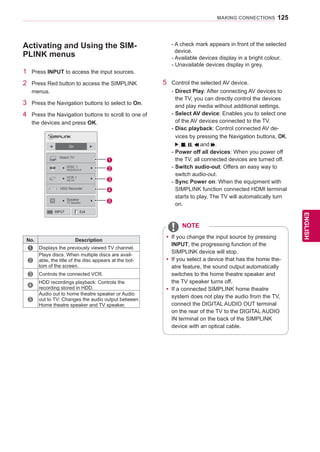
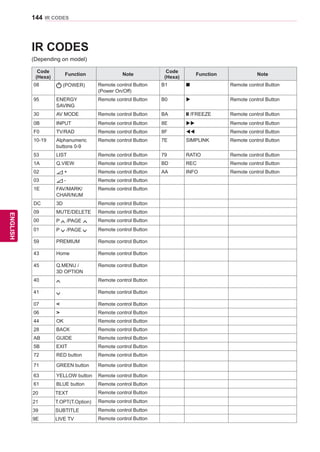
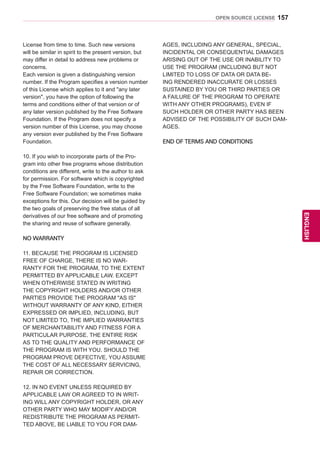
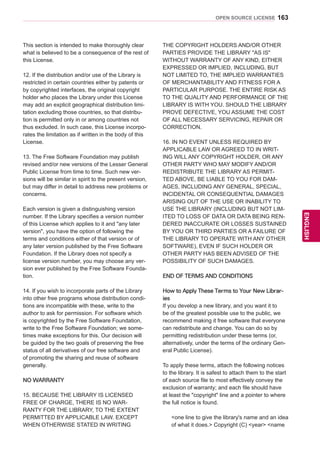
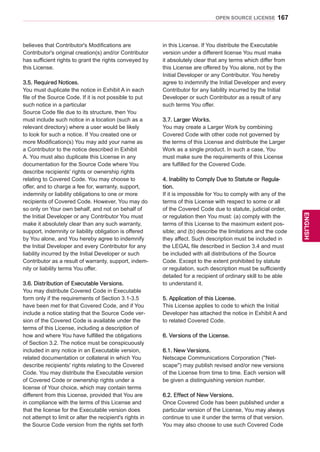
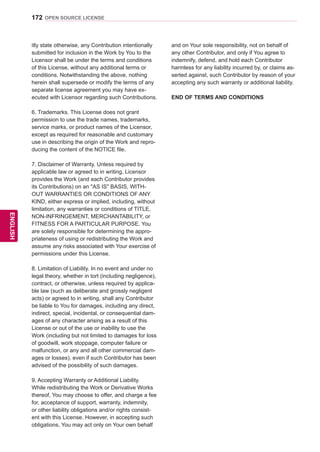
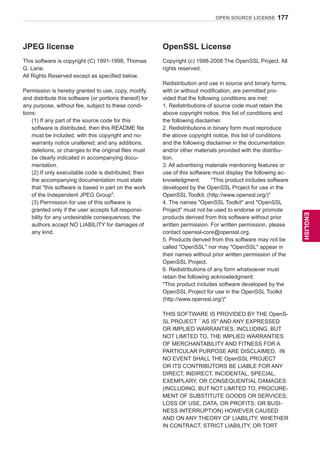
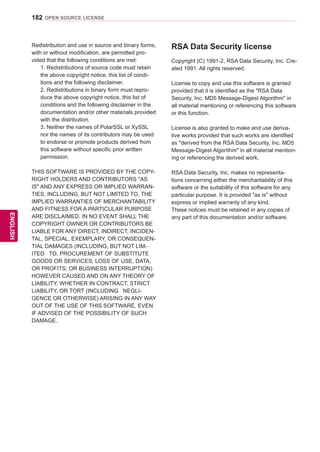
Viewing Photos
You can view image files saved on a USB storage
device. The displays on the screen may based on
the from the model.
1 Press Home to access the Home menu.
2 Press the Navigation buttons to scroll to Smart
Share and press OK.
3 Press the Navigation buttons to scroll to the
device you want and press OK.
4 Press the Navigation buttons to scroll to Photo
List and press OK.
5 Press the Navigation buttons to scroll to a
folder/file you want and press OK.
6 View photos by using the following menus/but-
tons.
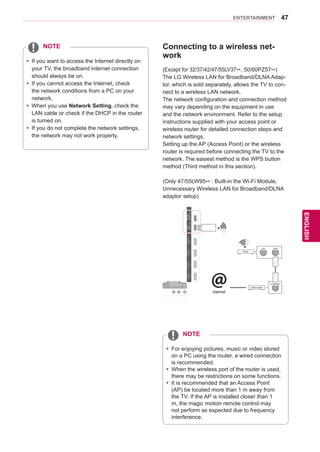
Page 1/1
Photo List
USB2 External Drive1 Page 1/2
ꔵ Page Change
P1 P2 P3 P4
P5 P6 P7 P8
P9 P10 P11 P12
P13 P14 P15 P16
� Change device � Go to root folder � Go to upper folder Exit
Button Description
Navigation
button
Scrolls the file.
OK Views the highlighted file.
P Moves to the previous or next page.
Red button
Change device: Changes to a differ-
ent input.
Green button Go to root folder.
Yellow button Go to upper folder.
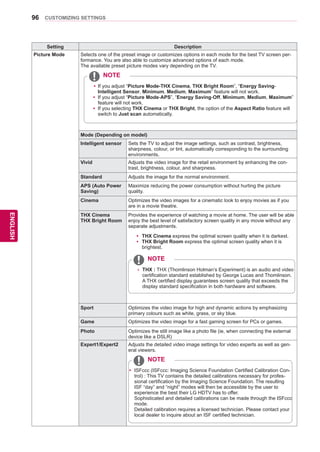
7 The following options are available while view-
ing photos.
01_a.jpg
2008/12/10
1920 x 1080
479 KB
[1/66]
Slideshow BGM Option Hide Exit
Option Description
Slideshow
Starts or stops a slideshow.
All photos saved in the current folder
display during a slideshow.
To set a slideshow speed, select Op-
tion.
BGM
(Background
Music)
Turns the background music on or off.
To set the background music folder,
select Option.
(Colour Filter)
(Only Plasma
TV)
Displays the current photo in Original,
Monotone, Sepia, Oil Painting and
Vignetting.
(Rotate)
Rotates photos clockwise (90°, 180°,
270°, 360°).
yy The supported photo size is lim-
ited. You cannot rotate a photo
if the resolution of the rotated
width is larger than the sup-
ported resolution size.
NOTE
Views the photo in full mode or original
mode.
(ENERGY
SAVING)
Increases or decreases the brightness
of your screen.
3D (Only 3D
models)
Views the 3D images.
Option Shows the Option menu (See p.70).
Hide
Hides the option window.
To display the options, press OK.
Exit Moves to the previous menu screen.
Slideshow BGM Option Hide Exit
or](https://image.slidesharecdn.com/lwlveng-150710011208-lva1-app6891/85/LW-LV-Eng-69-320.jpg)


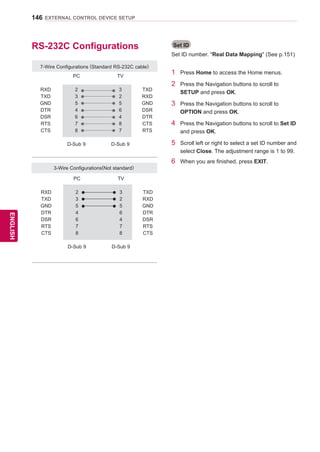
![148
ENGENGLISH
EXTERNAL CONTROL DEVICE SETUP
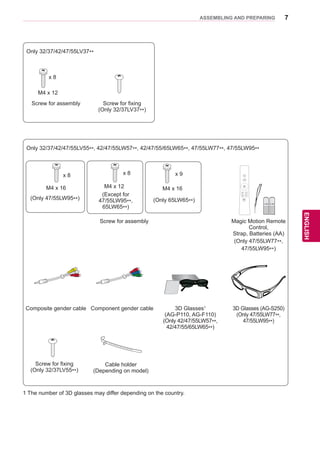
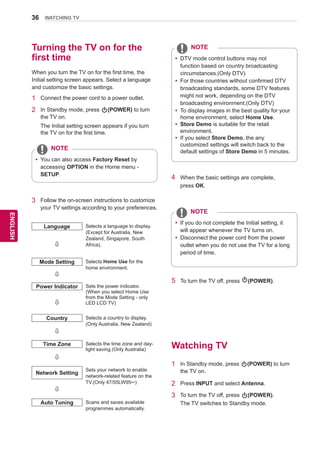
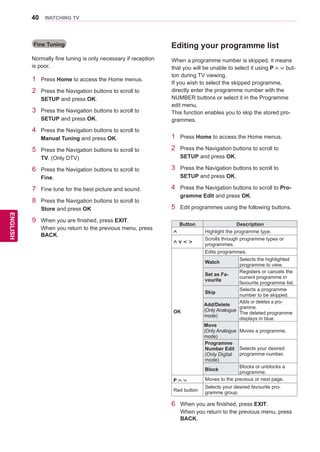
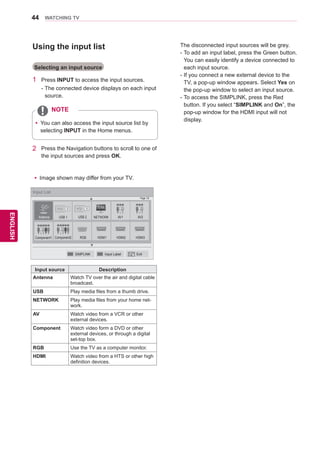
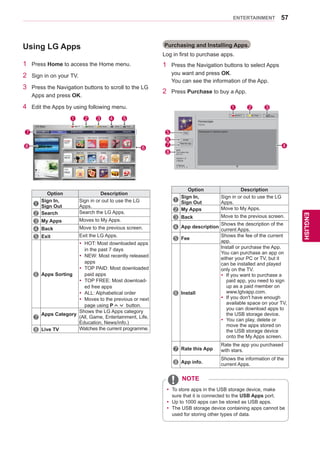
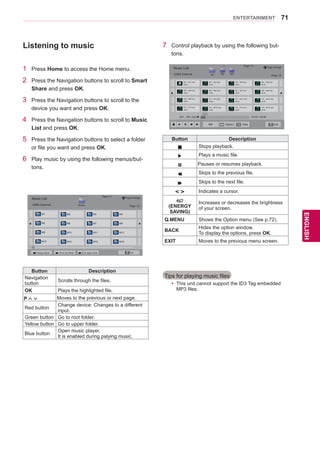
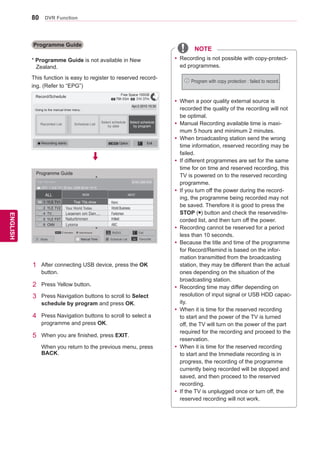
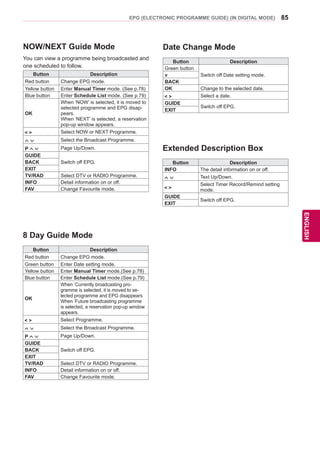
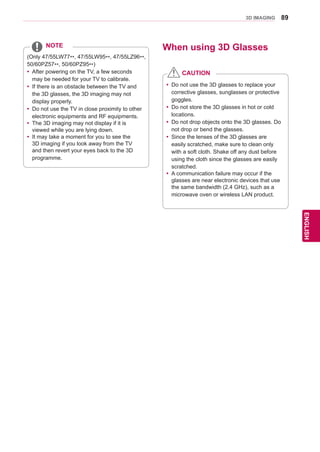
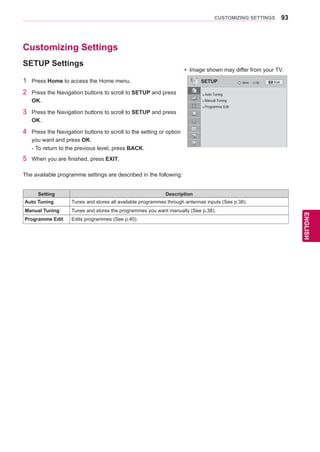
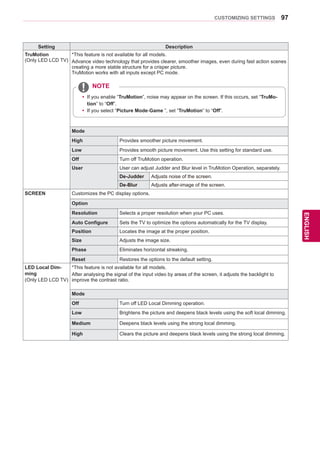
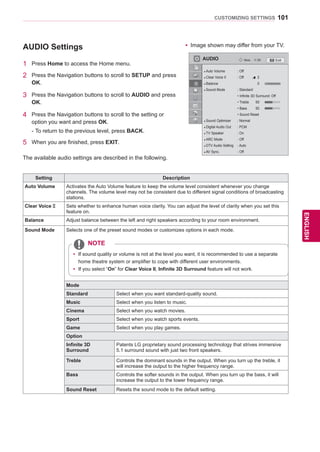
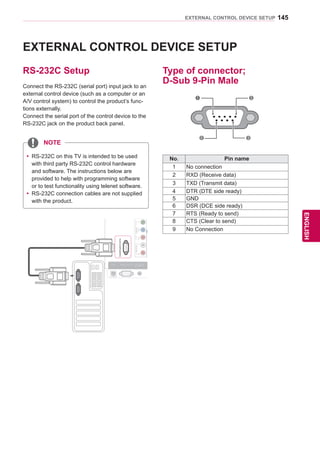
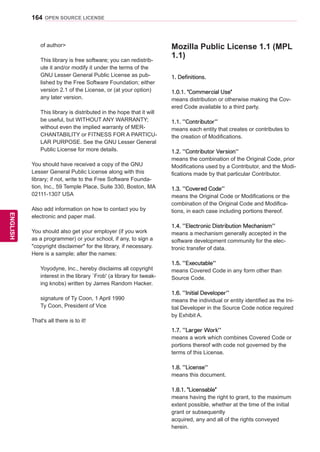
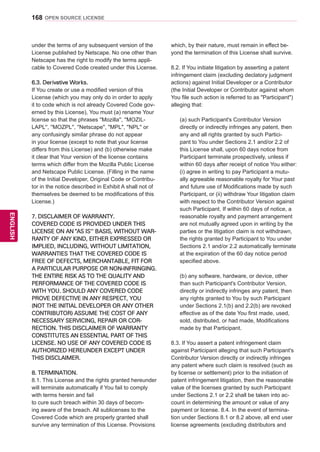
02. Aspect Ratio (Command: k c) (Main Picture Size)
►► To adjust the screen format. (Main picture format)
You can also adjust the screen format using the
Aspect Ratio in the Q.MENU. or PICTURE menu.
Transmission [k][c][ ][Set ID][ ][Data][Cr]
* Using the PC input, you select either 16:9 or 4:3
screen aspect ratio.
* In DTV/HDMI (1080i 50 Hz / 60 Hz, 720p 50Hz / 60
Hz, 1080p 24 Hz / 30 Hz / 50 Hz / 60 Hz),
Component( 720p, 1080i, 1080p 50 Hz / 60 Hz) mode,
Just Scan is available.
* Full Wide is supported only for DTV.
Ack [c][ ][Set ID][ ][OK/NG][Data][x]
03. Screen Mute (Command: k d)
►► To select screen mute on/off.
Data 00 : Screen mute off (Picture on)
Video mute off
01 : Screen mute on (Picture off)
10 : Video mute on
* In case of video mute on only, TV will display On
Screen Display(OSD). But, in case of Screen mute
on, TV will not display OSD.
Transmission [k][d][ ][Set ID][ ][Data][Cr]
Ack [d][ ][Set ID][ ][OK/NG][Data][x]
01. Power (Command: k a)
►► To control Power On/Off of the set.
Data 00 : Power Off 01 : Power On
Transmission[k][a][ ][Set ID][ ][Data][Cr]
Ack [a][ ][Set ID][ ][OK/NG][Data][x]
►► To show Power On/Off.
Transmission [k][a][ ][Set ID][ ][FF][Cr]
* Similarly, if other functions transmit ‘0xFF’ data based
on this format, Acknowledgement data feed back
presents status about each function.
* OK Ack., Error Ack. and other message may display
on the screen when TV is power On.
Ack [a][ ][Set ID][ ][OK/NG][Data][x]
OK Acknowledgement
[Command2][ ][Set ID][ ][OK][Data][x]
* The set transmits ACK (acknowledgement)
based on this format when receiving normal
data. At this time, if the data is data read mode,
it indicates present status data. If the data is
data write mode, it returns the data of the PC
computer.
Error Acknowledgement
[Command2][ ][Set ID][ ][NG][Data][x]
* The set transmits ACK (acknowledgement)
based on this format when receiving abnormal
data from
non-viable functions or communication errors.
Data 00: Illegal Code
[Command 1] First command to control the
TV.(j, k, m or x)
[Command 2] Second command to control the
TV.
[Set ID] You can adjust the set ID to
choose desired monitor ID num-
ber in option menu. Adjustment
range is 1 to 99.
When selecting Set ID ‘0’, every con-
nected set is controlled.
Set ID is indicated as decimal (1
to 99) on menu and as Hexa deci-
mal (0x0 to 0x63) on transmis-
sion/receiving protocol.
[DATA] To transmit command data.
Transmit ‘FF’ data to read status
of command.
[Cr] Carriage Return
ASCII code ‘0x0D’
[ ] ASCII code ‘space (0x20)’
Transmission / Receiving
Protocol
Transmission
[Command1][Command2][ ][Set ID][ ][Data][Cr]
Data 01 : Normal screen (4:3)
02 : Wide screen (16:9)
06 : Original
07 : 14:9
09 : Just Scan
0B : Full Wide
10 to 1F : Cinema Zoom 1 to 16](https://image.slidesharecdn.com/lwlveng-150710011208-lva1-app6891/85/LW-LV-Eng-148-320.jpg)
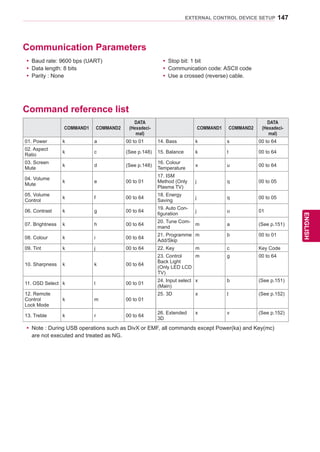
![149
ENGENGLISH
EXTERNAL CONTROL DEVICE SETUP
08. Colour (Command: k i)
►► To adjust the screen colour.
You can also adjust colour in the PICTURE menu.
Data Min : 00 to Max : 64
* Refer to ‘Real data mapping’. (See p.151)
Transmission [k][i][ ][Set ID][ ][Data][Cr]
Ack [i][ ][Set ID][ ][OK/NG][Data][x]
04. Volume Mute (Command: k e)
►► To control volume mute on/off.
You can also adjust mute using the MUTE button on
remote control.
Data 00 : Volume mute on (Volume off)
01 : Volume mute off (Volume on)
Transmission [k][e][ ][Set ID][ ][Data][Cr]
Ack [e][ ][Set ID][ ][OK/NG][Data][x]
05. Volume Control (Command: k f)
►► To adjust volume.
You can also adjust volume with the VOLUME but-
tons on remote control.
Data Min : 00 to Max : 64
* Refer to ‘Real data mapping’. (See p.151)
Transmission [k][f][ ][Set ID][ ][Data][Cr]
Ack [f][ ][Set ID][ ][OK/NG][Data][x]
06. Contrast (Command: k g)
►► To adjust screen contrast.
You can also adjust contrast in the PICTURE menu.
Data Min : 00 to Max : 64
* Refer to ‘Real data mapping’. (See p.151)
Transmission [k][g][ ][Set ID][ ][Data][Cr]
Ack [g][ ][Set ID][ ][OK/NG][Data][x]
07. Brightness (Command: k h)
►► To adjust screen brightness.
You can also adjust brightness in the PICTURE
menu.
Data Min : 00 to Max : 64
* Refer to ‘Real data mapping’. (See p.151)
Transmission [k][h][ ][Set ID][ ][Data][Cr]
Ack [h][ ][Set ID][ ][OK/NG][Data][x]
12. Remote control lock mode (Command: k m)
►► To lock the front panel controls on the monitor and remote
control.
Transmission [k][m][ ][Set ID][ ][Data][Cr]
Data 00 : Lock off 01 : Lock on
* If you are not using the remote control, use this mode.
When main power is on/off, external control lock is
released.
* In the standby mode, if key lock is on, TV will not turn
on by power on key of IR Local Key.
Ack [m][ ][Set ID][ ][OK/NG][Data][x]
11. OSD Select (Command: k l)
►► To select OSD (On Screen Display) on/off when controlling
remotely.
Transmission [k][l][ ][Set ID][ ][Data][Cr]
Data 00 : OSD off 01 : OSD on
Ack [l][ ][Set ID][ ][OK/NG][Data][x]
09. Tint (Command: k j)
►► To adjust the screen tint.
You can also adjust tint in the PICTURE menu.
Data Red : 00 to Green : 64
* Refer to ‘Real data mapping’. (See p.151)
Transmission [k][j][ ][Set ID][ ][Data][Cr]
Ack [j][ ][Set ID][ ][OK/NG][Data][x]
►► To adjust the screen sharpness.
You can also adjust sharpness in the PICTURE menu.
10. Sharpness (Command: k k)
Data Min : 00 to Max : 64
* Refer to ‘Real data mapping’. (See p.151)
Transmission [k][k][ ][Set ID][ ][Data][Cr]
Ack [k][ ][Set ID][ ][OK/NG][Data][x]](https://image.slidesharecdn.com/lwlveng-150710011208-lva1-app6891/85/LW-LV-Eng-149-320.jpg)
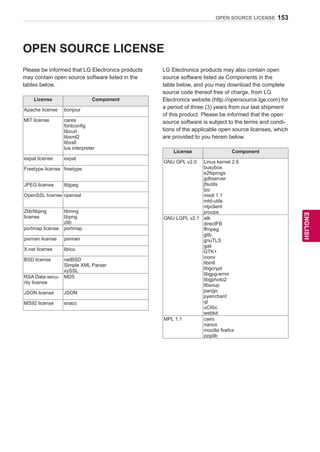
![150
ENGENGLISH
EXTERNAL CONTROL DEVICE SETUP
15. Balance (Command: k t)
►► To adjust balance.
You can also adjust balance in the AUDIO menu.
Data Min : 00 to Max : 64
* Refer to ‘Real data mapping’. (See p.151)
Transmission [k][t][ ][Set ID][ ][Data][Cr]
Ack [t][ ][Set ID][ ][OK/NG][Data][x]
14. Bass (Command: k s)
►► To adjust bass.
You can also adjust bass in the AUDIO menu.
Data Min : 00 to Max : 64
* Refer to ‘Real data mapping’. (See p.151)
Transmission [k][s][ ][Set ID][ ][Data][Cr]
Ack [s][ ][Set ID][ ][OK/NG][Data][x]
13. Treble (Command: k r)
►► To adjust treble.
You can also adjust treble in the AUDIO menu.
Data Min : 00 to Max : 64
* Refer to ‘Real data mapping’. (See p.151)
Transmission [k][r][ ][Set ID][ ][Data][Cr]
Ack [r][ ][Set ID][ ][OK/NG][Data][x]
16. Colour Temperature (Command: x u)
►► To adjust colour temperature. You can also adjust Colour
Temperature in the PICTURE menu.
Data Min : 00 to Max : 64
* Refer to ‘Real data mapping’. (See p.151)
Transmission [x][u][ ][Set ID][ ][Data][Cr]
Ack [u][ ][Set ID][ ][OK/NG][Data][x]
19. Auto Configure(Command: j u)
►► To adjust picture position and minimize image shaking
automatically. It works only in RGB (PC) mode.
Data 01: To set
Transmission [j][u][ ][Set ID][ ][Data][Cr]
Ack [u][ ][Set ID][ ][OK/NG][Data][x]
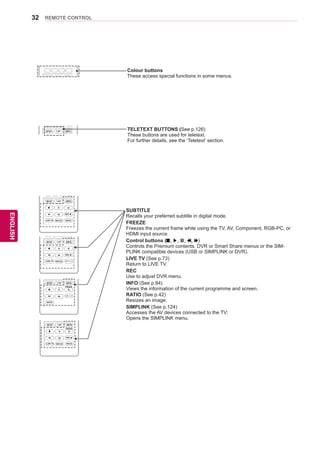
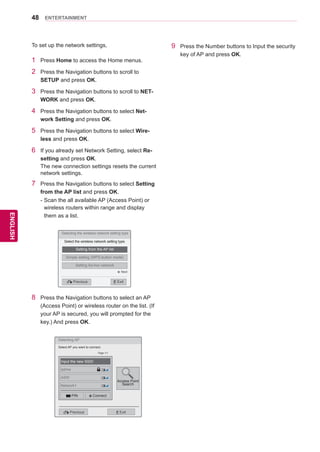
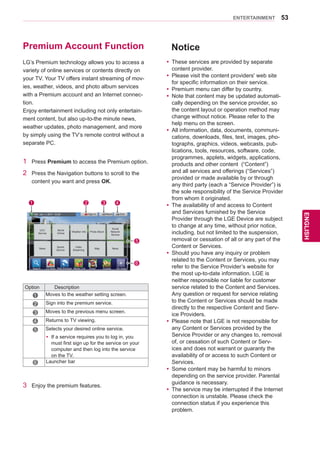
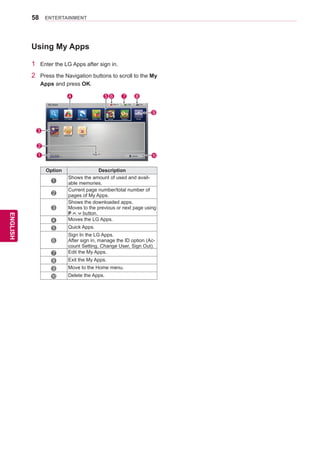
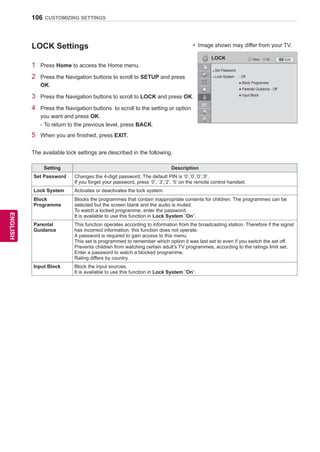
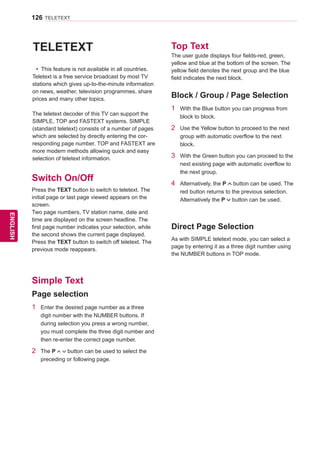
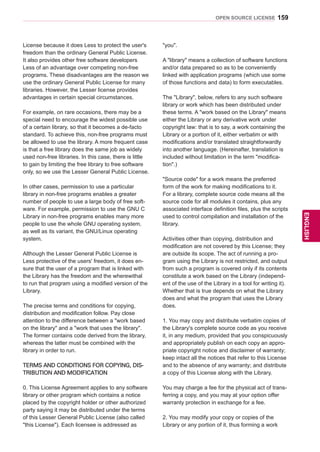
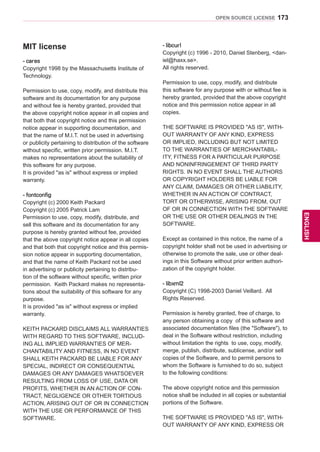
18. Energy Saving (Command: j q)
►► To reduce the power consumption of the TV. You can also
adjust Energy Saving in PICTURE menu.
Transmission [j][q][ ][Set ID][ ][Data][Cr]
Ack [q][ ][Set ID][ ][OK/NG][Data][x]
Power Saving
Function
Level
Description
7 6 5 4 3 2 1 0
0 0 0 0
Low
Power
0 0 0 0 Off
0 0 0 0
Low
Power
0 0 0 1 Minimum
0 0 0 0
Low
Power
0 0 1 0 Medium
0 0 0 0
Low
Power
0 0 1 1 Maximum
0 0 0 0
Low
Power
0 1 0 1 Screen Off
0 0 0 0
Low
Power
0 1 0 0
Auto
(LED LCD
TV only)
0 0 0 0
Low
Power
0 1 0 0
Intelligent
Sensor
(Plasma TV
only)
17. ISM Method (Command: j p) (Only Plasma TV)
►► To control the ISM method. You can also adjust ISM
Method in OPTION menu.
Data 02: Orbiter
04: White wash
08: Normal
20: Colour Wash
Transmission [j][p][ ][Set ID][ ][Data][Cr]
Ack [p][ ][Set ID][ ][OK/NG][Data][x]](https://image.slidesharecdn.com/lwlveng-150710011208-lva1-app6891/85/LW-LV-Eng-150-320.jpg)
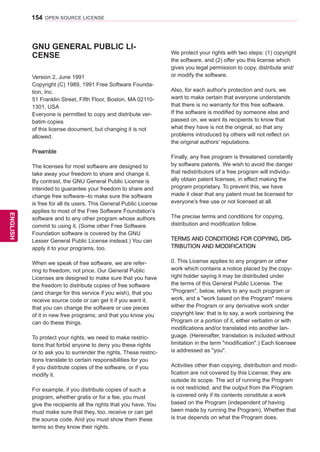
![151
ENGENGLISH
EXTERNAL CONTROL DEVICE SETUP
20. Tune Command (Command: m a)
►► Select channel to following physical number.
Data00 : High channel data
Data01 : Low channel data
ex. No. 47 - 00 2F (2FH)
No. 394 - 01 8A (18AH),
DTV No. 0 - Don’t care
Data02 : 0x00 : Analogue Main
0x10 : DTV Main
0x20 : Radio
Channel data range
Analogue - Min: 00 to Max: C7 (0 to 199)
Digital - Min: 00 to Max: 3E7 (0 to 999)
Transmission [m][a][ ][Set ID][ ][Data0][ ][Data1][ ][Data2][Cr]
Ack [a][ ][Set ID][ ][OK/NG][Data][x]
Data Min: 00 to Max: 7DH
22. Key(Command: m c)
►► To send IR remote key code.
Data Key code (See p.144)
Transmission [m][c][ ][Set ID][ ][Data][Cr]
Ack [c][ ][Set ID][ ][OK/NG][Data][x]
21. Programme Add/Skip(Command: m b)
►► To set skip status for the current Programme.
Data 00 : Skip 01 : Add
Transmission [m][b][ ][Set ID][ ][Data][Cr]
Ack [b][ ][Set ID][ ][OK/NG][Data][x]
23. Control Back Light(Command: m g) (Only LED
LCD TV)
►► To Control the back light.
Data Min : 00 to Max : 64
Transmission [m][g][ ][Set ID][ ][Data][Cr]
Ack [g][ ][Set ID][ ][OK/NG][Data][x]
24. Input select (Command: x b)
(Main Picture Input)
►► To select input source for main picture.
Data Structure
MSB LSB
Transmission [x][b][ ][Set ID][ ][Data][Cr]
External Input Input Number
0 0 0 0 0 0 0 0
Ack [b][ ][Set ID][ ][OK/NG][Data][x]
External Input Data
0 0 0 0 DTV
0 0 0 1 Analogue
0 0 1 0 AV
0 1 0 0 Component
0 1 1 0 RGB
0 1 1 1
HDMI
1 0 0 0
1 0 0 1
1 0 1 0
Input Number Data
0 0 0 0 Input1
0 0 0 1 Input2
0 0 1 0 Input3
0 0 1 1 Input4
* Real data mapping
00 : Step 0
A : Step 10 (Set ID 10)
F : Step 15 (Set ID 15)
10 : Step 16 (Set ID 16)
64 : Step 100
6E : Step 110
73 : Step 115
74 : Step 116
CF : Step 199
FE : Step 254
FF : Step 255](https://image.slidesharecdn.com/lwlveng-150710011208-lva1-app6891/85/LW-LV-Eng-151-320.jpg)
![152
ENGENGLISH
EXTERNAL CONTROL DEVICE SETUP
25. 3D (Command: x t) (Only 3D models)
►► To change 3D mode for TV.
Transmission [x][t][ ][Set ID][ ][Data1][ ][Data2][ ]
Data01 00 : 3D On
01 : 3D Off
02 : 3D to 2D
03 : 2D to 3D
Data02 00 : Top and Bottom
01 : Side by Side
02 : Check Board
03 : Frame Sequential
Data03 00 : Right to Left
01 : Left to Right
Data04 3D Effect(3D Depth) : 0~20
Ack : All data must be consist of 2 characters.
[t][ ][OK] [Data1][ ][Data2][ ][Data3][ ][Data4] [x]
[t][ ][NG] [Data1] [x]
26. Extended 3D(Command: x v) (Only 3D models)
►► To change 3D mode for TV.
Transmission [x][v][ ][Set ID][ ][Data1][ ][Data2] [Cr]
Data01 : 3D option item that user wants to adjust
Data 3D Option
00 Picture Correction(Picture Type)
01 Effect(Depth) (Only 2D to 3D)
02 Viewpoint
03 Picture Size (Only Plasma TV)
04 Picture Balance (Only Plasma TV)
05 Optimization (Only active type)
Data02 : It has own range for each 3D option deter-
mined by Data01.
1) When Data 01 is 00(Picture Correction)
Data Picture Correction
00 Right to Left
01 Left to Right
2) When Data 01 is 01(Effect)
Data Min: 00 ~ Max: 14
(* transmit by Hexadecimal code)
3) When Data 01 is 02(Viewpoint)
Data Min: 00 ~ Max: 14
(* transmit by Hexadecimal code)
Data value range(0 to 20) converts Viewpoint range
(-10 to 10) automatically.
4) When Data01 is 03(Picture Size)
Data Picture Size
00 Just Scan
01 16:9
5) When Data01 is 04(Picture Balance)
Data Picture Size
00 Off
01 On
6) When Data01 is 05(Optimization)
Data Min: 00 ~ Max: 02
(* transmit by Hexadecimal code)
Ack : All data must be consist of 2 characters.
[v][ ][OK] [Data1][ ][Data2] [x]
[v][ ][NG] [Data1] [x]
[Data3][ ][Data4][Cr]
Data 01 Data 02 Data 03 Data 04
00 O O X
01 X X X
02 X X X
03 X X O
X : don't care
*If data01 is 00(3D On), data04 has no meaning.
*If data01 is 01(3D off) or 02(3D to 2D), data02, data03
and data04 have no meaning.
*If data01 is 03(2D to 3D), data02 and data03 have no
meaning.](https://image.slidesharecdn.com/lwlveng-150710011208-lva1-app6891/85/LW-LV-Eng-152-320.jpg)
![158
ENGENGLISH
OPEN SOURCE LICENSE
GNU Lesser General Public Li-
cense
Version 2.1, February 1999
Copyright (C) 1991, 1999 Free Software Founda-
tion, Inc. 59 Temple Place, Suite 330, Boston, MA
02111-1307 USA Everyone is permitted to copy
and distribute verbatim copies of this license docu-
ment, but changing it is not allowed.
[This is the first released version of the Lesser
GPL. It also counts as the successor of the GNU
Library Public License, version 2, hence the ver-
sion number 2.1.]
Preamble
The licenses for most software are designed to
take away your freedom to share and change it.
By contrast, the GNU General Public Licenses are
intended to guarantee your freedom to share and
change free software--to make sure the software is
free for all its users.
This license, the Lesser General Public License,
applies to some specially designated software
packages--typically libraries--of the Free Software
Foundation and other authors who decide to use
it. You can use it too, but we suggest you first think
carefully about whether this license or the ordinary
General Public License is the better strategy to
use in any particular case, based on the explana-
tions below.
When we speak of free software, we are referring
to freedom of use, not price. Our General Public
Licenses are designed to make sure that you have
the freedom to distribute copies of free software
(and charge for this service if you wish); that you
receive source code or can get it if you want it; that
you can change the software and use pieces of it
in new free programs; and that you are informed
that you can do these things.
To protect your rights, we need to make restric-
tions that forbid distributors to deny you these
rights or to ask you to surrender these rights.
These restrictions translate to certain responsibili-
ties for you if you distribute copies of the library or
if you modify it.
For example, if you distribute copies of the library,
whether gratis or for a fee, you must give the
recipients all the rights that we gave you. You
must make sure that they, too, receive or can get
the source code. If you link other code with the
library, you must provide complete object files to
the recipients, so that they can relink them with the
library after making changes to the library and rec-
ompiling it. And you must show them these terms
so they know their rights.
We protect your rights with a two-step method: (1)
we copyright the library, and (2) we offer you this
license, which gives you legal permission to copy,
distribute and/or modify the library.
To protect each distributor, we want to make it very
clear that there is no warranty for the free library.
Also, if the library is modified by someone else and
passed on, the recipients should know that what
they have is not the original version, so that the
original author's reputation will not be affected by
problems that might be introduced by others.
Finally, software patents pose a constant threat
to the existence of any free program. We wish
to make sure that a company cannot effectively
restrict the users of a free program by obtaining a
restrictive license from a patent holder. Therefore,
we insist that any patent license obtained for a ver-
sion of the library must be consistent with the full
freedom of use specified in this license.
Most GNU software, including some libraries,
is covered by the ordinary GNU General Public
License. This license, the GNU Lesser General
Public License, applies to certain designated
libraries, and is quite different from the ordinary
General Public License. We use this license for
certain libraries in order to permit linking those
libraries into non-free programs.
When a program is linked with a library, whether
statically or using a shared library, the combination
of the two is legally speaking a combined work,
a derivative of the original library. The ordinary
General Public License therefore permits such
linking only if the entire combination fits its criteria
of freedom. The Lesser General Public License
permits more lax criteria for linking other code with
the library.
We call this license the Lesser General Public](https://image.slidesharecdn.com/lwlveng-150710011208-lva1-app6891/85/LW-LV-Eng-158-320.jpg)

![170
ENGENGLISH
OPEN SOURCE LICENSE
The Original Code is _______________________
_______________.
The Initial Developer of the Original Code is
________________________.
Portions created by ______________________
are Copyright (C) ______
_______________________.All Rights Reserved.
Contributor(s): ____________________________
__________.
Alternatively, the contents of this file may be used
under the terms
of the _____ license (the [___] License), in which
case the
provisions of [______] License are applicable
instead of those
above.If you wish to allow use of your version of
this file only
under the terms of the [____] License and not to
allow others to use
your version of this file under the MPL, indicate
your decision by
deleting the provisions above and replace them
with the notice and
other provisions required by the [___] License. If
you do not delete
the provisions above, a recipient may use your
version of this file
under either the MPL or the [___] License.
[NOTE: The text of this Exhibit A may differ slightly
from the text of the notices in the Source Code
files of the Original Code. You should use the text
of this Exhibit A rather than the text found in the
Original Code Source Code for Your Modifica-
tions.]
Apache License Version 2.0
Apache License
Version 2.0, January 2004
http://www.apache.org/licenses/
TERMS AND CONDITIONS FOR USE, REPRO-
DUCTION, AND DISTRIBUTION
1. Definitions.
License shall mean the terms and conditions for
use, reproduction, and distribution as defined by
Sections 1 through 9 of this document.
Licensor shall mean the copyright owner or entity
authorized by the copyright owner that is granting
the License.
Legal Entity shall mean the union of the acting
entity and all other entities that control, are con-
trolled by, or are under common control with that
entity. For the purposes of this definition, control
means (i) the power, direct or indirect, to cause the
direction or management of such entity, whether
by contract or otherwise, or (ii) ownership of fifty
percent (50%) or more of the outstanding shares,
or (iii) beneficial ownership of such entity.
You (or Your) shall mean an individual or Legal
Entity exercising permissions granted by this
License.
Source form shall mean the preferred form for
making modifications, including but not limited to
software source code, documentation source, and
configuration files.
Object form shall mean any form resulting from
mechanical transformation or translation of a
Source form, including but not limited to compiled
object code, generated documentation, and con-
versions to other media types.
Work shall mean the work of authorship, whether
in Source or Object form, made available under
the License, as indicated by a copyright notice that
is included in or attached to the work (an example
is provided in the Appendix below).
Derivative Works shall mean any work, whether
in Source or Object form, that is based on (or
derived from) the Work and for which the editorial
revisions, annotations, elaborations, or other modi-
fications represent, as a whole, an original work of
authorship. For the purposes of this License, De-
rivative Works shall not include works that remain
separable from, or merely link (or bind by name) to
the interfaces of, the Work and Derivative Works](https://image.slidesharecdn.com/lwlveng-150710011208-lva1-app6891/85/LW-LV-Eng-170-320.jpg)

![178
ENGENGLISH
OPEN SOURCE LICENSE
(INCLUDING NEGLIGENCE OR OTHERWISE)
ARISING IN ANY WAY OUT OF THE USE OF
THIS SOFTWARE, EVEN IF ADVISED OF THE
POSSIBILITY OF SUCH DAMAGE.
This product includes cryptographic software writ-
ten by Eric Young (eay@cryptsoft.com).
This product includes software written by Tim Hud-
son (tjh@cryptsoft.com).
Original SSLeay License
Copyright (C) 1995-1998 Eric Young (eay@crypt-
soft.com) All rights reserved.
This package is an SSL implementation written by
Eric Young (eay@cryptsoft.com).
The implementation was written so as to conform
with Netscapes SSL.
This library is free for commercial and non-com-
mercial use as long as the following conditions are
aheared to. The following conditions apply to all
code found in this distribution, be it the RC4, RSA,
lhash, DES, etc., code; not just the SSL code. The
SSL documentation included with this distribution
is covered by the same copyright terms except
that the holder is Tim Hudson (tjh@cryptsoft.com).
Copyright remains Eric Young's, and as such
any Copyright notices in the code are not to be
removed. If this package is used in a product, Eric
Young should be given attribution as the author
of the parts of the library used. This can be in the
form of a textual message at program startup or in
documentation (online or textual) provided with the
package.
Redistribution and use in source and binary forms,
with or without modification, are permitted pro-
vided that the following conditions are met:
1. Redistributions of source code must retain the
copyright notice, this list of conditions and the fol-
lowing disclaimer.
2. Redistributions in binary form must reproduce
the above copyright notice, this list of conditions
and the following disclaimer in the documentation
and/or other materials provided with the distribu-
tion.
3. All advertising materials mentioning features
or use of this software must display the following
acknowledgement:
This product includes cryptographic software writ-
ten by Eric Young (eay@cryptsoft.com)
The word 'cryptographic' can be left out if the
rouines from the library being used are not crypto-
graphic related :-).
4. If you include any Windows specific code (or a
derivative thereof) from the apps directory (ap-
plication code) you must include an acknowledge-
ment:
This product includes software written by Tim
Hudson (tjh@cryptsoft.com)
THIS SOFTWARE IS PROVIDED BY ERIC
YOUNG ``AS IS'' AND ANY EXPRESS OR IM-
PLIED WARRANTIES, INCLUDING, BUT NOT
LIMITED TO, THE IMPLIED WARRANTIES OF
MERCHANTABILITY AND FITNESS FOR A PAR-
TICULAR PURPOSE ARE DISCLAIMED. IN NO
EVENT SHALL THE AUTHOR OR CONTRIBU-
TORS BE LIABLE FOR ANY DIRECT, INDIRECT,
INCIDENTAL, SPECIAL, EXEMPLARY, OR
CONSEQUENTIAL DAMAGES (INCLUDING,
BUT NOT LIMITED TO, PROCUREMENT OF
SUBSTITUTE GOODS OR SERVICES; LOSS
OF USE, DATA, OR PROFITS; OR BUSINESS
INTERRUPTION) HOWEVER CAUSED AND ON
ANY THEORY OF LIABILITY, WHETHER IN CON-
TRACT, STRICT LIABILITY, OR TORT (INCLUD-
ING NEGLIGENCE OR OTHERWISE) ARISING
IN ANY WAY OUT OF THE USE OF THIS SOFT-
WARE, EVEN IF ADVISED OF THE POSSIBILITY
OF SUCH DAMAGE.
The licence and distribution terms for any publical-
ly available version or derivative of this code can-
not be changed. i.e. this code cannot simply be
copied and put under another distribution licence
[including the GNU Public Licence.]](https://image.slidesharecdn.com/lwlveng-150710011208-lva1-app6891/85/LW-LV-Eng-178-320.jpg)


![Tf honeywell hd-dvr-1016[1]](https://cdn.slidesharecdn.com/ss_thumbnails/tf-honeywellhd-dvr-10161-120926072516-phpapp02-thumbnail.jpg?width=640&height=640&fit=bounds)
![Hd dvr-1016[1]](https://cdn.slidesharecdn.com/ss_thumbnails/hd-dvr-10161-120121025511-phpapp01-thumbnail.jpg?width=640&height=640&fit=bounds)


