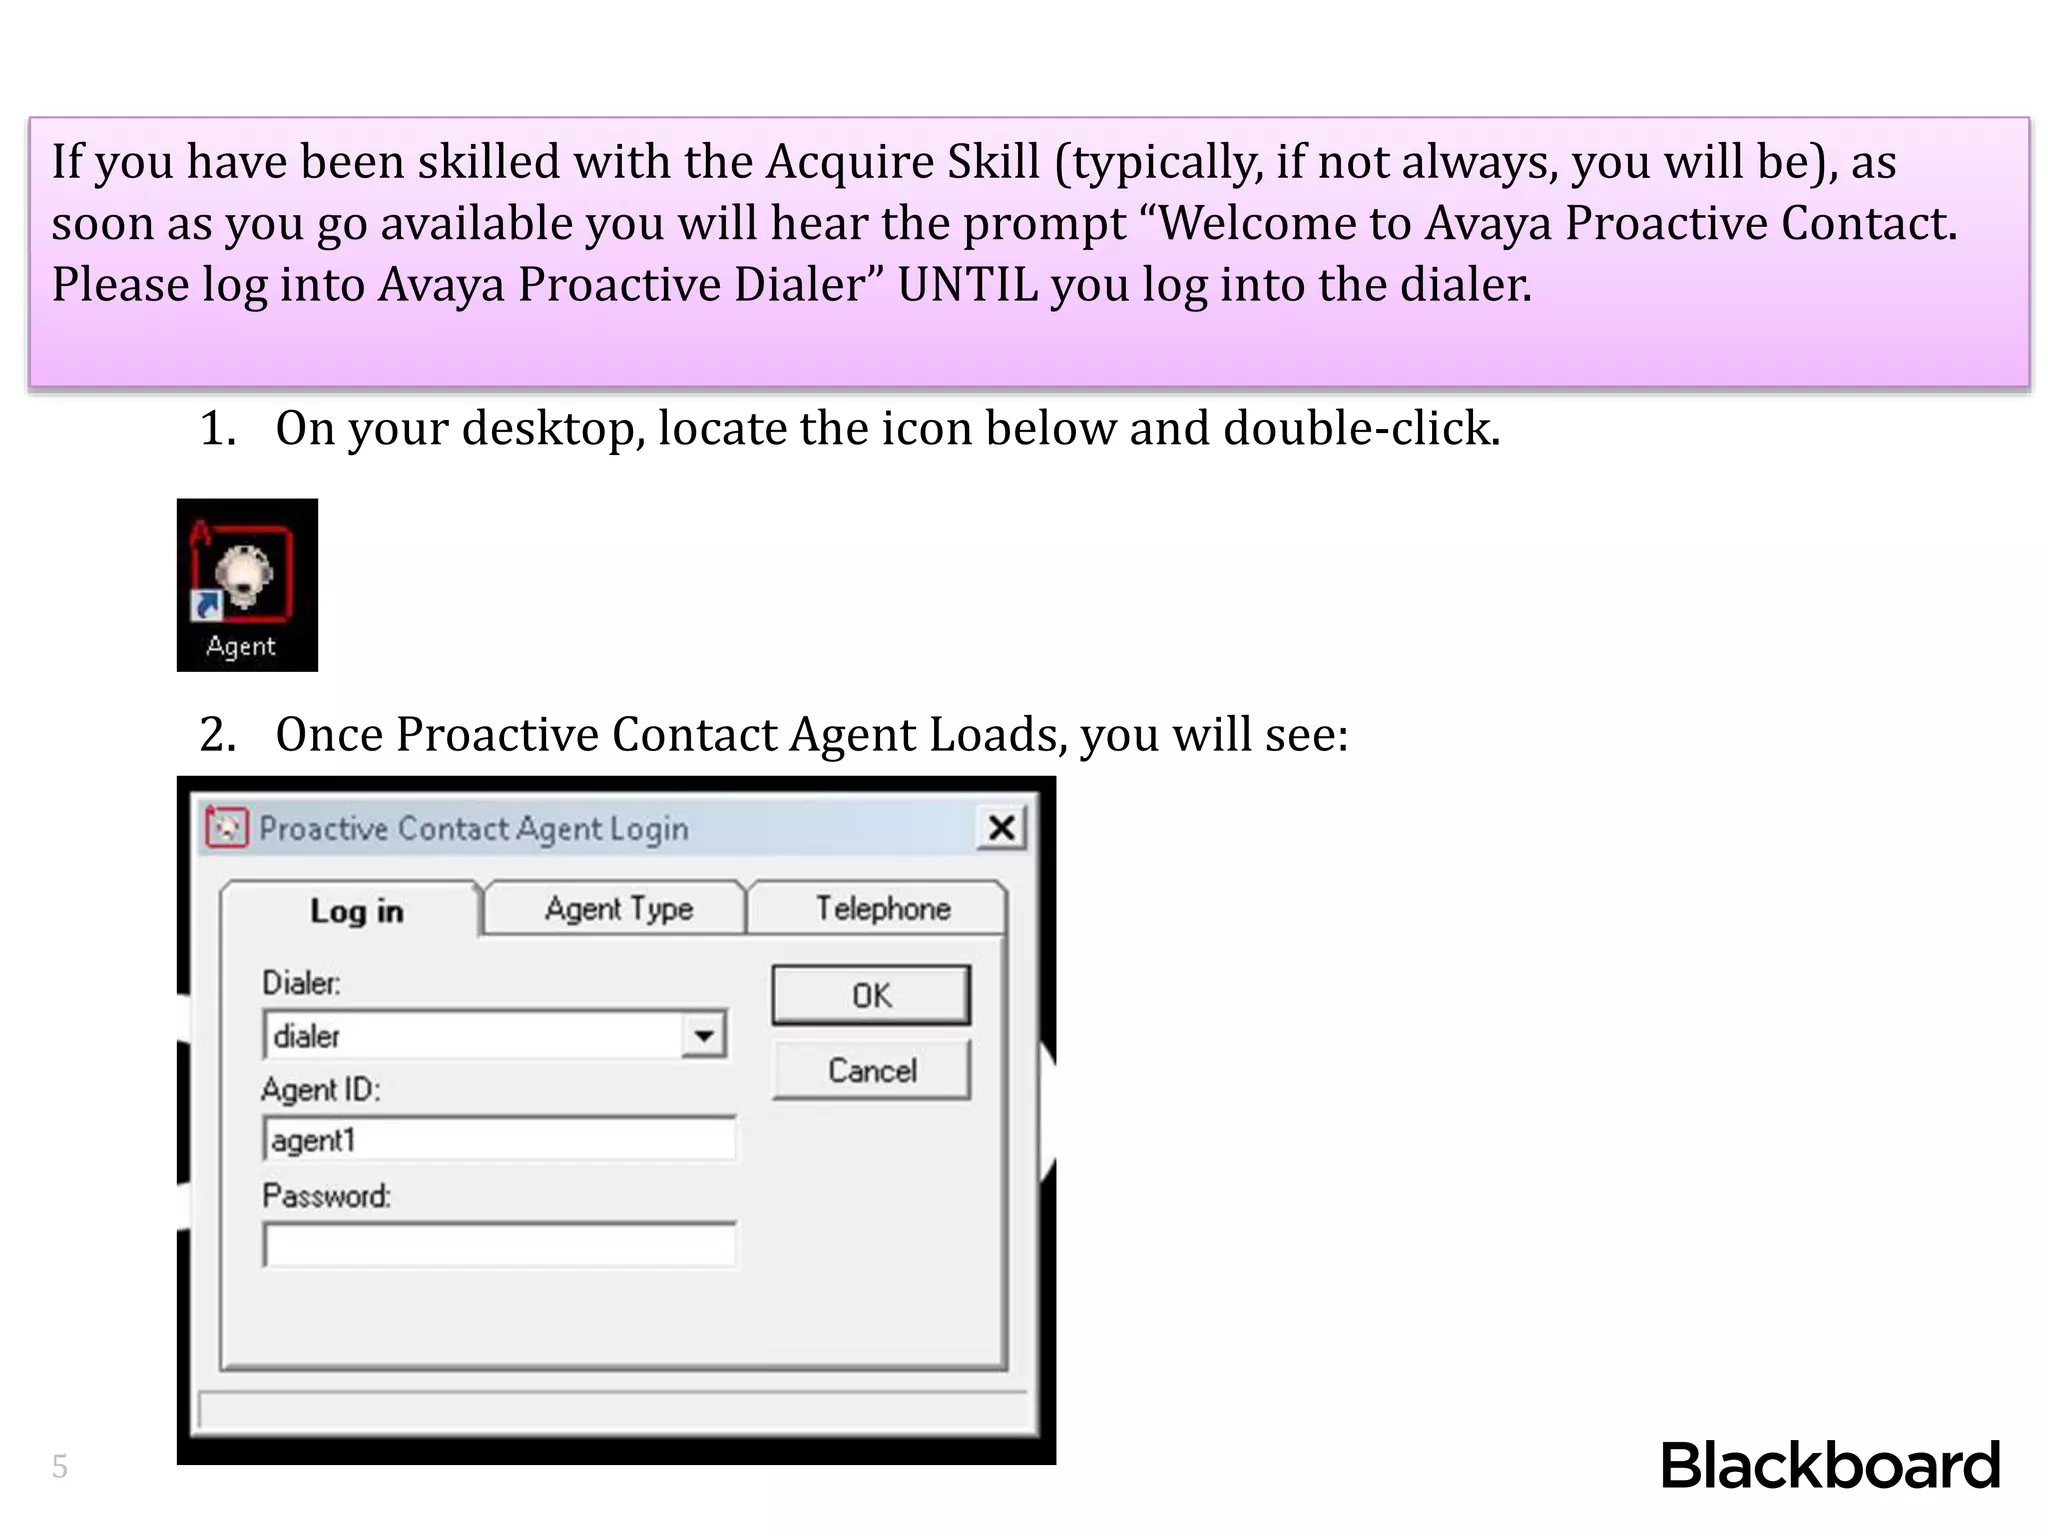
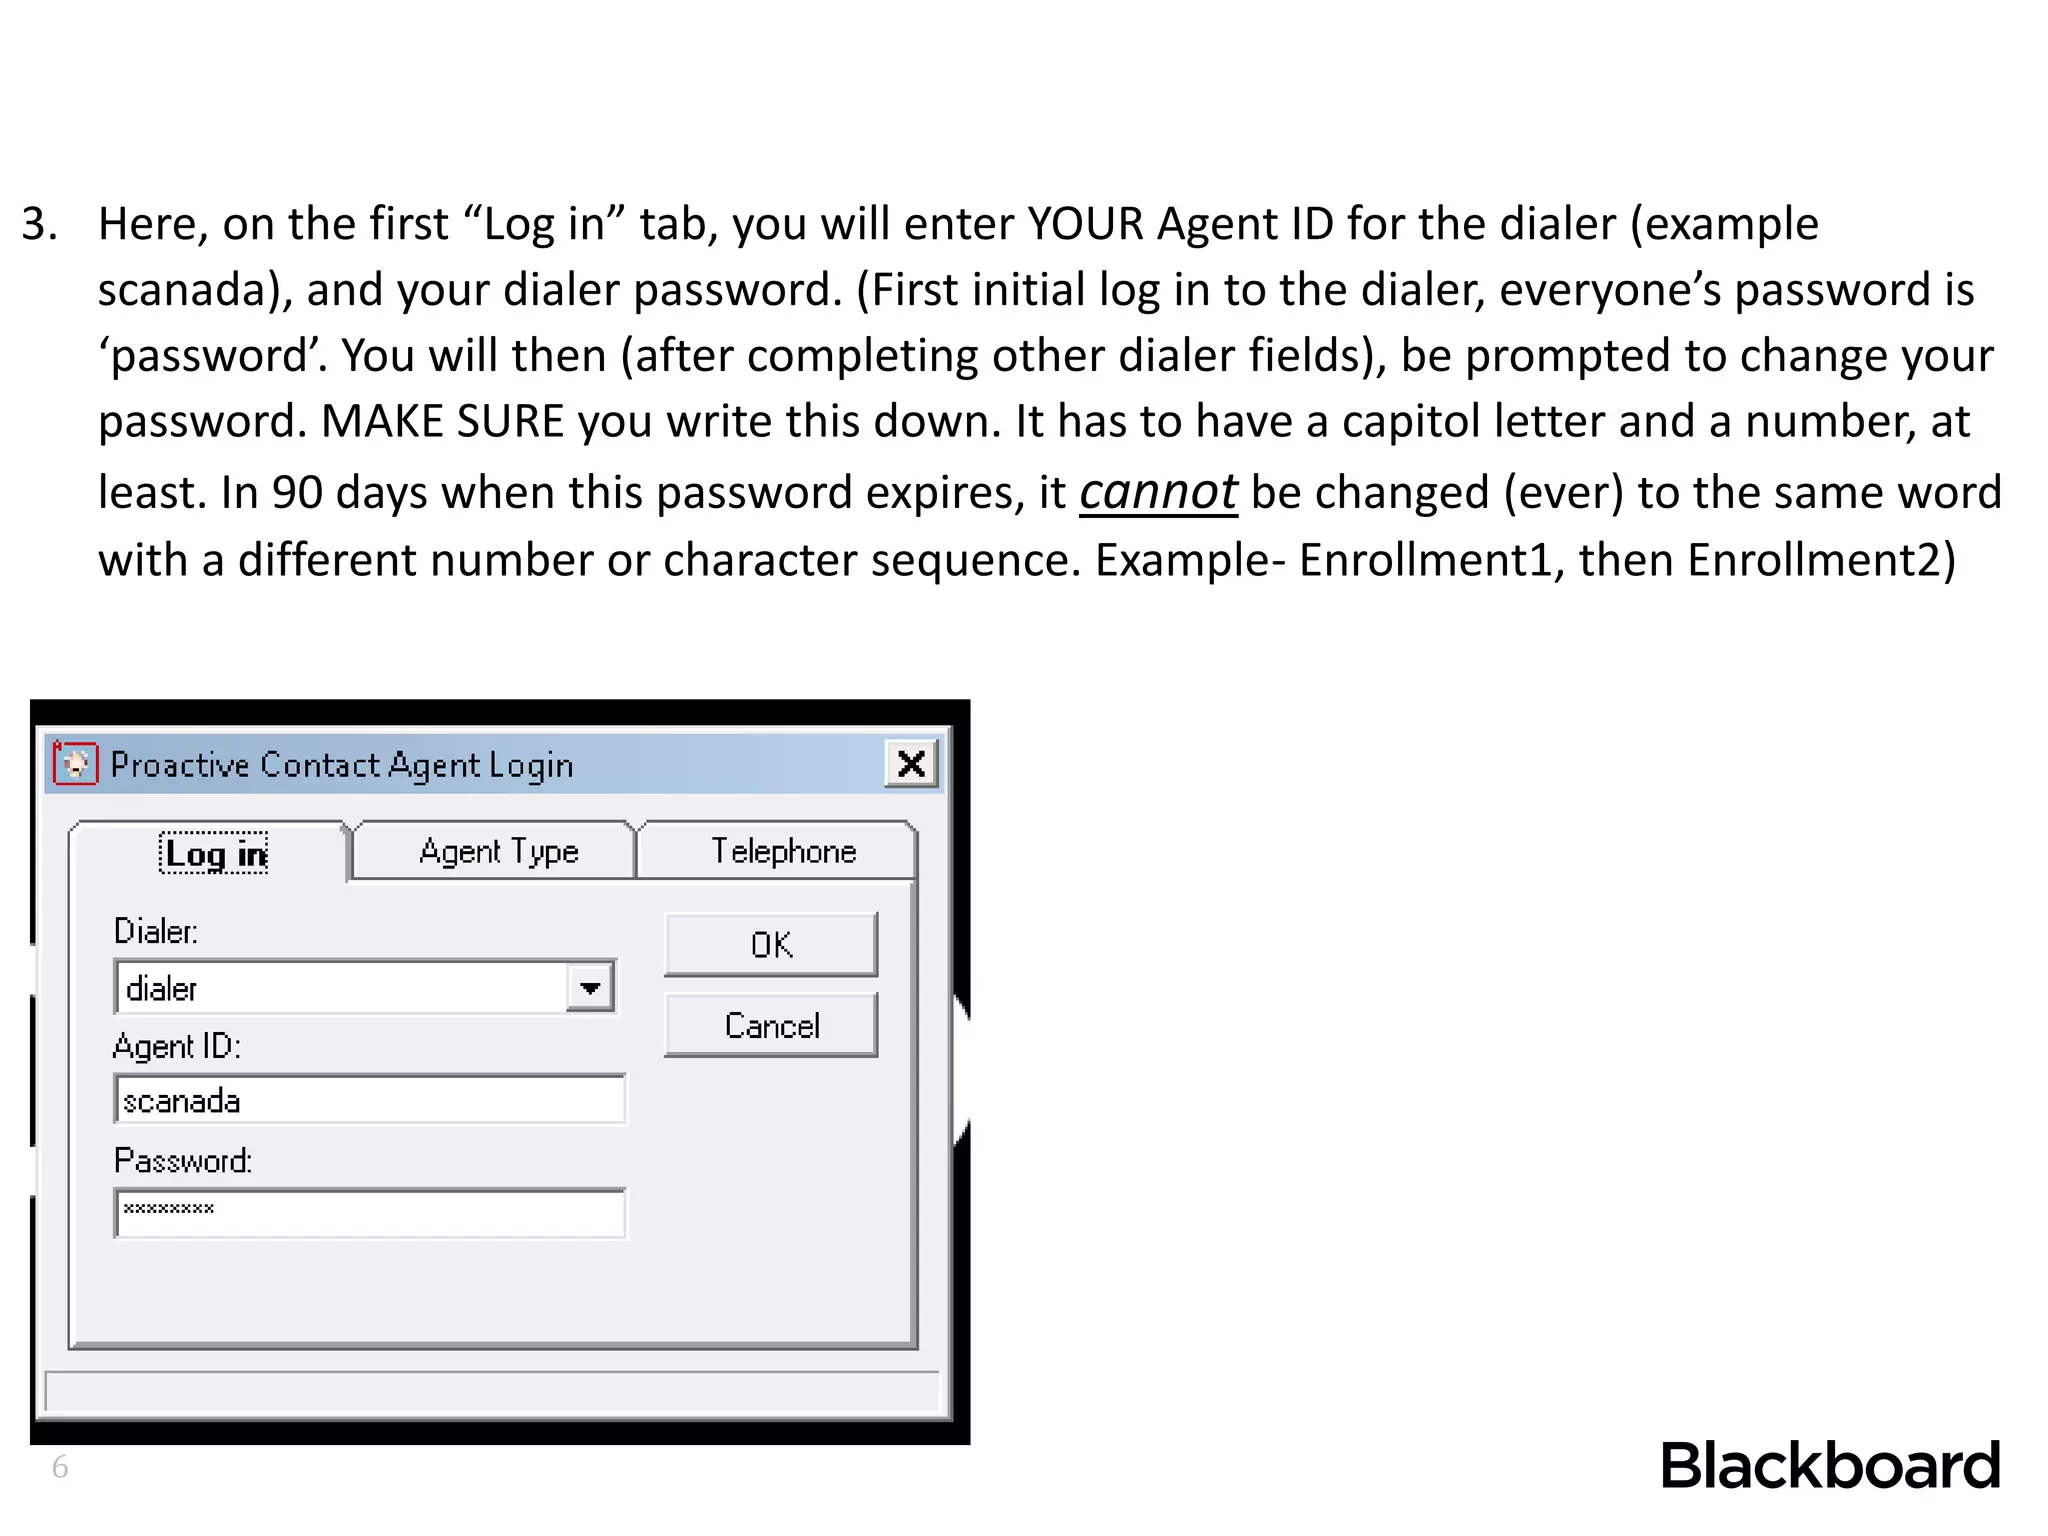
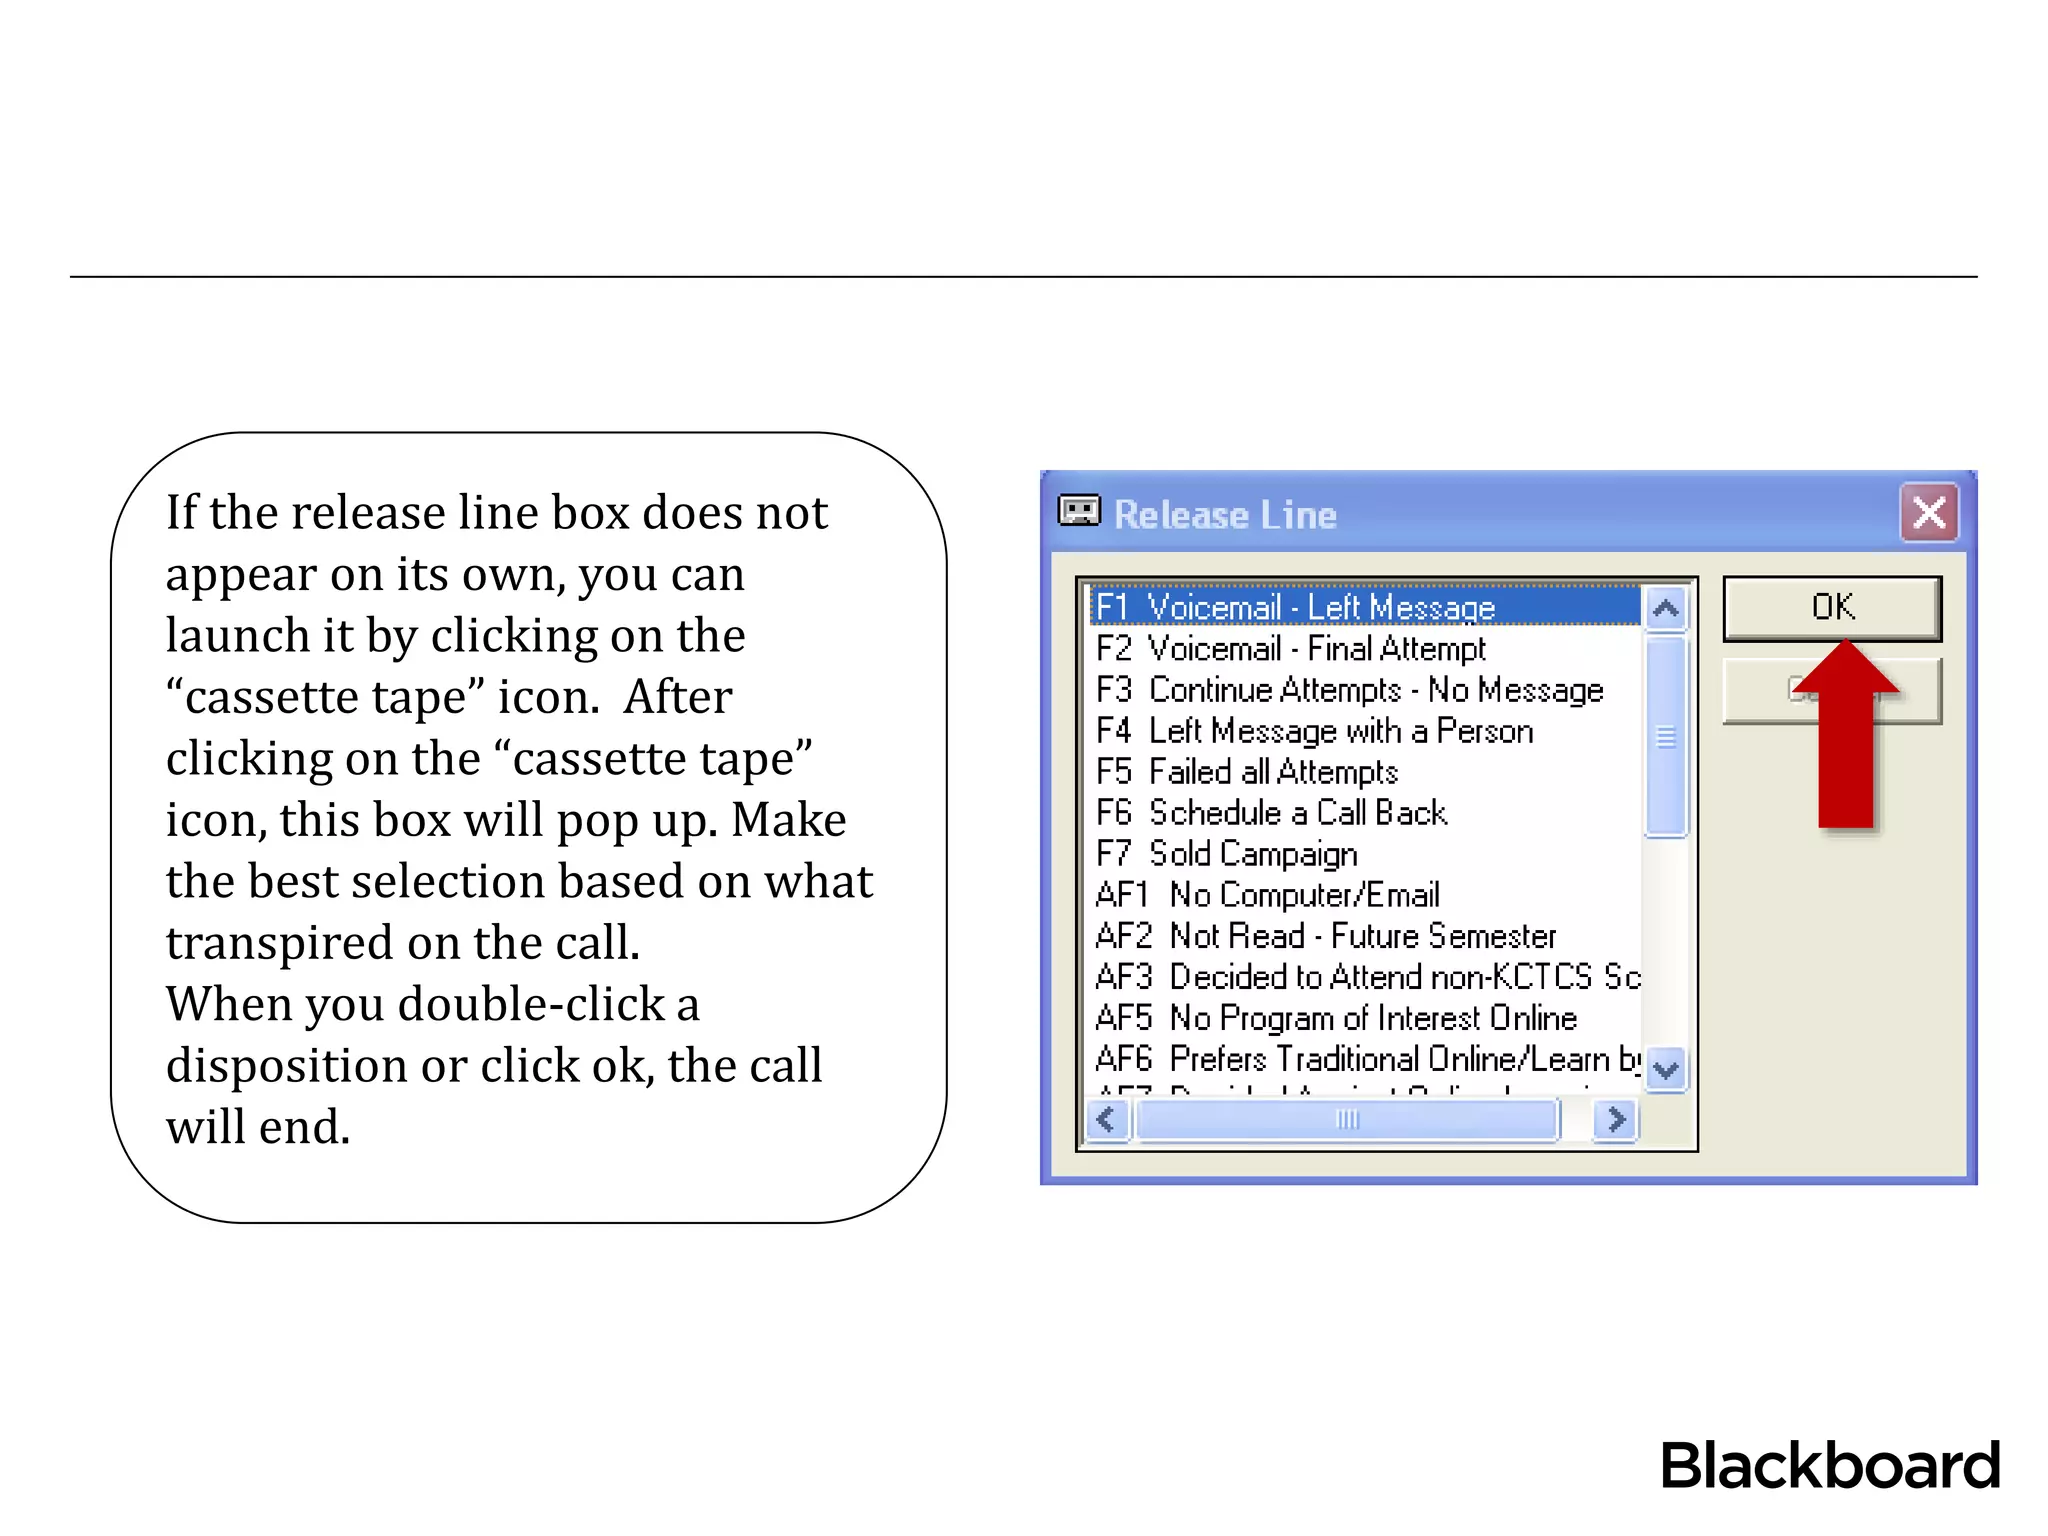
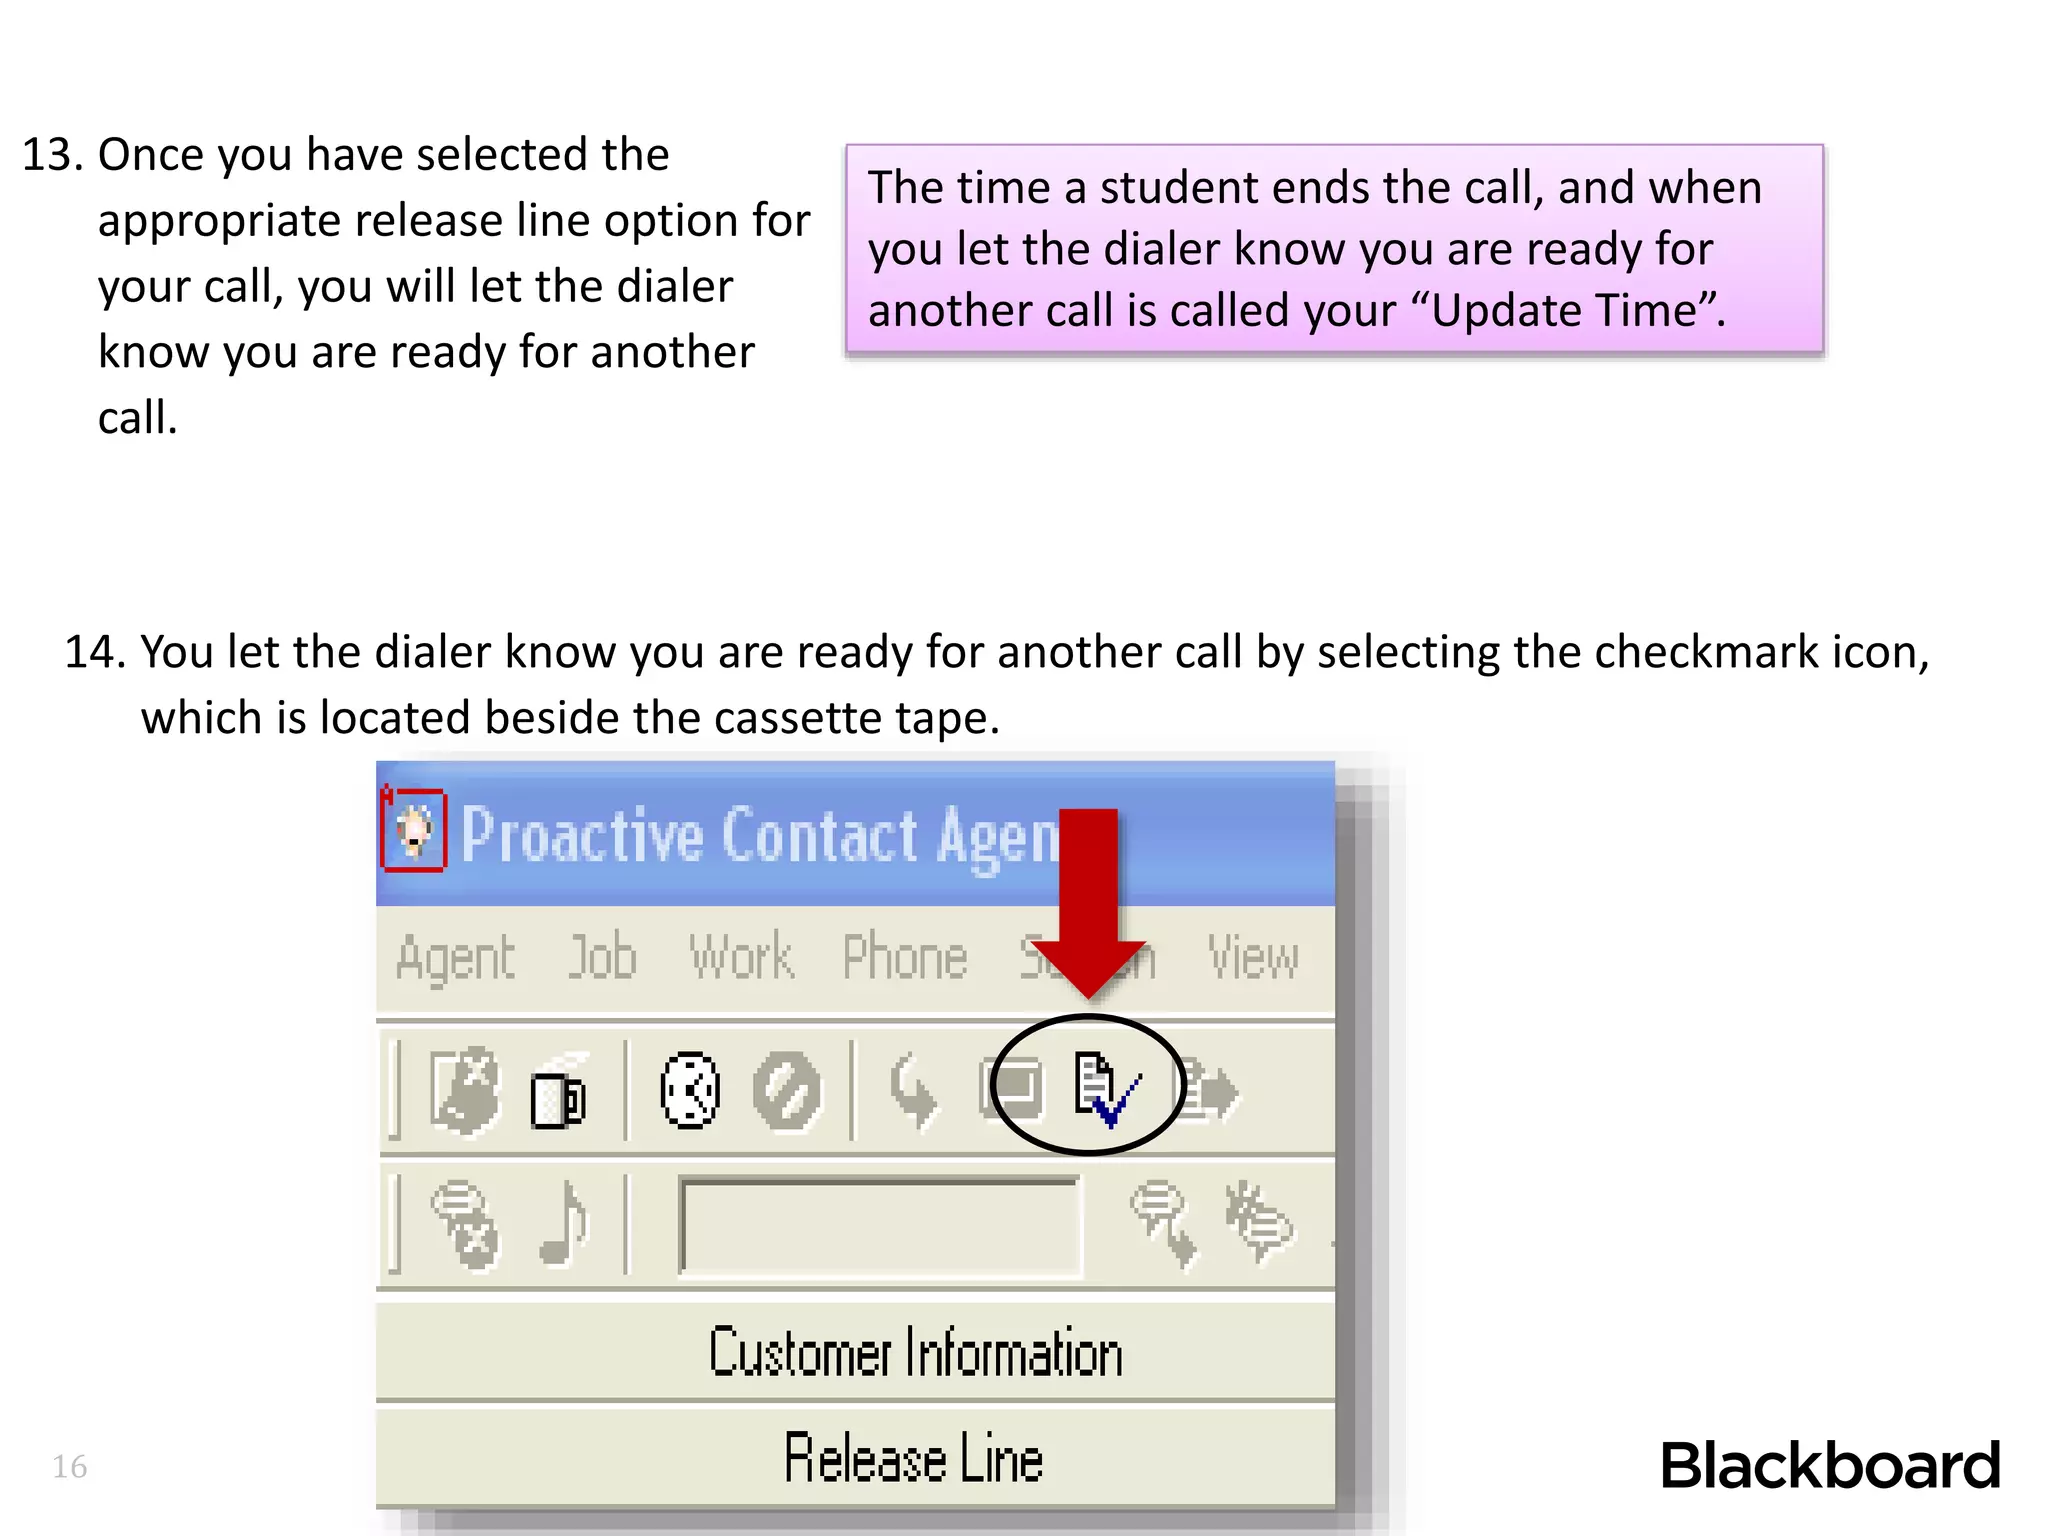
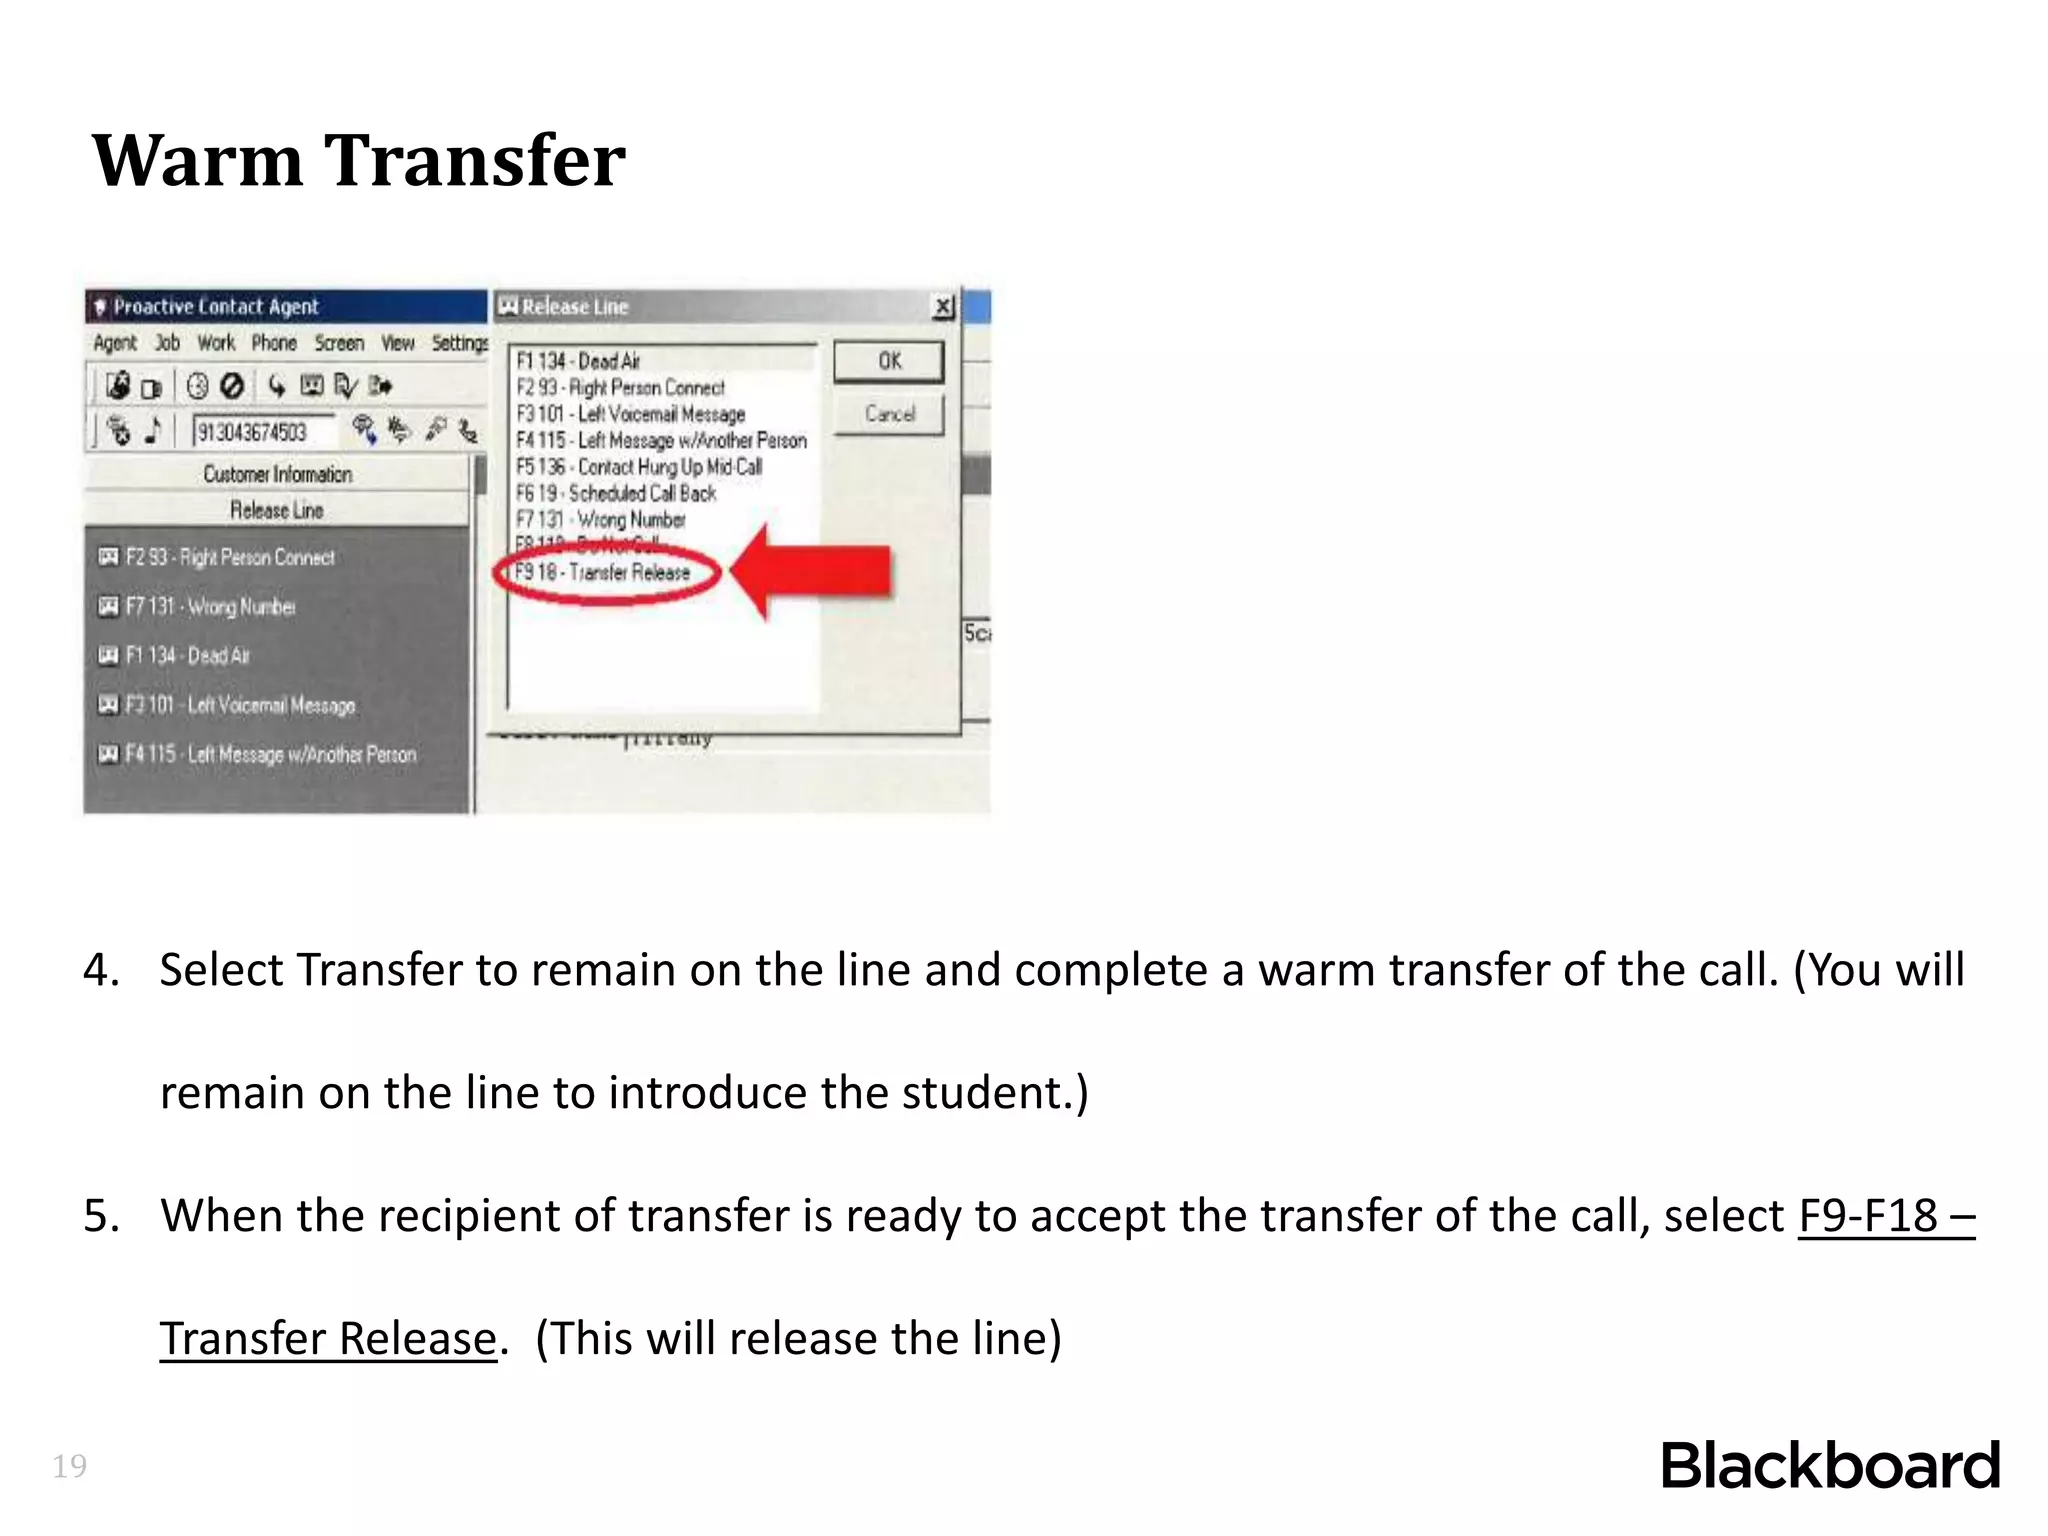
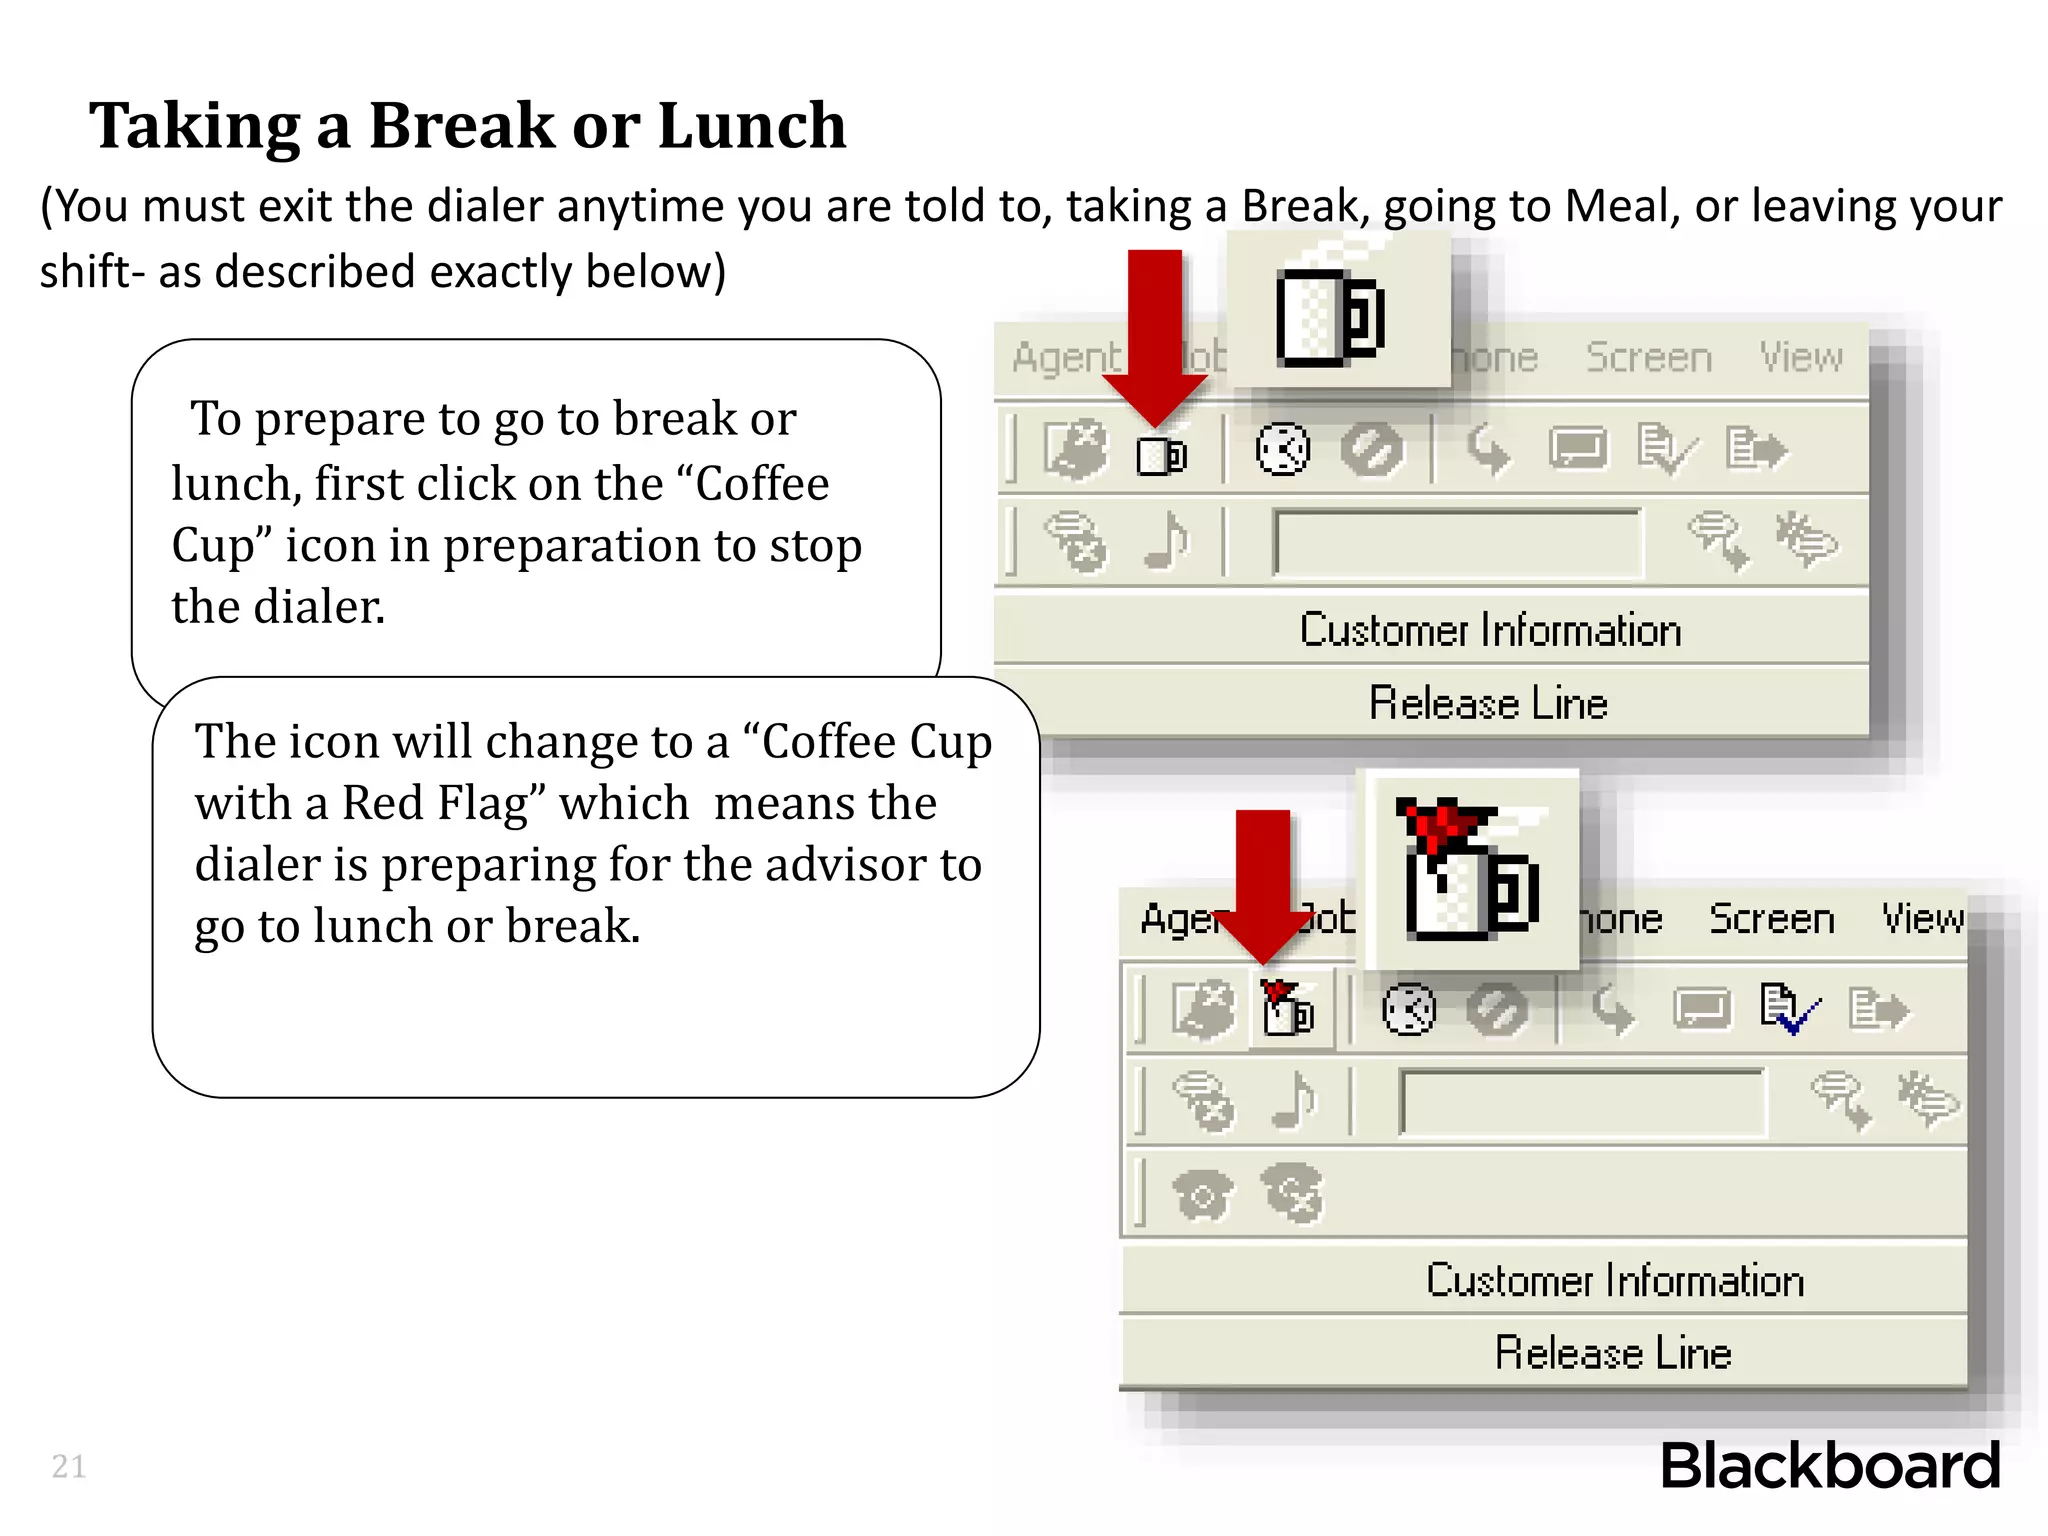
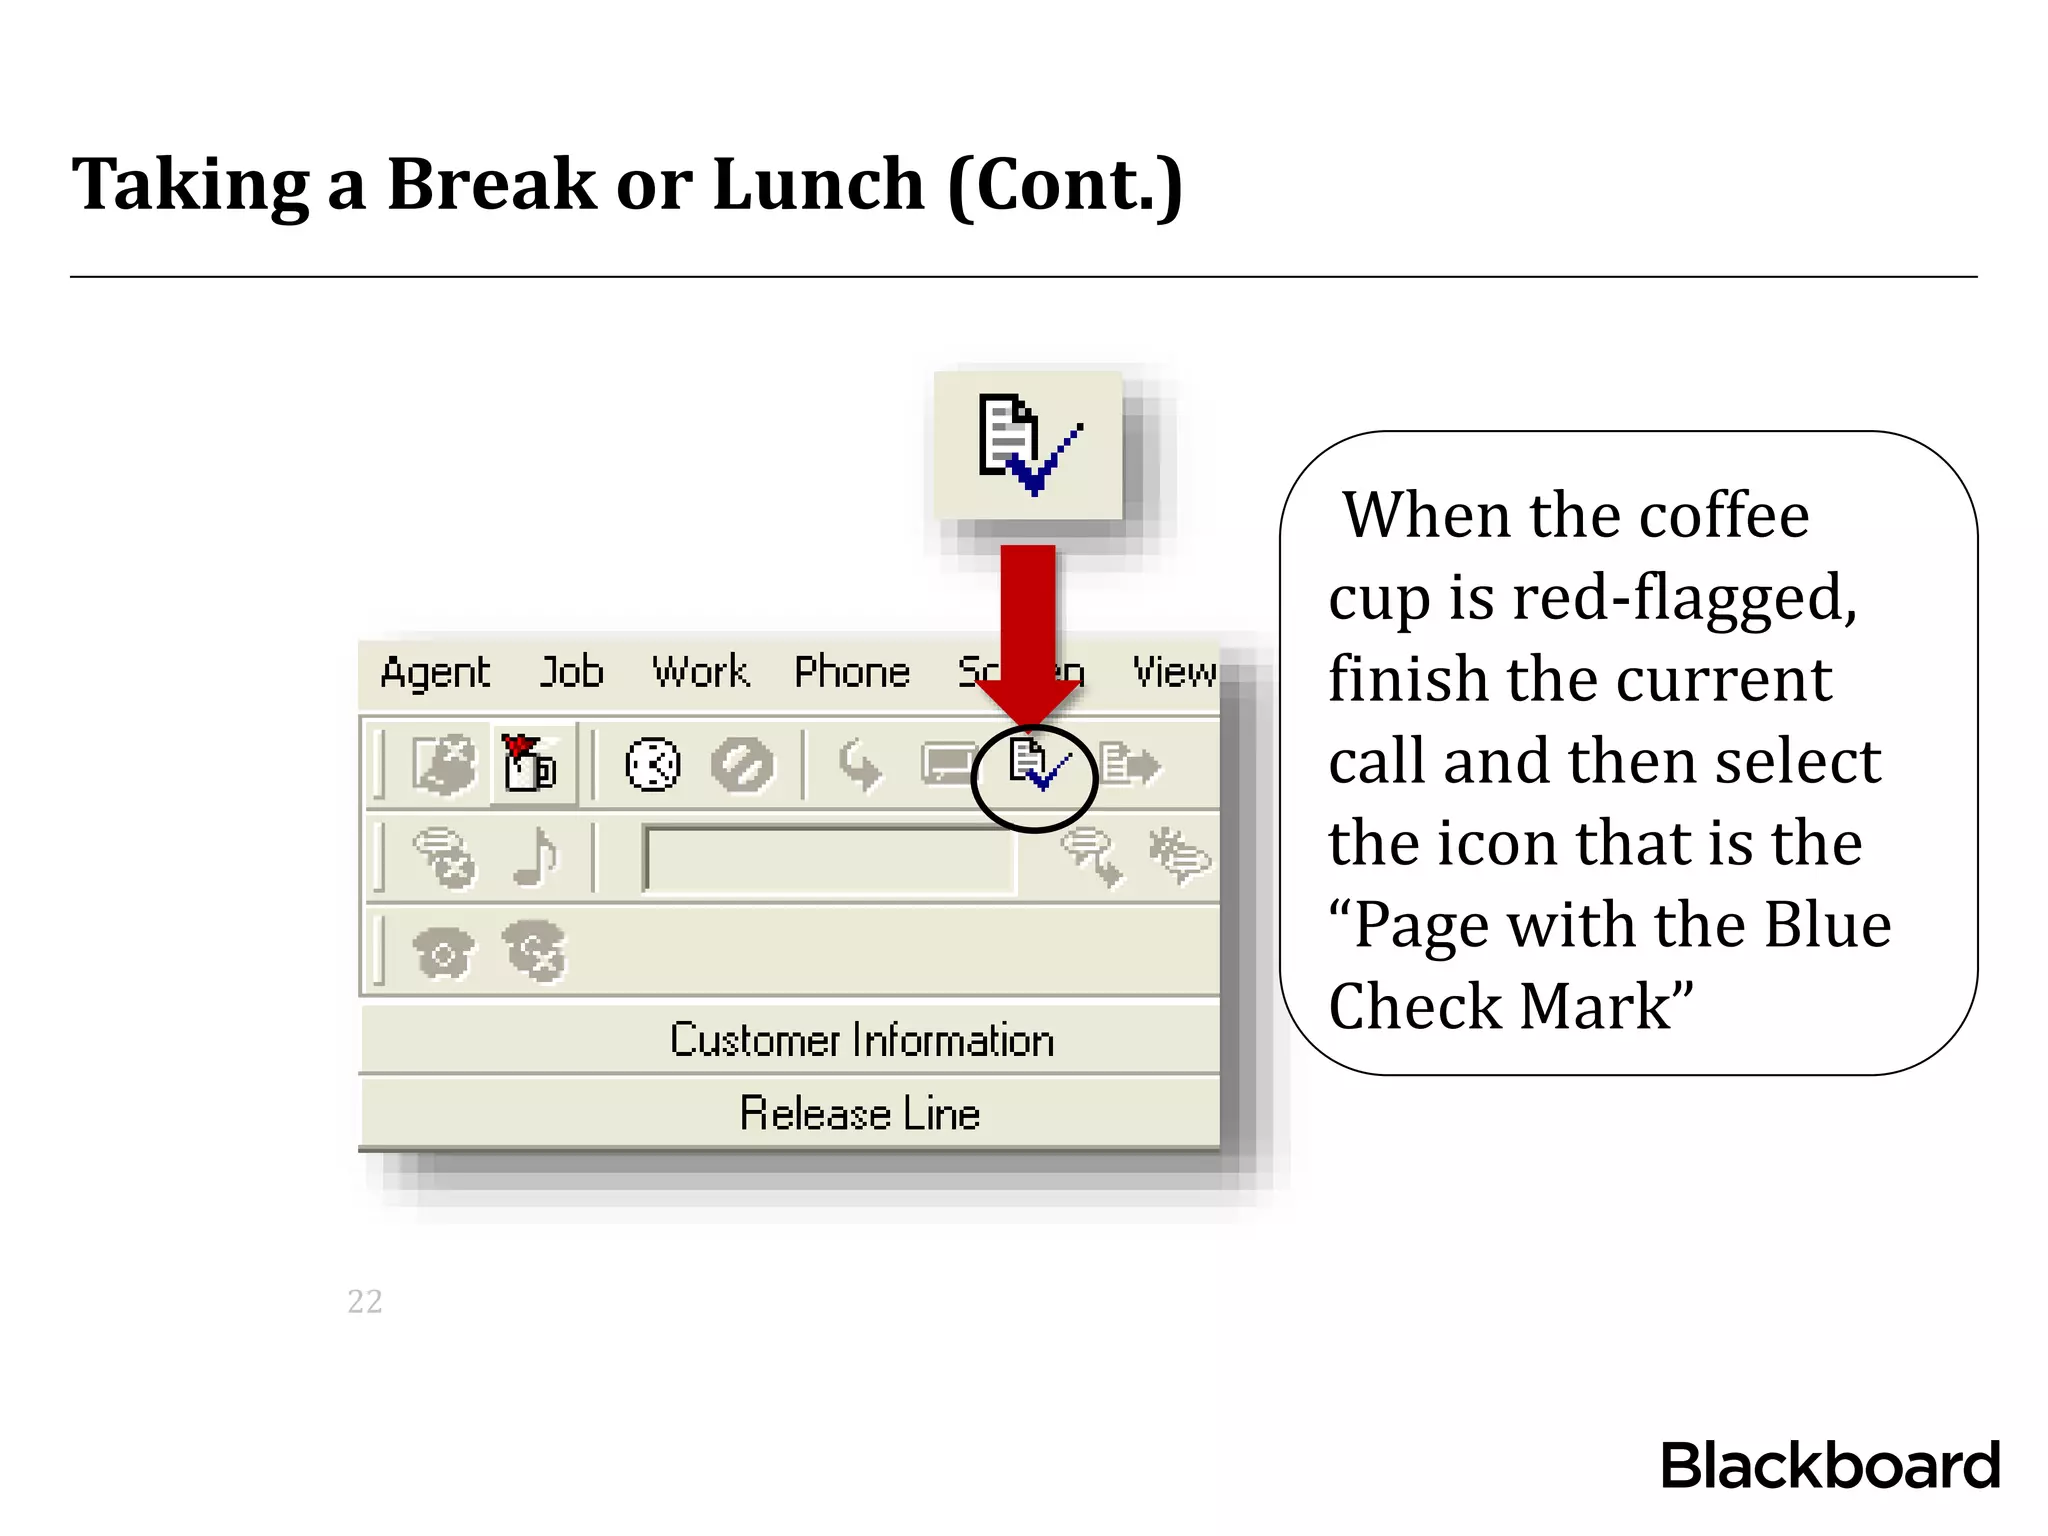
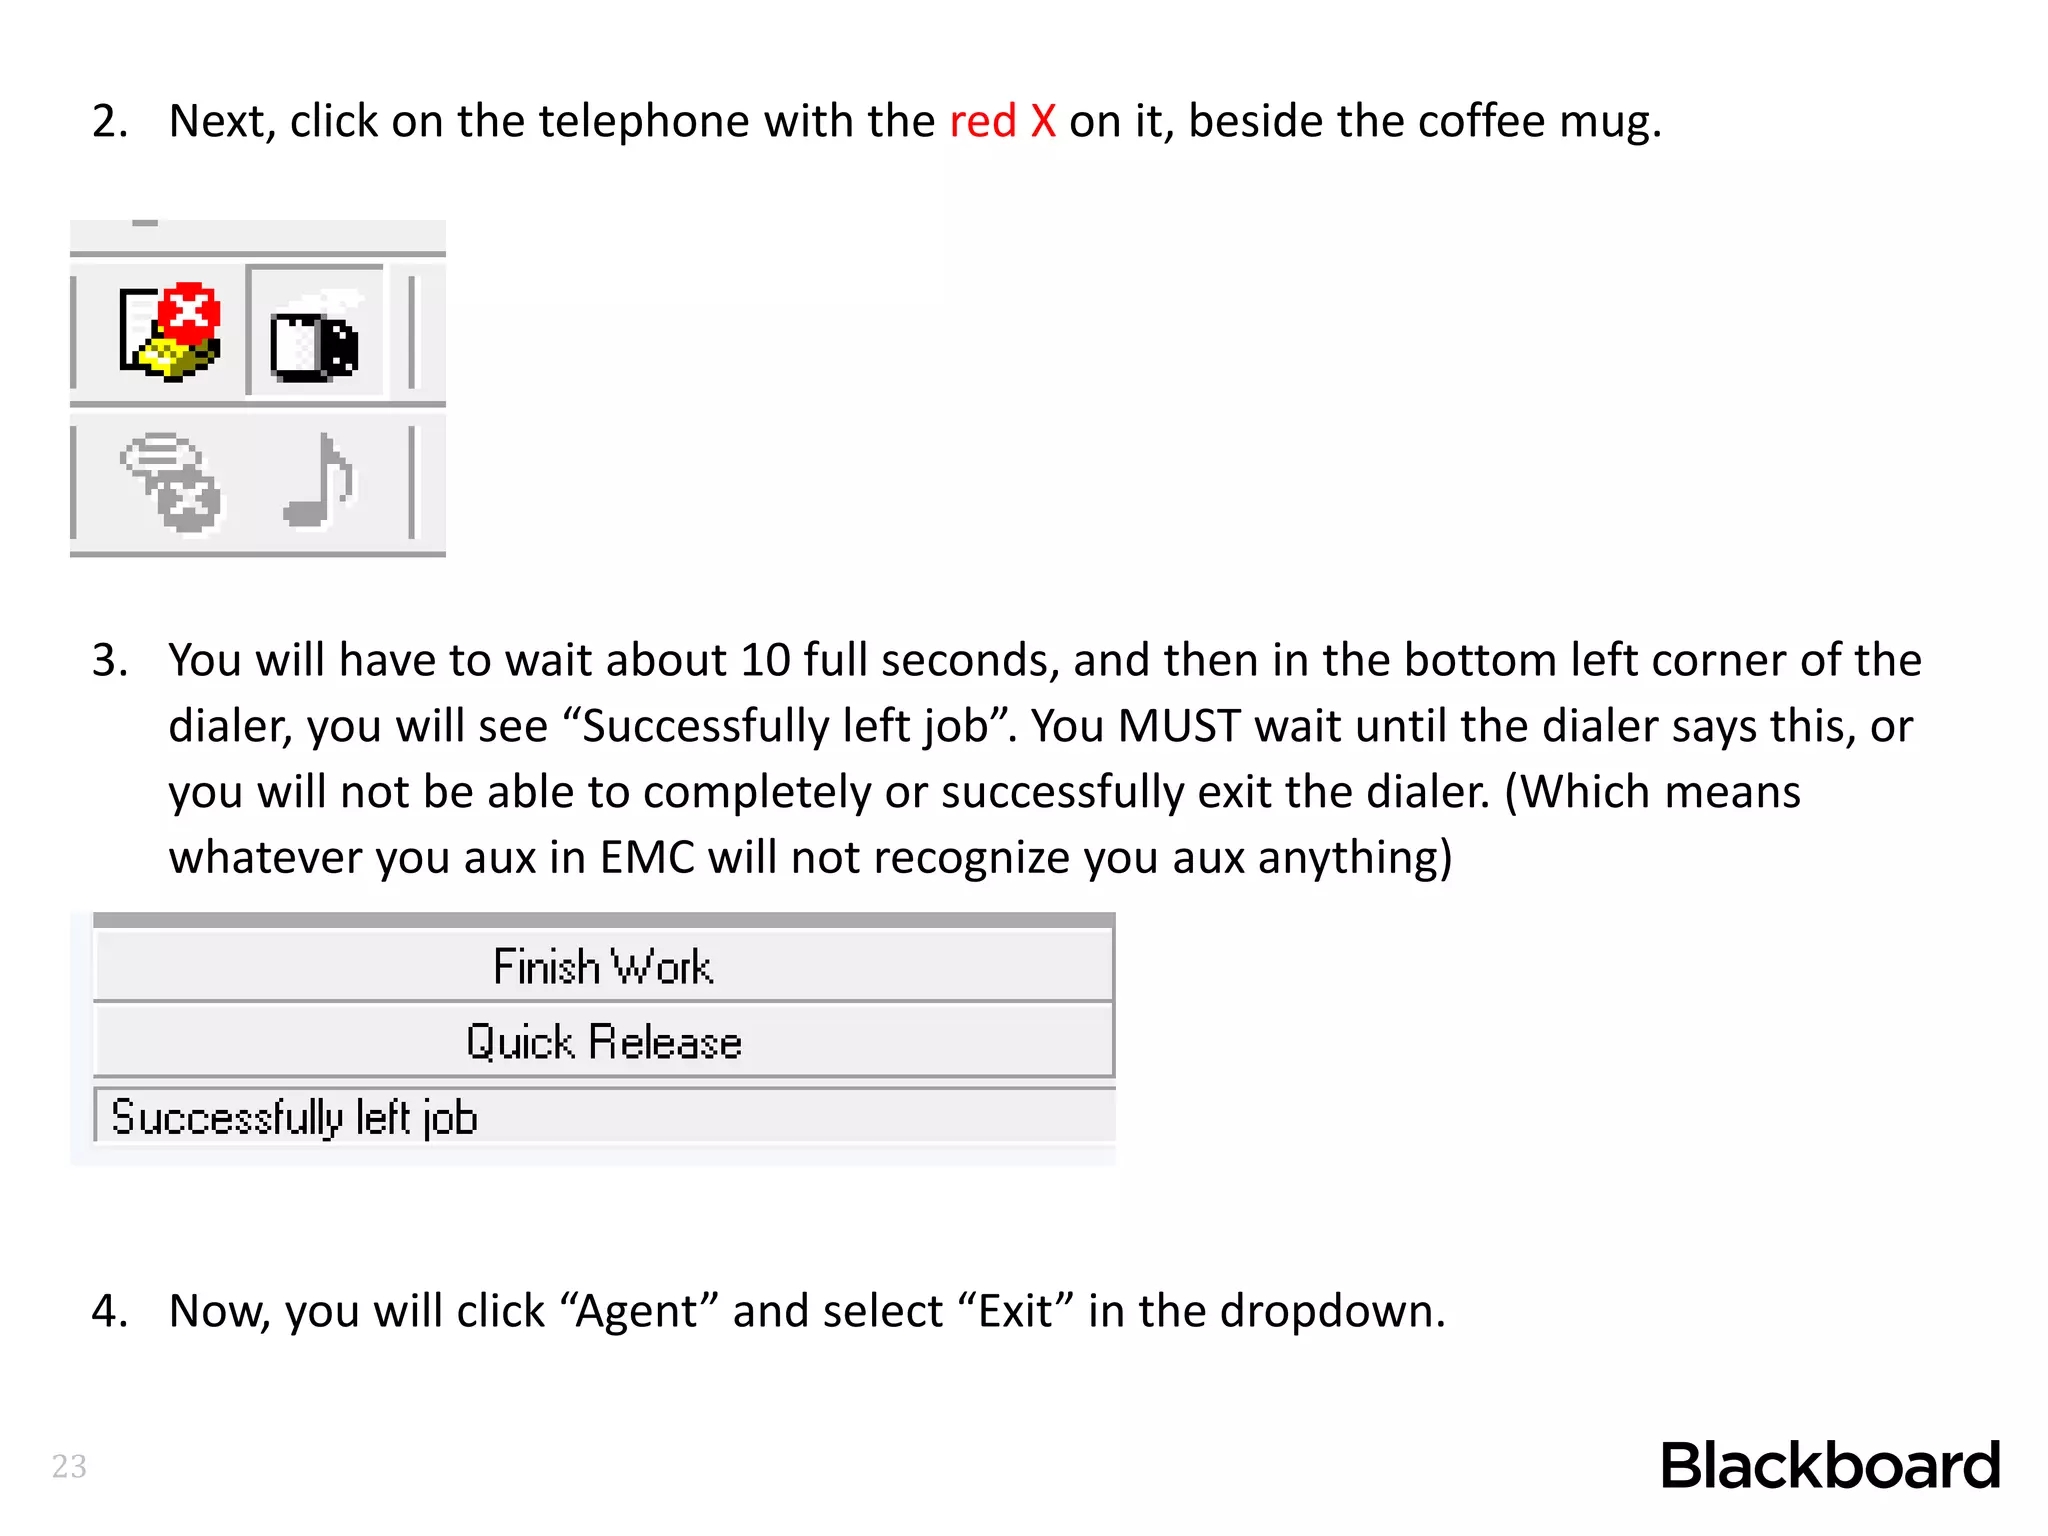
®
Logging into and Exiting the Dialer/Transferring and
Taking a Break/Lunch
March 2016
Training Expectations
• Know what the dialer is.
• Know how to access the dialer.
• Be comfortable with operating the dialer.
• Know how to make proper selections in the dialer.
Overview
3
The Dialer is a “Managed Dialer” which means:
• It dials customers for you.
• It determines how often we call someone based on dialer
resolution.
• It operates similarly to CCE with Inbound calls.
Logging into the Dialer
4
5
If you have been skilled with the Acquire Skill (typically, if not always, you will be), as
soon as you go available you will hear the prompt “Welcome to Avaya Proactive Contact.
Please log into Avaya Proactive Dialer” UNTIL you log into the dialer.
1. On your desktop, locate the icon below and double-click.
2. Once Proactive Contact Agent Loads, you will see:
6
3. Here, on the first “Log in” tab, you will enter YOUR Agent ID for the dialer (example
scanada), and your dialer password. (First initial log in to the dialer, everyone’s password is
‘password’. You will then (after completing other dialer fields), be prompted to change your
password. MAKE SURE you write this down. It has to have a capitol letter and a number, at
least. In 90 days when this password expires, it cannot be changed (ever) to the same word
with a different number or character sequence. Example- Enrollment1, then Enrollment2)
7
4. Clicking over to the next tab (not hitting OK) “Agent Type”- you ALWAYS leave this as
Outbound- where it is defaulted to.
8
5. Next, on the “Telephone” tab, MAKE SURE – EVERYDAY, that you put in the phone
extension of the station you are sitting at. Simply delete the one that is populated
first. You must also MAKE SURE that you check/select the “Log in to ACD” box.
A. B.
C.
Checking "Log in to ACD" is what makes
the dialer Blended, and allows you to
receive inbound calls as well as work in
the dialer.
9
6. If all fields have been accurately populated/changed in Proactive Agent, hit “OK”.
7. You are now connected to the Dialer, and this is what you will see:
10
8. Now, to join a job, the job you are instructed to work in, you will click on the yellow
telephone up in the top left corner of the dialer.
9. A box will pop up titled “Join Job”, and you will select a job appropriately by clicking on the
job and selecting OK.
11
10. When you are ‘acquired’ for the dialer to make calls in the selected campaign/job, you
will hear “Moving to Outbound”.
11. You will see “Successfully joined job” in the bottom left corner and “waiting for a call”
in the bottom right corner of the dialer screen. ALWAYS make sure you can see the full
dialer screen, at all times.
12
When a call is connected to a live person and sends the call to the advisor, typically
you hear a beep and the student’s information will populate on this screen.
Dispositioning and Ending the Call
What is Dispositioning?
Dispositioning is telling the dialer what transpired on the call so
that it will know what to do with that customer in the future.
When the call is completed, there are two ways of dispositioning
the call:
• Usually when the customer hangs up, this will end the call and
the disposition box will automatically appear.
• If the call doesn’t disconnect on it’s own, then it will be necessary
to manually disconnect and then disposition.
13
14
12. When you reach a student and have your conversation, at the end of the phone call,
the student will hang up and the Release Line box will populate, OR you will have to
open it yourself, by clicking on the ‘cassette tape’ icon (right under “Phone” tab at top)
*You will select your release line based on what happens on the phone call, appropriately.
Once you have been in a job a while, Release Lines that you use frequently will populate on
the left side of your Dialer. You can then just click the release line option you want to use.
If the release line box does not
appear on its own, you can
launch it by clicking on the
“cassette tape” icon. After
clicking on the “cassette tape”
icon, this box will pop up. Make
the best selection based on what
transpired on the call.
When you double-click a
disposition or click ok, the call
will end.
16
13. Once you have selected the
appropriate release line option for
your call, you will let the dialer
know you are ready for another
call.
14. You let the dialer know you are ready for another call by selecting the checkmark icon,
which is located beside the cassette tape.
The time a student ends the call, and when
you let the dialer know you are ready for
another call is called your “Update Time”.
Exiting the Dialer
17
Warm Transfer
18
1. On the Telephone Bar, enter the phone number in the Number box. (Be sure to put a 9
followed by 1 in front of the number to dial out.)
2. Select Phone Transfer.
3. The system displays a dialog box from which you can select Conference or Transfer.
Warm Transfer
A warm transfer is when the
advisor speaks with someone on
behalf of the customer before
transferring.
19
4. Select Transfer to remain on the line and complete a warm transfer of the call. (You will
remain on the line to introduce the student.)
5. When the recipient of transfer is ready to accept the transfer of the call, select F9-F18 –
Transfer Release. (This will release the line)
Warm Transfer
Taking a Break or Lunch
20
21
(You must exit the dialer anytime you are told to, taking a Break, going to Meal, or leaving your
shift- as described exactly below)
Taking a Break or Lunch
To prepare to go to break or
lunch, first click on the “Coffee
Cup” icon in preparation to stop
the dialer.
The icon will change to a “Coffee Cup
with a Red Flag” which means the
dialer is preparing for the advisor to
go to lunch or break.
Taking a Break or Lunch (Cont.)
22
When the coffee
cup is red-flagged,
finish the current
call and then select
the icon that is the
“Page with the Blue
Check Mark”
23
2. Next, click on the telephone with the red X on it, beside the coffee mug.
3. You will have to wait about 10 full seconds, and then in the bottom left corner of the
dialer, you will see “Successfully left job”. You MUST wait until the dialer says this, or
you will not be able to completely or successfully exit the dialer. (Which means
whatever you aux in EMC will not recognize you aux anything)
4. Now, you will click “Agent” and select “Exit” in the dropdown.
®
Logging into and Exiting the Dialer/How to Warm
Transfer
March 2016

Logging into and exiting the dialer,transferring and taking a break or lunch 3.14.16(2)

  • 1.
    ® Logging into andExiting the Dialer/Transferring and Taking a Break/Lunch March 2016
  • 2.
    Training Expectations • Knowwhat the dialer is. • Know how to access the dialer. • Be comfortable with operating the dialer. • Know how to make proper selections in the dialer.
  • 3.
    Overview 3 The Dialer isa “Managed Dialer” which means: • It dials customers for you. • It determines how often we call someone based on dialer resolution. • It operates similarly to CCE with Inbound calls.
  • 4.
  • 5.
    5 If you havebeen skilled with the Acquire Skill (typically, if not always, you will be), as soon as you go available you will hear the prompt “Welcome to Avaya Proactive Contact. Please log into Avaya Proactive Dialer” UNTIL you log into the dialer. 1. On your desktop, locate the icon below and double-click. 2. Once Proactive Contact Agent Loads, you will see:
  • 6.
    6 3. Here, onthe first “Log in” tab, you will enter YOUR Agent ID for the dialer (example scanada), and your dialer password. (First initial log in to the dialer, everyone’s password is ‘password’. You will then (after completing other dialer fields), be prompted to change your password. MAKE SURE you write this down. It has to have a capitol letter and a number, at least. In 90 days when this password expires, it cannot be changed (ever) to the same word with a different number or character sequence. Example- Enrollment1, then Enrollment2)
  • 7.
    7 4. Clicking overto the next tab (not hitting OK) “Agent Type”- you ALWAYS leave this as Outbound- where it is defaulted to.
  • 8.
    8 5. Next, onthe “Telephone” tab, MAKE SURE – EVERYDAY, that you put in the phone extension of the station you are sitting at. Simply delete the one that is populated first. You must also MAKE SURE that you check/select the “Log in to ACD” box. A. B. C. Checking "Log in to ACD" is what makes the dialer Blended, and allows you to receive inbound calls as well as work in the dialer.
  • 9.
    9 6. If allfields have been accurately populated/changed in Proactive Agent, hit “OK”. 7. You are now connected to the Dialer, and this is what you will see:
  • 10.
    10 8. Now, tojoin a job, the job you are instructed to work in, you will click on the yellow telephone up in the top left corner of the dialer. 9. A box will pop up titled “Join Job”, and you will select a job appropriately by clicking on the job and selecting OK.
  • 11.
    11 10. When youare ‘acquired’ for the dialer to make calls in the selected campaign/job, you will hear “Moving to Outbound”. 11. You will see “Successfully joined job” in the bottom left corner and “waiting for a call” in the bottom right corner of the dialer screen. ALWAYS make sure you can see the full dialer screen, at all times.
  • 12.
    12 When a callis connected to a live person and sends the call to the advisor, typically you hear a beep and the student’s information will populate on this screen.
  • 13.
    Dispositioning and Endingthe Call What is Dispositioning? Dispositioning is telling the dialer what transpired on the call so that it will know what to do with that customer in the future. When the call is completed, there are two ways of dispositioning the call: • Usually when the customer hangs up, this will end the call and the disposition box will automatically appear. • If the call doesn’t disconnect on it’s own, then it will be necessary to manually disconnect and then disposition. 13
  • 14.
    14 12. When youreach a student and have your conversation, at the end of the phone call, the student will hang up and the Release Line box will populate, OR you will have to open it yourself, by clicking on the ‘cassette tape’ icon (right under “Phone” tab at top) *You will select your release line based on what happens on the phone call, appropriately. Once you have been in a job a while, Release Lines that you use frequently will populate on the left side of your Dialer. You can then just click the release line option you want to use.
  • 15.
    If the releaseline box does not appear on its own, you can launch it by clicking on the “cassette tape” icon. After clicking on the “cassette tape” icon, this box will pop up. Make the best selection based on what transpired on the call. When you double-click a disposition or click ok, the call will end.
  • 16.
    16 13. Once youhave selected the appropriate release line option for your call, you will let the dialer know you are ready for another call. 14. You let the dialer know you are ready for another call by selecting the checkmark icon, which is located beside the cassette tape. The time a student ends the call, and when you let the dialer know you are ready for another call is called your “Update Time”.
  • 17.
  • 18.
    18 1. On theTelephone Bar, enter the phone number in the Number box. (Be sure to put a 9 followed by 1 in front of the number to dial out.) 2. Select Phone Transfer. 3. The system displays a dialog box from which you can select Conference or Transfer. Warm Transfer A warm transfer is when the advisor speaks with someone on behalf of the customer before transferring.
  • 19.
    19 4. Select Transferto remain on the line and complete a warm transfer of the call. (You will remain on the line to introduce the student.) 5. When the recipient of transfer is ready to accept the transfer of the call, select F9-F18 – Transfer Release. (This will release the line) Warm Transfer
  • 20.
    Taking a Breakor Lunch 20
  • 21.
    21 (You must exitthe dialer anytime you are told to, taking a Break, going to Meal, or leaving your shift- as described exactly below) Taking a Break or Lunch To prepare to go to break or lunch, first click on the “Coffee Cup” icon in preparation to stop the dialer. The icon will change to a “Coffee Cup with a Red Flag” which means the dialer is preparing for the advisor to go to lunch or break.
  • 22.
    Taking a Breakor Lunch (Cont.) 22 When the coffee cup is red-flagged, finish the current call and then select the icon that is the “Page with the Blue Check Mark”
  • 23.
    23 2. Next, clickon the telephone with the red X on it, beside the coffee mug. 3. You will have to wait about 10 full seconds, and then in the bottom left corner of the dialer, you will see “Successfully left job”. You MUST wait until the dialer says this, or you will not be able to completely or successfully exit the dialer. (Which means whatever you aux in EMC will not recognize you aux anything) 4. Now, you will click “Agent” and select “Exit” in the dropdown.
  • 24.
    ® Logging into andExiting the Dialer/How to Warm Transfer March 2016