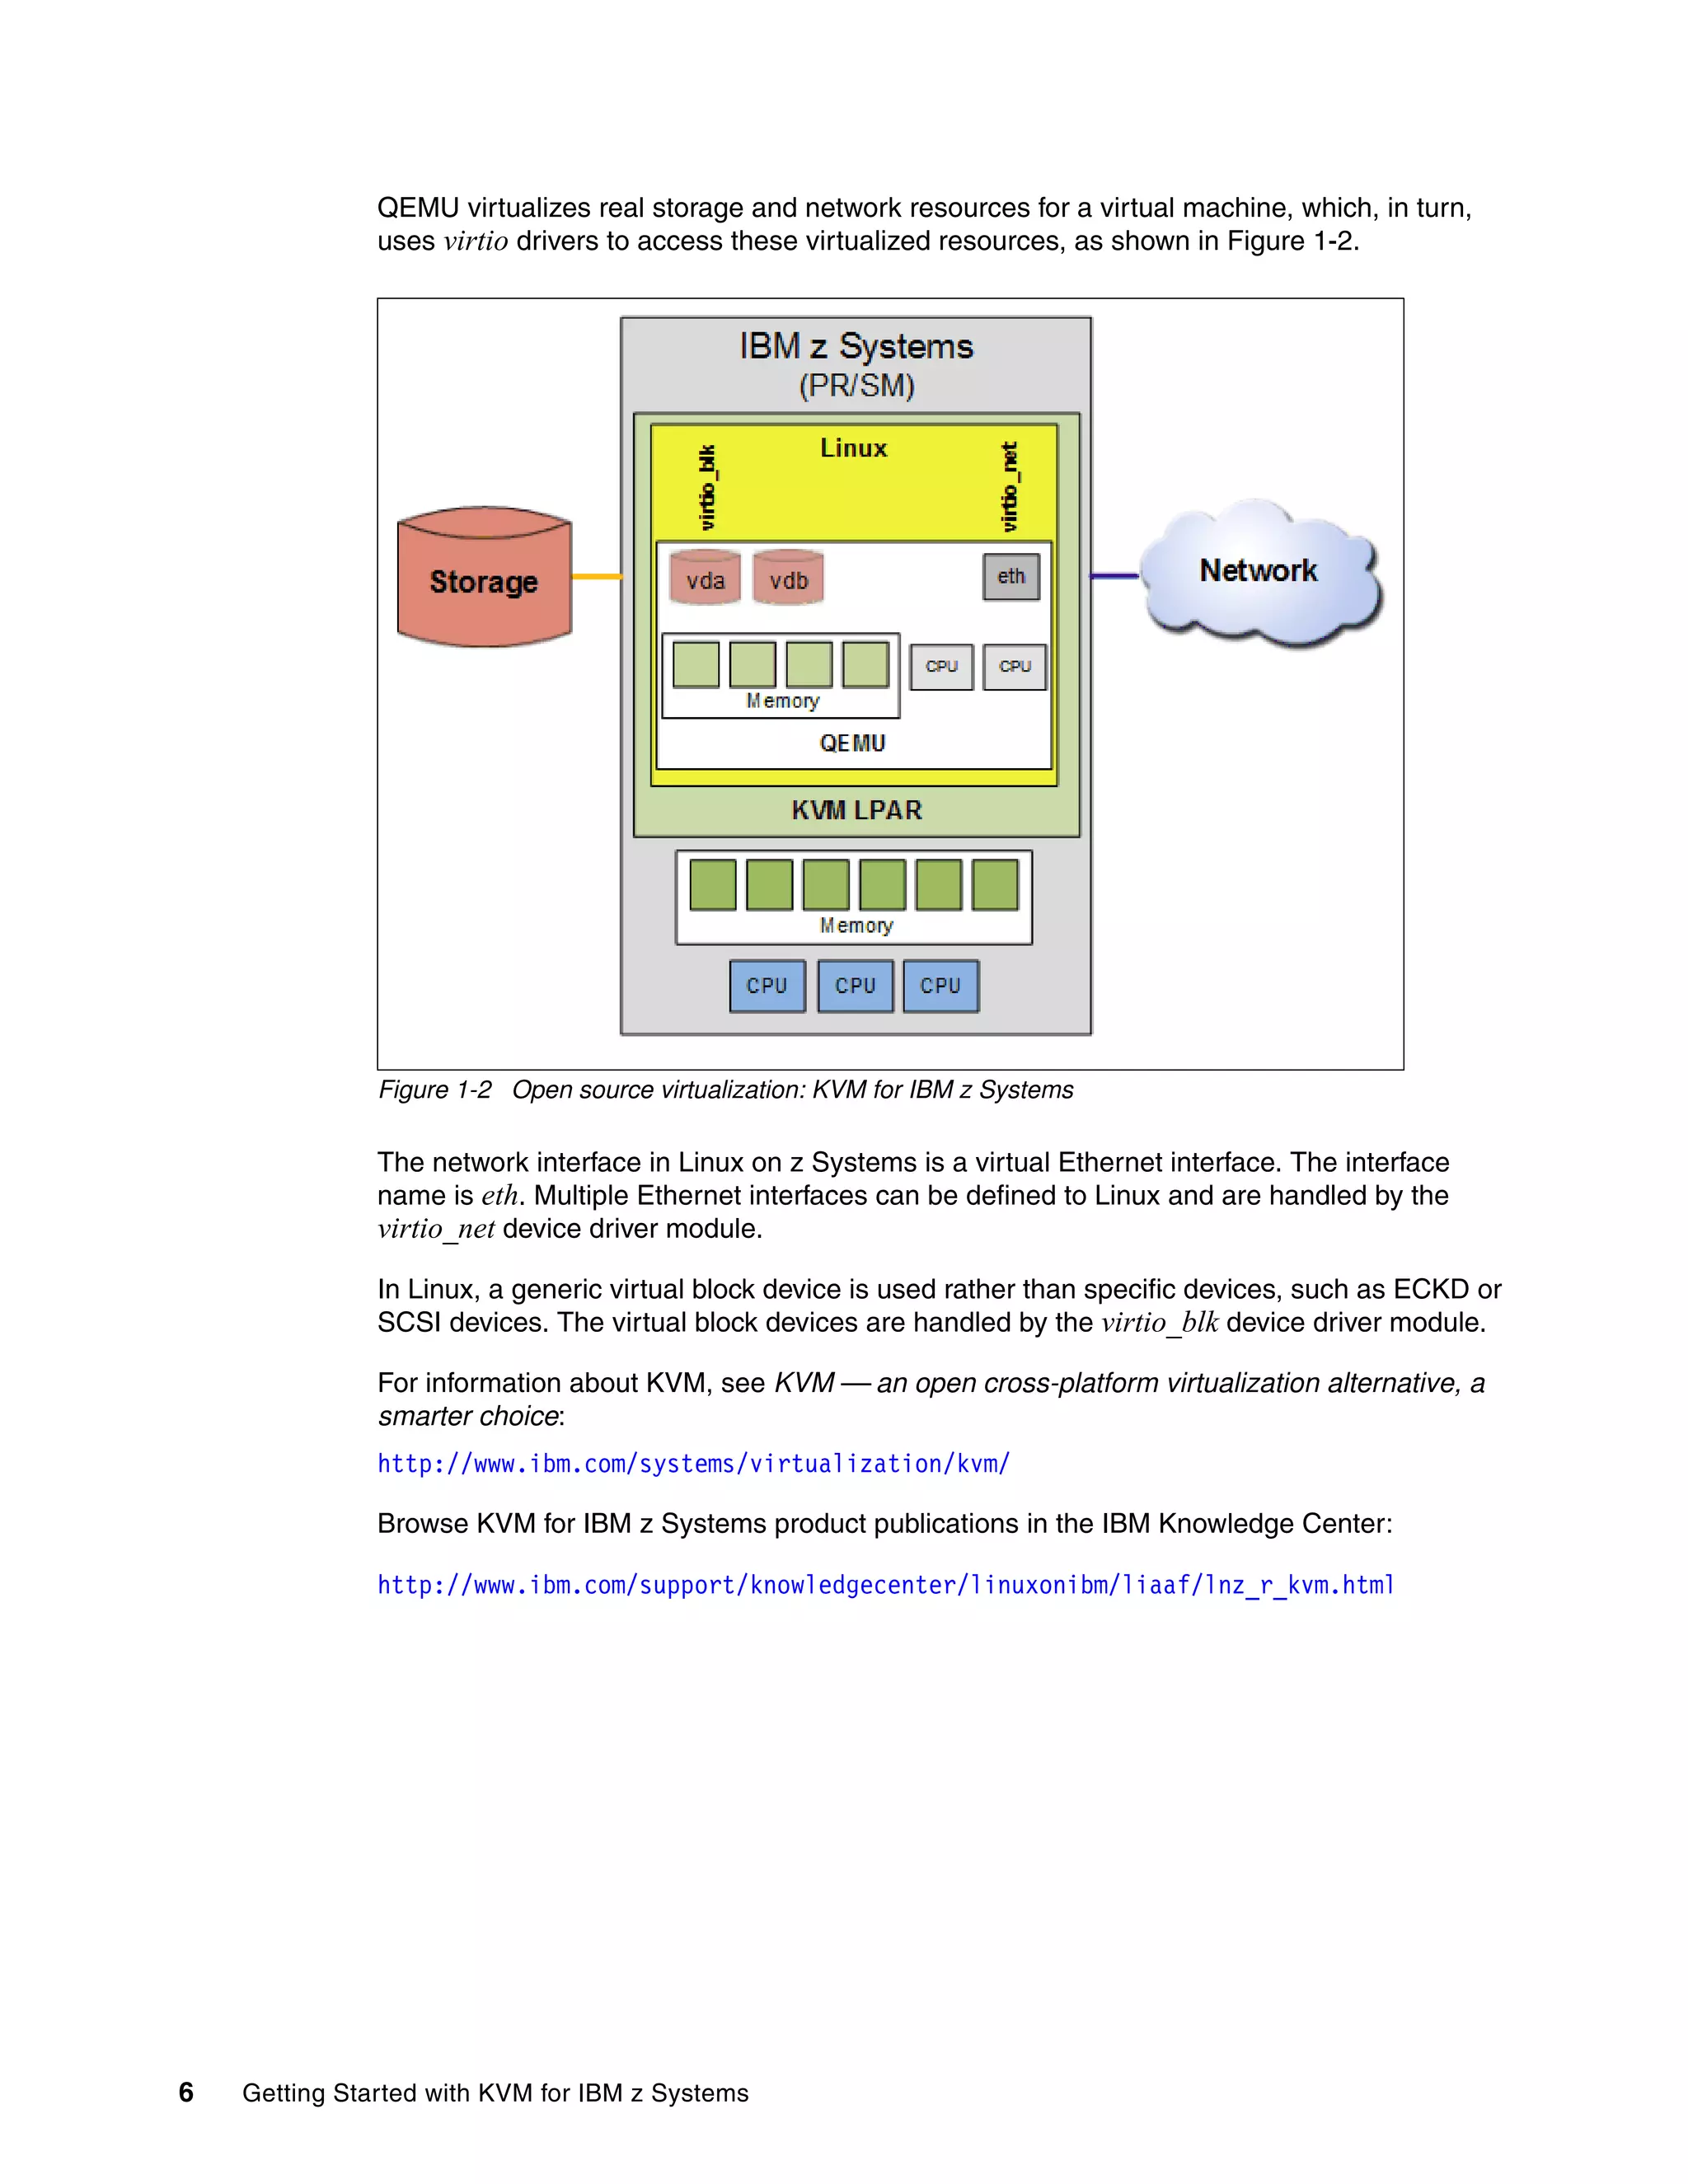
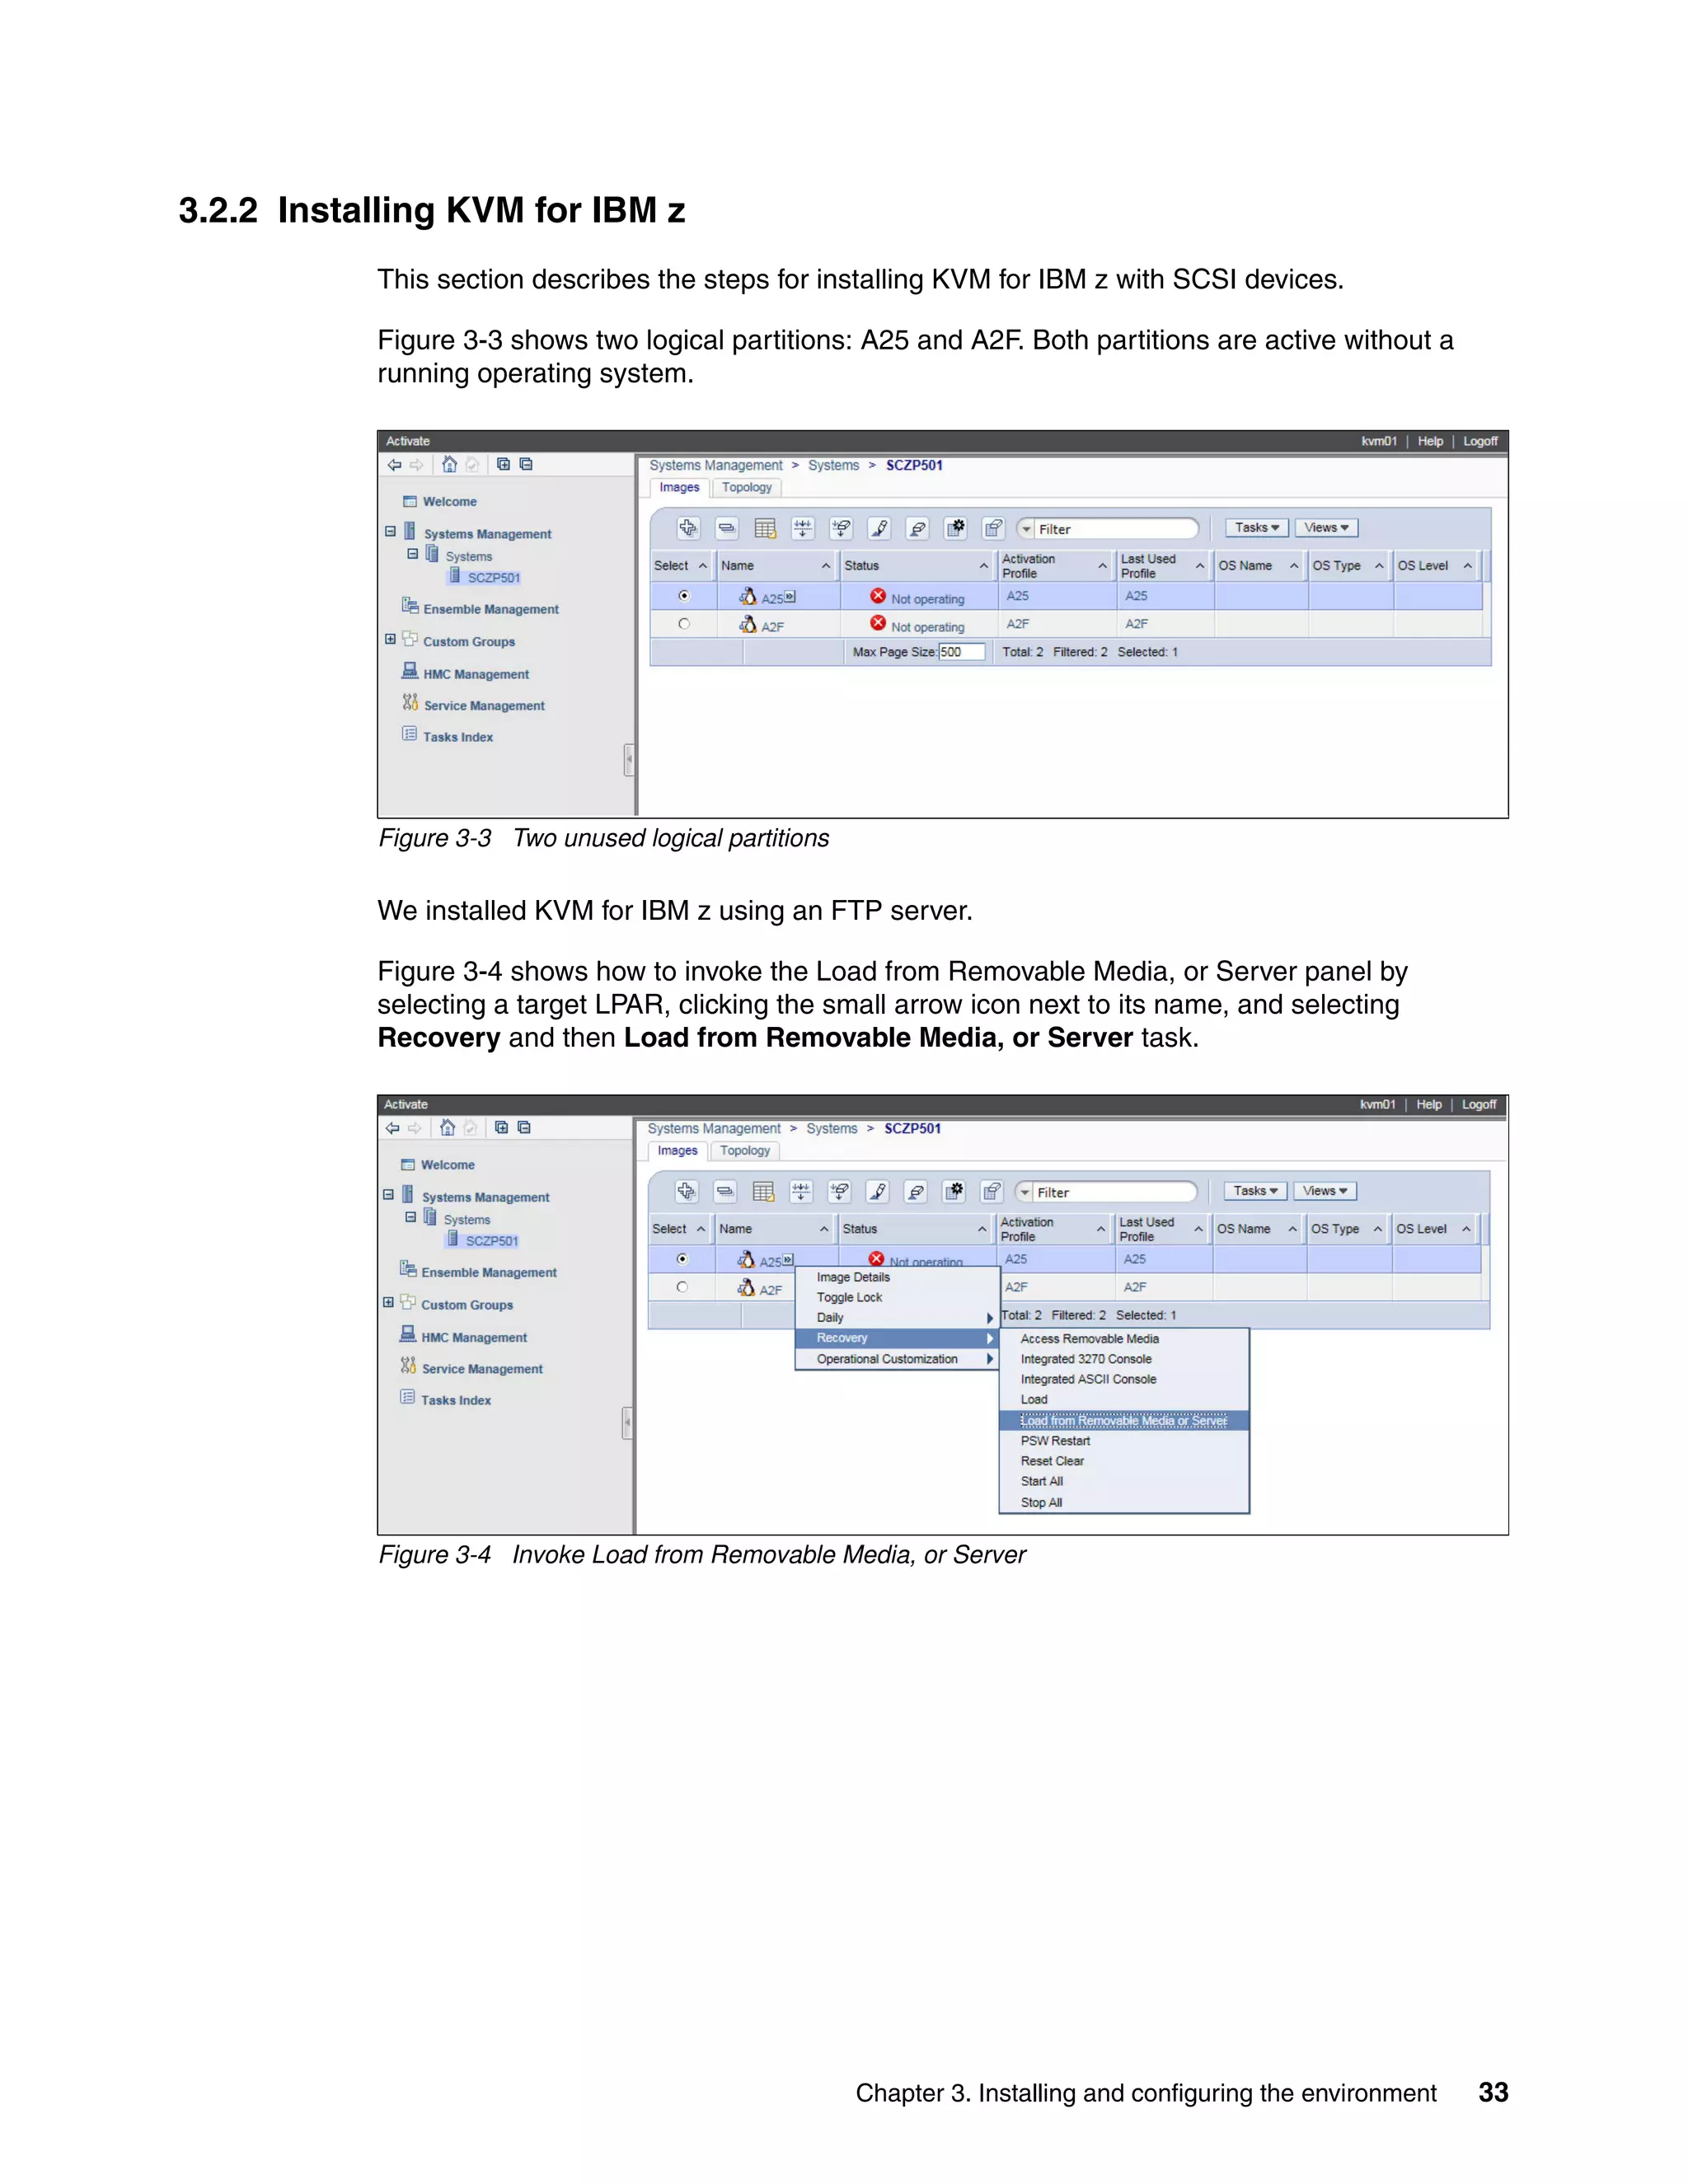
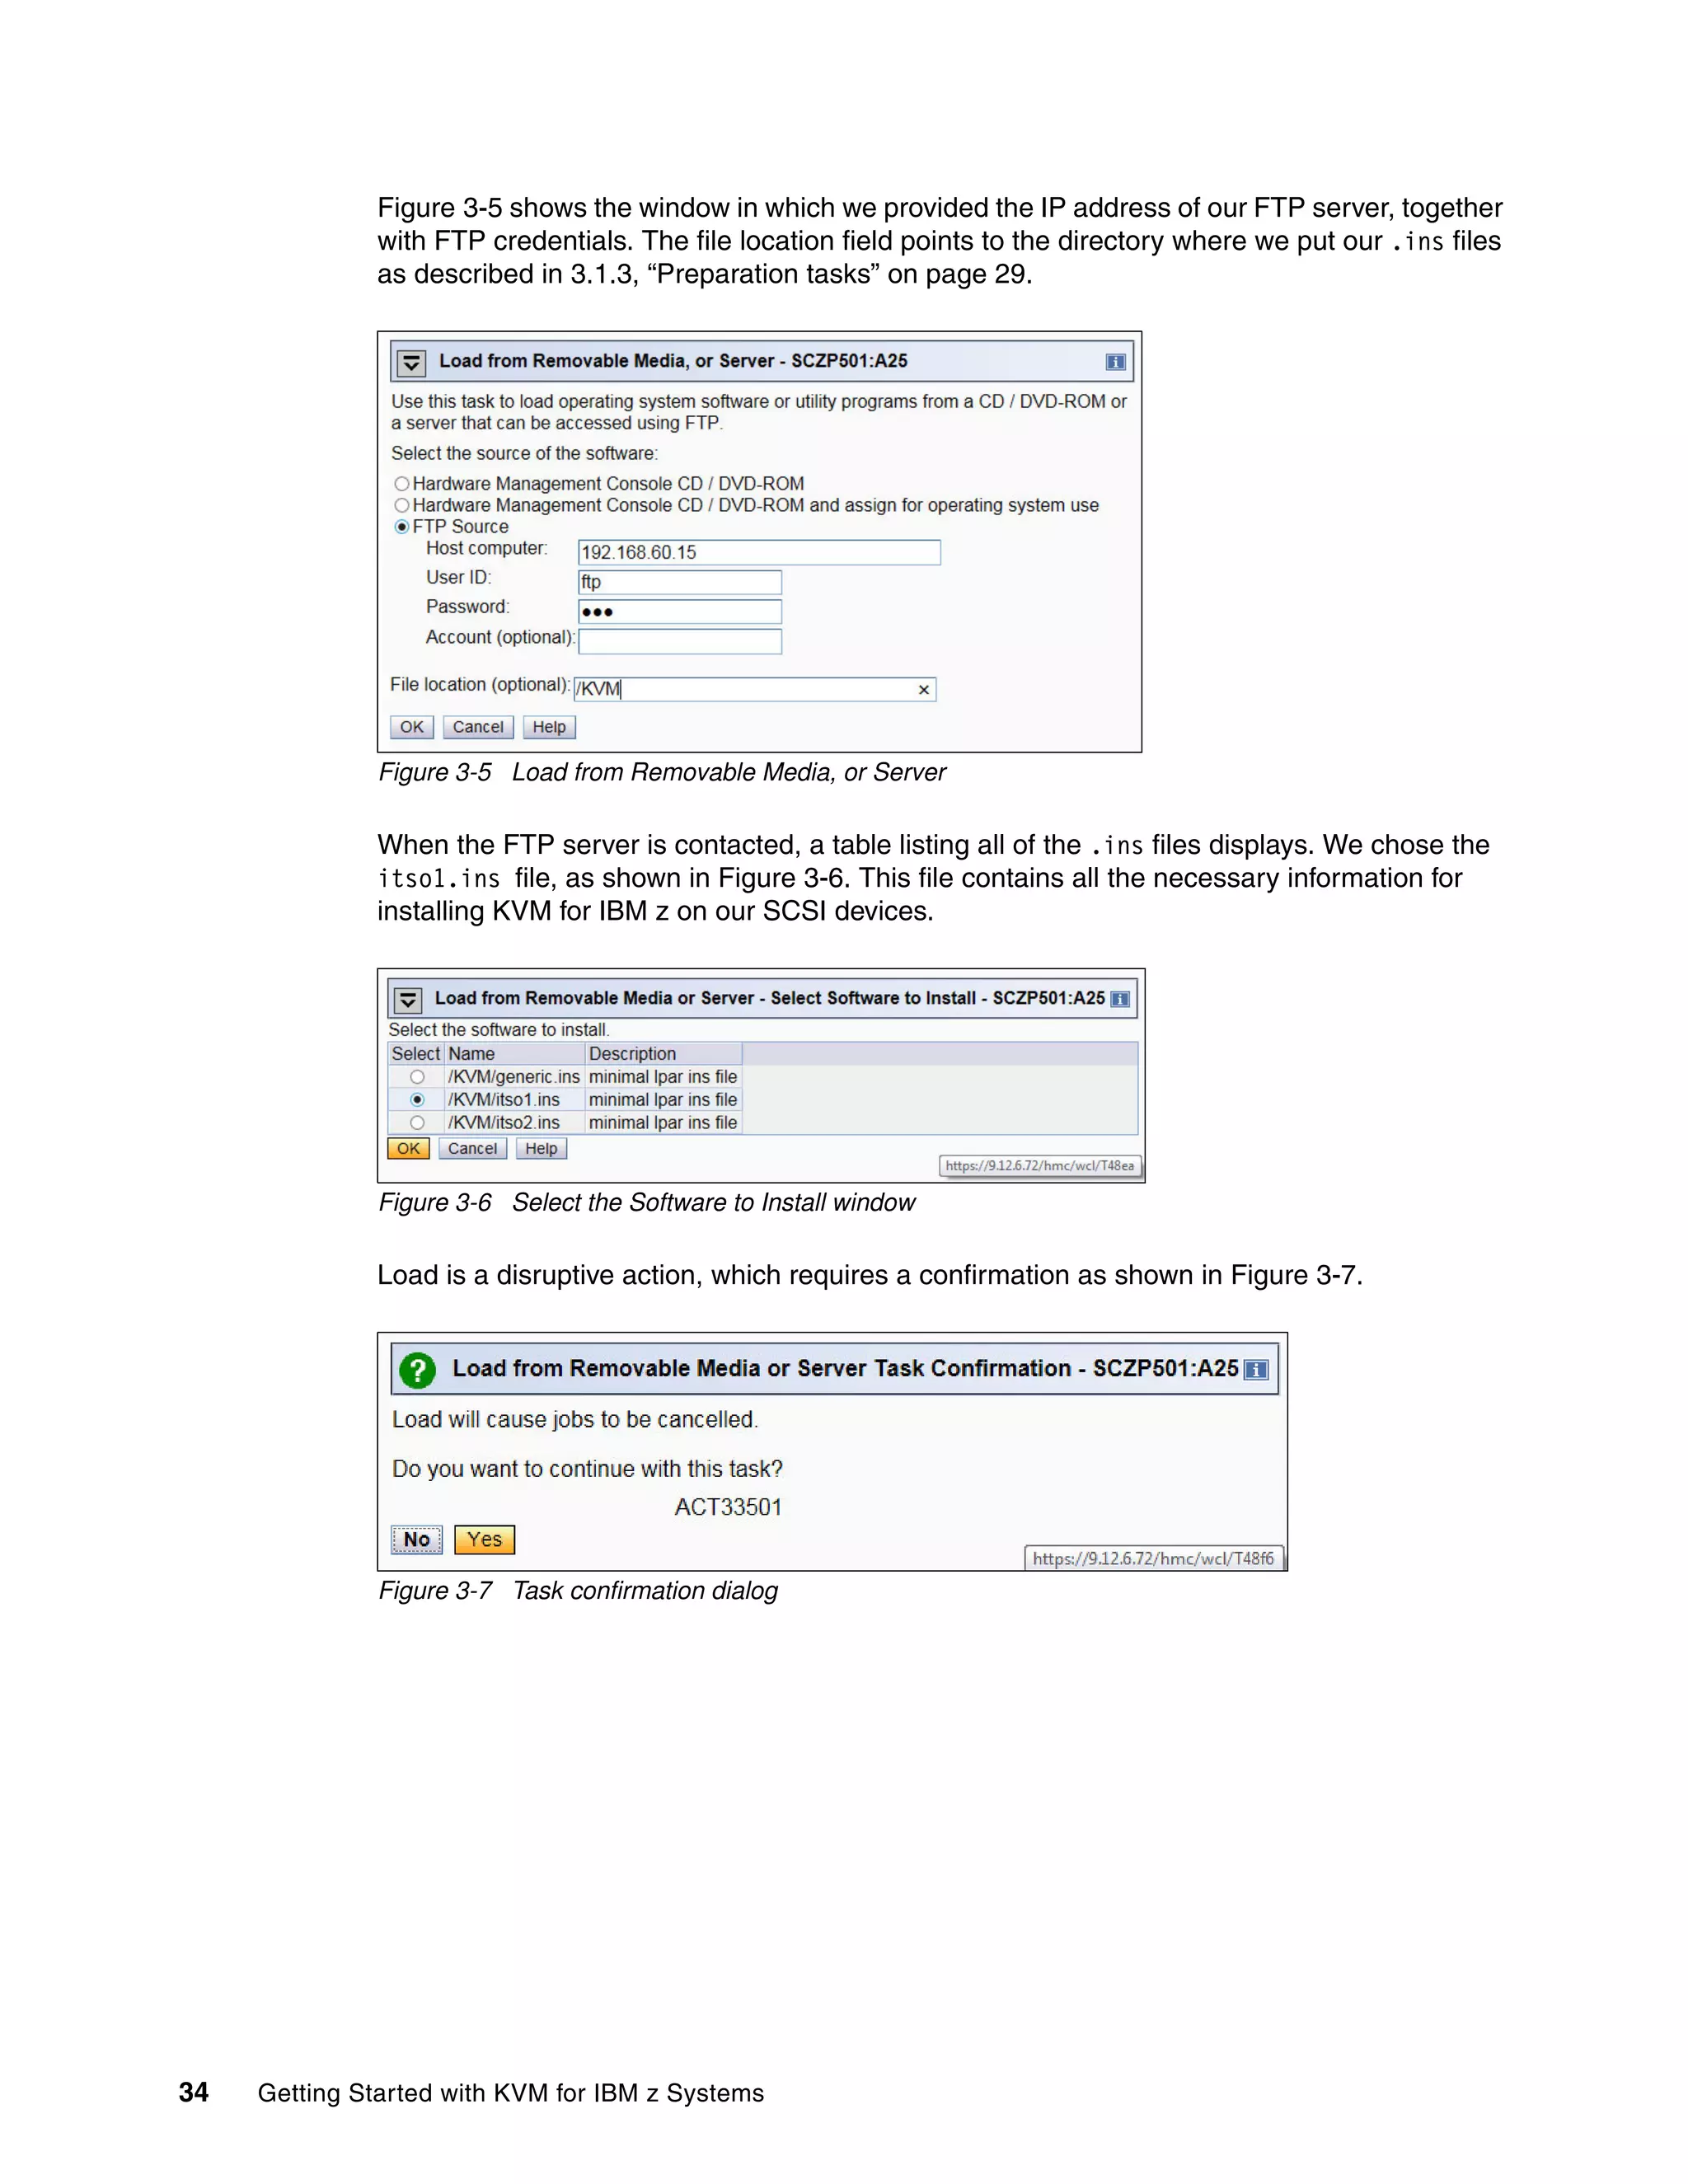
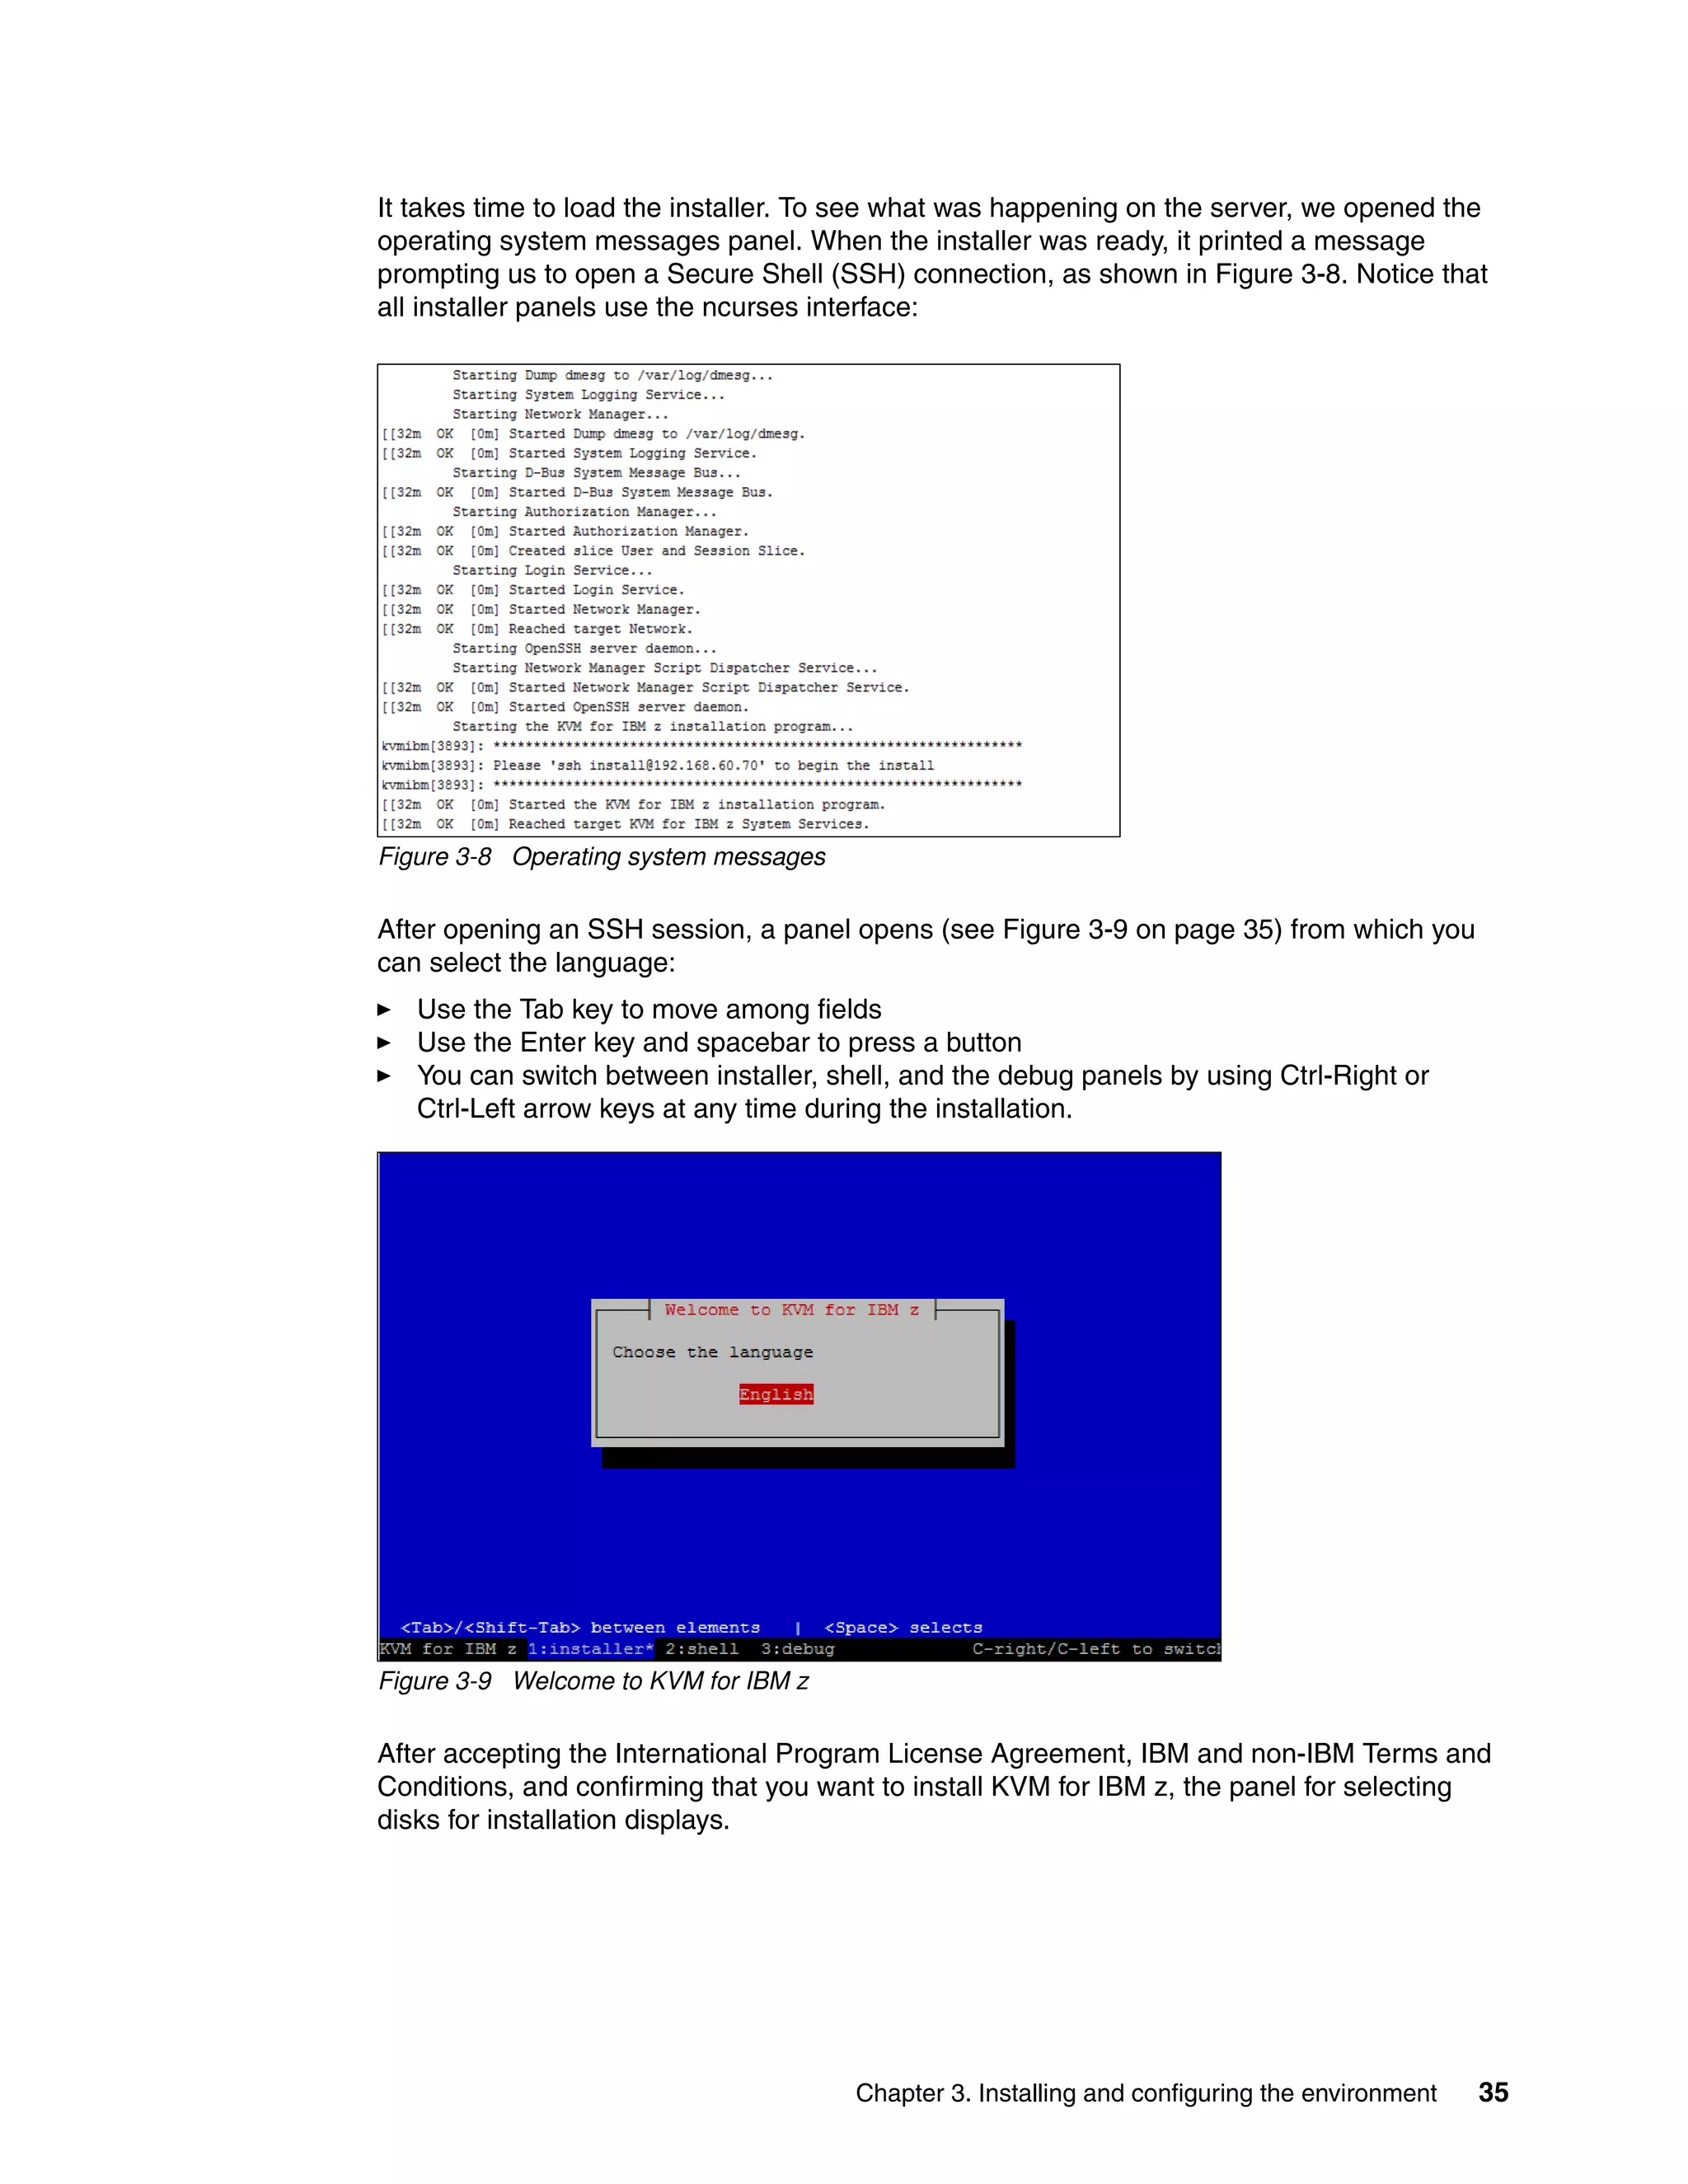
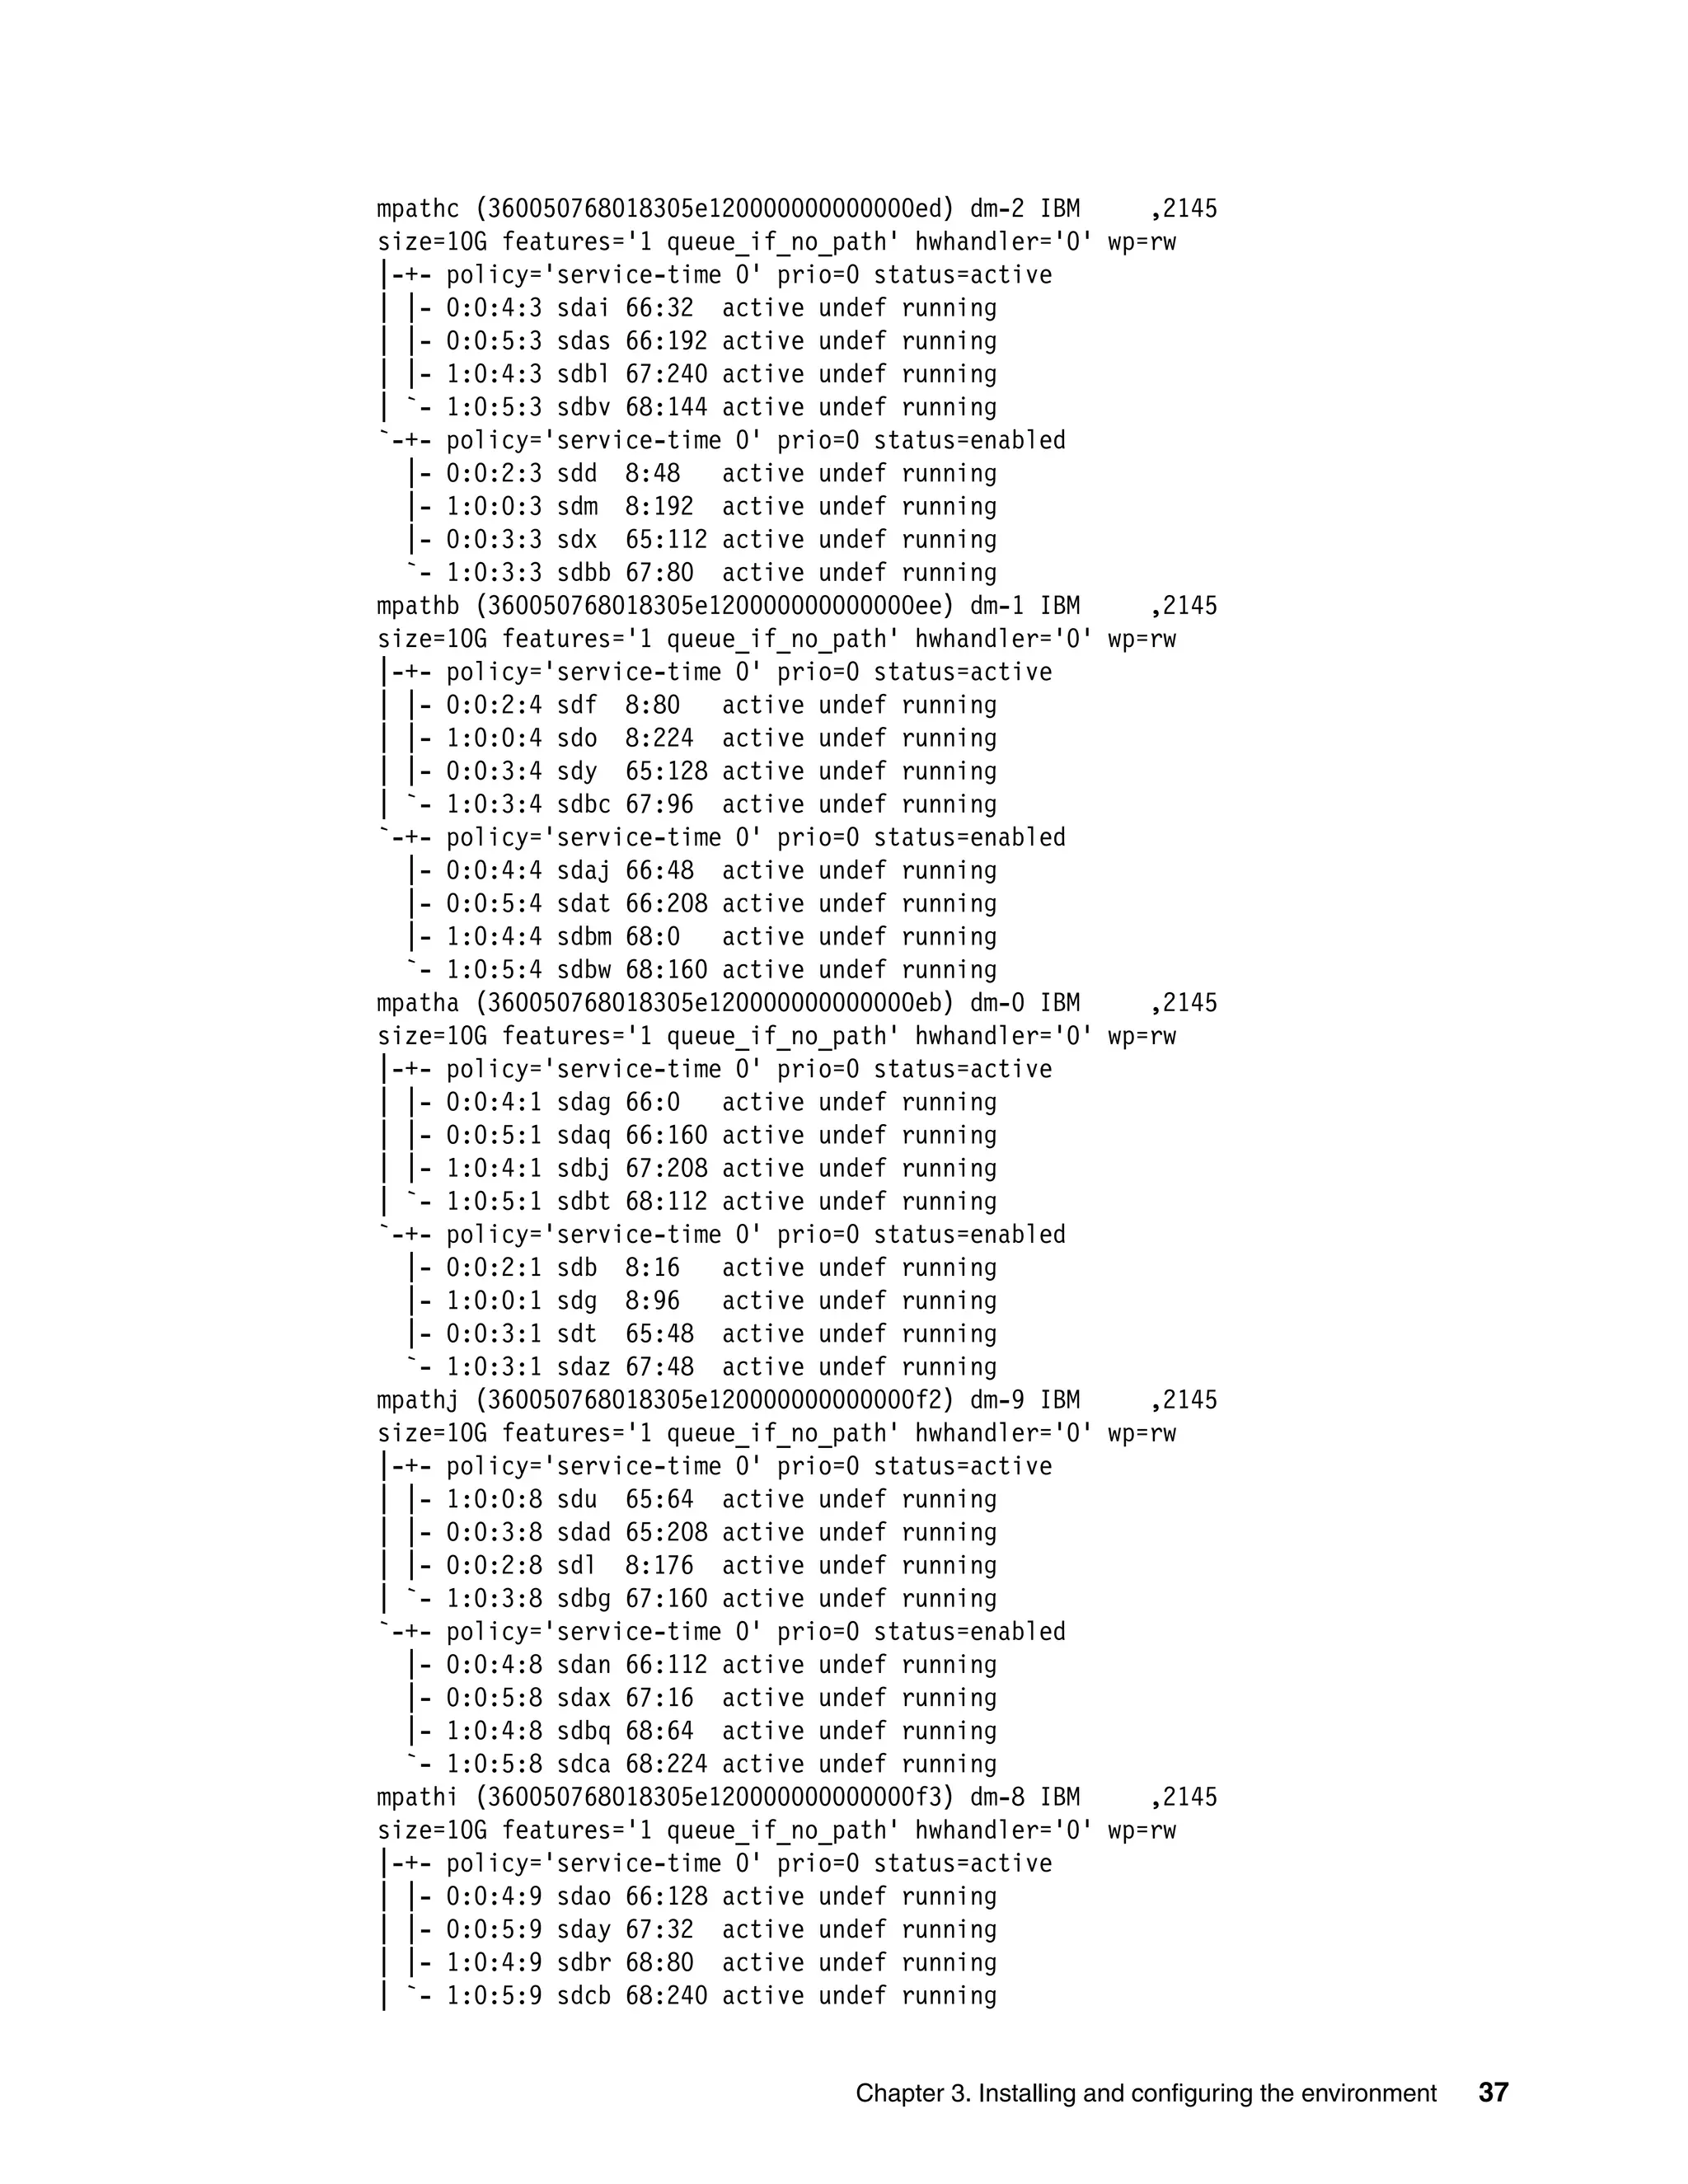
This document provides an introduction to using KVM for virtualization on IBM z Systems mainframes. It discusses the advantages of KVM on z Systems, the hardware and software components involved, and how to plan, install, configure, manage and monitor a KVM environment on an IBM mainframe. It also describes how to build a cloud infrastructure using KVM and IBM Cloud Manager with OpenStack.


![36 Getting Started with KVM for IBM z Systems
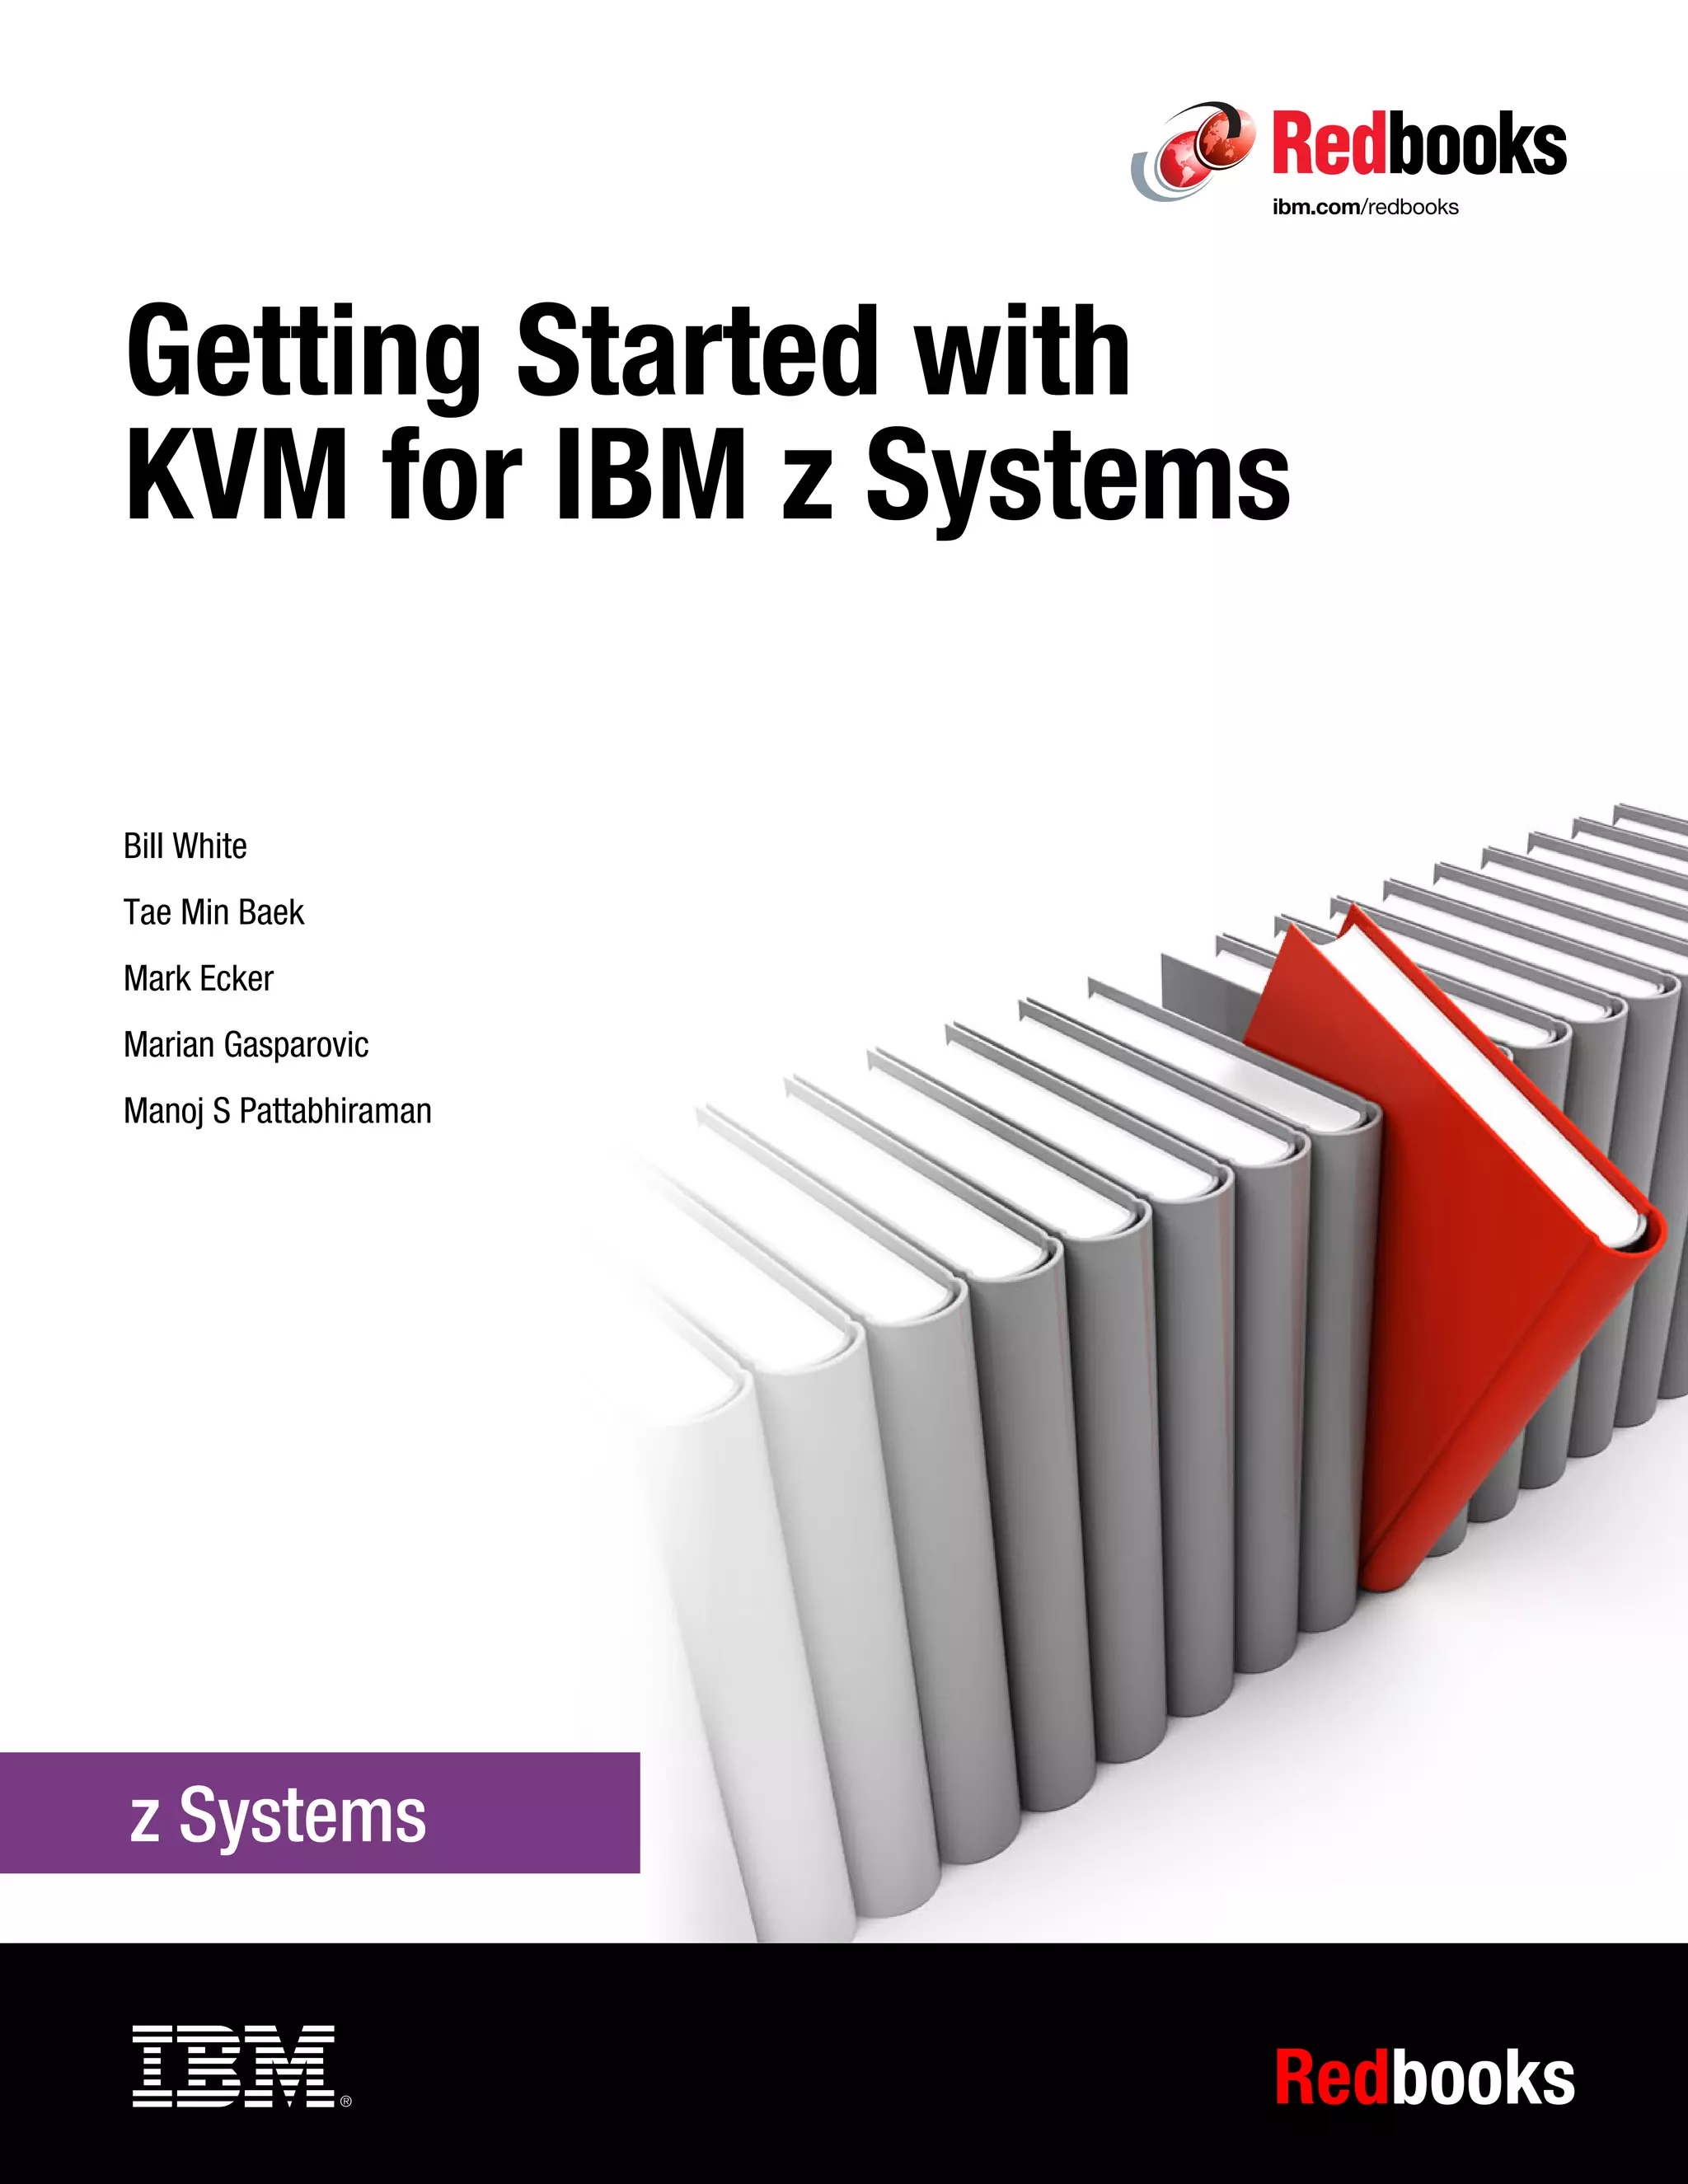
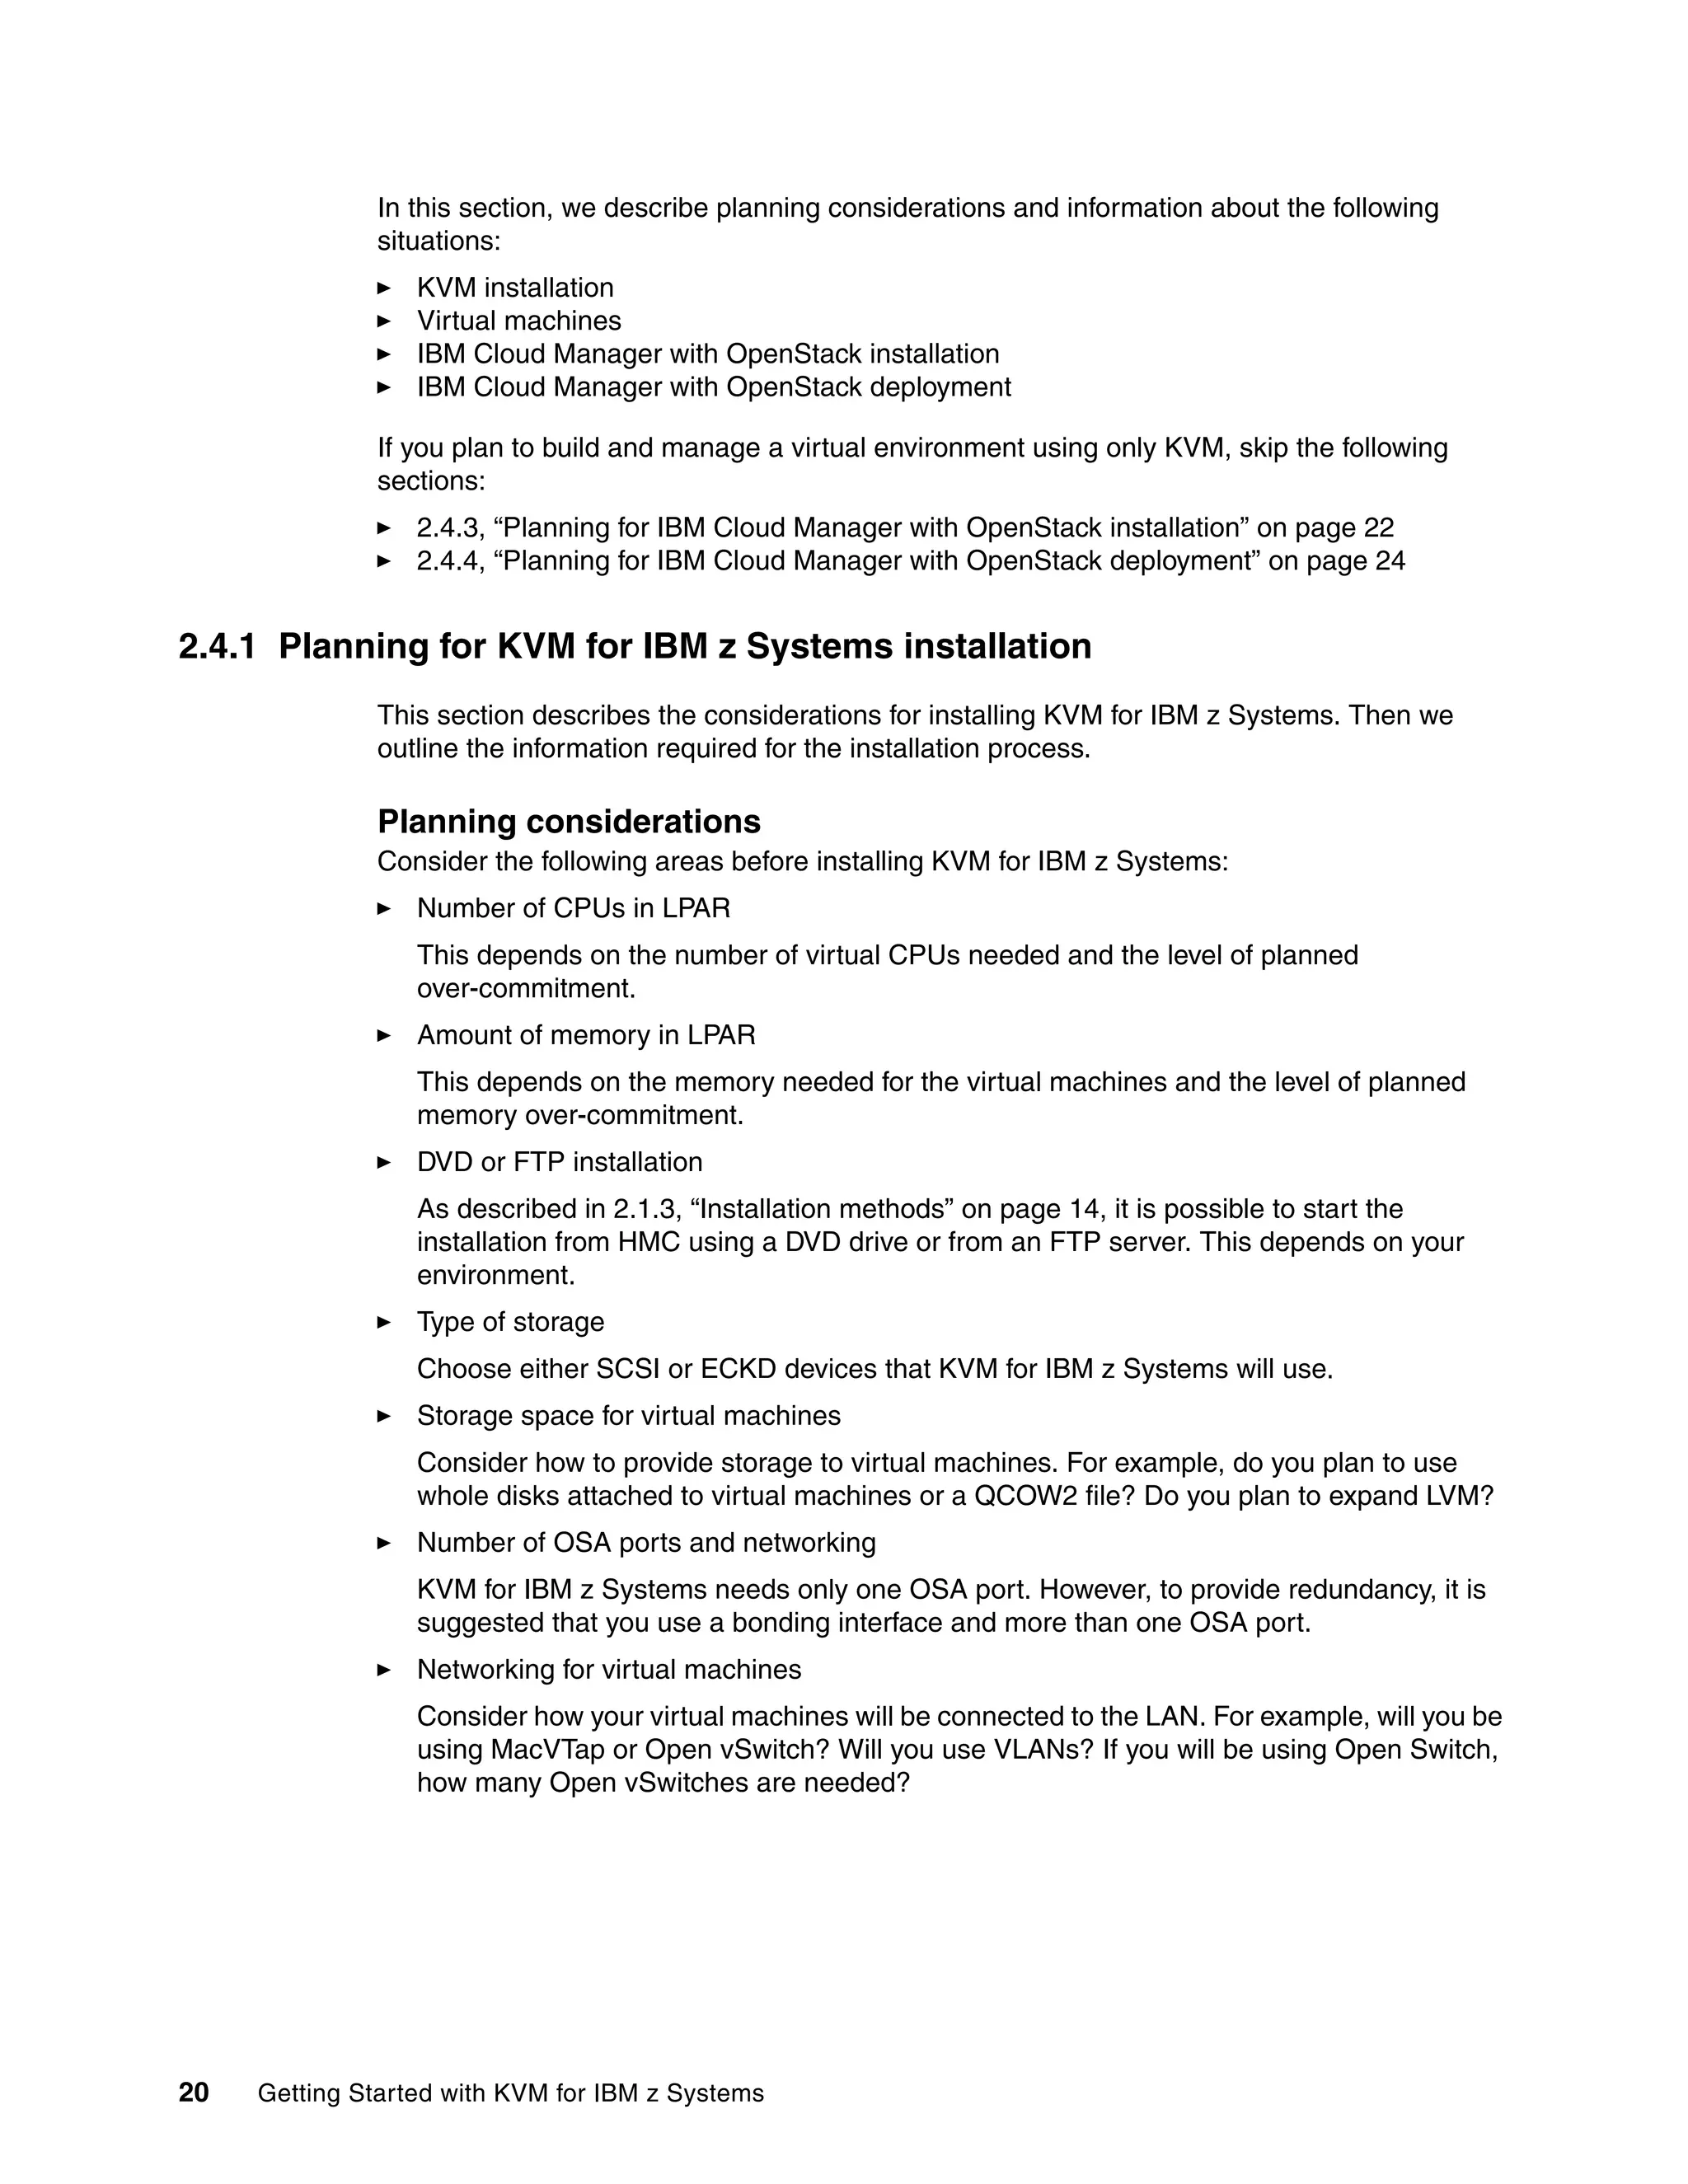
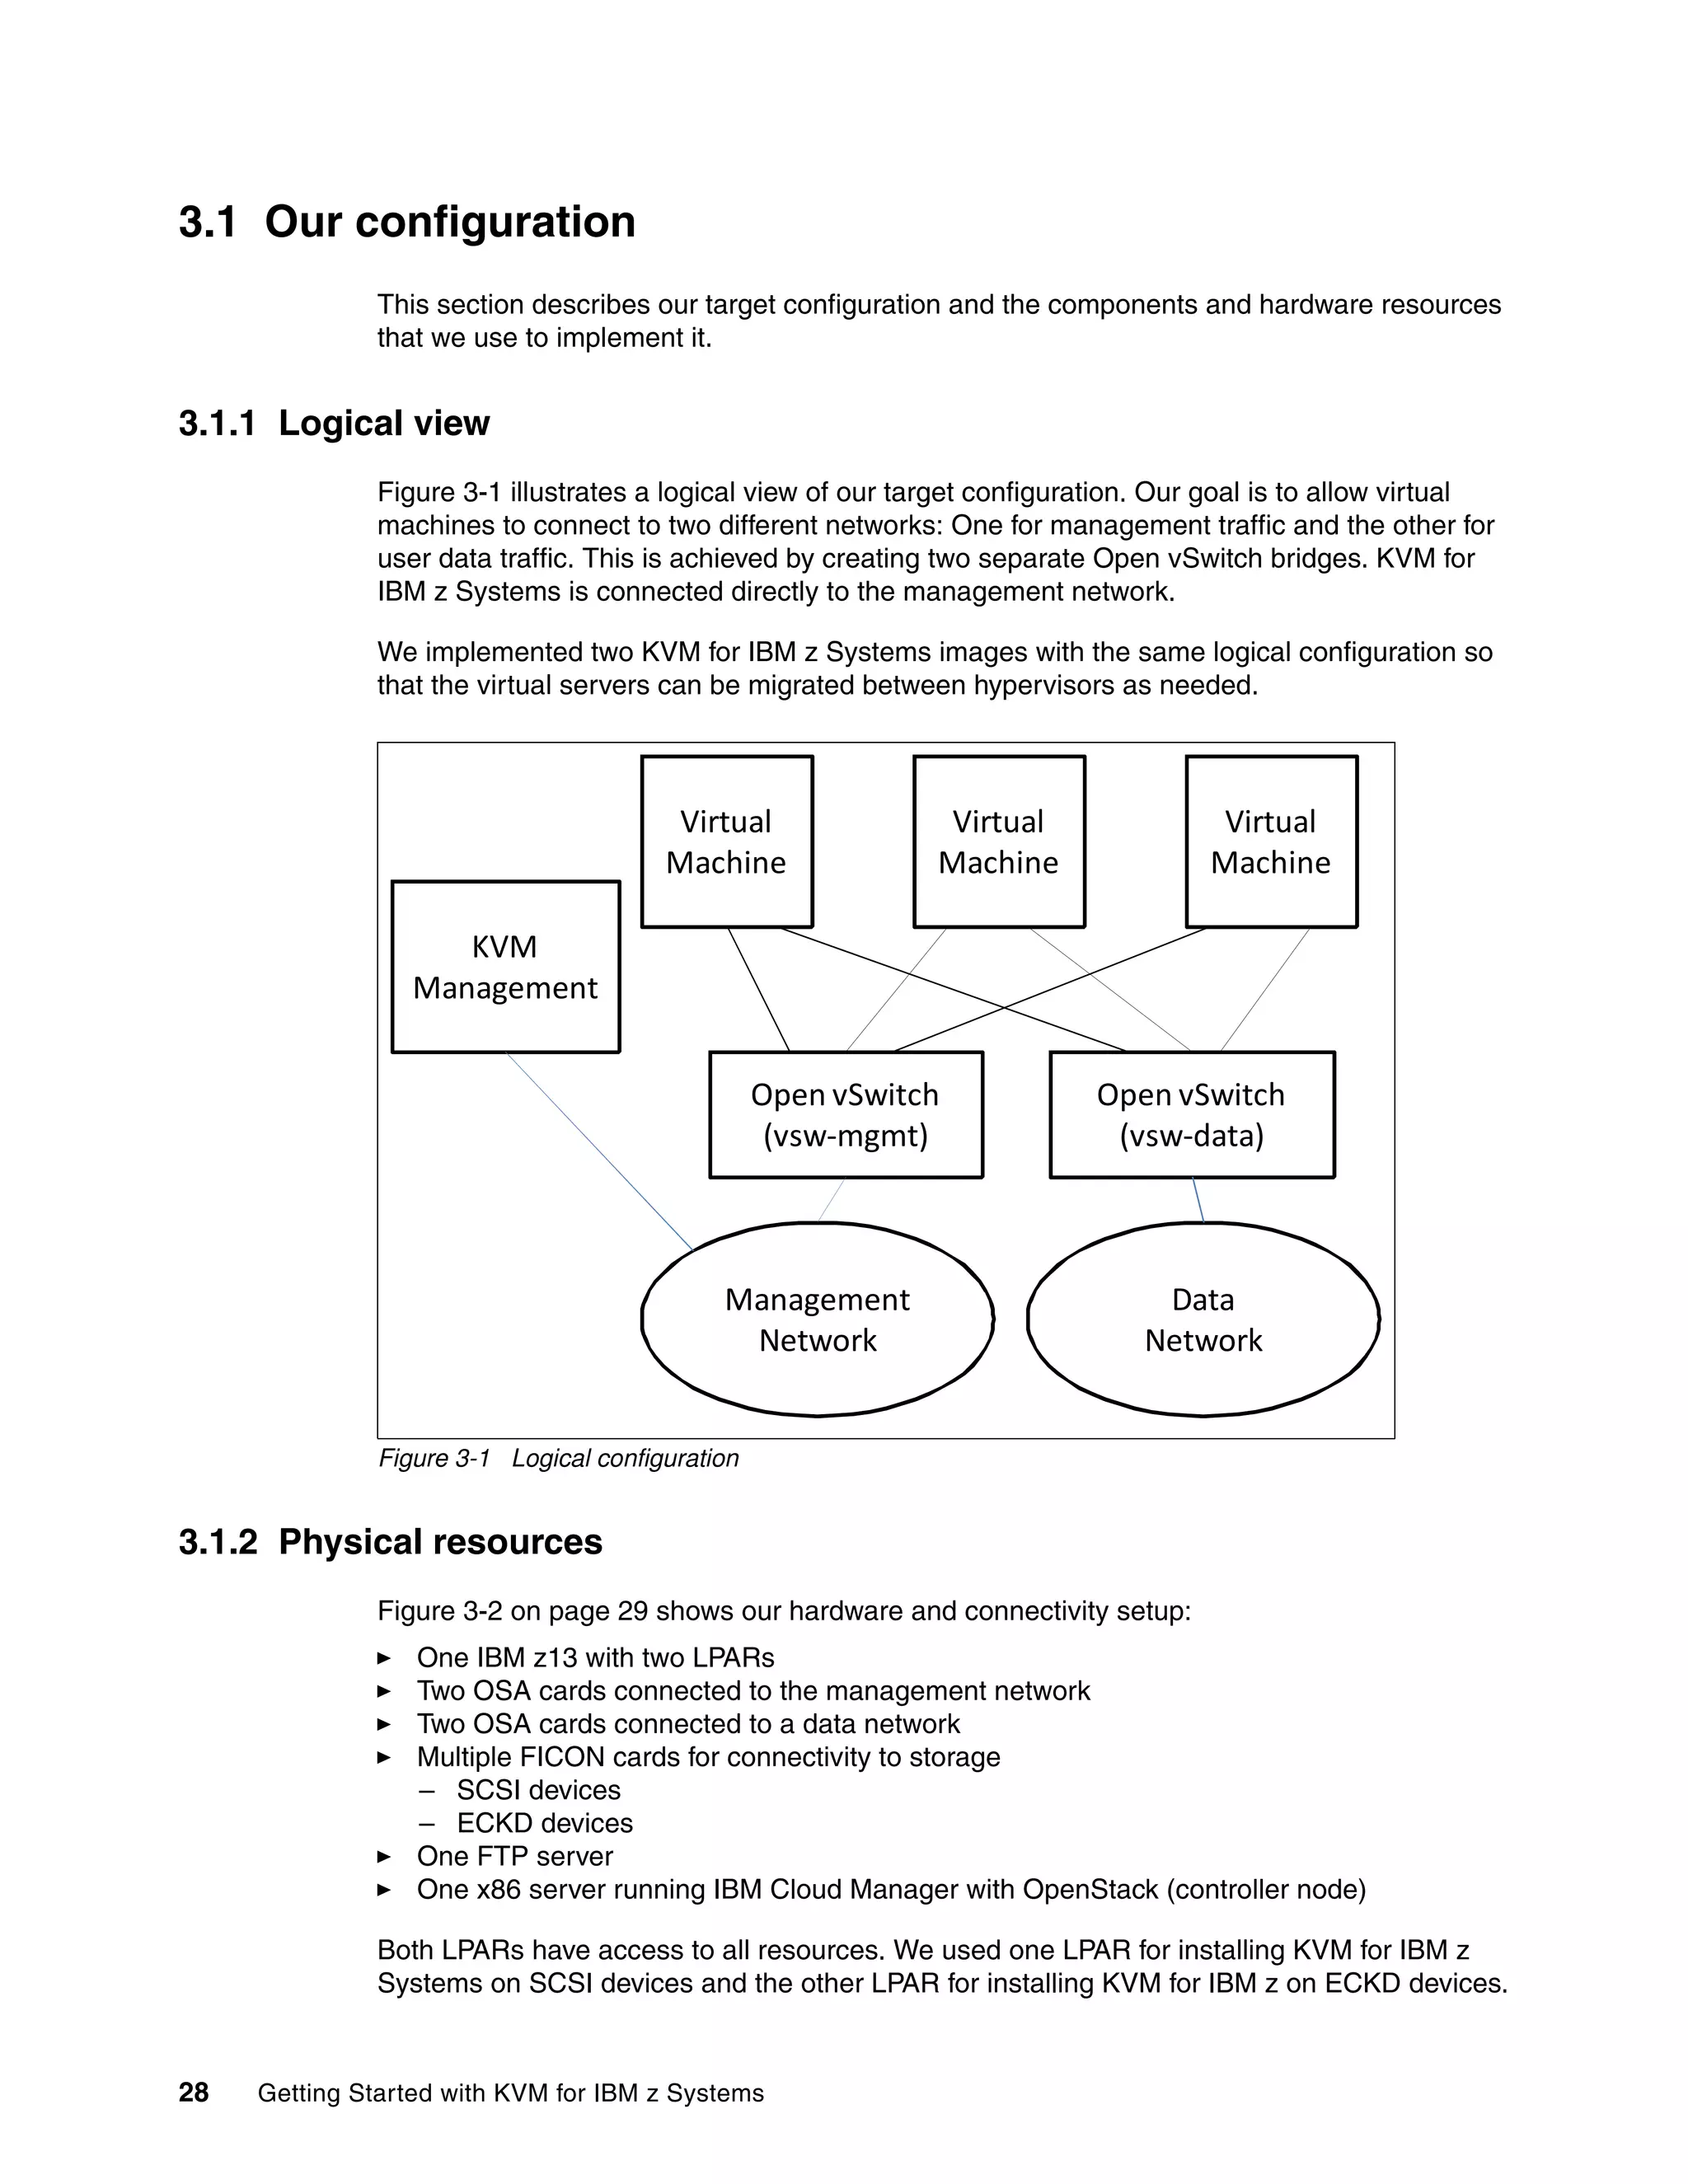
Figure 3-10 shows the panel that displays the available LUNs. These are the three LUNs we
defined in the .prm file in 3.2.1, “Preparing the .ins and .prm files” on page 32. The LUNs are
recognized as multipathed devices. From this panel, it is not clear which mpath device
represents which LUN. Such information is useful for manual partitioning.
Figure 3-10 Devices to install KVM for IBM z to
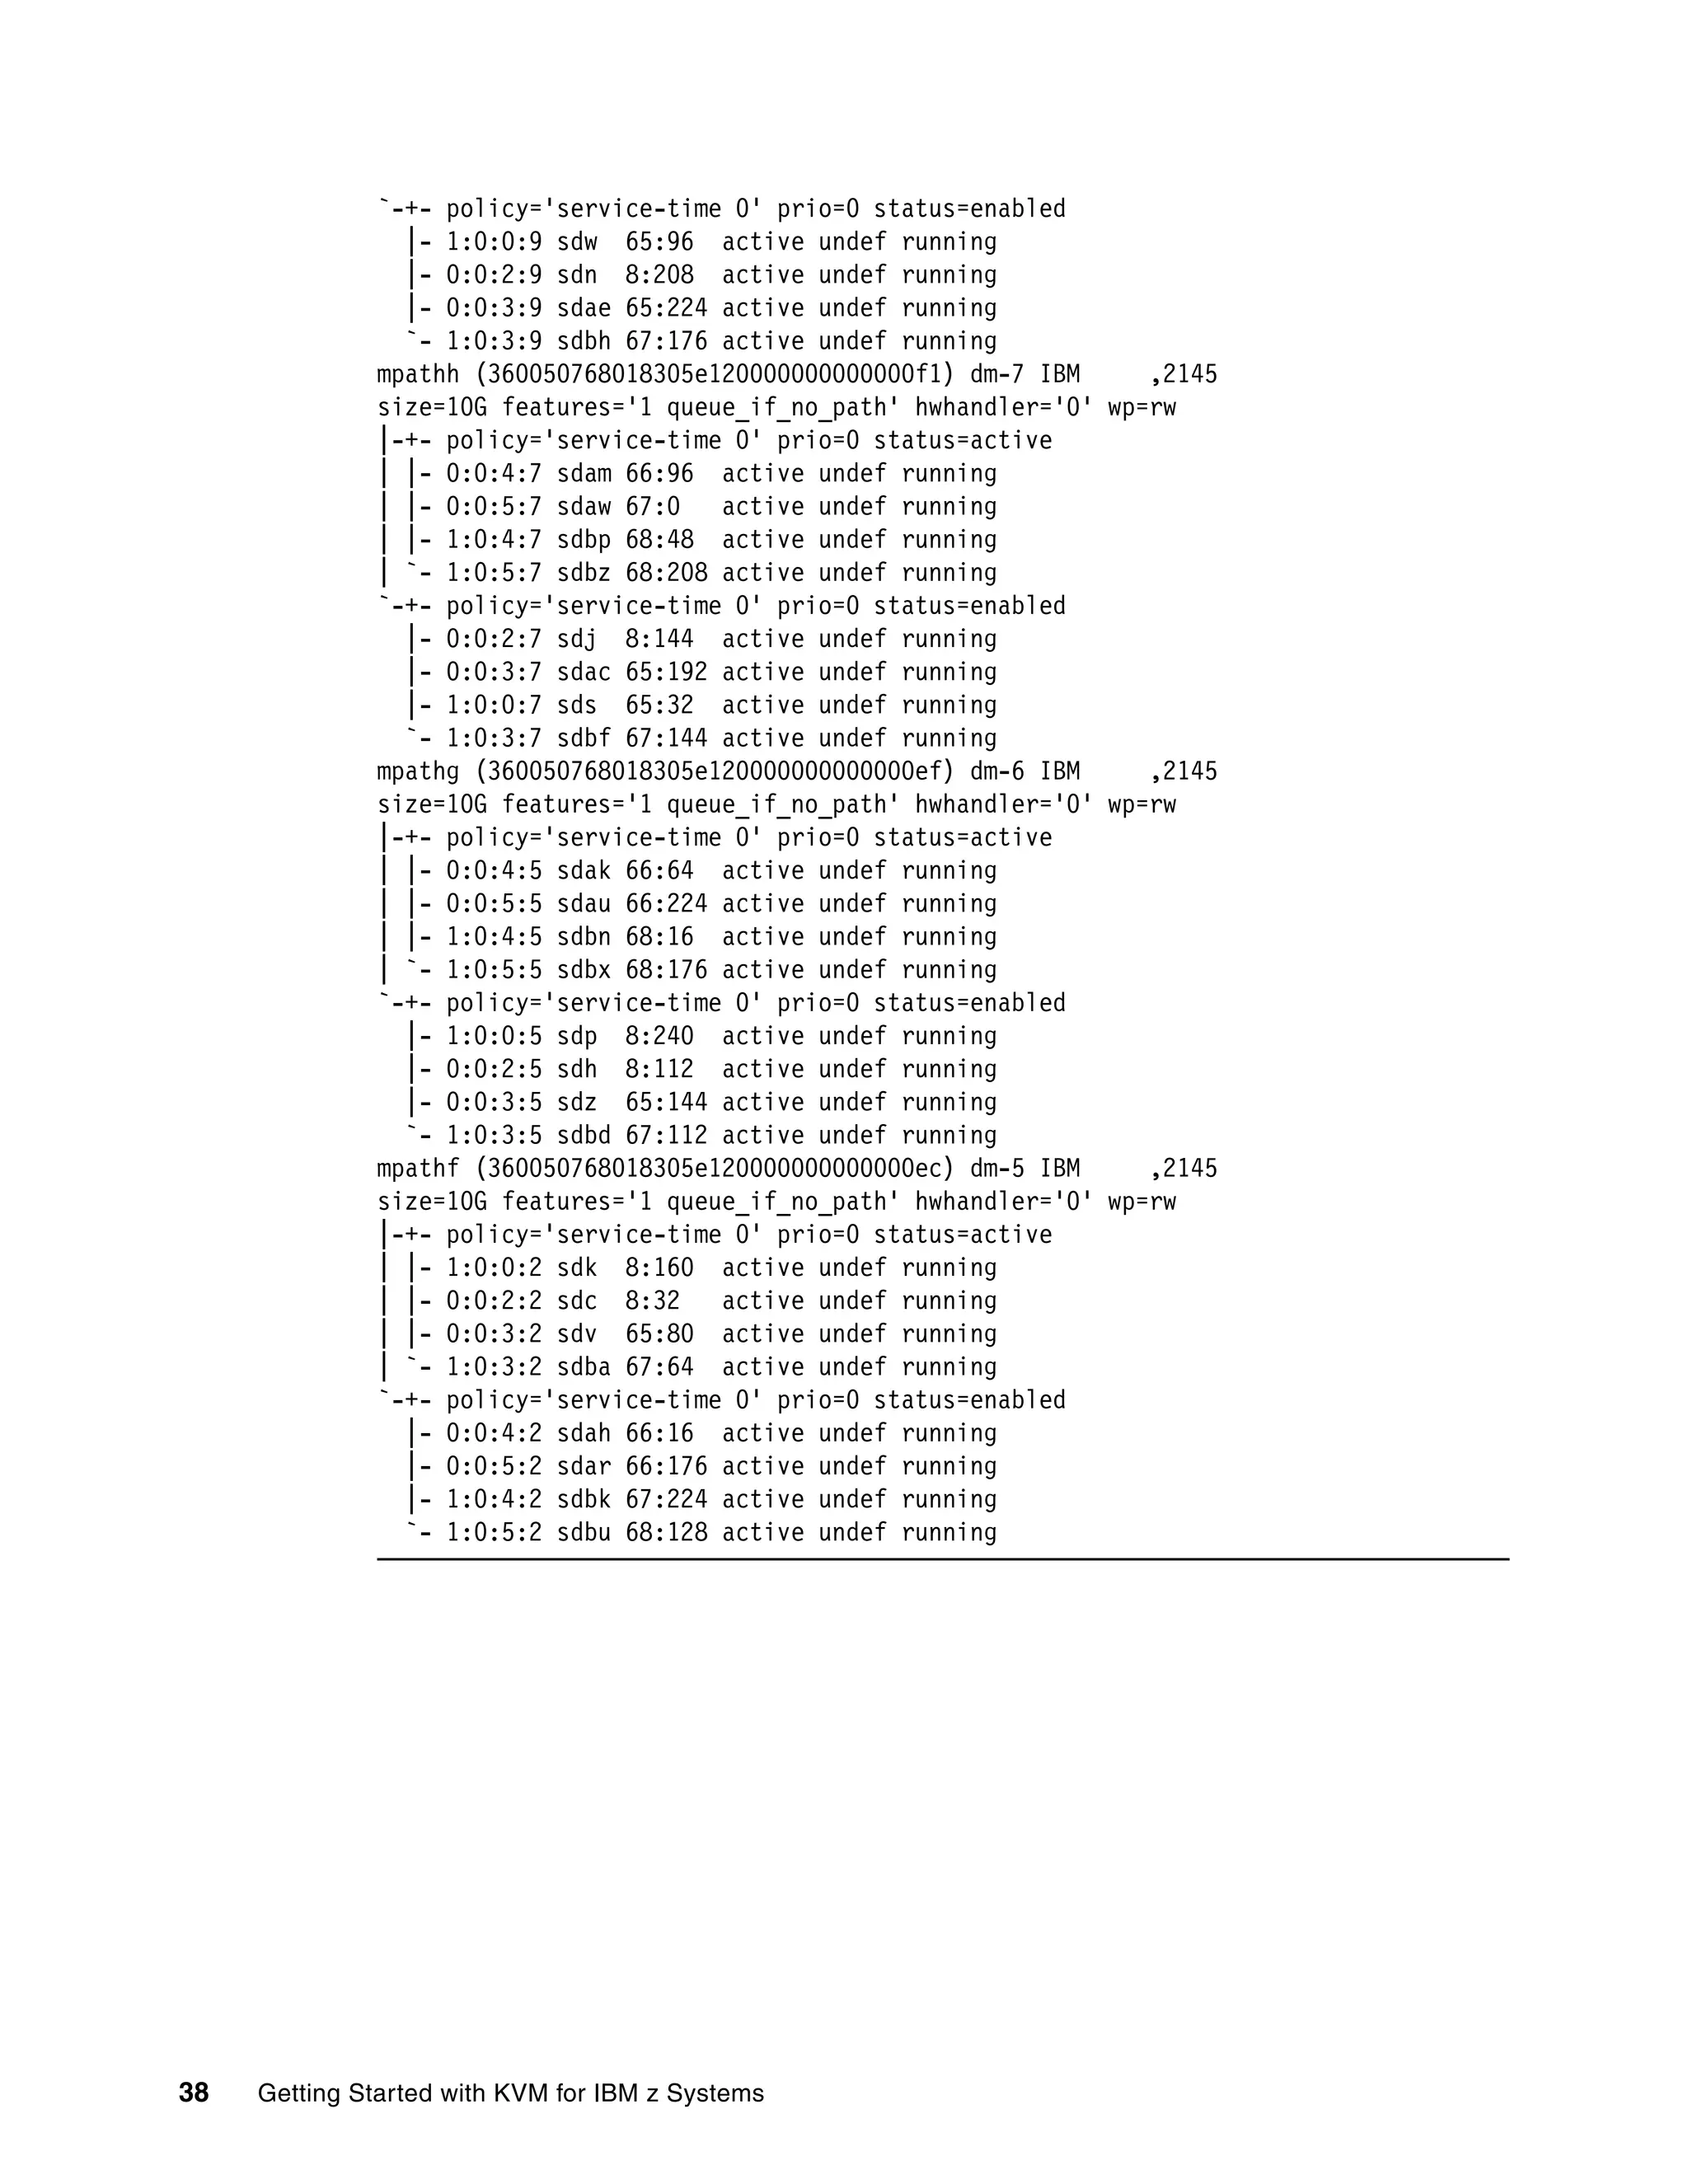
To determine which mpath represents which LUN, we switched to shell using Ctrl-Right
Arrow. With the multipath command (see Example 3-4 on page 36) three interesting pieces
of information display:
mpathe represents LUN 0, mpatha represents LUN 1 and mpathf represents LUN 2.
On top of the two paths to each of our three LUNs specified in a parameter file, the
installer detected six additional available paths to each LUN.
Aside from the three LUNs specified in a parameter file, the installer discovered another
seven LUNs available to our LPAR.
Example 3-4 multipath output
[root@itsokvm1 ~]# multipath -l
mpathe (360050768018305e120000000000000ea) dm-4 IBM ,2145
size=10G features='1 queue_if_no_path' hwhandler='0' wp=rw
|-+- policy='service-time 0' prio=0 status=active
| |- 0:0:3:0 sdr 65:16 active undef running
| |- 1:0:0:0 sde 8:64 active undef running
| |- 1:0:3:0 sdaa 65:160 active undef running
| `- 0:0:2:0 sda 8:0 active undef running
`-+- policy='service-time 0' prio=0 status=enabled
|- 0:0:4:0 sdaf 65:240 active undef running
|- 0:0:5:0 sdap 66:144 active undef running
|- 1:0:4:0 sdbi 67:192 active undef running
`- 1:0:5:0 sdbs 68:96 active undef running
mpathd (360050768018305e120000000000000f0) dm-3 IBM ,2145
size=10G features='1 queue_if_no_path' hwhandler='0' wp=rw
|-+- policy='service-time 0' prio=0 status=active
| |- 0:0:2:6 sdi 8:128 active undef running
| |- 1:0:0:6 sdq 65:0 active undef running
| |- 0:0:3:6 sdab 65:176 active undef running
| `- 1:0:3:6 sdbe 67:128 active undef running
`-+- policy='service-time 0' prio=0 status=enabled
|- 0:0:4:6 sdal 66:80 active undef running
|- 0:0:5:6 sdav 66:240 active undef running
|- 1:0:4:6 sdbo 68:32 active undef running
`- 1:0:5:6 sdby 68:192 active undef running](https://image.slidesharecdn.com/813f4873-82be-45ac-ace3-3348d7081223-151209165745-lva1-app6892/75/Getting-Started-with-KVM-for-IBM-z-Systems-50-2048.jpg)
![Chapter 3. Installing and configuring the environment 39
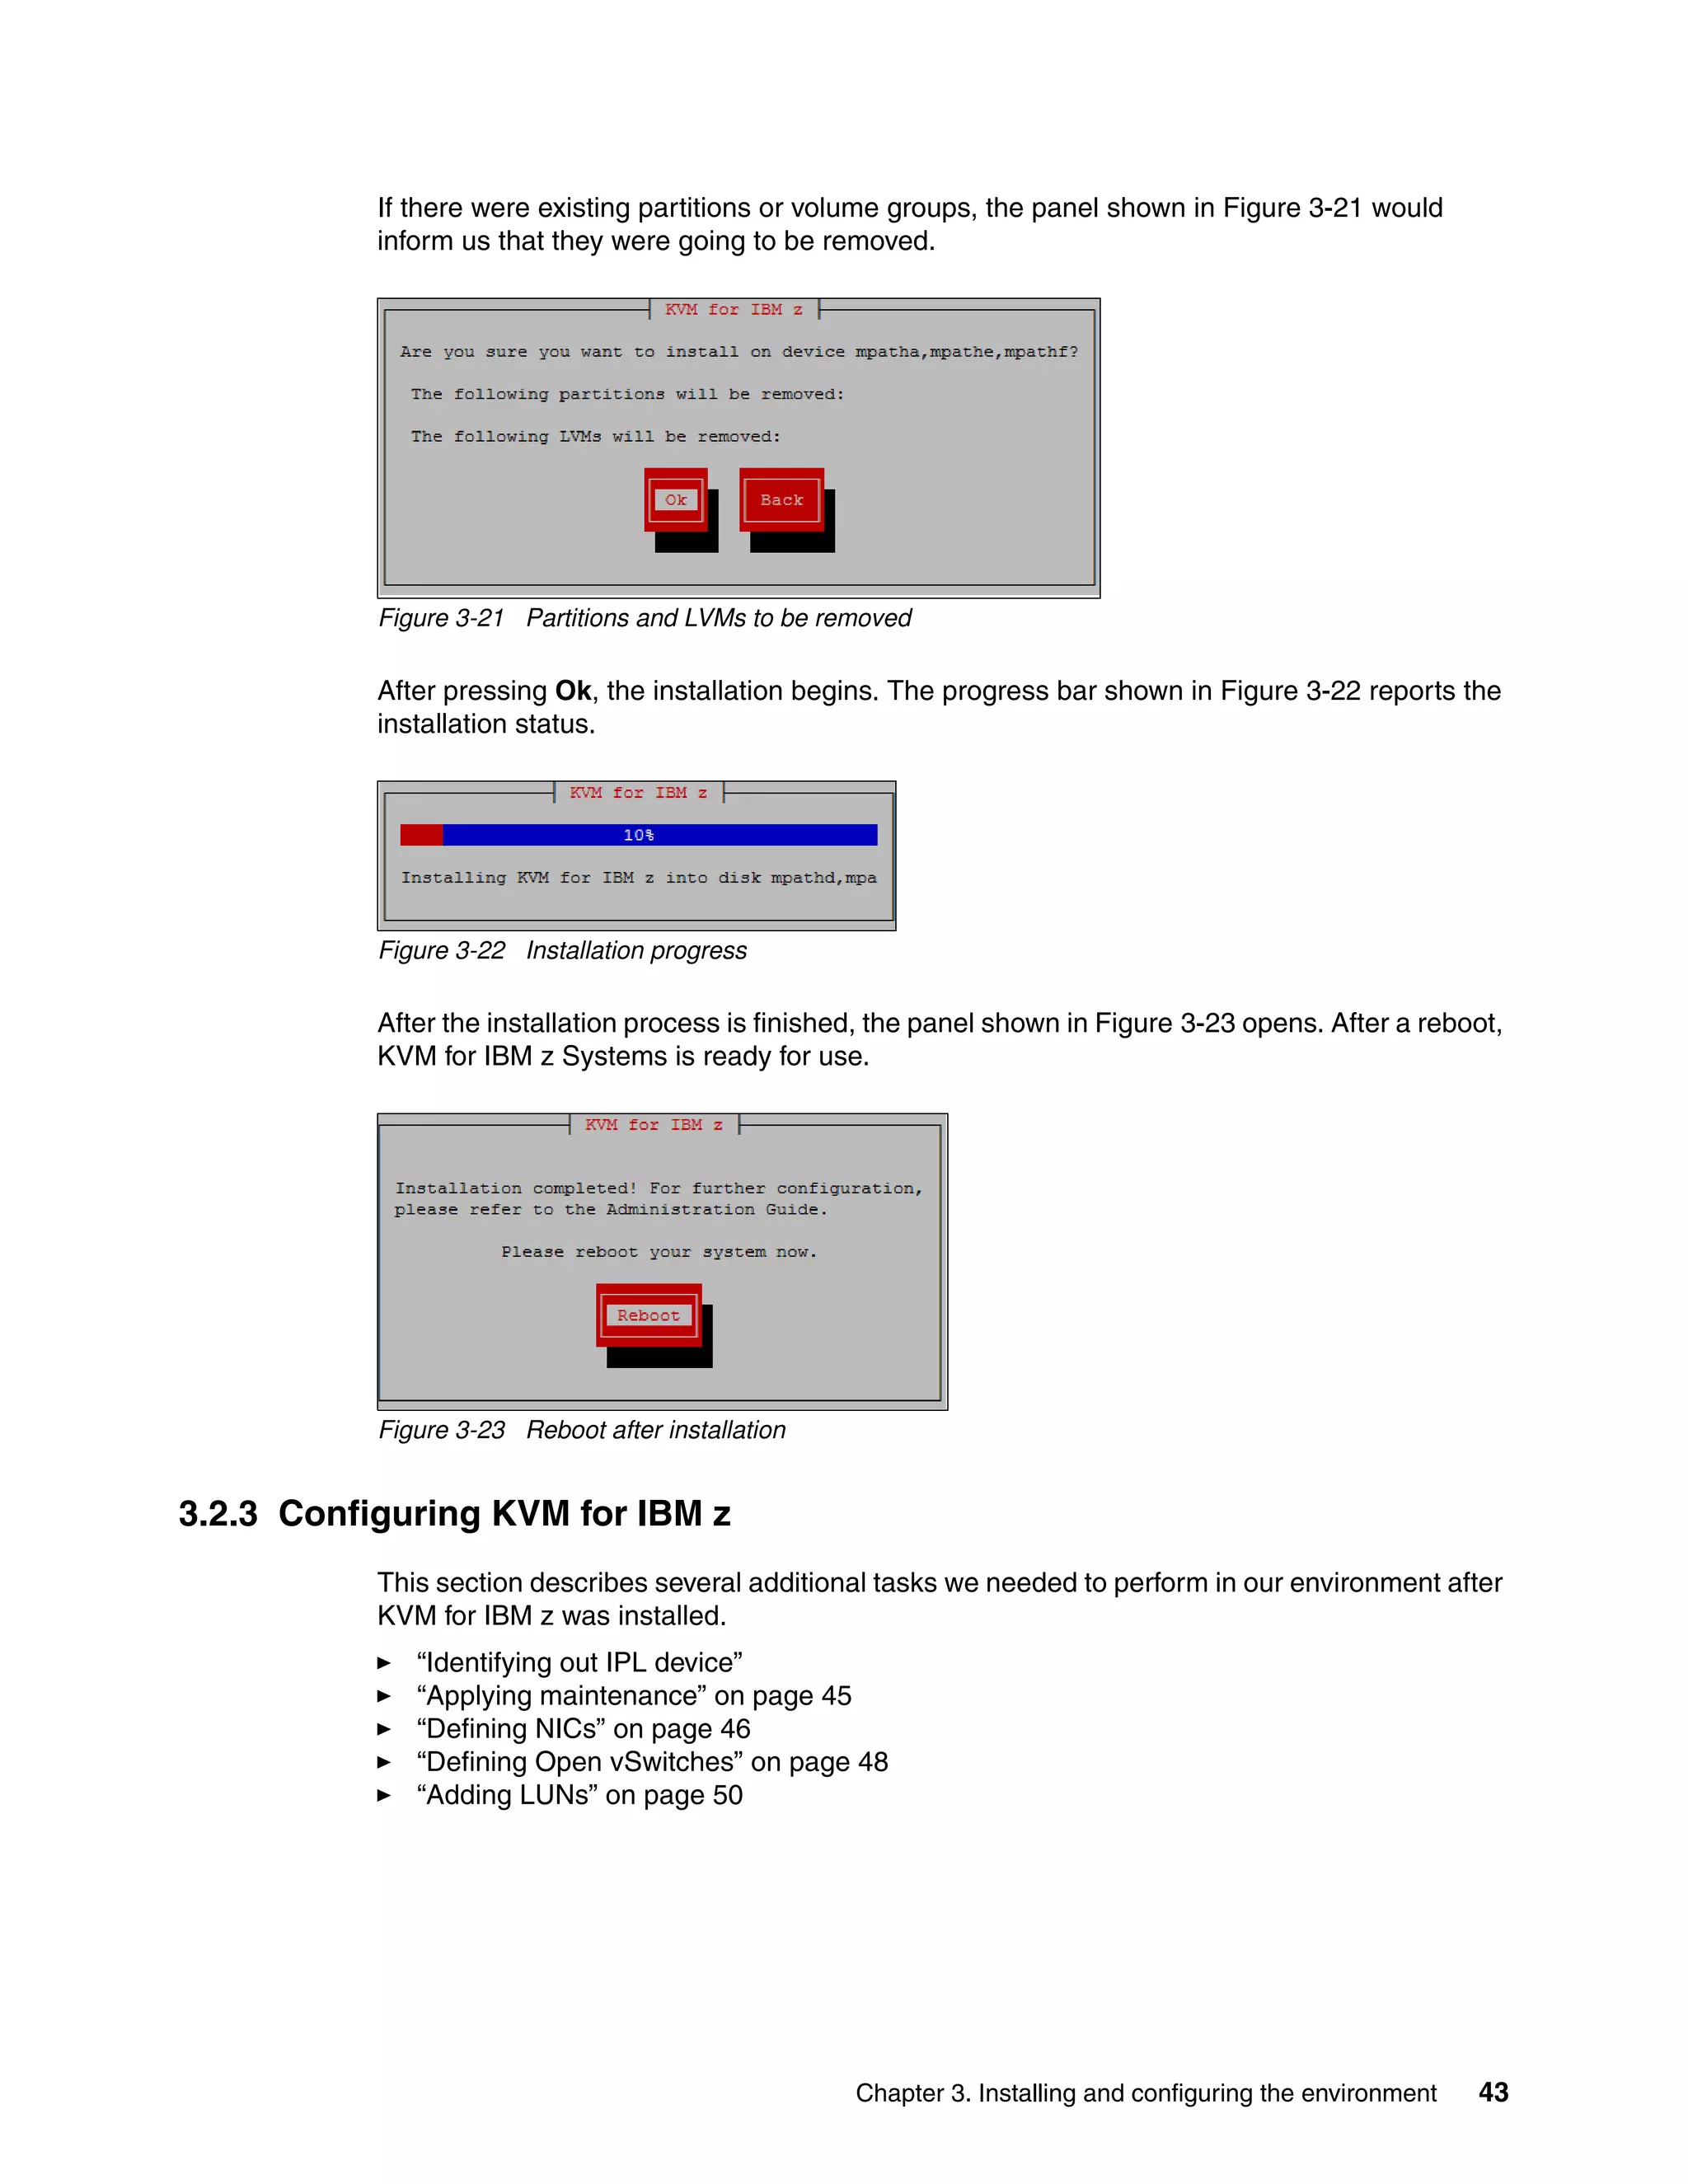
Example 3-5 shows the output confirming that only three LUNs are configured for use, as
specified in the parameter file, although 10 LUNs were discovered.
Example 3-5 lszfcp output
[root@itsokvm1 ~]# lszfcp -D
0.0.b600/0x500507680120bc24/0x0000000000000000 0:0:0:0
0.0.b600/0x500507680120bc24/0x0001000000000000 0:0:0:1
0.0.b600/0x500507680120bc24/0x0002000000000000 0:0:0:2
0.0.b600/0x500507680130bc24/0x0000000000000000 0:0:1:0
0.0.b600/0x500507680130bc24/0x0001000000000000 0:0:1:1
0.0.b600/0x500507680130bc24/0x0002000000000000 0:0:1:2
0.0.b600/0x500507680120bb91/0x0000000000000000 0:0:2:0
0.0.b600/0x500507680120bb91/0x0001000000000000 0:0:2:1
0.0.b600/0x500507680120bb91/0x0002000000000000 0:0:2:2
0.0.b600/0x500507680130bb91/0x0000000000000000 0:0:3:0
0.0.b600/0x500507680130bb91/0x0001000000000000 0:0:3:1
0.0.b600/0x500507680130bb91/0x0002000000000000 0:0:3:2
0.0.b700/0x500507680120bc24/0x0000000000000000 1:0:0:0
0.0.b700/0x500507680120bc24/0x0001000000000000 1:0:0:1
0.0.b700/0x500507680120bc24/0x0002000000000000 1:0:0:2
0.0.b700/0x500507680130bc24/0x0000000000000000 1:0:1:0
0.0.b700/0x500507680130bc24/0x0001000000000000 1:0:1:1
0.0.b700/0x500507680130bc24/0x0002000000000000 1:0:1:2
0.0.b700/0x500507680120bb91/0x0000000000000000 1:0:2:0
0.0.b700/0x500507680120bb91/0x0001000000000000 1:0:2:1
0.0.b700/0x500507680120bb91/0x0002000000000000 1:0:2:2
0.0.b700/0x500507680130bb91/0x0000000000000000 1:0:3:0
0.0.b700/0x500507680130bb91/0x0001000000000000 1:0:3:1
0.0.b700/0x500507680130bb91/0x0002000000000000 1:0:3:2
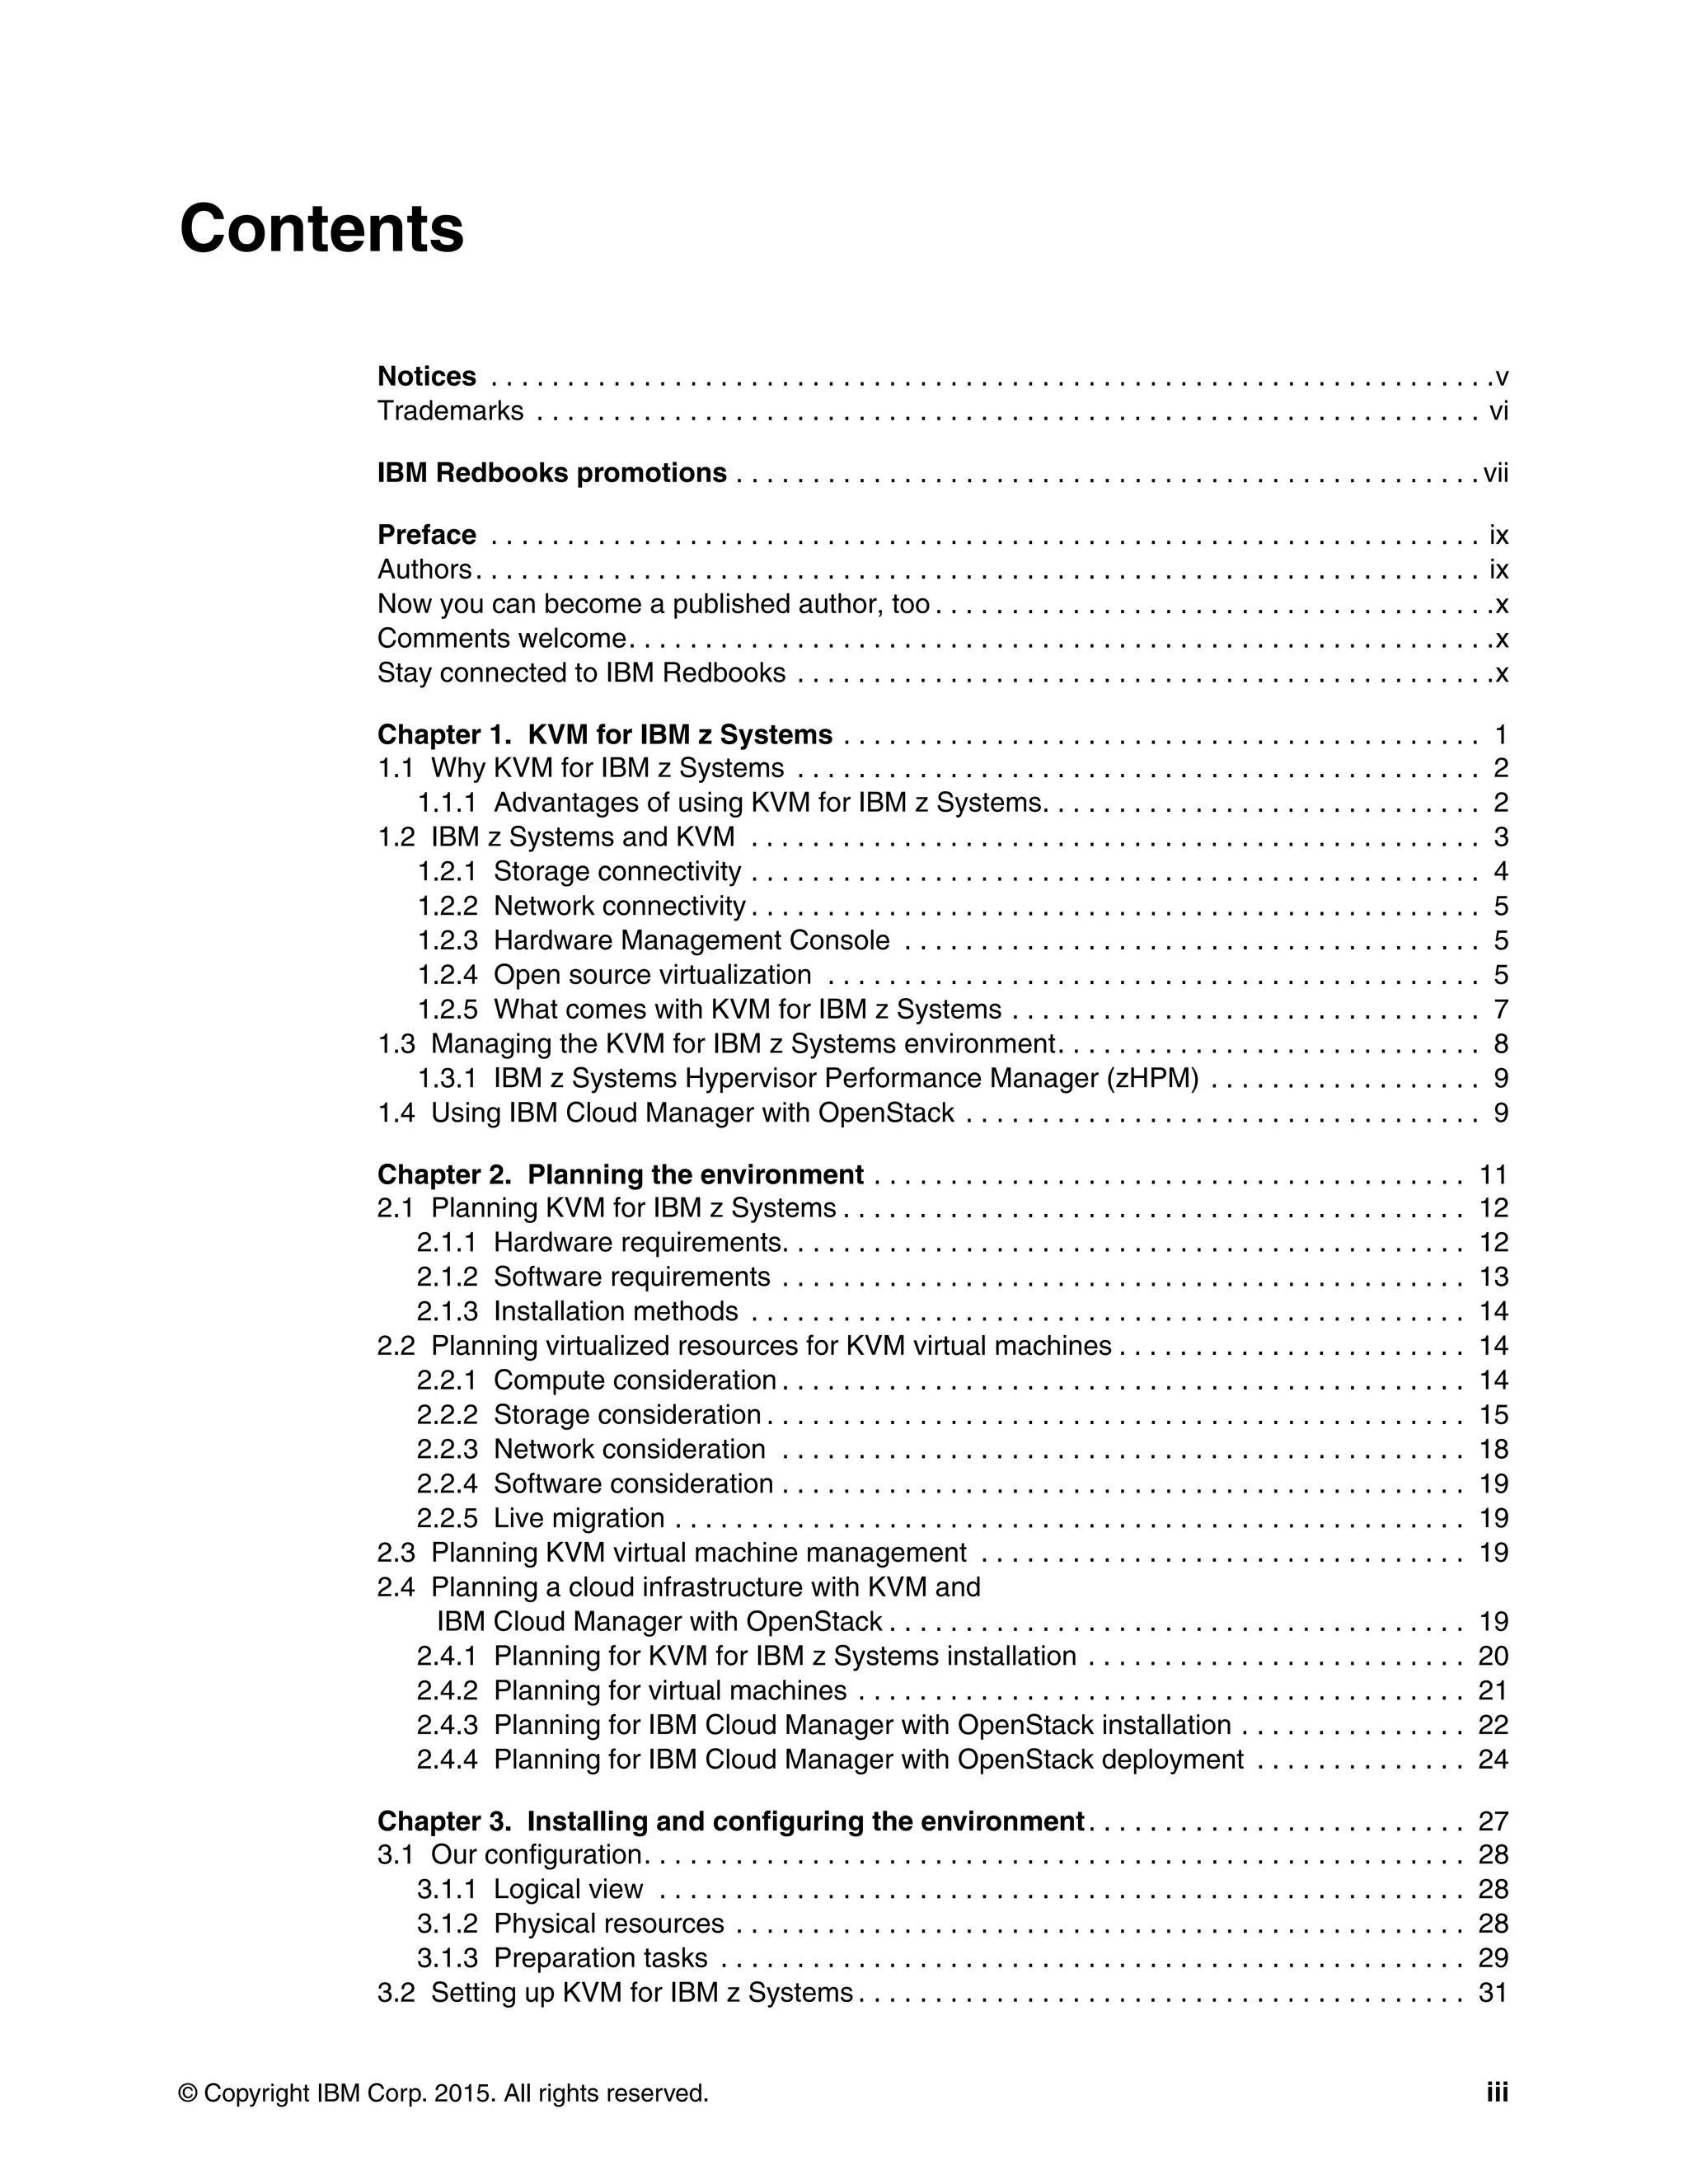
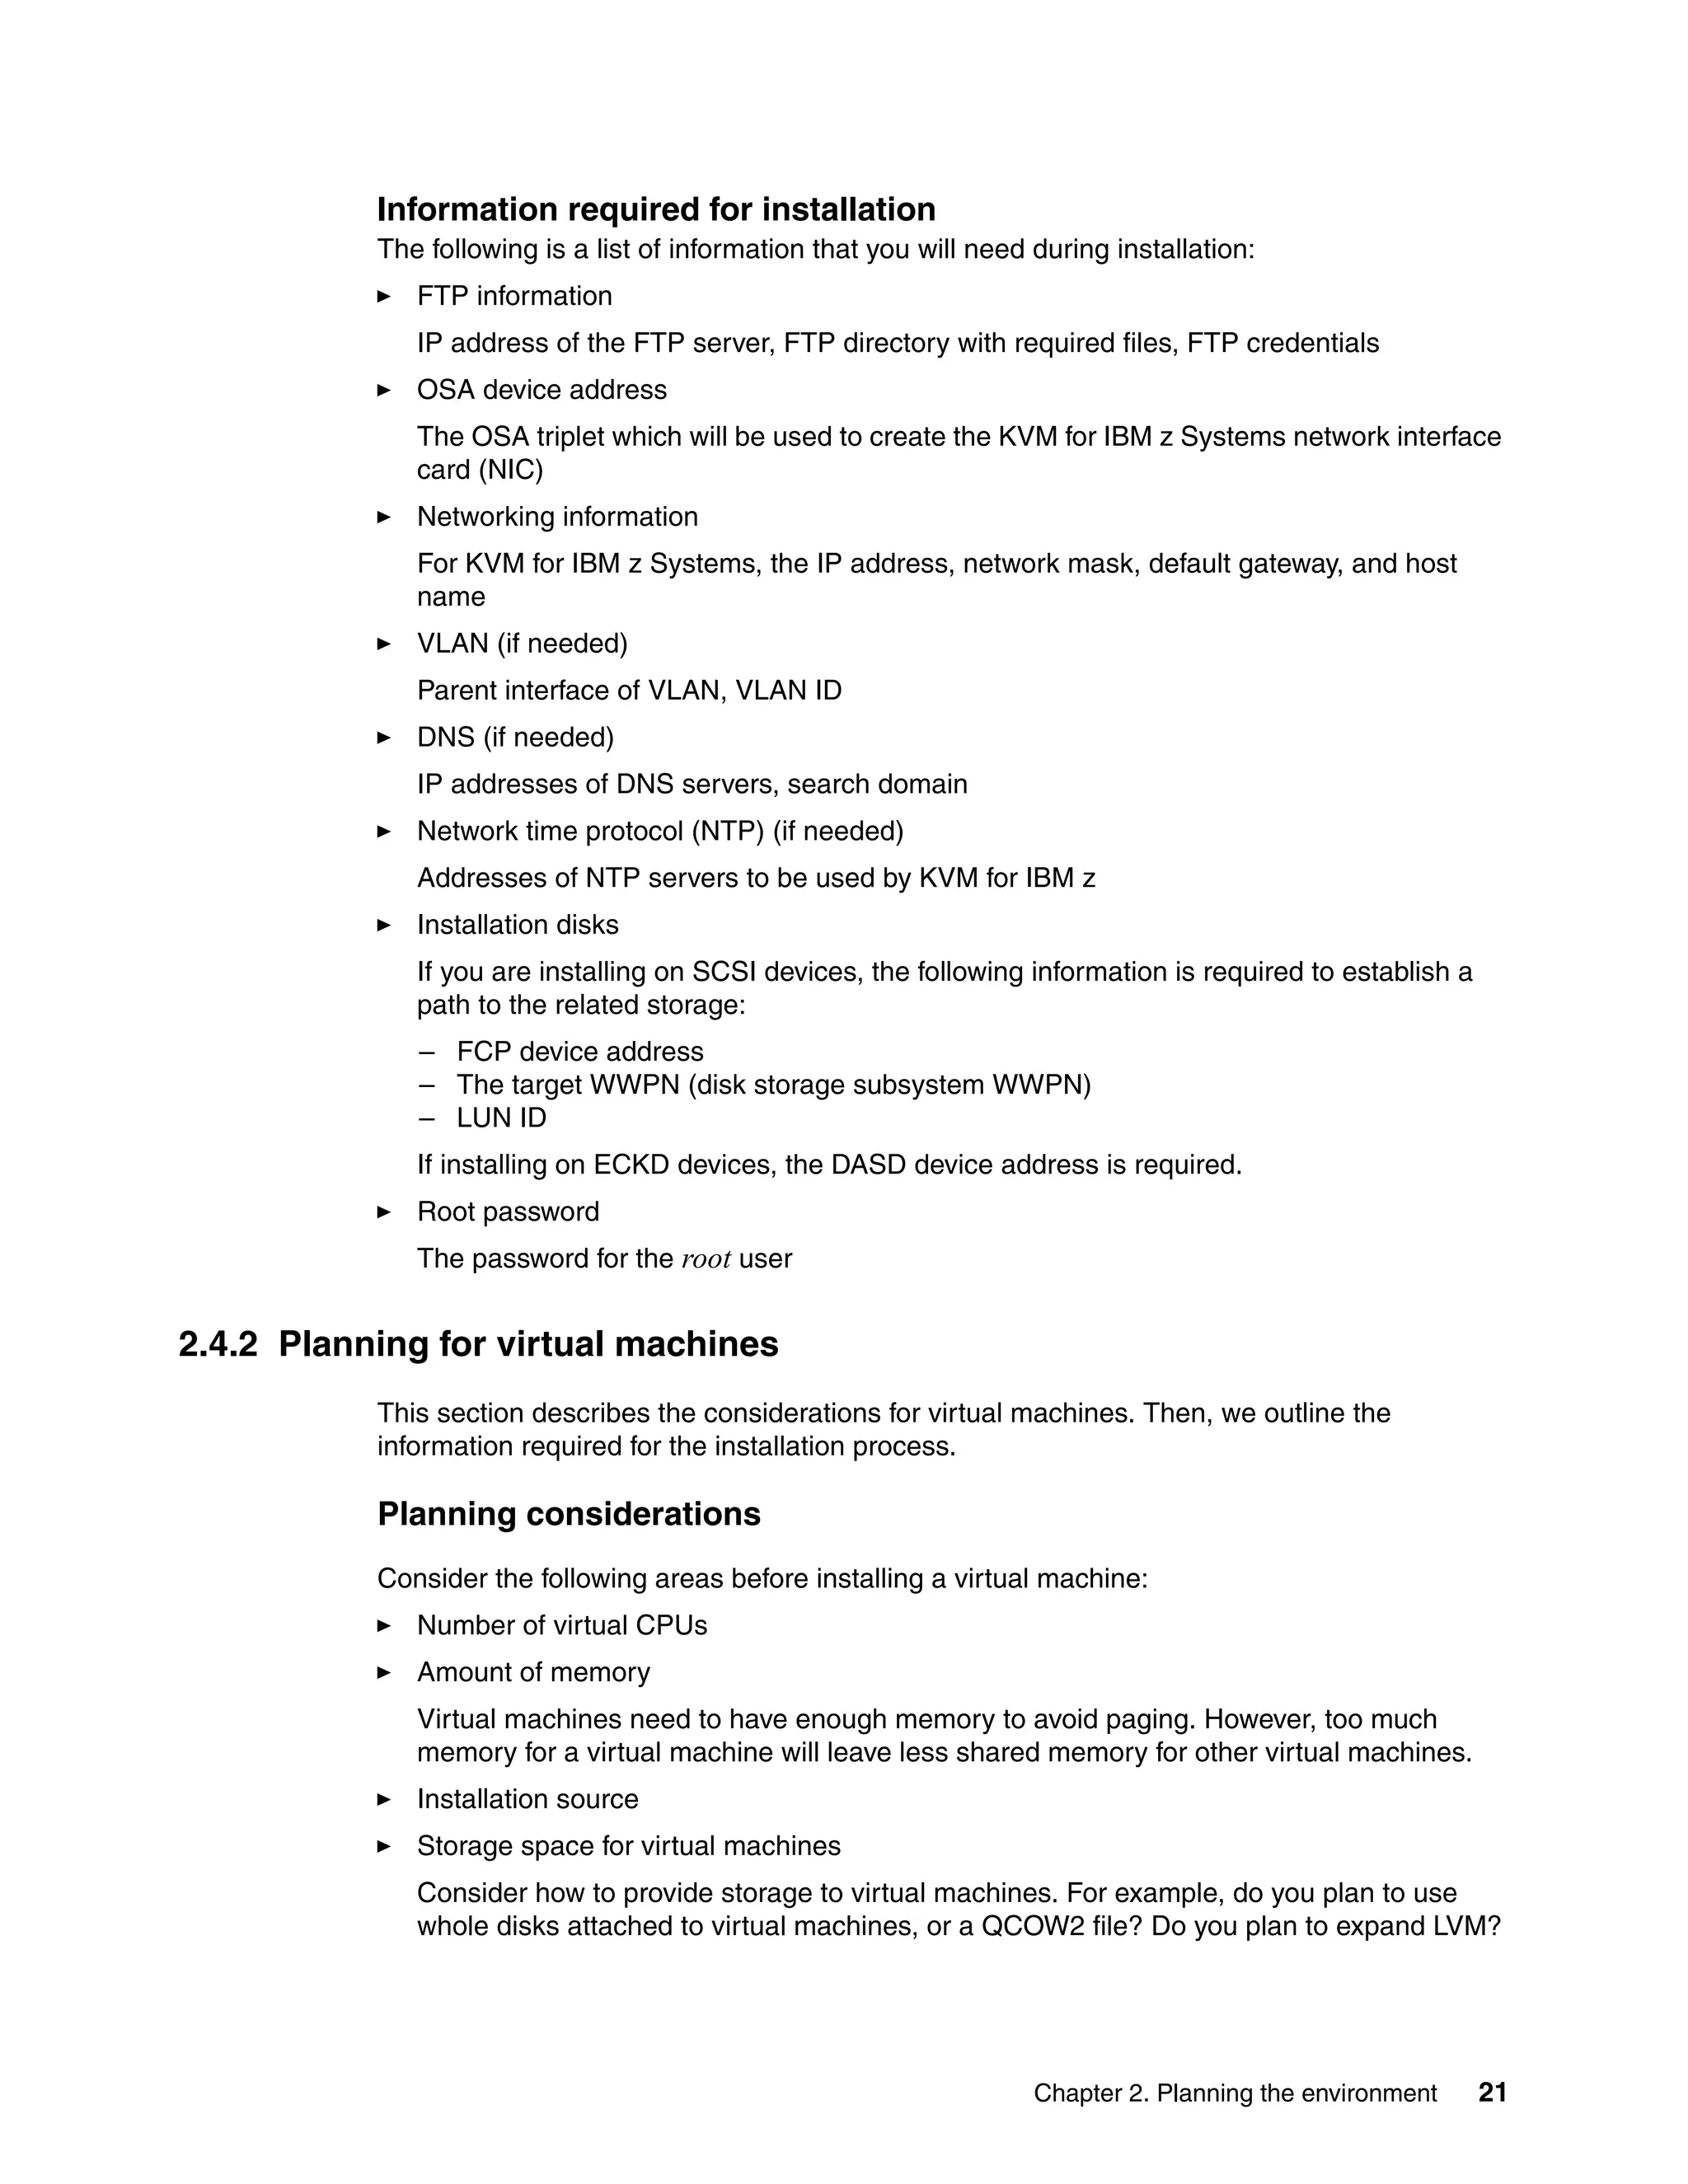
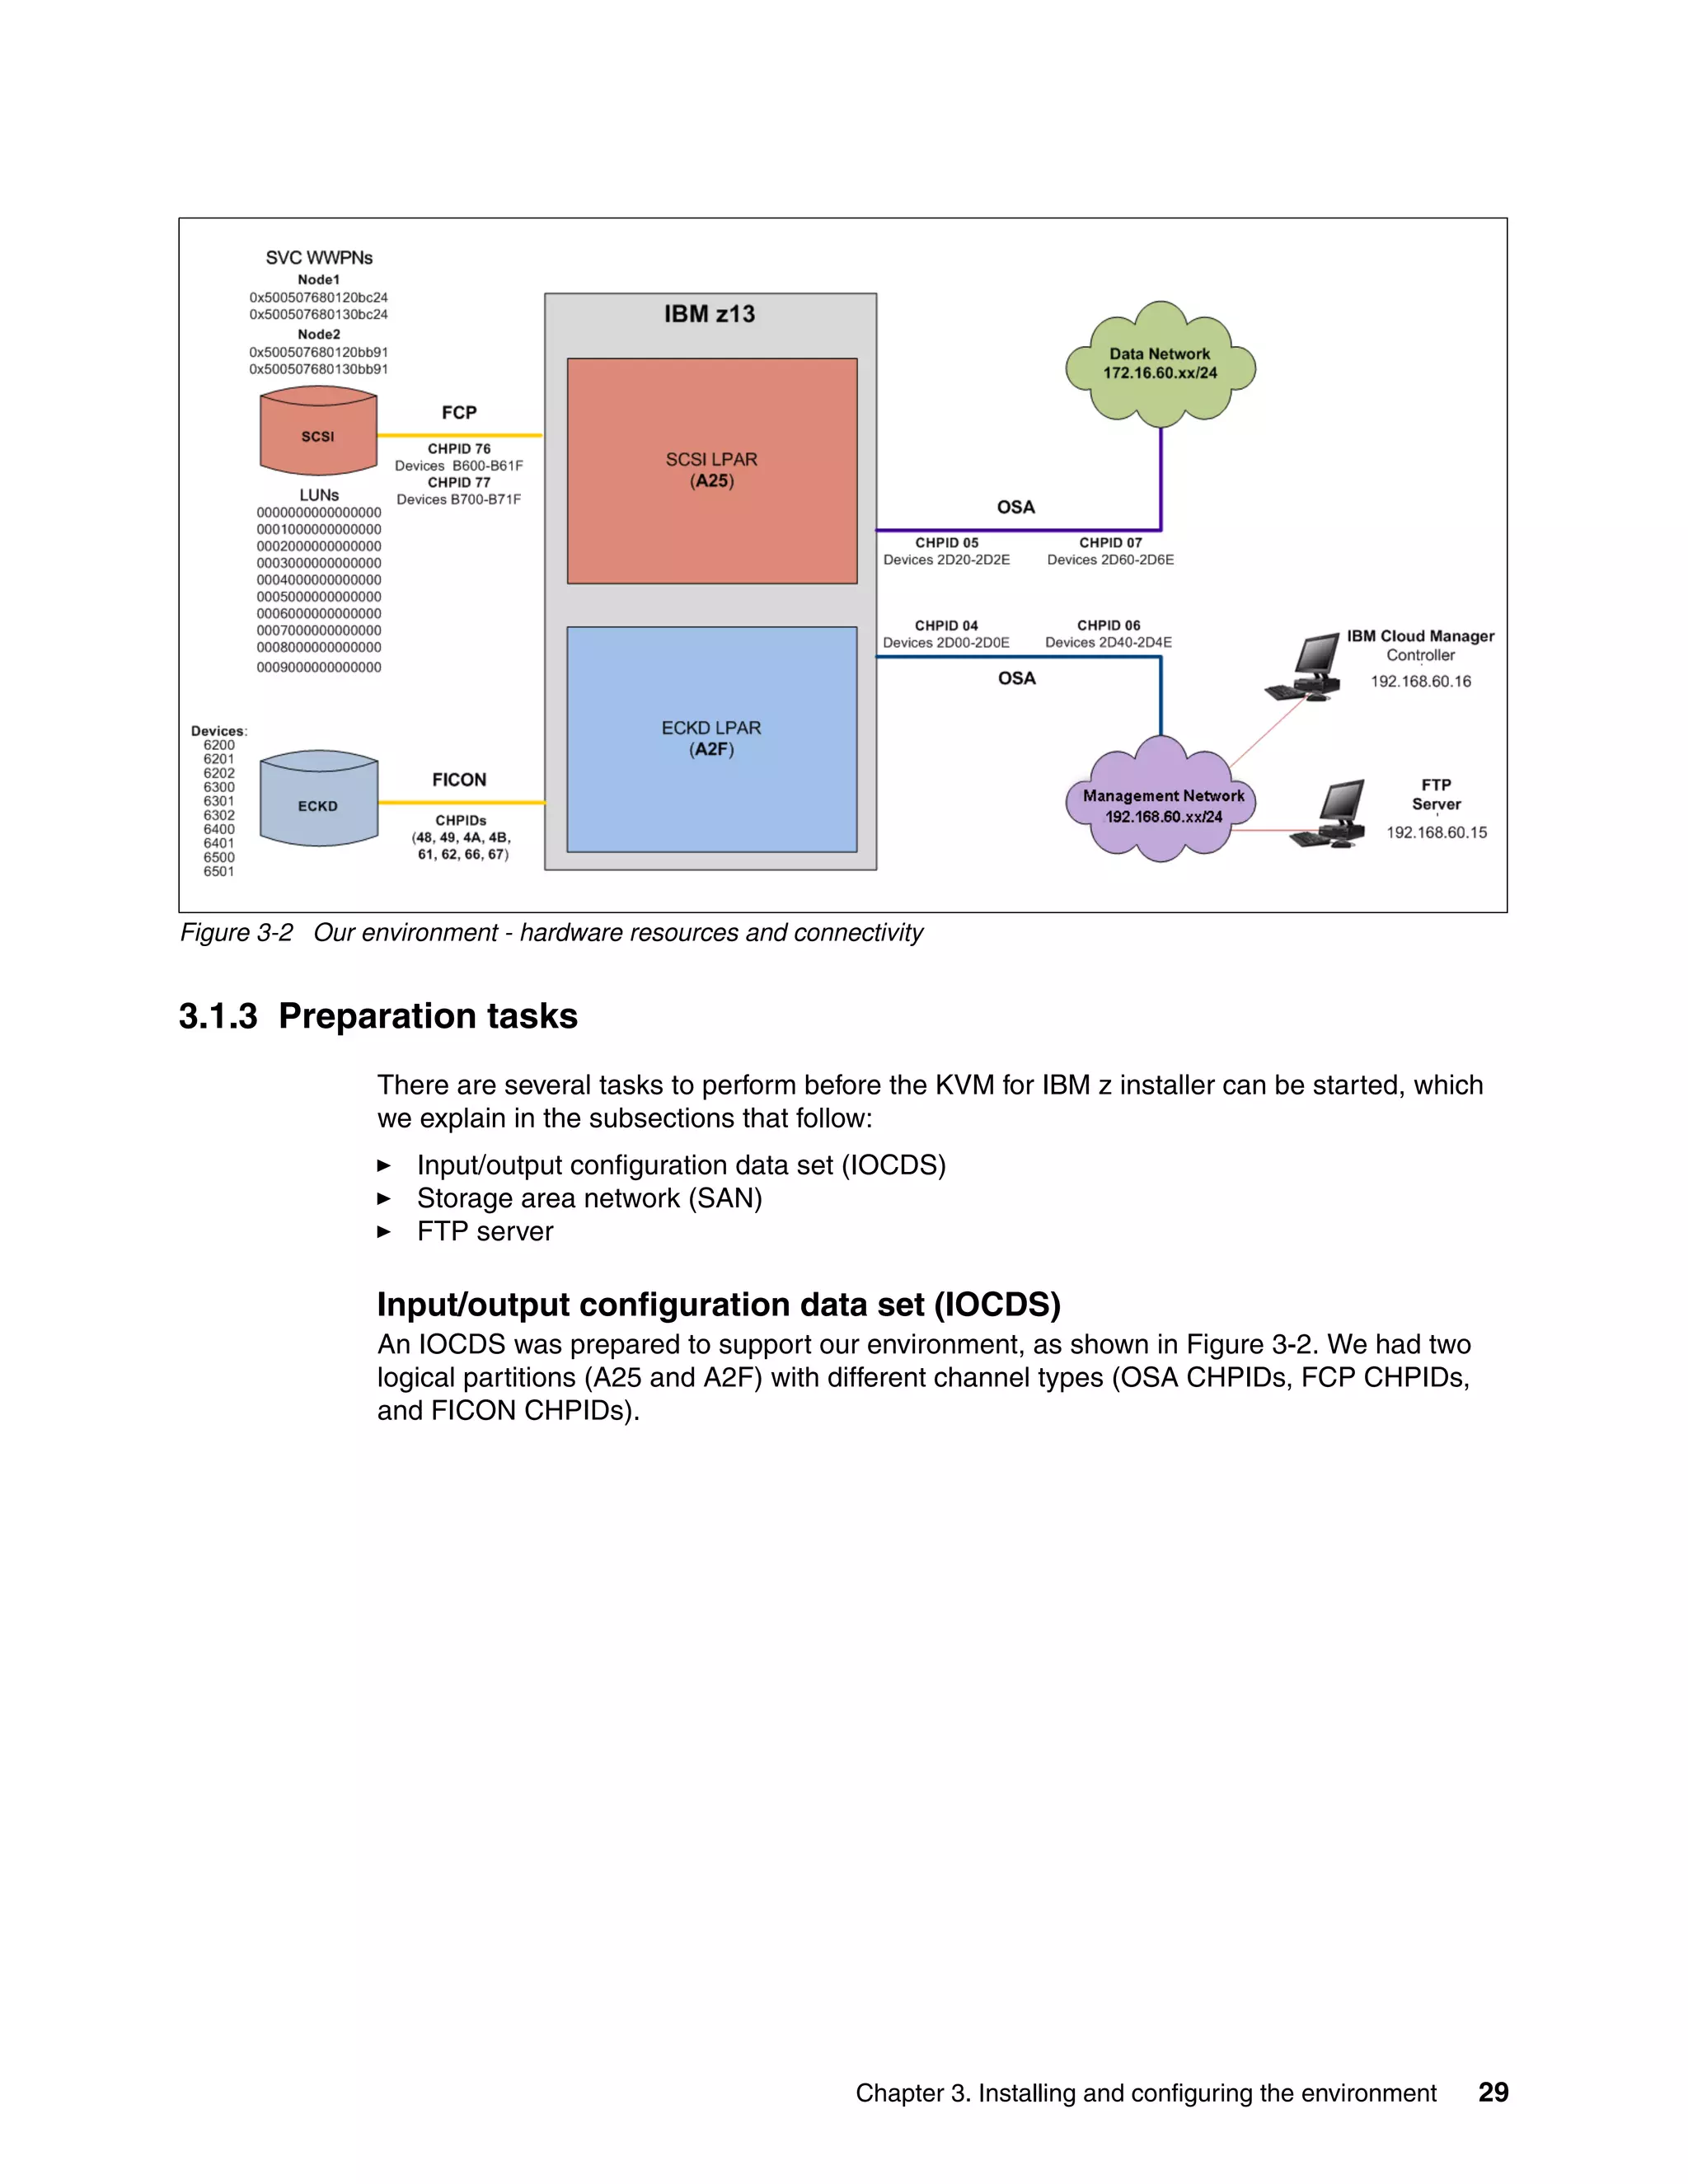
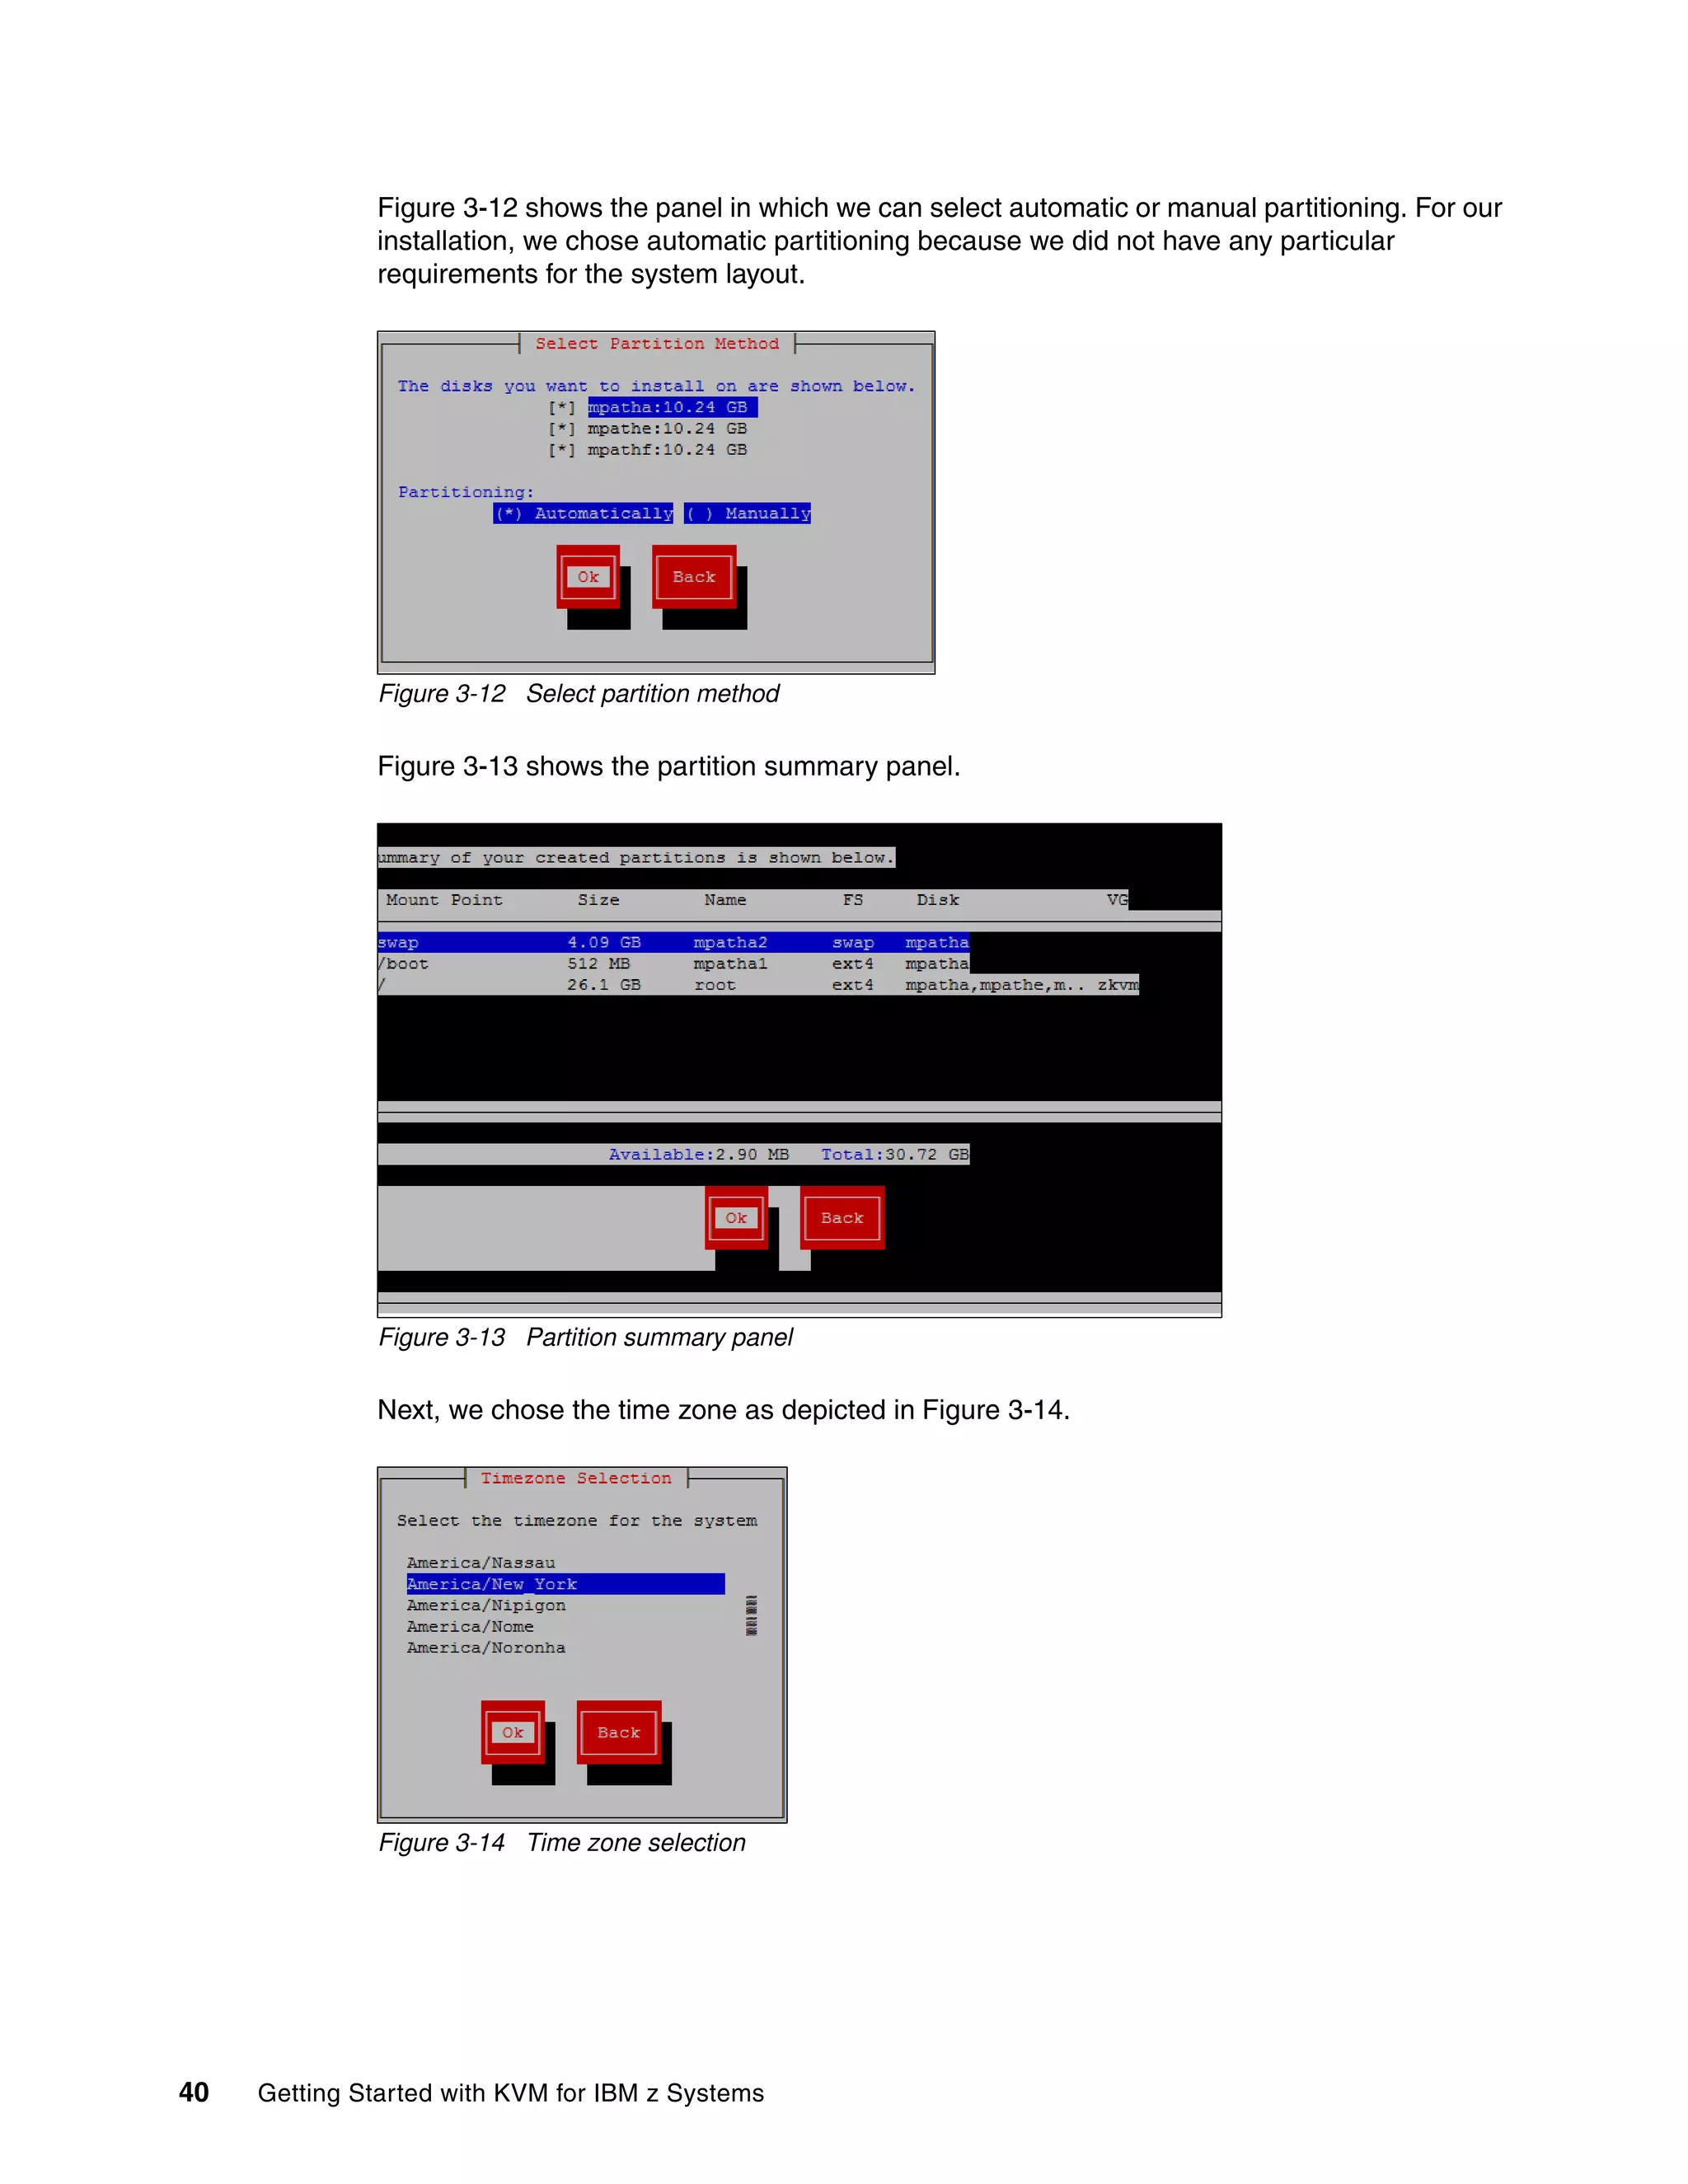
Figure 3-11 shows that we selected all three configured LUNs that KVM for IBM z will be
installed on. In this panel, we can define additional devices if needed.
Figure 3-11 Selected devices](https://image.slidesharecdn.com/813f4873-82be-45ac-ace3-3348d7081223-151209165745-lva1-app6892/75/Getting-Started-with-KVM-for-IBM-z-Systems-53-2048.jpg)
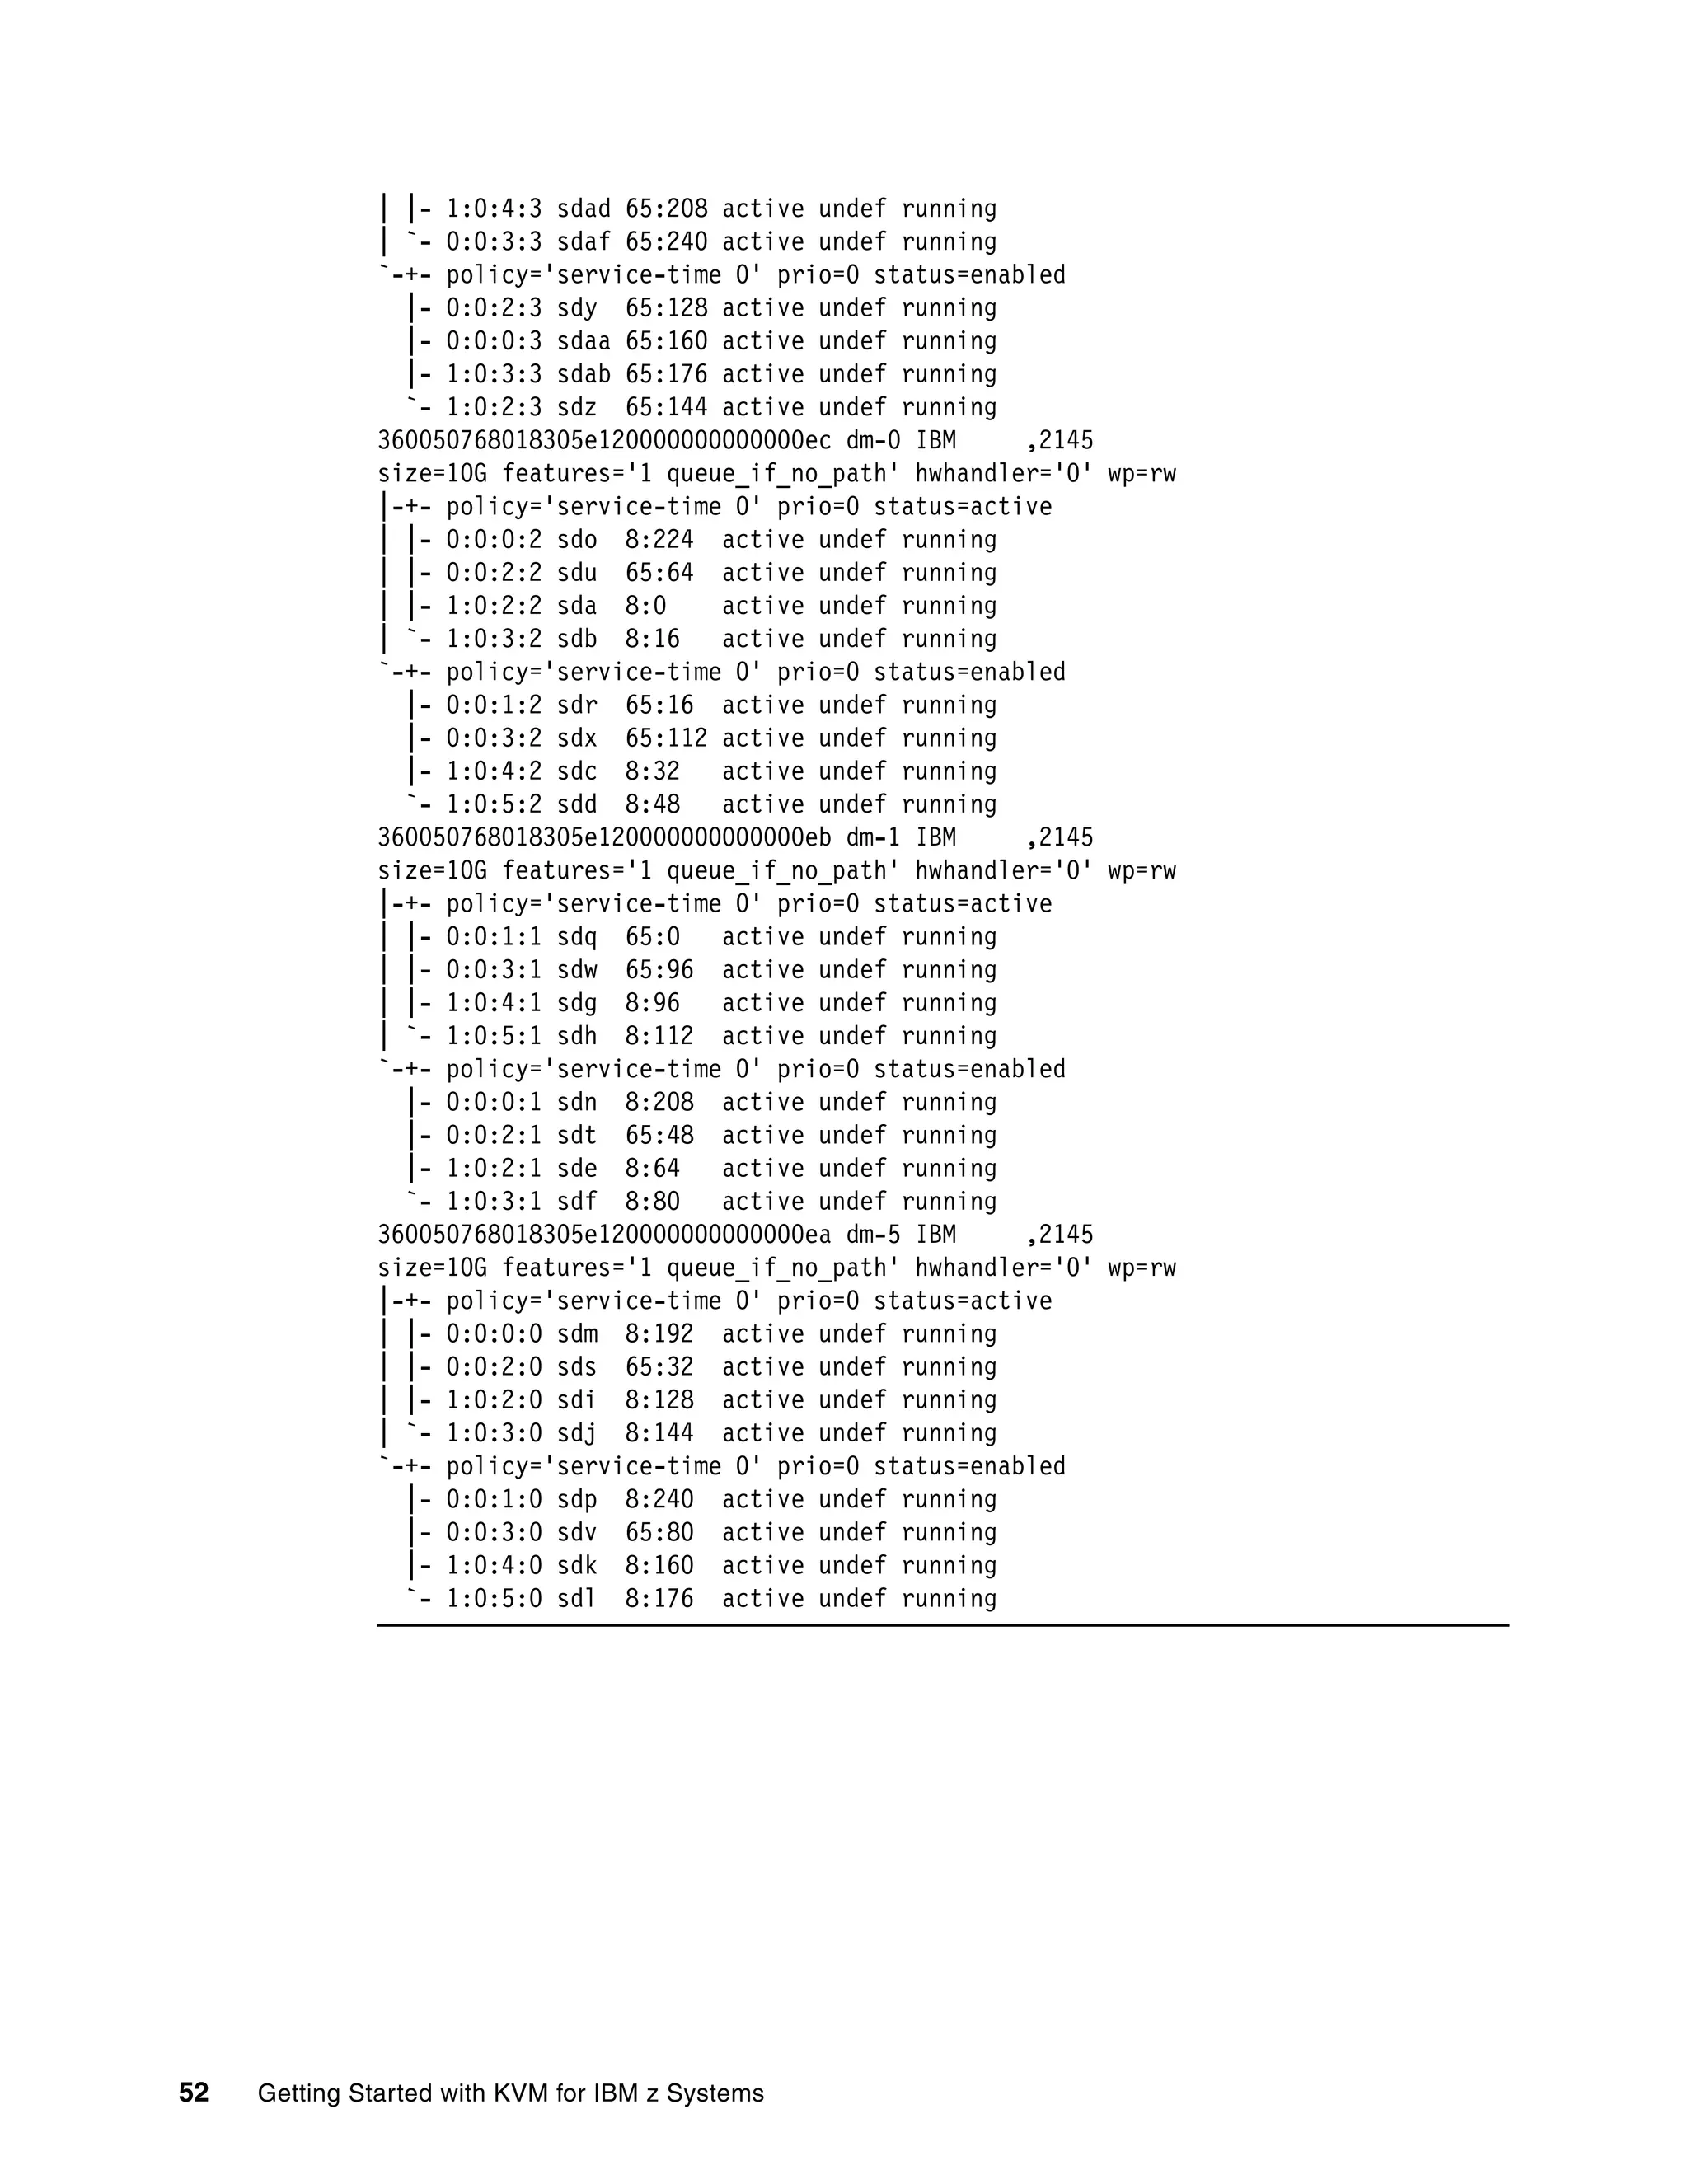
![44 Getting Started with KVM for IBM z Systems
Identifying out IPL device
During the installation we used automatic partitioning, and we had no control over which LUN
was to be used as the initial program load (IPL) device. Example 3-6 shows that the /boot
mount point resides on device 360050768018305e120000000000000ec.
Example 3-6 Find /boot device
[root@itsokvm1 ~]# mount |grep boot
/dev/mapper/360050768018305e120000000000000ec1 on /boot type ext4
(rw,relatime,seclabel,data=ordered)
Example 3-7 shows the output from the multipath command. It shows that device
360050768018305e120000000000000ec maps to LUN 2.
Example 3-7 multipath output
[root@itsokvm1 ~]# multipath -l
360050768018305e120000000000000ec dm-0 IBM ,2145
size=10G features='1 queue_if_no_path' hwhandler='0' wp=rw
|-+- policy='service-time 0' prio=0 status=active
| |- 0:0:0:2 sdd 8:48 active undef running
| |- 0:0:1:2 sda 8:0 active undef running
| |- 1:0:0:2 sdf 8:80 active undef running
| `- 1:0:1:2 sdh 8:112 active undef running
`-+- policy='service-time 0' prio=0 status=enabled
|- 0:0:2:2 sdb 8:16 active undef running
|- 0:0:3:2 sdc 8:32 active undef running
|- 1:0:2:2 sdi 8:128 active undef running
`- 1:0:3:2 sdj 8:144 active undef running
360050768018305e120000000000000eb dm-6 IBM ,2145
size=10G features='1 queue_if_no_path' hwhandler='0' wp=rw
|-+- policy='service-time 0' prio=0 status=active
| |- 0:0:2:1 sdr 65:16 active undef running
| |- 0:0:3:1 sdt 65:48 active undef running
| |- 1:0:2:1 sdv 65:80 active undef running
| `- 1:0:3:1 sdx 65:112 active undef running
`-+- policy='service-time 0' prio=0 status=enabled
|- 0:0:0:1 sdw 65:96 active undef running
|- 0:0:1:1 sdq 65:0 active undef running
|- 1:0:0:1 sds 65:32 active undef running
`- 1:0:1:1 sdu 65:64 active undef running
360050768018305e120000000000000ea dm-1 IBM ,2145
size=10G features='1 queue_if_no_path' hwhandler='0' wp=rw
|-+- policy='service-time 0' prio=0 status=active
| |- 0:0:0:0 sdn 8:208 active undef running
| |- 0:0:1:0 sde 8:64 active undef running
| |- 1:0:0:0 sdk 8:160 active undef running
| `- 1:0:1:0 sdm 8:192 active undef running
`-+- policy='service-time 0' prio=0 status=enabled
|- 0:0:2:0 sdg 8:96 active undef running
|- 0:0:3:0 sdl 8:176 active undef running
|- 1:0:2:0 sdp 8:240 active undef running
`- 1:0:3:0 sdo 8:224 active undef running](https://image.slidesharecdn.com/813f4873-82be-45ac-ace3-3348d7081223-151209165745-lva1-app6892/75/Getting-Started-with-KVM-for-IBM-z-Systems-58-2048.jpg)
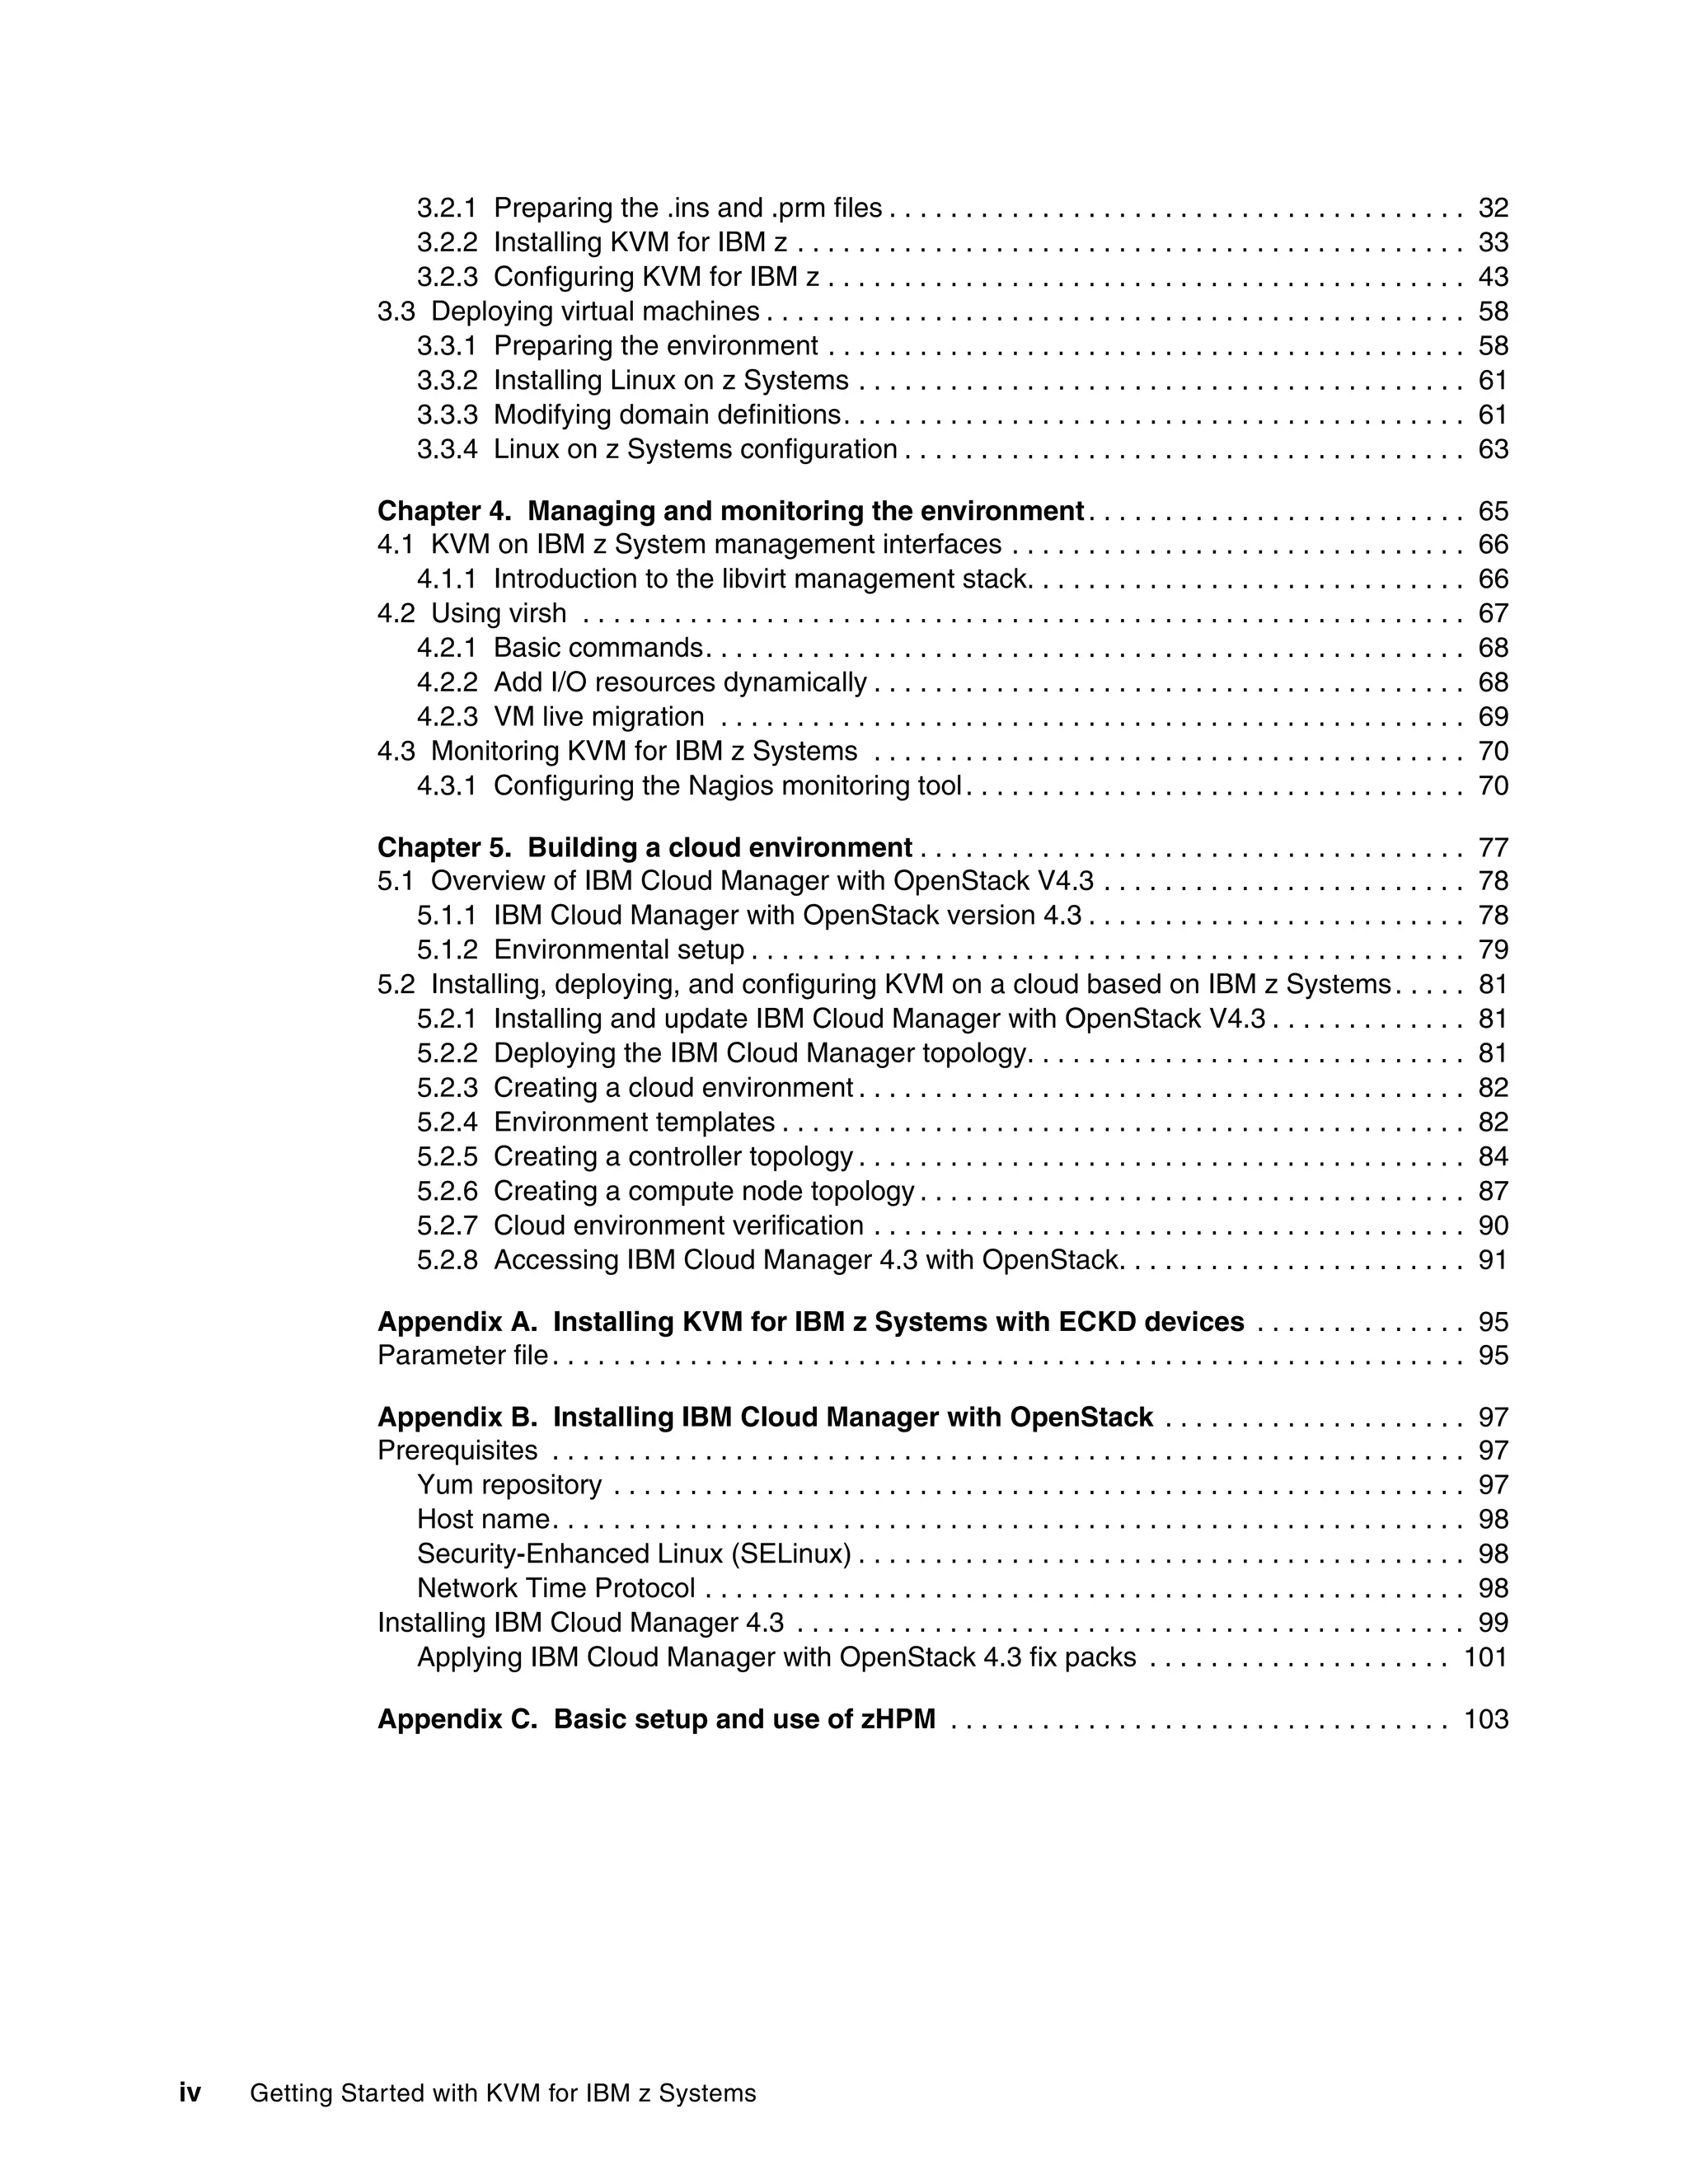
![Chapter 3. Installing and configuring the environment 45
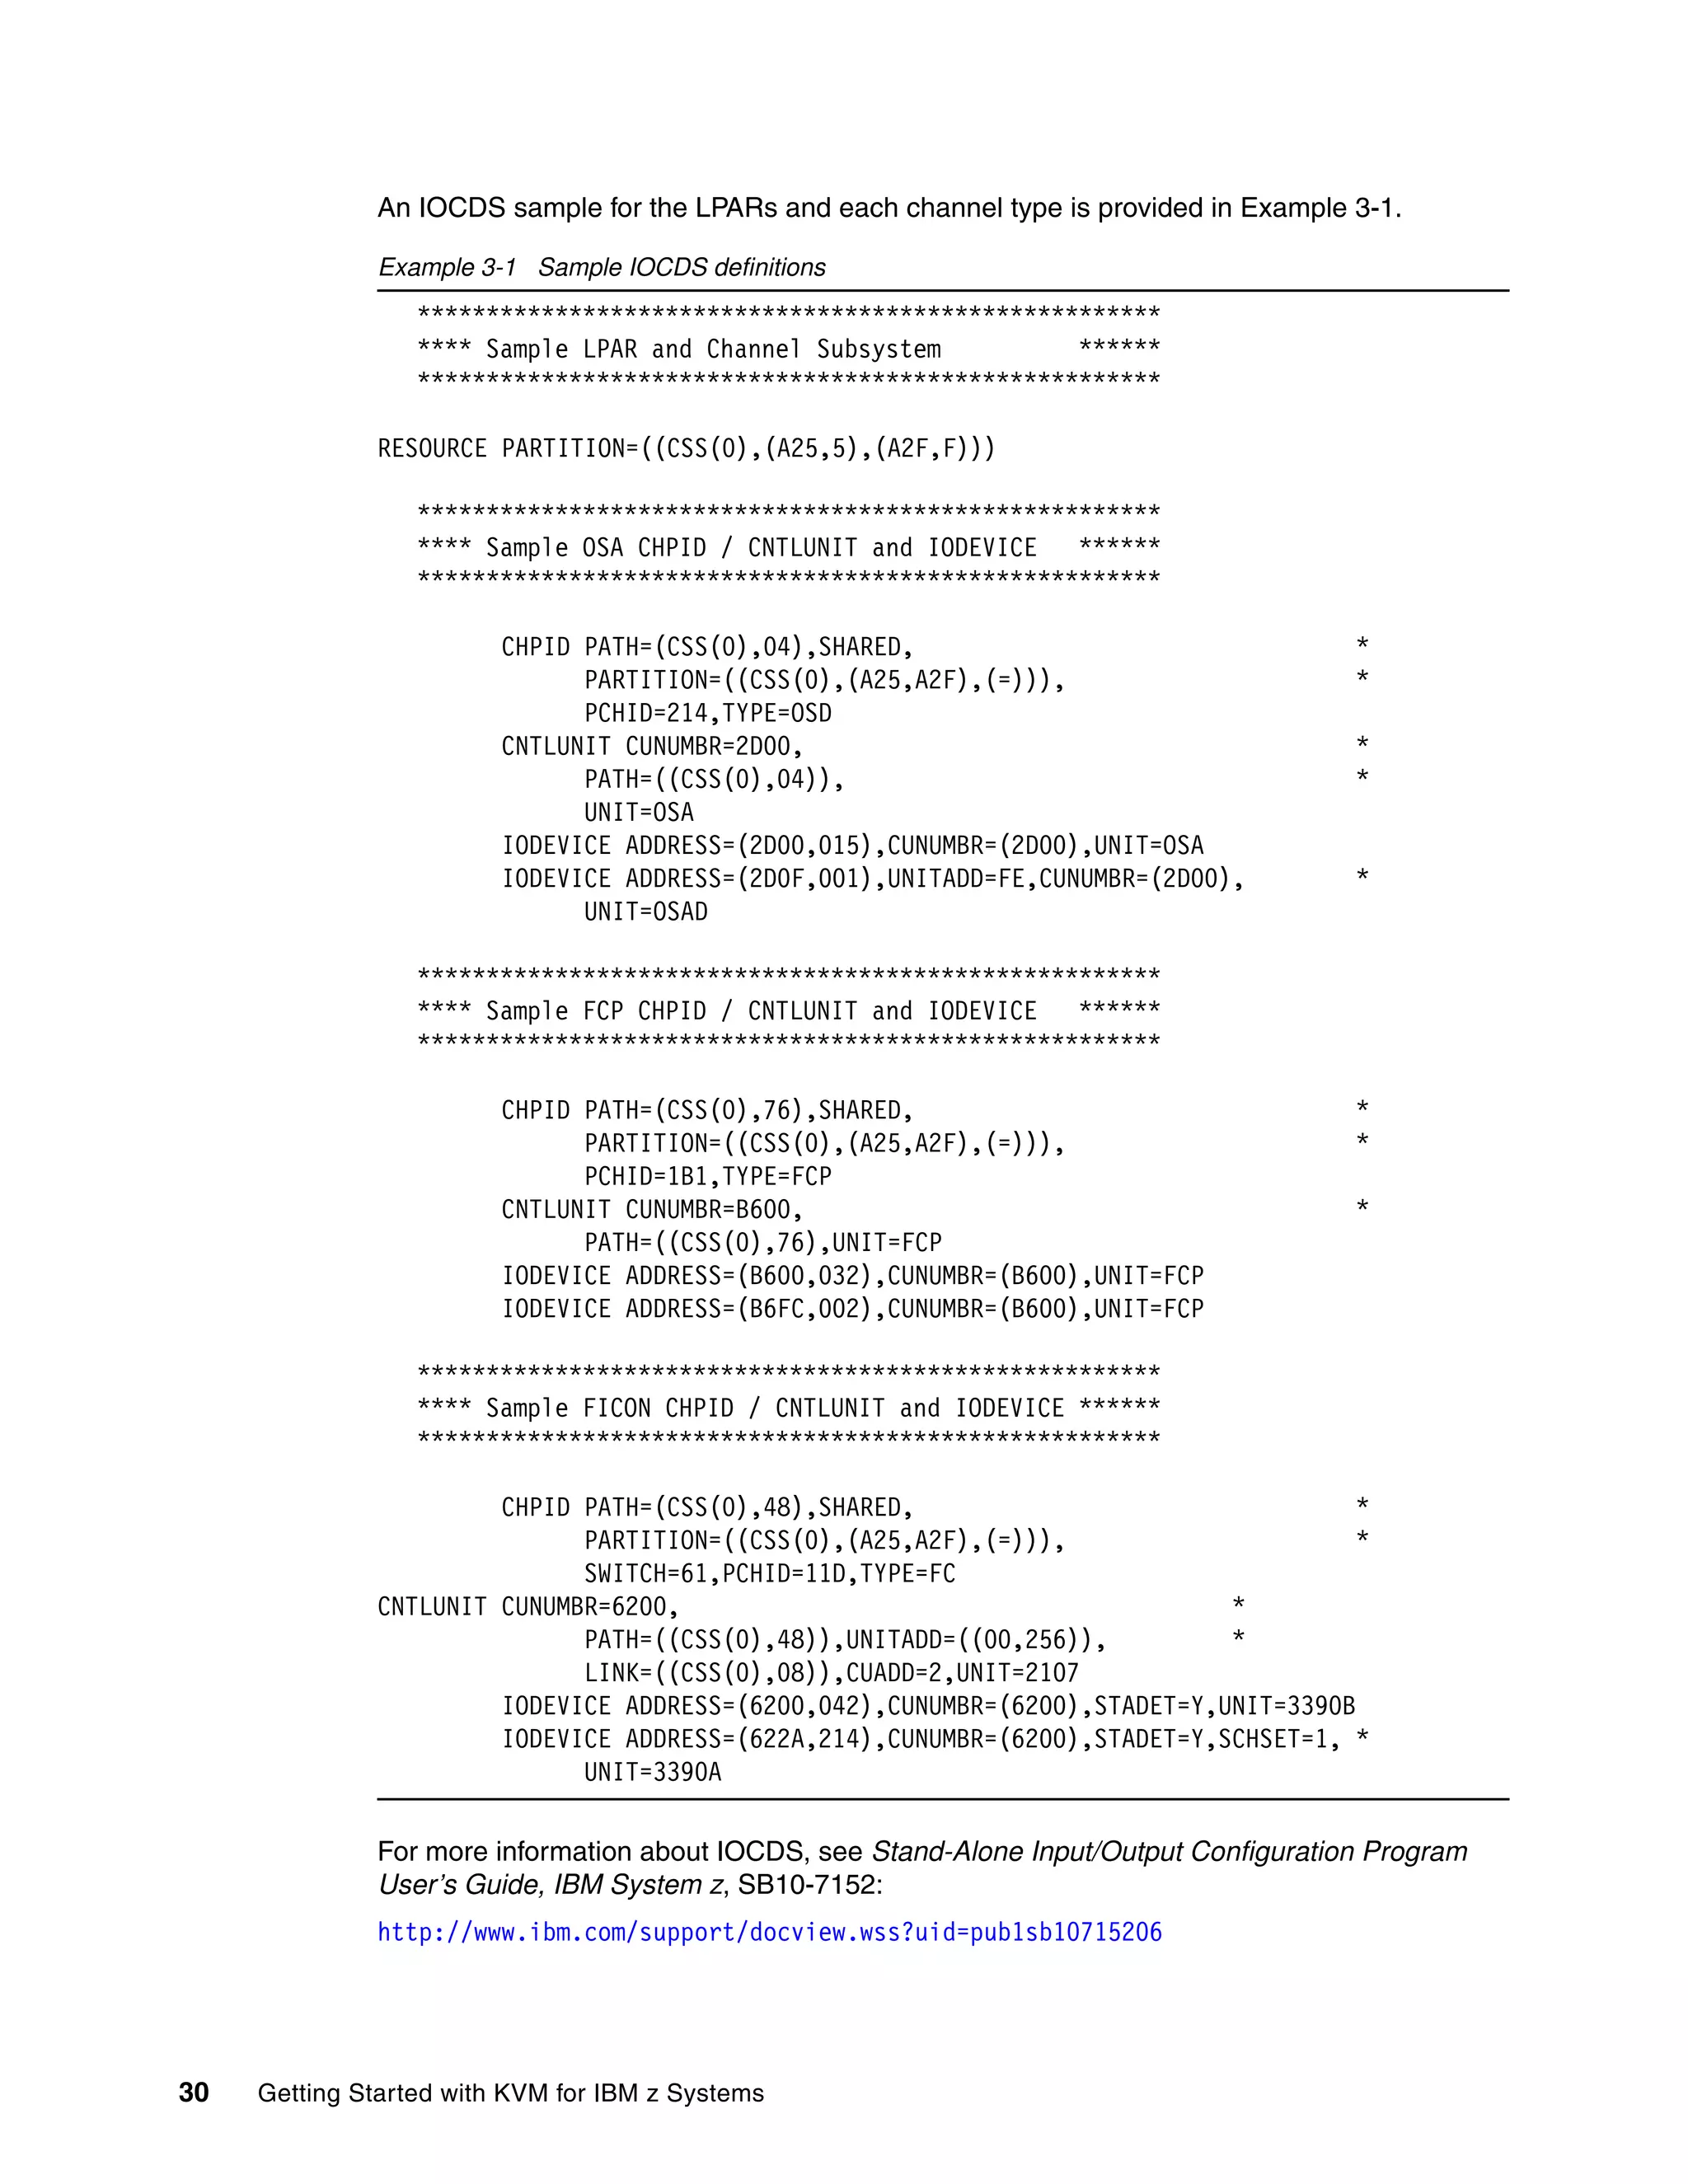
Figure 3-24 shows how to IPL KVM for IBM z from the correct LUN when needed.
Figure 3-24 Load window
Applying maintenance
At the time of writing, Fix Pack 1 (FP1) was available from
http://www.ibm.com/support/fixcentral/
After downloading the code, we followed the steps provided in the README file, which
accompanied FP1. Example 3-8 shows the commands that we executed, as instructed.
Example 3-8 Applying fixes
[root@itsokvm1 ~]# ll
total 152360
-rw-r--r--. 1 root root 156010496 Sep 22 11:11 KVMIBM-1.1.0.1-20150911-s390x.iso
-rw-r--r--. 1 root root 3260 Sep 22 11:11 README
[root@itsokvm1 ~]# mkdir -p /mnt/FIXPACK
[root@itsokvm1 ~]# mount -o ro,loop KVMIBM-1.1.0.1-20150911-s390x.iso /mnt/FIXPAC
CK/
[root@itsokvm1 ~]# ls -l /mnt/FIXPACK/
total 41
dr-xr-xr-x. 2 1055 1055 2048 Sep 10 18:00 apar_db
-r-xr-xr-x. 1 1055 1055 33836 Sep 10 18:00 ibm_apar.sh
-r--r--r--. 1 1055 1055 3266 Sep 10 18:00 README
dr-xr-xr-x. 4 1055 1055 2048 Sep 10 18:00 Updates
[root@itsokvm1 ~]# cd /mnt/FIXPACK
[root@itsokvm1 FIXPACK]# ./ibm_apar.sh -y /mnt/FIXPACK/Updates/
Generating local repository to /mnt/FIXPACK/Updates/ ..
fixpack.repo :
[FIXPACK]
name=IBM FixPack ISO
baseurl=file:///mnt/FIXPACK/Updates/
gpgcheck=1
enabled=1
gpgkey=file:///etc/pki/rpm-gpg/RPM-GPG-KEY-KVM-FOR-IBM](https://image.slidesharecdn.com/813f4873-82be-45ac-ace3-3348d7081223-151209165745-lva1-app6892/75/Getting-Started-with-KVM-for-IBM-z-Systems-59-2048.jpg)
![46 Getting Started with KVM for IBM z Systems
Copy fixpack.repo to /etc/yum.repos.d/ ? [y/N]y
/tmp//fixpack.repo -> /etc/yum.repos.d/fixpack.repo
Installation of REPO FIXPACK successful
[root@itsokvm1 FIXPACK]# ./ibm_apar.sh -a
Fetching packages from yum...
Creating APAR dependency list...
Analysing the available APAR against installed rpms
APAR | Status | Subject
-------------------------------------------------------------
ZZ00466 | NONE | FP1 fix collection (128088)
[root@itsokvm1 FIXPACK]# ./ibm_apar.sh -i latest
Found latest available APAR: ZZ00466
...
Do you want to continue with installation [y/N]y
Clean expirable cache files..
...
Total download size: 147 M
Is this ok [y/d/N]: y
Downloading packages:
...
Complete!
Processing done.
[root@itsokvm1 FIXPACK]# ./ibm_apar.sh -a
Fetching packages from yum...
Creating APAR dependency list...
Analysing the available APAR against installed rpms
APAR | Status | Subject
-------------------------------------------------------------
ZZ00466 | APPLIED | FP1 fix collection (128088)
[root@itsokvm1 FIXPACK]# reboot
Defining NICs
As described in 3.1, “Our configuration” on page 28, our environment needed more than one
NIC to support two different LANs for virtual servers, each LAN connected through a bonding
interface. Our image contains only one NIC, as shown in Example 3-9. It is a NIC that
provides access to KVM for IBM z.
Example 3-9 Checking configured NICs
[root@itsokvm1 ~]# znetconf -c
Device IDs Type Card Type CHPID Drv. Name
State
--------------------------------------------------------------------------------
0.0.2d00,0.0.2d01,0.0.2d02 1731/01 OSD_1000 04 qeth enccw0.0.2d00
online](https://image.slidesharecdn.com/813f4873-82be-45ac-ace3-3348d7081223-151209165745-lva1-app6892/75/Getting-Started-with-KVM-for-IBM-z-Systems-60-2048.jpg)
![Chapter 3. Installing and configuring the environment 47
Example 3-10 shows a list of unconfigured NICs available to our environment.
Example 3-10 Checking available NICs
[root@itsokvm1 ~]# znetconf -u
Scanning for network devices...
Device IDs Type Card Type CHPID Drv.
------------------------------------------------------------
0.0.2d03,0.0.2d04,0.0.2d05 1731/01 OSA (QDIO) 04 qeth
0.0.2d06,0.0.2d07,0.0.2d08 1731/01 OSA (QDIO) 04 qeth
0.0.2d09,0.0.2d0a,0.0.2d0b 1731/01 OSA (QDIO) 04 qeth
0.0.2d0c,0.0.2d0d,0.0.2d0e 1731/01 OSA (QDIO) 04 qeth
0.0.2d20,0.0.2d21,0.0.2d22 1731/01 OSA (QDIO) 05 qeth
0.0.2d23,0.0.2d24,0.0.2d25 1731/01 OSA (QDIO) 05 qeth
0.0.2d26,0.0.2d27,0.0.2d28 1731/01 OSA (QDIO) 05 qeth
0.0.2d29,0.0.2d2a,0.0.2d2b 1731/01 OSA (QDIO) 05 qeth
0.0.2d2c,0.0.2d2d,0.0.2d2e 1731/01 OSA (QDIO) 05 qeth
0.0.2d40,0.0.2d41,0.0.2d42 1731/01 OSA (QDIO) 06 qeth
0.0.2d43,0.0.2d44,0.0.2d45 1731/01 OSA (QDIO) 06 qeth
0.0.2d46,0.0.2d47,0.0.2d48 1731/01 OSA (QDIO) 06 qeth
0.0.2d49,0.0.2d4a,0.0.2d4b 1731/01 OSA (QDIO) 06 qeth
0.0.2d4c,0.0.2d4d,0.0.2d4e 1731/01 OSA (QDIO) 06 qeth
0.0.2d60,0.0.2d61,0.0.2d62 1731/01 OSA (QDIO) 07 qeth
0.0.2d63,0.0.2d64,0.0.2d65 1731/01 OSA (QDIO) 07 qeth
0.0.2d66,0.0.2d67,0.0.2d68 1731/01 OSA (QDIO) 07 qeth
0.0.2d69,0.0.2d6a,0.0.2d6b 1731/01 OSA (QDIO) 07 qeth
As shown in Figure 3-2 on page 29, we chose to use devices 2d03, 2d23, 2d43, and 2d63 to
connect our Open vSwitch bridges to the LAN. The devices need to be configured as Layer 2
devices, and they need to be able to provide bridging functions.
We configured them with the required parameters and confirmed that the needed devices
were online, as shown in Example 3-11.
Example 3-11 Configuring NICs online
[root@itsokvm1 ~]# znetconf -a 2d03 -o layer2=1 -o bridge_role=primary
Scanning for network devices...
Successfully configured device 0.0.2d03 (enccw0.0.2d03)
[root@itsokvm1 ~]# znetconf -a 2d23 -o layer2=1 -o bridge_role=primary
Scanning for network devices...
Successfully configured device 0.0.2d23 (enccw0.0.2d23)
[root@itsokvm1 ~]# znetconf -a 2d43 -o layer2=1 -o bridge_role=primary
Scanning for network devices...
Successfully configured device 0.0.2d43 (enccw0.0.2d43)
[root@itsokvm1 ~]# znetconf -a 2d63 -o layer2=1 -o bridge_role=primary
Scanning for network devices...
Successfully configured device 0.0.2d63 (enccw0.0.2d63)
[root@itsokvm1 ~]# znetconf -c
Device IDs Type Card Type CHPID Drv. Name
State
--------------------------------------------------------------------------------
0.0.2d00,0.0.2d01,0.0.2d02 1731/01 OSD_1000 04 qeth enccw0.0.2d00
online
0.0.2d03,0.0.2d04,0.0.2d05 1731/01 OSD_1000 04 qeth enccw0.0.2d03
online](https://image.slidesharecdn.com/813f4873-82be-45ac-ace3-3348d7081223-151209165745-lva1-app6892/75/Getting-Started-with-KVM-for-IBM-z-Systems-61-2048.jpg)
![48 Getting Started with KVM for IBM z Systems
0.0.2d23,0.0.2d24,0.0.2d25 1731/01 OSD_1000 05 qeth enccw0.0.2d23
online
0.0.2d43,0.0.2d44,0.0.2d45 1731/01 OSD_1000 06 qeth enccw0.0.2d43
online
0.0.2d63,0.0.2d64,0.0.2d65 1731/01 OSD_1000 07 qeth enccw0.0.2d63
online
Example 3-12shows a test of bridging capabilities of the newly configured NICs.
Example 3-12 Check bridging capabilities
[root@itsokvm1 ~]# cat /sys/class/net/enccw0.0.2d03/device/bridge_state
active
[root@itsokvm1 ~]# cat /sys/class/net/enccw0.0.2d23/device/bridge_state
active
[root@itsokvm1 ~]# cat /sys/class/net/enccw0.0.2d43/device/bridge_state
active
[root@itsokvm1 ~]# cat /sys/class/net/enccw0.0.2d63/device/bridge_state
active
We brought the NICs up online dynamically. These changes will not be persistent at system
restart. To make changes persistent, there must be corresponding ifcfg-enccw0.0.2dx3 files
in /etc/sysconfig/network-scripts directory.
An example of such a file is shown in Example 3-13. There must be a corresponding file
created for each NIC, or four files in our case.
Example 3-13 Make changes permanent
[root@itsokvm1 ~]# cat /etc/sysconfig/network-scripts/ifcfg-enccw0.0.2d03
TYPE=Ethernet
BOOTPROTO=none
NAME=enccw0.0.2d03
DEVICE=enccw0.0.2d03
ONBOOT=yes
NETTYPE=qeth
SUBCHANNELS="0.0.2d03,0.0.2d04,0.0.2d05"
OPTIONS="layer2=1 bridge_reflect_promisc=primary buffer_count=128"
Defining Open vSwitches
As described in 3.1, “Our configuration” on page 28, we needed to create two Open
vSwitches (which shows as OVS in our examples). For KVM for IBM z to handle OVS, the
openvswitch service must be running. This service is not enabled by default. Example 3-14
shows the commands to check whether service is running, enable the service to be started
after a system restart, start the service dynamically, and check the status after the service is
started.
Example 3-14 openswitch service
[root@itsokvm1 ~]# ovs-vsctl show
ovs-vsctl: unix:/var/run/openvswitch/db.sock: database connection failed (No such
file or directory)
[root@itsokvm1 ~]# systemctl status openvswitch
openvswitch.service - Open vSwitch
Loaded: loaded (/usr/lib/systemd/system/openvswitch.service; disabled)
Active: inactive (dead)](https://image.slidesharecdn.com/813f4873-82be-45ac-ace3-3348d7081223-151209165745-lva1-app6892/75/Getting-Started-with-KVM-for-IBM-z-Systems-62-2048.jpg)
![Chapter 3. Installing and configuring the environment 49
[root@itsokvm1 ~]# systemctl enable openvswitch
ln -s '/usr/lib/systemd/system/openvswitch.service'
'/etc/systemd/system/multi-user.target.wants/openvswitch.service'
[root@itsokvm1 ~]# systemctl start openvswitch
[root@itsokvm1 ~]# systemctl status openvswitch
openvswitch.service - Open vSwitch
Loaded: loaded (/usr/lib/systemd/system/openvswitch.service; enabled)
Active: active (exited) since Wed 2015-09-23 09:00:14 EDT; 3s ago
Process: 5366 ExecStart=/bin/true (code=exited, status=0/SUCCESS)
Main PID: 5366 (code=exited, status=0/SUCCESS)
Sep 23 09:00:14 itsokvm2 systemd[1]: Starting Open vSwitch...
Sep 23 09:00:14 itsokvm2 systemd[1]: Started Open vSwitch.
[root@itsokvm1 ~]# ovs-vsctl show
bcd5c59b-b1fd-4f95-8f66-926c1ffdc227
ovs_version: "2.3.0"
We created two OVS bridges and added bonding interfaces consisting of two NICs to connect
each bridge to the LAN, as shown in Example 3-15.
Example 3-15 Create bridge and bond port
[root@itsokvm1 ~]# ovs-vsctl add-br vsw_mgmt
[root@itsokvm1 ~]# ovs-vsctl add-br vsw_data
[root@itsokvm1 ~]# ovs-vsctl add-bond vsw_mgmt bond0 enccw0.0.2d03 enccw0.0.2d43
[root@itsokvm1 ~]# ovs-vsctl add-bond vsw_data bond1 enccw0.0.2d23 enccw0.0.2d63
Example 3-16 shows the defined switches and their interfaces.
Example 3-16 Defined bridges
[root@itsokvm1 ~]# ovs-vsctl show
e7d10201-8a83-42db-a8c9-96aa7a9bb17c
Bridge vsw_mgmt
Port vsw_mgmt
Interface vsw_mgmt
type: internal
Port "bond0"
Interface "enccw0.0.2d43"
Interface "enccw0.0.2d03"
Bridge vsw_data
Port vsw_data
Interface vsw_data
type: internal
Port "bond1"
Interface "enccw0.0.2d63"
Interface "enccw0.0.2d23"
ovs_version: "2.3.0"](https://image.slidesharecdn.com/813f4873-82be-45ac-ace3-3348d7081223-151209165745-lva1-app6892/75/Getting-Started-with-KVM-for-IBM-z-Systems-63-2048.jpg)
![50 Getting Started with KVM for IBM z Systems
Adding LUNs
We decided to add two more LUNs to our environment to have more space available for qcow2
files. We added those two LUNs to the root volume group and extended the root file system
dynamically.
To make LUNs available to the system, we performed the steps outlined in Example 3-17.
The first multipath command output shows original setup where three LUNs were available.
Next, we added paths to two more LUNs into the /etc/zfcp.conf file. Then, we ran
zfcpconf.sh which reads the /etc/zfcp.conf file and makes devices from the file available to
the system. This is followed by another multipath command, which shows that the two new
LUNs became available.
Example 3-17 Adding LUNs
[root@itsokvm1 ~]# multipath -l
360050768018305e120000000000000ec dm-0 IBM ,2145
size=10G features='1 queue_if_no_path' hwhandler='0' wp=rw
|-+- policy='service-time 0' prio=50 status=active
| |- 0:0:0:2 sdo 8:224 active ready running
| |- 0:0:2:2 sdu 65:64 active ready running
| |- 1:0:2:2 sda 8:0 active ready running
| `- 1:0:3:2 sdb 8:16 active ready running
`-+- policy='service-time 0' prio=10 status=enabled
|- 0:0:1:2 sdr 65:16 active ready running
|- 0:0:3:2 sdx 65:112 active ready running
|- 1:0:4:2 sdc 8:32 active ready running
`- 1:0:5:2 sdd 8:48 active ready running
360050768018305e120000000000000eb dm-1 IBM ,2145
size=10G features='1 queue_if_no_path' hwhandler='0' wp=rw
|-+- policy='service-time 0' prio=50 status=active
| |- 0:0:1:1 sdq 65:0 active ready running
| |- 0:0:3:1 sdw 65:96 active ready running
| |- 1:0:4:1 sdg 8:96 active ready running
| `- 1:0:5:1 sdh 8:112 active ready running
`-+- policy='service-time 0' prio=10 status=enabled
|- 0:0:0:1 sdn 8:208 active ready running
|- 0:0:2:1 sdt 65:48 active ready running
|- 1:0:2:1 sde 8:64 active ready running
`- 1:0:3:1 sdf 8:80 active ready running
360050768018305e120000000000000ea dm-5 IBM ,2145
size=10G features='1 queue_if_no_path' hwhandler='0' wp=rw
|-+- policy='service-time 0' prio=50 status=active
| |- 0:0:0:0 sdm 8:192 active ready running
| |- 0:0:2:0 sds 65:32 active ready running
| |- 1:0:2:0 sdi 8:128 active ready running
| `- 1:0:3:0 sdj 8:144 active ready running
`-+- policy='service-time 0' prio=10 status=enabled
|- 0:0:1:0 sdp 8:240 active ready running
|- 0:0:3:0 sdv 65:80 active ready running
|- 1:0:4:0 sdk 8:160 active ready running
`- 1:0:5:0 sdl 8:176 active ready running
[root@itsokvm1 ~]# vi /etc/zfcp.conf
0.0.b600 0x500507680130bc24 0x0002000000000000
0.0.b600 0x500507680120bb91 0x0002000000000000
0.0.b700 0x500507680120bc24 0x0002000000000000
0.0.b600 0x500507680130bb91 0x0002000000000000](https://image.slidesharecdn.com/813f4873-82be-45ac-ace3-3348d7081223-151209165745-lva1-app6892/75/Getting-Started-with-KVM-for-IBM-z-Systems-64-2048.jpg)
![Chapter 3. Installing and configuring the environment 51
0.0.b700 0x500507680130bc24 0x0002000000000000
0.0.b600 0x500507680120bc24 0x0002000000000000
0.0.b700 0x500507680120bb91 0x0002000000000000
0.0.b700 0x500507680130bb91 0x0002000000000000
0.0.b600 0x500507680130bc24 0x0000000000000000
0.0.b600 0x500507680120bb91 0x0000000000000000
0.0.b700 0x500507680120bc24 0x0000000000000000
0.0.b600 0x500507680130bb91 0x0000000000000000
0.0.b700 0x500507680130bc24 0x0000000000000000
0.0.b600 0x500507680120bc24 0x0000000000000000
0.0.b700 0x500507680130bb91 0x0000000000000000
0.0.b700 0x500507680120bb91 0x0000000000000000
0.0.b600 0x500507680130bc24 0x0001000000000000
0.0.b600 0x500507680120bb91 0x0001000000000000
0.0.b700 0x500507680120bc24 0x0001000000000000
0.0.b600 0x500507680130bb91 0x0001000000000000
0.0.b700 0x500507680130bc24 0x0001000000000000
0.0.b700 0x500507680120bb91 0x0001000000000000
0.0.b600 0x500507680120bc24 0x0001000000000000
0.0.b700 0x500507680130bb91 0x0001000000000000
0.0.b600 0x500507680130bc24 0x0003000000000000
0.0.b600 0x500507680120bb91 0x0003000000000000
0.0.b700 0x500507680120bc24 0x0003000000000000
0.0.b600 0x500507680130bb91 0x0003000000000000
0.0.b700 0x500507680130bc24 0x0003000000000000
0.0.b700 0x500507680120bb91 0x0003000000000000
0.0.b600 0x500507680120bc24 0x0003000000000000
0.0.b700 0x500507680130bb91 0x0003000000000000
0.0.b600 0x500507680130bc24 0x0004000000000000
0.0.b600 0x500507680120bb91 0x0004000000000000
0.0.b700 0x500507680120bc24 0x0004000000000000
0.0.b600 0x500507680130bb91 0x0004000000000000
0.0.b700 0x500507680130bc24 0x0004000000000000
0.0.b700 0x500507680120bb91 0x0004000000000000
0.0.b600 0x500507680120bc24 0x0004000000000000
0.0.b700 0x500507680130bb91 0x0004000000000000
[root@itsokvm1 ~]# zfcpconf.sh
[root@itsokvm1 ~]# multipath -l
360050768018305e120000000000000ee dm-11 IBM ,2145
size=10G features='1 queue_if_no_path' hwhandler='0' wp=rw
|-+- policy='service-time 0' prio=0 status=active
| |- 0:0:2:4 sdag 66:0 active undef running
| |- 1:0:2:4 sdah 66:16 active undef running
| |- 0:0:0:4 sdai 66:32 active undef running
| `- 1:0:3:4 sdaj 66:48 active undef running
`-+- policy='service-time 0' prio=0 status=enabled
|- 1:0:4:4 sdal 66:80 active undef running
|- 0:0:1:4 sdak 66:64 active undef running
|- 0:0:3:4 sdan 66:112 active undef running
`- 1:0:5:4 sdam 66:96 active undef running
360050768018305e120000000000000ed dm-9 IBM ,2145
size=10G features='1 queue_if_no_path' hwhandler='0' wp=rw
|-+- policy='service-time 0' prio=0 status=active
| |- 0:0:1:3 sdac 65:192 active undef running
| |- 1:0:5:3 sdae 65:224 active undef running](https://image.slidesharecdn.com/813f4873-82be-45ac-ace3-3348d7081223-151209165745-lva1-app6892/75/Getting-Started-with-KVM-for-IBM-z-Systems-65-2048.jpg)
![Chapter 3. Installing and configuring the environment 53
The next step is to create partitions on the new LUNs, as shown in Example 3-18.
Example 3-18 Creating partitions
[root@itsokvm1 ~]# fdisk
/dev/disk/by-id/dm-uuid-mpath-360050768018305e120000000000000ed
Welcome to fdisk (util-linux 2.23.2).
Changes will remain in memory only, until you decide to write them.
Be careful before using the write command.
Command (m for help): n
Partition type:
p primary (0 primary, 0 extended, 4 free)
e extended
Select (default p): p
Partition number (1-4, default 1):
First sector (2048-20971519, default 2048):
Using default value 2048
Last sector, +sectors or +size{K,M,G} (2048-20971519, default 20971519):
Using default value 20971519
Partition 1 of type Linux and of size 10 GiB is set
Command (m for help): w
The partition table has been altered!
Calling ioctl() to re-read partition table.
WARNING: Re-reading the partition table failed with error 22: Invalid argument.
The kernel still uses the old table. The new table will be used at
the next reboot or after you run partprobe(8) or kpartx(8)
Syncing disks.
[root@itsokvm1 ~]# fdisk
/dev/disk/by-id/dm-uuid-mpath-360050768018305e120000000000000ee
Welcome to fdisk (util-linux 2.23.2).
Changes will remain in memory only, until you decide to write them.
Be careful before using the write command.
Command (m for help): n
Partition type:
p primary (0 primary, 0 extended, 4 free)
e extended
Select (default p): p
Partition number (1-4, default 1):
First sector (2048-20971519, default 2048):
Using default value 2048
Last sector, +sectors or +size{K,M,G} (2048-20971519, default 20971519):
Using default value 20971519
Partition 1 of type Linux and of size 10 GiB is set
Command (m for help): w
The partition table has been altered!
Calling ioctl() to re-read partition table.](https://image.slidesharecdn.com/813f4873-82be-45ac-ace3-3348d7081223-151209165745-lva1-app6892/75/Getting-Started-with-KVM-for-IBM-z-Systems-67-2048.jpg)
![54 Getting Started with KVM for IBM z Systems
WARNING: Re-reading the partition table failed with error 22: Invalid argument.
The kernel still uses the old table. The new table will be used at
the next reboot or after you run partprobe(8) or kpartx(8)
Syncing disks.
The partprobe command forces the kernel to reread partitioning information. The ls
command, executed afterward, shows that the new partitions are available to the system. This
is shown in Example 3-19.
Example 3-19 Refresh partitioning information
[root@itsokvm1 ~]# partprobe
device-mapper: remove ioctl on 360050768018305e120000000000000eb1 failed: Device
or resource busy
Warning: parted was unable to re-read the partition table on
/dev/mapper/360050768018305e120000000000000eb (Device or resource busy). This
means Linux won't know anything about the modifications you made.
device-mapper: create ioctl on 360050768018305e120000000000000eb1 failed: Device
or resource busy
device-mapper: remove ioctl on 360050768018305e120000000000000eb1 failed: Device
or resource busy
device-mapper: remove ioctl on 360050768018305e120000000000000ea1 failed: Device
or resource busy
Warning: parted was unable to re-read the partition table on
/dev/mapper/360050768018305e120000000000000ea (Device or resource busy). This
means Linux won't know anything about the modifications you made.
device-mapper: create ioctl on 360050768018305e120000000000000ea1 failed: Device
or resource busy
device-mapper: remove ioctl on 360050768018305e120000000000000ea1 failed: Device
or resource busy
device-mapper: remove ioctl on 360050768018305e120000000000000ec3 failed: Device
or resource busy
device-mapper: remove ioctl on 360050768018305e120000000000000ec2 failed: Device
or resource busy
device-mapper: remove ioctl on 360050768018305e120000000000000ec1 failed: Device
or resource busy
Warning: parted was unable to re-read the partition table on
/dev/mapper/360050768018305e120000000000000ec (Device or resource busy). This
means Linux won't know anything about the modifications you made.
device-mapper: create ioctl on 360050768018305e120000000000000ec1 failed: Device
or resource busy
device-mapper: remove ioctl on 360050768018305e120000000000000ec1 failed: Device
or resource busy
device-mapper: create ioctl on 360050768018305e120000000000000ec2 failed: Device
or resource busy
device-mapper: remove ioctl on 360050768018305e120000000000000ec2 failed: Device
or resource busy
device-mapper: create ioctl on 360050768018305e120000000000000ec3 failed: Device
or resource busy
device-mapper: remove ioctl on 360050768018305e120000000000000ec3 failed: Device
or resource busy
[root@itsokvm1 ~]# ls -l /dev/mapper/
total 0
lrwxrwxrwx. 1 root root 7 Sep 24 14:17 360050768018305e120000000000000ea ->
../dm-6](https://image.slidesharecdn.com/813f4873-82be-45ac-ace3-3348d7081223-151209165745-lva1-app6892/75/Getting-Started-with-KVM-for-IBM-z-Systems-68-2048.jpg)
![Chapter 3. Installing and configuring the environment 55
lrwxrwxrwx. 1 root root 7 Sep 24 14:17 360050768018305e120000000000000ea1 ->
../dm-8
lrwxrwxrwx. 1 root root 7 Sep 24 14:17 360050768018305e120000000000000eb ->
../dm-1
lrwxrwxrwx. 1 root root 7 Sep 24 14:17 360050768018305e120000000000000eb1 ->
../dm-5
lrwxrwxrwx. 1 root root 7 Sep 24 14:17 360050768018305e120000000000000ec ->
../dm-0
lrwxrwxrwx. 1 root root 7 Sep 24 14:17 360050768018305e120000000000000ec1 ->
../dm-2
lrwxrwxrwx. 1 root root 7 Sep 24 14:17 360050768018305e120000000000000ec2 ->
../dm-3
lrwxrwxrwx. 1 root root 7 Sep 24 14:17 360050768018305e120000000000000ec3 ->
../dm-4
lrwxrwxrwx. 1 root root 7 Sep 24 14:17 360050768018305e120000000000000ed ->
../dm-7
lrwxrwxrwx. 1 root root 8 Sep 24 14:17 360050768018305e120000000000000ed1 ->
../dm-11
lrwxrwxrwx. 1 root root 7 Sep 24 14:17 360050768018305e120000000000000ee ->
../dm-9
lrwxrwxrwx. 1 root root 8 Sep 24 14:17 360050768018305e120000000000000ee1 ->
../dm-12
crw-------. 1 root root 10, 236 Sep 24 12:39 control
lrwxrwxrwx. 1 root root 8 Sep 24 14:17 zkvm1-root -> ../dm-10
These new partitions will be added to the root volume group (VG) later. However, for the
loader to be able to bring root VG up correctly, it needs to be aware of all of the LUNs that
form root VG. To achieve this, initramfs must be created and zipl updated, as shown in
Example 3-20. There is no need to modify the zipl.conf file, but zfcp.conf must contain all
relevant LUN information, as this file is read by dracut command.
Example 3-20 Modify initial ramdisk
[root@itsokvm1 ~]# dracut -f
[root@itsokvm1 ~]# zipl
Using config file '/etc/zipl.conf'
Run /lib/s390-tools/zipl_helper.device-mapper /boot
Building bootmap in '/boot'
Building menu 'zipl-automatic-menu'
Adding #1: IPL section '3.10.0-123.20.1.el7_0.kvmibm.15.s390x' (default)
Adding #2: IPL section 'linux'
Preparing boot device: dm-0.
Done.
Note: It is important to execute these two commands. Otherwise, the system will not come
up after reboot.](https://image.slidesharecdn.com/813f4873-82be-45ac-ace3-3348d7081223-151209165745-lva1-app6892/75/Getting-Started-with-KVM-for-IBM-z-Systems-69-2048.jpg)
![56 Getting Started with KVM for IBM z Systems
Example 3-21 shows the commands we executed to create physical volumes on new
partitions. Then the physical volumes were added to a volume group, the logical volume was
expanded, and the root file system was resized.
Example 3-21 Creating physical volumes
[root@itsokvm1 ~]# pvcreate /dev/mapper/360050768018305e120000000000000ed1
Physical volume "/dev/mapper/360050768018305e120000000000000ed1" successfully
created
[root@itsokvm1 ~]# pvcreate /dev/mapper/360050768018305e120000000000000ee1
Physical volume "/dev/mapper/360050768018305e120000000000000ee1" successfully
created
[root@itsokvm1 ~]# pvs
PV VG Fmt Attr PSize PFree
/dev/mapper/360050768018305e120000000000000ea1 zkvm lvm2 a-- 10.00g 0
/dev/mapper/360050768018305e120000000000000eb1 zkvm lvm2 a-- 10.00g 0
/dev/mapper/360050768018305e120000000000000ec3 zkvm lvm2 a-- 5.50g 0
/dev/mapper/360050768018305e120000000000000ed1 lvm2 a-- 10.00g 10.00g
/dev/mapper/360050768018305e120000000000000ee1 lvm2 a-- 10.00g 10.00g
Example 3-22 shows how to add physical volumes to the volume group. It shows volume
group information before and after the volume was extended, in addition to physical volume
information after the new physical volumes were added to the volume group.
Example 3-22 Adding physical volumes to the volume group
[root@itsokvm1 ~]# vgs
VG #PV #LV #SN Attr VSize VFree
zkvm 3 1 0 wz--n- 25.49g 0
[root@itsokvm1 ~]# vgextend zkvm /dev/mapper/360050768018305e120000000000000ed1
/dev/mapper/360050768018305e120000000000000ee1
Volume group "zkvm" successfully extended
[root@itsokvm1 ~]# pvs
PV VG Fmt Attr PSize PFree
/dev/mapper/360050768018305e120000000000000ea1 zkvm lvm2 a-- 10.00g 0
/dev/mapper/360050768018305e120000000000000eb1 zkvm lvm2 a-- 10.00g 0
/dev/mapper/360050768018305e120000000000000ec3 zkvm lvm2 a-- 5.50g 0
/dev/mapper/360050768018305e120000000000000ed1 zkvm lvm2 a-- 10.00g 10.00g
/dev/mapper/360050768018305e120000000000000ee1 zkvm lvm2 a-- 10.00g 10.00g
[root@itsokvm1 ~]# vgs
VG #PV #LV #SN Attr VSize VFree
zkvm 5 1 0 wz--n- 45.48g 19.99g](https://image.slidesharecdn.com/813f4873-82be-45ac-ace3-3348d7081223-151209165745-lva1-app6892/75/Getting-Started-with-KVM-for-IBM-z-Systems-70-2048.jpg)
![Chapter 3. Installing and configuring the environment 57
Example 3-23 shows the lvextend command together with logical volume information before
and after running the lvextend command.
Example 3-23 Extending a logical volume and resizing the file system
[root@itsokvm1 ~]# lvs
LV VG Attr LSize Pool Origin Data% Move Log Cpy%Sync Convert
root zkvm -wi-ao---- 25.49g
[root@itsokvm1 ~]# lvextend /dev/mapper/zkvm-root -L +19G
Extending logical volume root to 44.49 GiB
Logical volume root successfully resized
[root@itsokvm1 ~]# lvs
LV VG Attr LSize Pool Origin Data% Move Log Cpy%Sync Convert
root zkvm -wi-ao---- 44.49g
Example 3-24 shows resizing of the root file system. It also shows the output of the df
command before and after resizing.
Example 3-24 Resizing the root file system
[root@itsokvm1 ~]# df -h
Filesystem Size Used Avail Use% Mounted on
/dev/mapper/zkvm-root 25G 3.9G 20G 17% /
devtmpfs 32G 0 32G 0% /dev
tmpfs 32G 0 32G 0% /dev/shm
tmpfs 32G 8.5M 32G 1% /run
tmpfs 32G 0 32G 0%
/sys/fs/cgroup
/dev/mapper/360050768018305e120000000000000ec1 488M 80M 373M 18% /boot
[root@itsokvm1 ~]# resize2fs /dev/mapper/zkvm-root
resize2fs 1.42.9 (28-Dec-2013)
Filesystem at /dev/mapper/zkvm-root is mounted on /; on-line resizing required
old_desc_blocks = 4, new_desc_blocks = 6
The filesystem on /dev/mapper/zkvm-root is now 11662336 blocks long.
[root@itsokvm1 ~]# df -h
Filesystem Size Used Avail Use% Mounted on
/dev/mapper/zkvm1-root 44G 3.9G 38G 10% /
devtmpfs 32G 0 32G 0% /dev
tmpfs 32G 0 32G 0% /dev/shm
tmpfs 32G 8.5M 32G 1% /run
tmpfs 32G 0 32G 0%
/sys/fs/cgroup
/dev/mapper/360050768018305e120000000000000ec1 488M 80M 373M 18% /boot
Additional space provided by new LUNs is now available to KVM for IBM z for use.](https://image.slidesharecdn.com/813f4873-82be-45ac-ace3-3348d7081223-151209165745-lva1-app6892/75/Getting-Started-with-KVM-for-IBM-z-Systems-71-2048.jpg)
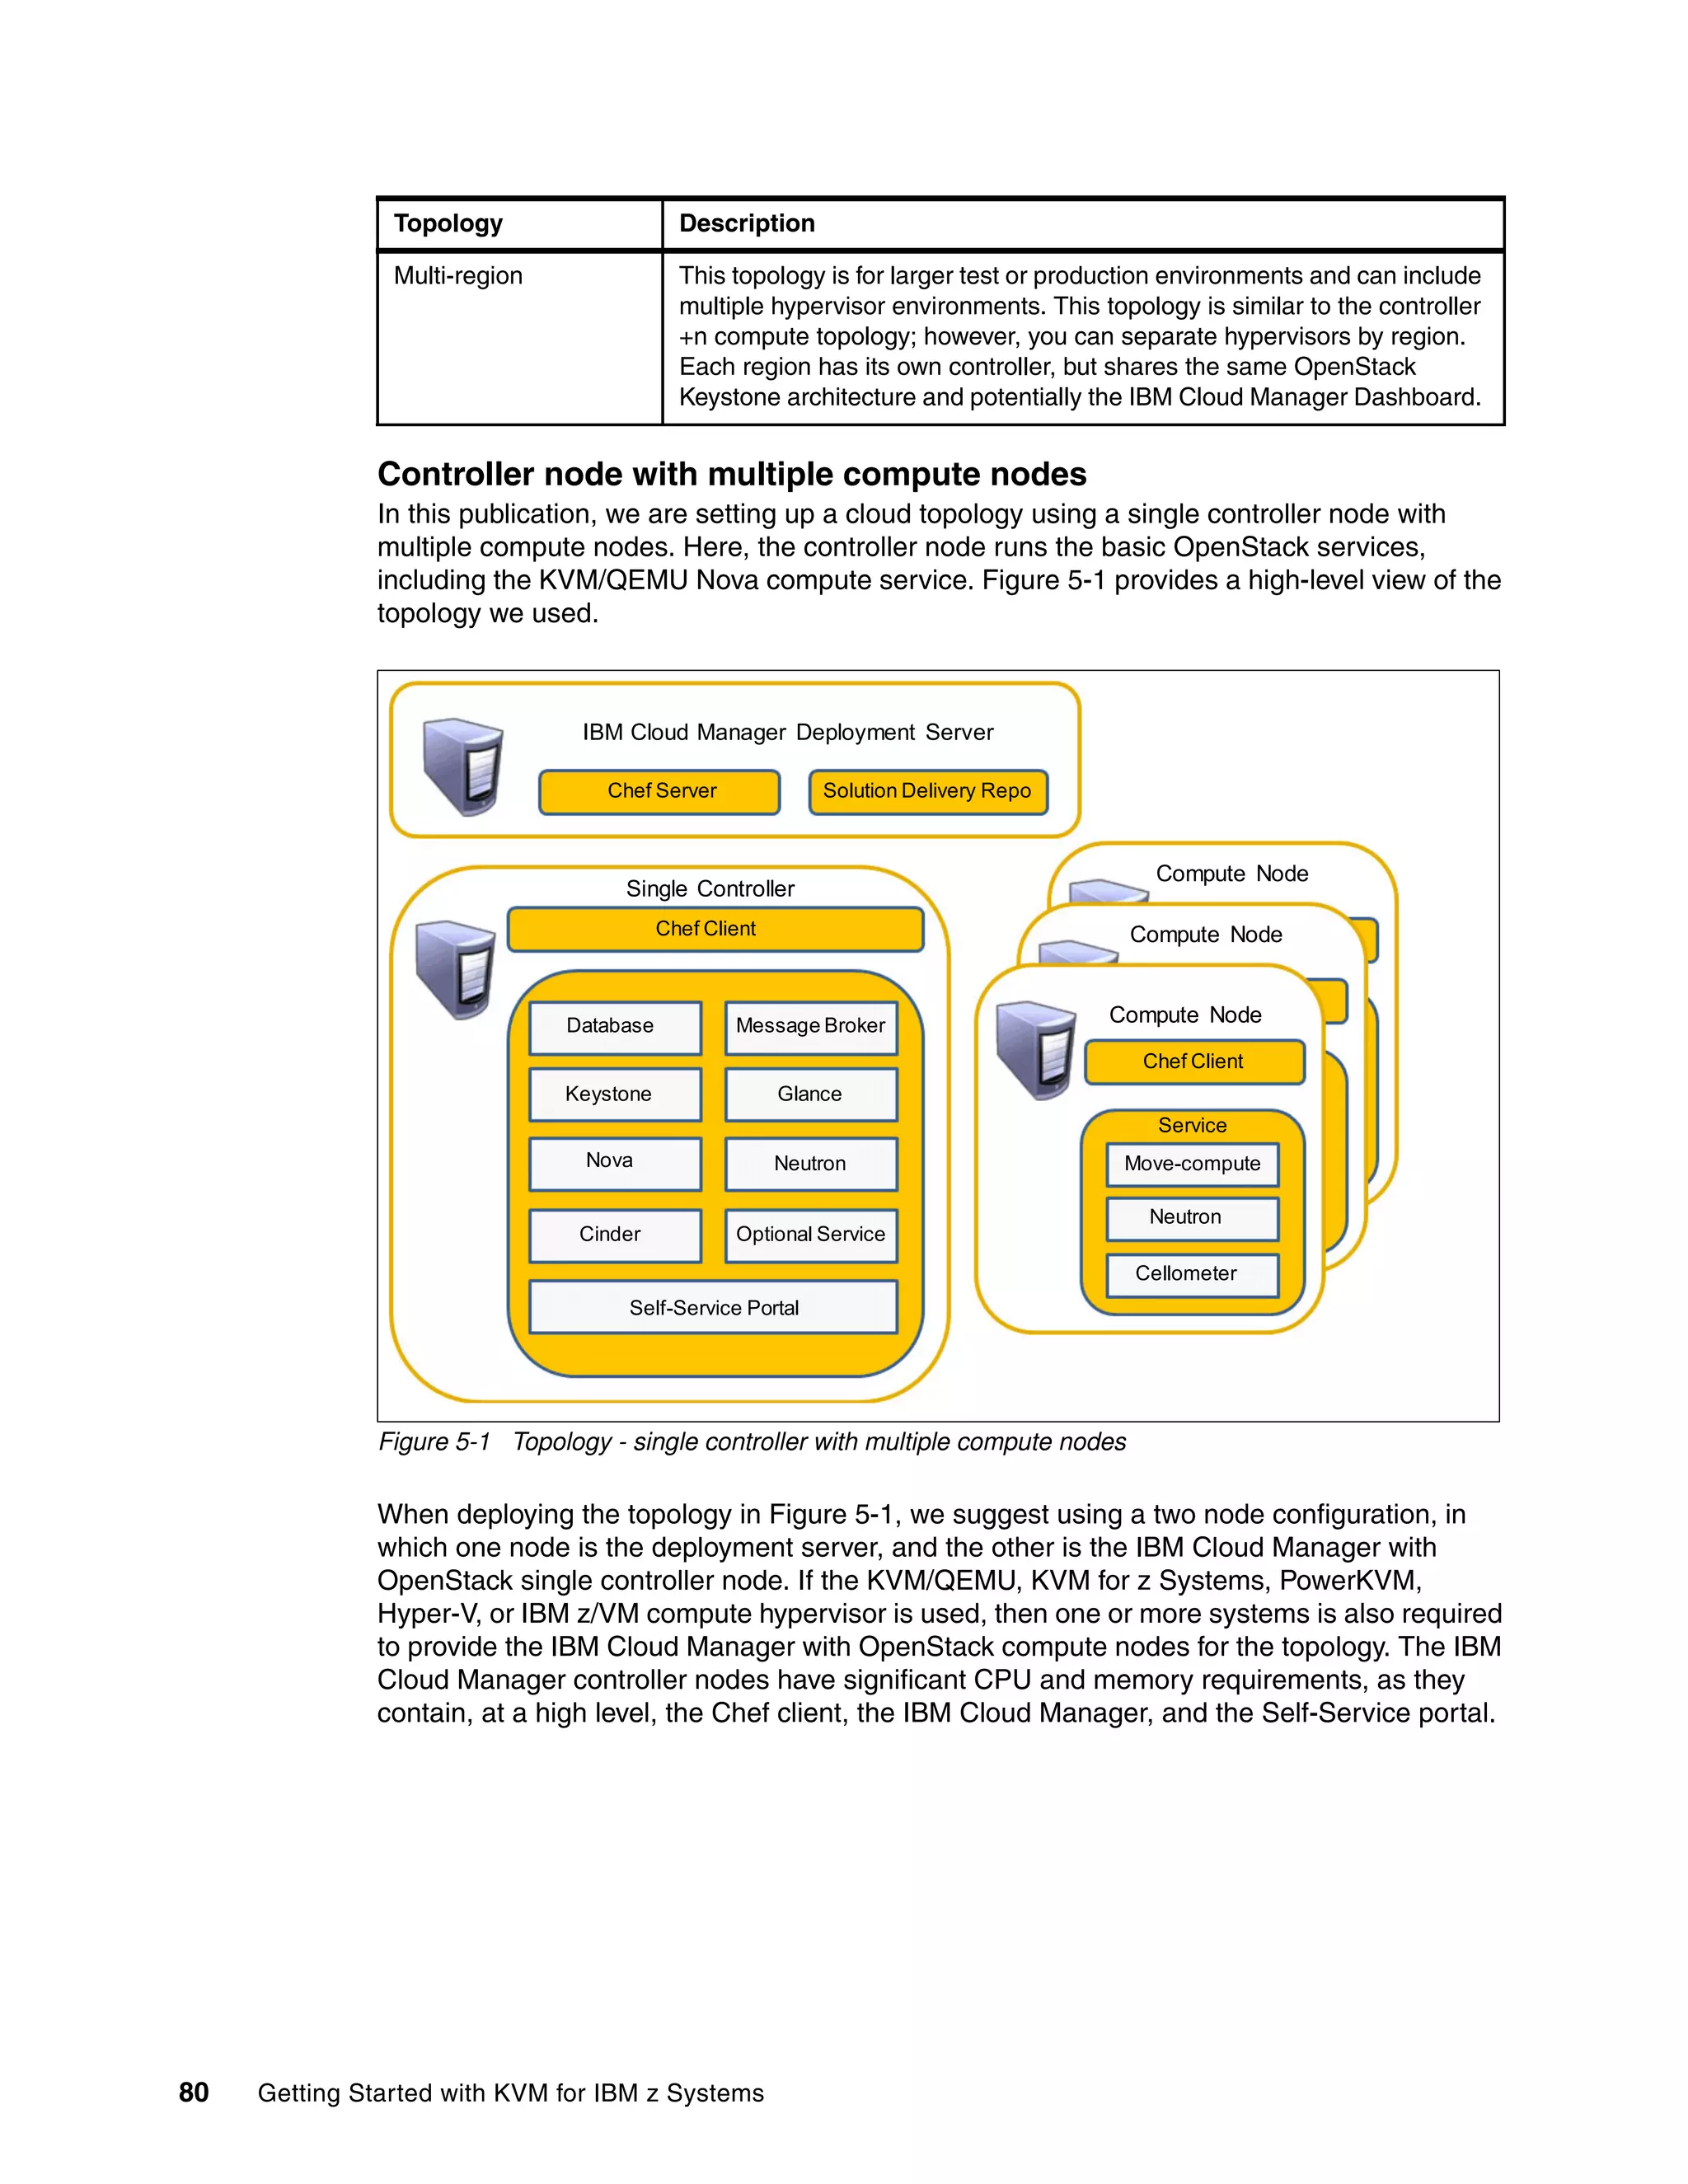
![58 Getting Started with KVM for IBM z Systems
3.3 Deploying virtual machines
This section describes the steps we performed in KVM for IBM z for defining a domain and
installing a Linux on z Systems virtual machine into that domain.
The following tasks are described in this section:
3.3.1, “Preparing the environment” on page 58
3.3.2, “Installing Linux on z Systems” on page 61
3.3.3, “Modifying domain definitions” on page 61
3.3.4, “Linux on z Systems configuration” on page 63
3.3.1 Preparing the environment
Example 3-25 shows that a 5 GB qcow2 file is being created, which is provided as a virtual
disk to the virtual machine.
Example 3-25 qcow2 disk
root@itsokvm1 ~]# cd /var/lib/libvirt/images/
root@itsokvm1 images]# qemu-img create -f qcow2 linux80.img 5G
Formatting 'linux80.img', fmt=qcow2 size=5368709120 encryption=off
cluster_size=65536 lazy_refcounts=off refcount_bits=16
The initial ramdisk and kernel files are needed for Linux on z Systems installation. We
obtained them from the installation DVD on the FTP server and renamed them to suit this
scenario, as depicted in Example 3-26.
Example 3-26 Obtaining files
[root@itsokvm1 images]# curl
ftp://ftp:ftp@192.168.60.15/SLES12SP1/DVD1/boot/s390x/cd.ikr > s12-kernel.boot
% Total % Received % Xferd Average Speed Time Time Time Current
Dload Upload Total Spent Left Speed
100 45.3M 100 45.3M 0 0 22.8M 0 0:00:01 0:00:01 --:--:-- 22.8M
[root@itsokvm1 images]# curl
ftp://ftp:ftp@192.168.60.15/SLES12SP1/DVD1/boot/s390x/initrd > s12-initrd.boot
% Total % Received % Xferd Average Speed Time Time Time Current
Dload Upload Total Spent Left Speed
100 29.3M 100 29.3M 0 0 16.4M 0 0:00:01 0:00:01 --:--:-- 16.4M
Lastly, we created domain definition files in .xml format. We found it convenient to create two
files for a domain: One for installation purposes and one for regular use after installation.](https://image.slidesharecdn.com/813f4873-82be-45ac-ace3-3348d7081223-151209165745-lva1-app6892/75/Getting-Started-with-KVM-for-IBM-z-Systems-72-2048.jpg)
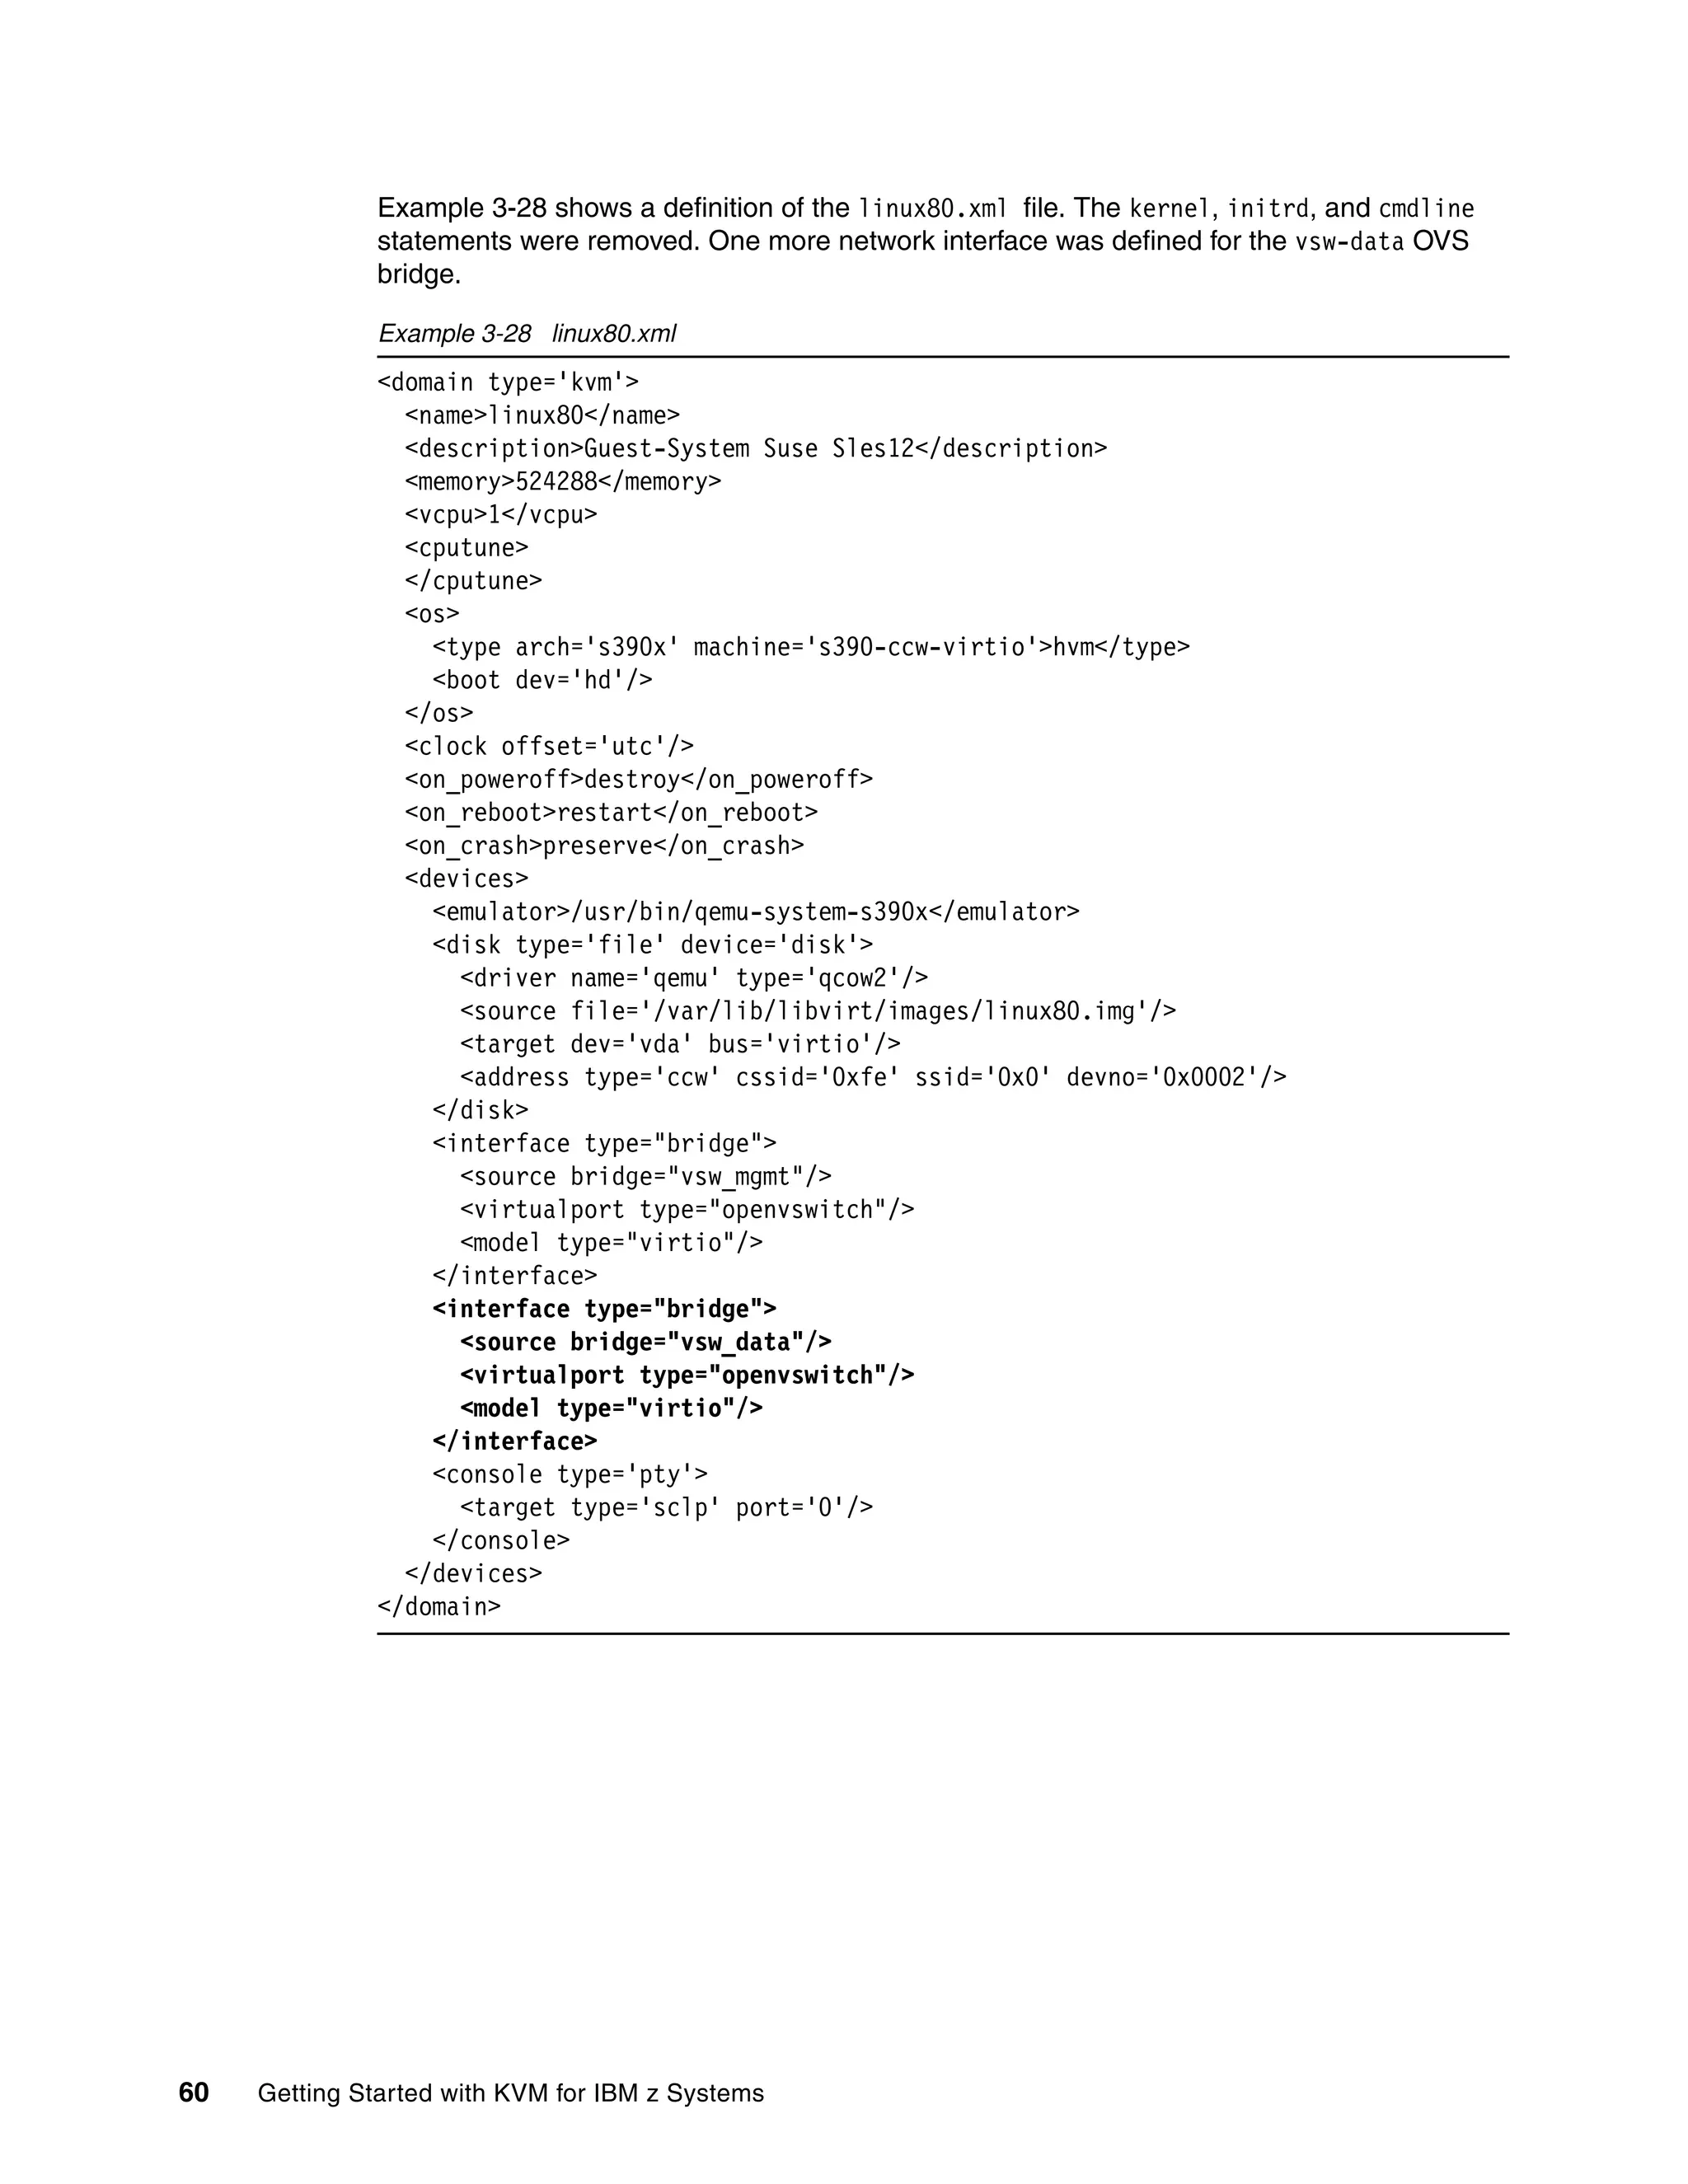
![Chapter 3. Installing and configuring the environment 61
3.3.2 Installing Linux on z Systems
Example 3-29 shows how we defined and started the linux80 domain. Because its .xml file
points to installation initial RAM disk and kernel, it starts the installation of Linux on z
Systems.
Example 3-29 Defining and starting Linux on z Systems installation
[root@itsokvm1 images]# virsh define linux80.xml.install
Domain linux80 defined from linux80.xml.install
[root@itsokvm1 ~]# virsh start linux80 --console
Domain linux80 started
Connected to domain linux80
...
starting VNC server...
A log file will be written to: /var/log/YaST2/vncserver.log ...
***
*** You can connect to <host>, display :1 now with vncviewer
*** Or use a Java capable browser on http://<host>:5801/
***
(When YaST2 is finished, close your VNC viewer and return to this window.)
Active interfaces:
eth0 Link encap:Ethernet HWaddr 52:54:00:A4:E3:B5
inet addr:192.168.60.80 Bcast:192.168.60.255 Mask:255.255.255.0
--
lo Link encap:Local Loopback
inet addr:127.0.0.1 Mask:255.0.0.0
*** Starting YaST2 ***
Linux on z Systems can be installed using the virtual network computing (VNC) interface.
Installing Linux on z Systems in a KVM for IBM z environment is no different than any other
Linux on z Systems installation. For more details, including installation panel captures, see
The Virtualization Cookbook for IBM z Systems Volume 3: SUSE Linux Enterprise Server 12,
SG24-8890:
http://www.redbooks.ibm.com/abstracts/sg248890.html?Open
3.3.3 Modifying domain definitions
After Linux on z Systems is installed, it is automatically rebooted. Because the domain
definition still specifies the same initial RAM disk and kernel as a boot device, the installation
process will be started again from the beginning. To get out of the console to execute virsh
commands, press Ctrl + ] (right bracket) to return to the shell.](https://image.slidesharecdn.com/813f4873-82be-45ac-ace3-3348d7081223-151209165745-lva1-app6892/75/Getting-Started-with-KVM-for-IBM-z-Systems-75-2048.jpg)
![62 Getting Started with KVM for IBM z Systems
Example 3-30 shows the commands we executed to redefine the linux80 domain:
The destroy command shuts down the virtual machine.
The undefine command removes the domain definition from KVM for IBM z. Linux on z
Systems was installed in the qcow2 file and can be used in the new domain definition.
The define command defines the linux80 domain again, this time from an .xml file that
defines the virtual hard disk as a boot device.
The edit command allows you to make changes to an existing virtual machine
configuration file. A text editor will open with the contents of the given .xml file.
Example 3-30 Redefine domain
[root@itsokvm1 images]# virsh destroy linux80
Domain linux80 destroyed
[root@itsokvm1 images]# virsh undefine linux80
Domain linux80 has been undefined
[root@itsokvm1 images]# virsh define linux80.xml
Domain linux80 defined from linux80.xml
After the domain is redefined, restart it again. Now, the previously installed Linux on z
Systems server has been brought up from the virtual disk, as shown in Example 3-31.
Example 3-31 Start virtual machine
[root@itsokvm1 images]# virsh start linux80 --console
Domain linux80 started
Connected to domain linux80
...
+----------------------------------------------------------------------------+
|*SLES12-SP1 |
| Advanced options for SLES12-SP1 |
| |
| |
| |
| |
| |
| |
| |
| |
| |
| |
+----------------------------------------------------------------------------+
...
Welcome to SUSE Linux Enterprise Server 12 SP1 Beta3 (s390x) - Kernel
3.12.47-2-default (ttysclp0).
linux80 login:](https://image.slidesharecdn.com/813f4873-82be-45ac-ace3-3348d7081223-151209165745-lva1-app6892/75/Getting-Started-with-KVM-for-IBM-z-Systems-76-2048.jpg)


![Chapter 4. Managing and monitoring the environment 69
Example 4-3 shows the command that reads the .xml file and attaches a device to a running
VM. This command attaches a disk to a VM temporarily. To make the change permanent, use
the --config parameter.
Example 4-3 The attach-device command
[root@itsokvm1 images]# virsh attach-device linux82 add_lun_8.xml
Device attached successfully
Example 4-4 shows the new device vdb available to VM linux82.
Example 4-4 After the attach-device
linux82:~ # ls -l /dev/vd*
brw-rw---- 1 root disk 254, 0 Sep 30 12:04 /dev/vda
brw-rw---- 1 root disk 254, 1 Sep 30 12:04 /dev/vda1
brw-rw---- 1 root disk 254, 2 Sep 30 12:04 /dev/vda2
brw-rw---- 1 root disk 254, 3 Sep 30 12:04 /dev/vda3
brw-rw---- 1 root disk 254, 16 Sep 30 13:39 /dev/vdb
brw-rw---- 1 root disk 254, 17 Sep 30 13:39 /dev/vdb1
4.2.3 VM live migration
The IBM Knowledge Center article titled KVM Virtual Server Management, SC34-2752
describes the details and considerations for migrating a virtual machine to another instance of
KVM for IBM z:
https://www.ibm.com/support/knowledgecenter/linuxonibm/liaaf/lnz_r_va.html
The most important requirement is to have equal I/O resources available in both
environments.
Default firewall settings on KVM for IBM z do not allow for live migration. Example 4-5 shows
the commands to execute on both of the KVM for IBM z images to allow for live migration
between them.
Example 4-5 Setting up a firewall to allow for live migration
root@itsokvm2 ~]# firewall-cmd --zone=public --add-port=49152-49215/tcp
--permanent
success
[root@itsokvm2 ~]# firewall-cmd --reload
Although we used IP addresses and not host names in the migrate command, we still needed
to create records for the target KVM for IBM z in the /etc/hosts file. Otherwise, the migrate
command reports an error.](https://image.slidesharecdn.com/813f4873-82be-45ac-ace3-3348d7081223-151209165745-lva1-app6892/75/Getting-Started-with-KVM-for-IBM-z-Systems-83-2048.jpg)
![70 Getting Started with KVM for IBM z Systems
Example 4-6 lists the running VMs on both KVM for IBM z images before the migration.
Example 4-6 List of running VMs before live migration
[root@itsokvm1 ~]# virsh list
Id Name State
----------------------------------------------------
2 linux80 running
19 instance-00000003 running
24 linux82 running
[root@itsokvm2 ~]# virsh list
Id Name State
----------------------------------------------------
Example 4-7 shows the actual migrate command that we executed.
Example 4-7 Live migration command
[root@itsokvm1 ~]# virsh migrate --live linux82 qemu+ssh://192.168.60.71/system
root@192.168.60.71's password:
Example 4-8 lists the running VMs on both KVM for IBM z Systems images after the
migration.
Example 4-8 List of running VMs after the live migration
[root@itsokvm1 ~]# virsh list
Id Name State
----------------------------------------------------
2 linux80 running
19 instance-00000003 running
[root@itsokvm2 ~]# virsh list
Id Name State
----------------------------------------------------
3 linux82 running
4.3 Monitoring KVM for IBM z Systems
For any virtualized environment, monitoring the hypervisor resources is crucial for predicting
bottlenecks and avoiding downtimes. The rest of this section focuses on monitoring and
describes the steps to configure the open source monitoring tool called Nagios.
4.3.1 Configuring the Nagios monitoring tool
Nagios is a monitoring tool that enables organizations to identify and resolve IT infrastructure
problems before they affect the business. If there is a failure, Nagios alerts the technical staff
about the problem, allowing them to begin the appropriate course of action.
In KVM for IBM z Systems, Nagios monitoring is enabled using the Nagios remote plug-in
executor (NRPE) which is the preferred method for remote monitoring of hosts.](https://image.slidesharecdn.com/813f4873-82be-45ac-ace3-3348d7081223-151209165745-lva1-app6892/75/Getting-Started-with-KVM-for-IBM-z-Systems-84-2048.jpg)
![Chapter 4. Managing and monitoring the environment 71
The following Nagios plug-ins are enabled in KVM for IBM z Systems:
Load average
Disk usage
Process count and resource usage
The next step is to prepare the configuration file /etc/nagios/nrpe.cfg with
environment-related attributes. The configuration file is backed up and then updates the
attributes.
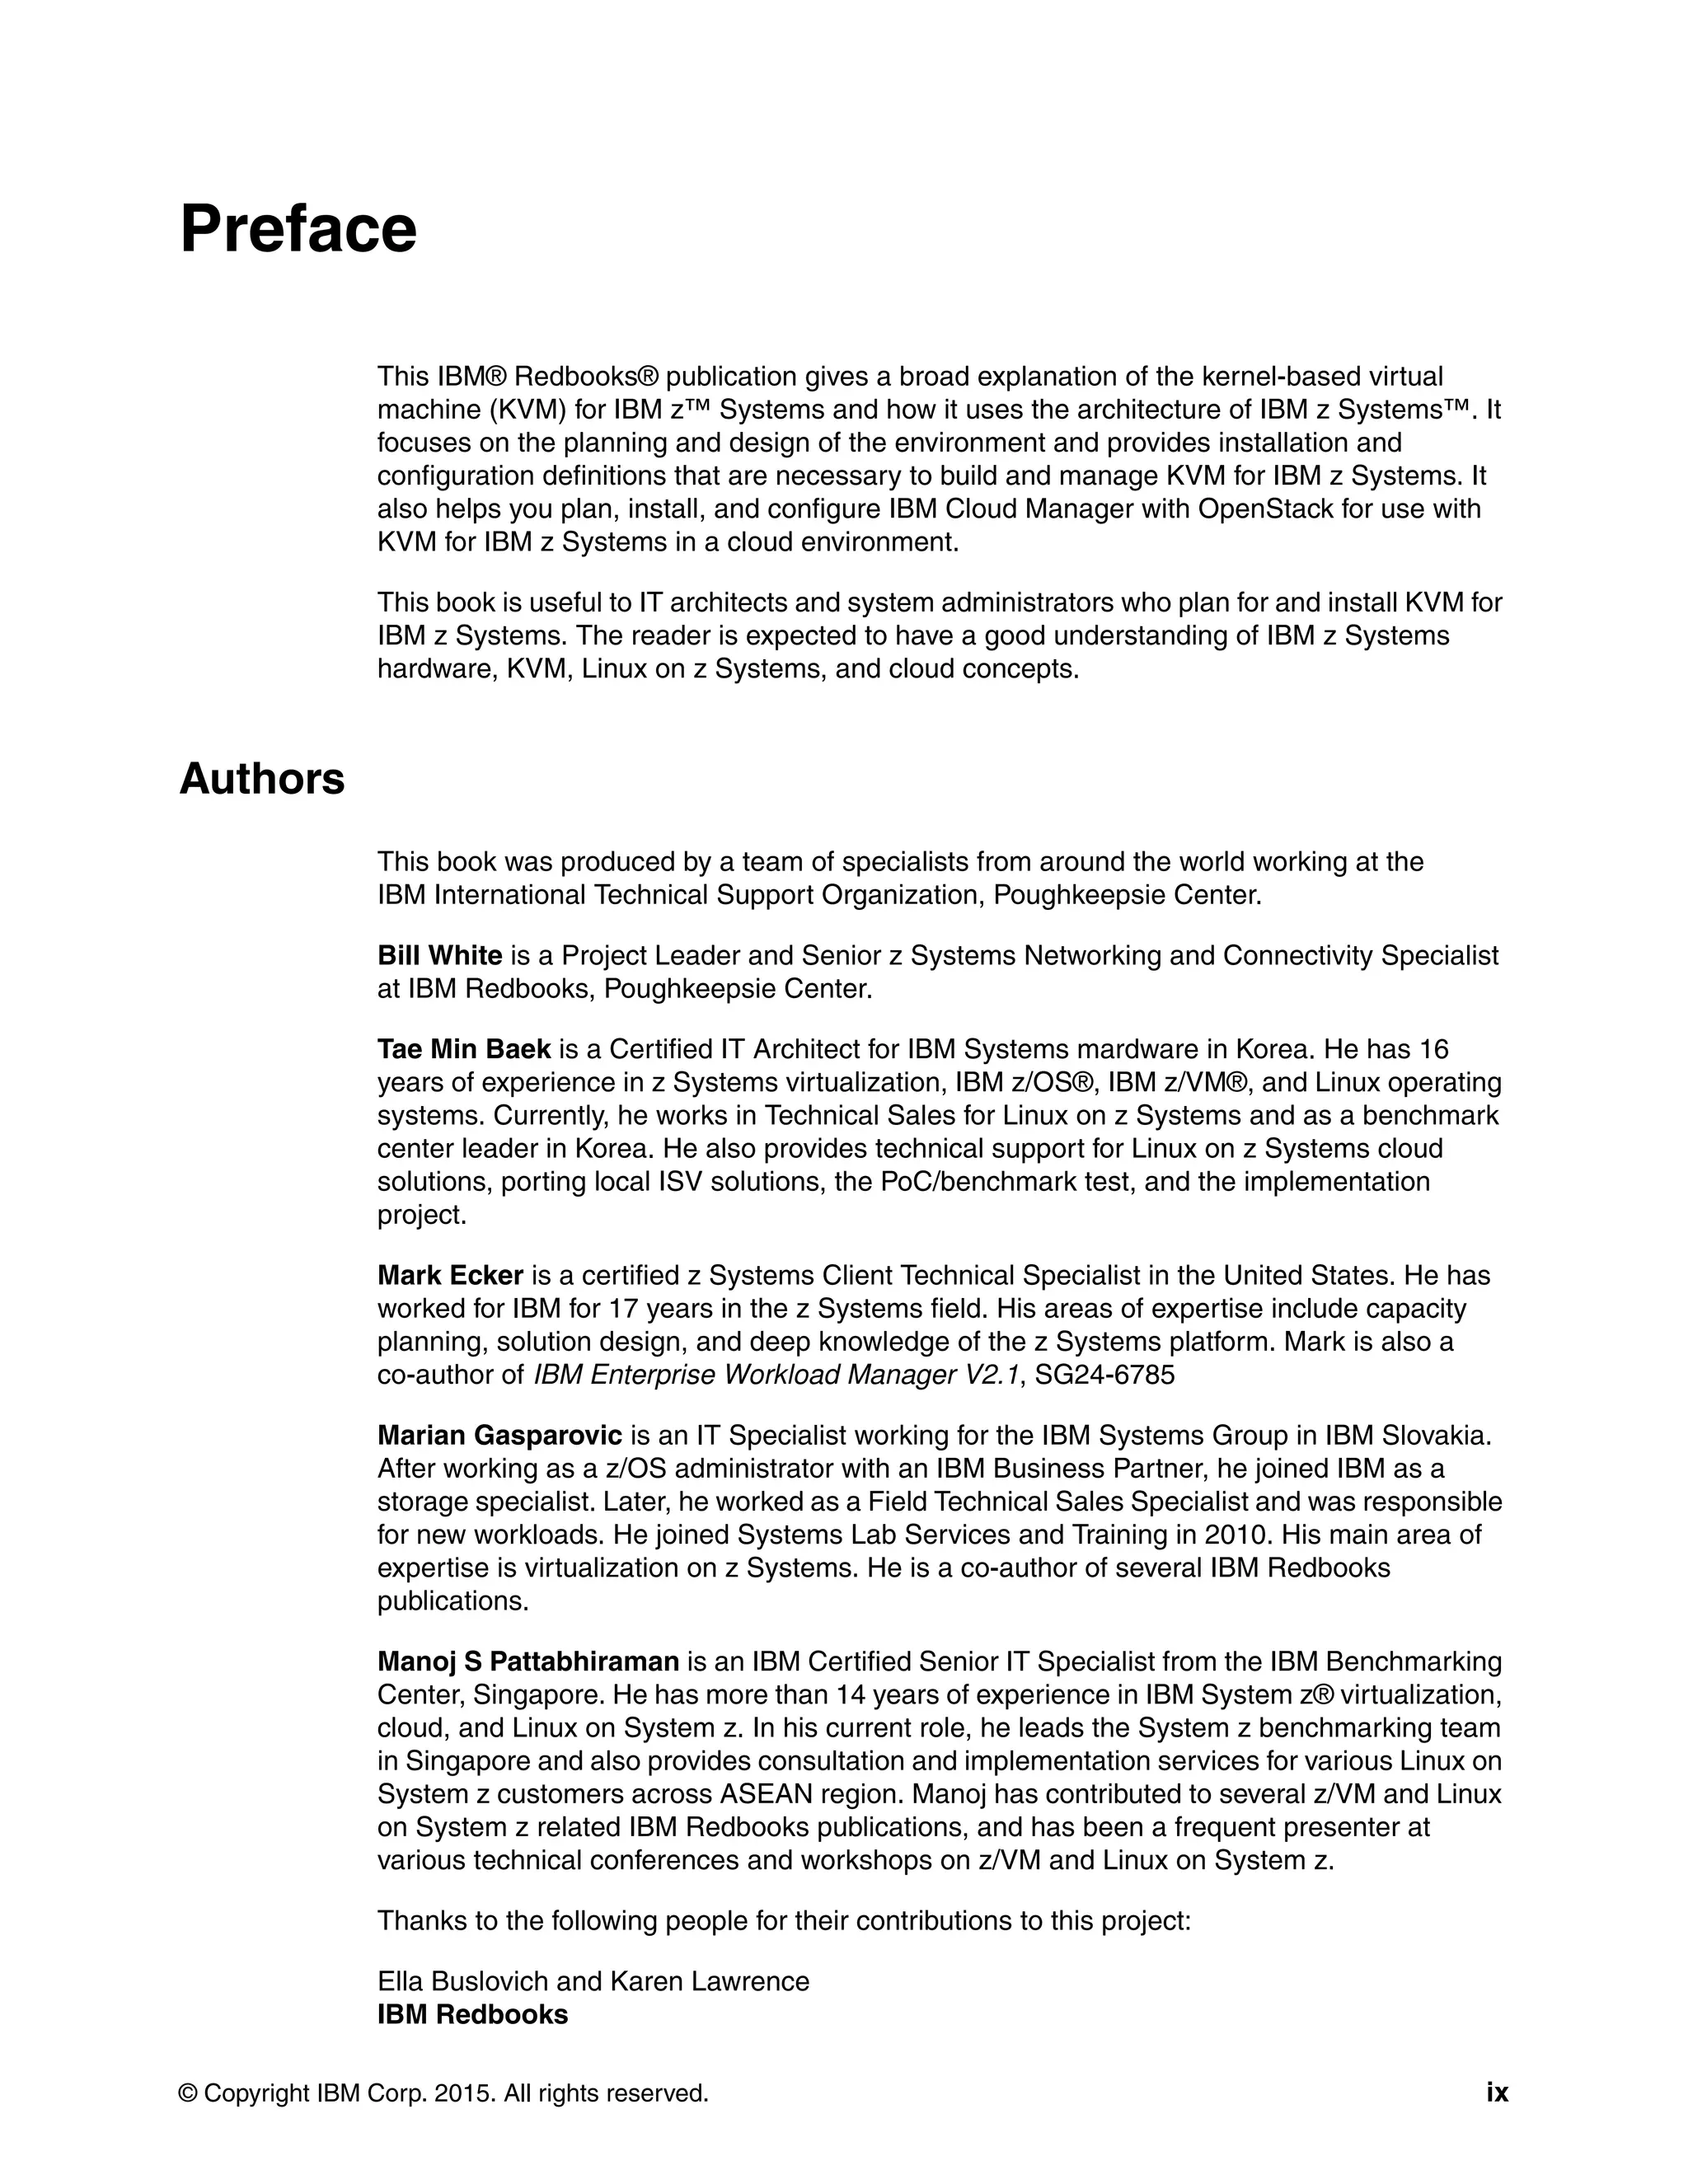
Figure 4-3 The configuration file updates the attributes according to this process
Configuring the Nagios server
The NRPE daemon is designed to enable you to execute the Nagios plug-ins on remote Linux
or UNIX machines. The main reason for doing this is to allow Nagios to monitor local
resources (such as CPU load and memory usage) on remote machines. Because these
public resources are not usually exposed to external machines, an agent such as NRPE must
be installed on the remote Linux or UNIX machines on which the /etc/nagios/nrpe.conf file
needs to be configured. See Example 4-9.
Example 4-9 Attributes to change in the /etc/nagios/nrpe.conf file
server_address=192.168.60.70
allowed_hosts=127.0.0.1,192.168.60.15
command[check_users]=/usr/lib64/nagios/plugins/check_users -w 5 -c 10
command[check_load]=/usr/lib64/nagios/plugins/check_load -w 15,10,5 -c 30,25,20
command[check_hda1]=/usr/lib64/nagios/plugins/check_disk -w 20% -c 10% -p
/dev/mapper/zkvm1-root
command[check_zombie_procs]=/usr/lib64/nagios/plugins/check_procs -w 5 -c 10 -s Z
command[check_total_procs]=/usr/lib64/nagios/plugins/check_procs -w 150 -c 200
Important: In this section, we cover only setting up the Nagios NRPE plug-in that is
packaged with KVM for IBM z Systems (see Monitored Host in Figure 4-3). The NRPE
daemon requires that the Nagios plug-ins be installed on the remote Linux or UNIX host.
Without these, the daemon cannot monitor the nodes. For implementing the Nagios server,
see the Nagios Quickstart Installation Guides website:
https://assets.nagios.com/downloads/nagioscore/docs/nagioscore/4/en/quickstart.html
Nagios Server Monitored Host
Nagios
NRPE NRPE
Check_load
Check_disk
KVM for IBM z Systems](https://image.slidesharecdn.com/813f4873-82be-45ac-ace3-3348d7081223-151209165745-lva1-app6892/75/Getting-Started-with-KVM-for-IBM-z-Systems-85-2048.jpg)
![72 Getting Started with KVM for IBM z Systems
Now we can start the NRPE daemon, as shown in Example 4-10.
Example 4-10 Start the NRPE daemon
[root@itsokvm1 nagios]# systemctl start nrpe.service
After the NRPE is started in the hypervisor, as shown in Example 4-11, verify that the port
(5666) used by NRPE is in a listening state.
Example 4-11 Starting NRPE in KVM for IBM z Systems
[root@itsokvm1 /]# systemctl status nrpe.service
nrpe.service - NRPE
Loaded: loaded (/usr/lib/systemd/system/nrpe.service; disabled)
Active: active (running) since Tue 2015-09-29 11:43:15 EDT; 1 day 3h ago
Process: 22566 ExecStart=/usr/sbin/nrpe -c /etc/nagios/nrpe.cfg -d $NRPE_SSL_OPT (code=exited,
status=0/SUCCESS)
Main PID: 22567 (nrpe)
CGroup: /system.slice/nrpe.service
ââ22567 /usr/sbin/nrpe -c /etc/nagios/nrpe.cfg -d
Sep 29 11:43:15 itsokvm1.itso.ibm.com nrpe[22567]: Starting up daemon
Sep 29 11:43:15 itsokvm1.itso.ibm.com systemd[1]: Started NRPE.
Sep 29 11:43:15 itsokvm1.itso.ibm.com nrpe[22567]: Server listening on 192.168.60.70 port 5666.
Sep 29 11:43:15 itsokvm1.itso.ibm.com nrpe[22567]: Listening for connections on port 0
Sep 29 11:43:15 itsokvm1.itso.ibm.com nrpe[22567]: Allowing connections from:
127.0.0.1,192.168.60.15
[root@itsokvm1 /]#
vi
[root@itsokvm1 /]# netstat -pant | grep nrpe
tcp 0 0 192.168.60.70:5666 0.0.0.0:* LISTEN 22567/nrpe
[root@itsokvm1 /]#
Next, we need to check whether the NRPE daemon is functioning properly. Execute the
check_nrpe plug-in. The plug-in becomes packaged with the Nagios tool for testing purposes.
From the Nagios server, execute the command shown in Example 4-12 with the IP address of
the server that needs to be monitored.
Example 4-12 Verification of NRPE communication with other remote hosts
[root@monitoring ~]# /usr/local/nagios/libexec/check_nrpe -H 192.168.60.70
NRPE v2.15
[root@monitoring ~]#](https://image.slidesharecdn.com/813f4873-82be-45ac-ace3-3348d7081223-151209165745-lva1-app6892/75/Getting-Started-with-KVM-for-IBM-z-Systems-86-2048.jpg)
![Chapter 4. Managing and monitoring the environment 73
Configuring the remote host (monitored)
Next, create a few object definitions so that you can monitor the remote Linux or UNIX
machine. We created a host.cfg file, shown in Example 4-13, in which our zKVM Hypervisor
template definition is inheriting default values from the generic-host template. We also defined
a new host for the remote itsozkvm1 and itsozkvm2 hosts that references our newly created
zKVM Hypervisor host template.
Example 4-13 The host.cfg file with object definitions
[root@monitoring etc]# pwd
/usr/local/nagios/etc
[root@monitoring etc]# cat hosts.cfg
## Default Linux Host Template ##
define host{
name zKVM HyperVisor ; Name of this template
use generic-host ; Inherit default values
check_period 24x7
check_interval 5
retry_interval 1
max_check_attempts 10
check_command check-host-alive
notification_period 24x7
notification_interval 30
notification_options d,r
contact_groups admins
register 0 ; DONT REGISTER THIS - ITS
A TEMPLATE
}
## Default
define host{
use zKVM HyperVisor ; Inherit default
values from a template
host_name itsozkvm1 ; The name we're
giving to this server
alias IBM KVM ; A longer name for the
server
address 192.168.60.70 ; IP address of Remote
Linux host
}
## Default
define host{
use zKVM HyperVisor ; Inherit default
values from a template
host_name itsozkvm2 ; The name we're
giving to this server
alias IBM KVM ; A longer name for the
server
address 192.168.60.71 ; IP address of Remote
Linux host
}
[root@monitoring etc]#](https://image.slidesharecdn.com/813f4873-82be-45ac-ace3-3348d7081223-151209165745-lva1-app6892/75/Getting-Started-with-KVM-for-IBM-z-Systems-87-2048.jpg)
![74 Getting Started with KVM for IBM z Systems
Next, define the built-in services for monitoring host system resources, as shown in
Example 4-14.
Example 4-14 Define the services that monitor system resources
[root@monitoring etc]# cat services.cfg
define service{
use generic-service
host_name itsozkvm1
service_description CPU Load
check_command check_nrpe!check_load
}
define service{
use generic-service
host_name itsozkvm1
service_description Total Processes
check_command check_nrpe!check_total_procs
}
define service{
use generic-service
host_name itsozkvm1
service_description Current Users
check_command check_nrpe!check_users
}
define service{
use generic-service
host_name itsozkvm1
service_description SSH Monitoring
check_command check_nrpe!check_disk
}
define service{
use generic-service
host_name itsozkvm1
service_description FTP Monitoring
check_command check_nrpe!check_procs
}
[root@monitoring etc]#](https://image.slidesharecdn.com/813f4873-82be-45ac-ace3-3348d7081223-151209165745-lva1-app6892/75/Getting-Started-with-KVM-for-IBM-z-Systems-88-2048.jpg)

![82 Getting Started with KVM for IBM z Systems
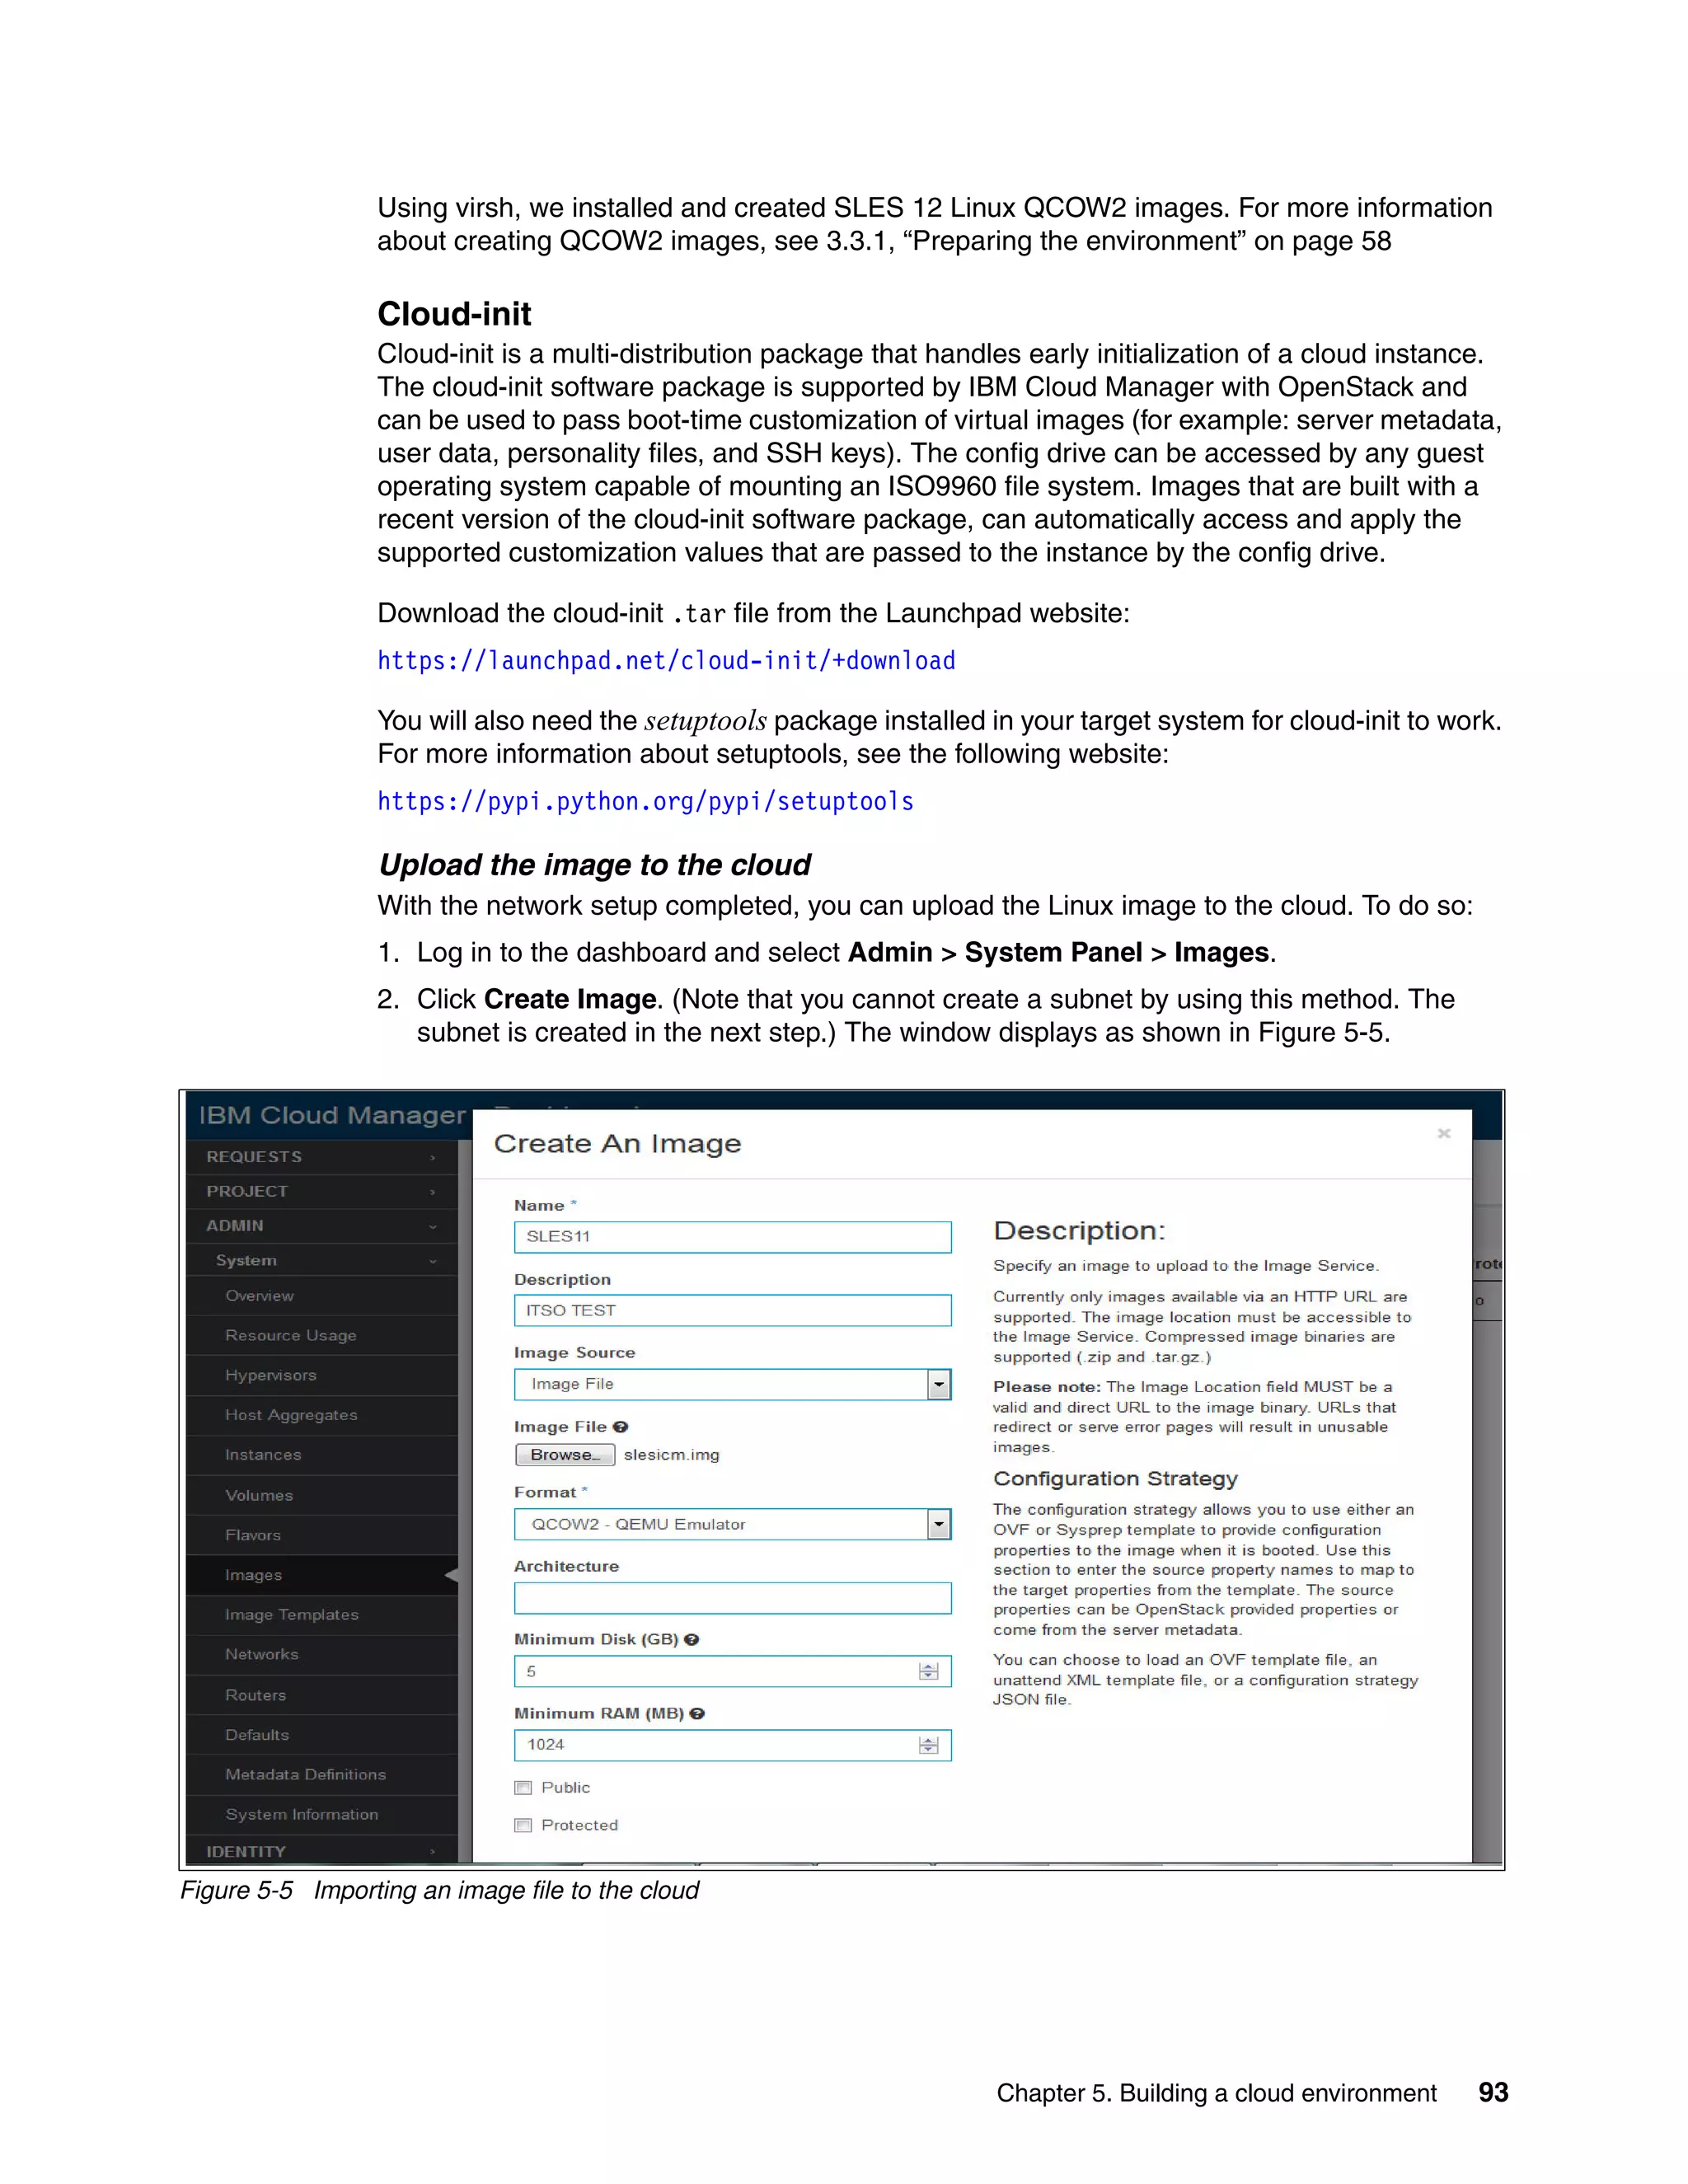
5.2.3 Creating a cloud environment
An environment is a way to map an organization’s real-life workflow to what can be configured
and managed when using the Chef server. In the following sections, we describe the steps
required to create your own cloud environment.
5.2.4 Environment templates
IBM Cloud Manager with OpenStack V4.3 has several prepackaged environments. Using the
knife command, we can list the environmental templates that are available. See
Example 5-1.
Example 5-1 List the default environmental templates
[root@controller ICM43]# knife environment list
_default
example-ibm-os-allinone
example-ibm-os-ha-controller-n-compute
example-ibm-os-single-controller-n-compute
example-ibm-sce
[root@controller ICM43]#
New cloud environment creation
Create a directory in the deployment node for storing environment and other topology files.
This directory is used by the Chef server for deployment purposes. In Example 5-2, we have
copied the templates for the single controller+n compute topology that we are going to deploy.
Example 5-2 Create your own environment
[root@controller itso_env]# knife environment show
example-ibm-os-single-controller-n-compute -d -Fjson > itso_cldenv.json
With the environment created (see Example 5-2), we can change the following attributes in
the new itso_env.json file:
Environment name
openstack.endpoints.host
openstack.endpoints.bind-host
openstack.endpoints.mq.hos
openstack.endpoints.db.host
ibm-sce.self-service.bind_interface
openstack.compute.virt_type
openstack.network.openvswitch.tenant_network_type = "gre"
openstack.network.openvswitch.bridge_mappings = ""
openstack.network.openvswitch.network_vlan_ranges = ""
openstack.network.openvswitch.bridge_mapping_interface = ""
openstack.network.ml2.tenant_network_types = "gre"
openstack.network.ml2.network_vlan_ranges = ""
openstack.network.ml2.flat_networks = ""
Tip: For the latest information about the attributes and parameters specific to KVM for IBM
z Systems, see Deploying an advanced configuration with KVM for IBM z Systems:
http://ibm.co/1MyQiMZ](https://image.slidesharecdn.com/813f4873-82be-45ac-ace3-3348d7081223-151209165745-lva1-app6892/75/Getting-Started-with-KVM-for-IBM-z-Systems-96-2048.jpg)

![84 Getting Started with KVM for IBM z Systems
Register the environment with the Chef server
After the relevant changes have been made to the environment JSON file, we can register the
environment with the Chef server. See Example 5-4.
Example 5-4 Registering the environment with the Chef server
[root@controller itso_env]# knife environment from file itso_cldenv.json
Updated Environment itso_zkvm
[root@controller itso_env]# knife environment list
_default
example-ibm-os-allinone
example-ibm-os-ha-controller-n-compute
example-ibm-os-single-controller-n-compute
example-ibm-sce
itso_zkvm
[root@controller itso_env]#
5.2.5 Creating a controller topology
Now we can proceed with creating a controller topology. In doing so, we provide details about
the following items in an .xml topology file:
The controller node host name and authentication details
Which environment the specific controller node conforms to
The role the controller node will act as
Other optional components to deploy, such as the IBM Self-Service Portal
Example 5-5 Creating a controller topology
[root@controller itso_env]# cat cntrltop.json
{
"name":"cntrltop",
"description":"topology definition for ITSO demo",
"environment":"itso_zkvm",
"secret_file":"/opt/ibm/cmwo/chef-repo/data_bags/example_data_bag_secret",
"run_sequentially":false,
"nodes": [
{
"fqdn":"controller.itso.ibm.com",
"password":"password",
"quit_on_error":true,
"run_order_number":1,
"runlist": [
"role[ibm-os-single-controller-node]",
"role[ibm-sce-node]"
]
}
]
}](https://image.slidesharecdn.com/813f4873-82be-45ac-ace3-3348d7081223-151209165745-lva1-app6892/75/Getting-Started-with-KVM-for-IBM-z-Systems-98-2048.jpg)
![Chapter 5. Building a cloud environment 85
Deploying the controller topology file
With the controller topology file created, we can deploy the topology using the Chef server.
From the deployment server, the Chef server authenticates to the controller node and starts
the deployment of various components of IBM Cloud Manager with OpenStack.
Example 5-6 Deploying the controller node topology
[root@controller itso_env]# knife os manage deploy topology cntrltop.json
Deploying topology 'cntrltop' ...
The topology nodes are being deployed.
Deploying to nodes with run_order_number '1' in parallel.
Bootstrapping nodes...
Bootstrapping node ...
Doing old-style registration with the validation key at
/root/.chef/ibm-validator.pem...
Delete your validation key in order to use your user credentials instead
Connecting to controller.itso.ibm.com
controller.itso.ibm.com Starting Chef Client on Node
controller.itso.ibm.com Bootstrapping Node
controller.itso.ibm.com Synchronizing Cookbooks
controller.itso.ibm.com Compiling Cookbooks
Deploying bootstrapped nodes...
Writing FIPS setting to environment 'itso_zkvm'
Setting run list for node controller.itso.ibm.com...
controller.itso.ibm.com:
run_list:
role[ibm-os-single-controller-node]
role[ibm-sce-node]
controller.itso.ibm.com Converging Node
controller.itso.ibm.com Synchronizing Cookbooks
controller.itso.ibm.com Compiling Cookbooks
controller.itso.ibm.com Running Recipe chef_handler::default
:
:
:
controller.itso.ibm.com Running Recipe openstack-bare-metal::api
controller.itso.ibm.com Running Recipe apache2::default
controller.itso.ibm.com Running Recipe ibm-sce::installfp
controller.itso.ibm.com Completed
All nodes with run_order_number '1' deployed.
Results for deploy of topology 'cntrltop'
Results for nodes with run_order_number '1'
Deploy of node at controller.itso.ibm.com was successful.
Deploy of topology 'cntrltop.json' completed in 9708 seconds.
[root@controller itso_env]#](https://image.slidesharecdn.com/813f4873-82be-45ac-ace3-3348d7081223-151209165745-lva1-app6892/75/Getting-Started-with-KVM-for-IBM-z-Systems-99-2048.jpg)
![86 Getting Started with KVM for IBM z Systems
Verifying the controller node
With the deployment of the controller node completed, we need to verify that all of the
OpenStack services and components are properly deployed and working, as shown in
Example 5-7.
Example 5-7 Verification of Nova services
[root@controller etc]# nova-manage service list
Binary Host Z Zone Status State Updated_At
nova-conductor controller.itso.ibm.com internal enabled XXX 2015-09-24
14:33:50.450389
nova-scheduler controller.itso.ibm.com internal enabled XXX 2015-09-24
14:34:11.488662
nova-consoleauth controller.itso.ibm.com internal enabled XXX 2015-09-24
14:33:54.926035
nova-cert controller.itso.ibm.com internal enabled XXX 2015-09-24
14:34:05.490160
[root@controller etc]#
We have tailored various attributes in the environment JSON file. One of these is to use gre
and openvswitch for connectivity. Therefore, during deployment of the controller node, the
Chef server automatically converts the Ethernet flat network to a bridge. The Chef server also
enables, configures, and couples the Open vSwitch ports for connectivity. The result is shown
in Example 5-8.
Example 5-8 Open vSwitch network configuration
[root@controller ~]# ifconfig
br-ex: flags=4163<UP,BROADCAST,RUNNING,MULTICAST> mtu 1500
inet 192.168.60.15 netmask 255.255.255.0 broadcast 192.168.60.255
inet6 fe80::216:41ff:feed:3cbd prefixlen 64 scopeid 0x20<link>
ether 00:16:41:ed:3c:bd txqueuelen 0 (Ethernet)
RX packets 1574 bytes 162929 (159.1 KiB)
RX errors 0 dropped 0 overruns 0 frame 0
TX packets 874 bytes 307373 (300.1 KiB)
TX errors 0 dropped 0 overruns 0 carrier 0 collisions 0
enp3s0: flags=4163<UP,BROADCAST,RUNNING,MULTICAST> mtu 1500
inet6 fe80::216:41ff:feed:3cbd prefixlen 64 scopeid 0x20<link>
ether 00:16:41:ed:3c:bd txqueuelen 1000 (Ethernet)
RX packets 2077 bytes 201279 (196.5 KiB)
RX errors 0 dropped 0 overruns 0 frame 0
TX packets 898 bytes 310586 (303.3 KiB)
TX errors 0 dropped 0 overruns 0 carrier 0 collisions 0
device interrupt 16
lo: flags=73<UP,LOOPBACK,RUNNING> mtu 65536
inet 127.0.0.1 netmask 255.0.0.0
inet6 ::1 prefixlen 128 scopeid 0x10<host>
loop txqueuelen 0 (Local Loopback)
RX packets 106408 bytes 14737594 (14.0 MiB)
RX errors 0 dropped 0 overruns 0 frame 0
TX packets 106408 bytes 14737594 (14.0 MiB)
TX errors 0 dropped 0 overruns 0 carrier 0 collisions 0
[root@controller ~]# ovs-vsctl show](https://image.slidesharecdn.com/813f4873-82be-45ac-ace3-3348d7081223-151209165745-lva1-app6892/75/Getting-Started-with-KVM-for-IBM-z-Systems-100-2048.jpg)
![Chapter 5. Building a cloud environment 87
142779c0-fa4f-484f-ab1f-920642e9cdba
Bridge br-tun
fail_mode: secure
Port patch-int
Interface patch-int
type: patch
options: {peer=patch-tun}
Port br-tun
Interface br-tun
type: internal
Bridge br-int
fail_mode: secure
Port br-int
Interface br-int
type: internal
Port patch-tun
Interface patch-tun
type: patch
options: {peer=patch-int}
Bridge br-ex
Port br-ex
Interface br-ex
type: internal
Port "enp3s0"
Interface "enp3s0"
ovs_version: "2.3.0"
[root@controller ~]#
5.2.6 Creating a compute node topology
With the successful deployment of the controller node, let’s deploy the KVM for IBM z
Systems compute node. Similar to what we did in Step 5.2.5, “Creating a controller topology”
on page 84 we need to create a topology for the compute node by providing the following
details:
Compute node host name and other authentication details
The environment that the specific controller node conforms to
The role of compute node, for example, ibm-os-compute-node-kvmibm
We also need to create a node-specific network attribute file. This file is only required
because the attributes of our compute node network are different from those defined in our
itso_zKVM environment file, itso_cldenv.json. For example, our controller node network
interface is ens192, but on the compute node we have a different network interface
(enccw0.0.2d00). So, using the attribute file as Example 5-9 on page 88 shows, we can
specify node-specific attributes.
Attention: Use care when providing the required attributes in the topology files, Some
customization options might not be supported for all hypervisor types, and some cannot be
configured after you deploy your cloud environment.](https://image.slidesharecdn.com/813f4873-82be-45ac-ace3-3348d7081223-151209165745-lva1-app6892/75/Getting-Started-with-KVM-for-IBM-z-Systems-101-2048.jpg)
![88 Getting Started with KVM for IBM z Systems
Example 5-9 System and network attributes file for the KVM for IBM z Systems compute node
[root@controller itso_env]# cat zkvmtop.json
{
"name":"zkvmtop",
"description":"topology definition for zkvm",
"environment":"itso_zkvm",
"secret_file":"/opt/ibm/cmwo/chef-repo/data_bags/example_data_bag_secret",
"run_sequentially":false,
"nodes": [
{
"fqdn":"itsokvm1.itso.ibm.com",
"password":"zlinux",
"quit_on_error":true,
"run_order_number":1,
"runlist": [
"role[ibm-os-compute-node-kvmibm]"
],
"attribute_file":"zkvm-attr.json"
}
]
}
[root@controller itso_env]# cat zkvm-attr.json
{
"openstack": {
"endpoints": {
"network-openvswitch": {
"bind_interface": "enccw0.0.2d00"
},
"compute-vnc-bind": {
"bind_interface": "enccw0.0.2d00"
},
"compute-vnc-proxy-bind": {
"bind_interface": "enccw0.0.2d00"
},
"compute-serial-console-bind": {
"bind_interface": "enccw0.0.2d00"
}
}
}
}](https://image.slidesharecdn.com/813f4873-82be-45ac-ace3-3348d7081223-151209165745-lva1-app6892/75/Getting-Started-with-KVM-for-IBM-z-Systems-102-2048.jpg)
![Chapter 5. Building a cloud environment 89
Compute node deployment
After customizing the topology and attribute files, proceed with the deployment of the
compute node topology, as shown in Example 5-10.
Example 5-10 Deploying the compute node topology using knife
[root@controller itso_env]# knife os manage deploy topology zkvmtop.json
Deploying topology 'zkvmtop' ...
The topology nodes are being deployed.
Deploying to nodes with run_order_number '1' in parallel.
Bootstrapping nodes...
Bootstrapping node ...
Doing old-style registration with the validation key at
/root/.chef/ibm-validator.pem...
Delete your validation key in order to use your user credentials instead
Connecting to itsokvm1.itso.ibm.com
itsokvm1.itso.ibm.com Starting Chef Client on Node
itsokvm1.itso.ibm.com Bootstrapping Node
itsokvm1.itso.ibm.com Synchronizing Cookbooks
itsokvm1.itso.ibm.com Compiling Cookbooks
Deploying bootstrapped nodes...
Setting run list for node itsokvm1.itso.ibm.com...
itsokvm1.itso.ibm.com:
run_list: role[ibm-os-compute-node-kvmibm]
itsokvm1.itso.ibm.com Converging Node
itsokvm1.itso.ibm.com Synchronizing Cookbooks
itsokvm1.itso.ibm.com Compiling Cookbooks
itsokvm1.itso.ibm.com Running Recipe chef_handler::default
itsokvm1.itso.ibm.com Running Recipe ibm-openstack-common::cmwo-version
:
:
:
itsokvm1.itso.ibm.com Running Recipe openstack-network::openvswitch
itsokvm1.itso.ibm.com Running Recipe openstack-telemetry::agent-compute
itsokvm1.itso.ibm.com Completed
All nodes with run_order_number '1' deployed.
Results for deploy of topology 'zkvmtop'
Results for nodes with run_order_number '1'
Deploy of node at itsokvm1.itso.ibm.com was successful.
Deploy of topology 'zkvmtop.json' completed in 139 seconds.
[root@controller itso_env]#
Important: As a prerequisite, the repository of the compute node has to be enabled and
recognized by the YUM repository.](https://image.slidesharecdn.com/813f4873-82be-45ac-ace3-3348d7081223-151209165745-lva1-app6892/75/Getting-Started-with-KVM-for-IBM-z-Systems-103-2048.jpg)
![90 Getting Started with KVM for IBM z Systems
5.2.7 Cloud environment verification
In this section, we verify that OpenStack services were successfully deployed.
Compute service
From the controller node, execute the Nova service command to confirm that the compute
node is now deployed and managed by IBM Cloud Manager with OpenStack.
Example 5-11 Nova service list
[root@controller itso_env]# source ~/openrc
[root@controller itso_env]# nova service-list
+----+------------------+-------------------------+----------+---------+-------+---------------------------
| Id | Binary | Host | Zone | Status | State | Updated_at
+----+------------------+-------------------------+----------+---------+-------+---------------------------
| 1 | nova-conductor | controller.itso.ibm.com | internal | enabled | up | 2015-09-29T02:13:11.644559
| - |
| 4 | nova-scheduler | controller.itso.ibm.com | internal | enabled | up | 2015-09-29T02:13:13.412254
| - |
| 5 | nova-consoleauth | controller.itso.ibm.com | internal | enabled | up | 2015-09-29T02:13:20.666483
| - |
| 6 | nova-cert | controller.itso.ibm.com | internal | enabled | up | 2015-09-29T02:13:17.528850
| - |
| 21 | nova-compute | itsokvm1.itso.ibm.com | nova | enabled | up | 2015-09-29T02:13:13.291343
| -
|+----+------------------+-------------------------+----------+---------+-------+--------------------------
Network services
Every network service or extension in the cloud environment registers itself with the Neutron
server when the server or extension starts. For this reason, it is best to determine whether the
compute node network agents are registered with the controller (see Example 5-12). To an
extent, this also verifies that the environment is deployed correctly.
Example 5-12 Neutron agent list
[root@controller ~]# neutron agent-list
+--------------------------------------+--------------------+-------------------------+-------+------------
| id | agent_type | host | alive |
admin_state_up | binary |
+--------------------------------------+--------------------+-------------------------+-------+------------
| b0cacb05-a5c7-4a50-9c18-e1646a8ba950 | DHCP agent | controller.itso.ibm.com | :-) | True
| neutron-dhcp-agent |
| 67e56dfa-9f0d-432e-b8c7-b17ef42516d1 | L3 agent | controller.itso.ibm.com | :-) | True
| neutron-l3-agent |
| e1be4b6c-9855-4a43-ab2a-a8d76db61cfa | Metadata agent | controller.itso.ibm.com | :-) | True
| neutron-metadata-agent |
| f84df0fc-e243-4375-9482-217efc73d1e4 | Open vSwitch agent | controller.itso.ibm.com | :-) | True
| neutron-openvswitch-agent |
| 4ceb8347-5b0f-46a3-98e8-10ef1c2428e4 | Loadbalancer agent | controller.itso.ibm.com | :-) | True
| neutron-lbaas-agent |
| 23e194b5-f825-4bca-9db2-407065a9b569 | Open vSwitch agent | itsokvm1.itso.ibm.com | :-) | True
| neutron-openvswitch-agent |
+--------------------------------------+--------------------+-------------------------+-------+----------------+--------------------------
Important: The Nova compute node must have a status of enabled, as shown in
Example 5-11. Otherwise, the controller will not communicate with the compute node.](https://image.slidesharecdn.com/813f4873-82be-45ac-ace3-3348d7081223-151209165745-lva1-app6892/75/Getting-Started-with-KVM-for-IBM-z-Systems-104-2048.jpg)

![© Copyright IBM Corp. 2015. All rights reserved. 97
Appendix B. Installing IBM Cloud Manager
with OpenStack
This appendix describes the steps required to install IBM Cloud Manager with OpenStack.
Prerequisites
Before installing IBM Cloud Manager with OpenStack, be sure that the prerequisites are met.
Yum repository
The first and foremost prerequisite that needs to be met before deployment is to create
repositories for the controller node OS and its optional operating system packages. If you are
not connected to a network for downloading the repositories from the RedHat website
(http://redhat.com), you have the option to create your own local repositories using the
RHEL7.1 repository and the optional RHEL 7.1 packages (see Example B-1).
Example B-1 Local yum repository
[root@controller ~]# yum repolist
Loaded plugins: langpacks, product-id, subscription-manager
This system is not registered to Red Hat Subscription Management. You can use
subscription-manager to register.
repo id repo name Status
local RHEL 7.1 linux yum repository 4,371
optional RHEL 7.1 linux Optional yum repository 3,194
repolist: 8,565
B](https://image.slidesharecdn.com/813f4873-82be-45ac-ace3-3348d7081223-151209165745-lva1-app6892/75/Getting-Started-with-KVM-for-IBM-z-Systems-111-2048.jpg)
![98 Getting Started with KVM for IBM z Systems
Host name
The host where you install the controller server must have a fully qualified domain name that
includes the domain suffix. For example, the fully qualified domain name would be
mydeploymentserver.ibm.com rather than mydeploymentserver. To verify that the controller
and compute node have fully qualified domain names, use the command shown in
Example B-2.
Example B-2 Verification of fully qualified domain name
[root@controller ~]# hostname
controller.itso.ibm.com
[root@controller ~]#
The host name of the controller system must be added to the DNS system. To verify that the
host name is resolvable, issue the command shown in Example B-3.
Example B-3 Verification of resolvable host name
[root@controller ~]# hostname -f
controller.itso.ibm.com
[root@controller ~]#
Security-Enhanced Linux (SELinux)
For ease of deployment, we dynamically disabled SELinux in the controller node, as shown in
Example B-4.
Example B-4 Disabling SELinux
[root@controller ICM43]# getenforce
Enforcing
[root@controller ICM43]# setenforce Permissive
[root@controller ICM43]# getenforce
Permissive
[root@controller ICM43]#
Network Time Protocol
Another important prerequisite is to ensure that you synchronize the deployment server with
the Network Time Protocol (NTP) server.
Before you can deploy the cloud, you need to ensure that all of the nodes are synchronized
with the NTP server. If the NTP server is not available or cannot be connected to, synchronize
the time across the controller and compute nodes manually. Some deviation is acceptable.](https://image.slidesharecdn.com/813f4873-82be-45ac-ace3-3348d7081223-151209165745-lva1-app6892/75/Getting-Started-with-KVM-for-IBM-z-Systems-112-2048.jpg)
![Appendix B. Installing IBM Cloud Manager with OpenStack 99
Installing IBM Cloud Manager 4.3
To install IBM Cloud Manager, you need to either download installation packages, as we did
for examples in this book, or order a DVD that is specific to the platform on which the
controller will be installed. After the installer packages are downloaded, we provide execute
permission to all of the installable packages in the directory, as shown in Example B-5.
Example B-5 IBM Cloud Manager with OpenStack 4.3 installable packages
[root@controller ICM43]# ls -lh
total 12G
-rwxrwxrwx. 1 root root 5.5G Jun 30 06:04 cmwo430_xlinux_install.bin
-rwxrwxrwx. 1 root root 409 Jun 30 04:39 cmwo_4.3.lic
-rwxrwxrwx. 1 root root 2.8G Jul 2 23:39 cmwo_fixpack_4.3.0.1.tar.gz
-rwxrwxrwx. 1 root root 3.5G Sep 14 04:06 cmwo_fixpack_4.3.0.3.tar.gz
-rwxrwxrwx. 1 root root 3.0K Jun 30 04:38 cmwo-install-sample.rsp
-rwxrwxrwx. 1 root root 59M Jun 30 04:39 IBM Cloud Manager with OpenStack Hyper-V
Agent.msi
-rwxrwxrwx. 1 root root 145K Jun 30 04:39 readme.pdf
-rwxrwxrwx. 1 root root 8.0K Jun 30 04:39 readme.txt
[root@controller ICM43]#
To install, run the Cloud Manager with OpenStack 4.3 binary installable package, as shown in
Example B-6. The process takes you through interactive steps during the installation.
Example B-6 IBM Cloud Manager with OpenStack 4.3 Installer
[root@controller ICM43]# ./cmwo430_xlinux_install.bin
Preparing to install...
Extracting the JRE from the installer archive...
Unpacking the JRE...
Extracting the installation resources from the installer archive...
Configuring the installer for this system's environment...
Launching installer...
===============================================================================
Choose Locale...
----------------
1- Deutsch
->2- English
...
CHOOSE LOCALE BY NUMBER: 2
Important: IBM Cloud Manager with OpenStack 4.3 packages are available only for
x86_64 and ppc64 platforms. At the time of writing, z Systems drivers are supported only
as compute node services.](https://image.slidesharecdn.com/813f4873-82be-45ac-ace3-3348d7081223-151209165745-lva1-app6892/75/Getting-Started-with-KVM-for-IBM-z-Systems-113-2048.jpg)
![Appendix B. Installing IBM Cloud Manager with OpenStack 101
Verifying IBM Cloud Manager installation
The installation was successful, as shown in Example B-8 on page 100. However, a
suggested practice is to view the logs for any errors or warnings. The installation logs are
available in the /opt/ibm/cmwo/_installation/Logs directory and can typically be identified
uniquely by the date and time of the installation.
Example B-9 shows a sample log file.
Example B-9 Installation log location
[root@controller Logs]# pwd
/opt/ibm/cmwo/_installation/Logs
[root@controller Logs]# ls -la
total 672
drwxrwxr-x. 2 root root 4096 Sep 22 16:47 .
drwxr-x---. 3 root root 4096 Sep 22 16:47 ..
-rwxr-xr-x. 1 root root 677109 Sep 22 16:47
IBM_Cloud_Manager_with_OpenStack_Install_09_22_2015_16_28_25.log
[root@controller Logs]#
Next, verify that the Chef server is installed properly and is running without any issues.
Example B-10 shows a sample.
Example B-10 Chef server status
[root@controller ~]# chef-server-ctl status
run: bookshelf: (pid 4824) 767s; run: log: (pid 30281) 1135s
run: nginx: (pid 4860) 767s; run: log: (pid 30451) 1131s
run: oc_bifrost: (pid 4866) 766s; run: log: (pid 29992) 1142s
run: oc_id: (pid 4896) 766s; run: log: (pid 30029) 1141s
run: opscode-erchef: (pid 4928) 765s; run: log: (pid 30323) 1134s
run: opscode-expander: (pid 4934) 764s; run: log: (pid 30216) 1137s
run: opscode-expander-reindexer: (pid 4949) 764s; run: log: (pid 30224) 1136s
run: opscode-solr4: (pid 4959) 763s; run: log: (pid 30105) 1138s
run: postgresql: (pid 4966) 763s; run: log: (pid 29947) 1143s
run: rabbitmq: (pid 4973) 763s; run: log: (pid 29909) 1149s
run: redis_lb: (pid 5067) 762s; run: log: (pid 30428) 1132s
The components that are necessary for creating a cloud environment are installed and ready
for use.
Applying IBM Cloud Manager with OpenStack 4.3 fix packs
While writing this book, we downloaded the latest fix pack (Fix Pack 3) to update Chef
cookbooks and other resources that are stored on our controller server. Any necessary fix
packs can be downloaded from IBM Fix Central:
http://www.ibm.com/support/fixcentral/
After the download, the fix packs need to be stored locally in your controller system.
The extraction of a fix pack is shown in Example B-11.
Example B-11 Extracting the fix pack
[root@controller ICM43]# tar -zxvf cmwo_fixpack_4.3.0.3.tar.gz](https://image.slidesharecdn.com/813f4873-82be-45ac-ace3-3348d7081223-151209165745-lva1-app6892/75/Getting-Started-with-KVM-for-IBM-z-Systems-115-2048.jpg)
![102 Getting Started with KVM for IBM z Systems
After the fix pack is extracted from its compressed format, recheck the IBM Cloud Manager
with OpenStack 4.3 installation logs to ensure that there are no errors reported during
installation.
Upon confirmation, apply the patch as shown in Example B-12.
Example B-12 Applying the fix pack
[root@controller ICM43]# ./install_cmwo_fixpack.sh
09/23/2015 10:49:00 AM Starting installation of fix pack for IBM Cloud Manager
with OpenStack 4.3.
09/23/2015 10:49:00 AM Installed version is 4.3.0.0-20150514-1836 .
09/23/2015 10:49:00 AM Fix pack is 4.3.0.3 F20150909-2056.
09/23/2015 10:49:01 AM Copying product files...
09/23/2015 10:51:28 AM Copy successful.
09/23/2015 10:51:28 AM Running post-install fix pack scripts...
09/23/2015 10:56:35 AM Post-install scripts completed successfully.
09/23/2015 10:56:35 AM IBM Cloud Manager with OpenStack fix pack installed
successfully.
Fix pack install logs archived as
/opt/ibm/cmwo/version/install_cmwo_fixpack_2015-09-23_10_56_35_logs.zip.
[root@controller ICM43]#
After the fix pack is applied to the IBM Cloud Manager with OpenStack installation, we
suggest verifying that the fix pack logs do not include errors or warning messages.](https://image.slidesharecdn.com/813f4873-82be-45ac-ace3-3348d7081223-151209165745-lva1-app6892/75/Getting-Started-with-KVM-for-IBM-z-Systems-116-2048.jpg)
![© Copyright IBM Corp. 2015. All rights reserved. 103
Appendix C. Basic setup and use of zHPM
This appendix describes our first steps with the IBM z Systems Hypervisor Performance
Manager (zHPM), which is used to bring a goal-oriented approach to the performance
management of a hypervisor.
Example C-1 shows the commands for enabling and starting zHPM.
Example C-1 Enabling and starting zhpmd
[root@itsokvm1 ~]# systemctl enable zhpmd
ln -s '/usr/lib/systemd/system/zhpmd.service'
'/etc/systemd/system/multi-user.target.wants/zhpmd.service'
[root@itsokvm1 ~]# systemctl start zhpmd
In our environment, we used the root user ID, which already has all authorities needed to
manage zHPM. Example C-2 shows how to add a non-root user ID to the appropriate groups
so that the user ID is authorized to use zHPM.
Example C-2 Allowing root to manage zHPM
[root@itsokvm1 ~]# usermod -a -G zhpmuser,zhpmadm non-root
Example C-3 shows that, by default, CPU management was not enabled. It also shows how it
was enabled.
Example C-3 Enabling zHPM CPU management
[root@itsokvm1 ~]# zhpm config --insecure
zHPM CPU Management is off
[root@itsokvm1 ~]# zhpm config --cpu-mgmt on --insecure
zHPM CPU Management is on
C
Terminology: The term virtual server is used throughout this appendix and is equivalent
to a virtual machine.](https://image.slidesharecdn.com/813f4873-82be-45ac-ace3-3348d7081223-151209165745-lva1-app6892/75/Getting-Started-with-KVM-for-IBM-z-Systems-117-2048.jpg)
![104 Getting Started with KVM for IBM z Systems
Then, we created a new workload resource group named darling. Example C-4 shows how it
was created and lists all of the defined workload resource groups and a default definition of
the new group, together with a default policy and service class.
Example C-4 Creating and displaying a workload resource group
[root@itsokvm1 ~]# zhpm wrg-create --wrg-name darling --insecure
Created new workload resource group: b7f5fead-20d1-4edf-9386-d6f8b8332b54
[root@itsokvm1 ~]# zhpm wrg-display --insecure
Wrg-Id Wrg-Name BI #VS
------------------------------------ -------------------------------- ------ ---
b28ccaf1-ee6d-4bd2-86a4-4eb5e51f3db6 zHPMDefaultWorkloadResourceGroup medium 7
b7f5fead-20d1-4edf-9386-d6f8b8332b54 darling medium 0
[root@itsokvm1 ~]# zhpm wrg-display --wrg-name darling --insecure --json
{
"workload-resource-groups": [
{
"wrg-info": {
"resource-uri": "/zhpm/wsapi/v1/workload-resource-groups/b7f5fea
d-20d1-4edf-9386-d6f8b8332b54",
"resource-id": "b7f5fead-20d1-4edf-9386-d6f8b8332b54",
"name": "darling",
"description": ""
},
"performance-policy": {
"perf-policy-info": {
"name": "zHPMDefaultPerformancePolicy",
"description": "zHPM Generated Default Performance Policy",
"last-modified-date": 1444991826275,
"last-modified-by": "root",
"business-importance": "medium"
},
"service-classes": [
{
"name": "zHPMDefaultServiceClass",
"description": "zHPM generated default service class",
"business-importance": "medium",
"velocity-goal": "moderate",
"cpu-critical": false,
"virtual-server-name-filters": [
".*"
]
}
]
},
"virtual-servers": []
}
]
}](https://image.slidesharecdn.com/813f4873-82be-45ac-ace3-3348d7081223-151209165745-lva1-app6892/75/Getting-Started-with-KVM-for-IBM-z-Systems-118-2048.jpg)
![Appendix C. Basic setup and use of zHPM 105
We added a virtual machine, linux80, to the darling workload resource group. Example C-5
shows how we added the virtual server and displayed information about all workload resource
groups. The darling group now contains one virtual server. Because all virtual servers have
the same goals, there are no dynamic resource adjustments reported by running the
ra-display command.
Example C-5 Adding a virtual machine and displaying information
[root@itsokvm1 ~]# zhpm --insecure vs-wrg-add --vs-name linux80 --wrg-name darli
ng
Successfully associated workload resource group to virtual server
[root@itsokvm1 ~]# zhpm wrg-display --insecure
Wrg-Id Wrg-Name BI #VS
------------------------------------ -------------------------------- ------ ---
b28ccaf1-ee6d-4bd2-86a4-4eb5e51f3db6 zHPMDefaultWorkloadResourceGroup medium 6
b7f5fead-20d1-4edf-9386-d6f8b8332b54 darling medium 1
[root@itsokvm1 ~]# zhpm ra-display --insecure
No dynamic resource adjustments have occurred over duration (60min)
zHPM CPU Management is on
We created new policy and service class definitions and updated the darling workload
resource group with this information, as shown in Example C-6. Virtual servers managed by
this policy have higher velocity goals and higher importance than the default virtual servers
managed by the default policy.
Example C-6 Updating policy and displaying information
[root@itsokvm1 ~]# cat darling.pol
{
"performance-policy": {
"perf-policy-info": {
"name": "Darling",
"description": "Policy for darling workload",
"business-importance": "high"
},
"service-classes": [
{
"name": "ServiceClass1",
"description": "service class",
"business-importance": "high",
"velocity-goal": "fast",
"cpu-critical": false,
"virtual-server-name-filters":
[".*"]
}]
}
}
[root@itsokvm1 ~]# zhpm --insecure wrg-update --wrg-name darling --perf-policy darling.pol
Successfully set performance policy for workload resource group:
b7f5fead-20d1-4edf-9386-d6f8b8332b54
[root@itsokvm1 ~]# zhpm wrg-display --wrg-name darling --insecure
Wrg-Id Wrg-Name BI #VS
------------------------------------ -------- ------- ---
b7f5fead-20d1-4edf-9386-d6f8b8332b54 darling high 1](https://image.slidesharecdn.com/813f4873-82be-45ac-ace3-3348d7081223-151209165745-lva1-app6892/75/Getting-Started-with-KVM-for-IBM-z-Systems-119-2048.jpg)
![106 Getting Started with KVM for IBM z Systems
[root@itsokvm1 ~]# zhpm wrg-display --insecure
Wrg-Id Wrg-Name BI #VS
------------------------------------ -------------------------------- ------- ---
b28ccaf1-ee6d-4bd2-86a4-4eb5e51f3db6 zHPMDefaultWorkloadResourceGroup medium 6
b7f5fead-20d1-4edf-9386-d6f8b8332b54 darling high 1
Because the linux80 virtual machine now has more demanding than competing virtual
servers do, we see dynamic resource adjustments in the ra-display output, as shown in
Example C-7. Virtual servers with less important goals are CPU donors for linux80.
Example C-7 Displaying dynamic resource adjustments
[root@itsokvm1 ~]# zhpm ra-display --insecure
Adj-Time Type CPU-SB CPU-SA Vs-Name Wrg-Name
------------------- -------- ------ ------ ----------------- --------------------------------
2015-10-16 07:12:56 receiver 1024 1084 linux80 darling
donor 1024 1012 linux84 zHPMDefaultWorkloadResourceGroup
donor 1024 1012 instance-00000003 zHPMDefaultWorkloadResourceGroup
donor 1024 1012 linux83 zHPMDefaultWorkloadResourceGroup
donor 1024 1012 linux85 zHPMDefaultWorkloadResourceGroup
donor 1024 1012 linux82 zHPMDefaultWorkloadResourceGroup
2015-10-16 07:13:56 receiver 1084 1154 linux80 darling
donor 1012 998 linux84 zHPMDefaultWorkloadResourceGroup
donor 1012 998 instance-00000003 zHPMDefaultWorkloadResourceGroup
donor 1012 998 linux83 zHPMDefaultWorkloadResourceGroup
donor 1012 998 linux85 zHPMDefaultWorkloadResourceGroup
donor 1012 998 linux82 zHPMDefaultWorkloadResourceGroup
Adj-Time Reason R-Vs-Name R-Wrg-Name
-------- ------ --------- ----------
No failed dynamic resource adjustments have occurred over duration (60min)
After a while, there were no more adjustments because the PI of the service class associated
with the receiver virtual machine achieved its goal. We decided to redefine the darling
workload resource group with even stricter goals, as shown in Example C-8.
Example C-8 Updating policy and displaying information
[root@itsokvm1 ~]# cat darling.pol
{
"performance-policy": {
"perf-policy-info": {
"name": "Darling",
"description": "Policy for darling workload",
"business-importance": "highest"
},
"service-classes": [
{
"name": "ServiceClass1",
"description": "service class",
"business-importance": "highest",
"velocity-goal": "fastest",
"cpu-critical": true,
"virtual-server-name-filters":
[".*"]
}]
}](https://image.slidesharecdn.com/813f4873-82be-45ac-ace3-3348d7081223-151209165745-lva1-app6892/75/Getting-Started-with-KVM-for-IBM-z-Systems-120-2048.jpg)
![Appendix C. Basic setup and use of zHPM 107
}
[root@itsokvm1 ~]# zhpm --insecure wrg-update --wrg-name darling --perf-policy darling.pol
Successfully set performance policy for workload resource group:
b7f5fead-20d1-4edf-9386-d6f8b8332b54
[root@itsokvm1 ~]# zhpm wrg-display --wrg-name darling --insecure
Wrg-Id Wrg-Name BI #VS
------------------------------------ -------- ------- ---
b7f5fead-20d1-4edf-9386-d6f8b8332b54 darling highest 1
[root@itsokvm1 ~]# zhpm wrg-display --insecure
Wrg-Id Wrg-Name BI #VS
------------------------------------ -------------------------------- ------- ---
b28ccaf1-ee6d-4bd2-86a4-4eb5e51f3db6 zHPMDefaultWorkloadResourceGroup medium 6
b7f5fead-20d1-4edf-9386-d6f8b8332b54 darling highest 1
Example C-9 shows that linux80 was able to receive another set of resources from other
virtual servers to satisfy its more demanding goal.
Example C-9 Updating policy and displaying information
[root@itsokvm1 ~]# zhpm ra-display --insecure
Adj-Time Type CPU-SB CPU-SA Vs-Name Wrg-Name
------------------- -------- ------ ------ ----------------- --------------------------------
2015-10-16 07:12:56 receiver 1024 1084 linux80 darling
donor 1024 1012 linux84 zHPMDefaultWorkloadResourceGroup
donor 1024 1012 instance-00000003 zHPMDefaultWorkloadResourceGroup
donor 1024 1012 linux83 zHPMDefaultWorkloadResourceGroup
donor 1024 1012 linux85 zHPMDefaultWorkloadResourceGroup
donor 1024 1012 linux82 zHPMDefaultWorkloadResourceGroup
2015-10-16 07:13:56 receiver 1084 1154 linux80 darling
donor 1012 998 linux84 zHPMDefaultWorkloadResourceGroup
donor 1012 998 instance-00000003 zHPMDefaultWorkloadResourceGroup
donor 1012 998 linux83 zHPMDefaultWorkloadResourceGroup
donor 1012 998 linux85 zHPMDefaultWorkloadResourceGroup
donor 1012 998 linux82 zHPMDefaultWorkloadResourceGroup
2015-10-16 07:19:41 receiver 1154 1224 linux80 darling
donor 998 984 linux84 zHPMDefaultWorkloadResourceGroup
donor 998 984 instance-00000003 zHPMDefaultWorkloadResourceGroup
donor 998 984 linux83 zHPMDefaultWorkloadResourceGroup
donor 998 984 linux85 zHPMDefaultWorkloadResourceGroup
donor 998 984 linux82 zHPMDefaultWorkloadResourceGroup
Adj-Time Reason R-Vs-Name R-Wrg-Name
-------- ------ --------- ----------
No failed dynamic resource adjustments have occurred over duration (60min)](https://image.slidesharecdn.com/813f4873-82be-45ac-ace3-3348d7081223-151209165745-lva1-app6892/75/Getting-Started-with-KVM-for-IBM-z-Systems-121-2048.jpg)