This Linux Security Cookbook provides over 150 scripts and configuration files to help secure Linux systems. It includes solutions for tasks like encrypting email within applications, restricting network access by time of day, setting up firewalls and key-based SSH authentication. The book aims to help administrators secure their systems without needing to look up complex syntax. It covers topics like system integrity checks with Tripwire, firewall configuration with iptables, network access control, authentication techniques and authorization controls.
![[ Team LiB ]
• Table of Contents
• Index
• Reviews
• Reader Reviews
• Errata
Linux Security Cookbook
By Daniel J. Barrett, Robert G. Byrnes, Richard Silverman
Publisher: O'Reilly
Pub Date: June 2003
ISBN: 0-596-00391-9
Pages: 332
The Linux Security Cookbook includes real solutions to a wide range of targeted problems, such as
sending encrypted email within Emacs, restricting access to network services at particular times of day,
firewalling a webserver, preventing IP spoofing, setting up key-based SSH authentication, and much
more. With over 150 ready-to-use scripts and configuration files, this unique book helps administrators
secure their systems without having to look up specific syntax.
[ Team LiB ]](https://image.slidesharecdn.com/linuxsecuritycookbook-120930200536-phpapp01/85/Linux-security-cookbook-1-320.jpg)
![[ Team LiB ]
• Table of Contents
• Index
• Reviews
• Reader Reviews
• Errata
Linux Security Cookbook
By Daniel J. Barrett, Robert G. Byrnes, Richard Silverman
Publisher: O'Reilly
Pub Date: June 2003
ISBN: 0-596-00391-9
Pages: 332
Copyright
Preface
A Cookbook About Security?!?
Intended Audience
Roadmap of the Book
Our Security Philosophy
Supported Linux Distributions
Trying the Recipes
Conventions Used in This Book
We'd Like to Hear from You
Acknowledgments
Chapter 1. System Snapshots with Tripwire
Recipe 1.1. Setting Up Tripwire
Recipe 1.2. Displaying the Policy and Configuration
Recipe 1.3. Modifying the Policy and Configuration
Recipe 1.4. Basic Integrity Checking
Recipe 1.5. Read-Only Integrity Checking
Recipe 1.6. Remote Integrity Checking
Recipe 1.7. Ultra-Paranoid Integrity Checking
Recipe 1.8. Expensive, Ultra-Paranoid Security Checking
Recipe 1.9. Automated Integrity Checking](https://image.slidesharecdn.com/linuxsecuritycookbook-120930200536-phpapp01/85/Linux-security-cookbook-2-320.jpg)


![Recipe 9.39. Displaying All Executed Commands
Recipe 9.40. Parsing the Process Accounting Log
Recipe 9.41. Recovering from a Hack
Recipe 9.42. Filing an Incident Report
Colophon
Index
[ Team LiB ]](https://image.slidesharecdn.com/linuxsecuritycookbook-120930200536-phpapp01/85/Linux-security-cookbook-7-320.jpg)
![[ Team LiB ]
Copyright
Copyright © 2003 O'Reilly & Associates, Inc.
Printed in the United States of America.
Published by O'Reilly & Associates, Inc., 1005 Gravenstein Highway North, Sebastopol, CA 95472.
O'Reilly & Associates books may be purchased for educational, business, or sales promotional use. Online
editions are also available for most titles (http://safari.oreilly.com). For more information, contact our
corporate/institutional sales department: (800) 998-9938 or corporate@oreilly.com.
Nutshell Handbook, the Nutshell Handbook logo, and the O'Reilly logo are registered trademarks of
O'Reilly & Associates, Inc. Many of the designations used by manufacturers and sellers to distinguish their
products are claimed as trademarks. Where those designations appear in this book, and O'Reilly &
Associates, Inc. was aware of a trademark claim, the designations have been printed in caps or initial
caps. The association between the image of a campfire scene and the topic of Linux security is a
trademark of O'Reilly & Associates, Inc.
While every precaution has been taken in the preparation of this book, the publisher and authors assume
no responsibility for errors or omissions, or for damages resulting from the use of the information
contained herein.
[ Team LiB ]](https://image.slidesharecdn.com/linuxsecuritycookbook-120930200536-phpapp01/85/Linux-security-cookbook-8-320.jpg)
![[ Team LiB ]
Preface
If you run a Linux machine, you must think about security. Consider this story told by Scott, a system
administrator we know:
In early 2001, I was asked to build two Linux servers for a client. They just wanted the machines
installed and put online. I asked my boss if I should secure them, and he said no, the client would
take care of all that. So I did a base install, no updates. The next morning, we found our network
switch completely saturated by a denial of service attack. We powered off the two servers, and
everything returned to normal. Later I had the fun of figuring out what had happened. Both
machines had been rooted, via ftpd holes, within six hours of going online. One had been scanning
lots of other machines for ftp and portmap exploits. The other was blasting SYN packets at some
poor cablemodem in Canada, saturating our 100Mb network segment. And you know, they had been
rooted independently, and the exploits had required no skill whatsoever. Just typical script kiddies.
Scott's story is not unusual: today's Internet is full of port scanners—both the automated and human
kinds—searching for vulnerable systems. We've heard of systems infiltrated one hour after installation.
Linux vendors have gotten better at delivering default installs with most vital services turned off instead of
left on, but you still need to think about security from the moment you connect your box to the Net . . .
and even earlier.
[ Team LiB ]](https://image.slidesharecdn.com/linuxsecuritycookbook-120930200536-phpapp01/85/Linux-security-cookbook-9-320.jpg)
![[ Team LiB ]
A Cookbook About Security?!?
Computer security is an ongoing process, a constant contest between system administrators and
intruders. It needs to be monitored carefully and revised frequently. So . . . how the heck can this
complex subject be condensed into a bunch of cookbook recipes?
Let's get one thing straight: this book is absolutely not a total security solution for your Linux computers.
Don't even think it. Instead, we've presented a handy guide filled with easy-to-follow recipes for
improving your security and performing common tasks securely. Need a quick way to send encrypted
email within Emacs? It's in here. How about restricting access to your network services at particular times
of day? Look inside. Want to firewall your web server? Prevent IP spoofing? Set up key-based SSH
authentication? We'll show you the specific commands and configuration file entries you need.
In short: this book won't teach you security, but it will demonstrate helpful solutions to targeted
problems, guiding you to close common security holes, and saving you the trouble of looking up specific
syntax.
[ Team LiB ]](https://image.slidesharecdn.com/linuxsecuritycookbook-120930200536-phpapp01/85/Linux-security-cookbook-10-320.jpg)
![[ Team LiB ]
Intended Audience
Here are some good reasons to read this book:
You need a quick reference for practical, security-related tasks.
You think your system is secure, but haven't done much to check or ensure this. Think again. If you
haven't followed the recipes in this book, or done something roughly equivalent, your system
probably has holes.
You are interested in Linux security, but fear the learning curve. Our book introduces a quick
sampling of security topics, with plenty of code for experimenting, which may lead you to explore
further.
The book is primarily for intermediate-level Linux users. We assume you know the layout of a Linux
system (/etc, /usr/bin, /var/spool, and so forth), have written shell and Perl scripts, and are comfortable
with commands like chmod, chgrp, umask, diff, ln, and emacs or vi. Many recipes require root
privileges, so you'll get the most out of this book if you administer a Linux system.
[ Team LiB ]](https://image.slidesharecdn.com/linuxsecuritycookbook-120930200536-phpapp01/85/Linux-security-cookbook-11-320.jpg)
![[ Team LiB ]
Roadmap of the Book
Like a regular cookbook, ours is designed to be opened anywhere and browsed. The recipes can be read
independently, and when necessary we provide cross-references to related recipes by number: for
example, the notation [3.7] means "see Chapter 3, Recipe 7."
The chapters are presented roughly in the order you would use them when setting up a new Linux
system. Chapter 1, covers the first vital, security-related activity after setup, taking a snapshot of your
filesystem state. From there we discuss protecting your system from unwanted network connections in
Chapter 2 and Chapter 3.
Once your system is snapshotted and firewalled, it's time to add users. Recipes for login security are
found in Chapter 4. And in case you need to share superuser privileges with multiple users, we follow with
Chapter 5.
Now that you have users, they'll want to secure their own network connections, files, and email. Recipes
for these topics are presented in Chapter 6, Chapter 7, and Chapter 8, respectively.
Finally, as your system happily chugs away, you'll want to watch out for attacks and security holes.
Chapter 9, is a grab-bag of recipes for checking your filesystem, network traffic, processes, and log files
on an ongoing basis.
[ Team LiB ]](https://image.slidesharecdn.com/linuxsecuritycookbook-120930200536-phpapp01/85/Linux-security-cookbook-12-320.jpg)
![[ Team LiB ]
Our Security Philosophy
Computer security is full of tradeoffs among risks, costs, and benefits. In theory, nothing less than 100%
security will protect your system, but 100% is impossible to achieve, and even getting close may be
difficult and expensive. Guarding against the many possibilities for intrusion, not to mention counter-
possibilities and counter-counter-possibilities, can be (and is) a full-time job.
As an example, suppose you are a careful communicator and encrypt all the mail messages you send to
friends using GnuPG, as we discuss in Chapter 8. Let's say you even verified all your friends' public
encryption keys so you know they haven't been forged. On the surface, this technique prevents hostile
third parties from reading your messages in transit over the Internet. But let's delve a little deeper. Did
you perform the encryption on a secure system? What if the GnuPG binary (gpg) has been compromised
by a cracker, replaced by an insecure lookalike? What if your text editor was compromised? Or the shared
libraries used by the editor? Or your kernel? Even if your kernel file on disk (vmlinuz) is genuine, what if
its runtime state (in memory) has been modified? What if there's a keyboard sniffer running on your
system, capturing your keystrokes before encryption occurs? There could even be an eavesdropper
parked in a van outside your building, watching the images from your computer monitor by capturing
stray electromagnetic emissions.
But enough about your system: what about your friends' computers? Did your friends choose strong
passphrases so their encryption keys can't be cracked? After decrypting your messages, do they store
them on disk, unencrypted? If their disks get backed up onto tape, are the tapes safely locked away or
can they be stolen? And speaking of theft, are all your computers secured under lock and key? And who
holds the keys? Maybe your next-door neighbor, to whom you gave a copy of your housekey, is a spy.
If you're the security chief at a Fortune 500 company or in government, you probably need to think about
this complex web of issues on a regular basis. If you're a home user with a single Linux system and a
cable modem, the costs of maintaining a large, multitiered security infrastructure, striving toward 100%
security, very likely outweigh the benefits.
Regardless, you can still improve your security in steps, as we demonstrate in this book. Encrypting your
sensitive files is better than not encrypting them. Installing a firewall, using SSH for remote logins, and
performing basic intrusion and integrity checking all contribute toward your system safety. Do you need
higher security? That depends on the level of risk you're willing to tolerate, and the price you're willing
(and able) to pay.
In this cookbook, we present security tools and their common uses. We do not, and cannot, address every
possible infiltration of your computer systems. Every recipe has caveats, exceptions, and limitations:
some stated, and others merely implied by the "facts of life" of computer security in the real world.
[ Team LiB ]](https://image.slidesharecdn.com/linuxsecuritycookbook-120930200536-phpapp01/85/Linux-security-cookbook-13-320.jpg)
![[ Team LiB ]
Supported Linux Distributions
We developed and tested these recipes on the following Linux distributions:
Red Hat Linux 8.0, kernel 2.4.18
SuSE Linux 8.0, kernel 2.4.18
Red Hat Linux 7.0, kernel 2.2.22 (for the ipchains recipes in Chapter 2)
In addition, our technical review team tested recipes on Red Hat 6.2, SuSE 8.1, Debian 3.0, and Mandrake
9.0. Overall, most recipes should work fine on most distributions, as long as you have the necessary
programs installed.
[ Team LiB ]](https://image.slidesharecdn.com/linuxsecuritycookbook-120930200536-phpapp01/85/Linux-security-cookbook-14-320.jpg)
![[ Team LiB ]
Trying the Recipes
Most recipes provide commands or scripts you can run, or a set of configuration options for a particular
program. When trying a recipe, please keep in mind:
Our default shell for recipes is bash. If you use another shell, you might need different syntax for
setting environment variables and other shell-specific things.
If you create a Linux shell script (say, "myscript") in your current directory, but the current directory
(".") is not in your search path, you can't run it simply by typing the script name:
$ myscript
bash: myscript: command not found
because the shell won't find it. To invoke the script, specify that it's in the current directory:
$ ./myscript
Alternatively, you could add the current directory to your search path, but we recommend against
this. [Recipe 9.7]
Linux commands may behave differently when run in an interactive shell, a script, or a batch job
(e.g., via cron). Each method may have a different environment (for example, search path), and
some commands even are coded to behave differently depending how they are invoked. If a recipe
does not behave as you expect in a script, try running it interactively, and vice versa. You can see
your environment with the env command, and your shell variables with the set built-in command.
Different Linux distributions may place important binaries and configuration files in locations different
from those in our recipes. Programs are assumed to be in your search path. You might need to add
directories to your path, such as /sbin, /usr/sbin, and /usr/kerberos/bin. If you cannot find a file, try
the locate command: [1]
[1] Contained in the RPM package slocate (for Red Hat) or findutils-locate (for SuSE).
$ locate sshd.config
/etc/ssh/sshd_config
or in the worst case, the find command from the root of the filesystem, as root:
# find / -name sshd_config -print
Make sure you have the most recent versions of programs involved in the recipe, or at least stable
versions, and that the programs are properly installed.
Finally, each Linux system is unique. While we have tested these recipes on various machines, yours
might be different enough to produce unexpected results.
Before you run any recipe, make sure you understand how it will affect security on
your system.
[ Team LiB ]](https://image.slidesharecdn.com/linuxsecuritycookbook-120930200536-phpapp01/85/Linux-security-cookbook-15-320.jpg)
![[ Team LiB ]
Conventions Used in This Book
The following typographic conventions are used in this book:
Italic is used to indicate new terms and for comments in code sections. It is also used for URLs, FTP sites,
filenames, and directory names. Some code sections begin with a line of italicized text, which usually
specifies the file that the code belongs in.
Constant width is used for code sections and program names.
Constant width italic is used to indicate replaceable parts of code.
Constant width bold is used to indicate text typed by the user in code sections.
We capitalize the names of software packages or protocols, such as Tripwire or FTP, in contrast to their
associated programs, denoted tripwire and ftp.
We use the following standards for shell prompts, so it's clear if a command must be run by a particular
user or on a particular machine:
Shell Prompt Meaning
$ Ordinary user prompt
# Root shell prompt
myhost$ Shell prompt on host myhost
myhost# Root prompt on host myhost
myname$ Shell prompt for user myname
myname@myhost$ Shell prompt for user myname on host myhost
This icon indicates a tip, suggestion, or general note.
This icon indicates a warning or caution.
[ Team LiB ]](https://image.slidesharecdn.com/linuxsecuritycookbook-120930200536-phpapp01/85/Linux-security-cookbook-16-320.jpg)
![[ Team LiB ]
We'd Like to Hear from You
Please address comments and questions concerning this book to the publisher:
O'Reilly & Associates, Inc.
1005 Gravenstein Highway North
Sebastopol, CA 95472
(800) 998-9938 (in the United States or Canada)
(707) 829-0515 (international or local)
(707) 829-0104 (fax)
We have a web page for this book, where we list errata, examples, or any additional information. You can
access this page at:
http://www.oreilly.com/catalog/linuxsckbk/
To comment or ask technical questions about this book, send email to:
bookquestions@oreilly.com
For more information about our books, conferences, Resource Centers, and the O'Reilly Network, see our
web site at:
http://www.oreilly.com
[ Team LiB ]](https://image.slidesharecdn.com/linuxsecuritycookbook-120930200536-phpapp01/85/Linux-security-cookbook-17-320.jpg)
![[ Team LiB ]
Acknowledgments
First and foremost, we thank our editor, Mike Loukides, for his guidance and patience as we completed
the book. Working with you is always a pleasure. We thank our technical review team, Olaf Gellert,
Michael A. Johnson, Nico Kadel, Klaus Möller, Sandra O'Brien, Colin Phipps, Marco Thorbrügge, and Kevin
Timm, for their insightful comments that improved the text. We also thank Paul Shelman, Beth Reagan,
John Kling, Jill Gaffney, Patrick Romain, Rick van Rein, Wouter Hanegraaff, Harvey Newstrom, and "Scott"
the sysadmin.
Dan would like to thank his family, Lisa and Sophie, for their support and love during the writing of this
book. Richard would like to thank H. David Todd and Douglas Bigelow for giving him the chance that led to
his career, lo these many years ago. Bob would like to thank his wife, Alison, for her support and
understanding during too many nights and weekends when he was glued to his keyboard.
[ Team LiB ]](https://image.slidesharecdn.com/linuxsecuritycookbook-120930200536-phpapp01/85/Linux-security-cookbook-18-320.jpg)
![[ Team LiB ]
Chapter 1. System Snapshots with Tripwire
Suppose your system is infiltrated by the infamous Jack the Cracker. Being a conscientious evildoer, he
quickly modifies some system files to create back doors and cover his tracks. For instance, he might
substitute a hacked version of /bin/login to admit him without a password, and a bogus /bin/ls could skip
over and hide traces of his evil deeds. If these changes go unnoticed, your system could remain secretly
compromised for a long time. How can this situation be avoided?
Break-ins of this kind can be detected by an integrity checker : a program that periodically inspects
important system files for unexpected changes. The very first security measure you should take when
creating a new Linux machine, before you make it available to networks and other users, is to "snapshot"
(record) the initial state of your system files with an integrity checker. If you don't, you cannot reliably
detect alterations to these files later. This is vitally important!
Tripwire is the best known open source integrity checker. It stores a snapshot of your files in a known
state, so you can periodically compare the files against the snapshot to discover discrepancies. In our
example, if /bin/login and /bin/ls were in Tripwire's snapshot, then any changes in their size, inode
number, permissions, or other attributes would catch Tripwire's attention. Notably, Tripwire detects
changes in a file's content, even a single character, by verifying its checksum.
tripwire Version 1.2, supplied in SuSE 8.0, is positively ancient and supports an
outdated syntax. Before attempting any recipes in this chapter, upgrade to the
latest tripwire (2.3 or higher) at http://sourceforge.org/projects/tripwire or
http://www.tripwire.org.
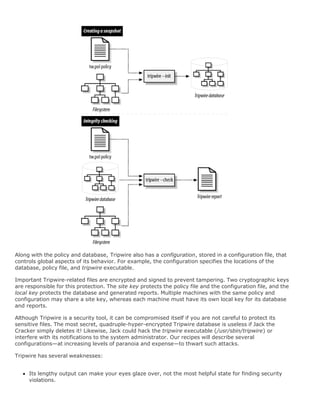
Tripwire is driven by two main components: a policy and a database. The policy lists all files and
directories that Tripwire should snapshot, along with rules for identifying violations (unexpected changes).
For example, a simple policy could treat any changes in /root, /bin, and /lib as violations. The Tripwire
database contains the snapshot itself, created by evaluating the policy against your filesystems. Once
setup is complete, you can compare filesystems against the snapshot at any time, and Tripwire will report
any discrepancies. This is a Tripwire integrity check, and it generates an integrity check report, as in
Figure 1-1.
Figure 1-1. Creating a Tripwire snapshot, and performing an integrity check](https://image.slidesharecdn.com/linuxsecuritycookbook-120930200536-phpapp01/85/Linux-security-cookbook-19-320.jpg)
![If you update your critical files frequently, then you must update the database frequently, which can
be tiresome.
Its batch-oriented approach (periodic checks, not real-time) leaves a window of opportunity.
Suppose you modify a file, and then a cracker modifies it again before the next integrity check.
Tripwire will rightfully flag the file, but you'll wrongly blame the discrepancy on your change instead
of the cracker's. Your Tripwire database will be "poisoned" (contain invalid data) on the next update.
It doesn't compile easily in some Linux and Unix environments.
Regardless, Tripwire can be a valuable security tool if used carefully and methodically.
Before connecting any Linux computer to a network, or making the machine
available to other users in any way, TAKE A SNAPSHOT. We cannot stress this
enough. A machine's first snapshot MUST capture a legitimate, uncompromised
state or it is worthless. (That's why this topic is the first chapter in the book.)
In addition to Tripwire, we also present a few non-Tripwire techniques for integrity checking, involving
rpm [Recipe 1.15], rsync [Recipe 1.16], and find. [Recipe 1.17]
There are other integrity checkers around, such as Aide (http://www.cs.tut.fi/~rammer/aide.html) and
Samhain (http://la-samhna.de/samhain), though we do not cover them. Finally, you might also check out
runtime kernel integrity checkers, like kstat (http://www.s0ftpj.org) and prosum
(http://prosum.sourceforge.net).
[ Team LiB ]](https://image.slidesharecdn.com/linuxsecuritycookbook-120930200536-phpapp01/85/Linux-security-cookbook-21-320.jpg)
![[ Team LiB ]
Recipe 1.1 Setting Up Tripwire
1.1.1 Problem
You want to prepare a computer to use Tripwire for the first time.
1.1.2 Solution
After you have installed Tripwire, do the following:
# cd /etc/tripwire
# ./twinstall.sh
# tripwire --init
# rm twcfg.txt twpol.txt
1.1.3 Discussion
The script twinstall.sh performs the following tasks within the directory /etc/tripwire:
Creates the site key and the local key, prompting you to enter their passphrases. (If the keys exist,
this step is skipped.) The site key is stored in site.key, and the local key in hostname-local.key,
where hostname is the hostname of the machine.
Signs the default configuration file, twcfg.txt, with the site key, creating tw.cfg.
Signs the default policy file, twpol.txt, with the site key, creating tw.pol.
If for some reason your system doesn't have twinstall.sh, equivalent manual steps are:
Helpful variables:
DIR=/etc/tripwire
SITE_KEY=$DIR/site.key
LOCAL_KEY=$DIR/`hostname`-local.key
Generate the site key:
# twadmin --generate-keys --site-keyfile $SITE_KEY
Generate the local key:
# twadmin --generate-keys --local-keyfile $LOCAL_KEY
Sign the configuration file:
# twadmin --create-cfgfile --cfgfile $DIR/tw.cfg
--site-keyfile $SITE_KEY $DIR/twcfg.txt
Sign the policy file:
# twadmin --create-polfile --cfgfile $DIR/tw.cfg](https://image.slidesharecdn.com/linuxsecuritycookbook-120930200536-phpapp01/85/Linux-security-cookbook-22-320.jpg)
![--site-keyfile $SITE_KEY $DIR/twpol.txt
Set appropriate permissions:
# cd $DIR
# chown root:root $SITE_KEY $LOCAL_KEY tw.cfg tw.pol
# chmod 600 $SITE_KEY $LOCAL_KEY tw.cfg tw.pol
(Or chmod 640 to allow a root group to access the files.)
These steps assume that your default configuration and policy files exist: twcfg.txt and twpol.txt,
respectively. They should have been supplied with the Tripwire distribution. Undoubtedly you'll need to
edit them to match your system. [Recipe 1.3] The names twcfg.txt and twpol.txt are mandatory if you
run twinstall.sh, as they are hard-coded inside the script.[1]
[1] If they are different on your system, read twinstall.sh to learn the appropriate names.
Next, tripwire builds the Tripwire database and signs it with the local key:
# tripwire --init
Enter the local key passphrase to complete the operation. If tripwire produces an error message like
"Warning: File System Error," then your default policy probably refers to nonexistent files. These are not
fatal errors: tripwire still ran successfully. At some point you should modify the policy to remove these
references. [Recipe 1.3]
The last step, which is optional but recommended, is to delete the plaintext (unencrypted) policy and
configuration files:
# rm twcfg.txt twpol.txt
You are now ready to run integrity checks.
1.1.4 See Also
twadmin(8), tripwire(8). If Tripwire isn't included in your Linux distribution, it can be downloaded from the
Tripwire project page at http://sourceforge.net/projects/tripwire or http://www.tripwire.org. (Check both
to make sure you're getting the latest version.) Basic documentation is installed in
/usr/share/doc/tripwire* but does not include the full manual, so be sure to download it (in PDF or source
formats) from the SourceForge project page. The commercial Tripwire is found at
http://www.tripwire.com.
[ Team LiB ]](https://image.slidesharecdn.com/linuxsecuritycookbook-120930200536-phpapp01/85/Linux-security-cookbook-23-320.jpg)
![[ Team LiB ]
Recipe 1.2 Displaying the Policy and Configuration
1.2.1 Problem
You want to view Tripwire's policy or configuration, but they are stored in non-human-readable, binary
files, or they are missing.
1.2.2 Solution
Generate the active configuration file:
# cd /etc/tripwire
# twadmin --print-cfgfile > twcfg.txt
Generate the active policy file:
# cd /etc/tripwire
# twadmin --print-polfile > twpol.txt
1.2.3 Discussion
Tripwire's active configuration file tw.cfg and policy file tw.pol are encrypted and signed and therefore
non-human-readable. To view them, you must first convert them to plaintext.
Tripwire's documentation advises you to delete the plaintext versions of the configuration and policy after
re-signing them. If your plaintext files were missing to start with, this is probably why.
Although you can redirect the output of twadmin to any files you like, remember that twinstall.sh requires
the plaintext policy and configuration files to have the names we used, twcfg.txt and twpol.txt. [Recipe
1.1]
1.2.4 See Also
twadmin(8).
[ Team LiB ]](https://image.slidesharecdn.com/linuxsecuritycookbook-120930200536-phpapp01/85/Linux-security-cookbook-24-320.jpg)
![[ Team LiB ]
Recipe 1.3 Modifying the Policy and Configuration
1.3.1 Problem
You want to change the set of files and directories that tripwire examines, or change tripwire's default
behavior.
1.3.2 Solution
Extract the policy and configuration to plaintext files: [Recipe 1.2]
# cd /etc/tripwire
# twadmin --print-polfile > twpol.txt
# twadmin --print-cfgfile > twcfg.txt
Modify the policy file twpol.txt and/or the configuration file twcfg.txt with any text editor. Then re-sign the
modified files: [Recipe 1.1]
# twadmin --create-cfgfile --cfgfile /etc/tripwire/tw.cfg
--site-keyfile site_key etc/tripwire/twcfg.txt
# twadmin --create-polfile --cfgfile /etc/tripwire/tw.cfg
--site-keyfile site_key etc/tripwire/twpol.txt
and reinitialize the database: [Recipe 1.1]
# tripwire --init
# rm twcfg.txt twpol.txt
1.3.3 Discussion
This is much like setting up Tripwire from scratch [Recipe 1.1], except our existing, cryptographically-
signed policy and configuration files are first converted to plaintext. [Recipe 1.2]
You'll want to modify the policy if tripwire complains that a file does not exist:
### Error: File could not be opened.
Edit the policy file and remove or comment out the reference to this file if it does not exist on your
system. Then re-sign the policy file.
You don't need to follow this procedure if you're simply updating the database after an integrity check
[Recipe 1.11], only if you've modified the policy or configuration.
1.3.4 See Also
twadmin(8), tripwire(8).](https://image.slidesharecdn.com/linuxsecuritycookbook-120930200536-phpapp01/85/Linux-security-cookbook-25-320.jpg)
![[ Team LiB ]](https://image.slidesharecdn.com/linuxsecuritycookbook-120930200536-phpapp01/85/Linux-security-cookbook-26-320.jpg)
![[ Team LiB ]
Recipe 1.4 Basic Integrity Checking
1.4.1 Problem
You want to check whether any files have been altered since the last Tripwire snapshot.
1.4.2 Solution
# tripwire --check
1.4.3 Discussion
This command is the lifeblood of Tripwire: has your system changed? It compares the current state of
your filesystem against the Tripwire database, according to the rules in your active policy. The results of
the comparison are written to standard output and also stored as a timestamped, signed Tripwire report.
You can also perform a limited integrity check against one or more files in the database. If your tripwire
policy contains this rule:
(
rulename = "My funky files",
severity = 50
)
{
/sbin/e2fsck -> $(SEC_CRIT) ;
/bin/cp -> $(SEC_CRIT) ;
/usr/tmp -> $(SEC_INVARIANT) ;
/etc/csh.cshrc -> $(SEC_CONFIG) ;
}
you can check selected files and directories with:
# tripwire --check /bin/cp /usr/tmp
or all files in the given rule with:
# tripwire --check --rule-name "My funky files"
or all rules with severities greater than or equal to a given value:
# tripwire --check --severity 40
1.4.4 See Also
tripwire(8), and the Tripwire manual for policy syntax. You can produce a help message with:
$ tripwire --check --help](https://image.slidesharecdn.com/linuxsecuritycookbook-120930200536-phpapp01/85/Linux-security-cookbook-27-320.jpg)
![[ Team LiB ]](https://image.slidesharecdn.com/linuxsecuritycookbook-120930200536-phpapp01/85/Linux-security-cookbook-28-320.jpg)
![[ Team LiB ]
Recipe 1.5 Read-Only Integrity Checking
1.5.1 Problem
You want to store Tripwire's most vital files on read-only media, such as a CD-ROM or write-protected
disk, to guard against compromise, and then run integrity checks.
1.5.2 Solution
1. Copy the site key, local key, and tripwire binary onto the desired disk, write-protect it, and mount it.
Suppose it is mounted at /mnt/cdrom.
# mount /mnt/cdrom
# ls -l /mnt/cdrom
total 2564
-r--r----- 1 root root 931 Feb 21 12:20 site.key
-r--r----- 1 root root 931 Feb 21 12:20 myhost-local.key
-r-xr-xr-x 1 root root 2612200 Feb 21 12:19 tripwire
2. Generate the Tripwire configuration file in plaintext: [Recipe 1.2]
# DIR=/etc/tripwire
# cd $DIR
# twadmin --print-cfgfile > twcfg.txt
3. Edit the configuration file to point to these copies: [Recipe 1.3]
/etc/tripwire/twcfg.txt:
ROOT=/mnt/cdrom
SITEKEYFILE=/mnt/cdrom/site.key
LOCALKEYFILE=/mnt/cdrom/myhost-local.key
4. Sign your modified Tripwire configuration file: [Recipe 1.3]
# SITE_KEY=/mnt/cdrom/site.key
# twadmin --create-cfgfile --cfgfile $DIR/tw.cfg
--site-keyfile $SITE_KEY $DIR/twcfg.txt
5. Regenerate the tripwire database [Recipe 1.3] and unmount the CD-ROM:
# /mnt/cdrom/tripwire --init
# umount /mnt/cdrom
Now, whenever you want to perform an integrity check [Recipe 1.4], insert the read-only disk and run:](https://image.slidesharecdn.com/linuxsecuritycookbook-120930200536-phpapp01/85/Linux-security-cookbook-29-320.jpg)
![# mount /mnt/cdrom
# /mnt/cdrom/tripwire --check
# umount /mnt/cdrom
1.5.3 Discussion
The site key, local key, and tripwire binary (/usr/sbin/tripwire) are the only files you need to protect from
compromise. Other Tripwire-related files, such as the database, policy, and configuration, are signed by
the keys, so alterations would be detected. (Back them up frequently, however, in case an attacker
deletes them!)
Before copying /usr/sbin/tripwire to CD-ROM, make sure it is statically linked (which is the default
configuration) so it does not depend on any shared runtime libraries that could be compromised:
$ ldd /usr/sbin/tripwire
not a dynamic executable
1.5.4 See Also
twadmin(8), tripwire(8), ldd(1), mount(8).
[ Team LiB ]](https://image.slidesharecdn.com/linuxsecuritycookbook-120930200536-phpapp01/85/Linux-security-cookbook-30-320.jpg)
![[ Team LiB ]
Recipe 1.6 Remote Integrity Checking
1.6.1 Problem
You want to perform an integrity check, but to increase security, you store vital Tripwire files off-host.
In this recipe and others, we use two machines: your original machine to be
checked, which we'll call trippy, and a second, trusted machine we'll call trusty.
trippy is the untrusted machine whose integrity you want to check with Tripwire.
trusty is a secure machine, typically with no incoming network access.
1.6.2 Solution
Store copies of the site key, local key, and tripwire binary on a trusted remote machine that has no
incoming network access. Use rsync, securely tunneled through ssh, to verify that the originals and copies
are identical, and to trigger an integrity check.
The initial setup on remote machine trusty is:
#!/bin/sh
REMOTE_MACHINE=trippy
RSYNC='/usr/bin/rsync -a --progress --rsh=/usr/bin/ssh'
SAFE_DIR=/usr/local/tripwire/${REMOTE_MACHINE}
VITAL_FILES="/usr/sbin/tripwire
/etc/tripwire/site.key
/etc/tripwire/${REMOTE_MACHINE}-local.key"
mkdir $SAFE_DIR
for file in $VITAL_FILES
do
$RSYNC ${REMOTE_MACHINE}:$file $SAFE_DIR/
done
Prior to running every integrity check on the local machine, verify these three files by comparing them to
the remote copies. The following code should be run on trusty, assuming the same variables as in the
preceding script (REMOTE_MACHINE, etc.):
#!/bin/sh
cd $SAFE_DIR
rm -f log
for file in $VITAL_FILES
do
base=`basename $file`
$RSYNC -n ${REMOTE_MACHINE}:$file . | fgrep -x "$base" >> log
done
if [ -s log ] ; then
echo 'Security alert!'
else](https://image.slidesharecdn.com/linuxsecuritycookbook-120930200536-phpapp01/85/Linux-security-cookbook-31-320.jpg)
![ssh ${REMOTE_MACHINE} -l root /usr/sbin/tripwire --check
fi
1.6.3 Discussion
rsync is a handy utility for synchronizing files on two machines. In this recipe we tunnel rsync through
ssh, the Secure Shell, to provide secure authentication and to encrypt communication between trusty and
trippy. (This assumes you have an appropriate SSH infrastructure set up between trusty and trippy, e.g.,
[Recipe 6.4]. If not, rsync can be used insecurely without SSH, but we don't recommend it.)
The —progress option of rsync produces output only if the local and remote files differ, and the -n option
causes rsync not to copy files, merely reporting what it would do. The fgrep command removes all output
but the filenames in question. (We use fgrep because it matches fixed strings, not regular expressions,
since filenames commonly contain special characters like "." found in regular expressions.) The fgrep -x
option matches whole lines, or in this case, filenames. Thus, the file log is empty if and only if the local
and remote files are identical, triggering the integrity check.
You might be tempted to store the Tripwire database remotely as well, but it's not necessary. Since the
database is signed with the local key, which is kept off-host, tripwire would alert you if the database
changed unexpectedly.
Instead of merely checking the important Tripwire files, trusty could copy them to trippy before each
integrity check:
# scp -p tripwire trippy:/usr/sbin/tripwire
# scp -p site.key trippy-local.key trippy:/etc/tripwire/
# ssh trippy -l root /usr/sbin/tripwire --check
Another tempting alternative is to mount trippy's disks remotely on trusty, preferably read-only, using a
network filesystem such as NFS or AFS, and then run the Tripwire check on trusty. This method, however,
is only as secure as your network filesystem software.
1.6.4 See Also
rsync(1), ssh(1).
[ Team LiB ]](https://image.slidesharecdn.com/linuxsecuritycookbook-120930200536-phpapp01/85/Linux-security-cookbook-32-320.jpg)
![[ Team LiB ]
Recipe 1.7 Ultra-Paranoid Integrity Checking
1.7.1 Problem
You want highly secure integrity checks, at the expense of speed and convenience.
1.7.2 Solution
Securely create a bootable CD-ROM containing a minimal Linux system, the tripwire binary, and your local
and site keys. Disconnect your computer from all networks, boot on the CD-ROM, and perform an
integrity check of your computer's disks, using executable programs on the CD-ROM only.
Back up your Tripwire database, configuration, and policy frequently, in case an attacker deletes them
from your system.
1.7.3 Discussion
This cumbersome but more secure method requires at least two computers, one of them carefully trusted.
As before, we'll call the trusted system trusty and the Tripwire machine trippy. Our goal is to run secure
Tripwire checks on trippy.
The first important step is to create a bootable CD-ROM securely. This means:
Create the CD-ROM on trusty, a virgin Linux machine built directly from trusted source or binary
packages, that has never been on a network or otherwise accessible to third parties. Apply all
necessary security patches to bring trusty up to date.
Configure the CD-ROM's startup scripts to disable all networking.
Populate the CD-ROM directly from trusted source or binary packages.
Create your Tripwire site key and local key on trusty.
Second, boot trippy on the CD-ROM, mount the local disks, and create trippy's Tripwire database, using
the tripwire binary and keys on the CD-ROM. Since the Tripwire database, policy, and configuration files
are signed with keys on the CD-ROM, these files may safely reside on trippy, rather than the CD-ROM.
Third, you must boot trippy on the CD-ROM before running an integrity check. Otherwise, if you simply
mount the CD-ROM on trippy and run the tripwire binary from the CD-ROM, you are not protected
against:
Compromised shared libraries on trippy, if your tripwire binary is dynamically linked.
A compromised Linux kernel on trippy.
A compromised mount point for the CD-ROM on trippy.](https://image.slidesharecdn.com/linuxsecuritycookbook-120930200536-phpapp01/85/Linux-security-cookbook-33-320.jpg)
![See, we told you this recipe was for the paranoid. But if you want higher security with Tripwire, you might
need this level of caution.
For more convenience, you could schedule a cron job to reboot trippy nightly from the CD-ROM, which
runs the Tripwire check and then reboots trippy normally. Do not, however, schedule this cron job on
trippy itself, since cron could be compromised. Instead, schedule it on trusty, perhaps triggering the
reboot via an SSH batch job. [Recipe 6.10]
1.7.4 See Also
A good starting point for making a self-contained bootable CD-ROM or floppy is tomsrtbt at
http://www.toms.net/rb.
Consider including post-mortem security tools on the CD-ROM, such as the Coroner's Toolkit. [Recipe
9.41]
[ Team LiB ]](https://image.slidesharecdn.com/linuxsecuritycookbook-120930200536-phpapp01/85/Linux-security-cookbook-34-320.jpg)
![[ Team LiB ]
Recipe 1.8 Expensive, Ultra-Paranoid Security Checking
1.8.1 Problem
You want highly secure integrity checks and are willing to shell out additional money for them.
1.8.2 Solution
Store your files on a dual-ported disk array. Mount the disk array read-only on a second, trusted machine
that has no network connection. Run your Tripwire scans on the second machine.
1.8.3 Discussion
A dual-ported disk array permits two machines to access the same physical disk. If you've got money to
spare for increased security, this might be a reasonable approach to securing Tripwire.
Once again, let trippy be your machine in need of Tripwire scans. trusty is a highly secure second
machine, built directly from trusted source or binary packages with all necessary security patches applied,
that has no network connection and has never been accessible to third parties.
trippy's primary storage is kept on a dual-ported disk array. Mount this array on trusty read-only. Perform
all Tripwire-related operations on trusty: initializing the database, running integrity checks, and so forth.
The Tripwire database, binaries, keys, policy, and configuration are likewise kept on trusty. Since trusty is
inaccessible via any network, your Tripwire checks will be as reliable as the physical security of trusty.
[ Team LiB ]](https://image.slidesharecdn.com/linuxsecuritycookbook-120930200536-phpapp01/85/Linux-security-cookbook-35-320.jpg)
![[ Team LiB ]
Recipe 1.9 Automated Integrity Checking
1.9.1 Problem
You want to schedule integrity checks at specific times or intervals.
1.9.2 Solution
Use cron. For example, to perform an integrity check every day at 3:00 a.m.:
root's crontab file:
0 3 * * * /usr/sbin/tripwire --check
1.9.3 Discussion
This is not a production-quality recipe. An intruder could compromise cron, substituting another job or
simply preventing yours from running. For more reliability, run the cron job on a trusted remote machine:
Remote crontab entry on trusty:
0 3 * * * ssh -n -l root trippy /usr/sbin/tripwire --check
but if an intruder compromises sshd on trippy, you're again out of luck. Likewise, some rootkits [Recipe
9.12] can subvert the exec call to tripwire even if invoked remotely. For maximum security, run not only
the cron job but also the integrity check on a trusted remote machine. [Recipe 1.8]
Red Hat Linux comes preconfigured to run tripwire every night via the cron job /etc/cron.daily/tripwire-
check. However, a Tripwire database is not supplied with the operating system: you must initialize one
yourself. [Recipe 1.1] If you don't, cron will send daily email to root about a failed tripwire invocation.
1.9.4 See Also
tripwire(8), crontab(1), crontab(5), cron(8).
[ Team LiB ]](https://image.slidesharecdn.com/linuxsecuritycookbook-120930200536-phpapp01/85/Linux-security-cookbook-36-320.jpg)
![[ Team LiB ]
Recipe 1.10 Printing the Latest Tripwire Report
1.10.1 Problem
You want to display the results of the most recent integrity check.
1.10.2 Solution
#!/bin/sh
DIR=/var/lib/tripwire/report
HOST=`hostname -s`
LAST_REPORT=`ls -1t $DIR/$HOST-*.twr | head -1`
twprint --print-report --twrfile "$LAST_REPORT"
1.10.3 Discussion
Tripwire reports are stored in the location indicated by the REPORTFILE variable in the Tripwire
configuration file. A common value is:
REPORTFILE = /var/lib/tripwire/report/$(HOSTNAME)-$(DATE).twr
The HOSTNAME variable contains the hostname of your machine (big surprise), and DATE is a numeric
timestamp such as 20020409-040521 (April 9, 2002, at 4:05:21). So for host trippy, this report filename
would be:
/var/lib/tripwire/report/trippy-20020409-040521.twr
When tripwire runs, it can optionally send reports by email. This notification should not be considered
reliable since email can be suppressed, spoofed, or otherwise compromised. Instead, get into the habit of
examining the reports yourself.
The twprint program can print reports not only for integrity checks but also for the Tripwire database. To
do the latter:
# twprint --print-dbfile --dbfile /var/lib/tripwire/`hostname -s`.twd
Tripwire(R) 2.3.0 Database
Database generated by: root
Database generated on: Mon Apr 1 22:33:52 2002
Database last updated on: Never
... contents follow ...
1.10.4 See Also
twprint(8).
[ Team LiB ]](https://image.slidesharecdn.com/linuxsecuritycookbook-120930200536-phpapp01/85/Linux-security-cookbook-37-320.jpg)
![[ Team LiB ]
Recipe 1.11 Updating the Database
1.11.1 Problem
Your latest Tripwire report contains discrepancies that tripwire should ignore in the future.
1.11.2 Solution
Update the Tripwire database relative to the most recent integrity check report:
#!/bin/sh
DIR=/var/lib/tripwire/report
HOST=`hostname -s`
LAST_REPORT=`ls -1t $DIR/$HOST-*.twr | head -1`
tripwire --update --twrfile "$LAST_REPORT"
1.11.3 Discussion
Updates are performed with respect to an integrity check report, not with respect to the current
filesystem state. Therefore, if you've modified some files since the last check, you cannot simply run an
update: you must run an integrity check first. Otherwise the update won't take the changes into account,
and the next integrity check will still flag them.
Updating is significantly faster than reinitializing the database. [Recipe 1.3]
1.11.4 See Also
tripwire(8).
[ Team LiB ]](https://image.slidesharecdn.com/linuxsecuritycookbook-120930200536-phpapp01/85/Linux-security-cookbook-38-320.jpg)
![[ Team LiB ]
Recipe 1.12 Adding Files to the Database
1.12.1 Problem
Tell tripwire to include a file or directory in its database.
1.12.2 Solution
Generate the active policy file in human-readable format. [Recipe 1.2] Add the given file or directory to
the active policy file.
To mark the file /bin/ls for inclusion:
/bin/ls --> $(SEC_BIN) ;
To mark the entire directory tree /etc for inclusion:
/etc --> $(SEC_BIN) ;
To mark /etc and its files, but not recurse into subdirectories:
/etc --> $(SEC_BIN) (recurse=1) ;
To mark only the /etc directory but none of its files or subdirectories:
/etc --> $(SEC_BIN) (recurse=0);
Then reinitialize the database. [Recipe 1.3]
1.12.3 Discussion
The policy is a list of rules stored in a policy file. A rule looks like:
filename -> rule ;
which means that the given file (or directory) should be considered compromised if the given rule is
broken. For instance,
/bin/login -> +pisug ;
means that /bin/login is suspect if its file permissions (p), inode number (i), size (s), user (u), or group
(g) have changed since the last snapshot. We won't document the full policy syntax because Tripwire's
manual is quite thorough. Our recipe uses a predefined rule in a global variable, SEC_BIN, designating a
binary file that should not change.
The recurse= n attribute for a directory tells tripwire to recurse n levels deep into the filesystem. Zero
means to consider only the directory file itself.](https://image.slidesharecdn.com/linuxsecuritycookbook-120930200536-phpapp01/85/Linux-security-cookbook-39-320.jpg)
![It's actually quite likely that you'll need to modify the policy. The default policy supplied with Tripwire is
tailored to a specific type of system or Linux distribution, and contains a number of files not necessarily
present on yours.
1.12.4 See Also
The Tripwire manual has detailed documentation on the policy file format.
[ Team LiB ]](https://image.slidesharecdn.com/linuxsecuritycookbook-120930200536-phpapp01/85/Linux-security-cookbook-40-320.jpg)
![[ Team LiB ]
Recipe 1.13 Excluding Files from the Database
1.13.1 Problem
You want to add some, but not all, files in a given directory to the Tripwire database.
1.13.2 Solution
Mark a directory hierarchy for inclusion:
/etc -> rule
Immediately after, mark some files to be excluded:
!/etc/not.me
!/etc/not.me.either
You can exclude a subdirectory too:
!/etc/dirname
1.13.3 Discussion
The exclamation mark (!) prevents the given file or subdirectory from being added to Tripwire's database.
1.13.4 See Also
The Tripwire manual has detailed documentation on the policy file format.
[ Team LiB ]](https://image.slidesharecdn.com/linuxsecuritycookbook-120930200536-phpapp01/85/Linux-security-cookbook-41-320.jpg)
![[ Team LiB ]
Recipe 1.14 Checking Windows VFAT Filesystems
1.14.1 Problem
When checking the integrity of a VFAT filesystem, tripwire always complains that files have changed when
they haven't.
1.14.2 Solution
Tell tripwire not to compare inode numbers.
filename -> rule -i ;
For example:
/mnt/windows/system -> $(SEC_BIN) -i ;
1.14.3 Discussion
Modern Linux kernels do not assign constant inode numbers in VFAT filesystems.
1.14.4 See Also
The Tripwire manual has detailed documentation on the policy file format.
[ Team LiB ]](https://image.slidesharecdn.com/linuxsecuritycookbook-120930200536-phpapp01/85/Linux-security-cookbook-42-320.jpg)
![[ Team LiB ]
Recipe 1.15 Verifying RPM-Installed Files
1.15.1 Problem
You have installed some RPM packages, perhaps long ago, and want to check whether any files have
changed since the installation.
1.15.2 Solution
# rpm -Va [packages]
Debian Linux has a similar tool called debsums.
1.15.3 Discussion
If your system uses RPM packages for installing software, this command conveniently compares the
installed files against the RPM database. It notices changes in file size, ownership, timestamp, MD5
checksum, and other attributes.
The output is a list of (possibly) problematic files, one per line, each preceded by a string of characters
with special meaning. For example:
$ rpm -Va
SM5....T c /etc/syslog.conf
.M...... /var/lib/games/trojka.scores
missing /usr/lib/perl5/5.6.0/Net/Ping.pm
..?..... /usr/X11R6/bin/XFree86
.....U.. /dev/audio
S.5....T /bin/ls
The first line indicates that syslog.conf has an unexpected size (S), permissions (M), checksum (5), and
timestamp (T). This is perhaps not surprising, since syslog.conf is a configuration file you'd be likely to
change after installation. In fact, that is exactly what the "c" means: a configuration file. Similarly,
troijka.scores is a game score file likely to change. The file Ping.pm has apparently been removed, and
XFree86 could not be checked (?) because we didn't run rpm as root. The last two files definitely deserve
investigation: /dev/audio has a new owner (U), and /bin/ls has been modified.
This technique is valid only if your RPM database and rpm command have not been compromised by an
attacker. Also, it checks only those files installed from RPMs.
1.15.4 See Also
rpm(8) lists the full set of file attributes checked.](https://image.slidesharecdn.com/linuxsecuritycookbook-120930200536-phpapp01/85/Linux-security-cookbook-43-320.jpg)
![[ Team LiB ]](https://image.slidesharecdn.com/linuxsecuritycookbook-120930200536-phpapp01/85/Linux-security-cookbook-44-320.jpg)
![[ Team LiB ]
Recipe 1.16 Integrity Checking with rsync
1.16.1 Problem
You want to snapshot and check your files but you can't use Tripwire. You have lots of disk space on a
remote machine.
1.16.2 Solution
Use rsync to copy your important files to the remote machine. Use rsync again to compare the copies on
the two machines.
1.16.3 Discussion
Let trippy and trusty be your two machines as before. You want to ensure the integrity of the files on
trippy.
1. On trippy, store the rsync binary on a CD-ROM mounted at /mnt/cdrom.
2. On trusty, copy the files from trippy:
trusty# rsync -a -v --rsync-path=/mnt/cdrom/rsync --rsh=/usr/bin/ssh
trippy:/ /data/trippy-backup
3. Check integrity from trusty:
trusty# rsync -a -v -n --rsync-path=/mnt/cdrom/rsync --rsh=/usr/bin/ssh
trippy:/ /data/trippy-backup
The first rsync actually performs copying, while the second merely reports differences, thanks to the -n
option. If there are no differences, the output will look something like this:
receiving file list ... done
wrote 16 bytes read 7478 bytes 4996.00 bytes/sec
total size is 3469510 speedup is 462.97
but if any files differ, their names will appear after the "receiving file list" message:
receiving file list ... done
/bin/ls
/usr/sbin/sshd
wrote 24 bytes read 7486 bytes 5006.67 bytes/sec
total size is 3469510 speedup is 461.99
Any listed files—in this case /bin/ls and /usr/sbin/sshd—should be treated as suspicious.](https://image.slidesharecdn.com/linuxsecuritycookbook-120930200536-phpapp01/85/Linux-security-cookbook-45-320.jpg)
![This method has important limitations, most notably that it does not check inode numbers or device
numbers. A real integrity checker is better.
1.16.4 See Also
rsync(1).
[ Team LiB ]](https://image.slidesharecdn.com/linuxsecuritycookbook-120930200536-phpapp01/85/Linux-security-cookbook-46-320.jpg)
![[ Team LiB ]
Recipe 1.17 Integrity Checking Manually
1.17.1 Problem
You can't use Tripwire for administrative or political reasons, but you want to snapshot your files for later
comparison. You don't have enough disk space to mirror your files.
1.17.2 Solution
Run a script like the following that stores pertinent information about each file of interest, such as
checksum, inode number, and timestamp:
#!/bin/sh
for file
do
date=`/usr/bin/stat "$file" | /bin/grep '^Modify:' | /usr/bin/cut -f2- -d' '`
sum=`/usr/bin/md5sum "$file" | /usr/bin/awk '{print $1}'`
inode=`/bin/ls -id "$file" | /usr/bin/awk '{print $1}'`
/bin/echo -e "$filet$inodet$sumt$date"
done
Store this script as /usr/local/bin/idfile (for example). Use find to run this script on your important files,
creating a snapshot. Store it on read-only media. Periodically create a new snapshot and compare the two
with diff.
This is not a production-quality integrity checker. It doesn't track file ownership or permissions. It checks
only ordinary files, not directories, device special files, or symbolic links. Its tools (md5sum, stat, etc.) are
not protected against tampering.
1.17.3 Discussion
1. Run the idfile script to create a snapshot file:
# find /dir -xdev -type f -print0 |
xargs -0 -r /usr/local/bin/idfile > /tmp/my_snapshot
This creates a snapshot file, basically a poor man's Tripwire database.
/bin/arch 2222 7ba4330c353be9dd527e7eb46d27f923 Wed Aug 30 17:54:25 2000
/bin/ash 2194 cef0493419ea32a7e26eceff8e5dfa90 Wed Aug 30 17:40:11 2000
/bin/awk 2171 b5915e362f1a33b7ede6d7965a4611e4 Sat Feb 23 23:37:18 2002
...
Note that idfile will process /tmp/my_snapshot itself, which will almost certainly differ next
time you snapshot. You can use grep -v to eliminate the /tmp/my_snapshot line from the
output.](https://image.slidesharecdn.com/linuxsecuritycookbook-120930200536-phpapp01/85/Linux-security-cookbook-47-320.jpg)
![Be aware of the important options and limitations of find. [Recipe 9.8]
2. In preparation for running the idfile script later from CD-ROM, modify idfile so all commands are
relative to /mnt/cdrom/bin:
#!/mnt/cdrom/bin/sh
BIN=/mnt/cdrom/bin
for file
do
date=`$BIN/stat "$file" | $BIN/grep '^Modify:' | $BIN/cut -f2- -d' '`
md5sum=`$BIN/sum "$file" | $BIN/awk '{print $1}'`
inode=`$BIN/ls -id "$file" | $BIN/awk '{print $1}'`
$BIN/echo -e "$filet$inodet$sumt$date"
done
3. Burn a CD-ROM with the following contents:
Directory Files
/ my_snapshot
/bin awk, cut, echo, diff, find, grep, ls, mdsum, sh, stat, xargs, idfile
4. Mount the CD-ROM at /mnt/cdrom.
5. As needed, rerun the find and do a diff, using the binaries on the CD-ROM:
#!/bin/sh
BIN=/mnt/cdrom/bin
$BIN/find /dir -xdev -type f -print0 |
xargs -0 -r $BIN/idfile > /tmp/my_snapshot2
$BIN/diff /tmp/my_snapshot2 /mnt/cdrom/my_snapshot
This approach is not production-quality; it has some major weaknesses:
Creating the snapshot can be very slow, and creating new snapshots frequently may be
cumbersome.
It doesn't check some important attributes of a file, such as ownership and permissions. Tailor the
idfile script to your needs.
It checks only ordinary files, not directories, device special files, or symbolic links.
By running ls, md5sum, and the other programs in sequence, you leave room for race conditions
during the generation of the snapshot. A file could change between the invocations of two of these
tools.
If any of the executables are dynamically linked against libraries on the system, and these libraries
are compromised, the binaries on the CD-ROM can theoretically be made to operate incorrectly.
If the mount point /mnt/cdrom is compromised, your CD-ROM can be spoofed.](https://image.slidesharecdn.com/linuxsecuritycookbook-120930200536-phpapp01/85/Linux-security-cookbook-48-320.jpg)
![1.17.4 See Also
find(1), diff(1). Use a real integrity checker if possible. If you can't use Tripwire, consider Aide
(http://www.cs.tut.fi/~rammer/aide.html) or Samhain (http://la-samhna.de/samhain).
[ Team LiB ]](https://image.slidesharecdn.com/linuxsecuritycookbook-120930200536-phpapp01/85/Linux-security-cookbook-49-320.jpg)
![[ Team LiB ]
Chapter 2. Firewalls with iptables and
ipchains
Your network's first barrier against unwanted infiltrators is your firewall. You do have a firewall in place,
right? If you think you don't need one, monitor your incoming network traffic some time: you might be
amazed by the attention you're receiving. For instance, one of our home computers has never run a
publicly accessible service, but it's hit 10-150 times per day by Web, FTP, and SSH connection requests
from unfamiliar hosts. Some of these could be legitimate, perhaps web crawlers creating an index; but
when the hits are coming from dialup12345.nowhere.aq in faraway Antarctica, it's more likely that some
script kiddie is probing your ports. (Or the latest Windows worm is trying in vain to break in.)
Linux has a wonderful firewall built right into the kernel, so you have no excuse to be without one. As a
superuser, you can configure this firewall with interfaces called ipchains and iptables. ipchains models
a stateless packet filter. Each packet reaching the firewall is evaluated against a set of rules. Stateless
means that the decision to accept, reject, or forward a packet is not influenced by previous packets.
iptables, in contrast, is stateful: the firewall can make decisions based on previous packets. Consider this
firewall rule: "Drop a response packet if its associated request came from server.example.com." iptables
can manage this because it can associate requests with responses, but ipchains cannot. Overall, iptables
is significantly more powerful, and can express complex rules more simply, than ipchains.
ipchains is found in kernel Versions 2.2 and up, while iptables requires kernel Version 2.4 or higher.[1] The
two cannot be used together: one or the other is chosen when the kernel is compiled.
[1] Kernel 2.0 has another interface called ipfwadm, but it's so old we won't cover it.
A few caveats before you use the recipes in this chapter:
We're definitely not providing a complete course in firewall security. ipchains and iptables can
implement complex configurations, and we're just scratching the surface. Our goal, as usual, is to
present useful recipes.
The recipes work individually, but not necessarily when combined. You must think carefully when
mixing and matching firewall rules, to make sure you aren't passing or blocking traffic
unintentionally. Assume all rules are flushed at the beginning of each recipe, using iptables -F or
ipchains -F as appropriate. [Recipe 2.17]
The recipes do not set default policies (-P option) for the chains. The default policy specifies what to
do with an otherwise unhandled packet. You should choose intelligent defaults consistent with your
site security policy. One example for iptables is:
# iptables -P INPUT DROP
# iptables -P OUTPUT ACCEPT
# iptables -P FORWARD DROP
and for ipchains:
# ipchains -P input DENY
# ipchains -P output ACCEPT
# ipchains -P forward DENY](https://image.slidesharecdn.com/linuxsecuritycookbook-120930200536-phpapp01/85/Linux-security-cookbook-50-320.jpg)
![These permit outgoing traffic but drop incoming or forwarded packets.
The official site for iptables is http://www.netfilter.org, where you can also find the Linux 2.4 Packet
Filtering Howto at http://www.netfilter.org/documentation/HOWTO/packet-filtering-HOWTO.html. Another
nice iptables article is at http://www.samag.com/documents/s=1769/sam0112a/0112a.htm.
Our Firewall Philosophy
In designing a set of firewall rules for a Linux host, there are several different models we could
follow. They correspond to different positions or functions of the host in your network.
Single computer
The host has a single network interface, and the firewall's purpose is to protect that host
from the outside world. The principle distinction here is "this host" versus "everything
else." One example is a home computer connected to a cable modem.
Multi-homed host
The host has multiple network interfaces connected to different networks, but is not
acting as a router. In other words, it has an address on each of its connected networks,
but it does not forward traffic across itself, nor interconnect those networks for other
hosts. Such a host is called multi-homed and may be directly connected to various
networks. In this case, firewall rules must distinguish among the different interfaces,
addresses, and networks to which the host/router is attached, perhaps implementing
different security policies on different networks. For example, the host might be
connected to the Internet on one side, and a trusted private network on the other.
Router
The host has multiple network interfaces and is configured as a router. That is, the
kernel's " IP forwarding" flag is on, and the host will forward packets between its
connected networks as directed by its routing table. In this case, firewall rules not only
must control what traffic may reach the host, but also might restrict what traffic can
cross the host (as router), bound for other hosts.
For this chapter, we decided to take the first approach—single computer—as our model. The
other models are also valid and common, but they require a more detailed understanding of
topics beyond the scope of this book, such as IP routing, routing protocols (RIP, OSPF, etc.),
address translation (NAT/NAPT), etc.
We also assume your single computer has source address verification turned on, to prevent
remote hosts from pretending to be local. [Recipe 2.1] Therefore we don't address such
spoofing directly in the firewall rules.
[ Team LiB ]](https://image.slidesharecdn.com/linuxsecuritycookbook-120930200536-phpapp01/85/Linux-security-cookbook-51-320.jpg)
![[ Team LiB ]
Recipe 2.1 Enabling Source Address Verification
2.1.1 Problem
You want to prevent remote hosts from spoofing incoming packets as if they had come from your local
machine.
2.1.2 Solution
Turn on source address verification in the kernel. Place the following code into a system boot file (i.e.,
linked into the /etc/rc.d hierarchy) that executes before any network devices are enabled:
#!/bin/sh
echo -n "Enabling source address verification..."
echo 1 > /proc/sys/net/ipv4/conf/default/rp_filter
echo "done"
Or, to perform the same task after network devices are enabled:
#!/bin/sh
CONF_DIR=/proc/sys/net/ipv4/conf
CONF_FILE=rp_filter
if [ -e ${CONF_DIR}/all/${CONF_FILE} ]; then
echo -n "Setting up IP spoofing protection..."
for f in ${CONF_DIR}/*/${CONF_FILE}; do
echo 1 > $f
done
echo "done"
fi
A quicker method may be to add this line to /etc/sysctl.conf:
net.ipv4.conf.all.rp_filter = 1
and run sysctl to reread the configuration immediately:
# sysctl -p
2.1.3 Discussion
Source address verification is a kernel-level feature that drops packets that appear to come from your
internal network, but do not. Enabling this feature should be your first network-related security task. If
your kernel does not support it, you can set up the same effect using firewall rules, but it takes more
work. [Recipe 2.2]
2.1.4 See Also](https://image.slidesharecdn.com/linuxsecuritycookbook-120930200536-phpapp01/85/Linux-security-cookbook-52-320.jpg)
![sysctl(8). Source address verification is explained in the IPCHAINS-HOWTO at
http://www.linux.org/docs/ldp/howto/IPCHAINS-HOWTO-5.html#ss5.7.
[ Team LiB ]](https://image.slidesharecdn.com/linuxsecuritycookbook-120930200536-phpapp01/85/Linux-security-cookbook-53-320.jpg)
![[ Team LiB ]
Recipe 2.2 Blocking Spoofed Addresses
2.2.1 Problem
You want to prevent remote hosts from pretending to be local to your network.
2.2.2 Solution
For a single machine, to prevent remote hosts from pretending to be that machine, use the following:
For iptables:
# iptables -A INPUT -i external_interface -s your_IP_address -j REJECT
For ipchains:
# ipchains -A input -i external_interface -s your_IP_address -j REJECT
If you have a Linux machine acting as a firewall for your internal network (say, 192.168.0.*) with two
network interfaces, one internal and one external, and you want to prevent remote machines from
spoofing internal IP addresses to the external interface, use the following:
For iptables:
# iptables -A INPUT -i external_interface -s 192.168.0.0/24 -j REJECT
Drop Versus Reject
The Linux firewall can refuse packets in two manners. iptables calls them DROP and REJECT,
while ipchains uses the terminology DENY and REJECT. DROP (or DENY) simply swallows the
packet, never to be seen again, and emits no response. REJECT, in contrast, responds to the
packet with a friendly message back to the sender, something like "Hello, I have rejected your
packet."
DROP and REJECT have pros and cons. In general, REJECT is more compliant with standards:
hosts are supposed to send rejection notices. Used within your network, rejects make things
easier to debug if problems occur. DROP gives a bit more security, but it's hard to say how
much, and it increases the risk of other network-related problems for you. A DROP policy
makes it appear to peers that your host is turned off or temporarily unreachable due to
network problems. Attempts to connect to TCP services will take a long time to fail, as clients
will receive no explicit rejection (TCP "reset" message), and will keep trying to connect. This
may have unexpected consequences beyond the blocking the service. For example, some
services automatically attempt to use the IDENT protocol (RFC 1413) to identify their clients.
If you DROP incoming IDENT connections, some of your outgoing protocol sessions may be
mysteriously slow to start up, as the remote server times out attempting to identify you.](https://image.slidesharecdn.com/linuxsecuritycookbook-120930200536-phpapp01/85/Linux-security-cookbook-54-320.jpg)
![On the other hand, REJECT can leave you open to denial of service attacks, with you as the
unwitting patsy. Suppose a Hostile Third Party sends you packets with a forged source address
from a victim site, V. In response, you reject the packets, returning them not to the Hostile
Third Party, but to victim V, owner of the source address. Voilà—you are unintentionally
flooding V with rejections. If you're a large site with hundreds or thousands of hosts, you
might choose DROP to prevent them from being abused in such a manner. But if you're a
home user, you're probably less likely to be targeted for this sort of attack, and perhaps
REJECT is fine. To further complicate matters, the Linux kernel has features like ICMP rate-
limiting that mitigate some of these concerns. We'll avoid religious arguments and simply say,
"Choose the solution best for your situation."
In this chapter, we stick with REJECT for simplicity, but you may feel free to tailor the recipes
more to your liking with DROP or DENY. Also note that iptables supports a variety of rejection
messages: "Hello, my port is unreachable," "Bummer, that network is not accessible," "Sorry
I'm not here right now, but leave a message at the beep," and so forth. (OK, we're kidding
about one of those.) See the —reject-with option.
For ipchains:
# ipchains -A input -i external_interface -s 192.168.0.0/24 -j REJECT
2.2.3 Discussion
For a single machine, simply enable source address verification in the kernel. [Recipe 2.1]
2.2.4 See Also
iptables(8), ipchains(8).
[ Team LiB ]](https://image.slidesharecdn.com/linuxsecuritycookbook-120930200536-phpapp01/85/Linux-security-cookbook-55-320.jpg)
![[ Team LiB ]
Recipe 2.3 Blocking All Network Traffic
2.3.1 Problem
You want to block all network traffic by firewall.
2.3.2 Solution
For iptables:
# iptables -F
# iptables -A INPUT -j REJECT
# iptables -A OUTPUT -j REJECT
# iptables -A FORWARD -j REJECT
For ipchains:
# ipchains -F
# ipchains -A input -j REJECT
# ipchains -A output -j REJECT
# ipchains -A forward -j REJECT
2.3.3 Discussion
You could also stop your network device altogether with ifconfig [Recipe 3.2] or even unplug your network
cable. It all depends on what level of control you need.
The target REJECT sends an error packet in response to the incoming packet. You can tailor iptables's
error packet using the option —reject-with. Alternatively, you can specify the targets DROP (iptables) and
DENY (ipchains) that simply absorb the packet and produce no response. See Drop Versus Reject.
2.3.4 See Also
iptables(8), ipchains(8).
Rules in a chain are evaluated in sequential order.
[ Team LiB ]](https://image.slidesharecdn.com/linuxsecuritycookbook-120930200536-phpapp01/85/Linux-security-cookbook-56-320.jpg)
![[ Team LiB ]
Recipe 2.4 Blocking Incoming Traffic
2.4.1 Problem
You want to block all incoming network traffic, except from your system itself. Do not affect outgoing
traffic.
2.4.2 Solution
For iptables:
# iptables -F INPUT
# iptables -A INPUT -m state --state ESTABLISHED -j ACCEPT
# iptables -A INPUT -j REJECT
For ipchains:
# ipchains -F input
# ipchains -A input -i lo -j ACCEPT
# ipchains -A input -p tcp --syn -j REJECT
# ipchains -A input -p udp --dport 0:1023 -j REJECT
2.4.3 Discussion
The iptables recipe takes advantage of statefulness, permitting incoming packets only if they are part of
established outgoing connections. All other incoming packets are rejected.
The ipchains recipe accepts all packets from yourself. The source can be either your actual IP address or
the loopback address, 127.0.0.1; in either case, the traffic is delivered via the loopback interface, lo. We
then reject TCP packets that initiate connections (—syn) and all UDP packets on privileged ports. This
recipe has a disadvantage, however, which is that you have to list the UDP port numbers. If you run other
UDP services on nonprivileged ports (1024 and up), you'll have to modify the port list. But even so there's
a catch: some outgoing services allocate a randomly numbered, nonprivileged port for return packets,
and you don't want to block it.
Don't simply drop all input packets, e.g.:
# ipchains -F input
# ipchains -A input -j REJECT
as this will block responses returning from your legitimate outgoing connections.
iptables also supports the —syn flag to process TCP packets:
# iptables -A INPUT -p tcp --syn -j REJECT
As with ipchains, this rule blocks TCP/IP packets used to initiate connections. They have their SYN bit set
but the ACK and FIN bits unset.](https://image.slidesharecdn.com/linuxsecuritycookbook-120930200536-phpapp01/85/Linux-security-cookbook-57-320.jpg)
![If you block all incoming traffic, you will block ICMP messages required by Internet standards (RFCs); see
http://rfc.net/rfc792.html and http://www.cymru.com/Documents/icmp-messages.html.
2.4.4 See Also
iptables(8), ipchains(8).
[ Team LiB ]](https://image.slidesharecdn.com/linuxsecuritycookbook-120930200536-phpapp01/85/Linux-security-cookbook-58-320.jpg)
![[ Team LiB ]
Recipe 2.5 Blocking Outgoing Traffic
2.5.1 Problem
Drop all outgoing network traffic. If possible, do not affect incoming traffic.
2.5.2 Solution
For iptables:
# iptables -F OUTPUT
# iptables -A OUTPUT -m state --state ESTABLISHED -j ACCEPT
# iptables -A OUTPUT -j REJECT
For ipchains:
# ipchains -F output
# ipchains -A output -p tcp ! --syn -j ACCEPT
# ipchains -A output -j REJECT
Depending on your shell, you might need to escape the exclamation point.
2.5.3 Discussion
This recipe takes advantage of iptables's statefulness. iptables can tell the difference between outgoing
traffic initiated from the local machine and outgoing traffic in response to established incoming
connections. The latter is permitted, but the former is not.
ipchains is stateless but can recognize (and reject) packets with the SYN bit set and the ACK and FIN bits
cleared, thereby permitting established and incoming TCP connections to function. However, this
technique is insufficient for UDP exchanges: you really need a stateful firewall for that.
2.5.4 See Also
iptables(8), ipchains(8).
[ Team LiB ]](https://image.slidesharecdn.com/linuxsecuritycookbook-120930200536-phpapp01/85/Linux-security-cookbook-59-320.jpg)
![[ Team LiB ]
Recipe 2.6 Blocking Incoming Service Requests
2.6.1 Problem
You want to block connections to a particular network service, for example, HTTP.
2.6.2 Solution
To block all incoming HTTP traffic:
For iptables:
# iptables -A INPUT -p tcp --dport www -j REJECT
For ipchains:
# ipchains -A input -p tcp --dport www -j REJECT
To block incoming HTTP traffic but permit local HTTP traffic:
For iptables:
# iptables -A INPUT -p tcp -i lo --dport www -j ACCEPT
# iptables -A INPUT -p tcp --dport www -j REJECT
For ipchains:
# ipchains -A input -p tcp -i lo --dport www -j ACCEPT
# ipchains -A input -p tcp --dport www -j REJECT
2.6.3 Discussion
You can also block access at other levels such as TCP-wrappers. [Recipe 3.9][Recipe 3.11]
2.6.4 See Also
iptables(8), ipchains(8).
[ Team LiB ]](https://image.slidesharecdn.com/linuxsecuritycookbook-120930200536-phpapp01/85/Linux-security-cookbook-60-320.jpg)
![[ Team LiB ]
Recipe 2.7 Blocking Access from a Remote Host
2.7.1 Problem
You want to block incoming traffic from a particular host.
2.7.2 Solution
To block all access by that host:
For iptables:
# iptables -A INPUT -s remote_IP_address -j REJECT
For ipchains:
# ipchains -A input -s remote_IP_address -j REJECT
To block requests for one particular service, say, the SMTP mail service:
For iptables:
# iptables -A INPUT -p tcp -s remote_IP_address --dport smtp -j REJECT
For ipchains:
# ipchains -A input -p tcp -s remote_IP_address --dport smtp -j REJECT
To admit some hosts but block all others:
For iptables :
# iptables -A INPUT -s IP_address_1 [-p protocol --dport service] -j ACCEPT
# iptables -A INPUT -s IP_address_2 [-p protocol --dport service] -j ACCEPT
# iptables -A INPUT -s IP_address_3 [-p protocol --dport service] -j ACCEPT
# iptables -A INPUT [-p protocol --dport service] -j REJECT
For ipchains:
# ipchains -A input -s IP_address_1 [-p protocol --dport service] -j ACCEPT
# ipchains -A input -s IP_address_2 [-p protocol --dport service] -j ACCEPT
# ipchains -A input -s IP_address_3 [-p protocol --dport service] -j ACCEPT
# ipchains -A input [-p protocol --dport service] -j REJECT
2.7.3 Discussion
You can also block access at other levels such as TCP-wrappers. [Recipe 3.9][Recipe 3.11]](https://image.slidesharecdn.com/linuxsecuritycookbook-120930200536-phpapp01/85/Linux-security-cookbook-61-320.jpg)
![2.7.4 See Also
iptables(8), ipchains(8).
[ Team LiB ]](https://image.slidesharecdn.com/linuxsecuritycookbook-120930200536-phpapp01/85/Linux-security-cookbook-62-320.jpg)
![[ Team LiB ]
Recipe 2.8 Blocking Access to a Remote Host
2.8.1 Problem
You want to block outgoing traffic to a particular host.
2.8.2 Solution
To block all access:
For iptables:
# iptables -A OUTPUT -d remote_IP_address -j REJECT
For ipchains:
# ipchains -A output -d remote_IP_address -j REJECT
To block a particular service, such as a remote web site:
For iptables:
# iptables -A OUTPUT -p tcp -d remote_IP_address --dport www -j REJECT
For ipchains:
# ipchains -A output -p tcp -d remote_IP_address --dport www -j REJECT
2.8.3 Discussion
Perhaps you've discovered that a particular web site has malicious content on it, such as a trojan horse.
This recipe will prevent all of your users from accessing that site. (We don't consider "redirector" web
sites, such as http://www.anonymizer.com, which would get around this restriction.)
2.8.4 See Also
iptables(8), ipchains(8).
[ Team LiB ]](https://image.slidesharecdn.com/linuxsecuritycookbook-120930200536-phpapp01/85/Linux-security-cookbook-63-320.jpg)
![[ Team LiB ]
Recipe 2.9 Blocking Outgoing Access to All Web Servers on
a Network
2.9.1 Problem
You want to prevent outgoing access to a network, e.g., all web servers at yahoo.com.
2.9.2 Solution
Figure out how to specify the yahoo.com network, e.g., 64.58.76.0/24, and reject web access:
For iptables:
# iptables -A OUTPUT -p tcp -d 64.58.76.0/24 --dport www -j REJECT
For ipchains:
# ipchains -A output -p tcp -d 64.58.76.0/24 --dport www -j REJECT
2.9.3 Discussion
Here the network is specified using Classless InterDomain Routing (CIDR) mask format, a.b.c.d/N,
where N is the number of bits in the netmask. In this case, N=24, so the first 24 bits are the network
portion of the address.
2.9.4 See Also
iptables(8), ipchains(8).](https://image.slidesharecdn.com/linuxsecuritycookbook-120930200536-phpapp01/85/Linux-security-cookbook-64-320.jpg)
![You can supply hostnames instead of IP addresses in your firewall rules. If DNS
reports multiple IP addresses for that hostname, a separate rule will be created for
each IP address. For example, www.yahoo.com has (at this writing) 11 IP
addresses:
$ host www.yahoo.com
www.yahoo.com is an alias for www.yahoo.akadns.net.
www.yahoo.akadns.net has address 216.109.125.68
www.yahoo.akadns.net has address 64.58.76.227
...
So you could block access to Yahoo, for example, and view the results by:
iptables:
# iptables -A OUTPUT -d www.yahoo.com -j REJECT
# iptables -L OUTPUT
ipchains:
# ipchains -A output -d www.yahoo.com -j REJECT
# ipchains -L output
Security experts recommend that you use only IP addresses in your rules, not
hostnames, since an attacker could poison your DNS and circumvent rules defined
for hostnames. However, the hostnames are relevant only at the moment you run
iptables or ipchains to define a rule, as the program looks up the underlying IP
addresses immediately and stores them in the rule. So you could conceivably use
hostnames for convenience when defining your rules, then check the results (via
the output of iptables-save or ipchains-save [Recipe 2.19]) to confirm the IP
addresses.
[ Team LiB ]](https://image.slidesharecdn.com/linuxsecuritycookbook-120930200536-phpapp01/85/Linux-security-cookbook-65-320.jpg)
![[ Team LiB ]
Recipe 2.10 Blocking Remote Access, but Permitting Local
2.10.1 Problem
You want only local users to access a TCP service; remote requests should be denied.
2.10.2 Solution
Permit connections via the loopback interface and reject all others.
For iptables :
# iptables -A INPUT -p tcp -i lo --dport service -j ACCEPT
# iptables -A INPUT -p tcp --dport service -j REJECT
For ipchains:
# ipchains -A input -p tcp -i lo --dport service -j ACCEPT
# ipchains -A input -p tcp --dport service -j REJECT
Alternatively, you can single out your local IP address specifically:
For iptables:
# iptables -A INPUT -p tcp ! -s your_IP_address --dport service -j REJECT
For ipchains:
# ipchains -A input -p tcp ! -s your_IP_address --dport service -j REJECT
Depending on your shell, you might need to escape the exclamation point.
2.10.3 Discussion
The local IP address can be a network specification, of course, such as a.b.c.d/N.
You can permit an unrelated set of machines to access the service but reject everyone else, like so:
For iptables:
# iptables -A INPUT -p tcp -s IP_address_1 --dport service -j ACCEPT
# iptables -A INPUT -p tcp -s IP_address_2 --dport service -j ACCEPT
# iptables -A INPUT -p tcp -s IP_address_3 --dport service -j ACCEPT
# iptables -P INPUT -j REJECT
For ipchains:](https://image.slidesharecdn.com/linuxsecuritycookbook-120930200536-phpapp01/85/Linux-security-cookbook-66-320.jpg)
![# ipchains -A input -p tcp -s IP_address_1 --dport service -j ACCEPT
# ipchains -A input -p tcp -s IP_address_2 --dport service -j ACCEPT
# ipchains -A input -p tcp -s IP_address_3 --dport service -j ACCEPT
# ipchains -P input -j REJECT
2.10.4 See Also
iptables(8), ipchains(8). Chapter 3 covers diverse, non-firewall approaches to block incoming service
requests.
[ Team LiB ]](https://image.slidesharecdn.com/linuxsecuritycookbook-120930200536-phpapp01/85/Linux-security-cookbook-67-320.jpg)
![[ Team LiB ]
Recipe 2.11 Controlling Access by MAC Address
2.11.1 Problem
You want only a particular machine, identified by its MAC address, to access your system.
2.11.2 Solution
# iptables -F INPUT
# iptables -A INPUT -i lo -j ACCEPT
# iptables -A INPUT -m mac --mac-source 12:34:56:89:90:ab -j ACCEPT
# iptables -A INPUT -j REJECT
ipchains does not support this feature.
2.11.3 Discussion
This technique works only within your local subnet. If you receive a packets from a machine outside your
subnet, it will contain your gateway's MAC address, not that of the original source machine.
MAC addresses can be spoofed. Suppose you have a machine called mackie whose MAC address is trusted
by your firewall. If an intruder discovers this fact, and mackie is down, the intruder could spoof mackie's
MAC address and your firewall would be none the wiser. On the other hand, if mackie is up during the
spoofing, its kernel will start screaming (via syslog) about duplicate MAC addresses.
Note that our recipe permits local connections from your own host; these arrive via the loopback
interface.
2.11.4 See Also
iptables(8), ipchains(8).
[ Team LiB ]](https://image.slidesharecdn.com/linuxsecuritycookbook-120930200536-phpapp01/85/Linux-security-cookbook-68-320.jpg)
![[ Team LiB ]
Recipe 2.12 Permitting SSH Access Only
2.12.1 Problem
You want to permit incoming SSH access but no other incoming access. Allow local connections to all
services, however.
2.12.2 Solution
For iptables:
# iptables -F INPUT
# iptables -A INPUT -p tcp --dport ssh -j ACCEPT
# iptables -A INPUT -i lo -j ACCEPT
# iptables -A INPUT -j REJECT
For ipchains:
# ipchains -F input
# ipchains -A input -p tcp --dport ssh -j ACCEPT
# ipchains -A input -i lo -j ACCEPT
# ipchains -A input -j REJECT
2.12.3 Discussion
A common setup is to permit access to a remote machine only by SSH. If you want this access limited to
certain hosts or networks, list them by IP address as follows:
For iptables :
# iptables -A INPUT -p tcp -s 128.220.13.4 --dport ssh -j ACCEPT
# iptables -A INPUT -p tcp -s 71.54.121.19 --dport ssh -j ACCEPT
# iptables -A INPUT -p tcp -s 152.16.91.0/24 --dport ssh -j ACCEPT
# iptables -A INPUT -j REJECT
For ipchains:
# ipchains -A input -p tcp -s 128.220.13.4 --dport ssh -j ACCEPT
# ipchains -A input -p tcp -s 71.54.121.19 --dport ssh -j ACCEPT
# ipchains -A input -p tcp -s 152.16.91.0/24 --dport ssh -j ACCEPT
# ipchains -A input -j REJECT
The REJECT rule in the preceding iptables and ipchains examples prevents all other incoming connections.
If you want to prevent only SSH connections (from nonapproved hosts), use this REJECT rule instead:
For iptables:
# iptables -A INPUT -p tcp --dport ssh -j REJECT](https://image.slidesharecdn.com/linuxsecuritycookbook-120930200536-phpapp01/85/Linux-security-cookbook-69-320.jpg)
![For ipchains:
# ipchains -A input -p tcp --dport ssh -j REJECT
Alternatively you can use TCP-wrappers. [Recipe 3.9] [Recipe 3.11] [Recipe 3.13]
2.12.4 See Also
iptables(8), ipchains(8), ssh(1).
[ Team LiB ]](https://image.slidesharecdn.com/linuxsecuritycookbook-120930200536-phpapp01/85/Linux-security-cookbook-70-320.jpg)
![[ Team LiB ]
Recipe 2.13 Prohibiting Outgoing Telnet Connections
2.13.1 Problem
You want to block outgoing Telnet connections.
2.13.2 Solution
To block all outgoing Telnet connections:
For iptables:
# iptables -A OUTPUT -p tcp --dport telnet -j REJECT
For ipchains:
# ipchains -A output -p tcp --dport telnet -j REJECT
To block all outgoing Telnet connections except to yourself from yourself:
For iptables:
# iptables -A OUTPUT -p tcp -o lo --dport telnet -j ACCEPT
# iptables -A OUTPUT -p tcp --dport telnet -j REJECT
For ipchains:
# ipchains -A output -p tcp -i lo --dport telnet -j ACCEPT
# ipchains -A output -p tcp --dport telnet -j REJECT
2.13.3 Discussion
Telnet is notoriously insecure in its most common form, which transmits your login name and password in
plaintext over the network. This recipe is a sneaky way to encourage your users to find a more secure
alternative, such as ssh. (Unless your users are running Telnet in a secure fashion with Kerberos
authentication. [Recipe 4.15])
2.13.4 See Also
iptables(8), ipchains(8), telnet(1).
[ Team LiB ]](https://image.slidesharecdn.com/linuxsecuritycookbook-120930200536-phpapp01/85/Linux-security-cookbook-71-320.jpg)
![[ Team LiB ]
Recipe 2.14 Protecting a Dedicated Server
2.14.1 Problem
You want to run a specific set of services on your machine, accessible to the outside world. All other
services should be rejected and logged. Internally, however, local users can access all services.
2.14.2 Solution
Suppose your services are www, ssh, and smtp.
For iptables :
# iptables -F INPUT
# iptables -A INPUT -i lo -j ACCEPT
# iptables -A INPUT -m multiport -p tcp --dport www,ssh,smtp -j ACCEPT
# iptables -A INPUT -j LOG -m limit
# iptables -A INPUT -j REJECT
For ipchains:
# ipchains -F input
# ipchains -A input -i lo -j ACCEPT
# ipchains -A input -p tcp --dport www -j ACCEPT
# ipchains -A input -p tcp --dport ssh -j ACCEPT
# ipchains -A input -p tcp --dport smtp -j ACCEPT
# ipchains -A input -l -j REJECT
2.14.3 Discussion
Local connections from your own host arrive via the loopback interface.
2.14.4 See Also
iptables(8), ipchains(8).
[ Team LiB ]](https://image.slidesharecdn.com/linuxsecuritycookbook-120930200536-phpapp01/85/Linux-security-cookbook-72-320.jpg)
![[ Team LiB ]
Recipe 2.15 Preventing pings
2.15.1 Problem
You don't want remote sites to receive responses if they ping you.
2.15.2 Solution
For iptables :
# iptables -A INPUT -p icmp --icmp-type echo-request -j DROP
For ipchains:
# ipchains -A input -p icmp --icmp-type echo-request -j DENY
2.15.3 Discussion
In this case, we use DROP and DENY instead of REJECT. If you're trying to hide from pings, then replying
with a rejection kind of defeats the purpose, eh?
Don't make the mistake of dropping all ICMP messages, e.g.:
WRONG!! DON'T DO THIS!
# iptables -A INPUT -p icmp -j DROP
because pings are only one type of ICMP message, and you might not want to block all types. That being
said, you might want to block some others, like redirects and source quench. List the available ICMP
messages with:
$ iptables -p icmp -h
$ ipchains -h icmp
2.15.4 See Also
iptables(8), ipchains(8). The history of ping, by its author, is at http://ftp.arl.mil/~mike/ping.html.
[ Team LiB ]](https://image.slidesharecdn.com/linuxsecuritycookbook-120930200536-phpapp01/85/Linux-security-cookbook-73-320.jpg)
![[ Team LiB ]
Recipe 2.16 Listing Your Firewall Rules
2.16.1 Problem
You want to see your firewall rules.
2.16.2 Solution
For iptables:
# iptables -L [chain]
For ipchains:
# ipchains -L [chain]
For more detailed output, append the -v option.
If iptables takes a long time to print the rule list, try appending the -n option to disable reverse DNS
lookups. Such lookups of local addresses, such as 192.168.0.2, may cause delays due to timeouts.
2.16.3 Discussion
An iptables rule like:
# iptables -A mychain -p tcp -s 1.2.3.4 -d 5.6.7.8 --dport smtp -j chain2
has a listing like:
Chain mychain (3 references)
target prot opt source destination
chain2 tcp -- 1.2.3.4 5.6.7.8 tcp dpt:smtp
which is basically a repeat of what you specified: any SMTP packets from IP address 1.2.3.4 to 5.6.7.8
should be forwarded to target chain2. Here's a similar ipchains rule that adds logging:
# ipchains -A mychain -p tcp -s 1.2.3.4 -d 5.6.7.8 --dport smtp -l -j chain2
Its listing looks like:
Chain mychain (3 references):
target prot opt source destination ports
chain2 tcp ----l- 1.2.3.4 5.6.7.8 any -> smtp
A detailed listing (-L -v) adds packet and byte counts and more:
Chain mychain (3 references):
pkts bytes target prot opt tosa tosx ifname source destination ports](https://image.slidesharecdn.com/linuxsecuritycookbook-120930200536-phpapp01/85/Linux-security-cookbook-74-320.jpg)
![15 2640 chain2 tcp ----l- 0xFF 0x00 any 1.2.3.4 5.6.7.8 any -> smtp
Another way to view your rules is in the output of iptables-save or ipchains-save [Recipe 2.19], but this
more concise format is not as readable. It's meant only to be processed by iptables-restore or ipchains-
restore, respectively:
# ipchains-save
... Saving 'mychain'.
-A foo -s 1.2.3.4/255.255.255.255 -d 5.6.7.8/255.255.255.255 25:25 -p 6 -j chain2 -l
2.16.4 See Also
iptables(8), ipchains(8).
[ Team LiB ]](https://image.slidesharecdn.com/linuxsecuritycookbook-120930200536-phpapp01/85/Linux-security-cookbook-75-320.jpg)
![[ Team LiB ]
Recipe 2.17 Deleting Firewall Rules
2.17.1 Problem
You want to delete firewall rules, individually or all at once.
2.17.2 Solution
To delete rules en masse, also called flushing a chain, do the following:
For iptables:
# iptables -F [chain]
For ipchains:
# ipchains -F [chain]
To delete rules individually:
For iptables:
# iptables -D chain rule_number
For ipchains:
# ipchains -D chain rule_number
2.17.3 Discussion
Rules are numbered beginning with 1. To list the rules:
# iptables -L
# ipchains -L
select one to delete (say, rule 4 on the input chain), and type:
# iptables -D INPUT 4
# ipchains -D input 4
If you've previously saved your rules and want your deletions to remain in effect after the next reboot, re-
save the new configuration. [Recipe 2.19]
2.17.4 See Also](https://image.slidesharecdn.com/linuxsecuritycookbook-120930200536-phpapp01/85/Linux-security-cookbook-76-320.jpg)
![iptables(8), ipchains(8).
[ Team LiB ]](https://image.slidesharecdn.com/linuxsecuritycookbook-120930200536-phpapp01/85/Linux-security-cookbook-77-320.jpg)
![[ Team LiB ]
Recipe 2.18 Inserting Firewall Rules
2.18.1 Problem
Rather than appending a rule to a chain, you want to insert or replace one elsewhere in the chain.
2.18.2 Solution
Instead of the -A option, use -I to insert or -R to replace. You'll need to know the numeric position, within
the existing rules, of the new rule. For instance, to insert a new rule in the fourth position in the chain:
# iptables -I chain 4 ...specification...
# ipchains -I chain 4 ...specification...
To replace the second rule in a chain:
# iptables -R chain 2 ...specification...
# ipchains -R chain 2 ...specification...
2.18.3 Discussion
When you insert a rule at position N in a chain, the old rule N becomes rule N+1, rule N+1 becomes rule
N+2, and so on. To see the rules in a chain in order, so you can determine the right numeric offset, list
the chain with -L. [Recipe 2.16]
2.18.4 See Also
iptables(8), ipchains(8).
[ Team LiB ]](https://image.slidesharecdn.com/linuxsecuritycookbook-120930200536-phpapp01/85/Linux-security-cookbook-78-320.jpg)
![[ Team LiB ]
Recipe 2.19 Saving a Firewall Configuration
2.19.1 Problem
You want to save your firewall configuration.
2.19.2 Solution
Save your settings:
For iptables :
# iptables-save > /etc/sysconfig/iptables
For ipchains:
# ipchains-save > /etc/sysconfig/ipchains
The destination filename is up to you, but some Linux distributions (notably Red Hat) refer to the files we
used, inside their associated /etc/init.d scripts.
2.19.3 Discussion
ipchains-save and iptables-save print your firewall rules in a text format, readable by ipchains-restore and
iptables-restore, respectively. [Recipe 2.20]
Our recipes using iptables-save, iptables-restore, ipchains-save, and ipchains-
restore will work for both Red Hat and SuSE. However, SuSE by default takes a
different approach. Instead of saving and restoring rules, SuSE builds rules from
variables set in /etc/sysconfig/SuSEfirewall2.
2.19.4 See Also
iptables-save(8), ipchains-save(8), iptables(8), ipchains(8).
[ Team LiB ]](https://image.slidesharecdn.com/linuxsecuritycookbook-120930200536-phpapp01/85/Linux-security-cookbook-79-320.jpg)
![[ Team LiB ]
Recipe 2.20 Loading a Firewall Configuration
2.20.1 Problem
You want to load your firewall rules, e.g., at boot time.
2.20.2 Solution
Use ipchains-restore or iptables-restore. Assuming you've saved your firewall configuration in
/etc/sysconfig: [Recipe 2.19]
For iptables:
#!/bin/sh
echo 1 > /proc/sys/net/ipv4/ip_forward (optional)
iptables-restore < /etc/sysconfig/iptables
For ipchains:
#!/bin/sh
echo 1 > /proc/sys/net/ipv4/ip_forward (optional)
ipchains-restore < /etc/sysconfig/ipchains
To tell Red Hat Linux that firewall rules should be loaded at boot time:
# chkconfig iptables on
# chkconfig ipchains on
2.20.3 Discussion
Place the load commands in one of your system rc files. Red Hat Linux already has rc files "iptables" and
"ipchains" in /etc/init.d that you can simply enable using chkconfig. SuSE Linux, in contrast, has a script
/sbin/SuSEpersonal-firewall that invokes iptables or ipchains rules, and it's optionally started by
/etc/init.d/personal-firewall.initial and /etc/init.d/personal-firewall.final at boot time.
To roll your own solution, you can write a script like the following and invoke it from an rc file of your
choice:
#!/bin/sh
# Uncomment either iptables or ipchains
PROGRAM=/usr/sbin/iptables
#PROGRAM=/sbin/ipchains
FIREWALL=`/bin/basename $PROGRAM`
RULES_FILE=/etc/sysconfig/${FIREWALL}
LOADER=${PROGRAM}-restore
FORWARD_BIT=/proc/sys/net/ipv4/ip_forward](https://image.slidesharecdn.com/linuxsecuritycookbook-120930200536-phpapp01/85/Linux-security-cookbook-80-320.jpg)
![if [ ! -f ${RULES_FILE} ]
then
echo "$0: Cannot find ${RULES_FILE}" 1>&2
exit 1
fi
case "$1" in
start)
echo 1 > ${FORWARD_BIT}
${LOADER} < ${RULES_FILE} || exit 1
;;
stop)
${PROGRAM} -F # Flush all rules
${PROGRAM} -X # Delete user-defined chains
echo 0 > ${FORWARD_BIT}
;;
*)
echo "Usage: $0 start|stop" 1>&2
exit 1
;;
esac
Make sure you load your firewall rules for all appropriate runlevels where networking is enabled. On most
systems this includes runlevels 2 (multiuser without NFS), 3 (full multiuser), and 5 (X11). Check
/etc/inittab to confirm this, and use chkconfig to list the status of the networking service at each runlevel:
$ chkconfig --list network
network 0:off 1:off 2:on 3:on 4:on 5:on 6:off
2.20.4 See Also
iptables-load(8), ipchains-load(8), iptables(8), ipchains(8).
[ Team LiB ]](https://image.slidesharecdn.com/linuxsecuritycookbook-120930200536-phpapp01/85/Linux-security-cookbook-81-320.jpg)
![[ Team LiB ]
Recipe 2.21 Testing a Firewall Configuration
2.21.1 Problem
You want to create and test an ipchains configuration nondestructively, i.e., without affecting your active
firewall.
2.21.2 Solution
Using ipchains, create a chain for testing:
# ipchains -N mytest
Insert your rules into this test chain:
# ipchains -A mytest ...
# ipchains -A mytest ....
Specify a test packet:
SA=source_address
SP=source_port
DA=destination_address
DP=destination_port
P=protocol
I=interface
Simulate sending the packet through the test chain:
# ipchains -v -C mytest -s $SA --sport $SP -d $DA --dport $DP -p $P -i $I
At press time, iptables does not have a similar feature for testing packets against rules. iptables 1.2.6a
has a -C option and provides this teaser:
# iptables -v -C mytest -p $P -s $SA --sport $SP -d $DA --dport $DP -i $I
iptables: Will be implemented real soon. I promise ;)
but the iptables FAQ (http://www.netfilter.org/documentation/FAQ/netfilter-faq.html) indicates that the
feature might never be implemented, since checking a single packet against a stateful firewall is
meaningless: decisions can depend on previous packets.
2.21.3 Discussion
This process constructs a packet with its interface, protocol, source, and destination. The response is
either "accepted," "denied," or "passed through chain" for user-defined chains. With -v, you can watch
each rule match or not.](https://image.slidesharecdn.com/linuxsecuritycookbook-120930200536-phpapp01/85/Linux-security-cookbook-82-320.jpg)
![The mandatory parameters are:
-C chain_name
-s source_addr --sport source_port
-d dest_addr --dport dest_port
-p protocol
-i interface_name
For a more realistic test of your firewall, use nmap to probe it from a remote machine. [Recipe 9.13]
2.21.4 See Also
ipchains(8).
[ Team LiB ]](https://image.slidesharecdn.com/linuxsecuritycookbook-120930200536-phpapp01/85/Linux-security-cookbook-83-320.jpg)
![[ Team LiB ]
Recipe 2.22 Building Complex Rule Trees
2.22.1 Problem
You want to construct complex firewall behaviors, but you are getting lost in the complexity.
2.22.2 Solution
Be modular: isolate behaviors into their own chains. Then connect the chains in the desired manner.
For iptables:
# iptables -N CHAIN1
# iptables -N CHAIN2
# iptables -N CHAIN3
# iptables -N CHAIN4
# iptables -N CHAIN5
Add your rules to each chain. Then connect the chains; for example:
# iptables -A INPUT ...specification... -j CHAIN1
# iptables -A CHAIN1 ...specification... -j CHAIN2
# iptables -A CHAIN2 ...specification... -j CHAIN3
# iptables -A INPUT ...specification... -j CHAIN4
# iptables -A INPUT ...specification... -j CHAIN5
to create a rule structure as in Figure 2-1.
Figure 2-1. Building rule chain structures in iptables or ipchains
For ipchains:
# ipchains -N chain1
# ipchains -N chain2
# ipchains -N chain3
# ipchains -N chain4
# ipchains -N chain5](https://image.slidesharecdn.com/linuxsecuritycookbook-120930200536-phpapp01/85/Linux-security-cookbook-84-320.jpg)
![Add your rules to each chain. Then connect the chains, for example:
# ipchains -A input ...specification... -j chain1
# ipchains -A chain1 ...specification... -j chain2
# ipchains -A chain2 ...specification... -j chain3
# ipchains -A input ...specification... -j chain4
# ipchains -A input ...specification... -j chain5
to create the same rule structure as in Figure 2-1.
2.22.3 Discussion
Connecting chains is like modular programming with subroutines. The rule:
# iptables -A CHAIN1 ...specification... -j CHAIN2
creates a jump point to CHAIN2 from this rule in CHAIN1, if the rule is satisfied. Once CHAIN2 has been
traversed, control returns to the next rule in CHAIN1, similar to returning from a subroutine.
2.22.4 See Also
iptables(8), ipchains(8).
[ Team LiB ]](https://image.slidesharecdn.com/linuxsecuritycookbook-120930200536-phpapp01/85/Linux-security-cookbook-85-320.jpg)
![[ Team LiB ]
Recipe 2.23 Logging Simplified
2.23.1 Problem
You want your firewall to log and drop certain packets.
2.23.2 Solution
For iptables, create a new rule chain that logs and drops in sequence:
# iptables -N LOG_DROP
# iptables -A LOG_DROP -j LOG --log-level warning --log-prefix "dropped" -m limit
# iptables -A LOG_DROP -j DROP
Then use it as a target in any relevant rules:
# iptables ...specification... -j LOG_DROP
For ipchains:
# ipchains ...specification... -l -j DROP
2.23.3 Discussion
iptables's LOG target causes the kernel to log packets that match your given specification. The —log-level
option sets the syslog level [Recipe 9.27] for these log messages and —log-prefix adds an identifiable
string to the log entries. The further options —log-prefix, —log-tcp-sequence, —log-tcp-options, and
—log-ip-options affect the information written to the log; see iptables(8).
LOG is usually combined with the limit module (-m limit) to limit the number of redundant log entries
made per time period, to prevent flooding your logs. You can accept the defaults (3 per hour, in bursts of
at most 5 entries) or tailor them with —limit and —limit-burst, respectively.
ipchains has much simpler logging: just add the -l option to the relevant rules.
2.23.4 See Also
iptables(8), ipchains(8).
[ Team LiB ]](https://image.slidesharecdn.com/linuxsecuritycookbook-120930200536-phpapp01/85/Linux-security-cookbook-86-320.jpg)
![[ Team LiB ]
Chapter 3. Network Access Control
One of your most vital security tasks is to maintain control over incoming network connections. As system
administrator, you have many layers of control over these connections. At the lowest
level—hardware—you can unplug network cables, but this is rarely necessary unless your computer has
been badly cracked beyond all trust. More practically, you have the following levels of control in software,
from general to service-specific:
Network interface
The interface can be brought entirely down and up.
Firewall
By setting firewall rules in the Linux kernel, you control the handling of incoming (and outgoing and
forwarded) packets. This topic is covered in Chapter 2.
A superdaemon or Internet services daemon
A superdaemon controls the invocation (or not) of specific network services, based on various
criteria. Suppose your system receives an incoming request for a Telnet connection. Your
superdaemon could accept or reject it based on the source address, the time of day, the count of
other Telnet connections open... or it could simply forbid all Telnet access. Superdaemons typically
have a set of configuration files for controlling your many services conveniently in one place.
Individual network services
Any network service, such as sshd or ftpd, may have built-in access control facilities of its own. For
example, sshd has its AllowUsers configuration keyword, ftpd has /etc/ftpaccess, and various
services require user authentication.
These levels all play a part when a network service request arrives. Suppose remote user joeblow tries to
FTP into the smith account on server.example.com, as in Figure 3-1:
If server.example.com is physically connected to the network...
And its network interface is up . . .
And its kernel firewall permits FTP packets from Joe's host . . .
And a superdaemon is running . . .
And the superdaemon is configured to invoke ftpd . . .
And the superdaemon accepts FTP connections from Joe's machine . . .
And ftpd is installed and executable . . .
And the ftpd configuration in /etc/ftpaccess accepts the connection . . .
And joeblow authenticates as smith . . .
then the connection succeeds. (Assuming nothing else blocks it, such as a network outage.)
Figure 3-1. Layers of security for incoming network connections](https://image.slidesharecdn.com/linuxsecuritycookbook-120930200536-phpapp01/85/Linux-security-cookbook-87-320.jpg)

![or to permit finger connections only from hosts in the friendly.org domain:
/etc/hosts.allow:
finger : *.friendly.org
finger : ALL : DENY
We won't reproduce the full syntax supported by these files, since it's in the manpage, hosts.allow(5). But
be aware that TCP-wrappers can also do IDENT checking, invoke arbitrary external programs, and other
important tasks. Both Red Hat and SuSE include TCP-wrappers.
All recipes in this chapter come with a large caveat: they do not actually restrict
access by host, but by IP source address. For example, we can specify that only
host 121.108.19.42 can access a given service on our system. Source addresses,
however, can be spoofed without much difficulty. A machine that falsely claims to
be 121.108.19.42 could potentially bypass such restrictions. If you truly need to
control access by host rather than source address, then a preferable technique is
cryptographic host authentication such as SSH server authentication, hostbased
client authentication, or IPSec.
[ Team LiB ]](https://image.slidesharecdn.com/linuxsecuritycookbook-120930200536-phpapp01/85/Linux-security-cookbook-89-320.jpg)
![[ Team LiB ]
Recipe 3.1 Listing Your Network Interfaces
3.1.1 Problem
You want a list of your network interfaces.
3.1.2 Solution
To list all interfaces, whether up or down, whose drivers are loaded:
$ ifconfig -a
To list all interfaces that are up:
$ ifconfig
To list a single interface, commonly eth0:
$ ifconfig eth0
3.1.3 Discussion
If you are not root, ifconfig might not be in your path: try /sbin/ifconfig.
When invoked with the -a option, ifconfig lists all network interfaces that are up or down, but it will miss
physical interfaces whose drivers are not loaded. For example, suppose you have a box with two Ethernet
cards installed (eth0 and eth1) from different manufacturers, with different drivers, but only one (eth0) is
configured in Linux (i.e., there is an /etc/sysconfig/network-scripts/ifcfg-* file for it). The other interface
you don't normally use. ifconfig -a will not show the second interface until you run ifconfig eth1 to load the
driver.
3.1.4 See Also
ifconfig(8).
[ Team LiB ]](https://image.slidesharecdn.com/linuxsecuritycookbook-120930200536-phpapp01/85/Linux-security-cookbook-90-320.jpg)
![[ Team LiB ]
Recipe 3.2 Starting and Stopping the Network Interface
3.2.1 Problem
You want to prevent all remote network connections, incoming and outgoing, on your network interfaces.
3.2.2 Solution
To shut down one network interface, say, eth0:
# ifconfig eth0 down
To bring up one network interface, say, eth0:
# ifconfig eth0 up
To shut down all networking:
# /etc/init.d/network stop
or:
# service network stop Red Hat
To bring up all networking:
# /etc/init.d/network start
or:
# service network start Red Hat
3.2.3 Discussion
Linux provides three levels of abstraction for enabling and disabling your network interfaces (short of
unplugging the network cable):
/sbin/ifconfig
The lowest level, to enable/disable a single network interface. It has other functions as well for
configuring an interface in various ways.
/sbin/ifup, /sbin/ifdown
This mid-level pair of scripts operates on a single network interface, bringing it up or down
respectively, by invoking ifconfig with appropriate arguments. They also initialize DHCP and handle
a few other details. These are rarely invoked directly by users.
/etc/init.d/network
A high-level script that operates on all network interfaces, not just one. It runs ifup or ifdown for](https://image.slidesharecdn.com/linuxsecuritycookbook-120930200536-phpapp01/85/Linux-security-cookbook-91-320.jpg)
![each interface as needed, and also handles other details: adding routes, creating a lock file to
indicate that networking is enabled, and much more. It even toggles the loopback interface, which
might be more than you intended, if you just want to block outside traffic.
The scripts ifup, ifdown, and network are pretty short and well worth reading.
3.2.4 See Also
ifconfig(8). usernetctl(8) describes how non-root users may modify parameters of network interfaces
using ifup and ifdown, if permitted by the system administrator.
[ Team LiB ]](https://image.slidesharecdn.com/linuxsecuritycookbook-120930200536-phpapp01/85/Linux-security-cookbook-92-320.jpg)
![[ Team LiB ]
Recipe 3.3 Enabling/Disabling a Service (xinetd)
3.3.1 Problem
You want to prevent a specific TCP service from being invoked on your system by xinetd .
3.3.2 Solution
If the service's name is "myservice," locate its configuration in /etc/xinetd.d/myservice or /etc/xinetd.conf
and add:
disable = yes
to its parameters. For example, to disable telnet, edit /etc/xinetd.d/telnet:
service telnet
{
...
disable = yes
}
Then inform xinetd by signal to pick up your changes:
# kill -USR2 `pidof xinetd`
To permit access, remove the disable line and resend the SIGUSR2 signal.
3.3.3 Discussion
Instead of disabling the service, you could delete its xinetd configuration file (e.g., /etc/xinetd.d/telnet),
or even delete the service's executable from the machine, but such deletions are harder to undo. (Don't
remove the executable and leave the service enabled, or xinetd will still try to run it and will complain.)
Alternatively use ipchains or iptables [Recipe 2.7] if you want to keep the service runnable but restrict the
network source addresses allowed to invoke it. Specific services might also have their own, program-level
controls for restricting allowed client addresses.
3.3.4 See Also
xinetd(8). The xinetd home page is http://www.synack.net/xinetd.
[ Team LiB ]](https://image.slidesharecdn.com/linuxsecuritycookbook-120930200536-phpapp01/85/Linux-security-cookbook-93-320.jpg)
![[ Team LiB ]
Recipe 3.4 Enabling/Disabling a Service (inetd)
3.4.1 Problem
You want to prevent a specific TCP service from being invoked on your system by inetd .
3.4.2 Solution
To disable, comment out the service's line in /etc/inetd.conf by preceding it with a hash mark (#). For
example, for the Telnet daemon:
/etc/inetd.conf:
# telnet stream tcp nowait root /usr/sbin/in.telnetd in.telnetd
Then inform inetd by signal to pick up your changes. (Here the hash mark is the root shell prompt, not a
comment symbol.)
# kill -HUP `pidof inetd`
To enable, uncomment the same line and send SIGHUP again.
3.4.3 Discussion
Instead of disabling the service, you could delete the line in the inetd configuration file, or even delete its
executable from the machine, but such deletions are harder to undo. (Don't remove the executable and
leave the service enabled, or inetd will still try to run it, and will complain.) Alternatively, use ipchains or
iptables [Recipe 2.6] to keep the service runnable, just not by remote request.
3.4.4 See Also
inetd(8), inetd.conf(5).
[ Team LiB ]](https://image.slidesharecdn.com/linuxsecuritycookbook-120930200536-phpapp01/85/Linux-security-cookbook-94-320.jpg)
![[ Team LiB ]
Recipe 3.5 Adding a New Service (xinetd)
3.5.1 Problem
You want to add a new network service, controlled by xinetd.
3.5.2 Solution
Create a new configuration file in /etc/xinetd.d with at least the following information:
service SERVICE_NAME Name from /etc/services; see services(5)
{
server = /PATH/TO/SERVER The service executable
server_args = ANY_ARGS_HERE Any arguments; omit if none
user = USER Run the service as this user
socket_type = TYPE stream, dgram, raw, or seqpacket
wait = YES/NO yes = single-threaded, no = multithreaded
}
Name the file SERVICE_NAME. Then signal xinetd to read your new service file. [Recipe 3.3]
3.5.3 Discussion
To create an xinetd configuration file for your service, you must of course know your service's desired
properties and behavior. Is it stream based? Datagram based? Single-threaded or multithreaded? What
arguments does the server executable take, if any?
xinetd configuration files have a tremendous number of additional keywords and values. See
xinetd.conf(5) for full details.
xinetd reads all files in /etc/xinetd.d only if /etc/xinetd.conf tells it to, via this line:
includedir /etc/xinetd.d
Check your /etc/xinetd.conf to confirm the location of its includedir.
3.5.4 See Also
xinetd(8), xinetd.conf(5), services(5). The xinetd home page is http://www.synack.net/xinetd.
[ Team LiB ]](https://image.slidesharecdn.com/linuxsecuritycookbook-120930200536-phpapp01/85/Linux-security-cookbook-95-320.jpg)
![[ Team LiB ]
Recipe 3.6 Adding a New Service (inetd)
3.6.1 Problem
You want to add a new network service, controlled by inetd .
3.6.2 Solution
Add a new line to /etc/inetd.conf of the form:
SERVICE_NAME SOCKET_TYPE PROTOCOL THREADING USER /PATH/TO/SERVER ARGS
Then signal inetd to reread /etc/inetd.conf. [Recipe 3.4]
3.6.3 Discussion
The values on the line are:
1. Service name. A service listed in /etc/services. If it's not, add an entry by selecting a service name,
port number, and protocol. See services(5).
2. Socket type. Either stream, dgram, raw, rdm, or seqpacket.
3. Protocol. Typically tcp or udp.
4. Threading . Use wait for single-threaded, or nowait for multithreaded.
5. User. The service will run as this user.
6. Path to server executable.
7. Server arguments, separated by whitespace. You must begin with the zeroth argument, the server's
basename itself. For example, for /usr/sbin/in.telnetd, the zeroth argument would be in.telnetd.
A full example is:
telnet stream tcp nowait root /usr/sbin/in.telnetd in.telnetd
A line in inetd.conf may contain a few other details as well, specifying buffer sizes, a local host address for
listening, and so forth. See the manpage.
3.6.4 See Also
inetd(8), inetd.conf(5), services(5).](https://image.slidesharecdn.com/linuxsecuritycookbook-120930200536-phpapp01/85/Linux-security-cookbook-96-320.jpg)
![[ Team LiB ]](https://image.slidesharecdn.com/linuxsecuritycookbook-120930200536-phpapp01/85/Linux-security-cookbook-97-320.jpg)
![[ Team LiB ]
Recipe 3.7 Restricting Access by Remote Users
3.7.1 Problem
You want only particular remote users to have access to a TCP service. You cannot predict the originating
hosts.
3.7.2 Solution
Block the service's incoming TCP port with a firewall rule [Recipe 2.6], run an SSH server, and permit
users to tunnel in via SSH port forwarding. Thus, SSH authentication will permit or deny access to the
service. Give your remote users SSH access by public key.
For example, to reach the news server (TCP port 119) on your site server.example.com, a remote user on
host myclient could consruct the following tunnel from (arbitrary) local port 23456 to the news server via
SSH:
myclient$ ssh -f -N -L 23456:server.example.com:119 server.example.com
and then connect to the tunnel, for example with the tin newsreader:
myclient$ export NNTPSERVER=localhost
myclient$ tin -r -p 23456
3.7.3 Discussion
SSH tunneling, or port forwarding, redirects a TCP connection to flow through an SSH client and server in
a mostly-transparent manner. [1] [Recipe 6.14] This tunnel connects from a local port to a remote port,
encrypting traffic on departure and decrypting on arrival. For example, to tunnel NNTP (Usenet news
service, port 119), the newsreader talks to an SSH client, which forwards its data across the tunnel to the
SSH server, which talks to the NNTP server, as in Figure 3-2.
[1]
It's not transparent to services sensitive to the details of their sockets, such as FTP, but in most cases the
communication is fairly seamless.
Figure 3-2. Tunneling NNTP with SSH](https://image.slidesharecdn.com/linuxsecuritycookbook-120930200536-phpapp01/85/Linux-security-cookbook-98-320.jpg)
![By blocking a service's port (119) to the outside world, you have prevented all remote access to that port.
But SSH travels over a different port (22) not blocked by the firewall.
Alternatively, investigate whether your given service has its own user authentication. For example, wu-
ftpd has the file /etc/ftpaccess, sshd has its AllowUsers keyword, and so forth.
3.7.4 See Also
ssh(1), sshd(8), tin(1).
[ Team LiB ]](https://image.slidesharecdn.com/linuxsecuritycookbook-120930200536-phpapp01/85/Linux-security-cookbook-99-320.jpg)
![[ Team LiB ]
Recipe 3.8 Restricting Access by Remote Hosts (xinetd)
3.8.1 Problem
You want only particular remote hosts to access a TCP service via xinetd .
3.8.2 Solution
Use xinetd.conf 's only_from and no_access keywords:
service ftp
{
only_from = 192.168.1.107
...
}
service smtp
{
no_access = haxor.evil.org
...
}
Then reset xinetd so your changes take effect. [Recipe 3.3]
3.8.3 Discussion
This is perhaps the simplest way to specify access control per service. But of course it works only for
services launched by xinetd.
only_from and no_access can appear multiple times in a service entry:
{
no_access = haxor.evil.org deny a particular host
no_access += 128.220. deny all hosts in a network
...
}
If a connecting host is found in both the only_from and no_access lists, xinetd takes one of the following
actions:
If the host matches entries in both lists, but one match is more specific than the other, the more
specific match prevails. For example, 128.220.13.6 is more specific than 128.220.13.
If the host matches equally specific entries in both lists, xinetd considers this a configuration error
and will not start the requested service.](https://image.slidesharecdn.com/linuxsecuritycookbook-120930200536-phpapp01/85/Linux-security-cookbook-100-320.jpg)
![So in this example:
service whatever
{
no_access = 128.220. haxor.evil.org client.example.com
only_from = 128.220.10. .evil.org client.example.com
}
connections from 128.220.10.3 are allowed, but those from 128.220.11.2 are denied. Likewise,
haxor.evil.org cannot connect, but any other hosts in evil.org can. client.example.com is incorrectly
configured, so its connection requests will be refused. Finally, any host matching none of the entries will
be denied access.
3.8.4 See Also
xinetd.conf(5).
[ Team LiB ]](https://image.slidesharecdn.com/linuxsecuritycookbook-120930200536-phpapp01/85/Linux-security-cookbook-101-320.jpg)
![[ Team LiB ]
Recipe 3.9 Restricting Access by Remote Hosts (xinetd with
libwrap)
3.9.1 Problem
You want only particular remote hosts to access a TCP service via xinetd , when xinetd was compiled with
libwrap support.
3.9.2 Solution
Control access via /etc/hosts.allow and /etc/hosts.deny. For example, to permit Telnet connections only
from 192.168.1.100 and hosts in the example.com domain, add this to /etc/hosts.allow:
in.telnetd : 192.168.1.100
in.telnetd : *.example.com
in.telnetd : ALL : DENY
Then reset xinetd so your changes take effect. [Recipe 3.3]
3.9.3 Discussion
If you want to consolidate your access control in /etc/hosts.allow and /etc/hosts.deny, rather than use
xinetd-specific methods [Recipe 3.8], or if you prefer the hosts.allow syntax and capabilities, this
technique might be for you. These files support a rich syntax for specifying hosts and networks that may,
or may not, connect to your system via specific services.
This works only if xinetd was compiled with libwrap support enabled. To detect this, look at the output of:
$ strings /usr/sbin/xinetd | grep libwrap
libwrap refused connection to %s from %s
%s started with libwrap options compiled in.
If you see printf-style format strings like the above, your xinetd has libwrap support.
3.9.4 See Also
xinetd(8), hosts.allow(5).
[ Team LiB ]](https://image.slidesharecdn.com/linuxsecuritycookbook-120930200536-phpapp01/85/Linux-security-cookbook-102-320.jpg)
![[ Team LiB ]
Recipe 3.10 Restricting Access by Remote Hosts (xinetd
with tcpd)
3.10.1 Problem
You want only particular remote hosts to access a TCP service via xinetd , when xinetd was not compiled
with libwrap support.
3.10.2 Solution
Set up access control rules in /etc/hosts.allow and/or /etc/hosts.deny. For example, to permit telnet
connections only from 192.168.1.100 and hosts in the example.com domain, add to /etc/hosts.allow:
in.telnetd : 192.168.1.100
in.telnetd : *.example.com
in.telnetd : ALL : DENY
Then modify /etc/xinetd.conf or /etc/xinetd.d/servicename to invoke tcpd in place of your service:
Old /etc/xinetd.conf or /etc/xinetd.d/telnet:
service telnet
{
...
flags = ...
server = /usr/sbin/in.telnetd
...
}
New /etc/xinetd.conf or /etc/xinetd.d/telnet:
service telnet
{
...
flags = ... NAMEINARGS
server = /usr/sbin/tcpd
server_args = /usr/sbin/in.telnetd
...
}
Then reset xinetd so your changes take effect. [Recipe 3.3]
3.10.3 Discussion
This technique is only for the rare case when, for some reason, you don't want to use xinetd's built-in
access control [Recipe 3.8] and your xinetd does not have libwrap support compiled in. It mirrors the
original inetd method of access control using TCP-wrappers. [Recipe 3.11]](https://image.slidesharecdn.com/linuxsecuritycookbook-120930200536-phpapp01/85/Linux-security-cookbook-103-320.jpg)
![You must include the flag NAMEINARGS, which tells xinetd to look in the server_args line to find the
service executable name (in this case, /usr/sbin/in.telnetd).
3.10.4 See Also
xinetd(8), hosts.allow(5), tcpd(8).
[ Team LiB ]](https://image.slidesharecdn.com/linuxsecuritycookbook-120930200536-phpapp01/85/Linux-security-cookbook-104-320.jpg)
![[ Team LiB ]
Recipe 3.11 Restricting Access by Remote Hosts (inetd)
3.11.1 Problem
You want only particular remote hosts to access a TCP service via inetd.
3.11.2 Solution
Use tcpd, specifying rules in /etc/hosts.allow and/or /etc/hosts.deny. Here's an example of wrapping the
Telnet daemon, in.telnetd, to permit connections only from IP address 192.168.1.100 or the example.com
domain. Add to /etc/hosts.allow:
in.telnetd : 192.168.1.100
in.telnetd : *.example.com
in.telnetd : ALL : DENY
Then modify the appropriate configuration files to substitute tcpd for your service, and restart inetd.
3.11.3 Discussion
The control files /etc/hosts.allow and /etc/hosts.deny define rules by which remote hosts may access local
TCP services. The access control daemon tcpd processes the rules and determines whether or not to
launch a given service.
First set up your access control rules in /etc/hosts.allow and/or /etc/hosts.deny. Then modify
/etc/inetd.conf to invoke the service through tcpd:
Old /etc/inetd.conf:
telnet stream tcp nowait root /usr/sbin/in.telnetd in.telnetd
New /etc/inetd.conf:
telnet stream tcp nowait root /usr/sbin/tcpd /usr/sbin/in.telnetd
Finally restart inetd so your changes take effect. [Recipe 3.4]
3.11.4 See Also
hosts.allow(5), tcpd(8), inetd.conf(5).
[ Team LiB ]](https://image.slidesharecdn.com/linuxsecuritycookbook-120930200536-phpapp01/85/Linux-security-cookbook-105-320.jpg)
![[ Team LiB ]
Recipe 3.12 Restricting Access by Time of Day
3.12.1 Problem
You want a service to be available only at certain times of day.
3.12.2 Solution
For xinetd , use its access_times attribute. For example, to make telnetd accessible from 8:00 a.m. until
5:00 p.m. (17:00) each day:
/etc/xinetd.conf or /etc/xinetd.d/telnet:
service telnet
{
...
access_times = 8:00-17:00
}
For inetd, we'll implement this manually using the m4 macro processor and cron. First, invent some
strings to represent times of day, such as "working" to mean 8:00 a.m. and "playing" to mean 5:00 p.m.
Then create a script (say, inetd-services) that uses m4 to select lines in a template file, creates the inetd
configuration file, and signals inetd to reread it:
/usr/local/sbin/inetd-services:
#!/bin/sh
m4 "$@" /etc/inetd.conf.m4 > /etc/inetd.conf.$$
mv /etc/inetd.conf.$$ /etc/inetd.conf
kill -HUP `pidof inetd`
Copy the original /etc/inetd.conf file to the template file, /etc/inetd.conf.m4. Edit the template to enable
services conditionally according to the value of a parameter, say, TIMEOFDAY. For example, the Telnet
service line that originally looks like this:
telnet stream tcp nowait root /usr/sbin/tcpd in.telnetd
might now look like:
ifelse(TIMEOFDAY,working,telnet stream tcp nowait root /usr/sbin/tcpd in.telnetd)
which means "if TIMEOFDAY is working, include the Telnet line, otherwise don't." Finally, set up crontab
entries to enable or disable services at specific times of day, by setting the TIMEOFDAY parameter:
0 8 * * * /usr/local/sbin/inetd-services -DTIMEOFDAY=working
0 17 * * * /usr/local/sbin/inetd-services -DTIMEOFDAY=playing
3.12.3 Discussion
For xinetd, we can easily control each service using the access_times parameter. Times are specified on a](https://image.slidesharecdn.com/linuxsecuritycookbook-120930200536-phpapp01/85/Linux-security-cookbook-106-320.jpg)
![24-hour clock.
For inetd, we need to work a bit harder, rebuilding the configuration file at different times of day to enable
and disable services. The recipe can be readily extended with additional parameters and values, like we do
with TIMEOFDAY. Notice that the xinetd solution uses time ranges, while the inetd solution uses time
instants (i.e., the minute that cron triggers inetd-services).
3.12.4 See Also
xinetd.conf(5), inetd.conf(5), m4(1), crontab(5).
[ Team LiB ]](https://image.slidesharecdn.com/linuxsecuritycookbook-120930200536-phpapp01/85/Linux-security-cookbook-107-320.jpg)
![[ Team LiB ]
Recipe 3.13 Restricting Access to an SSH Server by Host
3.13.1 Problem
You want to limit access to sshd from specific remote hosts.
3.13.2 Solution
Use sshd's built-in TCP-wrappers support. Simply add rules to the files /etc/hosts.allow and
/etc/hosts.deny, specifying sshd as the service. For example, to permit only 192.168.0.37 to access your
SSH server, insert these lines into /etc/hosts.allow:
sshd: 192.168.0.37
sshd: ALL: DENY
3.13.3 Discussion
There is no need to invoke tcpd or any other program, as sshd processes the rules directly.
TCP-wrappers support in sshd is optional, selected at compile time. Red Hat 8.0
includes it but SuSE does not. If you're not sure, or your sshd seems to ignore
settings in /etc/hosts.allow and /etc/hosts.deny, check if it was compiled with this
support:
$ strings /usr/sbin/sshd | egrep 'hosts.(allow|deny)'
/etc/hosts.allow
/etc/hosts.deny
If the egrep output is empty, TCP-wrappers support is not present. Download
OpenSSH from http://www.openssh.com (or use your vendor's source RPM) and
rebuild it:
$ ./configure --with-libwrap ...other desired options...
$ make
# make install
3.13.4 See Also
sshd(8), hosts_access(5).
[ Team LiB ]](https://image.slidesharecdn.com/linuxsecuritycookbook-120930200536-phpapp01/85/Linux-security-cookbook-108-320.jpg)
![[ Team LiB ]
Recipe 3.14 Restricting Access to an SSH Server by Account
3.14.1 Problem
You want only certain accounts on your machine to accept incoming SSH connections.
3.14.2 Solution
Use sshd 's AllowUsers keyword in /etc/ssh/sshd_config. For example, to permit SSH connections from
anywhere to access the smith and jones accounts, but no other accounts:
/etc/ssh/sshd_config:
AllowUsers smith jones
To allow SSH connections from remote.example.com to the smith account, but no other incoming SSH
connections:
AllowUsers smith@remote.example.com
Note this does not say anything about the remote user "smith@remote.example.com." It is a rule about
connections from the site remote.example.com to your local smith account.
After modifying sshd_config, restart sshd to incorporate your changes.
3.14.3 Discussion
AllowUsers specifies a list of local accounts that may accept SSH connections. The list is definitive: any
account not listed cannot receive SSH connections.
The second form of the syntax (user@host) looks unfortunately like an email address, or a reference to a
remote user, but it is no such thing. The line:
AllowUsers user@remotehost
means "allow the remote system called remotehost to connect via SSH to my local account user."
A listing in the AllowUsers line does not guarantee acceptance by sshd: the remote user must still
authenticate through normal means (password, public key, etc.), not to mention passing any other
roadblocks on the way (firewall rules, etc.).
3.14.4 See Also
sshd_config(5).](https://image.slidesharecdn.com/linuxsecuritycookbook-120930200536-phpapp01/85/Linux-security-cookbook-109-320.jpg)
![[ Team LiB ]](https://image.slidesharecdn.com/linuxsecuritycookbook-120930200536-phpapp01/85/Linux-security-cookbook-110-320.jpg)
![[ Team LiB ]
Recipe 3.15 Restricting Services to Specific Filesystem
Directories
3.15.1 Problem
You want to create a chroot cage to restrict a service to a particular directory (and its subdirectories) in
your filesystem.
3.15.2 Solution
Create a chroot cage by running the GNU chroot program instead of the service. Pass the service
executable as an argument. In other words, change this:
/etc/xinetd.conf or /etc/xinetd.d/myservice:
service myservice
{
...
server = /usr/sbin/myservice -a -b
...
}
into this:
service myservice
{
...
user = root
server = /usr/sbin/chroot
server_args = /var/cage /usr/sbin/myservice -a -b
...
}
3.15.3 Discussion
chroot takes two arguments: a directory and a program. It forces the program to behave as if the given
directory were the root of the filesystem, "/". This effectively prevents the program from accessing any
files not under the chroot cage directory, since those files have no names in the chroot'ed view of the
filesystem. Even if the program runs with root privileges, it cannot get around this restriction. The system
call invoked by chroot (which also is named chroot) is one-way: once it is invoked, there is no system call
to undo it in the context of the calling process or its children.
A chroot cage is most effective if the program relinquishes its root privileges after it starts—many
daemons can be configured to do this. A root program confined to a chroot cage can still wreak havoc by
creating and using new device special files, or maliciously using system calls that are not related to the
filesystem (like reboot!).](https://image.slidesharecdn.com/linuxsecuritycookbook-120930200536-phpapp01/85/Linux-security-cookbook-111-320.jpg)
![In normal operation, a program may access many files not directly related to its purpose, and this can
restrict the practicality of chroot. You might have to duplicate so much of your filesystem inside the cage
as to negate the cage's usefulness—especially if the files are sensitive (e.g., your password file, for
authentication), or if they change. In the former case, it's better if the service itself contains special
support for chroot, where it can choose to perform the chroot operation after it has accessed all the
general system resources it needs. In the latter case, you can use hard links to make files already named
outside the cage accessible from inside it—but that works only for files residing on the same filesystem as
the cage. Symbolic links will not be effective, as they will be followed in the context of the cage.
In order for chroot to work, it must be run as root, and the given "cage" directory must contain a Linux
directory structure sufficient to run myservice. In the preceding example, /var/cage will have to contain
/var/cage/usr/sbin/myservice, /var/cage/lib (which must include any libraries that myservice may use),
and so forth. Otherwise you'll see errors like:
chroot: cannot execute program_name: No such file or directory
This can be a bit of a detective game. For example, to get this simple command working:
# chroot /var/cage /usr/bin/who
the directory /var/cage will need to mirror:
/usr/bin/who
/lib/ld-linux.so.2
/lib/libc.so.6
/var/log/wtmp
/var/run/utmp
The commands ldd and strings can help identify which shared libraries and which files are used by the
service, e.g.:
$ ldd /usr/sbin/myservice
... output...
$ strings /usr/sbin/myservice | grep /
... output...
3.15.4 See Also
chroot(1), xinetd.conf(5), strings(1), ldd(1). If there's no ldd manpage on your system, type ldd —help
for usage.
[ Team LiB ]](https://image.slidesharecdn.com/linuxsecuritycookbook-120930200536-phpapp01/85/Linux-security-cookbook-112-320.jpg)
![[ Team LiB ]
Recipe 3.16 Preventing Denial of Service Attacks
3.16.1 Problem
You want to prevent denial of service (DOS) attacks against a network service.
3.16.2 Solution
For xinetd , use the cps, instances, max_load, and per_source keywords.
/etc/xinetd.conf or /etc/xinetd.d/myservice:
service myservice
{
...
cps = 10 30 Limit to 10 connections per second.
If the limit is exceeded, sleep for 30 seconds.
instances = 4 Limit to 4 concurrent instances of myservice.
per_source = 2 Limit to 2 simultaneous sessions per source IP address.
Specify UNLIMITED for no limit, the default.
max_load = 3.0 Reject new requests if the one-minute system load average exceeds 3.0.
}
For inetd, use the inetd -R option to specify the maximum number of times a service may be invoked per
minute. The default is 256.
3.16.3 Discussion
These keywords can be used individually or in combination. The cps keyword limits the number of connections
per second that your service will accept. If the limit is exceeded, then xinetd will disable the service
temporarily. You determine how long to disable the service via the second argument, in seconds.
The instances keyword limits the number of concurrent instances of the given service. By default there is no
limit, though you can state this explicitly with:
instances = UNLIMITED
The per_source keyword is similar: instead of limiting server instances, it limits sessions for each source IP
address. For example, to prevent any remote host from having multiple FTP connections to your site:
/etc/xinetd.conf or /etc/xinetd.d/ftp:
service ftp
{
...
per_source = 1
}](https://image.slidesharecdn.com/linuxsecuritycookbook-120930200536-phpapp01/85/Linux-security-cookbook-113-320.jpg)
![Finally, the max_load keyword disables a service if the local system load average gets too high, to prevent
throttling the CPU.
inetd is less flexible: it has a -R command option that limits the number of invocations for each service per
minute. The limit applies to all services, individually. If the limit is exceeded, inetd logs a message of the form:
telnet/tcp server failing (looping), service terminated
Actually, the service isn't terminated, it's just disabled for ten minutes. This time period cannot be adjusted.
Some firewalls have similar features: for example, iptables can limit the total number of incoming
connections. On the other hand, iptables does not support the per_source functionality: it cannot limit the total
per source address.
3.16.4 See Also
xinetd.conf(5).
[ Team LiB ]](https://image.slidesharecdn.com/linuxsecuritycookbook-120930200536-phpapp01/85/Linux-security-cookbook-114-320.jpg)
![[ Team LiB ]
Recipe 3.17 Redirecting to Another Socket
3.17.1 Problem
You want to redirect a connection to another host and/or port, on the same or a different machine.
3.17.2 Solution
Use xinetd 's redirect keyword:
/etc/xinetd.conf or /etc/xinetd.d/myservice:
service myservice
{
...
server = path to original service
redirect = IP_address port_number
}
The server keyword is required, but its value is ignored. xinetd will not activate a service unless it has a
server setting, even if the service being is redirected.
3.17.3 Discussion
For example, to redirect incoming finger connections (port 79) to another machine at 192.168.14.21:
/etc/xinetd.conf or /etc/xinetd.d/finger:
service finger
{
...
server = /usr/sbin/in.fingerd
redirect = 192.168.14.21 79
}
Of course you can redirect connections to an entirely different service, such as qotd on port 17:
service finger
{
...
server = /usr/sbin/in.fingerd
redirect = 192.168.14.21 17
}
Now incoming finger requests will instead receive an amusing "quote of the day," as long as the qotd
service is enabled on the other machine. You can also redirect requests to another port on the same
machine.](https://image.slidesharecdn.com/linuxsecuritycookbook-120930200536-phpapp01/85/Linux-security-cookbook-115-320.jpg)
![3.17.4 See Also
xinetd.conf(5). A tutorial can be found at http://www.macsecurity.org/resources/xinetd/tutorial.shtml.
[ Team LiB ]](https://image.slidesharecdn.com/linuxsecuritycookbook-120930200536-phpapp01/85/Linux-security-cookbook-116-320.jpg)
![[ Team LiB ]
Recipe 3.18 Logging Access to Your Services
3.18.1 Problem
You want to know who is accessing your services via xinetd .
3.18.2 Solution
Enable logging in the service's configuration file:
/etc/xinetd.conf or /etc/xinetd.d/myservice:
service myservice
{
...
log_type = SYSLOG facility level
log_on_success = DURATION EXIT HOST PID USERID
log_on_failure = ATTEMPT HOST USERID
}
xinetd logs to syslog by default. To log to a file instead, modify the preceding log_type line to read:
log_type = FILE filename
3.18.3 Discussion
xinetd can record diagnostic messages via syslog or directly to a file. To use syslog, choose a facility
(daemon, local0, etc.) and optionally a log level (crit, warning, etc.), where the default is info.
log_type = SYSLOG daemon facility = daemon, level = info
log_type = SYSLOG daemon warning facility = daemon, level = warning
To log to a file, simply specify a filename:
log_type = FILE /var/log/myservice.log
Optionally you may set hard and soft limits on the size of the log file: see xinetd.conf(5).
Log messages can be generated when services successfully start and terminate (via log_on_success) or
when they fail or reject connections (via log_on_failure).
If logging doesn't work for you, the most likely culprit is an incorrect setup in /etc/syslog.conf. It's easy to
make a subtle configuration error and misroute your log messages. Run our syslog testing script to see
where your messages are going. [Recipe 9.28]
3.18.4 See Also](https://image.slidesharecdn.com/linuxsecuritycookbook-120930200536-phpapp01/85/Linux-security-cookbook-117-320.jpg)
![xinetd.conf(5), syslog.conf(5), inetd.conf(5).
[ Team LiB ]](https://image.slidesharecdn.com/linuxsecuritycookbook-120930200536-phpapp01/85/Linux-security-cookbook-118-320.jpg)
![[ Team LiB ]
Recipe 3.19 Prohibiting root Logins on Terminal Devices
3.19.1 Problem
You want to prevent the superuser, root, from logging in directly over a terminal or pseudo-terminal.
3.19.2 Solution
Edit /etc/securetty. This file contains device names, one per line, that permit root logins. Make sure there
are no pseudo-ttys (pty) devices listed, so root cannot log in via the network, and remove any others of
concern to you. Lines do not contain the leading "/dev/" path, and lines beginning with a hash mark (#)
are comments. For example:
/etc/securetty:
# serial lines
tty1
tty2
# devfs devices
vc/1
vc/2
3.19.3 Discussion
If possible, don't permit root to log in directly. If you do, you're providing a route for breaking into your
system: an outsider can launch (say) a dictionary attack against the terminal in question. Instead, users
should log in as themselves and gain root privileges in an appropriate manner, as we discuss in Chapter 5.
3.19.4 See Also
securetty(5). Documentation on devfs is at
http://www.atnf.csiro.au/people/rgooch/linux/docs/devfs.html.
[ Team LiB ]](https://image.slidesharecdn.com/linuxsecuritycookbook-120930200536-phpapp01/85/Linux-security-cookbook-119-320.jpg)
![[ Team LiB ]
Chapter 4. Authentication Techniques and
Infrastructures
Before you can perform any operation on a Linux system, you must have an identity, such as a
username, SSH key, or Kerberos credential. The act of proving your identity is called authentication, and
it usually involves some kind of password or digital key. To secure your Linux system, you need to create
and control identities carefully. Our recipes span the following authentication systems:
Pluggable Authentication Modules (PAM)
An application-level, dynamically configurable system for consistent authentication. Instead of
having applications handle authentication on their own, they can use the PAM API and libraries to
take care of the details. Consistency is achieved when many applications perform the same
authentication by referencing the same PAM module. Additionally, applications needn't be
recompiled to change their authentication behavior: just edit a PAM configuration file (transparent
to the application) and you're done.
Secure Sockets Layer (SSL)[1]
A network protocol for reliable, bidirectional, byte-stream connections. It provides cryptographically
assured privacy (encryption), integrity, optional client authentication, and mandatory server
authentication. Its authentication relies on X.509 certificates: data structures that bind an entity's
public key to a name. The binding is attested to by a second, certifying entity, by means of a digital
signature; the entity owning the public key is the certificate's subject , and the certifying entity is
the issuer. The issuer in turn has its own certificate, with itself as the subject, and so on, forming a
chain of subjects and issuers. To verify a certificate's authenticity, software follows this chain,
possibly through several levels of certificate hierarchy, until it reaches one of a set of built-in,
terminal (self-signed ) certificates marked as trusted by the user or system. Linux includes a
popular implementation of SSL, called OpenSSL.
Kerberos
A sophisticated, comprehensive authentication system, initially developed at the Massachusetts
Institute of Technology as part of Project Athena in the 1980s. It involves a centralized
authentication database maintained on one or more highly-secure hosts acting as Kerberos Key
Distribution Centers (KDCs). Principals acting in a Kerberos system (users, hosts, or programs
acting on a user's behalf) obtain credentials called " tickets" from a KDC, for individual services such
as remote login, printing, etc. Each host participating in a Kerberos "realm" must be explicitly added
to the realm, as must each human user.
Kerberos has two major versions, called Kerberos-4 and Kerberos-5, and two major Unix-based
implementations, MIT Kerberos (http://web.mit.edu/kerberos/www) and Heimdal
(http://www.pdc.kth.se/heimdal). We cover the MIT variant of Kerberos-5, which is included in Red
Hat 8.0. SuSE 8.0 includes Heimdal; our recipes should guide you toward getting started there,
although some details will be different. You could also install MIT Kerberos on SuSE.
Secure Shell (SSH)
Provides strong, cryptographic authentication for users to access remote machines. We present SSH
recipes in Chapter 6.
Authentication is a complex topic, and we won't teach it in depth. Our recipes focus on basic setup and
scenarios. In the real world, you'll need a stronger understanding of (say) Kerberos design and operation](https://image.slidesharecdn.com/linuxsecuritycookbook-120930200536-phpapp01/85/Linux-security-cookbook-120-320.jpg)
![to take advantage of its many features, and to run it securely. For more information see the following web
sites:
Linux-PAM
http://www.kernel.org/pub/linux/libs/pam
OpenSSL
http://www.openssl.org
Kerberos
http://web.mit.edu/kerberos/www
SSH
http://www.openssh.com
In addition, there are other important authentication infrastructures for Linux which we do not cover. One
notable protocol is Internet Protocol Security (IPSec), which provides strong authentication and
encryption at the IP level. A popular implementation, FreeS/WAN, is found at http://www.freeswan.org.
PAM Modules
A PAM module consists of a shared library: compiled code dynamically loaded into the memory
space of a running process. A program that uses PAM loads modules based on per-program
configuration assigned by the system administrator, and calls them via a standard API. Thus,
a new PAM module effectively extends the capabilities of existing programs, allowing them to
use new authentication, authorization, and accounting mechanisms transparently.
To add a new PAM module to your system, copy the compiled PAM module code library into
the directory /lib/security. For example, if your library is pam_foo.so:
# cp pam_foo.so /lib/security
# cd /lib/security
# chown root.root pam_foo.so
# chmod 755 pam_foo.so
Now you can set applications to use the new module by adding appropriate configuration lines
to /etc/pam.conf, or to files among /etc/pam.d/*. There are many ways to configure use of a
module, and not all modules can be used in all possible ways. A module generally comes with
suggested configurations. Modules may also depend on other software: LDAP, Kerberos, and
so forth; see the module's documentation.
pam(8) explains the details of PAM operation and the module configuration language.
[ Team LiB ]](https://image.slidesharecdn.com/linuxsecuritycookbook-120930200536-phpapp01/85/Linux-security-cookbook-121-320.jpg)
![[ Team LiB ]
Recipe 4.1 Creating a PAM-Aware Application
4.1.1 Problem
You want to write a program that uses PAM for authentication.
4.1.2 Solution
Select (or create) a PAM configuration in /etc/pam.d. Then use the PAM API to perform authentication
with respect to that configuration. For example, the following application uses the su configuration, which
means every user but root must supply his login password:
#include <security/pam_appl.h>
#include <security/pam_misc.h>
#include <pwd.h>
#include <sys/types.h>
#include <stdio.h>
#define MY_CONFIG "su"
static struct pam_conv conv = { misc_conv, NULL };
main( )
{
pam_handle_t *pamh;
int result;
struct passwd *pw;
if ((pw = getpwuid(getuid( ))) == NULL)
perror("getpwuid");
else if ((result = pam_start(MY_CONFIG, pw->pw_name, &conv, &pamh)) != PAM_SUCCESS)
fprintf(stderr, "start failed: %dn", result);
else if ((result = pam_authenticate(pamh, 0)) != PAM_SUCCESS)
fprintf(stderr, "authenticate failed: %dn", result);
else if ((result = pam_acct_mgmt(pamh, 0)) != PAM_SUCCESS)
fprintf(stderr, "acct_mgmt failed: %dn", result);
else if ((result = pam_end(pamh, result)) != PAM_SUCCESS)
fprintf(stderr, "end failed: %dn", result);
else
Run_My_Big_Application( ); /* Run your application code */
}
Compile the program, linking with libraries libpam and libpam_misc:
$ gcc myprogram.c -lpam -lpam_misc
4.1.3 Discussion
The PAM libraries include functions to start PAM and check authentication credentials. Notice how the
details of authentication are completely hidden from the application: simply reference your desired PAM](https://image.slidesharecdn.com/linuxsecuritycookbook-120930200536-phpapp01/85/Linux-security-cookbook-122-320.jpg)
![module (in this case, su) and examine the function return values. Even after your application is compiled,
you can change the authentication behavior by editing configurations in /etc/pam.d. Such is the beauty of
PAM.
4.1.4 See Also
pam_start(3), pam_end(3), pam_authenticate(3), pam_acct_mgmt(3). The Linux PAM Developer's Guide
is at http://www.kernel.org/pub/linux/libs/pam/Linux-PAM-html/pam_appl.html.
[ Team LiB ]](https://image.slidesharecdn.com/linuxsecuritycookbook-120930200536-phpapp01/85/Linux-security-cookbook-123-320.jpg)
![[ Team LiB ]
Recipe 4.2 Enforcing Password Strength with PAM
4.2.1 Problem
You want your users to employ strong passwords.
4.2.2 Solution
Use the CrackLib [Recipe 9.2] module of PAM, pam_cracklib, to test and enforce password strength
requirements automatically. In some Linux distributions such as Red Hat 8.0, this feature is enabled by
default. passwd and other PAM-mediated programs will complain if a new password is too short, too
simple, too closely related to the previous password, etc.
You can adjust password strength and other variables by editing the parameters to the pam_cracklib
module in /etc/pam.d/system-auth. For example, to increase the number of consecutive times a user can
enter an incorrect password, change the retry parameter from its default of 3:
password required /lib/security/pam_cracklib.so retry=3
4.2.3 Discussion
PAM allows recursion via the pam_stack module—that is, one PAM module can invoke another. If you
examine the contents of /etc/pam.d, you will find quite a number of modules that recursively depend on
system-auth, for example. This lets you define a single, systemwide authentication policy that propagates
to other services.
Red Hat 8.0 has a sysadmin utility, authconfig , with a simple GUI for setting system authentication
methods and policies: how authentication is performed (local passwords, Kerberos, LDAP), whether
caching is done, etc. authconfig does its work by writing /etc/pam.d/system-auth. Unfortunately, it does
not preserve any customizations you might make to this file. So, if you make custom edits as described
above, beware using authconfig—it will erase them!
4.2.4 See Also
pam(8), authconfig(8), pam_stack(8). See /usr/share/doc/pam-*/txts/README.pam_cracklib for a list of
parameters to tweak.
[ Team LiB ]](https://image.slidesharecdn.com/linuxsecuritycookbook-120930200536-phpapp01/85/Linux-security-cookbook-124-320.jpg)
![[ Team LiB ]
Recipe 4.3 Creating Access Control Lists with PAM
4.3.1 Problem
You would like to apply an access control list (ACL) to an existing service that does not explicitly support
ACLs (e.g., telnetd, imapd, etc.).
4.3.2 Solution
Use the listfile PAM module.
First, make sure the server in question uses PAM for authentication, and find out which PAM service name
it uses. This may be in the server documentation, or it may be clear from examining the server itself and
perusing the contents of /etc/pam.d. For example, suppose you're dealing with the IMAP mail server. First
notice that there is a file called /etc/pam.d/imap. Further, the result of:
# locate imapd
...
/usr/sbin/imapd
shows that the IMAP server is in /usr/sbin/imapd, and:
# ldd /usr/sbin/imapd
libpam.so.0 => /lib/libpam.so.0 (0x40027000)
...
shows that the server is dynamically linked against the PAM library (libpam.so), also suggesting that it
uses PAM. In fact, the Red Hat 8.0 IMAP server uses PAM via that service name and control file ("imap").
Continuing with this example, create an ACL file for the IMAP service, let's say /etc/imapd.acl, and make
sure it is not world-writable:
# chmod o-w /etc/imapd.acl
Edit this file, and place in it the usernames of those accounts authorized to use the IMAP server, one
name per line. Then, add the following to /etc/pam.d/imap:
account required /lib/security/pam_listfile.so file=/etc/imapd.acl
item=user sense=allow onerr=fail
With this configuration, only those users listed in the ACL file will be allowed access to the IMAP service. If
the ACL file is missing, PAM will deny access for all accounts.
4.3.3 Discussion
The PAM " listfile" module is actually even more flexible than we've indicated. Entries in your ACL file can
be not only usernames (item=user), but also:](https://image.slidesharecdn.com/linuxsecuritycookbook-120930200536-phpapp01/85/Linux-security-cookbook-125-320.jpg)
![Terminal lines (item=tty)
Remote host (item=rhost)
Remote user (item=ruser)
Group membership (item=group)
Login shell (item=shell)
The sense keyword determines how the ACL file is interpreted. sense=allow means that access will be
allowed only if the configured item is in the file, and denied otherwise. sense=deny means the opposite:
access will be denied only if the item is in the file, and allowed otherwise.
The onerr keyword indicates what to do if some unexpected error occurs during PAM processing of the
listfile module—for instance, if the ACL file does not exist. The values are succeed and fail. fail is a more
conservative option from a security standpoint, but can also lock you out of your system because of a
configuration mistake!
Another keyword, apply=[user|@group], limits the restriction in question to apply only to particular users
or groups. This is intended for use with the tty , rhost, and shell items. For example, using item=rhost
and apply=@foo would restrict access to connections from hosts listed in the ACL file, and furthermore
only to local accounts in the foo group.
To debug problems with PAM modules, look for PAM-specific error messages in /var/log/messages and
/var/log/secure. (If you don't see the expected messages, check your system logger configuration.
[Recipe 9.28])
Note that not all module parameters have defaults. Specifically, the file, item, and sense parameters must
be supplied; if not, the module will fail with an error message like:
Dec 2 15:49:21 localhost login: PAM-listfile: Unknown sense or sense not specified
You generally do not need to restart servers using PAM: they usually re-initialize the PAM library for every
authentication and reread your changed files. However, there might be exceptions.
There is no standard correspondence between a server's name and its associated PAM service. For
instance, logins via Telnet are actually mediated by /bin/login, and thus use the login service. The SSH
server sshd uses the same-named PAM service (sshd), whereas the IMAP server imapd uses the imap
(with no "d") PAM service. And many services in turn depend on other services, notably system-auth.
4.3.4 See Also
See /usr/share/doc/pam-*/txts/README.pam_listfile for a list of parameters to tweak.
[ Team LiB ]](https://image.slidesharecdn.com/linuxsecuritycookbook-120930200536-phpapp01/85/Linux-security-cookbook-126-320.jpg)
![[ Team LiB ]
Recipe 4.4 Validating an SSL Certificate
4.4.1 Problem
You want to check that an SSL certificate is valid.
4.4.2 Solution
If your system's certificates are kept in a file (as in Red Hat):
$ openssl ... -CAfile file_of_CA_certificates ...
If they are kept in a directory (as in SuSE):
$ openssl ... -CAdir directory_of_CA_certificates ...
For example, to check the certificate for the secure IMAP server on mail.server.net against the system
trusted certificate list on a Red Hat host:
$ openssl s_client -quiet -CAfile /usr/share/ssl/cert.pem
-connect mail.server.net:993
To check the certificate of a secure web site https://www.yoyodyne.com/ from a SuSE host (recall HTTPS
runs on port 443):
$ openssl s_client -quiet -CAdir /usr/share/ssl/certs -connect www.yoyodyne.com:443
If you happen to have a certificate in a file cert.pem, and you want to validate it, there is a separate
validate command:
$ openssl validate -CA... -in cert.pem
Add -inform der if the certificate is in the binary DER format rather than PEM.
4.4.3 Discussion
Red Hat 8.0 comes with a set of certificates for some well-known Internet Certifying Authorities in the file
/usr/share/ssl/cert.pem. SuSE 8.0 has a similar collection, but it is instead stored in a directory with a
particular structure, a sort of hash table implemented using symbolic links. Under SuSE, the directory
/usr/share/ssl/certs contains each certificate in a separate file, together with the links.
If the necessary root certificate is present in the given file, along with any necessary intermediate
certificates not provided by the server, then openssl can validate the server certificate.
If a server certificate is invalid or cannot be checked, an SSL connection will not
fail. openssl will simply print a warning and continue connecting.](https://image.slidesharecdn.com/linuxsecuritycookbook-120930200536-phpapp01/85/Linux-security-cookbook-127-320.jpg)
![4.4.4 See Also
openssl(1).
[ Team LiB ]](https://image.slidesharecdn.com/linuxsecuritycookbook-120930200536-phpapp01/85/Linux-security-cookbook-128-320.jpg)
![[ Team LiB ]
Recipe 4.5 Decoding an SSL Certificate
4.5.1 Problem
You want to view information about a given SSL certificate, stored in a PEM file.
4.5.2 Solution
$ openssl x509 -text -in filename
Certificate:
Data:
Version: 3 (0x2)
Serial Number:
d0:1e:40:90:00:00:27:4b:00:00:00:01:00:00:00:04
Signature Algorithm: sha1WithRSAEncryption
Issuer: C=US, ST=Utah, L=Salt Lake City, O=Xcert EZ by DST, CN=Xcert EZ by
DST/Email=ca@digsigtrust.com
Validity
Not Before: Jul 14 16:14:18 1999 GMT
Not After : Jul 11 16:14:18 2009 GMT
Subject: C=US, ST=Utah, L=Salt Lake City, O=Xcert EZ by DST, CN=Xcert EZ by
DST/Email=ca@digsigtrust.com
...
4.5.3 Discussion
This is a quick way to learn who issued a certificate, its begin and end dates, and other pertinent details.
4.5.4 See Also
openssl(1).
[ Team LiB ]](https://image.slidesharecdn.com/linuxsecuritycookbook-120930200536-phpapp01/85/Linux-security-cookbook-129-320.jpg)
![[ Team LiB ]
Recipe 4.6 Installing a New SSL Certificate
4.6.1 Problem
You have a certificate that your SSL clients (mutt, openssl, etc.) cannot verify. It was issued by a
Certifying Authority (CA) not included in your installed list of trusted issuers.
4.6.2 Solution
Add the CA's root certificate to the list, together with any other, intermediate certificates you may need.
First, ensure the certificates are in PEM format. [Recipe 4.10] A PEM format file looks like this:
-----BEGIN CERTIFICATE-----
MIID+DCCAuCgAwIBAgIRANAeQJAAACdLAAAAAQAAAAQwDQYJKoZIhvcNAQEFBQAw
gYwxCzAJBgNVBAYTAlVTMQ0wCwYDVQQIEwRVdGFoMRcwFQYDVQQHEw5TYWx0IExh
...
wo3CbezcE9NGxXl8
-----END CERTIFICATE-----
Then for Red Hat, simply add it to the file /usr/share/ssl/cert.pem.
Note that only the base64-encoded data between the BEGIN CERTIFICATE and END CERTIFICATE lines is
needed. Everything else is ignored. The existing file includes a textual description of each certificate as
well, which you can generate [Recipe 4.5] and include if you like.
For SuSE, supposing your CA certificate is in newca.pem, run:
# cp newca.pem /usr/share/ssl/certs
# /usr/bin/c_rehash
4.6.3 Discussion
Red Hat keeps certificates in a single file, whereas SuSE keeps them in a directory with a particular
structure, a sort of hash table implemented using symbolic links. You can also use the hashed-directory
approach with Red Hat if you like, since it includes the c_rehash program.
Many programs have their own certificate storage and do not use this system-wide list. Netscape and
Mozilla use ~/.netscape/cert7.db, KDE applications use $KDEDIR/share/config/ksslcalist, Evolution has its
own list, and so on. Consult their documentation on how to add a new trusted CA.
Before installing a new CA certificate, you should be convinced that it's authentic, and that its issuer has
adequate security policies. After all, you are going to trust the CA to verify web site identities for you!
Take the same level of care as you would when adding a new GnuPG key as a trusted introducer. [Recipe
7.9]
4.6.4 See Also](https://image.slidesharecdn.com/linuxsecuritycookbook-120930200536-phpapp01/85/Linux-security-cookbook-130-320.jpg)
![openssl(1).
[ Team LiB ]](https://image.slidesharecdn.com/linuxsecuritycookbook-120930200536-phpapp01/85/Linux-security-cookbook-131-320.jpg)
![[ Team LiB ]
Recipe 4.7 Generating an SSL Certificate Signing Request
(CSR)
4.7.1 Problem
You want to obtain an SSL certificate from a trusted certifying authority (CA).
4.7.2 Solution
Generate a Certificate Signing Request (CSR):
Red Hat:
$ make -f /usr/share/ssl/certs/Makefile filename.csr
SuSE or other:
$ umask 077
$ openssl req -new -out filename.csr -keyout privkey.pem
and send filename.csr to the CA.
4.7.3 Discussion
You can obtain a certificate for a given service from a well-known Certifying Authority, such as Verisign,
Thawte, or Equifax. This is the simplest way to obtain a certificate, operationally speaking, as it will be
automatically verifiable by many SSL clients. However, this approach costs money and takes time.
To obtain a certificate from a commercial CA, you create a Certificate Signing Request:
$ make -f /usr/share/ssl/certs/Makefile foo.csr
This generates a new RSA key pair in the file foo.key, and a certificate request in foo.csr. You will be
prompted for a passphrase with which to encrypt the private key, which you will need to enter several
times. You must remember this passphrase, or your private key is forever lost and the certificate, when
you get it, will be useless.
openssl will ask you for the components of the certificate subject name:
Country Name (2 letter code) [GB]:
State or Province Name (full name) [Berkshire]:
Locality Name (eg, city) [Newbury]:
Organization Name (eg, company) [My Company Ltd]:
Organizational Unit Name (eg, section) []:
Common Name (eg, your name or your server's hostname) []:
Email Address []:
The most important part is the Common Name. It must be the DNS name with which your clients will be](https://image.slidesharecdn.com/linuxsecuritycookbook-120930200536-phpapp01/85/Linux-security-cookbook-132-320.jpg)
![configured, not the canonical hostname or other aliases the host may have. Suppose you decide to run a
secure mail server on your multipurpose machine server.bigcorp.com. Following good abstraction
principles, you create an alias (a DNS CNAME record) mail.bigcorp.com for this host, so you can easily
move mail service to another machine in the future without reconfiguring all its clients. When you
generate a CSR for this mail server, what name should the Common Name field contain? The answer is
mail.bigcorp.com, since your SSL clients will use this name to reach the server. If instead you used
server.bigcorp.com for the Common Name, the SSL clients would compare the intended destination
(mail.bigcorp.com) and the name in the server certificate (server.bigcorp.com) and complain that they do
not match.
You will also be prompted for a challenge password. Enter one and make a note of it; you may be asked
for it as part of your CA's certificate-issuing procedure.
When done, send the contents of foo.csr to your CA, following whatever procedure they have for getting it
signed. They will return to you a real, signed certificate, which you can then install for use. [Recipe 4.6]
For instance, if this certificate were for IMAP/SSL on a Red Hat server, you would place the certificate and
private key, unencrypted, in the file /usr/share/ssl/certs/imapd.pem (replacing the Red Hat-supplied
dummy certificate). First, make sure the certificate you've received is in PEM format. [Recipe 4.10]
Suppose it's in the file cert.pem; then, decrypt your private key and append it to this file:
$ openssl rsa -in foo.key >> cert.pem
and then as root:
# chown root.root cert.pem
# chmod 400 cert.pem
The private key must be unencrypted so that the IMAP server can read it on startup; thus the key file
must be protected accordingly.
4.7.4 See Also
openssl(1), req(1).
[ Team LiB ]](https://image.slidesharecdn.com/linuxsecuritycookbook-120930200536-phpapp01/85/Linux-security-cookbook-133-320.jpg)
![[ Team LiB ]
Recipe 4.8 Creating a Self-Signed SSL Certificate
4.8.1 Problem
You want to create an SSL certificate but don't want to use a well-known certifying authority (CA),
perhaps for reasons of cost.
4.8.2 Solution
Create a self-signed SSL certificate:
For Red Hat:
$ make -f /usr/share/ssl/certs/Makefile filename.crt
For SuSE or other:
$ umask 077
$ openssl req -new -x509 -days 365 -out filename.crt -keyout privkey.pem
4.8.3 Discussion
A certificate is self-signed if its subject and issuer are the same. A self-signed certificate does not depend
on any higher, well-known issuing authority for validation, so it will have to be explicitly marked as
trusted by your users. For instance, the first time you connect to such a server, client software (such as
your web browser) will ask if you would like to trust this certificate in the future.
Self-signing is convenient but runs the risk of man-in-the-middle attacks on the first connection, before
the client trusts the certificate. A more secure method is to pre-install this certificate on the client
machine in a separate step, and mark it as trusted.
When you create the certificate, you will be prompted for various things, particularly a Common Name.
Pay special attention to this, as when creating a certificate signing request (CSR). [Recipe 4.7]
If you need many certificates, this method may be cumbersome, as your users will have to trust each
certificate individually. Instead, use openssl to set up your own CA, and issue certificates under it. [Recipe
4.9] This way, you need only add your one CA certificate to your client's trusted caches; any individual
service certificates you create afterward will be automatically trusted.
Self-signed certificates are fine for tests and for services not available to the public
(i.e., inside a company intranet). For public access, however, use a certificate from
a well-known CA. To use a standalone certificate properly, you are somewhat at the
mercy of your users, who must be diligent about reading security warnings,
verifying the certificate with you, and so forth. They will be tempted to bypass
these steps, which is bad for your security and theirs.](https://image.slidesharecdn.com/linuxsecuritycookbook-120930200536-phpapp01/85/Linux-security-cookbook-134-320.jpg)
![4.8.4 See Also
openssl(1).
[ Team LiB ]](https://image.slidesharecdn.com/linuxsecuritycookbook-120930200536-phpapp01/85/Linux-security-cookbook-135-320.jpg)
![[ Team LiB ]
Recipe 4.9 Setting Up a Certifying Authority
4.9.1 Problem
You want to create a simple Certifying Authority (CA) and issue SSL certificates yourself.
4.9.2 Solution
Use CA.pl , a Perl script supplied with OpenSSL. It ties together various openssl commands so you can
easily construct a new CA and issue certificates under it. To create the CA:
$ /usr/share/ssl/misc/CA.pl -newca
To create a certificate, newcert.pem, signed by your CA:
$ /usr/share/ssl/misc/CA.pl -newreq
$ /usr/share/ssl/misc/CA.pl -sign
4.9.3 Discussion
First, realize that your newly created "CA" is more like a mockup than a real Certifying Authority:
OpenSSL provides the basic algorithmic building blocks, but the CA.pl script is just a quick
demonstration hack, not a full-blown program.
A real CA for a production environment requires a much higher degree of security. It's typically
implemented in specialized, tamper-resistant, cryptographic hardware—in a secure building with lots
of guards—rather than a simple file on disk! You can emulate what a CA does using OpenSSL for
testing purposes, but if you're going to use it for any sort of real application, first educate yourself
on the topic of Public-Key Infrastructure, and know what kind of tradeoffs you're making.
That being said, CA.pl is still useful for some realistic applications. Suppose you are a business owner, and
you need to enable secure web transactions for your partners on a set of HTTP servers you operate.
There are several servers, and the set will change over time, so you want an easy way to allow these to
be trusted. You use openssl to generate a CA key, and securely communicate its certificate to your
partners, who add it to their trusted CA lists. You can then issue certificates for your various servers as
they come online, and SSL server authentication will proceed automatically for your partners—and you
have full control over certificate expiration and revocation, if you wish. Take appropriate care with the CA
private key, commensurate with your (and your partners') security needs and the business threat level.
This might mean anything from using a good passphrase to keeping the whole CA infrastructure on a box
in a locked office not connected to the Net to using cryptographic hardware like CyberTrust SafeKeyper
(which OpenSSL can do)—whatever is appropriate.
Let's create your Certifying Authority, consisting of a new root key, self-signed certificate, and some
bookkeeping files under demoCA. CA.pl asks for a passphrase to protect the CA's private key, which is
needed to sign requests.](https://image.slidesharecdn.com/linuxsecuritycookbook-120930200536-phpapp01/85/Linux-security-cookbook-136-320.jpg)
![$ /usr/share/ssl/misc/CA.pl -newca
CA certificate filename (or enter to create)
[press return]
Making CA certificate ...
Using configuration from /usr/share/ssl/openssl.cnf
Generating a 1024 bit RSA private key
.......++++++
.............++++++
writing new private key to './demoCA/private/cakey.pem'
Enter PEM pass phrase: ********
Verifying password - Enter PEM pass phrase: ********
-----
You are about to be asked to enter information that will be incorporated
into your certificate request.
What you are about to enter is what is called a Distinguished Name or a DN.
There are quite a few fields but you can leave some blank
For some fields there will be a default value,
If you enter '.', the field will be left blank.
-----
Country Name (2 letter code) [GB]:US
State or Province Name (full name) [Berkshire]: Washington
Locality Name (eg, city) [Newbury]: Redmond
Organization Name (eg, company) [My Company Ltd]: BigCorp
Organizational Unit Name (eg, section) []: Dept of Corporate Aggression
Common Name (eg, your name or your server's hostname) []: www.bigcorp.com
Email Address []: abuse@bigcorp.com
Now, you can create a certificate request:
$ /usr/share/ssl/misc/CA.pl -newreq
You will be presented with a similar dialog, but the output will be a file called newreq.pem containing both
a new private key (encrypted by a passphrase you supply and must remember), and a certificate request
for its public component.
Finally, have the CA sign your request:
$ /usr/share/ssl/misc/CA.pl -sign
Using configuration from /usr/share/ssl/openssl.cnf
Enter PEM pass phrase: ...enter CA password here...
Check that the request matches the signature
Signature ok
The Subjects Distinguished Name is as follows
countryName :PRINTABLE:'US'
stateOrProvinceName :PRINTABLE:'Washington'
localityName :PRINTABLE:'Redmond'
organizationName :PRINTABLE:'BigCorp'
commonName :PRINTABLE:'Dept of Corporate Aggression'
Certificate is to be certified until Mar 5 15:25:09 2004 GMT (365 days)
Sign the certificate? [y/n]: y
1 out of 1 certificate requests certified, commit? [y/n] y
Write out database with 1 new entries
Data Base Updated
Signed certificate is in newcert.pem
Keep the private key from newreq.pem with the certificate in newcert.pem, and discard the certificate](https://image.slidesharecdn.com/linuxsecuritycookbook-120930200536-phpapp01/85/Linux-security-cookbook-137-320.jpg)
![request.
If this key and certificate are for a server (e.g., Apache), you can use them in this format—although you
will probably have to decrypt the private key and keep it in a protected file, so the server software can
read it on startup:
$ openssl rsa -in newreq.pem
If the key and certificate are for client authentication, say for use in a web browser, you may need to bind
them together in the PKCS-12 format to install it on the client:
$ openssl pkcs12 -export -inkey newreq.pem -in newcert.pem -out newcert.p12
You will be prompted first for the key passphrase (so openssl can read the private key), then for an
"export" password with which to protect the private key in the new file. You will need to supply the export
password when opening the .p12 file elsewhere.
In any event, you will need to distribute your CA's root certificate to clients, so they can validate the
certificates you issue with this CA. Often the format wanted for this purpose is DER (a .crt file):
$ openssl x509 -in demoCA/cacert.pem -outform der -out cacert.crt
4.9.4 See Also
openssl(1) and the Perl script /usr/share/ssl/misc/CA.pl.
[ Team LiB ]](https://image.slidesharecdn.com/linuxsecuritycookbook-120930200536-phpapp01/85/Linux-security-cookbook-138-320.jpg)
![[ Team LiB ]
Recipe 4.10 Converting SSL Certificates from DER to PEM
4.10.1 Problem
You have an SSL certificate in binary format, and you want to convert it to text-based PEM format.
4.10.2 Solution
$ openssl x509 -inform der -in filename -out filename.pem
4.10.3 Discussion
It may happen that you obtain a CA certificate in a different format. If it appears to be a binary file (often
with the filename extension .der or .crt), it is probably the raw DER-encoded form; test this with:
$ openssl x509 -inform der -text -in filename
DER stands for Distinguished Encoding Rules, an encoding for ASN.1 data structures; X.509 certificates
are represented using the ASN.1 standard. The openssl command uses PEM encoding by default. You can
convert a DER-encoded certificate to PEM format thus:
$ openssl x509 -inform der -in filename -out filename.pem
4.10.4 See Also
openssl(1).
[ Team LiB ]](https://image.slidesharecdn.com/linuxsecuritycookbook-120930200536-phpapp01/85/Linux-security-cookbook-139-320.jpg)
![[ Team LiB ]
Recipe 4.11 Getting Started with Kerberos
4.11.1 Problem
You want to set up an MIT Kerberos-5 Key Distribution Center (KDC).
4.11.2 Solution
1. Confirm that Kerberos is installed; if not, install the necessary Red Hat packages:
$ rpm -q krb5-server krb5-workstation
2. Add /usr/kerberos/bin and /usr/kerberos/sbin to your search path.
3. Choose a realm name (normally your DNS domain), and in the following files:
/etc/krb5.conf
/var/kerberos/krb5kdc/kdc.conf
/var/kerberos/krb5kdc/kadm5.acl
replace all occurrences of EXAMPLE.COM with your realm and domain.
4. Create the KDC principal database, and choose a master password:
# kdb5_util create
5. Start the KDC:
# krb5kdc [-m]
6. Set up a Kerberos principal for yourself with administrative privileges, and a host principal for the
KDC host. (Note the prompt is "kadmin.local:".) Suppose your KDC host is kirby.dogood.org:
# kadmin.local [-m]
kadmin.local: addpol users
kadmin.local: addpol admin
kadmin.local: addpol hosts
kadmin.local: ank -policy users username
kadmin.local: ank -policy admin username /admin
kadmin.local: ank -randkey -policy hosts host/kirby.dogood.org
kadmin.local: ktadd -k /var/kerberos/krb5kdc/kadm5.keytab
kadmin/admin kadmin/changepw
kadmin.local: quit
7. Start up the kadmin service:](https://image.slidesharecdn.com/linuxsecuritycookbook-120930200536-phpapp01/85/Linux-security-cookbook-140-320.jpg)
![7.
# kadmind [-m]
8. Test by obtaining your own Kerberos user credentials, and listing them:
$ kinit
$ klist
9. Test the Kerberos administrative system (note the prompt is "kadmin:"):
$ kadmin
kadmin: listprincs
kadmin: quit
4.11.3 Discussion
When choosing a realm name, normally you should use the DNS domain of your organization. Suppose
ours is dogood.org. Here's an example of replacing EXAMPLE.COM with your realm and domain names in
/etc/krb5.conf:
[libdefaults]
default_realm = DOGOOD.ORG
[realms]
DOGOOD.ORG = {
kdc = kirby.dogood.org:88
admin_server = kirby.dogood.org:749
default_domain = dogood.org
}
[domain_realm]
.dogood.org = DOGOOD.ORG
dogood.org = DOGOOD.ORG
The KDC principal database is the central repository of authentication information for the realm; it
contains records for all principals (users and hosts) in the realm, including their authentication keys.
These are strong random keys for hosts, or derived from passwords in the case of user principals.
# kdb5_util create
Initializing database '/var/kerberos/krb5kdc/principal' for realm 'DOGOOD.ORG',
master key name 'K/M@DOGOOD.ORG'
You will be prompted for the database Master Password.
It is important that you NOT FORGET this password.
Enter KDC database master key: ********
Re-enter KDC database master key to verify: ********
Store the database master password in a safe place. The KDC needs it to start, and
if you lose it, your realm database is useless and you will need to recreate it from
scratch, including all user accounts.
kdb5_util stores the database in the files /var/kerberos/krb5kdc/principal* and stores the database
master key in /var/kerberos/krb5kdc/.k5.DOGOOD.ORG. The key allows the KDC to start up unattended
(e.g., on a reboot), but at the cost of some security, since it can now be stolen if the KDC host is
compromised. You may remove this key file, but if so, you must enter the master password by hand on
system startup and at various other points. For this recipe, we assume that you leave the key file in place,](https://image.slidesharecdn.com/linuxsecuritycookbook-120930200536-phpapp01/85/Linux-security-cookbook-141-320.jpg)
![but we'll indicate where password entry would be necessary if you removed it.
When you start the KDC (adding the -m option to enter the master password if necessary):
Protect Your Key Distribution Server
The KDC is the most sensitive part of the Kerberos system. The data in its database is
equivalent to all your user's passwords; an attacker who steals it can impersonate any user or
service in the system. For production use, KDCs should be locked down, particularly if your
KDC master key is on disk to permit unattended restarts.
Typically, a KDC should run only Kerberos services (TGT server, kadmin, Kerberos-5-to-4
credentials conversion) and have no other inbound network access. Administration, typically
infrequent, should be done only at the console. At MIT, for example, KDCs are literally locked
in a safe, with only a network and power cable emerging to the outside world. If you truly
require remote administration, a possible compromise is login access via SSH, using only
public-key authentication (and perhaps also Kerberos, but the likely time you'll need to get in
is when Kerberos isn't working!).
# krb5kdc [-m]
monitor its operation by watching its log file in another window:
$ tail -f /var/log/krb5kdc.log
Mar 05 03:05:01 kirbyg krb5kdc[4231](info): setting up network...
Mar 05 03:05:01 kirby krb5kdc[4231](info): listening on fd 7: 192.168.10.5 port 88
Mar 05 03:05:01 kirby krb5kdc[4231](info): listening on fd 8: 192.168.10.5 port 750
Mar 05 03:05:01 kirby krb5kdc[4231](info): set up 2 sockets
Mar 05 03:05:01 kirby krb5kdc[4232](info): commencing operation
Next, in the realm database set up a Kerberos principal for yourself with administrative privileges, and a
host principal for the KDC host. Kerberos includes a secure administration protocol for modifying the KDC
database from any host over the network, using the kadmin utility. Of course, we can't use that yet as
setup is not complete. To bootstrap, we modify the database directly using root privilege to write the
database file, with a special version of kadmin called kadmin.local. Add the -m option to supply the
master password if needed. Supposing that your username is pat and the KDC host is kirby.dogood.org:
# kadmin.local [-m]
Authenticating as principal root/admin@DOGOOD.ORG with password.
kadmin.local: addpol users
kadmin.local: addpol admin
kadmin.local: addpol hosts
kadmin.local: ank -policy users pat
Enter password for principal "pat@DOGOOD.ORG": ********
Re-enter password for principal "pat@DOGOOD.ORG": ********
Principal "pat@DOGOOD.ORG" created.
kadmin.local: ank -policy admin pat/admin
Enter password for principal "pat/admin@DOGOOD.ORG": ********
Re-enter password for principal "pat/admin@DOGOOD.ORG": ********
Principal "pat/admin@DOGOOD.ORG" created.
kadmin.local: ank -randkey -policy hosts host/kirby.dogood.org
Principal "host/kirby.dogood.org@DOGOOD.ORG" created.
kadmin.local: ktadd -k /etc/krb5.keytab host/kirby.dogood.org](https://image.slidesharecdn.com/linuxsecuritycookbook-120930200536-phpapp01/85/Linux-security-cookbook-142-320.jpg)
![Entry for principal host/kirby.dogood.org with kvno 3, encryption type
Triple DES cbc mode with HMAC/sha1 added to keytab WRFILE:/etc/krb5.keytab.
kadmin.local: ktadd -k /var/kerberos/krb5kdc/kadm5.keytab
kadmin/admin kadmin/changepw
Entry for principal kadmin/admin with kvno 3, encryption type
Triple DES cbc mode with HMAC/sha1 added to keytab WRFILE:/var/kerberos/krb5kdc/
kadm5.keytab.
Entry for principal kadmin/changepw with kvno 3, encryption type
Triple DES cbc mode with HMAC/sha1 added to keytab WRFILE:/var/kerberos/krb5kdc/
kadm5.keytab.
kadmin.local: quit
The addpol command creates a policy—a collection of parameters and restrictions on accounts—which
may be changed later. We create three policies for user, administrative, and host credentials, and begin
applying them; this is a good idea even if not strictly needed, in case you want to start using policies
later.
The ank command adds a new principal. The user and user administrative principals require passwords;
for the host principal, we use the -randkey option, which generates a random key instead of using a
password. When a user authenticates via Kerberos, she uses her password. A host also has credentials,
but cannot supply a password, so a hosts's secret key is stored in a protected file, /etc/krb5.keytab.
Now, we can start up and test the kadmin service, which you can monitor via its log file,
/var/log/kadmind.log:
# kadmind [-m]
First, try obtaining your Kerberos user credentials using kinit:
$ kinit
Password for pat@DOGOOD.ORG:
Having succeeded, use klist to examine your credentials:
$ klist
Ticket cache: FILE:/tmp/krb5cc_500
Default principal: pat@DOGOOD.ORG
Valid starting Expires Service principal
03/05/03 03:48:35 03/05/03 13:48:35 krbtgt/DOGOOD.ORG@DOGOOD.ORG
Kerberos 4 ticket cache: /tmp/tkt500
klist: You have no tickets cached
Now test the Kerberos administrative system, using the separate administrative password you assigned
earlier:
$ kadmin
Authenticating as principal pat/admin@DOGOOD.ORG with password.
Enter password: ********
kadmin: listprincs
[list of all Kerberos principals in the database]
kadmin: quit
Finally, test the local host principal by using Kerberos authentication with OpenSSH [Recipe 4.14] or
Telnet [Recipe 4.15].](https://image.slidesharecdn.com/linuxsecuritycookbook-120930200536-phpapp01/85/Linux-security-cookbook-143-320.jpg)
![If you left the KDC master disk on disk at the beginning of this recipe, you may set the KDC and kadmin
servers to start automatically on boot:
# chkconfig krb5kdc on
# chkconfig kadmin on
Otherwise, you will need to start them manually after every system reset, using the -m switch and typing
in the KDC master database password.
4.11.4 See Also
kadmin(8), kadmind(8), kdb5_util(8), krb5kdc(8), kinit(1), klist(1), chkconfig(8) .
[ Team LiB ]](https://image.slidesharecdn.com/linuxsecuritycookbook-120930200536-phpapp01/85/Linux-security-cookbook-144-320.jpg)
![[ Team LiB ]
Recipe 4.12 Adding Users to a Kerberos Realm
4.12.1 Problem
You want to add a new user to an existing MIT Kerberos-5 realm.
4.12.2 Solution
Use kadmin on any realm host:
$ kadmin
Authenticating as principal pat/admin@DOGOOD.ORG with password.
To add the user named joe:
kadmin: ank -policy users joe
Enter password for principal "joe@DOGOOD.ORG": ********
Re-enter password for principal "joe@DOGOOD.ORG": ********
Principal "joe@DOGOOD.ORG" created.
To give joe administrative privileges:
kadmin: ank -policy admin joe/admin
Enter password for principal "joe/admin@DOGOOD.ORG": ********
Re-enter password for principal "joe/admin@DOGOOD.ORG": ********
Principal "joe/admin@DOGOOD.ORG" created.
and tell Joe his temporary user and admin passwords, which he should immediately change with kpasswd
. When finished:
kadmin: quit
4.12.3 Discussion
This is the same procedure we used while setting up your KDC. [Recipe 4.11] You need not be on the KDC
to do administration; you can do it remotely with kadmin. The program kadmin.local, which we used
before, is only for bootstrapping or other exceptional situations.
4.12.4 See Also
kadmin(8).
[ Team LiB ]](https://image.slidesharecdn.com/linuxsecuritycookbook-120930200536-phpapp01/85/Linux-security-cookbook-145-320.jpg)
![[ Team LiB ]
Recipe 4.13 Adding Hosts to a Kerberos Realm
4.13.1 Problem
You want to add a new host to an existing MIT Kerberos-5 realm.
4.13.2 Solution
Copy /etc/krb5.conf from your KDC (or any other realm host) to the new host. Then run kadmin on the
new host, say, samaritan:
samaritan# kadmin -p pat/admin
Authenticating as principal pat/admin@DOGOOD.ORG with password.
Enter password: ********
kadmin: ank -randkey -policy hosts host/samaritan.dogood.org
kadmin: ktadd -k /etc/krb5.keytab host/samaritan.dogood.org
kadmin: quit
4.13.3 Discussion
Assume the Kerberos realm we set up previously, DOGOOD.ORG [Recipe 4.11], and suppose your new
host is samaritan.dogood.org. Once the DOGOOD.ORG realm configuration file (/etc/krb5.conf) has been
copied from the KDC to samaritan, we can take advantage of the kadmin protocol we set up on the KDC
to administer the Kerberos database remotely, directly from samaritan. We add a host principal for our
new machine and store the host's secret key in the local keytab file. (kadmin can find the Kerberos admin
server from the krb5.conf file we just installed.)
samaritan# kadmin -p pat/admin
Authenticating as principal pat/admin@DOGOOD.ORG with password.
Enter password: ********
kadmin: ank -randkey -policy hosts host/samaritan.dogood.org
Principal "host/samaritan.dogood.org@DOGOOD.ORG" created.
kadmin: ktadd -k /etc/krb5.keytab host/samaritan.dogood.org
Entry for principal host/samaritan.dogood.org with kvno 3, encryption type
Triple DES cbc mode with HMAC/sha1 added to keytab WRFILE:/etc/krb5.keytab.
kadmin: quit
That's it! Test by doing a kinit in your user account (pat):
# su - pat
pat@samaritan$ kinit
Password for pat@DOGOOD.ORG: ********
Having succeeded, use klist to examine your credentials:](https://image.slidesharecdn.com/linuxsecuritycookbook-120930200536-phpapp01/85/Linux-security-cookbook-146-320.jpg)
![pat@samaritan$ klist
Ticket cache: FILE:/tmp/krb5cc_500
Default principal: pat@DOGOOD.ORG
Valid starting Expires Service principal
03/05/03 03:48:35 03/05/03 13:48:35 krbtgt/DOGOOD.ORG@DOGOOD.ORG
and try connecting to yourself via ssh with Kerberos authentication, to test the operation of the host
principal: [Recipe 4.14]
pat@samaritan$ ssh -v1 samaritan
OpenSSH_3.4p1, SSH protocols 1.5/2.0, OpenSSL 0x0090602f
debug1: Reading configuration data /home/res/.ssh/config
...
debug1: Trying Kerberos v5 authentication.
debug1: Kerberos v5 authentication accepted.
...
pat@samaritan$
4.13.4 See Also
kadmin(8), kinit(1), klist(1), ssh(1).
[ Team LiB ]](https://image.slidesharecdn.com/linuxsecuritycookbook-120930200536-phpapp01/85/Linux-security-cookbook-147-320.jpg)
![[ Team LiB ]
Recipe 4.14 Using Kerberos with SSH
4.14.1 Problem
You want to authenticate to your SSH server via Kerberos-5. We assume you already have an MIT Kerberos-5
infrastructure. [Recipe 4.11]
4.14.2 Solution
Suppose your SSH server and client machines are myserver and myclient, respectively:
1. Make sure your OpenSSH distribution is compiled with Kerberos-5 support on both myserver and myclient. The
Red Hat OpenSSH distribution comes this way, but if you're building your own, use:
$ ./configure --with-kerberos5 ...
before building and installing OpenSSH.
2. Configure the SSH server on myserver:
/etc/ssh/sshd_config:
KerberosAuthentication yes
KerberosTicketCleanup yes
Decide whether you want sshd to fall back to ordinary password authentication if Kerberos authentication
fails:
KerberosOrLocalPasswd [yes|no]
3. Restart the SSH server:
myserver# /etc/init.d/sshd restart
4. On myclient, obtain a ticket-granting ticket if you have not already done so, and connect to myserver via SSH.
Kerberos-based authentication should occur.
myclient$ kinit
Password for username@REALM: ********
myclient$ ssh -1 myserver That's the number one, not a lower-case L
4.14.3 Discussion
We use the older SSH-1 protocol:](https://image.slidesharecdn.com/linuxsecuritycookbook-120930200536-phpapp01/85/Linux-security-cookbook-148-320.jpg)

![access your own account!
~/.k5login:
me@REALM
myfriend@REALM
4.14.4 See Also
sshd(8), sshd_config(5), kinit(1). OpenSSH also has support for Kerberos-4.
[ Team LiB ]](https://image.slidesharecdn.com/linuxsecuritycookbook-120930200536-phpapp01/85/Linux-security-cookbook-150-320.jpg)
![[ Team LiB ]
Recipe 4.15 Using Kerberos with Telnet
4.15.1 Problem
You want to use Telnet securely, and you have an MIT Kerberos-5 environment.
4.15.2 Solution
Use the Kerberos-aware ("Kerberized") version of telnet. Assuming you have set up a Kerberos realm
[Recipe 4.11] and hosts [Recipe 4.13], enable the Kerberized Telnet daemon on your desired destination
machine:
/etc/xinetd.d/krb5-telnet:
service telnet
{
...
disable = no
}
and disable the standard Telnet daemon:
/etc/xinetd.d/telnet:
service telnet
{
...
disable = yes
}
Then restart xinetd on that machine [Recipe 3.3] (suppose its hostname is moof):
moof# kill -HUP `pidof xinetd`
and check /var/log/messages for any error messages. Then, on a client machine (say, dogcow) in the
same realm, DOGOOD.ORG:
dogcow$ kinit -f
Password for pat@DOGOOD.ORG:
dogcow$ /usr/kerberos/bin/telnet -fax moof
Trying 10.1.1.6...
Connected to moof.dogood.org (10.1.1.6).
Escape character is '^]'.
Waiting for encryption to be negotiated...
[ Kerberos V5 accepts you as ``pat@DOGOOD.ORG'' ]
[ Kerberos V5 accepted forwarded credentials ]
Last login: Fri Mar 7 03:28:14 from localhost.localdomain
You have mail.
moof$](https://image.slidesharecdn.com/linuxsecuritycookbook-120930200536-phpapp01/85/Linux-security-cookbook-151-320.jpg)
![You now have an encrypted Telnet connection, strongly and automatically authenticated via Kerberos.
4.15.3 Discussion
Often, people think of Telnet as synonymous with "insecure," but this is not so. The Telnet protocol allows
for strong authentication and encryption, though it is seldom implemented. With the proper infrastructure,
Telnet can be quite secure, as shown here.
The -f flag to kinit requests forwardable credentials, and the same flag to telnet then requests that
they be forwarded. Thus, your Kerberos credentials follow you from one host to the next, removing the
need to run kinit again on the second host in order to use Kerberos there. This provides a more complete
single-sign-on effect.
As shown, the Kerberized Telnet server still allows plaintext passwords if Kerberos authentication fails, or
if the client doesn't offer it. To make telnetd require strong authentication, modify its xinetd configuration
file:
/etc/xinetd.d/krb5-telnet:
service telnet
{
...
service_args = -a valid
}
and restart xinetd again. Now when you try to telnet insecurely, it fails:
dogcow$ telnet moof
telnetd: No authentication provided.
Connection closed by foreign host.
If Kerberized authentication doesn't work, try the following to get more information:
dogcow$ telnet -fax
telnet> set authd
auth debugging enabled
telnet> set encd
Encryption debugging enabled
telnet> open moof
Trying 10.1.1.6...
which prints details about the Telnet authentication and encryption negotiation.
4.15.4 See Also
telnet(1), telnetd(8).
[ Team LiB ]](https://image.slidesharecdn.com/linuxsecuritycookbook-120930200536-phpapp01/85/Linux-security-cookbook-152-320.jpg)
![[ Team LiB ]
Recipe 4.16 Securing IMAP with Kerberos
4.16.1 Problem
You want to take advantage of your MIT Kerberos-5 infrastructure for authentication to your mail server.
4.16.2 Solution
Use a mail client that supports GSSAPI Kerberos authentication via the IMAP AUTHENTICATE command,
such as mutt or pine.
If you have set up an IMAP server using imapd , and a Kerberos realm [Recipe 4.11], then most of the
work is done: the Red Hat imapd comes with Kerberos support already built in and enabled. All that
remains is to add Kerberos principals for the mail service on the server host.
If your username is homer and the mail server is marge, then:
marge# kadmin -p homer/admin
Authenticating as principal homer/admin@DOGOOD.ORG with password.
Enter password: ********
kadmin: ank -randkey -policy hosts imap/marge.dogood.org
Principal "imap/marge.dogood.org@DOGOOD.ORG" created.
kadmin: ktadd -k /etc/krb5.keytab imap/marge.dogood.org
Entry for principal imap/marge.dogood.org@DOGOOD.ORG with kvno 3,
encryption type Triple DES cbc mode with HMAC/sha1 added to keytab WRFILE:/etc/
krb5.keytab.
kadmin: quit
Now on any host in the Kerberos realm, your compatible mail client should automatically use your
Kerberos credentials, if available:
$ kinit
Password for pat@DOGOOD.ORG: ********
$ klist
Ticket cache: FILE:/tmp/krb5cc_503
Default principal: pat@DOGOOD.ORG
Valid starting Expires Service principal
03/05/03 03:48:35 03/05/03 13:48:35 krbtgt/DOGOOD.ORG@DOGOOD.ORG
Then connect with your mail client, such as mutt: [Recipe 8.12]
$ MAIL=imap://pat@marge.dogood.org/ mutt
or pine: [Recipe 8.11]](https://image.slidesharecdn.com/linuxsecuritycookbook-120930200536-phpapp01/85/Linux-security-cookbook-153-320.jpg)
![$ pine -inbox-path='{pat@marge.dogood.org/imap}'
If it works correctly, you will be connected to your mailbox without being asked for a password, and you'll
have acquired a Kerberos ticket for IMAP on the mail server:
$ klist
Ticket cache: FILE:/tmp/krb5cc_500
Default principal: pat@DOGOOD.ORG
Valid starting Expires Service principal
03/07/03 14:44:40 03/08/03 00:44:40 krbtgt/DOGOOD.ORG@DOGOOD.ORG
03/07/03 14:44:48 03/08/03 00:44:40 imap/marge.dogood.org@DOGOOD.ORG
4.16.3 Discussion
This technique works for POP as well. With pine, use Kerberos service principal
pop/marge.dogood.org@DOGOOD.ORG and a mailbox path ending in /pop. With mutt, however, we were
unable to make this work in our Red Hat 8.0 system. There is some confusion about whether the Kerberos
principal is pop/... or pop-3/...; also, the actual AUTH GSSAPI data transmitted by the client appears to be
truncated, causing authentication failure. We assume this is a bug that will be fixed eventually.
For debugging, remember to examine the KDC syslog messages for clues.
4.16.4 See Also
mutt(1), pine(1). See SSL for Securing Mail, regarding the relationship between SSL and different forms
of user authentication.
The Kerberos FAQ has more about GSSAPI: http://www.faqs.org/faqs/kerberos-faq/general/section-
84.html.
[ Team LiB ]](https://image.slidesharecdn.com/linuxsecuritycookbook-120930200536-phpapp01/85/Linux-security-cookbook-154-320.jpg)
![[ Team LiB ]
Recipe 4.17 Using Kerberos with PAM for System-Wide
Authentication
4.17.1 Problem
You want your existing MIT Kerberos-5 realm to be used pervasively in system authentication.
4.17.2 Solution
Run authconfig (as root) and turn on the option "Use Kerberos 5." The needed parameters for realm,
KDC, and Admin server should be prefilled automatically from /etc/krb5.conf.
4.17.3 Discussion
Turning on the Kerberos option in authconfig alters various PAM configuration files in /etc/pam.d to
include Kerberos. In particular, it allows Kerberos in /etc/pam.d/system-auth, which controls the
authentication behavior of most servers and programs that validate passwords under Red Hat.
# grep -l system-auth /etc/pam.d/*
/etc/pam.d/authconfig
/etc/pam.d/authconfig-gtk
/etc/pam.d/chfn
...dozens more lines...
As a side effect, the general login process (e.g., via telnet, gdm/xdm, console, etc.) will automatically
obtain Kerberos credentials on login, removing the need to run a separate kinit, as long as your Linux and
Kerberos passwords are the same.
Avoid authconfig if you have a custom PAM configuration. authconfig overwrites
PAM files unconditionally; you will lose your changes.
The configuration produced by authconfig still allows authentication via local Linux passwords as well
(from /etc/passwd and /etc/shadow). By tailoring /etc/pam.d/system-auth, however, you can produce
other behavior. Consider these two lines:
/etc/pam.d/system-auth:
auth sufficient /lib/security/pam_unix.so likeauth nullok
auth sufficient /lib/security/pam_krb5.so use_first_pass
If you remove the second one, then local password validation will be forbidden, and Kerberos will be
strictly required for authentication. Not all applications use PAM, however: in particular, Kerberized Telnet.
So even if PAM ignores the local password database as shown, Kerberized Telnet will still do so if it falls
back to password authentication. In this case, you could disable plain Telnet password authentication
altogether. [Recipe 4.15]](https://image.slidesharecdn.com/linuxsecuritycookbook-120930200536-phpapp01/85/Linux-security-cookbook-155-320.jpg)
![As a matter of overall design, however, consider having a fallback to local authentication, at least for a
subset of accounts and for root authorization. Otherwise, if the network fails, you'll be locked out of all
your machines! SSH public-key authentication, for example, would be a good complement to Kerberos:
sysadmin accounts could have public keys in place to allow access in exceptional cases. [Recipe 6.4]
4.17.4 See Also
authconfig(8), pam(8), and the documentation in the files /usr/share/doc/pam_krb5*/*.
[ Team LiB ]](https://image.slidesharecdn.com/linuxsecuritycookbook-120930200536-phpapp01/85/Linux-security-cookbook-156-320.jpg)
![[ Team LiB ]
Chapter 5. Authorization Controls
Authorization means deciding what a user may or may not do on a computer: for example, reading
particular files, running particular programs, or connecting to particular network ports. Typically,
permission is granted based on a credential such as a password or cryptographic key.
The superuser root, with uid 0, has full control over every file, directory, port, and dust particle on the
computer. Therefore, your big, security-related authorization questions are:
Who has root privileges on my computer?
How are these privileges bestowed?
Most commonly, anyone knowing your root password has superuser powers, which are granted with the
su command:
$ su
Password: *******
#
This technique is probably fine for a single person with one computer. But if you're a superuser on
multiple machines, or if you have several superusers, things get more complicated. What if you want to
give temporary or limited root privileges to a user? What if one of your superusers goes berserk: can you
revoke his root privileges without impacting other superusers? If these tasks seem inconvenient or
difficult, your system might benefit from additional infrastructure for authorization.
Here are some common infrastructures and our opinions of them:
Sharing the root password
This is conceptually the simplest, but giving every superuser full access to everything is risky. Also,
to revoke a rogue superuser's access you must change the root password, which affects all other
superusers. Consider a finer grained approach. When cooking a hamburger, after all, a
flamethrower will work but a simple toaster oven might be more appropriate.
Multiple root accounts
Make several accounts with uid 0 and gid 0, but different usernames and passwords.
/etc/passwd:
root:x:0:0:root:/root:/bin/bash
root-bob:x:0:0:root:/root:/bin/bash
root-sally:x:0:0:root:/root:/bin/bash
root-vince:x:0:0:root:/root:/bin/bash
We do not recommend this method. It provides finer control than sharing the root password, but it's less
powerful than the later methods we'll describe. Plus you'll break some common scripts that check for the
literal username "root" before proceeding. See our recipe for locating superuser accounts so you can
replace them and use another method. [Recipe 9.4]
sudo
Most of this chapter is devoted to sudo recipes. This package has a system-wide configuration file,](https://image.slidesharecdn.com/linuxsecuritycookbook-120930200536-phpapp01/85/Linux-security-cookbook-157-320.jpg)
![/etc/sudoers, that specifies precisely which Linux commands may be invoked by given users on
particular hosts with specific privileges. For example, the sudoers entry:
/etc/sudoers:
smith myhost = (root) /usr/local/bin/mycommand
means that user smith may invoke the command /usr/local/bin/mycommand on host myhost as user
root. User smith can now successfully invoke this program by:
smith$ sudo -u root /usr/local/bin/mycommand
sudo lets you easily give out and quickly revoke root privileges without revealing the root password.
(Users authenticate with their own passwords.) It also supports logging so you can discover who ran
which programs via sudo. On the down side, sudo turns an ordinary user password into a (possibly
limited) root password. And you must configure it carefully, disallowing arbitrary root commands and
arbitrary argument lists, or else you can open holes in your system.
SSH
The Secure Shell can authenticate superusers by public key and let them execute root commands
locally or remotely. Additionally, restricted privileges can be granted using SSH forced commands.
The previous sudoers example could be achieved by SSH as:
~root/.ssh/authorized_keys:
command="/usr/local/bin/mycommand" ssh-dss fky7Dj7bGYxdHRYuHN ...
and the command would be invoked something like this:
$ ssh -l root -i private_key_name localhost
Kerberos ksu
If your environment has a Kerberos infrastructure, you can use ksu, Kerberized su, for
authorization. Like sudo, ksu checks a configuration file to make authorization decisions, but the file
is per user rather than per system. That is, if user emma wants to invoke a command as user ben,
then ben must grant this permission via configuration files in his account:
~ben/.k5login:
emma@EXAMPLE.COM
~ben/.k5users:
emma@EXAMPLE.COM /usr/local/bin/mycommand
and emma would invoke it as:
emma$ ksu ben -e mycommand
Like SSH, ksu also performs strong authentication prior to authorization. Kerberos is installed by default
in Red Hat 8.0 but not included with SuSE 8.0.
[ Team LiB ]](https://image.slidesharecdn.com/linuxsecuritycookbook-120930200536-phpapp01/85/Linux-security-cookbook-158-320.jpg)
![[ Team LiB ]
Recipe 5.1 Running a root Login Shell
5.1.1 Problem
While logged in as a normal user, you need to run programs with root privileges as if root had logged in.
5.1.2 Solution
$ su -
5.1.3 Discussion
This recipe might seem trivial, but some Linux users don't realize that su alone does not create a full root
environment. Rather, it runs a root shell but leaves the original user's environment largely intact.
Important environment variables such as USER, MAIL, and PWD can remain unchanged.
su - (or equivalently, su -l or su —login) runs a login shell, clearing the original user's environment and
running all the startup scripts in ~root that would be run on login (e.g., .bash_profile).
Look what changes in your environment when you run su:
$ env > /tmp/env.user
$ su
# env > /tmp/env.rootshell
# diff /tmp/env.user /tmp/env.rootshell
# exit
Now compare the environment of a root shell and a root login shell:
$ su -
# env > /tmp/env.rootlogin
# diff /tmp/env.rootshell /tmp/env.rootlogin
# exit
Or do a quick three-way diff:
$ diff3 /tmp/env.user /tmp/env.rootshell /tmp/env.rootlogin
5.1.4 See Also
su(1), env(1), environ(5). Your shell's manpage explains environment variables.
[ Team LiB ]](https://image.slidesharecdn.com/linuxsecuritycookbook-120930200536-phpapp01/85/Linux-security-cookbook-159-320.jpg)
![[ Team LiB ]
Recipe 5.2 Running X Programs as root
5.2.1 Problem
While logged in as a normal user, you need to run an X window application as root. You get this error
message:
** WARNING ** cannot open display
5.2.2 Solution
Create a shell script called, say, xsu:
#!/bin/sh
su - -c "exec env DISPLAY='$DISPLAY'
XAUTHORITY='${XAUTHORITY-$HOME/.Xauthority}'
"'"$SHELL"'" -c '$*'"
and run it with the desired command as its argument list:
# xsu ...command line...
5.2.3 Discussion
The problem is that root's .Xauthority file does not have the proper authorization credentials to access
your X display.
This script invokes a login shell [Recipe 5.1] and the env program sets the environment variables
DISPLAY and XAUTHORITY. The values are set to be the same as the invoking user's. Otherwise they
would be set to root's values, but root doesn't own the display.
So in this solution, XAUTHORITY remains ~user/.Xauthority instead of changing to ~root/.Xauthority.
Since root can read any user's .Xauthority file, including this one, it works.
This trick will not work if the user's home directory is NFS-mounted without remote root access.
5.2.4 See Also
env(1), su(1), xauth(1).
[ Team LiB ]](https://image.slidesharecdn.com/linuxsecuritycookbook-120930200536-phpapp01/85/Linux-security-cookbook-160-320.jpg)
![[ Team LiB ]
Recipe 5.3 Running Commands as Another User via sudo
5.3.1 Problem
You want one user to run commands as another, without sharing passwords.
5.3.2 Solution
Suppose you want user smith to be able to run a given command as user jones.
/etc/sudoers:
smith ALL = (jones) /usr/local/bin/mycommand
User smith runs:
smith$ sudo -u jones /usr/local/bin/mycommand
smith$ sudo -u jones mycommand If /usr/local/bin is in $PATH
User smith will be prompted for his own password, not jones's. The ALL keyword, which matches
anything, in this case specifies that the line is valid on any host.
5.3.3 Discussion
sudo exists for this very reason!
To authorize root privileges for smith, replace "jones" with "root" in the above example.
5.3.4 See Also
sudo(8), sudoers(5).
[ Team LiB ]](https://image.slidesharecdn.com/linuxsecuritycookbook-120930200536-phpapp01/85/Linux-security-cookbook-161-320.jpg)
![[ Team LiB ]
Recipe 5.4 Bypassing Password Authentication in sudo
Careful sudo Practices
Always edit /etc/sudoers with the visudo program, not by invoking a text editor directly. visudo
uses a lock to ensure that only one person edits /etc/sudoers at a time, and verifies that there
are no syntax errors before the file is saved.
Never permit the following programs to be invoked with root privileges by sudo: su, sudo,
visudo, any shell, and any program having a shell escape.
Be meticulous about specifying argument lists for each command in /etc/sudoers. If you aren't
careful, even common commands like cat and chmod can be springboards to gain root
privileges:
$ sudo cat /etc/shadow > my.evil.file
$ sudo cat ~root/.ssh/id_dsa > my.copy.of.roots.ssh.key
$ sudo chmod 777 /etc/passwd; emacs /etc/passwd
$ sudo chmod 4755 /usr/bin/less (root-owned with a shell escape)
Obviously, never let users invoke a program or script via sudo if the users have write
permissions to the script. For example:
/etc/sudoers:
smith ALL = (root) /home/smith/myprogram
would be a very bad idea, since smith can modify myprogram arbitrarily.
5.4.1 Problem
You want one user to run a command as another user without supplying a password.
5.4.2 Solution
Use sudo's NOPASSWD tag, which indicates to sudo that no password is needed for authentication:
/etc/sudoers:
smith ALL = (jones) NOPASSWD: /usr/local/bin/mycommand args
smith ALL = (root) NOPASSWD: /usr/local/bin/my_batch_script ""
5.4.3 Discussion
By not requiring a password, you are trading security for convenience. If a sudo-enabled user leaves
herself logged in at an unattended terminal, someone else can sit down and run privileged commands.
That being said, passwordless authorization is particularly useful for batch jobs, where no human operator](https://image.slidesharecdn.com/linuxsecuritycookbook-120930200536-phpapp01/85/Linux-security-cookbook-162-320.jpg)
![is available to type a password.
5.4.4 See Also
sudo(8), sudoers(5).
[ Team LiB ]](https://image.slidesharecdn.com/linuxsecuritycookbook-120930200536-phpapp01/85/Linux-security-cookbook-163-320.jpg)
![[ Team LiB ]
Recipe 5.5 Forcing Password Authentication in sudo
5.5.1 Problem
You want sudo always to prompt for a password.
5.5.2 Solution
When controlled by superuser:
/etc/sudoers:
Defaults timestamp_timeout = 0 systemwide
Defaults:smith timestamp_timeout=0 per sudo user
When controlled by end-user, write a script that runs sudo -k after each sudo invocation. Call it "sudo"
and put it in your search path ahead of /usr/bin/sudo:
~/bin/sudo:
#!/bin/sh
/usr/bin/sudo $@
/usr/bin/sudo -k
5.5.3 Discussion
After invoking sudo, your authorization privileges last for some number of minutes, determined by the
variable timestamp_timeout in /etc/sudoers. During this period, you will not be prompted for a password.
If your timestamp_timeout is zero, sudo always prompts for a password.
This feature can be enabled only by the superuser, however. Ordinary users can achieve the same
behavior with sudo -k, which forces sudo to prompt for a password on your next sudo command. Our
recipe assumes that the directory ~/bin is in your search path ahead of /usr/bin.
5.5.4 See Also
sudo(8), sudoers(5).
[ Team LiB ]](https://image.slidesharecdn.com/linuxsecuritycookbook-120930200536-phpapp01/85/Linux-security-cookbook-164-320.jpg)
![[ Team LiB ]
Recipe 5.6 Authorizing per Host in sudo
5.6.1 Problem
You want to allow a user authorization privileges only on certain machines.
5.6.2 Solution
First, define a list of machines:
/etc/sudoers:
Host_Alias SAFE_HOSTS = avocado, banana, cherry
Let smith run a program as jones on these machines:
smith SAFE_HOSTS = (jones) /usr/local/bin/mycommand
Let smith run all programs as jones on these machines:
smith SAFE_HOSTS = (jones) ALL
As an alternative, you can define a netgroup, in the /etc/netgroup file:
safe-hosts (avocado,-,-) (banana,-,-) (cherry,-,-)
Then use the netgroup in the /etc/sudoers file, with the "+" prefix:
Host_Alias SAFE_HOSTS = +safe-hosts
You can also use the netgroup in place of the host alias:
smith +safe_hosts = (jones) ALL
5.6.3 Discussion
This recipe assumes you have centralized your sudo configuration: the same sudoers file on all your
computers. If not, you could grant per-machine privileges by installing a different sudoers file on each
machine.
Netgroups can be useful for centralization if they are implemented as a shared NIS database. In that
case, you can update the machines in netgroups without changing your /etc/sudoers files.
The host alias is optional but helpful for organizing your sudoers file, so you needn't retype the set of
hostnames repeatedly.
As another example, you could let users administer their own machines but not others:
/etc/sudoers:
bob bobs_machine = ALL](https://image.slidesharecdn.com/linuxsecuritycookbook-120930200536-phpapp01/85/Linux-security-cookbook-165-320.jpg)
![gert gerts_machine = ALL
ernie ernies_machine = ALL
(Though this is perhaps pointless infrastructure, since ALL would permit these people to modify their
/etc/sudoers file and their root password.)
5.6.4 See Also
sudo(8), sudoers(5).
[ Team LiB ]](https://image.slidesharecdn.com/linuxsecuritycookbook-120930200536-phpapp01/85/Linux-security-cookbook-166-320.jpg)
![[ Team LiB ]
Recipe 5.7 Granting Privileges to a Group via sudo
5.7.1 Problem
Let a set of users run commands as another user.
5.7.2 Solution
Define a Linux group containing those users:
/etc/group:
mygroup:x:1200:joe,jane,hiram,krishna
Then create a sudo rule with the %groupname syntax:
/etc/sudoers:
# Let the group run a particular program:
%mygroup ALL = (root) /usr/local/bin/mycommand arg1 arg2
# Give full superuser privileges to the group
%mygroup ALL = (ALL) ALL
5.7.3 See Also
sudo(8), sudoers(5), group(5).
[ Team LiB ]](https://image.slidesharecdn.com/linuxsecuritycookbook-120930200536-phpapp01/85/Linux-security-cookbook-167-320.jpg)
![[ Team LiB ]
Recipe 5.8 Running Any Program in a Directory via sudo
5.8.1 Problem
Authorize a user to run all programs in a given directory, but only those programs, as another user.
5.8.2 Solution
Specify a fully-qualified directory name instead of a command, ending it with a slash:
/etc/sudoers:
smith ALL = (root) /usr/local/bin/
smith$ sudo -u root /usr/local/bin/mycommand Authorized
smith$ sudo -u root /usr/bin/emacs Rejected
This authorization does not descend into subdirectories.
smith$ sudo -u root /usr/local/bin/gnu/emacs Rejected
5.8.3 See Also
sudo(8), sudoers(5).
[ Team LiB ]](https://image.slidesharecdn.com/linuxsecuritycookbook-120930200536-phpapp01/85/Linux-security-cookbook-168-320.jpg)
![[ Team LiB ]
Recipe 5.9 Prohibiting Command Arguments with sudo
5.9.1 Problem
You want to permit a command to be run via sudo, but only without command-line arguments.
5.9.2 Solution
Follow the program name with the single argument "" in /etc/sudoers:
/etc/sudoers:
smith ALL = (root) /usr/local/bin/mycommand ""
smith$ sudo -u root mycommand a b c Rejected
smith$ sudo -u root mycommand Authorized
5.9.3 Discussion
If you specify no arguments to a command in /etc/sudoers, then by default any arguments are permitted.
/etc/sudoers:
smith ALL = (root) /usr/local/bin/mycommand
smith$ sudo -u root mycommand a b c Authorized
Use "" to prevent any runtime arguments from being authorized.
5.9.4 See Also
sudo(8), sudoers(5).
[ Team LiB ]](https://image.slidesharecdn.com/linuxsecuritycookbook-120930200536-phpapp01/85/Linux-security-cookbook-169-320.jpg)
![[ Team LiB ]
Recipe 5.10 Sharing Files Using Groups
5.10.1 Problem
Two or more users want to share files, both with write privileges.
5.10.2 Solution
Create a group containing only those users, say, smith, jones, and ling:
/etc/group:
friends:x:200:smith,jones,ling
Create the shared file in a directory writable by this group:
jones$ cd
jones$ mkdir share
jones$ chmod 2770 share
jones$ chgrp friends share
jones$ ls -ld share
drwxrws--- 2 jones friends 4096 Apr 18 20:17 share/
jones$ cd share
jones$ touch myfile
jones$ chmod 660 myfile
jones$ ls -l myfile
-rw-rw---- 1 jones friends 0 Apr 18 20:18 myfile
Users smith and ling can now enter the directory and modify jones's file:
smith$ cd ~jones/share
smith$ emacs myfile
5.10.3 Discussion
smith, jones, and ling should consider setting their umasks so files they create are group writable, e.g.:
$ umask 007
$ touch newfile
$ ls -l newfile
-rw-rw---- 1 smith 0 Jul 17 23:09 newfile
The setgid bit on the directory (indicated by mode 2000 for chmod, or "s" in the output from ls -l) means
that newly created files in the directory will be assigned the group of the directory. The applies to newly
created subdirectories as well.
To enable this behavior for an entire filesystem, use the grpid mount option. This option can appear on
the command line:](https://image.slidesharecdn.com/linuxsecuritycookbook-120930200536-phpapp01/85/Linux-security-cookbook-170-320.jpg)
![# mount -o grpid ...
or in /etc/fstab:
/dev/hdd3 /home ext2 rw,grpid 1 2
5.10.4 See Also
group(5), chmod(1), chgrp(1), umask(1).
[ Team LiB ]](https://image.slidesharecdn.com/linuxsecuritycookbook-120930200536-phpapp01/85/Linux-security-cookbook-171-320.jpg)
![[ Team LiB ]
Recipe 5.11 Permitting Read-Only Access to a Shared File
via sudo
5.11.1 Problem
Two or more users want to share a file, some read/write and the others read-only.
5.11.2 Solution
Create two Linux groups, one for read/write and one for read-only users:
/etc/group:
readers:x:300:r1,r2,r3,r4
writers:x:301:w1,w2,w3
Permit the writers group to write the file via group permissions:
$ chmod 660 shared_file
$ chgrp writers shared_file
Permit the readers group to read the file via sudo:
/etc/sudoers:
%readers ALL = (w1) /bin/cat /path/to/shared_file
5.11.3 Discussion
This situation could arise in a university setting, for example, if a file must be writable by a group of
teaching assistants but read-only to a group of students.
If there were only two users—one reader and one writer—you could dispense with groups and simply let
the reader access the file via sudo. If smith is the reader and jones the writer, and we give smith the
following capability:
/etc/sudoers:
smith ALL = (jones) NOPASSWD: /bin/cat /home/jones/private.stuff
then jones can protect her file:
jones$ chmod 600 $HOME/private.stuff
and smith can view it:
smith$ sudo -u jones cat /home/jones/private.stuff
5.11.4 See Also](https://image.slidesharecdn.com/linuxsecuritycookbook-120930200536-phpapp01/85/Linux-security-cookbook-172-320.jpg)
![sudo(8), sudoers(5), group(5), chmod(1), chgrp(1).
[ Team LiB ]](https://image.slidesharecdn.com/linuxsecuritycookbook-120930200536-phpapp01/85/Linux-security-cookbook-173-320.jpg)
![[ Team LiB ]
Recipe 5.12 Authorizing Password Changes via sudo
5.12.1 Problem
You want to permit a user to change the passwords of certain other users.
5.12.2 Solution
To permit smith to change the passwords of jones, chu, and agarwal:
/etc/sudoers:
smith ALL = NOPASSWD:
/usr/bin/passwd jones,
/usr/bin/passwd chu,
/usr/bin/passwd agarwal
The NOPASSWD tag is optional, for convenience. [Recipe 5.4]
5.12.3 Discussion
As another example, permit a professor to change passwords for her students, whose logins are
student00, student01, student02,...up to student99.
/etc/sudoers:
prof ALL = NOPASSWD: /usr/bin/passwd student[0-9][0-9]
Note that this uses shell-style wildcard expansion; see sudoers(5) for the full syntax.
5.12.4 See Also
sudo(8), sudoers(5).
[ Team LiB ]](https://image.slidesharecdn.com/linuxsecuritycookbook-120930200536-phpapp01/85/Linux-security-cookbook-174-320.jpg)
![[ Team LiB ]
Recipe 5.13 Starting/Stopping Daemons via sudo
5.13.1 Problem
You want specific non-superusers to start and stop system daemons.
5.13.2 Solution
Here we let four different users start, stop, and restart web servers. The script for doing so is
/etc/init.d/httpd for Red Hat, or /etc/init.d/apache for SuSE. We'll reference the Red Hat script in our
solution.
/etc/sudoers:
User_Alias FOLKS=barbara, l33t, jimmy, miroslav
Cmnd_Alias DAEMONS=/etc/init.d/httpd start,
/etc/init.d/httpd stop,
/etc/init.d/httpd restart
FOLKS ALL = (ALL) DAEMONS
5.13.3 Discussion
Note our use of sudo aliases for the users and commands. Read the sudoers(5) manpage to learn all kinds
of fun capabilities like this.
5.13.4 See Also
sudo(8), sudoers(5).
[ Team LiB ]](https://image.slidesharecdn.com/linuxsecuritycookbook-120930200536-phpapp01/85/Linux-security-cookbook-175-320.jpg)
![[ Team LiB ]
Recipe 5.14 Restricting root's Abilities via sudo
5.14.1 Problem
You want to let a user run all commands as root except for specific exceptions, such as su.
5.14.2 Solution
Don't.
Instead, list all the permissible commands explicitly in /etc/sudoers. Don't try the reverse—letting the
user run all commands as root "except these few"—which is prohibitively difficult to do securely.
5.14.3 Discussion
It's tempting to try excluding dangerous commands with the "!" syntax:
/etc/sudoers:
smith ALL = (root) !/usr/bin/su ...
but this technique is fraught with problems. A savvy user can easily get around it by renaming the
forbidden executables:
smith$ ln -s /usr/bin/su gimmeroot
smith$ sudo gimmeroot
Instead, we recommend listing all acceptable commands individually, making sure that none have shell
escapes.
5.14.4 See Also
sudo(8), sudoers(5).
[ Team LiB ]](https://image.slidesharecdn.com/linuxsecuritycookbook-120930200536-phpapp01/85/Linux-security-cookbook-176-320.jpg)
![[ Team LiB ]
Recipe 5.15 Killing Processes via sudo
5.15.1 Problem
Allow a user to kill a certain process but no others.
5.15.2 Solution
Create a script that kills the process by looking up its PID dynamically and safely. Add the script to
/etc/sudoers.
5.15.3 Discussion
Because we don't know a process's PID until runtime, we cannot solve this problem with /etc/sudoers
alone, which is written before runtime. You need a script to deduce the PID for killing.
For example, to let users restart sshd :
#!/bin/sh
pidfile=/var/run/sshd.pid
sshd=/usr/sbin/sshd
# sanity check that pid is numeric
pid=`/usr/bin/perl -ne 'print if /^d+$/; last;' $pidfile`
if [ -z "$pid" ]
then
echo "$0: error: non-numeric pid $pid found in $pidfile" 1>&2
exit 1
fi
# sanity check that pid is a running process
if [ ! -d "/proc/$pid" ]
then
echo "$0: no such process" 1>&2
exit 1
fi
# sanity check that pid is sshd
if [ `readlink "/proc/$pid/exe"` != "$sshd" ]
then
echo "$0: error: attempt to kill non-sshd process" 1>&2
exit 1
fi
kill -HUP "$pid"](https://image.slidesharecdn.com/linuxsecuritycookbook-120930200536-phpapp01/85/Linux-security-cookbook-177-320.jpg)
![Call the script /usr/local/bin/sshd-restart and let users invoke it via sudo:
# /etc/sudoers:
smith ALL = /usr/local/bin/sshd-restart ""
The empty double-quotes prevent arguments from being passed to the script. [Recipe 5.9]
Our script carefully signals only the parent sshd process, not its child processes for SSH sessions already
in progress. If you prefer to kill all processes with a given name, use the pidof command:
# kill -USR1 `pidof mycommand`
or the skill command:
# skill -USR1 mycommand
5.15.4 See Also
kill(1), proc(5), pidof(8), skill(1), readlink(1).
[ Team LiB ]](https://image.slidesharecdn.com/linuxsecuritycookbook-120930200536-phpapp01/85/Linux-security-cookbook-178-320.jpg)
![[ Team LiB ]
Recipe 5.16 Listing sudo Invocations
5.16.1 Problem
See a report of all unauthorized sudo attempts.
5.16.2 Solution
Use logwatch: [Recipe 9.36]
# logwatch --print --service sudo --range all
smith => root
-------------
/usr/bin/passwd root
/bin/rm -f /etc/group
/bin/chmod 4755 /bin/sh
5.16.3 Discussion
If logwatch complains that the script /etc/log.d/scripts/services/sudo cannot be found, upgrade logwatch to the
latest version.
You could also view the log entries directly without logwatch, extracting the relevant information from
/var/log/secure:
#!/bin/sh
LOGFILE=/var/log/secure
echo 'Unauthorized sudo attempts:'
egrep 'sudo: .* : command not allowed' $LOGFILE
| sed 's/^.* sudo: ([^ ][^ ]*) .* ; USER=([^ ][^ ]*) ; COMMAND=(.*)$/1 (2): 3/'
Output:
Unauthorized sudo attempts:
smith (root): /usr/bin/passwd root
smith (root): /bin/rm -f /etc/group
smith (root): /bin/chmod 4755 /bin/sh
5.16.4 See Also
logwatch(8). The logwatch home page is http://www.logwatch.org.
[ Team LiB ]](https://image.slidesharecdn.com/linuxsecuritycookbook-120930200536-phpapp01/85/Linux-security-cookbook-179-320.jpg)
![[ Team LiB ]
Recipe 5.17 Logging sudo Remotely
5.17.1 Problem
You want your sudo logs kept off-host to prevent tampering or interference.
5.17.2 Solution
Use syslog 's @otherhost syntax: [Recipe 9.29]
/etc/syslog.conf:
authpriv.* @securehost
5.17.3 Discussion
Remember that the remote host's syslogd needs must be invoked with the -r flag to receive remote
messages. Make sure your remote host doesn't share root privileges with the sudo host, or else this
offhost logging is pointless.
5.17.4 See Also
syslog.conf(5), syslogd(8).
[ Team LiB ]](https://image.slidesharecdn.com/linuxsecuritycookbook-120930200536-phpapp01/85/Linux-security-cookbook-180-320.jpg)
![[ Team LiB ]
Recipe 5.18 Sharing root Privileges via SSH
5.18.1 Problem
You want to share superuser privileges with other users but not reveal the root password.
5.18.2 Solution
Append users' public keys to ~root/.ssh/authorized_keys.[1] [Recipe 6.4] Users may then run a root
shell:
[1] In older versions of OpenSSH, the file for SSH-2 protocol keys is authorized_keys2.
$ ssh -l root localhost
or execute commands as root:
$ ssh -l root localhost ...command...
5.18.3 Discussion
As an alternative to su, you can use ssh to assign superuser privileges without giving out the root
password. Users connect to localhost and authenticate by public key. (There's no sense using password
authentication here: you'd have to give out the root password, which is exactly what we're trying to
avoid.)
This method is more flexible than using su, since you can easily instate and revoke root privileges: simply
add and remove users' keys from ~root/.ssh/authorized_keys. However, it provides less logging than
sudo: you can learn who became root (by log messages) but not what commands were run during the
SSH session.
Some discussion points:
Make sure /etc/ssh/sshd_config has PermitRootLogin yes specified.
ssh is built for networking, so of course you can extend the scope of these root privileges to remote
machines the same way. Instead of connecting to localhost, users connect to the remote machine as
root:
$ ssh -l root remote_host
Users can avoid passphrase prompts by running ssh-agent. [Recipe 6.9] This feature must be
balanced against your security policy, however. If no passphrase is required for root privileges, then
the user's terminal becomes a target for attack.
For more security on a single machine, consider extending the method in this way:
1. Run a second sshd on an arbitrary port (say 22222) with an alternative configuration file (sshd
2.](https://image.slidesharecdn.com/linuxsecuritycookbook-120930200536-phpapp01/85/Linux-security-cookbook-181-320.jpg)
![1.
-f).
2. In the alternative configuration file, set PermitRootLogin yes, and let the only method of
authentication be PubkeyAuthentication.
3. Disable all unneeded options in authorized_keys; in particular, use from="127.0.0.1" or
from="your actual IP address" to prevent connections from other hosts to your local root
account.
4. In your firewall, block port 22222 to prevent unwanted incoming network connections.
5. For convenience and abstraction, create a script that runs the command:
ssh -p 22222 -l root localhost $@
5.18.4 See Also
ssh(1), sshd(8), sshd_config(5).
[ Team LiB ]](https://image.slidesharecdn.com/linuxsecuritycookbook-120930200536-phpapp01/85/Linux-security-cookbook-182-320.jpg)
![[ Team LiB ]
Recipe 5.19 Running root Commands via SSH
5.19.1 Problem
You want to grant root privileges to another user, but permit only certain commands to be run.
5.19.2 Solution
Share your root privileges via SSH [Recipe 5.18] and add forced commands to
~root/.ssh/authorized_keys.
5.19.3 Discussion
Using SSH forced commands, you can limit which programs a user may run as root. For example, this key
entry:
~root/.ssh/authorized_keys:
command="/sbin/dump -0 /local/data" ssh-dss key...
permits only the command /sbin/dump -0 /local/data to be run, on successful authentication.
Each key is limited to one forced command, but if you make the command a shell script, you can restrict
users to a specific set of programs after authentication. Suppose you write a script /usr/local/bin/ssh-
switch:
#!/bin/sh
case "$1" in
backups)
# Perform level zero backups
/sbin/dump -0 /local/data
;;
messages)
# View log messages
/bin/cat /var/log/messages
;;
settime)
# Set the system time via ntp
/usr/sbin/ntpdate timeserver.example.com
;;
*)
# Refuse anything else
echo 'Permission denied' 1>&2
exit 1
;;
esac](https://image.slidesharecdn.com/linuxsecuritycookbook-120930200536-phpapp01/85/Linux-security-cookbook-183-320.jpg)
![and make it a forced command:
~root/.ssh/authorized_keys:
command="/usr/local/bin/ssh-switch $SSH_ORIGINAL_COMMAND" ssh-dss key...
Then users can run selected commands as:
$ ssh -l root localhost backups Runs dump
$ ssh -l root localhost settime Runs ntpdate
$ ssh -l root localhost cat /etc/passwd Not authorized: Permission denied
Take care that your forced commands use full paths and have no shell escapes, and do not let the user
modify authorized_keys. Here's a bad idea:
~root/.ssh/authorized_keys: DON'T DO THIS!!!!
command="/usr/bin/less some_file" ssh-dss key...
since less has a shell escape.
5.19.4 See Also
ssh(1), sshd(8), sshd_config(5).
[ Team LiB ]](https://image.slidesharecdn.com/linuxsecuritycookbook-120930200536-phpapp01/85/Linux-security-cookbook-184-320.jpg)
![[ Team LiB ]
Recipe 5.20 Sharing root Privileges via Kerberos su
5.20.1 Problem
You want to obtain root privileges in a Kerberos environment.
5.20.2 Solution
Use ksu .
To obtain a root shell:
$ ksu
To obtain a shell as user barney:
$ ksu barney
To use another Kerberos principal besides your default for authentication:
$ ksu [user] -n principal ...
To execute a specific command under the target uid, rather than get a login shell:
$ ksu [user] -e command
5.20.3 Discussion
Like the usual Unix su program, ksu allows one account to access another, if the first account is
authorized to do so. Unlike su, ksu does authentication using Kerberos rather than plain passwords, and
has many more options for authorization.
With su, one simply types su <target>. su prompts for the target account's password; if the user supplies
the correct password, su starts a shell under the target account's uid (or executes another program
supplied on the su command line). With ksu, both authentication and authorization are done differently.
5.20.3.1 Authentication
ksu performs authentication via Kerberos, so you must select a Kerberos principal to use. First, ksu tries
the default principal indicated in your current Kerberos credentials cache (klist command). If you have no
credentials, then it will be the default principal indicated by your Unix account name and the local
Kerberos configuration. For example, if your Unix username is fred and the Kerberos realm of your host is
FOO.ORG, then your default principal would normally be fred@FOO.ORG (note that Kerberos realm names
are case-sensitive and by convention are in uppercase). If this principal is authorized to access the target
account (explained later), then ksu proceeds with it. If not, then it proceeds with the default principal
corresponding to the target account. The usual effect of this arrangement is that either your usual](https://image.slidesharecdn.com/linuxsecuritycookbook-120930200536-phpapp01/85/Linux-security-cookbook-185-320.jpg)

![By default, the Kerberos credentials cache for the created process, under the target uid, will contain
not only the ticket(s) authorizing the session, but also valid tickets from the original user as well. If
you want to avoid this, use the -z or -Z options.
5.20.4 See Also
ksu(1), and our Kerberos coverage in Chapter 4.
[ Team LiB ]](https://image.slidesharecdn.com/linuxsecuritycookbook-120930200536-phpapp01/85/Linux-security-cookbook-187-320.jpg)
![[ Team LiB ]
Chapter 6. Protecting Outgoing Network
Connections
In Chapter 3, we discussed how to protect your computer from unwanted incoming network connections.
Now we'll turn our attention to outgoing connections: how to contact remote machines securely on a
network. If you naively telnet, ftp, rlogin, rsh, rcp, or cvs to another machine, your password gets
transmitted over the network, available to any snooper passing by. [Recipe 9.19] Clearly a better
alternative is needed.
Our recipes will primarily use SSH, the Secure Shell, a protocol for secure authentication and encryption
of network connections. It's an appropriate technology for many secure networking tasks. OpenSSH, a
free implementation of the SSH protocol, is included in most Linux distributions, so our recipes are
tailored to work with it. Its important programs and files are listed in Table 6-1.
Table 6-1. Important OpenSSH programs and files for this chapter
Client programs
ssh Performs remote logins and remote command execution
scp Copies files between computers
sftp Copies files between computers with an interactive, FTP-like user interface
Server programs
sshd Server daemon
Programs for creating and using cryptographic keys
ssh-keygen Creates and modifies public and private keys
ssh-agent Caches SSH private keys to avoid typing passphrases
ssh-add Manipulates the key cache of ssh-agent
Important files and directories
~/.ssh Directory (per user) for keys and configuration files
/etc/ssh Directory (systemwide) for keys and configuration files
~/.ssh/config Client configuration file (per user)
/etc/ssh/ssh_config Client configuration file (systemwide)
For outgoing connections, the client program ssh initiates remote logins and invokes remote commands:
Do a remote login:
$ ssh -l remoteuser remotehost
Invoke a remote command:](https://image.slidesharecdn.com/linuxsecuritycookbook-120930200536-phpapp01/85/Linux-security-cookbook-188-320.jpg)
![$ ssh -l remoteuser remotehost uptime
and the client scp securely copies files between computers:
Copy local file to remote machine:
$ scp myfile remotehost:remotefile
Copy remote file to local machine:
$ scp remotehost:remotefile myfile
Some of our recipes might work for other implementations of SSH, such as the original SSH Secure Shell
from SSH Communication Security (http://www.ssh.com). For a broader discussion see the book SSH,
The Secure Shell: The Definitive Guide (O'Reilly).
[ Team LiB ]](https://image.slidesharecdn.com/linuxsecuritycookbook-120930200536-phpapp01/85/Linux-security-cookbook-189-320.jpg)
![[ Team LiB ]
Recipe 6.1 Logging into a Remote Host
6.1.1 Problem
You want to log into a remote host securely.
6.1.2 Solution
$ ssh -l remoteuser remotehost
For example:
$ ssh -l smith server.example.com
If your local and remote usernames are the same, omit the -l option:
$ ssh server.example.com
6.1.3 Discussion
The client program ssh establishes a secure network connection to a remote machine that's running an
SSH server. It authenticates you to the remote machine without transmitting a plaintext password over
the network. Data that flows across the connection is encrypted and decrypted transparently.
By default, your login password serves as proof of your identity to the remote machine. SSH supports
other authentication methods as we'll see in other recipes. [Recipe 6.4][Recipe 6.8]
Avoid the insecure programs rsh, rlogin, and telnet when communicating with remote hosts.[1] They do
not encrypt your connection, and they transmit your login password across the network in the clear. Even
if the local and remote hosts are together behind a firewall, don't trust these programs for
communication: do you really want your passwords flying around unencrypted even on your intranet?
What if the firewall gets hacked? What if a disgruntled coworker behind the firewall installs a packet
sniffer? [Recipe 9.19] Stick with SSH.
[1] And avoid ftp in favor of scp or sftp for the same reasons. [Recipe 6.3]
6.1.4 See Also
ssh(1). We keep lots of SSH tips at http://www.snailbook.com. The official OpenSSH site is
http://www.openssh.com.
[ Team LiB ]](https://image.slidesharecdn.com/linuxsecuritycookbook-120930200536-phpapp01/85/Linux-security-cookbook-190-320.jpg)
![[ Team LiB ]
Recipe 6.2 Invoking Remote Programs
6.2.1 Problem
You want to invoke a program on a remote machine over a secure network connection.
6.2.2 Solution
For noninteractive commands:
$ ssh -l remoteuser remotehost uptime
For interactive programs, add the -t option:
$ ssh -t -l remoteuser remotehost vi
For X Window applications, add the -X option to enable X forwarding. Also add the -f option to background
the program after authentication, and to redirect standard input from /dev/null to avoid dangling
connections.
$ ssh -X -f -l remoteuser remotehost xterm
6.2.3 Discussion
For noninteractive commands, simply append the remote program invocation to the end of the ssh
command line. After authentication, ssh will run the program remotely and exit. It will not establish a
login session.
For interactive commands that run in your existing terminal window, such as a terminal-based text editor
or game, supply the -t option to force ssh to allocate a pseudo-tty. Otherwise the remote program can get
confused or refuse to run:
$ ssh server.example.com emacs -nw
emacs: standard input is not a tty
$ ssh server.example.com /usr/games/nethack
NetHack (gettty): Invalid argument
NetHack (settty): Invalid argument Terminal must backspace.
If your program is an X application, use the -X option to enable X forwarding. This forces the connection
between the X client and X server—normally insecure—to pass through the SSH connection, protecting
the data.
$ ssh -X -f server.example.com xterm
If X forwarding fails, make sure that your remote session is not manually setting the value of the DISPLAY
environment variable. ssh sets it automatically to the correct value. Check your shell startup files (e.g.,
.bash_profile or .bashrc) and their systemwide equivalents (such as /etc/profile) to ensure they are not
setting DISPLAY. Alternatively, X forwarding might be disabled in the SSH server: check the remote](https://image.slidesharecdn.com/linuxsecuritycookbook-120930200536-phpapp01/85/Linux-security-cookbook-191-320.jpg)
![/etc/ssh/sshd_config for the setting X11Forwarding no.
6.2.4 See Also
ssh(1). We keep lots of SSH tips at http://www.snailbook.com. The official OpenSSH site is
http://www.openssh.com.
[ Team LiB ]](https://image.slidesharecdn.com/linuxsecuritycookbook-120930200536-phpapp01/85/Linux-security-cookbook-192-320.jpg)
![[ Team LiB ]
Recipe 6.3 Copying Files Remotely
6.3.1 Problem
You want to copy files securely from one computer to another.
6.3.2 Solution
For one file:
$ scp myfile remotehost:
$ scp remotehost:myfile .
For one file, renamed:
$ scp myfile remotehost:myfilecopy
$ scp remotehost:myfile myfilecopy
For multiple files:
$ scp myfile* remotehost:
$ scp remotehost:myfile* .
To specify another directory:
$ scp myfile* remotehost:/name/of/directory
$ scp remotehost:/name/of/directory/myfile* .
To specify an alternate username for authentication:
$ scp myfile smith@remotehost:
$ scp smith@remotehost:myfile .
To copy a directory recursively (-r):
$ scp -r mydir remotehost:
$ scp -r remotehost:mydir .
To preserve file attributes (-p):
$ scp -p myfile* remotehost:
$ scp -p remotehost:myfile .
6.3.3 Discussion
The scp command has syntax very similar to that of rcp or even cp:
scp name-of-source name-of-destination](https://image.slidesharecdn.com/linuxsecuritycookbook-120930200536-phpapp01/85/Linux-security-cookbook-193-320.jpg)
![A single file may be copied to a remote file or directory. In other words, if name-of-source is a file, name-
of-destination may be a file (existing or not) or a directory (which must exist).
Multiple files and directories, however, may be copied only into a directory. So, if name-of-source is two
or more files, one or more directories, or a combination, then specify name-of-destination as an
existing directory into which the copy will take place.
Both name-of-source and name-of-destination may have the following form, in order:
1. The username of the account containing the file or directory, followed by "@". (Optional; permitted
only if a hostname is specified.) If omitted, the value is the username of the user invoking scp.
2. The hostname of the host containing the file or directory, followed by a colon. (Optional if the path is
present.) If omitted, the local host is assumed.
3. The path to the file or directory. Relative pathnames are assumed relative to the default directory,
which is the current directory (for local paths) or the remote user's home directory (for remote
paths). If omitted entirely, the path is assumed to be the default directory.
Although each of the fields is optional, you cannot omit them all at the same time, yielding the empty
string. Either the hostname (item 2) or the directory path (item 3) must be present.
Whew! Once you get the hang of it, scp is pretty easy to use, and most scp commands you invoke will
probably be pretty basic. If you prefer a more interactive interface, try sftp , which resembles ftp.
If you want to "mirror" a set of files securely between machines, you could use scp -pr, but it has
disadvantages:
scp follows symbolic links automatically, which you might not want.
scp copies every file in its entirety, even if they already exist on the mirror machine, which is
inefficient.
A better alternative is rsync with ssh, which optimizes the transfer in various ways and needn't follow
symbolic links:
$ rsync -a -e ssh mydir remotehost:otherdir
Add -v and —progress for more verbose output:
$ rsync -a -e ssh -v --progress mydir remotehost:otherdir
6.3.4 See Also
scp(1), sftp(1), rcp(1), rsync(1).
[ Team LiB ]](https://image.slidesharecdn.com/linuxsecuritycookbook-120930200536-phpapp01/85/Linux-security-cookbook-194-320.jpg)
![[ Team LiB ]
Recipe 6.4 Authenticating by Public Key (OpenSSH)
6.4.1 Problem
You want to set up public-key authentication between an OpenSSH client and an OpenSSH server.
6.4.2 Solution
1. Generate a key if necessary:
$ mkdir -p ~/.ssh If it doesn't already exist
$ chmod 700 ~/.ssh
$ cd ~/.ssh
$ ssh-keygen -t dsa
2. Copy the public key to the remote host:
$ scp -p id_dsa.pub remoteuser@remotehost:
Password: ********
3. Log into the remote host and install the public key:
$ ssh -l remoteuser remotehost
Password: ********
remotehost$ mkdir -p ~/.ssh If it doesn't already exist
remotehost$ chmod 700 ~/.ssh
remotehost$ cat id_dsa.pub >> ~/.ssh/authorized_keys (Appending)
remotehost$ chmod 600 ~/.ssh/authorized_keys
remotehost$ mv id_dsa.pub ~/.ssh Optional, just to be organized
remotehost$ logout
4. Log back in via public-key authentication:
$ ssh -l remoteuser remotehost
Enter passphrase for key '/home/smith/.ssh/id_dsa': ********
OpenSSH public keys go into the file ~/.ssh/authorized_keys. Older versions of
OpenSSH, however, require SSH-2 protocol keys to be in ~/.ssh/authorized_keys2.
6.4.3 Discussion](https://image.slidesharecdn.com/linuxsecuritycookbook-120930200536-phpapp01/85/Linux-security-cookbook-195-320.jpg)

![/etc/ssh/sshd_config:
PubkeyAuthentication yes If no, change it and restart sshd
For more convenience, you can eliminate the passphrase prompt using ssh-agent [Recipe 6.9] and create
host aliases in ~/.ssh/config. [Recipe 6.12]
6.4.4 See Also
ssh(1), scp(1), ssh-keygen(1).
SSH-2 Key File Formats
The two major implementations of SSH—OpenSSH and SSH Secure Shell ("SSH2")—use different
file formats for SSH-2 protocol keys. (Their SSH-1 protocol keys are compatible.) OpenSSH public
keys for the SSH-2 protocol begin like this:
ssh-dss A9AAB3NzaC1iGMqHpSCEliaouBun8FF9t8p...
or:
ssh-rsa AAAAB3NzaC1yc2EAAAABIwAAAIEA3DIqRox...
SSH Secure Shell public keys for the SSH-2 protocol look like this:
---- BEGIN SSH2 PUBLIC KEY ----
AAAAB3NzaC1kc3MAAACBAM4a2KKBE6zhPBgRx4q6Dbjxo5hXNKNWYIGkX/W/k5PqcCH0J6 ...
---- END SSH2 PUBLIC KEY ----
These keys are installed differently too. For OpenSSH, you insert your public keys into the file
~/.ssh/authorized_keys. For SSH Secure Shell, you copy your public key files into the directory
~/.ssh2 and reference them in the file ~/.ssh2/authorization by name:
Key public_key_filename
As for private keys, OpenSSH has no special requirements for installation, but SSH Secure Shell
does. You must reference them in the file ~/.ssh2/identification by name:
IdKey private_key_filename
[ Team LiB ]](https://image.slidesharecdn.com/linuxsecuritycookbook-120930200536-phpapp01/85/Linux-security-cookbook-197-320.jpg)
![[ Team LiB ]
Recipe 6.5 Authenticating by Public Key (OpenSSH Client, SSH2
Server, OpenSSH Key)
6.5.1 Problem
You want to authenticate between an OpenSSH client and an SSH2 server (i.e., SSH Secure Shell from SSH Commun
Security) using an existing OpenSSH-format key.
6.5.2 Solution
1. Export your OpenSSH key to create an SSH2-format public key. If your OpenSSH private key is ~/.ssh/id_dsa:
$ cd ~/.ssh
$ ssh-keygen -e -f id_dsa > mykey-ssh2.pub
2. Copy the public key to the SSH2 server:
$ scp mykey-ssh2.pub remoteuser@remotehost:
3. Log into the SSH2 server and install the public key, then log out:
$ ssh -l remoteuser remotehost
Password: ********
remotehost$ mkdir -p ~/.ssh2 If it doesn't already
remotehost$ chmod 700 ~/.ssh2
remotehost$ mv mykey-ssh2.pub ~/.ssh2/
remotehost$ cd ~/.ssh2
remotehost$ echo "Key mykey-ssh2.pub" >> authorization (Appending)
remotehost$ chmod 600 mykey-ssh2.pub authorization
remotehost$ logout
4. Now log in via public-key authentication:
$ ssh -l remoteuser remotehost
Enter passphrase for key '/home/smith/.ssh/id_dsa': *******
6.5.3 Discussion
OpenSSH's ssh-keygen converts OpenSSH-style keys into SSH2-style using the -e (export) option. Recall that SSH2
the authorization file, as explained in the sidebar, SSH-2 Key File Formats.](https://image.slidesharecdn.com/linuxsecuritycookbook-120930200536-phpapp01/85/Linux-security-cookbook-198-320.jpg)
![6.5.4 See Also
ssh-keygen(1).
[ Team LiB ]](https://image.slidesharecdn.com/linuxsecuritycookbook-120930200536-phpapp01/85/Linux-security-cookbook-199-320.jpg)
![[ Team LiB ]
Recipe 6.6 Authenticating by Public Key (OpenSSH Client,
SSH2 Server, SSH2 Key)
6.6.1 Problem
You want to authenticate between an OpenSSH client and an SSH2 server (i.e., SSH Secure Shell from
SSH Communication Security) using an existing SSH2-format key.
6.6.2 Solution
Suppose your SSH2 private key is id_dsa_1024_a.
1. Make a copy of the SSH2 private key:
$ cd ~/.ssh2
$ cp -p id_dsa_1024_a newkey
2. Set its passphrase to the empty string, creating an unencrypted key:
$ ssh-keygen2 -e newkey
...
Do you want to edit passphrase (yes or no)? yes
New passphrase :
Again :
3. Import the SSH2 private key to convert it into an OpenSSH private key, imported-ssh2-key:
$ mkdir -p ~/.ssh If it doesn't already exist
$ chmod 700 ~/.ssh
$ cd ~/.ssh
$ mv ~/.ssh2/newkey .
$ ssh-keygen -i -f newkey > imported-ssh2-key
$ rm newkey
$ chmod 600 imported-ssh2-key
4. Change the passphrase of the imported key:
$ ssh-keygen -p imported-ssh2-key
5. Use your new key:
$ ssh -l remoteuser -i ~/.ssh/imported-ssh2-key remotehost
To generate the OpenSSH public key from the OpenSSH private key imported-ssh2-key, run:](https://image.slidesharecdn.com/linuxsecuritycookbook-120930200536-phpapp01/85/Linux-security-cookbook-200-320.jpg)
![$ ssh-keygen -y -f imported-ssh2-key > imported-ssh2-key.pub
Enter passphrase: ********
6.6.3 Discussion
OpenSSH's ssh-keygen can convert an SSH2-style private key into an OpenSSH-style private key, using
the -i (import) option; however, it works only for unencrypted SSH2 keys. So we decrypt the key
(changing its passphrase to null), import it, and re-encrypt it.
This technique involves some risk, since your SSH2 private key will be unencrypted on disk for a few
moments. If this concerns you, perform steps 2-3 on a secure machine with no network connection (say,
a laptop). Then burn the laptop.
To make the newly imported key your default OpenSSH key, name it ~/.ssh/id_dsa instead of imported-
ssh2-key.
As an alternative solution, you could ignore your existing SSH2 private key, generate a brand new
OpenSSH key pair, and convert its public key for SSH2 use. [Recipe 6.5] But if your SSH2 public key is
already installed on many remote sites, it might make sense to import and reuse the SSH2 private key.
6.6.4 See Also
ssh-keygen(1), ssh-keygen2(1).
[ Team LiB ]](https://image.slidesharecdn.com/linuxsecuritycookbook-120930200536-phpapp01/85/Linux-security-cookbook-201-320.jpg)
![[ Team LiB ]
Recipe 6.7 Authenticating by Public Key (SSH2 Client, OpenSSH
Server)
6.7.1 Problem
You want to authenticate between an SSH2 client (SSH Secure Shell from SSH Communication Security) and an
OpenSSH server by public key.
6.7.2 Solution
1. Create an SSH2 private key on the client machine, if one doesn't already exist, and install it by appending a
line to ~/.ssh2/identification:
$ mkdir -p ~/.ssh2 If it doesn't already exist
$ chmod 700 ~/.ssh2
$ cd ~/.ssh2
$ ssh-keygen2 Creates id_dsa_1024_a
$ echo "IdKey id_dsa_1024_a" >> identification (Appending)
2. Copy its public key to the OpenSSH server machine:
$ scp2 id_dsa_1024_a.pub remoteuser@remotehost:.ssh/
3. Log into the OpenSSH server host and use OpenSSH's ssh-keygen to import the public key, creating an
OpenSSH format key: [Recipe 6.6]
$ ssh2 -l remoteuser remotehost
Password: ********
remotehost$ cd ~/.ssh
remotehost$ ssh-keygen -i > imported-ssh2-key.pub
Enter file in which the key is (/home/smith/.ssh/id_rsa): id_dsa_1024_a.pub
4. Install the new public key by appending a line to ~/.ssh/authorized_keys:
remotehost$ cat imported-ssh2-key.pub >> authorized_keys (Appending)
5. Log out and log back in using the new key:
remotehost$ exit
$ ssh2 -l remoteuser remotehost](https://image.slidesharecdn.com/linuxsecuritycookbook-120930200536-phpapp01/85/Linux-security-cookbook-202-320.jpg)
![6.7.3 Description
Recall that SSH2 uses the identification file as explained in the sidebar, SSH-2 Key File Formats.
6.7.4 See Also
ssh-keygen(1), ssh-keygen2(1).
[ Team LiB ]](https://image.slidesharecdn.com/linuxsecuritycookbook-120930200536-phpapp01/85/Linux-security-cookbook-203-320.jpg)
![[ Team LiB ]
Recipe 6.8 Authenticating by Trusted Host
6.8.1 Problem
You want to authenticate between an OpenSSH client and server using hostbased or "trusted host"
authentication.
6.8.2 Solution
Suppose you want to allow the account nocnoc@supplicant.foo.net access to whosthere@server.foo.net.
Then:
1. Make sure hostbased authentication enabled in on server.foo.net:
/etc/ssh/sshd_config:
HostbasedAuthentication yes
IgnoreRhosts no
and optionally (see "Discussion"):
HostbasedUsesNameFromPacketOnly yes
and restart sshd.
2. Ensure that the ssh-keysign program is setuid root on the client machine. The file is usually located
in /usr/libexec or /usr/libexec/openssh:
$ ls -lo /usr/libexec/openssh/ssh-keysign
-rwsr-xr-x 1 root 222936 Mar 7 16:09 /usr/libexec/openssh/ssh-keysign
3. Enable trusted host authentication in your system's client configuration file: [Recipe 6.12]
/etc/ssh/ssh_config:
Host remotehost
HostName remotehost
HostbasedAuthentication yes
4. Insert the client machine's host keys, /etc/ssh/ssh_host_dsa_key.pub and
/etc/ssh/ssh_host_rsa_key.pub, into the server's known hosts database, /etc/ssh/ssh_known_hosts
, using the client host's canonical name (supplicant.foo.net here; see "Discussion"):
/etc/ssh/ssh_known_hosts on server.foo.net:
supplicant.foo.net ssh-dss ...key...
5.](https://image.slidesharecdn.com/linuxsecuritycookbook-120930200536-phpapp01/85/Linux-security-cookbook-204-320.jpg)
![5. Authorize the client account to log into the server, by creating the file ~/.shosts:
~whosthere/.shosts on server.foo.net:
supplicant.foo.net nocnoc
If the account names on the client and server hosts happen to be the same, you can omit the
username. (But in this case the usernames are different, nocnoc and whosthere.)
6. Make sure your home directory and .shosts files have acceptable permissions:
$ chmod go-w ~
$ chmod go-w ~/.shosts
7. Log in from supplicant.foo.net:
$ ssh -l whosthere server.foo.net
6.8.3 Discussion
This recipe applies only to SSH-2 protocol connections. OpenSSH does support an SSH-1 type of trusted-
host authentication (keyword RhostsRSAAuthentication) but as we've said before, we strongly recommend
the more secure SSH-2.
Before using hostbased authentication at all, decide if you truly need it. This technique has assumptions
and implications unlike other SSH user-authentication mechanisms:
Strong trust of the client host
The server must trust the client host to have effectively authenticated the user. In hostbased
authentication, the server does not authenticate the user, but instead authenticates the client host,
then simply trusts whatever the client says about the user. If the client host is compromised, all
accounts on the server accessible via hostbased authentication are also immediately vulnerable.
Weak authorization controls
Individual users on the server can override hostbased restrictions placed by the sysadmin. This is
why the server's IgnoreRhosts option exists.
If all you want is automatic authentication (without a password), there are other ways to do it, such as
public-key authentication with ssh-agent [Recipe 6.9] or Kerberos. [Recipe 4.14]
If you decide to use hostbased authentication for an entire user population, read the relevant sections of
SSH, The Secure Shell: The Definitive Guide (O'Reilly), which detail various subtleties and unexpected
consequences of this mechanism.
Speaking of subtleties, the issue of the client's canonical hostname can be tricky. The SSH server will look
up the client's host key by this name, which it gets from the client's IP address via the gethostbyname
library function. This in turn depends on the naming service setup on the server side, which might consult
any (or none) of /etc/hosts, NIS, DNS, LDAP, and so on, as specified in /etc/nsswitch.conf. In short, the
client's idea of its hostname might not agree with the server's view.
To learn the client's canonical hostname as sshd will determine it, run this quick Perl script on the server:
#!/usr/bin/perl
use Socket;](https://image.slidesharecdn.com/linuxsecuritycookbook-120930200536-phpapp01/85/Linux-security-cookbook-205-320.jpg)

![sshd(8), sshd_config(5), gethostbyname(3).
[ Team LiB ]](https://image.slidesharecdn.com/linuxsecuritycookbook-120930200536-phpapp01/85/Linux-security-cookbook-207-320.jpg)
![[ Team LiB ]
Recipe 6.9 Authenticating Without a Password (Interactively)
6.9.1 Problem
You want to authenticate without typing a password or passphrase.
6.9.2 Solution
Use ssh-agent, invoking it within backticks as shown:
$ eval `ssh-agent`
Add your keys to the agent using ssh-add:
$ ssh-add
Enter passphrase for /home/smith/.ssh/id_dsa: ********
Then log in using public-key authentication and you won't be prompted for a passphrase: [Recipe 6.4]
$ ssh -l remoteuser remotehost
Some Linux distributions automatically run ssh-agent when you log in under an X session manager. In this
case just skip the ssh-agent invocation.
6.9.3 Discussion
The SSH agent, controlled by the programs ssh-agent and ssh-add, maintains a cache of private keys on
your local (client) machine. You load keys into the agent, typing their passphrases to decrypt them. SSH
clients (ssh, scp, sftp) then query the agent transparently about keys, rather than prompting you for a
passphrase.
The invocation of ssh-agent might look a little odd with the eval and backticks:
$ eval `ssh-agent`
but it is necessary because ssh-agent prints several commands on the standard output that set
environment variables when run. To view these commands for testing, run ssh-agent alone:
$ ssh-agent
SSH_AUTH_SOCK=/tmp/ssh-XXNe6NhE/agent.13583; export SSH_AUTH_SOCK;
SSH_AGENT_PID=13584; export SSH_AGENT_PID;
echo Agent pid 13584;
and then kill it manually (kill 13584).[2]
[2] In this case, you cannot kill the agent with ssh-agent -k because the environment variables aren't set.
ssh-add, invoked with no command-line arguments, adds your default keys to the cache. To add a](https://image.slidesharecdn.com/linuxsecuritycookbook-120930200536-phpapp01/85/Linux-security-cookbook-208-320.jpg)
![selected key, simply list it:
$ ssh-add ~/.ssh/other_key
Removing keys is done like this:
Remove one key:
$ ssh-add -d ~/.ssh/other_key
Remove all keys:
$ ssh-add -D
A tempting but naive alternative to ssh-agent is a key with an empty passphrase, called a plaintext key. If
you authenticate with this key, indeed, no passphrase is needed . . . but this is risky! If a cracker steals
your plaintext key, he can immediately impersonate you on every machine that contains the
corresponding public key.
For interactive use, there is no reason to use a plaintext key. It's like putting your login password into a
file named password.here.please.steal.me. Don't do it. Use ssh-agent instead.
Another way to avoid passphrases is to use hostbased (trusted host) authentication [Recipe 6.8], but for
interactive use we recommend public-key authentication with ssh-agent as inherently more secure.
6.9.4 See Also
ssh-agent(1), ssh-add(1).
[ Team LiB ]](https://image.slidesharecdn.com/linuxsecuritycookbook-120930200536-phpapp01/85/Linux-security-cookbook-209-320.jpg)
![[ Team LiB ]
Recipe 6.10 Authenticating in cron Jobs
6.10.1 Problem
You want to invoke unattended remote commands, i.e., as cron or batch jobs, and do it securely without
any prompting for passwords.
6.10.2 Solution
Use a plaintext key and a forced command.
1. Create a plaintext key:
$ cd ~/.ssh
$ ssh-keygen -t dsa -f batchkey -N ""
2. Install the public key (batchkey.pub) on the server machine. [Recipe 6.4]
3. Associate a forced command with the public key on the server machine, to limit its capabilities:
~/.ssh/authorized_keys:
command="/usr/local/bin/my_restricted_command" ssh-dss AAAAB3NzaC1kc3MAA ...
Disable other capabilities for this key as well, such as forwarding and pseudo-ttys, and if feasible,
restrict use of the key to a particular source address or set of addresses. (This is a single line in
authorized_keys, though it's split on our page.)
~/.ssh/authorized_keys:
no-port-forwarding,no-X11-forwarding,no-agent-forwarding,no-pty, from="myclient.
example.com", command="/usr/local/bin/my_restricted_command" ssh-dss
AAAAB3NzaC1kc3MAA ...
4. Use the plaintext key in batch scripts on the client machine:
$ ssh -i ~/.ssh/batchkey remotehost ...
Alternatively, use hostbased authentication [Recipe 6.8] instead of public-key authentication.
6.10.3 Discussion
A plaintext key is a cryptographic key with no passphrase. Usually it's not appropriate to omit the
passphrase, since a thief who steals the key could immediately use it to impersonate you. But for batch
jobs, plaintext keys are a reasonable approach, especially if the key's scope can be restricted to specific
remote commands. You create a plaintext key by supplying an empty password to the -N option:](https://image.slidesharecdn.com/linuxsecuritycookbook-120930200536-phpapp01/85/Linux-security-cookbook-210-320.jpg)
![$ ssh-keygen -t dsa -f batchkey -N ""
A forced command is a server-side restriction on a given public key listed in ~/.ssh/authorized_keys. When
someone authenticates by that key, the forced command is automatically invoked in place of any command
supplied by the client. So, if you associate a forced command with a key (say, batchkey) with the following
public component:
~/.ssh/authorized_keys:
command="/bin/who" ssh-dss key...
and a client tries to invoke (say) /bin/ls via this key:
$ ssh -i batchkey remotehost /bin/ls
the forced command /bin/who is invoked instead. Therefore, you prevent the key from being used for
unplanned purposes. You can further restrict use of this key by source address using the from keyword:
~/.ssh/authorized_keys:
command="/bin/who",from="client.example.com" ssh-dss key...
Additionally, disable any unneeded capabilities for this key, such as port forwarding, X forwarding, agent
forwarding, and the allocation of pseudo-ttys for interactive sessions. The key options no-port-forwarding,
no-X11-forwarding, no-agent-forwarding, and no-pty, respectively, perform these jobs.
Make sure you edit authorized_keys with an appropriate text editor that does not blindly insert newlines.
Your key and all its options must remain on a single line of text, with no whitespace around the commas.
Carefully consider whether to include plaintext keys in your regular system backups. If you do include them,
a thief need only steal a backup tape to obtain them. If you don't, then you risk losing them, but if new
keys can easily be generated and installed, perhaps this is an acceptable tradeoff.
Finally, store plaintext keys only on local disks, not insecurely shared volumes such as NFS partitions.
Otherwise their unencrypted contents will travel over the network and risk interception. [Recipe 9.19]
6.10.4 See Also
ssh-keygen(1), sshd(1).
[ Team LiB ]](https://image.slidesharecdn.com/linuxsecuritycookbook-120930200536-phpapp01/85/Linux-security-cookbook-211-320.jpg)
![[ Team LiB ]
Recipe 6.11 Terminating an SSH Agent on Logout
6.11.1 Problem
When you log out, you want the ssh-agent process to be terminated automatically.
6.11.2 Solution
For bash:
~/.bash_profile:
trap 'test -n "$SSH_AGENT_PID" && eval `/usr/bin/ssh-agent -k`' 0
For csh or tcsh:
~/.logout:
if ( "$SSH_AGENT_PID" != "" ) then
eval `/usr/bin/ssh-agent -k`
endif
6.11.3 Discussion
SSH agents you invoke yourself don't die automatically when you log out: you must kill them explicitly.
When you run an agent, it defines the environment variable SSH_AGENT_PID. [Recipe 6.9] Simply test
for its existence and kill the agent with the -k option.
6.11.4 See Also
ssh-agent(1).
[ Team LiB ]](https://image.slidesharecdn.com/linuxsecuritycookbook-120930200536-phpapp01/85/Linux-security-cookbook-212-320.jpg)
![[ Team LiB ]
Recipe 6.12 Tailoring SSH per Host
6.12.1 Problem
You want to simplify a complicated SSH command line, or tailor SSH clients to operate differently per
remote host.
6.12.2 Solution
Create a host alias in ~/.ssh/config:
~/.ssh/config:
Host mybox
HostName mybox.whatever.example.com
User smith
...other options...
Then connect via the alias:
$ ssh mybox
6.12.3 Discussion
OpenSSH clients obey configurations found in ~/.ssh/config. Each configuration begins with the word Host
followed by an hostname alias of your invention.
Host work
Immediately following this line, and continuing until the next Host keyword or end of file, place
configuration keywords and values documented on the ssh(1) manpage. In this recipe we include the real
name of the remote machine (HostName), and the remote username (User):
Host work
HostName mybox.whatever.example.com
User smith
Other useful keywords (there are dozens) are:
IdentityFile ~/.ssh/my_alternate_key_dsa Choose a private key file
Port 12345 Connect on an alternative port
Protocol 2 Use only the SSH-2 protocol
6.12.4 See Also
ssh_config(5) defines the client configuration keywords.](https://image.slidesharecdn.com/linuxsecuritycookbook-120930200536-phpapp01/85/Linux-security-cookbook-213-320.jpg)
![[ Team LiB ]](https://image.slidesharecdn.com/linuxsecuritycookbook-120930200536-phpapp01/85/Linux-security-cookbook-214-320.jpg)
![[ Team LiB ]
Recipe 6.13 Changing SSH Client Defaults
6.13.1 Problem
You want to change the default behavior of ssh.
6.13.2 Solution
Create a host alias named "*" in ~/.ssh/config:
Host *
keyword value
keyword value
...
If this is the first entry in the file, these values will override all others. If the last entry in the file, they are
fallback values, i.e., defaults if nobody else has set them. You can make Host * both the first and last
entry to achieve both behaviors.
6.13.3 Discussion
We are just taking advantage of a few facts about host aliases in the configuration file:
Earlier values take precedence
The aliases may be patterns, and "*" matches anything
All matching aliases apply, not just the first one to match your ssh command
So if this is your ~/.ssh/config file:
Host *
User smith
Host server.example.com
User jones
PasswordAuthentication yes
Host *
PasswordAuthentication no
then your remote username will always be smith (even for server.example.com!), and password
authentication will be disabled by default (except for server.example.com).
You can still override host aliases using command-line options:
$ ssh -l jane server.example.com The -l option overrides the User keyword](https://image.slidesharecdn.com/linuxsecuritycookbook-120930200536-phpapp01/85/Linux-security-cookbook-215-320.jpg)
![6.13.4 See Also
ssh_config(5) documents the client configuration keywords.
[ Team LiB ]](https://image.slidesharecdn.com/linuxsecuritycookbook-120930200536-phpapp01/85/Linux-security-cookbook-216-320.jpg)
![[ Team LiB ]
Recipe 6.14 Tunneling Another TCP Session Through SSH
6.14.1 Problem
You want to secure a client/server TCP connection such as POP, IMAP, NNTP (Usenet news), IRC, VNC,
etc. Both the client and server must reside on computers that run SSH.
6.14.2 Solution
Tunnel (forward) the TCP connection through SSH. To secure port 119, the NNTP protocol for Usenet
news, which you read remotely from news.example.com:
$ ssh -f -N -L12345:localhost:119 news.example.com
While this tunnel is open, read news via local port 12345, e.g.:
$ export NNTPSERVER=localhost
$ tin -r -p 12345
6.14.3 Discussion
Tunneling or port forwarding uses SSH to secure another TCP/IP connection, such as an NNTP or IMAP
connection. You first create a tunnel, a secure connection between an SSH client and server. Then you
make your TCP/IP applications (client and server) communicate over the tunnel, as in Figure 6-1. SSH
makes this process mostly transparent.
Figure 6-1. SSH forwarding or tunneling
The SSH command:
$ ssh -f -N -L12345:localhost:119 news.example.com
establishes a tunnel between localhost and news.example.com. The tunnel has three segments:
1. The newsreader on your local machine sends data to local port 12345. This occurs entirely on your
local machine, not over the network.
2.](https://image.slidesharecdn.com/linuxsecuritycookbook-120930200536-phpapp01/85/Linux-security-cookbook-217-320.jpg)
![1.
2. The local SSH client reads port 12345, encrypts the data, and sends it through the tunnel to the
remote SSH server on news.example.com.
3. The remote SSH server on news.example.com decrypts the data and passes it to the news server
running on port 119. This runs entirely on news.example.com, not over the network.
Therefore, when your local news client connects to localhost port 12345:
$ tin -r -p 12345
the connection operates through the tunnel to the remote news server on news.example.com. Data is
sent back from the news server to the news client by the same process in reverse.
The general syntax for this forwarding command is:
$ ssh -f -N -Llocal_port_number:localhost:remote_port_number remote_host
local_port_number is arbitrary: select an unused port number higher than 1024. The -N option keeps
the tunnel open without the need to run a remote command.
6.14.4 See Also
ssh(1) and sshd(8) discuss port forwarding and its configuration keywords briefly.
The target host of the forwarding need not be localhost, but this topic is beyond the scope of our
cookbook. For more depth, try Chapter 9 of SSH, The Secure Shell: The Definitive Guide (O'Reilly).
[ Team LiB ]](https://image.slidesharecdn.com/linuxsecuritycookbook-120930200536-phpapp01/85/Linux-security-cookbook-218-320.jpg)
![[ Team LiB ]
Recipe 6.15 Keeping Track of Passwords
6.15.1 Problem
You have to remember a zillion different usernames, passwords, and SSH passphrases for various remote
hosts and web sites.
6.15.2 Solution
Store them in a file encrypted with GnuPG. Maintain it with Emacs and crypt++.el [Recipe 7.23] or with
vim. [Recipe 7.24] Create handy scripts to extract and print passwords as you need them.
6.15.3 Discussion
A possible file format is:
login<tab>password<tab>comment
Protect the file from access by other users:
$ chmod 600 $HOME/lib/passwords.gpg
Then create a script, say, $HOME/bin/mypass, to extract passwords based on grep patterns:
#!/bin/bash
PWFILE=$HOME/lib/passwords.gpg
/usr/bin/gpg -d $PWFILE | /bin/grep -i $@
$ mypass yahoo
Enter passphrase: ********
karma24 s3kr1TT My Yahoo password
billybob 4J%ich3!UKMr Bill's Yahoo password
Now you can type or copy/paste the username and password as needed. When finished, clear your
window scroll history (or close the window entirely) and clear your clipboard if it contained the password.
Admittedly, this technique will not satisfy every security expert. If the password file gets stolen, it could
conceivably be cracked and all your passwords compromised en masse. Nevertheless, the method is
convenient and in use at major corporations. If you are concerned about higher security, keep the
password file on a computer that has no network connection. If this is not possible, at least keep the
computer behind a firewall. For very high security installations, also physically isolate the computer in a
locked room and distribute door keys only to trusted individuals.
6.15.4 See Also](https://image.slidesharecdn.com/linuxsecuritycookbook-120930200536-phpapp01/85/Linux-security-cookbook-219-320.jpg)
![gpg(1).
[ Team LiB ]](https://image.slidesharecdn.com/linuxsecuritycookbook-120930200536-phpapp01/85/Linux-security-cookbook-220-320.jpg)
![[ Team LiB ]
Chapter 7. Protecting Files
So far we've been concerned mainly with securing your computer system. Now we turn to securing your
data, specifically, your files. At a basic level, file permissions , enforced by the operating system, can
protect your files from other legitimate users on your system. (But not from the superuser.) We'll provide
a few recipes based on the chmod (change mode) command.
File permissions only go so far, however—your file data are still readable if an attacker masquerades as
you (e.g., by stealing your login password) or breaks other aspects the system, perhaps using some
security exploit to gain root access on the host, or simply stealing a backup tape.
To guard against these possibilities, use encryption to scramble your data, so that a secret password or
key is required to unscramble and make it intelligible again. Thus, merely gaining the ability to read your
file is not enough; an attacker must also have your secret password in order to make any sense out of the
data. We'll focus on the excellent encryption software included with most Linux systems: the Gnu Privacy
Guard , also known as GnuPG or GPG. If you've used PGP (Pretty Good Privacy), you'll find GnuPG quite
similar but far more configurable. While the pgp command has around 35 command-line flags, its GnuPG
equivalent gpg has a whopping 140 at press time.
GnuPG supports two types of encryption: symmetric (or secret-key) and asymmetric (or public-key). In
symmetric encryption, the same key is used for encrypting and decrypting. Typically this key is a
password. Public-key encryption, on the other hand, uses two related keys (a "key pair") known as the
public and private (a.k.a. secret) keys. They are related in a mathematically clever way: data encrypted
with the public key can be decrypted with the private one, but it is not feasible to discover the private key
from the public. In daily use, you keep your private key, well... private, and distribute the public key
freely to anyone who wants it, without worrying about disclosure. Ideally, you publish it in a directory next
to your name, as in a telephone book. When someone wants to send you a secret message, she encrypts
it with your public key. Decryption requires your corresponding private key, however, which is your
closely guarded secret. Although other people may have your public key, it won't allow them to decrypt
the message.
Symmetric encryption is GnuPG's simplest operating mode: just provide the same password for
encrypting and decrypting. [Recipe 7.4] Public-key encryption requires setup, at the very least generating
a key pair [Recipe 7.6], but it is more flexible: it allows others to send you confidential messages without
the hassle of first agreeing on a shared secret key.
Before using a public key to encrypt sensitive data to send to someone, make sure that the key actually
belongs to that person! GnuPG allows keys to be signed, indicating that the signer vouches for the key. It
also lets you control how much you trust others to vouch for keys (called "trust management"). When you
consider the interconnections between keys and signatures, as users vouch for keys of users who vouch
for keys, this interconnected graph is called a web of trust . To participate in this web, try to collect
signatures on your GnuPG key from widely trusted people within particular communities of interest,
thereby enabling your key to be trusted automatically by others.
Public-key methods are also the basis for digital signatures : extra information attached to a digital
document as evidence that a particular person created it, or has seen and agreed to it, much as a pen-
and-ink signature does with a paper document. When we speak of "signing" a file in this chapter, we
mean adding a digital signature to a file to certify that it has not been modified since the signature was
created.
Once you're comfortable with encryption, check out Chapter 8 to integrate encryption into your preferred](https://image.slidesharecdn.com/linuxsecuritycookbook-120930200536-phpapp01/85/Linux-security-cookbook-221-320.jpg)
![mail program.
[ Team LiB ]](https://image.slidesharecdn.com/linuxsecuritycookbook-120930200536-phpapp01/85/Linux-security-cookbook-222-320.jpg)
![[ Team LiB ]
Recipe 7.1 Using File Permissions
7.1.1 Problem
You want to prevent other users on your machine from reading your files.
7.1.2 Solution
To protect existing files and directories:
$ chmod 600 file_name
$ chmod 700 directory_name
To protect future files and directories:
$ umask 077
7.1.3 Discussion
chmod and umask are the most basic file-protection commands available for Linux. Protected in this
manner, the affected files and directories are accessible only to you and the superuser. (Not likely to be
helpful against an intruder, however.)
The two chmod commands set the protection bits on a file and directory, respectively, to limit access to
their owner. This protection is enforced by the filesystem. The umask command informs your shell that
newly created files and directories should be accessible only to their owner.
7.1.4 See Also
chmod(1). See your shell documentation for umask: bash(1), tcsh(1), etc.
[ Team LiB ]](https://image.slidesharecdn.com/linuxsecuritycookbook-120930200536-phpapp01/85/Linux-security-cookbook-223-320.jpg)
![[ Team LiB ]
Recipe 7.2 Securing a Shared Directory
7.2.1 Problem
You want a directory in which anybody can create files, but only the file owners can delete or rename
them. (For example, /tmp, or an ftp upload directory.)
7.2.2 Solution
Set the sticky bit on a world-writable directory:
$ chmod 1777 dirname
7.2.3 Discussion
Normally, anyone can delete or rename files in a world-writable directory, mode 0777. The sticky bit
prevents this, permitting only the file owner, the directory owner, and the superuser to delete or rename
the files.[1]
[1] Directories with the sticky bit set are often called, somewhat inaccurately, "append-only" directories.
The sticky bit has a completely different meaning for files, particularly executable files. It specifies that
the file should be retained in swap space after execution. This feature was most useful back in the days
when RAM was scarce, but you'll hardly see it nowadays. This has nothing to do with our recipe, just a
note of historical interest.
7.2.4 See Also
chmod(1).
[ Team LiB ]](https://image.slidesharecdn.com/linuxsecuritycookbook-120930200536-phpapp01/85/Linux-security-cookbook-224-320.jpg)
![[ Team LiB ]
Recipe 7.3 Prohibiting Directory Listings
7.3.1 Problem
You want to prohibit directory listings for a particular directory, yet still permit the files within to be
accessed by name.
7.3.2 Solution
Use a directory that has read permission disabled, but execute permission enabled:
$ mkdir dir
$ chmod 0111 dir
$ ls -ld dir
d--x--x--x 2 smith smith 4096 Apr 2 22:04 dir/
$ ls dir
/bin/ls: dir: Permission denied
$ echo hello world > dir/secretfile
$ cd dir
$ cat secretfile
hello world
More practically, to permit only yourself to list a directory owned by you:
$ chmod 0711 dir
$ ls -ld dir
drwx--x--x 2 smith smith 4096 Apr 2 22:04 dir/
7.3.3 Discussion
A directory's read permission controls whether it can be listed (e.g., via ls), and the execute permission
controls whether it can be entered (e.g., via cd). Of course the superuser can still access your directory
any way she likes.
This technique is useful for web sites. If your web pages are contained in a readable, non-listable
directory, then they can be retrieved directly by their URLs (as you would want), but other files in the
containing directory cannot be discovered via HTTP. This is one way to prevent web robots from crawling
a directory.
FTP servers also use non-listable directories as private rendezvous points. Users can transfer files to and
from such directories, but third parties cannot eavesdrop as long as they cannot guess the filenames. The
directories need to be writable for users to create files, and you might want to restrict deletions or
renaming via the sticky bit. [Recipe 7.2]
7.3.4 See Also](https://image.slidesharecdn.com/linuxsecuritycookbook-120930200536-phpapp01/85/Linux-security-cookbook-225-320.jpg)
![chmod(1).
[ Team LiB ]](https://image.slidesharecdn.com/linuxsecuritycookbook-120930200536-phpapp01/85/Linux-security-cookbook-226-320.jpg)
![[ Team LiB ]
Recipe 7.4 Encrypting Files with a Password
7.4.1 Problem
You want to encrypt a file so only you can decrypt it with a password.
7.4.2 Solution
$ gpg -c filename
7.4.3 Discussion
Symmetric encryption (-c) is the simplest way to encrypt a file with gpg: just provide a password at
encryption time. To decrypt, provide the password again.
By default, encrypted files are binary. To produce an ASCII text file instead, add the -a (armor) option:
$ gpg -c -a filename
Binary encrypted files are created with the suffix .gpg, whereas ASCII encrypted files have the suffix .asc.
Though simple, symmetric encryption has some gotchas:
It's not practical for handling multiple files at once, as in scripts:
A bad idea:
#!/bin/sh
for file in file1 file2 file3 ...
do
gpg -c "$file"
done
GnuPG will prompt for the password for each file during encryption and decryption. This is tedious
and error-prone. Public-key encryption does not have this limitation, since no passphrase is needed
to encrypt a file. [Recipe 7.6] Another strategy is to bundle the files into a single file using tar, then
encrypt the tarball. [Recipe 7.18]
If you mistype the password during encryption and don't realize it, kiss your data goodbye. You can't
decrypt the file without the mistyped (and therefore unknown) password. gpg prompts you for the
password twice, so there's less chance you'll mistype it, but GnuPG's public-key encryption leaves
less opportunity to mistype a password unknowingly.
It's not much good for sharing files securely, since you'd also have to share the secret password.
Again, this is not true of public-key encryption.](https://image.slidesharecdn.com/linuxsecuritycookbook-120930200536-phpapp01/85/Linux-security-cookbook-227-320.jpg)
![7.4.4 See Also
gpg(1).
[ Team LiB ]](https://image.slidesharecdn.com/linuxsecuritycookbook-120930200536-phpapp01/85/Linux-security-cookbook-228-320.jpg)
![[ Team LiB ]
Recipe 7.5 Decrypting Files
7.5.1 Problem
You want to decrypt a file that was encrypted with GnuPG.
7.5.2 Solution
Assuming the file is myfile.gpg, decrypt it in place with:
$ gpg myfile.gpg creates myfile
Decrypt to standard output:
$ gpg --decrypt myfile.gpg
Decrypt to a named plaintext file:
$ gpg --decrypt --output new_file_name
myfile.gpg
7.5.3 Discussion
These commands work for both symmetric and public-key encrypted files. You'll be prompted for a
password (symmetric) or passphrase (public-key), which you must enter correctly to decrypt the file.
ASCII encrypted files (with the suffix .asc) are decrypted in the same way as binary encrypted files (with
the suffix .gpg).
7.5.4 See Also
gpg(1).
[ Team LiB ]](https://image.slidesharecdn.com/linuxsecuritycookbook-120930200536-phpapp01/85/Linux-security-cookbook-229-320.jpg)
![[ Team LiB ]
Recipe 7.6 Setting Up GnuPG for Public-Key Encryption
7.6.1 Problem
You want to start using GnuPG for more sophisticated operations, such as encrypting and signing files for
other parties to decrypt.
7.6.2 Solution
Generate a GnuPG keypair:
$ gpg --gen-key
then set a default key if you like [Recipe 7.8] and you're ready to use public-key encryption.
We strongly recommend you also create a revocation certificate at this time, in case you ever lose the key
and need to tell the world to stop using it. [Recipe 7.22]
7.6.3 Discussion
Public-key encryption lets you encrypt a file that only a designated recipient can decrypt, without sharing
any secrets like an encryption password. This recipe discusses just the initial setup.
First you need to generate your very own GnuPG keypair, which consists of a secret (private) key and a
public key. This is accomplished by:
$ gpg --gen-key
You'll be asked various questions, such as the key size in bits, key expiration date if any, an ID for the
key, and a passphrase to protect the key from snoopers.
First you'll be asked to choose the type of key. For most purposes simply choose the default by pressing
RETURN:
Please select what kind of key you want:
(1) DSA and ElGamal (default)
(2) DSA (sign only)
(4) ElGamal (sign and encrypt)
Your selection? <return>
Next, choose how many bits long the key should be. Longer keys are less like to be cracked. They also
slow down encryption and decryption performance, but on a fast processor you aren't likely to notice.
Choose at least 1024 bits.
DSA keypair will have 1024 bits.
About to generate a new ELG-E keypair.
minimum keysize is 768 bits](https://image.slidesharecdn.com/linuxsecuritycookbook-120930200536-phpapp01/85/Linux-security-cookbook-230-320.jpg)
![default keysize is 1024 bits
highest suggested keysize is 2048 bits
What keysize do you want? (1024) 2048
Next specify when the key should expire. For average use, a permanent key is best:
Please specify how long the key should be valid.
0 = key does not expire
<n> = key expires in n days
<n>w = key expires in n weeks
<n>m = key expires in n months
<n>y = key expires in n years
Key is valid for? (0) <return>
Key does not expire at all
Is this correct (y/n)? y
But if your key should expire, choose a lifetime and you'll see:
Key expires at Fri 19 Apr 2002 08:32:24 PM EDT
Is this correct (y/n)?
Next, choose a unique identifier for your key. gpg constructs an ID by combining your name, email
address, and a comment.
You need a User-ID to identify your key; the software constructs the user id
from Real Name, Comment and Email Address in this form:
"Heinrich Heine (Der Dichter) <heinrichh@duesseldorf.de>"
Real name: Shawn Smith
Email address: smith@example.com
Comment: My work key
You selected this USER-ID:
"Shawn Smith (My work key) <smith@example.com>"
Change (N)ame, (C)omment, (E)mail or (O)kay/(Q)uit? o
Next, choose a secret passphrase. Your key will be stored encrypted, and only this passphrase can unlock
it for use.
You need a Passphrase to protect your secret key.
Enter passphrase: ******
Repeat passphrase: ******
Eventually, you will see:
public and secret key created and signed.
which means your key is ready for use. Now you can encrypt [Recipe 7.11], decrypt [Recipe 7.5], sign
[Recipe 7.12], and verify [Recipe 7.15] files by public-key encryption.
7.6.4 See Also
gpg(1).](https://image.slidesharecdn.com/linuxsecuritycookbook-120930200536-phpapp01/85/Linux-security-cookbook-231-320.jpg)
![[ Team LiB ]](https://image.slidesharecdn.com/linuxsecuritycookbook-120930200536-phpapp01/85/Linux-security-cookbook-232-320.jpg)
![[ Team LiB ]
Recipe 7.7 Listing Your Keyring
7.7.1 Problem
You want to view the keys on your keyring.
7.7.2 Solution
To list your secret keys:
$ gpg --list-secret-keys
To list your public keys:
$ gpg --list-public-keys
7.7.3 Discussion
Here's a sample listing of a key on a keyring:
pub 1024D/83FA91C6 2000-07-21 Shawn Smith <smith@example.com>
It lists the following information:
Whether the key is secret (sec) or public (pub).[2]
[2]Actually, the key types are secret master signing key (sec), secret subordinate key (ssb), public master
signing key (pub), and public subordinate key (sub). Subordinate keys are beyond the scope of this book and
you might never need them. Just remember "sec" for secret and "pub" for public.
The number of bits in the key (1024)
The encryption algorithm (D means DSA)
The key ID (83FA91C6)
The key creation date (2000-07-21)
The user ID (Shawn Smith <smith@example.com>)
7.7.4 See Also
gpg(1).
[ Team LiB ]](https://image.slidesharecdn.com/linuxsecuritycookbook-120930200536-phpapp01/85/Linux-security-cookbook-233-320.jpg)
![[ Team LiB ]
Recipe 7.8 Setting a Default Key
7.8.1 Problem
You want a designated secret key to be your default for gpg operations.
7.8.2 Solution
List your keys: [Recipe 7.7]
$ gpg --list-secret-keys
Then locate the desired secret (sec) key, and specify its ID in your ~/.gnupg/options file:
~/.gnupg/options:
default-key ID_goes_here
7.8.3 Discussion
Most often, people have only a single secret key that GnuPG uses by default. This recipe applies if you
have generated multiple secret keys for particular purposes. For example, if you're a software developer,
you might a have a separate key for signing software releases, in addition to a personal key.
gpg places keys into keyring files held in your account. View your default keyring with:
$ gpg --list-secret-keys
/home/smith/.gnupg/secring.gpg
---------------------------------
sec 1024D/967D108B 2001-02-21 Shawn Smith (My work key) <smith@example.com>
ssb 2048g/6EA5084A 2001-02-21
sec 1024D/2987358A 2000-06-04 S. Smith (other key) <smith@example.com>
ssb 2048g/FC9274C2 2000-06-04
Normally the first secret (sec) key listed is the default for GnuPG operations. To change this, edit the
GnuPG options file, ~/.gnupg/options, which is automatically created by gpg with default values. Modify
the default-key line, setting its value to the ID of your desired secret key:
~/.gnupg/options:
default-key 2987358A
7.8.4 See Also
Key IDs can also be specified by email address or other identifying information: see the gpg(1) manpage.
We find using key IDs to be easy and unambiguous.
[ Team LiB ]](https://image.slidesharecdn.com/linuxsecuritycookbook-120930200536-phpapp01/85/Linux-security-cookbook-234-320.jpg)
![[ Team LiB ]
Recipe 7.9 Sharing Public Keys
7.9.1 Problem
You want to obtain a friend's public key securely but conveniently.
7.9.2 Solution
Most securely, get the public key on disk directly from your friend in person. Barring that:
1. Obtain the public key by any means (e.g., email, keyserver [Recipe 7.19]).
2. Add the key to your keyring. [Recipe 7.10]
3. Before using the key, telephone its owner and ask him to read the key fingerprint aloud. View the
fingerprint with:
$ gpg --fingerprint key_id
If they match, you're done. If not, consider the key suspect, delete it from your keyring, and
don't use it.
4. If you trust the key, indicate this to GnuPG:
$ gpg --edit-key key_id
Command> trust
and follow the prompts.
7.9.3 Discussion
Public keys are not secret, but they do require trust: the trust that a given key actually belongs to its
alleged owner. A fingerprint can provide that trust in a convenient form, easy to read aloud over a
telephone.
Always verify the fingerprint before trusting a public key. If you don't, consider this scenario:
1. You email your friend, asking for his public key.
2. A snooper intercepts your email and sends you his public key instead of your friend's.
3. You blindly add the snooper's public key to your keyring, believing it to be your friend's.
4. You encrypt sensitive mail using the snooper's key and send it to your friend.
5.](https://image.slidesharecdn.com/linuxsecuritycookbook-120930200536-phpapp01/85/Linux-security-cookbook-235-320.jpg)
![3.
4.
5. The snooper intercepts your mail and decrypts it.
7.9.4 See Also
gpg(1).
[ Team LiB ]](https://image.slidesharecdn.com/linuxsecuritycookbook-120930200536-phpapp01/85/Linux-security-cookbook-236-320.jpg)
![[ Team LiB ]
Recipe 7.10 Adding Keys to Your Keyring
7.10.1 Problem
You want to add a public or secret key to your keyring.
7.10.2 Solution
If the public key is in the file keyfile:
$ gpg --import keyfile
If the secret key is in the file keyfile:
$ gpg --import --allow-secret-key-import keyfile
7.10.3 Discussion
Importing the secret key implicitly imports the public key as well, since the public key is derivable from
the secret one.
7.10.4 See Also
gpg(1).
[ Team LiB ]](https://image.slidesharecdn.com/linuxsecuritycookbook-120930200536-phpapp01/85/Linux-security-cookbook-237-320.jpg)
![[ Team LiB ]
Recipe 7.11 Encrypting Files for Others
7.11.1 Problem
You want to encrypt a file so only particular recipients can decrypt it.
7.11.2 Solution
1. Obtain a recipient's GnuPG public key. [Recipe 7.9]
2. Add it to your GnuPG key ring. [Recipe 7.10]
3. Encrypt the file using your private key and the recipient's public key:
$ gpg -e -r recipient_public_key_ID myfile
To make the file decryptable by multiple recipients, repeat the -r option:
$ gpg -e -r key1 -r key2 -r key3 myfile
When you encrypt a file for a recipient other than yourself, you can't decrypt it! To
make a file decryptable by yourself as well, include your own public key at
encryption time (-r your_key_id).
7.11.3 Discussion
This is a classic use of GnuPG: encrypting a file to be read only by an intended recipient, say, Barbara
Bitflipper. To decrypt the file, Barbara will need her private key (corresponding to the public one used for
encryption) and its passphrase, both of which only Barbara has (presumably). Even if Barbara's private
key gets stolen, the thief would still need Barbara's passphrase to decrypt the file.
By default, encrypted files are binary. To produce an ASCII file instead, suitable for including in a text
message (email, Usenet post, etc.), add the -a (armor) option:
$ gpg -e -r Barbara's_public_key_ID -a filename
7.11.4 See Also
gpg(1).
[ Team LiB ]](https://image.slidesharecdn.com/linuxsecuritycookbook-120930200536-phpapp01/85/Linux-security-cookbook-238-320.jpg)
![[ Team LiB ]
Recipe 7.12 Signing a Text File
7.12.1 Problem
You want to attach a digital signature to a text file to verify its authenticity, leaving the file human-
readable.
7.12.2 Solution
$ gpg --clearsign myfile
You'll be prompted for your passphrase.
7.12.3 Discussion
If your original file has this content:
Hello world!
then the signed file will look something like this:
-----BEGIN PGP SIGNED MESSAGE-----
Hash: SHA1
Hello world!
-----BEGIN PGP SIGNATURE-----
Version: GnuPG v1.0.6 (GNU/Linux)
Comment: For info see http://www.gnupg.org
iD8DBQE9WFNU5U0ZSgD1tx8RAkAmAJ4wWTKWSy6C30raF2RWfQ6Eh8ZXAQCePUW3
N9JVeHSgYuSFu6XPLKW+2XU=
=5XaU
-----END PGP SIGNATURE-----
Anyone who has your public key can check the signature in this file using gpg, thereby confirming that the
file is from you. [Recipe 7.15]
7.12.4 See Also
gpg(1).
[ Team LiB ]](https://image.slidesharecdn.com/linuxsecuritycookbook-120930200536-phpapp01/85/Linux-security-cookbook-239-320.jpg)
![[ Team LiB ]
Recipe 7.13 Signing and Encrypting Files
7.13.1 Problem
You want to sign and encrypt a file, with the results not human-readable.
7.13.2 Solution
To sign myfile:
$ gpg -s myfile
To sign and encrypt myfile:
gpg -e -s myfile
In either case you must provide your passphrase. Add the -r option to encrypt the file with an intended
recipient's public key, so only he or she can decrypt it. [Recipe 7.11]
If you want the result to be an ASCII text file—say, for mailing—add the -a (armor) option.
7.13.3 Discussion
This signature confirms to a recipient that the file is authentic: that the claimed signer really signed it.
7.13.4 See Also
gpg(1).
[ Team LiB ]](https://image.slidesharecdn.com/linuxsecuritycookbook-120930200536-phpapp01/85/Linux-security-cookbook-240-320.jpg)
![[ Team LiB ]
Recipe 7.14 Creating a Detached Signature File
7.14.1 Problem
You want to sign a file digitally, but have the signature reside in a separate file.
7.14.2 Solution
To create a binary-format detached signature, myfile.sig:
$ gpg --detach-sign myfile
To create an ASCII-format detached signature, myfile.asc:
$ gpg --detach-sign -a myfile
In either case, you'll be prompted for your passphrase.
7.14.3 Discussion
A detached signature is placed into a file by itself, not inside the file it represents. Detached signatures are
commonly used to validate software distributed in compressed tar files, e.g., myprogram.tar.gz. You can't
sign such a file internally without altering its contents, so the signature is created in a separate file such
as myprogram.tar.gz.sig.
7.14.4 See Also
gpg(1).
[ Team LiB ]](https://image.slidesharecdn.com/linuxsecuritycookbook-120930200536-phpapp01/85/Linux-security-cookbook-241-320.jpg)
![[ Team LiB ]
Recipe 7.15 Checking a Signature
7.15.1 Problem
You want to verify that a GnuPG-signed file has not been altered.
7.15.2 Solution
To check a signed file, myfile:
$ gpg --verify myfile
To check myfile against a detached signature in myfile.sig: [Recipe 7.14]
$ gpg --verify myfile.sig myfile
Decrypting a signed file [Recipe 7.5] also checks its signature, e.g.:
$ gpg myfile
7.15.3 Discussion
When GnuPG detects a signature, it lets you know:
gpg: Signature made Wed 15 May 2002 10:19:20 PM EDT using DSA key ID 00F5B71F
If the signed file has not been altered, you'll see a result like:
gpg: Good signature from "Shawn Smith <smith@example.com>"
Otherwise:
gpg: BAD signature from "Shawn Smith <smith@example.com>"
indicates that the file is not to be trusted.
If you don't have the public key needed to check the signature, contact the key owner or check
keyservers [Recipe 7.21] to obtain it, then import it. [Recipe 7.10]
7.15.4 See Also
gpg(1).
[ Team LiB ]](https://image.slidesharecdn.com/linuxsecuritycookbook-120930200536-phpapp01/85/Linux-security-cookbook-242-320.jpg)
![[ Team LiB ]
Recipe 7.16 Printing Public Keys
7.16.1 Problem
You want to display your default public key in ASCII to share with other users.
7.16.2 Solution
Display in ASCII on standard output:
$ gpg -a --export keyname [keyname...]
7.16.3 Discussion
Try finding this combination in gpg's massive manpage. Whew!
Now you can distribute your public key to others [Recipe 7.9], and they can check its fingerprint and add
it to their keyrings. [Recipe 7.10] An ASCII public key looks like:
-----BEGIN PGP PUBLIC KEY BLOCK-----
Version: GnuPG v1.0.6 (GNU/Linux)
Comment: For info see http://www.gnupg.org
mQGiBDqTFZ8RBACuT1xDXPK0RUFBgcGKx7gk85v4r3tt98qWq+kCyWA1XuRqROyq
aj4OufqiabWm2QYjYrLSBx+BrAE5t84Fi4AR23M1dNOy2gUm2R6IvjwneL4erppk
...more...
2WEACgkQ5U0ZSgD1tx9A3XYbBLbpbNBV0w25TnqiUy/vOWZcxJEAoMz4ertAFAAO
=j962
-----END PGP PUBLIC KEY BLOCK-----
To write the results to a file, add the option —output pubkeyfile. You can also create binary output by
omitting the -a option.
7.16.4 See Also
gpg(1).
[ Team LiB ]](https://image.slidesharecdn.com/linuxsecuritycookbook-120930200536-phpapp01/85/Linux-security-cookbook-243-320.jpg)
![[ Team LiB ]
Recipe 7.17 Backing Up a Private Key
7.17.1 Problem
You want to protect against losing your private key or forgetting your passphrase. (And thereby losing the
ability to decrypt your files.)
7.17.2 Solution
Store your key pair in an offline, physically secure location, together with a throwaway passphrase. First
change the passphrase temporarily to something you do not use for any other purpose. This will be your
"throwaway" passphrase.
$ gpg --edit mykey_id ...
Command> passwd
...follow the prompts...
Then make a copy of your key pair that uses this throwaway passphrase, storing it in the file mykey.asc:
$ gpg -a -o mykey.asc --export mykey_id
$ gpg -a --export-secret-keys mykey_id >> mykey.asc
Finally, restore the original passphrase to your key on your keyring:
$ gpg --edit mykey_id ...
Command> passwd
...follow the prompts...
You now have a file called mykey.asc that contains your key pair, in which the private key is protected by
the throwaway passphrase, not your real passphrase. Now, store this file in a safe place, such as a safety
deposit box in a bank. Together with the key, store the passphrase, either on disk or on paper.
To guard against media deterioration or obsolescence, you can even print mykey.asc on acid-free paper
and store the printout with the media. Or maybe have the key laser-engraved on a gold plate? Whatever
makes you feel comfortable.
7.17.3 Discussion
Imagine what would happen if you forgot your passphrase or lost your secret key. All your important
encrypted files would become useless junk. Even if you are sure you could never forget your passphrase,
what if you become injured and suffer amnesia? Or what about when you die? Could your family and
business associates ever decrypt your files, or are they lost forever? This isn't just morbid, it's realistic:
your encrypted data may outlive you. So plan ahead.
If gpg could output your secret key to a file unencrypted, we would do so, but it has no such option. You
could get the same effect by temporarily changing to a null passphrase and then doing the export, but
that's dangerous and awkward to describe, so we recommend a throwaway passphrase instead.](https://image.slidesharecdn.com/linuxsecuritycookbook-120930200536-phpapp01/85/Linux-security-cookbook-244-320.jpg)
![Storing your plaintext key anywhere is, of course, a tradeoff. If your passphrase exists only inside your
head, then your encrypted data are more secure—but not necessarily "safer" in the general sense. If
losing access to your encrypted data is more worrisome than someone breaking into your safety deposit
box to steal your key, then use this procedure.
Other cryptographic techniques can address these issues, such as secret-sharing, or simply encrypting
documents with multiple keys, but they require extra software support and effort. A secure, plaintext,
backup copy of your private key ensures that your data will not be irretrievably lost in these situations.
You can, of course, create multiple keys for use with different kinds of data, some keys backed up in this
way and others not.
While you're visiting your safety deposit box, drop off a copy of your global password list as well. [Recipe
6.15] Your heirs may need it someday.
7.17.4 See Also
gpg(1).
[ Team LiB ]](https://image.slidesharecdn.com/linuxsecuritycookbook-120930200536-phpapp01/85/Linux-security-cookbook-245-320.jpg)
![[ Team LiB ]
Recipe 7.18 Encrypting Directories
7.18.1 Problem
You want to encrypt an entire directory tree.
7.18.2 Solution
To produce a single encrypted file containing all files in the directory, with symmetric encryption:
$ tar cf - name_of_directory | gpg -c > files.tar.gpg
or key-based encryption:
$ tar cf - name_of_directory | gpg -e > files.tar.gpg
To encrypt each file separately:
$ find name_of_directory -type f -exec gpg -e '{}' ;
7.18.3 Discussion
Notice the find method uses public-key encryption, not symmetric. If you need a symmetric cipher [Recipe
7.4] or to sign the files [Recipe 7.13], avoid this method, as you'd be prompted for your
password/passphrase for each file processed.
7.18.4 See Also
gpg(1), find(1), tar(1).
[ Team LiB ]](https://image.slidesharecdn.com/linuxsecuritycookbook-120930200536-phpapp01/85/Linux-security-cookbook-246-320.jpg)
![[ Team LiB ]
Recipe 7.19 Adding Your Key to a Keyserver
7.19.1 Problem
You have generated a new GnuPG key, and you want to make your public key available to others via a
keyserver.
7.19.2 Solution
Send the key to the keyserver:
$ gpg --keyserver server_name_or_IP_address --send-keys key_ID
Some well-known PGP/GnuPG keyservers are:
wwwkeys.pgp.net
www.keyserver.net
pgp.mit.edu
Additionally, most keyservers have a web-based interface for adding and locating keys.
7.19.3 Discussion
A keyserver is a resource for storing and retrieving public keys, often accessible via the Web. Most widely-
used GnuPG keyservers share keys automatically amongst themselves, so it is not necessary to send your
key to all of them. Your key should be available on many keyservers within a day or two.
7.19.4 See Also
gpg(1), and the keyservers mentioned herein.
[ Team LiB ]](https://image.slidesharecdn.com/linuxsecuritycookbook-120930200536-phpapp01/85/Linux-security-cookbook-247-320.jpg)
![[ Team LiB ]
Recipe 7.20 Uploading New Signatures to a Keyserver
7.20.1 Problem
You have collected some new signatures on your public key, and want to update your key on a keyserver
with those signatures.
7.20.2 Solution
Simply re-send your key to the keyserver [Recipe 7.19]; it will merge in the new signatures with your
existing entry on the keyserver.
[ Team LiB ]](https://image.slidesharecdn.com/linuxsecuritycookbook-120930200536-phpapp01/85/Linux-security-cookbook-248-320.jpg)
![[ Team LiB ]
Recipe 7.21 Obtaining Keys from a Keyserver
7.21.1 Problem
You want to obtain a public key from a keyserver.
7.21.2 Solution
If you have the key ID, you can import it immediately:
$ gpg --keyserver keyserver --recv-keys key_ID
Otherwise, to search for a key by the owner's name or email address, and match keys before importing
them, use:
$ gpg --keyserver keyserver --search-keys string_to_match
To specify a default keyserver, so you need not use the --keyserver option above:
~/.gnupg/options:
keyserver keyserver_DNS_name_or_IP_address
To have GnuPG automatically contact a keyserver and import keys whenever needed:
~/.gnupg/options:
keyserver keyserver_DNS_name_or_IP_address
keyserver-options auto-key-retrieve
With this configuration, for example, if you were to verify the signature on some downloaded software
signed with a key you didn't have (gpg —verify foo.tar.gz.sig), GnuPG would automatically download and
import that key from your keyserver, if available.
Additionally, most keyservers have a web-based interface for adding and locating keys.
Remember to check the key fingerprint with the owner before trusting it. [Recipe 7.9]
7.21.3 Discussion
Importing a key does not verify its validity—it does not verify that the claimed binding between a user
identity (name, email address, etc.) and the public key is legitimate. For example, if you use gpg —verify
to check the signature of a key imported from a keyserver, GnuPG may still produce the following
warning, even if the signature itself is good:
gpg: WARNING: This key is not certified with a trusted signature!
gpg: There is no indication that the signature belongs to the owner.
A keyserver does absolutely nothing to assure the ownership of keys. Anyone can add a key to a](https://image.slidesharecdn.com/linuxsecuritycookbook-120930200536-phpapp01/85/Linux-security-cookbook-249-320.jpg)
![keyserver, at any time, with any name whatsoever. A keyserver is only a convenient way to share keys
and their associated certificates; all responsibility for checking keys against identities rests with you, the
GnuPG user, employing the normal GnuPG web-of-trust techniques. To trust a given key K, either you
must trust K directly, or you must trust another key which has signed K, and thus whose owner
(recursively) trusts K.
The ultimate way to verify a key is to check its fingerprint with the key owner directly. [Recipe 7.9] If you
need to verify a key and do not have a chain of previously verified and trusted keys leading to it, then
anything you do to verify it involving only computers has some degree of uncertainty; it's just a question
of how paranoid you are and how sure you want to be.
This situation comes up often when verifying signatures on downloaded software. [Recipe 7.15] You
should always verify such signatures, since servers do get hacked and Trojan horses do get planted in
commonly-used software packages. A server that contains some software (foo.tar.gz) and a signature
(commonly foo.tar.gz.asc or foo.tar.gz.sig) should also have somewhere on it the public key used to
generate the signature. If you have not previously obtained and verified this key, download it now and
add it to your keyring. [Recipe 7.10] If the key is signed by other keys you already trust, you're set. If
not, don't trust it simply because it came from the same server as the software! If the server were
compromised and software modified, a savvy attacker would also have replaced the public key and
generated new, valid signatures using that key. In this case, it is wise to check the key against as many
other sources as possible. For instance:
Check the key fingerprint against copies of the key stored elsewhere. [Recipe 7.9]
Look who signed the key in question:
$ gpg --list-sigs keyname
Obtain those public keys, and verify these signatures. Try to pick well-known people or
organizations.
For both these operations, obtain the keys not only from keyservers, but also from web sites or
other repositories belonging to the key owners. Use secure web sites if available (HTTPS/SSL), and
verify the certificates and DNS names involved.
Try several of the above avenues together. None of them provides absolute assurance. But the more
smartly selected checks you make, the more independent servers and systems an attacker would have to
subvert in order to trick you—and thus the less likely it is that such an attack has actually occurred.
This process will also merge new signatures into an existing key on your key ring, if
any are available from the keyserver.
7.21.4 See Also
For more information on the web of trust, visit
http://webber.dewinter.com/gnupg_howto/english/GPGMiniHowto-1.html.
[ Team LiB ]](https://image.slidesharecdn.com/linuxsecuritycookbook-120930200536-phpapp01/85/Linux-security-cookbook-250-320.jpg)
![[ Team LiB ]
Recipe 7.22 Revoking a Key
7.22.1 Problem
You want to inform a keyserver that a particular public key (of yours) is no longer valid.
7.22.2 Solution
1. Create a revocation certificate:
$ gpg --gen-revoke --output certificate.asc key_id
2. Import the certificate:
$ gpg --import certificate.asc
3. Revoke the key at the keyserver:
$ gpg --keyserver server_name --send-keys key_id
4. Delete the key (optional)
$ gpg --delete-secret-and-public-key key_id
THINK CAREFULLY BEFORE DELETING A KEY. Once you delete a key, any files that
remain encrypted with this key CANNOT BE DECRYPTED. EVER.
7.22.3 Discussion
At times it becomes necessary to stop using a particular key. For example:
Your private key has been lost.
Your private key has been stolen, or you suspect it may have been.
You have forgotten your private key passphrase.
You replace your keys periodically (say, every two years) to enhance security, and this key has
expired.
Whatever the reason, it's time to inform others to stop using the corresponding public key to
communicate with you. Otherwise, if the key is lost, you might receive encrypted messages that you can
no longer decrypt. Worse, if the key has been stolen or compromised, the thief can read messages](https://image.slidesharecdn.com/linuxsecuritycookbook-120930200536-phpapp01/85/Linux-security-cookbook-251-320.jpg)
![encrypted for you.
To tell the world to cease using your key, distribute a revocation certificate for that key: a
cryptographically secure digital object that says, "Hey, don't use this public key anymore!" Once you
create the certificate, send it directly to your communication partners or to a keyserver [Recipe 7.19] for
general distribution.
For security reasons, the revocation certificate is digitally signed by you, or more specifically, with the
private key that it revokes. This proves (cryptographically speaking) that the person who generated the
certificate (you) is actually authorized to make this decision.
But wait: how can you create and sign a revocation certificate if you've lost the original private key
necessary for signing it? Well, you can't.[3] Instead, you should create the certificate in advance, just in
case you ever lose the key. As standard practice, you should create a revocation certificate immediately
each time you generate a new key. [Recipe 7.6]
[3] And this is a good thing. Otherwise, anybody could create a revocation certificate for your keys.
Guard your revocation certificate as carefully as your private key. If a thief obtains it, he can publish it
(anonymously) and immediately invalidate your keys, causing you a big headache.
7.22.4 See Also
http://www.keyserver.net/en/info.html and http://www.keyserver.net/en/about.html.
[ Team LiB ]](https://image.slidesharecdn.com/linuxsecuritycookbook-120930200536-phpapp01/85/Linux-security-cookbook-252-320.jpg)
![[ Team LiB ]
Recipe 7.23 Maintaining Encrypted Files with Emacs
7.23.1 Problem
You want to edit encrypted files in place with GNU Emacs, without decrypting them to disk.
7.23.2 Solution
Use the Emacs package crypt++.el:
~/.emacs:
(if (load "crypt++" t)
(progn
(setq crypt-encryption-type 'gpg)
(setq crypt-confirm-password t)
(crypt-rebuild-tables)))
7.23.3 Discussion
crypt++ provides a transparent editing mode for encrypted files. Once the package is installed and
loaded, simply edit any GnuPG-encrypted file. You'll be prompted for the passphrase within Emacs, and
the file will be decrypted and inserted into an Emacs buffer. When you save the file, it will be re-encrypted
automatically.
7.23.4 See Also
Crypt++ is available from http://freshmeat.net/projects/crypt and
http://www.cs.umb.edu/~karl/crypt++/crypt++.el.
[ Team LiB ]](https://image.slidesharecdn.com/linuxsecuritycookbook-120930200536-phpapp01/85/Linux-security-cookbook-253-320.jpg)
![[ Team LiB ]
Recipe 7.24 Maintaining Encrypted Files with vim
7.24.1 Problem
You want to edit encrypted files in place with vim, without decrypting them to disk.
7.24.2 Solution
Add the following lines to your ~/.vimrc file:
" Transparent editing of GnuPG-encrypted files
" Based on a solution by Wouter Hanegraaff
augroup encrypted
au!
" First make sure nothing is written to ~/.viminfo while editing
" an encrypted file.
autocmd BufReadPre,FileReadPre *.gpg,*.asc set viminfo=
" We don't want a swap file, as it writes unencrypted data to disk.
autocmd BufReadPre,FileReadPre *.gpg,*.asc set noswapfile
" Switch to binary mode to read the encrypted file.
autocmd BufReadPre,FileReadPre *.gpg set bin
autocmd BufReadPre,FileReadPre *.gpg,*.asc let ch_save = &ch|set ch=2
autocmd BufReadPost,FileReadPost *.gpg,*.asc
'[,']!sh -c 'gpg --decrypt 2> /dev/null'
" Switch to normal mode for editing
autocmd BufReadPost,FileReadPost *.gpg set nobin
autocmd BufReadPost,FileReadPost *.gpg,*.asc let &ch = ch_save|unlet ch_save
autocmd BufReadPost,FileReadPost *.gpg,*.asc
execute ":doautocmd BufReadPost " . expand("%:r")
" Convert all text to encrypted text before writing
autocmd BufWritePre,FileWritePre *.gpg
'[,']!sh -c 'gpg --default-recipient-self -e 2>/dev/null'
autocmd BufWritePre,FileWritePre *.asc
'[,']!sh -c 'gpg --default-recipient-self -e -a 2>/dev/null'
" Undo the encryption so we are back in the normal text, directly
" after the file has been written.
autocmd BufWritePost,FileWritePost *.gpg,*.asc u
augroup END
7.24.3 Discussion
vim can edit GnuPG-encrypted files transparently, provided they were encrypted for your key of course! If
the stanza in our recipe has been added to your ~/.vimrc file, simply edit an encrypted file. You'll be
prompted for your passphrase, and the decrypted file will be loaded into the current buffer for editing.
When you save the file, it will be re-encrypted automatically.](https://image.slidesharecdn.com/linuxsecuritycookbook-120930200536-phpapp01/85/Linux-security-cookbook-254-320.jpg)
![vim will recognize encrypted file types by their suffixes, .gpg for binary and .asc for ASCII-armored. The
recipe carefully disables viminfo and swap file functionality, to avoid storing any decrypted text on the
disk.
The gpg commands in the recipe use public-key encryption. Tailor the command-line options to reflect
your needs.
Incidentally, vim provides its own encryption mechanism, if vim was built with encryption support: you
can tell by running vim —version or using the :version command within vim, and looking for +cryptv in
the list of features. To use this feature when creating a new file, run vim -x. For existing files, vim will
recognize encrypted ones automatically, so -x is optional.
We don't recommend vim -x, however, because it has some significant disadvantages compared to
GnuPG:
It's nonstandard: you can encrypt and decrypt these files only with vim.
It's weaker cryptographically than GnuPG.
It doesn't automatically disable viminfo or swap files. You can do this manually by setting the
viminfo and swapfile variables, but it's easy to forget and leave decrypted data on the disk as a
consequence.
7.24.4 See Also
Wouter Hanegraaff's original solution can be found at
http://qref.sourceforge.net/Debian/reference/examples/vimgpg.
[ Team LiB ]](https://image.slidesharecdn.com/linuxsecuritycookbook-120930200536-phpapp01/85/Linux-security-cookbook-255-320.jpg)
![[ Team LiB ]
Recipe 7.25 Encrypting Backups
7.25.1 Problem
You want to create an encrypted backup.
7.25.2 Solution
Method 1: Pipe through gpg.
To write a tape:
$ tar cf - mydir | gpg -c | dd of=/dev/tape bs=10k
To read a tape:
$ dd if=/dev/tape bs=10k | gpg --decrypt | tar xf -
To write an encrypted backup of directory mydir onto a CD-ROM:
#!/bin/sh
mkdir destdir
tar cf - mydir | gpg -c > destdir/myfile.tar.gpg
mkisofs -R -l destdir | cdrecord speed=${SPEED} dev=${SCSIDEVICE} -
where SPEED and SCSIDEVICE are specific to your system; see cdrecord(1).
Method 2: Encrypt files separately.
1. Make a new directory containing links to your original files:
$ cp -lr mydir newdir
2. In the new directory, encrypt each file, and remove the links to the unencrypted files:
$ find newdir -type f -exec gpg -e '{}' ; -exec rm '{}' ;
3. Back up the new directory with the encrypted data:
$ tar c newdir
7.25.3 Discussion
Method 1 produces a backup that may be considered fragile: one big encrypted file. If part of the backup
gets corrupted, you might be unable to decrypt any of it.
Method 2 avoids this problem. The cp -l option creates hard links, which can only be used within a single](https://image.slidesharecdn.com/linuxsecuritycookbook-120930200536-phpapp01/85/Linux-security-cookbook-256-320.jpg)
![filesystem. If you want the encrypted files on a separate filesystem, use symbolic links instead:
$ cp -sr /full/path/to/mydir newdir
$ find newdir -type l -exec gpg -e '{}' ; -exec rm '{}' ;
Note that a full, absolute pathname must be used for the original directory in this case.
gpg does not preserve the owner, group, permissions, or modification times of the files. To retain this
information in your backups, copy the attributes from the original files to the encrypted files, before the
links to the original files are deleted:
# find newdir -type f -exec gpg -e '{}' ;
-exec chown --reference='{}' '{}.gpg' ;
-exec chmod --reference='{}' '{}.gpg' ;
-exec touch --reference='{}' '{}.gpg' ;
-exec rm '{}' ;
Method 2 and the CD-ROM variant of method 1 use disk space (at least temporarily) for the encrypted
files.
7.25.4 See Also
gpg(1), tar(1), find(1), cdrecord(1).
[ Team LiB ]](https://image.slidesharecdn.com/linuxsecuritycookbook-120930200536-phpapp01/85/Linux-security-cookbook-257-320.jpg)
![[ Team LiB ]
Recipe 7.26 Using PGP Keys with GnuPG
7.26.1 Problem
You want to use PGP keys in GnuPG operations.
7.26.2 Solution
Using PGP, export your key to a file called pgpkey.asc. For example, using freeware PGP 6.5.8, you export
a public key with:
$ pgp -kxa my_key pgpkey.asc
or a private key with:
$ pgp -kxa my_key pgpkey.asc my_secret_keyring.skr
Then import the key into your GnuPG keyring. For public keys:
$ gpg --import pgpkey.asc
For private keys:
$ gpg --import --allow-secret-key-import pgpkey.asc
Now you can use the key in normal GnuPG operations.
7.26.3 Discussion
Keys are really abstract mathematical objects; this recipe simply converts a key from one representation
to another so that GnuPG can use it. It's similar to converting an SSH key between the SSH2 and
OpenSSH formats. [Recipe 6.6]
Once you've imported a PGP key into your GPG keyring, this doesn't mean you can interoperate with PGP
in all ways using this key. Many versions of PGP have appeared over the years, before and after the
emergence of the OpenPGP standard, and GPG does not interoperate with every one. Suppose you
convert your friend's old PGP public key for use with GPG via this recipe. Now you can encrypt a message
to her, using her public key... but can she read it? Only if her version of PGP is capable of reading and
decrypting GPG messages, and not all can. Conversely, you may not be able to read old messages
encrypted with the PGP software—for example, some versions of PGP use the IDEA cipher for data
encryption, which GPG does not use because it is patented. Make sure you share a few test messages
with your friend before encrypting something truly important for her.
7.26.4 See Also](https://image.slidesharecdn.com/linuxsecuritycookbook-120930200536-phpapp01/85/Linux-security-cookbook-258-320.jpg)
![gpg(1), pgp(1).
[ Team LiB ]](https://image.slidesharecdn.com/linuxsecuritycookbook-120930200536-phpapp01/85/Linux-security-cookbook-259-320.jpg)
![[ Team LiB ]
Chapter 8. Protecting Email
Email is a terrific medium for communication, but it's neither private nor secure. For example, did you
know that:
Each message you send may pass through many other machines en route to its intended recipient?
Even on the recipient's computer, other users (particularly superusers) can conceivably read your
messages as they sit on disk?
Messages traveling over a traditional POP or IMAP connection can be captured and read in transit by
third parties?
In this chapter, we provide recipes to secure different segments of the email trail:
From sender to recipient
Secure your email messages, using encryption and signing
Between mail client and mail server
Protect your mail session, using secure IMAP, secure POP, or tunneling
At the mail server
Avoid exposing a public mail server, using fetchmail or SMTP authentication
We assume that you have already created a GnuPG key pair (private and public) on your GnuPG keyring,
a prerequisite for many recipes in this chapter. [Recipe 7.6]
[ Team LiB ]](https://image.slidesharecdn.com/linuxsecuritycookbook-120930200536-phpapp01/85/Linux-security-cookbook-260-320.jpg)
![[ Team LiB ]
Recipe 8.1 Encrypted Mail with Emacs
8.1.1 Problem
You use an Emacs mailer (vm, rmail, etc.) and want to send and receive encrypted email messages.
8.1.2 Solution
Use mailcrypt.el with GnuPG:
~/.emacs:
(load-library "mailcrypt")
(mc-setversion "gpg")
Then open a mail buffer, and use any Mailcrypt functions or variables as desired:
mc-encrypt
Encrypt the mail message in the current buffer
mc-decrypt
Decrypt the mail message in the current buffer
mc-sign
Sign the mail message in the current buffer
mc-verify
Verify the signature of the mail message in the current buffer
mc-insert-public-key
Insert your public key, in ASCII format, into the current buffer
...and many more.
8.1.3 Discussion
Mailcrypt is an Emacs package for encrypting, decrypting, and cryptographically signing email messages.
Once you have installed mailcrypt.el in your Emacs load path, e.g., by installing it in
/usr/share/emacs/site-lisp, and loaded and configured it in your ~/.emacs file:
(load-library "mailcrypt")
(mc-setversion "gpg")
compose a mail message in your favorite Emacs-based mailer. When done writing the message, invoke:
M-x mc-encrypt](https://image.slidesharecdn.com/linuxsecuritycookbook-120930200536-phpapp01/85/Linux-security-cookbook-261-320.jpg)
![(or select the Encrypt function from the Mailcrypt menu). You'll be prompted for the recipient, whose
public key must be on your GnuPG keyring:
Recipients: jones@example.com
and then asked whether you want to sign the message, which is an optional step and requires your
GnuPG passphrase.
Sign the message? (y or n)
Then voilà, your message becomes GnuPG-encrypted for that recipient:
-----BEGIN PGP MESSAGE-----
Version: GnuPG v1.0.6 (GNU/Linux)
Comment: Processed by Mailcrypt 3.5.8 and Gnu Privacy Guard
hQEOAxpFbNGB4CNMEAP/SeAEOPP6XW+uMrkHZ5b2kuYPE5BL06brHNL2Dae6uIjK
sMBhvKGcS3THpCcXzjCRRAJLsquUaazakXdLveyTRPMa9J7GhRUAJvd8n7ZZ8iRn
...
-----END PGP MESSAGE-----
Finally, send the message normally.
If you receive an encrypted message, and you already have the sender's key (indexed by her email
address) on your GnuPG public keyring, simply invoke:
M-x mc-decrypt
for the buffer containing the message. If you receive a signed message, check the signature by invoking:
[Recipe 7.15]
M-x mc-verify
Mailcrypt can be finicky about the buffer contents. If all else fails, save the encrypted message to a file
and decrypt it with gpg manually. [Recipe 7.5]
By default, Mailcrypt will remember your GnuPG passphrase once entered—but only for the duration of
the current Emacs session. You can run mc-deactivate-passwd to force Mailcrypt to erase your
passphrase from its memory immediately.
The load-library code given earlier will cause your startup file to abort if Emacs cannot find Mailcrypt. To
have it load conditionally, use this instead:
(if (load-library "mailcrypt") t)
(mc-setversion "gpg"))
8.1.4 See Also
The official web site for Mailcrypt is http://mailcrypt.sourceforge.net. To list all Mailcrypt functions and
variables in Emacs, try:
M-x apropos mc-
[ Team LiB ]](https://image.slidesharecdn.com/linuxsecuritycookbook-120930200536-phpapp01/85/Linux-security-cookbook-262-320.jpg)
![[ Team LiB ]
Recipe 8.2 Encrypted Mail with vim
8.2.1 Problem
You want to compose an encrypted mail message, and your mail editor is vim.
8.2.2 Solution
~/.vimrc:
map ^E :1,$!gpg --armor --encrypt 2>/dev/null^M^L
map ^G :1,$!gpg --armor --encrypt --sign 2>/dev/null^M^L
map ^Y :1,$!gpg --clearsign 2>/dev/null^M^L
The ^X symbols are actual control characters inserted into the file, not a caret
followed by a letter. In vim, this is accomplished by pressing ctrl-V followed by the
desired key, for example, ctrl-V ctrl-E to insert a ctrl-E.
8.2.3 Discussion
These macros filter the entire edit buffer (1,$) through gpg. The first macro merely encrypts the buffer,
the second encrypts and signs, and the third only signs. You'll be prompted for your passphrase for any
signing.
8.2.4 See Also
gpg(1), vim(1). Credit goes to Rick van Rein for this tip: http://rick.vanrein.org/linux/tricks/elmPGP.html.
[ Team LiB ]](https://image.slidesharecdn.com/linuxsecuritycookbook-120930200536-phpapp01/85/Linux-security-cookbook-263-320.jpg)
![[ Team LiB ]
Recipe 8.3 Encrypted Mail with Pine
8.3.1 Problem
You want to send and receive encrypted email conveniently with the Pine mailer.
8.3.2 Solution
Use PinePGP.
8.3.3 Description
Before using PinePGP, make sure you have previously used Pine on your local computer, so you have a
~/.pinerc configuration file. Then download PinePGP from
http://www.megaloman.com/~hany/software/pinepgp, build, and install it. (As root if you prefer.)
When installing PinePGP, you must make a choice: Should messages you encrypt be decryptable only by
their intended recipients, or by yourself as well? If the former, which is the default behavior, run:
$ pinegpg-install
Alternatively, if you want to change this default, making your messages decryptable by you (with your
public key) in addition to the recipient, instead invoke:
$ pinegpg-install your@email.address.com
where your@email.address.com is the email address associated with your intended GnuPG key. [Recipe
7.7]
Now let's send an encrypted message to our friend buddy@example.com, whose GnuPG public key is
already on our keyring. Run pine and compose a message. Press
ctrl-X
to send the message normally, and you will receive this prompt, asking if you want the message filtered
before sending:
Send message (unfiltered)?
Press
ctrl-N
repeatedly to display the filters, which will appear like this:
Send message (filtered thru "gpg-sign")?
Send message (filtered thru "gpg-encrypt")?](https://image.slidesharecdn.com/linuxsecuritycookbook-120930200536-phpapp01/85/Linux-security-cookbook-264-320.jpg)
![Send message (filtered thru "gpg-sign+encrypt")?
Select the filter you want and press Return to send the message. If you're signing the message, you'll be
prompted for your key passphrase first.
That's sending, but what about receiving? When an encrypted message arrives in your mailbox and you
attempt to view it, pine will automatically prompt for your passphrase. If entered correctly, the message
will be displayed. The beginning and end of the decrypted text will be surrounded by [PinePGP] markers:
Date: Tue, 22 Oct 2002 21:08:32 -0400 (EDT)
From: Some Buddy <buddy@example.com>
To: You <smith@example.com>
Subject: Test message
--[PinePGP]--------------------------------------------------[begin]--
Hey, d00d, this encryption stuff rocks!
--[PinePGP]-----------------------------------------------------------
gpg: encrypted with 1024-bit ELG-E key, ID 61E9334C, created 2001-02-21
"Some W. Buddy (The d00d) <buddy@example.com>"
--[PinePGP]----------------------------------------------------[end]--
How does this all work? PinePGP filters your sent and displayed email via the sending-filters and display-
filters variables in ~/.pinerc.
8.3.4 See Also
pine(1). The Pine home page is http://www.washington.edu/pine. PinePGP is found at
http://www.megaloman.com/~hany/software/pinepgp.
[ Team LiB ]](https://image.slidesharecdn.com/linuxsecuritycookbook-120930200536-phpapp01/85/Linux-security-cookbook-265-320.jpg)
![[ Team LiB ]
Recipe 8.4 Encrypted Mail with Mozilla
8.4.1 Problem
You want to send and receive encrypted email conveniently with Mozilla's Mail & Newsgroups application.
8.4.2 Solution
Use Enigmail from enigmail.mozdev.org for GnuPG encryption support. S/MIME is also supported natively
within Mozilla.
8.4.3 Discussion
Once you have downloaded and installed Enigmail, compose a message normally, addressing it to
someone whose public key is in your GnuPG keyring. Instead of clicking the Send button, notice that your
message window has a new menu, Enigmail. From this menu, you choose to encrypt or sign your
message, or both, and it is immediately sent.
To decrypt a message you receive, simply view it and Mozilla will prompt for your GnuPG passphrase.
Your Mail & Newsgroups window also has a new Enigmail menu. Explore both menus where you'll find
numerous useful options and utilities: generating new GnuPG keys, setting default behavior, viewing the
actual gpg commands invoked, and more.
8.4.4 See Also
The Enigmail home page is http://enigmail.mozdev.org, and Mozilla's is http://www.mozilla.org.
[ Team LiB ]](https://image.slidesharecdn.com/linuxsecuritycookbook-120930200536-phpapp01/85/Linux-security-cookbook-266-320.jpg)
![[ Team LiB ]
Recipe 8.5 Encrypted Mail with Evolution
8.5.1 Problem
You want to send and receive encrypted email conveniently with the Evolution mailer from Ximian.
8.5.2 Solution
During setup:
1. Under Inbox/Tools/Mail Settings/Other, make sure "PGP binary path" refers to your encryption
program, usually /usr/bin/gpg.
2. In the Evolution Account Editor, set your Security preferences, including your default GnuPG key,
whether you want all messages signed by default, etc.
In use:
1. Compose an email message to someone whose key is in your GnuPG public keyring. You must trust
their public key [Recipe 7.9] or encryption will fail.
2. From the Security menu, select PGP Sign, PGP Encrypt, or both. (Or do nothing, and the defaults
you set in the Evolution Account Editor will be used.)
3. Click Send. Your message will be sent encrypted or signed as you requested. (You'll be prompted for
your passphrase before signing.)
8.5.3 Discussion
Evolution supports PGP, GnuPG, and S/MIME out of the box.
8.5.4 See Also
The home page for Ximian, makers of Evolution, is http://www.ximian.com.
[ Team LiB ]](https://image.slidesharecdn.com/linuxsecuritycookbook-120930200536-phpapp01/85/Linux-security-cookbook-267-320.jpg)
![[ Team LiB ]
Recipe 8.6 Encrypted Mail with mutt
8.6.1 Problem
You want to send and receive encrypted email conveniently with the mutt mailer.
8.6.2 Solution
mutt comes with configuration files pgp2.rc, pgp5.rc, and gpg.rc, ready to use with pgp2, pgp5, and gpg,
respectively. Include one of these files inside your ~/.muttrc. (For GnuPG support, obviously include
gpg.rc.)
8.6.3 Discussion
Compose a message normally. Notice the headers include a setting called PGP:
From: Daniel Barrett <dbarrett@oreilly.com>
To: Shawn Smith <smith@example.com>
Cc:
Bcc:
Subject: Test message
Reply-To:
Fcc:
PGP: Clear
By default, encryption is disabled (Clear). To change this, type p to display the PGP options, and choose to
encrypt, sign, or both. When you send the message (press y), you'll be presented with the available
private keys for encrypting or signing. Select one and the message will be sent.
To decrypt a message you receive, simply view it. mutt will prompt for your GnuPG passphrase and
display the decrypted message.
8.6.4 See Also
mutt(1), and Mutt's supplied documentation in /usr/share/doc/mutt*, in particular the file PGP-Notes.txt.
The home page for Mutt is http://www.mutt.org.
[ Team LiB ]](https://image.slidesharecdn.com/linuxsecuritycookbook-120930200536-phpapp01/85/Linux-security-cookbook-268-320.jpg)
![[ Team LiB ]
Recipe 8.7 Encrypted Mail with elm
8.7.1 Problem
You want to send and receive encrypted email conveniently with the elm mailer.
8.7.2 Solution
While viewing an encrypted message, type:
| gpg --decrypt | less
to display the decrypted text page by page. To send an encrypted message, encrypt it in your text editor.
[Recipe 8.1][Recipe 8.2]
8.7.3 Discussion
We take advantage of elm's pipe feature, which sends the body of a mail message to another Linux
command, in this case gpg. We further pipe it to a pager (we chose less) for convenient display. For
encryption, we handle it in the text editor invoked by elm to compose messages. [Recipe 8.1][Recipe 8.2]
There are alternatives. A patched version of elm, known as ELMME+ , supports GnuPG directly. (The
author, Michael Elkins, went on to create mutt, [Recipe 8.6] which also supports GnuPG.)
You might also try the pair of scripts morepgp (for decrypting and reading) and mailpgp (for encrypting
and sending), available at http://www.math.fu-berlin.de/~guckes/elm/scripts/elm.pgp.scripts.html. These
scripts are for PGP, but modification for GnuPG should not be difficult.
8.7.4 See Also
The elm home page is http://www.instinct.org/elm. Read more about the scripts morepgp and mailpgp at
http://www.math.fu-berlin.de/~guckes/elm/scripts/elm.pgp.scripts.html and http://www.math.fu-
berlin.de/~guckes/elm/elm.index.html#security.
[ Team LiB ]](https://image.slidesharecdn.com/linuxsecuritycookbook-120930200536-phpapp01/85/Linux-security-cookbook-269-320.jpg)
![[ Team LiB ]
Recipe 8.8 Encrypted Mail with MH
8.8.1 Problem
You want to send and receive encrypted email conveniently with the MH mail handler.
8.8.2 Solution
To view an encrypted message:
show | gpg --decrypt | less
To encrypt and send a message, use the encryption features of your text editor, such as emacs [Recipe
8.1] or vim [Recipe 8.2]. Care must be taken so that only the message body, not the header, gets
encrypted.
8.8.3 Discussion
MH (or more likely found on Linux, nmh ) differs from most mailers in that each mail-handling command
is invoked from the shell prompt and reads/writes standard input/output. Therefore, to decrypt a message
normally displayed by the show command, pipe show through gpg, then optionally through a pager such
as less.
8.8.4 See Also
Further instructions for integrating MH and GnuPG (and PGP) are at http://www.tac.nyc.ny.us/mail/mh
and http://www.faqs.org/faqs/mail/mh-faq/part1/section-68.html.](https://image.slidesharecdn.com/linuxsecuritycookbook-120930200536-phpapp01/85/Linux-security-cookbook-270-320.jpg)
![SSL for Securing Mail
Most major mail clients (pine, mutt, etc.) support secure POP and IMAP using the Secure
Sockets Layer (SSL) protocol (also known by its later, IETF-standards name, Transport Layer
Security or TLS). Most commercial mail servers and ISPs, however, do not support SSL, which
is highly annoying. But if you're lucky enough to find a mail server that does support it, or if
you run your own server [Recipe 8.9], here's a brief introduction to how it works.
A mail server may support SSL in two ways, to protect your session against eavesdroppers:
STARTTLS
The mail server listens on the normal service port for unsecured connections, such as
110 for POP3 or 143 for IMAP, and permits a client to "turn on" SSL after the fact. The
IMAP command for this is STARTTLS; the POP command, STLS; we will refer to this
approach generically as STARTTLS.
SSL-port
The mail server listens on a separate port, such as 995 for POP3 or 993 for IMAP, and
requires that SSL be negotiated on that port before speaking to the mail protocol.
STARTTLS is the more modern, preferred method (see RFC 2595 for reasoning), but both are
common. Our recipes suggest that you try STARTTLS first, and if it's unsupported, fall back to
SSL-port.
The most critical thing to protect in email sessions is, of course, your mail server password.
The strong session protection provided by SSL is one approach, which protects not only the
password but also all other data in the session. Another approach is strong authentication ,
which focuses on protecting the password (or other credential), as found in Kerberos [Recipe
4.16] for example.[1] These two classes of protection are orthogonal: they can be used
separately or together, as shown in Table 8-1.
Whatever happens, you don't want your password flying unprotected over the network, where
hordes of dsniff-wielding script kiddies can snarf it up while barely lifting a finger. [Recipe
9.19] In most cases, protecting the content of the email over POP or IMAP is less critical, since
it has already traversed the public network as plain text before delivery. (If this concerns you,
encrypt your mail messages.)
Finally, as with any use of SSL, check your certificates; otherwise server authentication is
meaningless. [Recipe 4.4]
[1]SSL can also perform user authentication, but we do not address it. Our recipes employ SSL to protect an interior
protocol that performs its own user authentication.
[ Team LiB ]](https://image.slidesharecdn.com/linuxsecuritycookbook-120930200536-phpapp01/85/Linux-security-cookbook-271-320.jpg)
![[ Team LiB ]
Recipe 8.9 Running a POP/IMAP Mail Server with SSL
8.9.1 Problem
You want to allow secure, remote mail access that protects passwords and prevents session
eavesdropping or tampering.
8.9.2 Solution
Use imapd with SSL. Out of the box, imapd can negotiate SSL protection on mail sessions via the
STARTTLS (IMAP) and STLS (POP) mechanisms. (See SSL for Securing Mail.) Simply set your client to
require SSL on the same port as the normal protocol (143 for IMAP, 110 for POP), and verify that it
works. If so, you're done.
Otherwise, if your client insists on using alternate ports, it is probably using the older convention of
connecting to those ports with SSL first. In that case, use the following recipe:
1. Enable the IMAP daemon within xinetd:
/etc/xinetd.d/imaps:
service imaps
{
...
disabled = no
}
or within inetd (add or uncomment the line below):
/etc/inetd.conf:
imaps stream tcp nowait root /usr/sbin/tcpd imapd
whichever your system supports.
2. Signal xinetd or inetd, whichever the case may be, to re-read its configuration and therefore begin
accepting imapd connections. [Recipe 3.3][Recipe 3.4]
3. Test the SSL connection locally on the mail server, port 993: [Recipe 8.10]
$ openssl s_client -quiet -connect localhost:993
(Type 0 LOGOUT to end the test.)
Alternatively, use POP with SSL, following an analogous procedure:
1. Enable the POP daemon within xinetd :](https://image.slidesharecdn.com/linuxsecuritycookbook-120930200536-phpapp01/85/Linux-security-cookbook-272-320.jpg)
![1.
/etc/xinetd.d/pop3s:
service pop3s
{
...
disabled = no
}
or inetd (add or uncomment the line below):
/etc/inetd.conf:
pop3s stream tcp nowait root /usr/sbin/tcpd ipop3d
whichever your system supports.
2. Signal xinetd or inetd, whichever the case may be, to reread its configuration and therefore begin
accepting ipop3d connections. [Recipe 3.3][Recipe 3.4]
3. Test the SSL connection locally on the mail server, port 995: [Recipe 8.10]
$ openssl s_client -quiet -connect localhost:995
(Type QUIT to end the test.)
Table 8-1. Authentication and session protection are independent
Strong session
Weak session protection
protection
Protects password, but session is still vulnerable to
Strong
Protects all eavesdropping, corruption, hijacking, server spoofing, or man-in-
authentication
the-middle attack
Weak
Protects all No protection: avoid this combination
authentication
8.9.3 Discussion
Many mail clients can run POP or IMAP over SSL to protect email sessions from eavesdropping or attack.
[Recipe 8.11][Recipe 8.12][Recipe 8.13] In particular they protect your mail server passwords, which
may otherwise be transmitted over the network unencrypted. Red Hat 8.0 and SuSE 8.0 come
preconfigured with SSL support in the POP/IMAP server, /usr/sbin/imapd.
First, enable imapd within xinetd or inetd as shown, then signal the server to re-read its configuration.
Examine /var/log/messages to verify that the daemon reconfigured correctly, and then test the
connection using the openssl command. [Recipe 8.10] A successful connection will look like this:
$ openssl s_client -quiet -connect localhost:993
depth=0 /C=--/ST=SomeState/L=SomeCity/...
verify error:num=18:self signed certificate
verify return:1
depth=0 /C=--/ST=SomeState/L=SomeCity/...
verify return:1
* OK [CAPABILITY IMAP4REV1 LOGIN-REFERRALS AUTH=PLAIN AUTH=LOGIN] localhost ...](https://image.slidesharecdn.com/linuxsecuritycookbook-120930200536-phpapp01/85/Linux-security-cookbook-273-320.jpg)
![The first few lines indicate a problem verifying the server's SSL certificate, discussed later. The last line is
the initial IMAP protocol statement from the server. Type 0 LOGOUT or just Ctrl-C to disconnect from the
server.
Next, test the connection from your mail client, following its documentation for connecting to a mail
server over SSL. This is usually an option when specifying the mail server, or sometimes in a separate
configuration section or GUI panel for "advanced" settings, labeled "secure connection" or "Use SSL." Use
any existing user account on the server for authentication; by default, imapd uses the same PAM-based
password authentication scheme as most other services like Telnet and SSH. (We discuss PAM in Chapter
4.)
Examine /var/log/debug for information on your test; a successful connection would produce entries like
this:
Mar 3 00:28:38 server xinetd[844]: START: imaps pid=2061 from=10.1.1.5
Mar 3 00:28:38 server imapd[2061]: imaps SSL service init from 10.1.1.5
Mar 3 00:28:43 server imapd[2061]: Login user=res host=client [10.1.1.5]
Mar 3 00:28:54 server imapd[2061]: Logout user=res host=client [10.1.1.5]
Mar 3 00:28:54 server xinetd[844]: EXIT: imaps pid=2061 duration=16(sec)
If you don't see the expected entries, be sure that the system logger is configured to send debug priority
messages to this file. [Recipe 9.27]
You might see warning messages that imapd is unable to verify the server's SSL certificate; for testing
purposes you may ignore these, but for production systems beware! Some Linux systems have dummy
keypairs and corresponding certificates installed for use by imapd and pop3d; for instance, Red Hat 8.0
has /usr/share/ssl/certs/imapd.pem and /usr/share/ssl/certs/ipop3d.pem, respectively. This setup is fine
for testing, but do not use these certificates for a production system. These keys are distributed with
every Red Hat system: they are public knowledge. If you deploy a service using default, dummy keys,
you are vulnerable to a man-in-the-middle (MITM) attack, in which the attacker impersonates your
system using the well-known dummy private keys. Furthermore, the name in the certificate does not
match your server's hostname, and the certificate is not issued by a recognized Certifying Authority; both
of these conditions will be flagged as warnings by your mail client. [Recipe 4.4]
To preserve the server authentication and MITM resistance features of SSL, generate a new key for your
mail server, and obtain an appropriate certificate binding the key to your server's name. [Recipe
4.7][Recipe 4.8]
You can control how imapd performs password validation by means of PAM. The configuration file
/etc/pam.d/imap directs imapd to use general system authentication, so it will be controlled by that
setting, either through authconfig or by direct customization of /etc/pam.d/imap yourself.
Note also that the "common name" field of the SSL server's certificate must match the name you
configure clients with, or they will complain during certificate validation. Even if the two names are aliases
for one another in DNS, they must match in this usage. [Recipe 4.7]
Our described configuration absolutely requires SSL for all IMAP connections. However, you may also
want to permit unsecured sessions from localhost only, if:
You also provide mail access on the same server via a Web-based package such as SquirrelMail or
IMP. Such packages often require an unsecured back-end connection to the mail server. Perhaps you
could hack them to use SSL, but there's little point if they are on the same machine.
You sometimes access your mail by port-forwarding when logged into the mail server via SSH.
[Recipe 6.14][Recipe 8.15]](https://image.slidesharecdn.com/linuxsecuritycookbook-120930200536-phpapp01/85/Linux-security-cookbook-274-320.jpg)
![You can permit unsecured IMAP connections by editing /etc/xinetd.d/imap (note "imap" and not "imaps")
to read:
/etc/xinetd.d/imap:
service imap
{
...
disabled = no
bind = localhost
}
This accepts unsecured IMAP connections to port 143, but only from the same host.
8.9.4 See Also
imapd(8C), ipopd(8C). SquirrelMail is found at http://www.squirrelmail.org, and IMP at
http://www.horde.org/imp.
[ Team LiB ]](https://image.slidesharecdn.com/linuxsecuritycookbook-120930200536-phpapp01/85/Linux-security-cookbook-275-320.jpg)
![[ Team LiB ]
Recipe 8.10 Testing an SSL Mail Connection
8.10.1 Problem
You want to verify an SSL connection to a secure POP or IMAP server.
8.10.2 Solution
For secure POP:
$ openssl s_client -quiet -connect server:995
[messages about server certificate validation]
+OK POP3 server.net v2001.78rh server ready
Type QUIT to exit.
For secure IMAP:
$ openssl s_client -quiet -connect server:993
[messages about server certificate validation]
* OK [CAPABILITY ...] server.net IMAP4rev1 2001.315rh at Mon, 3 Mar 2003 20:01:43 -
0500 (EST)
Type 0 LOGOUT to exit.
8.10.3 Discussion
If you omit the -quiet switch, openssl will print specifics about the SSL protocol negotiation, including the
server's X.509 public-key certificate.
The openssl command can verify the server certificate only if that certificate, or one in its issuer chain, is
listed in the system trusted certificate cache. [Recipe 4.4]
8.10.4 See Also
openssl(1).
[ Team LiB ]](https://image.slidesharecdn.com/linuxsecuritycookbook-120930200536-phpapp01/85/Linux-security-cookbook-276-320.jpg)
![[ Team LiB ]
Recipe 8.11 Securing POP/IMAP with SSL and Pine
8.11.1 Problem
You want to secure your POP or IMAP email session. Your mail client is pine, and your mail server
supports SSL.
8.11.2 Solution
Test whether you can use STARTTLS, as explained in SSL for Securing Mail:
$ pine -inbox-path='{mail.server.net/user=fred/protocol}'
replacing protocol with either pop or imap as desired. One of three outcomes will occur:
1. You get no connection. In this case, you cannot use STARTTLS; move on and try SSL-port, below.
2. You get a connection, but the login prompt includes the word INSECURE:
HOST: mail.server.net (INSECURE) ENTER LOGIN NAME [fred] :
In this case, you again cannot use STARTTLS; move on and try SSL-port, below.
3. You get a connection and the login prompt does not say INSECURE. In this case, congratulations,
you have a secure mail connection. You are done.
If you could not use STARTTLS as shown, try the SSL-port method:
$ pine -inbox-path='{mail.server.net/user=fred/protocol/ssl}'
again replacing protocol with either pop or imap as appropriate.
To ensure you have a secure connection (i.e., to forbid pine to engage in weak authentication, unless it's
over a secure connection), add /secure to your inbox-path. For example:
$ pine -inbox-path='{mail.server.net/user=fred/imap/secure}'
If none of this works, your ISP does not appear to support IMAP over SSL in any form; try SSH instead.
[Recipe 8.16]
8.11.3 Discussion
You might be able to simplify the mailbox specifications; for instance:
{mail.server.net/user=fred/imap}](https://image.slidesharecdn.com/linuxsecuritycookbook-120930200536-phpapp01/85/Linux-security-cookbook-277-320.jpg)
![could be simply {mail} instead: IMAP is the default, the usernames on both sides are assumed to be the
same if unspecified, and your DNS search path may allow using the short hostname.
8.11.4 See Also
pine(1).
SSL Connection Problems: Server-Side
Debugging
If you have access to the system logs on the mail server, you can examine them to debug SSL
connection problems, or just to verify what's happening. In /var/log/maillog, successful SSL-
port-style connections look like this:
Mar 7 16:26:13 mail imapd[20091]: imaps SSL service init from 209.225.172.154
Mar 7 16:24:17 mail ipop3d[20079]: pop3s SSL service init from 209.225.172.154
as opposed to these, indicating no initial use of SSL:
Mar 7 16:26:44 mail imapd[20099]: imap service init from 209.225.172.154
Mar 7 16:15:47 mail ipop3d[20018]: pop3 service init from 209.225.172.154
Note, however, that you cannot distinguish the success of STARTTLS-style security this way.
Another way of verifying the secure operation is to watch the mail protocol traffic directly using
tcpdump [Recipe 9.16] or Ethereal [Recipe 9.17]. Ethereal is especially good, as it understands
all the protocols involved here and will show exactly what's happening in a reasonably obvious
fashion.
[ Team LiB ]](https://image.slidesharecdn.com/linuxsecuritycookbook-120930200536-phpapp01/85/Linux-security-cookbook-278-320.jpg)
![[ Team LiB ]
Recipe 8.12 Securing POP/IMAP with SSL and mutt
8.12.1 Problem
You want to secure your POP or IMAP email session. Your mail client is mutt, and your mail server
supports SSL.
8.12.2 Solution
If you want a POP connection, use SSL-port, since mutt does not support STARTTLS over POP. (See SSL
for Securing Mail for definitions.)
$ MAIL=pops://fred@mail.server.net/ mutt
For an IMAP connection, test whether you can use STARTTLS:
$ MAIL=imap://fred@mail.server.net/ mutt
If this works, mutt will flash a message about setting up a "TLS/SSL" connection, confirming your success.
If not, then try SSL-port:
$ MAIL=imaps://fred@mail.server.net/ mutt
If none of this works, your ISP does not appear to support IMAP over SSL in any form; try SSH instead.
[Recipe 8.15]
8.12.3 Discussion
Many SSL-related configuration variables in mutt affect its behavior; we are assuming the defaults here.
Mutt uses the systemwide trusted certificate list in /usr/share/ssl/cert.pem, which contains certificates
from widely recognized Certifying Authorities, such as Verisign, Equifax, and Thawte. If this file does not
contain a certificate chain sufficient to validate your mail server's SSL certificate, mutt will complain about
the certificate. It will then prompt you to accept or reject the connection. You can alter this behavior by
setting:
~/.muttrc:
set certificate_file=~/.mutt/certificates
Now mutt will further offer to accept the connection either "once" or "always." If you choose "always,"
mutt will store the certificate in ~/.mutt/certificates and accept it automatically from then on. Be cautious
before doing this, however: it allows a man-in-the-middle attack on the first connection. A far better
solution is to add the appropriate, trusted issuer certificates to cert.pem.
8.12.4 See Also](https://image.slidesharecdn.com/linuxsecuritycookbook-120930200536-phpapp01/85/Linux-security-cookbook-279-320.jpg)
![mutt(1).
[ Team LiB ]](https://image.slidesharecdn.com/linuxsecuritycookbook-120930200536-phpapp01/85/Linux-security-cookbook-280-320.jpg)
![[ Team LiB ]
Recipe 8.13 Securing POP/IMAP with SSL and Evolution
8.13.1 Problem
You want to read mail on a POP or IMAP mail server securely, using Evolution. The mail server supports
SSL.
8.13.2 Solution
In the Evolution menu Tools/Mail Settings/Edit/Receiving Mail, check "Use secure connection (SSL)".
The default ports for IMAP and POP over SSL are 993 and 995, respectively. If your server uses a non-
standard port, specify it.
If you're having problems establishing the connection, you can test it. [Recipe 8.10]
8.13.3 Discussion
Evolution on Red Hat 8.0 does not appear to check any pre-installed trusted certificates automatically. As
it encounters certificates, it will store them in ~/evolution/cert7.db. This file is not ASCII text, so adding
certificates is not easy; you'll need the program certutil.
8.13.4 See Also
certutil is found at http://www.mozilla.org/projects/security/pki/nss/tools/certutil.html. Additional
discussion is found at http://lists.ximian.com/archives/public/evolution/2001-November/014351.html.
[ Team LiB ]](https://image.slidesharecdn.com/linuxsecuritycookbook-120930200536-phpapp01/85/Linux-security-cookbook-281-320.jpg)
![[ Team LiB ]
Recipe 8.14 Securing POP/IMAP with stunnel and SSL
8.14.1 Problem
You want to read mail on a POP or IMAP mail server securely. Your mail client supports SSL, but the mail server
does not.
8.14.2 Solution
Use stunnel, installed on the mail server machine. Suppose your client host is myclient, the mail server host is
mailhost, and the mail server listens on standard port numbers (110 for POP, 143 for IMAP).
1. Generate a self-signed X.509 certificate foo.crt, with private key in foo.key. [Recipe 4.8]
2. Place the certificate and key into a single file:
$ cat foo.crt foo.key > foo.pem
$ chmod 600 foo.pem
3. Choose an arbitrary, unused TCP port number on mailhost, such as 12345.
4. Run this stunnel process on mailhost for a POP server, supplying the certificate's private-key passphrase
when prompted:
mailhost$ /usr/sbin/stunnel -p foo.pem -d 12345 -r localhost:110 -P none -f
2003.03.27 15:07:08 LOG5[621:8192]: Using 'localhost.110' as tcpwrapper service name
Enter PEM pass phrase: ********
2003.03.27 15:07:10 LOG5[621:8192]: stunnel 3.22 on i386-redhat-linux-gnu
PTHREAD+LIBWRAP with OpenSSL 0.9.6b [engine] 9 Jul 2001
2003.03.27 15:07:10 LOG5[621:8192]: FD_SETSIZE=1024, file ulimit=1024->500
clients allowed
For an IMAP server, use port 143 instead of 110.
5. Add foo.crt to the client's list of trusted certificates, in whatever way is appropriate for the client software
and OS. You may need to convert the certificate format from PEM to DER: [Recipe 4.10]
$ openssl x509 -in foo.crt -out foo.der -outform der
6. Configure your mail client on myclient to connect to port 12345 of mailhost using SSL.
8.14.3 Discussion
This recipe assumes you are not a system administrator on mailhost, and need to get this working just for](https://image.slidesharecdn.com/linuxsecuritycookbook-120930200536-phpapp01/85/Linux-security-cookbook-282-320.jpg)
![yourself. If you have root privileges, just configure your mail server to support SSL directly.
We create two secure connections to mailhost's port 12345. The stunnel command connects this arbitrary port
to the mail server, all locally on mailhost. Then the mail client crosses the network via SSL to connect to port
12345. These two segments together form a complete, secure connection between mail client and mail server.
If you remove the -f option, stunnel will fork into the background and log messages to syslog, instead of
remaining on the terminal and printing status messages to stderr.
8.14.4 See Also
The directory /usr/share/doc/stunnel-* contains stunnel documentation. The stunnel home page is
http://www.stunnel.org.
[ Team LiB ]](https://image.slidesharecdn.com/linuxsecuritycookbook-120930200536-phpapp01/85/Linux-security-cookbook-283-320.jpg)
![[ Team LiB ]
Recipe 8.15 Securing POP/IMAP with SSH
8.15.1 Problem
You want to read mail on a POP or IMAP mail server securely. The mail server machine runs an SSH
daemon.
8.15.2 Solution
Use SSH port forwarding. [Recipe 6.14]
1. Choose an arbitrary, unused TCP port number on your client machine, such as 12345.
2. Assuming your client is myclient and your mail server is mailhost, open a tunnel to its POP server
(TCP port 110):
myclient$ ssh -f -N -L 12345:localhost:110 mailhost
or IMAP server (port 143):
myclient$ ssh -f -N -L 12345:localhost:143 mailhost
or whatever other port your mail server listens on.
3. Configure your mail client to connect to the mail server on port 12345 of localhost, instead of the
POP or IMAP port on mailhost.
8.15.3 Discussion
As we discussed in our recipe on general port forwarding [Recipe 6.14], ssh -L opens a secure connection
from the SSH client to the SSH server, tunneling the data from TCP-based protocol (in this case POP or
IMAP) across the connection. We add -N so ssh keeps the tunnel open without requiring a remote
command to do so.
Be aware that our recipe uses localhost in two subtly different ways. When we specify the tunnel:
12345:localhost:143
the name "localhost" is interpreted on the SSH server side. But when your mail client connects to
localhost, the name is interpreted on the SSH client side. This is normally the behavior you want.
However, if the server machine is not listening on the loopback address for some reason, you may need
to specify the server name explicitly instead:
12345:mailhost:143
In addition, if the server machine is multihomed (has multiple real network interfaces), the situation may](https://image.slidesharecdn.com/linuxsecuritycookbook-120930200536-phpapp01/85/Linux-security-cookbook-284-320.jpg)
![be more complicated. Find out which socket the mail server is listening on by asking your systems staff,
or by looking yourself: [Recipe 9.14]
mailhost$ netstat --inet --listening
If your mail client and SSH client are on different hosts, consider adding the -g option of ssh to permit
connections to the forwarded port from other hosts. Be careful, however, as this option allows anyone
with connectivity to the client machine to use your tunnel.
If your SSH server and mail server are on different hosts, say sshhost and mailhost, then use this tunnel
instead:
myclient$ ssh -f -N -L 12345:mailhost:143 sshhost
sshhost could be an SSH login gateway for a corporate network, while mailhost is an internal mail server
on which you have a mailbox but no SSH login. sshhost must have connectivity to mailhost, and your
client machine to sshhost, but your client machine cannot reach mailhost directly (that's the point of the
gateway).
8.15.4 See Also
ssh(1) and sshd(8) discuss port forwarding and its configuration keywords briefly. For more depth, try
Chapter 9 of our previous book, SSH, The Secure Shell: The Definitive Guide (O'Reilly), which goes into
great detail on the subject.
[ Team LiB ]](https://image.slidesharecdn.com/linuxsecuritycookbook-120930200536-phpapp01/85/Linux-security-cookbook-285-320.jpg)
![[ Team LiB ]
Recipe 8.16 Securing POP/IMAP with SSH and Pine
8.16.1 Problem
You want to read mail on a POP or IMAP mail server securely using Pine, with automatic authentication.
The mail server machine runs an SSH daemon.
8.16.2 Solution
Use Pine's built-in SSH subprocess feature, together with SSH public-key authentica tion and ssh-agent.
1. Set up SSH public-key authentication with the mail server machine. [Recipe 6.4]
2. Set up the SSH agent. [Recipe 6.9]
3. Set up the SSH authentication in your ~/.pinerc file:
inbox-path={mailserver/imap/user=username}inbox
ssh-path=/usr/bin/ssh
4. Simply run pine, and it should automatically open your remote mailbox without prompting for a
password or any other authentication credentials.
8.16.3 Discussion
Suppose your mail server is mail.server.net, and your account there is joe. First, arrange for public-key
authentication to your login account on the server [Recipe 6.4] using ssh-agent. [Recipe 6.9] Verify that
this works smoothly, e.g., you have all the necessary user and host keys in place, so that you can execute
a command like this:
$ ssh -l joe mail.server.net echo FOO
FOO
If you see any password or passphrase prompts, doublecheck your public key and ssh-agent setup. If you
are prompted to accept the mail server's SSH host key, get this out of the way as well. The preceding ssh
command must succeed uninterrupted for Pine/SSH integration to work.
Next, log into the mail server machine and locate the mail server program.[2] Pine assumes its location is
/etc/rimapd. If it's not there, other likely locations are:
[2]We will assume here that it's an IMAP server. For a POP server, simply substitute "POP" for "IMAP"—and "pop" for
"imap"—in the subsequent discussion.
/usr/sbin/imapd
/usr/local/sbin/imapd](https://image.slidesharecdn.com/linuxsecuritycookbook-120930200536-phpapp01/85/Linux-security-cookbook-286-320.jpg)
![Test the IMAP server by running it; you should see something similar to this:
$ /usr/sbin/imapd
* PREAUTH [CAPABILITY IMAP4REV1 IDLE NAMESPACE]
Pre-authenticated user joe client.bar.org ...
To stop the program, type:
0 logout
or ctrl-D, or ctrl-C.
Now, edit your ~/.pinerc file and make the following setting:
inbox-path={mail.server.net/imap/user=joe}inbox
ssh-path=/usr/bin/ssh
(or whatever the path to your SSH client is; run which ssh on your client machine if you're not sure).
If your server program was not in the default location (/etc/rimapd), point to it with the ssh-command
setting:
ssh-command="%s %s -l %s exec /usr/sbin/%sd"
The final argument, /usr/sbin/%sd, must expand to the path to the IMAP daemon when the final "%s"
expands to "imap". (So in this case your path is /usr/sbin/imapd.)
Note that you may need to find the existing settings in ~/.pinerc and change them, rather than add new
ones. Also make sure the ssh-timeout parameter has not been set to 0, which disables Pine's use of SSH.
Now you're all set; simply run Pine:
$ pine
and it should automatically open your remote mailbox without prompting for further authentication. If it
doesn't work, run the following command manually on the client machine:
$ /usr/bin/ssh mail.server.net -l joe exec /usr/sbin/imapd
(modified to match the settings you made above), and verify that this starts the remote server program.
If not, you have further debugging to do.
Now, why does automatic authentication work? Because your ssh command starts the server as yourself
in your account on the mail server machine, rather than as root by the system. This runs the IMAP server
in pre-authenticated mode, and simply accesses the mail of the account under which it runs. So, the ssh
subprocess gets you single-signon for your mail. That is, once you have SSH authorization to log into the
mail server, you don't need to authenticate again via password to access your mail.
This method of mail access can be slow. If you're using IMAP and have multiple mail folders, each time
you change folders Pine will create a new IMAP connection, which now involves setting up a complete SSH
connection. However, this is a matter of implementation—ideally we'd establish a single SSH connection to
the server, and then have a command that quickly establishes a new SSH channel to the server via the
existing connection. The free SSH implementation lsh in fact has this capability; see its lsh -G and lshg
commands.
Notes:
For concreteness we suggested SSH public-key authentication with ssh-agent, but any form of](https://image.slidesharecdn.com/linuxsecuritycookbook-120930200536-phpapp01/85/Linux-security-cookbook-287-320.jpg)
![automatic SSH authentication will work, such as Kerberos [Recipe 4.14], hostbased [Recipe 6.8],
etc.
Although this recipe is written for Pine, you can adapt the same technique for any mail client that
can connect to its server via an arbitrary external program.
8.16.4 See Also
pine(1). The LSH home page is http://www.lysator.liu.se/~nisse/lsh .
[ Team LiB ]](https://image.slidesharecdn.com/linuxsecuritycookbook-120930200536-phpapp01/85/Linux-security-cookbook-288-320.jpg)
![[ Team LiB ]
Recipe 8.17 Receiving Mail Without a Visible Server
8.17.1 Problem
You want to receive Internet email without running a publicly accessible mail server or daemon.
8.17.2 Solution
Don't run a mail daemon. Queue your mail on another ISP and use fetchmail to download it. Authenticate
to the ISP via SSH, and transfer the email messages over an SSH tunnel. Then have fetchmail invoke
your local mail delivery agent directly to deliver the mail.
~/.fetchmailrc:
poll imap.example.com with proto IMAP:
preauth ssh
plugin "ssh %h /usr/sbin/imapd";
user 'shawn' there is smith here;
mda "/usr/sbin/sendmail -oem -f %F %T"
fetchall;
no keep;
~/.bash_profile:
if [ -z "$SSH_AGENT_PID" ]
then
eval `/usr/bin/ssh-agent` > /dev/null 2> /dev/null
fi
~/.bashrc:
(/usr/bin/ssh-add -l | /bin/grep -q 'no identities')
&& /usr/bin/ssh-add
&& /usr/bin/fetchmail -d 600
8.17.3 Discussion
fetchmail is the Swiss army knife of mail delivery. Using a powerful configuration mechanism
(~/.fetchmailrc), fetchmail can poll remote IMAP and POP servers, retrieve messages, and forward them
through sendmail and other mail delivery systems.
For security reasons, you might not want a sendmail daemon visible to the outside world, and yet you
want mail delivered locally. For example, the machine where you read mail could be behind a firewall.
This recipe is run by user smith on the local machine. When he logs in, the given commands in his
.bash_profile and .bashrc make sure an SSH agent [Recipe 6.9] is running and is loaded with the
necessary keys. Also fetchmail is launched, polling a remote IMAP server, imap.example.com, every 10
minutes (600 seconds). fetchmail authenticates via SSH as user shawn@imap.example.com and
downloads all messages (fetchall) in shawn's mailbox. These messages are delivered to smith's local
mailbox by invoking sendmail directly (mda). Our recipe also deletes the messages from the IMAP server](https://image.slidesharecdn.com/linuxsecuritycookbook-120930200536-phpapp01/85/Linux-security-cookbook-289-320.jpg)
![(no keep) but this is optional: you might skip this until you're sure things are working correctly.
While smith is not logged in, fetchmail doesn't run. Mail will arrive normally on imap.example.com,
awaiting retrieval.
If you prefer to run a mail daemon (sendmail -bd) on the machine receiving your email messages, simply
delete the mda line.
fetchmail is tremendously useful and has tons of options. The manpage is well worth reading in full.
8.17.4 See Also
fetchmail(1).
[ Team LiB ]](https://image.slidesharecdn.com/linuxsecuritycookbook-120930200536-phpapp01/85/Linux-security-cookbook-290-320.jpg)
![[ Team LiB ]
Recipe 8.18 Using an SMTP Server from Arbitrary Clients
8.18.1 Problem
You want your SMTP server to relay mail from arbitrary places, without creating an open relay.
8.18.2 Solution
Use SMTP authentication. To set up the server:
1. Find this line in /etc/mail/sendmail.mc:
DAEMON_OPTIONS(`Port=smtp,Addr=127.0.0.1, Name=MTA')
and change it to:
DAEMON_OPTIONS(`Port=smtp, Name=MTA')
The default setting restricts sendmail to accepting connections only from the same host, for
security; now it will accept connections from elsewhere.
2. Make sure this line in /etc/mail/sendmail.mc appears uncommented (i.e., it is not preceded by the
comment symbol dnl):
TRUST_AUTH_MECH(`EXTERNAL DIGEST-MD5 CRAM-MD5 LOGIN PLAIN')
3. If you have changed /etc/mail/sendmail.mc, rebuild your sendmail configuration file[3] and restart
sendmail.
[3]You'll need the RPM package sendmail-cf installed to do this. Note also that some Linux distributions put
sendmail.cf in the /etc/mail directory.
Rebuild the configuration:
# m4 /etc/mail/sendmail.mc > /etc/sendmail.cf
Restart sendmail:
# /etc/init.d/sendmail restart
4. Establish an account for SMTP authentication, say, with username mailman:
# /usr/sbin/saslpasswd -c mailman
Password: ********
Again (for verification): ********
1.](https://image.slidesharecdn.com/linuxsecuritycookbook-120930200536-phpapp01/85/Linux-security-cookbook-291-320.jpg)
![EHLO foo
QUIT
# tail /var/log/maillog
and look for any enlightening error messages.
This configuration by itself does not secure the entire SMTP session, which is still a plaintext TCP
connection. So don't use simple password authentication, as your passwords can then be stolen by
network eavesdropping. By default, sendmail accepts only the DIGEST-MD5 and CRAM-MD5
authentication methods, which do not send the password in plaintext.
It is also possible to configure sendmail to use SSL to protect the entire SMTP session. If you understand
the security properties and limitations of the authentication mechanisms mentioned above, and consider
them inadequate for your application, this might be a necessary step to take. However, don't do it out of
some notion to "protect" the content of your email. Unless you have a closed system, your email will be
further relayed across other networks on the way to its destination, so securing this one hop is of little
value. For more security, use an end-to-end approach, encrypting messages with GnuPG, PGP, or S/MIME
(see [Recipe 8.1] through [Recipe 8.8]).
8.18.4 See Also
Learn more about SMTP authentication at ftp://ftp.isi.edu/in-notes/rfc2554.txt, and sendmail's particular
implementation at http://www.sendmail.org/~ca/email/auth.html. The SASL RFC is at ftp://ftp.isi.edu/in-
notes/rfc2222.txt.
[ Team LiB ]](https://image.slidesharecdn.com/linuxsecuritycookbook-120930200536-phpapp01/85/Linux-security-cookbook-293-320.jpg)
![[ Team LiB ]
Chapter 9. Testing and Monitoring
To keep your system secure, be proactive: test for security holes and monitor for unusual activity. If you
don't keep watch for break-ins, you may wake up one day to find your systems totally hacked and owned,
which is no party.
In this chapter we cover useful tools and techniques for testing and monitoring your system, in the
following areas:
Logins and passwords
Testing password strength, locating accounts with no password, and tracking suspicious login
activity
Filesystems
Searching them for weak security, and looking for rootkits
Networking
Looking for open ports, observing local network use, packet-sniffing, tracing network processes, and
detecting intrusions
Logging
Reading your system logs, writing log entries from various languages, configuring syslogd, and
rotating log files
We must emphasize that our discussion of network monitoring and intrusion detection is fairly basic. Our
recipes will get you started, but these important topics are complex, with no easy, turnkey solutions. You
may wish to investigate additional resources for these purposes, such as:
Computer Incident Advisory Capability (CIAC) Network Monitoring Tools page:
http://ciac.llnl.gov/ciac/ToolsUnixNetMon.html
Stanford Linear Accelerator (SLAC) Network Monitoring Tools page:
http://www.slac.stanford.edu/xorg/nmtf/nmtf-tools.html
National Institutes of Health "Network and Network Monitoring Software" page:
http://www.alw.nih.gov/Security/prog-network.html
Setting Up a Network Monitoring Console: http://com.pp.asu.edu/support/nmc/nmcdocs/nmc.html
Insecure.org's top 50 security tools: http://www.insecure.org/tools.html
[ Team LiB ]](https://image.slidesharecdn.com/linuxsecuritycookbook-120930200536-phpapp01/85/Linux-security-cookbook-294-320.jpg)
![[ Team LiB ]
Recipe 9.1 Testing Login Passwords (John the Ripper)
9.1.1 Problem
You want to check that all login passwords in your system password database are strong.
9.1.2 Solution
Use John the Ripper, a password-cracking utility from the Openwall Project (http://www.openwall.com).
After the software is installed, run:
# cd /var/lib/john
# umask 077
# unshadow /etc/passwd /etc/shadow > mypasswords
# john mypasswords
Cracked passwords will be written into the file john.pot. Cracked username/password pairs can be shown
after the fact (or during cracking) with the -show option:
# john -show mypasswords
You can instruct john to crack the passwords of only certain users or groups with the options -
users:u1,u2,... or -groups:g1,g2,..., e.g.:
# john -users:smith,jones,akhmed mypasswords
Running john with no options will print usage information.
9.1.3 Discussion
SuSE distributes John the Ripper, but Red Hat does not. If you need it, download the software in source
form for Unix from http://www.openwall.com/john, together with its signature, and check the signature
before proceeding. [Recipe 7.15]
Unpack the source:
$ tar xvzpf john-*.tar.gz
Prepare to compile:
$ cd `ls -d john-* | head -1`/src
$ make
This will print out a list of targets for various systems; choose the appropriate one for your host, e.g.:
linux-x86-any-elf Linux, x86, ELF binaries
and run make to build your desired target, e.g.:](https://image.slidesharecdn.com/linuxsecuritycookbook-120930200536-phpapp01/85/Linux-security-cookbook-295-320.jpg)
![$ make linux-x86-any-elf
Install the software, as root:
# cd ../run
# mkdir -p /usr/local/sbin
# umask 077
# cp -d john un* /usr/local/sbin
# mkdir -p /var/lib/john
# cp *.* mailer /var/lib/john
Then use the recipe we've provided.
By default, Red Hat 8.0 uses MD5-hashed passwords stored in /etc/shadow, rather than the traditional
DES-based crypt( ) hashes stored in /etc/passwd; this is effected by the md5 and shadow directives in
/etc/pam.d/system-auth:
password sufficient /lib/security/pam_unix.so nullok use_authtok md5 shadow
The unshadow command gathers the account and hash information together again for cracking. This
information should not be publicly available for security reasons— that's why it is split up in the first
place—so be careful with this re-integrated file. If your passwords change, you will have to re-run the
unshadow command to build an up-to-date password file for cracking.
In general, cracking programs use dictionaries of common words when attempting to crack a password,
trying not only the words themselves but also permutations, misspellings, alternate capitalizations, and so
forth. The default dictionary (/var/lib/john/password.lst) is small, so obtain larger ones for effective
cracking. Also, add words appropriate to your environment, such as the names of local projects,
machines, companies, and people. Some available dictionaries are:
ftp://ftp.ox.ac.uk/pub/wordlists/
ftp://ftp.cerias.purdue.edu/pub/dict/wordlists
Concatenate your desired word lists into a single file, and point to it with the wordlist directive in
/var/lib/john/john.ini.
john operates on a file of account records, so you can gather the password data from many machines and
process them in one spot. You must ensure, however, that they all use the same hashing algorithms
compiled into the version you built on your cracking host. For security, it might be wise to gather your
account databases, then perform the cracking on a box off the network, in a secure location.
There are other crackers available, notably Crack by Alec Muffet. [Recipe 9.2] We feature John the Ripper
here not because it's necessarily better, but because it's simpler to use on Red Hat 8.0, automatically
detecting and supporting the default MD5 hashes.
9.1.4 See Also
See the doc directory of the John the Ripper distribution for full documentation and examples.
Learn about Alec Muffet's Crack utility at http://www.cryptcide.org/alecm/security/c50-faq.html.
The Red Hat Guide to Password Security is at http://www.redhat.com/docs/manuals/linux/RHL-8.0-
Manual/security-guide/s1-wstation-pass.html.](https://image.slidesharecdn.com/linuxsecuritycookbook-120930200536-phpapp01/85/Linux-security-cookbook-296-320.jpg)
![[ Team LiB ]](https://image.slidesharecdn.com/linuxsecuritycookbook-120930200536-phpapp01/85/Linux-security-cookbook-297-320.jpg)
![[ Team LiB ]
Recipe 9.2 Testing Login Passwords (CrackLib)
9.2.1 Problem
You want assurance that your login passwords are secure.
9.2.2 Solution
Write a little program that calls the FascistCheck function from CrackLib:
#include <stdlib.h>
#include <unistd.h>
#include <stdio.h>
#include <crack.h>
#define DICTIONARY "/usr/lib/cracklib_dict"
int main(int argc, char *argv[]) {
char *password;
char *problem;
int status = 0;
printf("nEnter an empty password or Ctrl-D to quit.n");
while ((password = getpass("nPassword: ")) != NULL && *password ) {
if ((problem = FascistCheck(password, DICTIONARY)) != NULL) {
printf("Bad password: %s.n", problem);
status = 1;
} else {
printf("Good password!n");
}
}
exit(status);
}
Compile and link it thusly:
$ gcc cracktest.c -lcrack -o cracktest
Run it (the passwords you type will not appear on the screen):
$ ./cracktest
Enter an empty password or Ctrl-D to quit.
Password: xyz
Bad password: it's WAY too short.
Password: elephant
Bad password: it is based on a dictionary word.
Password: kLu%ziF7
Good password!
9.2.3 Discussion](https://image.slidesharecdn.com/linuxsecuritycookbook-120930200536-phpapp01/85/Linux-security-cookbook-298-320.jpg)
![CrackLib is an offshoot of Alec Muffet's password cracker, Crack. It is designed to be embedded in other
programs, and hence is provided only as a library (and dictionary). The FascistCheck function subjects a
password to a variety of tests, to ensure that it is not vulnerable to guessing.
9.2.4 See Also
Learn more about CrackLib at http://www.crypticide.org/users/alecm.
Perl for System Administration (O'Reilly), section 10.5, shows how to make a Perl module to use CrackLib.
PAM can use CrackLib to force users to choose good passwords. [Recipe 4.2]
[ Team LiB ]](https://image.slidesharecdn.com/linuxsecuritycookbook-120930200536-phpapp01/85/Linux-security-cookbook-299-320.jpg)
![[ Team LiB ]
Recipe 9.3 Finding Accounts with No Password
9.3.1 Problem
You want to detect local login accounts that can be accessed without a password.
9.3.2 Solution
# awk -F: '$2 == "" { print $1, "has no password!" }' /etc/shadow
9.3.3 Discussion
The worst kind of password is no password at all, so you want to make sure every account has one. Any
good password-cracking program can be employed here—they often try to find completely unprotected
accounts first—but you can also look for missing passwords directly.
Encrypted passwords are stored in the second field of each entry in the shadow password database, just
after the username. Fields are separated by colons.
Note that the shadow password file is readable only by superusers.
9.3.4 See Also
shadow(5).
[ Team LiB ]](https://image.slidesharecdn.com/linuxsecuritycookbook-120930200536-phpapp01/85/Linux-security-cookbook-300-320.jpg)
![[ Team LiB ]
Recipe 9.4 Finding Superuser Accounts
9.4.1 Problem
You want to list all accounts with superuser access.
9.4.2 Solution
$ awk -F: '$3 == 0 { print $1, "is a superuser!" }' /etc/passwd
9.4.3 Discussion
A superuser, by definition, has a numerical user ID of zero. Be sure your system has only one superuser
account: root. Multiple superuser accounts are a very bad idea because they are harder to control and
track. (See Chapter 5 for better ways to share root privileges.)
Numerical user IDs are stored in the third field of each entry in the passwd database. The username is
stored in the first field. Fields are separated by colons.
9.4.4 See Also
passwd(5).
[ Team LiB ]](https://image.slidesharecdn.com/linuxsecuritycookbook-120930200536-phpapp01/85/Linux-security-cookbook-301-320.jpg)
![[ Team LiB ]
Recipe 9.5 Checking for Suspicious Account Use
9.5.1 Problem
You want to discover unusual or dangerous usage of accounts on your system: dormant user accounts,
recent logins to system accounts, etc.
9.5.2 Solution
To print information about the last login for each user:
$ lastlog [-u username]
To print the entire login history:
$ last [username]
To print failed login attempts:
$ lastb [username]
To enable recording of bad logins:
# touch /var/log/btmp
# chown --reference=/var/log/wtmp /var/log/btmp
# chmod --reference=/var/log/wtmp /var/log/btmp
9.5.3 Discussion
Attackers look for inactive accounts that are still enabled, in the hope that intrusions will escape detection
for long periods of time. If Joe retired and left the organization last year, will anyone notice if his account
becomes compromised? Certainly not Joe! To avoid problems like this, examine all accounts on your
system for unexpected usage patterns.
Linux systems record each user's last login time in the database /var/log/lastlog. The terminal (or X
Window System display name) and remote system name, if any, are also noted. The lastlog command
prints this information in a convenient, human-readable format.](https://image.slidesharecdn.com/linuxsecuritycookbook-120930200536-phpapp01/85/Linux-security-cookbook-302-320.jpg)
![/var/log/lastlog is a database, not a log file. It does not grow continuously, and
therefore should not be rotated. The apparent size of the file (e.g., as displayed by
ls -l) is often much larger than the actual size, because the file contains "holes" for
ranges of unassigned user IDs.
Access is restricted to the superuser by recent versions of Red Hat (8.0 or later). If
this seems too paranoid for your system, it is safe to make the file world-readable:
# chmod a+r /var/log/lastlog
In contrast, the btmp log file will grow slowly (unless you are under attack!), but it
should be rotated like other log files. You can either add btmp to the wtmp entry in
/etc/logrotate.conf, or add a similar entry in a separate file in the /etc/logrotate.d
directory. [Recipe 9.30]
A history of all logins and logouts (interspersed with system events like shutdowns, reboots, runlevel
changes, etc.) is recorded in the log file /var/log/wtmp. The last command scans this log file to produce a
report of all login sessions, in reverse chronological order, sorted by login time.
Failed login attempts can also be recorded in the log file /var/log/btmp, but this is not done by default. To
enable recording of bad logins, create the btmp file manually, using the same owner, group, and
permissions as for the wtmp file. The lastb command prints a history of bad logins.
The preceding methods do not scale well to multiple systems, so see our more general solution. [Recipe
9.6]
9.5.4 See Also
lastlog(1), last(1), lastb(1).
[ Team LiB ]](https://image.slidesharecdn.com/linuxsecuritycookbook-120930200536-phpapp01/85/Linux-security-cookbook-303-320.jpg)
![[ Team LiB ]
Recipe 9.6 Checking for Suspicious Account Use, Multiple
Systems
9.6.1 Problem
You want to scan multiple computers for unusual or dangerous usage of accounts.
9.6.2 Solution
Merge the lastlog databases from several systems, using Perl:
use DB_File;
use Sys::Lastlog;
use Sys::Hostname;
my %omnilastlog;
tie(%omnilastlog, "DB_File", "/share/omnilastlog");
my $ll = Sys::Lastlog->new( );
while (my ($user, $uid) = (getpwent( ))[0, 2]) {
if (my $llent = $ll->getlluid($uid)) {
$omnilastlog{$user} = pack("Na*", $llent->ll_time( ),
join("0", $llent->ll_line( ),
$llent->ll_host( ),
hostname))
if $llent->ll_time( ) >
(exists($omnilastlog{$user}) ?
unpack("N", $omnilastlog{$user}) : -1);
}
}
untie(%omnilastlog);
exit(0);
To read the merged lastlog database, omnilastlog, use another Perl script:
use DB_File;
my %omnilastlog;
tie(%omnilastlog, "DB_File", "/share/omnilastlog");
while (my ($user, $record) = each(%omnilastlog)) {
my ($time, $rest) = unpack("Na*", $record);
my ($line, $host_from, $host_to) = split("0", $rest, -1);
printf("%-8.8s %-16.16s -> %-16.16s %-8.8s %sn",
$user, $host_from, $host_to, $line,
$time ? scalar(localtime($time)) : "**Never logged in**");
}
untie(%omnilastlog);
exit(0);](https://image.slidesharecdn.com/linuxsecuritycookbook-120930200536-phpapp01/85/Linux-security-cookbook-304-320.jpg)
![9.6.3 Discussion
Perusing the output from the lastlog , last, and lastb commands [Recipe 9.5] might be sufficient to
monitor activity on a single system with a small number of users, but the technique doesn't scale well in
the following cases:
If accounts are shared among many systems, you probably want to know a user's most recent login
on any of your systems.
Some system accounts intended for special purposes, such as bin or daemon, should never be used
for routine logins.
Disabled accounts should be monitored to make sure they have no login activity.
Legitimate usage patterns vary, and your goal should be to notice deviations from the norm. We need
more flexibility than the preceding tools provide.
We can solve this dilemma through automation. The Perl modules Sys::Lastlog and Sys::Utmp, which are
available from CPAN, can parse and display a system's last-login data. Despite its name, Sys::Utmp can
process the wtmp and btmp files; they have the same format as /var/log/utmp, the database containing a
snapshot of currently logged-in users.
Our recipe merges lastlog databases from several systems into a single database, which we call
omnilastlog, using Perl. The script steps through each entry in the password database on each system,
looks up the corresponding entry in the lastlog database using the Sys::Lastlog module, and updates the
entry in the merged omnilastlog database if the last login time is more recent than any other we have
previously seen.
The merged omnilastlog database is tied to a hash for easy access. We use the Berkeley DB format
because it is byte-order-independent and therefore portable: this would be important if your Linux
systems run on different architectures. If all of your Linux systems are of the same type (e.g., Intel x86
systems), then any other Perl database module could be used in place of DB_File.
Our hash is indexed by usernames rather than numeric user IDs, in case the user IDs are not
standardized among the systems (a bad practice that, alas, does happen). The record for each user
contains the time, terminal (ll_line), and remote and local hostnames. The time is packed as an integer in
network byte order (another nod to portability: for homogeneous systems, using the native "L" packing
template instead of "N" would work as well). The last three values are glued together with null characters,
which is safe because the strings never contain nulls.
Run the merge script on all of your systems, as often as desired, to update the merged omnilastlog
database. Our recipe assumes a shared filesystem location, /share/omnilastlog; if this is not convenient,
copy the file to each system, update it, and then copy it back to a central repository. The merged
database is compact, often smaller than the individual lastlog databases.
An even simpler Perl script reads and analyzes the merged omnilastlog database. Our recipe steps
through and unpacks each record in the database, and then prints all of the information, like the lastlog
command.
This script can serve as a template for checking account usage patterns, according to your own
conventions. For example, you might notice dormant accounts by insisting that users with valid shells (as
listed in the file /etc/shells, with the exception of /sbin/nologin) must have logged in somewhere during
the last month. Conversely, you might require that system accounts (recognized by their low numeric
user IDs) with invalid shells must never login, anywhere. Finally, you could maintain a database of the
dates when accounts are disabled (e.g., as part of a standard procedure when people leave your
organization), and demand that no logins occur for such accounts after the termination date for each.](https://image.slidesharecdn.com/linuxsecuritycookbook-120930200536-phpapp01/85/Linux-security-cookbook-305-320.jpg)
![Run a script frequently to verify your assumptions about legitimate account usage patterns. This way, you
will be reminded promptly after Joe's retirement party that his account should be disabled, hopefully
before crackers start guessing his password.
9.6.4 See Also
The Sys::Lastlog and Sys::Utmp Perl modules are found at http://www.cpan.org.
Perl for System Administration (section 9.2) from O'Reilly shows how to unpack the utmp records used for
wtmp and btmp files. O'Reilly's Perl Cookbook also has sample programs for reading records from lastlog
and wtmp files: see the laston and tailwtmp scripts in Chapter 8 of that book.
[ Team LiB ]](https://image.slidesharecdn.com/linuxsecuritycookbook-120930200536-phpapp01/85/Linux-security-cookbook-306-320.jpg)
![[ Team LiB ]
Recipe 9.7 Testing Your Search Path
9.7.1 Problem
You want to avoid invoking the wrong program of a given name.
9.7.2 Solution
Ensure that your search path contains no relative directories:
$ perl -e 'print "PATH contains insecure relative directory "$_"n"
foreach grep ! m[^/], split /:/, $ENV{"PATH"}, -1;'
9.7.3 Discussion
Imagine you innocently type ls while your current working directory is /tmp, and you discover to your
chagrin that you have just run a malicious program, /tmp/ls, instead of the expected /bin/ls. Worse, you
might not notice at all, if the rogue program behaves like the real version while performing other
nefarious activities silently.
This can happen if your search path contains a period ("."), meaning the current working directory. The
possibility of unexpected behavior is higher if "." is early in your search path, but even the last position is
not safe: consider the possibility of misspellings. A cracker could create a malicious /tmp/hwo, a
misspelling of the common who command, and hope you type "hwo" sometime while you're in /tmp. As
there is no earlier "hwo" in your search path, you'll unintentionally run the cracker's ./hwo program.
(Which no doubt prints, `basename $SHELL`: hwo: command not found to stderr while secretly
demolishing your filesystem.) Play it safe and keep "." out of your search path.
An empty search path element—two adjacent colons, or a leading or trailing colon— also refers to the
current working directory. These are sometimes created inadvertently by scripts that paste together the
PATH environment variable with ":" separators, adding one too many, or adding an extra separator at the
beginning or end.
In fact, any relative directories in your search path are dangerous, as they implicitly refer to the current
working directory. Remove all of these relative directories: you can still run programs (securely!) by
explicitly typing their relative directory, as in:
./myprogram
Our recipe uses a short Perl script to split the PATH environment variable, complaining about any
directory that is not absolute (i.e., that does not start with a "/" character). The negative limit (-1) for
split is important for noticing troublesome empty directories at the end of the search path.
9.7.4 See Also
environ(5).](https://image.slidesharecdn.com/linuxsecuritycookbook-120930200536-phpapp01/85/Linux-security-cookbook-307-320.jpg)
![[ Team LiB ]](https://image.slidesharecdn.com/linuxsecuritycookbook-120930200536-phpapp01/85/Linux-security-cookbook-308-320.jpg)
![[ Team LiB ]
Recipe 9.8 Searching Filesystems Effectively
9.8.1 Problem
You want to locate files of interest to detect security risks.
9.8.2 Solution
Use find and xargs, but be knowledgeable of their important options and limitations.
9.8.3 Discussion
Are security risks lurking within your filesystems? If so, they can be hard to detect, especially if you must
search through mountains of data. Fortunately, Linux provides the powerful tools find and xargs to help
with the task. These tools have so many options, however, that their flexibility can make them seem
daunting to use. We recommend the following good practices:
Know your filesystems
Linux supports a wide range of filesystem types. To see the ones configured in your kernel, read the
file /proc/filesystems. To see which filesystems are currently mounted (and their types), run:
$ mount
/dev/hda1 on / type ext2 (rw)
/dev/hda2 on /mnt/windows type vfat (rw)
remotesys:/export/spool/mail on /var/spool/mail type nfs
(rw,hard,intr,noac,addr=192.168.10.13)
//MyPC/C$ on /mnt/remote type smbfs (0)
none on /proc type proc (rw)
...
with no options or arguments. We see a traditional Linux ext2 filesystem (/dev/hda1), a Windows FAT32
filesystem (/dev/hda2), a remotely mounted NFS filesystem (remotesys:/export/spool/mail), a Samba
filesystem (//MyPC/C$) mounted remotely, and the proc filesystem provided by the kernel. See mount(8)
for more details.
Know which filesystems are local and which are remote
Searching network filesystems like NFS partitions can be quite slow. Furthermore, NFS typically
maps your local root account to an unprivileged user on the mounted filesystem, so some files or
directories might be inaccessible even to root. To avoid these problems when searching a
filesystem, run find locally on the server that physically contains it.
Be aware that some filesystem types (e.g., for Microsoft Windows) use different models for owners,
groups, and permissions, while other filesystems (notably some for CD-ROMs) do not support these
file attributes at all. Consider scanning "foreign" filesystems on servers that recognize them
natively, and just skip read-only filesystems like CD-ROMs (assuming you know and trust the
source).](https://image.slidesharecdn.com/linuxsecuritycookbook-120930200536-phpapp01/85/Linux-security-cookbook-309-320.jpg)
![The standard Linux filesystem type is ext2. If your local filesystems are of this type only,[1] you can
scan them all with a command like:
[1] And if they are not mounted on filesystems of other types, which would be an unusual configuration.
# find / ! -fstype ext2 -prune -o ... (other find options) ...
This can be readily extended to multiple local filesystem types (e.g., ext2 and ext3):
# find / ! ( -fstype ext2 -o -fstype ext3 ) -prune -o ...
The find -prune option causes directories to be skipped, so we prune any filesystems that do not match
our desired types (ext2 or ext3). The following -o ("or") operator causes the filesystems that survive the
pruning to be scanned.
The find -xdev option prevents crossing filesystem boundaries, and can be useful for avoiding
uninteresting filesystems that might be mounted. Our recipes use this option as a reminder to be
conscious of filesystem types.
Carefully examine permissions
The find -perm option can conveniently select a subset of the permissions, optionally ignoring the
rest. In the most common case, we are interested in testing for any of the permissions in the
subset: use a "+" prefix with the permission argument to specify this. Occasionally, we want to test
all of the permissions: use a "-" prefix instead.[2] If no prefix is used, then the entire set of
permissions is tested; this is rarely useful.
[2]Of course, if the subset contains only a single permission, then there is no difference between "any" and
"all," so either prefix can be used.
Handle filenames safely
If you scan enough filesystems, you will eventually encounter filenames with embedded spaces or
unusual characters like newlines, quotation marks, etc. The null character, however, never appears
in filenames, and is therefore the only safe separator to use for lists of filenames that are passed
between programs.
The find -print0 option produces null-terminated filenames; xargs and perl both support a -0 (zero)
option to read them. Useful filters like sort and grep also understand a -z option to use null
separators when they read and write data, and grep has a separate -Z option that produces null-
terminated filenames (with the -l or -L options). Use these options whenever possible to avoid
misinterpreting filenames, which can be disastrous when modifying filesystems as root!
Avoid long command lines
The Linux kernel imposes a 128 KB limit on the combined size of command-line arguments and the
environment. This limit can be exceeded by using shell command substitution, e.g.:
$ mycommand `find ...`
Use the xargs program instead to collect filename arguments and run commands repeatedly, without
exceeding this limit:
$ find ... -print0 | xargs -0 -r mycommand
The xargs -r option avoids running the command if the output of find is empty, i.e., no filenames were
found. This is usually desirable, to prevent errors like:
$ find ... -print0 | xargs -0 rm
rm: too few arguments
It can occasionally be useful to connect multiple xargs invocations in a pipeline, e.g.:](https://image.slidesharecdn.com/linuxsecuritycookbook-120930200536-phpapp01/85/Linux-security-cookbook-310-320.jpg)
![$ find ... -print0 | xargs -0 -r grep -lZ pattern | xargs -0 -r mycommand
The first xargs collects filenames from find and passes them to grep, as command-line arguments. grep
then searches the file contents (which find cannot do) for the pattern, and writes another list of filenames
to stdout. This list is then used by the second xargs to collect command-line arguments for mycommand.
If you want grep to select filenames (instead of contents), insert it directly into the pipe:
$ find ... -print0 | grep -z pattern | xargs -0 -r mycommand
In most cases, however, find -regex pattern is a more direct way to select filenames using a regular
expression.
Note how grep -Z refers to writing filenames, while grep -z refers to reading and writing data.
xargs is typically much faster than find -exec, which runs the command separately for each file and
therefore incurs greater start-up costs. However, if you need to run a command that can process only one
file at a time, use either find -exec or xargs -n 1:
$ find ... -exec mycommand '{}' ;
$ find ... -print0 | xargs -0 -r -n 1 mycommand
These two forms have a subtle difference, however: a command run by find -exec uses the standard input
inherited from find, while a command run by xargs uses the pipe as its standard input (which is not
typically useful).
9.8.4 See Also
find(1), xargs(1), mount(8).
[ Team LiB ]](https://image.slidesharecdn.com/linuxsecuritycookbook-120930200536-phpapp01/85/Linux-security-cookbook-311-320.jpg)
![[ Team LiB ]
Recipe 9.9 Finding setuid (or setgid) Programs
9.9.1 Problem
You want to check for potentially insecure setuid (or setgid) programs.
9.9.2 Solution
To list all setuid or setgid files (programs and scripts):
$ find /dir -xdev -type f -perm +ug=s -print
To list only setuid or setgid scripts:
$ find /dir -xdev -type f -perm +ug=s -print0 |
perl -0ne 'chomp;
open(FILE, $_);
read(FILE, $magic, 2);
print $_, "n" if $magic eq "#!";
close(FILE)'
To remove setuid or setgid bits from a file:
$ chmod u-s file Remove the setuid bit
$ chmod g-s file Remove the setgid bit
To find and interactively fix setuid and setgid programs:
$ find /dir -xdev -type f
( -perm +u=s -printf "setuid: %pn" -ok chmod -v u-s {} ; ,
-perm +g=s -printf "setgid: %pn" -ok chmod -v g-s {} ; )
To ignore the setuid or setgid attributes for executables in a filesystem, mount it with the nosuid option.
To prohibit executables entirely, use the noexec mount option. These options can appear on the command
line:
# mount -o nosuid ...
# mount -o noexec ...
or in /etc/fstab:
/dev/hdd3 /home ext2 rw,nosuid 1 2
/dev/hdd7 /data ext2 rw,noexec 1 3
Be aware of the important options and limitations of find, so you don't inadvertently overlook important
files. [Recipe 9.8]](https://image.slidesharecdn.com/linuxsecuritycookbook-120930200536-phpapp01/85/Linux-security-cookbook-312-320.jpg)
![9.9.3 Discussion
If your system has been compromised, it is quite likely that an intruder has installed backdoors. A
common ploy is to hide a setuid root program in one of your filesystems.
The setuid permission bit changes the effective user ID to the owner of the file (even root) when a
program is executed; the setgid bit performs the same function for the group. These two attributes are
independent: either or both may be set.
Programs (and especially scripts) that use setuid or setgid bits must be written very carefully to avoid
security holes. Whether you are searching for backdoors or auditing your own programs, be aware of any
activity that involves these bits.
Many setuid and setgid programs are legitimately included in standard Linux distributions, so do not panic
if you detect them while searching directories like /usr. You can maintain a list of known setuid and setgid
programs, and then compare the list with results from more recent filesystem scans. Tripwire (Chapter 1)
is an even better tool for keeping track of such changes.
Our recipe uses find to detect the setuid and setgid bits. By restricting attention to regular files (with -
type f), we avoid false matches for directories, which use the setgid bit for an unrelated purpose. In
addition, our short Perl program identifies scripts, which contain "#!" in the first two bytes (the magic
number).
The chmod command removes setuid or setgid bits (or both) for individual files. We can also combine
detection with interactive repair using find: our recipe tests each bit separately, prints a message if it is
found, asks (using -ok) if a chmod command should be run to remove the bit, and finally confirms each
repair with chmod -v. Commands run by find -ok (or -exec) must be terminated with a ";" argument,
and the "{}" argument is replaced by the filename for each invocation. The separate "," (comma)
argument causes find to perform the tests and actions for the setuid and setgid bits independently.
Finally, mount options can offer some protection against misuse of setuid or setgid programs. The nosuid
option prevents recognition of either bit, which might be appropriate for network filesystems mounted
from a less trusted server, or for local filesystems like /home or /tmp.[3] The even more restrictive
noexec option prevents execution of any programs on the filesystem, which might be useful for
filesystems that should contain only data files.
[3] Note that Perl's suidperl program does not honor the nosuid option for filesystems that contain setuid Perl scripts.
9.9.4 See Also
find(1), xargs(1), chmod(1), perlsec(1).
[ Team LiB ]](https://image.slidesharecdn.com/linuxsecuritycookbook-120930200536-phpapp01/85/Linux-security-cookbook-313-320.jpg)
![[ Team LiB ]
Recipe 9.10 Securing Device Special Files
9.10.1 Problem
You want to check for potentially insecure device special files.
9.10.2 Solution
To list all device special files (block or character):
$ find /dir -xdev ( -type b -o -type c ) -ls
To list any regular files in /dev (except the MAKEDEV program):
$ find /dev -type f ! -name MAKEDEV -print
To prohibit device special files on a filesystem, use mount -o nodev or add the nodev option to entries in
/etc/fstab.
Be aware of the important options and limitations of find, so you don't inadvertently overlook important
files. [Recipe 9.8]
9.10.3 Discussion
Device special files are objects that allow direct access to devices (either real or virtual) via the filesystem.
For the security of your system, you must carefully control this access by maintaining appropriate
permissions on these special files. An intruder who hides extra copies of important device special files can
use them as backdoors to read—or even modify—kernel memory, disk drives, and other critical devices.
Conventionally, device special files are installed only in the /dev directory, but they can live anywhere in
the filesystem, so don't limit your searches to /dev. Our recipe looks for the two flavors of device special
files: block and character (using -type b and -type c, respectively). We use the more verbose -ls (instead
of -print) to list the major and minor device numbers for any that are found: these can be compared to
the output from ls -l /dev to determine the actual device (the filename is irrelevant).
It is also worthwhile to monitor the /dev directory, to ensure that no regular files have been hidden there,
either as replacements for device special files, or as rogue (perhaps setuid) programs. An exception is
made for the /dev/MAKEDEV program, which creates new entries in /dev.
The mount option nodev prevents recognition of device special files. It is a good idea to use this for any
filesystem that does not contain /dev, especially network filesystems mounted from less trusted servers.
9.10.4 See Also
find(1).](https://image.slidesharecdn.com/linuxsecuritycookbook-120930200536-phpapp01/85/Linux-security-cookbook-314-320.jpg)
![[ Team LiB ]](https://image.slidesharecdn.com/linuxsecuritycookbook-120930200536-phpapp01/85/Linux-security-cookbook-315-320.jpg)
![[ Team LiB ]
Recipe 9.11 Finding Writable Files
9.11.1 Problem
You want to locate world-writable files and directories on your machine.
9.11.2 Solution
To find world-writable files:
$ find /dir -xdev -perm +o=w ! ( -type d -perm +o=t ) ! -type l -print
To disable world write access to a file:
$ chmod o-w file
To find and interactively fix world-writable files:
$ find /dir -xdev -perm +o=w ! ( -type d -perm +o=t ) ! -type l -ok chmod -v o-w {} ;
To prevent newly created files from being world-writable:
$ umask 002
Be aware of the important options and limitations of find, so you don't inadvertently overlook important
files. [Recipe 9.8]
9.11.3 Discussion
Think your system is free of world-writable files? Check anyway: you might be surprised. For example, files
extracted from Windows Zip archives are notorious for having insecure or screwed-up permissions.
Our recipe skips directories that have the sticky bit set (e.g., /tmp). Such directories are often world-
writable, but this is safe because of restrictions on removing and renaming files. [Recipe 7.2]
We also skip symbolic links, since their permission bits are ignored (and are usually all set). Only the
permissions of the targets of symbolic links are relevant for access control.
The chmod command can disable world-write access. Combine it with find -ok and you can interactively
detect and repair world-writable files.
You can avoid creating world-writable files by setting a bit in your umask. You also can set other bits for
further restrictions. [Recipe 7.1] Note that programs like unzip are free to override the umask, however,
so you still need to check.
9.11.4 See Also](https://image.slidesharecdn.com/linuxsecuritycookbook-120930200536-phpapp01/85/Linux-security-cookbook-316-320.jpg)
![find(1), chmod(1). See your shell documentation for information on umask: bash(1), tcsh(1), etc.
[ Team LiB ]](https://image.slidesharecdn.com/linuxsecuritycookbook-120930200536-phpapp01/85/Linux-security-cookbook-317-320.jpg)
![[ Team LiB ]
Recipe 9.12 Looking for Rootkits
9.12.1 Problem
You want to check for evidence that a rootkit—a program to create or exploit security holes—has been
run on your system.
9.12.2 Solution
Use chkrootkit. Download the tarfile from http://www.chkrootkit.org, verify its checksum:
$ md5sum chkrootkit.tar.gz
unpack it:
$ tar xvzpf chkrootkit.tar.gz
build it:
$ cd chkrootkit-*
$ make sense
and run it as root:
# ./chkrootkit
More securely, run it using known, good binaries you have previously copied to a secure medium, such as
CD-ROM, e.g.:
# ./chkrootkit -p /mnt/cdrom
9.12.3 Discussion
chkrootkit tests for the presence of certain rootkits, worms, and trojans on your system. If you suspect
you've been hacked, this is a good first step toward confirmation and diagnosis.
chkrootkit invokes a handful of standard Linux commands. At press time they are awk, cut, egrep, find,
head, id, ls, netstat, ps, strings, sed, and uname. If these programs have been compromised on your
system, chkrootkit's output cannot be trusted. So ideally, you should keep around a CD-ROM or write-
protected floppy disk with these programs, and run chkrootkit with the -p option to use these known good
binaries.
Be sure to use the latest version of chkrootkit, which will be aware of the most recently discovered
threats.
9.12.4 See Also](https://image.slidesharecdn.com/linuxsecuritycookbook-120930200536-phpapp01/85/Linux-security-cookbook-318-320.jpg)
![The README file included with chkrootkit explains the tests conducted, and lists the full usage information.
[ Team LiB ]](https://image.slidesharecdn.com/linuxsecuritycookbook-120930200536-phpapp01/85/Linux-security-cookbook-319-320.jpg)
![[ Team LiB ]
Recipe 9.13 Testing for Open Ports
9.13.1 Problem
You want a listing of open network ports on your system.
9.13.2 Solution
Probe your ports from a remote system.
To test a specific TCP port (e.g., SSH):
$ telnet target.example.com ssh
$ nc -v -z target.example.com ssh
To scan most of the interesting TCP ports:
# nmap -v target.example.com
To test a specific UDP port (e.g., 1024):
$ nc -v -z -u target.example.com 1024
To scan most of the interesting UDP ports (slowly!):
# nmap -v -sU target.example.com
To do host discovery (only) for a range of addresses, without port scanning:
# nmap -v -sP 10.12.104.200-222
To do operating system fingerprinting:
# nmap -v -O target.example.com
For a handy (but less flexible) GUI, run nmapfe instead of nmap.
9.13.3 Discussion
When attackers observe your systems from the outside, what do they see? Obviously, you want to present
an image of an impenetrable fortress, not a vulnerable target. You've designed your defenses accordingly:
a carefully constructed firewall, secure network services, etc. But how can you really be sure?
You don't need to wait passively to see what will happen next. Instead, actively test your own armor with
the same tools the attackers will use.
Your vulnerability to attack is influenced by several interacting factors:](https://image.slidesharecdn.com/linuxsecuritycookbook-120930200536-phpapp01/85/Linux-security-cookbook-320-320.jpg)
![The vantage point of the attacker
Firewalls sometimes make decisions based on the source IP address (or the source port).
All intervening firewalls
You have your own, of course, but your ISP might impose additional restrictions on incoming or even
outgoing traffic from your site.
The network configuration of your systems
Which servers listen for incoming connections and are willing to accept them?
Start by testing the last two subsystems in isolation. Verify your firewall operation by simulating the
traversal of packets through ipchains. [Recipe 2.21] Examine the network state on your machines with
netstat. [Recipe 9.14]
Next, the acid test is to probe from the outside. Use your own accounts on distant systems, if you have
them (and if you have permission to do this kind of testing, of course). Alternatively, set up a temporary
test system immediately outside your firewall, which might require cooperation from your ISP.
The nmap command is a powerful and widely used tool for network security testing. It gathers information
about target systems in three distinct phases, in order:
Host discovery
Initial probes to determine which machines are responding within an address range
Port scanning
More exhaustive tests to find open ports that are not protected by firewalls, and are accepting
connections
Operating system fingerprinting
An analysis of network behavioral idiosyncrasies can reveal a surprising amount of detailed
information about the targets
Use nmap to test only systems that you maintain. Many system administrators
consider port scanning to be hostile and antisocial. If you intend to use nmap's
stealth features, obtain permission from third parties that you employ as decoys or
proxies.
Inform your colleagues about your test plans, so they will not be alarmed by
unexpected messages in system logs. Use the logger command [Recipe 9.31] to
record the beginning and end of your tests.
Use caution when probing mission-critical, production systems. You should test
these important systems, but nmap deliberately violates network protocols, and this
behavior can occasionally confuse or even crash target applications and kernels.
To probe a single target, specify the hostname or address:
# nmap -v target.example.com
# nmap -v 10.12.104.200
We highly recommend the -v option, which provides a more informative report. Repeat the option (-v -
v...) for even more details.
You can also scan a range of addresses, e.g., those protected by your firewall. For a class C network,
which uses the first three bytes (24 bits) for the network part of each address, the following commands](https://image.slidesharecdn.com/linuxsecuritycookbook-120930200536-phpapp01/85/Linux-security-cookbook-321-320.jpg)
![are all equivalent:
# nmap -v target.example.com/24
# nmap -v 10.12.104.0/24
# nmap -v 10.12.104.0-255
# nmap -v "10.12.104.*"
Lists of addresses (or address ranges) can be scanned as well:
# nmap -v 10.12.104.10,33,200-222,250
nmapfe is a graphical front end that runs nmap with appropriate command-line
options and displays the results. nmapfe is designed to be easy to use, though it
does not provide the full flexibility of all the nmap options.
By default, nmap uses both TCP and ICMP pings for host discovery. If these are blocked by an intervening
firewall, the nmap -P options provide alternate ping strategies. Try these options when evaluating your
firewall's policies for TCP or ICMP. The goal of host discovery is to avoid wasting time performing port
scans for unused addresses (or machines that are down). If you know that your targets are up, you can
disable host discovery with the -P0 (that's a zero) option.
The simplest way to test an individual TCP port is to try to connect with telnet. The port might be open:
$ telnet target.example.com ssh
Trying 10.12.104.200...
Connected to target.example.com.
Escape character is '^]'.
SSH-1.99-OpenSSH_3.1p1
or closed (i.e., passed by the firewall, but having no server accepting connections on the target):
$ telnet target.example.com 33333
Trying 10.12.104.200...
telnet: connect to address 10.12.104.200: Connection refused
or blocked (filtered) by a firewall:
$ telnet target.example.com 137
Trying 10.12.104.200...
telnet: connect to address 10.12.104.200: Connection timed out
Although telnet's primary purpose is to implement the Telnet protocol, it is also a simple, generic TCP client
that connects to arbitrary ports.
The nc command is an even better way to probe ports:
$ nc -z -vv target.example.com ssh 33333 137
target.example.com [10.12.104.200] 22 (ssh) open
target.example.com [10.12.104.200] 33333 (?) : Connection refused
target.example.com [10.12.104.200] 137 (netbios-ns) : Connection timed out
The -z option requests a probe, without transferring any data. The repeated -v options control the level of
detail, as for nmap.
Port scans are a tour de force for nmap:
# nmap -v target.example.com](https://image.slidesharecdn.com/linuxsecuritycookbook-120930200536-phpapp01/85/Linux-security-cookbook-322-320.jpg)
![...
Remote operating system guess: Linux Kernel 2.4.0 - 2.5.20
Uptime 3.167 days (since Mon Feb 21 12:22:21 2003)
TCP Sequence Prediction: Class=random positive increments
Difficulty=4917321 (Good luck!)
IPID Sequence Generation: All zeros
Nmap run completed -- 1 IP address (1 host up) scanned in 31 seconds
Fingerprinting requires an open and a closed port, which are chosen automatically (so a port scan is
required). nmap then determines the operating system of the target by noticing details of its IP protocol
implementation: Linux is readily recognized (even the version!). It guesses the uptime using the TCP
timestamp option. The TCP and IPID Sequence tests measure vulnerability to forged connections and other
advanced attacks, and Linux performs well here.
It is sobering to see how many details nmap can learn about a system, particularly by attackers with no
authorized access. Expect that attacks on your Linux systems will focus on known Linux-specific
vulnerabilities, especially if you are using an outdated kernel. To protect yourself, keep up to date with
security patches.
nmap can test for other vulnerabilities of specific network services. If you run an open FTP server, try
nmap -b to see if it can be exploited as a proxy. Similarly, if you allow access to an IDENT server, use
nmap -I to determine if attackers can learn the username (especially root!) that owns other open ports.
The -sR option displays information about open RPC services, even without direct access to your
portmapper.
If your firewall makes decisions based on source addresses, run nmap on different remote machines to
test variations in behavior. Similarly, if the source port is consulted by your firewall policies, use the nmap
-g option to pick specific source ports.
The nmap -o options save results to log files in a variety of formats. The XML format (-oX) is ideal for
parsing by scripts: try the XML::Simple Perl module for an especially easy way to read the structured data.
Alternately, the -oG option produces results in a simplified format that is designed for searches using grep.
The -oN option uses the same human-readable format that is printed to stdout, and -oA writes all three
formats to separate files.
nmap supports several stealth options that attempt to disguise the source of attacks by using third-parties
as proxies or decoys, or to escape detection by fragmenting packets, altering timing parameters, etc.
These can occasionally be useful for testing your logging and intrusion detection mechanisms, like Snort.
[Recipe 9.20]
9.13.4 See Also
nmap(1), nmapfe(1), nc(1), telnet(1). The nmap home page is http://www.insecure.org/nmap. The
XML::Simple Perl module is found on CPAN, http://www.cpan.org.](https://image.slidesharecdn.com/linuxsecuritycookbook-120930200536-phpapp01/85/Linux-security-cookbook-324-320.jpg)
![The /proc Filesystem
Programs like ps, netstat, and lsof obtain information from the Linux kernel via the /proc
filesystem. Although /proc looks like an ordinary file hierarchy (e.g., you can run /bin/ls for a
directory listing), it actually contains simulated files. These files are like windows into the
kernel, presenting its data structures in an easy-to-read manner for programs and users,
generally in text format. For example, the file /proc/mounts contains the list of currently
mounted filesystems:
$ cat /proc/mounts
/dev/root / ext2 rw 0 0
/proc /proc proc rw 0 0
/dev/hda9 /var ext2 rw 0 0
...
but if you examine the file listing:
$ ls -l /proc/mounts
-r--r--r-- 1 root root 0 Feb 23 17:07 /proc/mounts
you'll see several curious things. The file has zero size, yet it "contains" the mounted filesystem
data, because it's a simulated file. Also its "last modified" timestamp is the current time. The
permission bits are accurate: this file is world-readable but not writable.[4] The kernel enforces
these access restrictions just as for ordinary files.
You can read /proc files directly, but it's usually more convenient to use programs like ps ,
netstat, and lsof because:
They combine data from a wide range of /proc files into an informative report.
They have options to control the output format or select specific information.
Their output format is usually more portable than the format of the corresponding /proc
files, which are Linux-specific and can change between kernel versions (although
considerable effort is expended to provide backward compatibility). For instance, the
output of lsof -F is in a standardized format, and therefore easily parsed by other
programs.
Nevertheless, /proc files are sometimes ideal for scripts or interactive use. The most important
files for networking are /proc/net/tcp and /proc/net/udp, both consulted by netstat. Kernel
parameters related to networking can be found in the /proc/sys/net directory.
Information for individual processes is located in /proc/<pid> directories, where <pid> is the
process ID. For example, the file /proc/12345/cmdline contains the original command line that
invoked the (currently running) process 12345. Programs like ps summarize the data in these
files. Each process directory contains a /proc/<pid>/fd subdirectory with links for open files:
this is used by the lsof command.
For more details about the format of files in the /proc filesystem, see the proc(5) manpage,
and documentation in the Linux kernel source distribution, specifically:
/usr/src/linux*/Documentation/filesystems/proc.txt
[4] Imagine the havoc one could wreak by writing arbitrary text into a kernel data structure.](https://image.slidesharecdn.com/linuxsecuritycookbook-120930200536-phpapp01/85/Linux-security-cookbook-325-320.jpg)
![[ Team LiB ]](https://image.slidesharecdn.com/linuxsecuritycookbook-120930200536-phpapp01/85/Linux-security-cookbook-326-320.jpg)
![[ Team LiB ]
Recipe 9.14 Examining Local Network Activities
9.14.1 Problem
You want to examine network use occurring on your local machine.
9.14.2 Solution
To print a summary of network use:
$ netstat --inet Connected sockets
$ netstat --inet --listening Server sockets
$ netstat --inet --all Both
# netstat --inet ... -p Identify processes
To print dynamically assigned ports for RPC services:
$ rpcinfo -p [host]
To list network connections for all processes:
# lsof -i[TCP|UDP][@host][:port]
To list all open files for specific processes:
# lsof -p pid
# lsof -c command
# lsof -u username
To list all open files (and network connections) for all processes:
# lsof
To trace network system calls, use strace . [Recipe 9.15]
9.14.3 Discussion
Suppose you see a process with an unfamiliar name running on your system. Should you be concerned?
What is it doing? Could it be surreptitiously transmitting data to some other machine on a distant
continent?
To answer these kinds of questions, you need tools for observing network use and for correlating activities
with specific processes. Use these tools frequently so you will be familiar with normal network usage, and
equipped to focus on suspicious behavior when you encounter it.
The netstat command prints a summary of the state of networking on your machine, and is a good way to
start investigations. The —inet option prints active connections:](https://image.slidesharecdn.com/linuxsecuritycookbook-120930200536-phpapp01/85/Linux-security-cookbook-327-320.jpg)
![$ netstat --inet
Active Internet connections (w/o servers)
Proto Recv-Q Send-Q Local Address Foreign Address State
tcp 0 240 myhost.example.com:ssh client.example.com:3672 ESTABLISHED
tcp 0 0 myhost.example.com:4099 server.example.com:ssh TIME_WAIT
This example shows inbound and outbound ssh connections; the latter is shutting down (as indicated by
TIME_WAIT). If you see an unusually large number of connections in the SYN_RECV state, your system is
probably being probed by a port scanner like nmap. [Recipe 9.13]
Add the —listening option to instead see server sockets that are ready to accept new connections (or use
—all to see both kinds of sockets):
$ netstat --inet --listening
Active Internet connections (only servers)
Proto Recv-Q Send-Q Local Address Foreign Address State
tcp 0 0 *:ssh *:* LISTEN
tcp 0 0 *:http *:* LISTEN
tcp 0 0 *:814 *:* LISTEN
udp 0 0 *:ntp *:*
udp 0 0 *:811 *:*
This example shows the ssh daemon, a web server (http), a network time server (which uses udp), and
two numerical mystery ports, which might be considered suspicious. On a typical system, you would
expect to see many more server sockets, and you should try to understand the purpose of each. Consider
disabling services that you don't need, as a security precaution.
Port numbers for RPC services are assigned dynamically by the portmapper. The rpcinfo command shows
these assignments:
$ rpcinfo -p | egrep -w "port|81[14]"
program vers proto port
100007 2 udp 811 ypbind
100007 1 udp 811 ypbind
100007 2 tcp 814 ypbind
100007 1 tcp 814 ypbind
This relieves our concerns about the mystery ports found by netstat.
You can even query the portmapper on a different machine, by specifying the hostname on the command
line. This is one reason why your firewall should block access to your portmapper, and why you should run
it only if you need RPC services.
The netstat -p option adds a process ID and command name for each socket, and the -e option adds a
username.
Only the superuser can examine detailed information for processes owned by others.
If you need to observe a wide variety of processes, run these commands as root.
The lsof command lists open files for individual processes, including network connections. With no options,
lsof reports on all open files for all processes, and you can hunt for information of interest using grep or
your favorite text editor. This technique can be useful when you don't know precisely what you are looking
for, because all of the information is available, which provides context. The voluminous output, however,
can make specific information hard to notice.](https://image.slidesharecdn.com/linuxsecuritycookbook-120930200536-phpapp01/85/Linux-security-cookbook-328-320.jpg)
![lsof provides many options to select files or processes for more refined searches. By default, lsof prints
information that matches any of the selections. Use the -a option to require matching all of them instead.
The -i option selects network connections: lsof -i is more detailed than but similar to netstat —inet —all -p.
The -i option can be followed by an argument of the form [TCP|UDP][@host][:port] to select specific
network connections—any or all of the components can be omitted. For example, to view all ssh
connections (which use TCP), to or from any machine:
# lsof -iTCP:ssh
COMMAND PID USER FD TYPE DEVICE SIZE NODE NAME
sshd 678 root 3u IPv4 1279 TCP *:ssh (LISTEN)
sshd 7122 root 4u IPv4 211494 TCP myhost:ssh->client:367 (ESTABLISHED)
sshd 7125 katie 4u IPv4 211494 TCP myhost:ssh->client:3672 (ESTABLISHED)
ssh 8145 marianne 3u IPv4 254706 TCP myhost:3933->server:ssh (ESTABLISHED)
Note that a single network connection (or indeed, any open file) can be shared by several processes, as
shown in this example. This detail is not revealed by netstat -p.
Both netstat and lsof convert IP addresses to hostnames, and port numbers to
service names (e.g., ssh), if possible. You can inhibit these conversions and force
printing of numeric values, e.g., if you are have many network connections and
some nameservers are responding slowly. Use the netstat —numeric-hosts or
—numeric-ports options, or the lsof -n, -P, or -l options (for host addresses, port
numbers, and user IDs, respectively) to obtain numeric values, as needed.
To examine processes that use RPC services, the +M option is handy for displaying portmapper
registrations:
# lsof +M -iTCP:814 -iUDP:811
COMMAND PID USER FD TYPE DEVICE SIZE NODE NAME
ypbind 633 root 6u IPv4 1202 UDP *:811[ypbind]
ypbind 633 root 7u IPv4 1207 TCP *:814[ypbind] (LISTEN)
ypbind 635 root 6u IPv4 1202 UDP *:811[ypbind]
ypbind 635 root 7u IPv4 1207 TCP *:814[ypbind] (LISTEN)
ypbind 636 root 6u IPv4 1202 UDP *:811[ypbind]
ypbind 636 root 7u IPv4 1207 TCP *:814[ypbind] (LISTEN)
ypbind 637 root 6u IPv4 1202 UDP *:811[ypbind]
ypbind 637 root 7u IPv4 1207 TCP *:814[ypbind] (LISTEN)
This corresponds to rpcinfo -p output from our earlier example. The RPC program names are enclosed in
square brackets, after the port numbers.
You can also select processes by ID (-p), command name (-c), or username (-u):
# lsof -a -c myprog -u tony
COMMAND PID USER FD TYPE DEVICE SIZE NODE NAME
myprog 8387 tony cwd DIR 0,15 4096 42329 /var/tmp
myprog 8387 tony rtd DIR 8,1 4096 2 /
myprog 8387 tony txt REG 8,2 13798 31551 /usr/local/bin/myprog
myprog 8387 tony mem REG 8,1 87341 21296 /lib/ld-2.2.93.so
myprog 8387 tony mem REG 8,1 90444 21313 /lib/libnsl-2.2.93.so
myprog 8387 tony mem REG 8,1 11314 21309 /lib/libdl-2.2.93.so
myprog 8387 tony mem REG 8,1 170910 81925 /lib/i686/libm-2.2.93.so
myprog 8387 tony mem REG 8,1 10421 21347 /lib/libutil-2.2.93.so
myprog 8387 tony mem REG 8,1 42657 21329 /lib/libnss_files-2.2.93.so
myprog 8387 tony mem REG 8,1 15807 21326 /lib/libnss_dns-2.2.93.so](https://image.slidesharecdn.com/linuxsecuritycookbook-120930200536-phpapp01/85/Linux-security-cookbook-329-320.jpg)
![myprog 8387 tony mem REG 8,1 69434 21341 /lib/libresolv-2.2.93.so
myprog 8387 tony mem REG 8,1 1395734 81923 /lib/i686/libc-2.2.93.so
myprog 8387 tony 0u CHR 136,3 2 /dev/pts/3
myprog 8387 tony 1u CHR 136,3 2 /dev/pts/3
myprog 8387 tony 2u CHR 136,3 2 /dev/pts/3
myprog 8387 tony 3r REG 8,5 0 98315 /var/tmp/foo
myprog 8387 tony 4w REG 8,5 0 98319 /var/tmp/bar
myprog 8387 tony 5u IPv4 274331 TCP myhost:2944->www:http (ESTABLISHED)
Note that the arrow does not indicate the direction of data transfer for network connections: the order
displayed is always local->remote.
The letters following the file descriptor (FD) numbers show that myprog has opened the file foo for reading
(r), the file bar for writing (w), and the network connection bidirectionally (u).
The complete set of information printed by lsof can be useful when investigating suspicious processes. For
example, we can see that myprog's current working directory (cwd) is /var/tmp, and the pathname for the
program (txt) is /usr/local/bin/myprog. Be aware that rogue programs may try to disguise their identity: if
you find sshd using the executable /tmp/sshd instead of /usr/sbin/sshd, that is cause for alarm. Similarly,
it would be troubling to discover a program called "ls" with network connections to unfamiliar ports![5]
[5]Even ls can legitimately use the network, however, if your system uses NIS for user or group ID lookups. You need
to know what to expect in each case.
9.14.4 See Also
netstat(8), rpcinfo(8), lsof(8).
[ Team LiB ]](https://image.slidesharecdn.com/linuxsecuritycookbook-120930200536-phpapp01/85/Linux-security-cookbook-330-320.jpg)
![[ Team LiB ]
Recipe 9.15 Tracing Processes
9.15.1 Problem
You want to know what an unfamiliar process is doing.
9.15.2 Solution
To attach to a running process and trace system calls:
# strace -p pid
To trace network system calls:
# strace -e trace=network,read,write ...
9.15.3 Discussion
The strace command lets you observe a given process in detail, printing its system calls as they occur. It
expands all arguments, return values, and errors (if any) for the system calls, showing all information
passed between the process and the kernel. (It can also trace signals.) This provides a very complete
picture of what the process is doing.
Use the strace -p option to attach to and trace a process, identified by its process ID, say, 12345:
# strace -p 12345
To detach and stop tracing, just kill strace. Other than a small performance penalty, strace has no effect
on the traced process.
Tracing all system calls for a process can produce overwhelming output, so you can select sets of
interesting system calls to print. For monitoring network activity, the -e trace=network option is
appropriate. Network sockets often use the generic read and write system calls as well, so trace those
too:
$ strace -e trace=network,read,write finger katie@server.example.com
...
socket(PF_INET, SOCK_STREAM, IPPROTO_TCP) = 4
connect(4, {sin_family=AF_INET,
sin_port=htons(79),
sin_addr=inet_addr("10.12.104.222")}, 16) = 0
write(4, "katie", 5) = 5
write(4, "rn", 2) = 2
read(4, "Login: katie tttName: K"..., 4096) = 244
read(4, "", 4096) = 0
...
The trace shows the creation of a TCP socket, followed by a connection to port 79 for the finger service at](https://image.slidesharecdn.com/linuxsecuritycookbook-120930200536-phpapp01/85/Linux-security-cookbook-331-320.jpg)
![the IP address for the server. The program then follows the finger protocol by writing the username and
reading the response.
By default, strace prints only 32 characters of string arguments, which can lead to the truncated output
shown. For a more complete trace, use the -s option to specify a larger maximum data size. Similarly,
strace abbreviates some large structure arguments, such as the environment for new processes: supply
the -v option to print this information in full.
You can trace most network activity effectively by following file descriptors: in the previous example, the
value is 4 (returned by the socket-creation call, and used as the first argument for the subsequent system
calls). Then match these values to the file descriptors displayed in the FD column by lsof. [Recipe 9.14]
When you identify an interesting file descriptor, you can print the transferred data in both hexadecimal
and ASCII using the options -e [read|write]=fd:
$ strace -e trace=read -e read=4 finger katie@server.example.com
...
read(4, "Login: katie tttName: K"..., 4096) = 244
| 00000 4c 6f 67 69 6e 3a 20 6b 61 74 69 65 20 20 20 20 Login: k atie |
| 00010 20 20 20 20 20 20 09 09 09 4e 61 6d 65 3a 20 4b .. .Name: K |
...
strace watches data transfers much like network packet sniffers do, but it also can observe input/output
involving local files and other system activities.
If you trace programs for long periods, ask strace to annotate its output with timestamps. The -t option
records absolute times (repeat the option for more detail), the -r option records relative times between
system calls, and -T records time spent in the kernel within system calls. Finally, add the strace -f option
to follow child processes.[6]
[6]To follow child processes created by vfork, include the -F option as well, but this requires support from the kernel
that is not widely available at press time. Also, strace does not currently work well with multithreaded processes: be
sure you have the latest version, and a kernel Version 2.4 or later, before attempting thread tracing.
Each line of the trace has the process ID added for children. Alternatively, you can untangle the system
calls by directing the trace for each child process to a separate file, using the options:
$ strace -f -ff -o filename ...
9.15.4 See Also
strace(1), and the manpages for the system calls appearing in strace output.
[ Team LiB ]](https://image.slidesharecdn.com/linuxsecuritycookbook-120930200536-phpapp01/85/Linux-security-cookbook-332-320.jpg)
![[ Team LiB ]
Recipe 9.16 Observing Network Traffic
9.16.1 Problem
You want to watch network traffic flowing by (or through) your machine.
9.16.2 Solution
Use a packet sniffer such as tcpdump.[7]
[7]In spite of its name, tcpdump is not restricted to TCP. It can capture entire packets, including the link-level
(Ethernet) headers, IP, UDP, etc.
To sniff packets and save them in a file:
# tcpdump -w filename [-c count] [-i interface] [-s snap-length] [expression]
To read and display the saved network trace data:
$ tcpdump -r filename [expression]
To select packets related to particular TCP services to or from a host:
# tcpdump tcp port service [or service] and host server.example.com
For a convenient and powerful GUI, use Ethereal. [Recipe 9.17]
To enable an unconfigured interface, for a "stealth" packet sniffer:
# ifconfig interface-name 0.0.0.0 up
To print information about all of your network interfaces with loaded drivers: [Recipe 3.1]
$ ifconfig -a
9.16.3 Discussion
Is your system under attack? Your firewall is logging unusual activities, you see lots of half-open
connections, and the performance of your web server is degrading. How can you learn what is happening
so you can take defensive action? Use a packet sniffer to watch traffic on the network!
In normal operation, network interfaces are programmed to receive only the following:
Unicast packets, addressed to a specific machine
Multicast packets, targeted to systems that choose to subscribe to services like streaming video or
sound](https://image.slidesharecdn.com/linuxsecuritycookbook-120930200536-phpapp01/85/Linux-security-cookbook-333-320.jpg)
![Broadcast packets, for when an appropriate destination is not known, or for important information
that is probably of interest to all machines on the network
The term "unicast" is not an oxymoron: all packets on networks like Ethernet are in fact sent
(conceptually) to all systems on the network. Each system simply ignores unicast packets addressed to
other machines, or uninteresting multicast packets.
A packet sniffer puts a network interface into promiscuous mode, causing it to receive all packets on the
network, like a wiretap. Almost all network adapters support this mode nowadays. Linux restricts the use
of promiscuous mode to the superuser, so always run packet-sniffing programs as root. Whenever you
switch an interface to promiscuous mode, the kernel logs the change, so we advise running the logger
command [Recipe 9.27] to announce your packet-sniffing activities.
If promiscuous mode doesn't seem to be working, and your kernel is sending
complaints to the system logger (usually in /var/log/messages) that say:
modprobe: can't locate module net-pf-17
then your kernel was built without support for the packet socket protocol, which is
required for network sniffers.
Rebuild your kernel with the option CONFIG_PACKET=y (or CONFIG_PACKET=m to
build a kernel module). Red Hat and SuSE distribute kernels with support for the
packet socket protocol enabled, so network sniffers should work.
Network switches complicate this picture. Unlike less intelligent hubs, switches watch network traffic,
attempt to learn which systems are connected to each network segment, and then send unicast packets
only to ports known to be connected to the destination systems, which defeats packet sniffing. However,
many network switches support packet sniffing with a configuration option to send all traffic to designated
ports. If you are running a network sniffer on a switched network, consult the documentation for your
switch.
The primary purpose of network switches is to improve performance, not to
enhance security. Packet sniffing is more difficult on a switched network, but not
impossible: dsniff [Recipe 9.19] is distributed with a collection of tools to
demonstrate such attacks. Do not be complacent about the need for secure
protocols, just because your systems are connected to switches instead of hubs.
Similarly, routers and gateways pass traffic to different networks based on the destination address for
each packet. If you want to watch traffic between machines on different networks, attach your packet
sniffer somewhere along the route between the source and destination.
Packet sniffers tap into the network stack at a low level, and are therefore immune to restrictions imposed
by firewalls. To verify the correct operation of your firewall, use a packet sniffer to watch the firewall
accept or reject traffic.
Your network interface need not even be configured in order to watch traffic (it does need to be up,
however). Use the ifconfig command to enable an unconfigured interface by setting the IP address to
zero:
# ifconfig eth2 0.0.0.0 up
Unconfigured interfaces are useful for dedicated packet-sniffing machines, because they are hard to
detect or attack. Such systems are often used on untrusted networks exposed to the outside (e.g., right
next to your web servers). Use care when these "stealth" packet sniffers are also connected (by normally
configured network interfaces) to trusted, internal networks: for example, disable IP forwarding. [Recipe](https://image.slidesharecdn.com/linuxsecuritycookbook-120930200536-phpapp01/85/Linux-security-cookbook-334-320.jpg)
![2.3]
Promiscuous mode can degrade network performance. Avoid running a packet
sniffer for long periods on important, production machines: use a separate,
dedicated machine instead.
Almost all Linux packet-sniffing programs use libpcap , a packet capture library distributed with tcpdump.
As a fortunate consequence, network trace files share a common format, so you can use one tool to
capture and save packets, and others to display and analyze the traffic. The file command recognizes and
displays information about libpcap-format network trace files:
$ file trace.pcap
trace.pcap: tcpdump capture file (little-endian) - version 2.4 (Ethernet, capture
length 96)
Kernels of Version 2.2 or higher can send warnings to the system logger like:
tcpdump uses obsolete (PF_INET,SOCK_PACKET)
These are harmless, and can be safely ignored. To avoid the warnings, upgrade to a
more recent version of libpcap.
To sniff packets and save them in a file, use the tcpdump -w option:
# tcpdump -w trace.pcap [-c count] [-i interface] [-s snap-length] [expression]
Just kill tcpdump when you are done, or use the -c option to request a maximum number of packets to
record.
If your system is connected to multiple networks, use the -i option to listen on a specific interface (e.g.,
eth2). The ifconfig command prints information about all of your network interfaces with loaded drivers:
[Recipe 3.1]
$ ifconfig -a
The special interface name "any" denotes all of the interfaces by any program that
uses libpcap, but these interfaces are not put into promiscuous mode automatically.
Before using tcpdump -i any , use ifconfig to enable promiscuous mode for specific
interfaces of interest:
# ifconfig interface promisc
Remember to disable promiscuous mode when you are done sniffing:
# ifconfig interface -promisc
Support for the "any" interface is available in kernel Versions 2.2 or later.
Normally, tcpdump saves only the first 68 bytes of each packet. This snapshot length is good for analysis
of low-level protocols (e.g., TCP or UDP), but for higher-level ones (like HTTP) use the -s option to
request a larger snapshot. To capture entire packets and track all transmitted data, specify a snapshot
length of zero. Larger snapshots consume dramatically more disk space, and can impact network
performance or even cause packet loss under heavy load.
By default, tcpdump records all packets seen on the network. Use a capture filter expression to select
specific packets: the criteria can be based on any data in the protocol headers, using a simple syntax](https://image.slidesharecdn.com/linuxsecuritycookbook-120930200536-phpapp01/85/Linux-security-cookbook-335-320.jpg)
![described in the tcpdump(8) manpage. For example, to record FTP transfers to or from a server:
# tcpdump -w trace.pcap tcp port ftp or ftp-data and host server.example.com
By restricting the kinds of packets you capture, you can reduce the performance implications and storage
requirements of larger snapshots.
To read and display the saved network trace data, use the tcpdump -r option:
$ tcpdump -r trace.pcap [expression]
Root access is not required to analyze the collected data, since it is stored in ordinary files. You may want
to protect those trace files, however, if they contain sensitive data.
Use a display filter expression to print information only about selected packets; display filters use the
same syntax as capture filters.
The capture and display operations can be combined, without saving data to a file, if neither the -w nor -r
options are used, but we recommend saving to a file, because:
Protocol analysis often requires displaying the data multiple times, in different formats, and perhaps
using different tools.
You might want to analyze data captured at some earlier time.
It is hard to predict selection criteria in advance. Use more inclusive filter expressions at capture
time, then more discriminating ones at display time, when you understand more clearly which data
is interesting.
Display operations can be inefficient. Memory is consumed to track TCP sequence numbers, for
example. Your packet sniffer should be lean and mean if you plan to run it for long periods.
Display operations sometimes interfere with capture operations. Converting IP addresses to
hostnames often involves DNS lookups, which can be confusing if you are watching traffic to and
from your nameservers! Similarly, if you tunnel tcpdump output through an SSH connection, that
generates additional SSH traffic.
Saving formatted output from tcpdump is an even worse idea. It consumes large amounts of space, is
difficult for other programs to parse, and discards much of the information saved in the libpcap-format
trace file. Use tcpdump -w to save network traces.
tcpdump prints information about packets in a terse, protocol-dependent format meticulously described in
the manpage. Suppose a machine 10.6.6.6 is performing a port scan of another machine, 10.9.9.9, by
running nmap -r. [Recipe 9.13] If you use tcpdump to observe this port scan activity, you'll see something
like this:
# tcpdump -nn
...
23:08:14.980358 10.6.6.6.6180 > 10.9.9.9.20: S 5498218:5498218(0) win 4096 [tos 0x80]
23:08:14.980436 10.9.9.9.20 > 10.6.6.6.6180: R 0:0(0) ack 5498219 win 0 (DF) [tos 0x80]
23:08:14.980795 10.6.6.6.6180 > 10.9.9.9.21: S 5498218:5498218(0) win 4096 [tos 0x80]
23:08:14.980893 10.9.9.9.21 > 10.6.6.6.6180: R 0:0(0) ack 5498219 win 0 (DF) [tos 0x80]
23:08:14.983496 10.6.6.6.6180 > 10.9.9.9.22: S 5498218:5498218(0) win 4096
23:08:14.984488 10.9.9.9.22 > 10.6.6.6.6180: S 3458349:3458349(0) ack 5498219 win 5840
<mss 1460> (DF)
23:08:14.983907 10.6.6.6.6180 > 10.9.9.9.23: S 5498218:5498218(0) win 4096 [tos 0x80]
23:08:14.984577 10.9.9.9.23 > 10.6.6.6.6180: R 0:0(0) ack 5498219 win 0 (DF) [tos 0x80]](https://image.slidesharecdn.com/linuxsecuritycookbook-120930200536-phpapp01/85/Linux-security-cookbook-336-320.jpg)
![23:08:15.060218 10.6.6.6.6180 > 10.9.9.99.22: R 5498219:5498219(0) win 0 (DF)
23:08:15.067712 10.6.6.6.6180 > 10.9.9.99.24: S 5498218:5498218(0) win 4096
23:08:15.067797 10.9.9.9.24 > 10.6.6.6.6180: R 0:0(0) ack 5498219 win 0 (DF)
23:08:15.068201 10.6.6.6.6180 > 10.9.9.9.25: S 5498218:5498218(0) win 4096 [tos 0x80]
23:08:15.068282 10.9.9.9.25 > 10.6.6.6.6180: R 0:0(0) ack 5498219 win 0 (DF) [tos 0x80]
...
The nmap -r process scans the ports sequentially. For each closed port, we see an incoming TCP SYN
packet, and a TCP RST reply from the target. An open SSH port (22) instead elicits a TCP SYN+ACK reply,
indicating that a server is listening: the scanner responds a short time later with a TCP RST packet (sent
out of order) to tear down the half-open SSH connection. Protocol analysis is especially enlightening when
a victim is confronted by sneakier probes and denial of service attacks that don't adhere to the usual
network protocol rules.
The previous example used -nn to print everything numerically. The -v option requests additional details;
repeat it (-v -v ...) for increased verbosity. Timestamps are recorded by the kernel (and saved in libpcap-
format trace files), and you can select a variety of formats by specifying the -t option one or more times.
Use the -e option to print link-level (Ethernet) header information.
9.16.4 See Also
ifconfig(8), tcpdump(8), nmap(8). The tcpdump home page is http://www.tcpdump.org, and the nmap
home page is http://www.insecure.org/nmap.
A good reference on Internet protocols is found at http://www.protocols.com. Also, the book Internet
Core Protocols: The Definitive Guide (O'Reilly) covers similar material.
[ Team LiB ]](https://image.slidesharecdn.com/linuxsecuritycookbook-120930200536-phpapp01/85/Linux-security-cookbook-337-320.jpg)
![[ Team LiB ]
Recipe 9.17 Observing Network Traffic (GUI)
9.17.1 Problem
You want to watch network traffic via a graphical interface.
9.17.2 Solution
Use Ethereral and tethereal.
9.17.3 Discussion
Prolonged perusing of tcpdump output [Recipe 9.16] can lead to eyestrain. Fortunately, alternatives are
available, and Ethereal is one of the best.
Ethereal is a GUI network sniffer that supports a number of enhancements beyond the capabilities of
tcpdump. When Ethereal starts, it presents three windows:
Packet List
A summary line for each packet, in a format similar to tcpdump.
Tree View
An expandable protocol tree for the packet selected in the previous window. An observer can drill
down to reveal individual fields at each protocol level. Ethereal understands and can display an
astounding number of protocols in detail.
Data View
Hexadecimal and ASCII dumps of all bytes captured in the selected packet. Bytes are highlighted
according to selections in the protocol tree.
Ethereal uses the same syntax as tcpdump for capture filter expressions. However, it uses a different,
more powerful syntax for display filter expressions. Our previous tcpdump example, to select packets
related to FTP transfers to or from a server: [Recipe 9.16]
tcp port ftp or ftp-data and host server.example.com
would be rewritten using Ethereal's display filter syntax as:
ftp or ftp-data and ip.addr == server.example.com
The display filter syntax is described in detail in the ethereal(1) manpage.
If you receive confusing and uninformative syntax error messages, make sure you
are not using display filter syntax for capture filters, or vice-versa.](https://image.slidesharecdn.com/linuxsecuritycookbook-120930200536-phpapp01/85/Linux-security-cookbook-338-320.jpg)
![Ethereal provides a GUI to construct and update display filter expressions, and can use those expressions
to find packets in a trace, or to colorize the display.
Ethereal also provides a tool to follow a TCP stream, reassembling (and reordering) packets to construct
an ASCII or hexadecimal dump of an entire TCP session. You can use this to view many protocols that are
transmitted as clear text.
Menus are provided as alternatives for command-line options (which are very similar to those of
tcpdump). Ethereal does its own packet capture (using libpcap), or reads and writes network trace files in
a variety of formats. On Red Hat systems, the program is installed with a wrapper that asks for the root
password (required for packet sniffing), and allows running as an ordinary user (if only display features
are used).
The easiest way to start using Ethereal is:
1. Launch the program.
2. Use the Capture Filters item in the Edit menu to select the traffic of interest, or just skip this step to
capture all traffic.
3. Use the Start item in the Capture menu. Fill out the Capture Preferences dialog box, which allows
specification of the interface for listening, the snapshot (or "capture length"), and whether you want
to update the display in real time, as the packet capture happens. Click OK to begin sniffing packets.
4. Watch the dialog box (and the updated display, if you selected the real time update option) to see
the packet capture in progress. Click the Stop button when you are done.
5. The display is now updated, if it was not already. Try selecting packets in the Packet List window,
drill down to expand the Tree View, and select parts of the protocol tree to highlight the
corresponding sections of the Data View. This is a great way to learn about internal details of
network protocols!
6. Select a TCP packet, and use the Follow TCP Stream item in the Tools menu to see an entire session
displayed in a separate window.
Ethereal is amazingly flexible, and this is just a small sample of its functionality. To learn more, browse
the menus and see the Ethereal User's Guide for detailed explanations and screen shots.
tethereal is a text version of Ethereal, and is similar in function to tcpdump, except it uses Ethereal's
enhanced display filter syntax. The -V option prints the protocol tree for each packet, instead of a one-line
summary.
Use the tethereal -b option to run in "ring buffer" mode (Ethereal also supports this option, but the mode
is designed for long-term operation, when the GUI is not as useful). In this mode, tethereal maintains a
specified number of network trace files, switching to the next file when a maximum size (determined by
the -a option) is reached, and discarding the oldest files, similar to logrotate. [Recipe 9.30] For example,
to keep a ring buffer with 10 files of 16 megabytes each:
# tethereal -w ring-buffer -b 10 -a filesize:16384
9.17.4 See Also
ethereal(1), tethereal(1). The Ethereal home page is http://www.ethereal.com.
[ Team LiB ]](https://image.slidesharecdn.com/linuxsecuritycookbook-120930200536-phpapp01/85/Linux-security-cookbook-339-320.jpg)
![[ Team LiB ]
Recipe 9.18 Searching for Strings in Network Traffic
9.18.1 Problem
You want to watch network traffic, searching for strings in the transmitted data.
9.18.2 Solution
Use ngrep.
To search for packets containing data that matches a regular expression and protocols that match a filter
expression:
# ngrep [grep-options] regular-expression [filter-expression]
To search instead for a sequence of binary data:
# ngrep -X hexadecimal-digits [filter-expression]
To sniff packets and save them in a file:
# ngrep -O filename [-n count] [-d interface] [-s snap-length]
regular-expression [filter-expression]
To read and display the saved network trace data:
$ ngrep -I filename regular-expression [filter-expression]
9.18.3 Discussion
ngrep is supplied with SuSE but not Red Hat; however, it is easy to obtain and install if you need it.
Download it from http://ngrep.sourceforge.net and unpack it:
$ tar xvpzf ngrep-*.tar.gz
compile it:
$ cd ngrep
$ ./configure --prefix=/usr/local
$ make
and install it into /usr/local as root:[8]
[8]We explicitly install in /usr/local, because otherwise the configure script would install into /usr, based on the
location of gcc. We recommend /usr/local to avoid clashes with vendor-supplied software in /usr; this
recommendation is codified in the Filesystem Hierarchy Standard (FHS), http://www.pathname.com/fhs. The
configure script used for ngrep is unusual—such scripts typically install into /usr/local by default, and therefore do
not need an explicit —prefix option. We also create the installation directories if they don't already exist, to overcome
deficiencies in the make install command.](https://image.slidesharecdn.com/linuxsecuritycookbook-120930200536-phpapp01/85/Linux-security-cookbook-340-320.jpg)
![# mkdir -p /usr/local/bin /usr/local/man/man8
# make install
Sometimes we are interested in observing the data delivered by network packets, known as the payload.
Tools like tcpdump [Recipe 9.16] and especially Ethereal [Recipe 9.17] can display the payload, but they
are primarily designed for protocol analysis, so their ability to select packets based on arbitrary data is
limited.[9]
[9]
The concept of a packet's payload is subjective. Each lower-level protocol regards the higher-level protocols as its
payload. The highest-level protocol delivers the user data; for example, the files transferred by FTP.
The ngrep command searches network traffic for data that matches extended regular expressions, in the
same way that the egrep command (or grep -E) searches files. In fact, ngrep supports many of the same
command-line options as egrep, such as -i (case-insensitive), -w (whole words), or -v (nonmatching). In
addition, ngrep can select packets using the same filter expressions as tcpdump. To use ngrep as an
ordinary packet sniffer, use the regular expression ".", which matches any nonempty payload.
ngrep is handy for detecting the use of insecure protocols. For example, we can observe FTP transfers to
or from a server, searching for FTP request command strings to reveal usernames, passwords, and
filenames that are transmitted as clear text:
$ ngrep -t -x 'USER|PASS|RETR|STOR' tcp port ftp and host server.example.com
interface: eth0 (10.44.44.0/255.255.255.0)
filter: ip and ( tcp port ftp )
match: USER|PASS|RETR|STOR
#############
T 2003/02/27 23:31:20.303636 10.33.33.33:1057 -> 10.88.88.88:21 [AP]
55 53 45 52 20 6b 61 74 69 65 0d 0a USER katie..
#####
T 2003/02/27 23:31:25.315858 10.33.33.33:1057 -> 10.88.88.88:21 [AP]
50 41 53 53 20 44 75 6d 62 6f 21 0d 0a PASS Dumbo!..
#############
T 2003/02/27 23:32:15.637343 10.33.33.33:1057 -> 10.88.88.88:21 [AP]
52 45 54 52 20 70 6f 6f 68 62 65 61 72 0d 0a RETR poohbear..
########
T 2003/02/27 23:32:19.742193 10.33.33.33:1057 -> 10.88.88.88:21 [AP]
53 54 4f 52 20 68 6f 6e 65 79 70 6f 74 0d 0a STOR honeypot..
###############exit
58 received, 0 dropped
The -t option adds timestamps; use -T instead for relative times between packets. The -x option prints
hexadecimal values in addition to the ASCII strings.
ngrep prints a hash character (#) for each packet that matches the filter expression: only those packets
that match the regular expression are printed in detail. Use the -q option to suppress the hashes.
To search for binary data, use the -X option with a sequence of hexadecimal digits (of any length) instead
of a regular expression. This can detect some kinds of buffer overflow attacks, characterized by known
signatures of fixed binary data.
ngrep matches data only within individual packets. If strings are split between
packets due to fragmentation, they will not be found. Try to match shorter strings
to reduce (but not entirely eliminate) the probability of these misses. Shorter
strings can also lead to false matches, however—a bit of experimentation is
sometimes required. dsniff does not have this limitation. [Recipe 9.19]
Like other packet sniffers, ngrep can write and read libpcap-format network trace files, using the -O and -](https://image.slidesharecdn.com/linuxsecuritycookbook-120930200536-phpapp01/85/Linux-security-cookbook-341-320.jpg)
![I options. [Recipe 9.16] This is especially convenient when running ngrep repeatedly to refine your
search, using data captured previously, perhaps by another program. Usually ngrep captures packets until
killed, or it will exit after recording a maximum number of packets requested by the -n option. The -d
option selects a specific interface, if your machine has several. By default, ngrep captures entire packets
(in contrast to tcpdump and ethereal), since ngrep is interested in the payloads. If your data of interest is
at the beginning of the packets, use the -s option to reduce the snapshot and gain efficiency.
When ngrep finds an interesting packet, the adjacent packets might be of interest too, as context. The
ngrep -A option prints a specified number of extra (not necessarily matching) packets for trailing context.
This is similar in spirit to the grep -A option, but ngrep does not support a corresponding -B option for
leading context.
A recommended practice: Save a generous amount of network trace data with
tcpdump, then run ngrep to locate interesting data. Finally, browse the complete
trace using Ethereal, relying on the timestamps to identify the packets matched by
ngrep.
9.18.4 See Also
ngrep(8), egrep(1), grep(1), tcpdump(8). The home page for ngrep is http://ngrep.sourceforge.net, and
the tcpdump home page is http://www.tcpdump.org.
Learn more about extended regular expressions in the O'Reilly book Mastering Regular Expressions.
[ Team LiB ]](https://image.slidesharecdn.com/linuxsecuritycookbook-120930200536-phpapp01/85/Linux-security-cookbook-342-320.jpg)
![[ Team LiB ]
Recipe 9.19 Detecting Insecure Network Protocols
9.19.1 Problem
You want to determine if insecure protocols are being used on the network.
9.19.2 Solution
Use dsniff.
To monitor the network for insecure protocols:
# dsniff -m [-i interface] [-s snap-length] [filter-expression]
To save results in a database, instead of printing them:
# dsniff -w gotcha.db [other options...]
To read and print the results from the database:
$ dsniff -r gotcha.db
To capture mail messages from SMTP or POP traffic:
# mailsnarf [-i interface] [-v] [regular-expression [filter-expression]]
To capture file contents from NFS traffic:
# filesnarf [-i interface] [-v] [regular-expression [filter-expression]]
To capture URLs from HTTP traffic:
# urlsnarf [-i interface] [-v] [regular-expression [filter-expression]]
ngrep is also useful for detecting insecure network protocols. [Recipe 9.18]
9.19.3 Discussion
dsniff is not supplied with Red Hat or SuSE, but installation is straightforward. A few extra steps are
required for two prerequisite libraries, libnet and libnids, not distributed by Red Hat. SuSE provides these
libraries, so you can skip ahead to the installation of dsniff itself on such systems.
If you need the libraries, first download libnet, a toolkit for network packet manipulation, from
http://www.packetfactory.net/projects/libnet, and unpack it:
$ tar xvzpf libnet-1.0.*.tar.gz
Then compile it:[10]](https://image.slidesharecdn.com/linuxsecuritycookbook-120930200536-phpapp01/85/Linux-security-cookbook-343-320.jpg)
![[10]At press time, dsniff 2.3 (the latest stable version) cannot be built with the most recent version of libnet. Be sure
to use the older libnet 1.0.2a with dsniff 2.3.
$ cd Libnet-1.0.*
$ ./configure --prefix=/usr/local
$ make
and install it as root:
# make install
We explicitly configure to install in /usr/local (instead of /usr), to match the default location for our later
configuration steps. Next, download libnids , which is used for TCP stream reassembly, from
http://www.packetfactory.net/projects/libnids, and unpack it:
$ tar xvzpf libnids-*.tar.gz
Then compile it:
$ cd `ls -d libnids-* | head -1`
$ ./configure
$ make
and install it as root:
# make install
dsniff also requires the Berkeley database library, which is provided by both Red
Hat and SuSE. Unfortunately, some systems such as Red Hat 7.0 are missing
/usr/include/db_185.h (either a plain file or a symbolic link) that dsniff needs. This
is easy to fix:
# cd /usr/include
# test -L db.h -a ! -e db_185.h
&& ln -sv `readlink db.h | sed -e 's,/db,&_185,'` .
Your link should look like this:
$ ls -l db_185.h
lrwxrwxrwx 1 root root 12 Feb 14 14:56 db_185.h -> db4/db_185.h
It's OK if the link points to a different version (e.g., db3 instead of db4).
Finally, download dsniff from http://naughty.monkey.org/~dugsong/dsniff, and unpack it:
$ tar xvzpf dsniff-*.tar.gz
Then compile it:
$ cd `ls -d dsniff-* | head -1`
$ ./configure
$ make
and install it as root:
# make install
Whew! With all of the software in place, we can start using dsniff to audit the use of insecure network](https://image.slidesharecdn.com/linuxsecuritycookbook-120930200536-phpapp01/85/Linux-security-cookbook-344-320.jpg)
![protocols:
# dsniff -m
dsniff: listening on eth0
-----------------
03/01/03 20:11:07 tcp client.example.com.2056 -> server.example.com.21 (ftp)
USER katie
PASS Dumbo!
-----------------
03/01/03 20:11:23 tcp client.example.com.1112 -> server.example.com.23 (telnet)
marianne
aspirin?
ls -l
logout
-----------------
03/01/03 20:14:56 tcp client.example.com.1023 -> server.example.com.514 (rlogin)
[1022:tony]
rm junque
-----------------
03/01/03 20:16:33 tcp server.example.com.1225 -> client.example.com.6000 (x11)
MIT-MAGIC-COOKIE-1 c166a754fdf243c0f93e9fecb54abbd8
-----------------
03/01/03 20:08:20 udp client.example.com.688 -> server.example.com.777 (mountd)
/home [07 04 00 00 01 00 00 00 0c 00 00 00 02 00 00 00 3b 11 a1 36 00 00 00 00 00 00
00 00 00 00 00 00 ]
dsniff understands a wide range of protocols, and recognizes sensitive data that is transmitted without
encryption. Our example shows passwords captured from FTP and Telnet sessions, with telnet commands
and other input. (See why typing the root password over a Telnet connection is a very bad idea?) The
rlogin session used no password, because the source host was trusted, but the command was captured.
Finally, we see authorization information used by an X server, and filehandle information returned for an
NFS mount operation.
dsniff uses libnids to reassemble TCP streams, because individual characters for interactively-typed
passwords are often transmitted in separate packets. This reassembly relies on observation of the initial
three-way handshake that starts all TCP sessions, so dsniff does not trace sessions already in progress
when it was invoked.
The dsniff -m option enables automatic pattern-matching of protocols used on nonstandard ports (e.g.,
HTTP on a port other than 80). Use the -i option to listen on a specific interface, if your system is
connected to multiple networks. Append a filter-expression to restrict the network traffic that is
monitored, using the same syntax as tcpdump. [Recipe 9.16] dsniff uses libpcap to examine the first
kilobyte of each packet: use the -s option to adjust the size of the snapshot if necessary.
dsniff can save the results in a database file specified by the -w option; the -r option reads and prints the
results. If you use a database, be sure to protect this sensitive data from unwanted viewers.
Unfortunately, dsniff cannot read or write libpcap-format network trace files—it performs live network-
monitoring only.
A variety of more specialized sniffing tools are also provided with dsniff. The mailsnarf command captures
mail messages from SMTP or POP traffic, and writes them in the standard mailbox format:
# mailsnarf
mailsnarf: listening on eth0
From engh@example.com Sat Mar 1 21:00:02 2003
Received: (from engh@example.com)
by mail.example.com (8.11.6/8.11.6) id h1DJAPe10352](https://image.slidesharecdn.com/linuxsecuritycookbook-120930200536-phpapp01/85/Linux-security-cookbook-345-320.jpg)
![for liberace@example.com; Sat, 1 Mar 2003 21:00:02 -0500
Date: Sat, 1 Mar 2003 21:00:02 -0500
From: Engelbert Humperdinck <engh@example.com>
Message-Id: <200303020200.AED1D74A1@example.com>
To: liberace@example.com
Subject: Elvis lives!
I ran into Elvis on the subway yesterday.
He said he was on his way to Graceland.
Suppose you want to encourage users who are sending email as clear text to encrypt their messages with
GnuPG (see Chapter 8). You could theoretically inspect every email message, but of course this would be
a gross violation of their privacy. You just want to detect whether encryption was used in each message,
and to identify the correspondents if it was not. One approach is:
# mailsnarf -v "-----BEGIN PGP MESSAGE-----" |
perl -ne 'print if /^From / .. /^$/;' |
tee insecure-mail-headers
Our regular expression identifies encrypted messages, and the mailsnarf -v option (similar to grep -v)
captures only those messages that were not encrypted. A short Perl script then discards the message
bodies and records only the mail headers. The tee command prints the headers to the standard output so
we can watch, and also writes them to a file, which can be used later to send mass mailings to the
offenders. This strategy never saves your users' sensitive email data in a file.
dsniff comes with similar programs for other protocols, but they are useful mostly as convincing
demonstrations of the importance of secure protocols. We hope you are already convinced by now!
The filesnarf command captures files from NFS traffic, and saves them in the current directory:
# filesnarf
filesnarf: listening on eth0
filesnarf: 10.220.80.1.2049 > 10.220.80.4.800: known_hosts (1303@0)
filesnarf: 10.220.80.1.2049 > 10.220.80.4.800: love-letter.doc (8192@0)
filesnarf: 10.220.80.1.2049 > 10.220.80.4.800: love-letter.doc (4096@8192)
filesnarf: 10.220.80.1.2049 > 10.220.80.4.800: .Xauthority (204@0)
filesnarf: 10.220.80.1.2049 > 10.220.80.4.800: myprog (8192@0)
filesnarf: 10.220.80.1.2049 > 10.220.80.4.800: myprog (8192@8192)
filesnarf: 10.220.80.1.2049 > 10.220.80.4.800: myprog (8192@16384)
filesnarf: 10.220.80.1.2049 > 10.220.80.4.800: myprog (8192@40960)
The last values on each line are the number of bytes transferred, and the file offsets. Of course, you can
capture only those parts of the file transmitted on the network, so the saved files can have "holes" (which
read as null bytes) where the missing data would be. No directory information is recorded. You can select
specific filenames using a regular expression (and optionally with the -v option, to invert the sense of the
match, as for mailsnarf or grep).
The urlsnarf command captures URLs from HTTP traffic, and records them in the Common Log Format
(CLF). This format is used by most web servers, such as Apache, and is parsed by many web log analysis
programs.
# urlsnarf
urlsnarf: listening on eth1 [tcp port 80 or port 8080 or port 3128]
client.example.com - - [ 1/Mar/2003:21:06:36 -0500] "GET http://naughty.monkey.org/
cgi-bin/counter?ft=0|dd=E|trgb=ffffff|df=dugsong-dsniff.dat HTTP/1.1" - - "http://
naughty.monkey.org/~dugsong/dsniff/" "Mozilla/5.0 (X11; U; Linux i686; en-US; rv:0.9.
9) Gecko/20020513"](https://image.slidesharecdn.com/linuxsecuritycookbook-120930200536-phpapp01/85/Linux-security-cookbook-346-320.jpg)
![client.example.com - - [ 1/Mar/2003:21:06:46 -0500] "GET http://naughty.monkey.org/
~dugsong/dsniff/faq.html HTTP/1.1" - - "http://naughty.monkey.org/~dugsong/dsniff/"
"Mozilla/5.0 (X11; U; Linux i686; en-US; rv:0.9.9) Gecko/20020513"
By default, urlsnarf watches three ports that commonly carry HTTP traffic: 80, 3128, and 8080. To
monitor a different port, use a capture filter expression:
# urlsnarf tcp port 8888
urlsnarf: listening on eth1 [tcp port 8888]
...
To monitor all TCP ports, use a more general expression:
# urlsnarf -i eth1 tcp
urlsnarf: listening on eth1 [tcp]
...
A regular expression can be supplied to select URLs of interest, optionally with -v as for mailsnarf or
filesnarf.
A few other programs are provided with dsniff as a proof of concept for attacks on switched networks,
man-in-the-middle attacks, and slowing or killing TCP connections. Some of these programs can be quite
disruptive, especially if used incorrectly, so we don't recommend trying them unless you have an
experimental network to conduct penetration testing.
9.19.4 See Also
dsniff(8), mailsnarf(8), filesnarf(8), urlsnarf(8). The dsniff home page is
http://naughty.monkey.org/~dugsong/dsniff.
[ Team LiB ]](https://image.slidesharecdn.com/linuxsecuritycookbook-120930200536-phpapp01/85/Linux-security-cookbook-347-320.jpg)
![[ Team LiB ]
Recipe 9.20 Getting Started with Snort
9.20.1 Problem
You want to set up Snort, a network-intrusion detection system.
9.20.2 Solution
Snort is included with SuSE but not Red Hat. If you need it (or you want to upgrade), download the
source distribution from http://www.snort.org and unpack it:
$ tar xvpzf snort-*.tar.gz
Then compile it:
$ cd `ls -d snort-* | head -1`
$ ./configure
$ make
and install the binary and manpage as root:
# make install
Next, create a logging directory. It should not be publicly readable, since it will contain potentially
sensitive data:
# mkdir -p -m go-rwx /var/log/snort
Finally, install the configuration files and rules database:
# mkdir -p /usr/local/share/rules
# cp etc/* rules/*.rules /usr/local/share/rules
9.20.3 Discussion
Snort is a network intrusion detection system (NIDS), sort of an early-warning radar system for break-
ins. It sniffs packets from the network and analyzes them according to a collection of well-known
signatures characteristic of suspicious or hostile activities. This may remind you of an anti-virus tool,
which looks for patterns in files to identify viruses.
By examining the protocol information and payload of each packet (or a sequence of packets) and
applying its pattern-matching rules, Snort can identify the telltale fingerprints of attempted buffer
overflows, denial of service attacks, port scans, and many other kinds of probes. When Snort detects a
disturbing event, it can log network trace information for further investigation, and issue alerts so you can
respond rapidly.
9.20.4 See Also](https://image.slidesharecdn.com/linuxsecuritycookbook-120930200536-phpapp01/85/Linux-security-cookbook-348-320.jpg)
![snort(8). The Snort home page is http://www.snort.org.
[ Team LiB ]](https://image.slidesharecdn.com/linuxsecuritycookbook-120930200536-phpapp01/85/Linux-security-cookbook-349-320.jpg)
![[ Team LiB ]
Recipe 9.21 Packet Sniffing with Snort
9.21.1 Problem
You want to use Snort as a simple packet sniffer.
9.21.2 Solution
To format and print network trace information:
# snort -v [-d|-X] [-C] [-e] [filter-expression]
To sniff packets from the network:
# snort [-i interface] [-P snap-length] [filter-expression]
To read network trace data you have saved previously:
$ snort -r filename [filter-expression]
9.21.3 Discussion
Snort can act as a simple packet sniffer, providing a level of detail between the terseness of tcpdump
[Recipe 9.16] and the verbosity of tethereal. [Recipe 9.17] The -v option prints a summary of the protocol
information for each packet. To dump the payload data in hexadecimal and ASCII, add the -d option (with
the -C option if you care only about the characters). For more information about lower-level protocols,
add -e to print a summary of the link-level (Ethernet) headers, or use -X instead of -d to dump the
protocol headers along with the payload data:
# snort -veX
02/27-23:32:15.641528 52:54:4C:A:6B:CD -> 0:50:4:D5:8E:5A type:0x800 len:0x9A
192.168.33.1:20 -> 192.168.33.3:1058 TCP TTL:60 TOS:0x8 ID:28465 IpLen:20 DgmLen
:140
***AP*** Seq: 0xDCE2E01 Ack: 0xA3B50859 Win: 0x1C84 TcpLen: 20
0x0000: 00 50 04 D5 8E 5A 52 54 4C 0A 6B CD 08 00 45 08 .P...ZRTL.k...E.
0x0010: 00 8C 6F 31 00 00 3C 06 4B DE C0 A8 21 01 C0 A8 ..o1..<.K...!...
0x0020: 21 03 00 14 04 22 0D CE 2E 01 A3 B5 08 59 50 18 !....".......YP.
0x0030: 1C 84 34 BB 00 00 54 6F 75 72 69 73 74 73 20 2D ..4...Tourists -
0x0040: 2D 20 68 61 76 65 20 73 6F 6D 65 20 66 75 6E 20 - have some fun
0x0050: 77 69 74 68 20 4E 65 77 20 59 6F 72 6B 27 73 20 with New York's
...
Addresses and ports are always printed numerically.
If your system is connected to multiple networks, use the -i option to select an interface for sniffing.
Alternately, you can read libpcap-format trace files [Recipe 9.16] saved by Snort or some other
compatible network sniffer, by using the -r option.](https://image.slidesharecdn.com/linuxsecuritycookbook-120930200536-phpapp01/85/Linux-security-cookbook-350-320.jpg)
![Append a filter expression to the command line to limit the data collected, using the same syntax as for
tcpdump. [Recipe 9.16] Filter expressions can focus attention on specific machines (such as your
production web server), or efficiently ignore uninteresting traffic, especially if it is causing false alarms.
When Snort is displaying data from network trace files, the filter expression selects packets to be printed,
a handy feature when playing back previously logged data.
By default, Snort captures entire packets to examine their payloads. If you are
looking at only a few specific protocols, and you know that the data of interest is at
the start of the packets, use the -P option to specify smaller snapshots and achieve
an efficiency gain.
9.21.4 See Also
snort(8), tcpdump(1), tethereal(1). The Snort home page is http://www.snort.org.
[ Team LiB ]](https://image.slidesharecdn.com/linuxsecuritycookbook-120930200536-phpapp01/85/Linux-security-cookbook-351-320.jpg)
![[ Team LiB ]
Recipe 9.22 Detecting Intrusions with Snort
9.22.1 Problem
You want to notice if your system is under attack from the network.
9.22.2 Solution
To run as a network intrusion detection system, with binary logging, and alerts sent to the system logger:
# snort -c /usr/local/share/rules/snort.conf -b -s
To run Snort in the background, as a daemon:
# snort -D [-u user] [-g group] [-m umask] -c ...
9.22.3 Discussion
Snort is most valuable when run as a full-fledged NIDS:
# snort -c /etc/snort/snort.conf ... SuSE installation
# snort -c /usr/local/share/rules/snort.conf ... Manual installation
The configuration file includes a large number of pattern matching rules that control logging and alerts.
In this mode of operation, packets are recorded (logged) when they match known signatures indicating a
possible intrusion. Use the -b option for efficient logging to binary libpcap-format files. [Recipe 9.24] The -
N option disables logging if you want alerts only, but we don't recommend this: the logs provide valuable
context about the events that triggered the alerts.
Alerts can be directed to a wide range of destinations. We recommend the system logger [Recipe 9.27]
because:
It's efficient.
It's convenient (and enlightening) to correlate Snort's messages with those of other daemons, your
firewall, and the kernel—these are all recorded in the system log.
Tools like logwatch [Recipe 9.36] can scan the log files effectively and provide notification by email,
which works well with high-priority alerts.
Use the -s option to direct alerts to the system logger. By default, alerts are sent using the auth facility
and info priority. This can be changed by uncommenting and changing a line in snort.conf, e.g.:
output alert_syslog: LOG_LOCAL3 LOG_WARNING](https://image.slidesharecdn.com/linuxsecuritycookbook-120930200536-phpapp01/85/Linux-security-cookbook-352-320.jpg)
![At press time, the latest version of Snort (1.9.1) has an unfortunate bug: it
incorrectly requires an extra argument after the -s option. If you are experiencing
confusing command-line syntax errors, try providing this extra argument (which
will be ignored).
The Snort documentation also erroneously claims that the default facility and
priority are authpriv and alert, respectively. If you are not seeing alert messages in
/var/log/secure (typically used for authpriv), check /var/log/messages (which is
used for auth) instead.
To disable alerts entirely (e.g., for rules-based logging only), use the -A none option. We don't
recommend this for routine operation, unless you have some other special mechanism for producing
alerts by examining the logs.
To run Snort in the background, as a daemon, use the -D option. This is the recommended way to launch
Snort for continuous, long-term operation. Also, Snort is best run on a dedicated monitoring system,
ideally sniffing traffic on an unconfigured, "stealth" interface. [Recipe 9.16]
On SuSE systems, you can enable Snort to start automatically at boot time with the chkconfig command:
# chkconfig snort on
Edit /var/adm/fillup-templates/sysconfig.snort to specify the desired snort command-line options.
On Red Hat systems, the simplest way to start Snort at boot time is to add a command to
/etc/rc.d/rc.local. Alternately, you can copy one of the other scripts in /etc/init.d to create your own snort
script, and then use chkconfig.
Snort must be run as root initially to set the network interfaces to promiscuous mode for sniffing, but it
can run subsequently as a less privileged user—this is always a good idea for added security. Use the -u
and -g options to designate this lesser user and group ID, respectively. The permissions of the logging
directory need to allow only write access for this user or group. If you want to allow a set of other
authorized users to analyze the logging data (without root access), add the users to Snort's group, make
the logging directory group readable, and use -m 007 to set Snort's umask so that all of the files created
by Snort will be group readable as well. [Recipe 5.10]
You can ask Snort to dump statistics to the system logger (the same report that is produced before Snort
exits) by sending it a SIGUSR1 signal:
# kill -USR1 `pidof snort`
Snort writes its process ID to the file /var/run/snort_<interface>.pid. If you are running multiple copies
of snort, with each listening on a separate interface, these files can be handy for signaling specific
invocations, e.g.:
# kill -USR1 `cat /var/run/snort_eth2.pid`
9.22.4 See Also
snort(8). The Snort home page is http://www.snort.org.
[ Team LiB ]](https://image.slidesharecdn.com/linuxsecuritycookbook-120930200536-phpapp01/85/Linux-security-cookbook-353-320.jpg)
![[ Team LiB ]
Recipe 9.23 Decoding Snort Alert Messages
9.23.1 Problem
You want to understand a Snort alert message.
9.23.2 Solution
Consult the Snort signature database at http://www.snort.org/snort-db, using the signature ID as an
index, or searching based on the text message. Most alerts are described in detail, and many include links
to other NIDS databases with even more information, such as the arachNIDS database at
http://www.whitehats.com.
9.23.3 Discussion
Let's decode an alert message produced when Snort detects a port scan by nmap [Recipe 9.13]:
Mar 18 19:40:52 whimsy snort[3115]: [1:469:1] ICMP PING NMAP [Classification:
Attempted Information Leak] [Priority: 2]: <eth1> {ICMP} 10.120.66.1 -> 10.22.33.106
Breaking apart this single line, we first have the usual syslog information:
Mar 18 19:40:52 whimsy snort[3115]:
which includes a timestamp, the hostname where Snort was running, and the Snort identifier with its
process ID. Next we have:
[1:469:1] ICMP PING NMAP
In this portion of the alert, the first number, 1, is a generator ID, and identifies the Snort subsystem that
produced the alert. The value 1 means Snort itself. The next number, 469, is a signature ID that identifies
the alert, and corresponds to the subsequent text message (ICMP PING NMAP). The final number, 1, is a
version for the alert.
If the alert were produced by a Snort preprocessor, it would have a higher value for the generator ID, and
the name of the preprocessor would be listed in parentheses before the text message. For example:
[111:10:1] (spp_stream4) STEALTH ACTIVITY (XMAS scan) detection
Signature IDs are assigned by each preprocessor: to learn more about these alerts, see the snort.conf
file, and the Snort User's Manual. Continuing our example, we see the classification of the alert:
[Classification: Attempted Information Leak] [Priority: 2]:
Each alert is classified into one of a set of broad categories: see the file classification.config in the rules
directory. Alerts are also assigned priority levels, with lower values meaning more severe events. Finally,
the alert identifies the receiving network interface and lists the IP protocol, source address, and](https://image.slidesharecdn.com/linuxsecuritycookbook-120930200536-phpapp01/85/Linux-security-cookbook-354-320.jpg)
![destination address:
<eth1> {ICMP} 10.120.66.1 -> 10.22.33.106
It's optional to identify the receiving network interface: use the -I option to enable this feature, say, if
your system is connected to multiple networks. Finally, even though the source address is listed, you
cannot trust it in general: attackers often use spoofed addresses to implicate innocent third parties.
If you are replaying a network trace using snort -r, you probably don't want to send alerts to the system
logger: use the -A fast or -A full options to write the alerts to a file called alert in the logging directory.
The fast alert format is very similar to syslog's. Full alerts provide more protocol details, as well as cross-
references like:
[Xref => arachnids 162]
These usually correspond to links in the Snort signature database. See the file reference.config in the
rules directory to convert the ID numbers to URLs to obtain more information for each alert.
Use the -A console option to write alerts (in the fast alert format) to the standard output instead of the
alert file.
9.23.4 See Also
snort(8). The Snort home page is http://www.snort.org.
[ Team LiB ]](https://image.slidesharecdn.com/linuxsecuritycookbook-120930200536-phpapp01/85/Linux-security-cookbook-355-320.jpg)
![[ Team LiB ]
Recipe 9.24 Logging with Snort
9.24.1 Problem
You want to manage Snort's output and log files in an efficient, effective manner.
9.24.2 Solution
To log network trace data for later analysis:
# snort -b [-l logging-directory] [-L basename]
To examine the network trace data:
$ snort -r logfile
or use any other program that reads libpcap-format files, like Ethereal. [Recipe 9.17]
To manage the logs, don't use logrotate. [Recipe 9.30] Instead, periodically tell Snort to close all of its
files and restart, by sending it a SIGHUP signal:
# kill -HUP `pidof snort`
Then, use find to remove all files that are older than (say) a week:
# find /var/log/snort -type f -mtime +7 -print0 | xargs -0 -r rm
Finally, use find again to remove empty subdirectories:
# find /var/log/snort -mindepth 1 -depth -type d -print0 |
xargs -0 -r rmdir -v --ignore-fail-on-non-empty
To run these commands (for example) every night at 3:30 a.m., create a cleanup script (say,
/usr/local/sbin/clean-up-snort) and add a crontab entry for root:
30 3 * * * /usr/local/sbin/clean-up-snort
9.24.3 Discussion
To log network trace data for later analysis, use the -b option. This creates a libpcap-format binary file in
the logging directory (by default, /var/log/snort) with a name like snort.log.1047160213: the digits record
the start time of the trace, expressed as seconds since the epoch.[11] To convert this value to a more
readable format, use either Perl or the date command:
[11] The Unix "epoch" occurred on January 1, 1970, at midnight UTC.
$ perl -e 'print scalar localtime 1047160213, "n";'
Sat Mar 8 16:50:13 2003](https://image.slidesharecdn.com/linuxsecuritycookbook-120930200536-phpapp01/85/Linux-security-cookbook-356-320.jpg)
![$ date -d "1970-01-01 utc + 1047160213 sec"
Sat Mar 8 16:50:13 EST 2003
To learn the ending time of the trace, see the modification time of the file:
# ls --full-time -o snort.log.1047160213
-rw------- 1 root 97818 Sat Mar 08 19:05:47 2003 snort.log.1047160213
or use snort -r to examine the network trace data.
You can specify a different logging directory with the -l option, or an alternate basename (instead of
snort.log) with the -L option: the start timestamp is still added to the filename.
Since Snort filenames contain timestamps, and the formatted logging files might be split into separate
directories, logrotate [Recipe 9.30] is not an ideal mechanism for managing your log files. Use the method
we suggest, or something similar.
9.24.4 See Also
snort(8), logrotate(8). The Snort home page is http://www.snort.org.
[ Team LiB ]](https://image.slidesharecdn.com/linuxsecuritycookbook-120930200536-phpapp01/85/Linux-security-cookbook-357-320.jpg)
![[ Team LiB ]
Recipe 9.25 Partitioning Snort Logs Into Separate Files
9.25.1 Problem
You want to split Snort's log output into separate files, based on the IP addresses and protocols detected.
9.25.2 Solution
# snort -l /var/log/snort -h network -r snort.log.timestamp
9.25.3 Discussion
Snort can split its formatted output into separate files, with names based on the remote IP address and
protocols used: these files contain the same information printed by snort -v. Select this mode of operation
by using the -l option without -b, plus the -h option to specify the "home network" for identification of the
remote packets:
# cd /var/log/snort
# snort -l /var/log/snort -h 10.22.33.0/24 -r snort.log.1047160213
...
# find [0-9A-Z]* -type f -print | sort
10.30.188.28/TCP:1027-22
192.168.33.1/IP_FRAG
192.168.33.1/UDP:2049-800
192.168.33.2/TCP:6000-1050
192.168.33.2/TCP:6000-1051
192.168.33.2/TCP:6000-1084
ARP
The digits following the filenames for TCP and UDP traffic refer to the remote and local port numbers,
respectively. Information about fragmented IP packets that could not otherwise be classified is stored in
files named IP_FRAG. Details for ARP packets are stored in a file named ARP in the top-level logging
directory.
Don't use split formatted output for logging while sniffing packets from the network —it's inefficient and
discards information. For logging, we recommend binary libpcap-format files (produced by the -b option)
for speed and flexibility. [Recipe 9.16] You can always split and format the output later, using the
technique in this recipe.
9.25.4 See Also
snort(8). The Snort home page is http://www.snort.org.
[ Team LiB ]](https://image.slidesharecdn.com/linuxsecuritycookbook-120930200536-phpapp01/85/Linux-security-cookbook-358-320.jpg)
![[ Team LiB ]
Recipe 9.26 Upgrading and Tuning Snort's Ruleset
9.26.1 Problem
You want Snort to use the latest intrusion signatures.
9.26.2 Solution
Download the latest rules from http://www.snort.org and install them in /usr/local/share to be consistent
with our other Snort recipes:
# tar xvpzf snortrules-stable.tar.gz -C /usr/local/share
To test configuration changes, or to verify the correct usage of command-line options:
# snort -T ...
To omit the verbose initialization and summary messages:
# snort -q ...
9.26.3 Discussion
The field of NIDS is an area of active research, and Snort is undergoing rapid development. Furthermore,
the arms race between attackers and defenders of systems continues to escalate. You should upgrade
your Snort installation frequently to cope with the latest threats.
If you have locally modified your rules, then before upgrading them, preserve your changes and merge
them into the new versions. If you confine your site-specific additions to the file local.rules, merging will
be a lot easier.
Although the snort.conf file can be used without modification, it is worthwhile to edit the file to customize
Snort's operation for your site. Comments in the file provide a guided tour of Snort's features, and can be
used as a step-by-step configuration guide, along with the Snort User's Manual.
The most important parameters are the network variables at the beginning of the configuration file. These
define the boundaries of your networks, and the usage patterns within those networks. For quick testing,
you can override variables on the command line with the -S option, e.g.:
# snort -S HOME_NET=10.22.33.0/24 ...
Depending on your interests and needs, you may also wish to enable or tune some of the Snort
preprocessors that are designed to respond to various threats. IP defragmentation and TCP stream
reassembly are enabled by default, to detect denial of service attacks and to support the other
preprocessors. If you are being subjected to anti-NIDS attacks such as noise generators that attempt to
overwhelm Snort with a flood of alert-inducing traffic, use:
# snort -z est ...](https://image.slidesharecdn.com/linuxsecuritycookbook-120930200536-phpapp01/85/Linux-security-cookbook-359-320.jpg)
![to limit alerts to known, established connections only. Several preprocessors are available to defeat
attempts to escape detection during attacks on specific protocols. These often take the form of path name
or instruction sequence mutations, and the preprocessors work to convert the input streams into a
canonical form that can be more readily recognized by the pattern matching rules. Port scans are noticed
by preprocessors that watch a range of protocols over time.
Finally, a variety of output plugins can direct alerts to databases, XML files, SNMP traps, a local Unix
socket, or even WinPopup messages on Windows workstations, using Samba. Many of these features are
experimental, or require special configuration options when Snort is installed; consult the documentation
in the source distribution for details.
Whenever you modify the Snort configuration or add or customize rules, use the -T
option to verify that your changes are correct. This will prevent Snort from dying
unexpectedly when it next restarts, e.g., at boot time.
9.26.4 See Also
snort(8). The Snort home page is http://www.snort.org. The Honeynet project's web site,
http://www.honeynet.org, contains a wealth of information about network monitoring, including Snort.
See http://www.honeynet.org/papers/honeynet/tools/snort.conf for a sample Snort configuration file.
[ Team LiB ]](https://image.slidesharecdn.com/linuxsecuritycookbook-120930200536-phpapp01/85/Linux-security-cookbook-360-320.jpg)
![[ Team LiB ]
Recipe 9.27 Directing System Messages to Log Files
(syslog)
9.27.1 Problem
You want to configure the system logger to use an organized collection of log files.
9.27.2 Solution
Set up /etc/syslog.conf for local logging:
/etc/syslog.conf:
# Messages of priority info or higher, that are not logged elsewhere
*.info;
mail,authpriv,cron.none;
local0,local1,local2,local3,local4,local5,local6,local7.none
/var/log/messages
# Messages of priority debug, that are not logged elsewhere
*.=debug;
mail,authpriv,cron.none;
local0,local1,local2,local3,local4,local5,local6,local7.none
-/var/log/debug
# Facilities with log files that require restricted access permissions
mail.* /var/log/maillog
authpriv.* /var/log/secure
cron.* /var/log/cron
# Separate log files for local use
local0.* /var/log/local0
local1.* /var/log/local1
local2.* /var/log/local2
local3.* /var/log/local3
local4.* /var/log/local4
local5.* /var/log/local5
local6.* /var/log/local6
# Red Hat usurps the local7 facility for boot messages from init scripts
local7.* /var/log/boot.log
After you modify /etc/syslog.conf, you must send a signal to force syslogd to reread it and apply your
changes. Any of these will do:
# kill -HUP `pidof syslogd`
or:](https://image.slidesharecdn.com/linuxsecuritycookbook-120930200536-phpapp01/85/Linux-security-cookbook-361-320.jpg)
![# kill -HUP `cat /var/run/syslogd.pid`
or:
# /etc/init.d/syslog reload
or:
# service syslog reload Red Hat
9.27.3 Discussion
When your kernel needs to tell you something important, will you notice? If you are investigating a
potential break-in last night, will you have all of the information you need? Staying informed requires
careful configuration and use of the system logger.
The system logger collects messages from programs and even from the kernel. These messages are
tagged with a facility that identifies the broad category of the source, e.g., mail, kern (for kernel
messages), or authpriv (for security and authorization messages). In addition, a priority specifies the
importance (or severity) of each message. The lowest priorities are (in ascending order) debug, info, and
notice; the highest priority is emerg, which is used when your disk drive is on fire. The complete set of
facilities and priorities are described in syslog.conf(5) and syslog(3).
Messages can be directed to different log files, based on their facility and priority; this is controlled by the
configuration file /etc/syslog.conf. The system logger conveniently records a timestamp and the machine
name for each message.
It is tempting, but ill-advised, to try selecting the most important or interesting messages into separate
files, and then to ignore the rest. The problem with this approach is that you can't possibly know in
advance which information will be crucial in unforeseen circumstances.
Furthermore, the facilities and priorities are insufficient as message selection criteria, because they are
general, subjective, and unevenly applied by various programs. Consider the authpriv facility: it is
intended for security issues, but many security-related messages are tagged with other facilities. For
example, the message that your network interface is in "promiscuous mode" is tagged as a kernel
message, even though it means someone could be using your machine as a packet sniffer. Likewise, if a
system daemon emits a complaint about a ridiculously long name, perhaps filled with control characters,
someone might be trying to exploit a buffer overflow vulnerability.
Vigilance requires the examination of a wide range of messages. Even messages that are not directly
associated with security can provide a valuable context for security events. It can be reassuring to see
that the kernel's "promiscuous mode" message was preceded by a note from a system administrator
about using Ethereal to debug a network problem. [Recipe 9.17] Similarly, it is nice to know that the
nightly tape backups finished before a break-in occurred in the wee hours of the morning.
There is only one way to guarantee you have all of the information available when you need it: log
everything. It is relatively easy to ignore messages after they have been saved in log files, but it is
impossible to recover messages once they have been discarded by the system logger: the fate of
messages that do not match any entries in /etc/syslog.conf.
Auxiliary programs, like logwatch [Recipe 9.36], can scan log files and effectively select messages of
interest using criteria beyond the facility and priority: the name of the program that produced the
message, the timestamp, the machine name, and so forth. This is a good strategy in order to avoid being
overwhelmed by large amounts of logging data: you can use reports from logwatch to launch
investigations of suspicious activities, and be confident that more detailed information will always be
available in your log files for further sleuthing.](https://image.slidesharecdn.com/linuxsecuritycookbook-120930200536-phpapp01/85/Linux-security-cookbook-362-320.jpg)
![Even very busy systems using the most verbose logging typically produce only a few megabytes of
logging data per day. The modest amount of disk space required to store the log files can be reduced
further by logrotate. [Recipe 9.30] There are, nevertheless, some good reasons to direct messages to
different log files:
Some of the messages might contain sensitive information, and hence deserve more restrictive file
permissions.
Messages collected at a higher rate can be stored in log files that are rotated more frequently.
Our recipe shows one possible configuration for local logging. Higher priority messages from a range of
sources are collected in the traditional location /var/log/messages. Lower priority (debug) messages are
directed to a separate file, which we rotate more frequently because they may arrive at a higher rate. By
default, the system logger synchronizes log files to the disk after every message, to avoid data loss if a
system crash occurs. The dash ("-") character before the /var/log/debug filename disables this behavior
to achieve a performance boost: use this with other files that accumulate a lot of data. Exclusions are
used to prevent messages from being sent to multiple files. This is not strictly necessary, but is a nice
property if you later combine log files [Recipe 9.35], as there will be no duplicate messages.
Priority names in the configuration file normally mean the specified priority and all higher priorities.
Therefore, info means all priorities except debug. To specify only a single priority (but not all higher
priorities), add "=" before the priority name. The special priority none excludes facilities, as we show for
/var/log/messages and /var/log/debug. The "*" character is used as a wildcard to select all facilities or
priorities. See the syslog.conf(5) manpage for more details about this syntax.
Messages tagged with the authpriv , mail, and cron facilities are sent to separate files that are usually not
readable by everyone, because they could contain sensitive information.
Finally, the local[0-7] facilities, reserved for arbitrary local uses, are sent to separate files. This provides a
convenient mechanism for categorizing your own logging messages. Note that some system daemons use
these facilities, even though they really are not supposed to do so. For example, the local7 facility is used
by Red Hat for boot messages.
The facility local7 is used by Red Hat Linux for boot messages. Use care when
redirecting or ignoring messages with this facility.
The system logger notices changes in /etc/syslog.conf only when it receives a signal, so send one as
shown. The same commands also cause the system logger to close and reopen all its log files; this feature
is leveraged by logrotate. [Recipe 9.30]
When adding new log files, it is best to create new (empty) files manually so that
the correct permissions can be set. Otherwise, the log files created by the system
logger will be publicly readable, which isn't always appropriate.
9.27.4 See Also
syslogd(8), syslog.conf(5).
[ Team LiB ]](https://image.slidesharecdn.com/linuxsecuritycookbook-120930200536-phpapp01/85/Linux-security-cookbook-363-320.jpg)
![[ Team LiB ]
Recipe 9.28 Testing a syslog Configuration
9.28.1 Problem
You want to find out where all your syslog messages go.
9.28.2 Solution
#!/bin/sh
PROG=`basename "$0"`
FACILITIES='auth authpriv cron daemon ftp kern lpr mail news syslog user uucp
local0 local1 local2 local3 local4 local5 local6 local7'
PRIORITIES='emerg alert crit err warning notice info debug'
for f in $FACILITIES
do
for p in $PRIORITIES
do
logger -p $f.$p "$PROG[$$]: testing $f.$p"
done
done
9.28.3 Discussion
This script simply iterates through all syslog facilities and priorities, sending a message to each
combination. After running it, examine your log files to see which messages ended up where.
If you don't want to hard-code the facilities and priorities (in case they change), write an analogous
program in C and reference the names directly in /usr/include/sys/syslog.h.
9.28.4 See Also
logger(1), syslogd(8), syslog.conf(5).
syslog-ng ("new generation") is a more powerful replacement for the standard system logger. If you
crave more features or are frustrated by limitations of facilities and priorities, check out
http://www.balabit.com/products/syslog_ng.
[ Team LiB ]](https://image.slidesharecdn.com/linuxsecuritycookbook-120930200536-phpapp01/85/Linux-security-cookbook-364-320.jpg)
![[ Team LiB ]
Recipe 9.29 Logging Remotely
9.29.1 Problem
You want system logger messages saved on a remote machine rather than locally.
9.29.2 Solution
Configure /etc/syslog.conf for remote logging, using the "@" syntax:
/etc/syslog.conf:
# Send all messages to remote system "loghost"
*.* @loghost
On loghost, tell syslogd to accept messages from the network by adding the -r option:
# syslogd -r ...
or within /etc/sysconfig/syslog:
SYSLOGD_OPTIONS="... -r ..." Red Hat
SYSLOGD_PARAMS="... -r ..." SuSE
Remember to send a signal to syslogd to pick up any changes to /etc/syslog.conf [Recipe 9.27], or to
restart the daemon on loghost if you have changed command-line options.
9.29.3 Discussion
The system logger can redirect messages to another machine: this is indicated in /etc/syslog.conf by an
"@" character followed by a machine name as the destination. Our recipe shows a simple remote logging
configuration that sends all messages to a remote machine, conventionally named loghost.
The remote configuration can be convenient for collecting messages from several machines in log files on
a single centralized machine, where they can be monitored and examined. You might also want to use this
configuration on a machine like a web server, so that log files cannot be read, tampered with, or removed
by an intruder if a break-in occurs.
Local and remote rules can be combined in the same syslog.conf configuration, and some categories of
messages can be sent to both local and remote destinations.
The system logger will not accept messages from another machine by default. To allow this, add the
syslogd -r command-line option on loghost. Your loghost can even collect messages from other types of
systems, e.g., routers and switches. Protect your loghost with your firewall, however, to prevent others
from bombarding your server with messages as a denial of service attack.
To allow the loghost to be changed easily, set up a "loghost" CNAME record on your nameserver that
points to a specific machine:](https://image.slidesharecdn.com/linuxsecuritycookbook-120930200536-phpapp01/85/Linux-security-cookbook-365-320.jpg)
![loghost IN CNAME watchdog.example.com.
(Don't forget the final period.) You can then redirect messages by simply modifying the CNAME record,
rather than a potentially large number of /etc/syslog.conf files. Add the syslogd -h option on your old
loghost to forward your messages to the new loghost, until you have a chance to reconfigure those
routers and switches unaware of the change.
9.29.4 See Also
syslogd(8), syslog.conf(5).
[ Team LiB ]](https://image.slidesharecdn.com/linuxsecuritycookbook-120930200536-phpapp01/85/Linux-security-cookbook-366-320.jpg)
![[ Team LiB ]
Recipe 9.30 Rotating Log Files
9.30.1 Problem
You want to control and organize your ever-growing log files.
9.30.2 Solution
Use logrotate, a program to compress and/or delete log files automatically when they are sufficiently old,
perhaps after they have been stashed away on tape backups.
Add entries to /etc/logrotate.d/syslog, e.g.:
/etc/logrotate.d/syslog:
/var/log/local0 /var/log/local1 ...others... {
sharedscripts
postrotate
/bin/kill -HUP `cat /var/run/syslogd.pid`
endscript
}
9.30.3 Discussion
Log files should be rotated so they won't grow indefinitely. Our recipe shows a simple configuration that
can be used with logrotate to do this automatically. After the files are shuffled around, the postrotate
script sends a signal to the system logger to reopen the log files, and the sharedscripts directive ensures
that this is done only once, for all of the log files.
You can add a separate configuration file (with any name) in the /etc/logrotate.d directory, as an
alternative to editing the /etc/logrotate.d/syslog file. Separate entries can be used to tune the default
behavior of logrotate, which is described by /etc/logrotate.conf, e.g., to rotate some log files more
frequently.
9.30.4 See Also
logrotate(8), syslogd(8).
[ Team LiB ]](https://image.slidesharecdn.com/linuxsecuritycookbook-120930200536-phpapp01/85/Linux-security-cookbook-367-320.jpg)
![[ Team LiB ]
Recipe 9.31 Sending Messages to the System Logger
9.31.1 Problem
You want to add information about interesting events to the system log.
9.31.2 Solution
Use the logger program. A simple example:
$ logger "using Ethereal to debug a network problem"
Suppose "food" is the name of a program, short for "Foo Daemon." Log a simple message:
$ logger -t "food[$$]" -p local3.warning "$count connections from $host"
Direct stdout and stderr output to syslog:
$ food 2>&1 | logger -t "food[$$]" -p local3.notice &
Send stdout and stderr to syslog, using different priorities (bash only):
$ food 1> >(logger -t "food[$$]" -p local3.info)
2> >(logger -t "food[$$]" -p local3.err) &
You can also write to the system log from shell scripts [Recipe 9.32], Perl programs [Recipe 9.33], or C
programs [Recipe 9.34].
9.31.3 Discussion
The system logger isn't just for system programs: you can use it with your own programs and scripts, or
even interactively. This is a great way to record information for processes that run in the background
(e.g., as cron jobs), when stdout and stderr aren't necessarily connected to anything useful. Don't bother
to create, open, and maintain your own log files: let the system logger do the work.
Interactively, logger can be used almost like echo to record a message with the default user facility and
notice priority. Your username will be prepended to each message as an identifier.
Our recipe shows a sample "Foo Daemon" (food) that uses the local3 facility and various priority levels,
depending on the importance of each message. By convention, the script uses its name "food" as an
identifier that is prepended to each message.
It is a good idea to add a process ID to each message, so that a series of messages can be untangled
when several copies of the script are running simultaneously. For example, consider the log file entries
from a computer named cafeteria:
Feb 21 12:05:41 cafeteria food[1234]: customer arrived: Alison](https://image.slidesharecdn.com/linuxsecuritycookbook-120930200536-phpapp01/85/Linux-security-cookbook-368-320.jpg)
![Feb 21 12:06:15 cafeteria food[5678]: customer arrived: Bob
Feb 21 12:10:22 cafeteria food[1234]: devoured tofu
Feb 21 12:11:09 cafeteria food[5678]: consumed beef
Feb 21 12:15:34 cafeteria food[5678]: ingested pork
Feb 21 12:18:23 cafeteria food[1234]: gobbled up broccoli
Feb 21 12:22:52 cafeteria food[5678]: paid $7.89
Feb 21 12:24:35 cafeteria food[1234]: paid $4.59
In this case, the process IDs allow us to distinguish carnivores and herbivores, and to determine how
much each paid. We use the process ID of the invoking shell by appending "[$$]" to the program
name.[12] Other identifiers are possible, like the customer name in our example, but the process ID is
guaranteed to be unique: consider the possibility of two customers named Bob! The system logger can
record the process ID with each message automatically.
[12]logger's own option to log a process ID, -i, is unfortunately useless. It prints the process ID of logger itself,
which changes on each invocation.
It is a good practice to run logger before engaging in activities that might otherwise
be regarded as suspicious, such as running a packet sniffing program like Ethereal.
[Recipe 9.17]
Programs that don't use the system logger are unfortunately common. Our recipe shows two techniques
for capturing stdout and stderr from such programs, either combined or separately (with different
priorities), using logger. The latter uses process substitution, which is available only if the script is run by
bash (not the standard Bourne shell, sh).
9.31.4 See Also
logger(1), bash(1).
[ Team LiB ]](https://image.slidesharecdn.com/linuxsecuritycookbook-120930200536-phpapp01/85/Linux-security-cookbook-369-320.jpg)
![[ Team LiB ]
Recipe 9.32 Writing Log Entries via Shell Scripts
9.32.1 Problem
You want to add information to the system log using a shell script.
9.32.2 Solution
Use logger and this handy API, which emulates that of Perl and C:
syslog-api.sh:
#!/bin/sh
ident="$USER"
facility="user"
openlog( ) {
if [ $# -ne 3 ]
then
echo "usage: openlog ident option[,option,...] facility" 1>&2
return 1
fi
ident="$1"
local option="$2"
facility="$3"
case ",$option," in
*,pid,*) ident="$ident[$$]";;
esac
}
syslog( ) {
if [ $# -lt 2 ]
then
echo "usage: syslog [facility.]priority format ..." 1>&2
return 1
fi
local priority="$1"
local format="$2"
shift 2
case "$priority" in
*.*) ;;
*) priority="$facility.$priority";;
esac
printf "$format" "$@" | logger -t "$ident" -p "$priority"
}
closelog( ) {
ident="$USER"
facility="user"
}](https://image.slidesharecdn.com/linuxsecuritycookbook-120930200536-phpapp01/85/Linux-security-cookbook-370-320.jpg)
![To use the functions in a shell script:
#!/bin/sh
source syslog-api.sh
openlog `basename "$0"` pid local3
syslog warning "%d connections from %s" $count $host
syslog authpriv.err "intruder alert!"
closelog
The syslog API
The standard API for the system logger provides the following three functions for Perl scripts
and C programs, and we provide an implementation for Bash shell scripts as well. [Recipe
9.32]
openlog
Specify the identifier prepended to each message, conventionally the basename of the
program or script. An option is provided to add the process ID as well; other options are
less commonly used. Finally, a default facility is established for subsequent messages:
local0 through local6 are good choices.
syslog
Send messages. It is used like printf, with an added message priority. Specify a facility
to override the default established by openlog: this should be done sparingly, e.g., to
send security messages to authpriv. Each message should be a single line—omit
newlines at the end of the messages too. Don't use data from untrusted sources in the
format string, to avoid security holes that result when the data is maliciously crafted to
contain unexpected "%" characters (this advice applies to any function using printf-style
formatting): use "%s" as the format string instead, with the insecure data as a separate
argument.
closelog
Close the socket used to communicate with the system logger. This function can be
employed to clean up file descriptors before forking, but in most cases is optional.
9.32.3 Discussion
Our recipe shows how to use shell functions to implement the syslog API (see The syslog API) within shell
scripts. The openlog function can be readily extended to recognize other, comma-separated options. The
syslog function uses the same syntax as logger for the optional facility. The closelog function just restores
the defaults for the identifier and facility, which are stored in global variables. These functions can be
stored in a separate file and sourced by other shell scripts, as a convenient alternative to the direct use of
logger.
9.32.4 See Also
logger(1), syslog(3).
[ Team LiB ]](https://image.slidesharecdn.com/linuxsecuritycookbook-120930200536-phpapp01/85/Linux-security-cookbook-371-320.jpg)
![[ Team LiB ]
Recipe 9.33 Writing Log Entries via Perl
9.33.1 Problem
You want to add information to the system log from a Perl program.
9.33.2 Solution
Use the Perl module Sys::Syslog, which implements the API described in the sidebar, The syslog API.
syslog-demo.pl
#!/usr/bin/perl
use Sys::Syslog qw(:DEFAULT setlogsock);
use File::Basename;
my $count = 0;
my $host = "some-machine";
setlogsock("unix");
openlog(basename($0), "pid", "local3");
syslog("warning", "%d connections from %s", $count, $host);
syslog("authpriv|err", "intruder alert!");
syslog("err", "can't open configuration file: %m");
closelog( );
9.33.3 Discussion
The system logger by default refuses to accept network connections (assuming you have not used the
syslogd -r option). Unfortunately, the Perl module uses network connections by default, so our recipe calls
setlogsock to force the use of a local socket instead. If your syslog messages seem to be disappearing into
thin air, be sure to use setlogsock. Recent versions of Sys::Syslog resort to a local socket if the network
connection fails, but use of setlogsock for reliable operation is a good idea, since the local socket should
always work. Note that setlogsock must be explicitly imported.
Perl scripts can pass the %m format specifier to syslog to include system error messages, as an
alternative to interpolating the $! variable. Be sure to use %m (or $!) only when a system error has
occurred, to avoid misleading messages.
9.33.4 See Also
Sys::Syslog(3pm), syslog(3).
[ Team LiB ]](https://image.slidesharecdn.com/linuxsecuritycookbook-120930200536-phpapp01/85/Linux-security-cookbook-372-320.jpg)
![[ Team LiB ]
Recipe 9.34 Writing Log Entries via C
9.34.1 Problem
You want to add information to the system log from a C program.
9.34.2 Solution
Use the system library functions openlog , syslog, and closelog (see The syslog API):
syslog-demo.c:
#define _GNU_SOURCE /* for basename( ) in <string.h> */
#include <syslog.h>
#include <string.h>
int count = 0;
char *host = "some-machine ";
int main(int argc, char *argv[]) {
openlog(basename(argv[0]), LOG_PID, LOG_LOCAL3);
syslog(LOG_WARNING, "%d connection attempts from %s", count, host);
syslog(LOG_AUTHPRIV|LOG_ERR, "intruder alert!");
syslog(LOG_ERR, "can't open configuration file: %m");
closelog( );
return(0);
}
9.34.3 Discussion
Like Perl scripts [Recipe 9.33], C programs can pass the %m format specifier to syslog to include system
error messages, corresponding to strerror(errno). Be sure to use %m only when a system error has
occurred, to avoid misleading messages.
9.34.4 See Also
syslog(3).
[ Team LiB ]](https://image.slidesharecdn.com/linuxsecuritycookbook-120930200536-phpapp01/85/Linux-security-cookbook-373-320.jpg)
![[ Team LiB ]
Recipe 9.35 Combining Log Files
9.35.1 Problem
You want to merge a collection of log files into a single, chronological log file.
9.35.2 Solution
#!/bin/sh
perl -ne
'print $last, /last message repeated d+ times$/ ? "0" : "n" if $last;
chomp($last = $_);
if (eof) {
print;
undef $last;
}' "$@" | sort -s -k 1,1M -k 2,2n -k 3,3 | tr '0' 'n'
9.35.3 Discussion
The system logger automatically prepends a timestamp to each message, like this:
Feb 21 12:34:56 buster kernel: device eth0 entered promiscuous mode
To merge log files, sort each one by its timestamp entries, using the first three fields (month, date, and
time) as keys.
A complication arises because the system logger inserts "repetition messages" to conserve log file space:
Feb 21 12:48:16 buster last message repeated 7923 times
The timestamp for the repetition message is often later than the last message. It would be terribly
misleading if possibly unrelated messages from other log files were merged between the last message and
its associated repetition message.
To avoid this, our Perl script glues together the last message with a subsequent repetition message (if
present), inserting a null character between them: this is reliable because the system logger never writes
null characters to log files. The script writes out the final line before the end of each file and then forgets
the last line, to avoid any possibility of confusion if the next file happens to start with an unrelated
repetition message.
The sort command sees these null-glued combinations as single lines, and keeps them together as the
files are merged. The null characters are translated back to newlines after the files are sorted, to split the
combinations back into separate lines.
We use sort -s to avoid sorting entire lines if all of the keys are equal: this preserves the original order of
messages with the same timestamp, at least within each original log file.
If you have configured the system logger to write messages to multiple log files, then you may wish to](https://image.slidesharecdn.com/linuxsecuritycookbook-120930200536-phpapp01/85/Linux-security-cookbook-374-320.jpg)
![remove duplicates as you merge. This can be done by using sort -u instead of -s, and adding an extra sort
key -k 4 to compare the message contents. There is a drawback, however: messages could be rearranged
if they have the same timestamp. All of the issues related to sort -s and -u are consequences of the one-
second resolution of the timestamps used by the system logger.
We'll note a few other pitfalls related to timestamps. The system logger does not record the year, so if
your log files cross a year boundary, then you will need to merge the log files for each year separately,
and concatenate the results. Similarly, the system logger writes timestamps using the local time zone, so
you should avoid merging log files that cross a daylight saving time boundary, when the timestamps can
go backward. Again, split the log files on either side of the discontinuity, merge separately, and then
concatenate.
If your system logger is configured to receive messages from other machines, note that the timestamps
are generated on the machine where the log files are stored. This allows consistent sorting of messages
even from machines in different time zones.
9.35.4 See Also
sort(1).
[ Team LiB ]](https://image.slidesharecdn.com/linuxsecuritycookbook-120930200536-phpapp01/85/Linux-security-cookbook-375-320.jpg)
![[ Team LiB ]
Recipe 9.36 Summarizing Your Logs with logwatch
9.36.1 Problem
You want to scan your system log files for reports of problems.
9.36.2 Solution
Use logwatch, from http://www.logwatch.org. For example:
# logwatch --range all --archives --detail High --print | less
to see all the useful data logwatch can display, or:
# logwatch --print | less
to see only yesterday's entries.
9.36.3 Discussion
logwatch is a handy utility to scan system log files and display unexpected entries. Red Hat includes it but
SuSE does not. If you need it, download the binary RPM from http://www.logwatch.org,[13] and install it,
as root:
[13]Actually, there are no binaries: logwatch is a collection of Perl scripts. Therefore, you don't need to worry about
which RPM is right for your system's architecture.
# rpm -Uhv logwatch-*.noarch.rpm
The easiest way to see what logwatch does is to run it:
$ logwatch --range all --print | less
################### LogWatch 4.2.1 (10/27/02) ####################
Processing Initiated: Sun Nov 10 20:53:49 2002
Date Range Processed: all
Detail Level of Output: 0
Logfiles for Host: myhost
###############################################################
--------------------- Connections (secure-log) Begin ------------------------
Unauthorized sudo commands attempted (1):
smith:
/usr/bin/tail -30 /var/log/maillog
---------------------- Connections (secure-log) End -------------------------
--------------------- SSHD Begin ------------------------
SSHD Killed: 2 Time(s)
SSHD Started: 1 Time(s)](https://image.slidesharecdn.com/linuxsecuritycookbook-120930200536-phpapp01/85/Linux-security-cookbook-376-320.jpg)
![Users logging in through sshd:
smith logged in from foo.example.com (128.91.0.3) using publickey: 1 Time(s)
Refused incoming connections:
200.23.18.56: 1 Time(s)
---------------------- SSHD End -------------------------
...
Once installed, logwatch is often run daily by cron, emailing its results to root. This is not necessarily the
most secure way to do things: if your system is compromised, then you cannot trust email or logwatch
itself. Like tripwire (Chapter 1), logwatch is best run on a remote machine, or from a secure medium like
CD-ROM or write-protected floppy disk.
logwatch processes most but not all common log files. For the rest, you can define your own logwatch
filters to parse and summarize them. [Recipe 9.37]
If logwatch seems to do nothing when you run it, be aware of the —print option. By default, logwatch
does not write its results on standard output: it sends them by email. Specify —print to see the results on
screen. Also be aware that the default range is "yesterday," which might not be what you want.
9.36.4 See Also
See logwatch(8) for full usage information or run:
$ logwatch --help
[ Team LiB ]](https://image.slidesharecdn.com/linuxsecuritycookbook-120930200536-phpapp01/85/Linux-security-cookbook-377-320.jpg)
![[ Team LiB ]
Recipe 9.37 Defining a logwatch Filter
9.37.1 Problem
You want logwatch to print reports for a service it does not support.
9.37.2 Solution
Create your own logwatch filter for that service or log file. Suppose you have a service called foobar that
writes to the log file /var/log/foobar.log.
1. Create /etc/log.d/conf/logfiles/foobar.conf containing:
LogFile = /var/log/foobar.log
Archive = foobar.log.*
...
2. Create /etc/log.d/conf/services/foobar.conf containing:
LogFile = foobar
3. Create /etc/log.d/scripts/services/foobar.
This is a script (Perl, shell, etc.) that matches the desired lines in foobar.log and produces your
desired output. logwatch automatically strips the datestamps from syslog-format output, so your
script needn't do this.
9.37.3 Discussion
logwatch is more a framework than a log parser. In fact, all parsing is done by auxiliary scripts in
/etc/log.d/scripts/services, so for unsupported services, you must write your own scripts. You might think,
"Hey, if I have to write these scripts myself, what's the value of logwatch?" The answer is convenience, as
well as consistency of organization. It's helpful to have all your log groveling scripts together under one
roof. Plus logwatch supplies tons of scripts; use them as examples for writing your own.
To integrate a given service into logwatch, you must define three files:
A logfile group configuration file
Found in /etc/log.d/conf/logfiles, it defines where the service's logs are stored.
A service filter executable
Found in /etc/log.d/scripts/services, it must read log entries from standard input and write
whatever you like on standard output.](https://image.slidesharecdn.com/linuxsecuritycookbook-120930200536-phpapp01/85/Linux-security-cookbook-378-320.jpg)
![A service filter configuration file
Found in /etc/log.d/conf/services, it defines the association between the above two files. It specifies
that the above-mentioned logs will be fed to the above-mentioned filter.
Our recipe uses minimal configuration files. Plenty of other options are possible.
9.37.4 See Also
/usr/share/doc/logwatch*/HOWTO-Make-Filter documents the full syntax of logwatch filters.
[ Team LiB ]](https://image.slidesharecdn.com/linuxsecuritycookbook-120930200536-phpapp01/85/Linux-security-cookbook-379-320.jpg)
![[ Team LiB ]
Recipe 9.38 Monitoring All Executed Commands
9.38.1 Problem
You want to record information about executed commands, a.k.a., process accounting.
9.38.2 Solution
Prepare to enable process accounting:
# umask 077 Be sure that the accounting data isn't publicly re
# touch /var/account/pacct Create the log file if necessary
Enable it:
# accton /var/account/pacct
or:
# /etc/init.d/psacct start Red Hat
# /etc/init.d/acct start SuSE
or:
# service psacct start Red Hat
To disable it:
# accton Note: no filename
or:
# /etc/init.d/psacct stop Red Hat
# /etc/init.d/acct stop SuSE
or:
# service psacct stop Red Hat
To enable process accounting automatically at boot time:
# chkconfig psacct on Red Hat
# chkconfig acct on SuSE
By default, the process accounting RPM is not installed for Red Hat 8.0 or SuSE 8.0, but both distributions include it.
package name is psacct for Red Hat, and acct for SuSE.](https://image.slidesharecdn.com/linuxsecuritycookbook-120930200536-phpapp01/85/Linux-security-cookbook-380-320.jpg)
![9.38.3 Discussion
Sometimes, investigating suspicious activity requires time travel—you need detailed information about what happene
some interval in the past. Process accounting can help.
The Linux kernel can record a wealth of information about processes as they exit. This feature originally was designe
support charging for resources such as CPU time (hence the name "process accounting"), but today it is used mostly
audit trail for detective work.
The accton command enables process accounting, and specifies the file used for the audit trail, conventionally
/var/account/pacct. This file must already exist, so manually create an empty file first if necessary, carefully restricti
access to prevent public viewing of the sensitive accounting data. If the filename is omitted, then the accton comma
disables process accounting.
Usually process accounting is enabled automatically at boot time. On SuSE and Red Hat 8.0 or later systems, the chk
command installs the necessary links to run the scripts acct and psacct (respectively) in the /etc/init.d directory. The
behavior of earlier Red Hat versions is slightly different, and less flexible: the boot script /etc/init.d/rc.sysinit always
process accounting if the psacct RPM is installed, and the accounting files are stored in /var/log instead of /var/accou
Accounting data will accumulate fairly rapidly on a busy system, so the log files must be aggressively rotated [Recipe
the daily rotation specified by /etc/logrotate.d/psacct on Red Hat systems is typical. SuSE does not provide a logrota
script, but you can install one in /etc/logrotate.d/acct:
/var/account/pacct {
prerotate
/usr/sbin/accton
endscript
compress
notifempty
daily
rotate 31
create 0600 root root
postrotate
/usr/sbin/accton /var/account/pacct
endscript
}
The prerotate and postrotate scripts use the accton command to disable accounting temporarily while the log files ar
rotated. Compressed log files are retained for a month.
An alternative is to use the sa command with the -s option to truncate the current log file and write a summary of to
command name or user ID in the files savacct and usracct, respectively (in the same directory as pacct). The logrota
method is more suitable for sleuthing, since it preserves more information.
9.38.4 See Also
accton(8), sa(8).
[ Team LiB ]](https://image.slidesharecdn.com/linuxsecuritycookbook-120930200536-phpapp01/85/Linux-security-cookbook-381-320.jpg)
![[ Team LiB ]
Recipe 9.39 Displaying All Executed Commands
9.39.1 Problem
You want to display information about executed commands, as recorded by process accounting.
9.39.2 Solution
To view the latest accounting information:
$ lastcomm [command-name] [user-name] [terminal-name]
To view the complete record using lastcomm:
# umask 077 Avoid publicly-readable accounting data in /var/tmp
# zcat `ls -tr /var/account/pacct.*.gz` > /var/tmp/pacct
# cat /var/account/pacct >> /var/tmp/pacct
# lastcomm -f /var/tmp/pacct
# rm /var/tmp/pacct
For more detailed information:
# dump-acct [--reverse] /var/account/pacct
9.39.3 Discussion
The GNU accounting utilities are a collection of programs for viewing the audit trail. The most important is lastcomm
which prints the following information for each process:
The command name, truncated to sixteen characters.
A set of flags indicating if the command used superuser privileges, was killed by a signal, dumped core, or ran
after a fork without a subsequent exec (many daemons do this).
The user who ran the command.
The controlling terminal for the command (if any).
The CPU time used by the command.
The start time of the command.](https://image.slidesharecdn.com/linuxsecuritycookbook-120930200536-phpapp01/85/Linux-security-cookbook-382-320.jpg)
![The latest version of lastcomm available at press time suffers from some unfortunate bugs.
Terminals are printed incorrectly, usually as either "stdin" or "stdout", and are not recognized
when specified on the command line. The reported CPU times are slightly more than five
times the actual values for Red Hat 8.0 kernels; they are correct for earlier versions and for
SuSE.
Some documentation errors should also be noted. The "X" flag means that the command was
killed by any signal, not just SIGTERM. The last column is the start time, not the exit time for
the command.
If you encounter these problems with lastcomm, upgrade to a more recent version if
available.
Information about commands is listed in reverse chronological order, as determined by the time when each process
exited (which is when the kernel writes the accounting records). Commands can be selected by combinations of the
command name, user, or terminal; see lastcomm(1) for details.
lastcomm can read an alternative log file with the -f option, but it cannot read from a pipe, because it needs to seek
within the accounting file, so the following will not work:
Fails:
$ zcat pacct.gz | lastcomm -f /dev/stdin
The kernel records much more information than is displayed by lastcomm. The undocumented dump-acct command
prints more detailed information for each process:
The command name (same as lastcomm).
The CPU time, split into user and system (kernel) times, expressed as a number of ticks. The sum of these two
times corresponds to the value printed by lastcomm.
The elapsed (wall clock) time, also in ticks. This can be combined with the start time to determine the exit
time.
The numerical user and group IDs. These are real, not effective IDs. The user ID corresponds to the username
printed by lastcomm.
The average memory usage, in kilobytes.
A measure of the amount of I/O (always zero for Version 2.4 or earlier kernels).
The start time, with one second precision (lastcomm prints the time truncated to only one minute precision).
A tick is the most basic unit of time used by the kernel, and represents the granularity of the
clock. It is defined as 1/HZ, where HZ is the system timer interrupt frequency. The traditional
value of HZ is 100, which leads to a ten millisecond tick.[14]
[14] Known in Linux lore as a jiffy.
Red Hat 8.0 kernels increased HZ to 512 for better time resolution, with a correspondingly shorter tick. The tickadj
command prints the current value of the tick, in microseconds:
$ tickadj
tick = 10000](https://image.slidesharecdn.com/linuxsecuritycookbook-120930200536-phpapp01/85/Linux-security-cookbook-383-320.jpg)
![By default, dump-acct lists commands in chronological order; use the -r or —reverse options for behavior similar to
lastcomm. One or more accounting files must be explicitly specified on the command line for dump-acct.
9.39.4 See Also
lastcomm(1).
[ Team LiB ]](https://image.slidesharecdn.com/linuxsecuritycookbook-120930200536-phpapp01/85/Linux-security-cookbook-384-320.jpg)
![[ Team LiB ]
Recipe 9.40 Parsing the Process Accounting Log
9.40.1 Problem
You want to extract detailed information such as exit codes from the process accounting log.
9.40.2 Solution
Read and unpack the accounting records with this Perl script:
#!/usr/bin/perl
use POSIX qw(:sys_wait_h);
use constant ACORE => 0x08; # for $flag, below
$/ = 64; # size of each accounting record
while (my $acct = <>) {
my ( $flag,
$uid,
$gid,
$tty,
$btime,
$utime,
$stime,
$etime,
$mem,
$io,
$rw,
$minflt,
$majflt,
$swaps,
$exitcode,
$comm) =
unpack("CxS3LS9x2LA17", $acct);
printf("%s %-16s", scalar(localtime($btime)), $comm);
printf(" exited with status %d", WEXITSTATUS($exitcode))
if WIFEXITED($exitcode);
printf(" was killed by signal %d", WTERMSIG($exitcode))
if WIFSIGNALED($exitcode);
printf(" (core dumped)")
if $flag & ACORE;
printf("n"); }
exit(0);
9.40.3 Discussion
Even the dump-acct command [Recipe 9.39] misses some information recorded by the kernel, such as
the exit code. This is really the status that would have been returned by wait(2), and includes the specific
signal for commands that were killed. To recover this information, attack the accounting records directly](https://image.slidesharecdn.com/linuxsecuritycookbook-120930200536-phpapp01/85/Linux-security-cookbook-385-320.jpg)
![with a short Perl script.
Our recipe shows how to read and unpack the records, according to the description in
/usr/include/sys/acct.h. When we run the script, it produces a chronological report that describes how
each process expired, e.g:
Sun Feb 16 21:23:56 2003 ls exited with status 0
Sun Feb 16 21:24:05 2003 sleep was killed by signal 2
Sun Feb 16 21:24:14 2003 grep exited with status 1
Sun Feb 16 21:25:05 2003 myprogram was killed by signal 7 (core dumped)
9.40.4 See Also
acct(5). The C language file /usr/include/sys/acct.h describes the accounting records written by the
kernel.
[ Team LiB ]](https://image.slidesharecdn.com/linuxsecuritycookbook-120930200536-phpapp01/85/Linux-security-cookbook-386-320.jpg)
![[ Team LiB ]
Recipe 9.41 Recovering from a Hack
9.41.1 Problem
Your system has been hacked via the network.
9.41.2 Solution
1. Think. Don't panic.
2. Disconnect the network cable.
3. Analyze your running system. Document everything (and continue documenting as you go). Use the
techniques described in this chapter.
4. Make a full backup of the system, ideally by removing and saving the affected hard drives. (You
don't know if your backup software has been compromised.)
5. Report the break-in to relevant computer security incident response teams. [Recipe 9.42]
6. Starting with a blank hard drive, reinstall the operating system from trusted media.
7. Apply all security patches from your vendor.
8. Install all other needed programs from trusted sources.
9. Restore user files from a backup taken before the break-in occurred.
10. Do a post-mortem analysis on the original copy of your compromised system. The Coroner's Toolkit
(TCT) can help determine what happened and sometimes recover deleted files.
11. Reconnect to the network only after you've diagnosed the break-in and closed the relevant security
hole(s).
9.41.3 Discussion
Once your system has been compromised, trust nothing on the system. Anything may have been
modified, including applications, shared runtime libraries, and the kernel. Even innocuous utilities like
/bin/ls may have been changed to prevent the attacker's tracks from being viewed. Your only hope is a
complete reinstall from trusted media, meaning your original operating system CD-ROMs or ISOs.
The Coroner's Toolkit (TCT) is a collection of scripts and programs for analyzing compromised systems. It
collects forensic data and can sometimes recover (or at least help to identify) pieces of deleted files from
free space on filesystems. It also displays access patterns of files, including deleted ones. Become familiar
with TCT before any break-in occurs, and have the software compiled and ready on a CD-ROM in
advance.](https://image.slidesharecdn.com/linuxsecuritycookbook-120930200536-phpapp01/85/Linux-security-cookbook-387-320.jpg)
![The post-mortem analysis is the most time-consuming and open-ended task after a break-in. To obtain
usable results may require a lot of time and effort.
9.41.4 See Also
CERT's advice on recovery is at http://www.cert.org/tech_tips/win-UNIX-system_compromise.html. The
Coroner's Toolkit is available from http://www.porcupine.org/forensics/tct.html or
http://www.fish.com/tct.
[ Team LiB ]](https://image.slidesharecdn.com/linuxsecuritycookbook-120930200536-phpapp01/85/Linux-security-cookbook-388-320.jpg)
![[ Team LiB ]
Recipe 9.42 Filing an Incident Report
9.42.1 Problem
You want to report a security incident to appropriate authorities, such as a computer security incident
response team (CSIRT).
9.42.2 Solution
In advance of any security incident, develop and document a security policy that includes reporting
guidelines. Store CSIRT contact information offline, in advance.
When an incident occurs:
1. Decide if the incident merits an incident report. Consider the impact of the incident.
2. Gather detailed information about the incident. Organize it, so you can communicate effectively.
3. Contact system administrators at other sites that were involved in the incident, either as attackers
or victims.
4. Submit incident reports to appropriate CSIRTs. Be sure to respond to any requests for additional
information.
9.42.3 Discussion
If your system has been hacked [Recipe 9.41], or you have detected suspicious activity that might
indicate an impending break-in, report the incident. A wide range of computer security incident response
teams (CSIRTs) are available to help.
CSIRTs act as clearinghouses for security information. They collect and distribute news about ongoing
security threats, analyze statistics gathered from incident reports, and coordinate defensive efforts.
Collaboration with CSIRTs is an important part of being a responsible network citizen: any contribution,
however small, to improving the security of the Internet will help you, too.
Develop a security policy, including procedures and contact information for applicable CSIRTs, before a
break-in occurs. Most CSIRTs accept incident reports in a variety of formats, including Web forms,
encrypted email, phone, FAX, etc. Since your network access might be disrupted by break-ins or denial of
service attacks, store some or all of this information offline.
The Computer Emergency Response Team (CERT) serves the entire Internet, and is one of the most
important CSIRTs: this is a good starting point. The Forum of Incident Response and Security Teams
(FIRST) is a consortium of CSIRTs (including CERT) that serve more specialized constituencies. See their
list of members to determine if any apply to your organization.
Government agencies are increasingly acting as CSIRTs, with an emphasis on law enforcement and](https://image.slidesharecdn.com/linuxsecuritycookbook-120930200536-phpapp01/85/Linux-security-cookbook-389-320.jpg)
![prevention. Contact them to report activities that fall within their jurisdiction. An example in the United
States is the National Infrastructure Protection Center (NIPC).
What activities qualify as bona fide security incidents? Clearly, malicious activities that destroy data or
disrupt operations are included, but every Snort alert [Recipe 9.20] does not merit an incident report.
Consider the impact and potential effect of the activities, but if you are in doubt, report what you have
noticed. Even reports of well-known security threats are useful to CSIRTs, as they attempt to correlate
activities to detect widespread patterns and determine longer-term trends.
Before filing a report, gather the relevant information, including:
A detailed description of activities that you noticed
Monitoring techniques: how you noticed
Hosts and networks involved: yours, apparent attackers, and other victims
Supporting data such as log files and network traces
Start by contacting system administrators at other sites. If you are (or were) under attack, note the
source, but be aware that IP addresses might have been spoofed. If your system has been compromised
and used to attack other sites, notify them as well. ISPs might be interested in activities that involve large
amounts of network traffic.
The whois command can obtain technical and administrative contact information based on domain
names:
$ whois example.com
Save all of your correspondence—you might need it later. CSIRTs will want copies, and the
communication might have legal implications if you are reporting potentially criminal activity.
Next, contact the appropriate CSIRTs according to your security policy. Follow each CSIRT's reporting
guidelines, and note the incident tracking numbers assigned to your case, for future reference.
Provide good contact information, and try your best to respond in a timely manner to requests for more
details. Don't be disappointed or surprised if you don't receive a reply, though. CSIRTs receive many
reports, and if yours is a well-known threat, they might use it primarily for statistical analysis, with no
need for a thorough, individual investigation.
In many cases, however, you will at least receive the latest available information about recognized
activities. If you have discovered a new threat, you may even receive important technical assistance.
CSIRTs often possess information that has not been publicly released.
9.42.4 See Also
The Computer Emergency Response Team (CERT) home page is http://www.cert.org. For incident
reporting guidelines, see http://www.cert.org/tech_tips/incident_reporting.html.
The CERT Coordination Center (CERT/CC) incident reporting form is available at the secure web site
https://irf.cc.cert.org.
The Forum of Incident Response and Security Teams (FIRST) home page is http://www.first.org. Their
member list, with applicable constituencies, is available at http://www.first.org/team-info.
The National Infrastructure Protection Center (NIPC) home page is http://www.nipc.gov.](https://image.slidesharecdn.com/linuxsecuritycookbook-120930200536-phpapp01/85/Linux-security-cookbook-390-320.jpg)
![[ Team LiB ]](https://image.slidesharecdn.com/linuxsecuritycookbook-120930200536-phpapp01/85/Linux-security-cookbook-391-320.jpg)
![[ Team LiB ]
Colophon
Our look is the result of reader comments, our own experimentation, and feedback from distribution
channels. Distinctive covers complement our distinctive approach to technical topics, breathing personality
and life into potentially dry subjects.
Jane Ellin was the production editor and copyeditor for Linux Security Cookbook. Phil Dangler and Mary
Brady provided quality control. Jaime Peppard provided production support. Ellen Troutman-Zaig wrote
the index.
Hanna Dyer designed the cover of this book, based on a series design by herself and Edie Freedman. The
cover image of a campfire scene is a 19th-century engraving from American West. Emma Colby produced
the cover layout with QuarkXPress 4.1 using Adobe's ITC Garamond font.
David Futato designed the interior layout. Robert Romano chose the chapter opening images, which are
from the Dover Pictorial Archive, Marvels of the New West: A Vivid Portrayal of the Stupendous Marvels in
the Vast Wonderland West of the Missouri River, by William Thayer (The Henry Bill Publishing Co., 1888),
and The Pioneer History of America: A Popular Account of the Heroes and Adventures, by Augustus Lynch
Mason, A.M. (The Jones Brothers Publishing Company, 1884). This book was prepared in FrameMaker
5.5.6 by Andrew Savikas. The text font is Linotype Birka; the heading font is Adobe Myriad Condensed;
and the code font is LucasFont's TheSans Mono Condensed. The illustrations that appear in the book were
produced by Robert Romano and Jessamyn Read using Macromedia FreeHand 9 and Adobe Photoshop 6.
The tip and warning icons were drawn by Christopher Bing.
The online edition of this book was created by the Safari production group (John Chodacki, Becki Maisch,
and Madeleine Newell) using a set of Frame-to-XML conversion and cleanup tools written and maintained
by Erik Ray, Benn Salter, John Chodacki, and Jeff Liggett.
[ Team LiB ]](https://image.slidesharecdn.com/linuxsecuritycookbook-120930200536-phpapp01/85/Linux-security-cookbook-392-320.jpg)
![[ Team LiB ]
[ SYMBOL] [ A ] [ B ] [ C ] [ D] [ E] [ F] [ G ] [ H] [ I ] [ J] [ K ] [ L] [ M] [ N] [ O ] [ P ] [ Q ] [ R ] [ S ] [ T] [ U] [ V ] [ W] [ X ]
[ Team LiB ]](https://image.slidesharecdn.com/linuxsecuritycookbook-120930200536-phpapp01/85/Linux-security-cookbook-393-320.jpg)
![[ Team LiB ]
[ SYMBOL] [ A ] [ B ] [ C ] [ D] [ E] [ F] [ G ] [ H] [ I ] [ J] [ K ] [ L] [ M] [ N] [ O ] [ P ] [ Q ] [ R ] [ S ] [ T] [ U] [ V ] [ W] [ X ]
! (exclamation point)
escaping for shells
excluding commands in sudoers file
preventing file inclusion in Tripwire database
"" (quotes, double), empty
"any" interface
"ring buffer" mode (for tethereal)
$! variable (Perl), for system error messages
%m format specifier to syslog to include system error messages 2nd
. (period), in search path
.gpg suffix (binary encrypted files)
.shosts file
/ (slash), beginning absolute directory names
/dev directory
/dev/null, redirecting standard input from
/proc files
filesystems
networking, important files for (/proc/net/tcp and /proc/net/udp)
/sbin/ifconfig
/sbin/ifdown
/sbin/ifup
/tmp/ls (malicious program)
/usr/share/ssl/cert.pem file
/var/account/pacct
/var/log/lastlog
/var/log/messages
/var/log/secure
unauthorized sudo attempts, listing
/var/log/utmp
/var/log/wtmp
: (colons), current directory in empty search path element
@ character, redirecting log messages to another machine
@otherhost syntax, syslog.conf
~/.ssh directory, creating and setting mode
~/.ssh/config file
[ Team LiB ]](https://image.slidesharecdn.com/linuxsecuritycookbook-120930200536-phpapp01/85/Linux-security-cookbook-394-320.jpg)
![[ Team LiB ]
[ SYMBOL] [ A ] [ B ] [ C ] [ D] [ E] [ F] [ G ] [ H] [ I ] [ J] [ K ] [ L] [ M] [ N] [ O ] [ P ] [ Q ] [ R ] [ S ] [ T] [ U] [ V ] [ W] [ X ]
absolute directory names
access control lists (ACLs), creating with PAM
access_times attribute (xinetd)
accounting [See process accounting]
acct RPM
accton command (for process accounting)
addpol command (Kerberos)
administrative privileges, Kerberos user
administrative system, Kerberos [See kadmin utility]
agents, SSH [See also ssh-agent]
forwarding, disabling for authorized keys
terminating on logout
using with Pine
Aide (integrity checker)
alerts, intrusion detection [See Snort]
aliases
for hostnames
changing SSH client defaults
for users and commands (with sudo)
ALL keyword
user administration of their own machines (not others)
AllowUsers keyword (sshd)
Andrew Filesystem kaserver
ank command (adding new Kerberos principal)
apache (/etc/init.d startup file)
append-only directories
apply keyword (PAM, listfile module)
asymmetric encryption 2nd [See also public-key encryption]
attacks
anti-NIDS attacks
buffer overflow
detection with ngrep
indications from system daemon messages
dictionary attacks on terminals
dsniff, using to simulate
inactive accounts still enabled, using
man-in-the-middle (MITM)
risk with self-signed certificates
services deployed with dummy keys
operating system vulnerability to forged connections
setuid root program hidden in filesystems
on specific protocols
system hacked via the network
vulnerability to, factors in
attributes (file), preserving in remote file copying
authconfig utility
imapd, use of general system authentication
Kerberos option, turning on
AUTHENTICATE command (IMAP)
authentication
cryptographic, for hosts](https://image.slidesharecdn.com/linuxsecuritycookbook-120930200536-phpapp01/85/Linux-security-cookbook-395-320.jpg)
![for email sessions [See email IMAP]
interactive, without password [See ssh-agent]
Internet Protocol Security (IPSec)
Kerberos [See Kerberos authentication]
OpenSSH [See SSH]
PAM (Pluggable Authentication Modules) [See PAM]
SMTP [See SMTP]
specifying alternate username for remote file copying
SSH (Secure Shell) [See SSH]
SSL (Secure Sockets Layer) [See SSL]
by trusted host [See trusted-host authentication]
authentication keys for Kerberos users and hosts
authorization
root user
ksu (Kerberized su) command
multiple root accounts
privileges, dispensing
running root login shell
running X programs as
SSH, use of 2nd
sudo command
sharing files using groups
sharing root privileges
via Kerberos
via SSH
sudo command
allowing user authorization privileges per host
bypassing password authentication
forcing password authentication
granting privileges to a group
killing processes with
logging remotely
password changes
read-only access to shared file
restricting root privileges
running any program in a directory
running commands as another user
starting/stopping daemons
unauthorized attempts to invoke, listing
weak controls in trusted-host authentication
authorized_keys file (~/.ssh directory)
forced commands, adding to
authpriv facility (system messages)
[ Team LiB ]](https://image.slidesharecdn.com/linuxsecuritycookbook-120930200536-phpapp01/85/Linux-security-cookbook-396-320.jpg)
![[ Team LiB ]
[ SYMBOL] [ A ] [ B] [ C ] [ D] [ E] [ F] [ G ] [ H] [ I ] [ J] [ K ] [ L] [ M] [ N] [ O ] [ P ] [ Q ] [ R ] [ S ] [ T] [ U] [ V ] [ W] [ X ]
backups, encrypting
bash shell
process substitution
benefits of computer security, tradeoffs with risks and costs
Berkeley database library, use by dsniff
binary data
encrypted files
libpcap-format files
searching for with ngrep -X option
binary format (DER), certificates
converting to PEM
binary-format detached signature (GnuPG)
bootable CD-ROM, creating securely
broadcast packets
btmp file, processing with Sys::Utmp module
buffer overflow attacks
detection with ngrep
indicated by system daemon messages about names
[ Team LiB ]](https://image.slidesharecdn.com/linuxsecuritycookbook-120930200536-phpapp01/85/Linux-security-cookbook-397-320.jpg)
![[ Team LiB ]
[ SYMBOL] [ A ] [ B ] [ C] [ D] [ E] [ F] [ G ] [ H] [ I ] [ J] [ K ] [ L] [ M] [ N] [ O ] [ P ] [ Q ] [ R ] [ S ] [ T] [ U] [ V ] [ W] [ X ]
C programs
functions provided by system logger API
writing to system log from 2nd
CA (Certifying Authority)
setting up your own for self-signed certificates
SSL Certificate Signing Request (CSR), sending to
Verisign, Thawte, and Equifax
CA.pl (Perl script)
cage, chroot (restricting a service to a particular directory)
canonical hostname for SSH client
finding with Perl script
inconsistencies in
capture filter expressions
Ethereal, use of
CERT Coordination Center (CERT/CC), incident reporting form
cert.pem file
adding new SSL certificate to
validating SSL certificates in
certificates
generating self-signed X.509 certificate
revocation certificates for keys
distributing
SSL
converting from DER to PEM
creating self-signed certificate
decoding
dummy certificates for imapd and pop3d
generating Certificate Signing Request (CSR)
installing new
mutt mail client, use of
setting up CA and issuing certificates
validating
verifying 2nd
testing of pre-installed trusted certificates by Evolution
Certifying Authority [See CA]
certutil
challenge password for certificates
checksums (MD5), verifying for RPM-installed files
chkconfig command
enabling load commands for firewall
KDC and kadmin servers, starting at boot
process accounting packages, running at boot
Snort, starting at boot
chkrootkit program
commands invoked by
chmod (change mode) command 2nd
preventing directory listings
removing setuid or setgid bits
setting sticky bit on world-writable directory
world-writable files access, disabling
chroot program, restricting services to particular directories](https://image.slidesharecdn.com/linuxsecuritycookbook-120930200536-phpapp01/85/Linux-security-cookbook-398-320.jpg)
![CIAC (Computer Incident Advisory Capability), Network Monitoring Tools page
Classless InterDomain Routing (CIDR) mask format
client authentication [See Kerberos PAM SSH SSL trusted-host authentication]
client programs, OpenSSH
closelog function
using in C program
colons (:), referring to current working directory
command-line arguments
avoiding long
prohibiting for command run via sudo
Common Log Format (CLF) for URLs
Common Name
self-signed certificates
compromised systems, analyzing
Computer Emergency Response Team (CERT)
Computer Incident Advisory Capability (CIAC) Network Monitoring Tools page
computer security incident response team (CSIRT)
copying files
remotely
name-of-source and name-of-destination
rsync program, using
scp program
remote copying of multiple files
CoronerÕs Toolkit (TCT)
cps keyword (xinetd)
Crack utility (Alec Muffet)
cracking passwords
CrackLib program, using 2nd
John the Ripper software, using
CRAM-MD5 authentication (SMTP)
credentials, Kerberos
forwardable
listing with klist command
obtaining and listing for users
cron utility
authenticating in jobs
cron facility in system messages
integrity checking at specific times or intervals
restricting service access by time of day (with inetd)
secure integrity checks, running
crypt++ (Emacs package)
cryptographic authentication
for hosts
Kerberos [See Kerberos authentication]
plaintext keys
using with forced command
public-key authentication
between OpenSSH client and SSH2 server, using OpenSSH key
between OpenSSH client and SSH2 server, using SSH2 key
between SSH2 client/OpenSSH server
with ssh-agent
SSH [See SSH]
SSL [See SSL]
by trusted hosts [See trusted-host authentication]
cryptographic hardware
csh shell, terminating SSH agent on logout](https://image.slidesharecdn.com/linuxsecuritycookbook-120930200536-phpapp01/85/Linux-security-cookbook-399-320.jpg)
![CSR (Certificate Signing Request)
passphrase for private key
current directory
colons (:) referring to
Linux shell scripts in
CyberTrust SafeKeyper (cryptographic hardware)
[ Team LiB ]](https://image.slidesharecdn.com/linuxsecuritycookbook-120930200536-phpapp01/85/Linux-security-cookbook-400-320.jpg)
![[ Team LiB ]
[ SYMBOL] [ A ] [ B ] [ C ] [ D] [ E] [ F] [ G ] [ H] [ I ] [ J] [ K ] [ L] [ M] [ N] [ O ] [ P ] [ Q ] [ R ] [ S ] [ T] [ U] [ V ] [ W] [ X ]
daemons
IMAP, within xinetd
imapd [See imapd]
inetd [See inetd]
Kerberized Telnet daemon, enabling
mail, receiving mail without running
POP, enabling within xinetd or inetd
sendmail, security risks with visibility of
Snort, running as
sshd [See sshd]
starting/stopping via sudo
tcpd
using with inetd
using with xinetd
Telnet, disabling standard
xinetd [See xinetd]
dangling network connections, avoiding
date command
DATE environment variable
datestamps, handling by logwatch
Debian Linux, debsums tool
debugging
debug facility, system messages
Kerberized authentication on Telnet
Kerberos authentication on POP
Kerberos for SSH
PAM modules
SSL connection problems from server-side
dedicated server, protecting with firewall
denial-of-service (DOS) attacks
preventing
Snort detection of
vulnerability to using REJECT
DENY
absorbing incoming packets (ipchains) with no response
pings, preventing
REJECT vs. (firewalls)
DER (binary format for certificates)
converting to PEM
DES-based crypt( ) hashes in passwd file
destination name for remote file copying
detached digital signature (GnuPG)
devfs
device special files
inability to verify with manual integrity check
securing
DHCP, initialization scripts
dictionary attacks against terminals
diff command, using for integrity checks
DIGEST-MD5 authentication (SMTP)
digital signatures](https://image.slidesharecdn.com/linuxsecuritycookbook-120930200536-phpapp01/85/Linux-security-cookbook-401-320.jpg)
![ASCII-format detached signature, creating in GnuPG
binary-format detached signature (GnuPG), creating
email messages, verifying with mc-verify function
encrypted email messages, checking with mc-verify
GnuPG-signed file, checking for alteration
signing a text file with GnuPG
signing and encrypting files
signing email messages with mc-sign function
uploading new to keyserver
verifying for keys imported from keyserver
verifying on downloaded software
for X.509 certificates
directories
encrypting entire directory tree
fully-qualified name
inability to verify with manual integrity check
marking files for inclusion or exclusion from Tripwire database
recurse=n attribute (Tripwire)
recursive remote copying with scp
restricting a service to a particular directory
setgid bit
shared, securing
skipping with find -prune command
specifying another directory for remote file copying
sticky bit set on
disallowed connections [See hosts.deny file]
DISPLAY environment variable (X windows) 2nd
display filter expressions
using with Ethereal
using with tcpdump
display-filters for email (PinePGP)
Distinguished Encoding Rules [See DER]
DNS
Common Name for certificate subjects
using domain name in Kerberos realm name
dormant accounts
monitoring login activity
DOS [See denial-of-service attacks]
DROP
pings, preventing
REJECT and, refusing packets (iptables)
specifying targets for iptables
dsniff program
-m option (matching protocols used on nonstandard ports)
Berkeley database library, requirement of
downloading and installing
filesnarf command
insecure network protocols
auditing use of
detecting
libnet, downloading and compiling
libnids
downloading and installing
reassembling TCP streams with
libpcap snapshot, adjusting size of
mailsnarf command](https://image.slidesharecdn.com/linuxsecuritycookbook-120930200536-phpapp01/85/Linux-security-cookbook-402-320.jpg)
![urlsnarf command
dual-ported disk array
dump-acct command
[ Team LiB ]](https://image.slidesharecdn.com/linuxsecuritycookbook-120930200536-phpapp01/85/Linux-security-cookbook-403-320.jpg)
![[ Team LiB ]
[ SYMBOL] [ A ] [ B ] [ C ] [ D] [ E ] [ F] [ G ] [ H] [ I ] [ J] [ K ] [ L] [ M] [ N] [ O ] [ P ] [ Q ] [ R ] [ S ] [ T] [ U] [ V ] [ W] [ X ]
editing encrypted files 2nd
elapsed time (displayed in ticks)
elm mailer
ELMME+
Emacs
encrypted email with
Mailcrypt package, using with GnuPG
encrypted files, maintaining with
email
encryption
with elm
with Emacs
with Evolution
with MH
with mutt
with vim
Mailcrypt package [See Mailcrypt]
POP/IMAP security
with SSH
with SSH and Pine
with SSL
with SSL and Evolution
with SSL and mutt
with SSL and Pine
with stunnel and SSL
protecting
encouraging use of encryption
encrypted mail with Mozilla
between mail client and mail server
at the mail server
receiving Internet email without visible server
from sender to recipient
sending/receiving encrypted email with Pine
testing SSL mail connection
sending Tripwire reports by
SMTP server, using from arbitrary clients
empty passphrase in plaintext key
empty quotes ("")
encryption
asymmetric [See public-key encryption]
of backups
decrypting file encrypted with GnuPG
email [See email, encryption]
files [See also files, protecting]
entire directory tree
with password
public-key [See public-key encryption]
symmetric [See symmetric encryption]
encryption software
Enigmail (Mozilla)
env program](https://image.slidesharecdn.com/linuxsecuritycookbook-120930200536-phpapp01/85/Linux-security-cookbook-404-320.jpg)
![changes after running su
X windows DISPLAY and XAUTHORITY, setting
environment variables
Equifax (Certifying Authority)
error messages (system), including in syslog 2nd
errors
onerr keyword, PAM listfile module
PAM modules, debugging
Ethereal (network sniffing GUI)
observing network traffic
capture and display filter expressions
data view window
packet list window
tree view window
payload display
tethereal (text version)
tool to follow TCP stream
verifying secure mail traffic
Evolution mailer
certificate storage
POP/IMAP security with SSL 2nd
exclamation point [See !, under Symbols]
executables
ignoring setuid or setgid attributes for
linked to compromised libraries
prohibiting entirely
execute permission, controlling directory access
executed commands [See process accounting]
expiration for GnuPG keys
exporting PGP key into file
extended regular expressions, matching with ngrep
[ Team LiB ]](https://image.slidesharecdn.com/linuxsecuritycookbook-120930200536-phpapp01/85/Linux-security-cookbook-405-320.jpg)
![[ Team LiB ]
[ SYMBOL] [ A ] [ B ] [ C ] [ D] [ E] [ F] [ G ] [ H] [ I ] [ J] [ K ] [ L] [ M] [ N] [ O ] [ P ] [ Q ] [ R ] [ S ] [ T] [ U] [ V ] [ W] [ X ]
facilities, system messages
sensitive information in messages
FascistCheck function (CrackLib)
fetchmail
mail delivery with
fgrep command
file attributes, preserving in remote file copying
file command
file permissions [See permissions]
files, protecting [See also Gnu Privacy Guard]2nd
encrypted, maintaining with Emacs
encrypting directories
encrypting with password
encryption, using
maintaining encrypted files with vim
permissions [See permissions]
PGP keys, using with GnuPG
prohibiting directory listings
revoking a public key
shared directory
sharing public keys
uploading new signatures to keyserver
world-writable, finding
files, searching effectively [See find command]
filesnarf command
filesystems
/proc
Andrew Filesystem kaserver
device special files, potential security risks
mounted, listing in /proc/mounts
searching for security risks
filenames, handling carefully
information about your filesystems
local vs. remote filesystems
permissions, examining
preventing crossing filesystem boundaries (find -xdev)
rootkits
skipping directories (find -prune)
Windows VFAT, checking integrity of
filtered email messages (PineGPG)
filters
capture expressions
Ethereal, using with
selecting specific packets
display expressions
Ethereal, using with
tcpdump, using with
logwatch, designing for
protocols matching filter expression, searching network traffic for
Snort, use by
find command](https://image.slidesharecdn.com/linuxsecuritycookbook-120930200536-phpapp01/85/Linux-security-cookbook-406-320.jpg)

![testing configuration
vulnerability to attacks and
flushing a chain
forced commands
limiting programs user can run as root
plaintext key, using with
security considerations with
server-side restrictions on public keys in authorized keys
Forum of Incident Response and Security Teams (FIRST)
home page
forwardable credentials (Kerberized Telnet)
FreeS/WAN (IPSec implementation)
fstab file
grpid, setting
nodev option to prohibit device special files
prohibiting executables
setuid or setgid attributes for executables
FTP
open server, testing for exploitation as a proxy
passwords captured from sessions with dsniff
sftp
fully-qualified directory name
[ Team LiB ]](https://image.slidesharecdn.com/linuxsecuritycookbook-120930200536-phpapp01/85/Linux-security-cookbook-408-320.jpg)
![[ Team LiB ]
[ SYMBOL] [ A ] [ B ] [ C ] [ D] [ E] [ F] [ G] [ H] [ I ] [ J] [ K ] [ L] [ M] [ N] [ O ] [ P ] [ Q ] [ R ] [ S ] [ T] [ U] [ V ] [ W] [ X ]
gateways, packet sniffers and
generator ID (Snort alerts)
Generic Security Services Application Programming Interface (GSSAPI)
Kerberos authentication on IMAP
Kerberos authentication on POP
gethostbyname function
GNU Emacs [See Emacs]
Gnu Privacy Guard (GnuPG) 2nd 3rd
adding keys to keyring
backing up private key
decrypting files encrypted with
default secret key, designating for
direct support by ELMME+ mailer
encrypting backups
encrypting files for others
Enigmail (Mozilla), using for encryption support
Evolution mailer, using with
files encrypted with, editing with vim
key, adding to keyserver
keyring, using
keys, adding to keyring
Mailcrypt, using with
MH, integrating with
mutt mailer, using with
obtaining keys from keyserver
PGP keys, using
PinePGP, sending/receiving encrypted email
piping email through gpg command
piping show command through gpg command
printing your public key in ASCII
producing single encrypted files from all files in directory
public-key encryption
revoking a key
setting up for public-key encryption
sharing public keys
signed file, checking for alteration
signing and encrypting files (to be not human-readable)
signing text file
symmetric encryption
viewing keys on keyring
vim mail editor, composing encrypted email with
government agencies acting as CSIRTs
GPG [See Gnu Privacy Guard]
grep command
-z (reading/writing data) and -Z (writing filenames) 2nd
extracting passwords by patterns
group permissions
changes since last Tripwire check
read/write for files
groups
granting privileges to with sudo command](https://image.slidesharecdn.com/linuxsecuritycookbook-120930200536-phpapp01/85/Linux-security-cookbook-409-320.jpg)
![logfile group configuration file
sharing files in
setgid bit on directory
setting umasks as group writable
grpid option (mount)
GSSAPI [See Generic Security Services Application Programming Interface]
GUI (graphical user interface), observing network traffic via
[ Team LiB ]](https://image.slidesharecdn.com/linuxsecuritycookbook-120930200536-phpapp01/85/Linux-security-cookbook-410-320.jpg)
![[ Team LiB ]
[ SYMBOL] [ A ] [ B ] [ C ] [ D] [ E] [ F] [ G ] [ H] [ I ] [ J] [ K ] [ L] [ M] [ N] [ O ] [ P ] [ Q ] [ R ] [ S ] [ T] [ U] [ V ] [ W] [ X ]
hard links for encrypted files
hardware, cryptographic
Heimdal Kerberos
highly secure integrity checks
dual-ported disk array, using
history of all logins and logouts
Honeynet project web site (network monitoring information)
host aliases [See aliases]
host discovery (with nmap)
disabling port scanning with -sP options
for IP address range only
TCP and ICMP pings
Host keyword
host principal for KDC host
host program, problems with canonical hostname
hostbased authentication [See trusted-host authentication]
HostbasedAuthentication
in ssh_config
in sshd_config
HostbasedUsesNameFromPacketOnly keyword (sshd_config)
HOSTNAME environment variable
hostnames
conversion to IP addresses by netstat and lsof commands
in remote file copying
using instead of IP addresses in firewall rules
hosts
controlling access by (instead of IP source address)
firewall design, philosophies for
IMAP server, adding Kerberos principals for mail service
Kerberos
adding new principal for
adding to existing realm
modifying KDC database for
Kerberos KDC principal database of
Kerberos on SSH, localhost and
tailoring SSH per host
trusted, authenticating by [See trusted-host authentication]
hosts.allow file
access control for remote hosts
inetd with tcpd
restricting access by remote hosts
sshd
xinetd with tcpd
hosts.deny file 2nd
access control for remote hosts
inetd with tcpd
restricting access by remote hosts
sshd
xinetd with tcpd
HTTP
blocking all incoming service requests](https://image.slidesharecdn.com/linuxsecuritycookbook-120930200536-phpapp01/85/Linux-security-cookbook-411-320.jpg)
![capturing and recording URLs from traffic with urlsnarf
httpd (/etc/init.d startup file)
HTTPS, checking certificate for secure web site
[ Team LiB ]](https://image.slidesharecdn.com/linuxsecuritycookbook-120930200536-phpapp01/85/Linux-security-cookbook-412-320.jpg)
![[ Team LiB ]
[ SYMBOL] [ A ] [ B ] [ C ] [ D] [ E] [ F] [ G ] [ H] [ I] [ J] [ K ] [ L] [ M] [ N] [ O ] [ P ] [ Q ] [ R ] [ S ] [ T] [ U] [ V ] [ W] [ X ]
ICMP
blocking messages
blocking some messages
closed ports, detecting with messages
pings for host discovery, use by nmap
rate-limiting functions of Linux kernel
IDENT
checking with TCP-wrappers
DROP, problems with
testing server with nmap -I for security
identification file (SSH2 key files) 2nd
identity
idfile script (manual integrity checker)
IDs for cryptographic keys (GnuPG default secret key)
ifconfig program
-a option (information about all network interfaces and loaded drivers)
controlling network interfaces
enabling promiscuous mode for specific interfaces
enabling unconfigured interface
listing network interfaces
observing network traffic
stopping network device
ifdown script
ifup script
IgnoreRhosts option
IMAP
access control list (ACL) for server, creating with PAM
enabling IMAP daemon within xinetd or inetd
in /etc/pam.d startup file
Kerberos authentication, using with
mail session security
with SSH 2nd
with SSH and Pine
with SSL
with SSL and Evolution
with SSL and mutt 2nd
with SSL and Pine
with SSL and stunnel
with stunnel and SSL
remote polling of server by fetchmail
SSL certificate, validating server with
STARTTLS command
testing SSL connection to server
unsecured connections, permitting
IMAP/SSL certificate on Red Hat server
imapd
enabling within xinetd or inetd
Kerberos support
SSL, using with
validation of passwords, controlling with PAM
importing keys](https://image.slidesharecdn.com/linuxsecuritycookbook-120930200536-phpapp01/85/Linux-security-cookbook-413-320.jpg)
![from a keyserver
PGP, importing into GnuPG
incident report (security), filing
gathering information for
includedir (xinetd.conf)
incoming network traffic, controlling [See firewalls networks, access control]
incorrect net address (sshd)
inetd
-R option, preventing denial-of-service attacks 2nd
adding new network service
enabling/disabling TCP service invocation by
IMAP daemon, enabling
POP daemon, enabling
restricting access by remote hosts 2nd
inetd.conf file
adding new network service
restricting service access by time of day
inode numbers
changes since last Tripwire check
rsync tool, inability to check with
Windows VFAT filesystems, instructing Tripwire not to compare
input/output
capturing stdout/stderr from programs not using system logger
Snort alerts
stunnel messages
Insecure.orgÕs top 50 security tools
instances keyword (xinetd)
instruction sequence mutations (attacks against protocols)
integrity checkers 2nd [See also Tripwire]
Aide
runtime, for the kernel
Samhain
integrity checks
automated
checking for file alteration since last snapshot
highly secure
dual-ported disk array, using
manual
printing latest tripwire report
read-only
remote
reports
rsync, using for
interactive programs, invoking on remote machine
interfaces, network
bringing up
enabling/disabling, levels of control
listing 2nd
Internet email, acceptance by SMTP server
Internet Protocol Security (IPSec)
Internet protocols, references for
Internet services daemon [See inetd]
intrusion detection for networks
anti-NIDS attacks
Snort system
decoding alert messages](https://image.slidesharecdn.com/linuxsecuritycookbook-120930200536-phpapp01/85/Linux-security-cookbook-414-320.jpg)

![blocking remote access, while permitting local
blocking spoofed addresses
building chain structures
controlling access by MAC address
default policies
deleting firewall rules
disabling reverse DNS lookups (-n option)
disabling TCP service invocation by remote request
DROP and REJECT, refusing packets with
error packets, tailoring
inserting firewall rules in particular position
listing firewall rules
permitting incoming SSH access only
preventing pings
protecting dedicated server
restricting telnet service access by source address
rule chain for logging and dropping certain packets
testing firewall configuration
website
iptables-restore
loading firewall configuration
iptables-save
checking IP addresses
saving firewall configuration
viewing rules with
IPv4-in-IPv6 addresses, problems with
ISP mail servers, acceptance of relay mail
issuer (certificates)
self-signed
[ Team LiB ]](https://image.slidesharecdn.com/linuxsecuritycookbook-120930200536-phpapp01/85/Linux-security-cookbook-416-320.jpg)
![[ Team LiB ]
[ SYMBOL] [ A ] [ B ] [ C ] [ D] [ E] [ F] [ G ] [ H] [ I ] [ J] [ K ] [ L] [ M] [ N] [ O ] [ P ] [ Q ] [ R ] [ S ] [ T] [ U] [ V ] [ W] [ X ]
John the Ripper (password-cracking software)
dictionaries for
download site
wordlist directive
[ Team LiB ]](https://image.slidesharecdn.com/linuxsecuritycookbook-120930200536-phpapp01/85/Linux-security-cookbook-417-320.jpg)
![[ Team LiB ]
[ SYMBOL] [ A ] [ B ] [ C ] [ D] [ E] [ F] [ G ] [ H] [ I ] [ J] [ K] [ L] [ M] [ N] [ O ] [ P ] [ Q ] [ R ] [ S ] [ T] [ U] [ V ] [ W] [ X ]
kadmin utility
adding Kerberos principals to IMAP mail server
adding users to existing realm
modifying KDC database for host
running on new host
setting server to start at boot
kadmind command (Kerberos)
kaserver (Andrew Filesystem)
kdb5_util command (Kerberos)
KDC [See Key Distribution Center]
KDE applications, certificate storage
Kerberos authentication
in /etc/pam.d startup file
hosts, adding to existing realm
IMAP, using with
Key Distribution Centers (KDCs)
ksu
ksu command
PAM, using with
without passwords
POP, using with
setting up MIT Kerberos-5 KDC
sharing root privileges via
SSH, using with
debugging
SSH-1 protocol
Telnet, using with
users, adding to existing realm
web site (MIT)
KerberosTgtPassing (in sshd_config)
kernel
/proc files and
collection of messages from by system logger
enabling source address verification
IP forwarding flag
ipchains (Versions 2.2 and up)
iptables (Versions 2.4 and up)
process information recorded on exit
runtime integrity checkers
source address verification, enabling
Key Distribution Center (KDC), setting up for MIT Kerberos-5
keyring files (GnuPG)
adding keys to
viewing keys on
information listed for keys
keys, cryptographic [See also cryptographic authentication]
adding to GnuPG keyring
backing up GnuPG private key
dummy keypairs for imapd and pop3d
encrypting files for others with GnuPG
generating key pair for GnuPG](https://image.slidesharecdn.com/linuxsecuritycookbook-120930200536-phpapp01/85/Linux-security-cookbook-418-320.jpg)
![GnuPG, viewing on your keyring
key pairs in public-key encryption
keyring files for GnuPG keys
obtaining from keyserver and verifying
OpenSSH programs for creating/using
PGP keys, using in GnuPG
revoking a public key
sharing public keys securely
Tripwire
viewing on GnuPG keyring
keyserver
adding key to
informing that a public keys is no longer valid
obtaining keys from
uploading new signatures to
killing processes
authorizing users to kill via sudo command
pidof command, using
terminating SSH agent on logout
kinit command (Kerberos) 2nd 3rd
-f option (forwardable credentials)
klist command (Kerberos) 2nd
known hosts database (OpenSSH server)
kpasswd command (Kerberos)
krb5.conf file, copying to new Kerberos host
krb5.keytab file
krb5kdc
kstat (integrity checker)
ksu (Kerberized su)
authentication via Kerberos
sharing root privileges via
[ Team LiB ]](https://image.slidesharecdn.com/linuxsecuritycookbook-120930200536-phpapp01/85/Linux-security-cookbook-419-320.jpg)
![[ Team LiB ]
[ SYMBOL] [ A ] [ B ] [ C ] [ D] [ E] [ F] [ G ] [ H] [ I ] [ J] [ K ] [ L] [ M] [ N] [ O ] [ P ] [ Q ] [ R ] [ S ] [ T] [ U] [ V ] [ W] [ X ]
last command 2nd
lastb command
lastcomm utility
bugs in latest version
lastdb command
lastlog command
databases from several systems, merging
multiple systems, monitoring problems with
ldd command
libnet (toolkit for network packet manipulation)
libnids (for TCP stream reassembly)
libpcap (packet capture library) 2nd
binary files
Snort logging directory, creating in
logging Snort data to libpcap-format files
network trace files, ngrep
Snort, use by
libwrap, using with xinetd
Linux
/proc filesystem
differing locations for binaries and configuration files in distributions
encryption software included with
operating system vulnerabilities
Red Hat [See Red Hat Linux]
supported distributions for security recipes
SuSE [See SuSE Linux]
ListenAddress statements, adding to sshd_config
listfile module (PAM)
ACL file entries
local acces, permitting while blocking remote access
local facilities (system messages)
local filesystems, searching
local key (Tripwire)
creating with twinstall.sh script
fingerprints, creating in secure integrity checks
read-only integrity checking
local mail (acceptance by SMTP server)
local password authentication, using Kerberos with PAM
localhost
problems with Kerberos on SSH
SSH port forwarding, use in
unsecured mail sessions from
logfile group configuration file (logwatch)
logger program
writing system log entries via shell scripts and syslog API
logging
access to services
combining log files
firewalls, configuring for
nmap -o options, formats of
PAM modules, error messages](https://image.slidesharecdn.com/linuxsecuritycookbook-120930200536-phpapp01/85/Linux-security-cookbook-420-320.jpg)
![rotating log files
service access via xinetd
shutdowns, reboots, and runlevel changes in /var/log/wtmp
Snort 2nd
to binary files
partitioning into separate files
permissions for directory
stunnel messages
sudo command
remotely
system [See system logger]
testing with nmap stealth operations
loghost
changing
remote logging of system messages
login shells, root
logins
adding another Kerberos principal to your ~/.k5login file
Kerberos, using with PAM
monitoring suspicious activity
printing information about for each user
recent logins to system accounts, checking
testing passwords for strength
CrackLib, using
John the Ripper, using
logouts, history of all on system
logrotate program 2nd 3rd
logwatch
filter, defining
integrating services into
listing all sudo invocation attempts
scanning log files for messages of interest
scanning Snort logs and sending out alerts
scanning system log files for problem reports
lsh (SSH implementation)
lsof command
+M option, (for processes using RPC services)
-c option (command name for processes)
-i option (for network connections)
-p option (selecting processes by ID)
-u option (username for processes)
/proc files, reading
IP addresses, conversion to hostnames
network connections for processes, listing
[ Team LiB ]](https://image.slidesharecdn.com/linuxsecuritycookbook-120930200536-phpapp01/85/Linux-security-cookbook-421-320.jpg)
![[ Team LiB ]
[ SYMBOL] [ A ] [ B ] [ C ] [ D] [ E] [ F] [ G ] [ H] [ I ] [ J] [ K ] [ L] [ M] [ N] [ O ] [ P ] [ Q ] [ R ] [ S ] [ T] [ U] [ V ] [ W] [ X ]
m4 macro processor
MAC addresses
controlling access by
spoofed
mail [See email IMAP POP]
Mail application (Mozilla)
mail clients
connecting to mail server over SSL
support for secure POP and IMAP using SSL
mail facility (system messages)
mail servers
receiving Internet email without visible server
support for SSL
testing SSL connection locally
Mailcrypt
mc-deactivate-passwd to force passphrase erasure
official web site
using with GnuPG
mailpgp (script for encrypting/sending email)
mailsnarf command
-v option, capturing only unencrypted messages
malicious program, /tmp/ls
man-in-the-middle (MITM) attacks
dsniff, proof of concept with
self-signed certificates, risk of
services deployed with dummy keys
manual integrity checks
mask format, CIDR
Massachusetts Institute of Technology (MIT) Kerberos
matching anything (ALL keyword) 2nd
max_load keyword (xinetd) 2nd
mc-encrypt function
MD5 checksum
verifying for RPM-installed files
merging system log files
MH (mail handler)
mirroring a set of files securely between machines
MIT Kerberos
MITM [See man-in-the-middle attacks]
modules
PAM
CrackLib
listfile 2nd
pam_stack
Perl
Sys::Lastlog and Sys::Utmp
Sys::Syslog
XML::Simple
monitoring systems for suspicious activity
account use
checking on multiple systems](https://image.slidesharecdn.com/linuxsecuritycookbook-120930200536-phpapp01/85/Linux-security-cookbook-422-320.jpg)

![encrypted mail with Mail & Newsgroups
Muffet, Alec (Crack utility)
multi-homed hosts
firewall for
SSH client, problems with canonical hostname
multi-homed server machines, socket mail server is listening on
multicast packets
multithreaded services (in inetd.conf)
mutt mailer
home web page
securing POP/IMAP with SSL
[ Team LiB ]](https://image.slidesharecdn.com/linuxsecuritycookbook-120930200536-phpapp01/85/Linux-security-cookbook-424-320.jpg)
![[ Team LiB ]
[ SYMBOL] [ A ] [ B ] [ C ] [ D] [ E] [ F] [ G ] [ H] [ I ] [ J] [ K ] [ L] [ M] [ N] [ O ] [ P ] [ Q ] [ R ] [ S ] [ T] [ U] [ V ] [ W] [ X ]
NAMEINARGS flag for xinetd
NAT gateway, canonical client hostname and
National Infrastructure Protection Center (NIPC) (U.S.)
home page
National Institutes of Health, ÒNetwork and Network Monitoring SoftwareÓ page
nc command
-u option (for UDP ports)
probing ports with
netgroups
customizing shosts.equiv file to restrict hostbased authentication
defining
Netscape, certificate storage
netstat command
--all option
--inet option (printing active connections)
--listening option
-e option (adding username)
-p option (process ID and command name for each socket)
/proc files, reading
conversion of IP addresses to hostnames
examining network state on your machines
printing summary of network use
summary for networking on a machine
network (/etc/init.d startup file)
network configuration of your systems, attack vulnerability and
network filesystems
remote integrity checks
searching
snooping with filesnarf
network interfaces
bringing up
network intrusion detection systems (NIDS)
attacks against
rapid development in
Snort [See Snort]
network monitoring tools
NIH page
web page information on
network protocols, detecting insecure
network script
network services, access control facilities
network switches, packet sniffers and
networking
/proc/net/tcp and /proc/net/upd files
disabling for secure integrity checks
monitoring and intrusion detection [See intrusion detection for networks monitoring systems for suspicious activity]
summary for, printing with netstat
networks
access control [See also firewalls]
adding a new service (inetd)
adding a new service (xinetd)](https://image.slidesharecdn.com/linuxsecuritycookbook-120930200536-phpapp01/85/Linux-security-cookbook-425-320.jpg)
![denial-of-service attacks, preventing
enabling/disabling a service
levels of control
listing network interfaces
logging access to services
prohibiting root logins on terminal devices
redirecting connections to another socket
restricting access by remote hosts (inetd)
restricting access by remote hosts (xinetd with libwrap)
restricting access by remote hosts (xinetd with tcpd)
restricting access by remote hosts (xinetd)
restricting access by remote users
restricting access to service by time of day
restricting access to SSH server by account
restricting access to SSH server by host
restricting services to specific directories
starting/stopping network interface
hacks, system recovery from
intrusion detection [See intrusion detection for networks Snort]
local activities, examining
/proc filesystem
lsof command, examining processes
printing summary of use with netstat
monitoring traffic on
observing via GUI
searching for strings in
protecting outgoing traffic
authenticating between SSH2 client and OpenSSH server
authenticating between SSH2 server and OpenSSH client with OpenSSH key
authenticating between SSH2 server and OpenSSH client with SSH2 key
authenticating by public key in OpenSSH
authenticating by trusted host
authenticating in cron jobs
authenticating interactively without password
copying files remotely
invoking remote programs
keeping track of passwords
logging into remote host
SSH client defaults, changing
SSH, using
tailoring SSH per host
terminating SSH agent on logout
tunneling TCP connection through SSH
refusal of connections by system logger
tracing system calls 2nd
Newsgroups application (Mozilla)
NFS [See network filesystems]
ngrep program
-A option, printing extra packets for trailing context
-T option (relative times between packets)
-t option (timestamps)
-X option (searching for binary data)
detecting use of insecure protocols
download site
home page for
libcap-format network trace files](https://image.slidesharecdn.com/linuxsecuritycookbook-120930200536-phpapp01/85/Linux-security-cookbook-426-320.jpg)
![searching network traffic for data matching extended regular expressions
NIDS [See network intrusion detection systems Snort]
nmap command
-r option, sequential port scan
host discovery, use of TCP and ICMP pings
information gathered in network security testing
probing a single target
running as root
scanning range of addresses
stealth options, using to test logging and intrusion detection
testing for open ports
-O option for operating system fingerprints
-sU options (for UDP ports)
customizing number and ranges of ports scanned
port scans
testing for vulnerabilities of specific network services
nmapfe program 2nd
nmh (mail handler)
NNTP, tunneling with SSH 2nd
no_access keyword, xinetd.conf
non-local mail (acceptance by SMTP server)
noninteractive commands, invoking securely on remote machine
NOPASSWD tag (sudo command)
notice priority, system messages
null-terminated filenames
[ Team LiB ]](https://image.slidesharecdn.com/linuxsecuritycookbook-120930200536-phpapp01/85/Linux-security-cookbook-427-320.jpg)
![[ Team LiB ]
[ SYMBOL] [ A ] [ B ] [ C ] [ D] [ E] [ F] [ G ] [ H] [ I ] [ J] [ K ] [ L] [ M] [ N] [ O] [ P ] [ Q ] [ R ] [ S ] [ T] [ U] [ V ] [ W] [ X ]
onerr keyword (PAM, listfile module)
only_from and no_access keywords, xinetd.conf
open relay mail servers
open servers, testing FTP server for possible exploitation as a proxy
open-source integrity checkers [See Tripwire]
openlog function
using in C program
OpenSSH [See SSH]
OpenSSL
CA.pl, Perl script creating Certifying Authority
PEM encoding, converting DER certificate to
testing SSL connection to POP/IMAP server
web site
Openwall Project, John the Ripper
operating system fingerprints
nmap -O command
nmap command, using for
outgoing network connections [See networks, protecting outgoing traffic]
ownership, file
inability to track with manual integrity check
verifying for RPM-installed files
[ Team LiB ]](https://image.slidesharecdn.com/linuxsecuritycookbook-120930200536-phpapp01/85/Linux-security-cookbook-428-320.jpg)
![[ Team LiB ]
[ SYMBOL] [ A ] [ B ] [ C ] [ D] [ E] [ F] [ G ] [ H] [ I ] [ J] [ K ] [ L] [ M] [ N] [ O ] [ P] [ Q ] [ R ] [ S ] [ T] [ U] [ V ] [ W] [ X ]
packet filtering
Linux, website for
stateful
stateless
packet sniffers
dsniff, for switched networks
enabling unconfigured network interfaces with ifconfig
network intrusion detection system (NIDS)
ngrep, using for
observing network traffic with
promiscuous mode on network interfaces
unconfigured interface for stealth sniffer
Snort, using as
packets, refusing with DROP or REJECT
PAM (Pluggable Authentication Modules)
access control lists (ACLs), creating 2nd
controlling imapd password validation
creating PAM-aware application
enforcing password strength
imapd validation of passwords, controlling
Kerberos, using with
Linux Developers Guide
Linux-PAM, web site
modules
pam_stack module
passphrases
backing up for GnuPG private keys
caching SSH private keys to avoid typing
forcing erasure by Mailcrypt with mc-deactivate-passwd
secret, for GnuPG public keys
SSH
passwd file, DES-based crypt( ) hashes in
passwd program
passwords
authorizing changes via sudo
dsniff program
captured from FTP and Telnet sessions
using libnids to reassemble
encrypting files with
enforcing strength with PAM
interactive authentication without (ssh-agent)
keeping track of
Kerberos (kpasswd command)
local, authentication via (Kerberos with PAM)
login, testing for strength
CrackLib, using
John the Ripper, using
mail servers (IMAP/POP), protection by SSL
master password for KDC database
storage of
protection with SSH](https://image.slidesharecdn.com/linuxsecuritycookbook-120930200536-phpapp01/85/Linux-security-cookbook-429-320.jpg)
![root
sudo command
bypassing password authentication
forcing authentication with
testing and monitoring on system
PATH environment variable, splitting with Perl script
pathnames
mutation in attacks against protocols
in remote file copying
paths
search path, testing
to server executable (inetd.conf)
pattern matching [See regular expressions]
payload, observing
PEM format (certificates)
converting DER format to
per_source keyword (xinetd)
performance, effects of promiscuous mode
period (.), in search path
Perl scripts
CA.pl
canonical hostname for SSH client, finding
CrackLib, using with module
functions provided by system logger API
merging lastlog databases from several systems
merging log files
process accounting records, reading and unpacking
writing system log entries 2nd
permissions 2nd
changes since last Tripwire check
examining carefully for security
inability to track with manual integrity check
log files
preventing directory listings
Snort logging directory
world-writable files and directories, finding
PermitRootLogin (sshd_config)
PGP (Pretty Good Privacy)
Evolution mailer, using with
integrating with MH
keys, using in GnuPG operations
setting in mutt mailer headers
PID (process ID)
adding to system log messages
looking up
pidof command, killing all processes with given name
Pine
securing POP/IMAP with SSH and Pine
securing POP/IMAP with SSL and
sending/receiving encrypted email
PinePGP
pings
nmap, use of TCP and ICMP pings for host discovery
preventing responses to
plaintext keys
including in system backups, security risks of](https://image.slidesharecdn.com/linuxsecuritycookbook-120930200536-phpapp01/85/Linux-security-cookbook-430-320.jpg)
![using with forced command
Pluggable Authentication Modules [See PAM]
policies
default, for ipchains and iptables
Tripwire
displaying
generating in human-readable format and adding file to
modifying
signing with site key
POP
capturing messages from with dsniff mailsnarf command
enabling POP daemon within xinetd or inetd
Kerberos authentication, using with
mail server, running with SSL
running mail server with SSL
securing email session with SSL and mutt
securing mail server with SSH
securing mail server with SSH and Pine
securing mail server with stunnel and SSL
securing with SSL and pine
STLS command
testing SSL connection to server
port forwarding
disabling for authorized keys
SSH
tunneling TCP session through SSH
port numbers, conversion to service names by netstat and lsof
port scanners, presence evidenced by SYN_RECV state
portmappers
displaying registrations with lsof +M
querying from a different machine
ports
assigned to RPC services
default, IMAP and POP over SSL
nonstandard, used by network protocols
SSL-port on mail servers
testing for open
nc command, using
nmap command, port scanning capabilities
port scans with nmap
TCP port, testing with telnet connection
TCP RST packets returned by firewalls blocking ports
UDP ports, problems with
preprocessors, Snort
alert messages produced by
enabling or tuning
prerotate and postrotate scripts
Pretty Good Privacy [See PGP]
principals, Kerberos
adding another principal to your ~/.k5login file
adding new with ank command
adding to IMAP service on server host
database for
records for users and hosts
database, creating for KDC
host principal, testing for new host](https://image.slidesharecdn.com/linuxsecuritycookbook-120930200536-phpapp01/85/Linux-security-cookbook-431-320.jpg)
![ksu authentication
new host, adding to KDC database
POP, adding to
setting up with admin privileges and host principal for KDC host
priority
levels for Snort alerts
for system messages
private keys [See cryptographic authentication]2nd
GnuPG, backing up
PGP, exporting and using in GnuPG
process accounting
displaying all executed commands
lastcomm utility, using
dump-acct command
enabling with accton command
process IDs
adding to system log messages
looking up
process substitution
processes
/proc/<pid> directories
killing
with pidof command
with sudo command
listing
all open files (and network connections) for all processes
all open files for specific
command name (lsof -c)
by ID (lsof -p)
network connections for all
by username (lsof -u)
owned by others, examination by superuser
that use RPC services, examining with losf +M
tracing
strace command, using
promiscuous mode (for network interfaces)
enabling for specific interfaces with ifconfig
performance and
setting for Snort
prosum (integrity checker)
protocol tree for selected packet (Ethereal)
protocols
attacks on, detection by Snort preprocessors
insecure, detecting use of with ngrep
matching a filter expression, searching network traffic for
network, detecting insecure
ps command, reading /proc files
psacct RPM 2nd
pseudo-ttys
disabling allocation of for authorized keys
forcing ssh to allocate
PubkeyAuthentication (sshd_config)
public keys
adding to GnuPG keyring
inserting into current mail buffer with mc-insert-public-key
keyserver, storing and retrieving with](https://image.slidesharecdn.com/linuxsecuritycookbook-120930200536-phpapp01/85/Linux-security-cookbook-432-320.jpg)
![listing for GnuPG
PGP, exporting and using in GnuPG
public-key authentication [See cryptographic authentication]
public-key encryption
decrypting files encrypted with GNUPG
expiration for keys
find method, use by
GnuPG 2nd
bit length of keys
generating key pair
secret passphrase for keys
sharing public keys
unique identifier for keys
[ Team LiB ]](https://image.slidesharecdn.com/linuxsecuritycookbook-120930200536-phpapp01/85/Linux-security-cookbook-433-320.jpg)
![[ Team LiB ]
[ SYMBOL] [ A ] [ B ] [ C ] [ D] [ E] [ F] [ G ] [ H] [ I ] [ J] [ K ] [ L] [ M] [ N] [ O ] [ P ] [ Q] [ R ] [ S ] [ T] [ U] [ V ] [ W] [ X ]
queueing your mail on another ISP
quotation marks, empty double-quotes ("")
[ Team LiB ]](https://image.slidesharecdn.com/linuxsecuritycookbook-120930200536-phpapp01/85/Linux-security-cookbook-434-320.jpg)
![[ Team LiB ]
[ SYMBOL] [ A ] [ B ] [ C ] [ D] [ E] [ F] [ G ] [ H] [ I ] [ J] [ K ] [ L] [ M] [ N] [ O ] [ P ] [ Q ] [ R ] [ S ] [ T] [ U] [ V ] [ W] [ X ]
race conditions during snapshot generation
rc files, storing load commands for firewall
read permission, preventing directory listing
read-only access to shared file via sudo
read-only integrity checks
realms, Kerberos
adding hosts to existing realm
adding users to existing realm
choosing name for 2nd
reboots, records of
recent logins to system accounts, checking for
recipes in this book, trying
recurse=n attribute (Tripwire)
recursion in PAM modules
recursive copying of remote directory
Red Hat Linux
authconfig utility
default dummy keypairs and certificates for imapd and pop3d
Evolution, testing of pre-installed trusted SSL certificates
facility local7, use for boot messages
firewall rules, saving and restoring
Guide to Password Security
IMAP/SSL certificate on server
imapd with Kerberos support
Kerberos packages, installing
loading firewall rules at boot time
rc files ÒiptablesÓ and ÒipchainsÓ
MD5-hashed passwords stored in shadow file (v. 8.0)
MIT Kerberos-5
PAM, enforcing password strength requirements
preconfiguration to run tripwire nightly via cron
process accounting RPM
script allowing users to start/stop daemons
Snort, starting at boot
SSL certificates
adding new certificate
TCP wrappers 2nd
redirect keyword (xinetd)
redirecting
blocking redirects
connections to another socket
standard input from /dev/null
regular expressions (and pattern matching)
extracting passwords with grep patterns
fgrep command and
identifying encrypted mail messages
ngrep, finding strings in network traffic
urlsnarf, use with
REJECT
blocking incoming packet and sending error message
DROP and, refusing packets (iptables)](https://image.slidesharecdn.com/linuxsecuritycookbook-120930200536-phpapp01/85/Linux-security-cookbook-435-320.jpg)

![rotating log files
process accounting
routers
firewalls for hosts configured as
packet sniffers and
RPC services
displaying information about with nmap -sR
port numbers assigned to
printing dynamically assigned ports for
processes that use, examining with lsof +M
rpcinfo command 2nd
RPM-installed files, verifying
rsync utility
--progress option
-n option (not copying files)
integrity checking with
remote integrity checking
with ssh, mirroring set of files securely between machines
runlevel changes, records of
runlevels (networking), loading firewall rules for
runtime kernel integrity checkers
[ Team LiB ]](https://image.slidesharecdn.com/linuxsecuritycookbook-120930200536-phpapp01/85/Linux-security-cookbook-437-320.jpg)
![[ Team LiB ]
[ SYMBOL] [ A ] [ B ] [ C ] [ D] [ E] [ F] [ G ] [ H] [ I ] [ J] [ K ] [ L] [ M] [ N] [ O ] [ P ] [ Q ] [ R ] [ S] [ T] [ U] [ V ] [ W] [ X ]
S/MIME
native support by Mozilla
support by Evolution mailer
sa -s command (truncating process accounting the log file)
Samhain (integrity checker)
scp command
mirroring set of files securely between computers
options for remote file copying
securely copying files between computers
syntax
scripts, enabling/disabling network interfaces
search path, testing
. (period) in
relative directories in, dangers of
SEC_BIN global variable (Tripwire)
secret keys
adding to GnuPG keyring
default key for GnuPG operations
listing for GnuPG
secret-key encryption
secure integrity checks
creating bootable CD-ROM securely
dual-ported disk array, using
Secure Sockets Layer [See SSL]
securetty file, editing to prevent root logins via terminal devices
security policies [See policies]
security tests [See monitoring systems for suspicious activity]
security tools (Insecure.org)
self-signed certificates
creating
generating X.509 certificate
man-in-the-middle attacks, risk of
setting up your own CA to issue certificates
sending-filters for email (PinePGP)
sendmail
accepting mail from other hosts
authentication mechanisms accepted as trusted
daemons (visible), security risks with
restriction on accepting connections from only same host, changing
SSL, using to protect entire SMTP session
sense keyword (PAM, listfile module)
server arguments (inetd.conf file)
server authentication [See Kerberos; PAM; SSH; SSL; trusted-host authentication]
server keyword (xinetd)
server program, OpenSSH
service filter configuration file (logwatch)
service filter executable (logwatch)
service names
conversion of port numbers to by netstat and lsof
executable
modifying to invoke tcpd in /etc/xinetd.d startup file](https://image.slidesharecdn.com/linuxsecuritycookbook-120930200536-phpapp01/85/Linux-security-cookbook-438-320.jpg)
![PAM 2nd
services file, adding service names to inetd.conf
session protection for mail
setgid bit on directories
setgid/setuid programs
security checks
setgid/setuid programs, security checks
finding and interactively fixing
listing all files
listing scripts only
removing setgid/setuid bits from a file
setuid programs for hostbased authentication
setlogsock (Sys::Syslog)
setuid root, ssh-keysign program
sftp
shadow directive (/etc/pam.d/system-auth)
shadow password file 2nd
sharing files
prohibiting directory listings
protecting shared directory
shell command substitution, exceeding command line maximum
shell item (PAM)
shell prompts, standards used
shell scripts
in your current directory
writing system log entries 2nd
shell-style wildcard expansion
shells
bash
checking for dormant accounts
invoking MH commands from prompt
invoking with root privileges by sudo, security risks
process substitution
root login shell, running
root shell vs. root login shell
terminating SSH agent on logout
umask command
shosts.equiv file
show command, decrypting email displayed with
shutdowns (system), records of
shutting down network interfaces
signature ID (Snort alerts)
signed cryptographic keys
signing files [See digital signatures]
single computer
blocking spoofed addresses
firewall design
single-threaded services (inetd.conf file)
site key (Tripwire)
creating with twinstall.sh script
fingerprints, creating in secure integrity checks
read-only integrity checking
size, file
/bin/login, changes since last Tripwire check
verifying for RPM-installed files
SLAC (Stanford Linear Accelerator), Network Monitoring Tools page](https://image.slidesharecdn.com/linuxsecuritycookbook-120930200536-phpapp01/85/Linux-security-cookbook-439-320.jpg)
![SMTP
blocking requests for mail service from a remote host
capturing messages from with dsniff program mailsnarf
protecting dedicated server for smtp services
requiring authentication by server before relaying mail
using server from arbitrary clients
snapshots [See Tripwire]
Snort
decoding alert messages
nmap port scan detected
priority levels
writing alerts to file instead of syslog
detecting intrusions with
dumping statistics to the system logger
promiscuous mode, setting
running in background as daemon
packet sniffing with
partitioning logs into separate files
upgrading and tuning ruleset
socket type (inetd.conf file)
software packages, risk of Trojan horses in
sort command
-z option for null filename separators
source address verification
enabling
enabling in kernel
website information on
source addresses
controlling access by
limiting server sessions by
source name for remote file copying
source quench, blocking
sources for system messages
spoofed addresses
blocking access from
MAC
source addresses
SquirrelMail
SSH (Secure Shell)
agents [See ssh-agent]
authenticating between client/server by trusted host
authenticating between SSH2 client/OpenSSH server
authenticating by public key
changing client defaults
client configurations in ~/.ssh/config
connecting via ssh with Kerberos authentication
cryptographic authentication
download site for OpenSSH
fetchmail, use of
important programs and files
scp (client program)
ssh (client program)
Kerberos, using with
debugging
Kerberos-5 support
permitting only incoming access via SSH with firewall](https://image.slidesharecdn.com/linuxsecuritycookbook-120930200536-phpapp01/85/Linux-security-cookbook-440-320.jpg)


![sudo command
bypassing password authentication
careful practices for using
forcing password authentication
killing processes via
listing invocations
logging remotely
password changes, authorizing via
prohibiting command-line arguments for command run via
read-only access to shared file
running any program in a directory
running commands as another user
starting/stopping daemons
user authorization privileges, allowing per host
sudoers file
argument lists for each command, specifying meticulously
editing with visudo program
listing permissible commands for root privileges
running commands as another user
timestamp_timeout variable
user authorization to kill certain processes
superdaemons
inetd [See inetd]
xinetd [See xinetd]
superuser 2nd [See also root]
assigning privileges via ssh without disclosing root password
finding all accounts on system
ksu (Kerberized su)
processes owned by others, examining
SuSE Linux
firewall rules, building
Heimdal Kerberos
inetd superdaemon
loading firewall rules at boot time
process accounting RPM
script allowing users to start/stop daemons
Snort, starting automatically at boot
SSL certificates 2nd
TCP wrappers 2nd
switched networks
packet sniffers and
simulated attacks with dsniff
symbolic links
for encrypted files on separate system
inability to verify with manual integrity check
permission bits, ignoring
scp command and
symmetric encryption
file encryption with gpg -c
files encrypted with GnuPG, decrypting
problems with
single encrypted file containing all files in directory
SYN_RECV state, large numbers of network connections in
synchronizing files on two machines (rsync)
integrity checking with
Sys::Lastlog and Sys::Utmp modules (Perl)](https://image.slidesharecdn.com/linuxsecuritycookbook-120930200536-phpapp01/85/Linux-security-cookbook-443-320.jpg)
![Sys::Syslog module
syslog function
using in C program
syslog-ng (Ònew generationÓ)
syslog.conf file
directing messages to different log files by facility and priority
remote logging, configuring 2nd
RPM-installed, verifying with Tripwire
setting up for local logging
signaling system logger about changes in
tracing configuration errors in
syslogd
-r flag to receive remote messages
signaling to pick up changes in syslog.conf
system accounts, login activity on 2nd
system calls, tracing on network
system logger
combining log files
debugging SSL connections
directing system messages to log files
log files created by, permissions and
logging messages remotely
programs not using
scanning log files for problem reports
sending messages to
signaling changes in syslog.conf
standard API, functions provided by
testing and monitoring
writing system log entries
in C 2nd
in Perl
in shell scripts
xinetd, logging to
system-wide authentication (Kerberos with PAM)
system_auth (/etc/pam.d startup file)
forbidding local password validation
Kerberos in
systems
authentication methods and policies (authconfig)
security tests on [See monitoring systems for suspicious activity]
[ Team LiB ]](https://image.slidesharecdn.com/linuxsecuritycookbook-120930200536-phpapp01/85/Linux-security-cookbook-444-320.jpg)
![[ Team LiB ]
[ SYMBOL] [ A ] [ B ] [ C ] [ D] [ E] [ F] [ G ] [ H] [ I ] [ J] [ K ] [ L] [ M] [ N] [ O ] [ P ] [ Q ] [ R ] [ S ] [ T ] [ U] [ V ] [ W] [ X ]
tar utility
bundling files into single file and encrypting the tarball
encrypted backups, creating with gpg
encrypting all files in directory
TCP
enabling/disabling service invocation by inetd
IPID Sequence tests and, measuring vulnerability to forged connections
pings for host discovery, use by nmap
preventing service invocation by xinetd
reassembling streams with libnids
redirection of connections with SSH tunneling
restricting access by remote hosts (inetd)
restricting access by remote hosts (xinetd)
restricting access by remote users
RST packets for blocked ports, returned by firewall
slowing or killing connections, simulation with dsniff
stream reassembly with libnids
testing for open port
testing port by trying to connect with Telnet
tunneling session through SSH
TCP-wrappers
controlling incoming access by particular hosts or domains
sshd, built-in support for
TCP/IP connections
DROP vs. REJECT
rejecting TCP packets that initiate connections
tcpd
restricting access by remote hosts
using with xinetd
using with inetd to restrict remote host access
tcpdump (packet sniffer)
-i any options, using ifconfig before
-i option (to listen on a specific interface)
-r option, reading/displaying network trace data
-w option (saving packets to file)
libcap (packet capture library)
payload display
printing information about nmap port scan
selecting specific packets with capture filter expression
snapshot length
verifying secure mail traffic
tcsh shell
terminating SSH agent on logout
TCT (The CoronerÕs Toolkit)
tee command
Telnet
access control
blocking all outgoing connections
restricting access by time of day
restricting for remote hosts (xinetd with libwrap)
disabling/enabling invocation by xinetd](https://image.slidesharecdn.com/linuxsecuritycookbook-120930200536-phpapp01/85/Linux-security-cookbook-445-320.jpg)
![Kerberos authentication with PAM
Kerberos authentication, using with
passwords captured from sessions with dsniff
security risks of
testing TCP port by trying to connect
telnetd, configuring to require strong authentication
terminals
Linux recording of for each user
preventing superuser (root) from logging in via
testing systems for security holes [See monitoring systems for suspicious activity]
tethereal
text editors, using encryption features for email
text-based certificate format [See PEM format]
Thawte (Certifying Authority)
threading, listing for new service in inetd.conf
tickets, Kerberos
for IMAP on the mail server
SSH client, obtaining for
ticks
time of day, restricting service access by
timestamps
recorded by system logger for each message
in Snort filenames
sorting log files by
verifying for RPM-installed files
TLS (Transport Layer Security) [See SSL]
tracing network system calls
Transport Layer Security (TLS) [See SSL]
Tripwire
checking Windows VFAT filesystems
configuration
database
adding files to
excluding files from
updating to ignore discrepancies
displaying policy and configuration
download site for latest version
download sites
highly secure integrity checks
integrity check
integrity checking, basic
manual integrity checks, using instead of
policy
policy and configuration, modifying
printing latest report
protecting files against attacks
read-only integrity checks
remote integrity checking
RPM-installed files, verifying
setting up
twinstall.sh script
using rsync instead of
weaknesses
Trojan horses
checking for with chkrootkit
planted in commonly-used software packages](https://image.slidesharecdn.com/linuxsecuritycookbook-120930200536-phpapp01/85/Linux-security-cookbook-446-320.jpg)
![trust, web of
trusted certificates
trusted public keys (GnuPG)
trusted-host authentication
canonical hostname, finding for client
implications of
strong trust of client host
weak authorization controls
tty item (PAM)
tunneling
TCP session through SSH
transferring your email from another ISP with SSH
twcfg.txt file
twinstall.sh script (Tripwire)
twpol.txt file
twprint program
[ Team LiB ]](https://image.slidesharecdn.com/linuxsecuritycookbook-120930200536-phpapp01/85/Linux-security-cookbook-447-320.jpg)
![[ Team LiB ]
[ SYMBOL] [ A ] [ B ] [ C ] [ D] [ E] [ F] [ G ] [ H] [ I ] [ J] [ K ] [ L] [ M] [ N] [ O ] [ P ] [ Q ] [ R ] [ S ] [ T] [ U] [ V ] [ W] [ X ]
UDP
blocking packets on privileged ports
probing ports, difficulties of
stateful firewall, necessity for
testing for open port
umask
Linux chmod and umask commands
preventing files from being world-writable
setting as group writable
unicast packets
unique identifier for GnuPG keys
unsecured IMAP connections
unshadow command
urlsnarf command
Usenet news, tunneling NNTP connections through SSH
user (inetd.conf file)
user accounts
allowing one account to access another with ksu
multiple root accounts
without a password, finding
restricting access to SSH server by
restricting hostbased authentication to
for SMTP authentication
superuser, finding
suspicious use, checking for
on multiple systems
usernames in remote file copying
usernames in trusted-host authentication
user facility, system messages
user ID of zero (0) (superuser)
users
administration of their own machines
authorizing to restart sshd
changes since last Tripwire check
Kerberos credentials for
login information about, printing
script forcing sudo to prompt for password
[ Team LiB ]](https://image.slidesharecdn.com/linuxsecuritycookbook-120930200536-phpapp01/85/Linux-security-cookbook-448-320.jpg)
![[ Team LiB ]
[ SYMBOL] [ A ] [ B ] [ C ] [ D] [ E] [ F] [ G ] [ H] [ I ] [ J] [ K ] [ L] [ M] [ N] [ O ] [ P ] [ Q ] [ R ] [ S ] [ T] [ U] [ V] [ W] [ X ]
variables (Mailcrypt), listing all
verifying RPM-installed files
verifying signatures on downloaded software
Verisign (Certifying Authority)
VFAT filesystems, checking integrity of
vim editor
composing encrypted mail
maintaining encrypted files
violations (unexpected changes) in system files
visudo program, editing sudoers file
vulnerability to attacks
factors in
measuring for operating systems
[ Team LiB ]](https://image.slidesharecdn.com/linuxsecuritycookbook-120930200536-phpapp01/85/Linux-security-cookbook-449-320.jpg)
![[ Team LiB ]
[ SYMBOL] [ A ] [ B ] [ C ] [ D] [ E] [ F] [ G ] [ H] [ I ] [ J] [ K ] [ L] [ M] [ N] [ O ] [ P ] [ Q ] [ R ] [ S ] [ T] [ U] [ V ] [ W] [ X ]
web of trust
keys imported from keyserver, verifying
web site information on
web page for this book
web servers, blocking outgoing access to all on a network
web site, blocking outgoing traffic to
Web-based mail packages
well-known ports, scanning with nmap
whois command
wildcard expansion (shell-style)
Windows filesystems (VFAT)
worms, testing for with chkrootkit
writable files, finding
wtmp file
processing with Perl module Sys::Utmp
www services, protecting dedicated server for
[ Team LiB ]](https://image.slidesharecdn.com/linuxsecuritycookbook-120930200536-phpapp01/85/Linux-security-cookbook-450-320.jpg)
![[ Team LiB ]
[ SYMBOL] [ A ] [ B ] [ C ] [ D] [ E] [ F] [ G ] [ H] [ I ] [ J] [ K ] [ L] [ M] [ N] [ O ] [ P ] [ Q ] [ R ] [ S ] [ T] [ U] [ V ] [ W] [ X]
X Window System
disabling X forwarding for authorized keys
display name, Linux system record of
enabling X forwarding with ssh -X
running programs as root
ssh-agent, automatically run for logins
X.509 certificates
generating self-signed
xargs program
-n 1 option (one file at a time)
0 (zero) option, for null-terminated filenames
collecting filename arguments to avoid long command lines
searching filesystems effectively
XAUTHORITY environment variable (X windows)
Ximian, Evolution mailer
xinetd
access_times attribute
adding new network service controlled by
configuration files for services
configuring telnetd to require strong authentication
deleting service configuration file
enabling IMAP daemon within
home page
Kerberized Telnet, enabling
logging access to services
POP daemon, enabling
preventing DOS attacks with cps, instances, max_load, and per_source keywords
preventing invocation of TCP service by
redirecting connections with redirect keyword
server keyword
TCP services, access control
using with libwrap
using with tcpd
xinetd.conf file
confirming location of its includedir
modifying to invoke tcpd
only_from and no_access keywords
XML::Simple module (Perl)
[ Team LiB ]](https://image.slidesharecdn.com/linuxsecuritycookbook-120930200536-phpapp01/85/Linux-security-cookbook-451-320.jpg)