Download to read offline


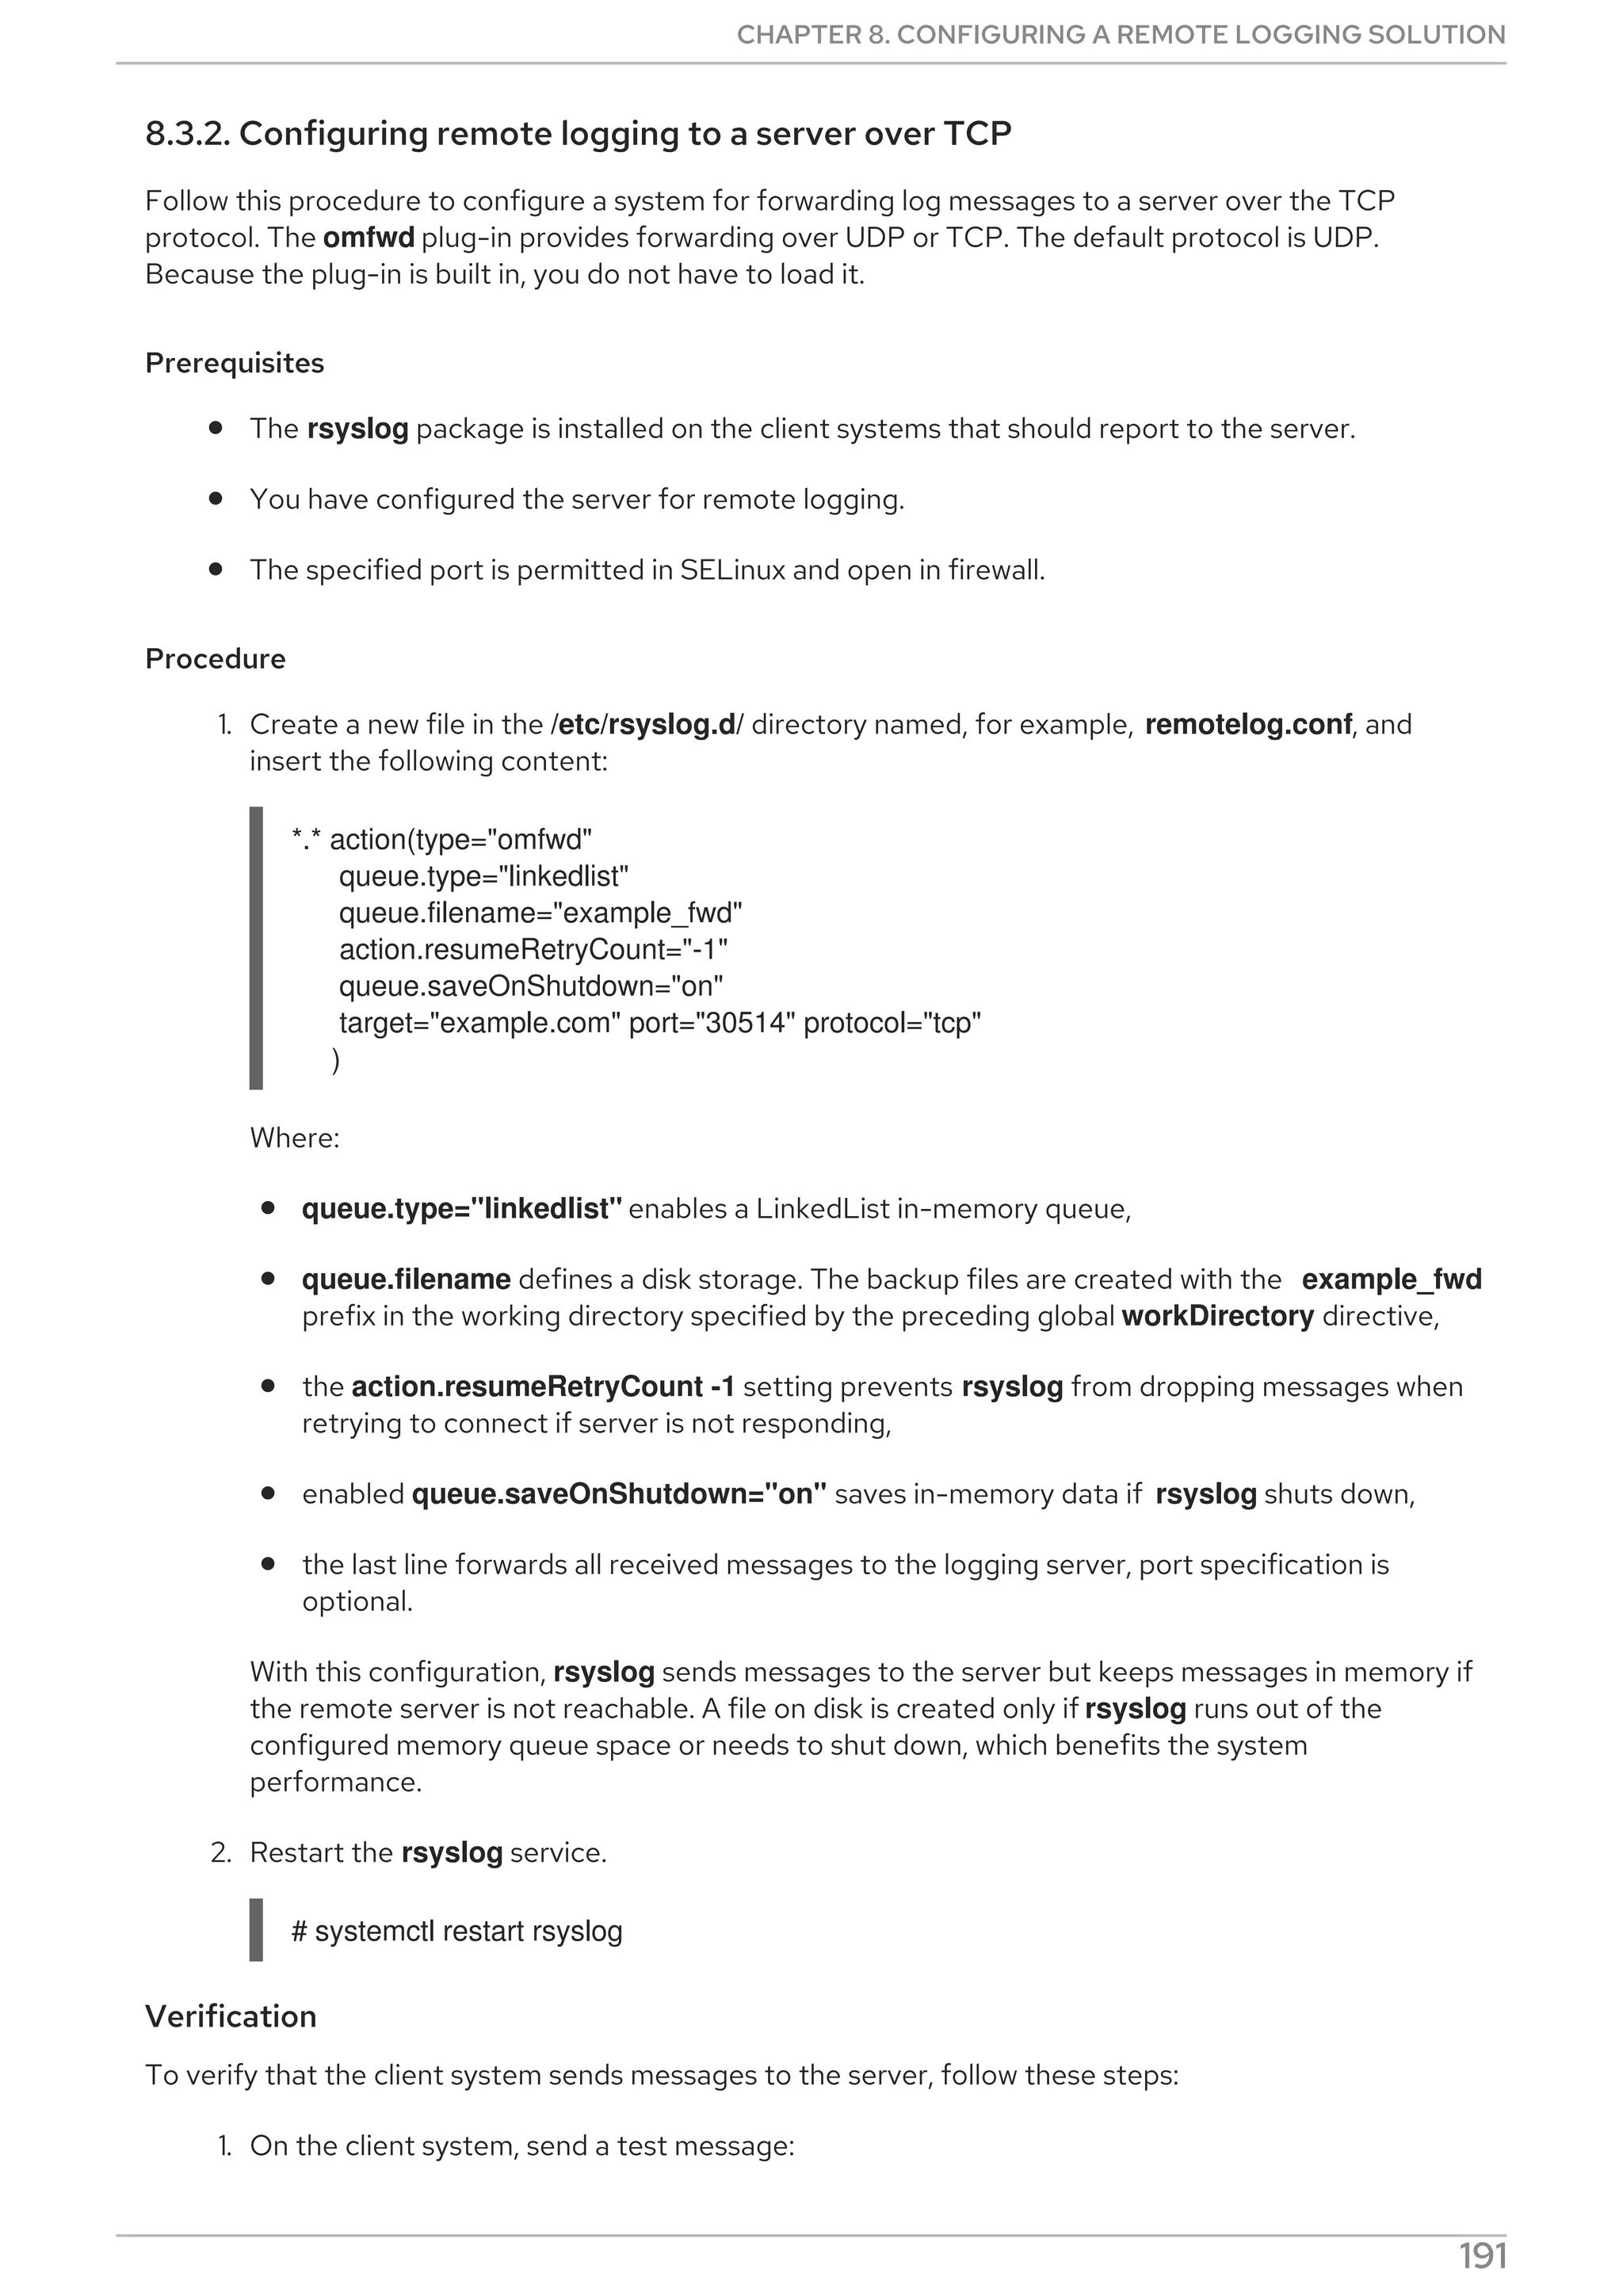
![[commands] section
Sets the mode of operation of DNF Automatic.
[emitters] section
Defines how the results of DNF Automatic are reported.
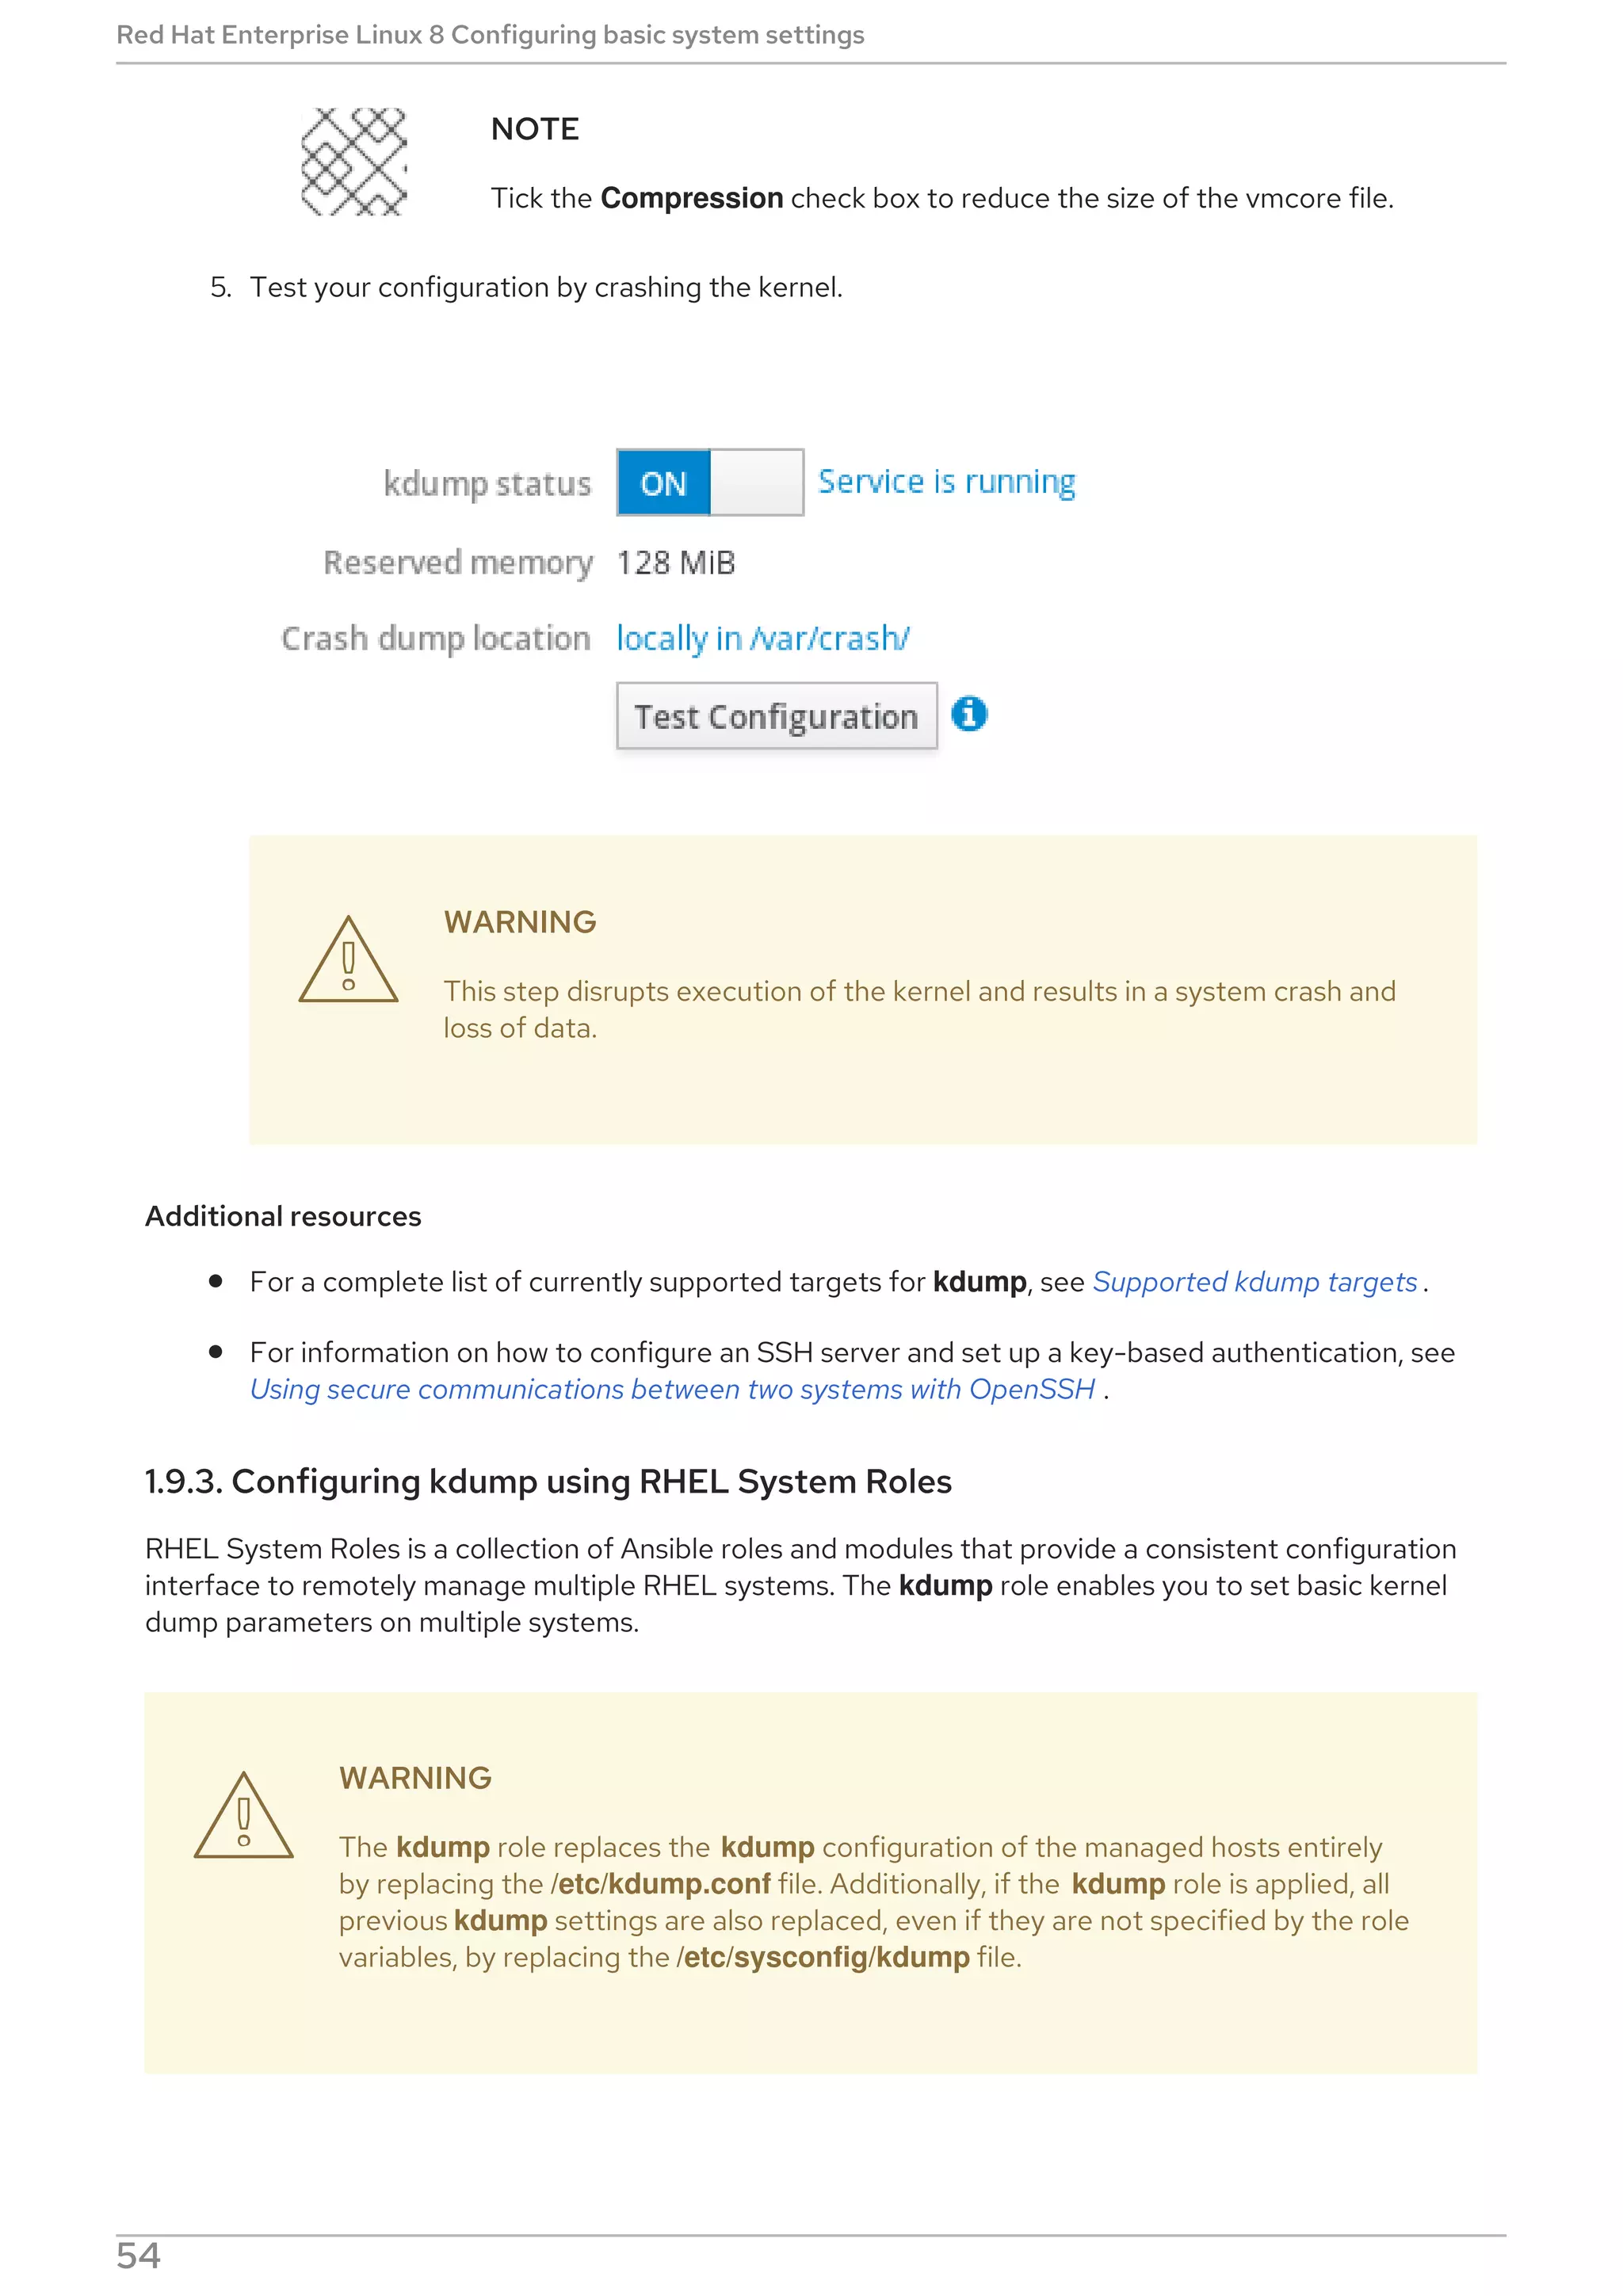
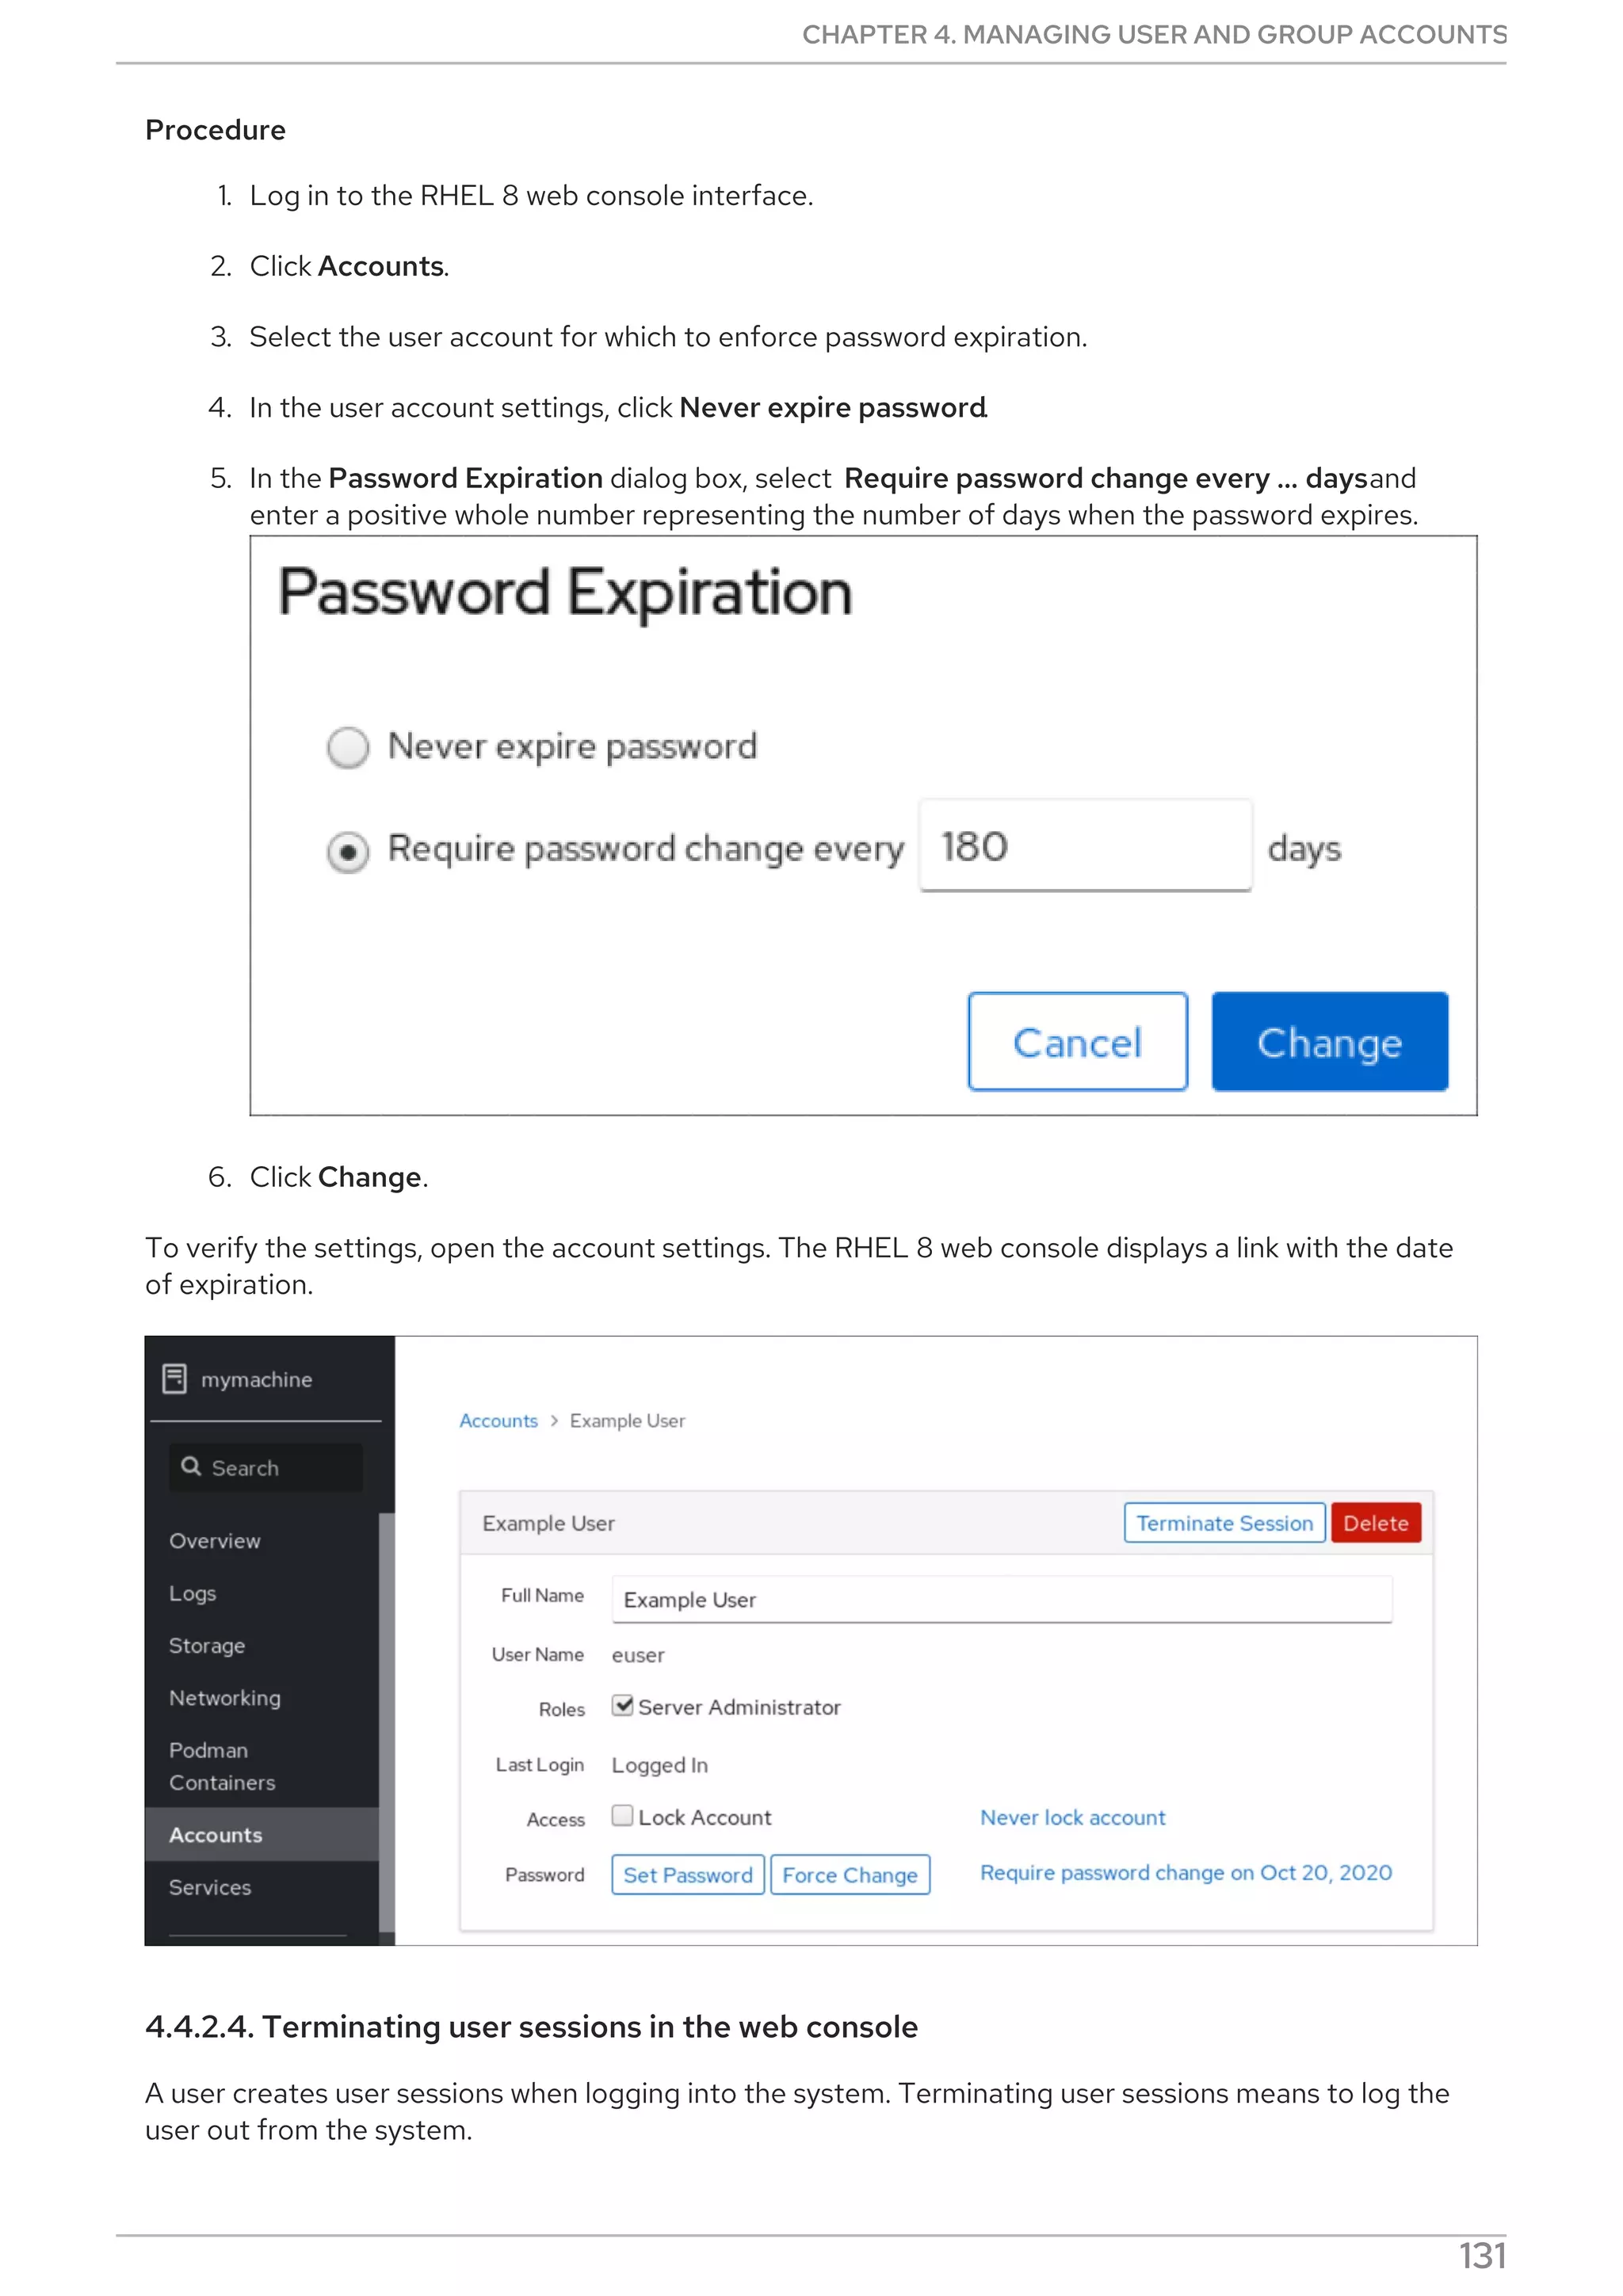
[command_email] section
Provides the email emitter configuration for an external command used to send email.
[email] section
Provides the email emitter configuration.
[base] section
Overrides settings from the main configuration file of yum.
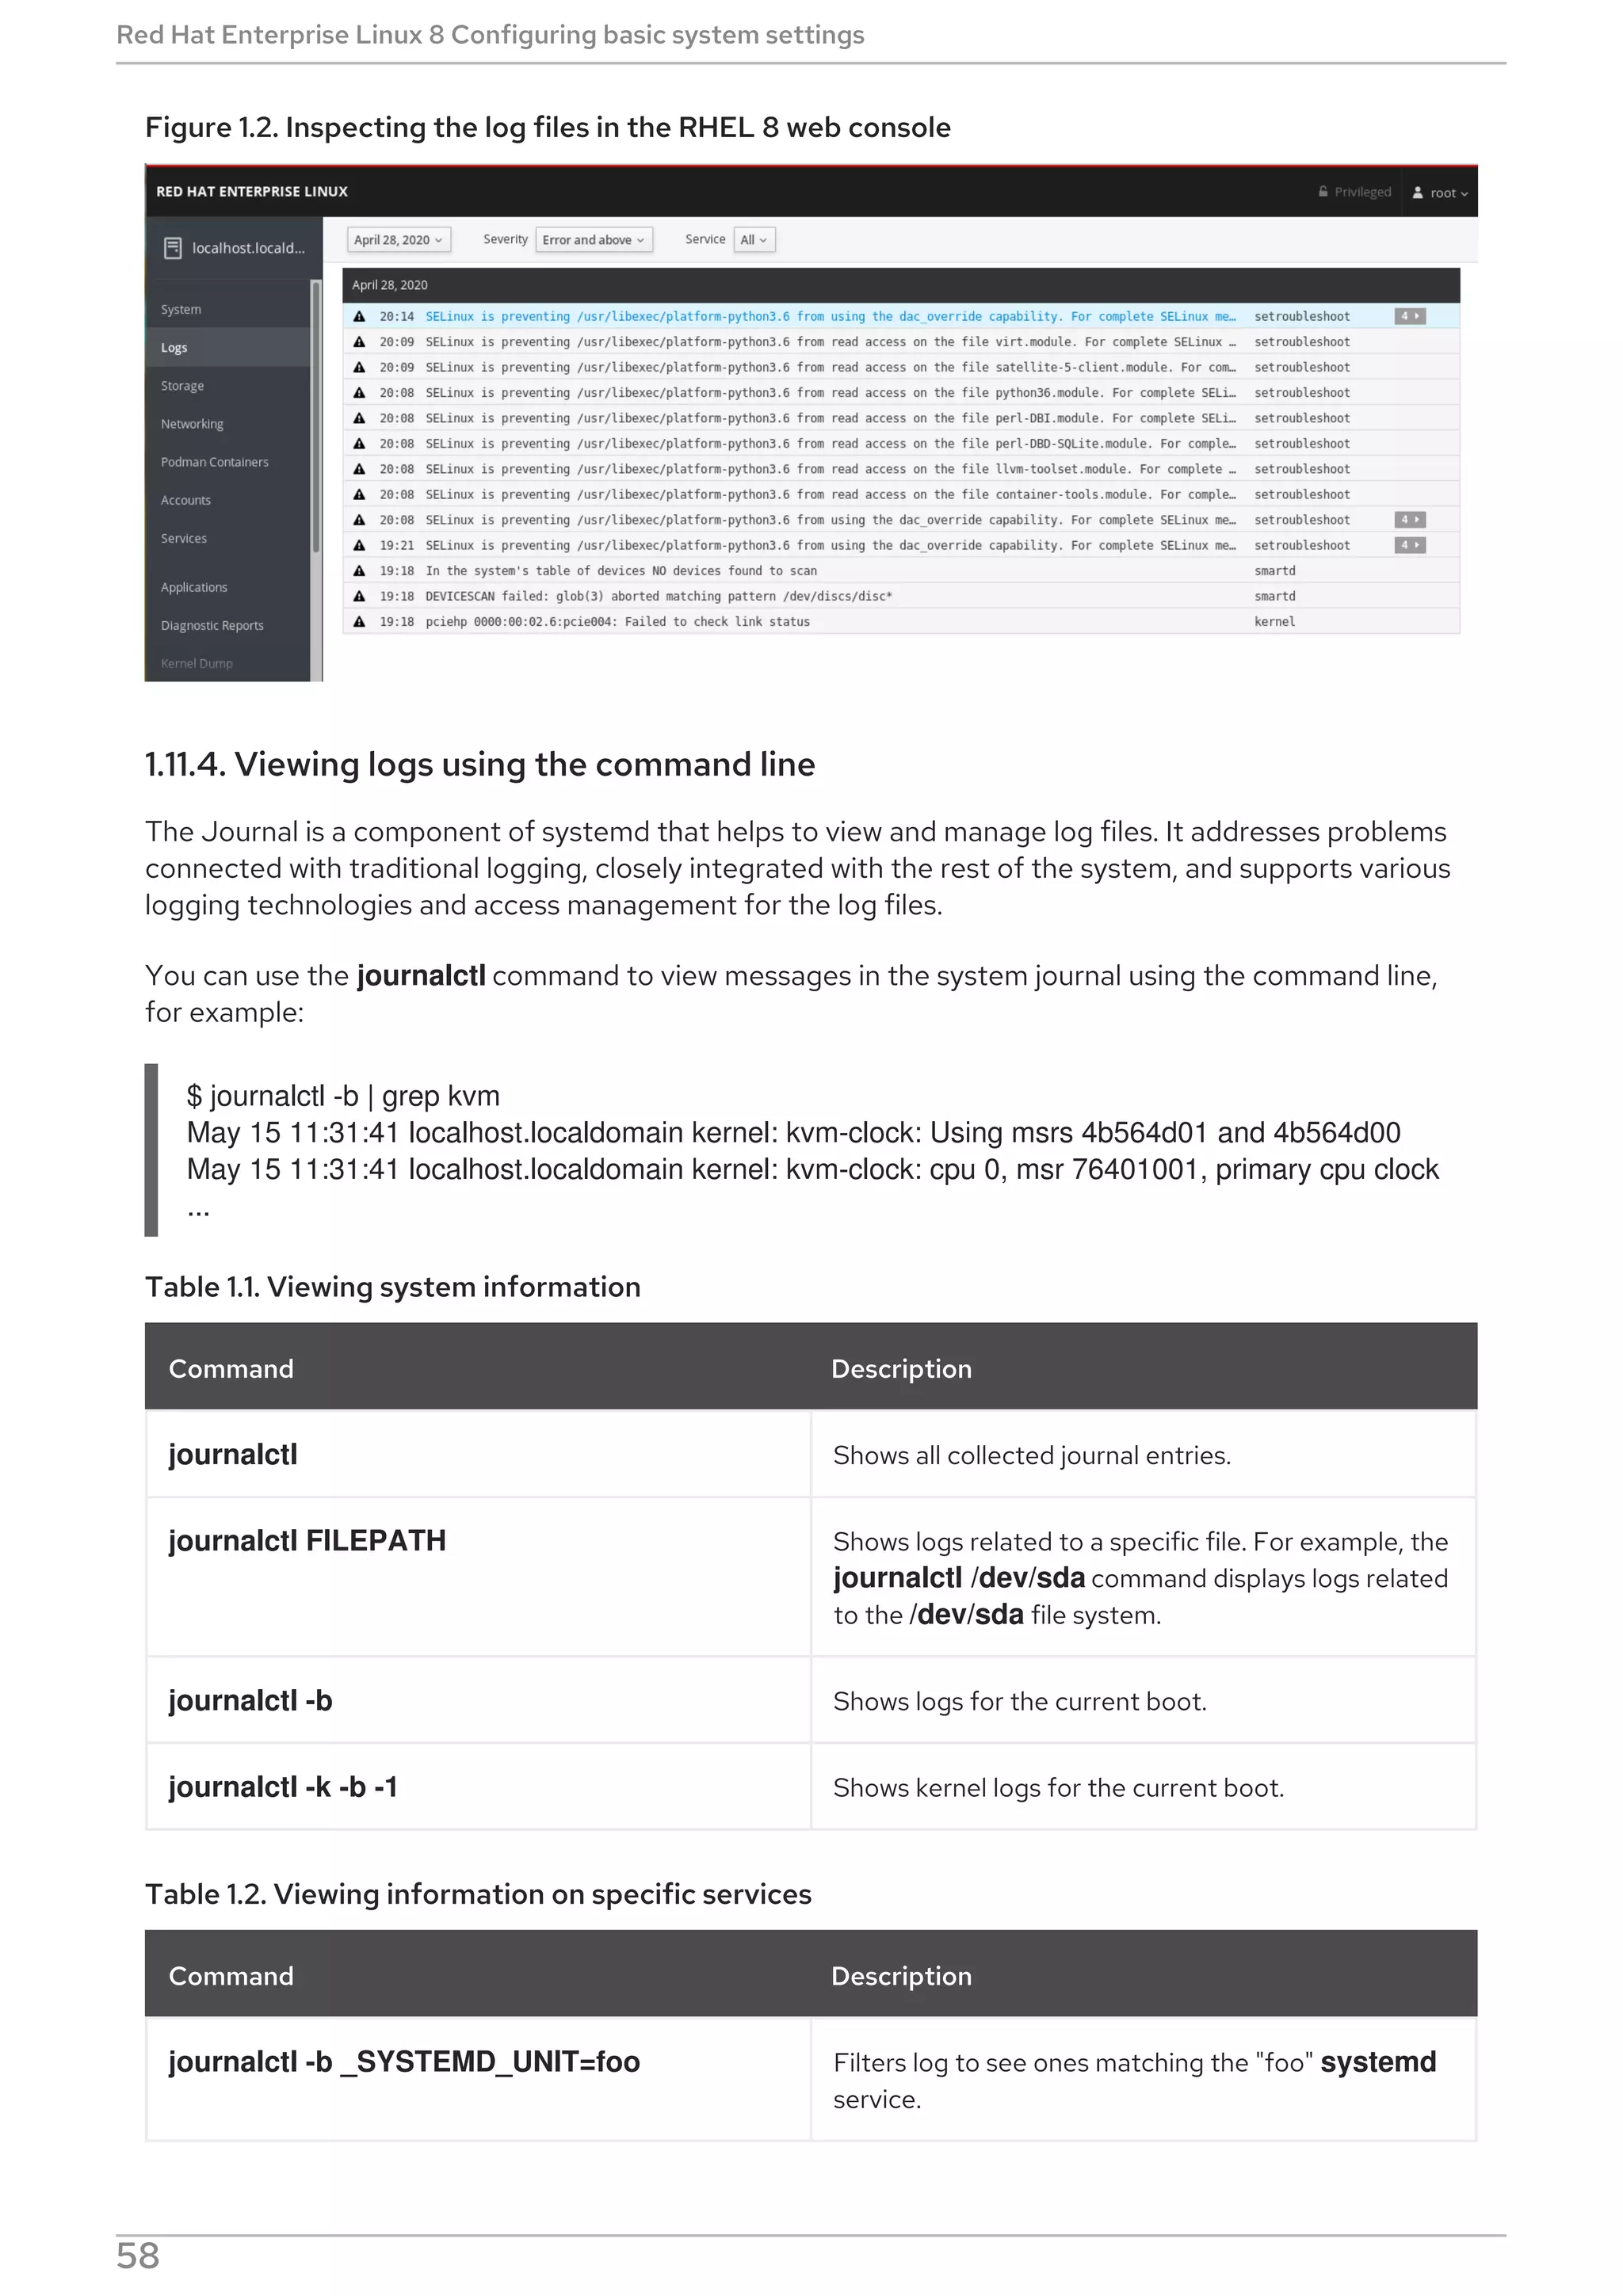
With the default settings of the /etc/dnf/automatic.conf file, DNF Automatic checks for available
updates, downloads them, and reports the results as standard output.
WARNING
Settings of the operation mode from the [commands] section are overridden by
settings used by a systemd timer unit for all timer units except dnf-automatic.timer.
Additional resources
For more details on particular sections, see DNF Automatic documentation.
For more details on systemd timer units, see the man dnf-automatic manual pages.
For the overview of the systemd timer units included in the dnf-automatic package, see
Section 2.5.6.4 Overview of the systemd timer units included in the dnf-automatic package
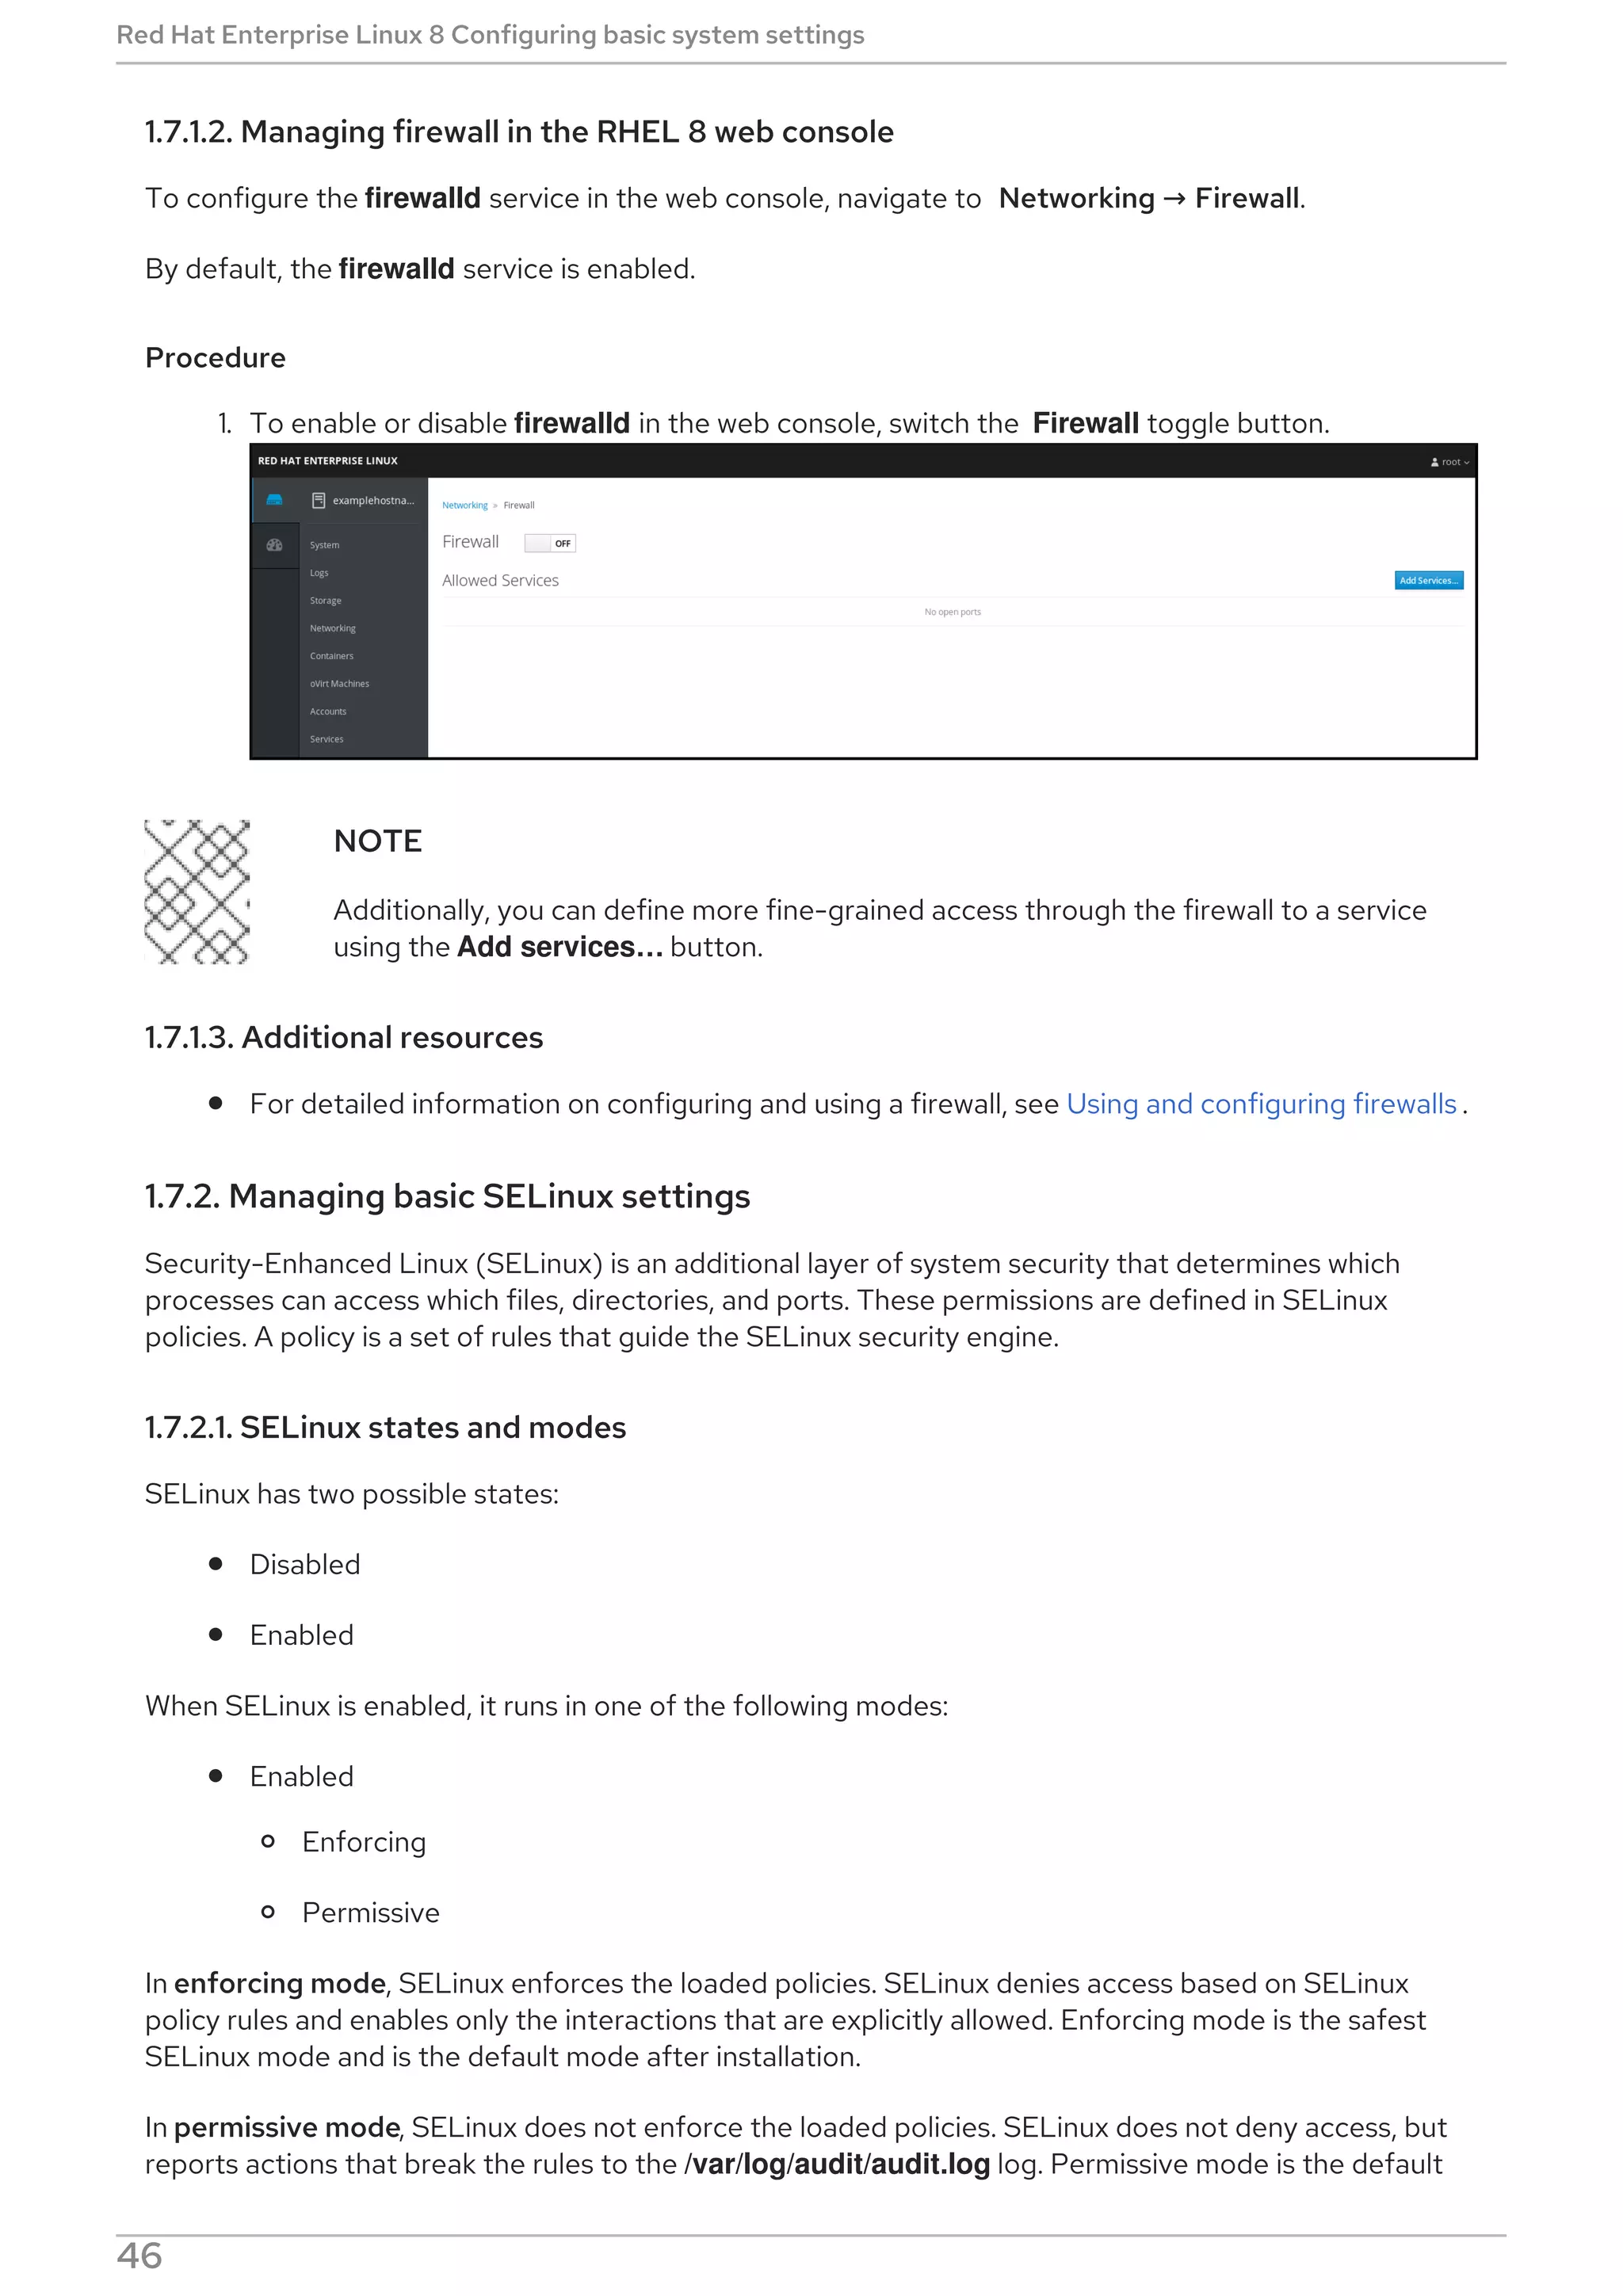
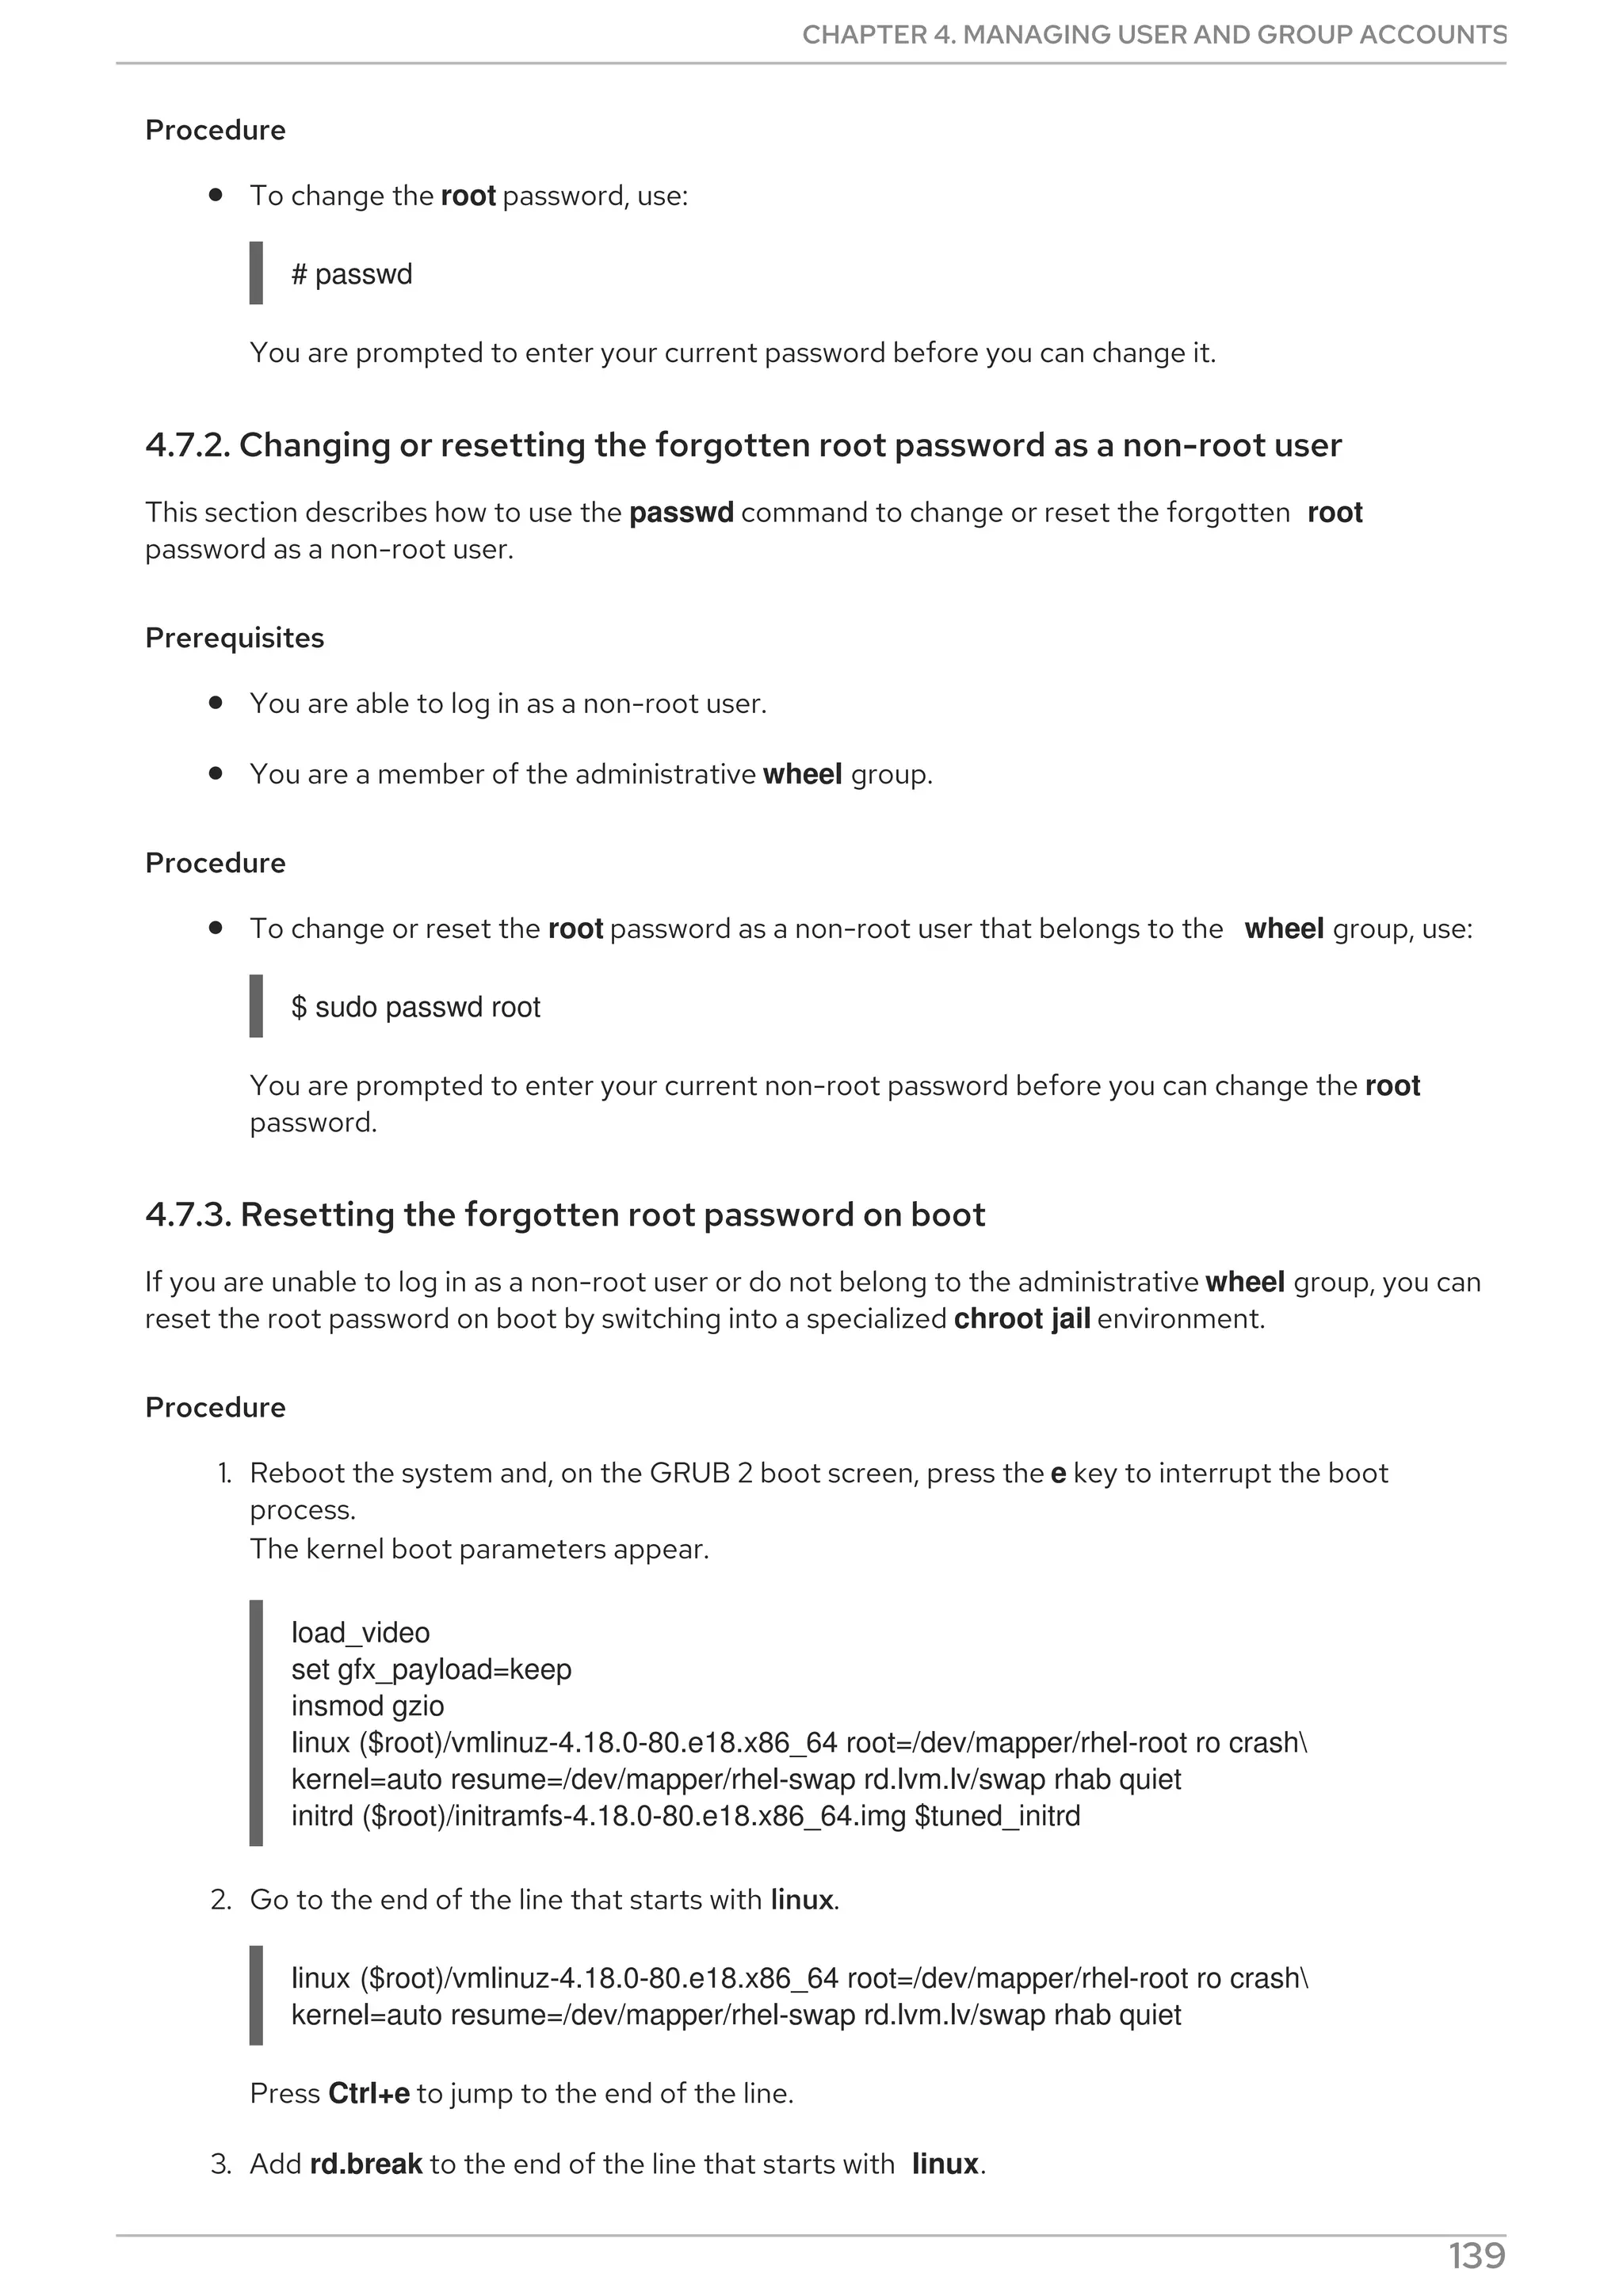
2.5.6.3. Enabling DNF Automatic
To run DNF Automatic, you always need to enable and start a specific systemd timer unit. You can use
one of the timer units provided in the dnf-automatic package, or you can write your own timer unit
depending on your needs.
The following section describes how to enable DNF Automatic.
Prerequisites
You specified the behavior of DNF Automatic by modifying the /etc/dnf/automatic.conf
configuration file.
For more information on DNF Automatic configuration file, see Section 2.5.6.2, “DNF Automatic
configuration file”.
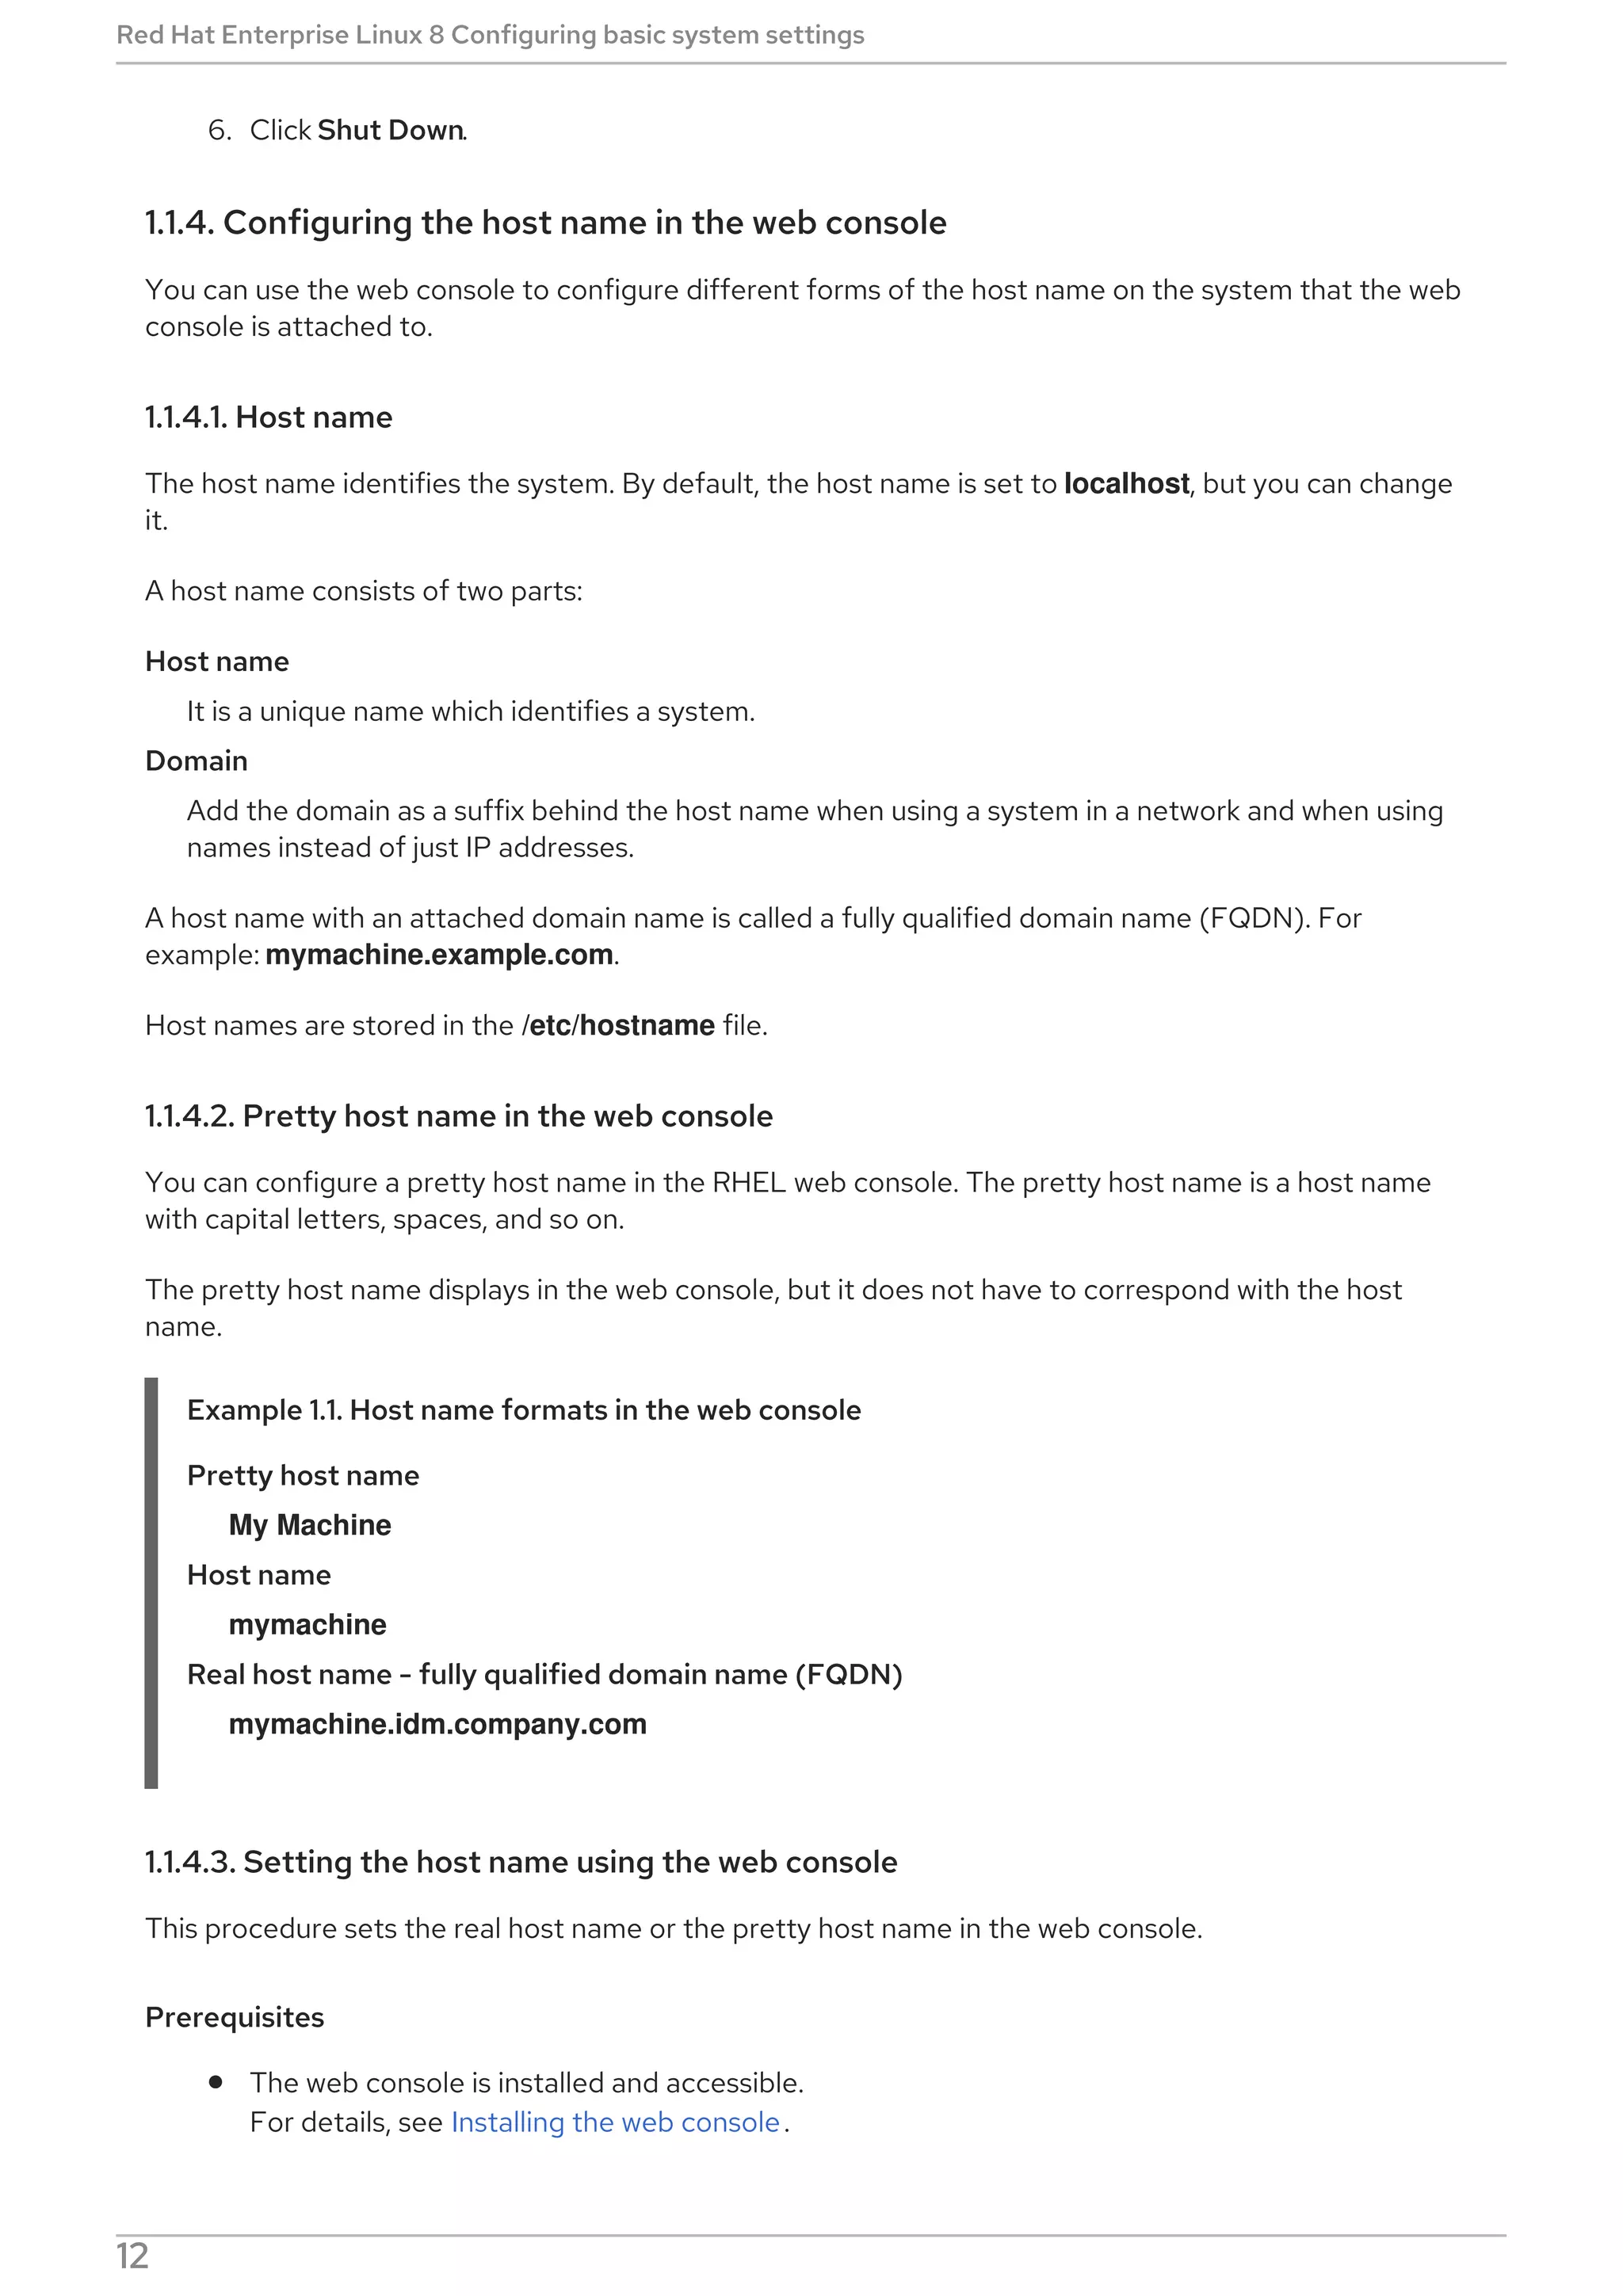
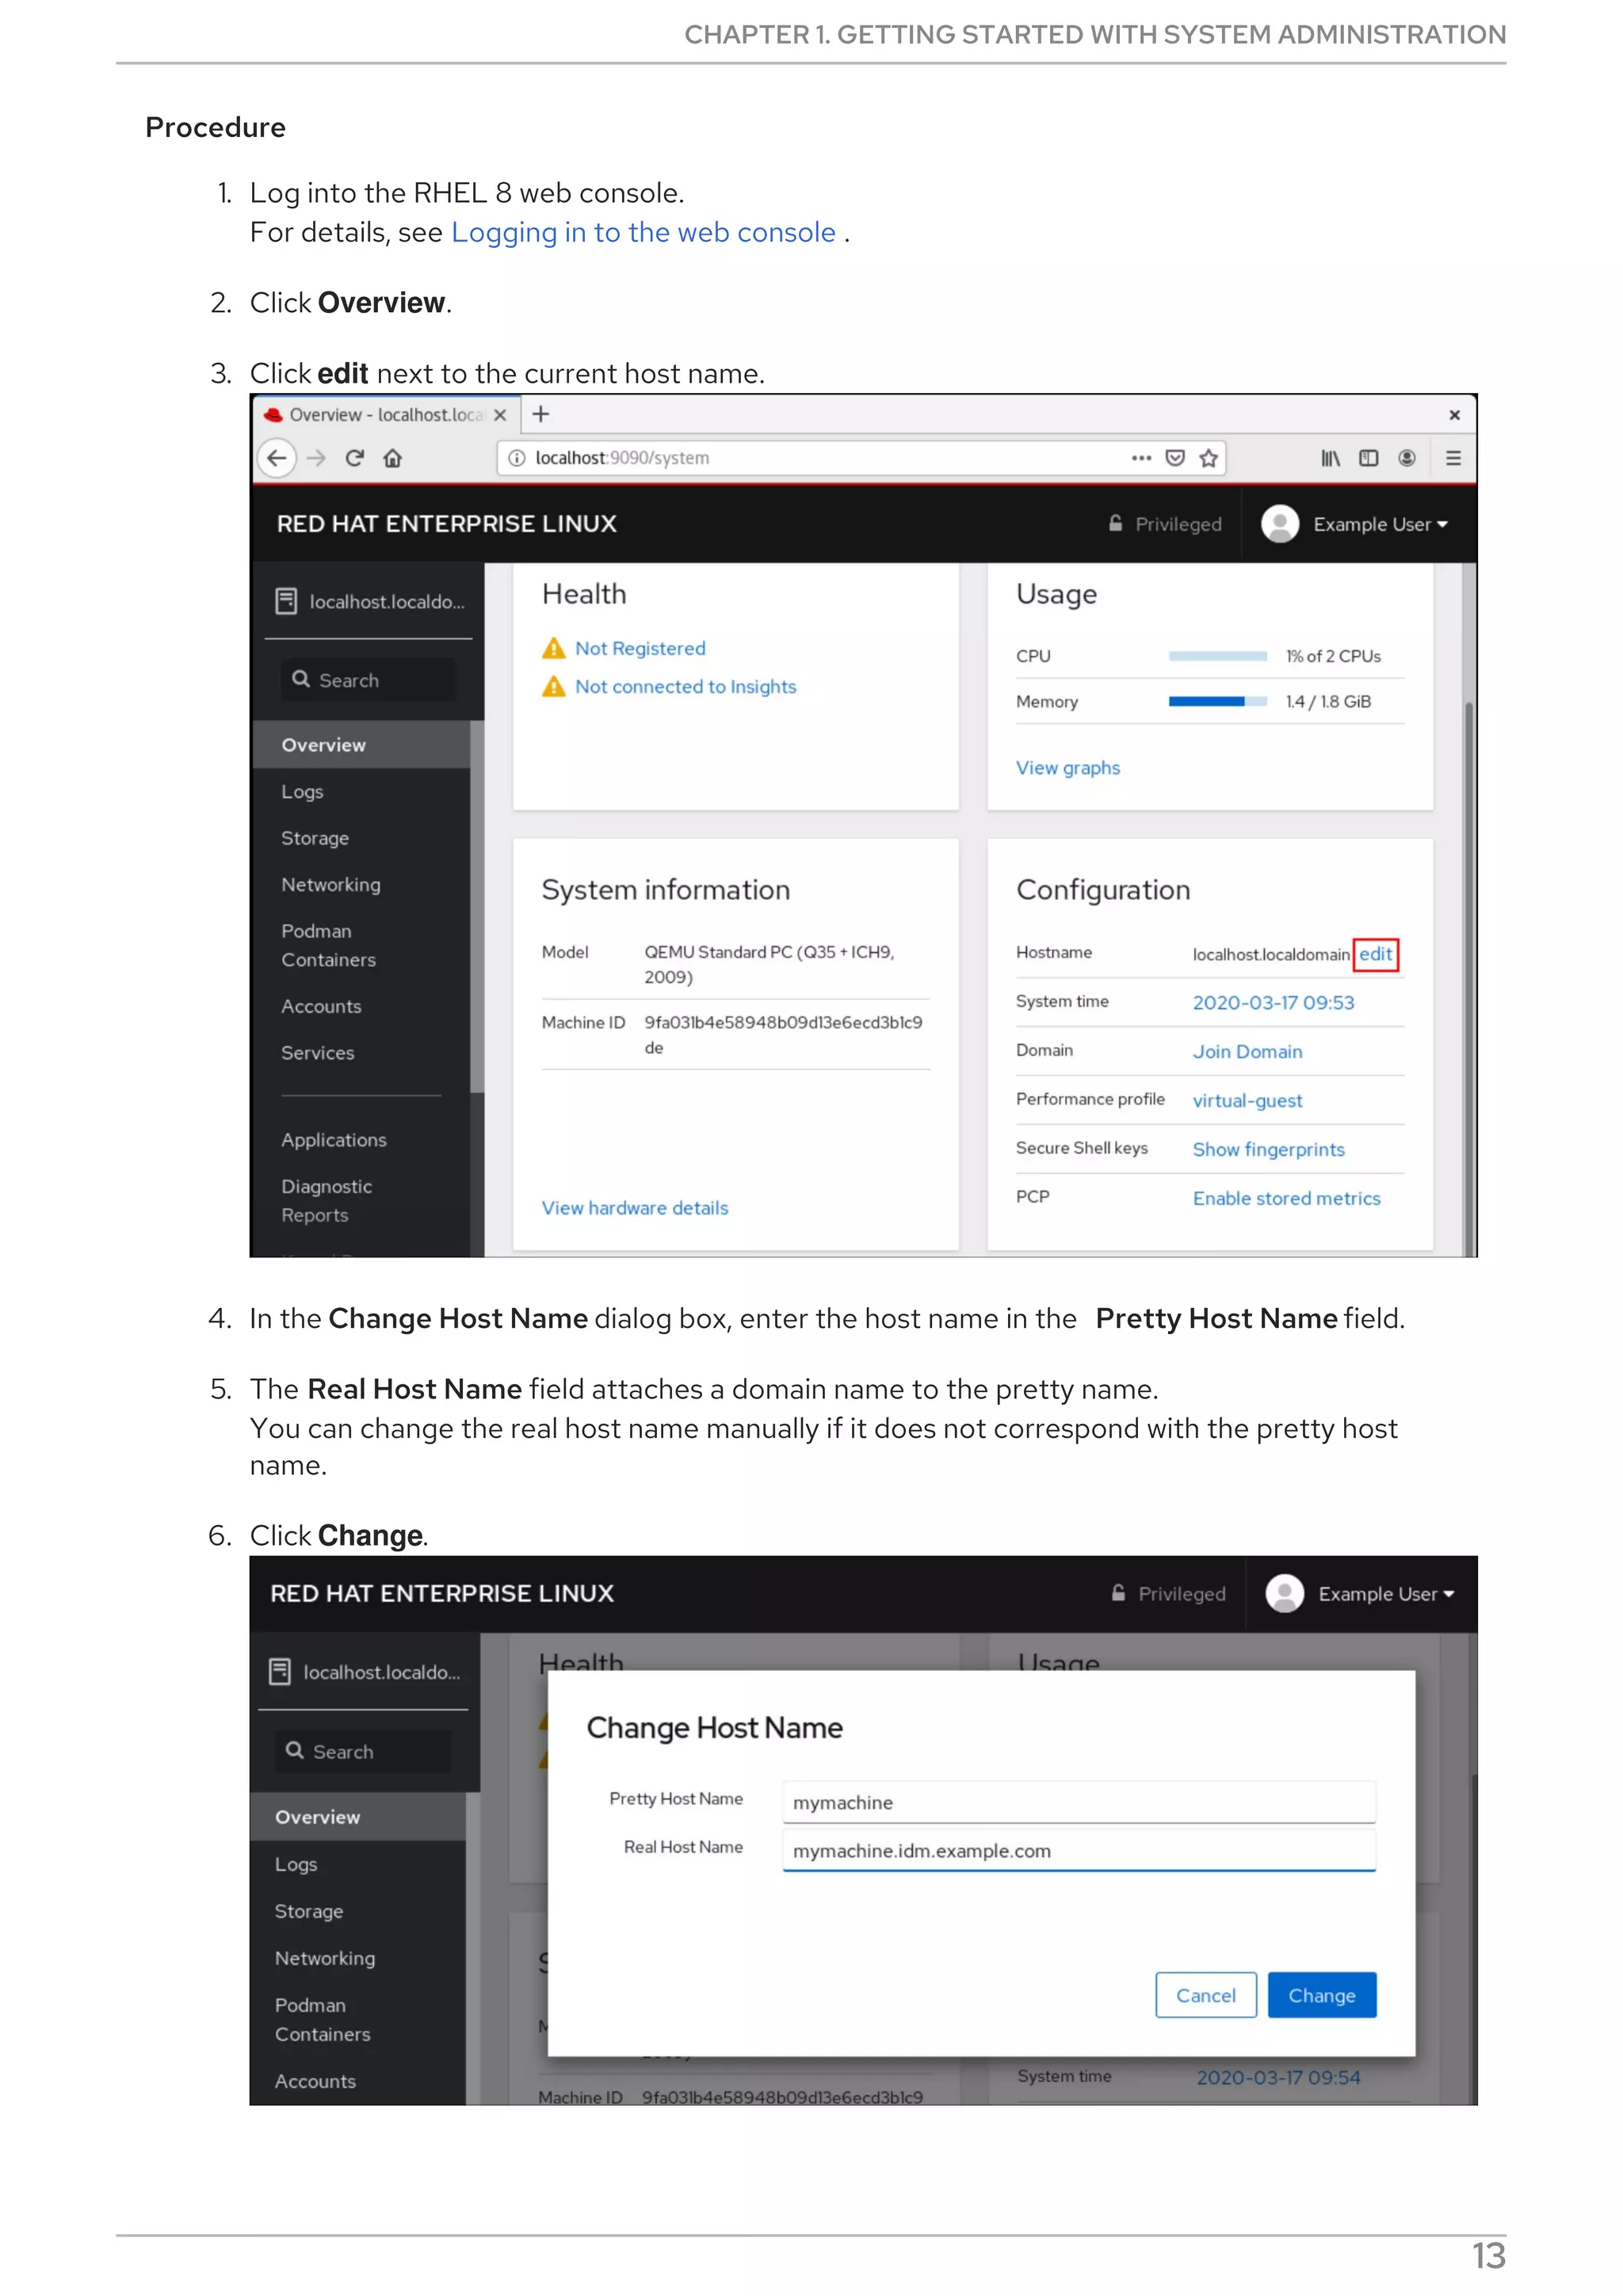
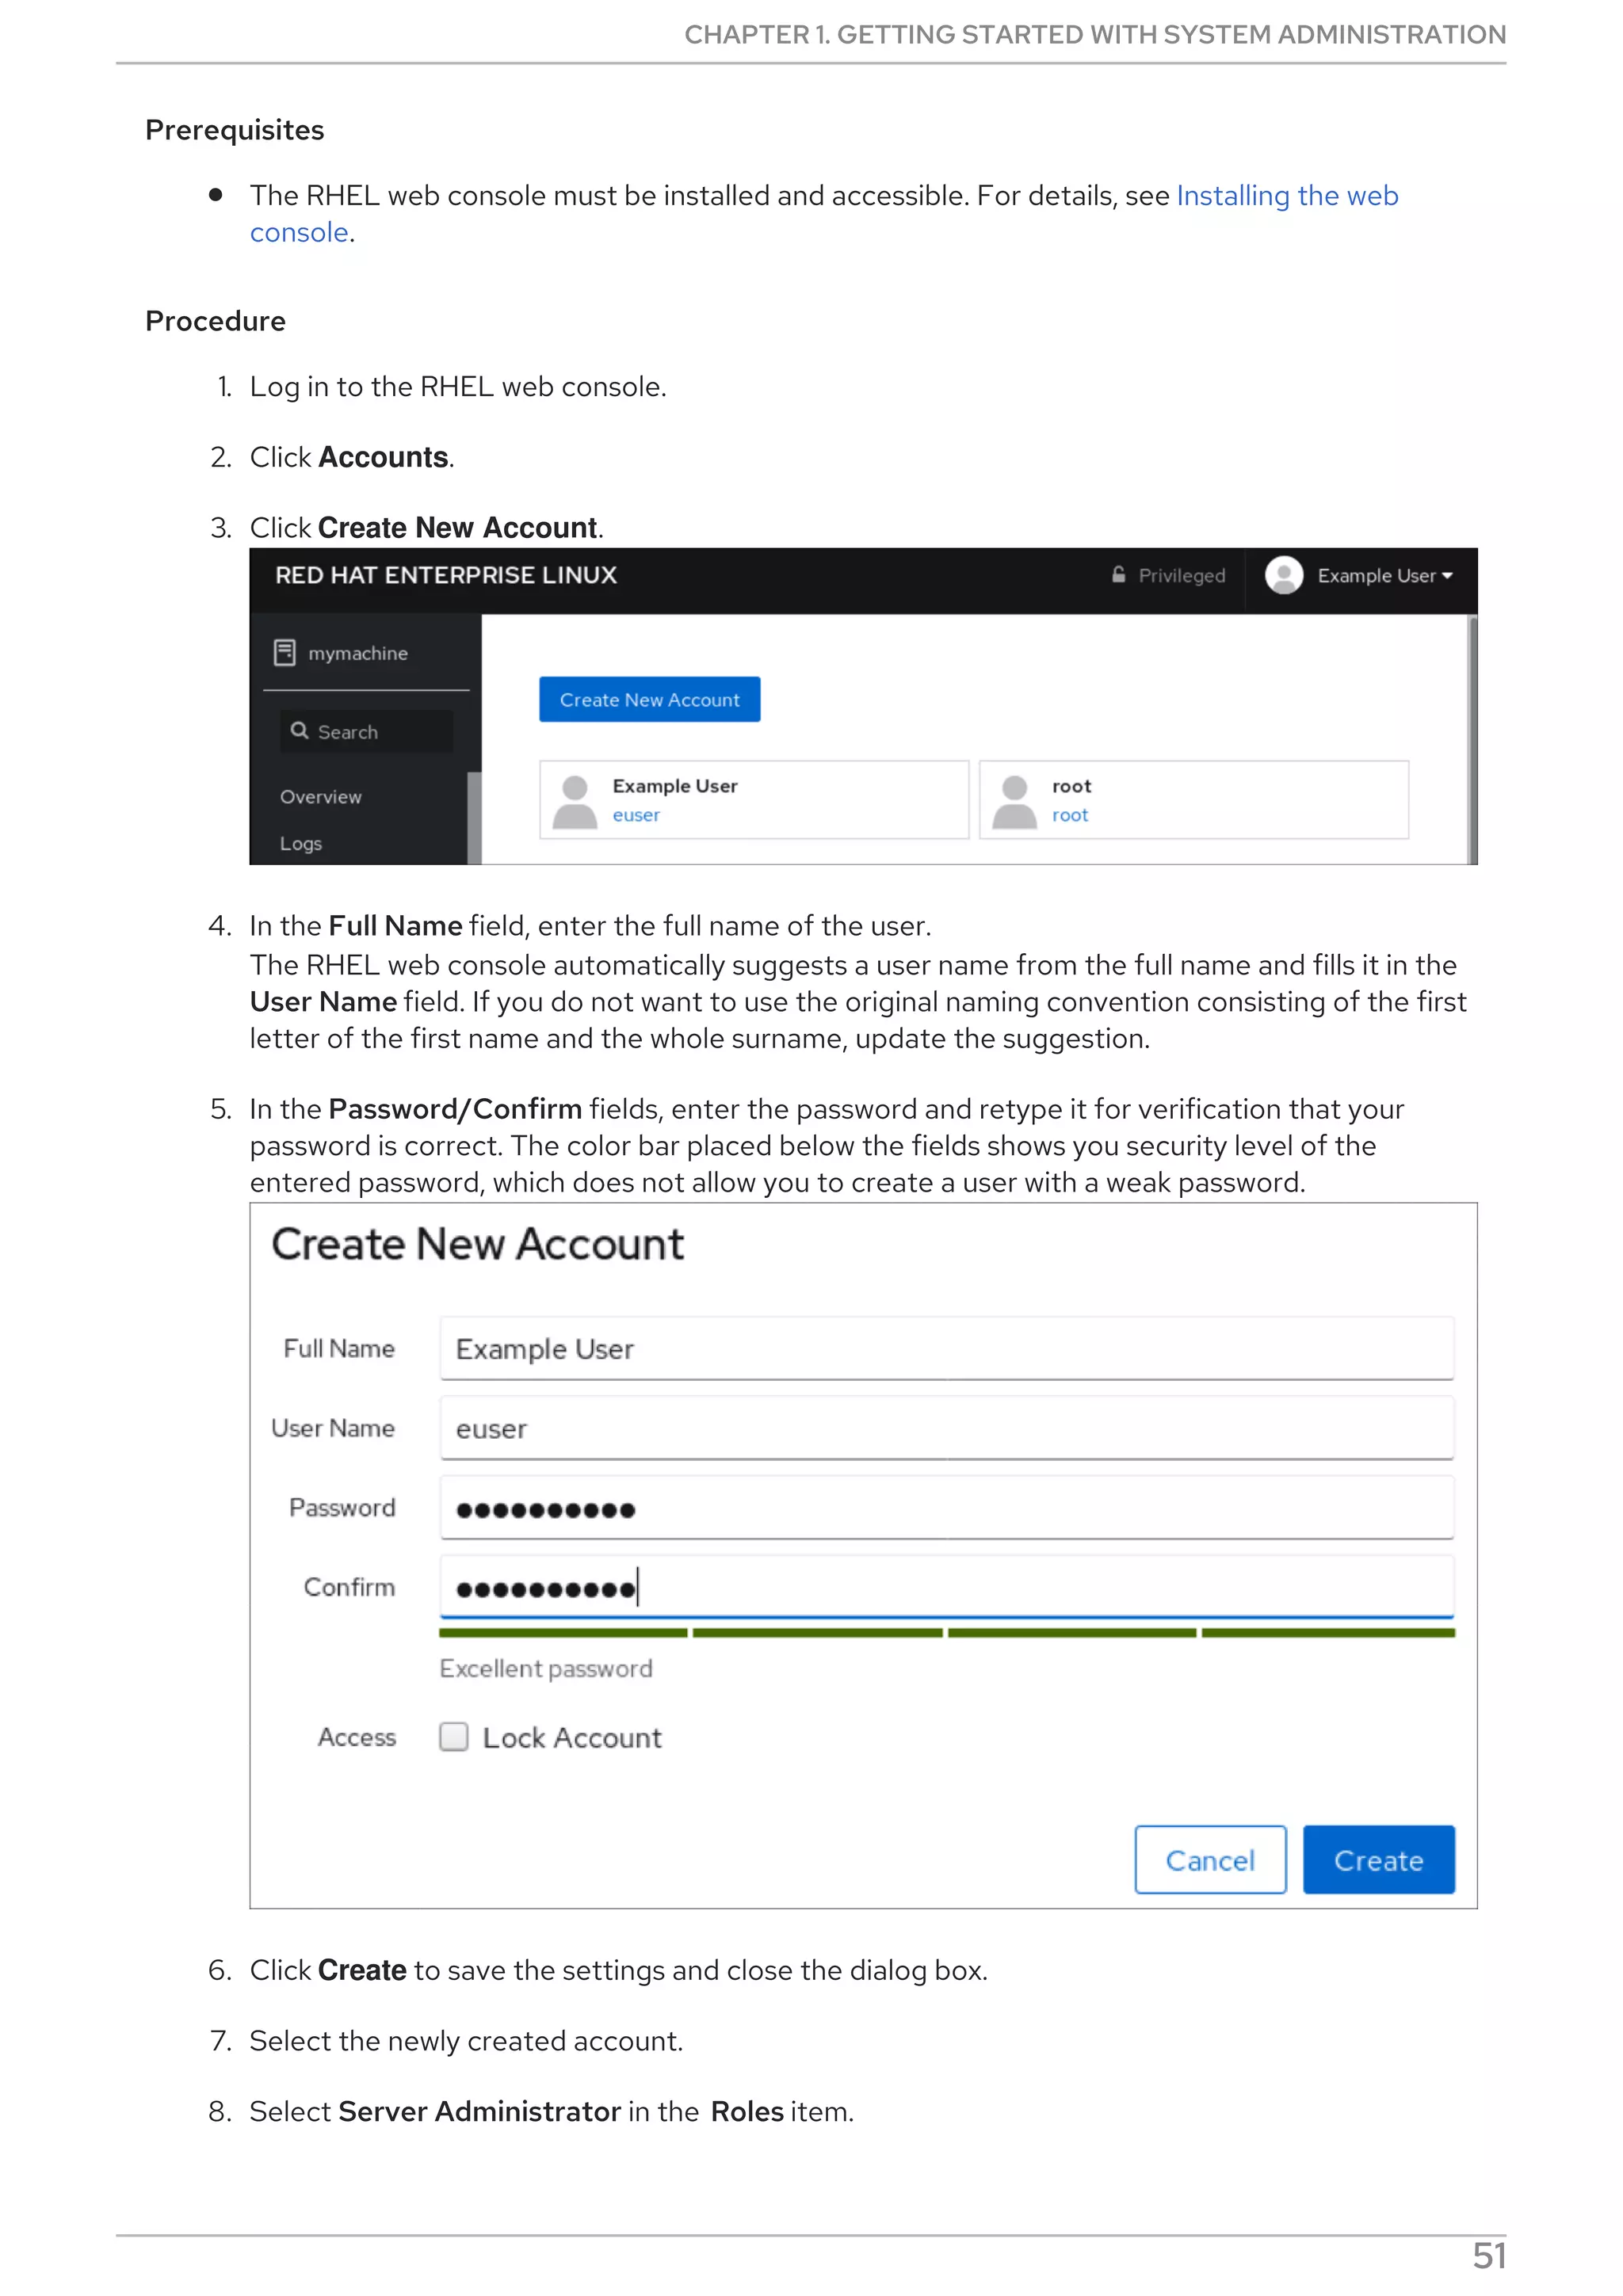
Procedure
Select, enable and start a systemd timer unit that fits your needs:
CHAPTER 2. MANAGING SOFTWARE PACKAGES
69](https://image.slidesharecdn.com/redhatenterpriselinux-8-configuringbasicsystemsettings-en-us-210331143352/75/Red-hat-enterprise_linux-8-configuring_basic_system_settings-en-us-73-2048.jpg)

![Replace file-name with the name of the file.
Escape the wildcard characters by preceding them with a backslash () character.
# yum provides */file-name
Replace file-name with the name of the file.
2.9. MANAGING SOFTWARE REPOSITORIES
The configuration information for yum and related utilities are stored in the /etc/yum.conf file. This file
contains one or more [repository] sections, which allow you to set repository-specific options.
It is recommended to define individual repositories in new or existing .repo files in the
/etc/yum.repos.d/ directory.
Note that the values you define in individual [repository] sections of the /etc/yum.conf file override
values set in the [main] section.
The following section describes how to:
Set [repository] options.
Add a yum repository.
Enable a yum repository.
Disable a yum repository.
2.9.1. Setting yum repository options
The /etc/yum.conf configuration file contains the [repository] sections, where repository is a unique
repository ID. The [repository] sections allows you to define individual yum repositories.
NOTE
Do not give custom repositories names used by the Red Hat repositories to avoid
conflicts.
For a complete list of available [repository] options, see the [repository] OPTIONS section of the
yum.conf(5) manual page.
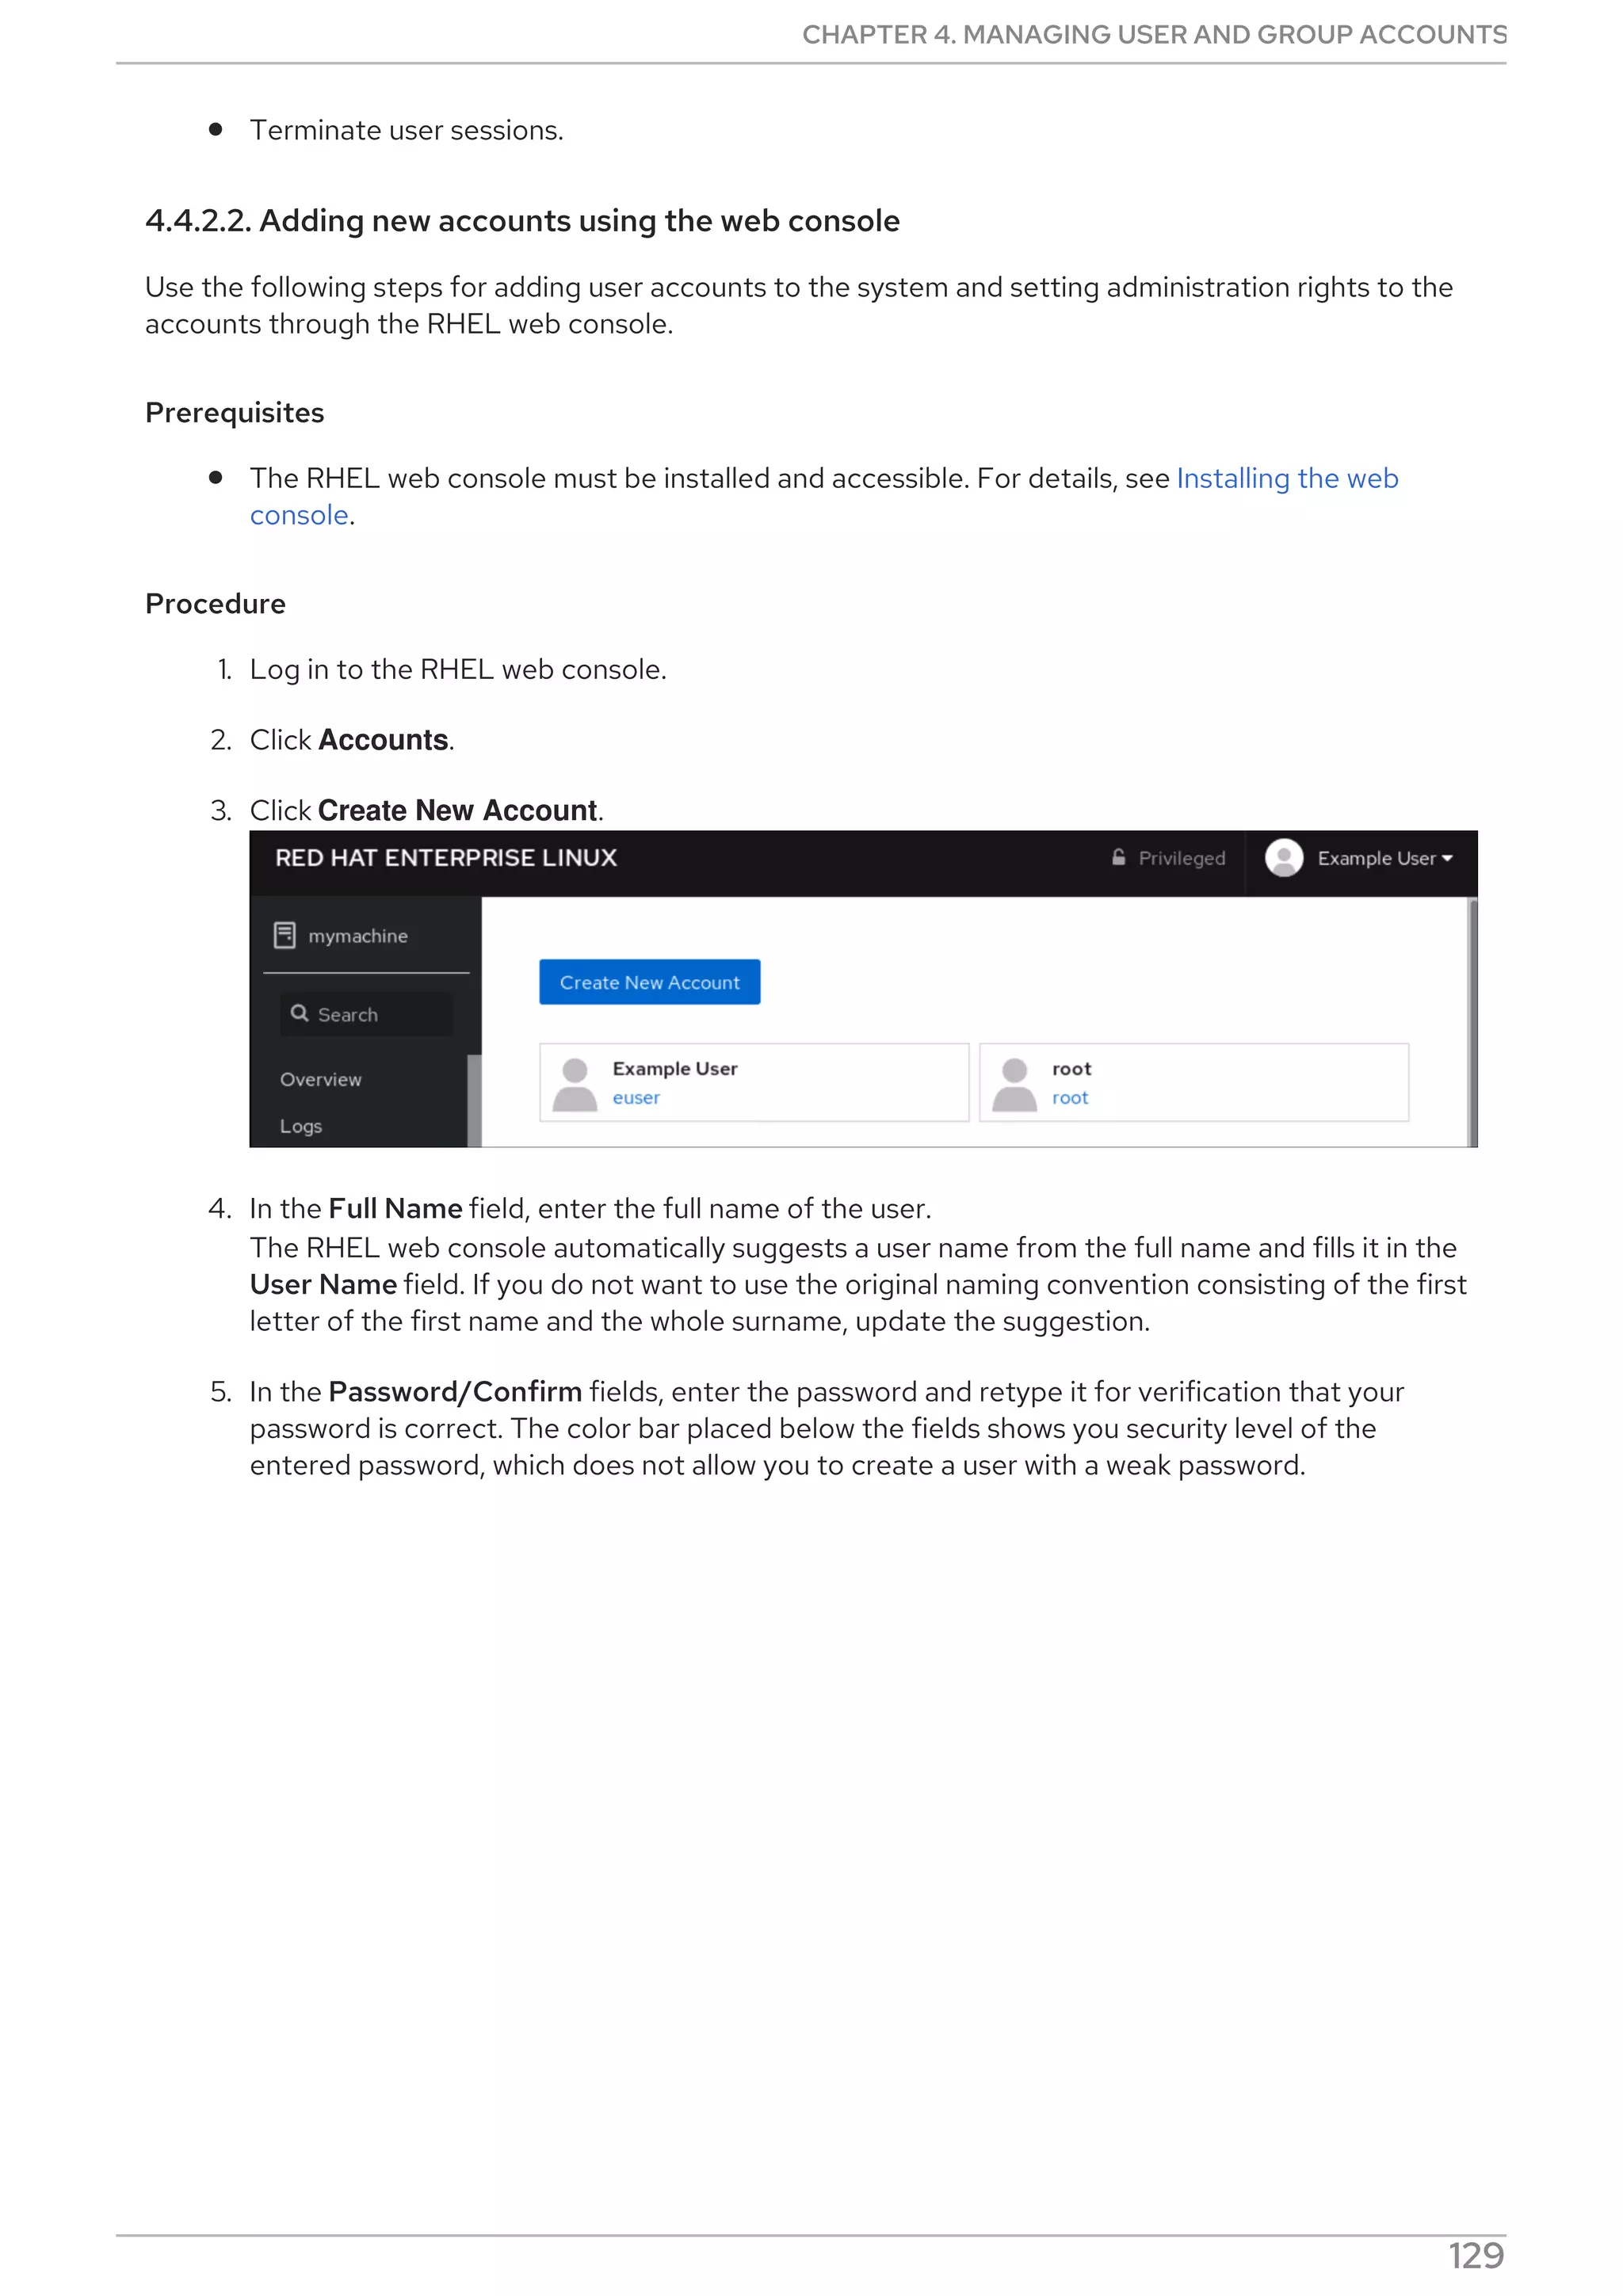
2.9.2. Adding a yum repository
To define a new repository, you can:
Add a [repository] section to the /etc/yum.conf file.
Add a [repository] section to a .repo file in the /etc/yum.repos.d/ directory.
yum repositories commonly provide their own .repo file.
NOTE
CHAPTER 2. MANAGING SOFTWARE PACKAGES
77](https://image.slidesharecdn.com/redhatenterpriselinux-8-configuringbasicsystemsettings-en-us-210331143352/75/Red-hat-enterprise_linux-8-configuring_basic_system_settings-en-us-81-2048.jpg)
![NOTE
It is recommended to define your repositories in a .repo file instead of /etc/yum.conf as
all files with the .repo file extension in this directory are read by yum.
To add a repository to your system and enable it, use:
# yum-config-manager --add-repo repository_URL
Replace repository_url with URL pointing to the repository.
WARNING
Obtaining and installing software packages from unverified or untrusted sources
other than Red Hat certificate-based Content Delivery Network (CDN)
constitutes a potential security risk, and could lead to security, stability,
compatibility, and maintainability issues.
2.9.3. Enabling a yum repository
To enable a repository, use:
# yum-config-manager --enable repositoryID
Replace repositoryID with the unique repository ID.
To list available repository IDs, see Section 2.3.2, “Listing packages with yum”.
2.9.4. Disabling a yum repository
To disable a yum repository, use:
# yum-config-manager --disable repositoryID
Replace repositoryID with the unique repository ID.
To list available repository IDs, see Section 2.3.2, “Listing packages with yum”.
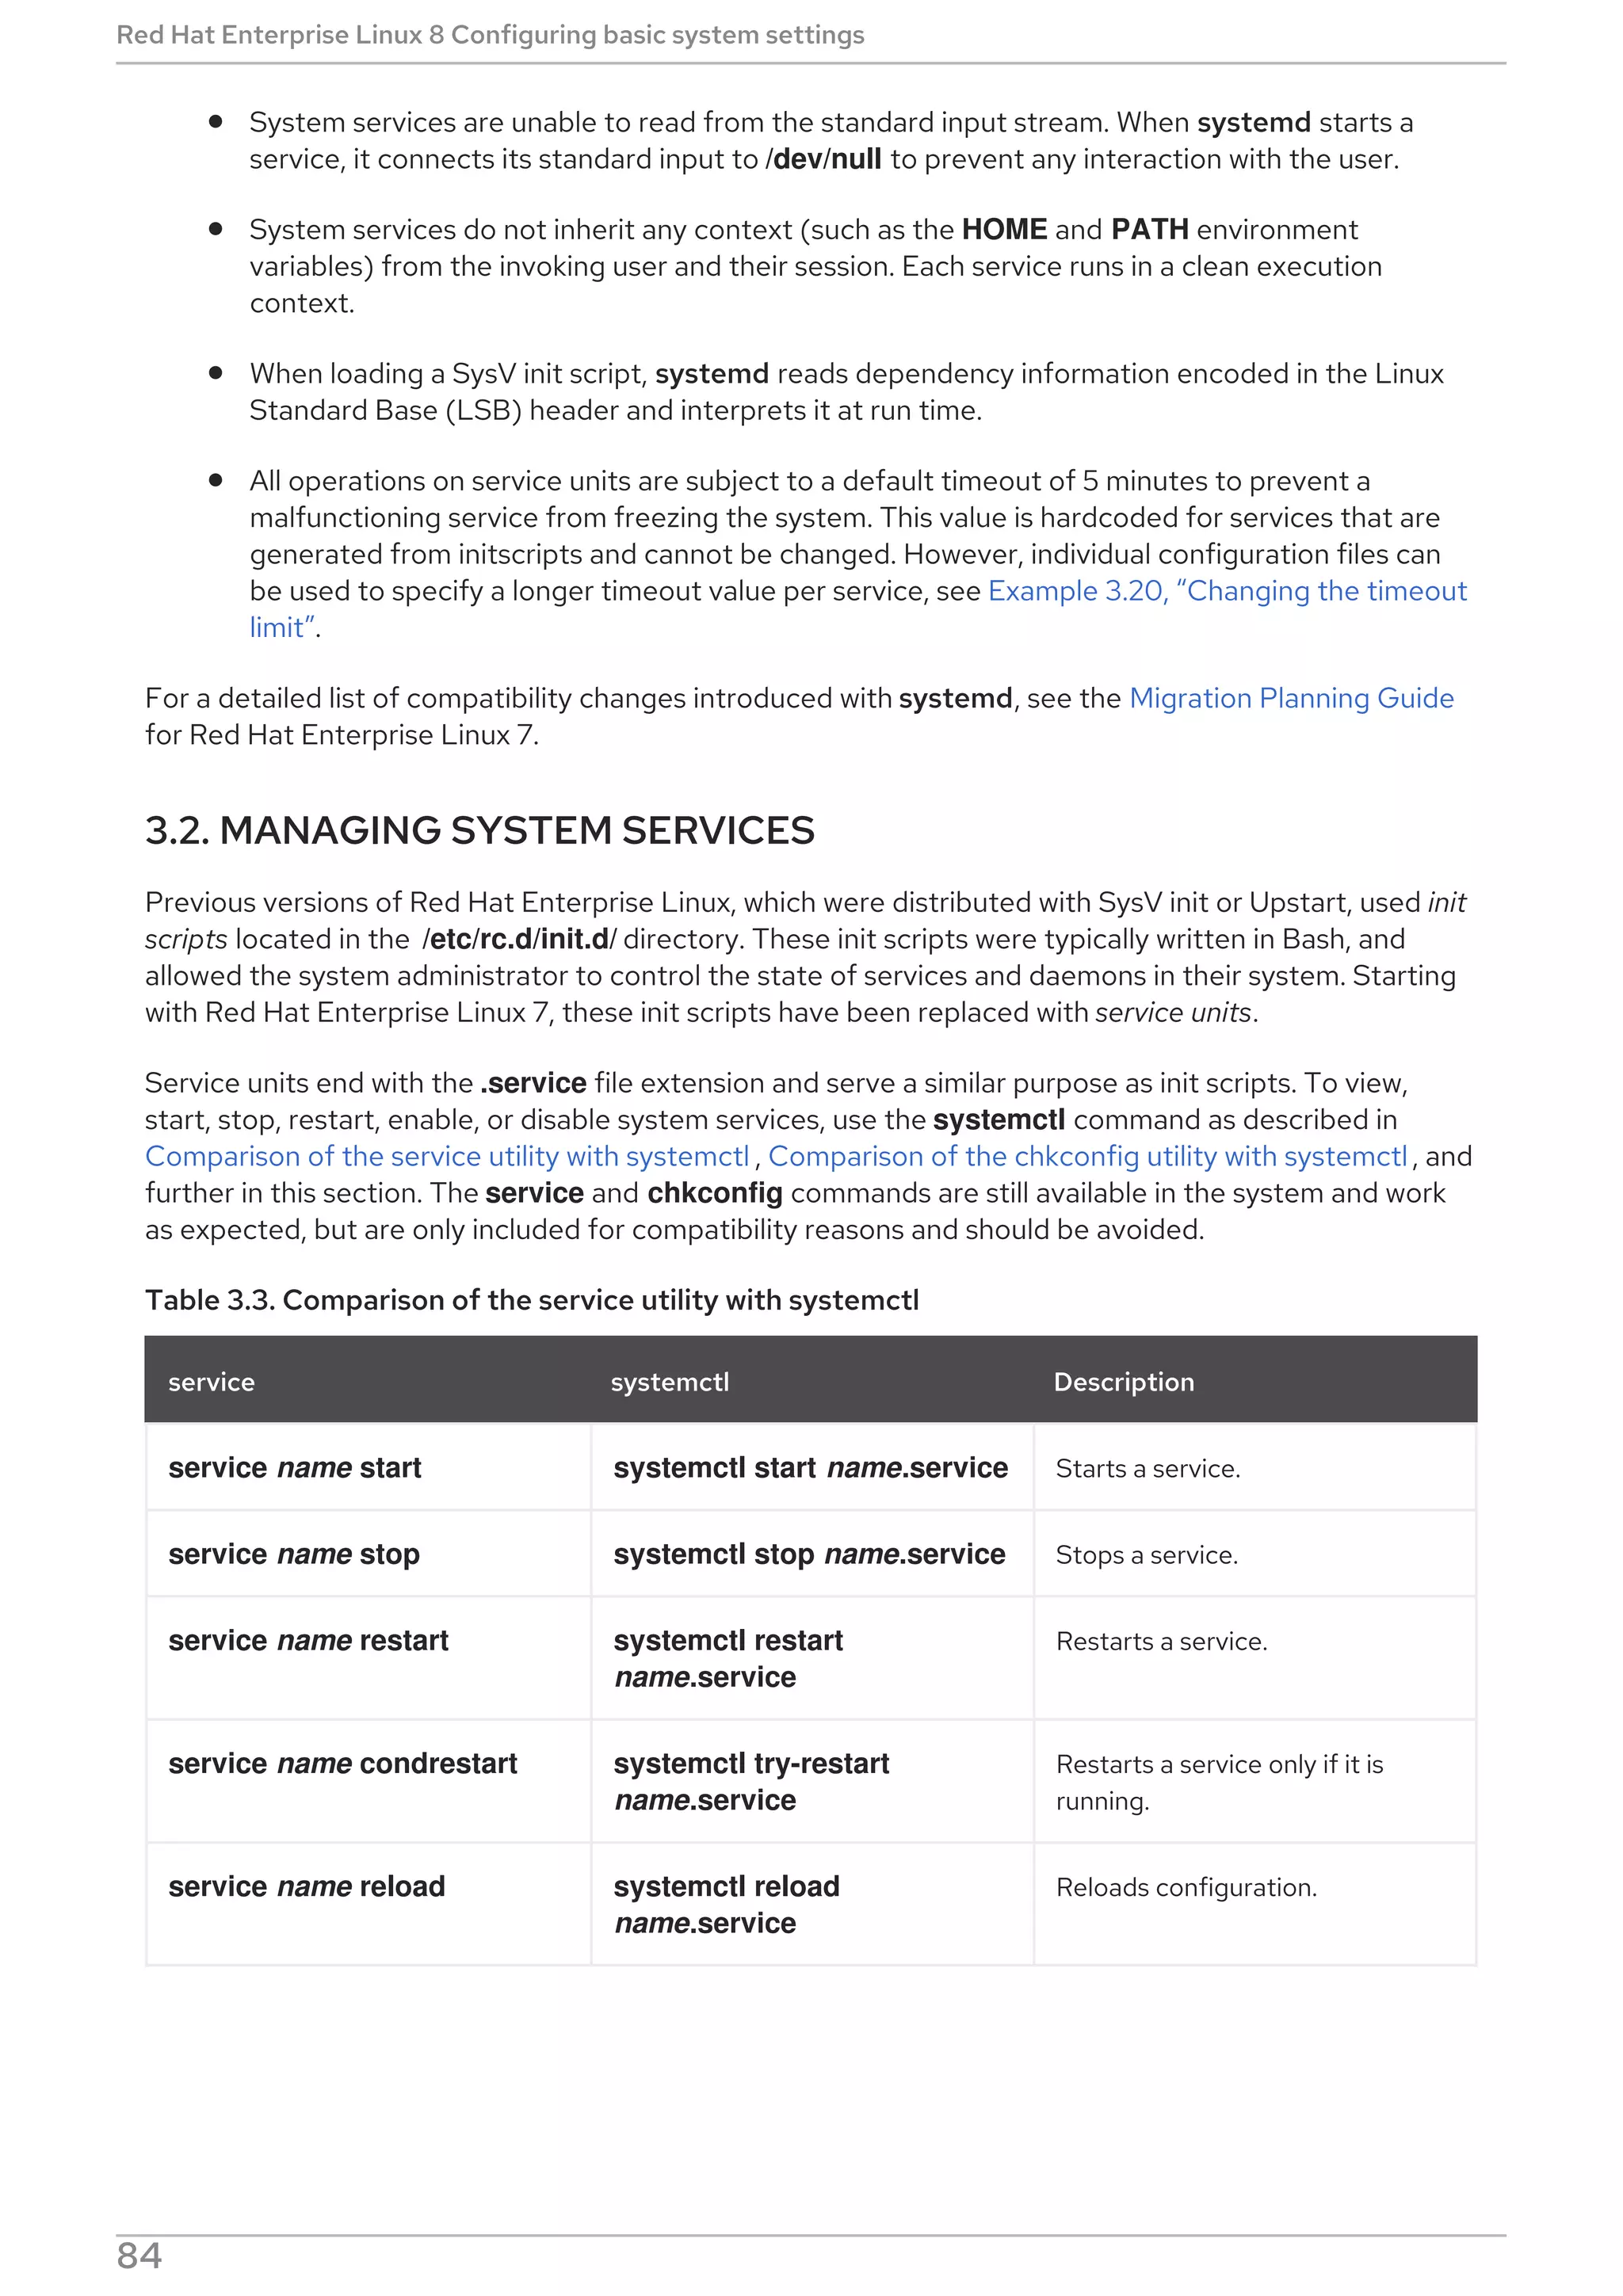
2.10. CONFIGURING YUM
The configuration information for yum and related utilities are stored in the /etc/yum.conf file. This file
contains one mandatory [main] section, which enables you to set yum options that have global effect.
The following section describes how to:
View the current yum configurations.
Set yum [main] options.
Red Hat Enterprise Linux 8 Configuring basic system settings
78](https://image.slidesharecdn.com/redhatenterpriselinux-8-configuringbasicsystemsettings-en-us-210331143352/75/Red-hat-enterprise_linux-8-configuring_basic_system_settings-en-us-82-2048.jpg)
![Use yum plug-ins.
2.10.1. Viewing the current yum configurations
To display the current values of global yum options specified in the [main] section of the
/etc/yum.conf file, use:
# yum config-manager --dump
2.10.2. Setting yum main options
The /etc/yum.conf configuration file contains one [main] section. The key-value pairs in this section
affect how yum operates and treats repositories.
You can add additional options under the [main] section heading in /etc/yum.conf.
For a complete list of available [main] options, see the [main] OPTIONS section of the yum.conf(5)
manual page.
2.10.3. Using yum plug-ins
yum provides plug-ins that extend and enhance its operations. Certain plug-ins are installed by default.
The following section describes how to enable, configure, and disable yum plug-ins.
2.10.3.1. Managing yum plug-ins
The plug-in configuration files always contain a [main] section where the enabled= option controls
whether the plug-in is enabled when you run yum commands. If this option is missing, you can add it
manually to the file.
Every installed plug-in has its own configuration file in the /etc/dnf/plugins/ directory. You can enable or
disable plug-in specific options in these files.
2.10.3.2. Enabling yum plug-ins
To enable all yum plug-ins:
1. Ensure a line beginning with plugins= is present in the [main] section of the /etc/yum.conf
file.
2. Set the value of plugins= to 1.
plugins=1
2.10.3.3. Disabling yum plug-ins
To disable all yum plug-ins:
1. Ensure a line beginning with plugins= is present in the [main] section of the /etc/yum.conf
file.
2. Set the value of plugins= to 0.
CHAPTER 2. MANAGING SOFTWARE PACKAGES
79](https://image.slidesharecdn.com/redhatenterpriselinux-8-configuringbasicsystemsettings-en-us-210331143352/75/Red-hat-enterprise_linux-8-configuring_basic_system_settings-en-us-83-2048.jpg)
![Status Additional information about the corresponding
system service.
Process Additional information about related processes.
CGroup Additional information about related Control Groups
(cgroups).
Field Description
To only verify that a particular service unit is running, run the following command:
systemctl is-active name.service
Similarly, to determine whether a particular service unit is enabled, type:
systemctl is-enabled name.service
Note that both systemctl is-active and systemctl is-enabled return an exit status of 0 if the specified
service unit is running or enabled. For information on how to list all currently loaded service units, see
Listing services.
Example 3.2. Displaying service status
The service unit for the GNOME Display Manager is named gdm.service. To determine the current
status of this service unit, type the following at a shell prompt:
# systemctl status gdm.service
gdm.service - GNOME Display Manager
Loaded: loaded (/usr/lib/systemd/system/gdm.service; enabled)
Active: active (running) since Thu 2013-10-17 17:31:23 CEST; 5min ago
Main PID: 1029 (gdm)
CGroup: /system.slice/gdm.service
├─1029 /usr/sbin/gdm
├─1037 /usr/libexec/gdm-simple-slave --display-id /org/gno…
└─1047 /usr/bin/Xorg :0 -background none -verbose -auth /r…
Oct 17 17:31:23 localhost systemd[1]: Started GNOME Display Manager.
Example 3.3. Displaying services ordered to start before a service
To determine what services are ordered to start before the specified service, type the following at a
shell prompt:
# systemctl list-dependencies --after gdm.service
gdm.service
├─dbus.socket
├─getty@tty1.service
├─livesys.service
├─plymouth-quit.service
Red Hat Enterprise Linux 8 Configuring basic system settings
88](https://image.slidesharecdn.com/redhatenterpriselinux-8-configuringbasicsystemsettings-en-us-210331143352/75/Red-hat-enterprise_linux-8-configuring_basic_system_settings-en-us-92-2048.jpg)
![├─system.slice
├─systemd-journald.socket
├─systemd-user-sessions.service
└─basic.target
[output truncated]
Example 3.4. Displaying services ordered to start after a service
To determine what services are ordered to start after the specified service, type the following at a
shell prompt:
# systemctl list-dependencies --before gdm.service
gdm.service
├─dracut-shutdown.service
├─graphical.target
│ ├─systemd-readahead-done.service
│ ├─systemd-readahead-done.timer
│ └─systemd-update-utmp-runlevel.service
└─shutdown.target
├─systemd-reboot.service
└─final.target
└─systemd-reboot.service
3.2.3. Starting a service
To start a service unit that corresponds to a system service, type the following at a shell prompt as root:
systemctl start name.service
Replace name with the name of the service unit you want to start (for example, gdm). This command
starts the selected service unit in the current session. For information on how to enable a service unit to
be started at boot time, see Enabling a service. For information on how to determine the status of a
certain service unit, see Displaying service status.
Example 3.5. Starting a service
The service unit for the Apache HTTP Server is named httpd.service. To activate this service unit
and start the httpd daemon in the current session, run the following command as root:
# systemctl start httpd.service
3.2.4. Stopping a service
To stop a service unit that corresponds to a system service, type the following at a shell prompt as root:
systemctl stop name.service
Replace name with the name of the service unit you want to stop (for example, bluetooth). This
command stops the selected service unit in the current session. For information on how to disable a
CHAPTER 3. MANAGING SERVICES WITH SYSTEMD
89](https://image.slidesharecdn.com/redhatenterpriselinux-8-configuringbasicsystemsettings-en-us-210331143352/75/Red-hat-enterprise_linux-8-configuring_basic_system_settings-en-us-93-2048.jpg)
![Replace name with the name of the service unit you want to enable (for example, httpd). This command
reads the [Install] section of the selected service unit and creates appropriate symbolic links to the
/usr/lib/systemd/system/name.service file in the /etc/systemd/system/ directory and its
subdirectories. This command does not, however, rewrite links that already exist. If you want to ensure
that the symbolic links are re-created, use the following command as root:
systemctl reenable name.service
This command disables the selected service unit and immediately enables it again. For information on
how to determine whether a certain service unit is enabled to start at boot time, see Displaying service
status. For information on how to start a service in the current session, see Starting a service .
Example 3.8. Enabling a service
To configure the Apache HTTP Server to start automatically at boot time, run the following
command as root:
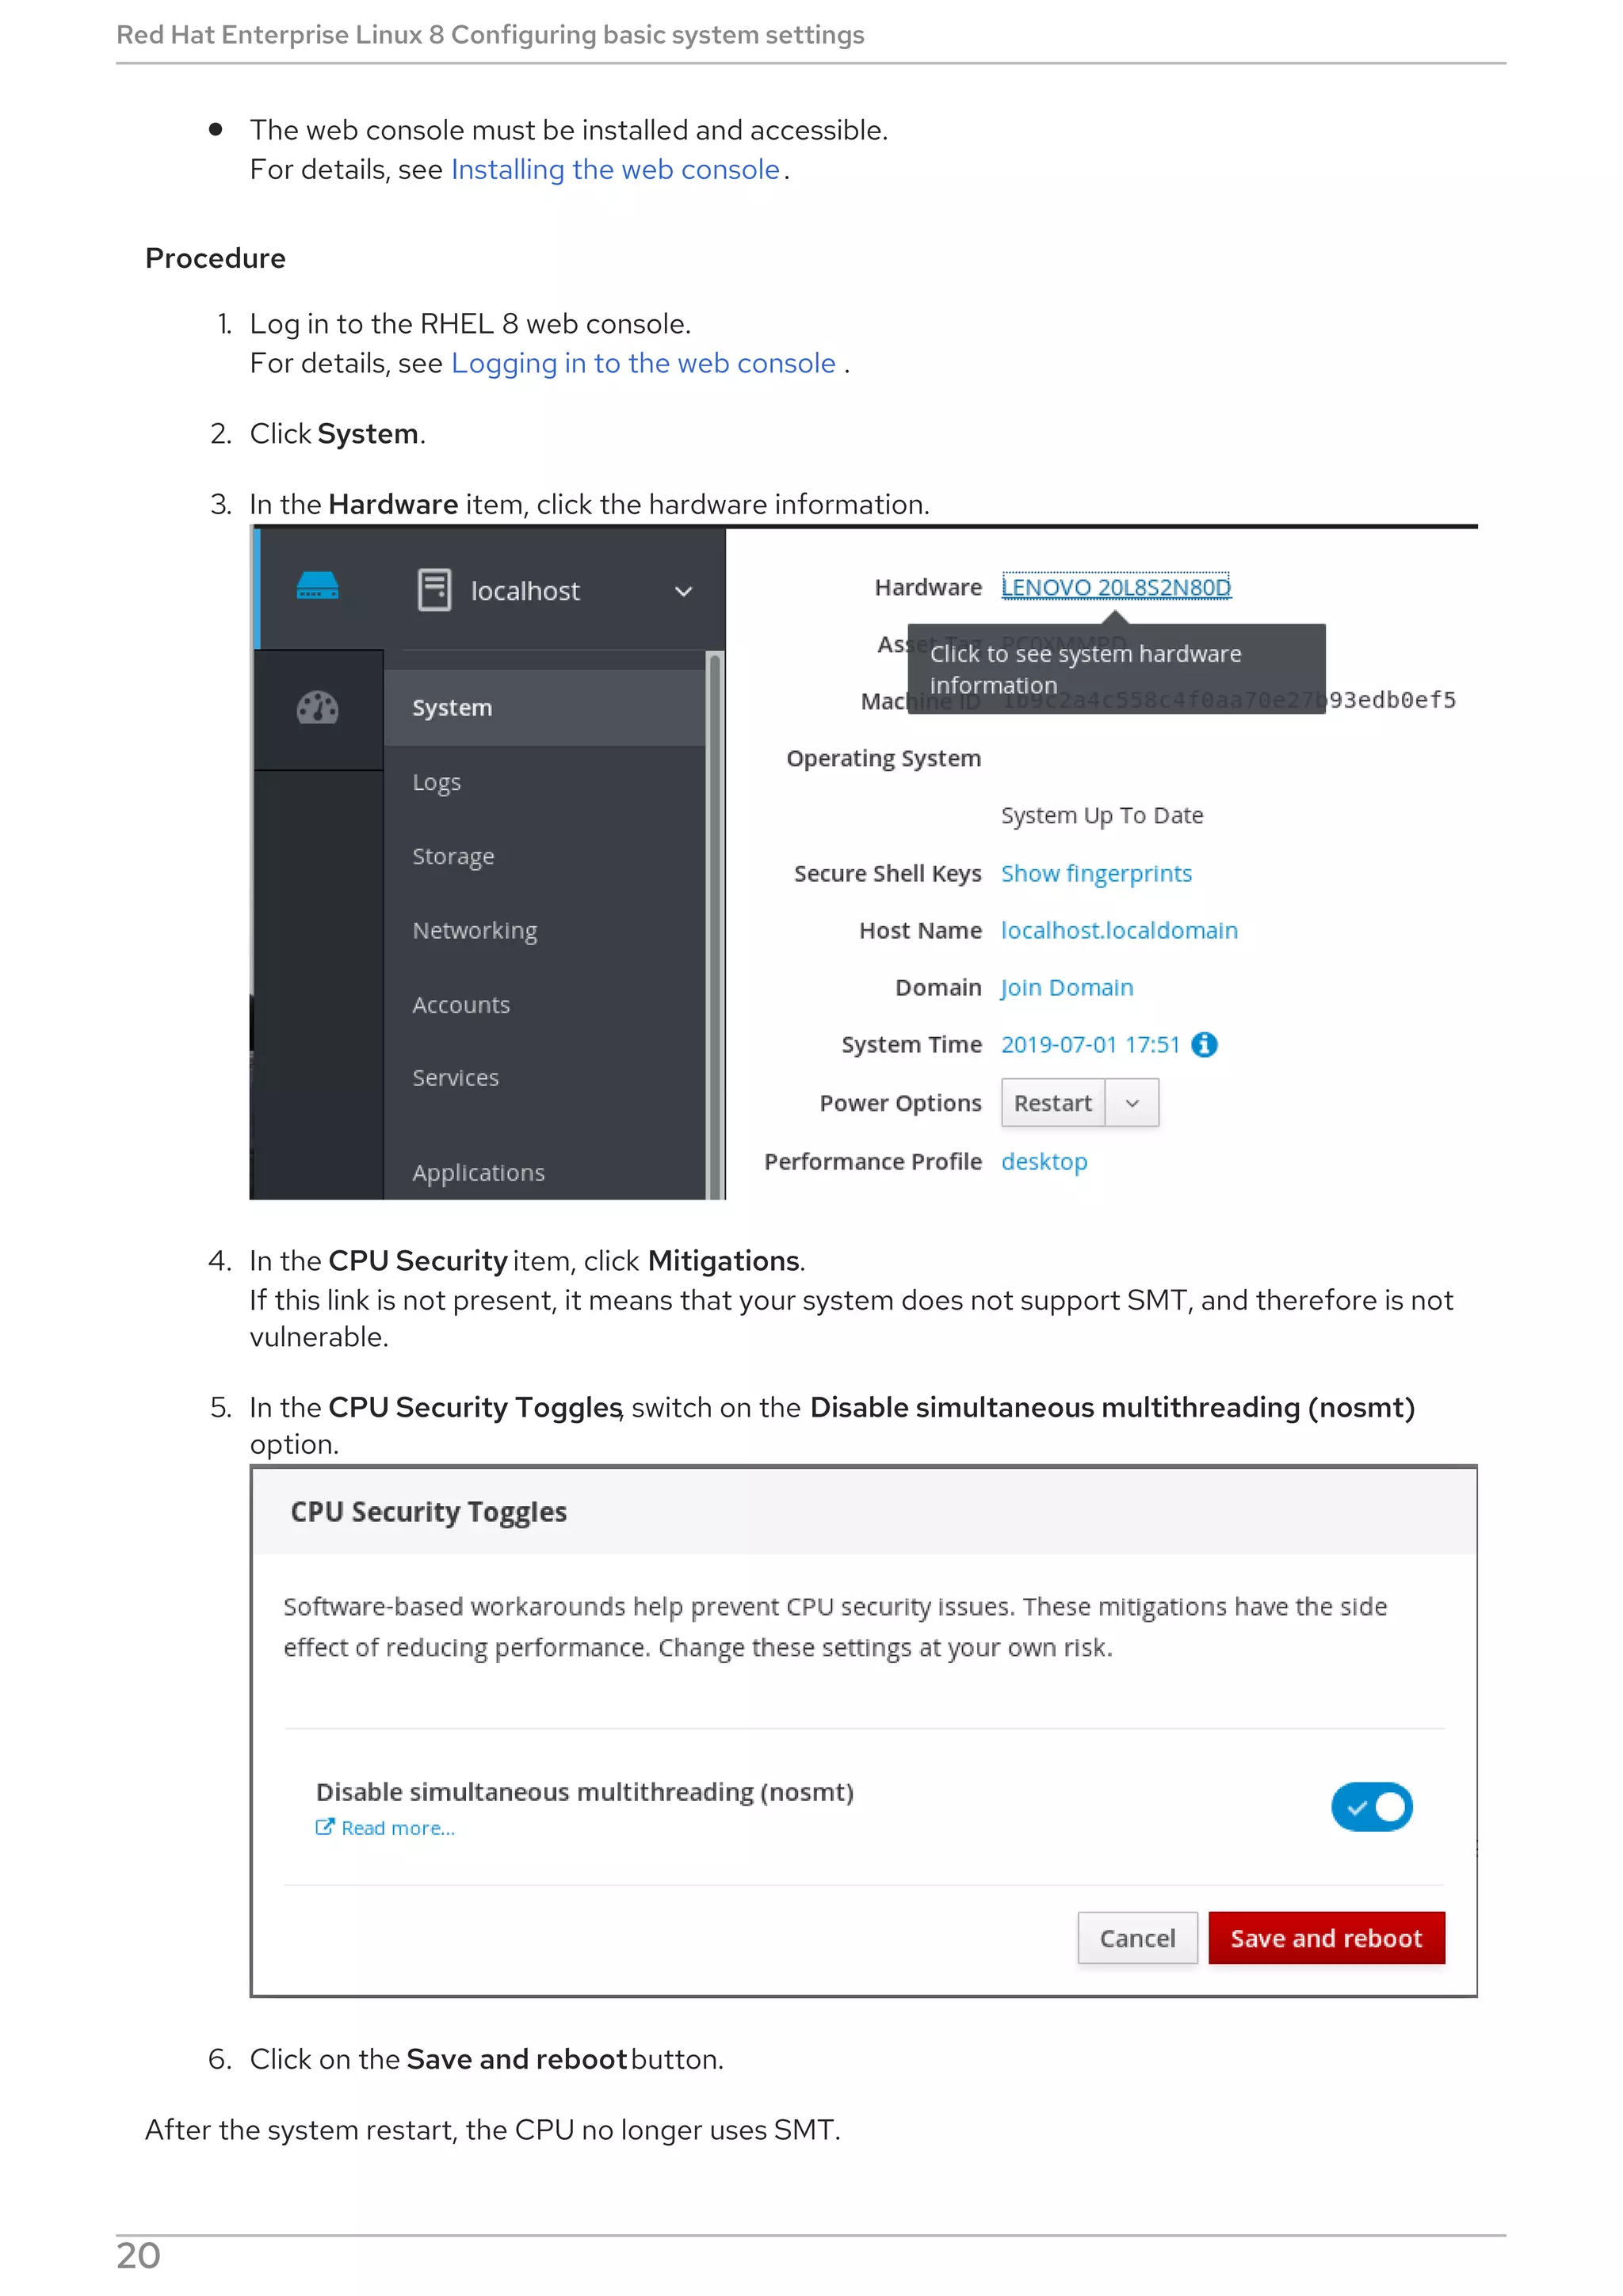
# systemctl enable httpd.service
Created symlink from /etc/systemd/system/multi-user.target.wants/httpd.service to
/usr/lib/systemd/system/httpd.service.
3.2.7. Disabling a service
To prevent a service unit that corresponds to a system service from being automatically started at boot
time, type the following at a shell prompt as root:
systemctl disable name.service
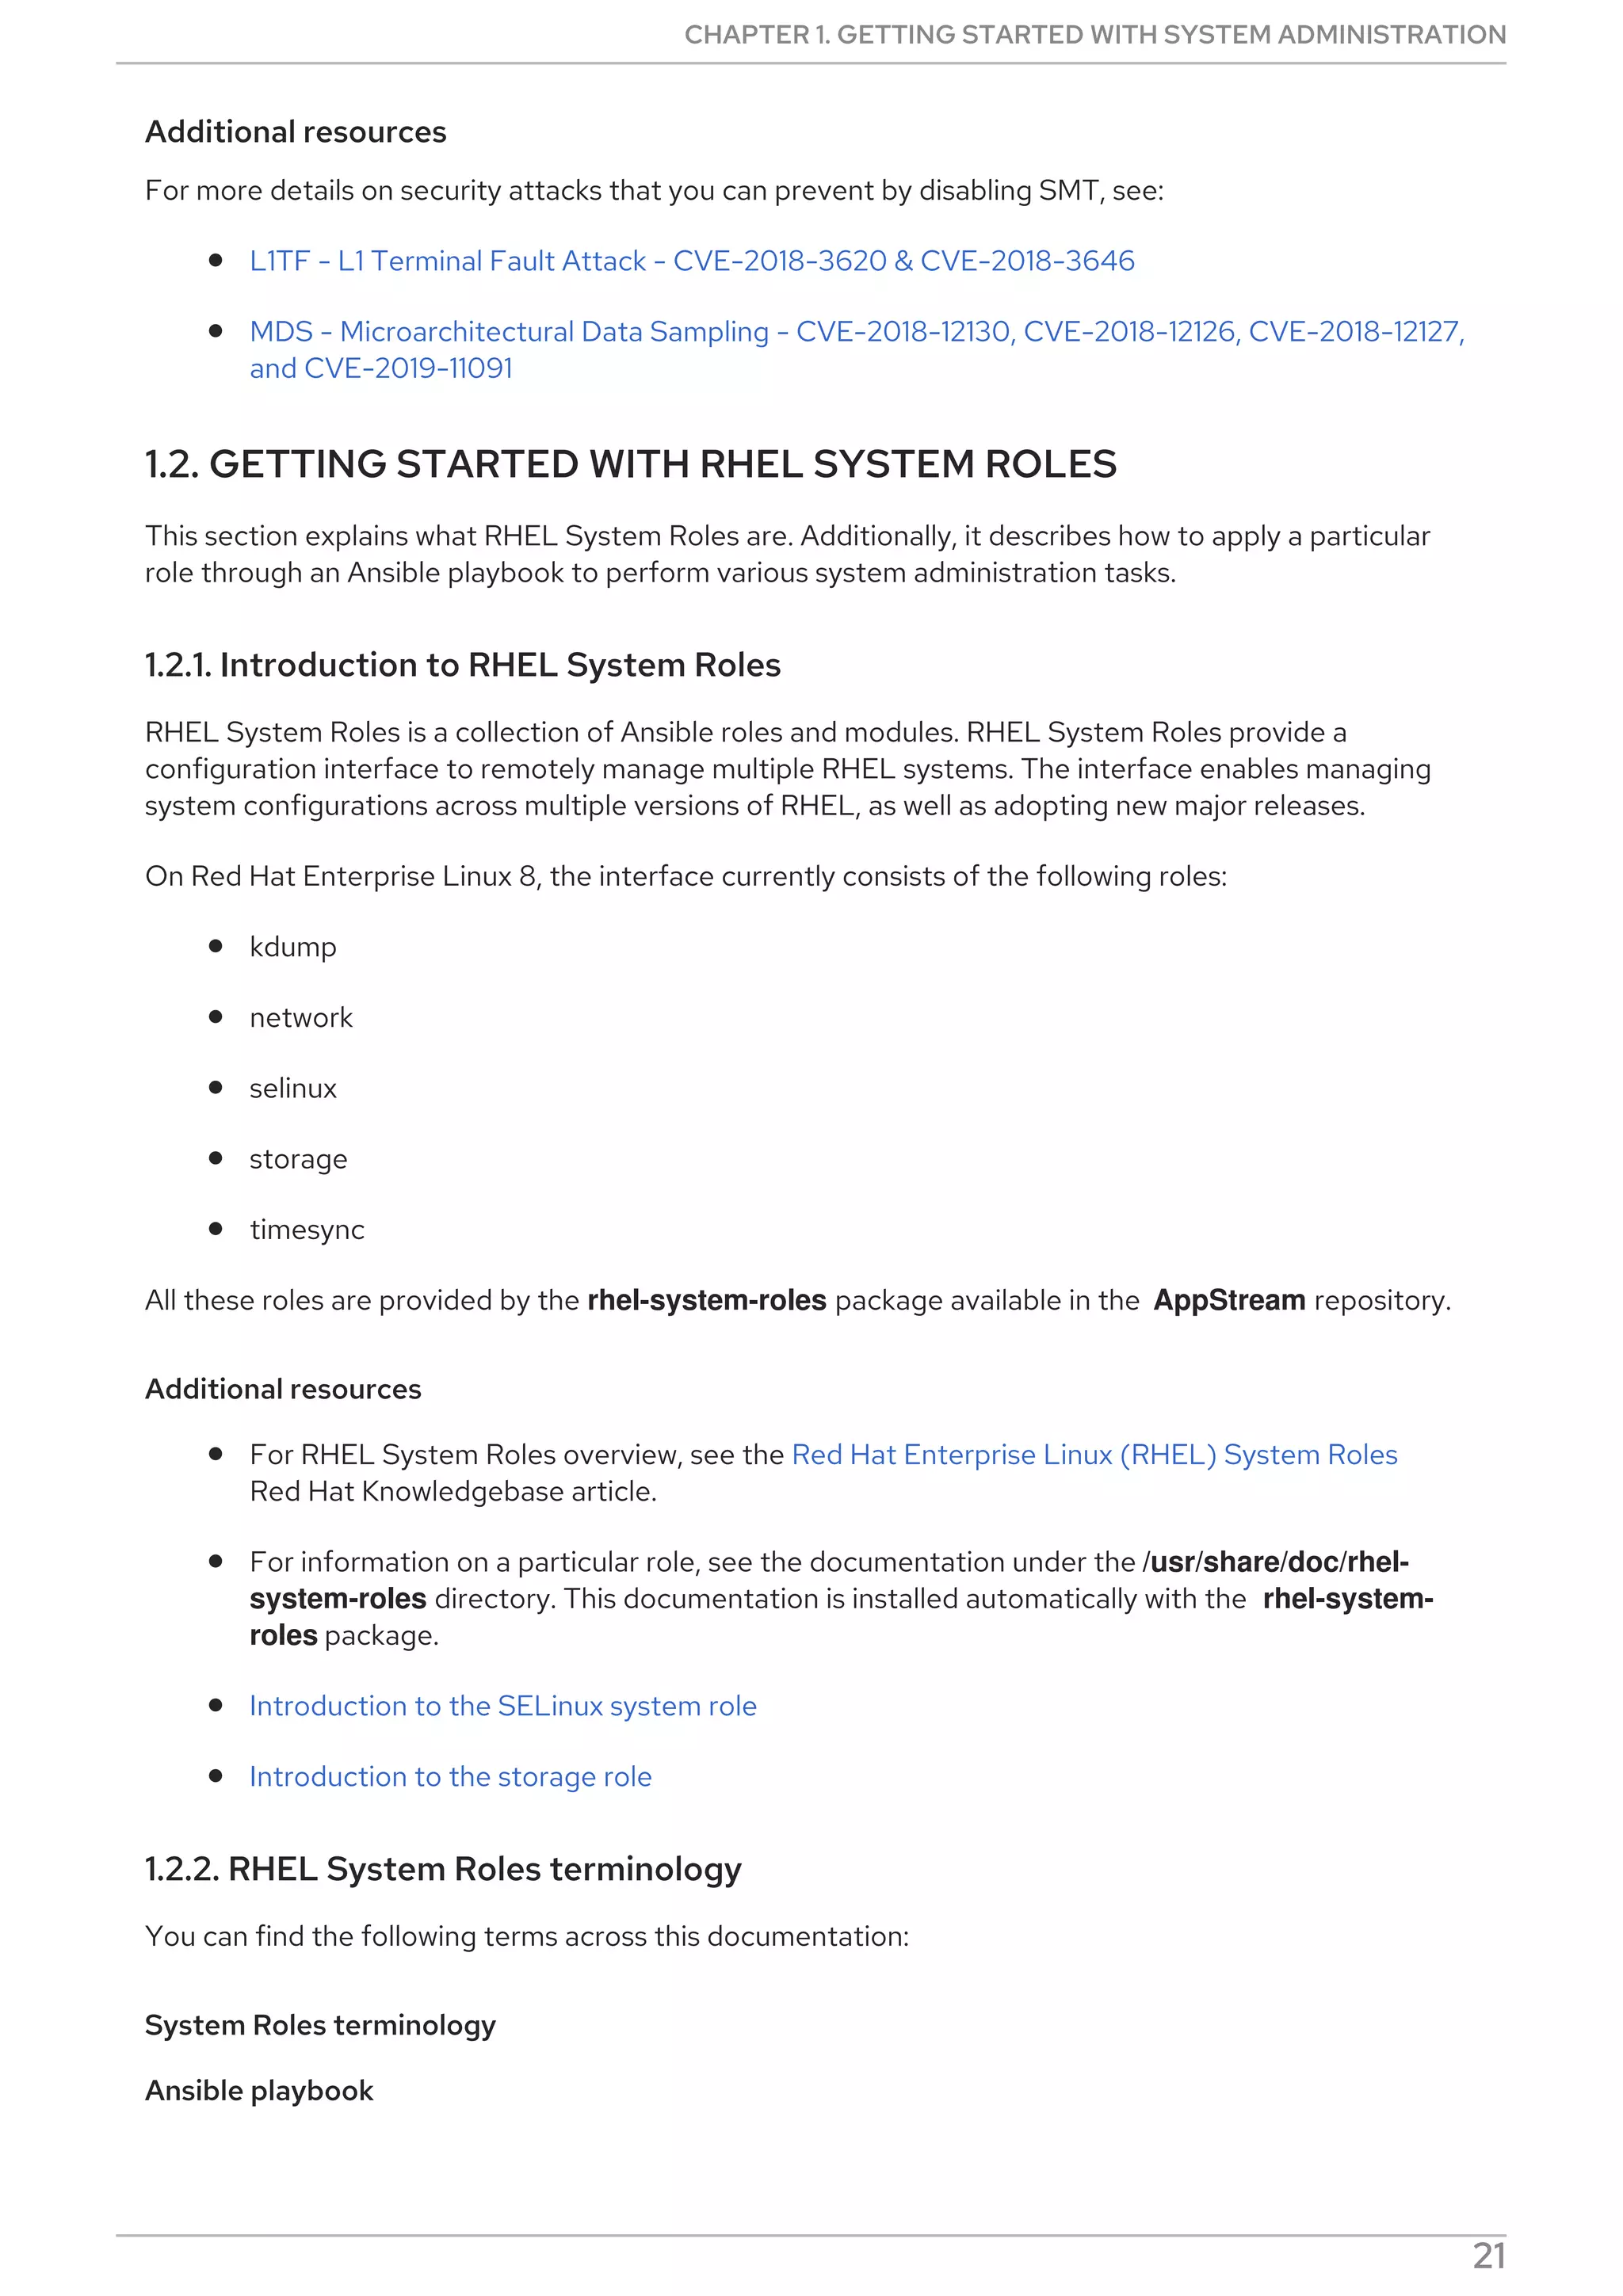
Replace name with the name of the service unit you want to disable (for example, bluetooth). This
command reads the [Install] section of the selected service unit and removes appropriate symbolic links
to the /usr/lib/systemd/system/name.service file from the /etc/systemd/system/ directory and its
subdirectories. In addition, you can mask any service unit to prevent it from being started manually or by
another service. To do so, run the following command as root:
systemctl mask name.service
This command replaces the /etc/systemd/system/name.service file with a symbolic link to /dev/null,
rendering the actual unit file inaccessible to systemd. To revert this action and unmask a service unit,
type as root:
systemctl unmask name.service
For information on how to determine whether a certain service unit is enabled to start at boot time, see
Displaying service status. For information on how to stop a service in the current session, see Stopping a
service.
Example 3.9. Disabling a service
Example 3.6, “Stopping a service” illustrates how to stop the bluetooth.service unit in the current
session. To prevent this service unit from starting at boot time, type the following at a shell prompt
as root:
CHAPTER 3. MANAGING SERVICES WITH SYSTEMD
91](https://image.slidesharecdn.com/redhatenterpriselinux-8-configuringbasicsystemsettings-en-us-210331143352/75/Red-hat-enterprise_linux-8-configuring_basic_system_settings-en-us-95-2048.jpg)

![3.5. WORKING WITH SYSTEMD UNIT FILES
A unit file contains configuration directives that describe the unit and define its behavior. Several
systemctl commands work with unit files in the background. To make finer adjustments, system
administrator must edit or create unit files manually. Table 3.1, “Systemd unit files locations” lists three
main directories where unit files are stored on the system, the /etc/systemd/system/ directory is
reserved for unit files created or customized by the system administrator.
Unit file names take the following form:
unit_name.type_extension
Here, unit_name stands for the name of the unit and type_extension identifies the unit type, see
Table 3.2, “Available systemd unit types” for a complete list of unit types. For example, there usually is
sshd.service as well as sshd.socket unit present on your system.
Unit files can be supplemented with a directory for additional configuration files. For example, to add
custom configuration options to sshd.service, create the sshd.service.d/custom.conf file and insert
additional directives there. For more information on configuration directories, see Section 3.5.4,
“Modifying existing unit files”.
Also, the sshd.service.wants/ and sshd.service.requires/ directories can be created. These
directories contain symbolic links to unit files that are dependencies of the sshd service. The symbolic
links are automatically created either during installation according to [Install] unit file options or at
runtime based on [Unit] options. It is also possible to create these directories and symbolic links
manually. For more details on [Install] and [Unit] options, see the tables below.
Many unit file options can be set using the so called unit specifiers – wildcard strings that are
dynamically replaced with unit parameters when the unit file is loaded. This enables creation of generic
unit files that serve as templates for generating instantiated units. See Section 3.5.5, “Working with
instantiated units” for details.
3.5.1. Understanding the unit file structure
Unit files typically consist of three sections:
The [Unit] section — contains generic options that are not dependent on the type of the unit.
These options provide unit description, specify the unit’s behavior, and set dependencies to
other units. For a list of most frequently used [Unit] options, see Table 3.9, “Important [Unit]
section options”.
The [Unit type] section — if a unit has type-specific directives, these are grouped under a
section named after the unit type. For example, service unit files contain the [Service] section.
The [Install] section — contains information about unit installation used by systemctl enable
and disable commands. For a list of options for the [Install] section, see Table 3.11, “Important
[Install] section options”.
Table 3.9. Important [Unit] section options
Option[a] section, see the systemd.unit(5)
manual page.]
Description
CHAPTER 3. MANAGING SERVICES WITH SYSTEMD
99](https://image.slidesharecdn.com/redhatenterpriselinux-8-configuringbasicsystemsettings-en-us-210331143352/75/Red-hat-enterprise_linux-8-configuring_basic_system_settings-en-us-103-2048.jpg)
![Description A meaningful description of the unit. This text is
displayed for example in the output of the
systemctl status command.
Documentation Provides a list of URIs referencing documentation for
the unit.
After[b] Defines the order in which units are started. The unit
starts only after the units specified in After are
active. Unlike Requires, After does not explicitly
activate the specified units. The Before option has
the opposite functionality to After.
Requires Configures dependencies on other units. The units
listed in Requires are activated together with the
unit. If any of the required units fail to start, the unit is
not activated.
Wants Configures weaker dependencies than Requires. If
any of the listed units does not start successfully, it
has no impact on the unit activation. This is the
recommended way to establish custom unit
dependencies.
Conflicts Configures negative dependencies, an opposite to
Requires.
[a] For a complete list of options configurable in the [Unit
[b] In most cases, it is sufficient to set only the ordering dependencies with After and Before unit file options. If you also
set a requirement dependency with Wants (recommended) or Requires, the ordering dependency still needs to be
specified. That is because ordering and requirement dependencies work independently from each other.
Option[a] section, see the systemd.unit(5)
manual page.]
Description
Table 3.10. Important [Service] section options
Option[a] section, see the systemd.service(5)
manual page.]
Description
Red Hat Enterprise Linux 8 Configuring basic system settings
100](https://image.slidesharecdn.com/redhatenterpriselinux-8-configuringbasicsystemsettings-en-us-210331143352/75/Red-hat-enterprise_linux-8-configuring_basic_system_settings-en-us-104-2048.jpg)
![Type Configures the unit process startup type that affects
the functionality of ExecStart and related options.
One of:
* simple – The default value. The process started
with ExecStart is the main process of the service.
* forking – The process started withExecStart
spawns a child process that becomes the main
process of the service. The parent process exits
when the startup is complete.
* oneshot – This type is similar tosimple, but the
process exits before starting consequent units.
* dbus – This type is similar tosimple, but
consequent units are started only after the main
process gains a D-Bus name.
* notify – This type is similar tosimple, but
consequent units are started only after a notification
message is sent via the sd_notify() function.
* idle – similar to simple, the actual execution of the
service binary is delayed until all jobs are finished,
which avoids mixing the status output with shell
output of services.
ExecStart Specifies commands or scripts to be executed when
the unit is started. ExecStartPre and
ExecStartPost specify custom commands to be
executed before and after ExecStart.
Type=oneshot enables specifying multiple custom
commands that are then executed sequentially.
ExecStop Specifies commands or scripts to be executed when
the unit is stopped.
ExecReload Specifies commands or scripts to be executed when
the unit is reloaded.
Restart With this option enabled, the service is restarted after
its process exits, with the exception of a clean stop
by the systemctl command.
RemainAfterExit If set to True, the service is considered active even
when all its processes exited. Default value is False.
This option is especially useful if Type=oneshot is
configured.
Option[a] section, see the systemd.service(5)
manual page.]
Description
CHAPTER 3. MANAGING SERVICES WITH SYSTEMD
101](https://image.slidesharecdn.com/redhatenterpriselinux-8-configuringbasicsystemsettings-en-us-210331143352/75/Red-hat-enterprise_linux-8-configuring_basic_system_settings-en-us-105-2048.jpg)
![[a] For a complete list of options configurable in the [Service
Option[a] section, see the systemd.service(5)
manual page.]
Description
Table 3.11. Important [Install] section options
Option[a] section, see the systemd.unit(5)
manual page.]
Description
Alias Provides a space-separated list of additional names
for the unit. Most systemctl commands, excluding
systemctl enable, can use aliases instead of the
actual unit name.
RequiredBy A list of units that depend on the unit. When this unit
is enabled, the units listed in RequiredBy gain a
Require dependency on the unit.
WantedBy A list of units that weakly depend on the unit. When
this unit is enabled, the units listed in WantedBy
gain a Want dependency on the unit.
Also Specifies a list of units to be installed or uninstalled
along with the unit.
DefaultInstance Limited to instantiated units, this option specifies the
default instance for which the unit is enabled. See
Section 3.5.5, “Working with instantiated units”
[a] For a complete list of options configurable in the [Install
A whole range of options that can be used to fine tune the unit configuration. The below example shows
a service unit installed on the system. Moreover, unit file options can be defined in a way that enables
dynamic creation of units as described in Working with instantiated units.
Example 3.16. postfix.service unit file
What follows is the content of the /usr/lib/systemd/system/postfix.service unit file as currently
provided by the postfix package:
[Unit]
Description=Postfix Mail Transport Agent
After=syslog.target network.target
Conflicts=sendmail.service exim.service
[Service]
Type=forking
PIDFile=/var/spool/postfix/pid/master.pid
Red Hat Enterprise Linux 8 Configuring basic system settings
102](https://image.slidesharecdn.com/redhatenterpriselinux-8-configuringbasicsystemsettings-en-us-210331143352/75/Red-hat-enterprise_linux-8-configuring_basic_system_settings-en-us-106-2048.jpg)
![EnvironmentFile=-/etc/sysconfig/network
ExecStartPre=-/usr/libexec/postfix/aliasesdb
ExecStartPre=-/usr/libexec/postfix/chroot-update
ExecStart=/usr/sbin/postfix start
ExecReload=/usr/sbin/postfix reload
ExecStop=/usr/sbin/postfix stop
[Install]
WantedBy=multi-user.target
The [Unit] section describes the service, specifies the ordering dependencies, as well as conflicting
units. In [Service], a sequence of custom scripts is specified to be executed during unit activation, on
stop, and on reload. EnvironmentFile points to the location where environment variables for the
service are defined, PIDFile specifies a stable PID for the main process of the service. Finally, the
[Install] section lists units that depend on the service.
3.5.2. Creating custom unit files
There are several use cases for creating unit files from scratch: you could run a custom daemon, create a
second instance of some existing service (as in Creating a second instance of the sshd service ), or
import a SysV init script (more in Converting SysV init scripts to unit files ). On the other hand, if you
intend just to modify or extend the behavior of an existing unit, use the instructions from Modifying
existing unit files. The following procedure describes the general process of creating a custom service:
1. Prepare the executable file with the custom service. This can be a custom-created script, or an
executable delivered by a software provider. If required, prepare a PID file to hold a constant
PID for the main process of the custom service. It is also possible to include environment files to
store shell variables for the service. Make sure the source script is executable (by executing the
chmod a+x) and is not interactive.
2. Create a unit file in the /etc/systemd/system/ directory and make sure it has correct file
permissions. Execute as root:
touch /etc/systemd/system/name.service
chmod 664 /etc/systemd/system/name.service
Replace name with a name of the service to be created. Note that file does not need to be
executable.
3. Open the name.service file created in the previous step, and add the service configuration
options. There is a variety of options that can be used depending on the type of service you wish
to create, see Section 3.5.1, “Understanding the unit file structure” . The following is an example
unit configuration for a network-related service:
[Unit]
Description=service_description
After=network.target
[Service]
ExecStart=path_to_executable
Type=forking
PIDFile=path_to_pidfile
CHAPTER 3. MANAGING SERVICES WITH SYSTEMD
103](https://image.slidesharecdn.com/redhatenterpriselinux-8-configuringbasicsystemsettings-en-us-210331143352/75/Red-hat-enterprise_linux-8-configuring_basic_system_settings-en-us-107-2048.jpg)
![[Install]
WantedBy=default.target
Where:
service_description is an informative description that is displayed in journal log files and in
the output of the systemctl status command.
the After setting ensures that the service is started only after the network is running. Add a
space-separated list of other relevant services or targets.
path_to_executable stands for the path to the actual service executable.
Type=forking is used for daemons that make the fork system call. The main process of the
service is created with the PID specified in path_to_pidfile. Find other startup types in
Table 3.10, “Important [Service] section options”.
WantedBy states the target or targets that the service should be started under. Think of
these targets as of a replacement of the older concept of runlevels, see Section 3.3,
“Working with systemd targets” for details.
4. Notify systemd that a new name.service file exists by executing the following command as
root:
systemctl daemon-reload
systemctl start name.service
WARNING
Always run the systemctl daemon-reload command after creating new
unit files or modifying existing unit files. Otherwise, the systemctl start or
systemctl enable commands could fail due to a mismatch between states
of systemd and actual service unit files on disk. Note, that on systems with
a large number of units this can take a long time, as the state of each unit
has to be serialized and subsequently deserialized during the reload.
Example 3.17. Creating the emacs.service file
When using the Emacs text editor, it is often faster and more convenient to have it running in the
background instead of starting a new instance of the program whenever editing a file. The following
steps show how to create a unit file for Emacs, so that it can be handled like a service.
1. Create a unit file in the /etc/systemd/system/ directory and make sure it has the correct file
permissions. Execute as root:
# touch /etc/systemd/system/emacs.service
# chmod 664 /etc/systemd/system/emacs.service
Red Hat Enterprise Linux 8 Configuring basic system settings
104](https://image.slidesharecdn.com/redhatenterpriselinux-8-configuringbasicsystemsettings-en-us-210331143352/75/Red-hat-enterprise_linux-8-configuring_basic_system_settings-en-us-108-2048.jpg)
![2. Add the following content to the file:
[Unit]
Description=Emacs: the extensible, self-documenting text editor
[Service]
Type=forking
ExecStart=/usr/bin/emacs --daemon
ExecStop=/usr/bin/emacsclient --eval "(kill-emacs)"
Environment=SSH_AUTH_SOCK=%t/keyring/ssh
Restart=always
[Install]
WantedBy=default.target
With the above configuration, the /usr/bin/emacs executable is started in daemon mode on
service start. The SSH_AUTH_SOCK environment variable is set using the "%t" unit specifier
that stands for the runtime directory. The service also restarts the emacs process if it exits
unexpectedly.
3. Execute the following commands to reload the configuration and start the custom service:
# systemctl daemon-reload
# systemctl start emacs.service
As the editor is now registered as a systemd service, you can use all standard systemctl commands.
For example, run systemctl status emacs to display the editor’s status or systemctl enable emacs
to make the editor start automatically on system boot.
Example 3.18. Creating a second instance of the sshd service
System Administrators often need to configure and run multiple instances of a service. This is done
by creating copies of the original service configuration files and modifying certain parameters to
avoid conflicts with the primary instance of the service. The following procedure shows how to
create a second instance of the sshd service:
1. Create a copy of the sshd_config file that will be used by the second daemon:
# cp /etc/ssh/sshd{,-second}_config
2. Edit the sshd-second_config file created in the previous step to assign a different port
number and PID file to the second daemon:
Port 22220
PidFile /var/run/sshd-second.pid
See the sshd_config(5) manual page for more information on Port and PidFile options.
Make sure the port you choose is not in use by any other service. The PID file does not have
to exist before running the service, it is generated automatically on service start.
3. Create a copy of the systemd unit file for the sshd service:
CHAPTER 3. MANAGING SERVICES WITH SYSTEMD
105](https://image.slidesharecdn.com/redhatenterpriselinux-8-configuringbasicsystemsettings-en-us-210331143352/75/Red-hat-enterprise_linux-8-configuring_basic_system_settings-en-us-109-2048.jpg)
![# cp /usr/lib/systemd/system/sshd.service /etc/systemd/system/sshd-second.service
4. Alter the sshd-second.service created in the previous step as follows:
a. Modify the Description option:
Description=OpenSSH server second instance daemon
b. Add sshd.service to services specified in the After option, so that the second instance
starts only after the first one has already started:
After=syslog.target network.target auditd.service sshd.service
c. The first instance of sshd includes key generation, therefore remove the
ExecStartPre=/usr/sbin/sshd-keygen line.
d. Add the -f /etc/ssh/sshd-second_config parameter to the sshd command, so that the
alternative configuration file is used:
ExecStart=/usr/sbin/sshd -D -f /etc/ssh/sshd-second_config $OPTIONS
e. After the above modifications, the sshd-second.service should look as follows:
[Unit]
Description=OpenSSH server second instance daemon
After=syslog.target network.target auditd.service sshd.service
[Service]
EnvironmentFile=/etc/sysconfig/sshd
ExecStart=/usr/sbin/sshd -D -f /etc/ssh/sshd-second_config $OPTIONS
ExecReload=/bin/kill -HUP $MAINPID
KillMode=process
Restart=on-failure
RestartSec=42s
[Install]
WantedBy=multi-user.target
5. If using SELinux, add the port for the second instance of sshd to SSH ports, otherwise the
second instance of sshd will be rejected to bind to the port:
# semanage port -a -t ssh_port_t -p tcp 22220
6. Enable sshd-second.service, so that it starts automatically upon boot:
# systemctl enable sshd-second.service
Verify if the sshd-second.service is running by using the systemctl status command. Also,
verify if the port is enabled correctly by connecting to the service:
$ ssh -p 22220 user@server
If the firewall is in use, make sure that it is configured appropriately in order to allow
Red Hat Enterprise Linux 8 Configuring basic system settings
106](https://image.slidesharecdn.com/redhatenterpriselinux-8-configuringbasicsystemsettings-en-us-210331143352/75/Red-hat-enterprise_linux-8-configuring_basic_system_settings-en-us-110-2048.jpg)
![Find descriptive information about the script on the line starting with #description. Use this description
together with the service name in the Description option in the [Unit] section of the unit file. The LSB
header might contain similar data on the #Short-Description and #Description lines.
Finding service dependencies
The LSB header might contain several directives that form dependencies between services. Most of
them are translatable to systemd unit options, see Table 3.12, “Dependency options from the LSB
header”
Table 3.12. Dependency options from the LSB header
LSB Option Description Unit File Equivalent
Provides Specifies the boot facility name
of the service, that can be
referenced in other init scripts
(with the "$" prefix). This is no
longer needed as unit files refer to
other units by their file names.
–
Required-Start Contains boot facility names of
required services. This is
translated as an ordering
dependency, boot facility names
are replaced with unit file names
of corresponding services or
targets they belong to. For
example, in case of postfix, the
Required-Start dependency on
$network was translated to the
After dependency on
network.target.
After, Before
Should-Start Constitutes weaker dependencies
than Required-Start. Failed
Should-Start dependencies do
not affect the service startup.
After, Before
Required-Stop, Should-Stop Constitute negative
dependencies.
Conflicts
Finding default targets of the service
The line starting with #chkconfig contains three numerical values. The most important is the first
number that represents the default runlevels in which the service is started. Map these runlevels to
equivalent systemd targets. Then list these targets in the WantedBy option in the [Install] section of the
unit file. For example, postfix was previously started in runlevels 2, 3, 4, and 5, which translates to multi-
user.target and graphical.target. Note that the graphical.target depends on multiuser.target, therefore it
is not necessary to specify both, as in Example 3.16, “postfix.service unit file”. You might find information
on default and forbidden runlevels also at #Default-Start and #Default-Stop lines in the LSB header.
The other two values specified on the #chkconfig line represent startup and shutdown priorities of the
init script. These values are interpreted by systemd if it loads the init script, but there is no unit file
equivalent.
Red Hat Enterprise Linux 8 Configuring basic system settings
108](https://image.slidesharecdn.com/redhatenterpriselinux-8-configuringbasicsystemsettings-en-us-210331143352/75/Red-hat-enterprise_linux-8-configuring_basic_system_settings-en-us-112-2048.jpg)
![Finding files used by the service
Init scripts require loading a function library from a dedicated directory and allow importing
configuration, environment, and PID files. Environment variables are specified on the line starting with
#config in the init script header, which translates to the EnvironmentFile unit file option. The PID file
specified on the #pidfile init script line is imported to the unit file with the PIDFile option.
The key information that is not included in the init script header is the path to the service executable,
and potentially some other files required by the service. In previous versions of Red Hat Enterprise Linux,
init scripts used a Bash case statement to define the behavior of the service on default actions, such as
start, stop, or restart, as well as custom-defined actions. The following excerpt from the postfix init
script shows the block of code to be executed at service start.
conf_check() {
[ -x /usr/sbin/postfix ] || exit 5
[ -d /etc/postfix ] || exit 6
[ -d /var/spool/postfix ] || exit 5
}
make_aliasesdb() {
if [ "$(/usr/sbin/postconf -h alias_database)" == "hash:/etc/aliases" ]
then
# /etc/aliases.db might be used by other MTA, make sure nothing
# has touched it since our last newaliases call
[ /etc/aliases -nt /etc/aliases.db ] ||
[ "$ALIASESDB_STAMP" -nt /etc/aliases.db ] ||
[ "$ALIASESDB_STAMP" -ot /etc/aliases.db ] || return
/usr/bin/newaliases
touch -r /etc/aliases.db "$ALIASESDB_STAMP"
else
/usr/bin/newaliases
fi
}
start() {
[ "$EUID" != "0" ] && exit 4
# Check that networking is up.
[ ${NETWORKING} = "no" ] && exit 1
conf_check
# Start daemons.
echo -n $"Starting postfix: "
make_aliasesdb >/dev/null 2>&1
[ -x $CHROOT_UPDATE ] && $CHROOT_UPDATE
/usr/sbin/postfix start 2>/dev/null 1>&2 && success || failure $"$prog start"
RETVAL=$?
[ $RETVAL -eq 0 ] && touch $lockfile
echo
return $RETVAL
}
The extensibility of the init script allowed specifying two custom functions, conf_check() and
make_aliasesdb(), that are called from the start() function block. On closer look, several external files
and directories are mentioned in the above code: the main service executable /usr/sbin/postfix, the
/etc/postfix/ and /var/spool/postfix/ configuration directories, as well as the /usr/sbin/postconf/
directory.
Systemd supports only the predefined actions, but enables executing custom executables with
CHAPTER 3. MANAGING SERVICES WITH SYSTEMD
109](https://image.slidesharecdn.com/redhatenterpriselinux-8-configuringbasicsystemsettings-en-us-210331143352/75/Red-hat-enterprise_linux-8-configuring_basic_system_settings-en-us-113-2048.jpg)
![IMPORTANT
To modify properties, such as dependencies or timeouts, of a service that is handled by a
SysV initscript, do not modify the initscript itself. Instead, create a systemd drop-in
configuration file for the service as described in Extending the default unit configuration
and Overriding the default unit configuration . Then manage this service in the same way
as a normal systemd service.
For example, to extend the configuration of the network service, do not modify the
/etc/rc.d/init.d/network initscript file. Instead, create new directory
/etc/systemd/system/network.service.d/ and a systemd drop-in file
/etc/systemd/system/network.service.d/my_config.conf. Then, put the modified values
into the drop-in file. Note: systemd knows the network service as network.service,
which is why the created directory must be called network.service.d
Extending the default unit configuration
To extend the default unit file with additional configuration options, first create a configuration directory
in /etc/systemd/system/. If extending a service unit, execute the following command as root:
mkdir /etc/systemd/system/name.service.d/
Replace name with the name of the service you want to extend. The above syntax applies to all unit
types.
Create a configuration file in the directory made in the previous step. Note that the file name must end
with the .conf suffix. Type:
touch /etc/systemd/system/name.service.d/config_name.conf
Replace config_name with the name of the configuration file. This file adheres to the normal unit file
structure, therefore all directives must be specified under appropriate sections, see Section 3.5.1,
“Understanding the unit file structure”.
For example, to add a custom dependency, create a configuration file with the following content:
[Unit]
Requires=new_dependency
After=new_dependency
Where new_dependency stands for the unit to be marked as a dependency. Another example is a
configuration file that restarts the service after its main process exited, with a delay of 30 seconds:
[Service]
Restart=always
RestartSec=30
It is recommended to create small configuration files focused only on one task. Such files can be easily
moved or linked to configuration directories of other services.
To apply changes made to the unit, execute as root:
systemctl daemon-reload
systemctl restart name.service
CHAPTER 3. MANAGING SERVICES WITH SYSTEMD
111](https://image.slidesharecdn.com/redhatenterpriselinux-8-configuringbasicsystemsettings-en-us-210331143352/75/Red-hat-enterprise_linux-8-configuring_basic_system_settings-en-us-115-2048.jpg)
![Example 3.19. Extending the httpd.service configuration
To modify the httpd.service unit so that a custom shell script is automatically executed when starting
the Apache service, perform the following steps. First, create a directory and a custom configuration
file:
# mkdir /etc/systemd/system/httpd.service.d/
# touch /etc/systemd/system/httpd.service.d/custom_script.conf
Provided that the script you want to start automatically with Apache is located at
/usr/local/bin/custom.sh, insert the following text to the custom_script.conf file:
[Service]
ExecStartPost=/usr/local/bin/custom.sh
To apply the unit changes, execute:
# systemctl daemon-reload
# systemctl restart httpd.service
NOTE
The configuration files from configuration directories in /etc/systemd/system/ take
precedence over unit files in /usr/lib/systemd/system/. Therefore, if the configuration
files contain an option that can be specified only once, such as Description or ExecStart,
the default value of this option is overridden. Note that in the output of the systemd-
delta command, described in Monitoring overriden units , such units are always marked as
[EXTENDED], even though in sum, certain options are actually overridden.
Overriding the default unit configuration
To make changes that will persist after updating the package that provides the unit file, first copy the
file to the /etc/systemd/system/ directory. To do so, execute the following command as root:
cp /usr/lib/systemd/system/name.service /etc/systemd/system/name.service
Where name stands for the name of the service unit you wish to modify. The above syntax applies to all
unit types.
Open the copied file with a text editor, and make the desired changes. To apply the unit changes,
execute as root:
systemctl daemon-reload
systemctl restart name.service
Example 3.20. Changing the timeout limit
You can specify a timeout value per service to prevent a malfunctioning service from freezing the
Red Hat Enterprise Linux 8 Configuring basic system settings
112](https://image.slidesharecdn.com/redhatenterpriselinux-8-configuringbasicsystemsettings-en-us-210331143352/75/Red-hat-enterprise_linux-8-configuring_basic_system_settings-en-us-116-2048.jpg)
![You can specify a timeout value per service to prevent a malfunctioning service from freezing the
system. Otherwise, timeout is set by default to 90 seconds for normal services and to 300 seconds
for SysV-compatible services.
For example, to extend timeout limit for the httpd service:
1. Copy the httpd unit file to the /etc/systemd/system/ directory:
cp /usr/lib/systemd/system/httpd.service /etc/systemd/system/httpd.service
2. Open file /etc/systemd/system/httpd.service and specify the TimeoutStartUSec value in
the [Service] section:
…
[Service]
…
PrivateTmp=true
TimeoutStartSec=10
[Install]
WantedBy=multi-user.target
…
3. Reload the systemd daemon:
systemctl daemon-reload
4. Optional. Verify the new timeout value:
systemctl show httpd -p TimeoutStartUSec
NOTE
To change the timeout limit globally, input the DefaultTimeoutStartSec in the
/etc/systemd/system.conf file.
Monitoring overriden units
To display an overview of overridden or modified unit files, use the following command:
systemd-delta
For example, the output of the above command can look as follows:
[EQUIVALENT] /etc/systemd/system/default.target → /usr/lib/systemd/system/default.target
[OVERRIDDEN] /etc/systemd/system/autofs.service → /usr/lib/systemd/system/autofs.service
--- /usr/lib/systemd/system/autofs.service 2014-10-16 21:30:39.000000000 -0400
+ /etc/systemd/system/autofs.service 2014-11-21 10:00:58.513568275 -0500
@@ -8,7 +8,8 @@
EnvironmentFile=-/etc/sysconfig/autofs
ExecStart=/usr/sbin/automount $OPTIONS --pid-file /run/autofs.pid
ExecReload=/usr/bin/kill -HUP $MAINPID
CHAPTER 3. MANAGING SERVICES WITH SYSTEMD
113](https://image.slidesharecdn.com/redhatenterpriselinux-8-configuringbasicsystemsettings-en-us-210331143352/75/Red-hat-enterprise_linux-8-configuring_basic_system_settings-en-us-117-2048.jpg)
![-TimeoutSec=180
+TimeoutSec=240
+Restart=Always
[Install]
WantedBy=multi-user.target
[MASKED] /etc/systemd/system/cups.service → /usr/lib/systemd/system/cups.service
[EXTENDED] /usr/lib/systemd/system/sssd.service →
/etc/systemd/system/sssd.service.d/journal.conf
4 overridden configuration files found.
Table 3.13, “systemd-delta difference types” lists override types that can appear in the output of
systemd-delta. Note that if a file is overridden, systemd-delta by default displays a summary of
changes similar to the output of the diff command.
Table 3.13. systemd-delta difference types
Type Description
[MASKED] Masked unit files, see Section 3.2.7, “Disabling a
service” for description of unit masking.
[EQUIVALENT] Unmodified copies that override the original files but
do not differ in content, typically symbolic links.
[REDIRECTED] Files that are redirected to another file.
[OVERRIDEN] Overridden and changed files.
[EXTENDED] Files that are extended with .conf files in the
/etc/systemd/system/unit.d/ directory.
[UNCHANGED] Unmodified files are displayed only when the --
type=unchanged option is used.
It is good practice to run systemd-delta after system update to check if there are any updates to the
default units that are currently overridden by custom configuration. It is also possible to limit the output
only to a certain difference type. For example, to view just the overridden units, execute:
systemd-delta --type=overridden
If you want to edit a unit file and automatically create a drop-in file with the submitted changes, use the
following command:
# systemctl edit unit_name.type_extension
To dump the unit configuration applying all overrides and drop-ins, use this command:
# systemctl cat unit_name.type_extension
Red Hat Enterprise Linux 8 Configuring basic system settings
114](https://image.slidesharecdn.com/redhatenterpriselinux-8-configuringbasicsystemsettings-en-us-210331143352/75/Red-hat-enterprise_linux-8-configuring_basic_system_settings-en-us-118-2048.jpg)
![%H Host name Stands for the hostname of the
running system at the point in
time the unit configuration is
loaded.
%t Runtime directory Represents the runtime directory,
which is either /run for the root
user, or the value of the
XDG_RUNTIME_DIR variable for
unprivileged users.
Unit Specifier Meaning Description
For a complete list of unit specifiers, see the systemd.unit(5) manual page.
For example, the getty@.service template contains the following directives:
[Unit]
Description=Getty on %I
…
[Service]
ExecStart=-/sbin/agetty --noclear %I $TERM
…
When the getty@ttyA.service and getty@ttyB.service are instantiated from the above template,
Description= is resolved as Getty on ttyA and Getty on ttyB.
3.6. OPTIMIZING SYSTEMD TO SHORTEN THE BOOT TIME
There is a list of systemd unit files that are enabled by default. System services that are defined by these
unit files are automatically run at boot, which influences the boot time.
This section describes:
The tools to examine system boot performance.
The purpose of systemd units enabled by default, and circumstances under which you can safely
disable such systemd units in order to shorten the boot time.
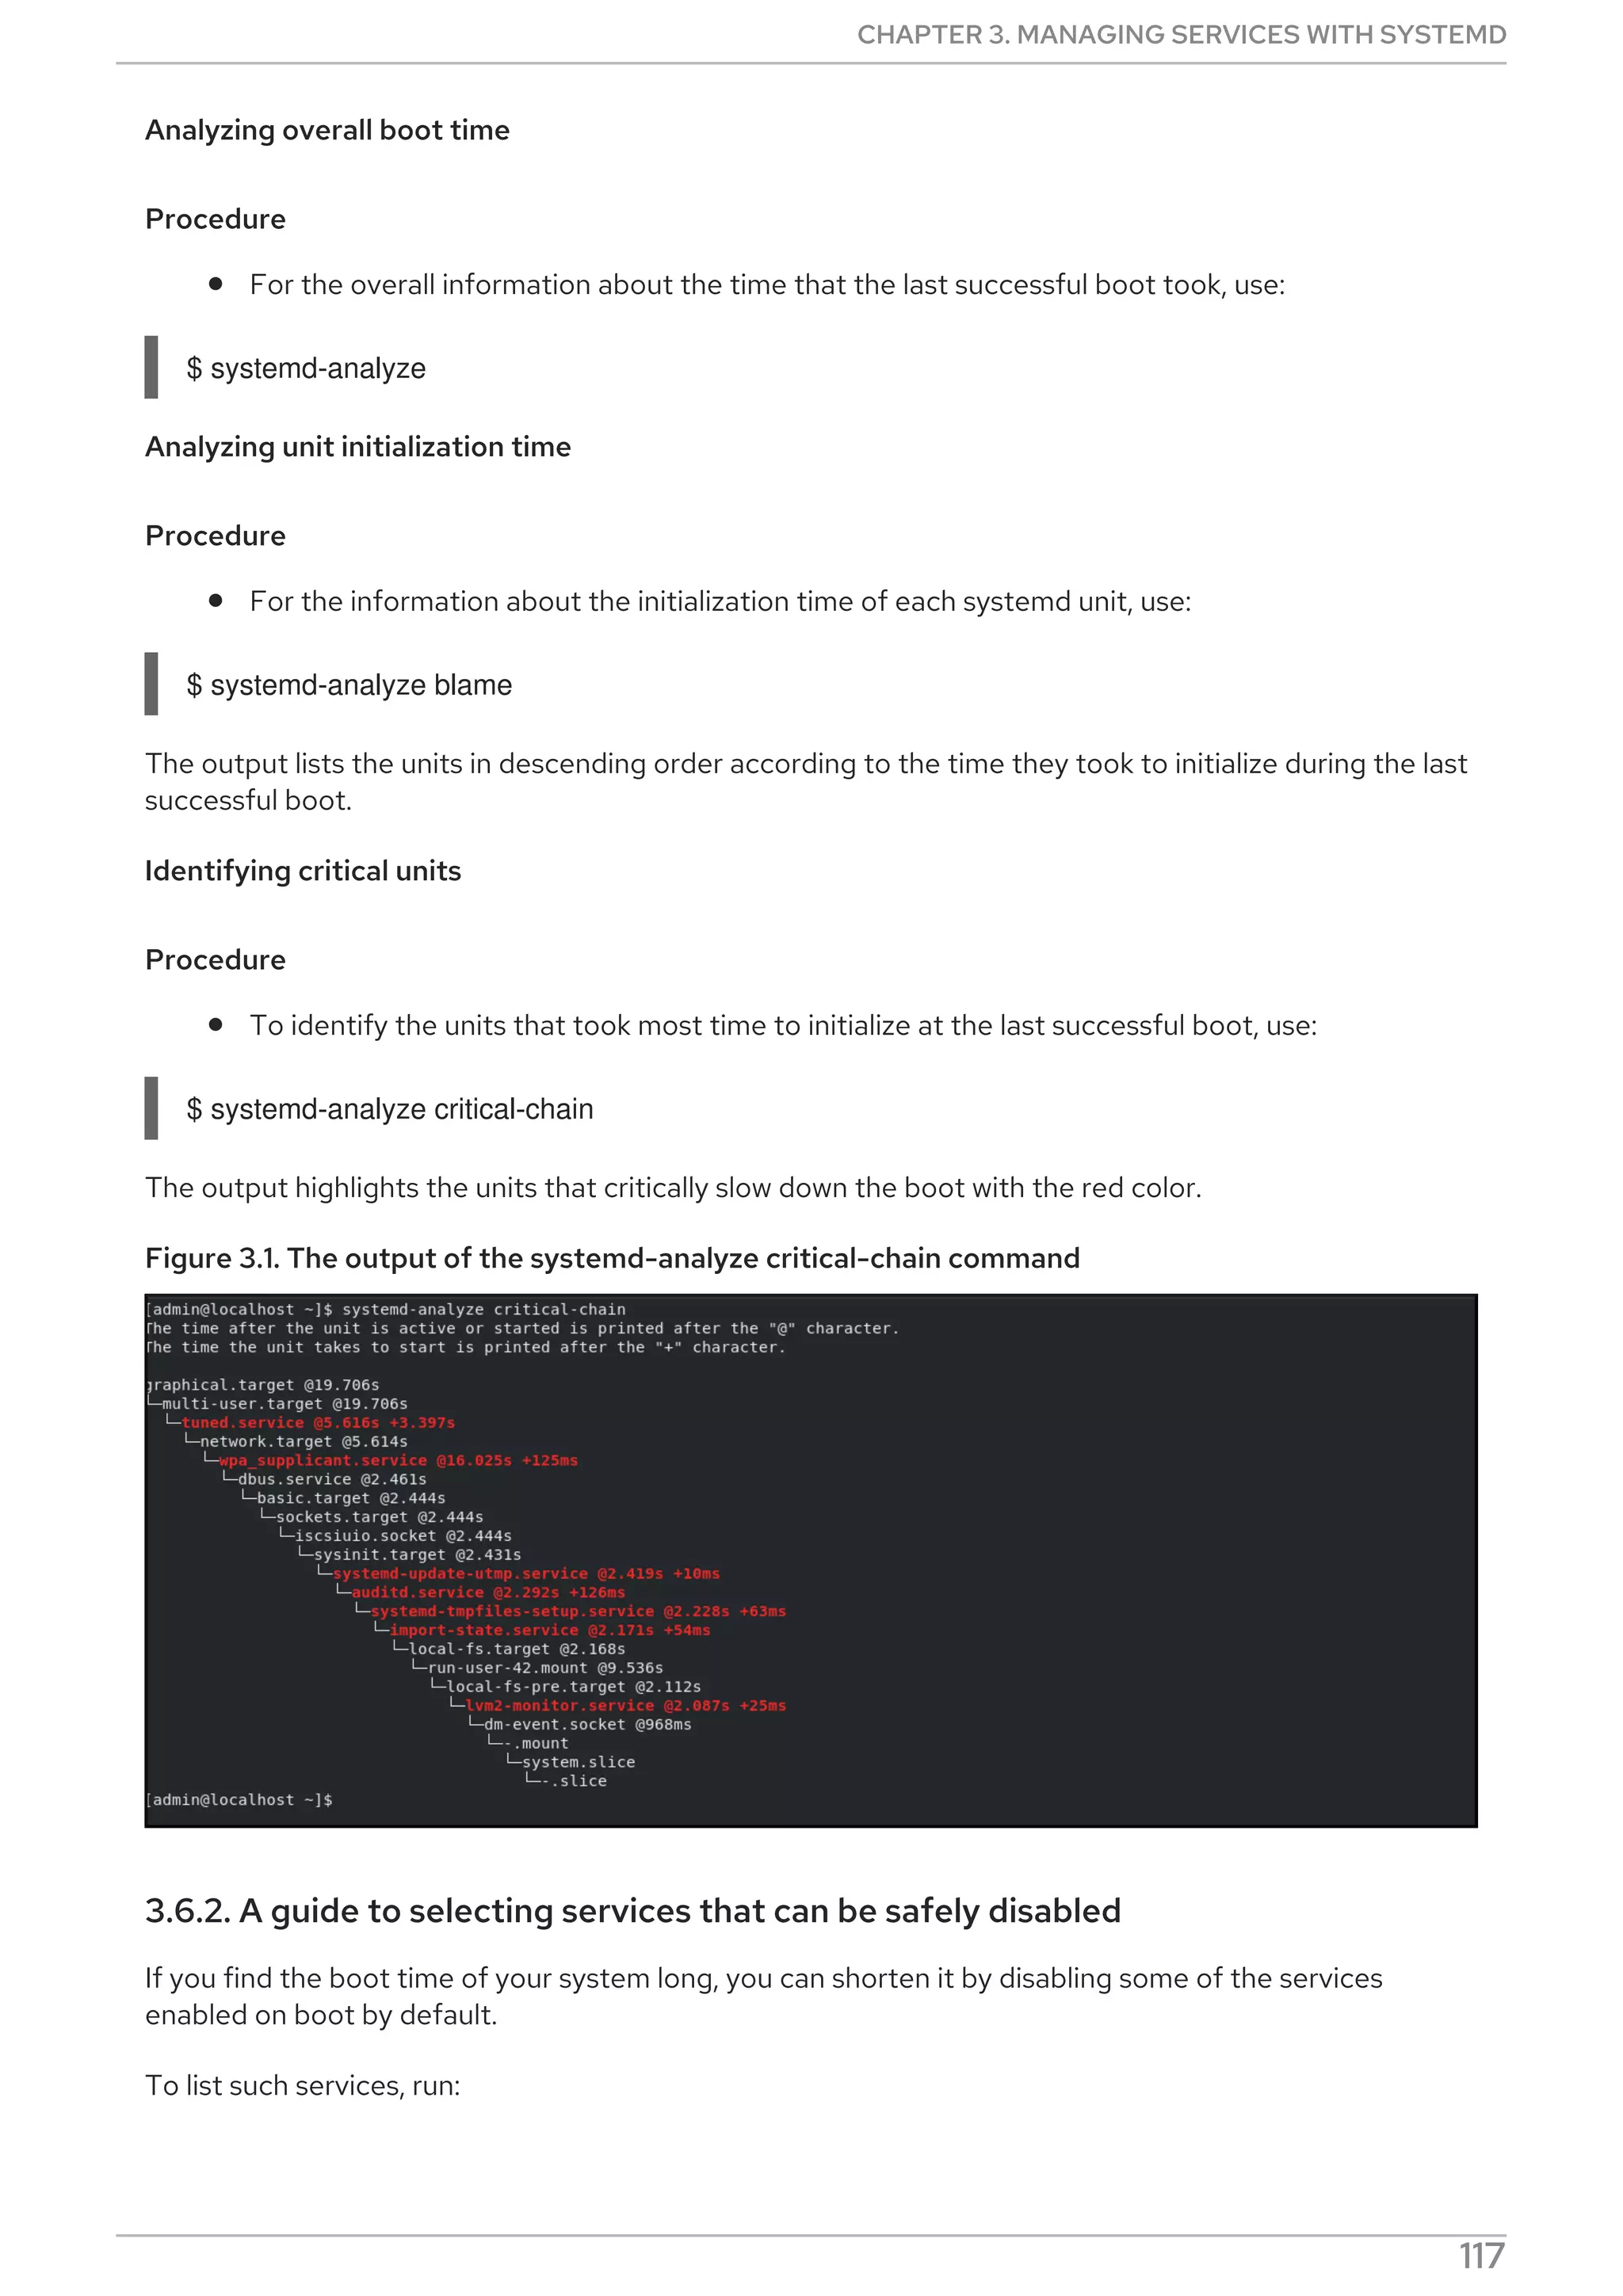
3.6.1. Examining system boot performance
To examine system boot performance, you can use the systemd-analyze command. This command has
many options available. However, this section covers only the selected ones that may be important for
systemd tuning in order to shorten the boot time.
For a complete list and detailed description of all options, see the systemd-analyze man page.
Prerequisites
Before starting to examine systemd in order to tune the boot time, you may want to list all enabled
services:
$ systemctl list-unit-files --state=enabled
Red Hat Enterprise Linux 8 Configuring basic system settings
116](https://image.slidesharecdn.com/redhatenterpriselinux-8-configuringbasicsystemsettings-en-us-210331143352/75/Red-hat-enterprise_linux-8-configuring_basic_system_settings-en-us-120-2048.jpg)

![$ umask a=rwx
Note that the umask is only valid for the current shell session.
5.5.2. Setting the umask using octal values
The following section describes how to set the umask with octal values.
Procedure
To set the umask for the current shell session using octal values, use:
$ umask octal_value
Replace octal_value with an octal value. See Section 5.1.2, “User file-creation mode mask” for
more details.
Note that the umask is only valid for the current shell session.
5.6. CHANGING THE DEFAULT UMASK
The following section describes how to:
Change the default bash umask for the non-login shell.
Change the default bash umask for the login shell.
Change the default bash umask for a specific user.
Set default permissions for newly created home directories.
Prerequisites
Root access.
5.6.1. Changing the default umask for the non-login shell
The following section describes how to change the default bash umask for standard users.
Procedure
1. As root, open the /etc/bashrc file in an editor of your choice.
2. Modify the following sections to set a new default bash umask:
if [ $UID -gt 199 ] && [ “id -gn” = “id -un” ]; then
umask 002
else
umask 022
fi
Replace the default octal value of the umask (002) with another octal value. See Section 5.1.2,
“User file-creation mode mask” for more details.
CHAPTER 5. MANAGING FILE PERMISSIONS
151](https://image.slidesharecdn.com/redhatenterpriselinux-8-configuringbasicsystemsettings-en-us-210331143352/75/Red-hat-enterprise_linux-8-configuring_basic_system_settings-en-us-155-2048.jpg)
![3. Save the changes.
5.6.2. Changing the default umask for the login shell
The following section describes how to change the default bash umask for the root user.
Procedure
1. As root, open the /etc/profile file in an editor of your choice.
2. Modify the following sections to set a new default bash umask:
if [ $UID -gt 199 ] && [ “/usr/bin/id -gn” = “/usr/bin/id -un” ]; then
umask 002
else
umask 022
fi
Replace the default octal value of the umask (022) with another octal value. See Section 5.1.2,
“User file-creation mode mask” for more details.
3. Save the changes.
5.6.3. Changing the default umask for a specific user
The following section describes how to change the default umask for a specific user.
Procedure
Put the line that specifies the octal value of the umask into the .bashrc file for the particular
user.
$ echo 'umask octal_value' >> /home/username/.bashrc
Replace octal_value with an octal value and replace username with the name of the user. See
Section 5.1.2, “User file-creation mode mask” for more details.
5.6.4. Setting default UMASK for newly created home directories
The following section describes how to change the permissions that specify the UMASK for newly
created user home directories.
Procedure
1. As root, open the /etc/login.defs file in an editor of your choice.
2. Modify the following section to set a new default UMASK:
# The permission mask is initialized to this value. If not specified,
# the permission mask will be initialized to 022.
UMASK 077
Replace the default octal value (077) with another octal value. See Section 5.1.2, “User file-
creation mode mask” for more details.
Red Hat Enterprise Linux 8 Configuring basic system settings
152](https://image.slidesharecdn.com/redhatenterpriselinux-8-configuringbasicsystemsettings-en-us-210331143352/75/Red-hat-enterprise_linux-8-configuring_basic_system_settings-en-us-156-2048.jpg)
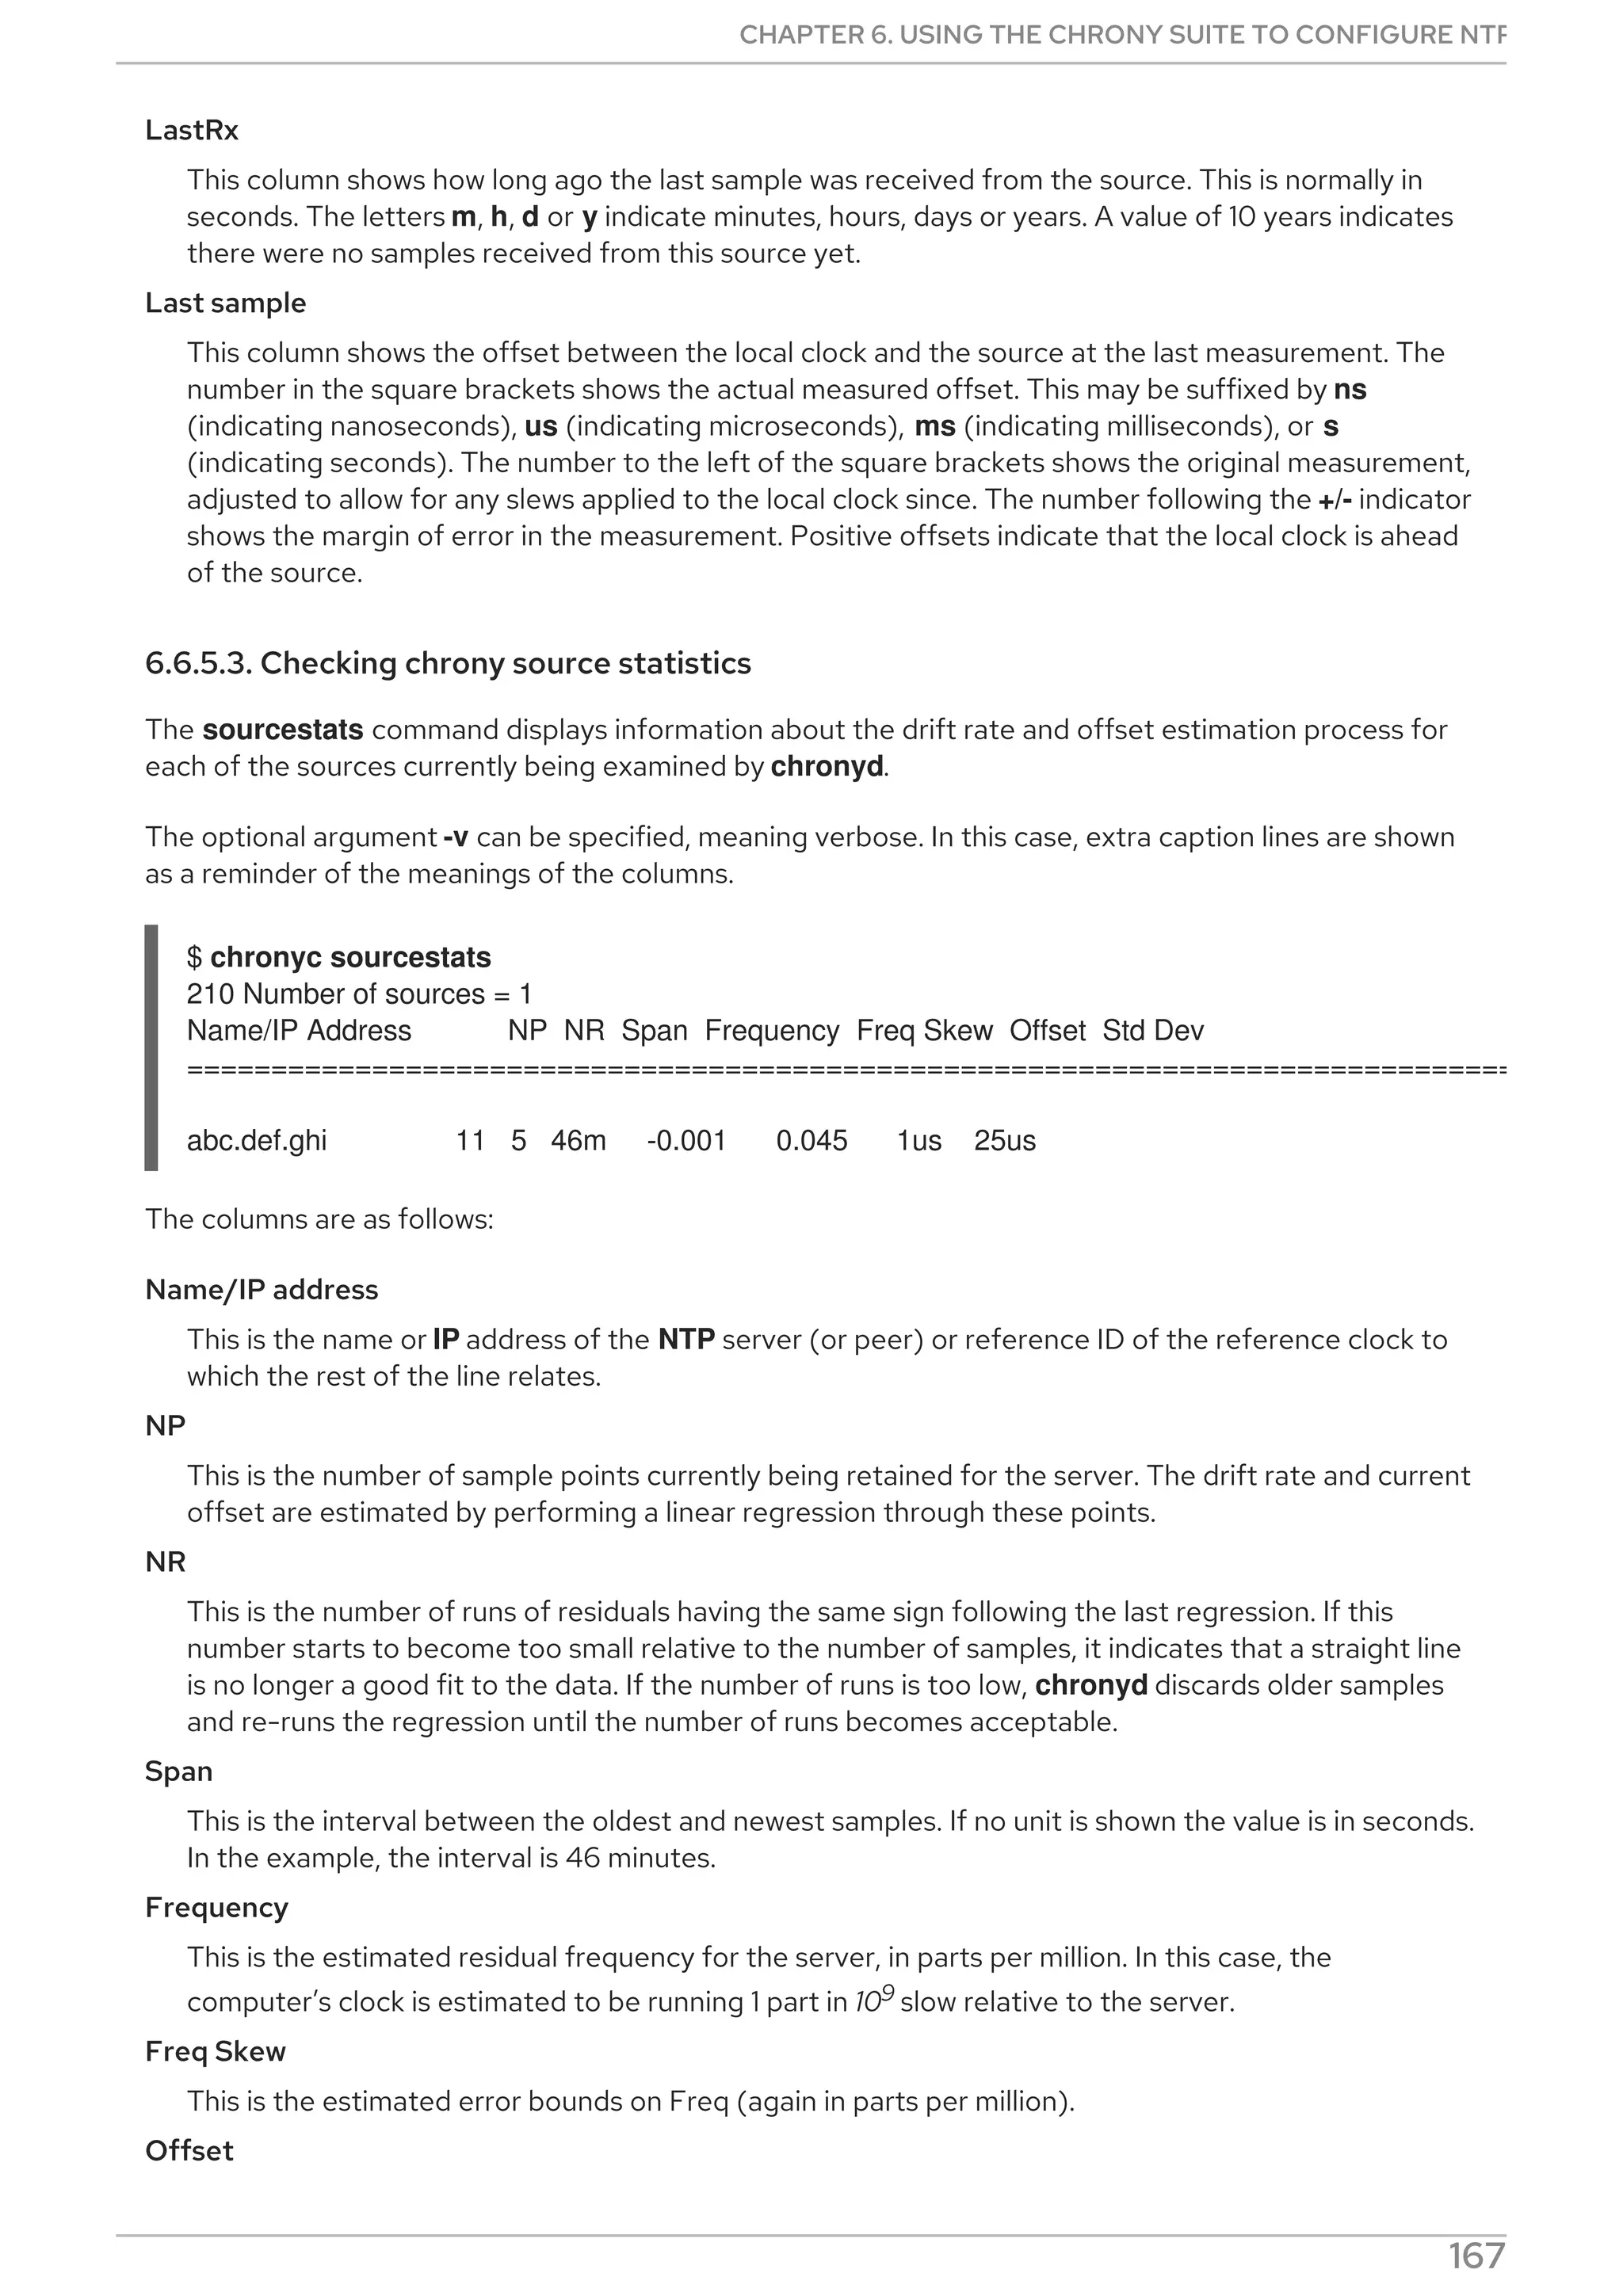
![This is the total dispersion accumulated through all the computers back to the stratum-1 computer
from which the computer is ultimately synchronized. Dispersion is due to system clock resolution,
statistical measurement variations etc. Root dispersion values are printed in nanosecond resolution.
Leap status
This is the leap status, which can be Normal, Insert second, Delete second or Not synchronized.
6.6.5.2. Checking chrony sources
The sources command displays information about the current time sources that chronyd is accessing.
The optional argument -v can be specified, meaning verbose. In this case, extra caption lines are shown
as a reminder of the meanings of the columns.
$ chronyc sources
210 Number of sources = 3
MS Name/IP address Stratum Poll Reach LastRx Last sample
===============================================================================
#* GPS0 0 4 377 11 -479ns[ -621ns] /- 134ns
^? a.b.c 2 6 377 23 -923us[ -924us] +/- 43ms
^ d.e.f 1 6 377 21 -2629us[-2619us] +/- 86ms
The columns are as follows:
M
This indicates the mode of the source. ^ means a server, = means a peer and # indicates a locally
connected reference clock.
S
This column indicates the state of the sources. "*" indicates the source to which chronyd is currently
synchronized. "+" indicates acceptable sources which are combined with the selected source. "-"
indicates acceptable sources which are excluded by the combining algorithm. "?" indicates sources to
which connectivity has been lost or whose packets do not pass all tests. "x" indicates a clock which
chronyd thinks is a falseticker (its time is inconsistent with a majority of other sources). "~" indicates
a source whose time appears to have too much variability. The "?" condition is also shown at start-
up, until at least 3 samples have been gathered from it.
Name/IP address
This shows the name or the IP address of the source, or reference ID for reference clock.
Stratum
This shows the stratum of the source, as reported in its most recently received sample. Stratum 1
indicates a computer with a locally attached reference clock. A computer that is synchronized to a
stratum 1 computer is at stratum 2. A computer that is synchronized to a stratum 2 computer is at
stratum 3, and so on.
Poll
This shows the rate at which the source is being polled, as a base-2 logarithm of the interval in
seconds. Thus, a value of 6 would indicate that a measurement is being made every 64 seconds.
chronyd automatically varies the polling rate in response to prevailing conditions.
Reach
This shows the source’s reach register printed as an octal number. The register has 8 bits and is
updated on every received or missed packet from the source. A value of 377 indicates that a valid
reply was received for all of the last eight transmissions.
Red Hat Enterprise Linux 8 Configuring basic system settings
166](https://image.slidesharecdn.com/redhatenterpriselinux-8-configuringbasicsystemsettings-en-us-210331143352/75/Red-hat-enterprise_linux-8-configuring_basic_system_settings-en-us-170-2048.jpg)
![6.8.6. Configuring server for large number of clients
The default server configuration allows a few thousands of clients at most to use the interleaved mode
concurrently. To configure the server for a larger number of clients, increase the clientloglimit directive
in /etc/chrony.conf. This directive specifies the maximum size of memory allocated for logging of
clients' access on the server:
clientloglimit 100000000
6.8.7. Verifying hardware timestamping
To verify that the interface has successfully enabled hardware timestamping, check the system log. The
log should contain a message from chronyd for each interface with successfully enabled hardware
timestamping.
Example 6.3. Log messages for interfaces with enabled hardware timestamping
chronyd[4081]: Enabled HW timestamping on eth0
chronyd[4081]: Enabled HW timestamping on eth1
When chronyd is configured as an NTP client or peer, you can have the transmit and receive
timestamping modes and the interleaved mode reported for each NTP source by the chronyc ntpdata
command:
Example 6.4. Reporting the transmit, receive timestamping and interleaved mode for each NTP
source
# chronyc ntpdata
Output:
Remote address : 203.0.113.15 (CB00710F)
Remote port : 123
Local address : 203.0.113.74 (CB00714A)
Leap status : Normal
Version : 4
Mode : Server
Stratum : 1
Poll interval : 0 (1 seconds)
Precision : -24 (0.000000060 seconds)
Root delay : 0.000015 seconds
Root dispersion : 0.000015 seconds
Reference ID : 47505300 (GPS)
Reference time : Wed May 03 13:47:45 2017
Offset : -0.000000134 seconds
Peer delay : 0.000005396 seconds
Peer dispersion : 0.000002329 seconds
Response time : 0.000152073 seconds
Jitter asymmetry: +0.00
NTP tests : 111 111 1111
Interleaved : Yes
CHAPTER 6. USING THE CHRONY SUITE TO CONFIGURE NTP
171](https://image.slidesharecdn.com/redhatenterpriselinux-8-configuringbasicsystemsettings-en-us-210331143352/75/Red-hat-enterprise_linux-8-configuring_basic_system_settings-en-us-175-2048.jpg)

![The OpenSSH suite uses two different sets of configuration files: those for client programs (that is, ssh,
scp, and sftp), and those for the server (the sshd daemon). System-wide SSH configuration
information is stored in the /etc/ssh/ directory. User-specific SSH configuration information is stored in
~/.ssh/ in the user’s home directory. For a detailed list of OpenSSH configuration files, see the FILES
section in the sshd(8) man page.
Additional resources
Man pages for the ssh topic listed by the man -k ssh command.
Using system-wide cryptographic policies .
7.2. CONFIGURING AND STARTING AN OPENSSH SERVER
Use the following procedure for a basic configuration that might be required for your environment and
for starting an OpenSSH server. Note that after the default RHEL installation, the sshd daemon is
already started and server host keys are automatically created.
Prerequisites
The openssh-server package is installed.
Procedure
1. Start the sshd daemon in the current session and set it to start automatically at boot time:
# systemctl start sshd
# systemctl enable sshd
2. To specify different addresses than the default 0.0.0.0 (IPv4) or :: (IPv6) for the
ListenAddress directive in the /etc/ssh/sshd_config configuration file and to use a slower
dynamic network configuration, add the dependency on the network-online.target target unit
to the sshd.service unit file. To achieve this, create the
/etc/systemd/system/sshd.service.d/local.conf file with the following content:
[Unit]
Wants=network-online.target
After=network-online.target
3. Review if OpenSSH server settings in the /etc/ssh/sshd_config configuration file meet the
requirements of your scenario.
4. Optionally, change the welcome message that your OpenSSH server displays before a client
authenticates by editing the /etc/issue file, for example:
Welcome to ssh-server.example.com
Warning: By accessing this server, you agree to the referenced terms and conditions.
Note that to change the message displayed after a successful login you have to edit the
/etc/motd file on the server. See the pam_motd man page for more information.
5. Reload the systemd configuration to apply the changes:
# systemctl daemon-reload
Red Hat Enterprise Linux 8 Configuring basic system settings
178](https://image.slidesharecdn.com/redhatenterpriselinux-8-configuringbasicsystemsettings-en-us-210331143352/75/Red-hat-enterprise_linux-8-configuring_basic_system_settings-en-us-182-2048.jpg)
![Verification steps
1. Check that the sshd daemon is running:
# systemctl status sshd
● sshd.service - OpenSSH server daemon
Loaded: loaded (/usr/lib/systemd/system/sshd.service; enabled; vendor preset: enabled)
Active: active (running) since Mon 2019-11-18 14:59:58 CET; 6min ago
Docs: man:sshd(8)
man:sshd_config(5)
Main PID: 1149 (sshd)
Tasks: 1 (limit: 11491)
Memory: 1.9M
CGroup: /system.slice/sshd.service
└─1149 /usr/sbin/sshd -D -oCiphers=aes128-ctr,aes256-ctr,aes128-cbc,aes256-cbc -
oMACs=hmac-sha2-256,>
Nov 18 14:59:58 ssh-server-example.com systemd[1]: Starting OpenSSH server daemon...
Nov 18 14:59:58 ssh-server-example.com sshd[1149]: Server listening on 0.0.0.0 port 22.
Nov 18 14:59:58 ssh-server-example.com sshd[1149]: Server listening on :: port 22.
Nov 18 14:59:58 ssh-server-example.com systemd[1]: Started OpenSSH server daemon.
2. Connect to the SSH server with an SSH client.
# ssh user@ssh-server-example.com
ECDSA key fingerprint is SHA256:dXbaS0RG/UzlTTku8GtXSz0S1++lPegSy31v3L/FAEc.
Are you sure you want to continue connecting (yes/no/[fingerprint])? yes
Warning: Permanently added 'ssh-server-example.com' (ECDSA) to the list of known hosts.
user@ssh-server-example.com's password:
Additional resources
sshd(8) and sshd_config(5) man pages
7.3. USING KEY PAIRS INSTEAD OF PASSWORDS FOR SSH
AUTHENTICATION
To improve system security even further, generate SSH key pairs and then enforce key-based
authentication by disabling password authentication.
7.3.1. Setting an OpenSSH server for key-based authentication
Follow these steps to configure your OpenSSH server for enforcing key-based authentication.
Prerequisites
The openssh-server package is installed.
The sshd daemon is running on the server.
Procedure
1. Open the /etc/ssh/sshd_config configuration in a text editor, for example:
CHAPTER 7. USING SECURE COMMUNICATIONS BETWEEN TWO SYSTEMS WITH OPENSSH
179](https://image.slidesharecdn.com/redhatenterpriselinux-8-configuringbasicsystemsettings-en-us-210331143352/75/Red-hat-enterprise_linux-8-configuring_basic_system_settings-en-us-183-2048.jpg)
![# vi /etc/ssh/sshd_config
2. Change the PasswordAuthentication option to no:
PasswordAuthentication no
On a system other than a new default installation, check that PubkeyAuthentication no has not
been set and the ChallengeResponseAuthentication directive is set to no. If you are
connected remotely, not using console or out-of-band access, test the key-based login process
before disabling password authentication.
3. To use key-based authentication with NFS-mounted home directories, enable the
use_nfs_home_dirs SELinux boolean:
# setsebool -P use_nfs_home_dirs 1
4. Reload the sshd daemon to apply the changes:
# systemctl reload sshd
Additional resources
sshd(8), sshd_config(5), and setsebool(8) man pages
7.3.2. Generating SSH key pairs
Use this procedure to generate an SSH key pair on a local system and to copy the generated public key
to an OpenSSH server. If the server is configured accordingly, you can log in to the OpenSSH server
without providing any password.
IMPORTANT
If you complete the following steps as root, only root is able to use the keys.
Procedure
1. To generate an ECDSA key pair for version 2 of the SSH protocol:
$ ssh-keygen -t ecdsa
Generating public/private ecdsa key pair.
Enter file in which to save the key (/home/joesec/.ssh/id_ecdsa):
Enter passphrase (empty for no passphrase):
Enter same passphrase again:
Your identification has been saved in /home/joesec/.ssh/id_ecdsa.
Your public key has been saved in /home/joesec/.ssh/id_ecdsa.pub.
The key fingerprint is:
SHA256:Q/x+qms4j7PCQ0qFd09iZEFHA+SqwBKRNaU72oZfaCI
joesec@localhost.example.com
The key's randomart image is:
+---[ECDSA 256]---+
|.oo..o=++ |
|.. o .oo . |
|. .. o. o |
Red Hat Enterprise Linux 8 Configuring basic system settings
180](https://image.slidesharecdn.com/redhatenterpriselinux-8-configuringbasicsystemsettings-en-us-210331143352/75/Red-hat-enterprise_linux-8-configuring_basic_system_settings-en-us-184-2048.jpg)
![|....o.+... |
|o.oo.o +S . |
|.=.+. .o |
|E.*+. . . . |
|.=..+ +.. o |
| . oo*+o. |
+----[SHA256]-----+
You can also generate an RSA key pair by using the -t rsa option with the ssh-keygen
command or an Ed25519 key pair by entering the ssh-keygen -t ed25519 command.
2. To copy the public key to a remote machine:
$ ssh-copy-id joesec@ssh-server-example.com
/usr/bin/ssh-copy-id: INFO: attempting to log in with the new key(s), to filter out any that are
already installed
...
Number of key(s) added: 1
Now try logging into the machine, with: "ssh 'joesec@ssh-server-example.com'" and check to
make sure that only the key(s) you wanted were added.
If you do not use the ssh-agent program in your session, the previous command copies the
most recently modified ~/.ssh/id*.pub public key if it is not yet installed. To specify another
public-key file or to prioritize keys in files over keys cached in memory by ssh-agent, use the
ssh-copy-id command with the -i option.
NOTE
If you reinstall your system and want to keep previously generated key pairs, back up the
~/.ssh/ directory. After reinstalling, copy it back to your home directory. You can do this
for all users on your system, including root.
Verification steps
1. Log in to the OpenSSH server without providing any password:
$ ssh joesec@ssh-server-example.com
Welcome message.
...
Last login: Mon Nov 18 18:28:42 2019 from ::1
Additional resources
ssh-keygen(1) and ssh-copy-id(1) man pages
7.4. USING SSH KEYS STORED ON A SMART CARD
Red Hat Enterprise Linux 8 enables you to use RSA and ECDSA keys stored on a smart card on
OpenSSH clients. Use this procedure to enable authentication using a smart card instead of using a
password.
Prerequisites
CHAPTER 7. USING SECURE COMMUNICATIONS BETWEEN TWO SYSTEMS WITH OPENSSH
181](https://image.slidesharecdn.com/redhatenterpriselinux-8-configuringbasicsystemsettings-en-us-210331143352/75/Red-hat-enterprise_linux-8-configuring_basic_system_settings-en-us-185-2048.jpg)
![On the client side, the opensc package is installed and the pcscd service is running.
Procedure
1. List all keys provided by the OpenSC PKCS #11 module including their PKCS #11 URIs and save
the output to the keys.pub file:
$ ssh-keygen -D pkcs11: > keys.pub
$ ssh-keygen -D pkcs11:
ssh-rsa AAAAB3NzaC1yc2E...KKZMzcQZzx
pkcs11:id=%02;object=SIGN%20pubkey;token=SSH%20key;manufacturer=piv_II?module-
path=/usr/lib64/pkcs11/opensc-pkcs11.so
ecdsa-sha2-nistp256 AAA...J0hkYnnsM=
pkcs11:id=%01;object=PIV%20AUTH%20pubkey;token=SSH%20key;manufacturer=piv_II?
module-path=/usr/lib64/pkcs11/opensc-pkcs11.so
2. To enable authentication using a smart card on a remote server (example.com), transfer the
public key to the remote server. Use the ssh-copy-id command with keys.pub created in the
previous step:
$ ssh-copy-id -f -i keys.pub username@example.com
3. To connect to example.com using the ECDSA key from the output of the ssh-keygen -D
command in step 1, you can use just a subset of the URI, which uniquely references your key, for
example:
$ ssh -i "pkcs11:id=%01?module-path=/usr/lib64/pkcs11/opensc-pkcs11.so" example.com
Enter PIN for 'SSH key':
[example.com] $
4. You can use the same URI string in the ~/.ssh/config file to make the configuration permanent:
$ cat ~/.ssh/config
IdentityFile "pkcs11:id=%01?module-path=/usr/lib64/pkcs11/opensc-pkcs11.so"
$ ssh example.com
Enter PIN for 'SSH key':
[example.com] $
Because OpenSSH uses the p11-kit-proxy wrapper and the OpenSC PKCS #11 module is
registered to PKCS#11 Kit, you can simplify the previous commands:
$ ssh -i "pkcs11:id=%01" example.com
Enter PIN for 'SSH key':
[example.com] $
If you skip the id= part of a PKCS #11 URI, OpenSSH loads all keys that are available in the proxy module.
This can reduce the amount of typing required:
$ ssh -i pkcs11: example.com
Enter PIN for 'SSH key':
[example.com] $
Additional resources
Red Hat Enterprise Linux 8 Configuring basic system settings
182](https://image.slidesharecdn.com/redhatenterpriselinux-8-configuringbasicsystemsettings-en-us-210331143352/75/Red-hat-enterprise_linux-8-configuring_basic_system_settings-en-us-186-2048.jpg)

![# logger test
2. On the server system, view the /var/log/messages log, for example:
# cat /var/log/remote/msg/hostname/root.log
Feb 25 03:53:17 hostname root[6064]: test
Where hostname is the host name of the client system. Note that the log contains the user
name of the user that entered the logger command, in this case root.
Additional resources
The rsyslogd(8) and rsyslog.conf(5) man pages
Documentation installed with the rsyslog-doc package at
file:///usr/share/doc/rsyslog/html/index.html
8.4. CONFIGURING REMOTE LOGGING OVER UDP
The Rsyslog application enables you to configure a system to receive logging information from remote
systems. To use remote logging through UDP, configure both the server and the client. The receiving
server collects and analyzes the logs sent by one or more client systems. By default, rsyslog uses UDP
on port 514 to receive log information from remote systems.
8.4.1. Configuring a server for receiving remote logging information over UDP
Follow this procedure to configure a server for collecting and analyzing logs sent by one or more client
systems over the UDP protocol.
Prerequisites
The rsyslog utility is installed.
Procedure
1. Optional: To use a different port for rsyslog traffic than the default port 514:
a. Add the syslogd_port_t SELinux type to the SELinux policy configuration, replacing
portno with the port number you want rsyslog to use:
# semanage port -a -t syslogd_port_t -p udp portno
b. Configure firewalld to allow incoming rsyslog traffic, replacing portno with the port
number and zone with the zone you want rsyslog to use:
# firewall-cmd --zone=zone --permanent --add-port=portno/udp
success
c. Reload the firewall rules:
# firewall-cmd --reload
2. Create a new .conf file in the /etc/rsyslog.d/ directory, for example, remotelogserv.conf, and
Red Hat Enterprise Linux 8 Configuring basic system settings
192](https://image.slidesharecdn.com/redhatenterpriselinux-8-configuringbasicsystemsettings-en-us-210331143352/75/Red-hat-enterprise_linux-8-configuring_basic_system_settings-en-us-196-2048.jpg)
![3. Optional: If rsyslog is not enabled, ensure the rsyslog service starts automatically after reboot:
# systemctl enable rsyslog
Verification
To verify that the client system sends messages to the server, follow these steps:
1. On the client system, send a test message:
# logger test
2. On the server system, view the /var/log/remote/msg/hostname/root.log log, for example:
# cat /var/log/remote/msg/hostname/root.log
Feb 25 03:53:17 hostname root[6064]: test
Where hostname is the host name of the client system. Note that the log contains the user
name of the user that entered the logger command, in this case root.
Additional resources
The rsyslogd(8) and rsyslog.conf(5) man pages
Browser-based documentation, which you can install from the rsyslog-doc package, at
file:///usr/share/doc/rsyslog/html/index.html
8.5. CONFIGURING RELIABLE REMOTE LOGGING
With the Reliable Event Logging Protocol (RELP), you can send and receive syslog messages over TCP
with a much reduced risk of message loss. RELP provides reliable delivery of event messages, which
makes it useful in environments where message loss is not acceptable. To use RELP, configure the
imrelp input module, which runs on the server and receives the logs, and the omrelp output module,
which runs on the client and sends logs to the logging server.
Prerequisites
You have installed the rsyslog, librelp, and rsyslog-relp packages on the server and the client
systems.
The specified port is permitted in SELinux and open in the firewall.
Procedure
1. Configure the client system for reliable remote logging:
a. On the client system, create a new .conf file in the /etc/rsyslog.d/ directory named, for
example, relpcli.conf, and insert the following content:
module(load="omrelp")
*.* action(type="omrelp" target="target_IP" port="target_port")
Where:
CHAPTER 8. CONFIGURING A REMOTE LOGGING SOLUTION
195](https://image.slidesharecdn.com/redhatenterpriselinux-8-configuringbasicsystemsettings-en-us-210331143352/75/Red-hat-enterprise_linux-8-configuring_basic_system_settings-en-us-199-2048.jpg)
![# cat /var/log/remote/msg/hostname/root.log
Feb 25 03:53:17 hostname root[6064]: test
Where hostname is the host name of the client system. Note that the log contains the user
name of the user that entered the logger command, in this case root.
Additional resources
The rsyslogd(8) and rsyslog.conf(5) man pages
Browser-based documentation, which you can install from the rsyslog-doc package, at
file:///usr/share/doc/rsyslog/html/index.html
8.6. SUPPORTED RSYSLOG MODULES
To expand the functionality of the Rsyslog utility, you can use specific additional modules. Modules
provide additional inputs (Input Modules), outputs (Output Modules), and other specific functionalities.
A module may also provide additional configuration directives that become available after you load that
module.
List the input and output modules installed on your system with the following command:
# ls /usr/lib64/rsyslog/{i,o}m*
To view the list of all available rsyslog modules, open the following page from documentation installed
from the rsyslog-doc package.
$ firefox file:///usr/share/doc/rsyslog/html/configuration/modules/idx_output.html
8.7. ADDITIONAL RESOURCES
Documentation installed with the rsyslog-doc package at
file:///usr/share/doc/rsyslog/html/index.html
The rsyslog.conf(5) and rsyslogd(8) man pages
The Configuring system logging without journald or with minimized journald usage
Knowledgebase article
The Negative effects of the RHEL default logging setup on performance and their mitigations
article
CHAPTER 8. CONFIGURING A REMOTE LOGGING SOLUTION
197](https://image.slidesharecdn.com/redhatenterpriselinux-8-configuringbasicsystemsettings-en-us-210331143352/75/Red-hat-enterprise_linux-8-configuring_basic_system_settings-en-us-201-2048.jpg)
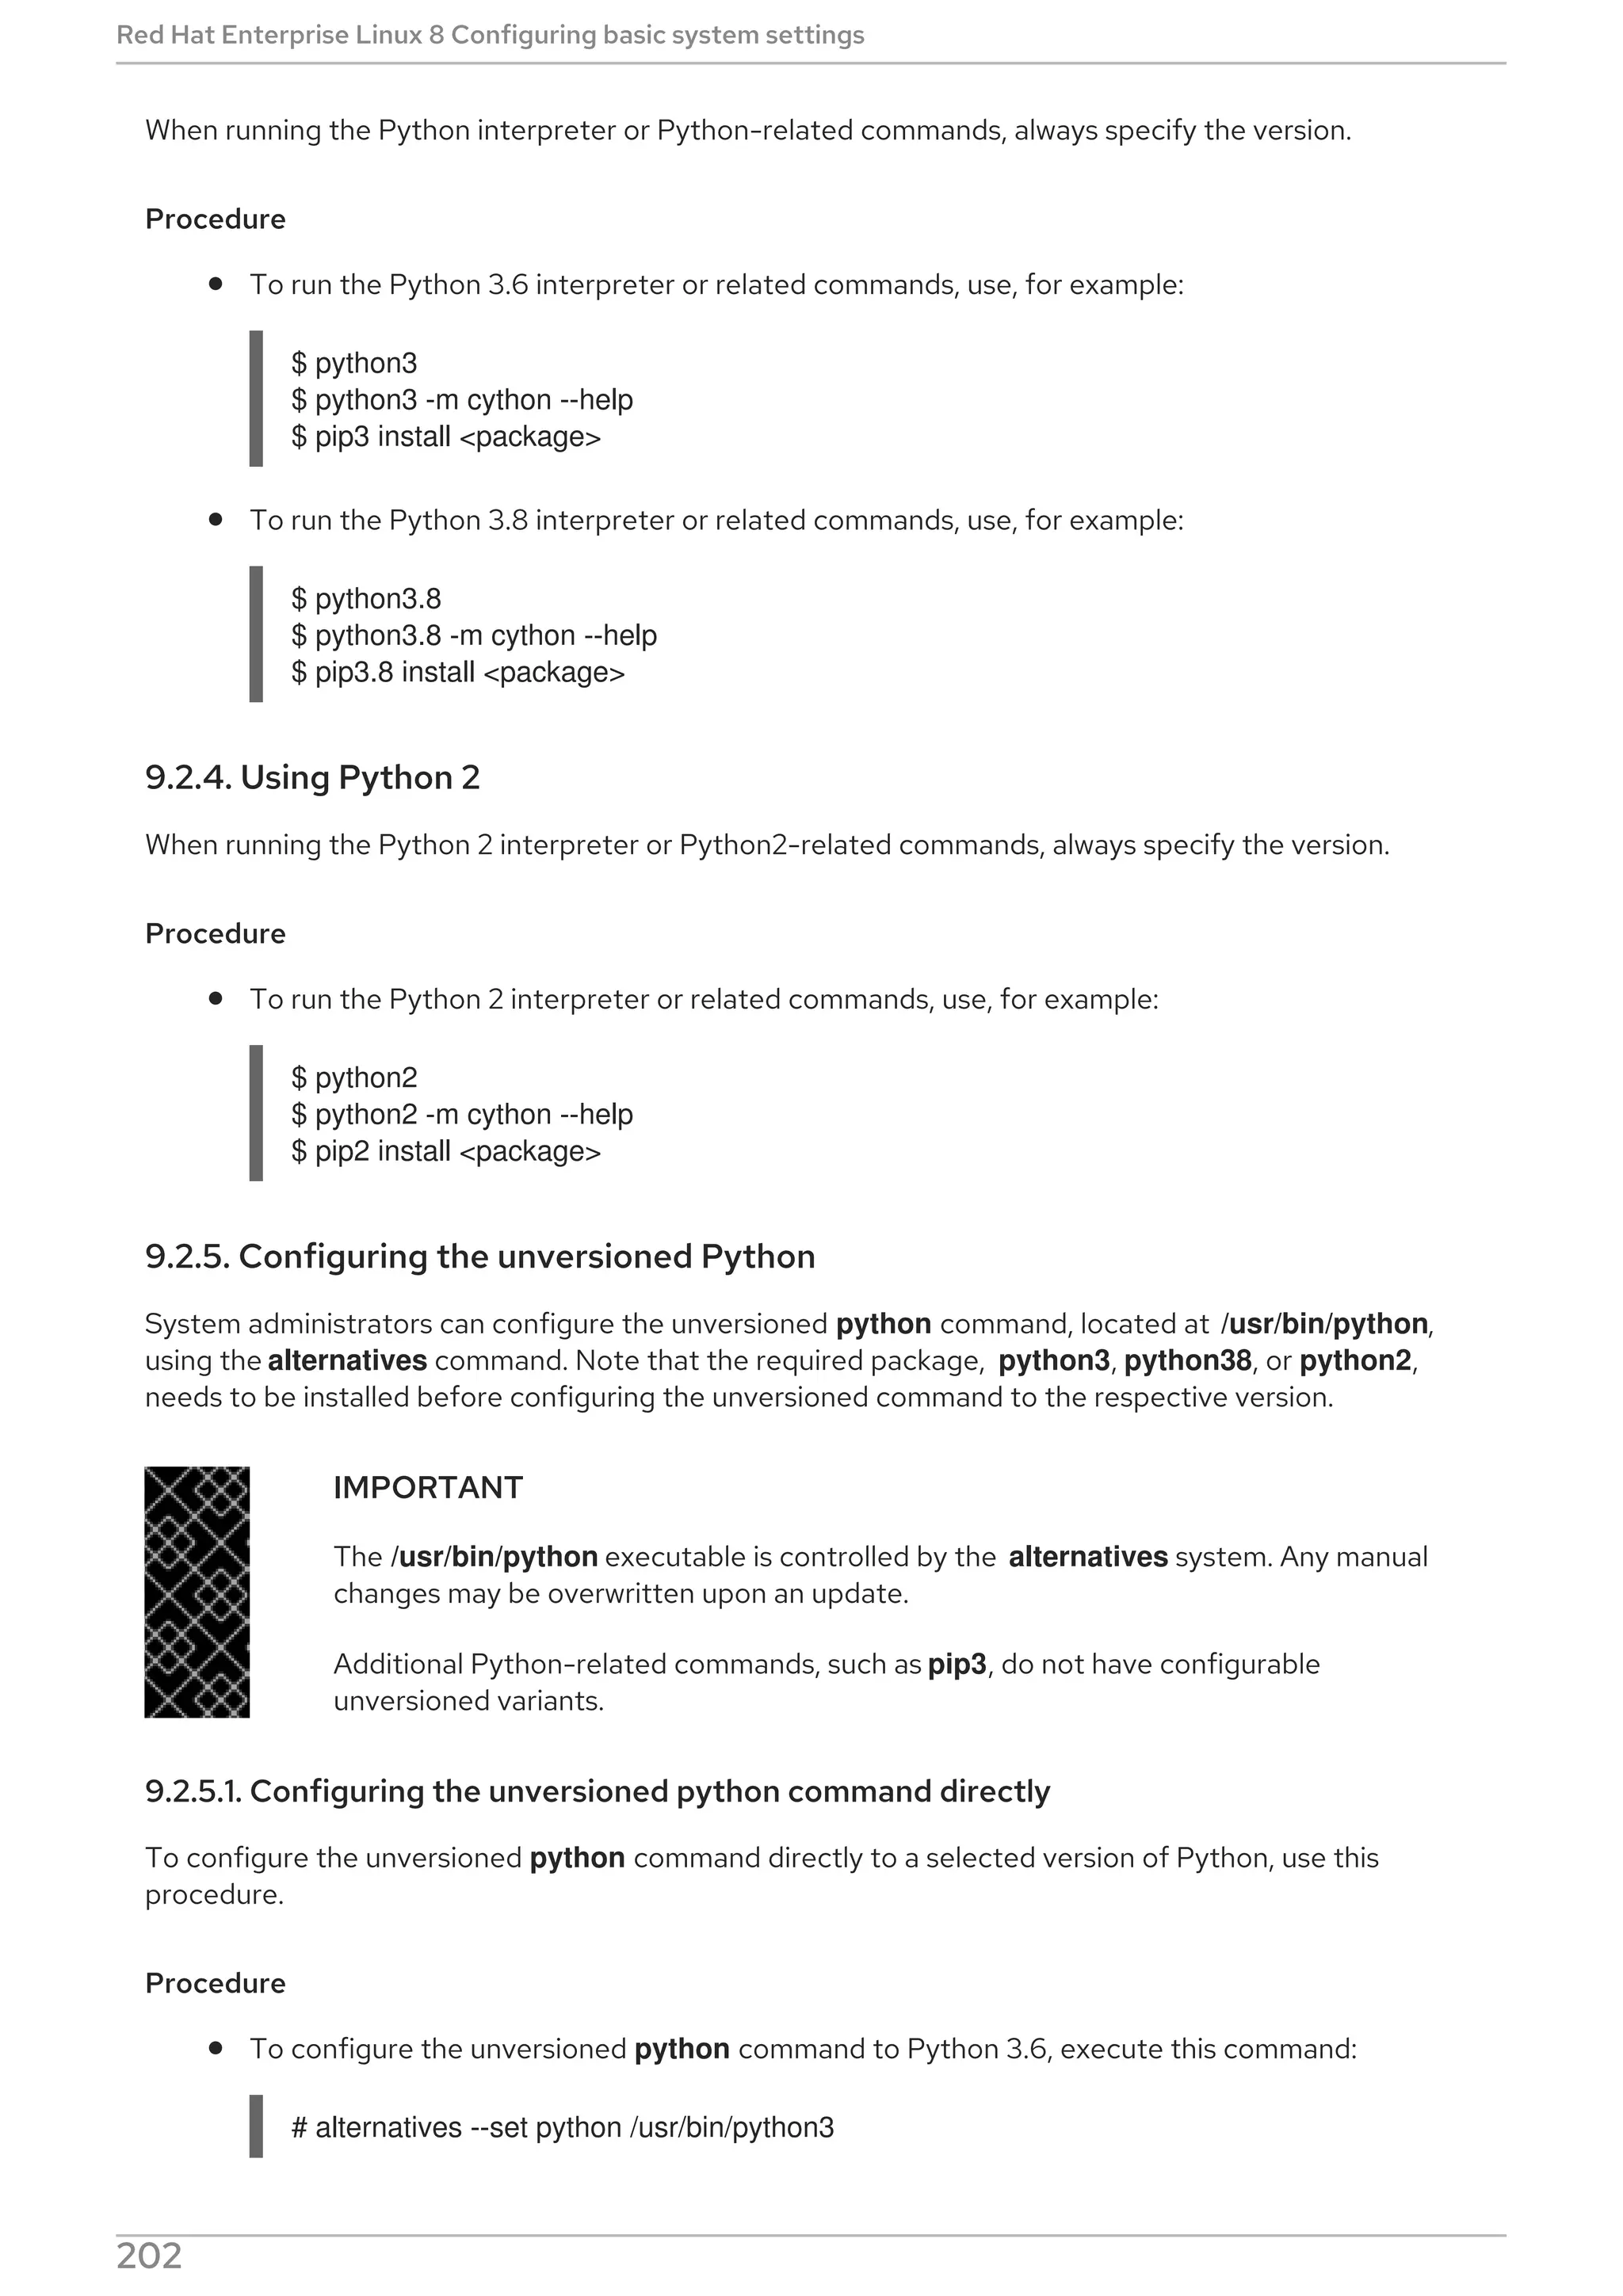

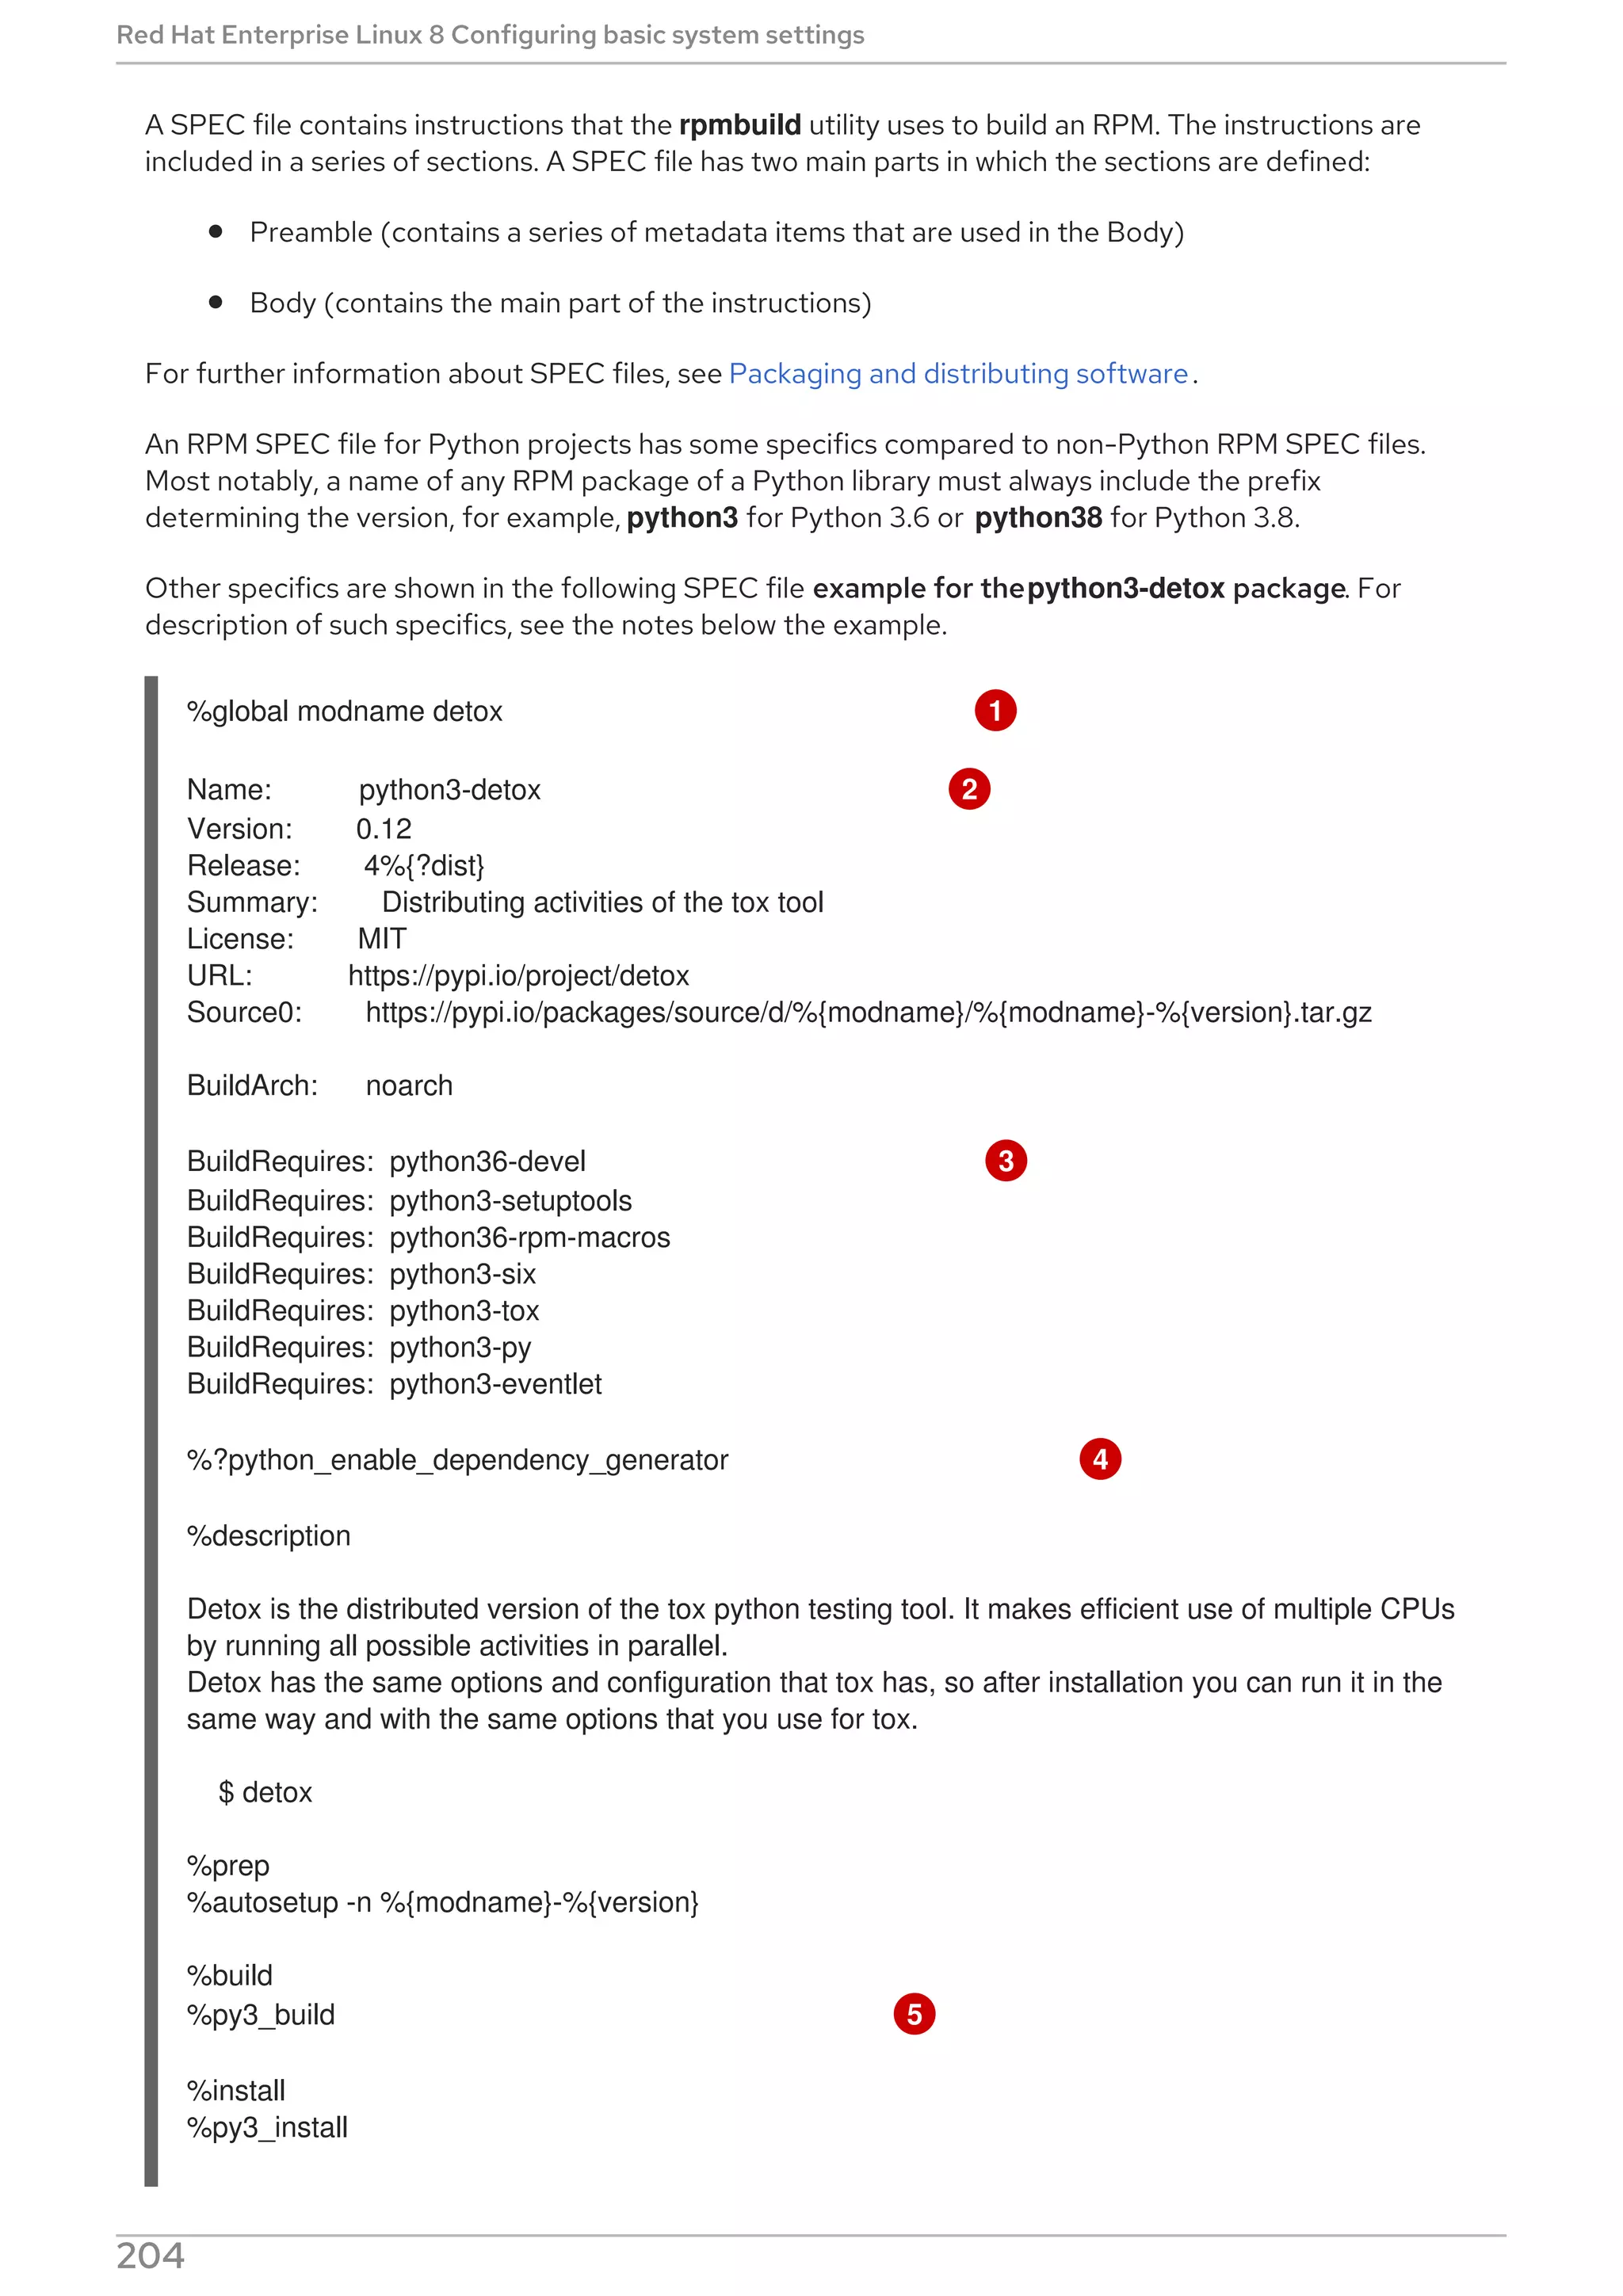
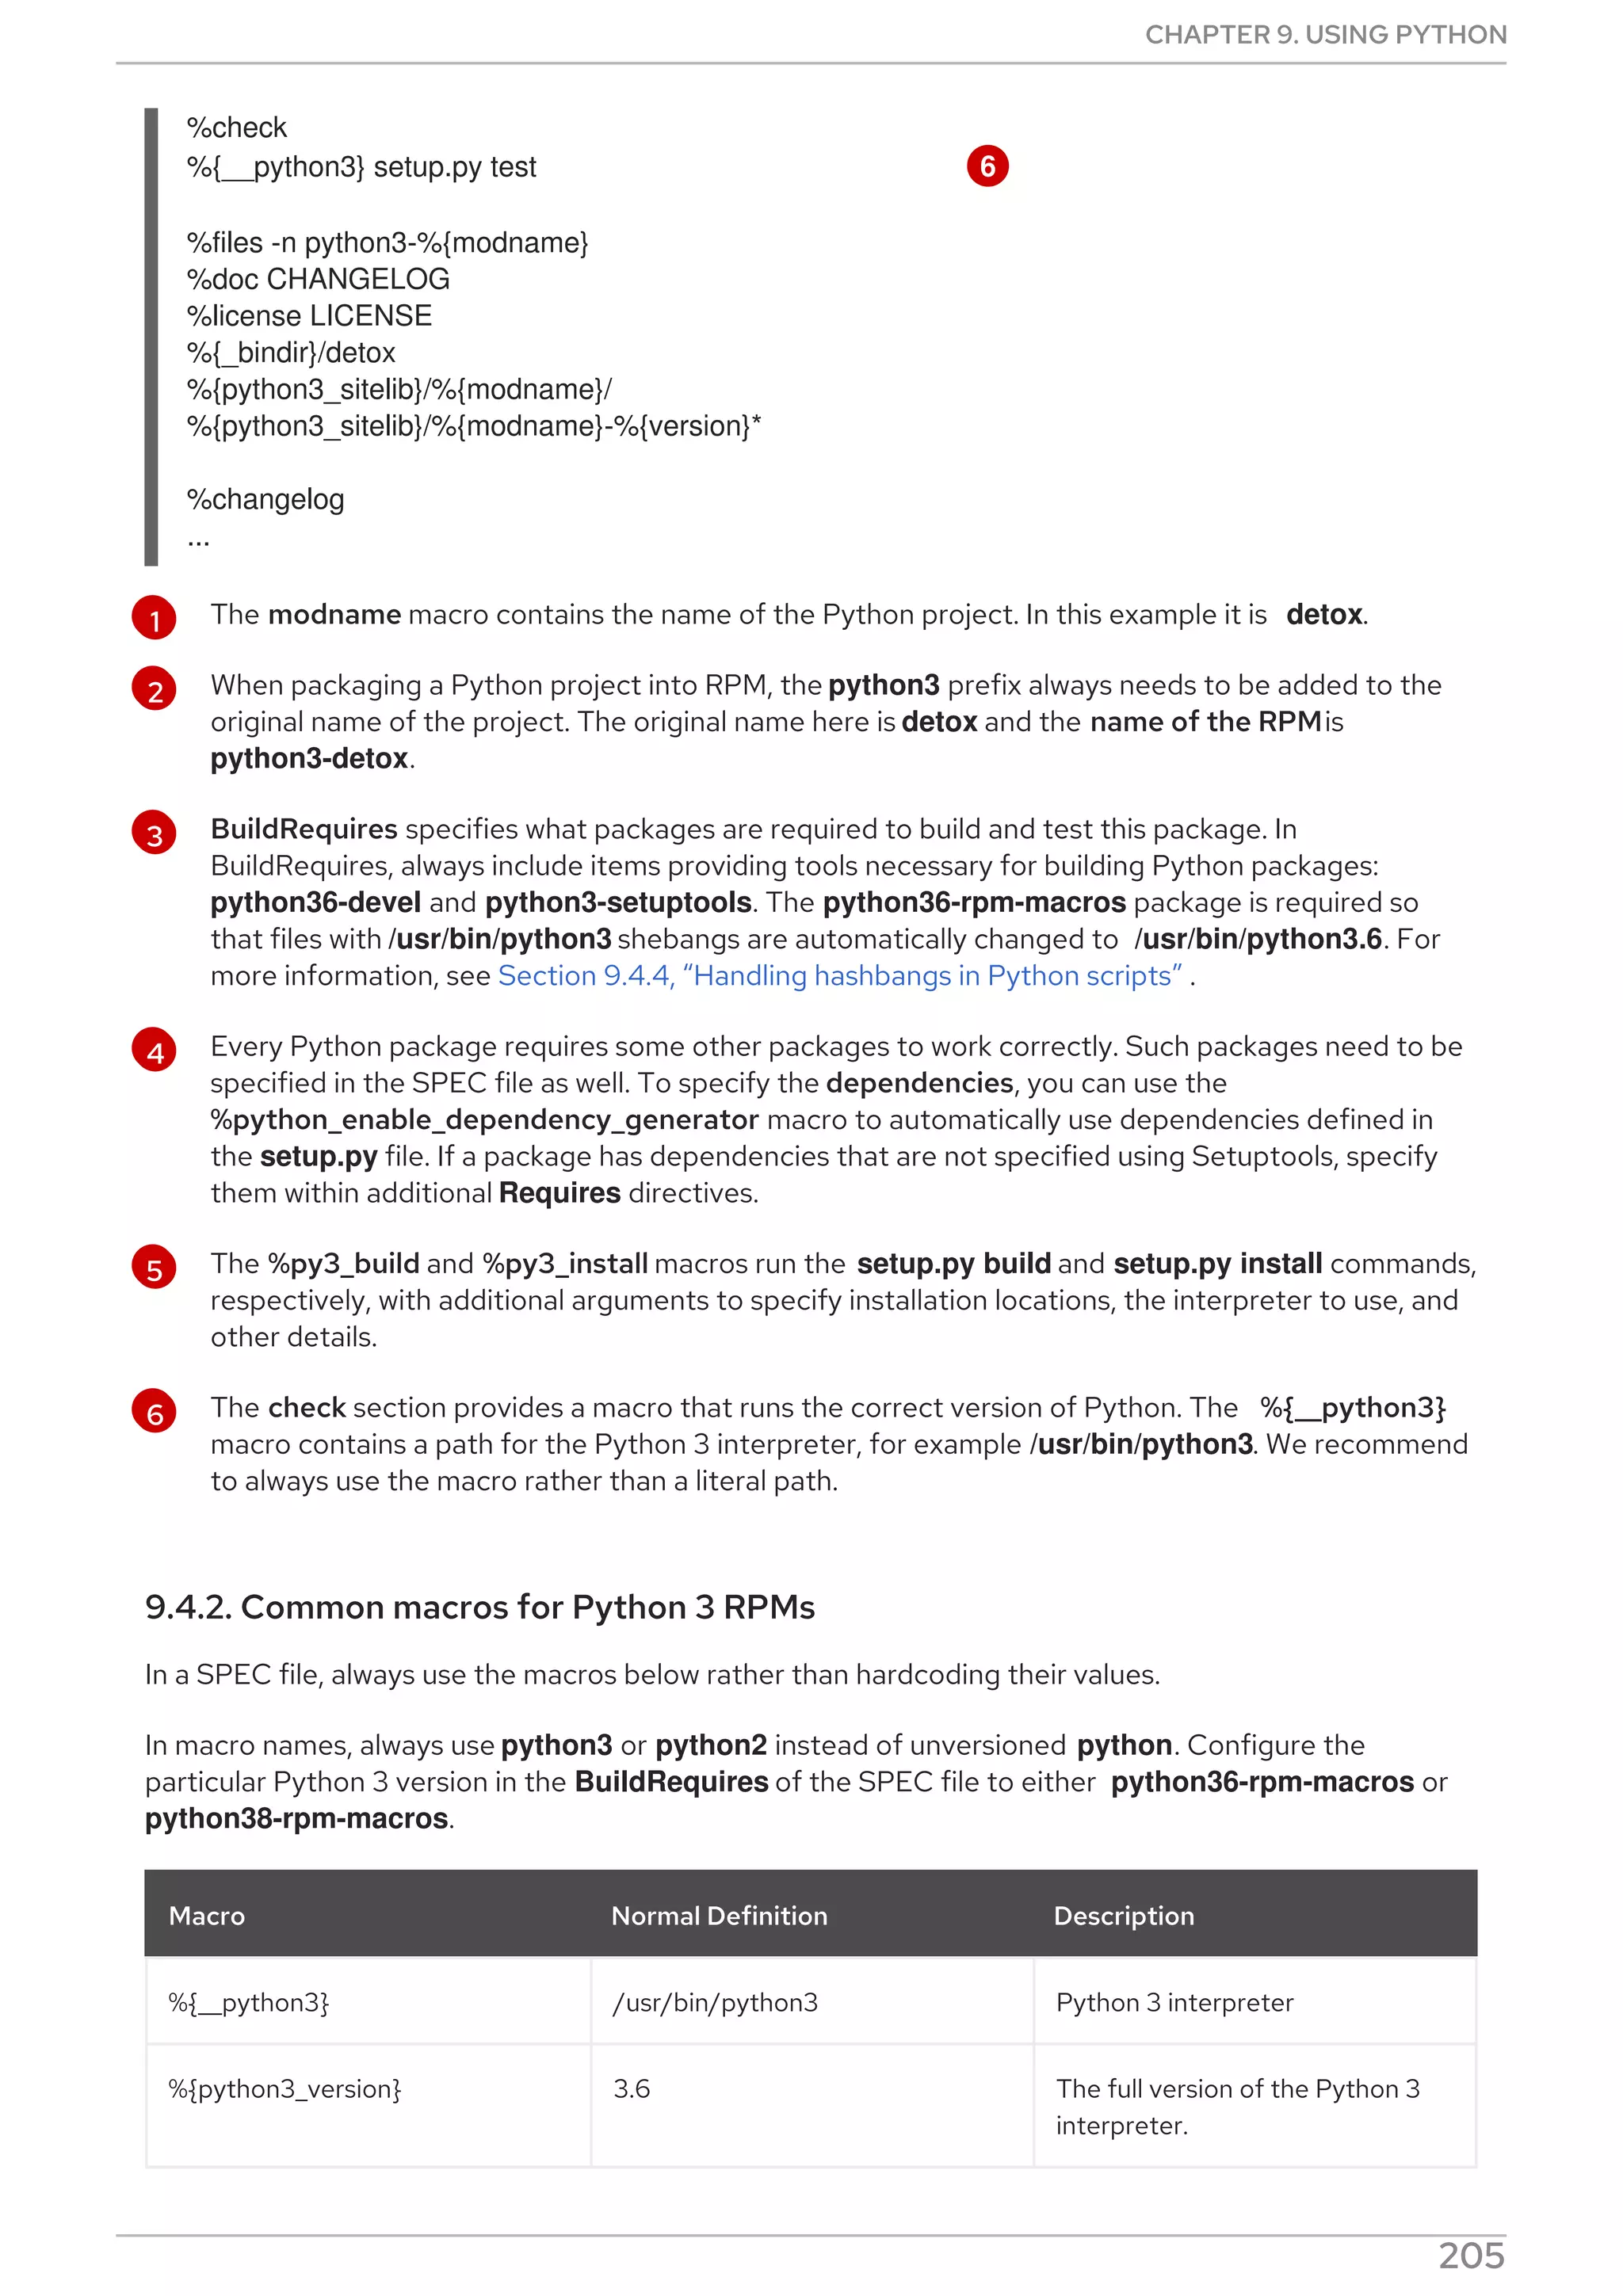
![9.4.4.1. Modifying hashbangs in Python scripts
To modify hashbangs in the Python scripts that cause the build errors at RPM build time, use this
procedure.
Procedure
Apply the pathfix.py script from the platform-python-devel package:
# pathfix.py -pn -i %{__python3} PATH …
Note that multiple PATHs can be specified. If a PATH is a directory, pathfix.py recursively
scans for any Python scripts matching the pattern ^[a-zA-Z0-9_]+.py$, not only those with an
ambiguous hashbang. Add this command to the %prep section or at the end of the %install
section.
Alternatively, modify the packaged Python scripts so that they conform to the expected format. For this
purpose, pathfix.py can be used outside the RPM build process, too. When running pathfix.py outside a
RPM build, replace __python3 from the example above with a path for the hashbang, such as
/usr/bin/python3.
If the packaged Python scripts require other version than Python 3.6, adjust the commands above to
include the respective version.
9.4.4.2. Changing /usr/bin/python3 hashbangs in their custom packages
Additionally, hashbangs in the form /usr/bin/python3 are by default replaced with hashbangs pointing to
Python from the platform-python package used for system tools with Red Hat Enterprise Linux.
To change the /usr/bin/python3 hashbangs in their custom packages to point to a version of Python
installed from Application Stream, in the form /usr/bin/python3.6, use the following procedure.
Procedure
Add the python36-rpm-macros package into the BuildRequires section of the SPEC file by
including the following line:
BuildRequires: python36-rpm-macros
NOTE
To prevent hashbang check and modification by the BRP script, use the following RPM
directive:
%undefine %brp_mangle_shebangs
If you are using other version than Python 3.6, adjust the commands above to include the respective
version.
9.4.5. Additional resources
For more information on RPM packaging, see Packaging and distributing software.
CHAPTER 9. USING PYTHON
207](https://image.slidesharecdn.com/redhatenterpriselinux-8-configuringbasicsystemsettings-en-us-210331143352/75/Red-hat-enterprise_linux-8-configuring_basic_system_settings-en-us-211-2048.jpg)


This document provides a summary of basic system administration tasks for Red Hat Enterprise Linux 8. It covers topics such as using the web console to manage system settings, installing and updating software packages with yum, configuring network settings, managing user accounts and services with systemd, and accessing log files and Red Hat support.


![[Docker Tokyo - DockerCon Recap] Updates from Microsoft](https://cdn.slidesharecdn.com/ss_thumbnails/20160722dockertokyoupdatesfrommicrosoft-160722115038-thumbnail.jpg?width=640&height=640&fit=bounds)


