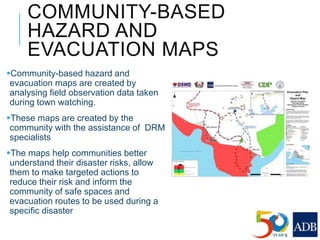
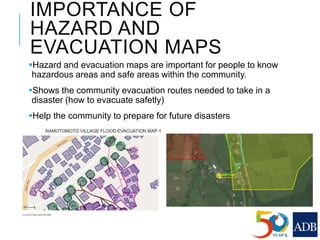
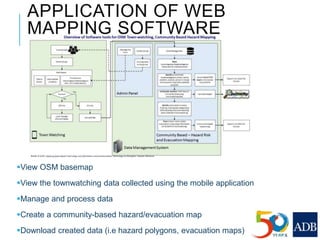
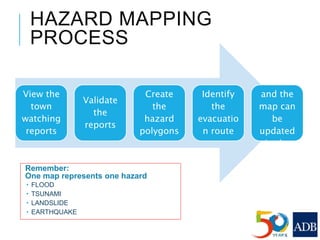
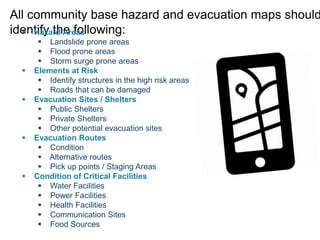
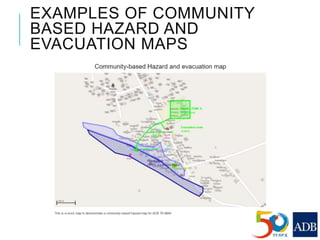
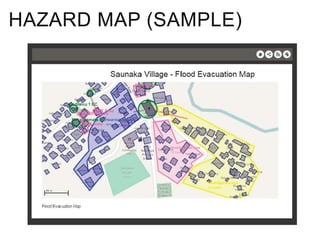
COMMUNITY
BASED HAZARD
AND EVACUATION
MAPPING
MODULE 4.0
3.1 Introduction to Hazard and Evacuation Maps
3.2 Map creation using web mapping software
3.3 Functions and Applications of software
3.4 Hazard mapping process
3.5 Map creation
3.6 Final product
SESSION OUTLINE
COMMUNITY-BASED
HAZARD AND
EVACUATION MAPS
Community-based hazard and
evacuation maps are created by
analysing field observation data taken
during town watching.
These maps are created by the
community with the assistance of DRM
specialists
The maps help communities better
understand their disaster risks, allow
them to make targeted actions to
reduce their risk and inform the
community of safe spaces and
evacuation routes to be used during a
specific disaster
IMPORTANCE OF
HAZARD AND
EVACUATION MAPS
Hazard and evacuation maps are important for people to know
hazardous areas and safe areas within the community.
Shows the community evacuation routes needed to take in a
disaster (how to evacuate safetly)
Help the community to prepare for future disasters
MAP CREATION
Once the community members along with the DRM experts have collected
data (through the town watching step) and vetted the data; it can then be
used to develop the community-based hazard and evacuation map.
MAP CREATION USING WEB
MAPPING SOFTWARE
The web mapping software used by ADB in this project is GeoBingAn Web.
This software has a variety of functions that enable the user to use town
watching data to produce appropriate, evidence based and community
accepted hazard and risk maps and evacuation maps.
WEB MAPPING SOFTWARE
In order to view the data collection reports and perform basic
mapping functions you will need to use mapping software. Some
mobile applications provide a web viewing and mapping platform,
if it doesn’t, QGIS should be used.
NEEDED FUNCTIONALITY OF
WEB MAPPING SOFTWARE
Overlay Town-Watching data on OSM basemap;
Town-Watching data visualized by category, or as disadvantageous and
advantageous data;
OSM data filtering and visualization, ie, buildings in poor condition,
houses with more than one storey;
Draw and label all type of spatial data (points, line and polygon);
Export spatial (GIS) data to commercial data format
Upload kml, geojson and geotiff data
Create and export reports and maps
APPLICATION OF WEB
MAPPING SOFTWARE
View OSM basemap
View the townwatching data collected using the mobile application
Manage and process data
Create a community-based hazard/evacuation map
Download created data (i.e hazard polygons, evacuation maps)
HAZARD MAPPING
PROCESS
Remember:
One map represents one hazard
 FLOOD
 TSUNAMI
 LANDSLIDE
 EARTHQUAKE
View the
town
watching
reports
Validate
the
reports
Create
the
hazard
polygons
Identify
the
evacuatio
n route
Ensure
the data
and the
map can
be
updated
in the
future
All community base hazard and evacuation maps should
identify the following: Hazard Areas
 Landslide prone areas
 Flood prone areas
 Storm surge prone areas
 Elements at Risk
 Identify structures in the high risk areas
 Roads that can be damaged
 Evacuation Sites / Shelters
 Public Shelters
 Private Shelters
 Other potential evacuation sites
 Evacuation Routes
 Condition
 Alternative routes
 Pick up points / Staging Areas
 Condition of Critical Facilities
 Water Facilities
 Power Facilities
 Health Facilities
 Communication Sites
 Food Sources
MAP CREATION STEPS
1. View each report on the map – zoom in and out to ensure all the
information collected is present
2. Categorize the points into blue – advantageous and red –
disadvantageous. To validate the data view the photographs of each
point.
MAP CREATION STEPS
3. Use the exposure database to identify all of the buildings in
poor condition. Change the symbol on the map to ensure
these stand out from other buildings.
4. Identify all buildings which are shelters – this is important for
evacuation planning
5. Use reports to draw hazard polygons onto the map – make
sure to label the hazard type (FLOOD HAZARD) and using
the chosen hazard colour (usually red) present this on the
map.
Buildings in
poor
conditions
shortcut
MAP CREATION STEPS
6. Upload local hazard and risk data if available. This can contribute more
information to the hazard and evacuation maps.
7. Estimate the number of people living within each hazard area.
When estimating the number of
people living in each area, be
sure to only count residential
buildings. By using OSM,
information can be collected
regarding the building use.
Commercial
Residential
MAP CREATION STEPS
8. Identify the shelters and their capacity to plan the evacuation routes. If
there are more people then there are shelters – they need to establish
pick up points where residents can be relocated to a safe area.
By clicking on the shelter
the attributes should
show the capacity of
each location.
MAP CREATION STEPS –
EVACUATION ROUTES
9. Draw and label the evacuation route as a polyline on the map. Colour
this green.
For evacuation routes:
- Prioritize evacuating high risk populations to the nearest shelters
- Keep in mine the population number and the capacity of each shelter
Note: shelters should not be in hazard area
With the understanding of the population affected and the capacity of each shelter determine the route
and shelter location for each groups of affected people to evacuate; use the reports for guidance and
the community
MAP CREATION STEPS
9. Export the data from the online
web mapping software as a
shapefile and the map as a jpg
or png image.
10.Update the shapefile of the
hazard data frequently as the
risks change. This way the
hazard map will be more
accurate in an event of a
disaster.
11.The final map should be
printed and posted in public
areas so that the community
members know the hazard
areas and evacuation routes.
EXAMPLES OF COMMUNITY
BASED HAZARD AND
EVACUATION MAPS
HAZARD MAP (SAMPLE)
COMMUNITY-BASED
HAZARD AND EVACUATION
MAPS SHOULD BE
APPROVED BY THE LOCAL
GOVERNMENT AND
SHARED IN PUBLIC
SPACES AND ITS USE
PROMOTED IN THE
COMMUNITY
THANK YOU FOR
COMPLETING HAZARD
AND EVACUATION
MAPPING

Lesson 4. Community Based Hazard and Evacuation Mapping

  • 1.
  • 2.
    3.1 Introduction toHazard and Evacuation Maps 3.2 Map creation using web mapping software 3.3 Functions and Applications of software 3.4 Hazard mapping process 3.5 Map creation 3.6 Final product SESSION OUTLINE
  • 3.
    COMMUNITY-BASED HAZARD AND EVACUATION MAPS Community-basedhazard and evacuation maps are created by analysing field observation data taken during town watching. These maps are created by the community with the assistance of DRM specialists The maps help communities better understand their disaster risks, allow them to make targeted actions to reduce their risk and inform the community of safe spaces and evacuation routes to be used during a specific disaster
  • 4.
    IMPORTANCE OF HAZARD AND EVACUATIONMAPS Hazard and evacuation maps are important for people to know hazardous areas and safe areas within the community. Shows the community evacuation routes needed to take in a disaster (how to evacuate safetly) Help the community to prepare for future disasters
  • 5.
    MAP CREATION Once thecommunity members along with the DRM experts have collected data (through the town watching step) and vetted the data; it can then be used to develop the community-based hazard and evacuation map.
  • 6.
    MAP CREATION USINGWEB MAPPING SOFTWARE The web mapping software used by ADB in this project is GeoBingAn Web. This software has a variety of functions that enable the user to use town watching data to produce appropriate, evidence based and community accepted hazard and risk maps and evacuation maps.
  • 7.
    WEB MAPPING SOFTWARE Inorder to view the data collection reports and perform basic mapping functions you will need to use mapping software. Some mobile applications provide a web viewing and mapping platform, if it doesn’t, QGIS should be used.
  • 8.
    NEEDED FUNCTIONALITY OF WEBMAPPING SOFTWARE Overlay Town-Watching data on OSM basemap; Town-Watching data visualized by category, or as disadvantageous and advantageous data; OSM data filtering and visualization, ie, buildings in poor condition, houses with more than one storey; Draw and label all type of spatial data (points, line and polygon); Export spatial (GIS) data to commercial data format Upload kml, geojson and geotiff data Create and export reports and maps
  • 9.
    APPLICATION OF WEB MAPPINGSOFTWARE View OSM basemap View the townwatching data collected using the mobile application Manage and process data Create a community-based hazard/evacuation map Download created data (i.e hazard polygons, evacuation maps)
  • 10.
    HAZARD MAPPING PROCESS Remember: One maprepresents one hazard  FLOOD  TSUNAMI  LANDSLIDE  EARTHQUAKE View the town watching reports Validate the reports Create the hazard polygons Identify the evacuatio n route Ensure the data and the map can be updated in the future
  • 11.
    All community basehazard and evacuation maps should identify the following: Hazard Areas  Landslide prone areas  Flood prone areas  Storm surge prone areas  Elements at Risk  Identify structures in the high risk areas  Roads that can be damaged  Evacuation Sites / Shelters  Public Shelters  Private Shelters  Other potential evacuation sites  Evacuation Routes  Condition  Alternative routes  Pick up points / Staging Areas  Condition of Critical Facilities  Water Facilities  Power Facilities  Health Facilities  Communication Sites  Food Sources
  • 12.
    MAP CREATION STEPS 1.View each report on the map – zoom in and out to ensure all the information collected is present 2. Categorize the points into blue – advantageous and red – disadvantageous. To validate the data view the photographs of each point.
  • 13.
    MAP CREATION STEPS 3.Use the exposure database to identify all of the buildings in poor condition. Change the symbol on the map to ensure these stand out from other buildings. 4. Identify all buildings which are shelters – this is important for evacuation planning 5. Use reports to draw hazard polygons onto the map – make sure to label the hazard type (FLOOD HAZARD) and using the chosen hazard colour (usually red) present this on the map. Buildings in poor conditions shortcut
  • 14.
    MAP CREATION STEPS 6.Upload local hazard and risk data if available. This can contribute more information to the hazard and evacuation maps. 7. Estimate the number of people living within each hazard area. When estimating the number of people living in each area, be sure to only count residential buildings. By using OSM, information can be collected regarding the building use. Commercial Residential
  • 15.
    MAP CREATION STEPS 8.Identify the shelters and their capacity to plan the evacuation routes. If there are more people then there are shelters – they need to establish pick up points where residents can be relocated to a safe area. By clicking on the shelter the attributes should show the capacity of each location.
  • 16.
    MAP CREATION STEPS– EVACUATION ROUTES 9. Draw and label the evacuation route as a polyline on the map. Colour this green. For evacuation routes: - Prioritize evacuating high risk populations to the nearest shelters - Keep in mine the population number and the capacity of each shelter Note: shelters should not be in hazard area With the understanding of the population affected and the capacity of each shelter determine the route and shelter location for each groups of affected people to evacuate; use the reports for guidance and the community
  • 17.
    MAP CREATION STEPS 9.Export the data from the online web mapping software as a shapefile and the map as a jpg or png image. 10.Update the shapefile of the hazard data frequently as the risks change. This way the hazard map will be more accurate in an event of a disaster. 11.The final map should be printed and posted in public areas so that the community members know the hazard areas and evacuation routes.
  • 18.
    EXAMPLES OF COMMUNITY BASEDHAZARD AND EVACUATION MAPS
  • 19.
  • 20.
    COMMUNITY-BASED HAZARD AND EVACUATION MAPSSHOULD BE APPROVED BY THE LOCAL GOVERNMENT AND SHARED IN PUBLIC SPACES AND ITS USE PROMOTED IN THE COMMUNITY
  • 21.
    THANK YOU FOR COMPLETINGHAZARD AND EVACUATION MAPPING