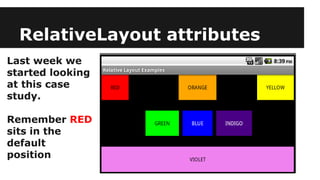
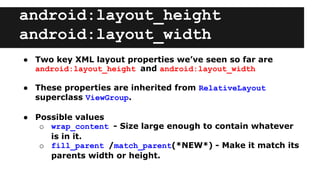
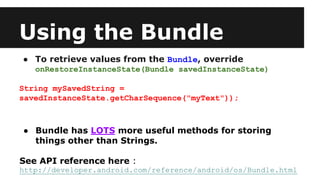
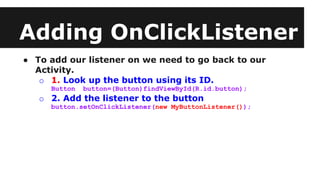
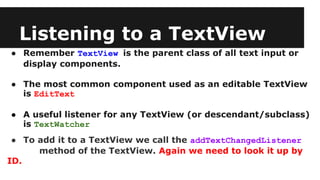
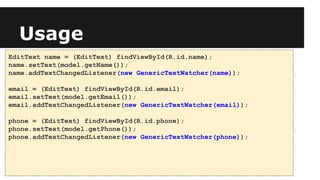
Android App Development
Lesson 3 - Lifecycle, Bundles & More On Events
Today’s Lesson
● Continuation of layout Case Study
● More on App Lifecycle
● Bundles
RelativeLayout attributes
Last week we
started looking
at this case
study.
Remember RED
sits in the
default
position
android:layout_height
android:layout_width
● Two key XML layout properties we’ve seen so far are
android:layout_height and android:layout_width
● These properties are inherited from RelativeLayout
superclass ViewGroup.
● Possible values
o wrap_content - Size large enough to contain whatever
is in it.
o fill_parent /match_parent(*NEW*) - Make it match its
parents width or height.
The Other Components
● The ORANGE component is centred horizontally relative
to its parent (the RelativeLayout)
<TextView
android:text="ORANGE"
android:layout_height="wrap_content"
android:background="#ffa500"
android:gravity="center"
android:textColor="#000"
android:id="@+id/TextView02"
android:layout_width="wrap_content"
android:layout_centerHorizontal="true"
android:padding="25dp"></TextView>
The Other Components
● The YELLOW component is aligned with the right-hand
edge of the parent (the RelativeLayout)
<TextView
android:text="YELLOW"
android:layout_height="wrap_content"
android:background="#ffff00"
android:gravity="center"
android:textColor="#000"
android:id="@+id/TextView03"
android:layout_width="wrap_content"
android:layout_alignParentRight="true"
android:padding="25dp"></TextView>
The Other Components
● The BLUE component is centered horizontally and
vertically relative to the parent (the RelativeLayout).
<TextView
android:text="BLUE"
android:layout_height="wrap_content"
android:background="#00f"
android:gravity="center"
android:textColor="#fff"
android:id="@+id/TextView05"
android:layout_width="wrap_content"
android:layout_centerInParent="true"
android:layout_margin="10dp"
android:padding="25dp"></TextView>
The Other Components
● Both the GREEN and the the INDIGO are vertically
centered on the parent (the RelativeLayout) BUT
horizontally positioned to the left and right respectively
of the BLUE component.
android:layout_centerVertical="true"
AND
android:layout_toLeftOf="@+id/TextView05"
android:layout_toRightOf="@+id/TextView05"
And Finally - VIOLET
● The VIOLET component is positioned relative to the
bottom edge of the parent (the RelativeLayout). Its
width is made to match that of its parent.
android:layout_alignParentBottom="true"
android:layout_width="match_parent"
App Lifecycle
● Already seen that onCreate(Bundle savedInstance) gets
called on app startup. There is also an onDestroy()
● But by its very nature the Android OS can intervene in
other ways. So what are they ?
o onStart() and onStop() (Wrap entire Activity lifecycle start to finish)
o onRestart() and onPause() (Wrap period when Activity is in the
foreground visible to user)
● For the moment our main concern is when our app is
restarted. This is an onDestroy() followed by onCreate()
App Restarting
● Apps are NOT like desktop apps where we “start
afresh” each time we run
● Use expects to be able flick between apps and come
back to your app and find it as it was. e.g.
o Open your app. Fill in a few text fields
o Open Facbook & post something
o Hit home button and click on your app icon again.
(In a scenario like this your app may be left running in the background or
may be killed by the Android OS to free up resources. Either way the user
expects their data to still be there => YOU need to handle restarts)
Retaining State
● NOTE : Simplest example of app restart iswhen
orientation changes. (i.e. from portrait to landscape)
● “User editable” text components automatically retain
state in this type of restart. The Bundle is automatically
populated with these. (but not when started afresh)
@Override
protected void onCreate(Bundle savedInstanceState) {
super.onCreate(savedInstanceState);
The Bundle
● The Bundle is just a set of key / value pairs like a table of
name and addresses.
● We can use this Bundle to save data which we would like
to save in additon to what Android OS saves.
● To get access to the Bundle we need to override another
method called onSaveInstanceState(Bundle savedInstanceState)
● One of its methods called putCharSequence(String key, String value)
Here’s the Code
@Override
protected void onSaveInstanceState(
Bundle savedInstanceState){
savedInstanceState.putCharSequence(
"myText",textView.getText());
super.onSaveInstanceState(savedInstanceState);
}
This would be a reference to one of your GUI components.
Like last week when we looked up components by their
IDs.
Using the Bundle
● To retrieve values from the Bundle, override
onRestoreInstanceState(Bundle savedInstanceState)
String mySavedString =
savedInstanceState.getCharSequence("myText"));
● Bundle has LOTS more useful methods for storing
things other than Strings.
See API reference here :
http://developer.android.com/reference/android/os/Bundle.html
More on Events
● Only the onClick() can be done through XML via the
property sheet like as in the previous lecture.
● For all other types of events (e.g. Typing in a text field)
we need more “traditional” Java event handling code.
● We can also do onClick() using the traditional method
so we’ll use that as our starting point.
● The Android eqivalent of ActionListener (Swing) is
OnClickListener
OnClickListener
package com.example.lotterygenerator.listeners;
import android.view.View;
import android.view.View.OnClickListener;
public class MyButtonListener implements OnClickListener {
@Override
public void onClick(View v) {
//The Code to be run in response to a click goes
here
}
}
As in Swing
anonymous
inner classes
are preferable
to this more
basic approach.
Adding OnClickListener
● To add our listener on we need to go back to our
Activity.
o 1. Look up the button using its ID.
Button button=(Button)findViewById(R.id.button);
o 2. Add the listener to the button
button.setOnClickListener(new MyButtonListener());
Listening to a TextView
● Remember TextView is the parent class of all text input or
display components.
● The most common component used as an editable TextView
is EditText
● A useful listener for any TextView (or descendant/subclass)
is TextWatcher
● To add it to a TextView we call the addTextChangedListener
method of the TextView. Again we need to look it up by
ID.
TextWatcher
● TextWatcher has three event handling methods which have
the following signature.
public abstract void afterTextChanged (Editable s)
public abstract void beforeTextChanged (CharSequence s, int start, int count, int after)
public abstract void onTextChanged (CharSequence s, int start, int before, int count)
● We are most interested in afterTextChanged(Editable s)
Listening to a few Views
private class GenericTextWatcher implements TextWatcher{
private View view;
private GenericTextWatcher(View view) {
this.view = view;
}
public void beforeTextChanged(CharSequence charSequence, int i, int i1, int i2) {}
public void onTextChanged(CharSequence charSequence, int i, int i1, int i2) {}
● We would use a listener like this if we want to
centralize our listener into one class for multiple View
classes
Listening to a few Views
public void afterTextChanged(Editable editable) {
String text = editable.toString();
switch(view.getId()){
case R.id.name:
//Do something with name text; break;
case R.id.email:
//Do something with email text; break;
case R.id.phone:
//Do something with name text;break;
}
}
Depending which of
the instances of
GenericTextWatcher
is triggered we have
a switch statment
which decides what
to do
Usage
EditText name = (EditText) findViewById(R.id.name);
name.setText(model.getName());
name.addTextChangedListener(new GenericTextWatcher(name));
email = (EditText) findViewById(R.id.email);
email.setText(model.getEmail());
email.addTextChangedListener(new GenericTextWatcher(email));
phone = (EditText) findViewById(R.id.phone);
phone.setText(model.getPhone());
phone.addTextChangedListener(new GenericTextWatcher(phone));

Lesson 3

  • 1.
    Android App Development Lesson3 - Lifecycle, Bundles & More On Events
  • 2.
    Today’s Lesson ● Continuationof layout Case Study ● More on App Lifecycle ● Bundles
  • 3.
    RelativeLayout attributes Last weekwe started looking at this case study. Remember RED sits in the default position
  • 4.
    android:layout_height android:layout_width ● Two keyXML layout properties we’ve seen so far are android:layout_height and android:layout_width ● These properties are inherited from RelativeLayout superclass ViewGroup. ● Possible values o wrap_content - Size large enough to contain whatever is in it. o fill_parent /match_parent(*NEW*) - Make it match its parents width or height.
  • 5.
    The Other Components ●The ORANGE component is centred horizontally relative to its parent (the RelativeLayout) <TextView android:text="ORANGE" android:layout_height="wrap_content" android:background="#ffa500" android:gravity="center" android:textColor="#000" android:id="@+id/TextView02" android:layout_width="wrap_content" android:layout_centerHorizontal="true" android:padding="25dp"></TextView>
  • 6.
    The Other Components ●The YELLOW component is aligned with the right-hand edge of the parent (the RelativeLayout) <TextView android:text="YELLOW" android:layout_height="wrap_content" android:background="#ffff00" android:gravity="center" android:textColor="#000" android:id="@+id/TextView03" android:layout_width="wrap_content" android:layout_alignParentRight="true" android:padding="25dp"></TextView>
  • 7.
    The Other Components ●The BLUE component is centered horizontally and vertically relative to the parent (the RelativeLayout). <TextView android:text="BLUE" android:layout_height="wrap_content" android:background="#00f" android:gravity="center" android:textColor="#fff" android:id="@+id/TextView05" android:layout_width="wrap_content" android:layout_centerInParent="true" android:layout_margin="10dp" android:padding="25dp"></TextView>
  • 8.
    The Other Components ●Both the GREEN and the the INDIGO are vertically centered on the parent (the RelativeLayout) BUT horizontally positioned to the left and right respectively of the BLUE component. android:layout_centerVertical="true" AND android:layout_toLeftOf="@+id/TextView05" android:layout_toRightOf="@+id/TextView05"
  • 9.
    And Finally -VIOLET ● The VIOLET component is positioned relative to the bottom edge of the parent (the RelativeLayout). Its width is made to match that of its parent. android:layout_alignParentBottom="true" android:layout_width="match_parent"
  • 10.
    App Lifecycle ● Alreadyseen that onCreate(Bundle savedInstance) gets called on app startup. There is also an onDestroy() ● But by its very nature the Android OS can intervene in other ways. So what are they ? o onStart() and onStop() (Wrap entire Activity lifecycle start to finish) o onRestart() and onPause() (Wrap period when Activity is in the foreground visible to user) ● For the moment our main concern is when our app is restarted. This is an onDestroy() followed by onCreate()
  • 11.
    App Restarting ● Appsare NOT like desktop apps where we “start afresh” each time we run ● Use expects to be able flick between apps and come back to your app and find it as it was. e.g. o Open your app. Fill in a few text fields o Open Facbook & post something o Hit home button and click on your app icon again. (In a scenario like this your app may be left running in the background or may be killed by the Android OS to free up resources. Either way the user expects their data to still be there => YOU need to handle restarts)
  • 12.
    Retaining State ● NOTE: Simplest example of app restart iswhen orientation changes. (i.e. from portrait to landscape) ● “User editable” text components automatically retain state in this type of restart. The Bundle is automatically populated with these. (but not when started afresh) @Override protected void onCreate(Bundle savedInstanceState) { super.onCreate(savedInstanceState);
  • 13.
    The Bundle ● TheBundle is just a set of key / value pairs like a table of name and addresses. ● We can use this Bundle to save data which we would like to save in additon to what Android OS saves. ● To get access to the Bundle we need to override another method called onSaveInstanceState(Bundle savedInstanceState) ● One of its methods called putCharSequence(String key, String value)
  • 14.
    Here’s the Code @Override protectedvoid onSaveInstanceState( Bundle savedInstanceState){ savedInstanceState.putCharSequence( "myText",textView.getText()); super.onSaveInstanceState(savedInstanceState); } This would be a reference to one of your GUI components. Like last week when we looked up components by their IDs.
  • 15.
    Using the Bundle ●To retrieve values from the Bundle, override onRestoreInstanceState(Bundle savedInstanceState) String mySavedString = savedInstanceState.getCharSequence("myText")); ● Bundle has LOTS more useful methods for storing things other than Strings. See API reference here : http://developer.android.com/reference/android/os/Bundle.html
  • 16.
    More on Events ●Only the onClick() can be done through XML via the property sheet like as in the previous lecture. ● For all other types of events (e.g. Typing in a text field) we need more “traditional” Java event handling code. ● We can also do onClick() using the traditional method so we’ll use that as our starting point. ● The Android eqivalent of ActionListener (Swing) is OnClickListener
  • 17.
    OnClickListener package com.example.lotterygenerator.listeners; import android.view.View; importandroid.view.View.OnClickListener; public class MyButtonListener implements OnClickListener { @Override public void onClick(View v) { //The Code to be run in response to a click goes here } } As in Swing anonymous inner classes are preferable to this more basic approach.
  • 18.
    Adding OnClickListener ● Toadd our listener on we need to go back to our Activity. o 1. Look up the button using its ID. Button button=(Button)findViewById(R.id.button); o 2. Add the listener to the button button.setOnClickListener(new MyButtonListener());
  • 19.
    Listening to aTextView ● Remember TextView is the parent class of all text input or display components. ● The most common component used as an editable TextView is EditText ● A useful listener for any TextView (or descendant/subclass) is TextWatcher ● To add it to a TextView we call the addTextChangedListener method of the TextView. Again we need to look it up by ID.
  • 20.
    TextWatcher ● TextWatcher hasthree event handling methods which have the following signature. public abstract void afterTextChanged (Editable s) public abstract void beforeTextChanged (CharSequence s, int start, int count, int after) public abstract void onTextChanged (CharSequence s, int start, int before, int count) ● We are most interested in afterTextChanged(Editable s)
  • 21.
    Listening to afew Views private class GenericTextWatcher implements TextWatcher{ private View view; private GenericTextWatcher(View view) { this.view = view; } public void beforeTextChanged(CharSequence charSequence, int i, int i1, int i2) {} public void onTextChanged(CharSequence charSequence, int i, int i1, int i2) {} ● We would use a listener like this if we want to centralize our listener into one class for multiple View classes
  • 22.
    Listening to afew Views public void afterTextChanged(Editable editable) { String text = editable.toString(); switch(view.getId()){ case R.id.name: //Do something with name text; break; case R.id.email: //Do something with email text; break; case R.id.phone: //Do something with name text;break; } } Depending which of the instances of GenericTextWatcher is triggered we have a switch statment which decides what to do
  • 23.
    Usage EditText name =(EditText) findViewById(R.id.name); name.setText(model.getName()); name.addTextChangedListener(new GenericTextWatcher(name)); email = (EditText) findViewById(R.id.email); email.setText(model.getEmail()); email.addTextChangedListener(new GenericTextWatcher(email)); phone = (EditText) findViewById(R.id.phone); phone.setText(model.getPhone()); phone.addTextChangedListener(new GenericTextWatcher(phone));