THYRISTOR Rectifier Operation and Maintenance
•Download as PPTX, PDF•
0 likes•62 views

This document provides an overview and instructions for a thyristor rectifier. It begins with safety precautions and introduces thyristor rectifiers for industrial and telecom applications. It then summarizes the components and operating principle, including the transformer, thyristor bridge, filtering capacitors, and microprocessor controller. Troubleshooting tips are provided for common faults like mains faults and rectifier/charger faults. Maintenance procedures including periodic checks of voltage settings, air filters, and replacing parts after several years are also described.

Recommended
Recommended
More Related Content
Similar to THYRISTOR Rectifier Operation and Maintenance
Similar to THYRISTOR Rectifier Operation and Maintenance (20)
Recently uploaded
Recently uploaded (20)
THYRISTOR Rectifier Operation and Maintenance
- 2. Agenda • Introduction • Overview of the Project • Operating principle of the Rectifier Thyrotronic • Description of the Electric diagram • Description of the various organs (key Components) • Description Display / Menu (machine interface) • Description of the Alarms • Maintenance of the Equipment • Test • Question
- 3. Safety Precaution : Authorized and qualified personnel to operate the equipment. Follow the instructions in the documentation. (Electrical drawing - Operating Manual) The user should study the instructions carefully in order to ensure that the system is operated correctly and safely. This avoids: • Risks during installation, operation and maintenance. • Risks to the installer / operator. • Downtime, and enhances the reliability and lifespan of the system. Proper Insulated tools There is a risk of injury from improper handling. Introduction
- 4. Proper tools
- 5. THYROTRONIC The thyristors rectifier For Industrial and Telecom applications Range of applications : • Power plants / substations • Railway equipment • Offshore projects • Oil and gas pipeline systems • hospitals Leading role : To furnish a DC output voltage from a three phase alternative current source during mains supply, as well as during mains failure, Electrical loads are employed in all areas of industry and public life which must be protected against failure of the power supply system. Together with shunt-connected batteries, the rectifier THYROTRONIC forms a guaranteed power supply.
- 6. Overview of the Project Under the reference k2917 and S/S9020 6 Chargers D220G116/400 TDG3 2 ATS (Automatic transfer switch) 4 BMP (Batteries Monitoring Panel) 2 batteries string 58 cells 2250
- 7. Overview of the Product Príncipe of THYROTRONIC Powerrange THYROTRONIC Standard architecture Principle operation Mains components descriptions
- 8. Energy flow: Mains -> rectifier -> battery ->load (normal operation) Battery -> load (during mains failure) Secure supply of the load during mains failure due to stand by parallel operation rectifier mains load battery Principe of THYROTRONIC
- 9. The rating of the rectifier is depending of the load and the battery type, 1- For NiCd Battery type The output current of the rectifier is the current load and the battery capacity divided by 5 (battery charge current recommended by the battery manufacturer) 2- For vented lead acid battery type The output current of the rectifier is the current load and the battery capacity divided by 10 (battery charge current recommended by the battery manufacturer) For example for 100Ah NiCd and a load of 50A The nominal rectifier output current is 50A+100A/5=70A For example for 100Ah Opzs and a load of 50A The nominal rectifier output current is 50A+100A/10=60A Rating of the rectifier
- 10. Power range THYROTRONIC Power range DC Voltage 24V, 48V, 60V, 110V, 120V, 220V Nominal output current from 20A to 2000A (more with parallel units) Input 1 phase model (small power) 1 x 220/230 V ± 10,15 %, 50/60 Hz ± 5 % Input 3 phases models 3 x 220/230/380/400/440/480 V ± 10 %, 50/60 Hz ± 5 % Input power factor >= 0,75 Ambient temperature Std +40°C , special feature up to +55°C Total efficiency from 78% (24V) up to 96%(220V),depending of charger rating
- 11. Standard architecture Charger type designation The rectifier THYROTRONIC is available in different versions. The following is an example of a decoded type designation: D 380 G 48/200 BWrug-TDG3 Additional manufacturer designation Equipment characteristics (battery and resistance load, characteristic control, switchable characteristic, smoothed output current Nominal output voltage/current (48V/200A) G = AC/DC converter Mains Nominal voltage (380V) Input model (D=3 phases; E=single phase)
- 12. Floor cabinets (Height x width x depth) From 1500 x 600 x 400mm Up to 2200 x 2400 x 1000mm Standard protection IP20 for indoor using up to IP56 for outdoor using. Standard architecture
- 13. Display LCD or graphic Thysat regulator unit, digital controller Mains transformer Thyristor pulse transformers card Thyristors bridge Mains contactor
- 15. General description The mains voltage is supplied to the transformer by way of a mains switch and contactor. This is where the galvanic separation of battery and mains and the adjustment of the voltage to the corresponding battery voltage take place. The alternating voltage is converted into a direct voltage in a three-phase or single-phase bridge circuit (thyristor bridge). The thyristors are activated by the microprocessor-controlled Thysat regulator. Smoothing of the direct current is achieved by way of a filter. This consists of a smoothing choke situated in the direct current circuit and several shunt-connected electrolyte capacitors. Voltage and current can be read off the built-in instruments. The rectifier operates with an IU characteristic according to DIN 41773, by means of which the set output voltage is kept constant within a load range of 0 and 100% of the equipment current with a deviation of ± 0.5 %. Mains voltage and mains frequency fluctuations are compensated.
- 16. Thyristor charger principle operation
- 17. Mains components Input protection by MCCB or FUSE Mains input contactor (K001) Mains input transformer (T1) Auxiliary transformer (T2) Thyristors rectifier bridge assembly (V1..V6) Digital controller THYSAT regulator board (A1) Pulse transformers card (A3) RC network card (A10) Ballast resistor (R10) Rectifier bridge protection by fast fuse (F7) DC smothing chemical capacitors (C10) DC smothing choke (L1) DC charger current measure shunt In/60mV (R001) DC output protection (for load or battery)
- 18. Thyristor rectifier Mains transformer (T1) : Example for transformer calculation : Charger used with a lead battery, Max. voltage per cell = 2.65V Output voltage per leg (Us) = ((2,65 x N° of cells x 1,1) + 3) / 2,18 1,1 is 10% for the voltage drop on mains network (std); 3 is 3V of drop voltage on the 2 thyristors and choke. 2,18 it’s a fixed coefficient for 3 phases charger. Example : charger used with lead battery 24 cells (48V) and output current of 400A. Us = ((2.65x24x1.1)+3)/2.18 = 33.4V Is = 0,81 x Ic = 0,81 x 400 = 324A Transformer power is : 324A x 33.4V x 3 = 32,5 kVA Us Is Ic
- 19. Thyristor rectifier Ballast resistor (R10) : The function of this resistor is to maintain a minimum conducting current in the bridge « Holding cuurent ». This value is in general 1/1000 of the nominal current of the thyristors. e.g. For 48V range, we use a resistor of 200 ohms which apply an holding current of around 275mA under 55V (so applicable for all the range in 48V up to a bridge of 275A).
- 20. Thyristor rectifier Output filtering (chemical capacitors C10 and chocke L1) : The function of the cellul L-C is to smooth voltage and current from the bridge. The values of the DC choke and capacitors are a compromise between them. An easy rule can be used to calculate these components for 3 phases models: L1(in mH) = 2.5 Udc / I dc C10= 5000 x (Idc/Udc) for a ripple of 3% RMS , this value must be multplied by 2 for a ripple of 1% RMS. Example: charger 120V/100A with a ripple of 3% RMS : C10 = 5000x(100/120) = 4166uF; in this case we will install 5 capacitors of 1000uF in //. For lower ripple value request (e.g. Telecom filtering 1/1000) we add a 2nd cell L-C in parallel. Udc Idc
- 21. Thyristor rectifier RC network (A10) : This card integrates several RC cells which are connected in // with each thyristors , this allow to reduce Dv/dt (short time voltage variation) on the thyristor (a high Dv/dt can destroy the thyristor).
- 22. Thyristor rectifier Fast Fuse (F7) : This fuse allows to protect the thyristors agaisnt short-circuit. The fuse it’s a fast fuse specially used for semi- conductors protection. In order to protect correctly the thyrisor the I2t from the fuse must << 0.8 x I2t from the thyristor. This fuse has a micro-swicth which allow to stop the charger (pulse blocking on the regulator board) in case of fuse blowing.
- 23. THYSAT Regulator (A1) The Thysat regulator is a microprocessor-controlled, configurable assembly and serves to monitor and control the rectifier. Regulation, activation of thyristors, measuring signal processing and provision of supply voltages takes place on the basic regulator card. Control unit and basic regulator card are an integral assembly; they are designed to complement each other and function only as a unit. The Thysat regulator consists on the assembly of 2 PCBs.
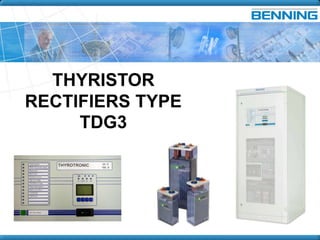
- 26. Standard display for charger TDG3 • Multifunctional display and operation panel • 4-line multi lingual LC-display • Easy operation over menu driven arrow buttons • 4 LED‘s for rectifier status • 13 LED‘s for direkt information • Pass word protection on important menu points • Event recorder for max. 200 inputs with time and date
- 27. Preventive Maintenance The DC charger system is virtually maintenance-free however, please respect the following instructions: CHECK VOLTAGE SETTINGS (Floating, equalizing,…) one time per year minimum. To ensure trouble free operation, it is recommended to check the air inlet and outlet yearly. Dust should be removed by suction. Do not used compressed air, as dust particles may enter the interior of the rectifier part. It’s recommended every 5 years to replace the rectifier bridge fan (forced cooling version) and the chemical capacitors C10.
- 28. MAINS FAULT 1-Check the 3 phases.Input voltage mains 2-Check the MAINS Input MCCB or fuses 3-Check if the mains voltage on the regulation board A1 is present ( X1:1.3.5) 4-Check jumpers (X11, 12, 13) on A1 5-Check 3 fuses (F1,F2, F3) on A1 6- Replace A1
- 30. Maintenance 1-Check The input Voltage You should have 380VAC between the phase1-2,1-3 and2- 3 And if you can to respect a clockwise
- 31. RECTIFIER/CHARGER FAULT 1-Check if green LED of pulse transformer card is lit 2-Check if auxiliary fuses are corrects 3- Check auxiliary transformer T2 (if existing) 4- check the coil of mains contactor K001 5-Check the thyristor ,pulse tranformer, card A1 (see after) 6- Replace A1.