

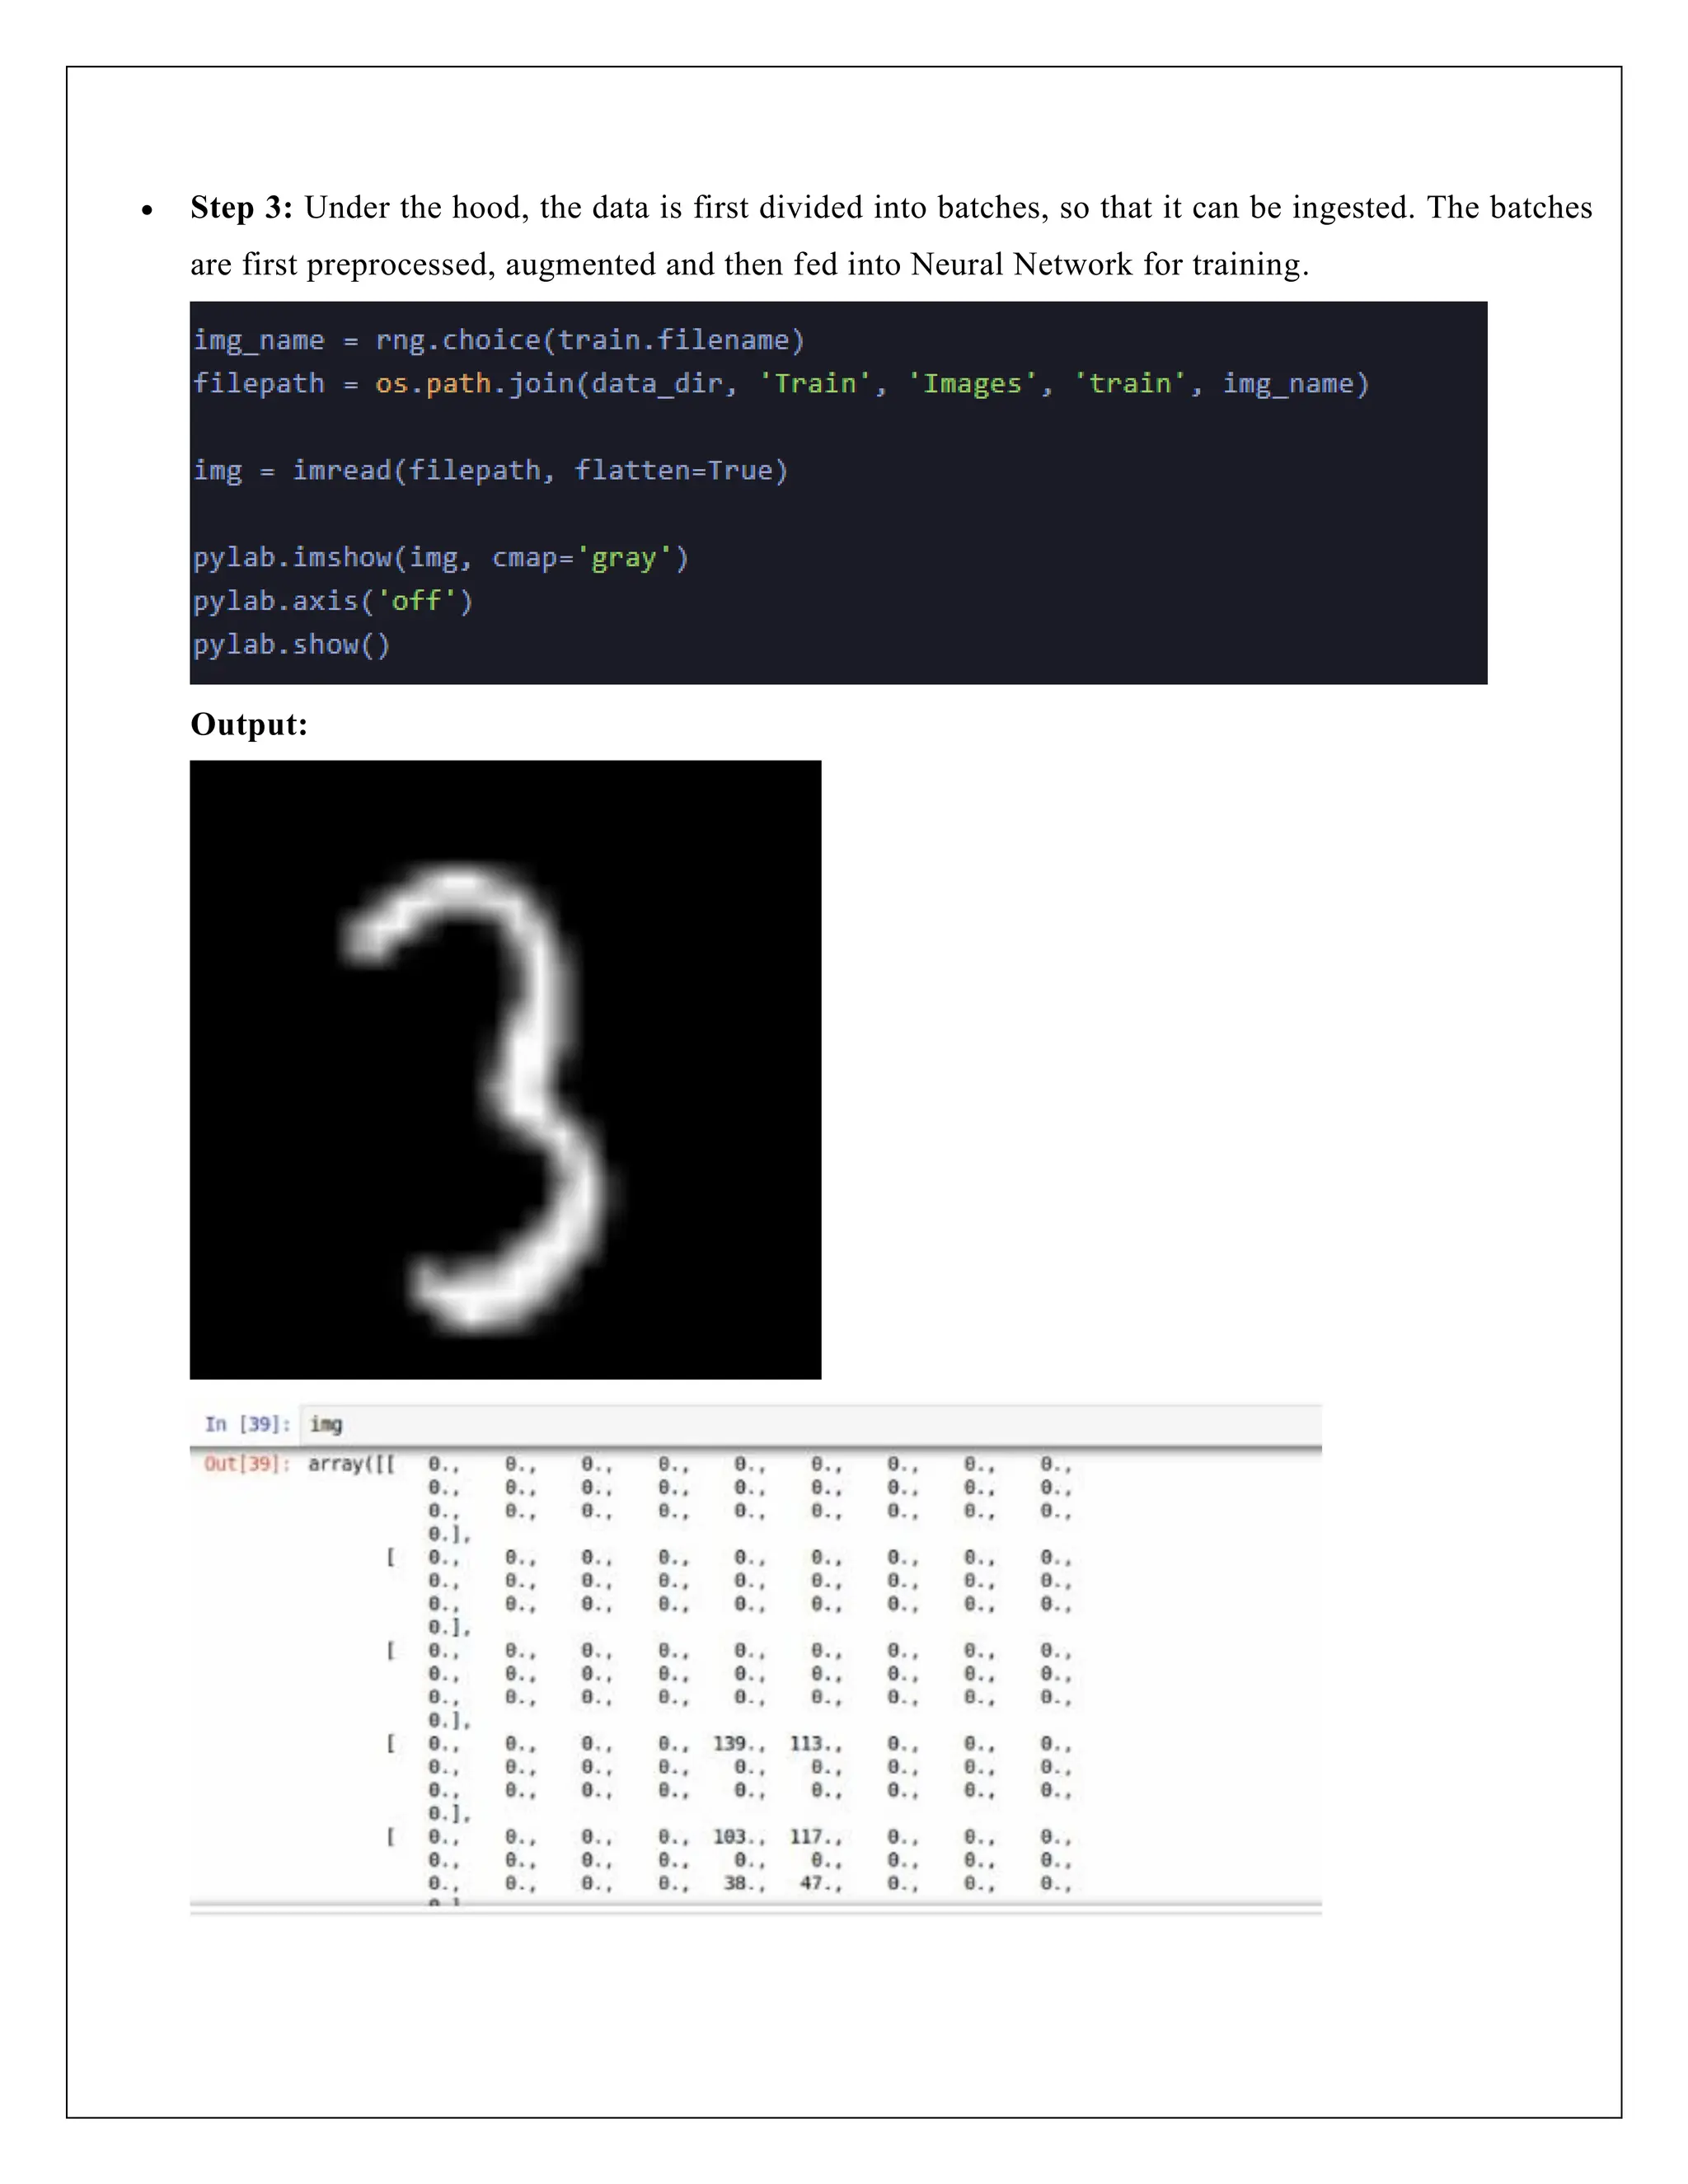
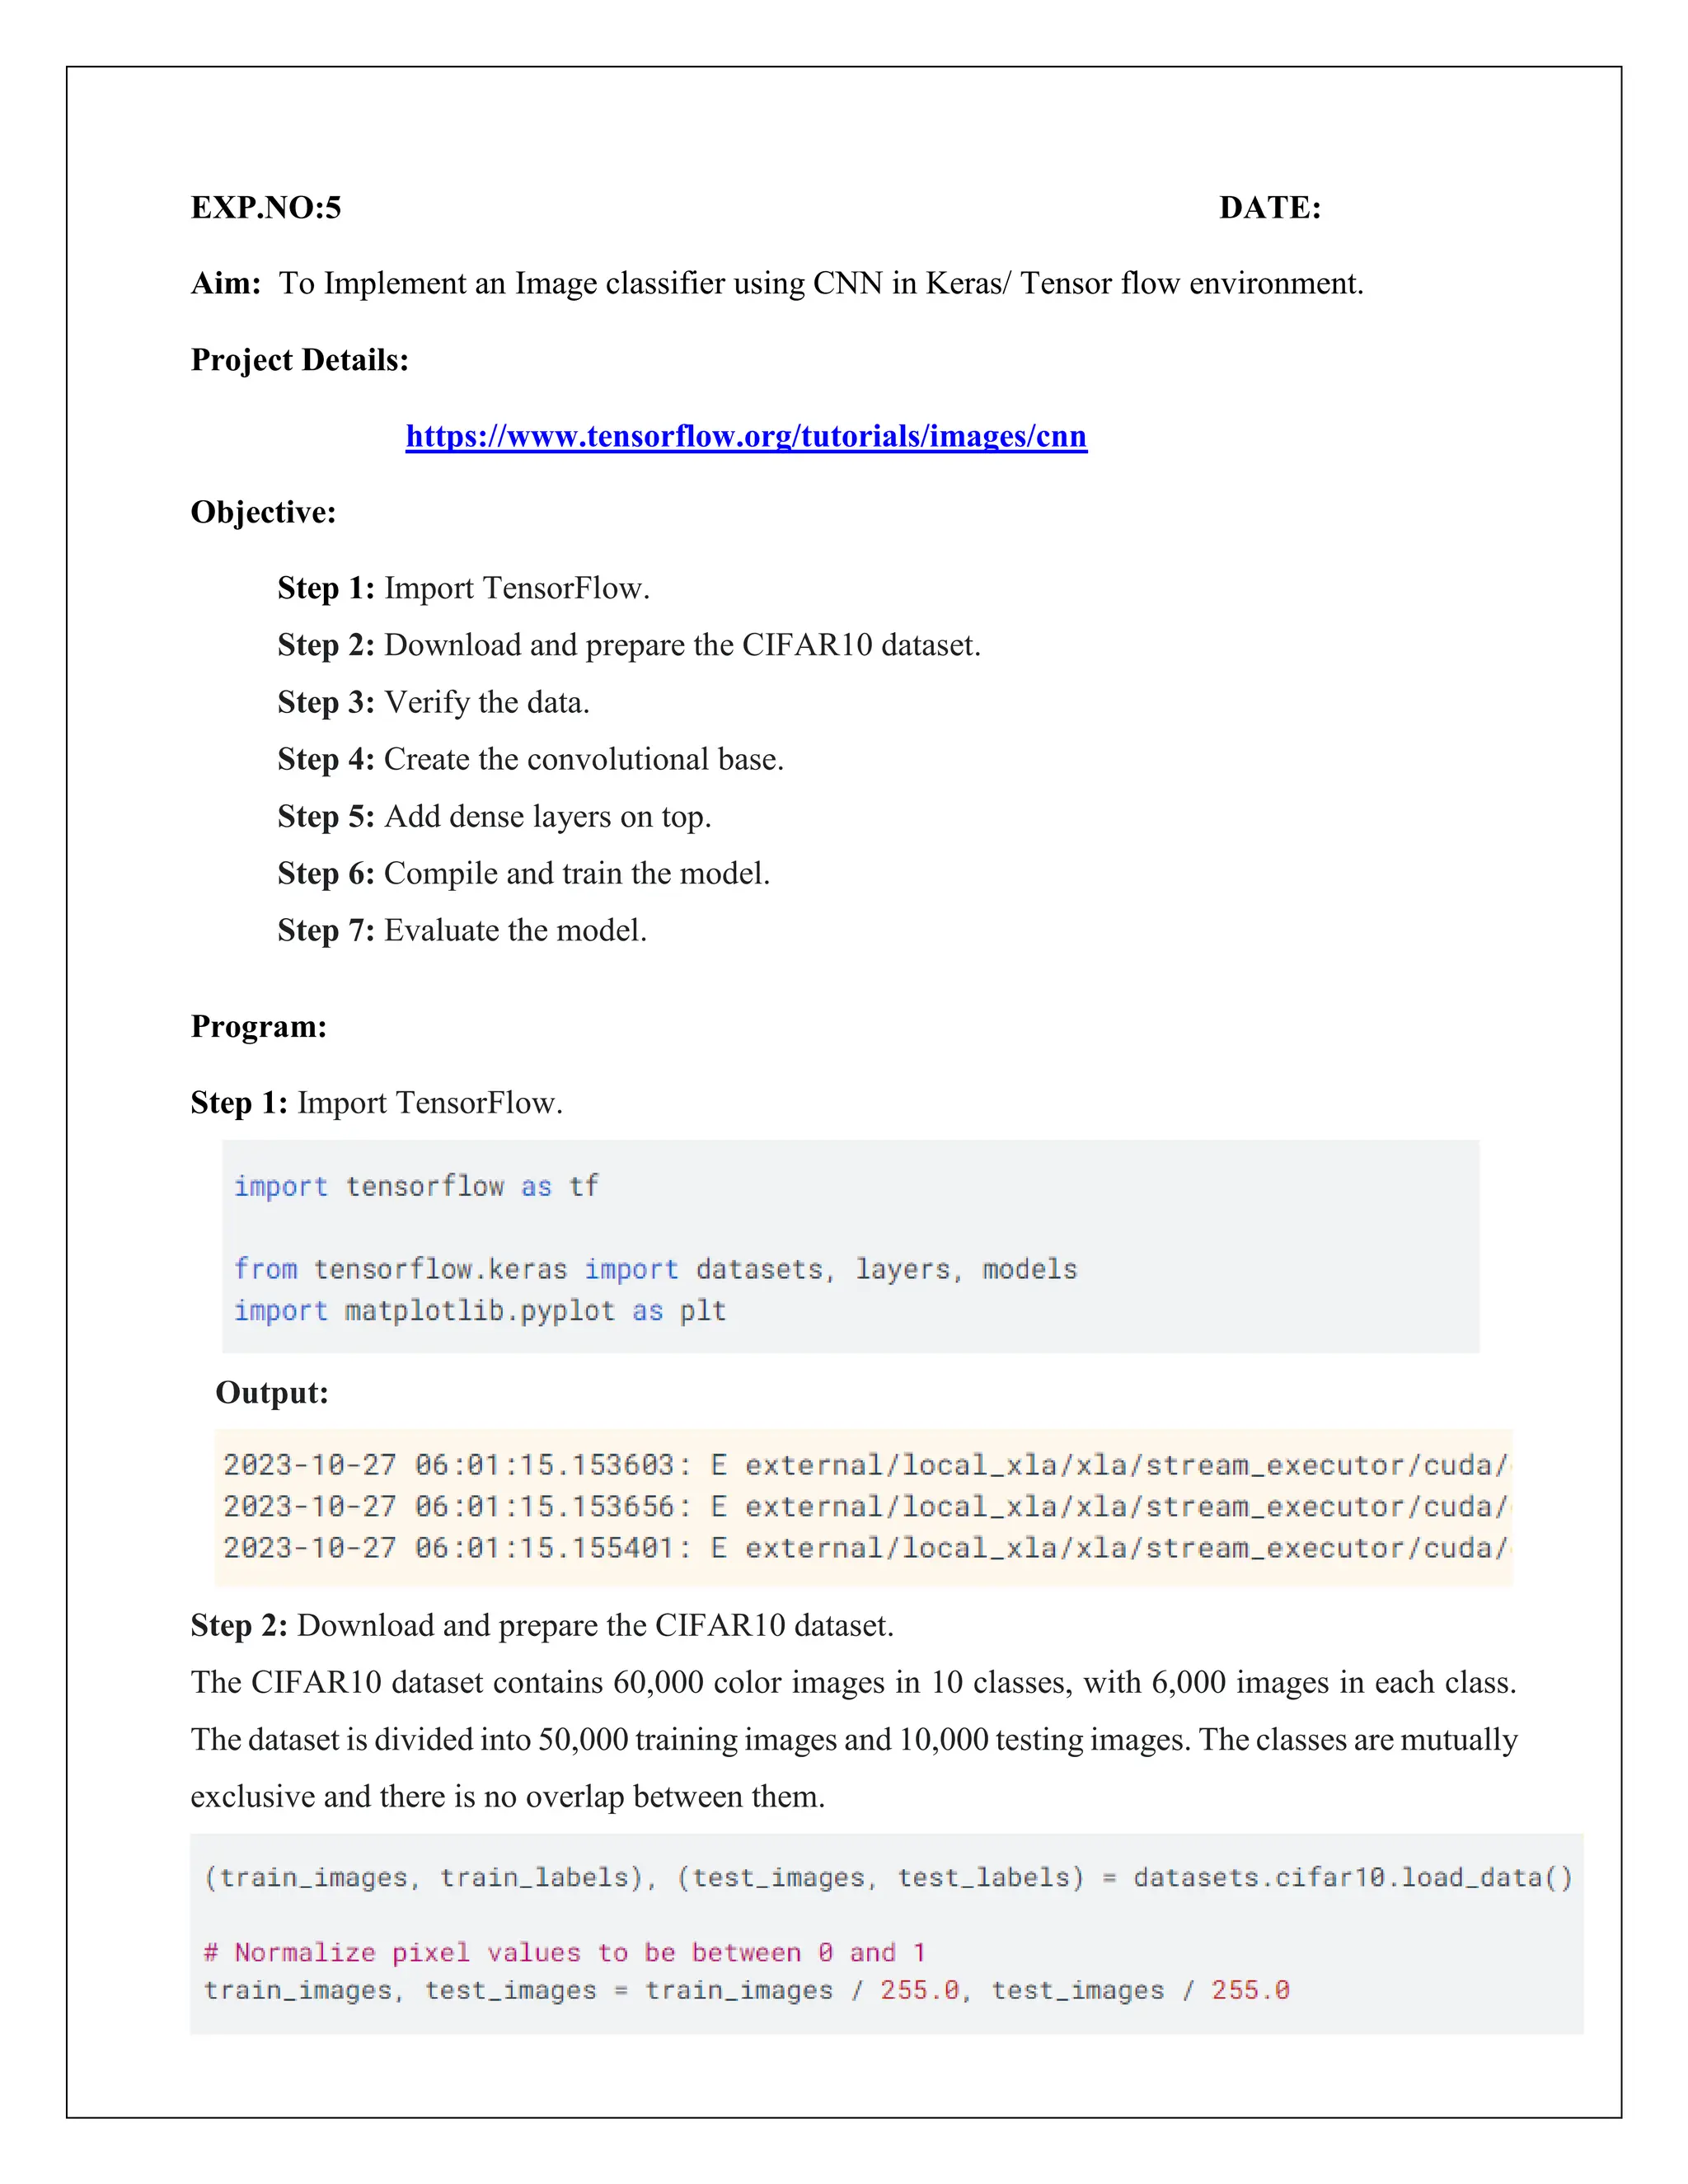
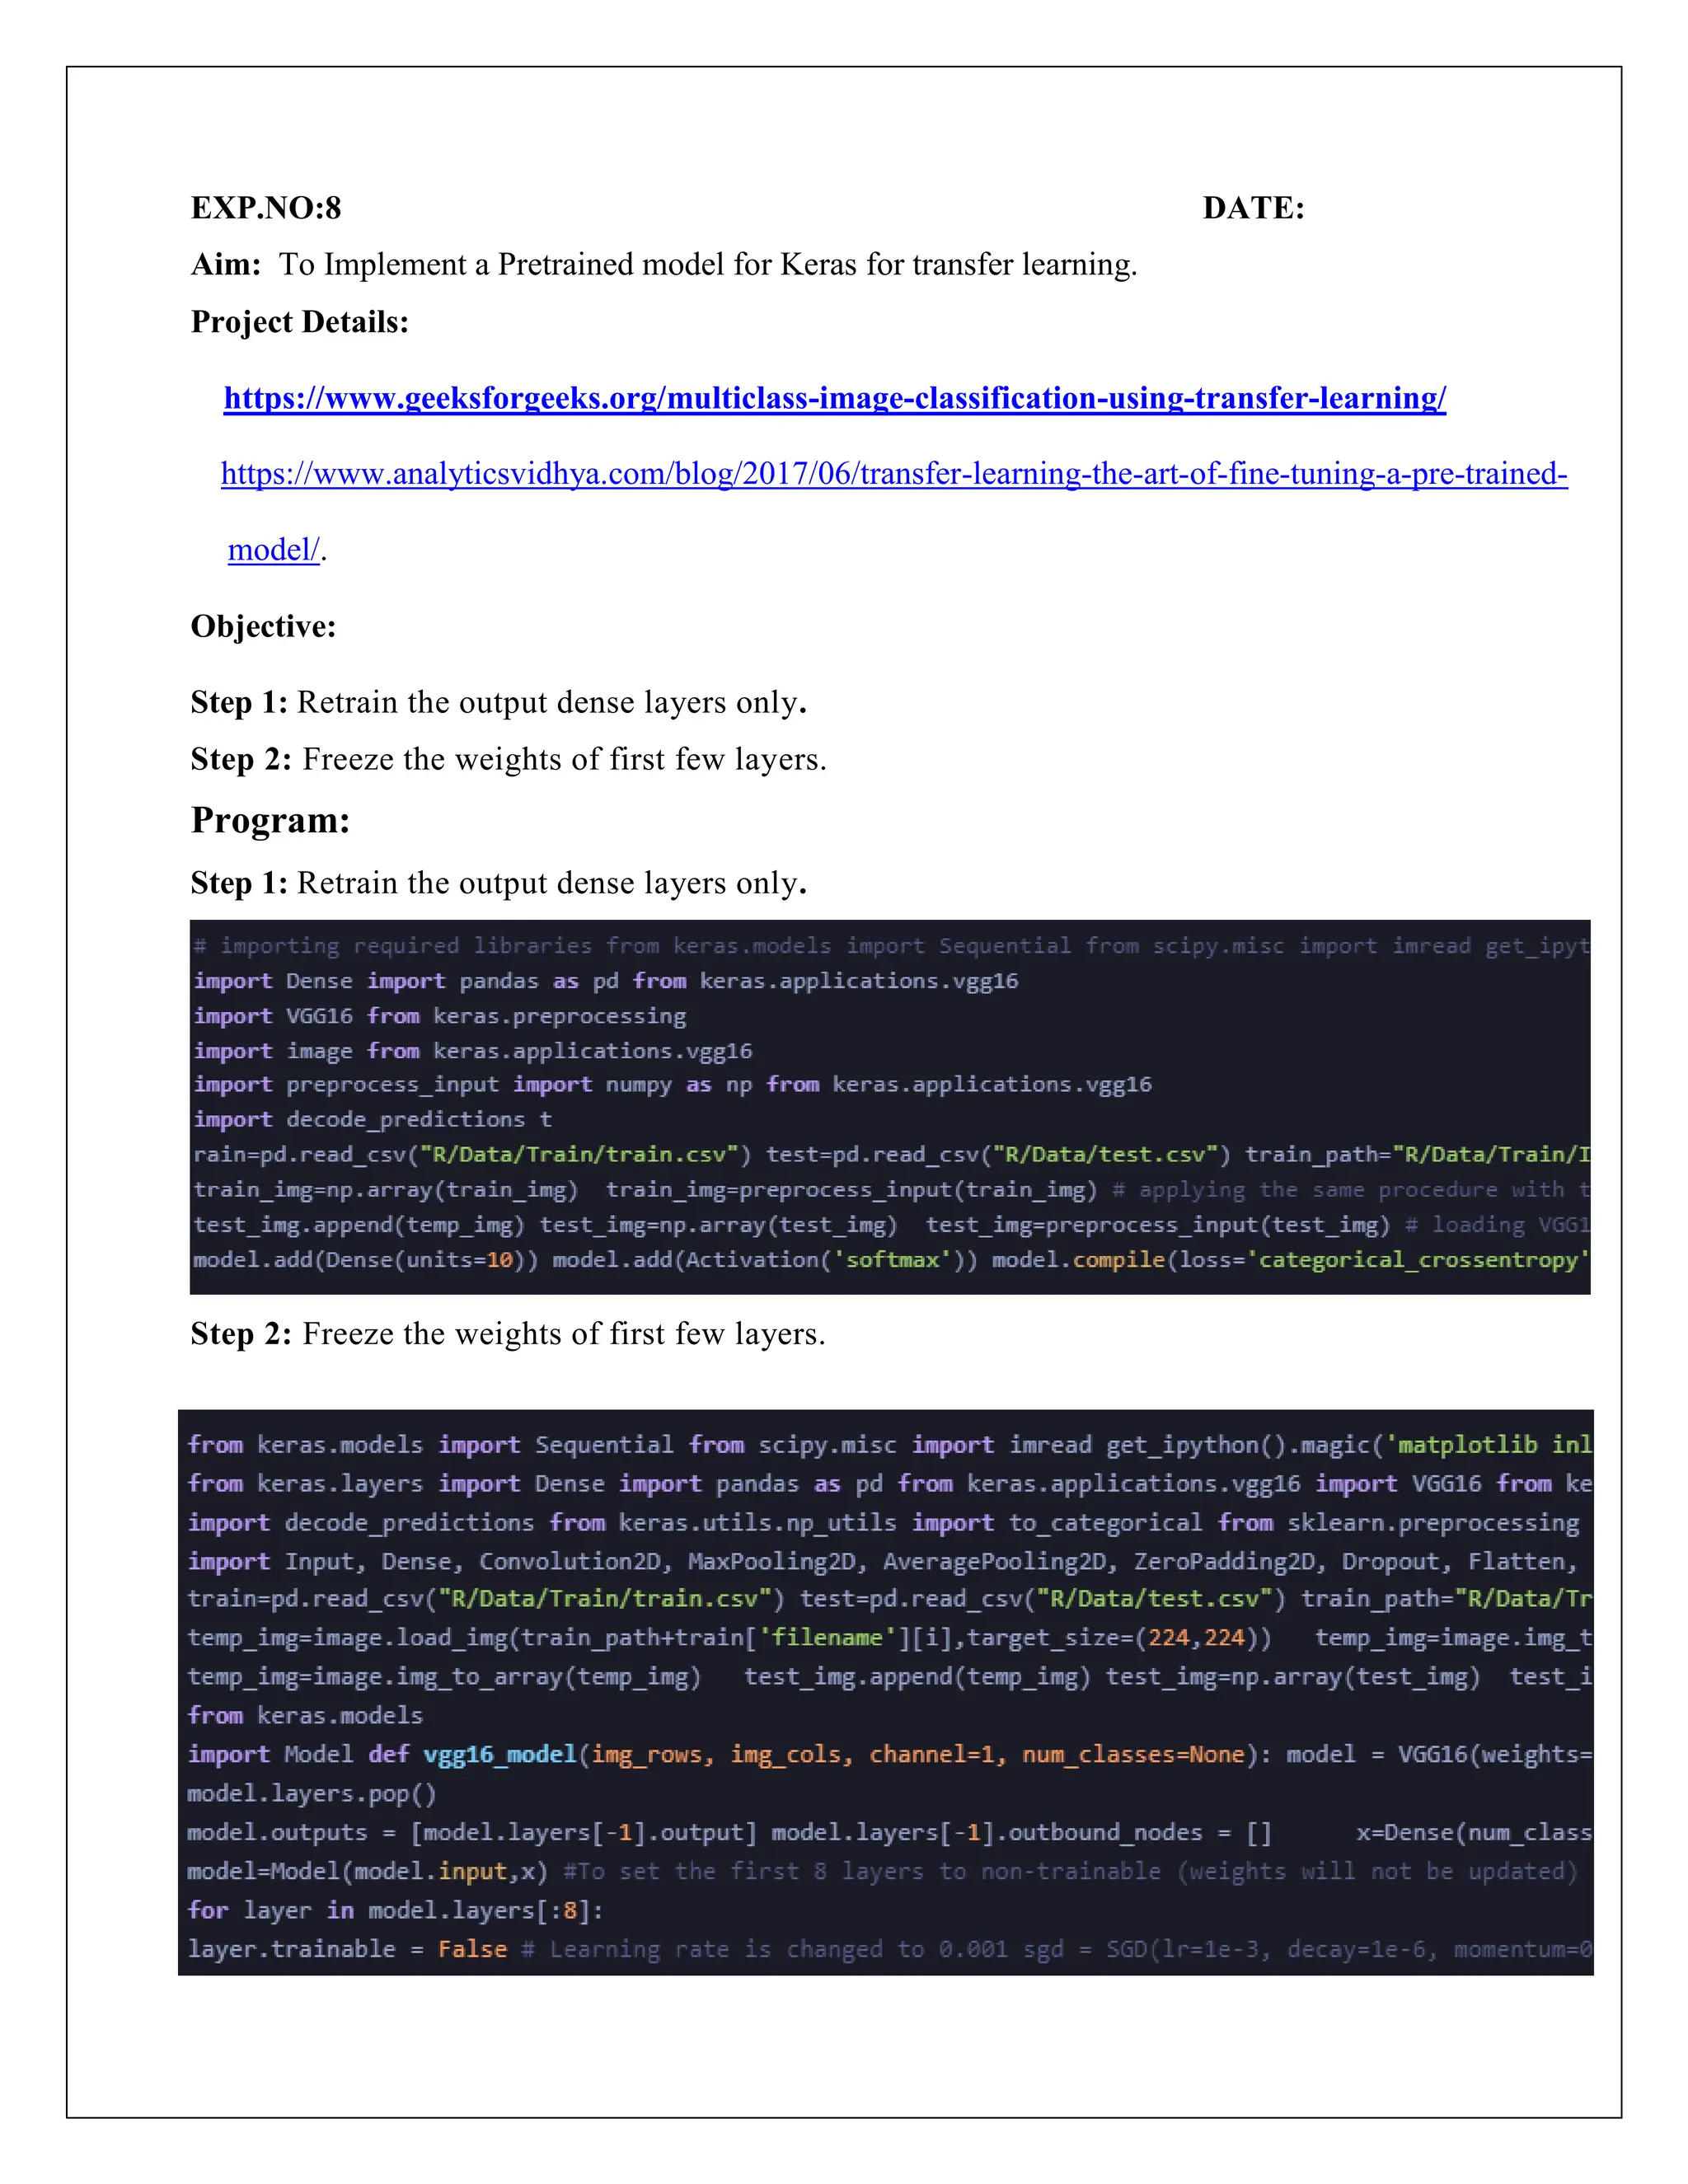
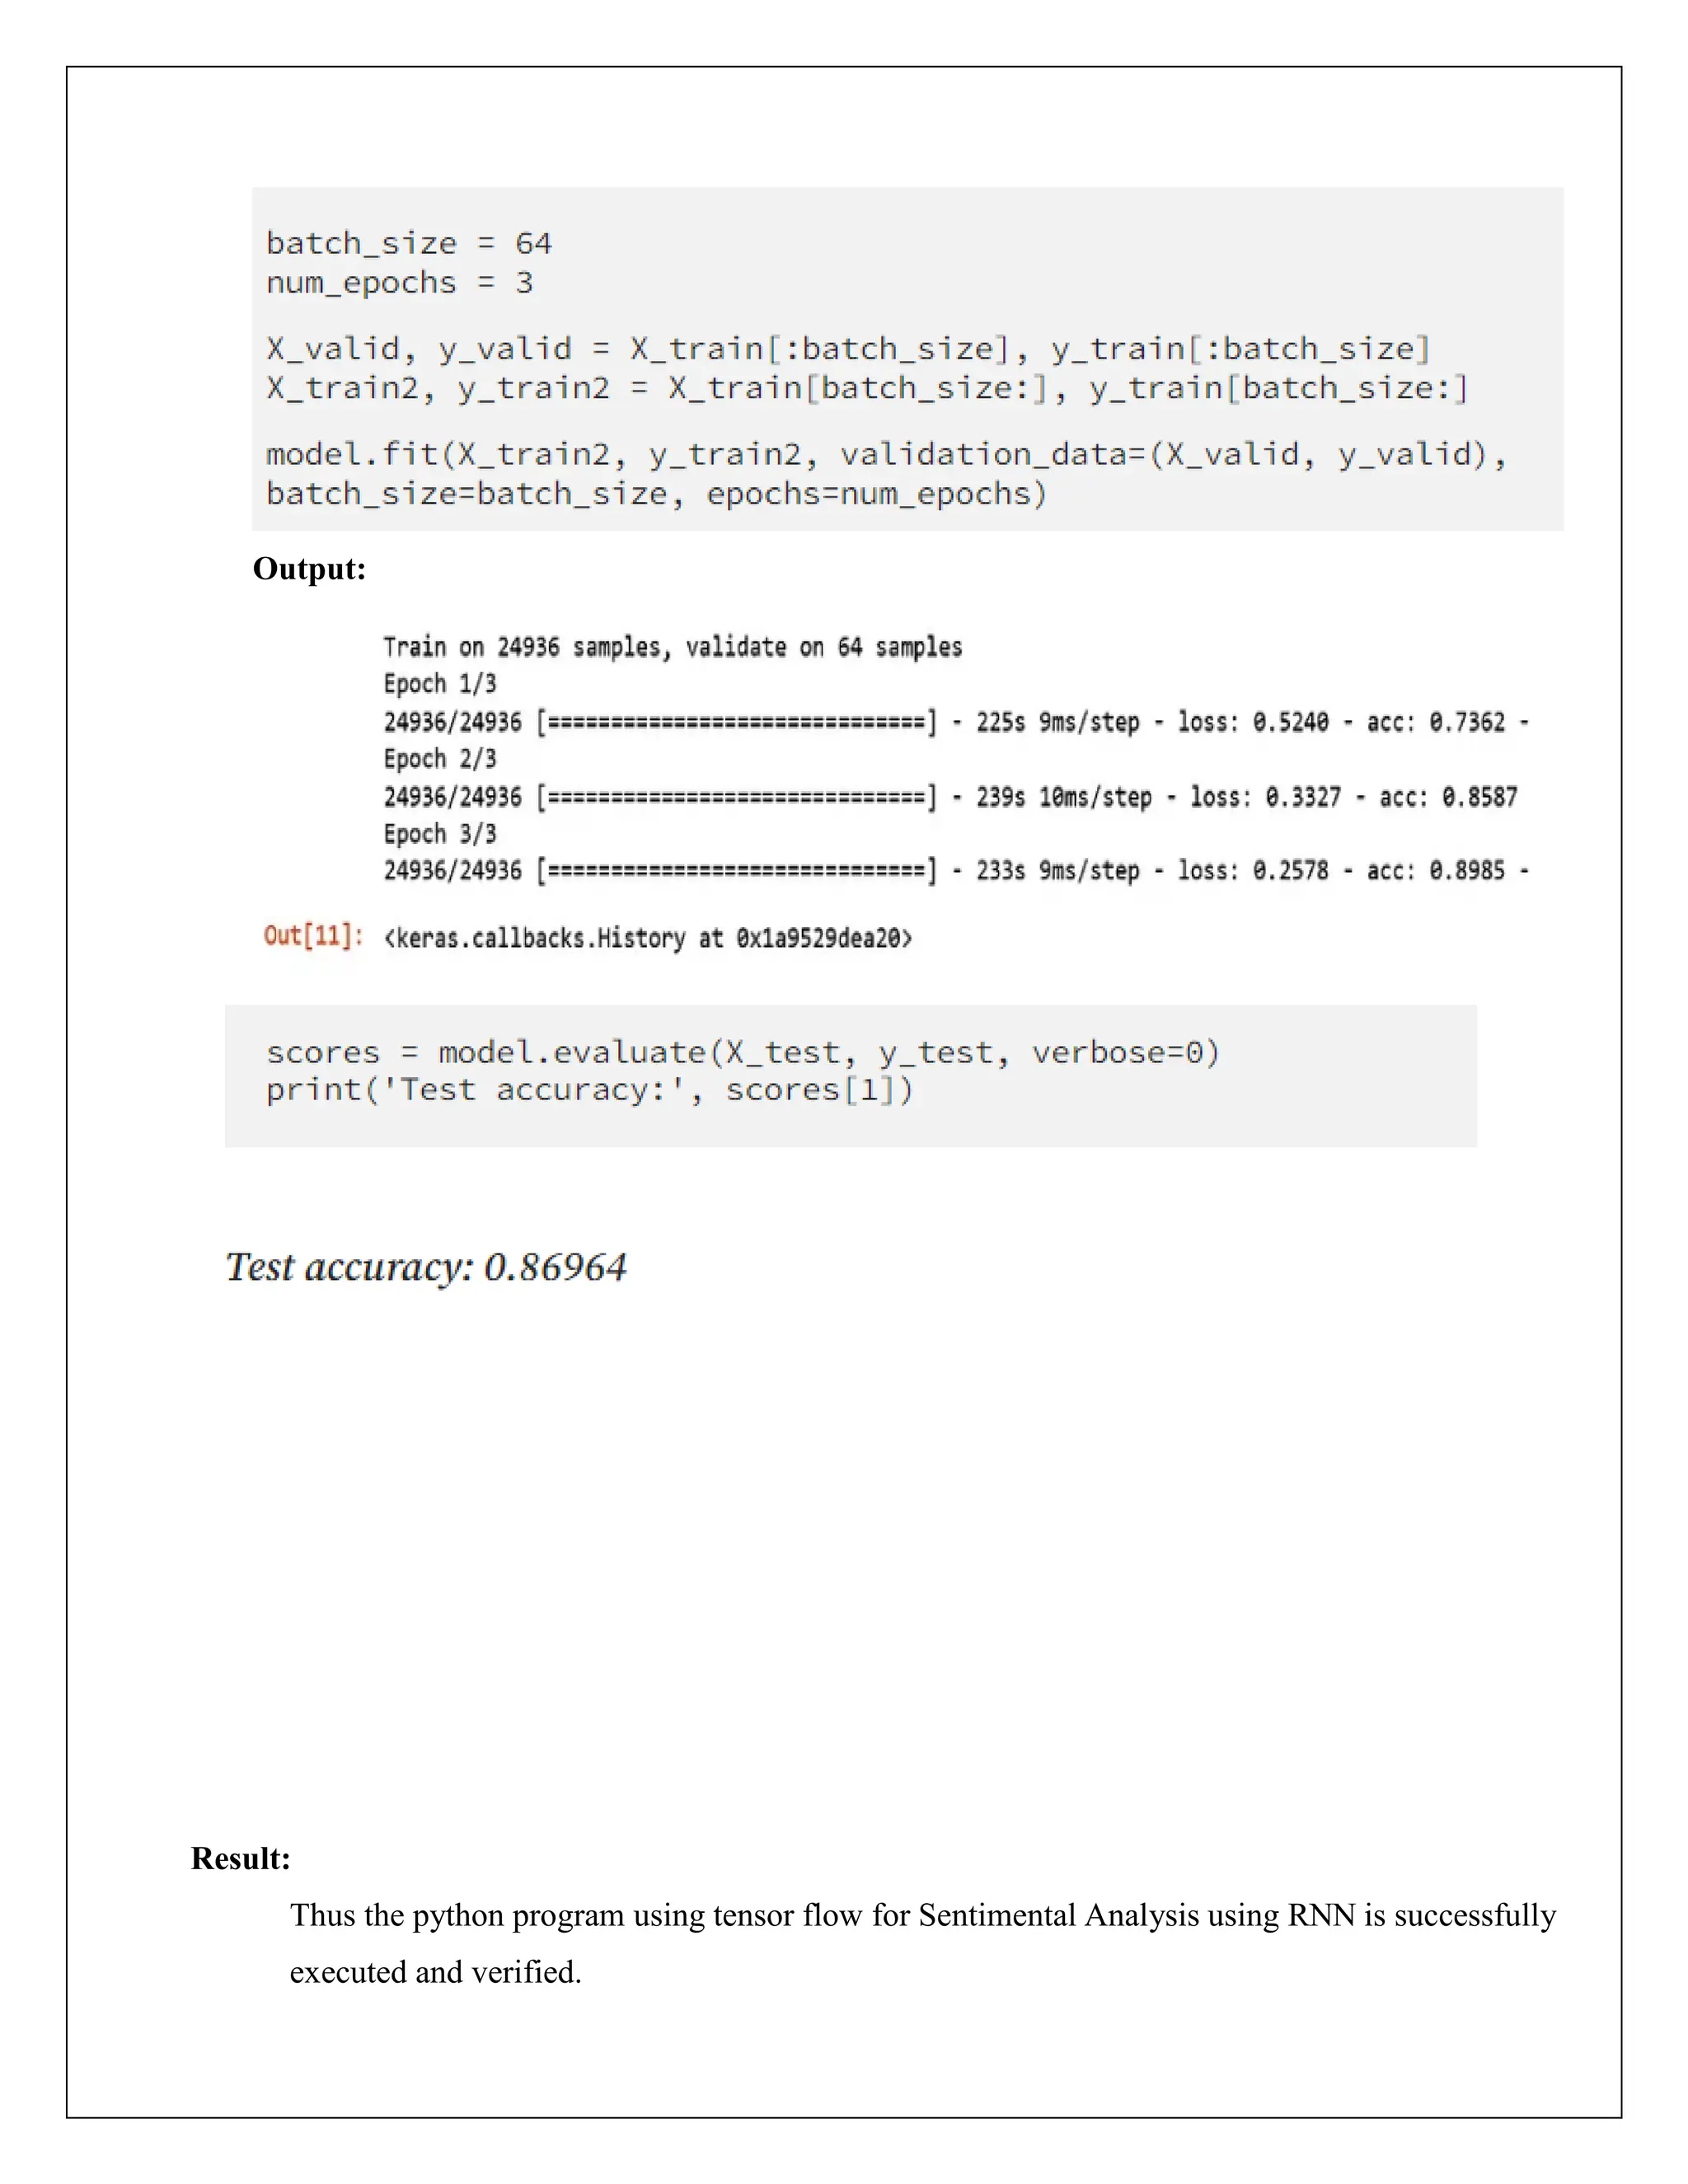
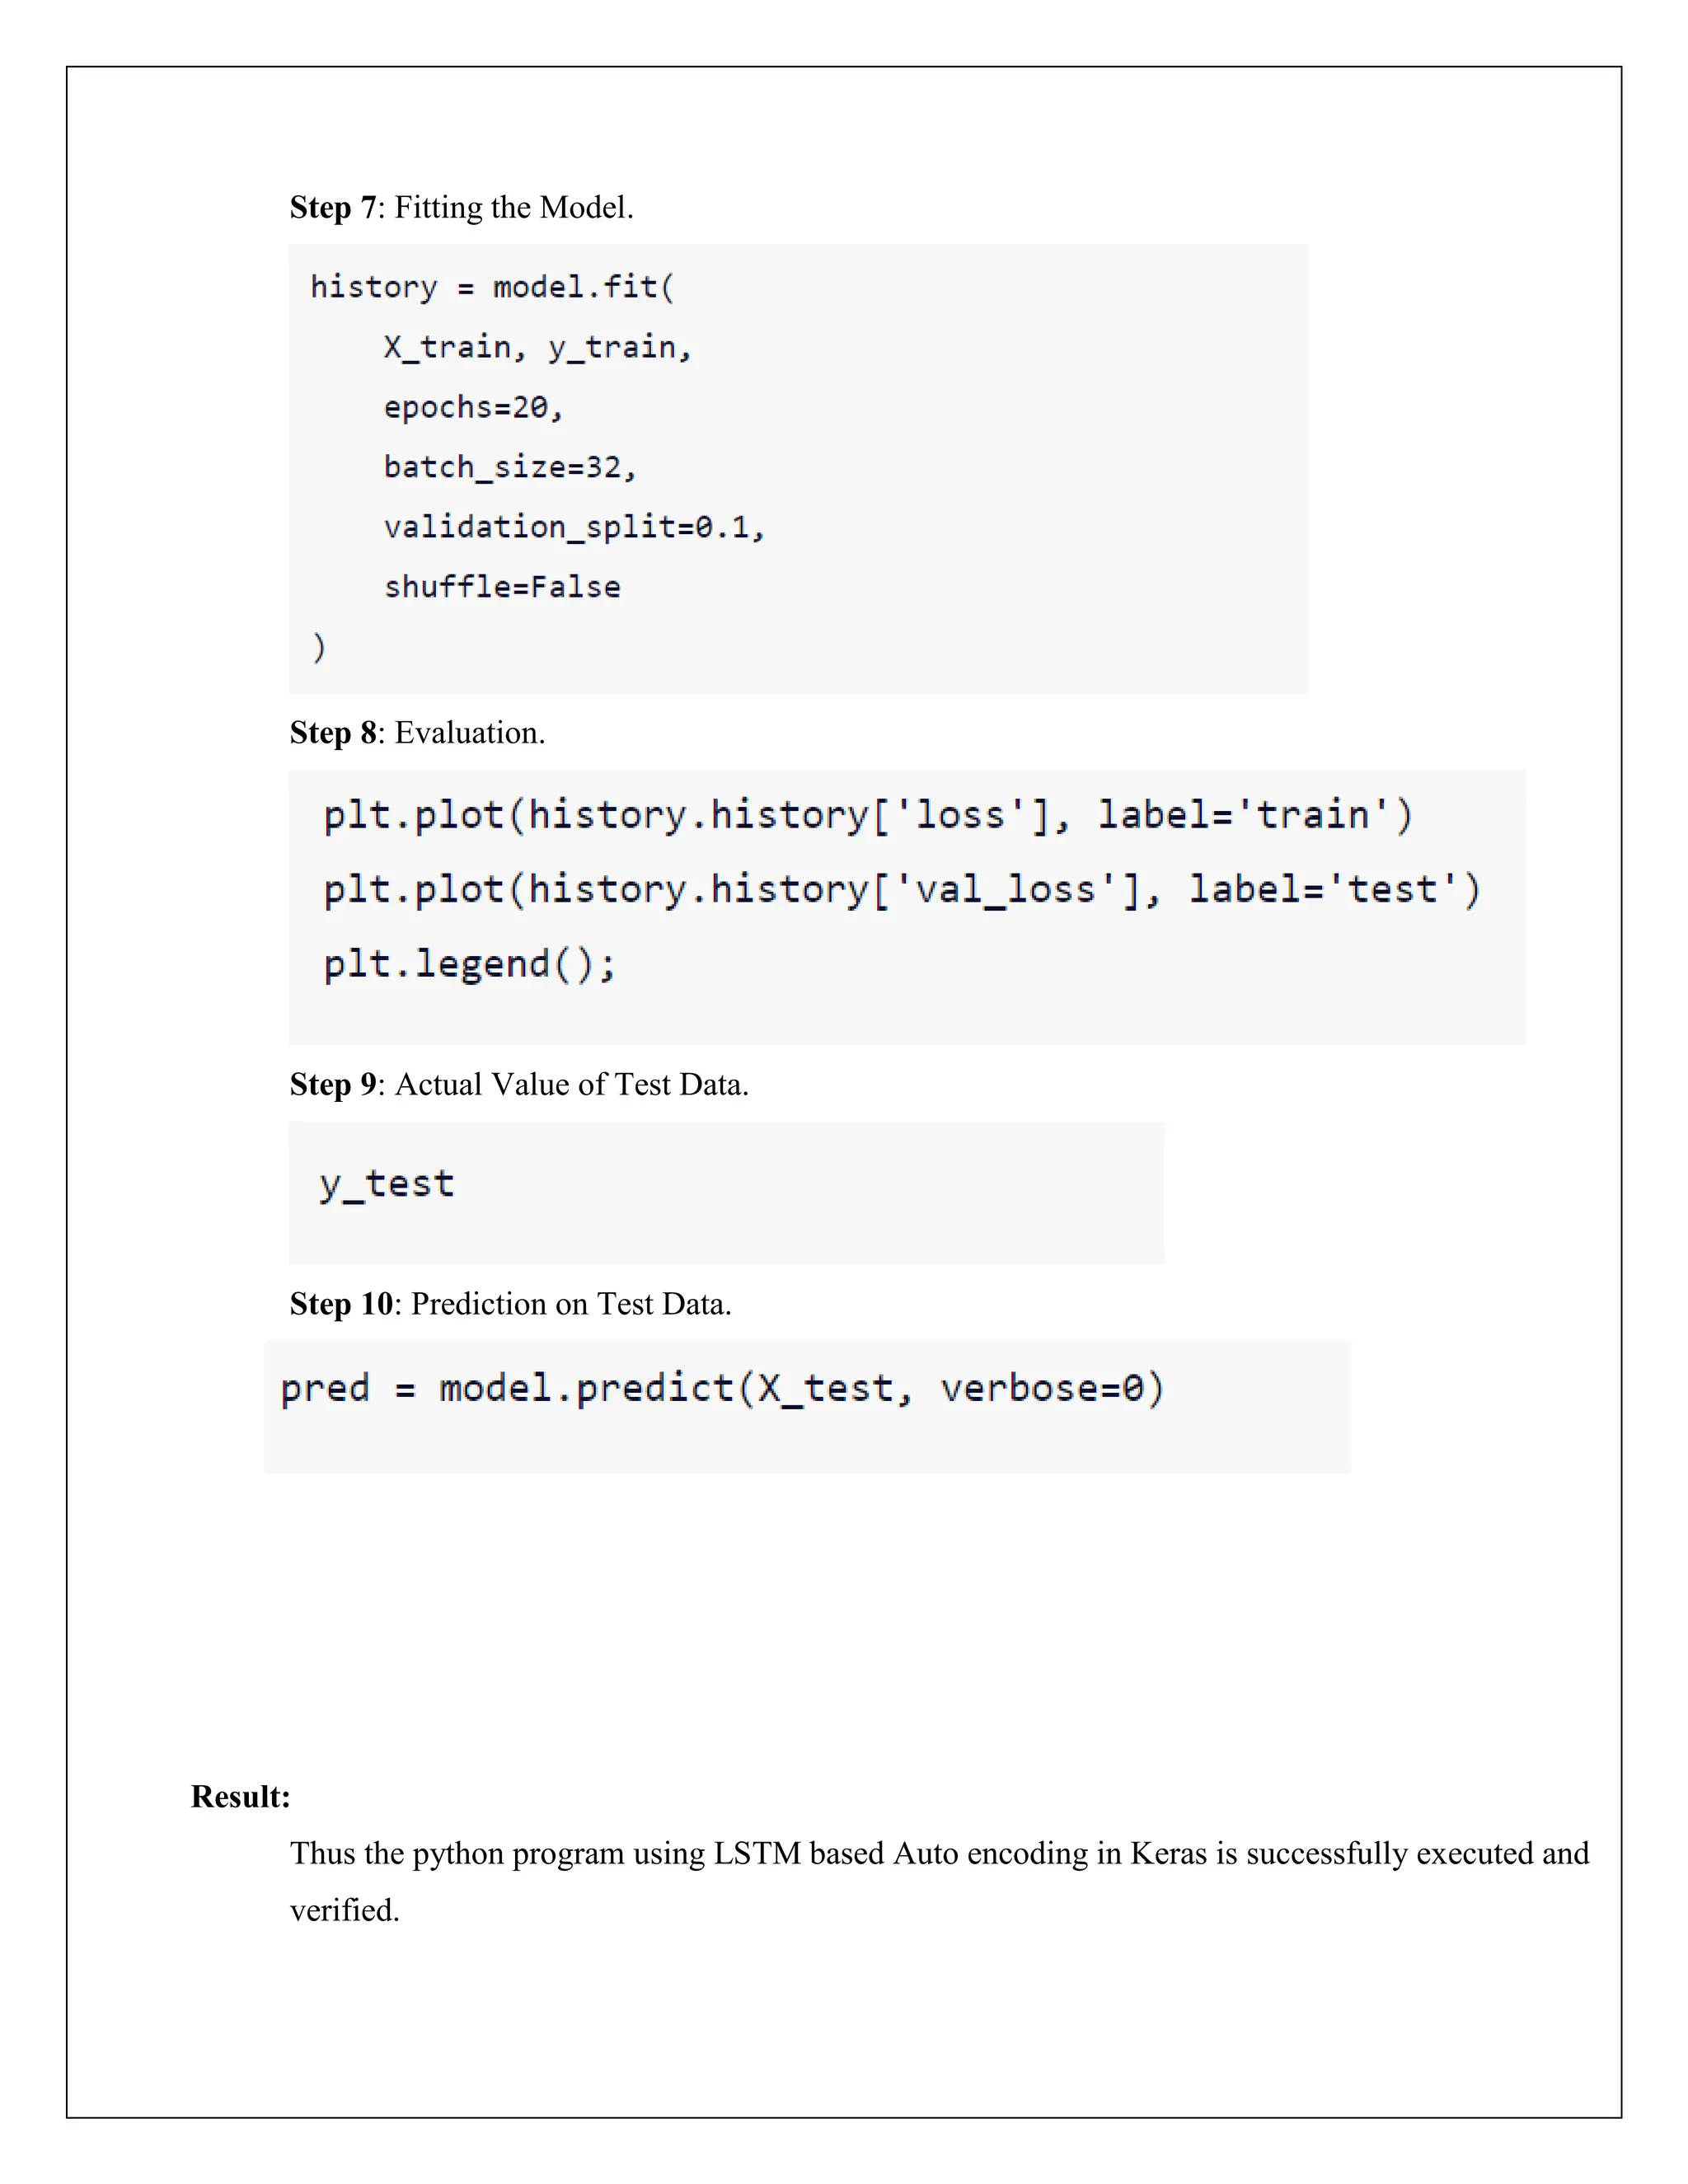
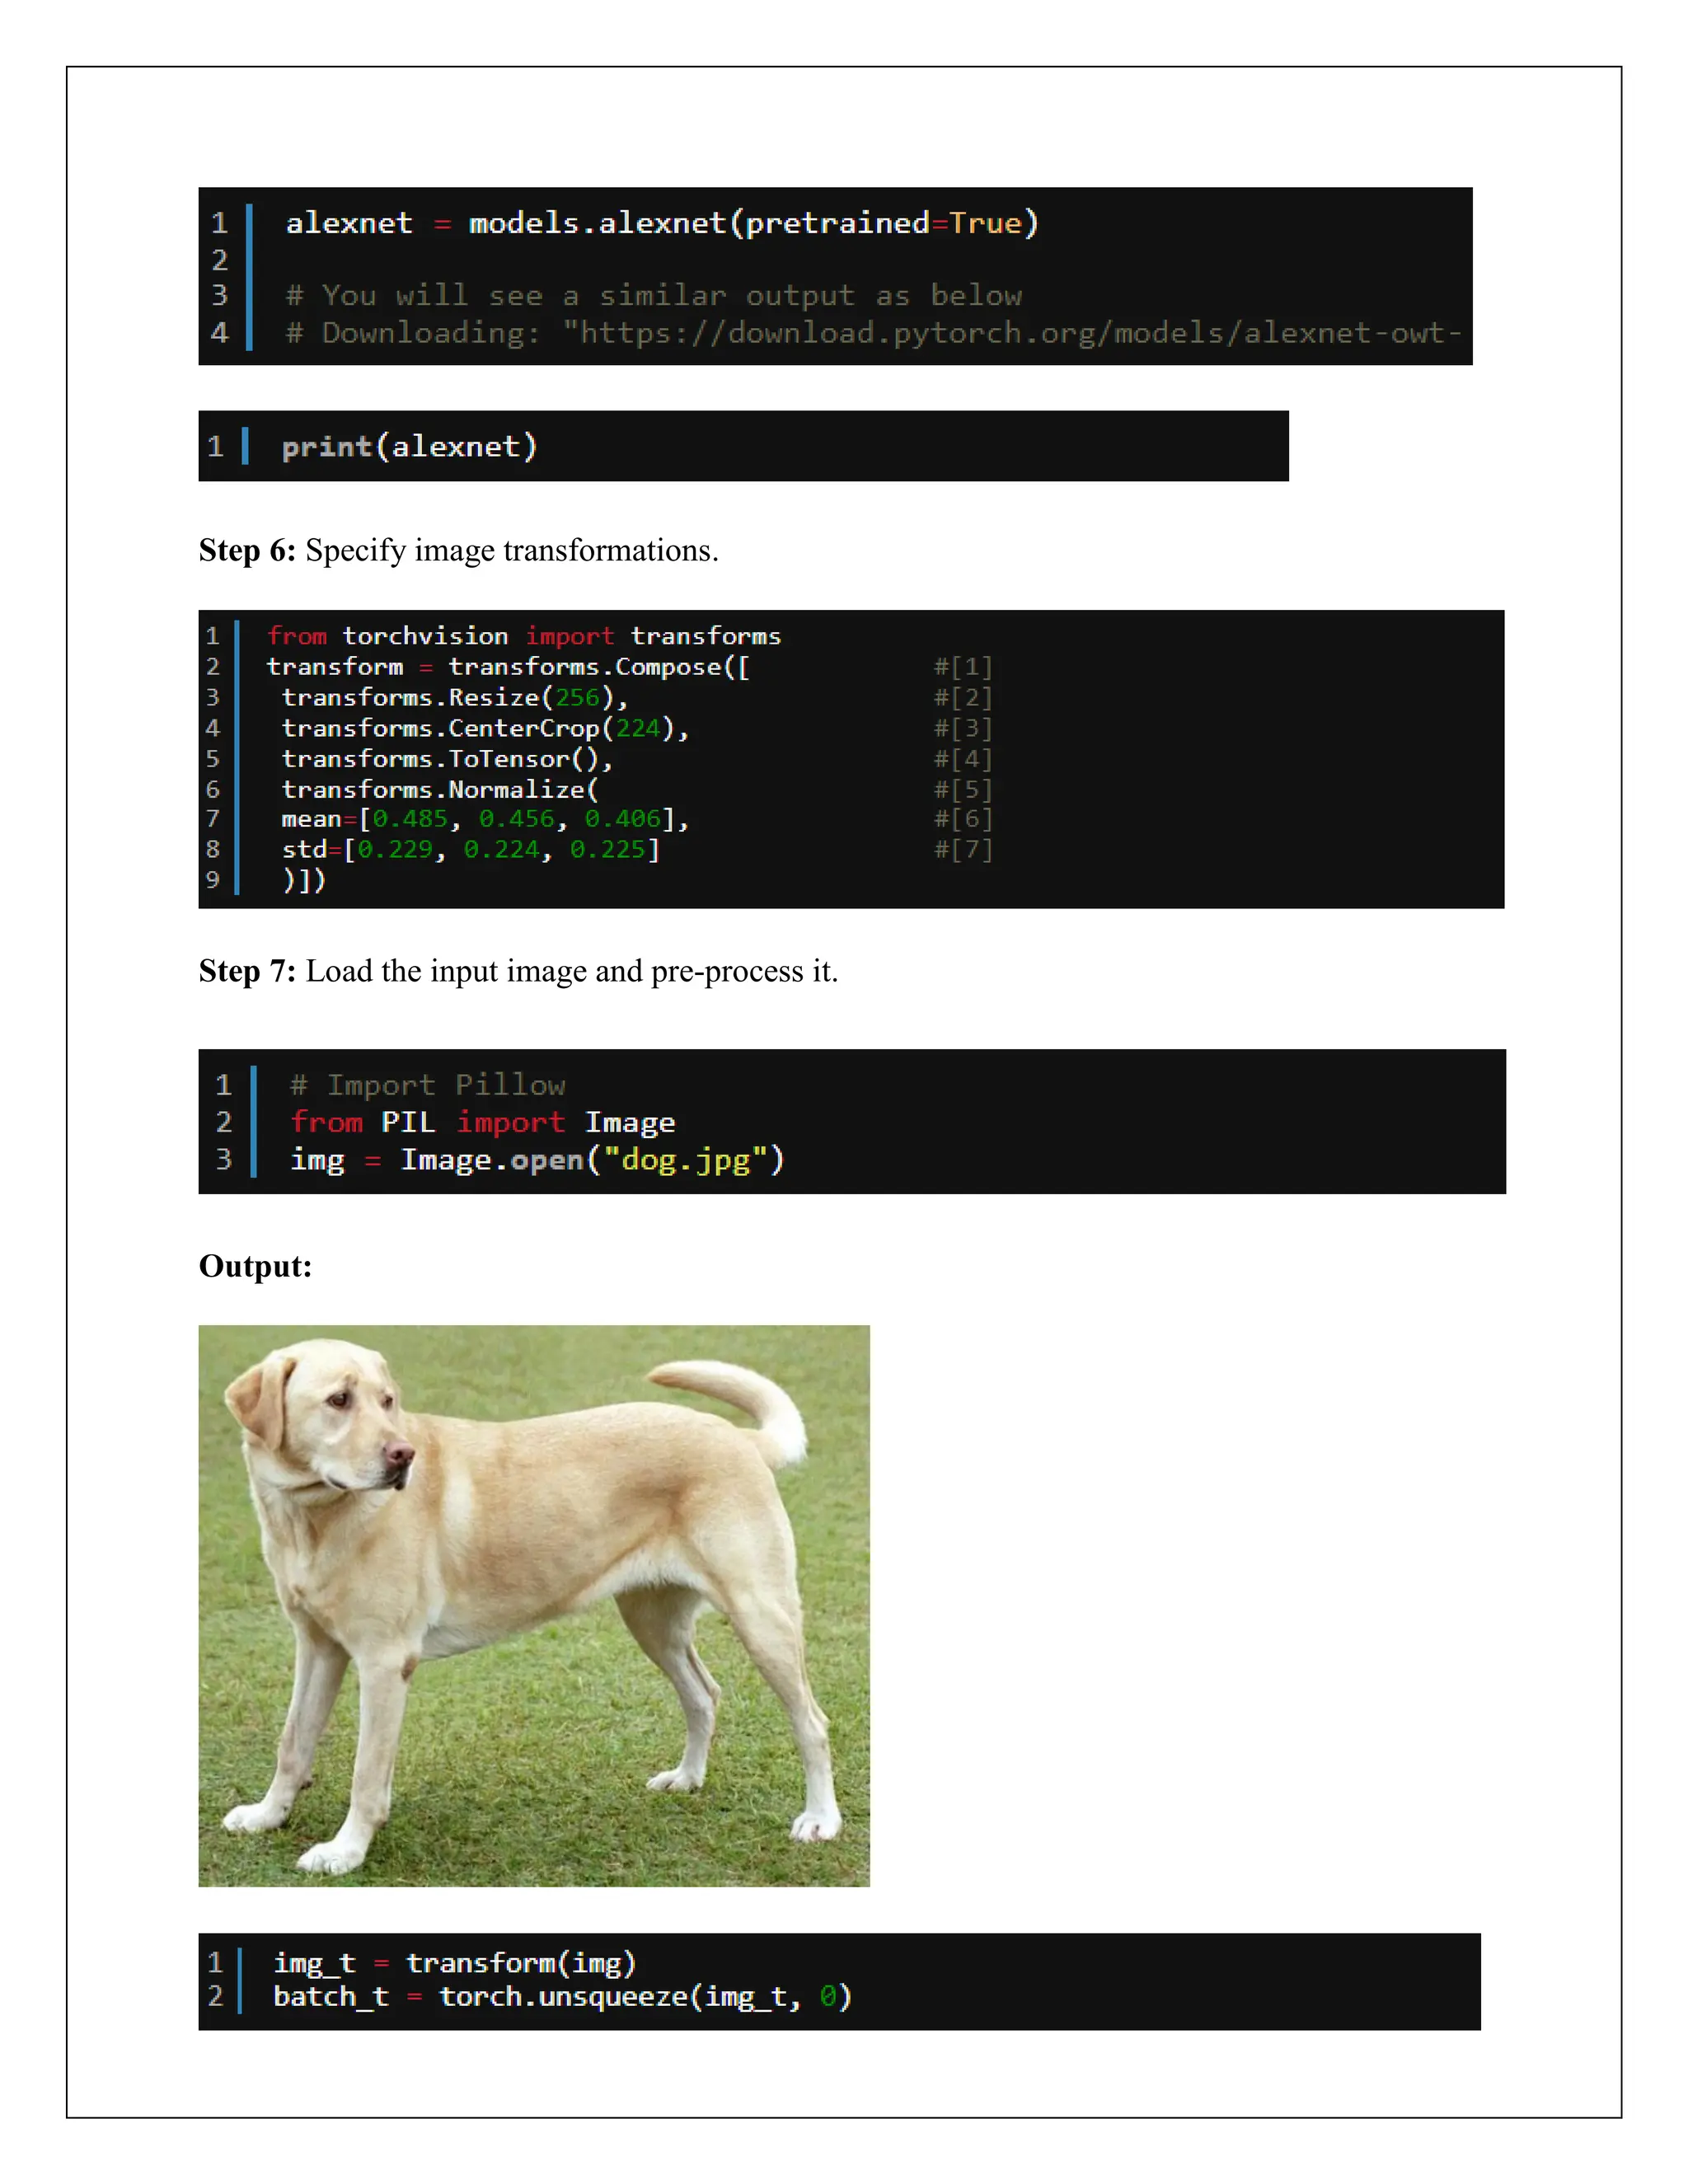
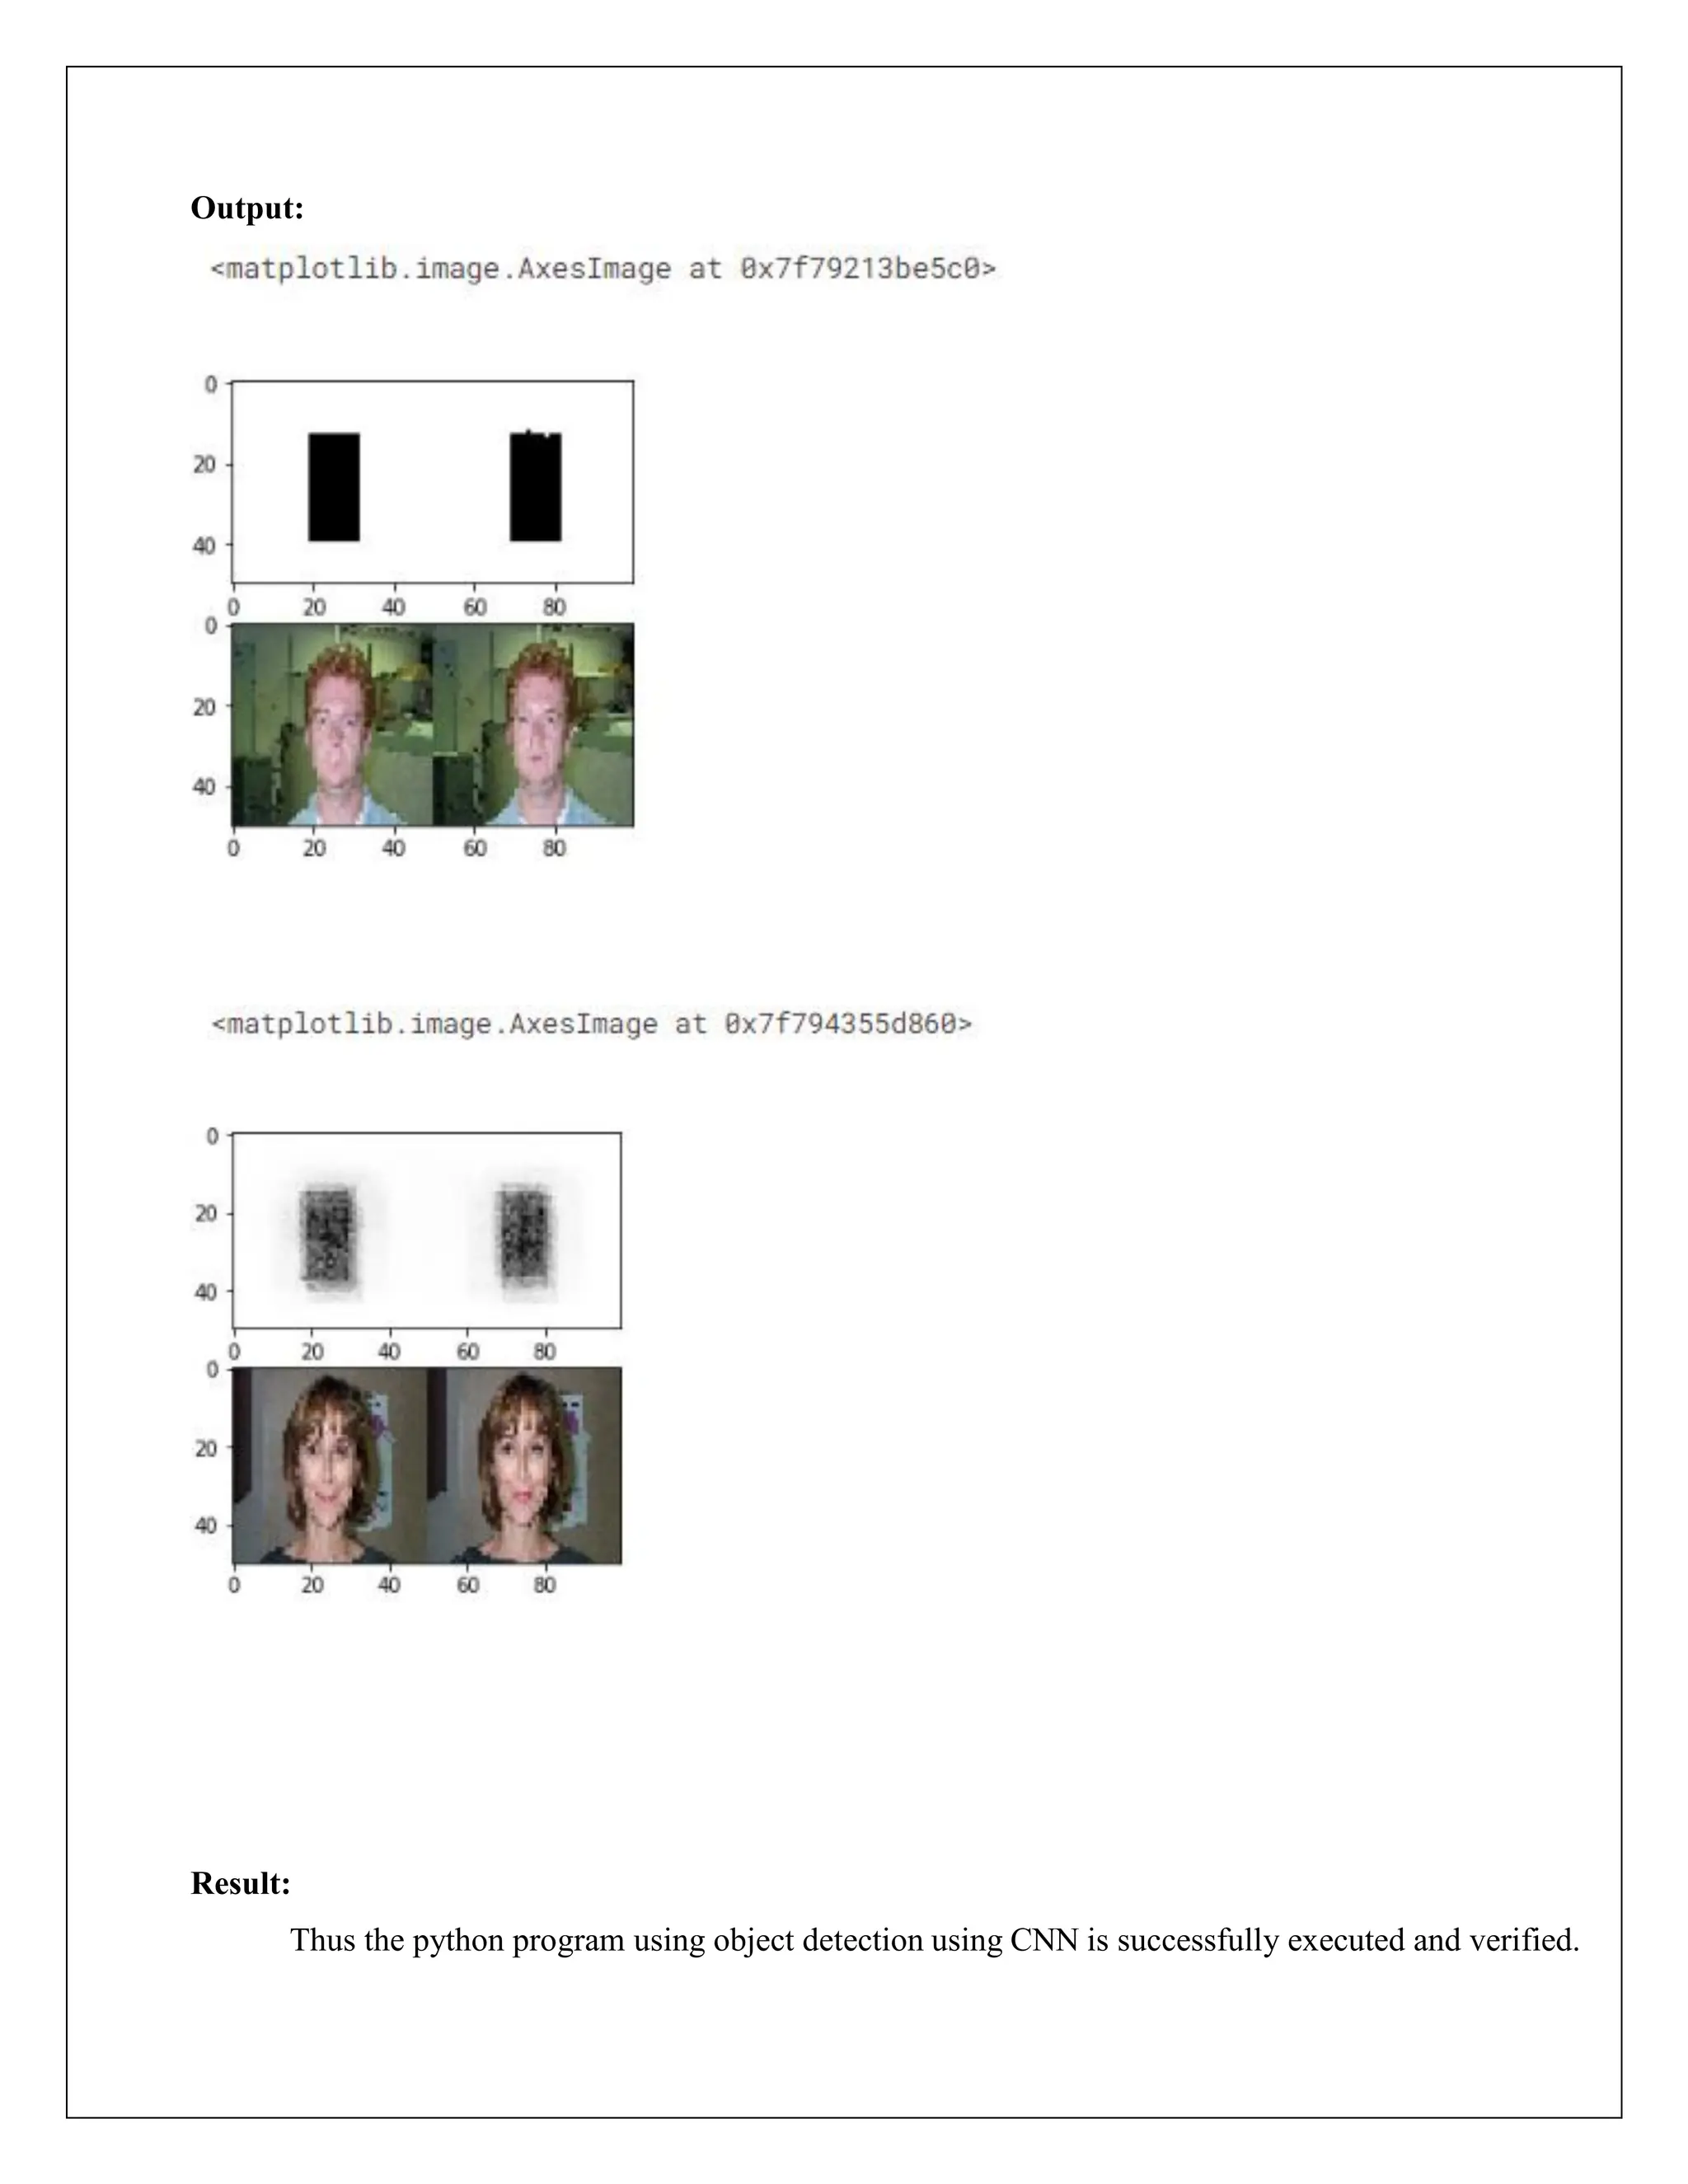
![Program:
i.Tensor Flow:
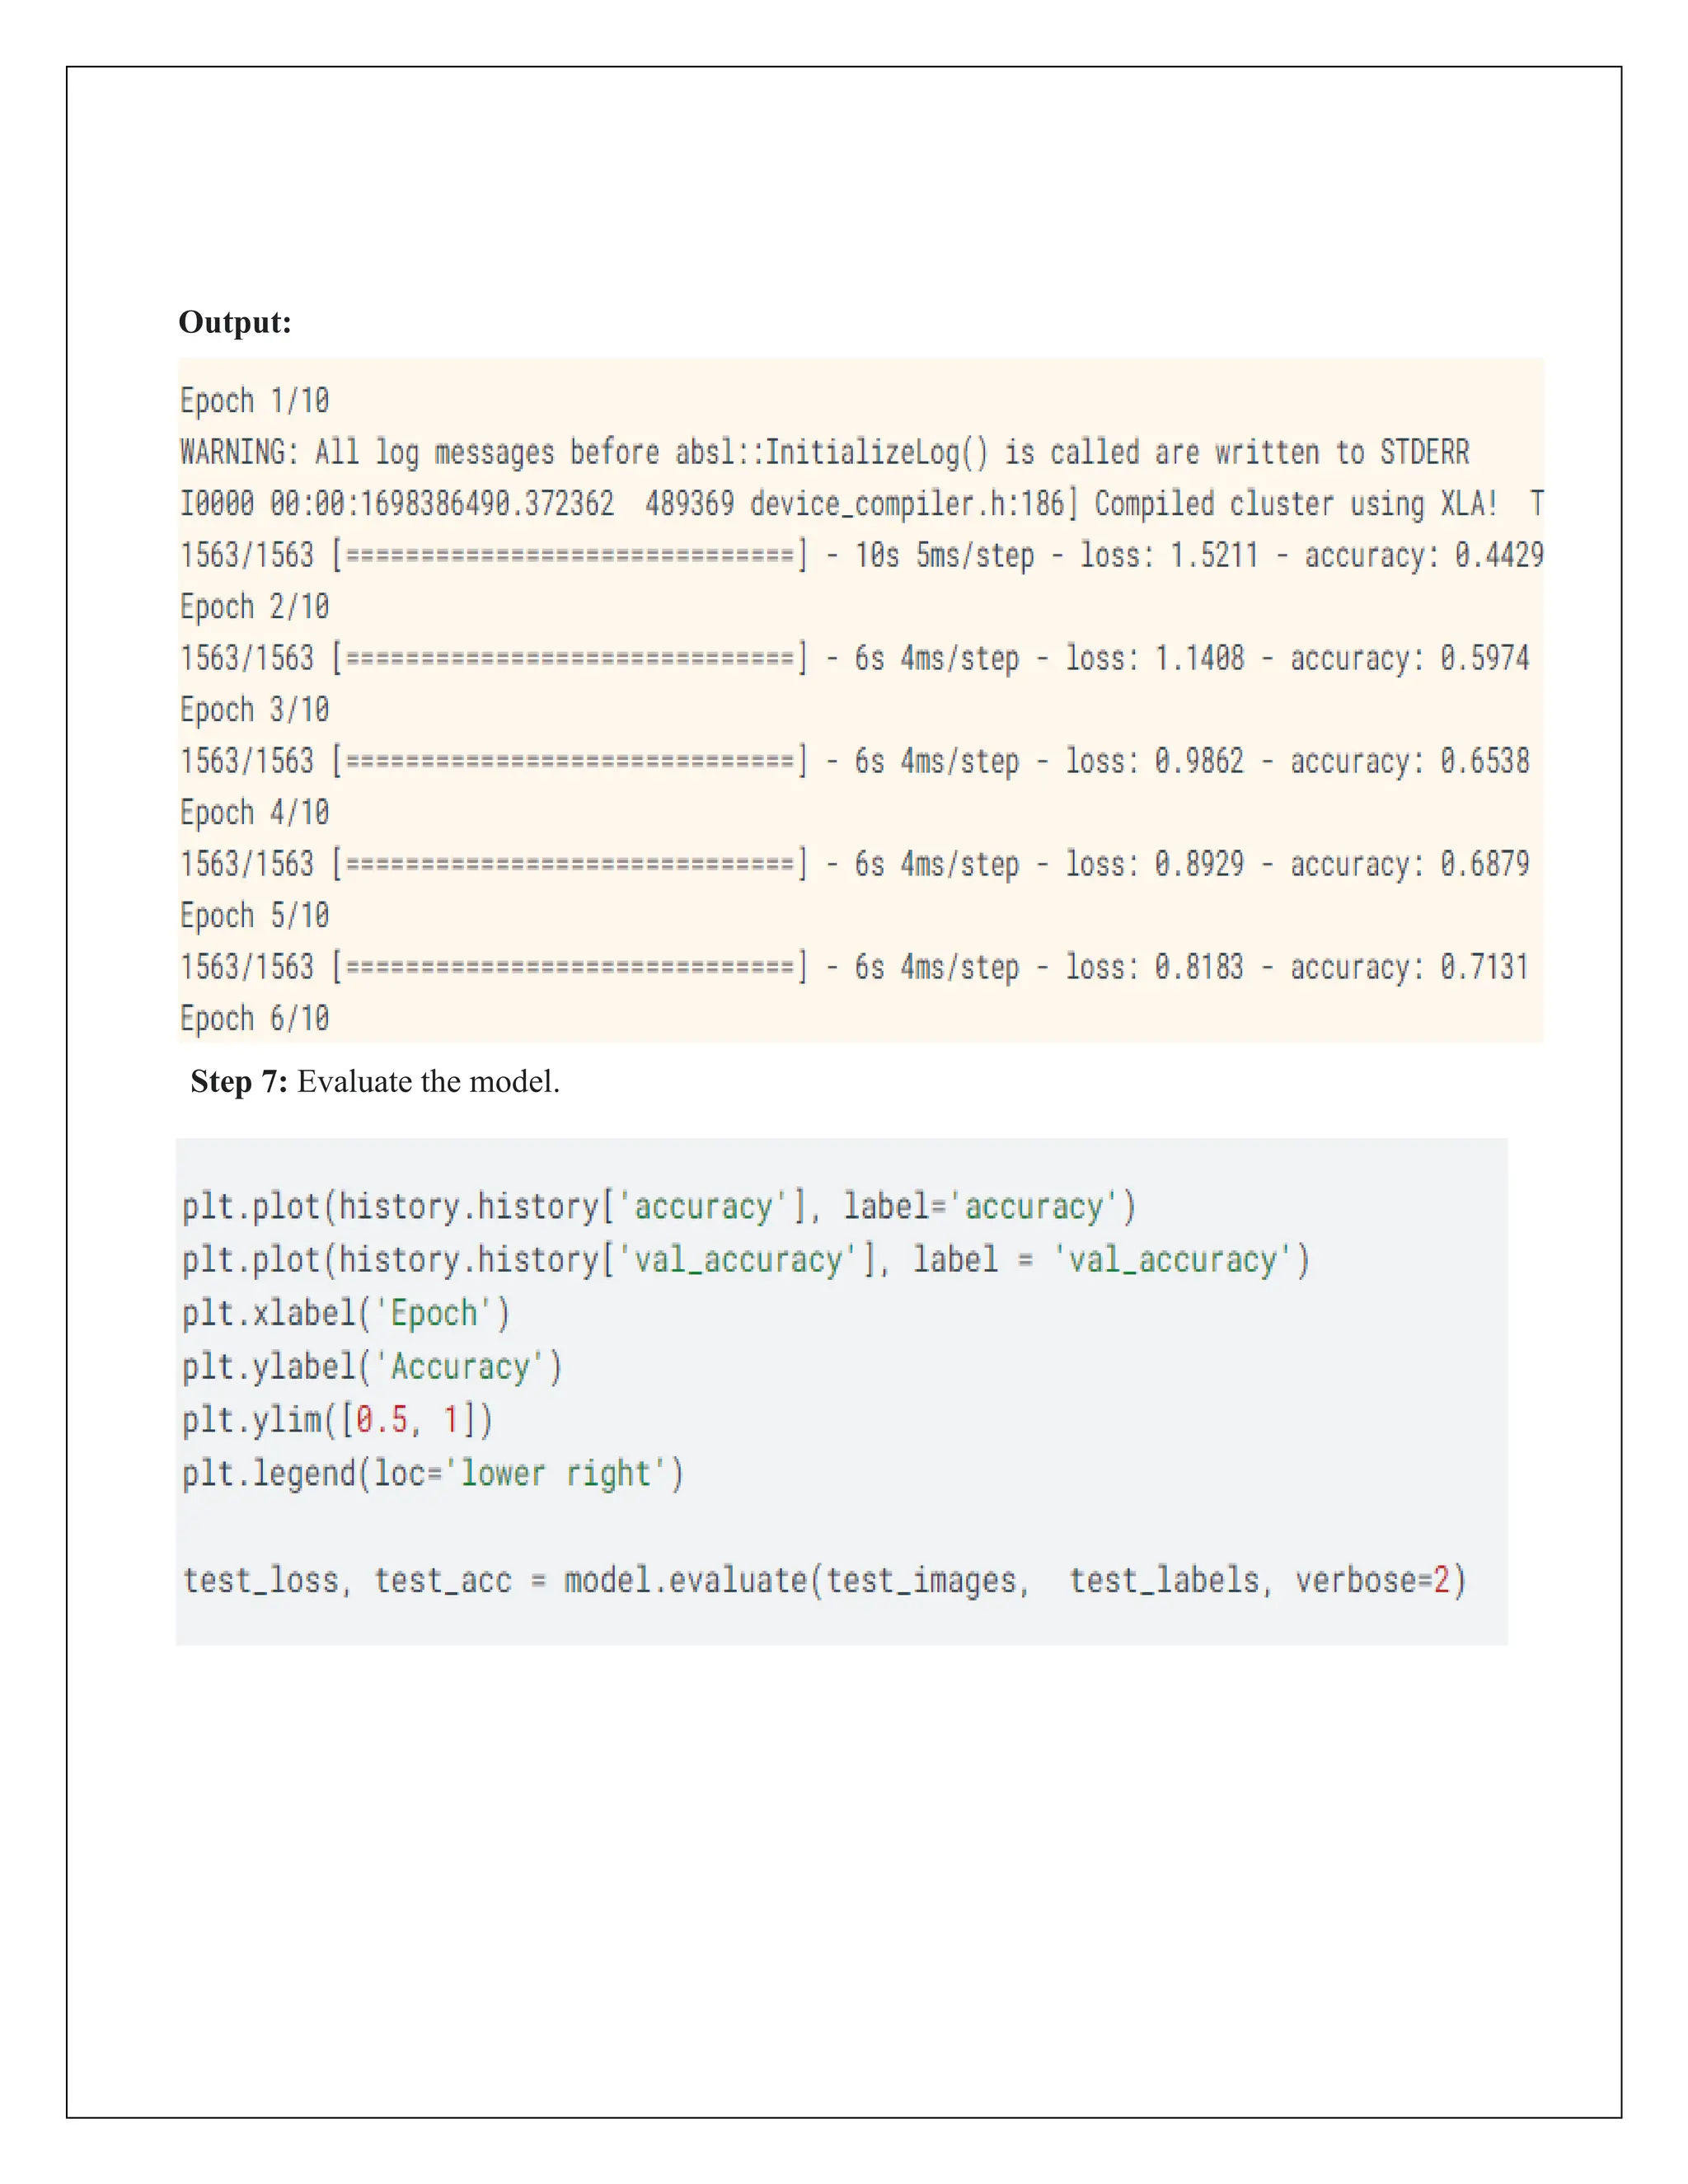
Output:
tf.Tensor(
[[1 2]
[3 4]], shape=(2, 2), dtype=int64)
ii.Convert Numpy array to tensor flow:
Output:
<tf.Variable 'tensor1:0' shape=(2, 2) dtype=float32, numpy=
array([[1., 2.],
[3., 4.]], dtype=float32)>
iii.Matrix using Tensorflow:
import tensorflow as tf
import numpy as np
numpy_array = np.array([[1,2],[3,4]])
tensor1 = tf.convert_to_tensor(numpy_array)
print(tensor1)
import tensorflow as tf
import numpy as np
numpy_array = np.array([[1, 2], [3, 4]])
tensor1 = tf.Variable(numpy_array, dtype=float, name='tensor1')
tensor1
import tensorflow as tf
matrix_data = [[1, 2, 3],
[4, 5, 6]]
matrix_tensor = tf.constant(matrix_data, dtype=tf.int32, shape=(2, 3),
name='MyMatrix')
print("TensorFlow Matrix:")
print(matrix_tensor)](https://image.slidesharecdn.com/exp015-240501141729-32c565eb/75/CCS335-_-Neural-Networks-and-Deep-Learning-Laboratory_Lab-Complete-Record-7-2048.jpg)
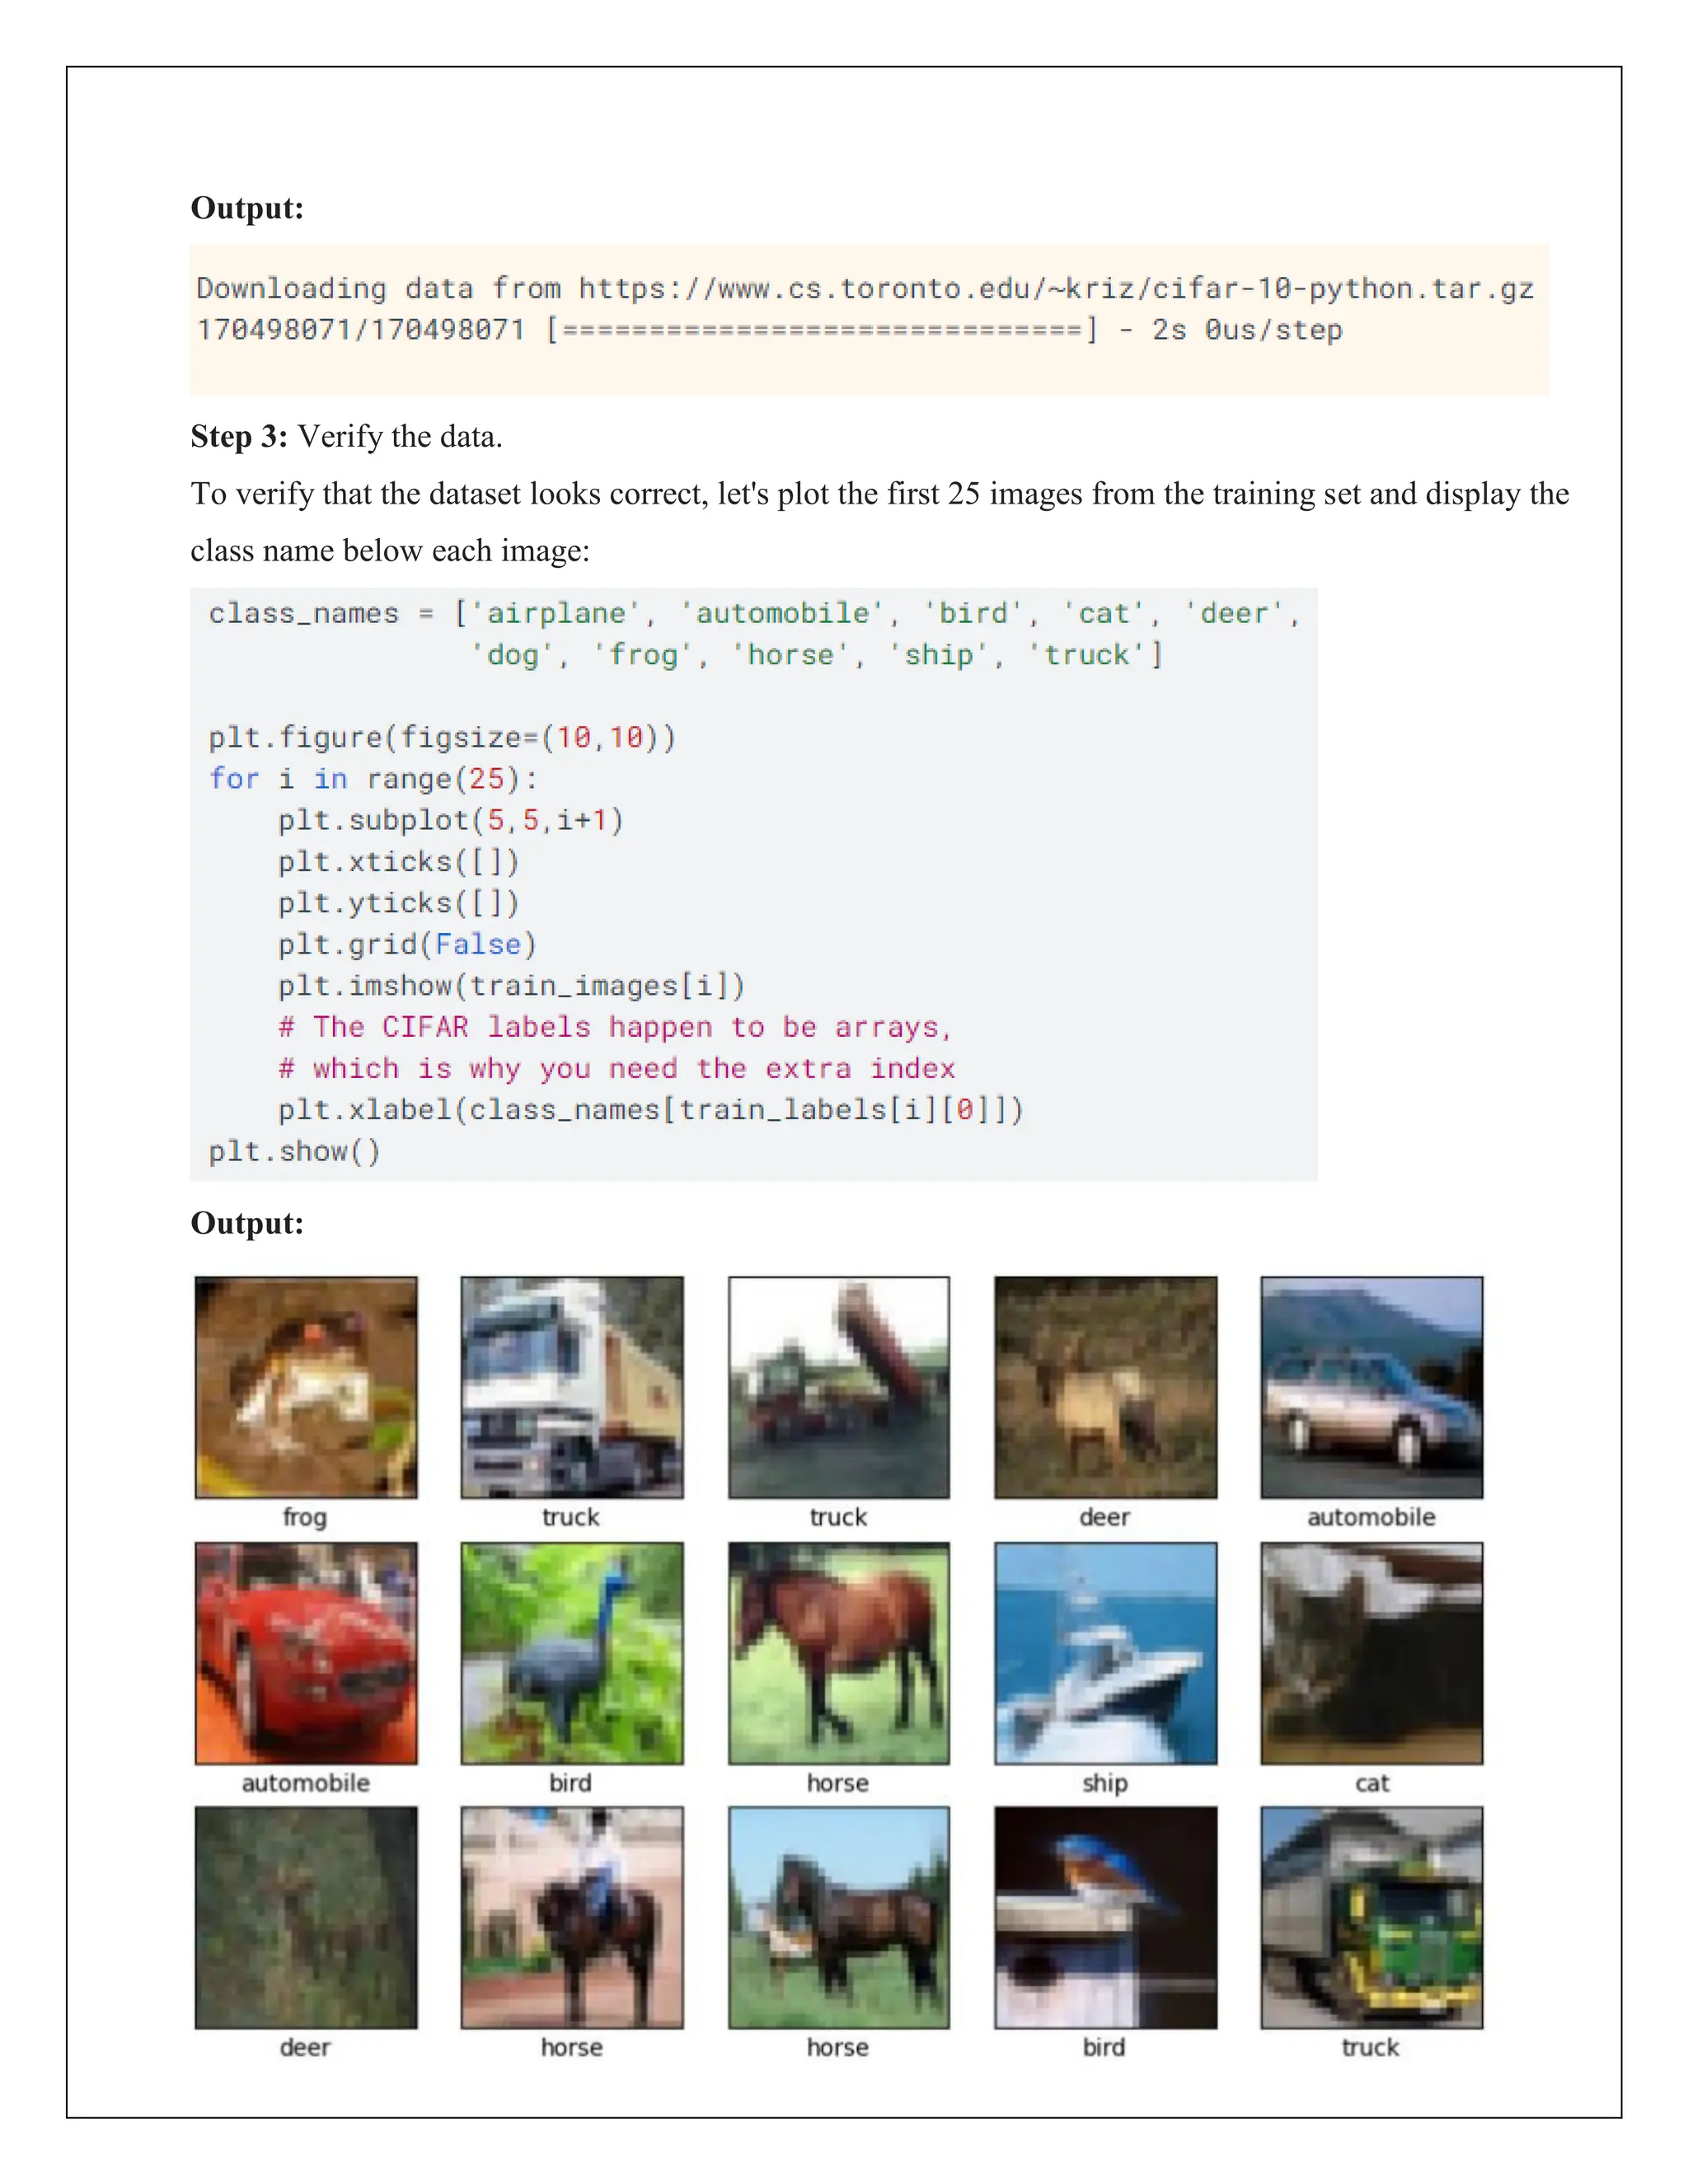
![Output:
TensorFlow Matrix:
tf.Tensor(
[[1 2 3]
[4 5 6]], shape=(2, 3), dtype=int32)
Result:
Thus the python program using tensor flow for above experiment is successfully executed and
verified.](https://image.slidesharecdn.com/exp015-240501141729-32c565eb/75/CCS335-_-Neural-Networks-and-Deep-Learning-Laboratory_Lab-Complete-Record-8-2048.jpg)
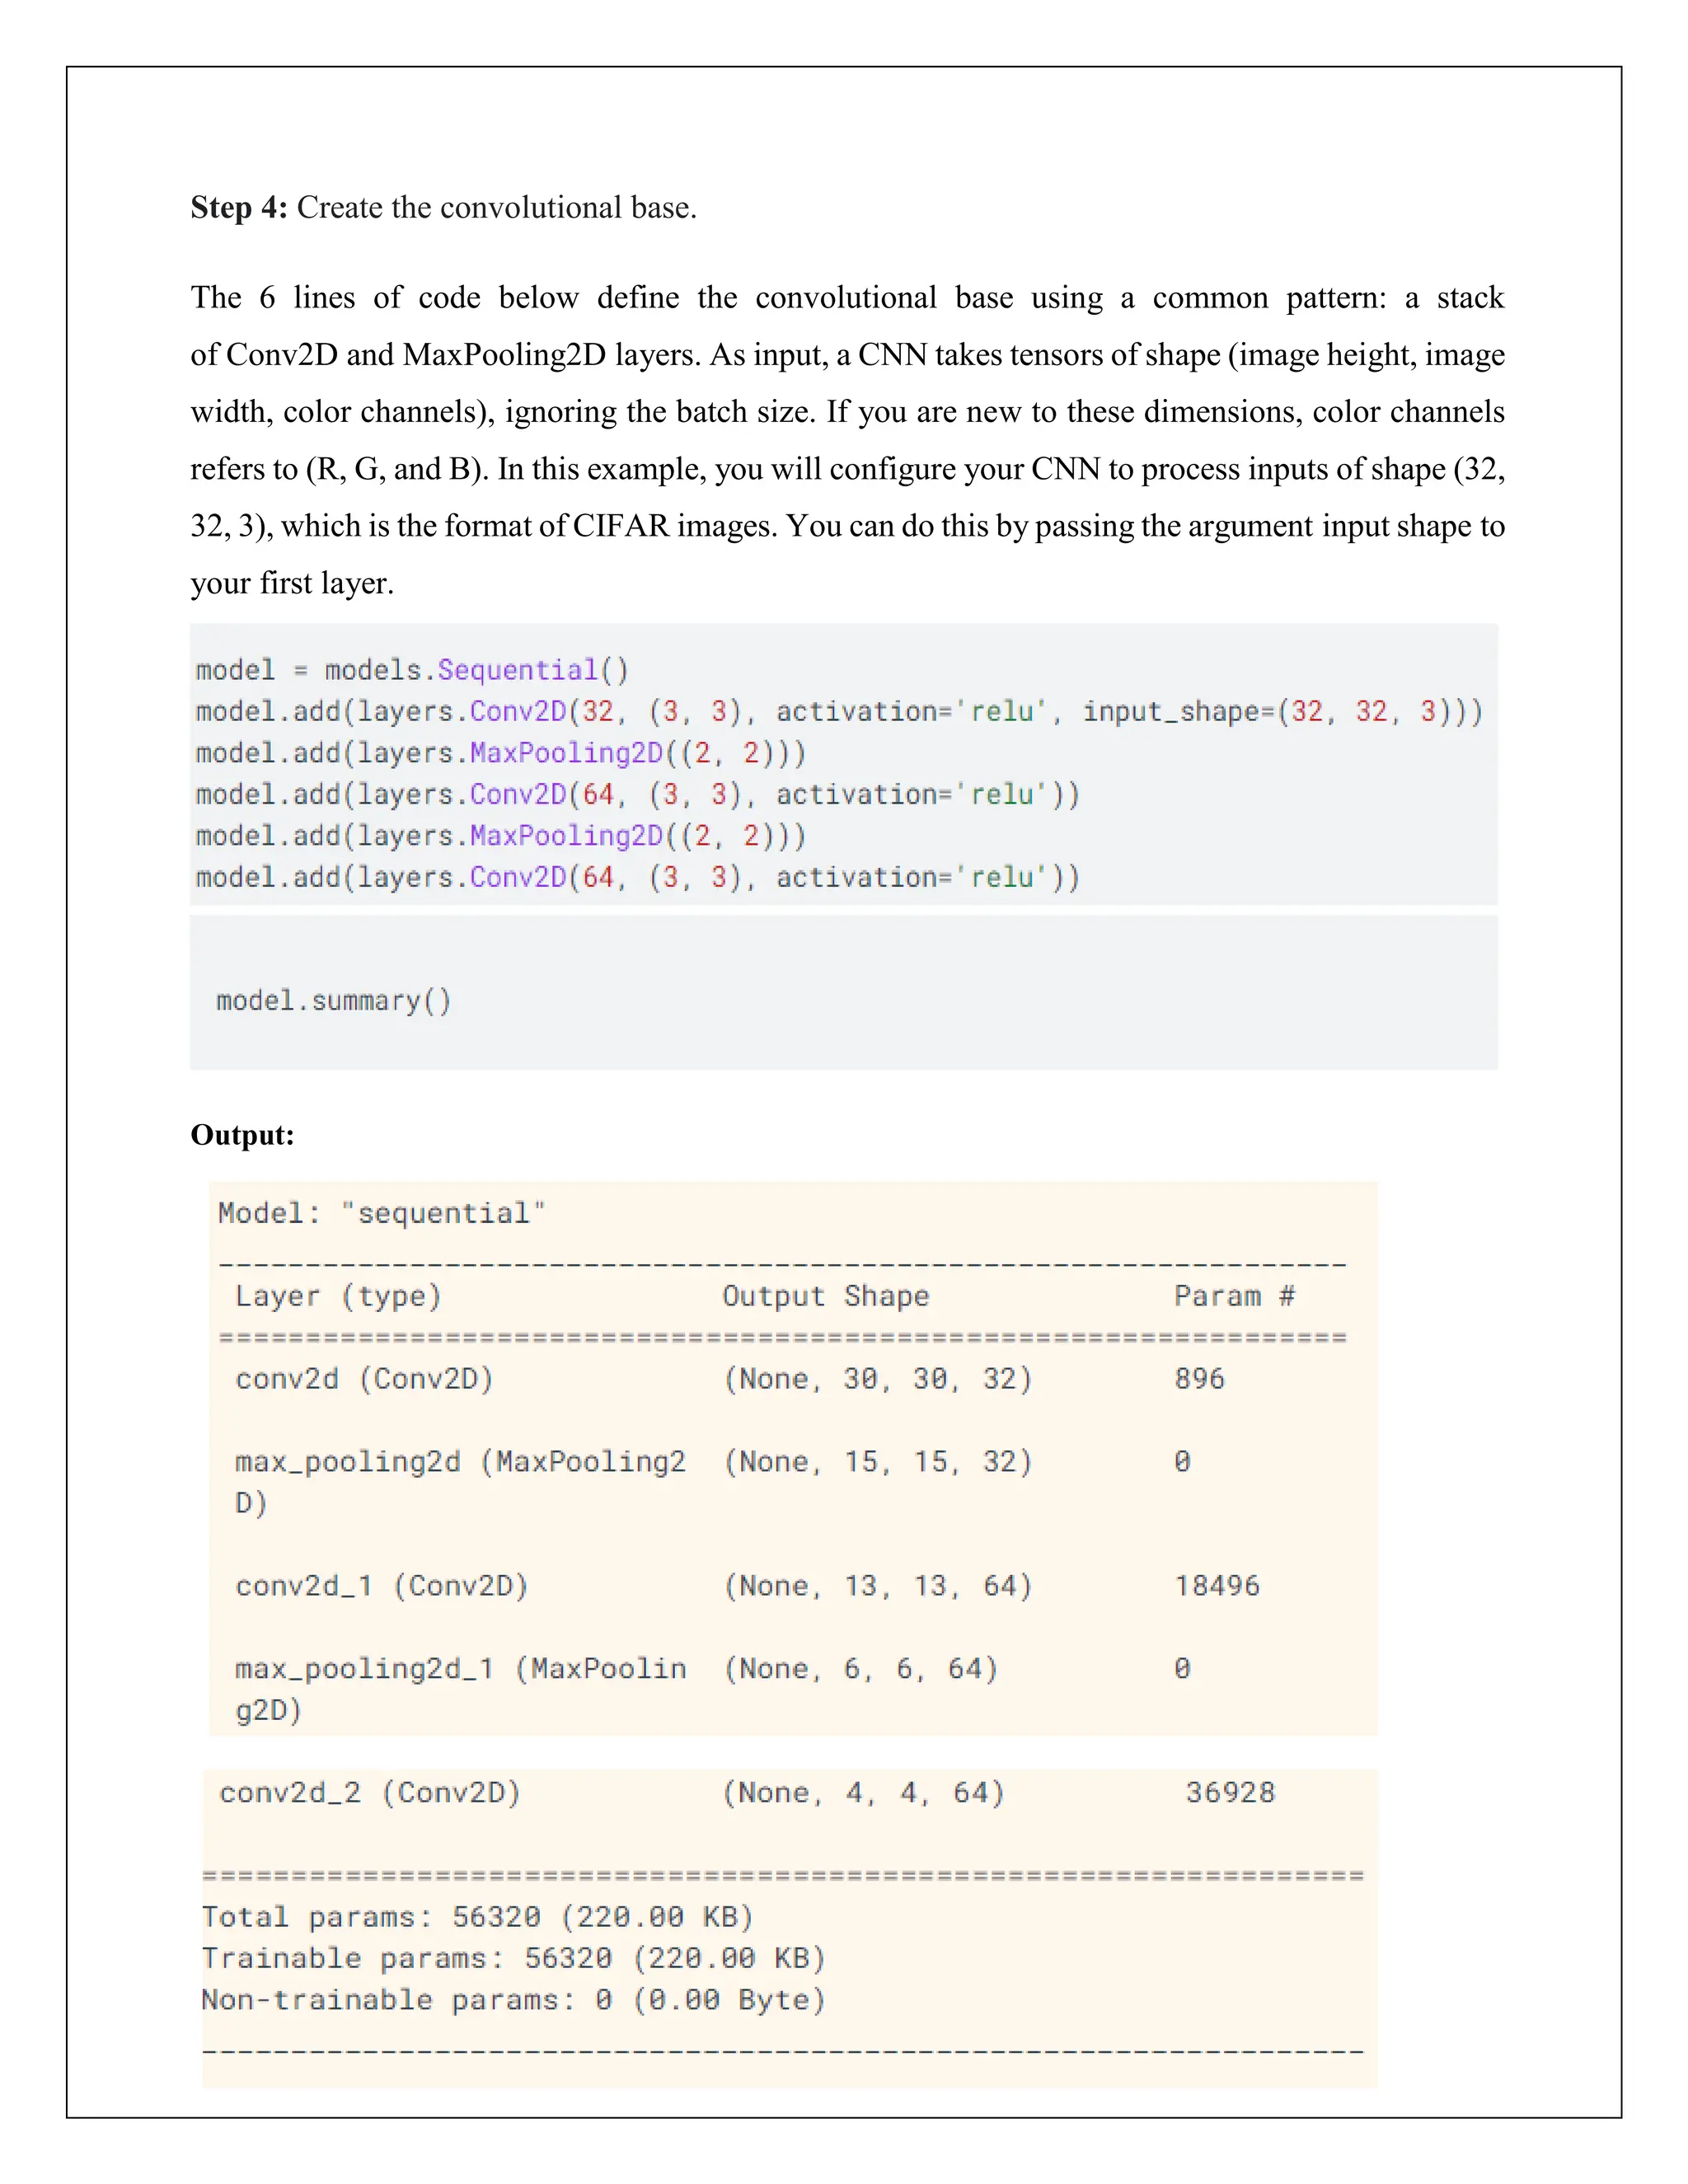
![ii. Subtraction:
a. Use `tf.subtract()` for element-wise subtraction.
iii. Multiplication:
a. Use `tf.multiply()` for element-wise multiplication.
iv. Division:
a. Use `tf.divide()` for element-wise division.
v. Transpose:
a. Use `tf.transpose()` for matrix transposition.
vi. Dot Product:
a. Use `tf.tensordot()` for matrix multiplication.
8. Run the Code:
a. Execute each cell in the Colab notebook to see the results.
Program:
1.Scalar:
Output:
<tf.Tensor: shape=(), dtype=int32, numpy=7>
2.Dimensions of Scalar:
Output:
0
3.Vector:
# importing packages
import tensorflow as tf
# creating a scalar
scalar = tf.constant(7)
scalar
#checking dimensions of scalar
scalar.ndim
# importing
packages import
tensorflow as tf
# create a vector
vector = tf.constant([10,
10]) vector](https://image.slidesharecdn.com/exp015-240501141729-32c565eb/75/CCS335-_-Neural-Networks-and-Deep-Learning-Laboratory_Lab-Complete-Record-10-2048.jpg)
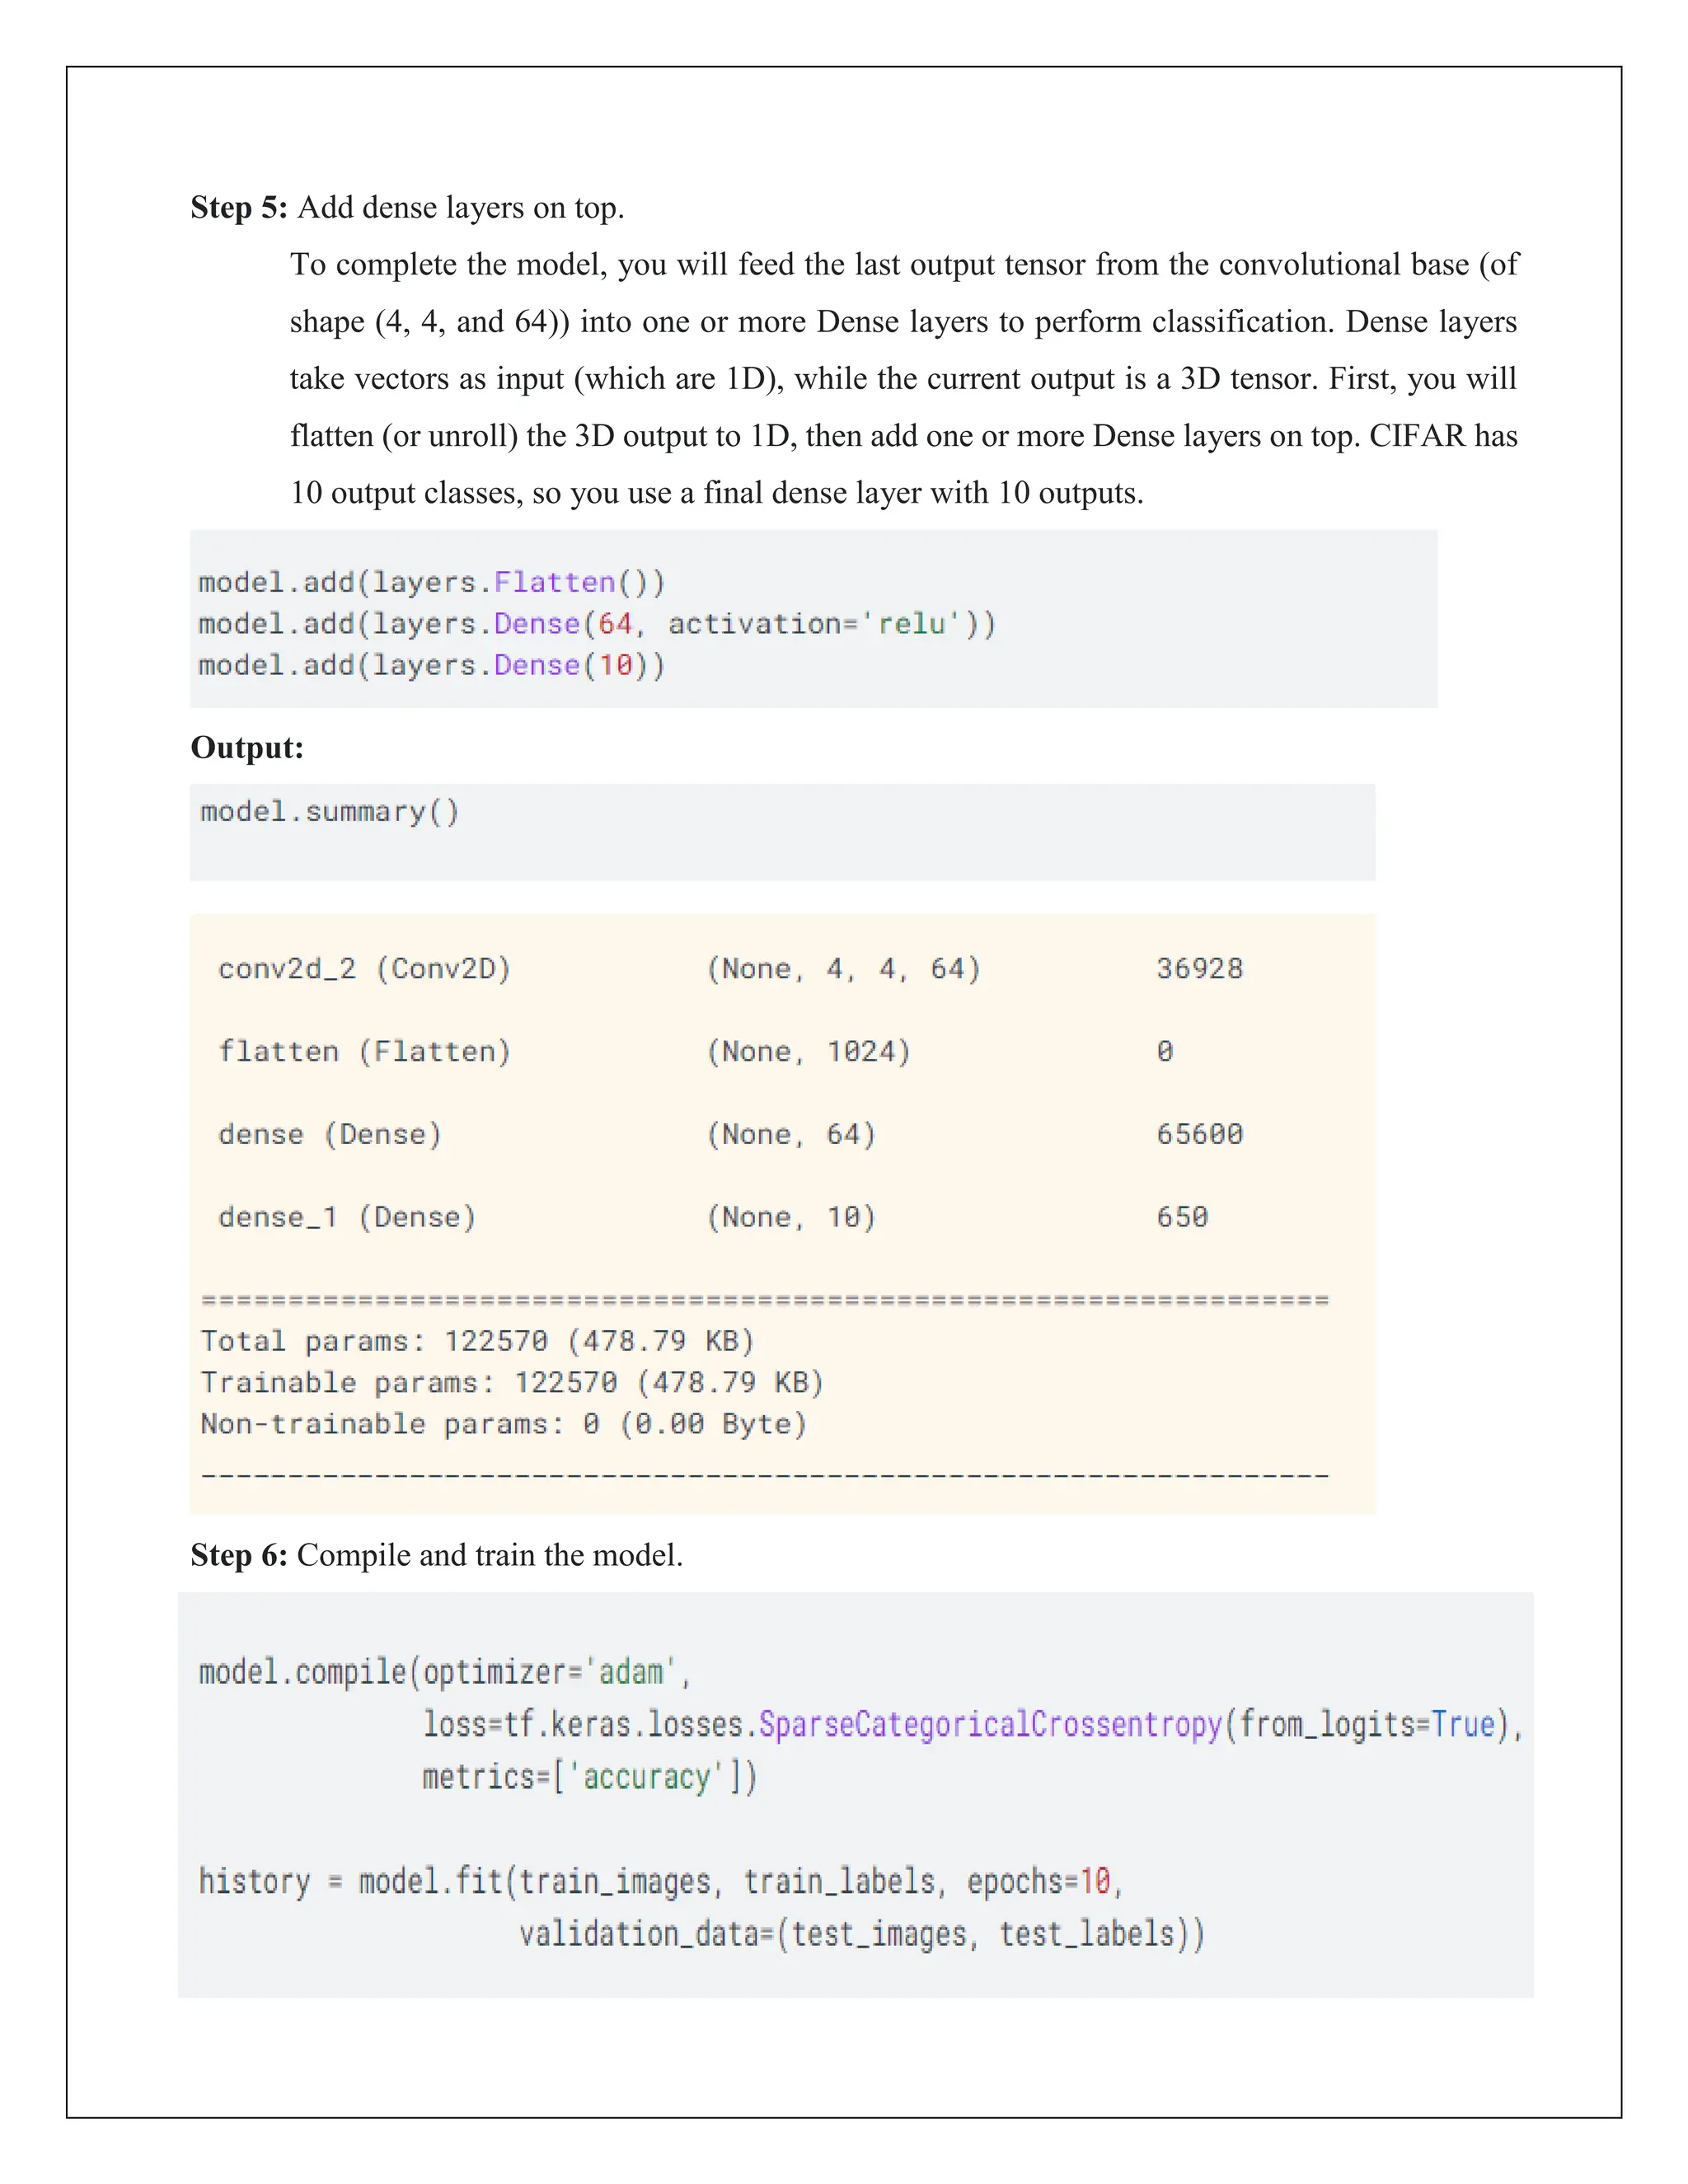
![Output:
<tf.Tensor: shape=(2,), dtype=int32, numpy=array([10, 10], dtype=int32)>
4.Dimensions of Vector:
Output:
1
5.Matrix:
Output:
tf.Tensor(
[[1 2]
[3 4]], shape=(2, 2), dtype=int32)
The number of dimensions of a matrix is :2
6.Mathematical Operations:
i.Addition:
Output:
tf.Tensor(
[[ 3 6]
[ 9 12]], shape=(2, 2), dtype=int32)
# importing packages
import tensorflow as tf
# creating two tensors
matrix = tf.constant([[1, 2], [3, 4]])
matrix1 = tf.constant([[2, 4], [6, 8]])
# addition of two matrices
result = tf.add(matrix, matrix1)
print(result)
# checking the dimensions of vector
vector.ndim
# importing packages
import tensorflow as tf
# creating a matrix
matrix = tf.constant([[1, 2], [3, 4]])
print(matrix)
print('the number of dimensions of a matrix is :
'+str(matrix.ndim))](https://image.slidesharecdn.com/exp015-240501141729-32c565eb/75/CCS335-_-Neural-Networks-and-Deep-Learning-Laboratory_Lab-Complete-Record-11-2048.jpg)
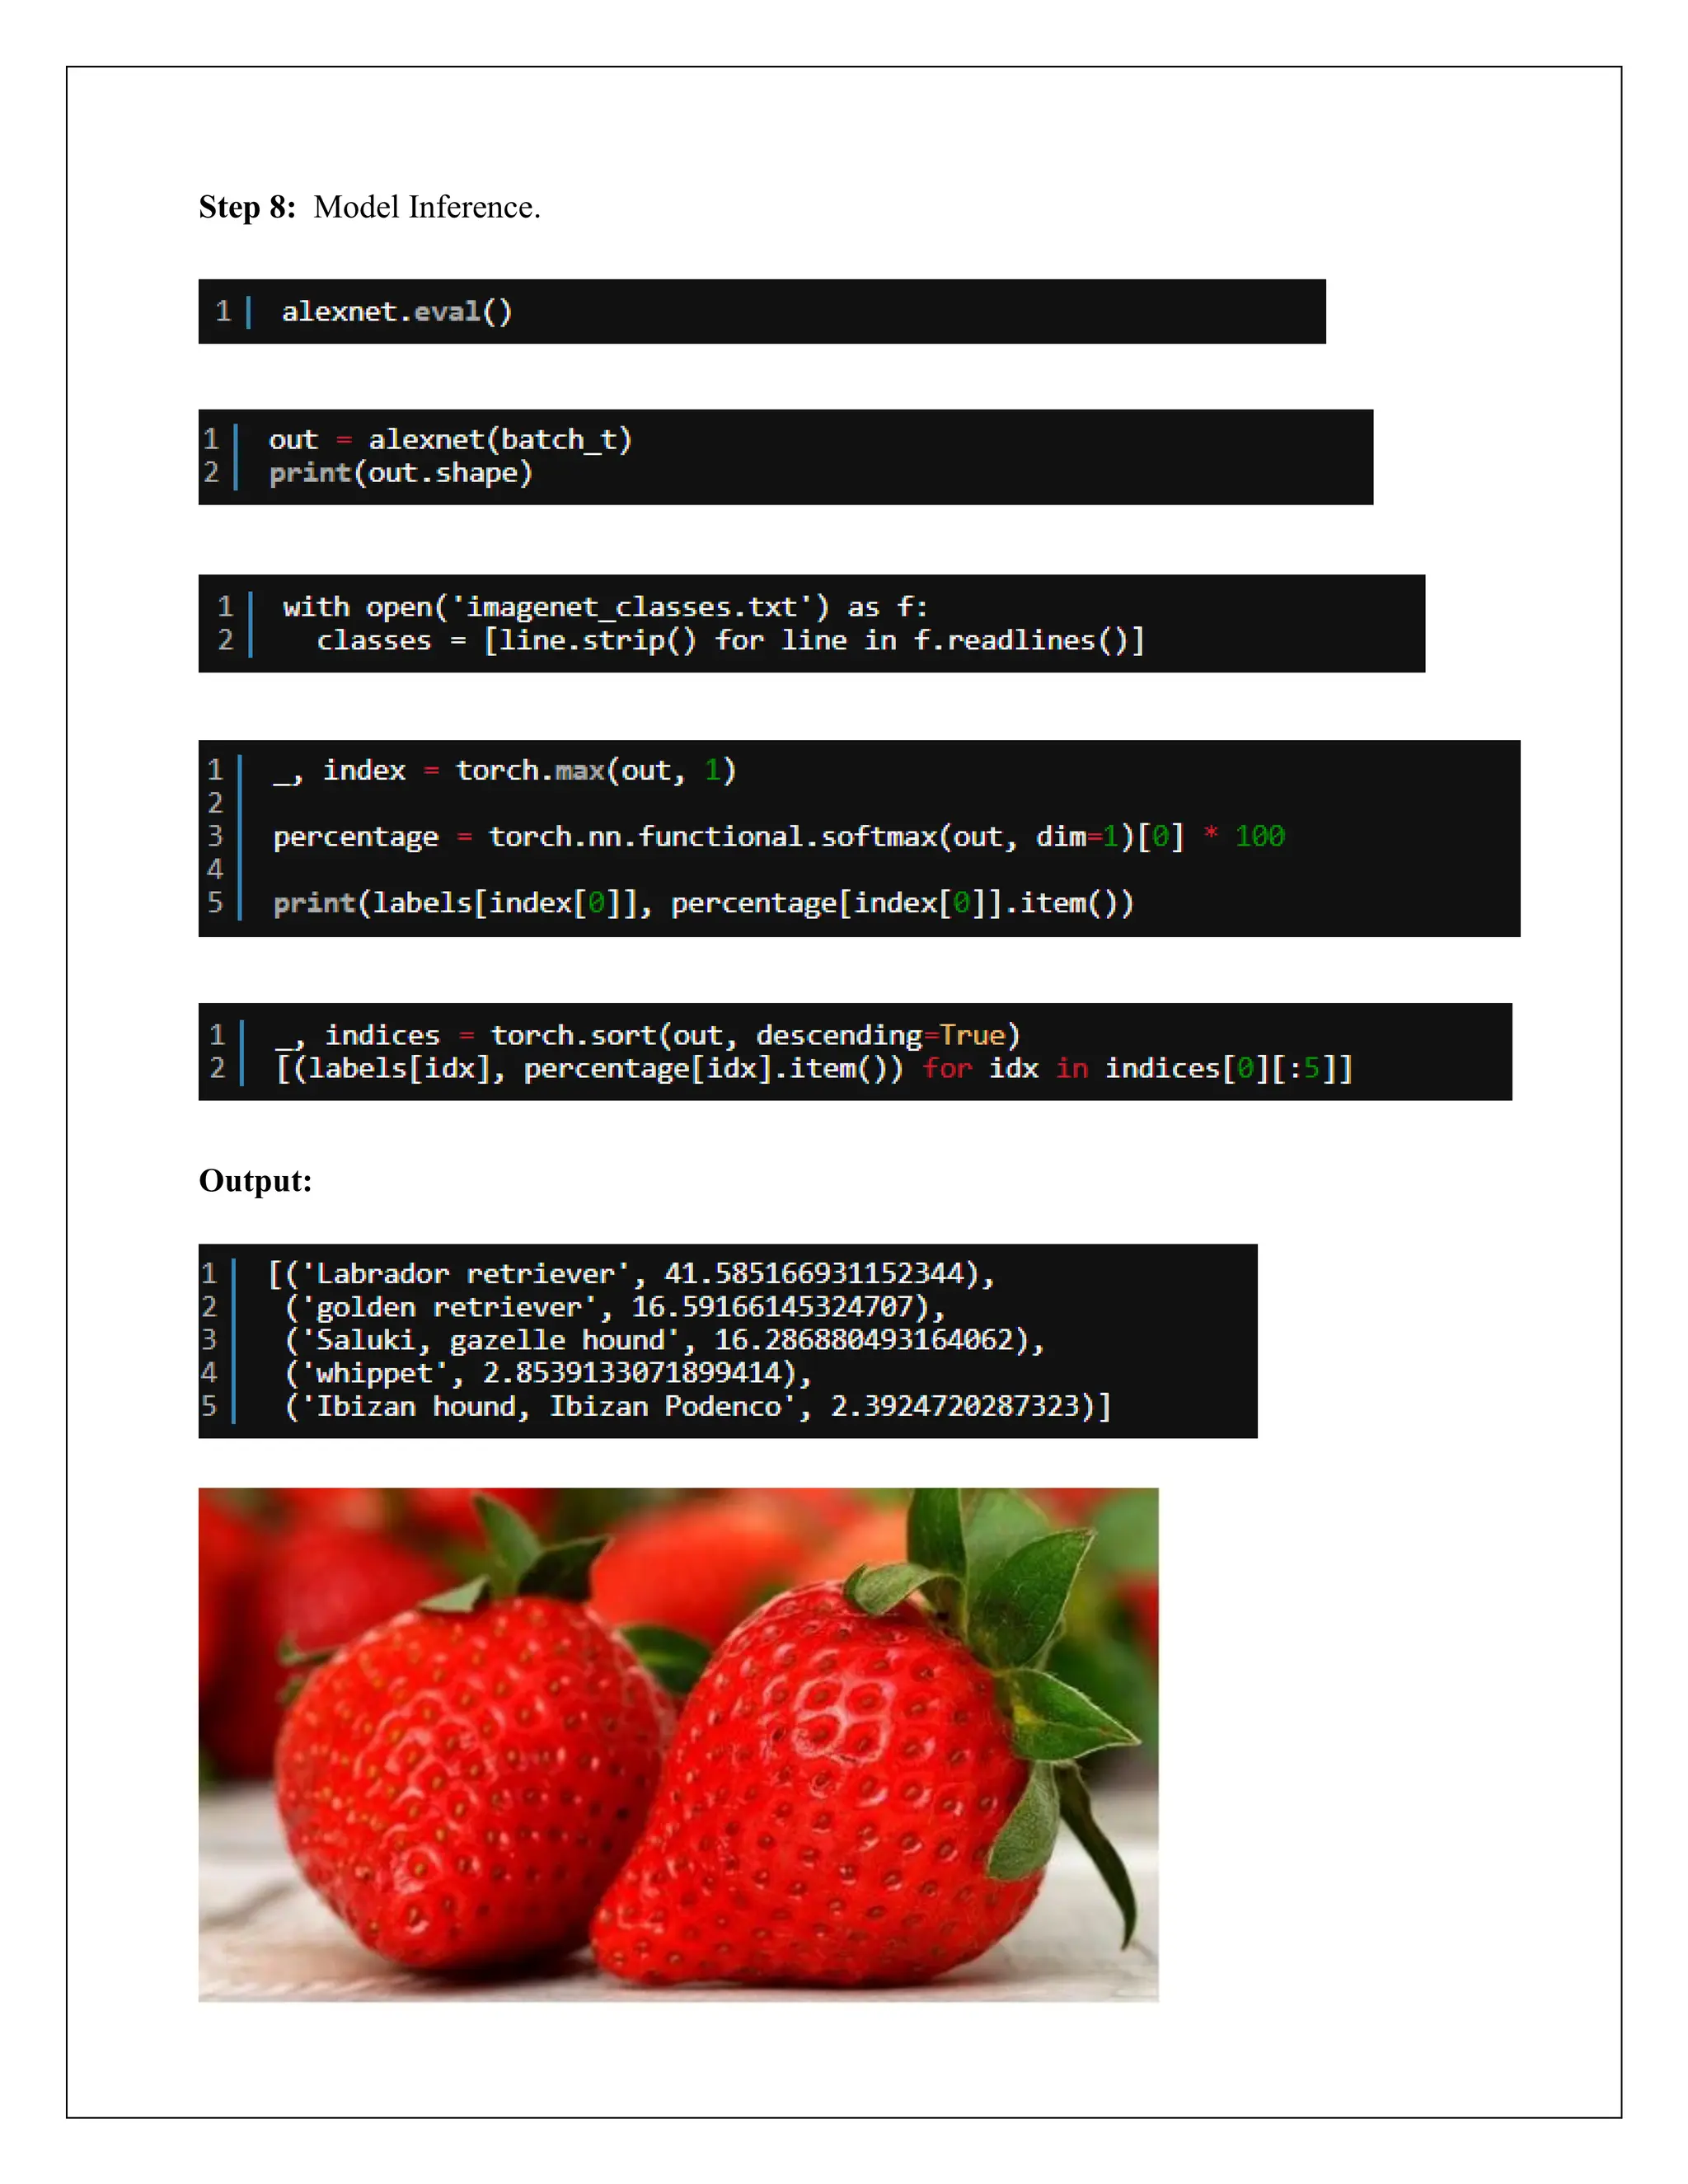
![ii.Subtraction:
Output:
tf.Tensor(
[[1 2]
[3 4]], shape=(2, 2), dtype=int32)
ii.Multiplication:
Output:
tf.Tensor(
[[ 2 8]
[18 32]], shape=(2, 2), dtype=int32)
[15 22]], shape=(2, 2), dtype=int32
# importing packages
import tensorflow as tf
# creating two tensors
matrix = tf.constant([[1, 2], [3, 4]])
matrix1 = tf.constant([[2, 4], [6, 8]])
# multiplication of two matrices
result=tf.multiply(matrix,matrix1)
print(result)
# importing packages
import tensorflow as tf
# creating two tensors
matrix = tf.constant([[1, 2], [3, 4]])
matrix1 = tf.constant([[2, 4], [6, 8]])
# subtraction of two matrices
result=tf.subtract(matrix,matrix1)
print(result)](https://image.slidesharecdn.com/exp015-240501141729-32c565eb/75/CCS335-_-Neural-Networks-and-Deep-Learning-Laboratory_Lab-Complete-Record-12-2048.jpg)
![iii.Division:
Output:
tf.Tensor(
[[2. 2.]
[2. 2.]], shape=(2, 2), dtype=float64)
iv. Transpose:
Output:
tf.Tensor(
[[1 3]
[2 4]], shape=(2, 2), dtype=int32)
# importing packages
import tensorflow as tf
# creating two tensors
matrix = tf.constant([[1, 2],[3, 4]])
matrix1 = tf.constant([[2, 4],[6, 8]])
# division of two matrices
result=tf.divide(matrix,matrix1)
print(result)
# importing packages
import tensorflow as tf
# creating a matrix
matrix = tf.constant([[1, 2], [3, 4]])
# transpose of the matrix
print(tf.transpose(matrix))](https://image.slidesharecdn.com/exp015-240501141729-32c565eb/75/CCS335-_-Neural-Networks-and-Deep-Learning-Laboratory_Lab-Complete-Record-13-2048.jpg)
![v. Dot Product:
Output:
dot product of matrices is : tf.Tensor(
[[ 7 10]
Result:
Thus the python program using tensor flow for about mathematical operations is successfully
executed and verified.
# importing packages
import tensorflow as tf
# creating a matrix
matrix = tf.constant([[1, 2], [3, 4]])
# dot product of matrices
print('dot product of matrices is : ' +
str(tf.tensordot(matrix, matrix, axes=1)))](https://image.slidesharecdn.com/exp015-240501141729-32c565eb/75/CCS335-_-Neural-Networks-and-Deep-Learning-Laboratory_Lab-Complete-Record-14-2048.jpg)

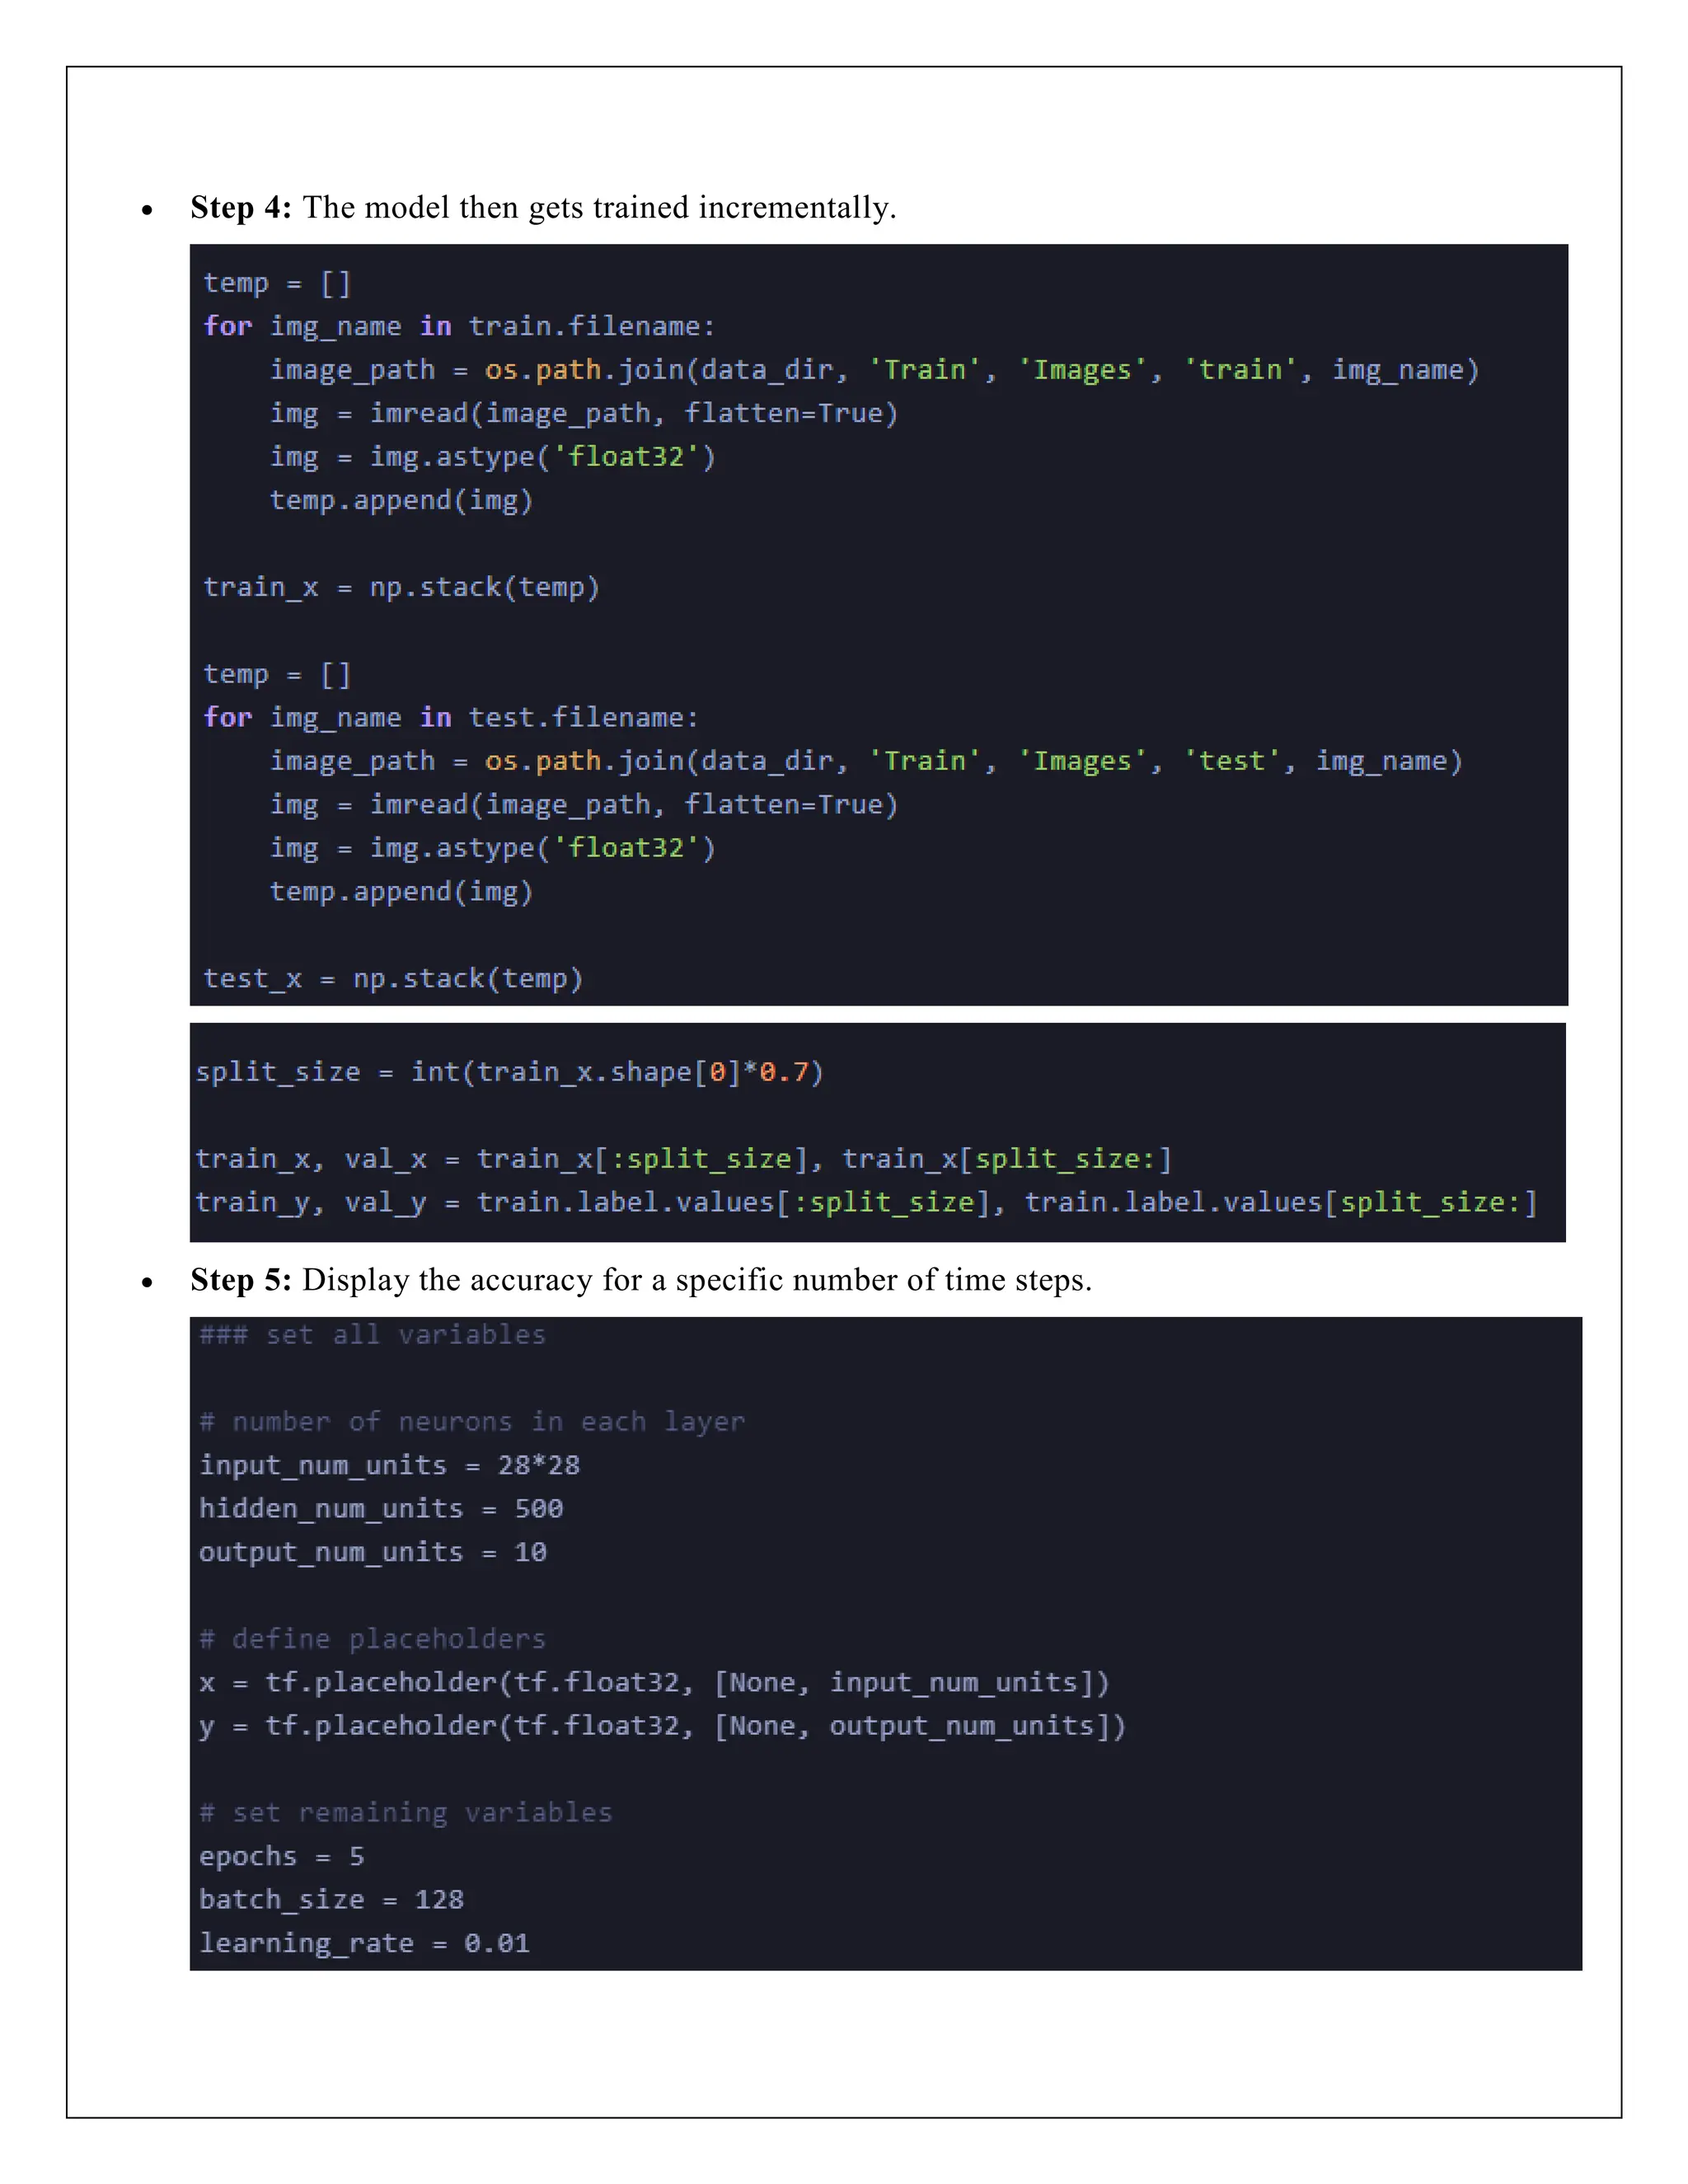
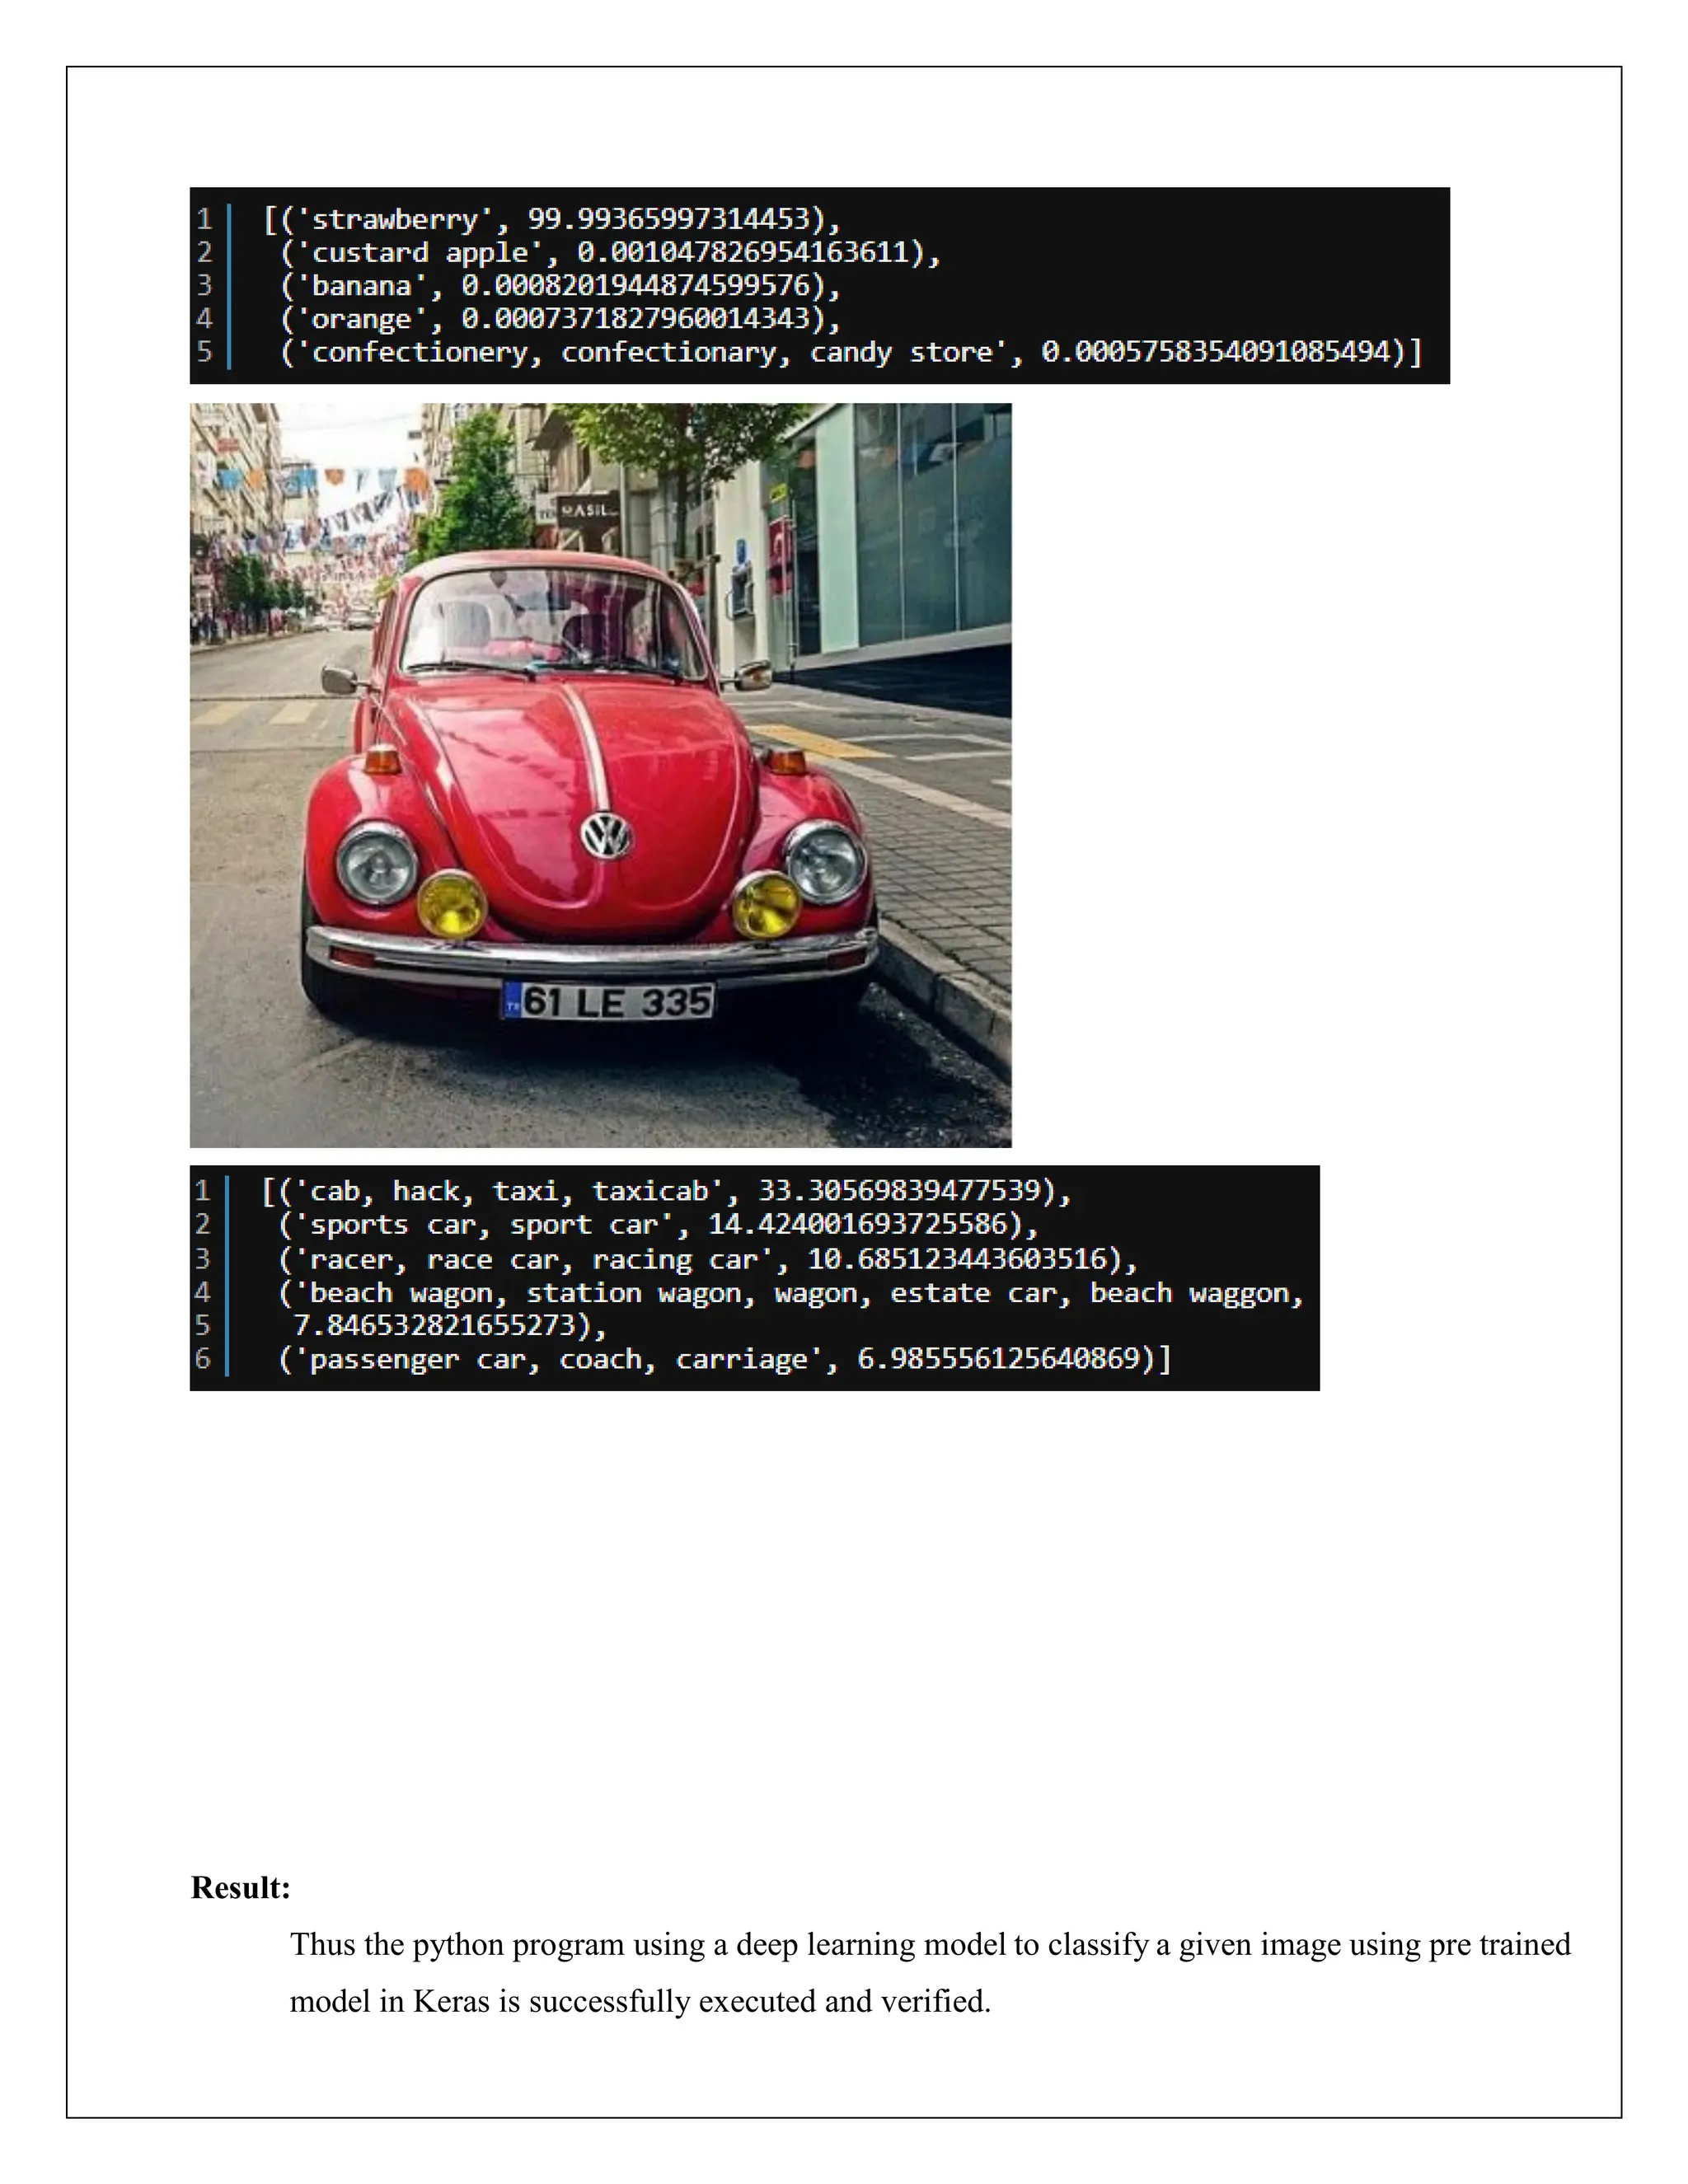
![3.Load The Dataset:
4.Data Preprocessing:
X_train = X_train.astype('float32') / 255
X_test = X_test.astype('float32') / 255
y_train = y_train.astype('float32') / 255
y_test = y_test.astype('float32') / 255
5.Creating Regression Model:
6.Compiling The Model:
7.Fitting The Model:
mnist_train = pd.read_csv("/content/drive/MyDrive/mnist_test.csv")
mnist_test = pd.read_csv("/content/drive/MyDrive/mnist_train.csv")
X_train = mnist_train.drop("label", axis=1).values
y_train = mnist_train["label"].values
X_test = mnist_test.drop("label", axis=1).values
y_test = mnist_test["label"].values
model = Sequential()
model.add(Dense(512, activation='relu'))
model.add(Dropout(0.5))
model.add(Dense(256, activation='relu'))
model.add(Dropout(0.25))
model.add(Dense(10))
model.compile(loss='sparse_categorical_crossentropy',
optimizer='adam',
metrics=['accuracy'])
model.fit(X_train, y_train,
batch_size=128,
epochs=2,
verbose=1,
validation_data=(X_test, y_test))
model.summary()](https://image.slidesharecdn.com/exp015-240501141729-32c565eb/75/CCS335-_-Neural-Networks-and-Deep-Learning-Laboratory_Lab-Complete-Record-17-2048.jpg)
![Output:
Epoch 1/2
79/79 [==============================] - 9s 98ms/step - loss: 0.1766 - accuracy:
0.0957 - val_loss: 9.5367e-07 - val_accuracy: 0.0987
Epoch 2/2
79/79 [==============================] - 9s 109ms/step - loss: 9.5367e-07 - accuracy:
0.0980 - val_loss: 9.5367e-07 - val_accuracy: 0.0987
Model: "sequential_3"
Layer (type) Output Shape Param #
=================================================================
dense_6 (Dense) (None, 512) 401920
dropout_4 (Dropout) (None, 512) 0
dense_7 (Dense) (None, 256) 131328
dropout_5 (Dropout) (None, 256) 0
dense_8 (Dense) (None, 10) 2570
=================================================================
Total params: 535818 (2.04 MB)
Trainable params: 535818 (2.04 MB)
Non-trainable params: 0 (0.00 Byte)
8.Evaluating the Model:
Output:
Test loss: 9.536742595628311e-07
Test accuracy: 0.09871666878461838
score = model.evaluate(X_test, y_test, verbose=0)
print('Test loss:', score[0])
print('Test accuracy:', score[1])](https://image.slidesharecdn.com/exp015-240501141729-32c565eb/75/CCS335-_-Neural-Networks-and-Deep-Learning-Laboratory_Lab-Complete-Record-18-2048.jpg)
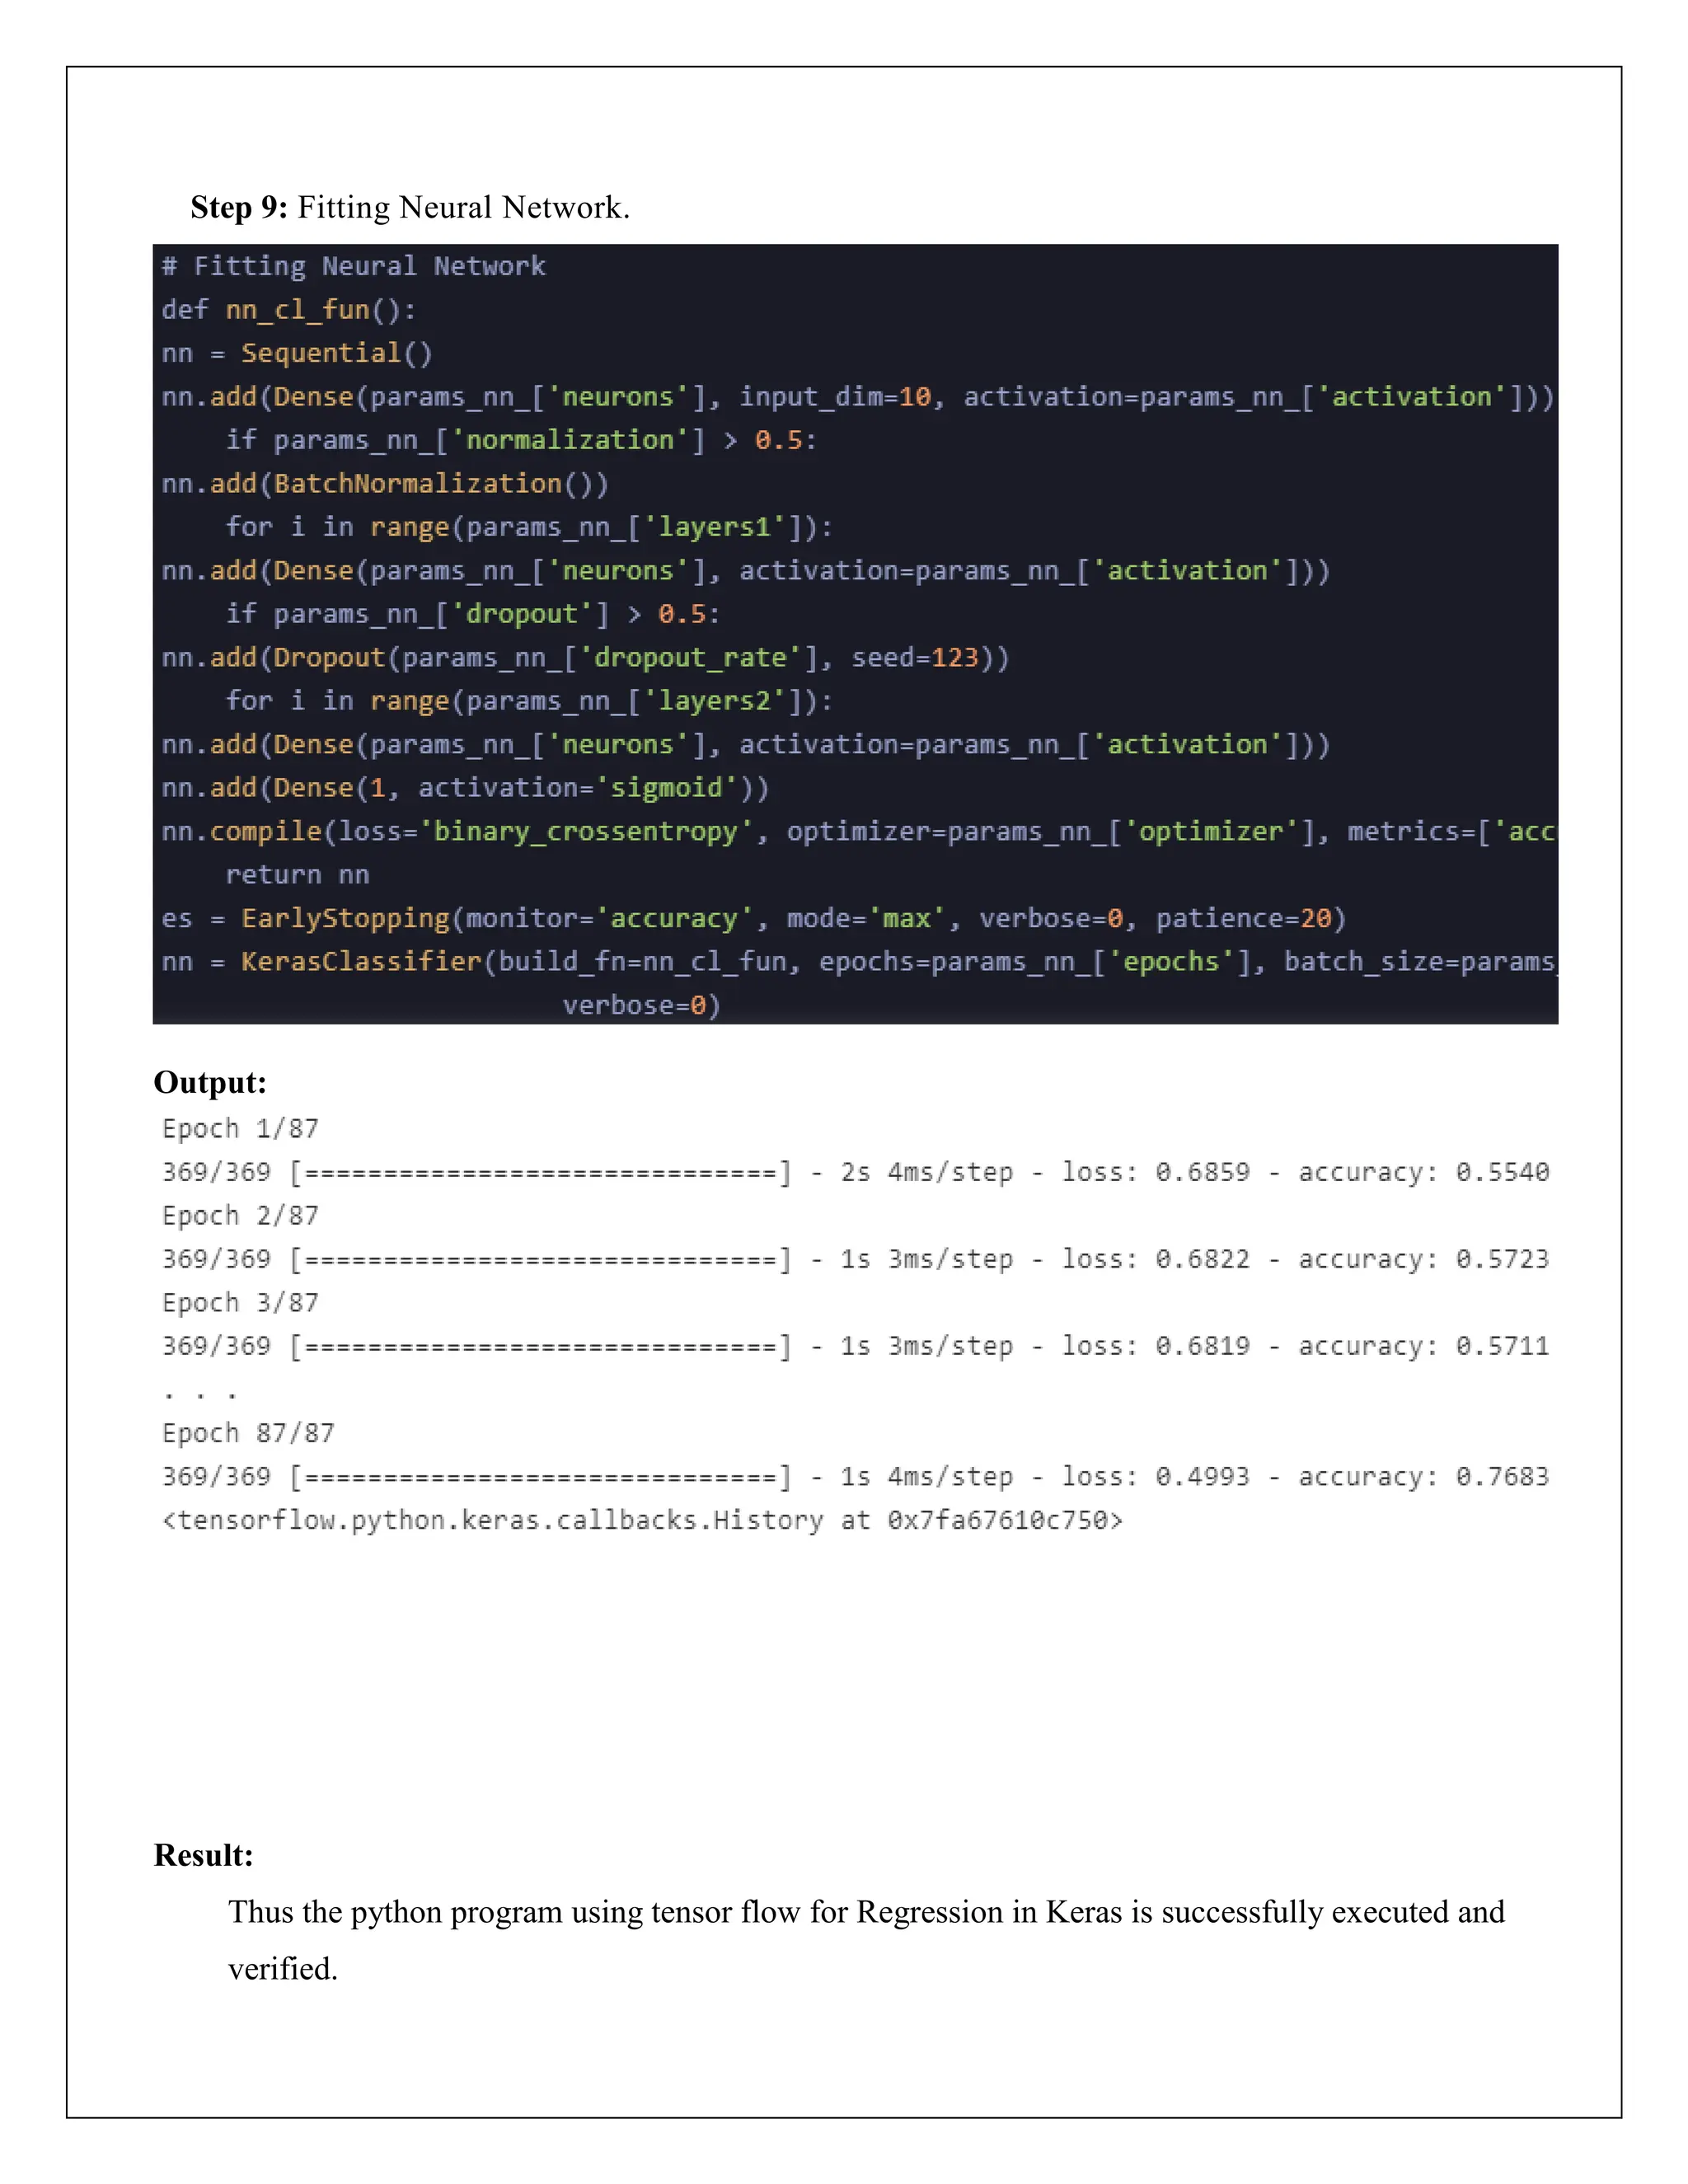
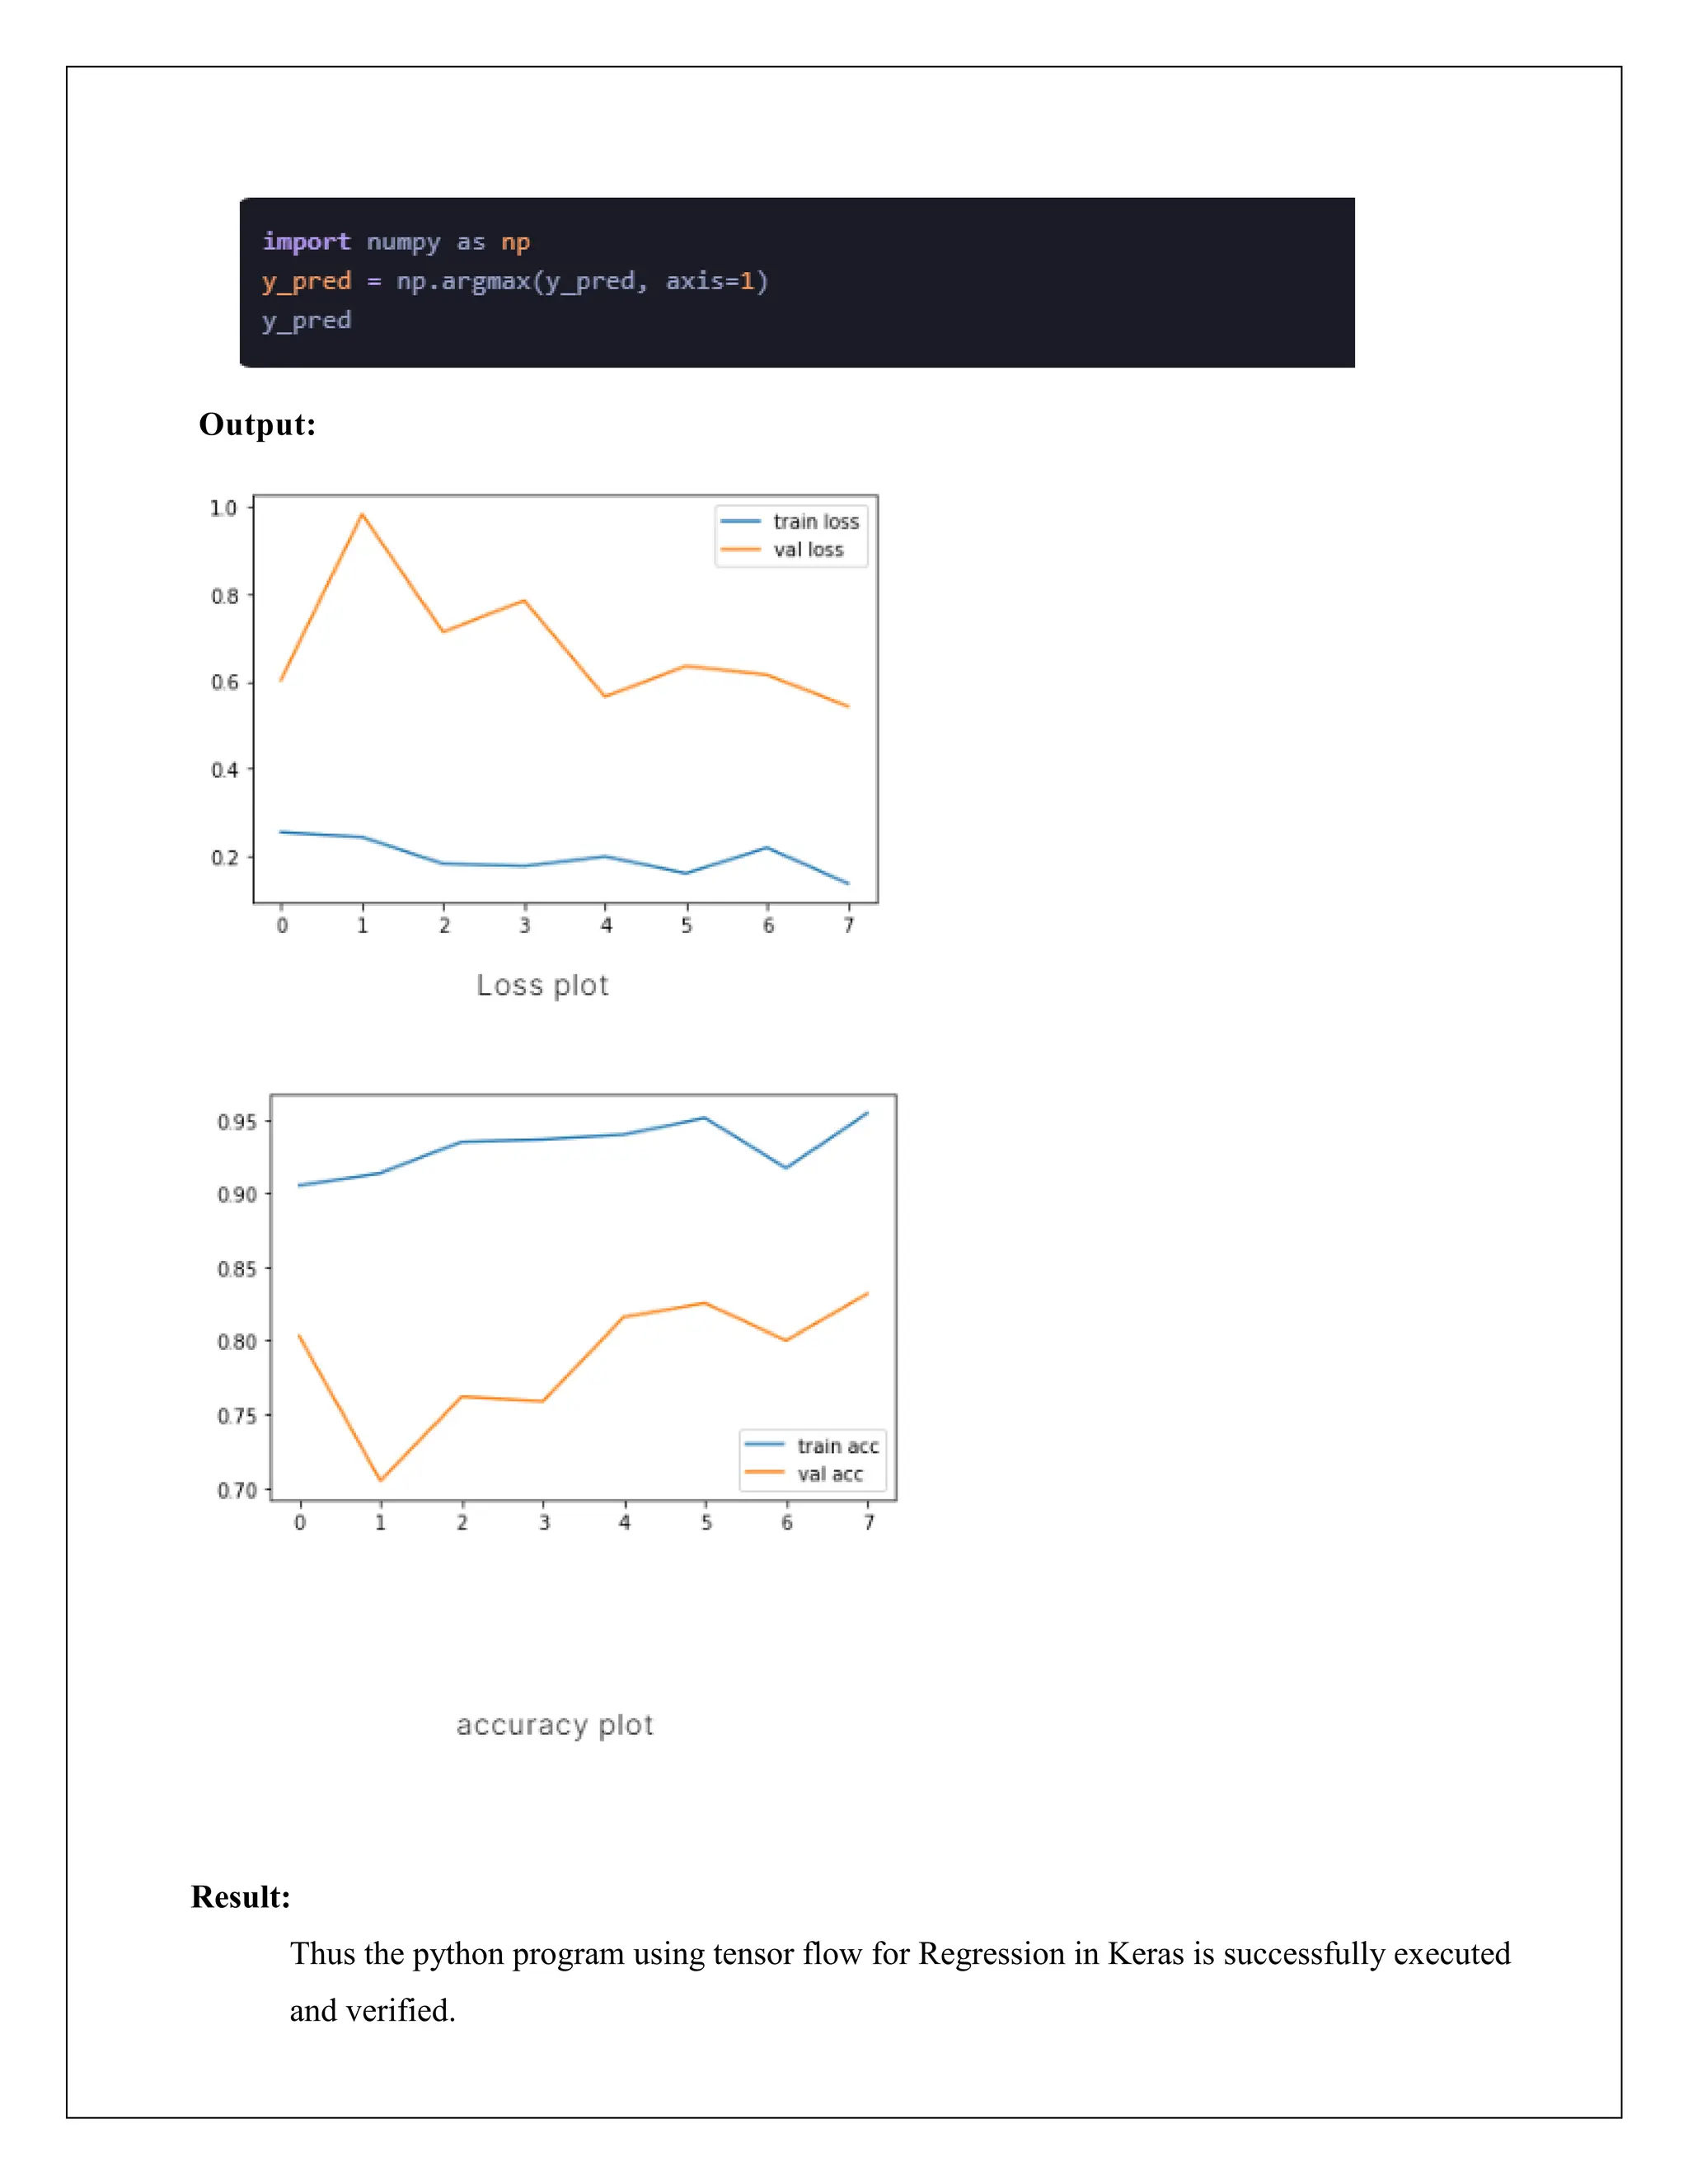
![9.Predicting the Output:
Output:
1875/1875 [==============================] - 10s 5ms/step
[[ 7.6505547 -5.039996 -4.8032265 ... -5.1202197 -4.11554 -4.5914993]
[ 8.687883 -5.6656256 -5.358442 ... -5.6097336 -4.4189353 -4.6995463]
[ 5.088747 -3.361604 -3.19289 ... -3.178188 -2.7151685 -2.9893024]
...
[ 6.4936686 -4.0753646 -3.68436 ... -4.2753725 -3.3604608 -3.5153835]
[ 5.344781 -3.5582738 -3.5012681 ... -3.5117133 -2.885717 -3.028985 ]
[ 5.977292 -3.7096646 -3.6107407 ... -3.9403937 -3.1786413 -3.3968258]]
Result:
Thus the python program using tensor flow for Regression in Keras is successfully executed and
verified.
y_pred = model.predict(X_test)
print(y_pred)](https://image.slidesharecdn.com/exp015-240501141729-32c565eb/75/CCS335-_-Neural-Networks-and-Deep-Learning-Laboratory_Lab-Complete-Record-19-2048.jpg)

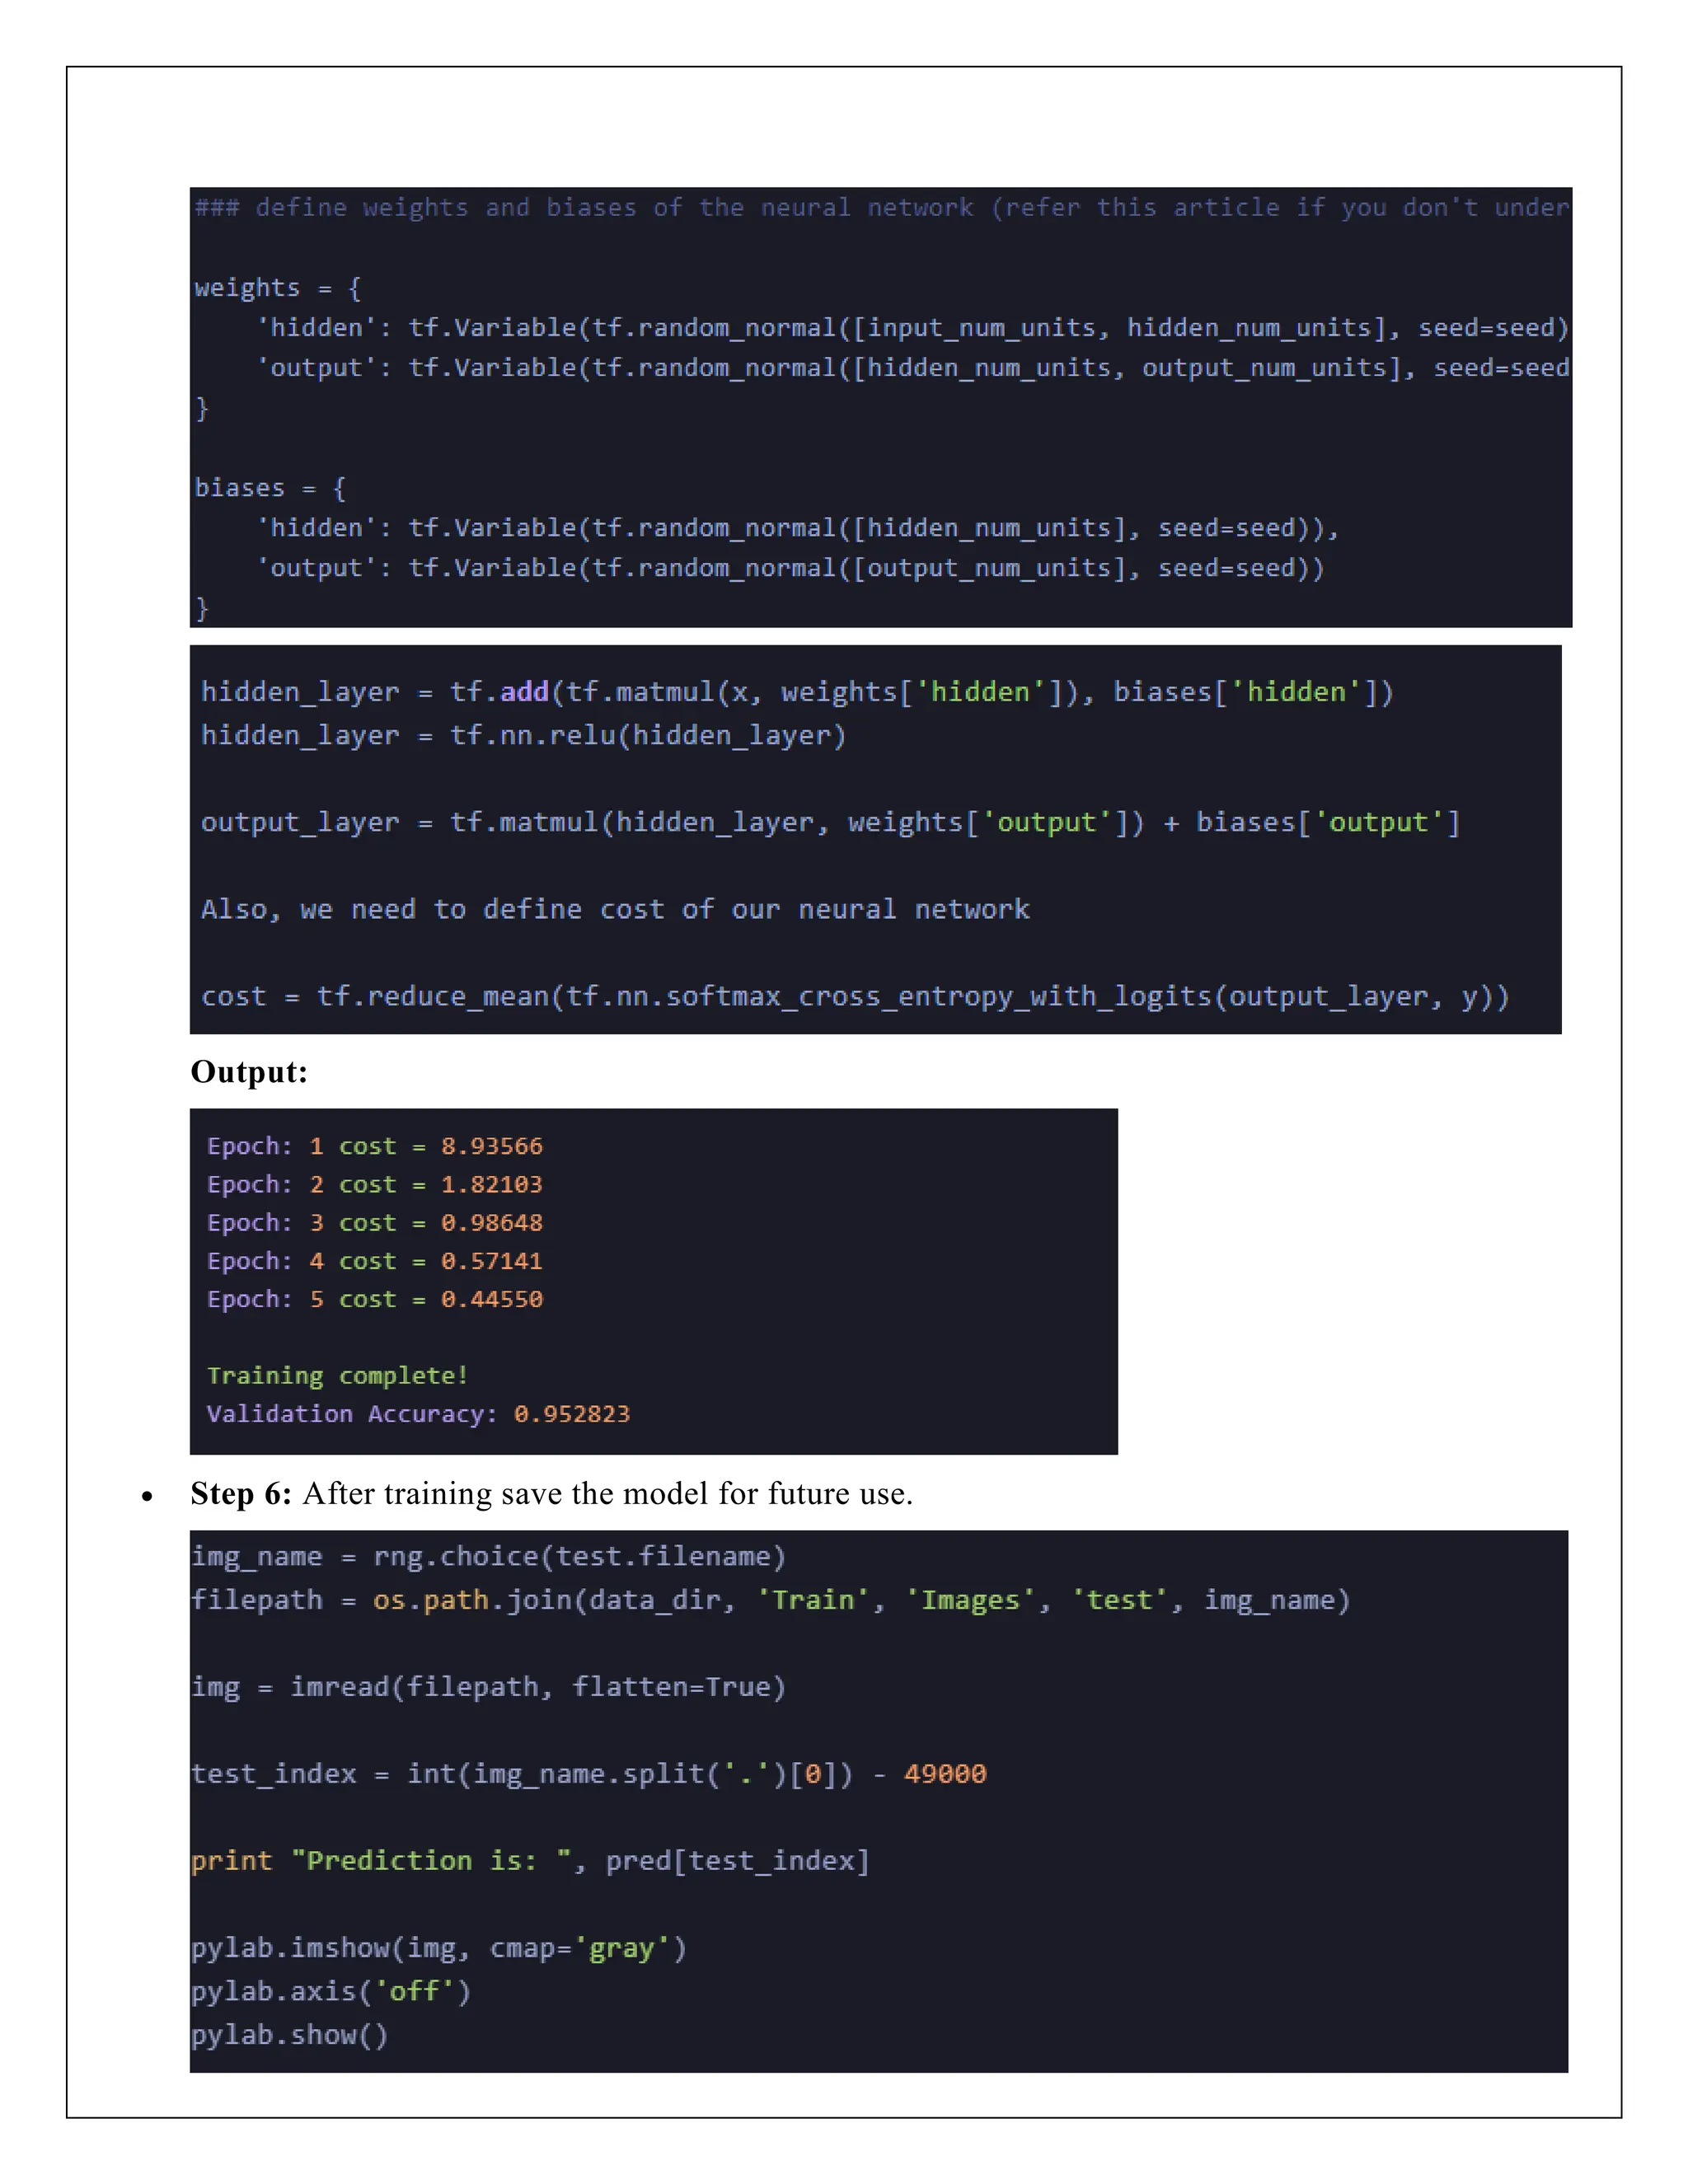
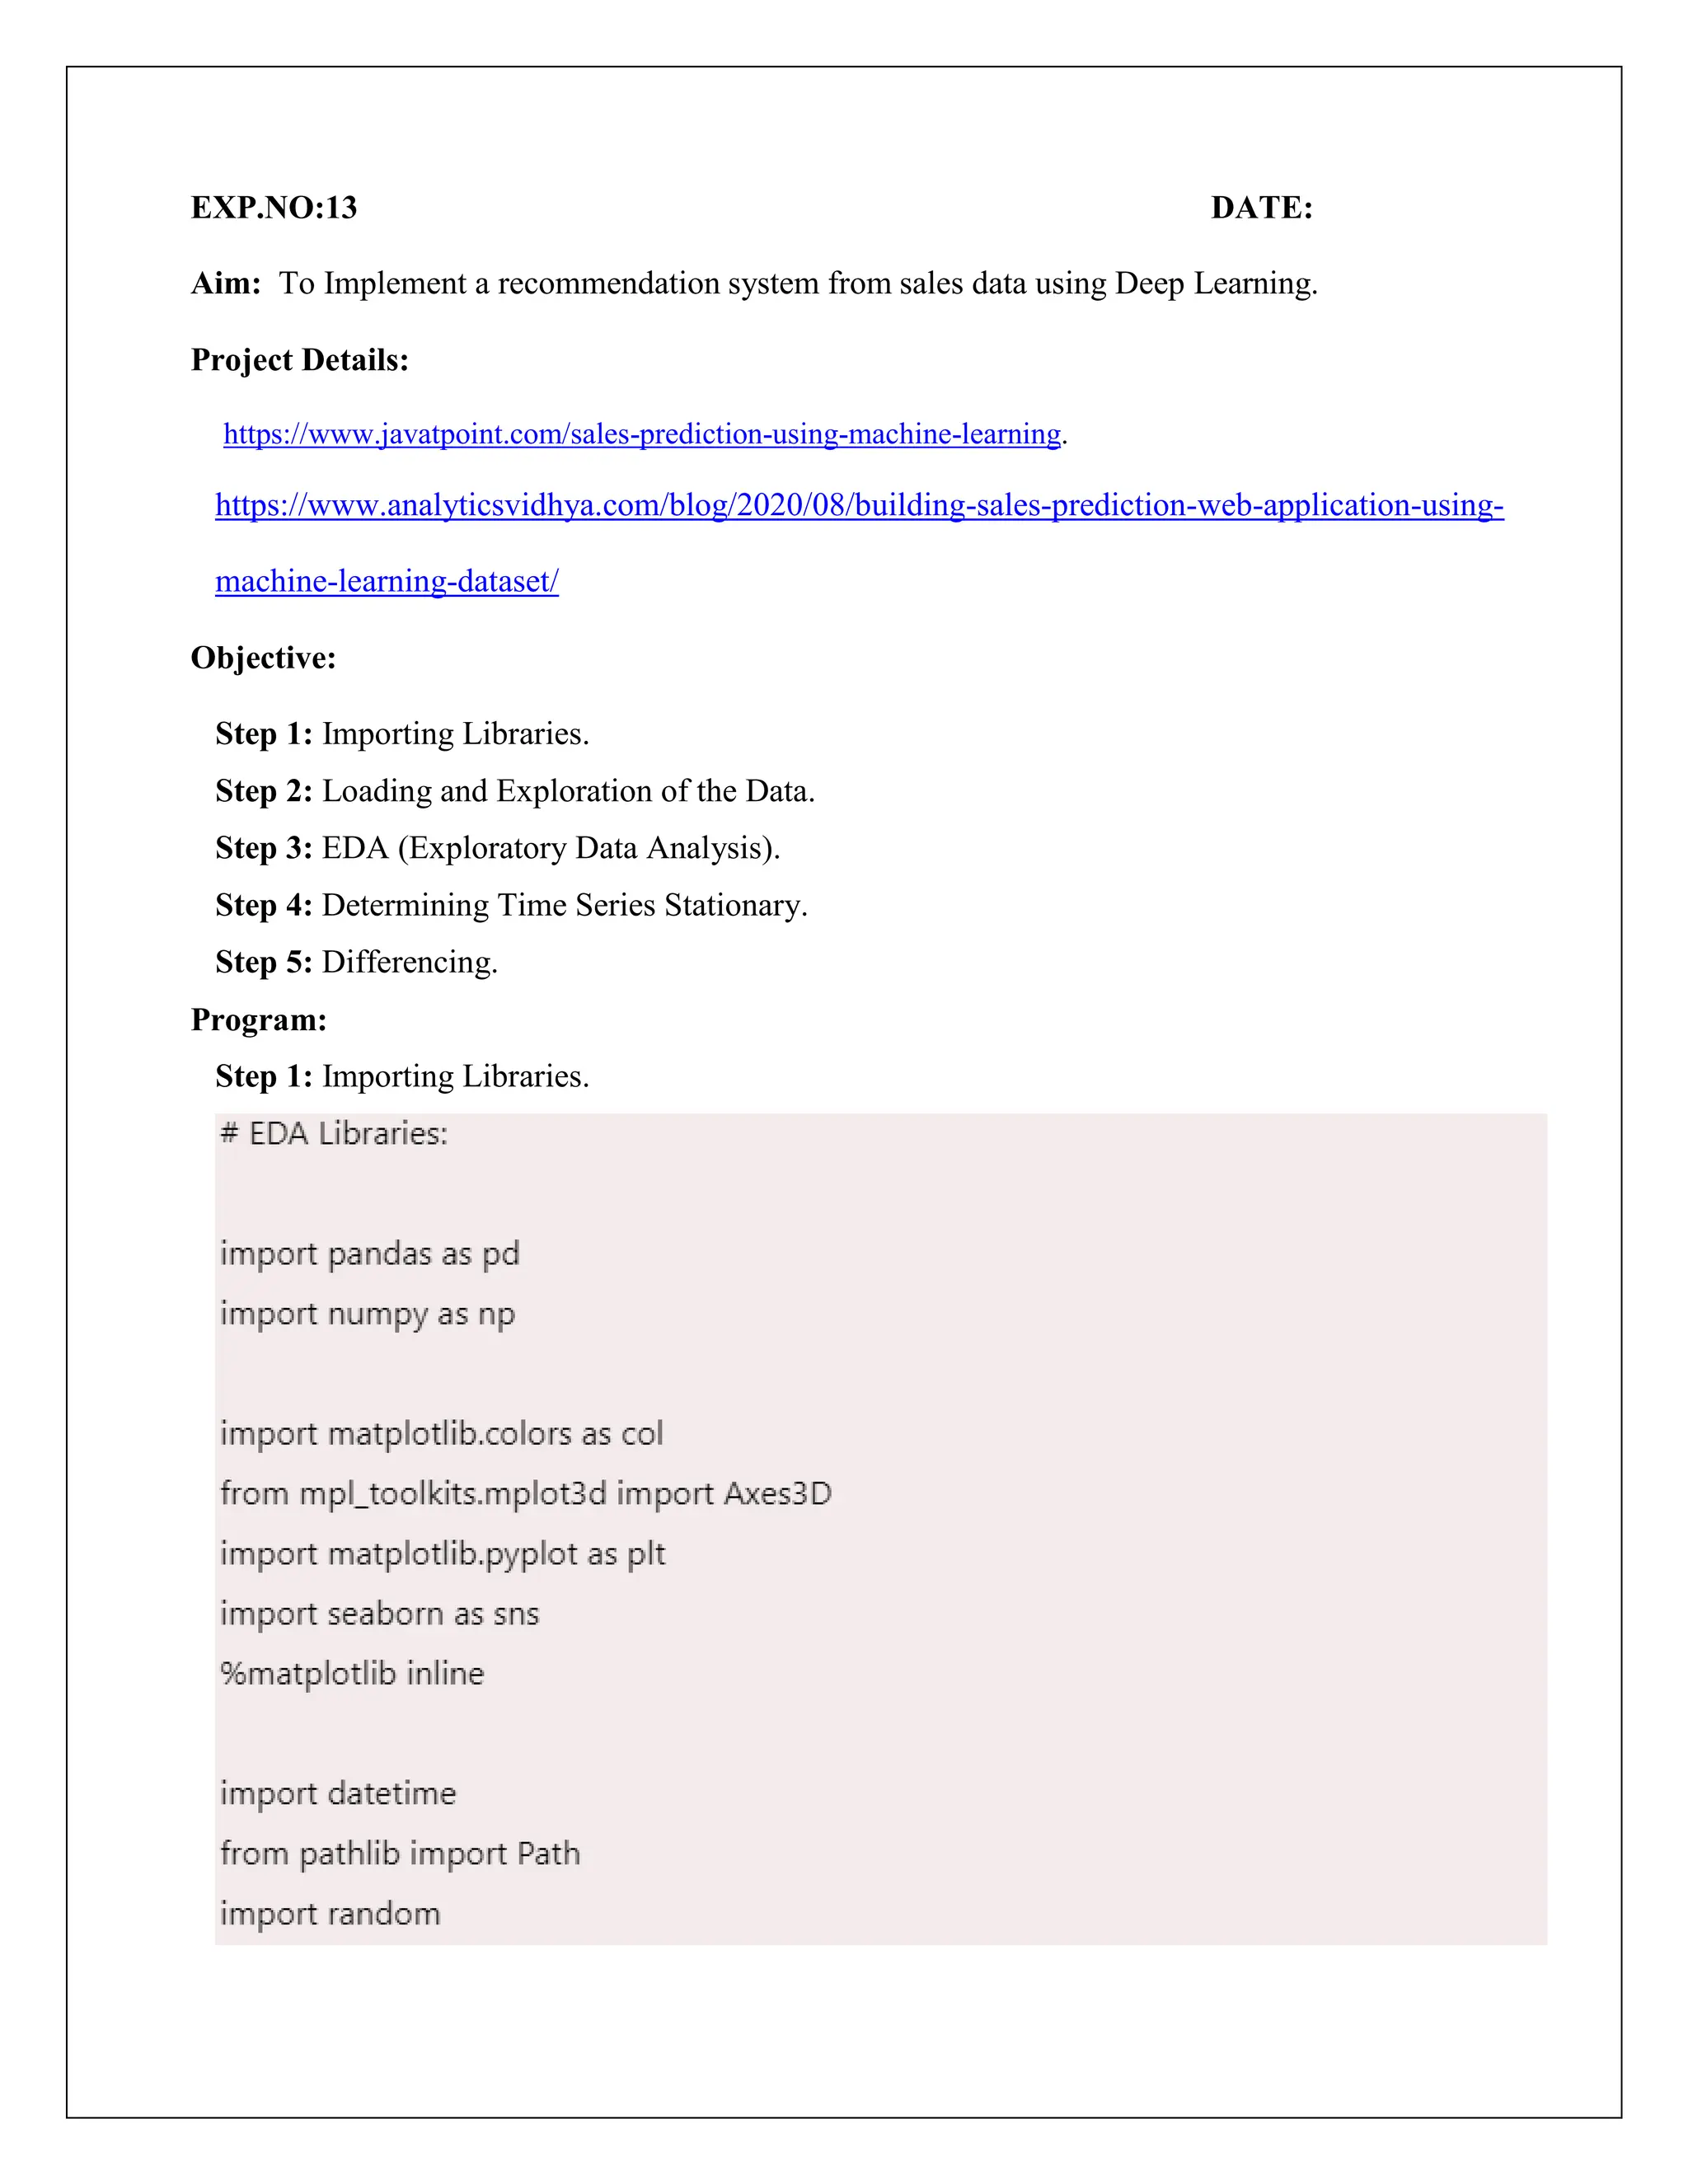
![3.Load The Dataset:
4.Displaying The Dataset:
Output:
Training data shape: (10000, 784)
Testing data shape: (60000, 784)
Shape of the first image: (784,)
<matplotlib.image.AxesImage at 0x796ebbf83d60>
mnist_train = pd.read_csv("/content/drive/MyDrive/mnist_test.csv")
mnist_test = pd.read_csv("/content/drive/MyDrive/mnist_train.csv")
x_train = mnist_train.drop("label", axis=1).values
y_train = mnist_train["label"].values
x_test = mnist_test.drop("label", axis=1).values
y_test = mnist_test["label"].values
print("Training data shape:", x_train.shape)
print("Testing data shape:", x_test.shape)
print("Shape of the first image:", x_train[0].shape)
# Reshape the flattened image into a 2D array and display first image
image = np.reshape(x_train[0], (28, 28))
plt.imshow(image)](https://image.slidesharecdn.com/exp015-240501141729-32c565eb/75/CCS335-_-Neural-Networks-and-Deep-Learning-Laboratory_Lab-Complete-Record-22-2048.jpg)
![5.Normalizing The Dataset:
x_train = x_train.astype('float32') / 255
x_test = x_test.astype('float32') / 255
y_train = y_train.astype('float32') / 255
y_test = y_test.astype('float32') / 255
6.Flatenning The Image:
1. Building The Model:
Output:
Epoch 1/5
313/313 [==============================] - 1s 1ms/step - loss: 0.0888 - accuracy:
0.0975
Epoch 2/5
313/313 [==============================] - 0s 1ms/step - loss: 0.0051 - accuracy:
0.0980
Epoch 3/5
313/313 [==============================] - 0s 1ms/step - loss: 0.0024 - accuracy:
0.0980
Epoch 4/5
313/313 [==============================] - 0s 1ms/step - loss: 0.0015 - accuracy:
0.0980
Epoch 5/5
313/313 [==============================] - 0s 1ms/step - loss: 9.8897e-04 - accuracy:
0.0980
<keras.src.callbacks.History at 0x796ebbe53a30>
x_train_flatten = x_train.reshape(len(x_train), 28*28)
x_test_flatten = x_test.reshape(len(x_test), 28*28)
model = keras.Sequential([
keras.layers.Dense(10, input_shape=(784,),
activation='sigmoid')
])
model.compile(
optimizer='adam',
loss='sparse_categorical_crossentropy',
metrics=['accuracy'])
model.fit(x_train_flatten, y_train, epochs=5)](https://image.slidesharecdn.com/exp015-240501141729-32c565eb/75/CCS335-_-Neural-Networks-and-Deep-Learning-Laboratory_Lab-Complete-Record-23-2048.jpg)
![2. Output Accuracy:
Output:
1875/1875 [==============================] - 3s 2ms/step - loss: 8.6323e-04 -
accuracy: 0.0987
Accuracy: 9.87%
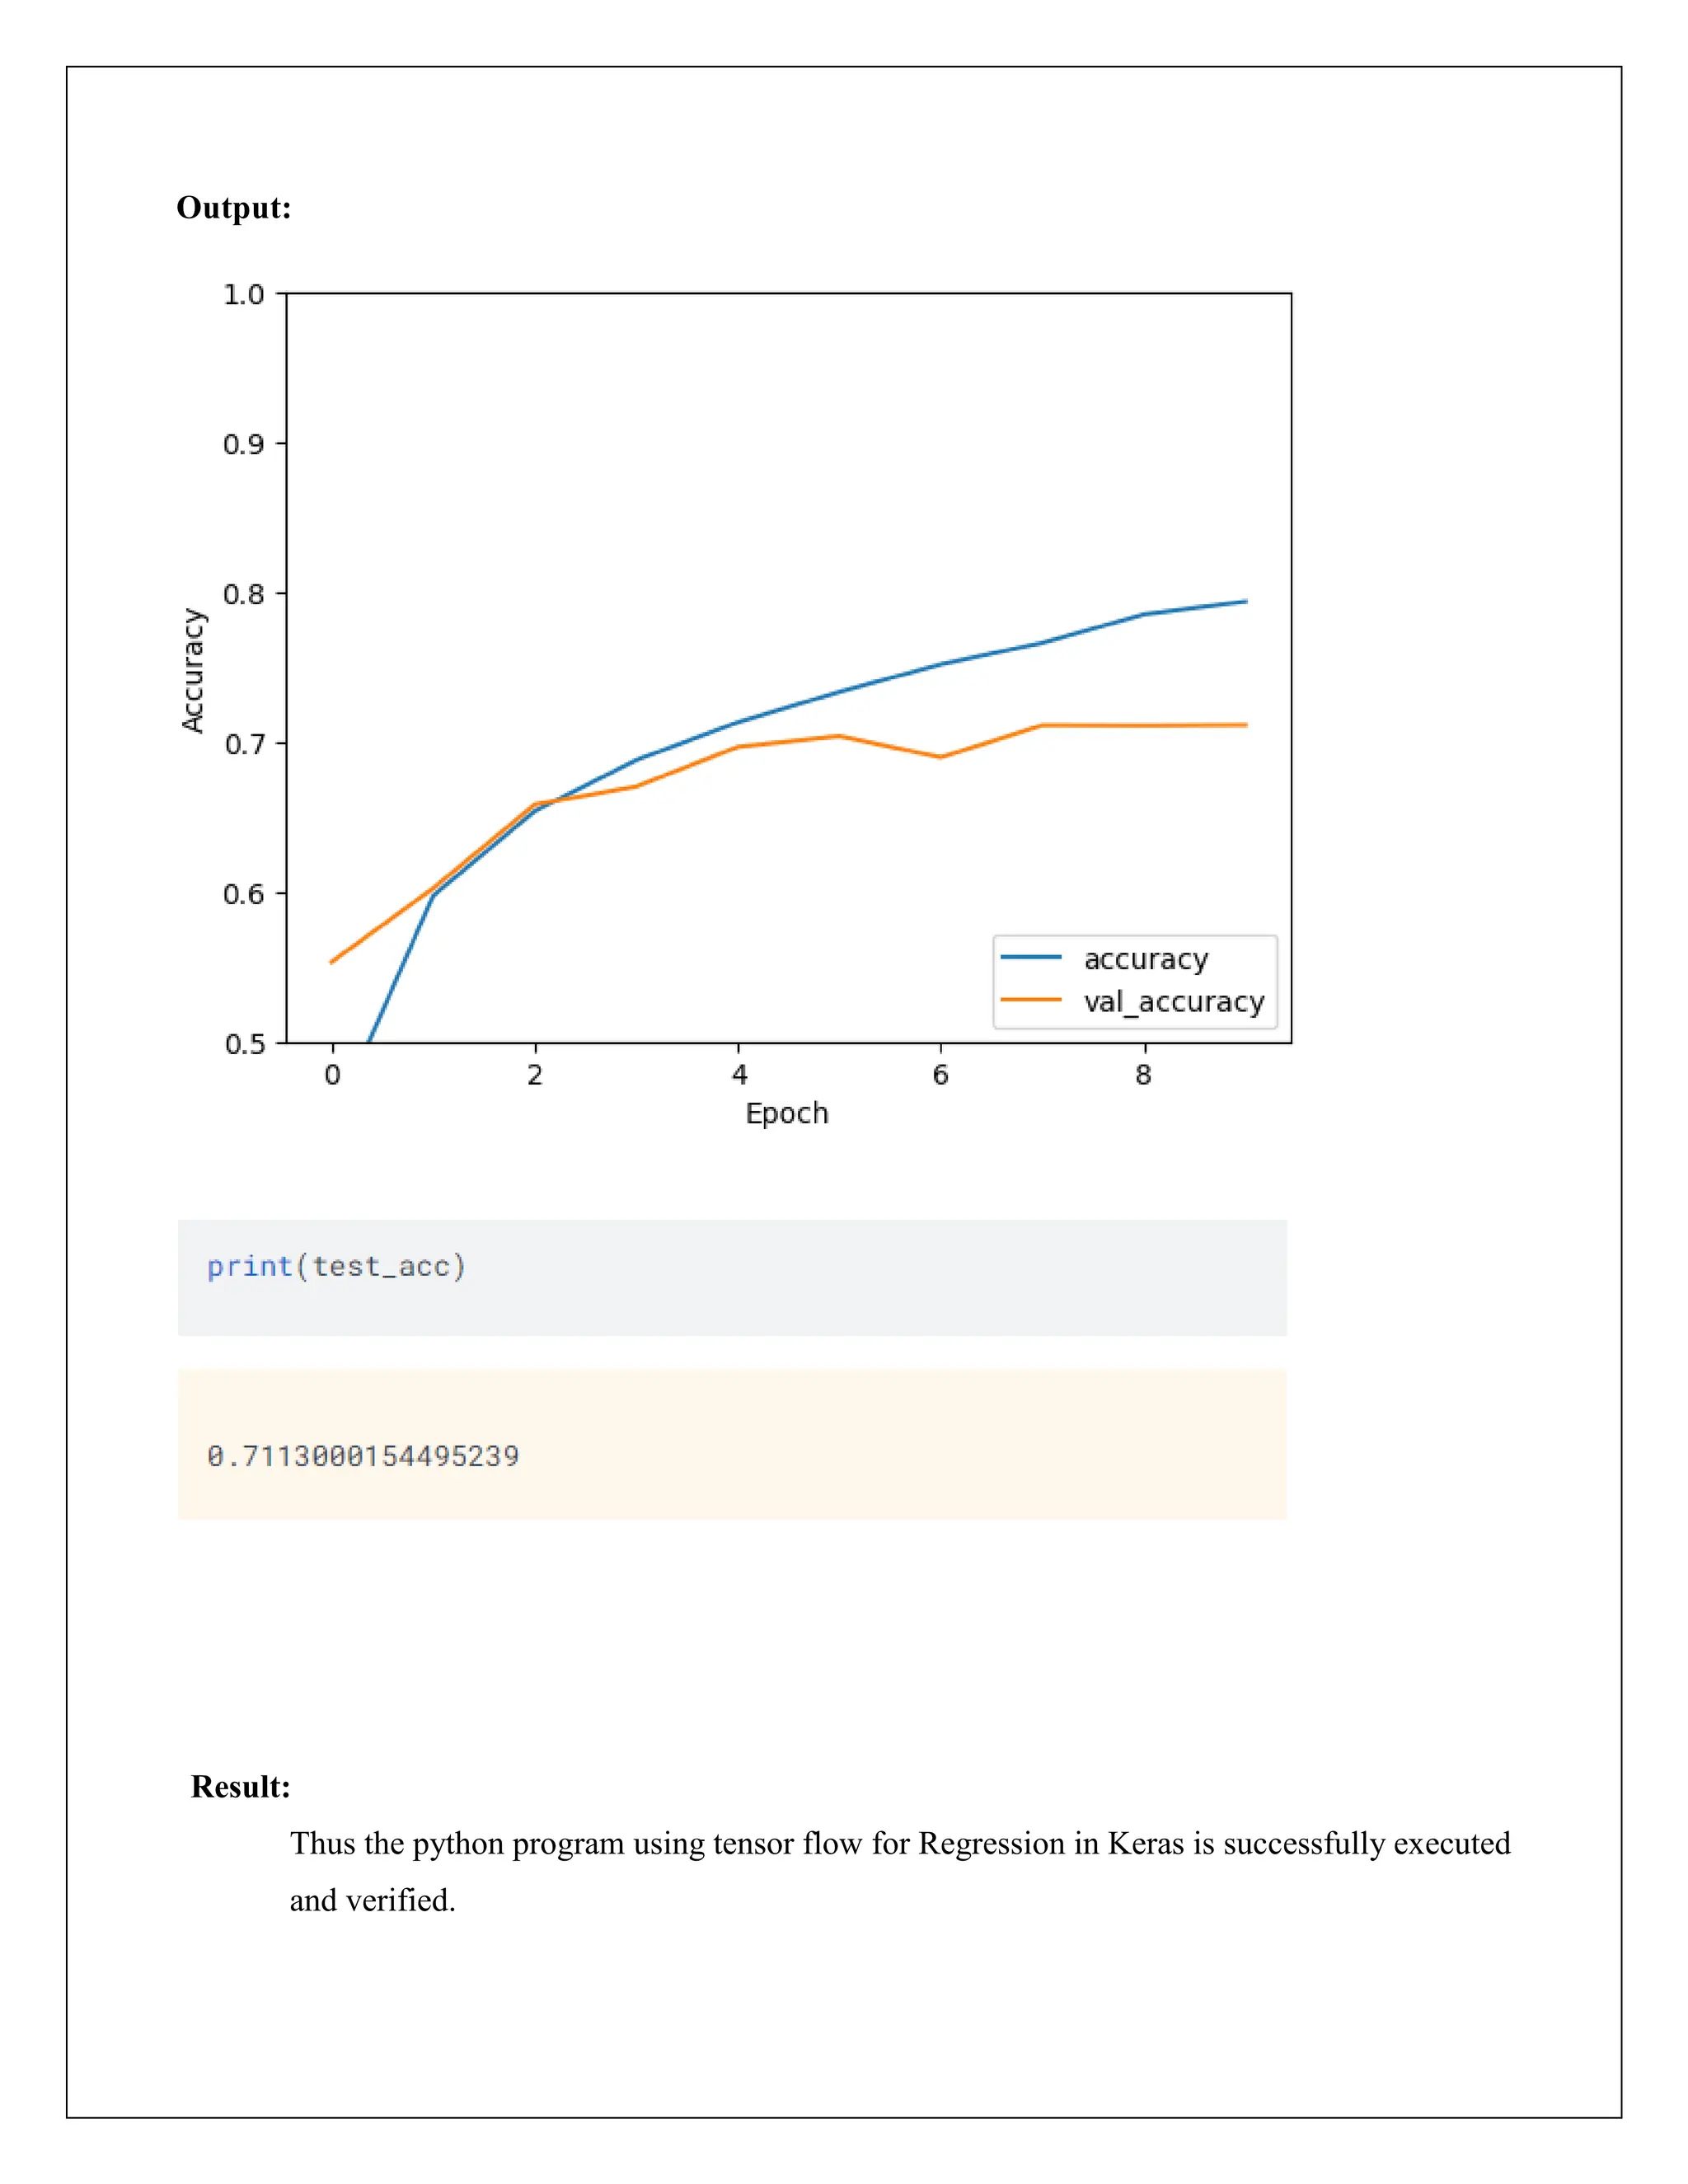
Result:
Thus the python program using tensor flow for Regression in Keras is successfully executed and
verified.
evaluation_results = model.evaluate(x_test_flatten, y_test)
accuracy = evaluation_results[1]
# Convert accuracy to percentage
accuracy_percentage = accuracy * 100
# Print accuracy
print("Accuracy: {:.2f}%".format(accuracy_percentage))](https://image.slidesharecdn.com/exp015-240501141729-32c565eb/75/CCS335-_-Neural-Networks-and-Deep-Learning-Laboratory_Lab-Complete-Record-24-2048.jpg)


The document is a report from the Nehru Institute of Engineering and Technology detailing the Neural Network and Deep Learning lab course for Computer Science and Engineering students. It outlines course objectives, a comprehensive list of experiments including implementations in TensorFlow and Keras, and expected outcomes upon completion of the course. Additionally, it includes setup instructions and sample code for various deep learning tasks, emphasizing the use of essential libraries and techniques in machine learning.