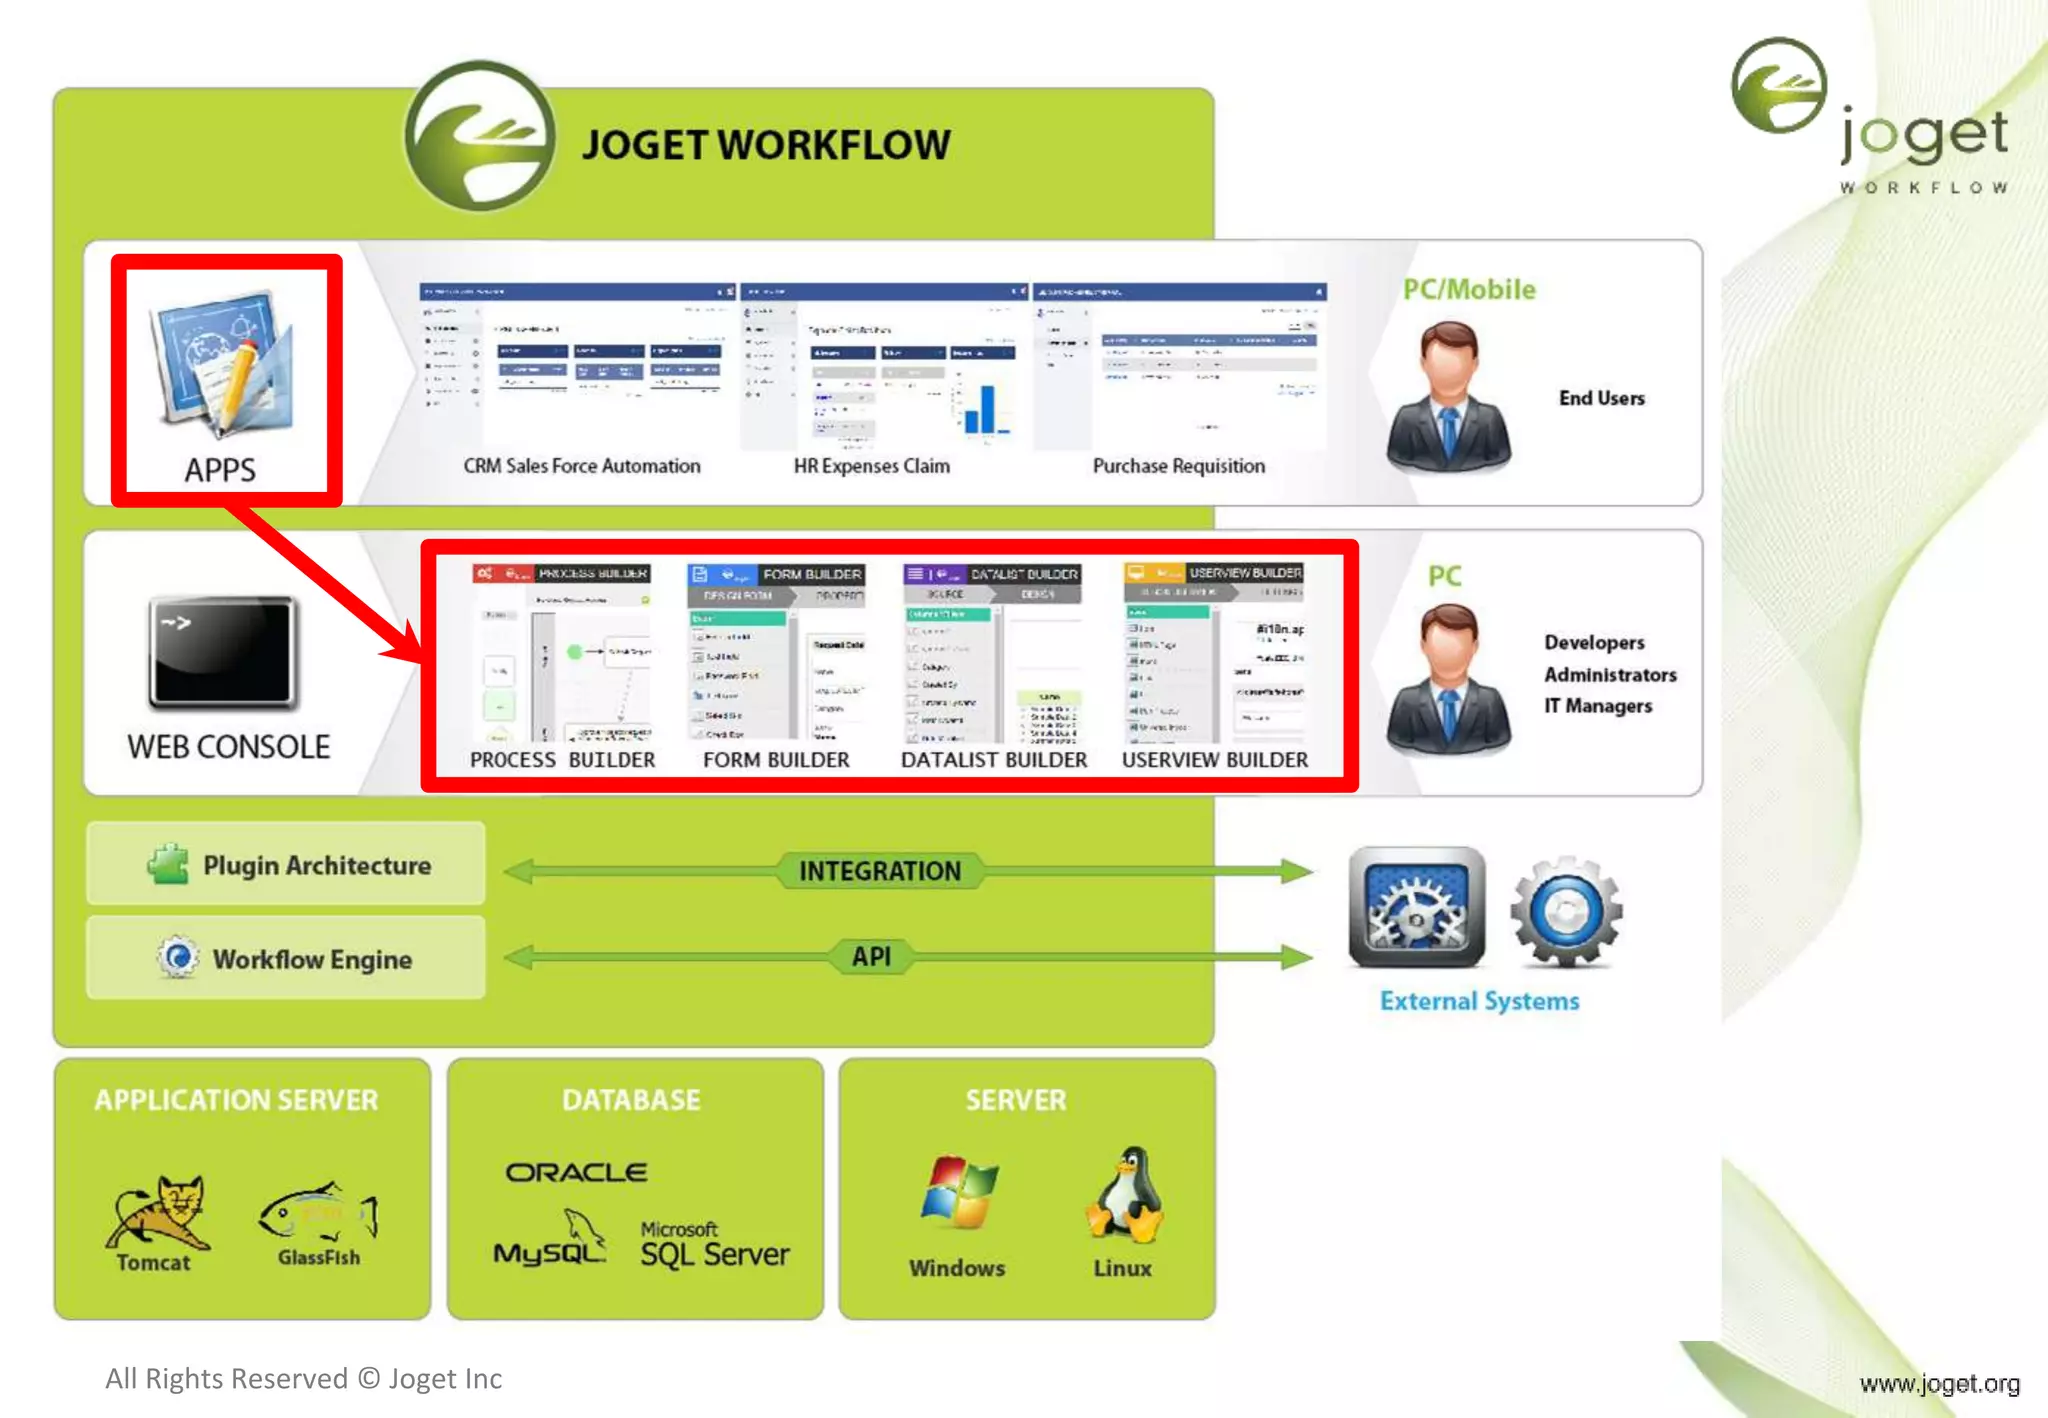
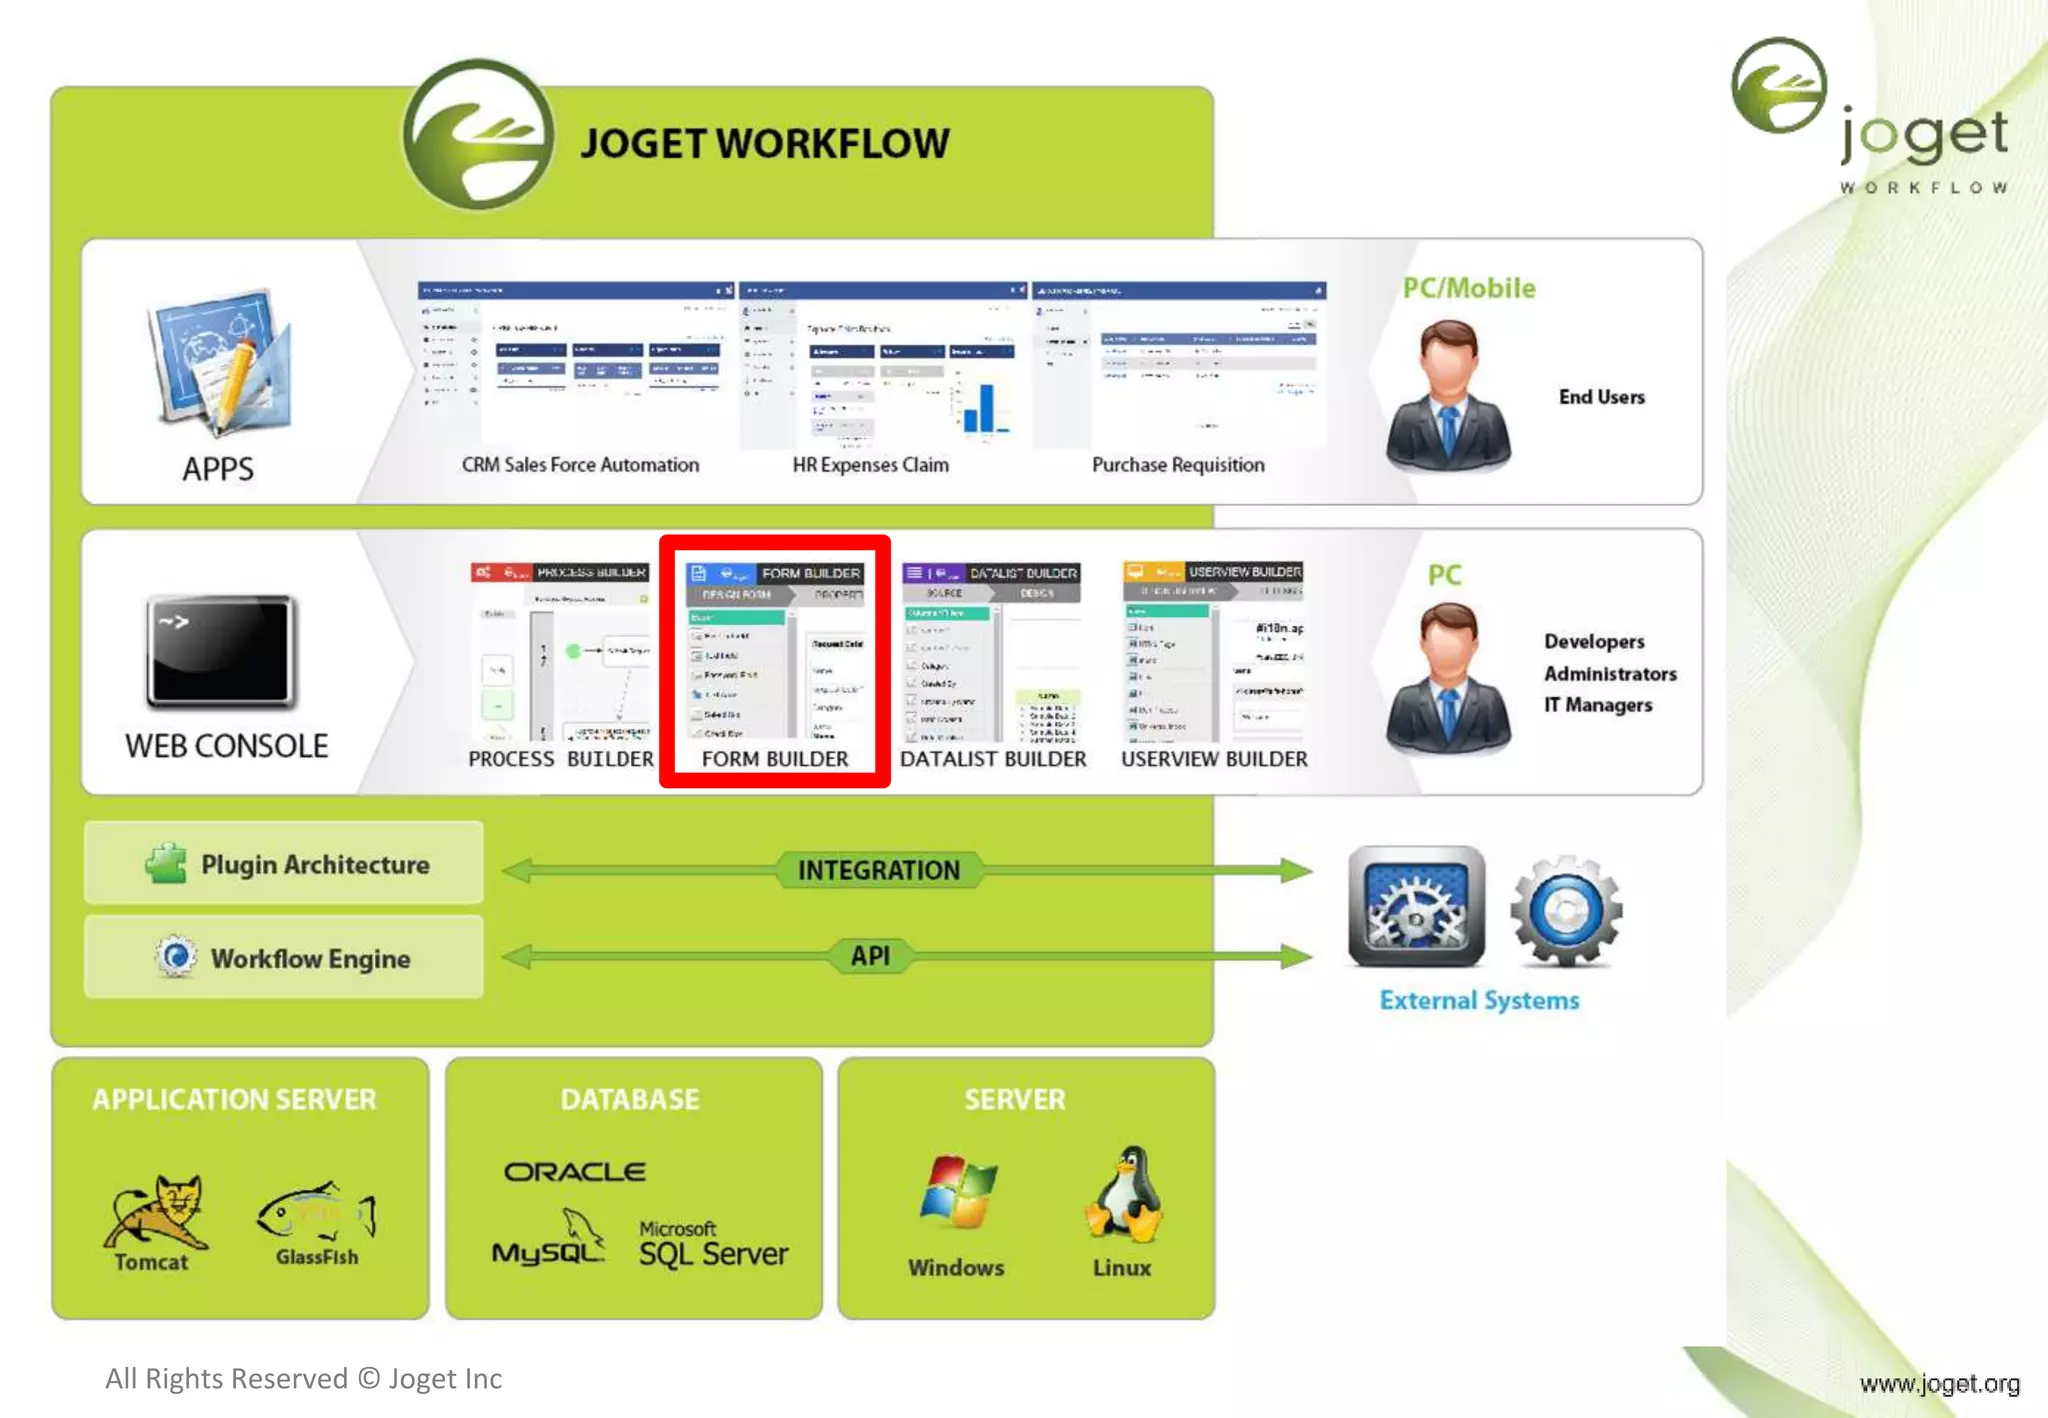
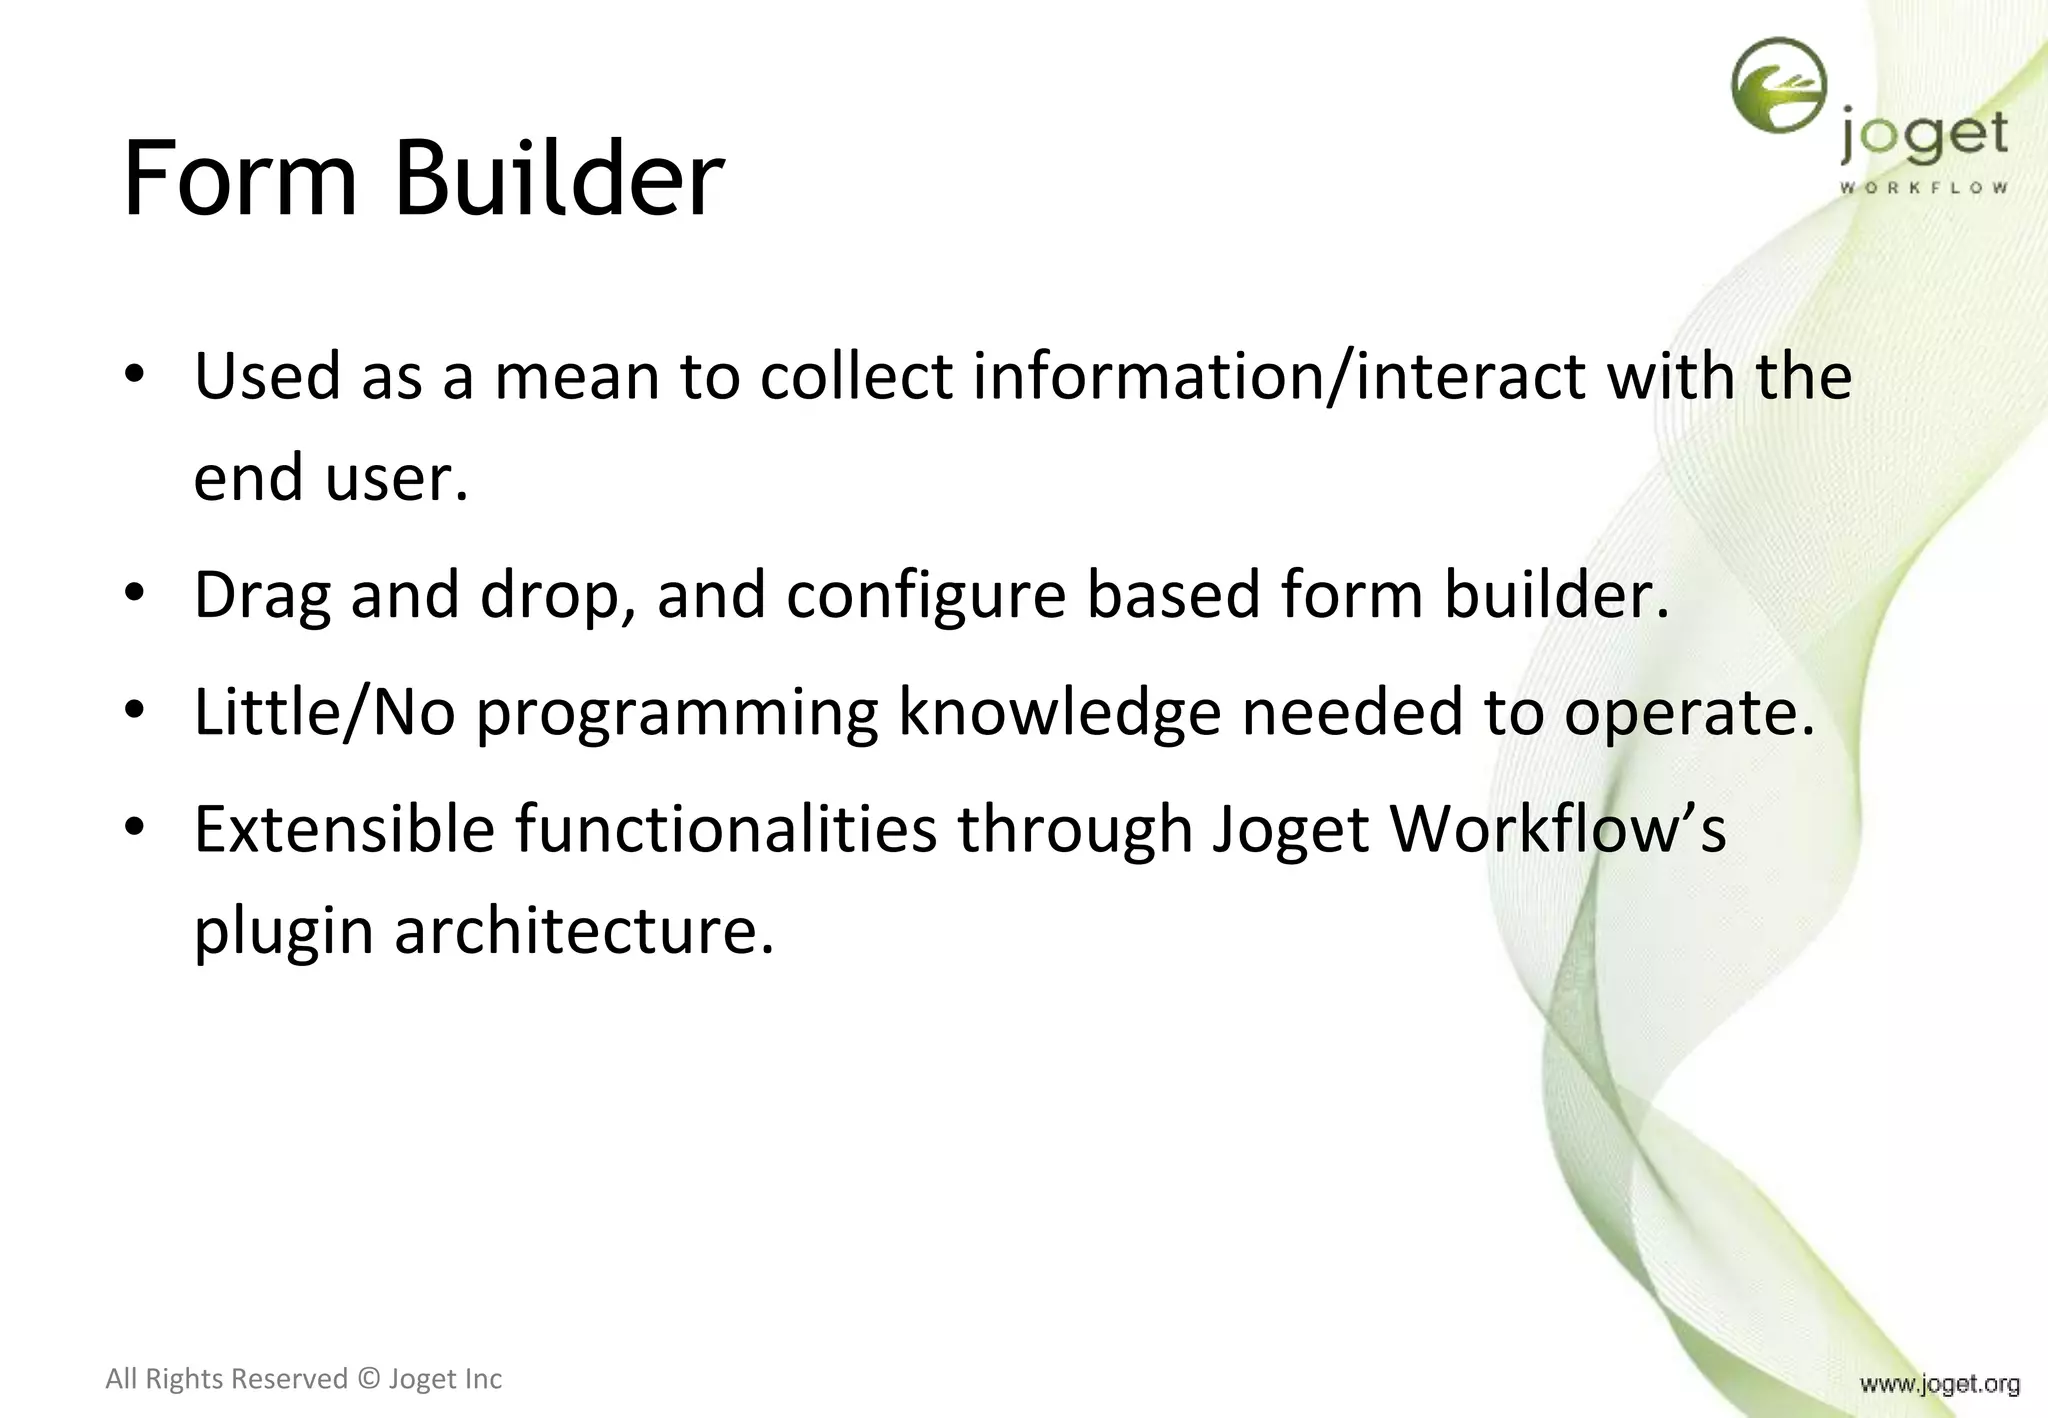
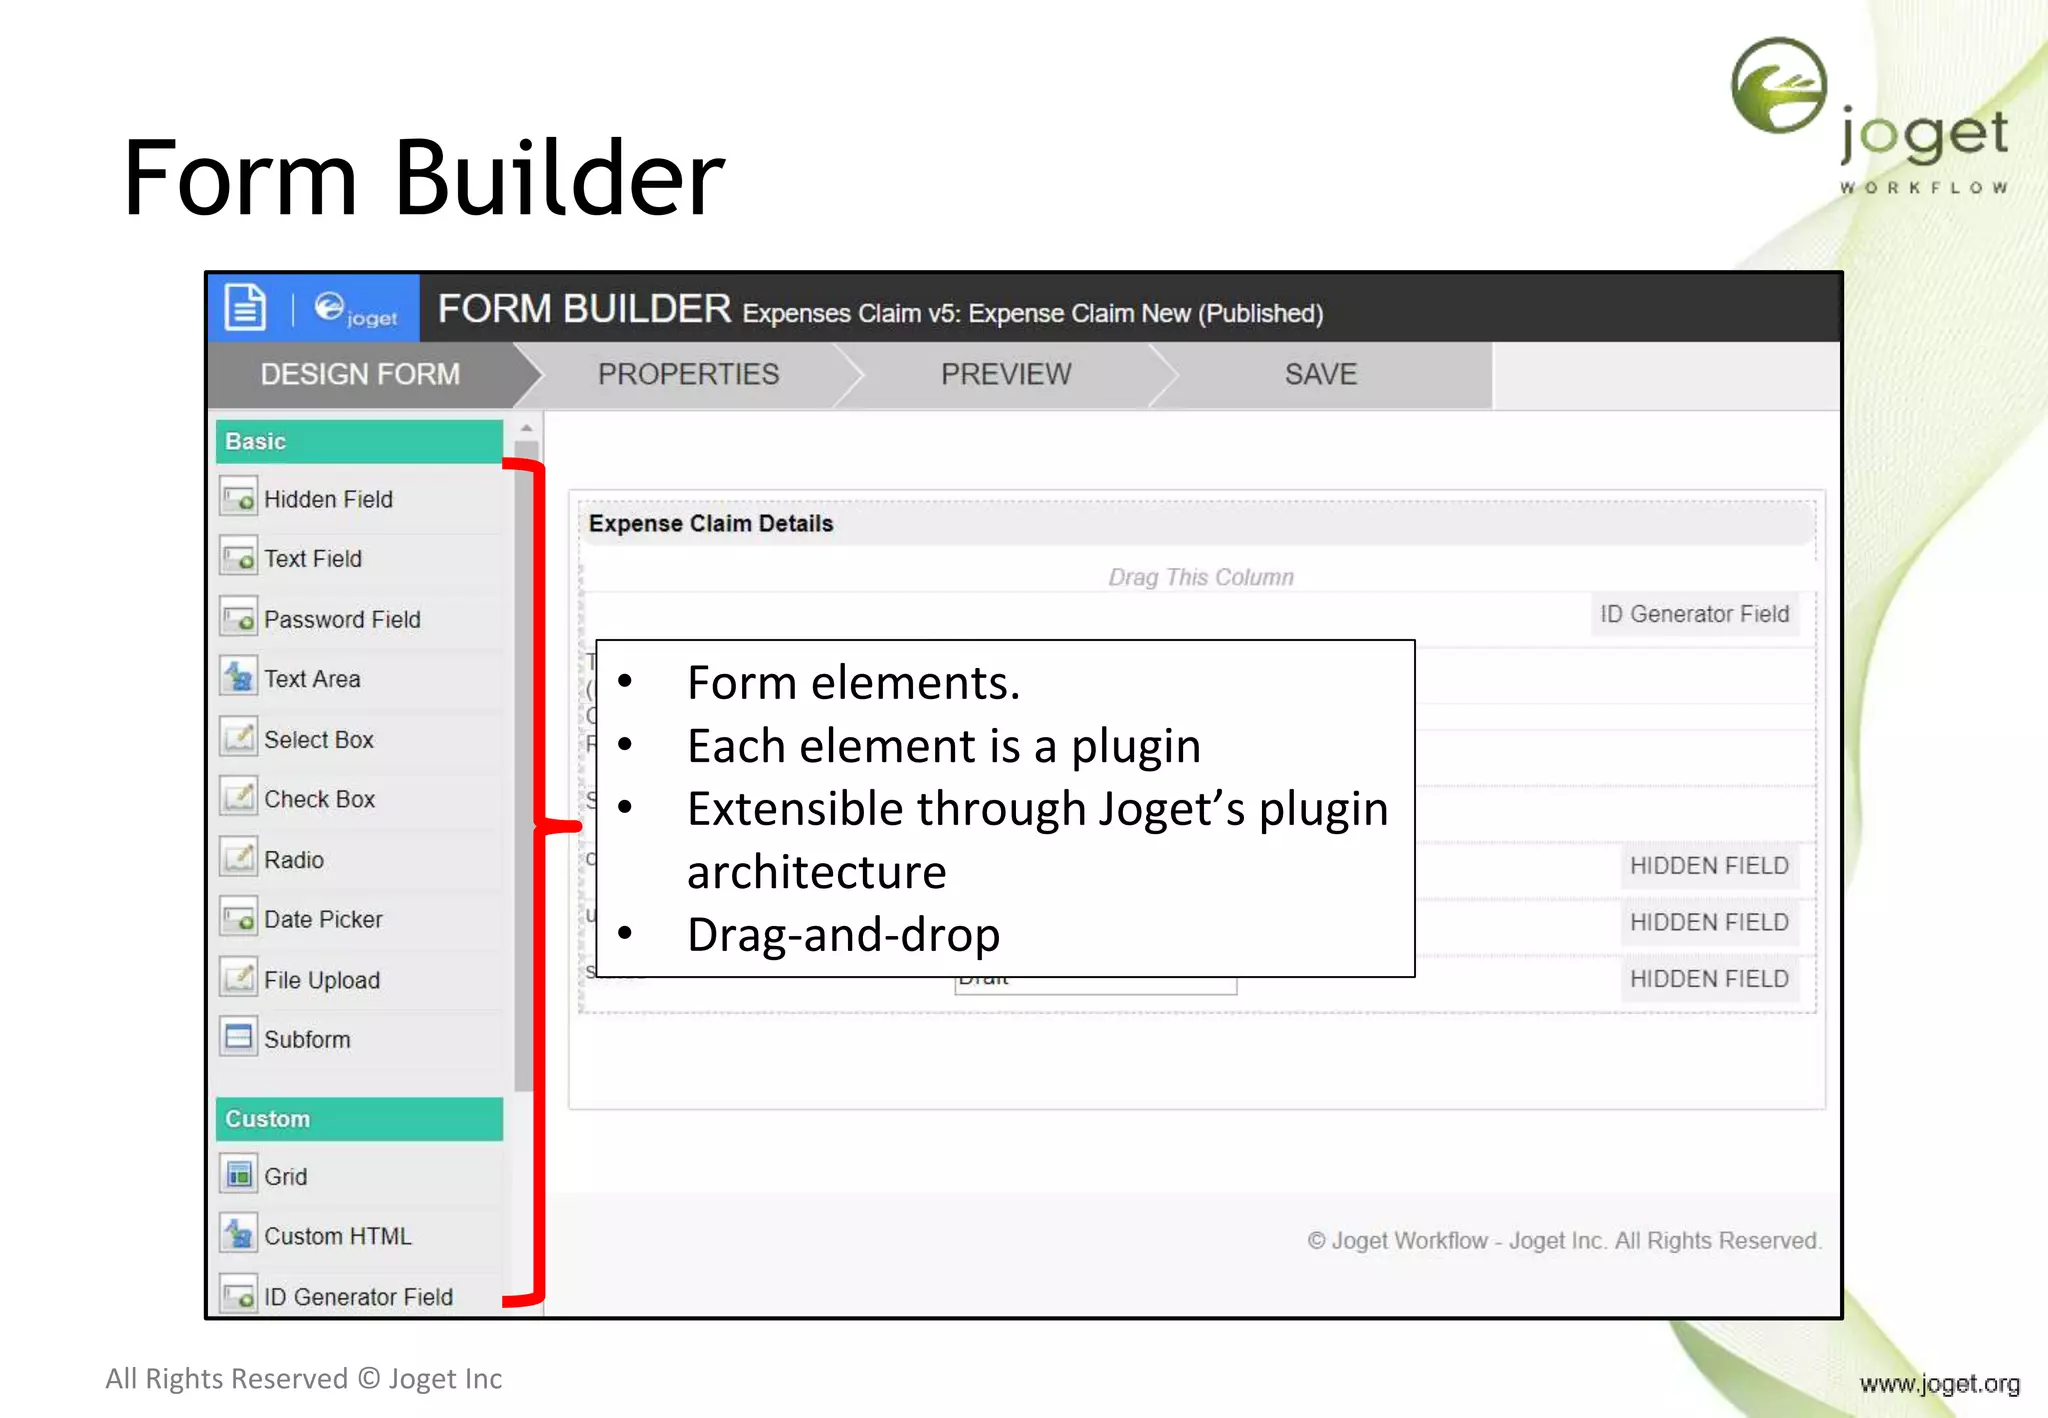
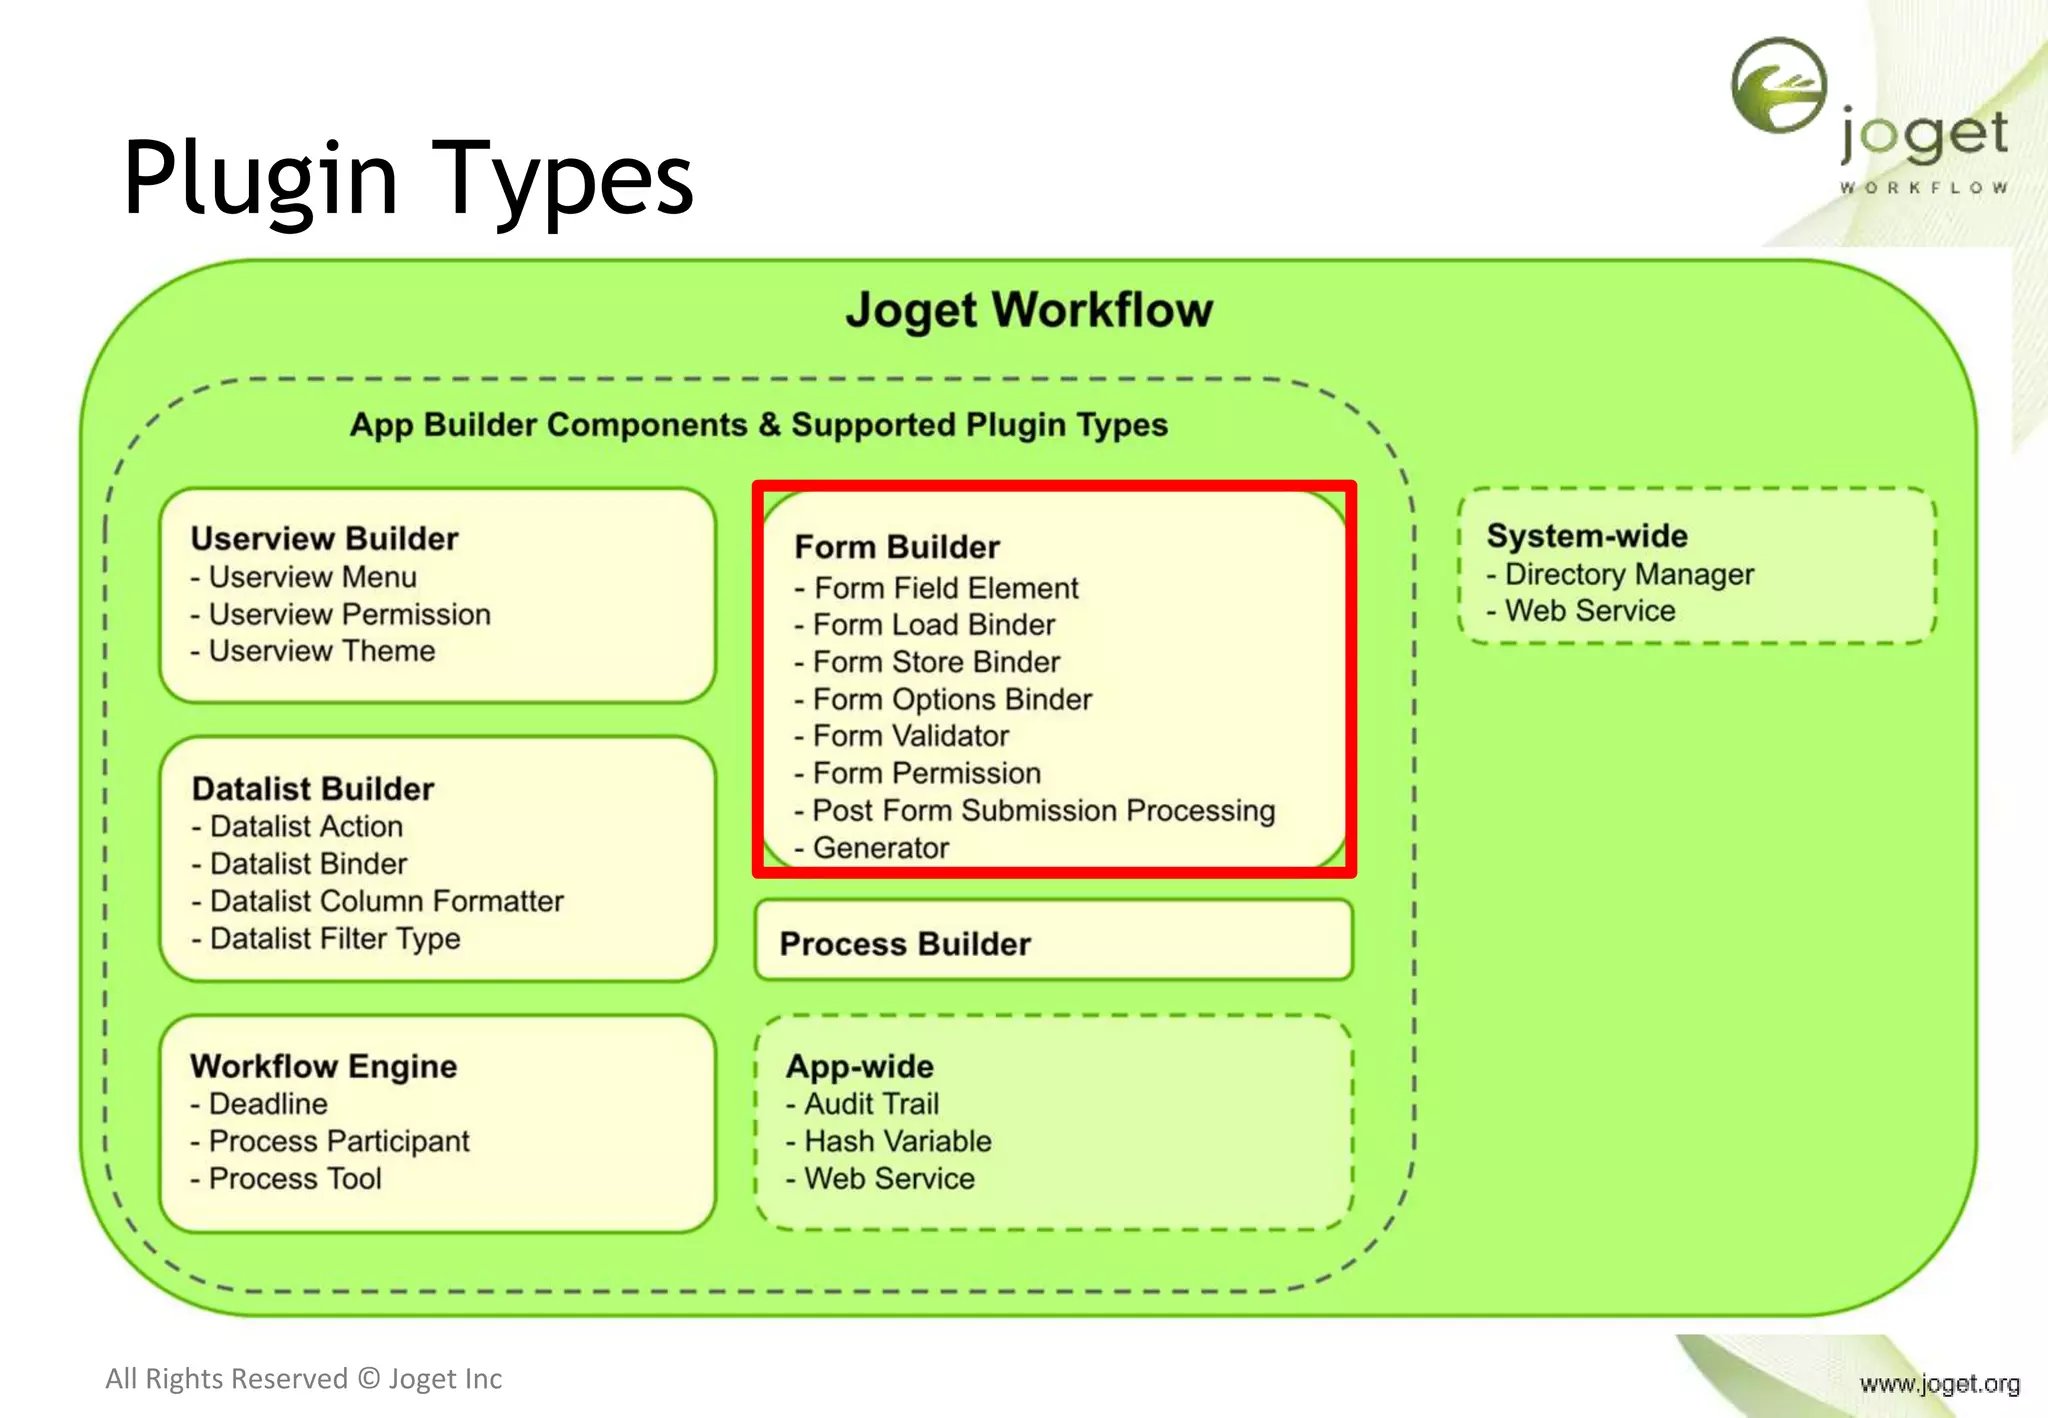
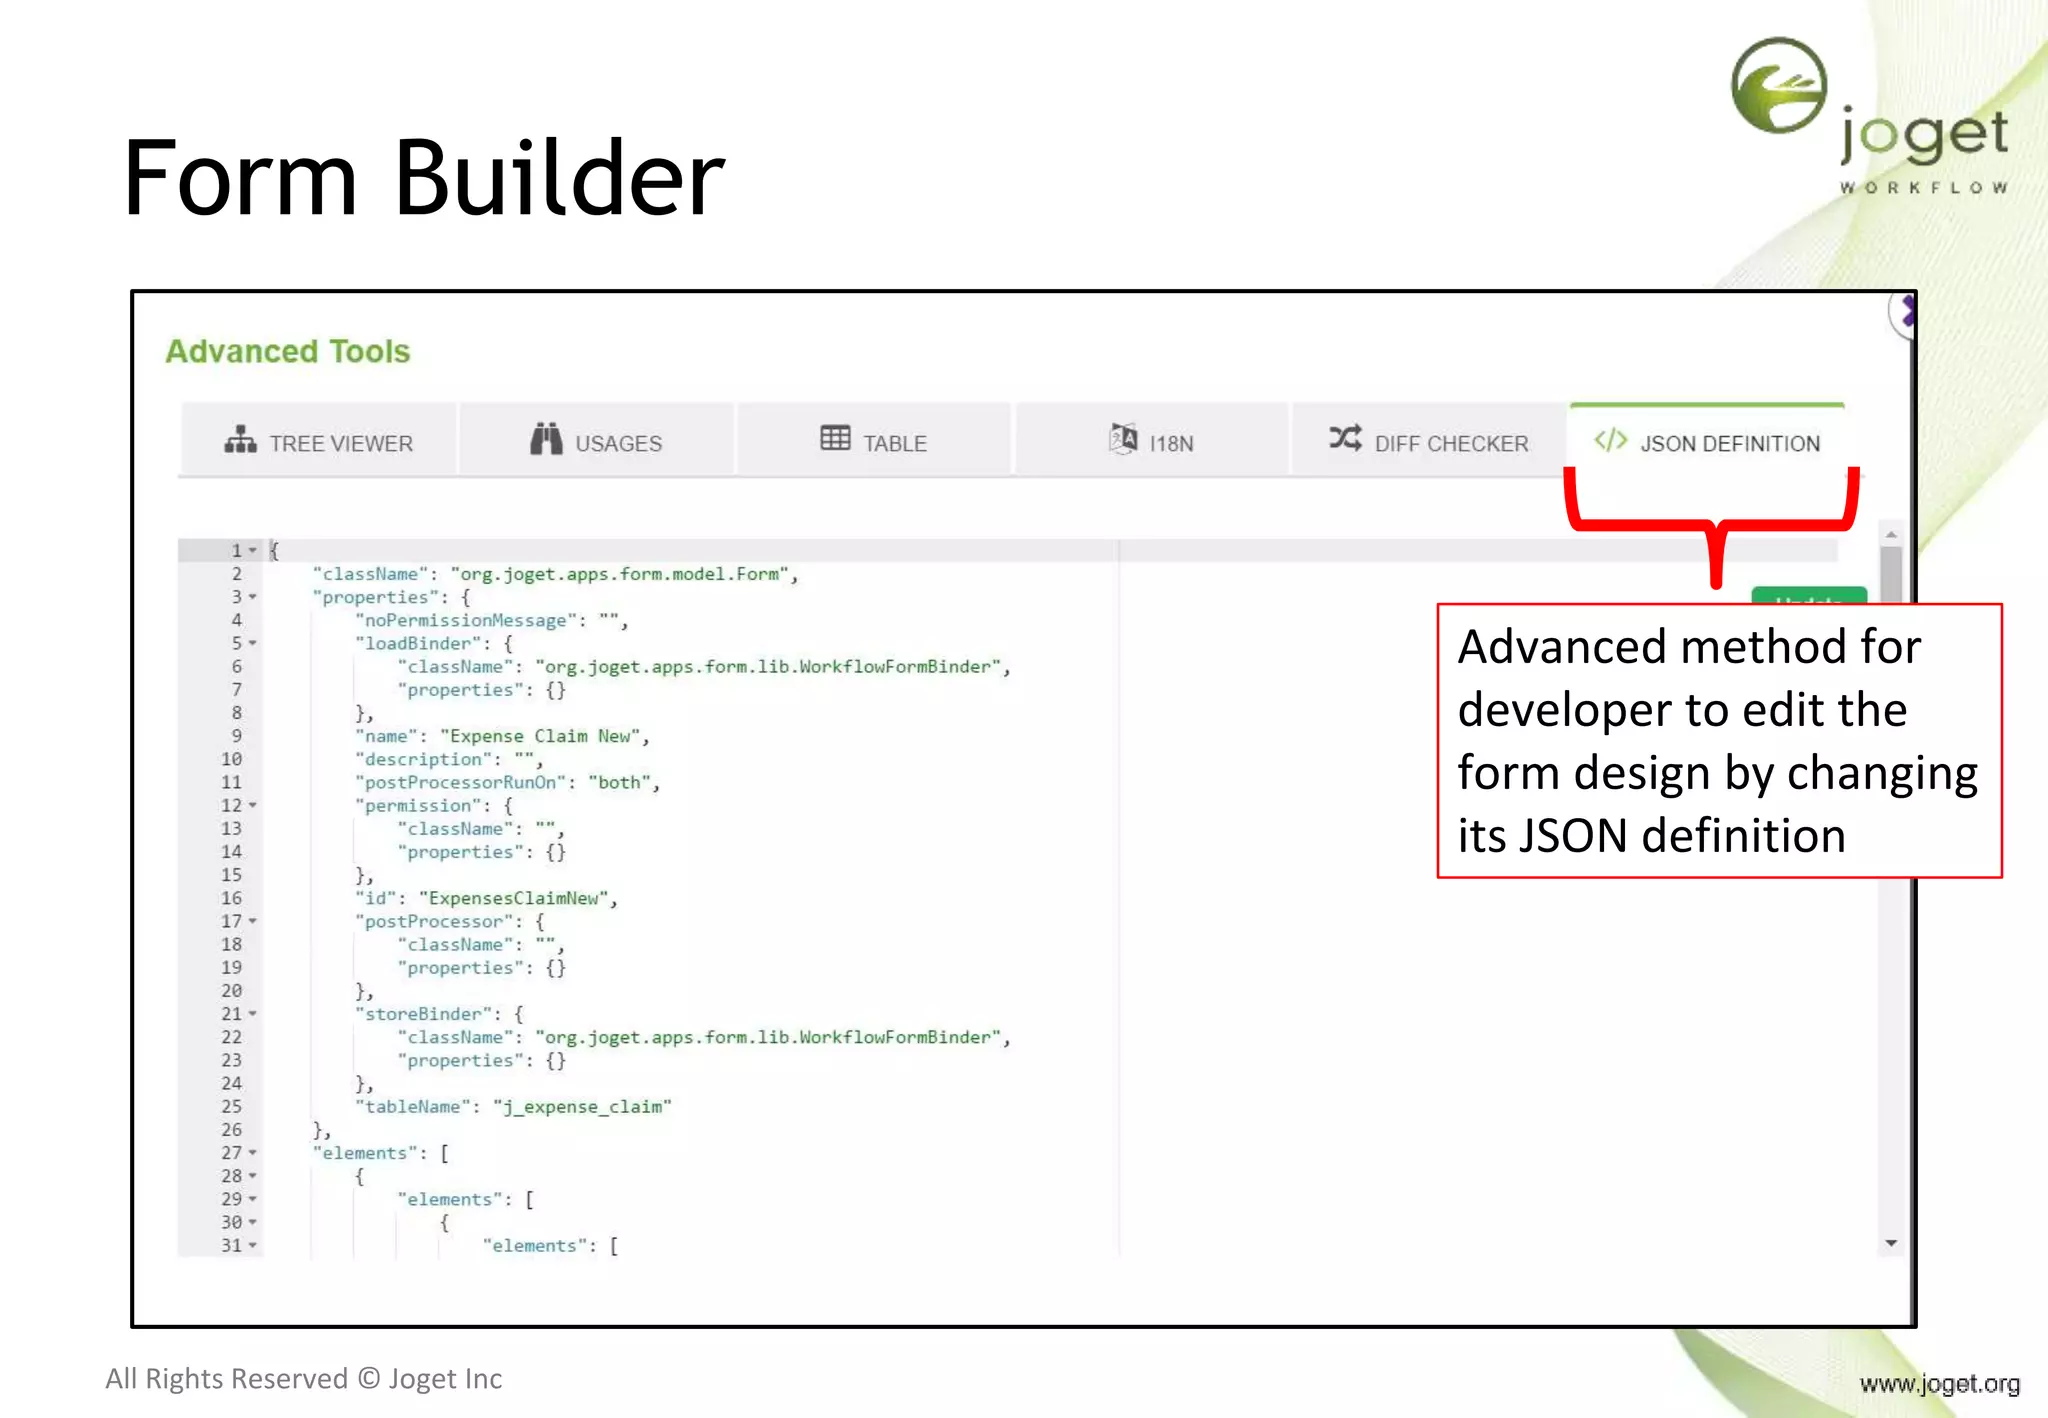
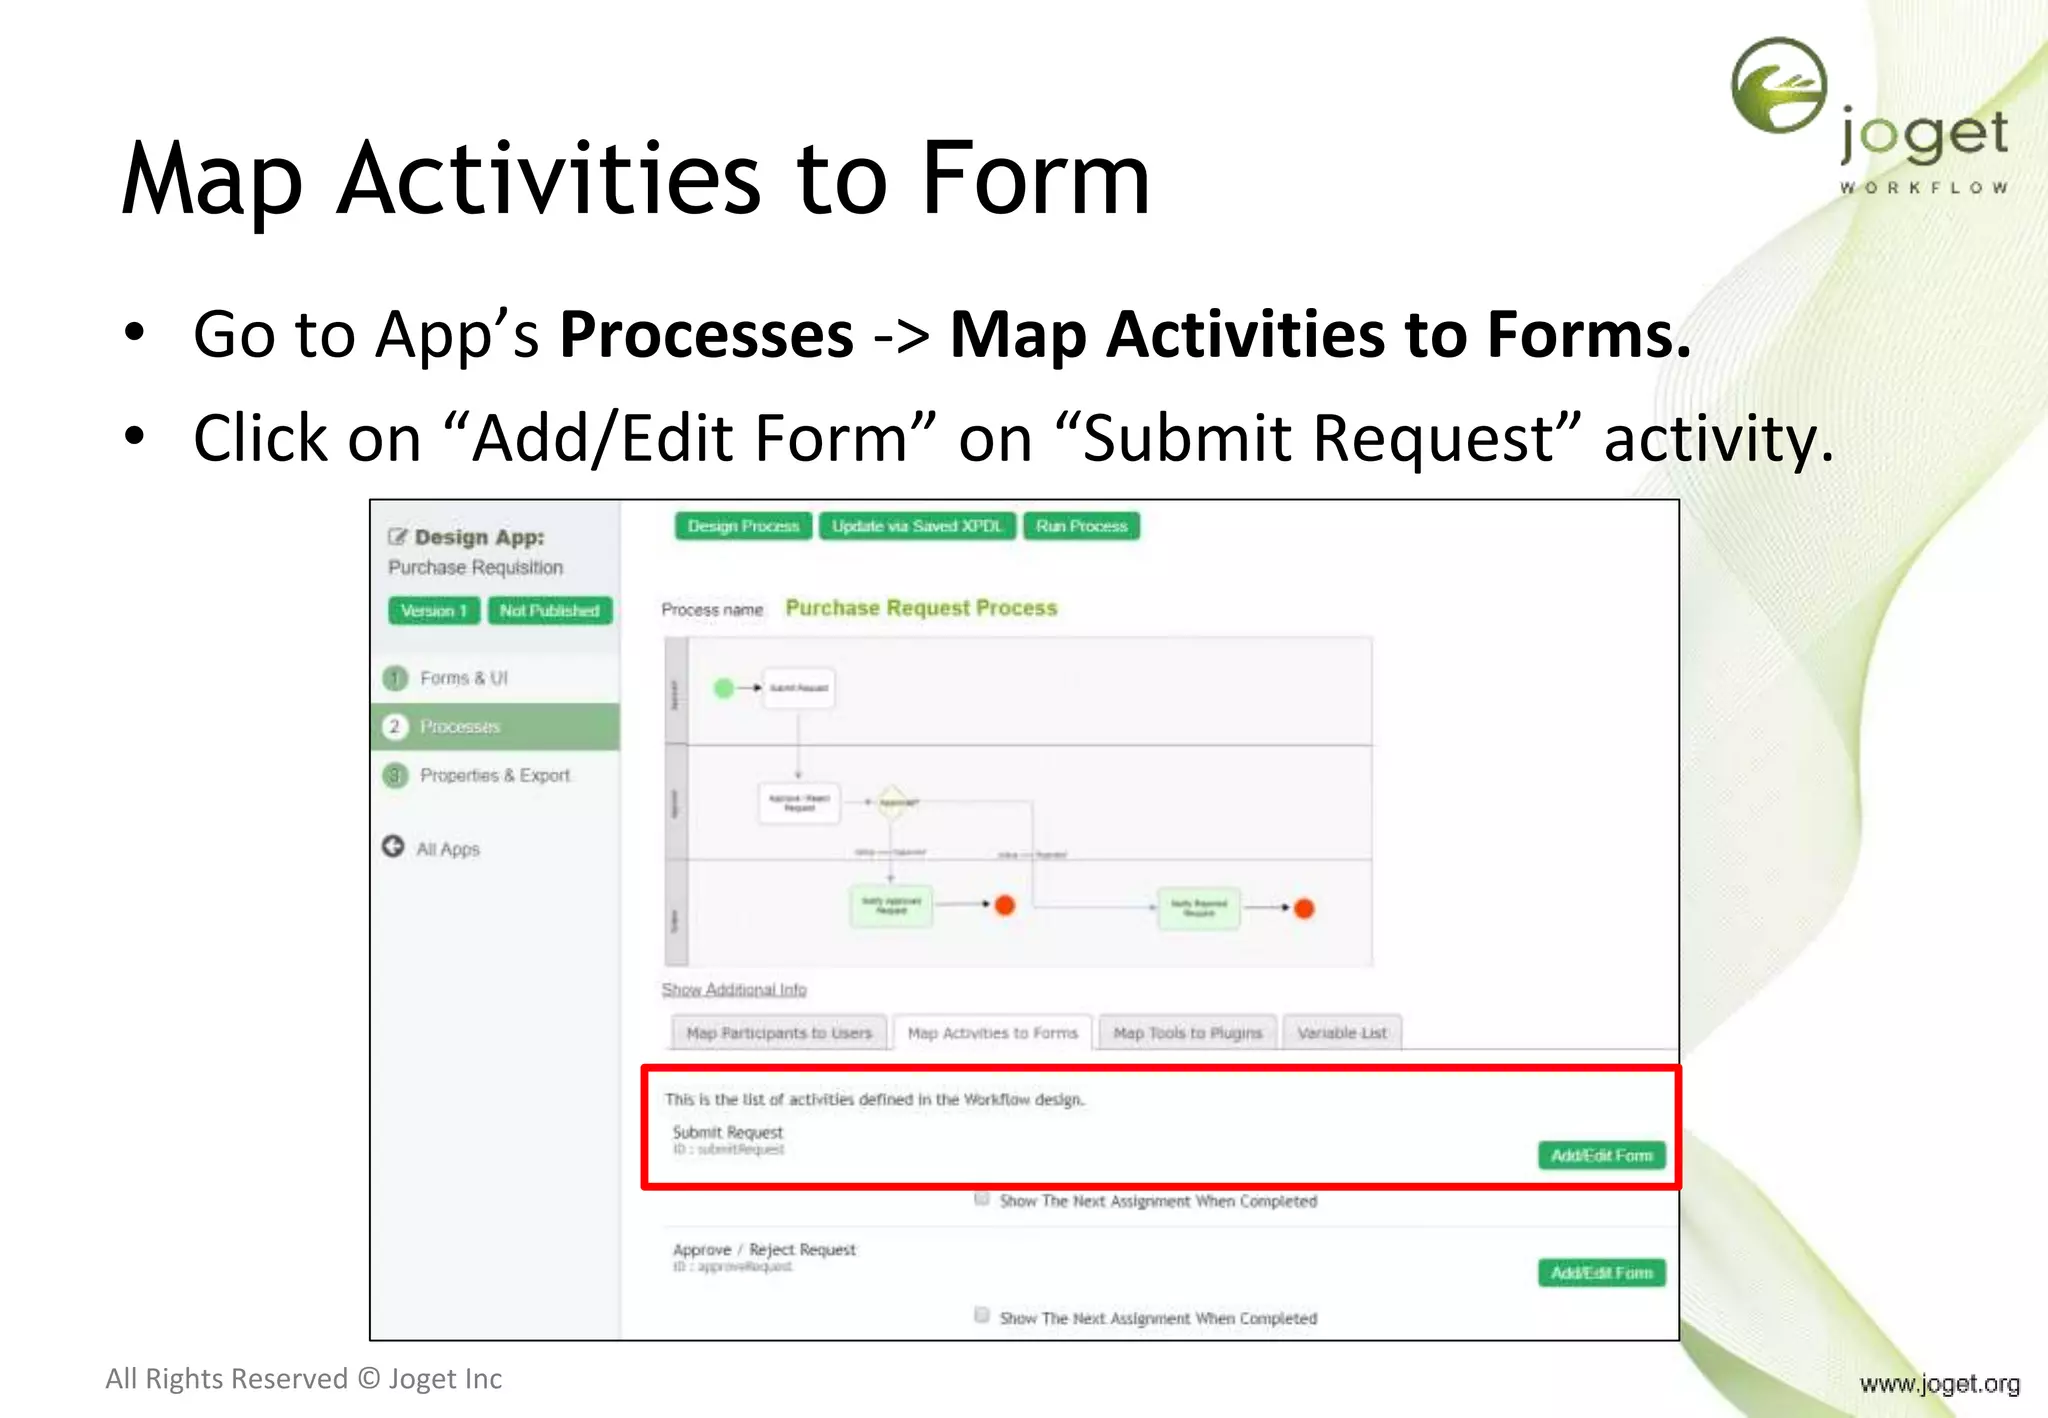
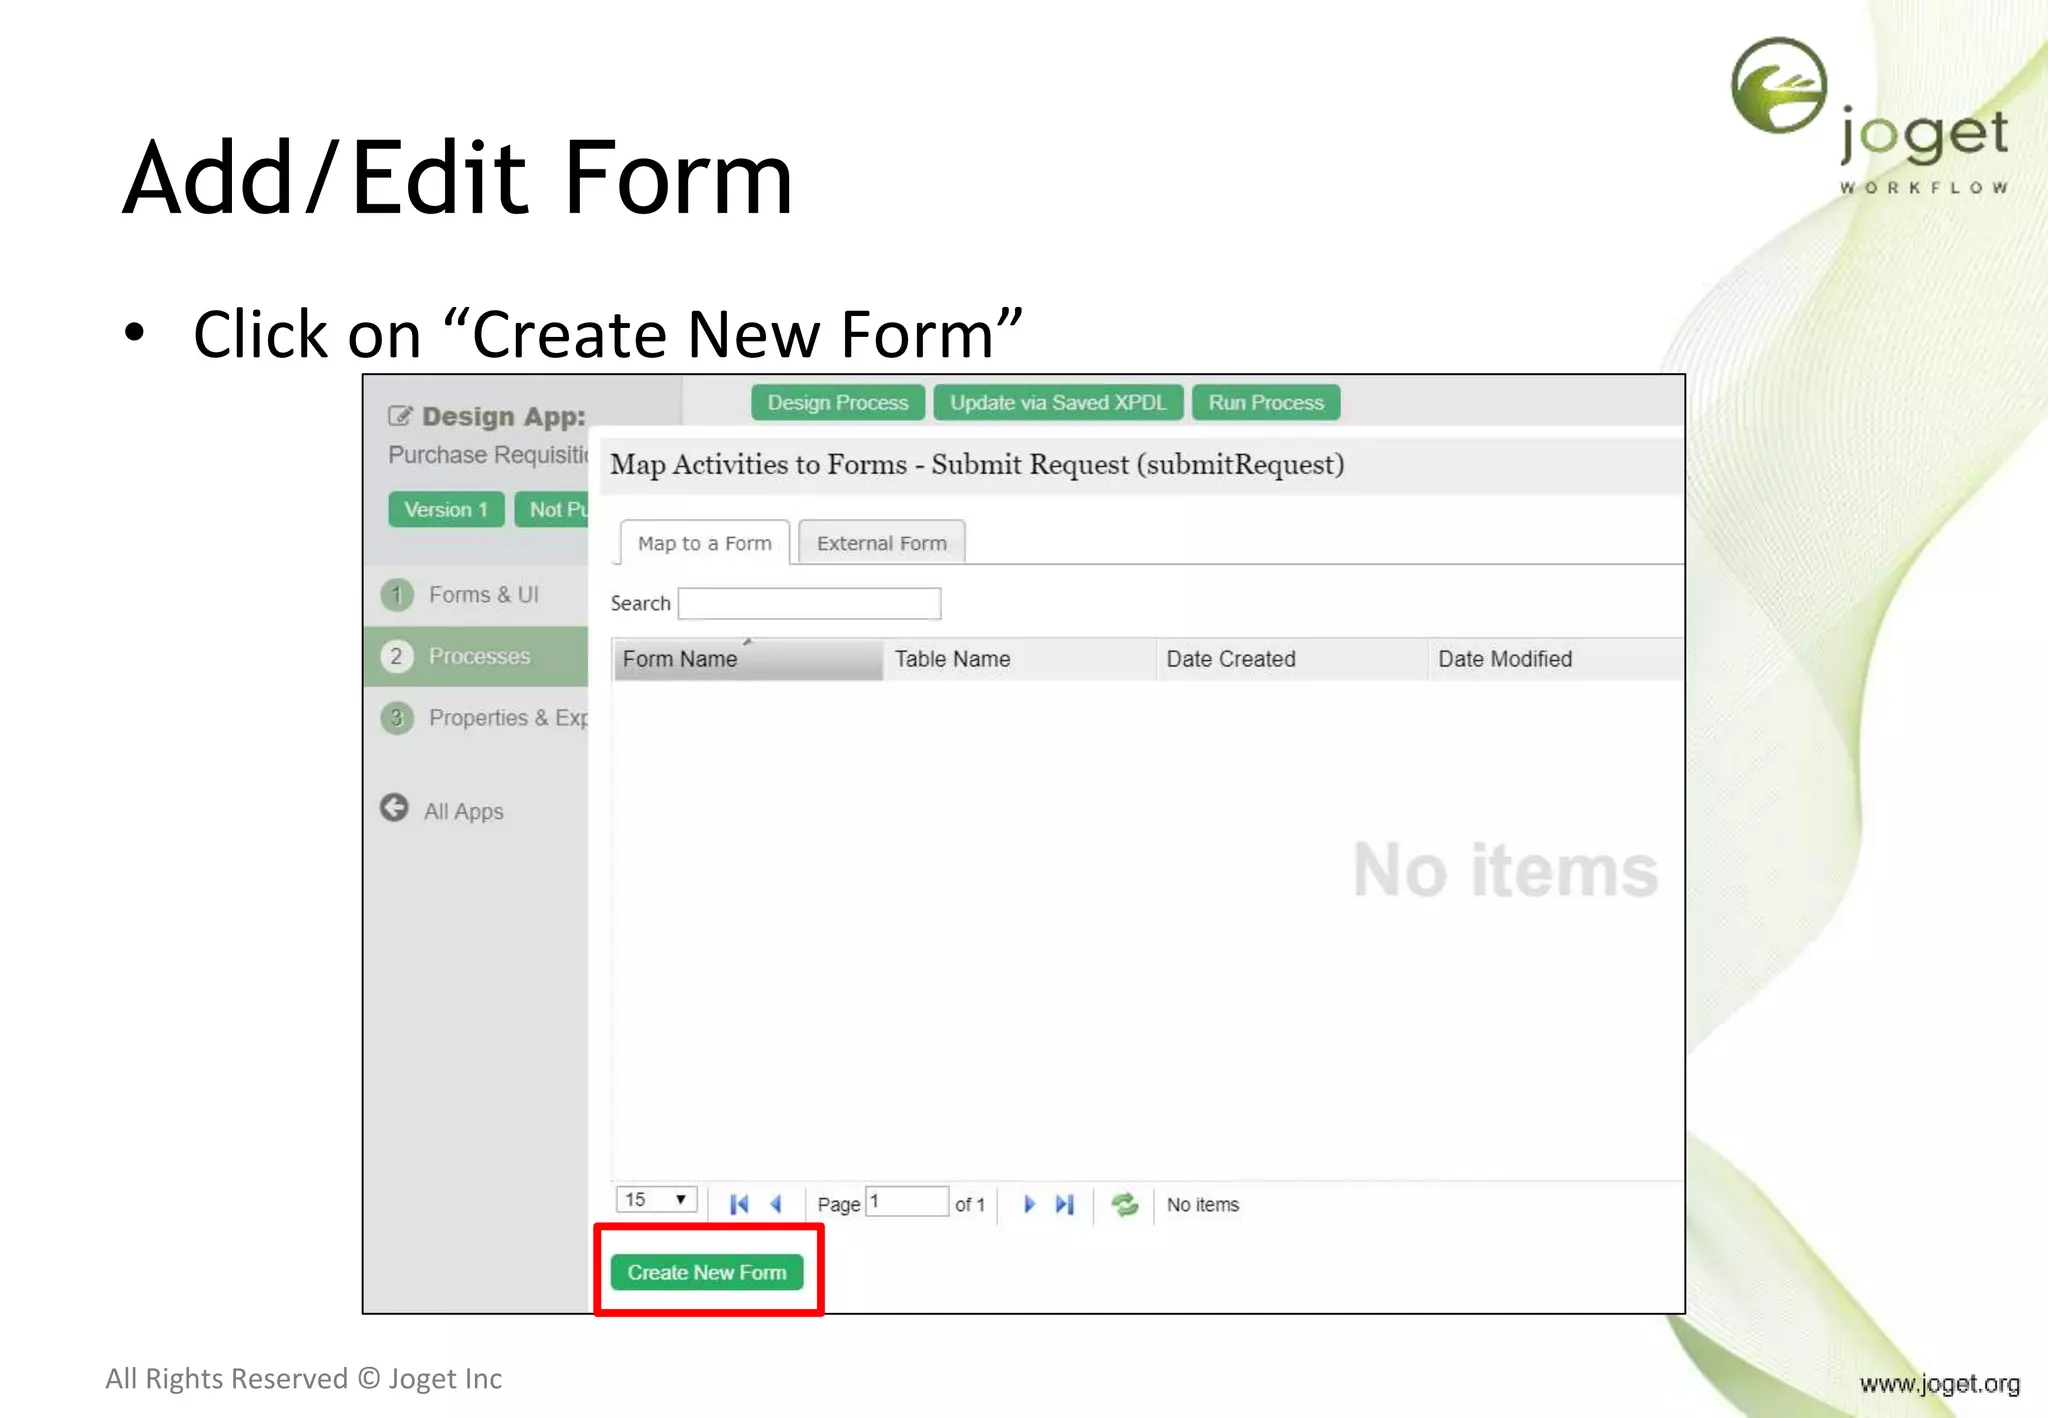
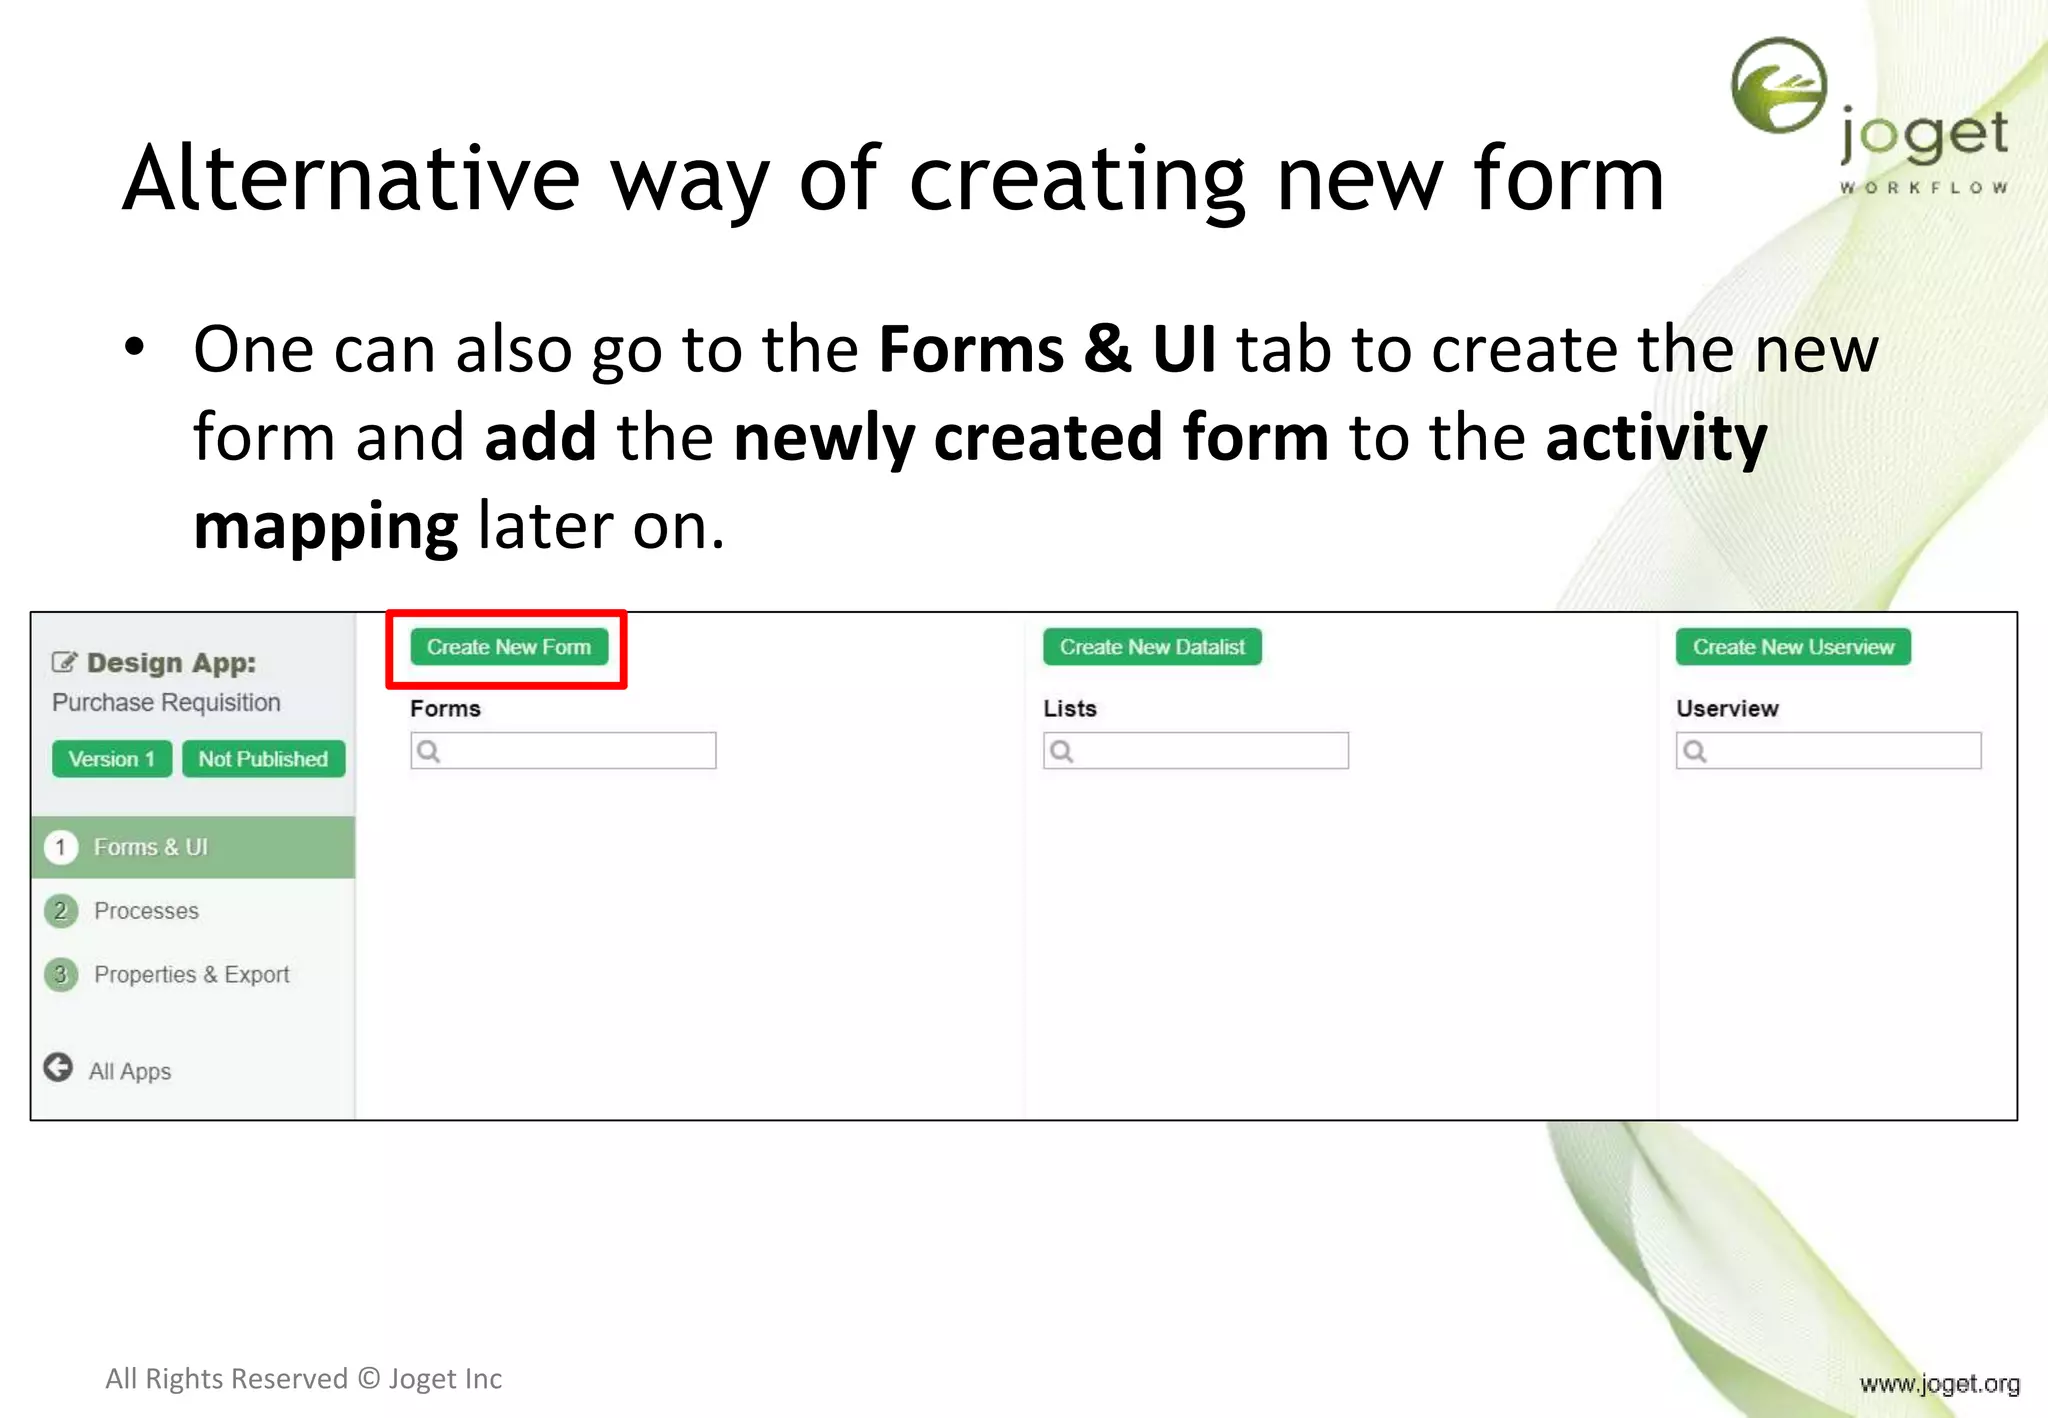
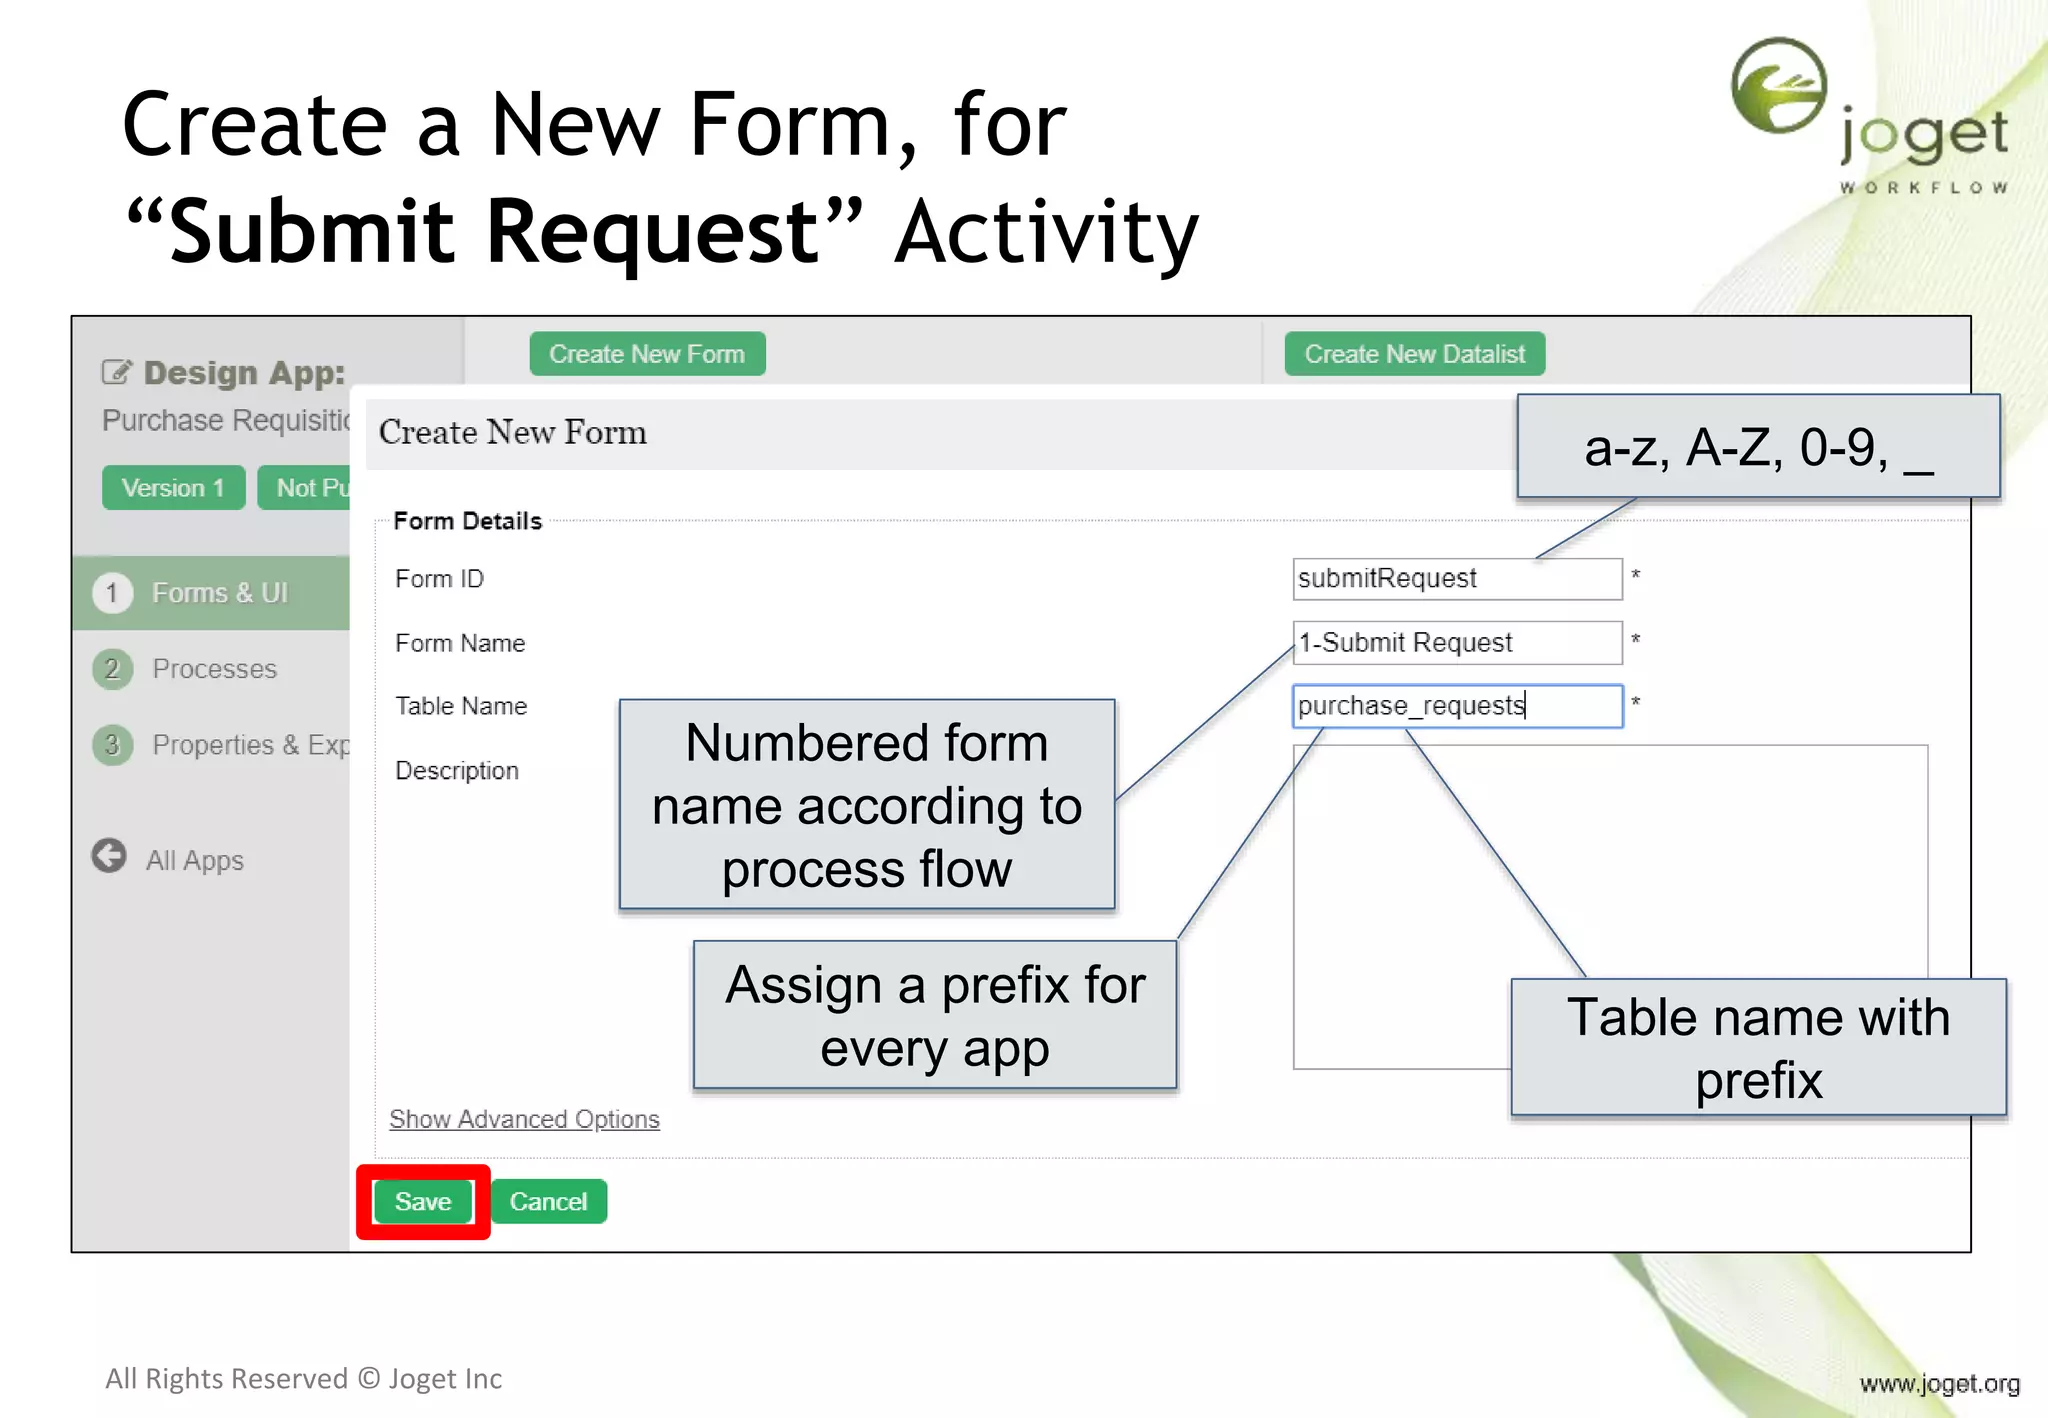
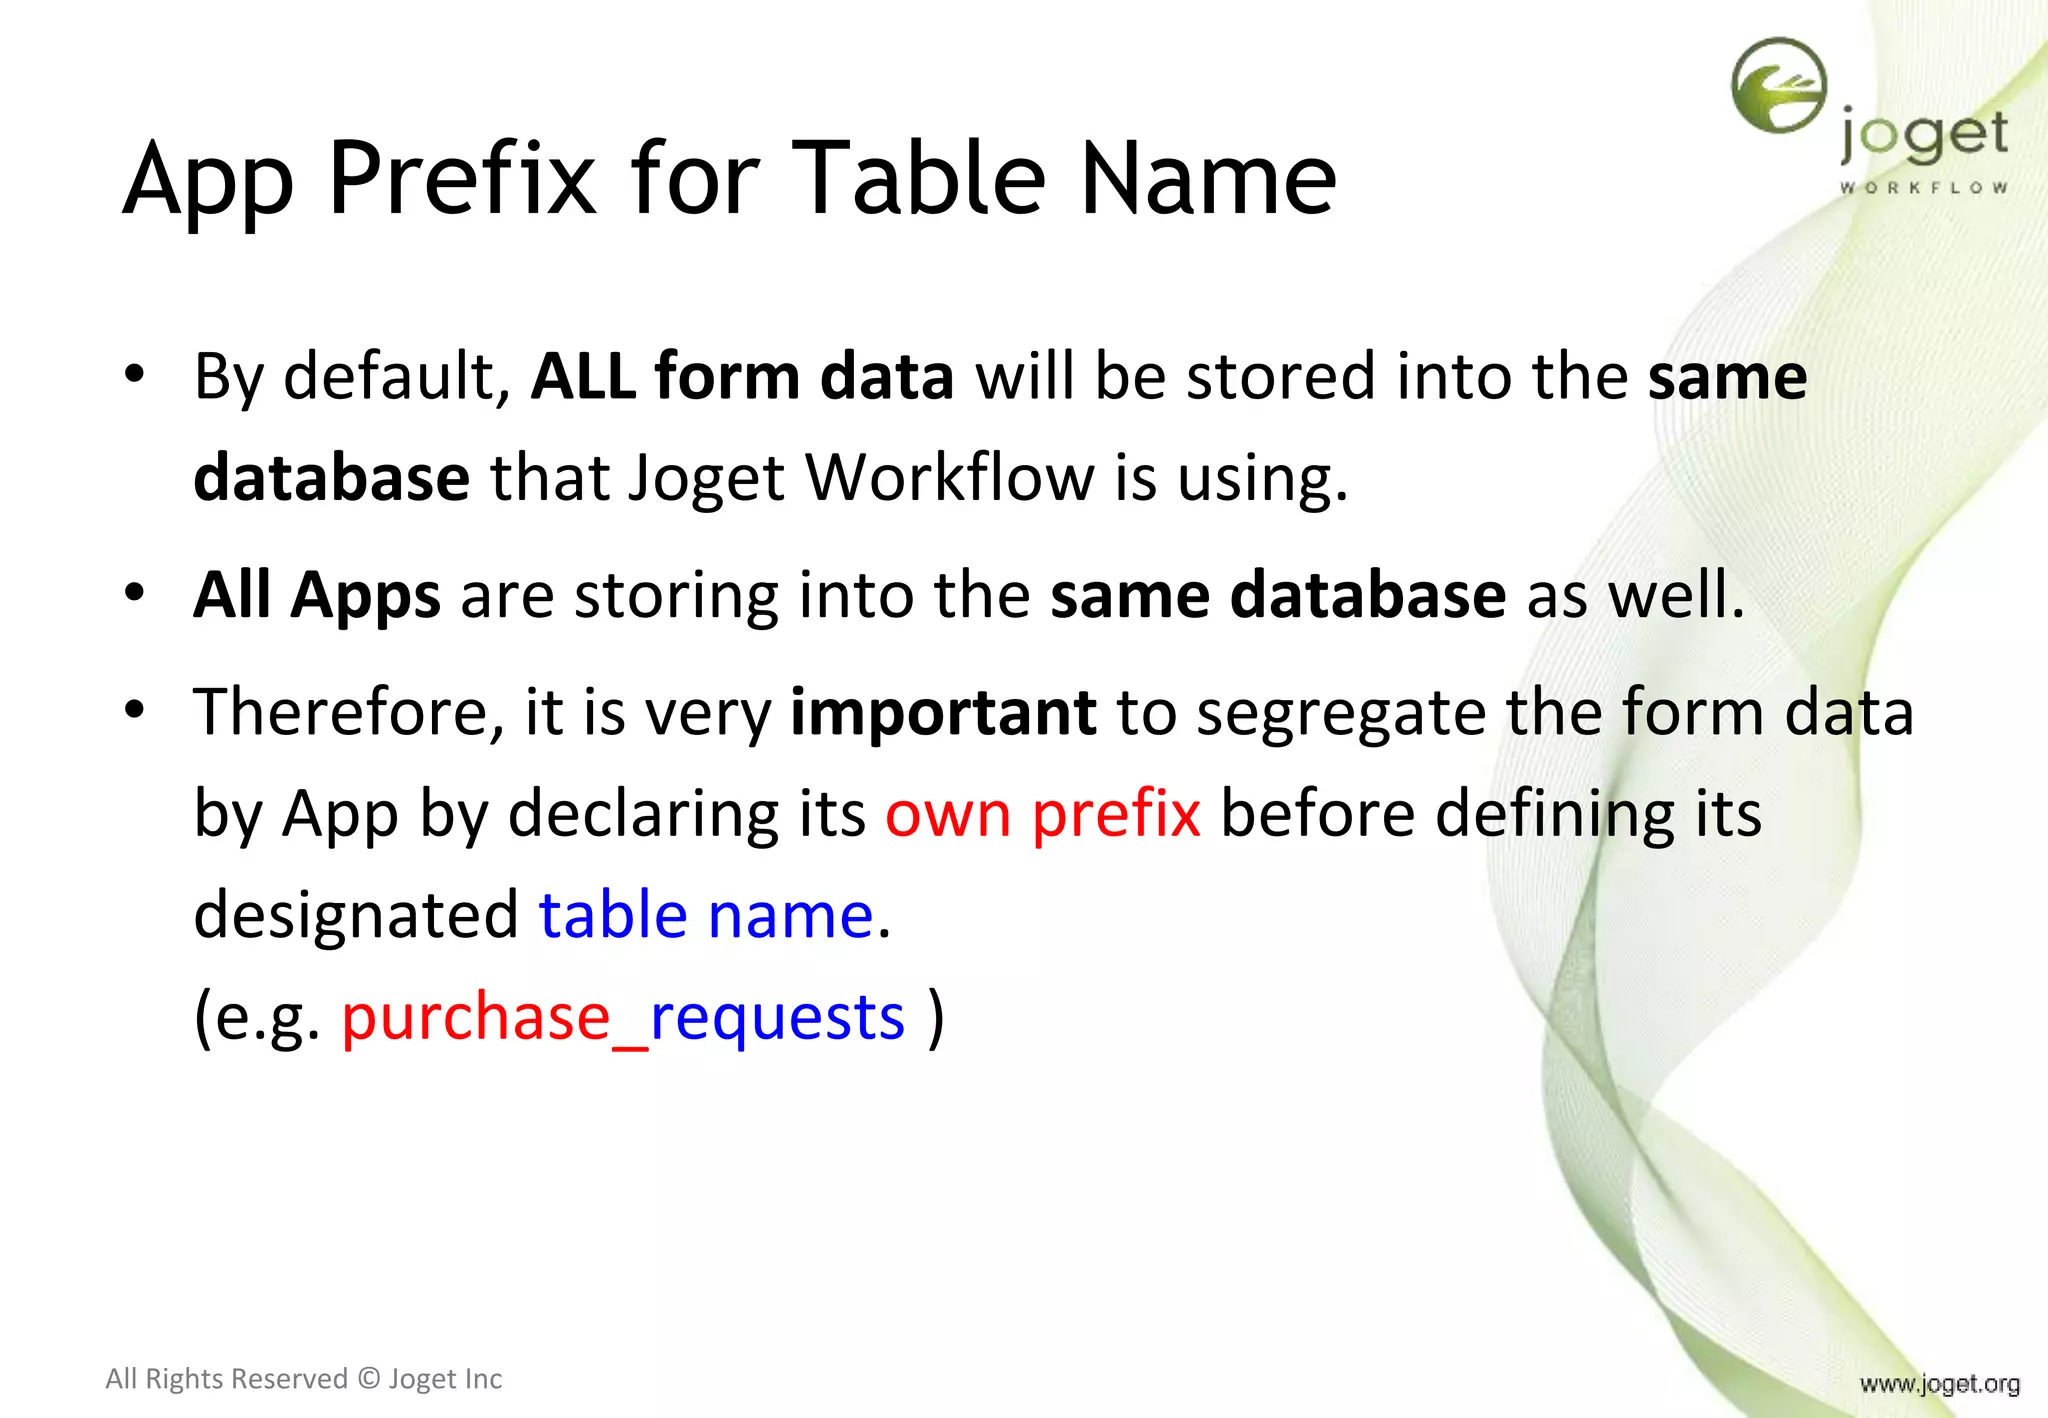
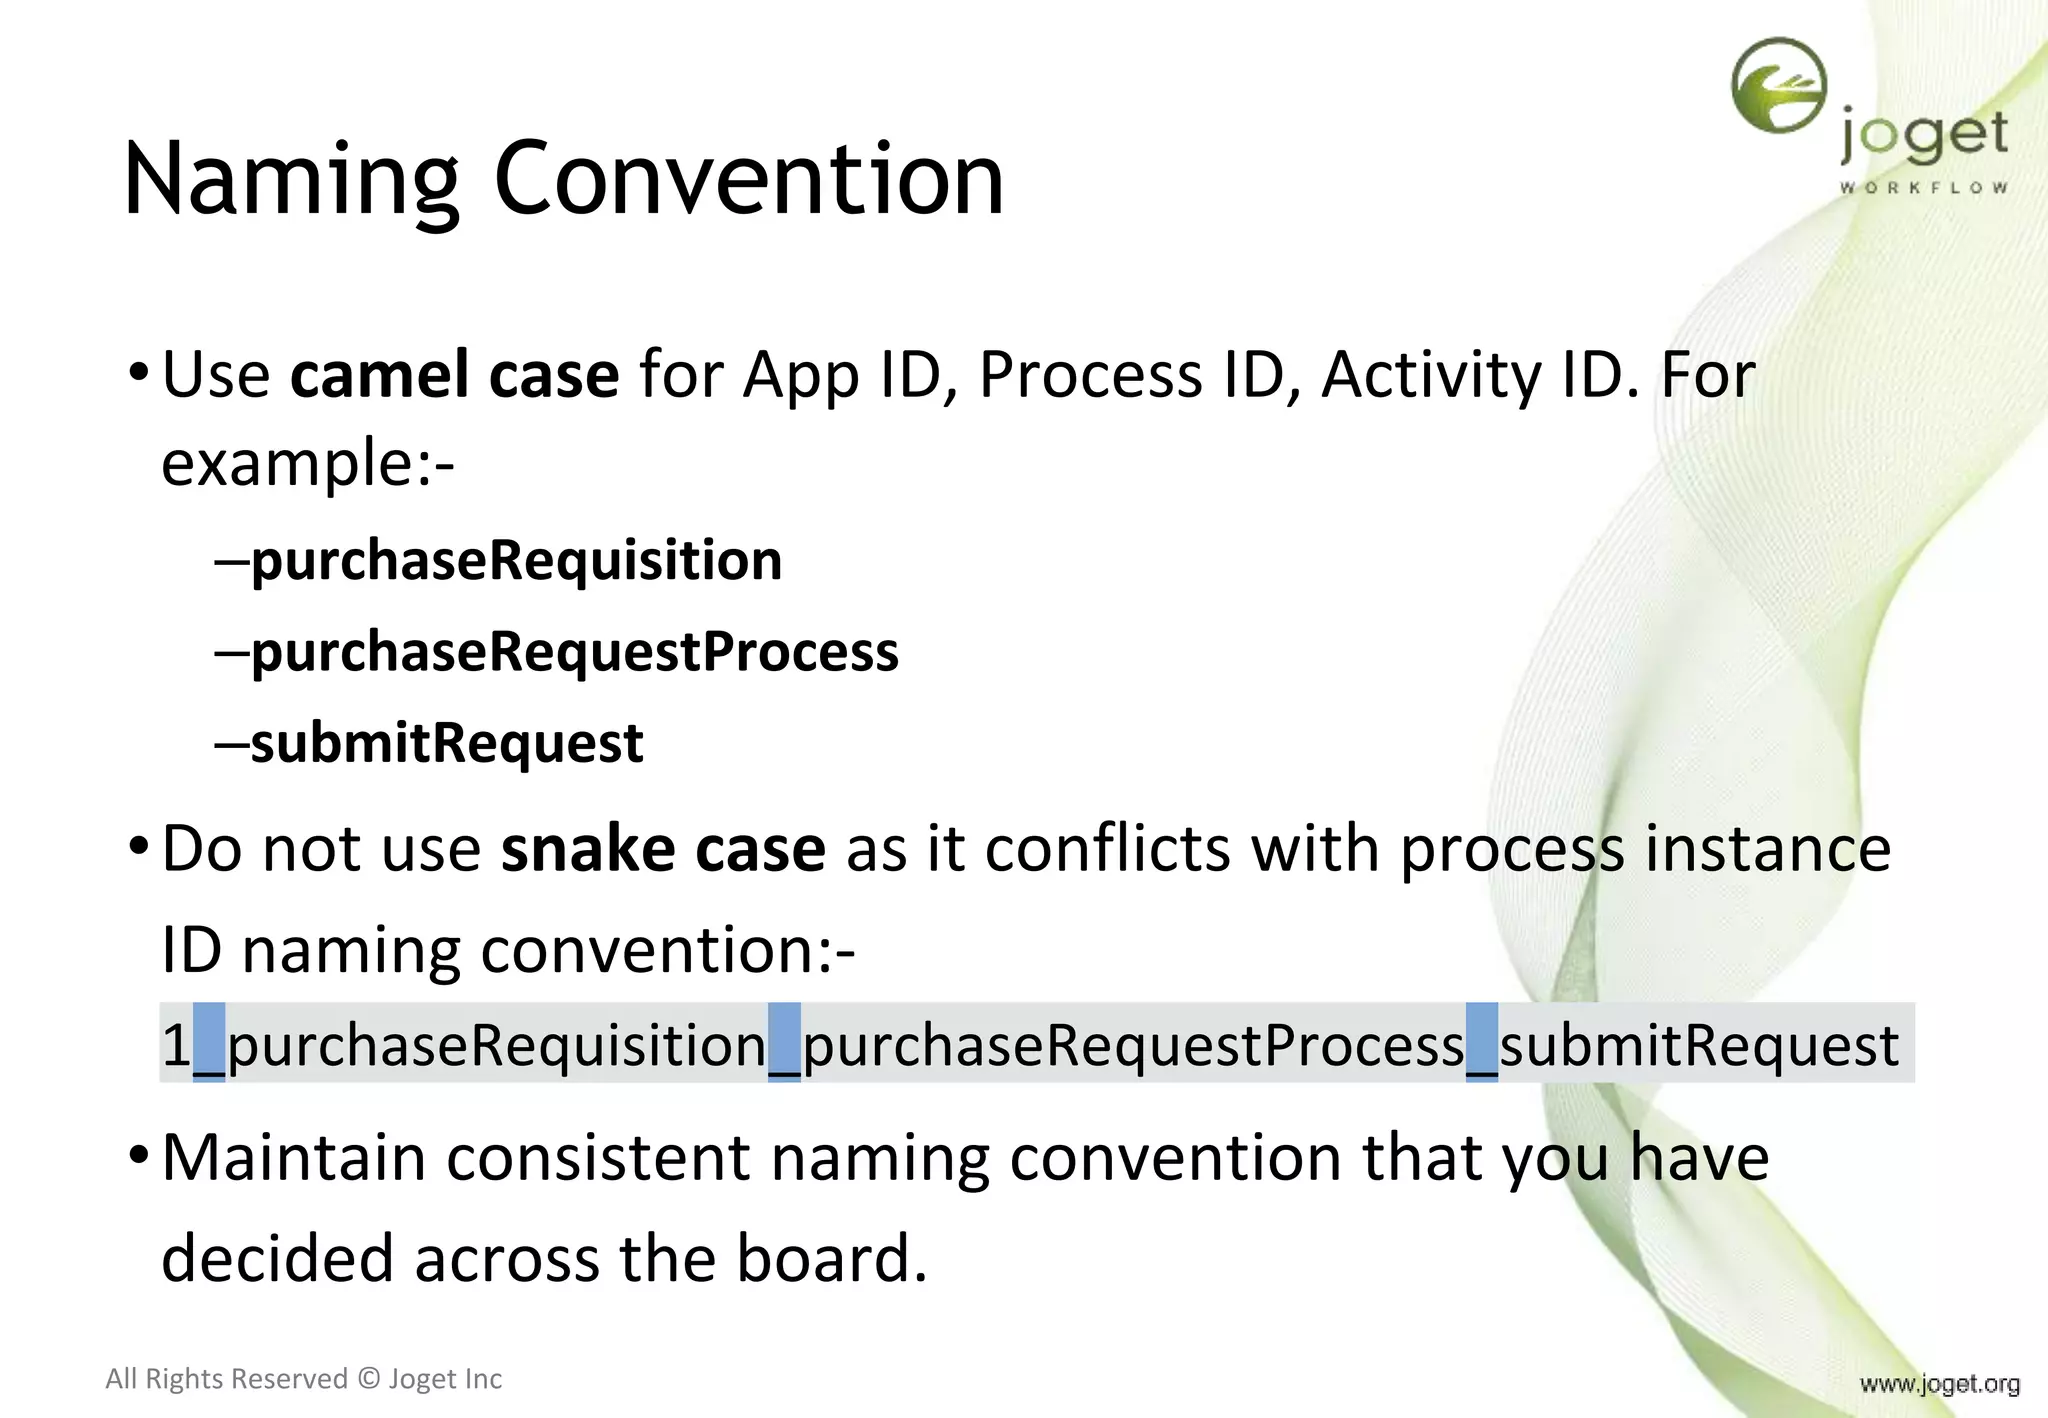
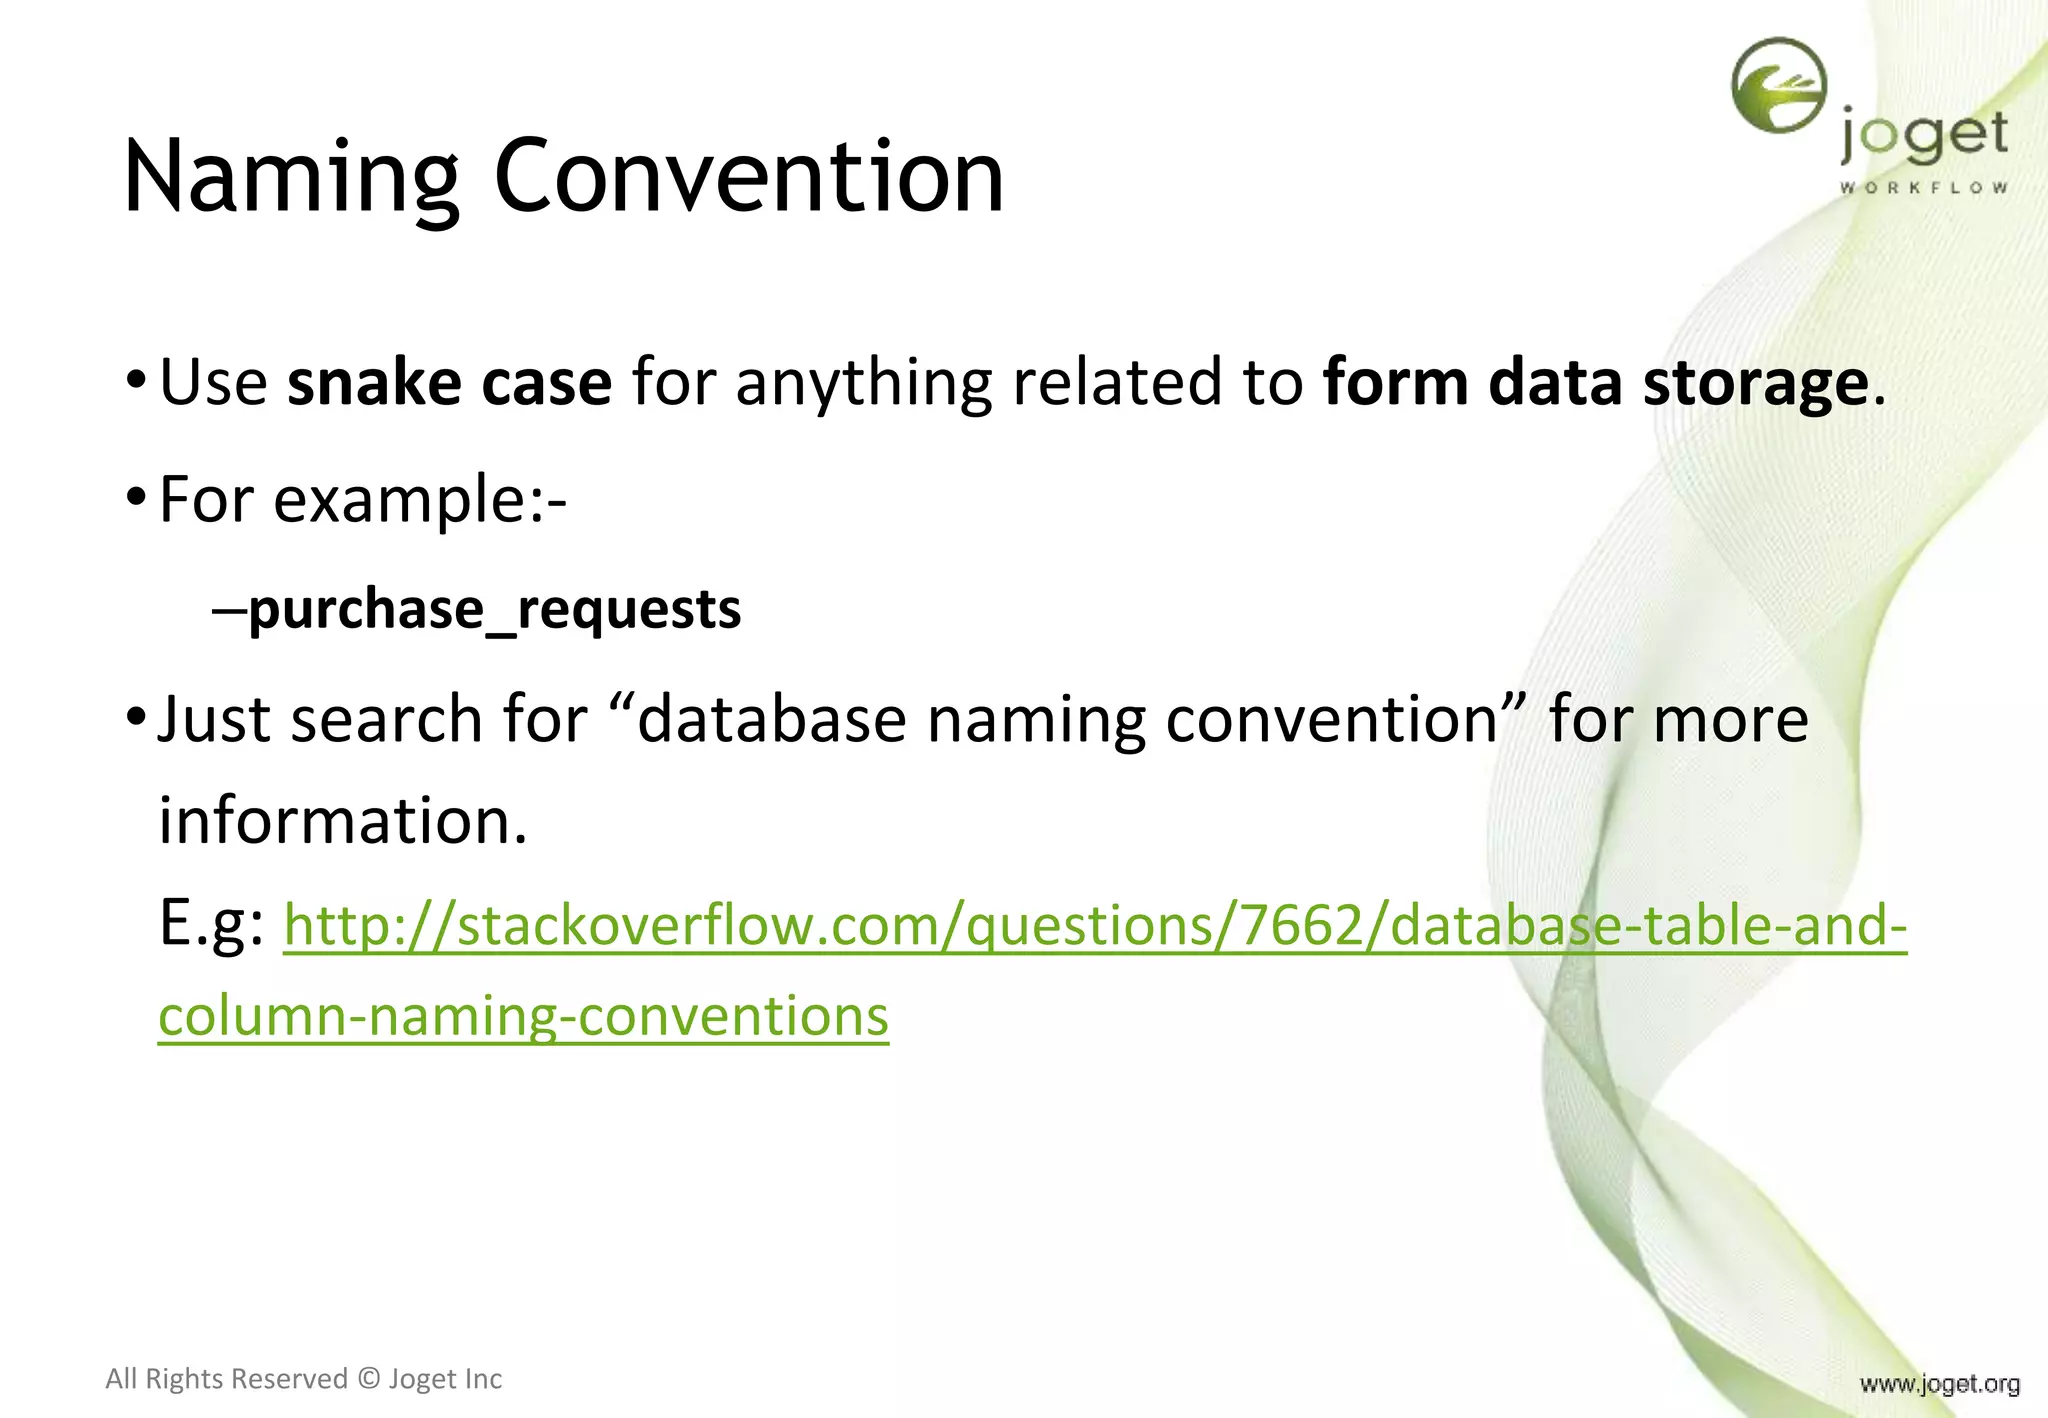
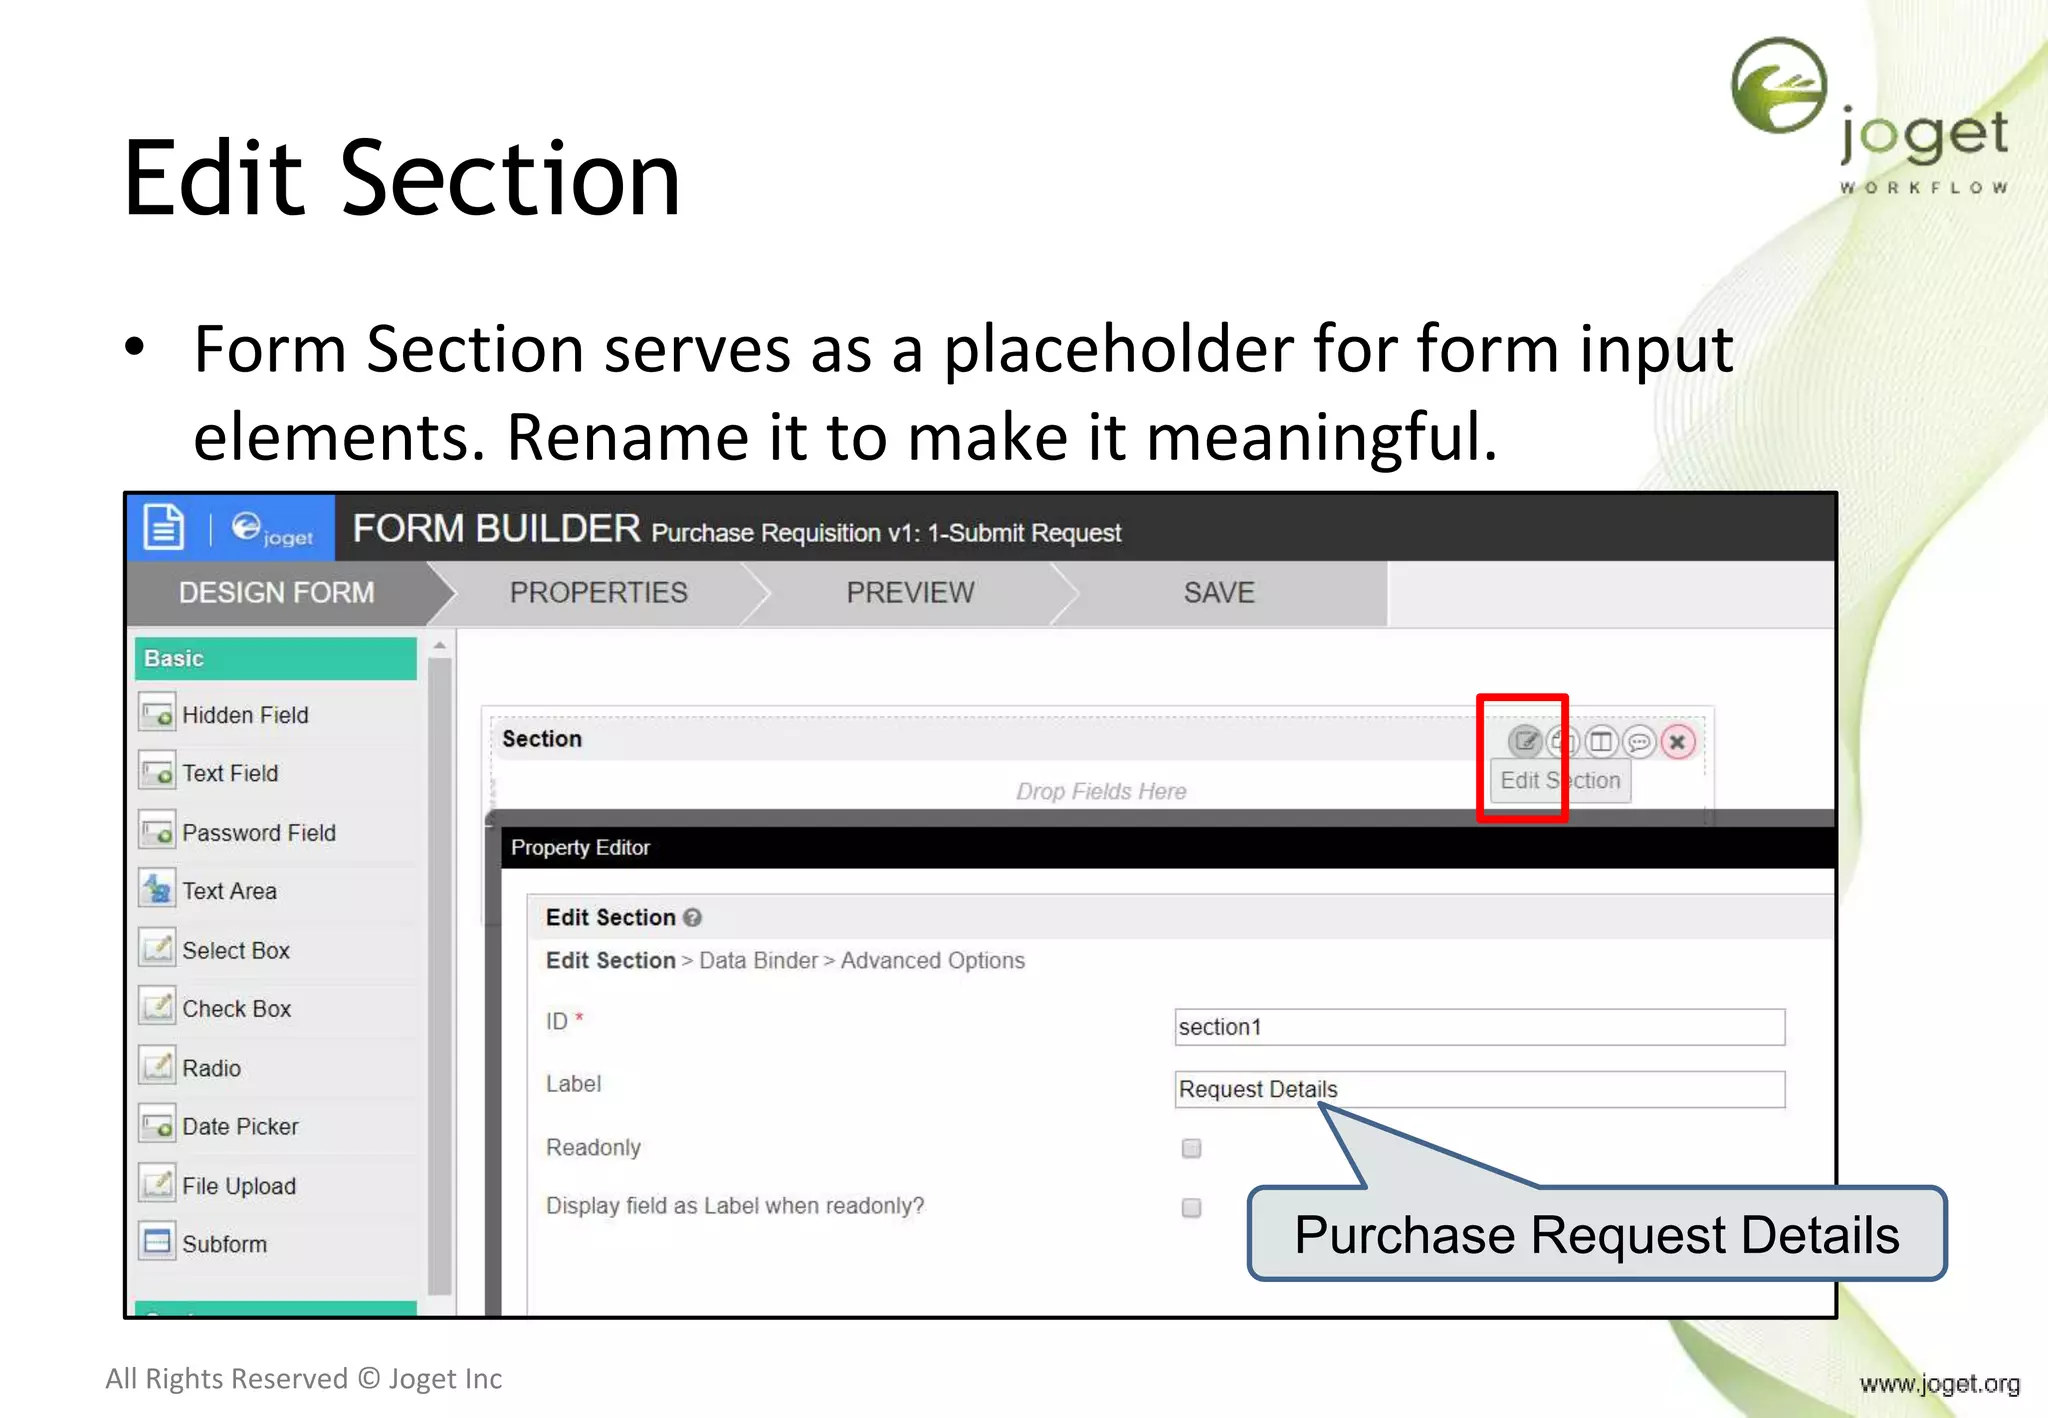
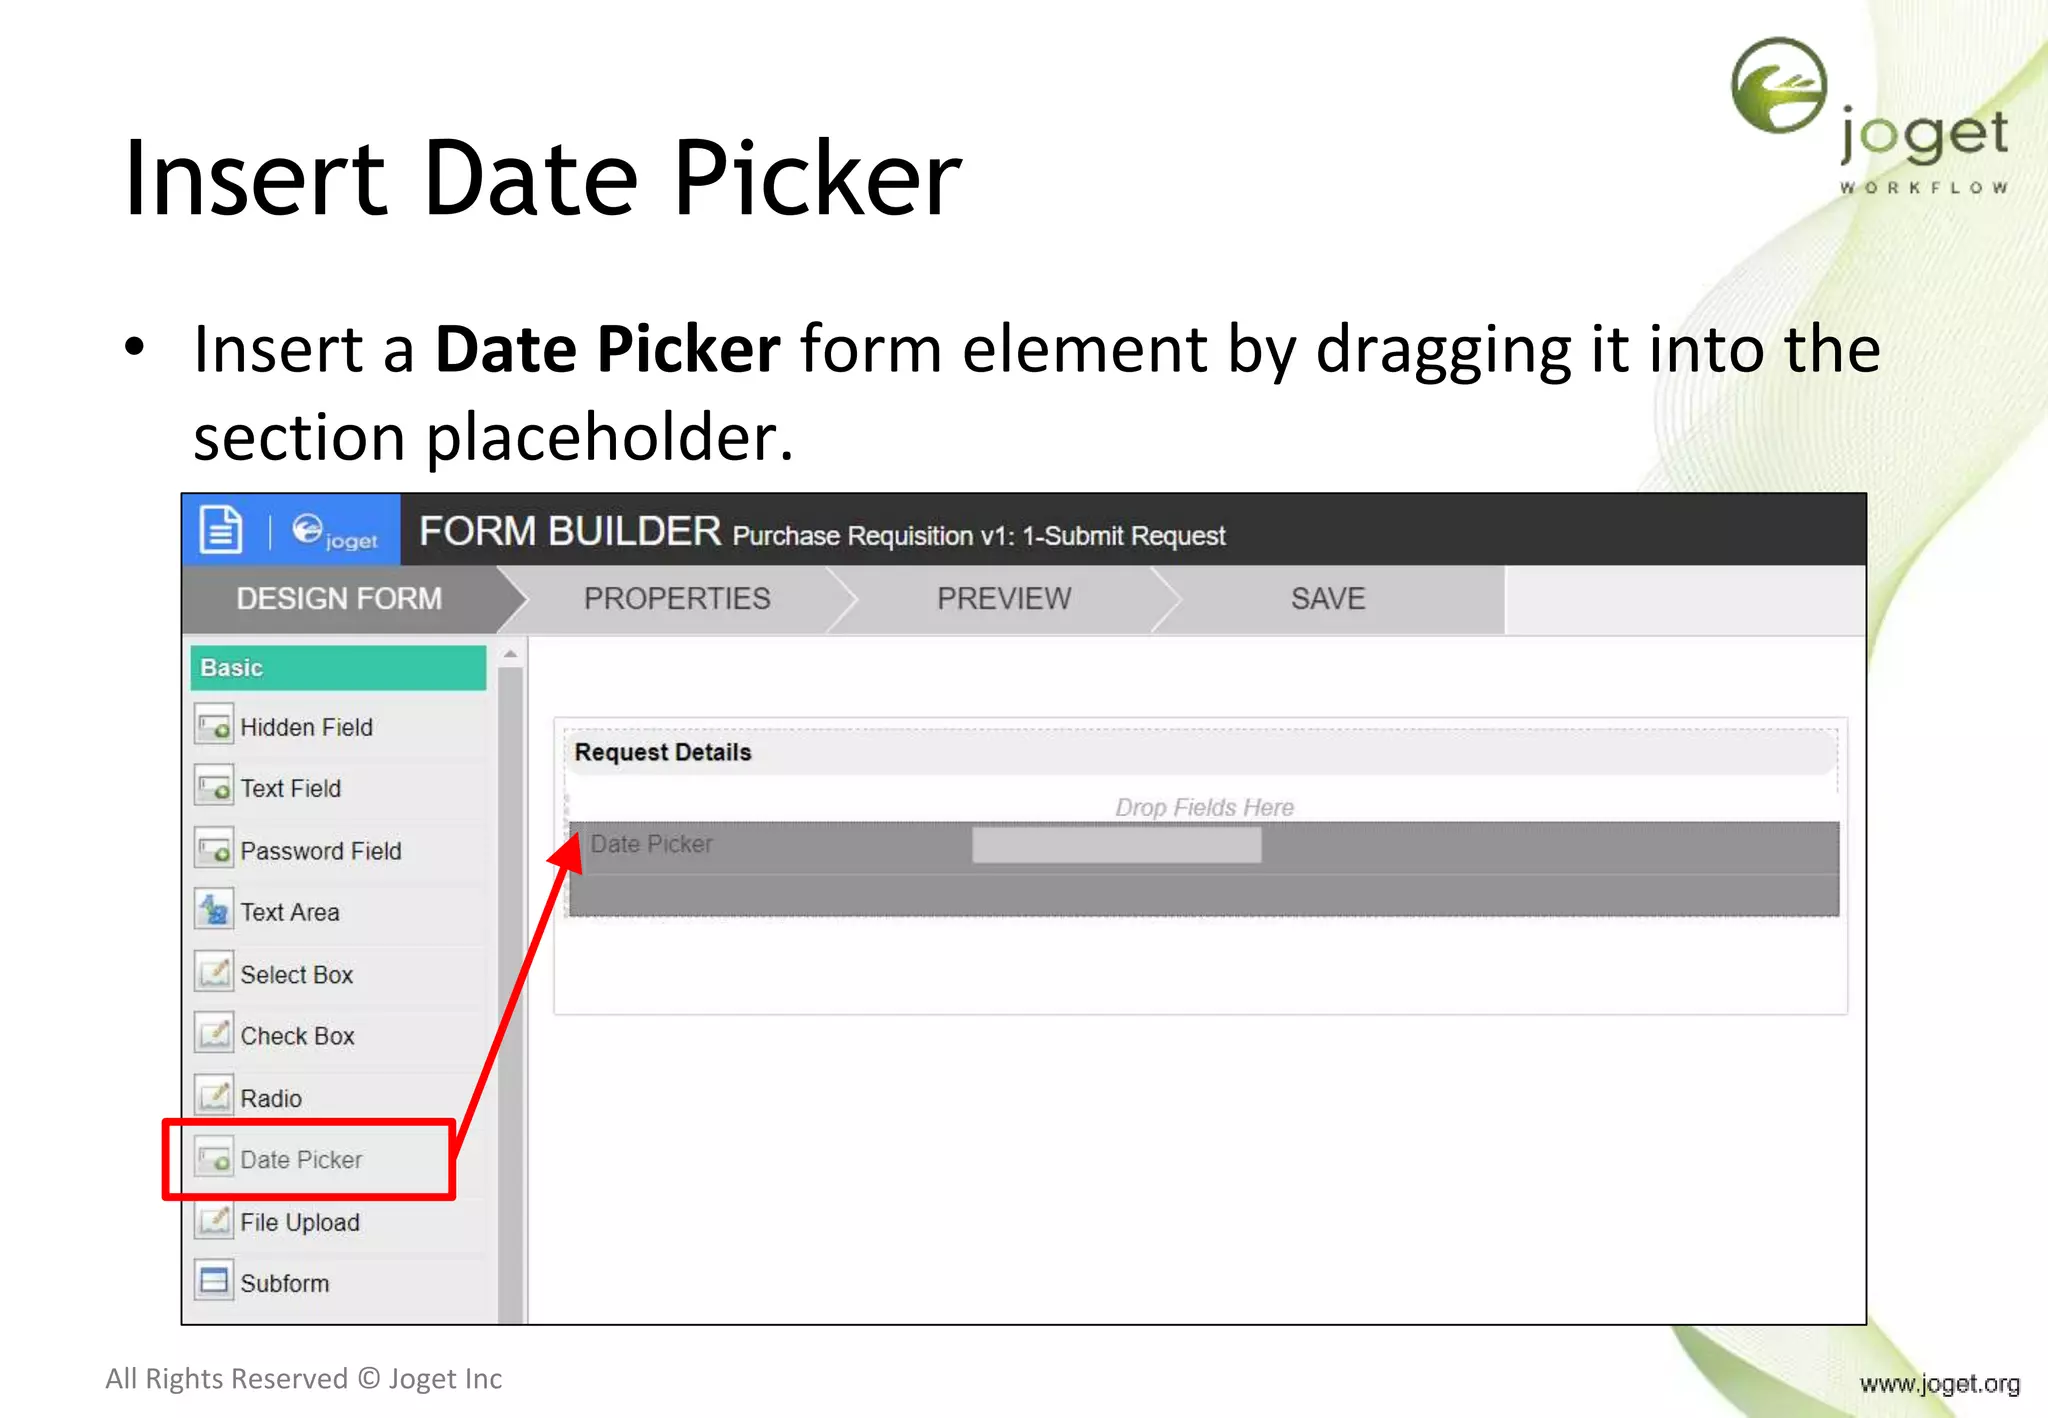
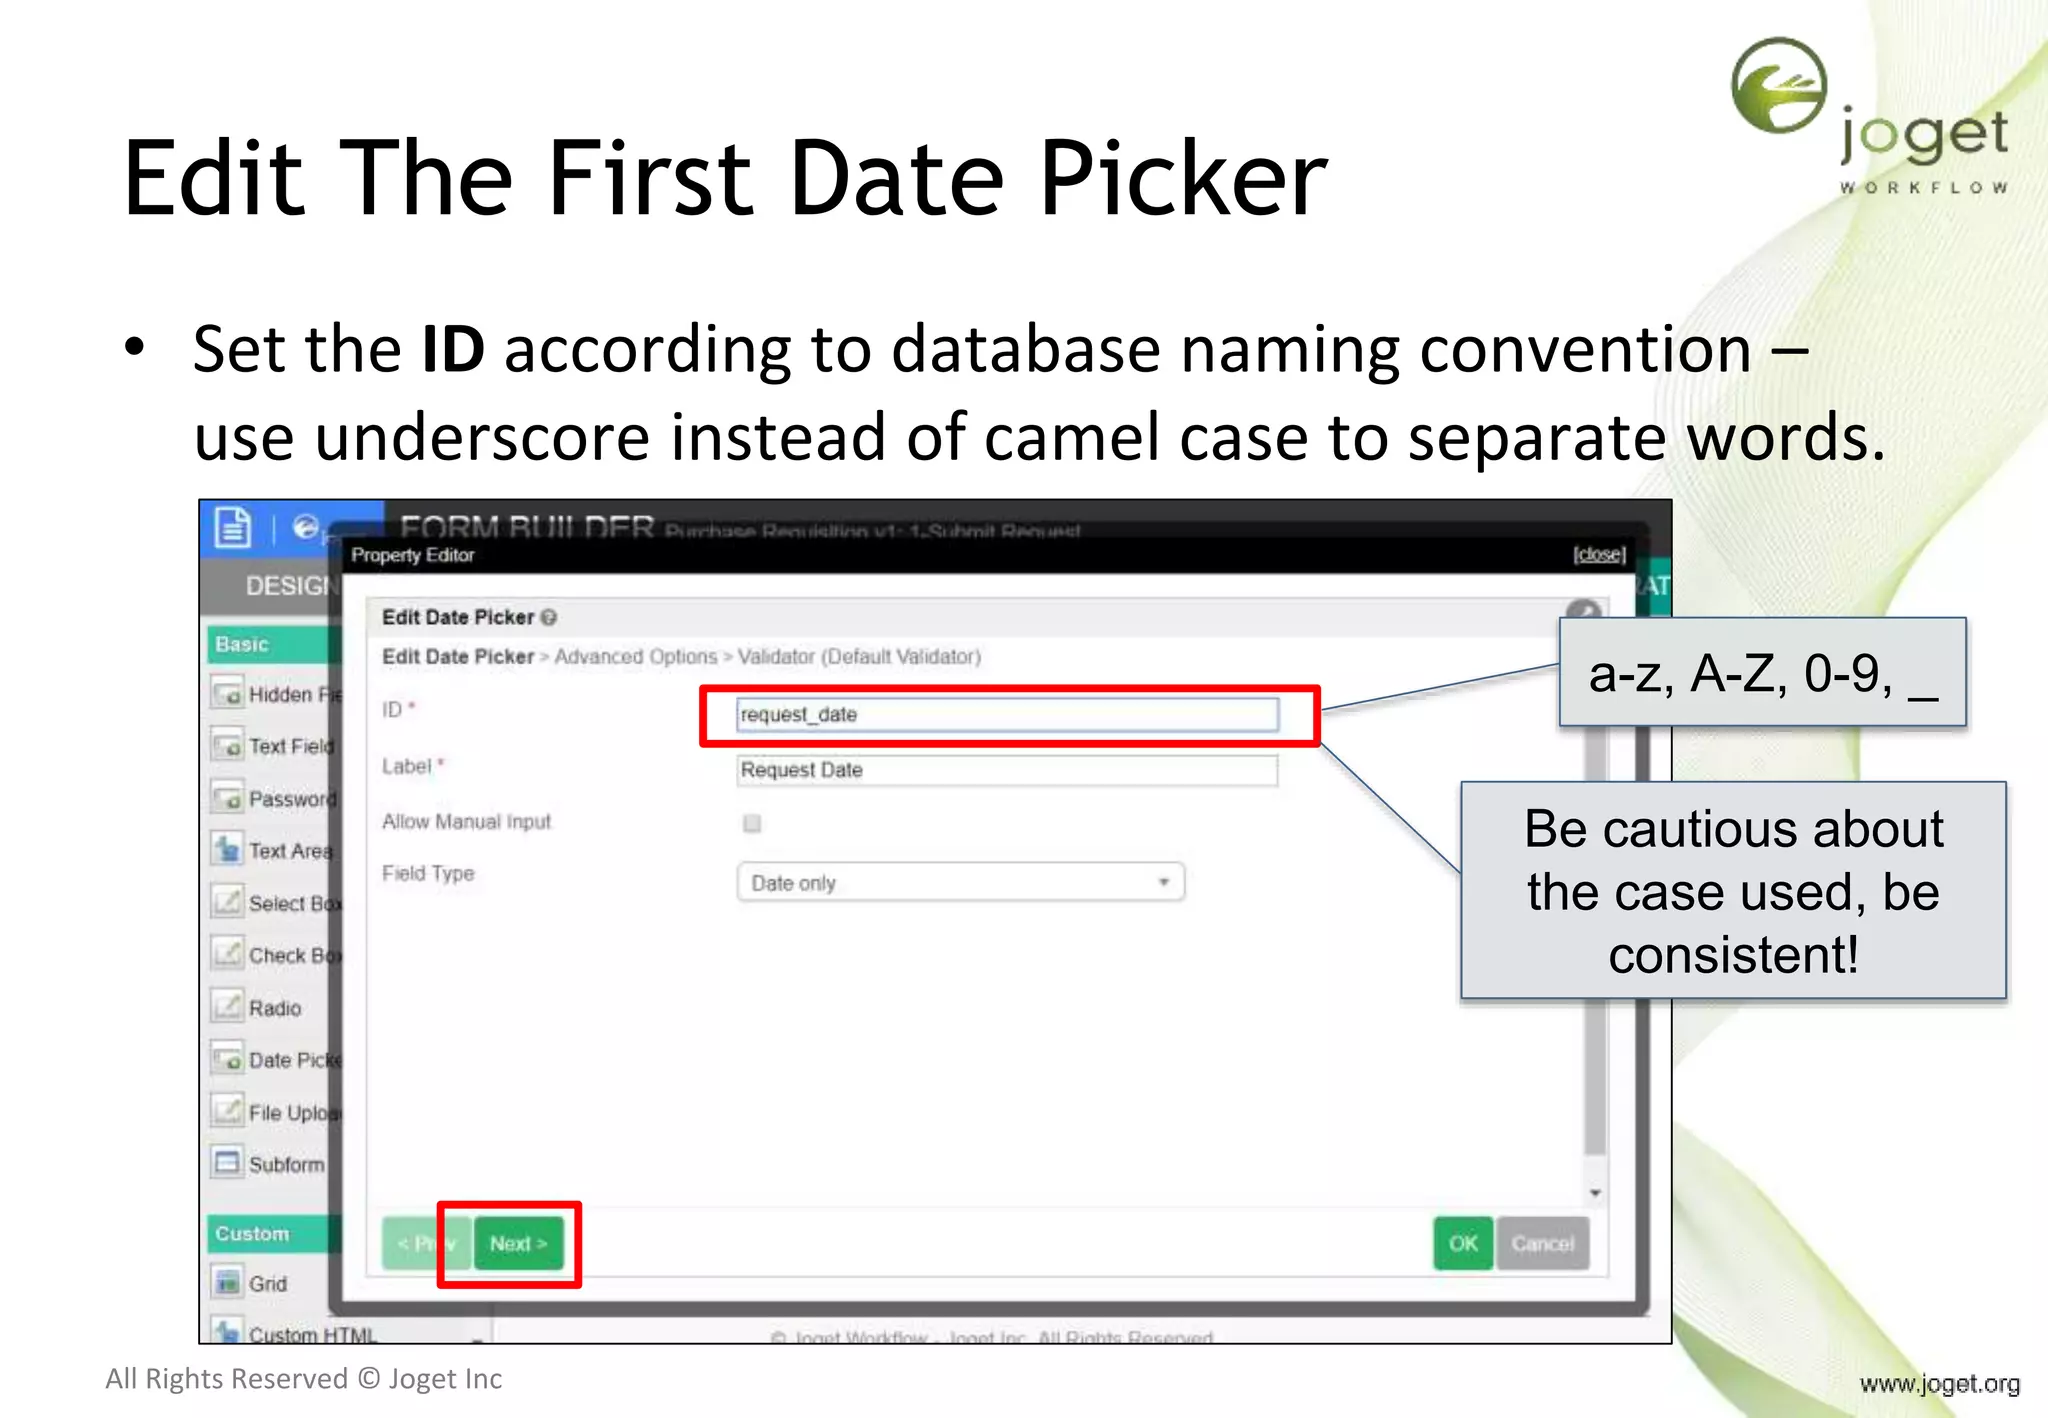
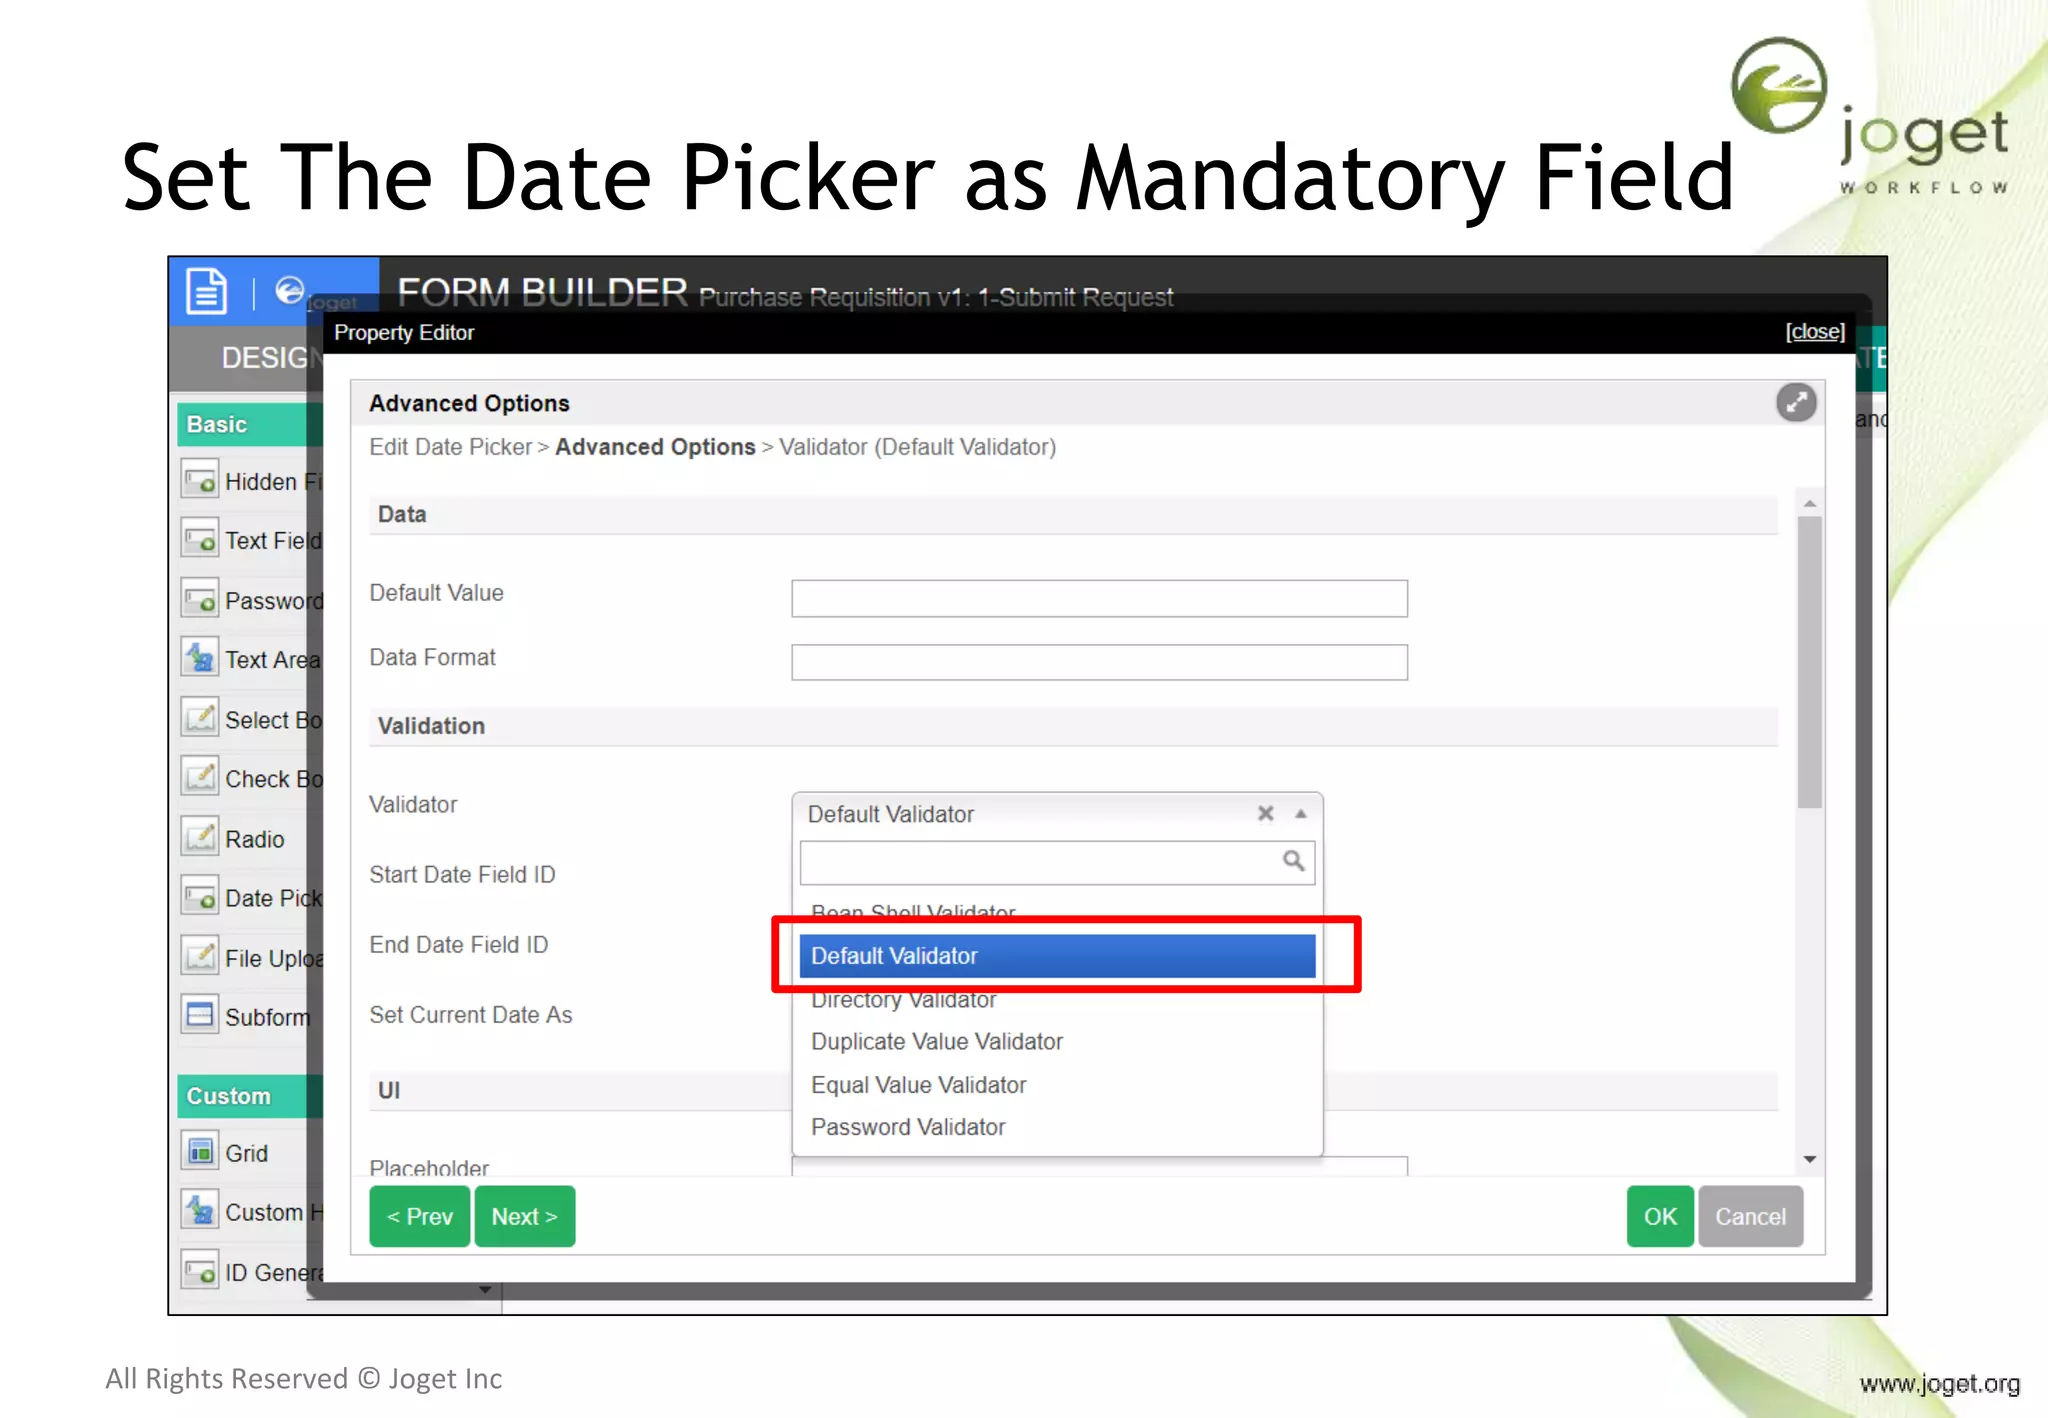
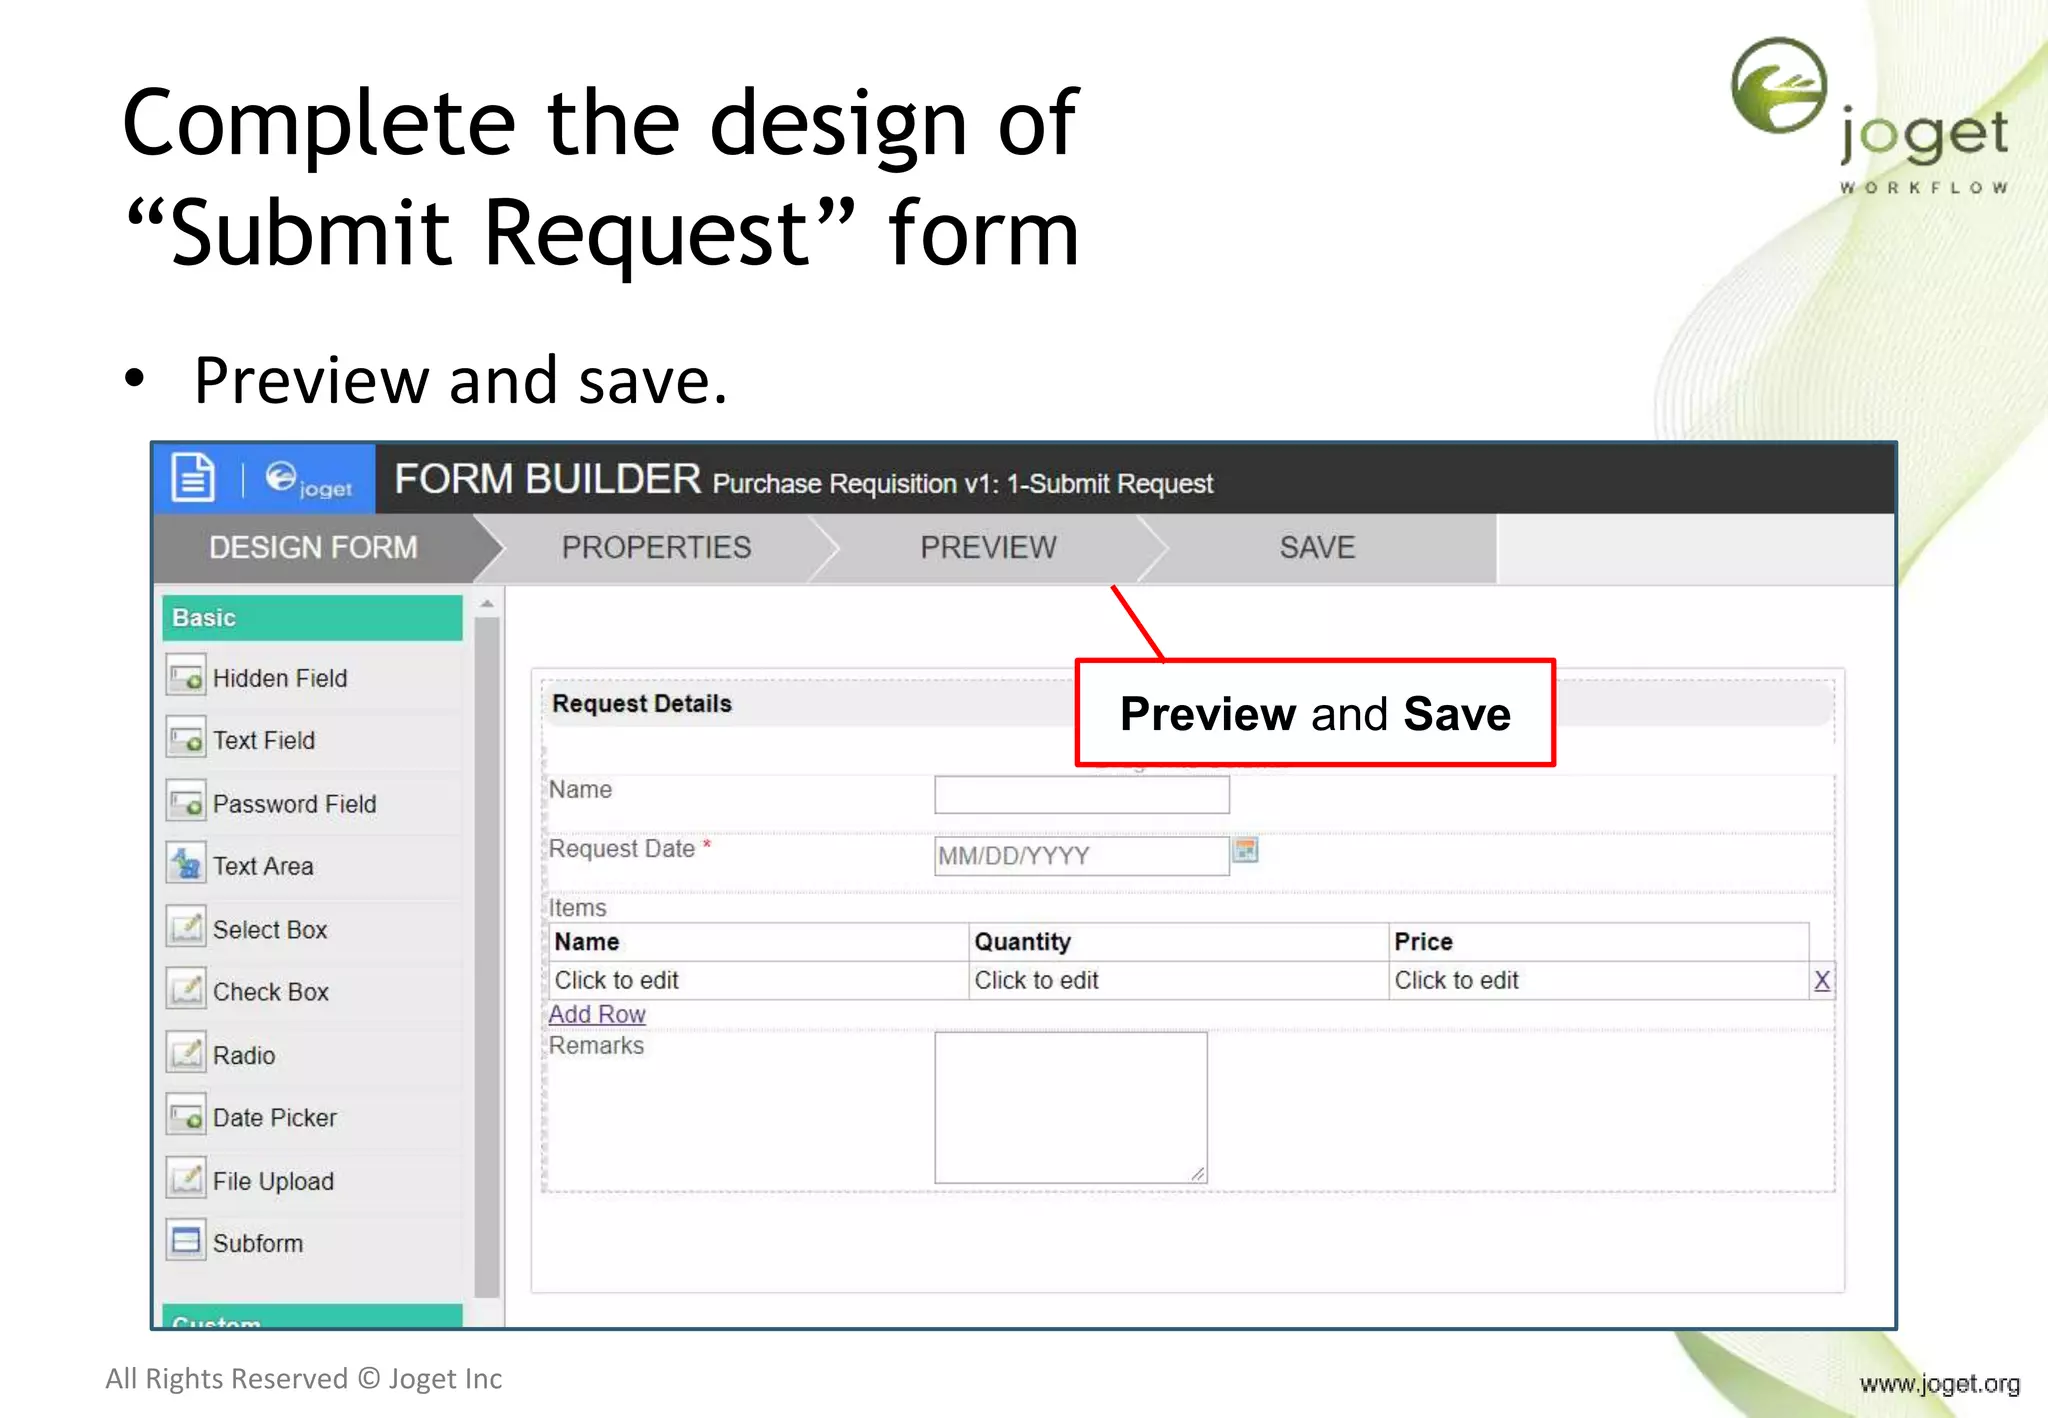
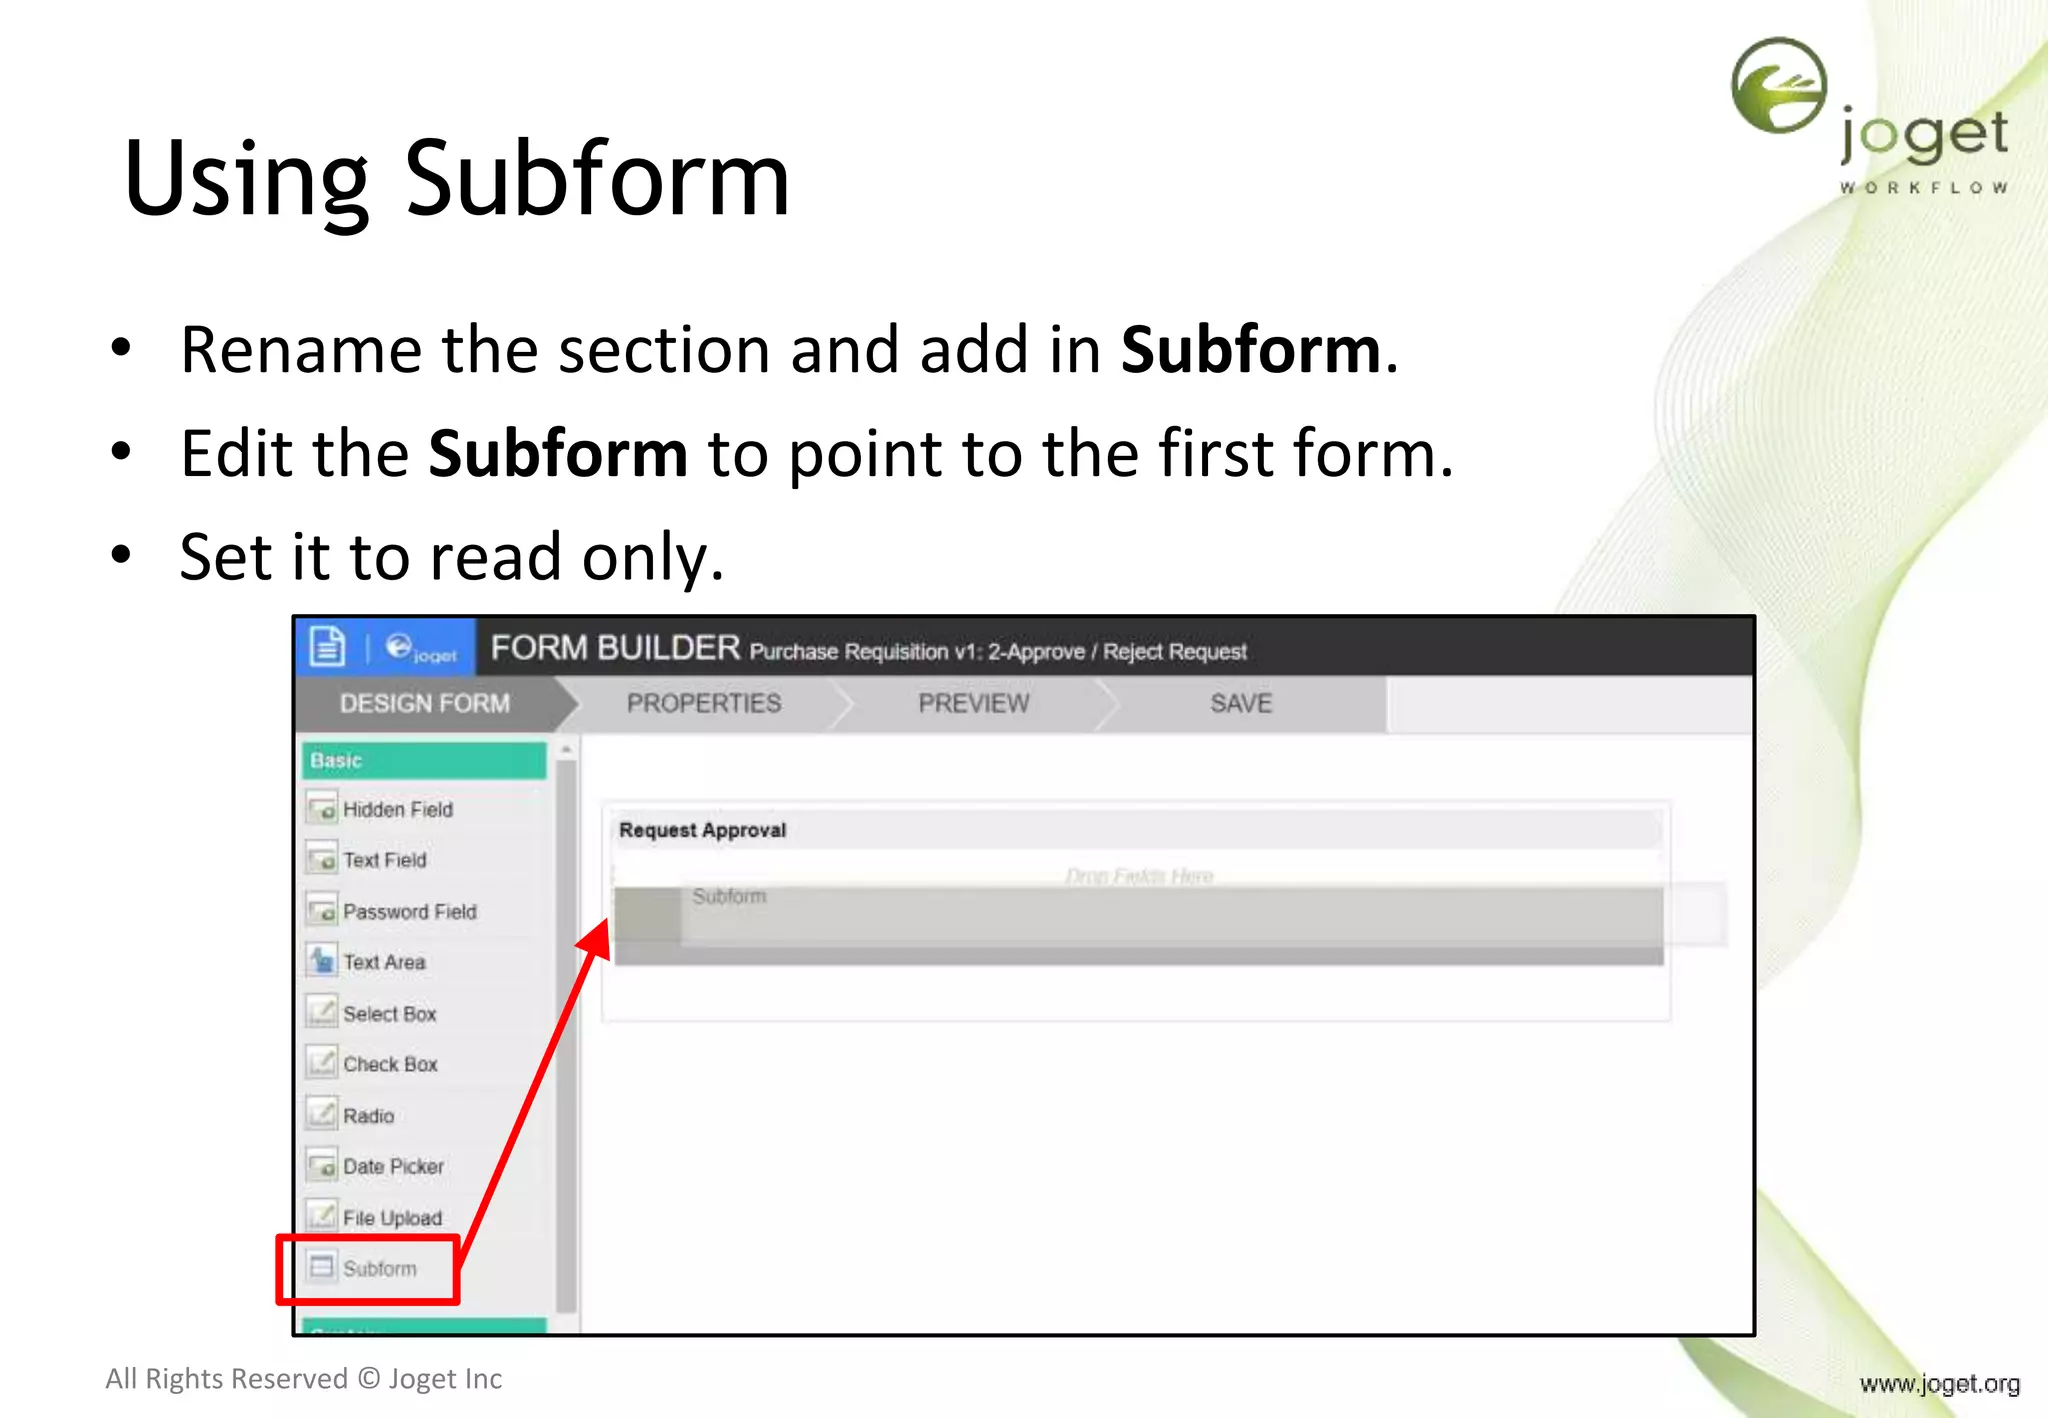
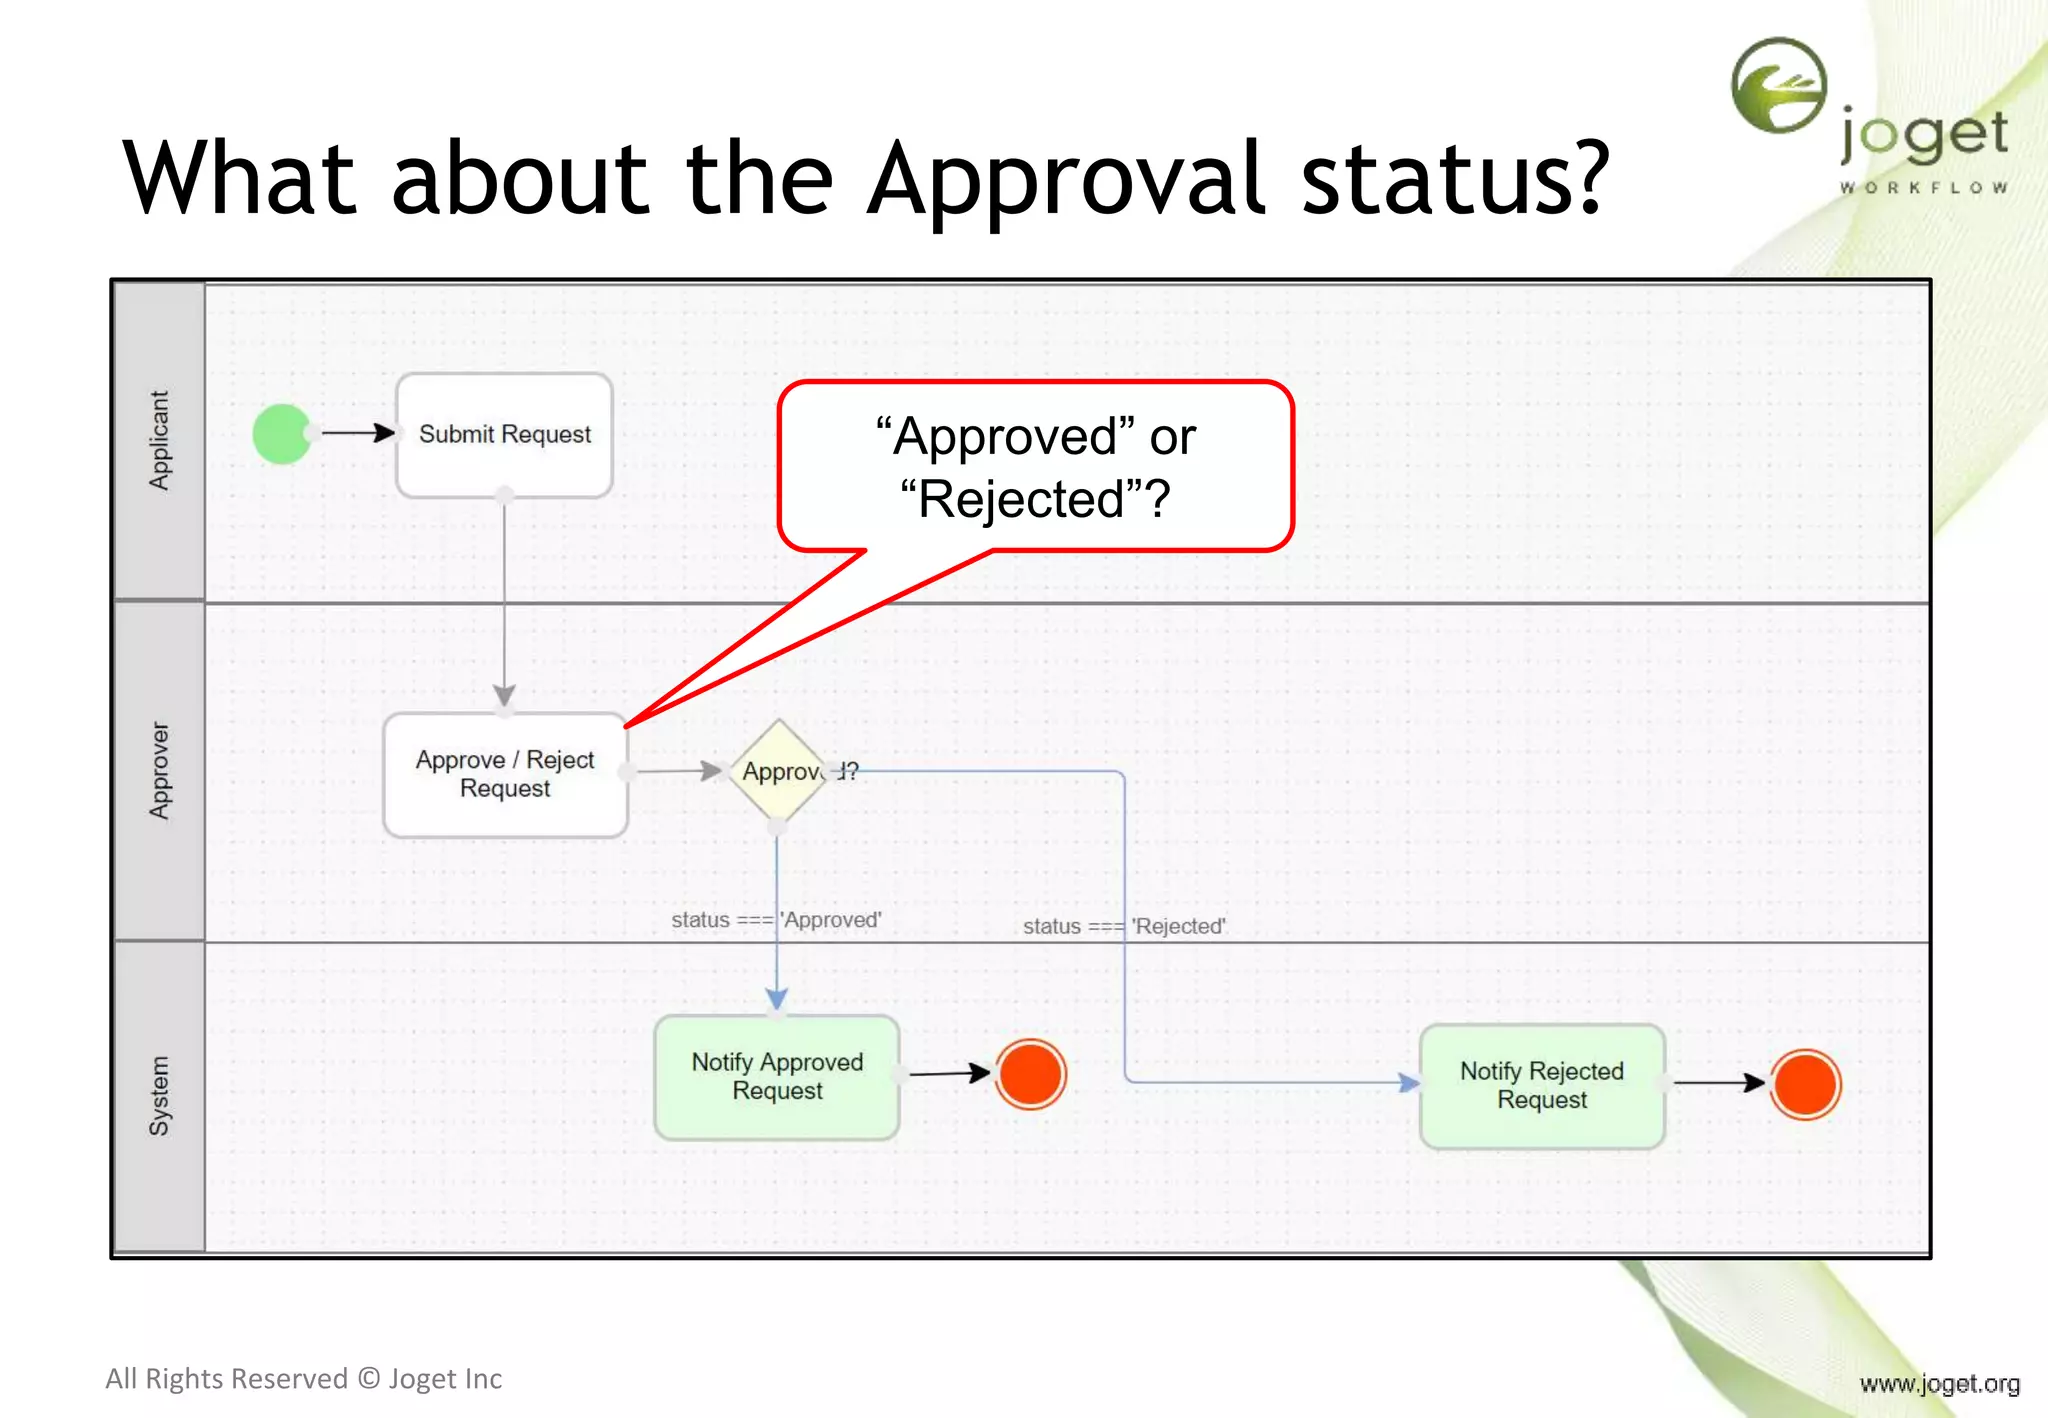
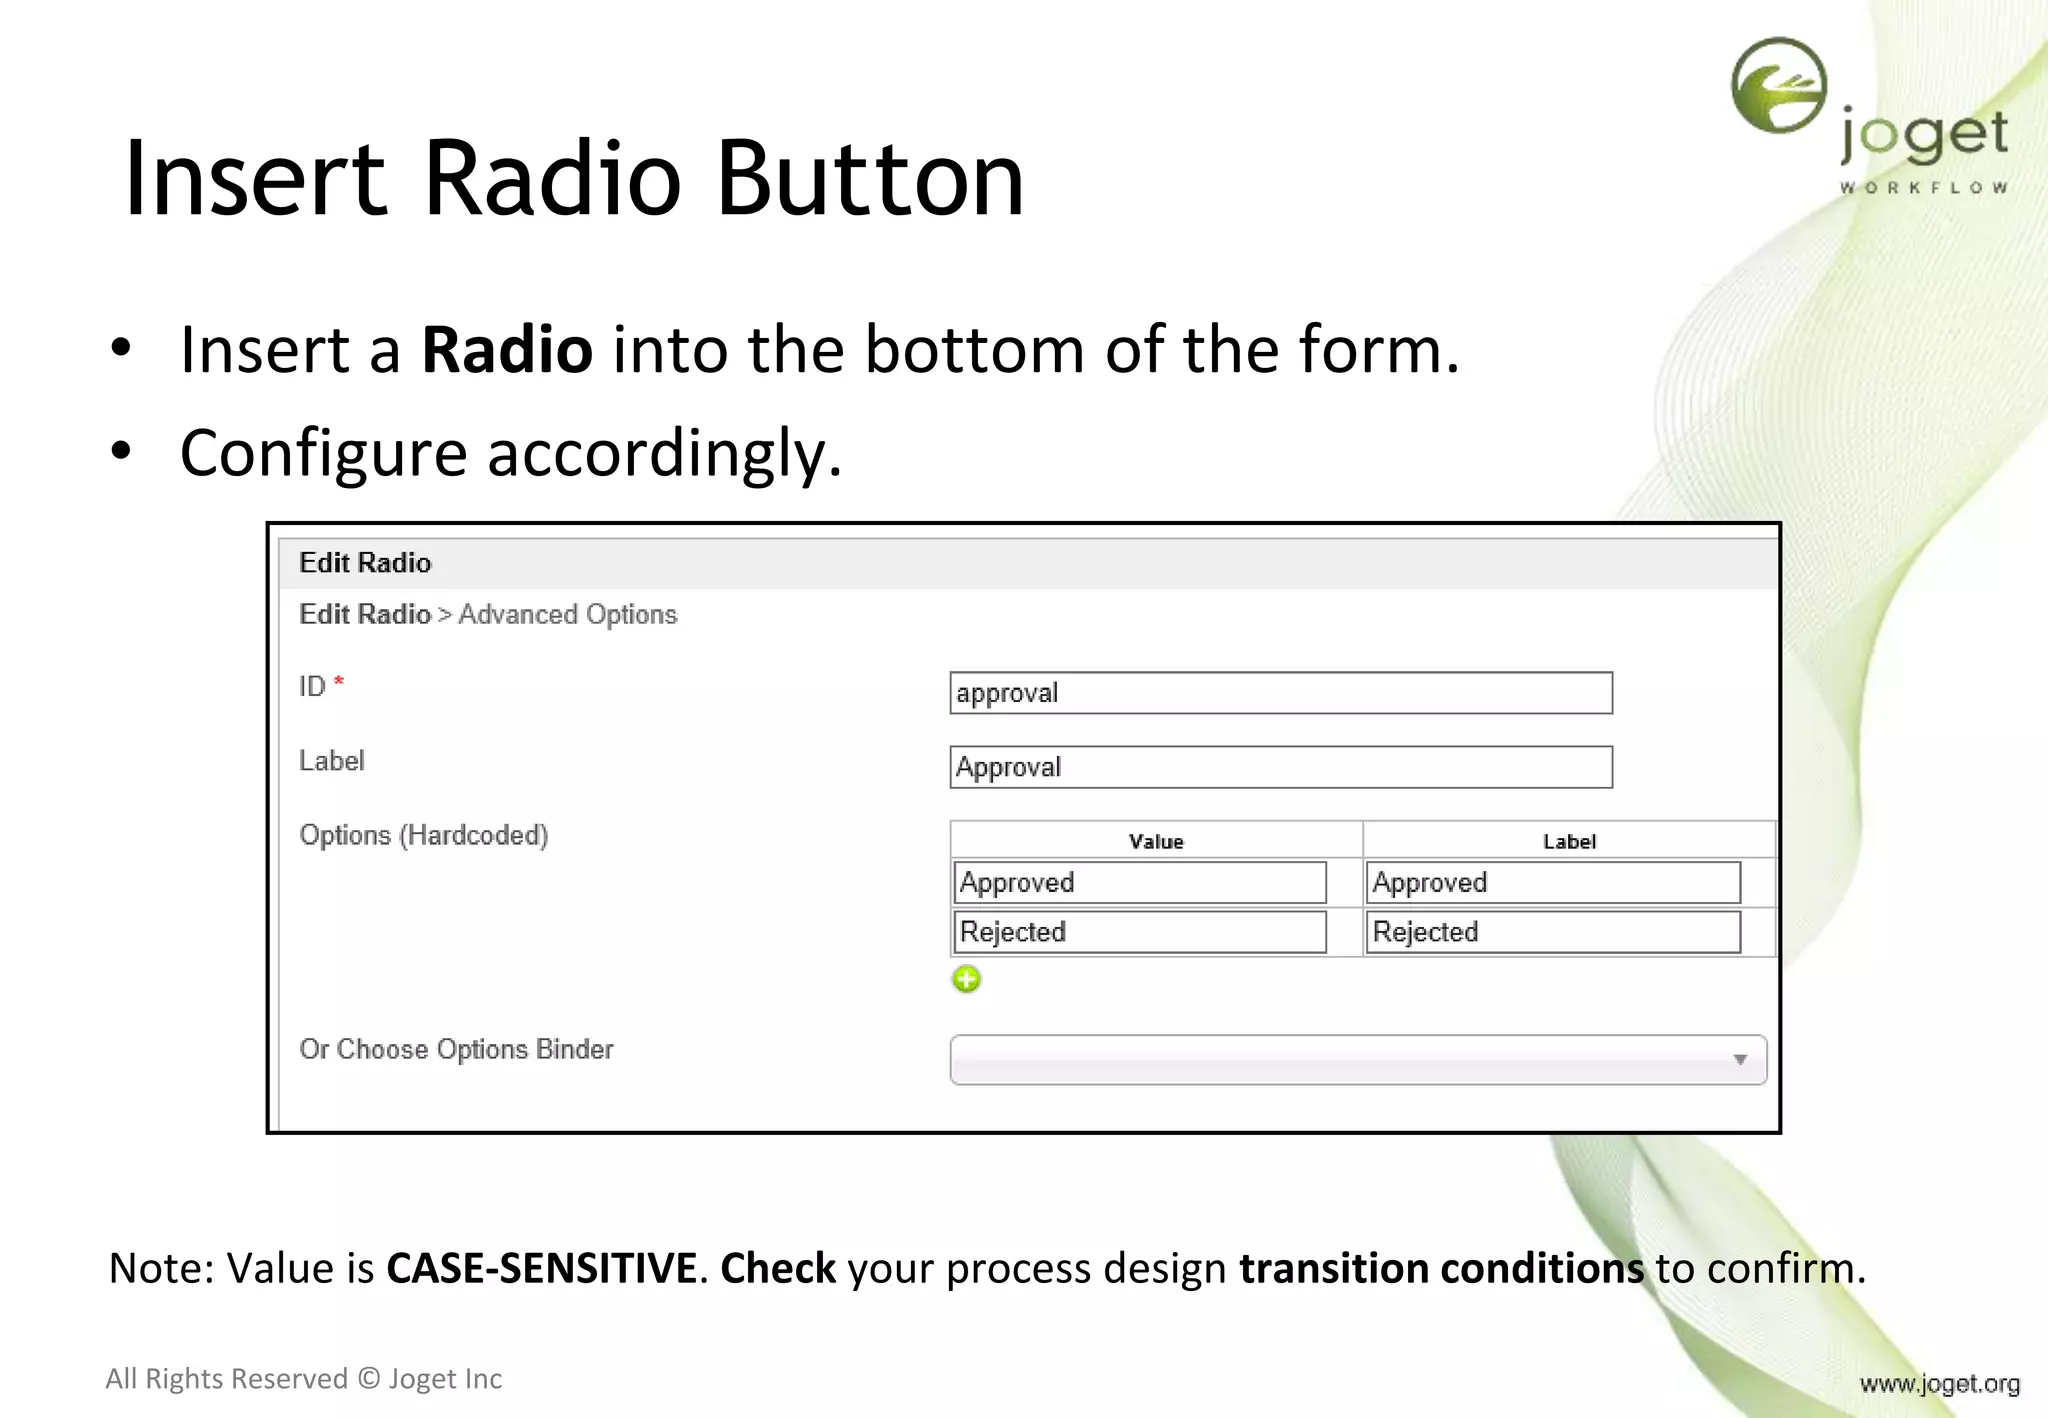
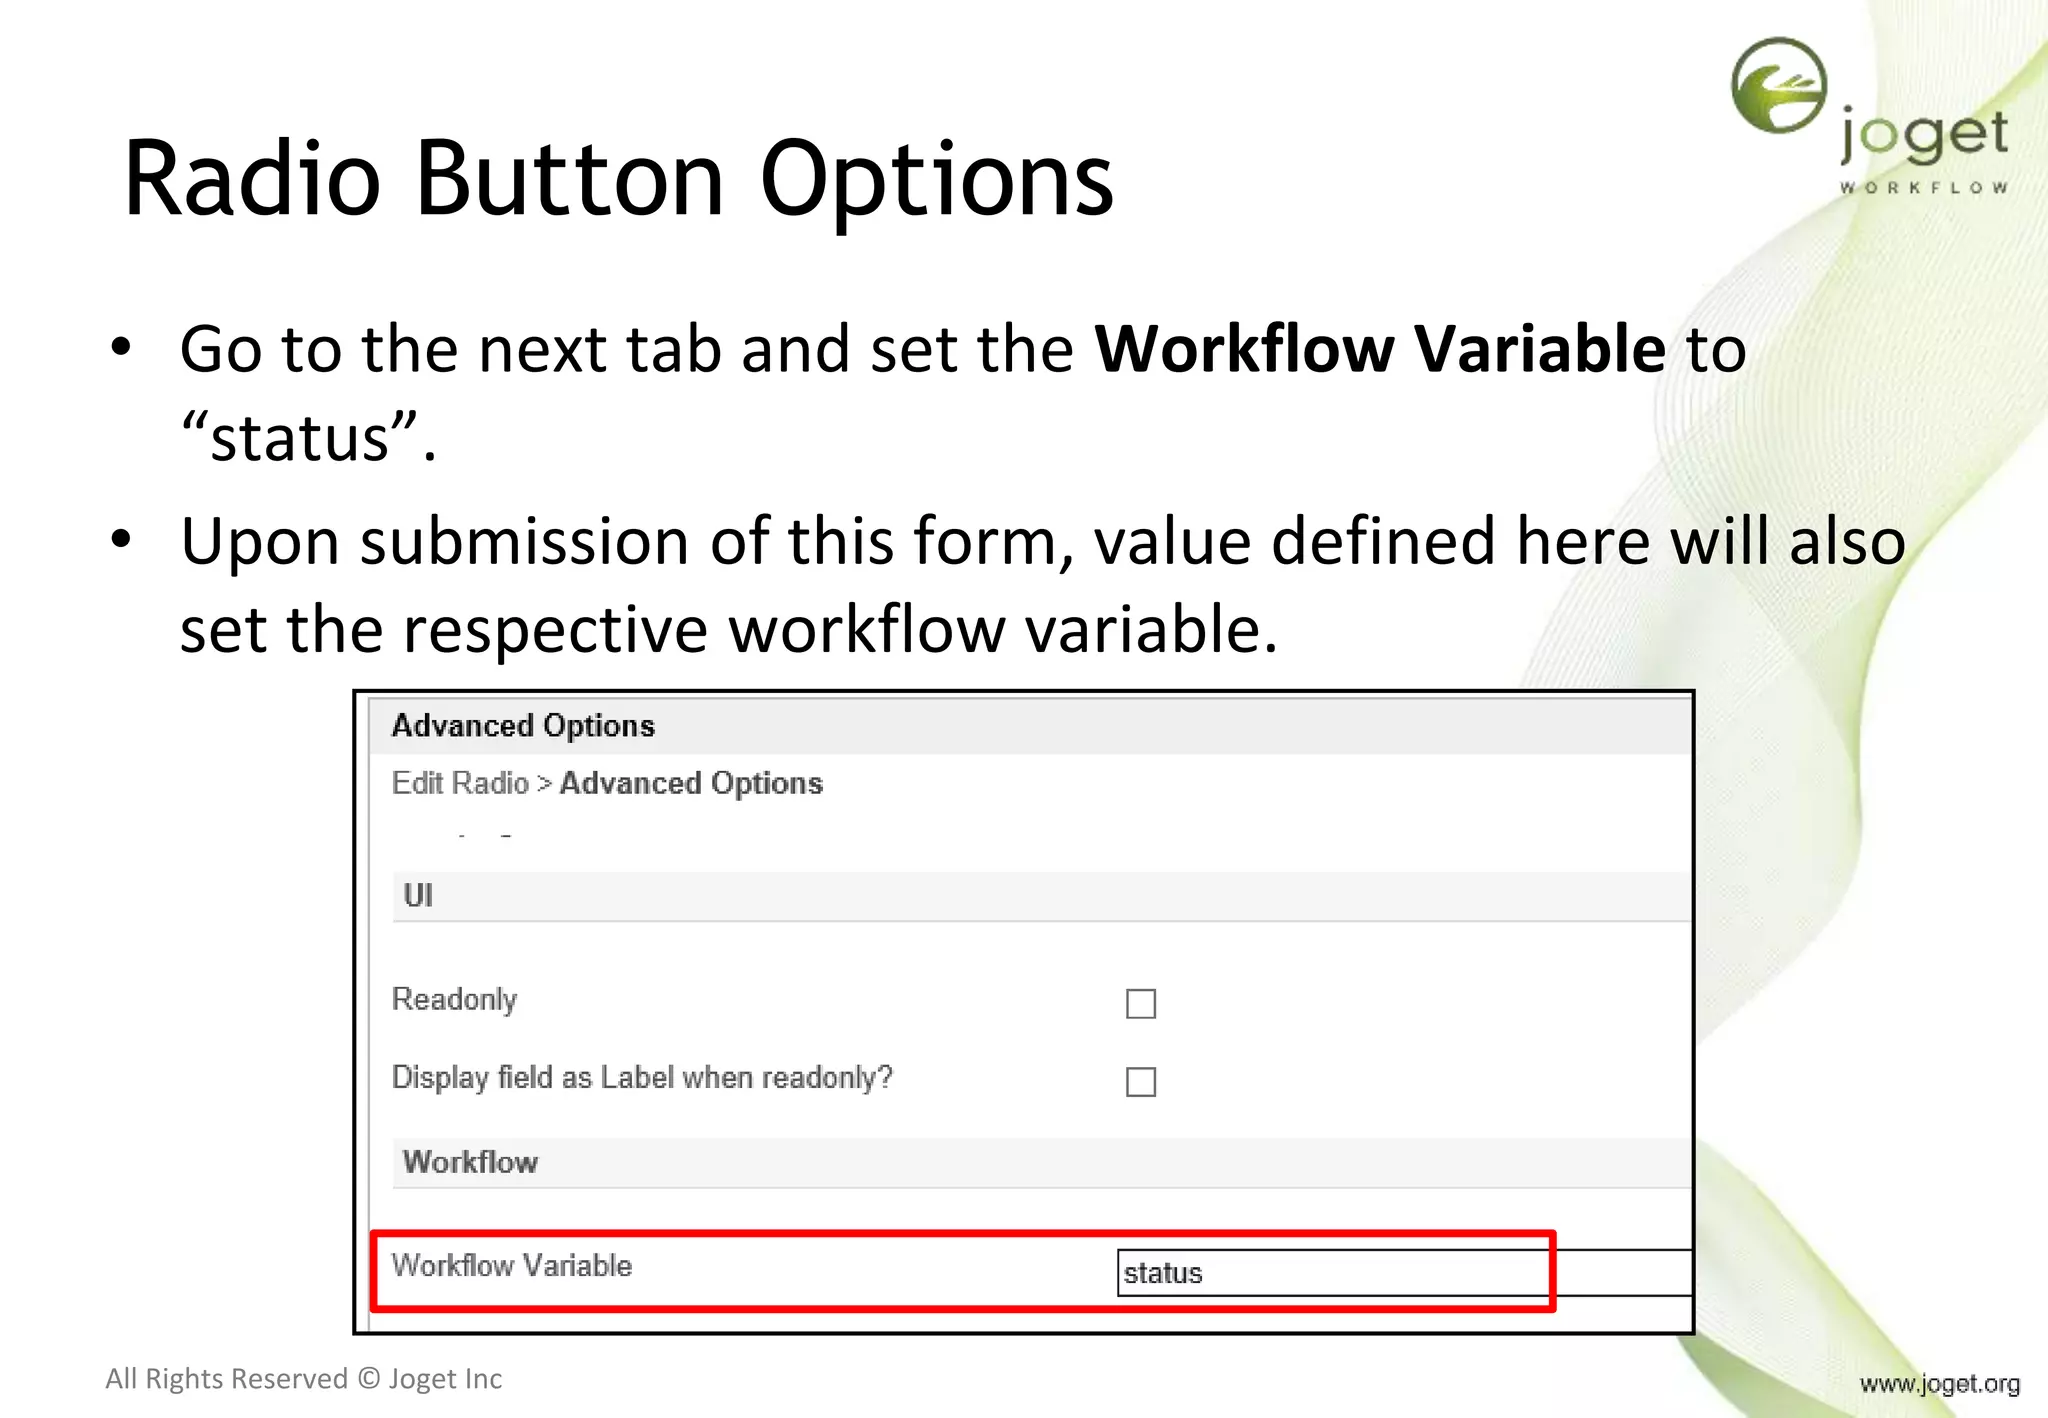
All Rights Reserved © Joget Inc
Joget Workflow v6
Designing your first Form
http://facebook.com/jogetworkflow
http://twitter.com/jogetworkflow
Last Revised on Oct 2018
All Rights Reserved © Joget Inc
Prerequisites
• Appreciates the use of a form
• Understanding on ER diagram is highly recommended
• Created a Process
All Rights Reserved © Joget Inc
Content
1. Introduction to Form Builder
2. Designing your first forms
3. Controlling Process by using Form
All Rights Reserved © Joget Inc
Chapter 1
Introduction to Form Builder
All Rights Reserved © Joget Inc
Form Builder
• Used as a mean to collect information/interact with the
end user.
• Drag and drop, and configure based form builder.
• Little/No programming knowledge needed to operate.
• Extensible functionalities through Joget Workflow’s
plugin architecture.
All Rights Reserved © Joget Inc
Form Builder
• Form elements.
• Each element is a plugin
• Extensible through Joget’s plugin
architecture
• Drag-and-drop
All Rights Reserved © Joget Inc
Plugin Types
All Rights Reserved © Joget Inc
Form Builder
Advanced method for
developer to edit the
form design by changing
its JSON definition
All Rights Reserved © Joget Inc
Where and How Form is used?
• By itself
– Each form record is distinctive by itself.
– Made accessible through the use of Userview.
All Rights Reserved © Joget Inc
Form or CRUD in Userview
All Rights Reserved © Joget Inc
Where and How Form is used?
• Part of a Process
– Each form record relates to a process instance.
– Made accessible through the process activity’s assignment view
in the Inbox.
• Inbox is made accessible via the App Center or Userview.
All Rights Reserved © Joget Inc
Form - Assignment - Inbox - Userview
All Rights Reserved © Joget Inc
Viewing a Form
• In general, this is how a Form is loaded.
Fetch Form
Data
Format Form Data
View Form
All Rights Reserved © Joget Inc
Submitting a Form
• In general, this is how a Form is handled when submitted.
Submit
Form
Validate Form
Elements
Store Form Data
Error
All Rights Reserved © Joget Inc
Good to know
• It is not possible to run/view a Form without having Joget
Workflow running as the server.
All Rights Reserved © Joget Inc
Chapter Review
• General understanding on how Form and Form Builder
works.
All Rights Reserved © Joget Inc
Chapter 2
Designing your first Form
All Rights Reserved © Joget Inc
Association with the Process flow
• Designing the first form for the first activity in the flow.
All Rights Reserved © Joget Inc
Map Activities to Form
• Go to App’s Processes -> Map Activities to Forms.
• Click on “Add/Edit Form” on “Submit Request” activity.
All Rights Reserved © Joget Inc
Add/Edit Form
• Click on “Create New Form”
All Rights Reserved © Joget Inc
Alternative way of creating new form
• One can also go to the Forms & UI tab to create the new
form and add the newly created form to the activity
mapping later on.
All Rights Reserved © Joget Inc
Create a New Form, for
“Submit Request” Activity
a-z, A-Z, 0-9, _
Numbered form
name according to
process flow
Table name with
prefix
Assign a prefix for
every app
All Rights Reserved © Joget Inc
App Prefix for Table Name
• By default, ALL form data will be stored into the same
database that Joget Workflow is using.
• All Apps are storing into the same database as well.
• Therefore, it is very important to segregate the form data
by App by declaring its own prefix before defining its
designated table name.
(e.g. purchase_requests )
All Rights Reserved © Joget Inc
Naming Convention
•Use camel case for App ID, Process ID, Activity ID. For
example:-
–purchaseRequisition
–purchaseRequestProcess
–submitRequest
•Do not use snake case as it conflicts with process instance
ID naming convention:-
1_purchaseRequisition_purchaseRequestProcess_submitRequest
•Maintain consistent naming convention that you have
decided across the board.
All Rights Reserved © Joget Inc
Naming Convention
•Use snake case for anything related to form data storage.
•For example:-
–purchase_requests
•Just search for “database naming convention” for more
information.
E.g: http://stackoverflow.com/questions/7662/database-table-and-
column-naming-conventions
All Rights Reserved © Joget Inc
Edit Section
Purchase Request Details
• Form Section serves as a placeholder for form input
elements. Rename it to make it meaningful.
All Rights Reserved © Joget Inc
Insert Date Picker
• Insert a Date Picker form element by dragging it into the
section placeholder.
All Rights Reserved © Joget Inc
Edit The First Date Picker
• Set the ID according to database naming convention –
use underscore instead of camel case to separate words.
a-z, A-Z, 0-9, _
Be cautious about
the case used, be
consistent!
All Rights Reserved © Joget Inc
Set The Date Picker as Mandatory Field
All Rights Reserved © Joget Inc
Set The Date Picker as Mandatory Field
All Rights Reserved © Joget Inc
Complete the design of
“Submit Request” form
Grid
ID: items
Label: Items
Text Area
ID: remarks
Label: Remarks
Text Field
ID: name
Label: Name
• Add text field, grid, and text area.
All Rights Reserved © Joget Inc
Complete the design of
“Submit Request” form
Preview and Save
• Preview and save.
All Rights Reserved © Joget Inc
How the Form looks like when
you launch “Run Process” now?
All Rights Reserved © Joget Inc
Exercise 1
• Fill in the form, leave “requested date” empty to test out
form validation.
• Try to submit the form.
• Now fill up all the fields and complete the assignment.
All Rights Reserved © Joget Inc
Exercise 2
• Add a new Select Box called “Category” with the
following options:-
– Stationery
– Medical Equipment
– Pantry Supplies
All Rights Reserved © Joget Inc
Exercise 3 - Optional
• Customize the look and feel of how the form is rendered
by modifying its CSS.
– Add a Custom HTML form element into the bottom of the form.
– Edit it, add the following code into Custom HTML property.
<style type="text/css">
.form-cell .label, .subform-
cell .label{
width: 100%;
}
</style>
All Rights Reserved © Joget Inc
Discussion
• Do you know that you can still modify forms even after
(your app has been published) and users started using
them?
• What will happen to the submitted data if you delete
form elements that is previously added in the form?
All Rights Reserved © Joget Inc
Chapter Review
• Associating activity with form
• Creating Form and understanding the basic elements and
validations.
• Accessing assignment with a Form associated.
All Rights Reserved © Joget Inc
Chapter 3
Controlling Workflow
Process by using Form
All Rights Reserved © Joget Inc
Association with the Workflow
Process
• Designing the second form for the second activity in the
flow.
• Form controls the next course of action in the process
flow.
All Rights Reserved © Joget Inc
Create a New Form for “Approve /
Reject Request” Activity
• Click on “Add/Edit Form” on “Approve / Reject Request”
activity.
Fill in the following details.
All Rights Reserved © Joget Inc
Using Subform
Approve / Reject Request Form
Using “1-Submit Request”
as Subform
• Subform allows one to make reference to existing form
without duplicating form design again.
All Rights Reserved © Joget Inc
Using Subform
• Rename the section and add in Subform.
• Edit the Subform to point to the first form.
• Set it to read only.
All Rights Reserved © Joget Inc
Using “1-Submit Request” as
Subform
All Rights Reserved © Joget Inc
What about the Approval status?
“Approved” or
“Rejected”?
All Rights Reserved © Joget Inc
Insert Radio Button
• Insert a Radio into the bottom of the form.
• Configure accordingly.
Note: Value is CASE-SENSITIVE. Check your process design transition conditions to confirm.
All Rights Reserved © Joget Inc
Radio Button Options
• Go to the next tab and set the Workflow Variable to
“status”.
• Upon submission of this form, value defined here will also
set the respective workflow variable.
All Rights Reserved © Joget Inc
Workflow Process review
• Recall what we have declared and set in the transition’s
conditions.
All Rights Reserved © Joget Inc
Request Approval Form
All Rights Reserved © Joget Inc
Continue with the Assignment
Stationery
All Rights Reserved © Joget Inc
Exercise
• Refresh your memory on module 3 - designing process!
Design Form for “Acknowledge Approved” activity
• Add an activity to your purchase request process, after the
email tool in the “approved” lane.
• Create a new Form named “3-Acknowledge Approved” form
• Map the form to “Acknowledge Approved” activity.
• Point it back to the same table used before.
• In the form design, add a “Subform” and refer it to the “2-
Approve / Reject Request” form
All Rights Reserved © Joget Inc
“Acknowledge Approved” activity
added in process
Note: Pay attention to WHERE you are placing the “Acknowledge Approved” activity.
All Rights Reserved © Joget Inc
Acknowledge Approved Form
All Rights Reserved © Joget Inc
Complete the Process Cycle
• Go back to your Universal Inbox.
• Open “Acknowledge Approved” assignment.
Verify the form created and complete the process.
All Rights Reserved © Joget Inc
Complete the Process Cycle
Stationery
All Rights Reserved © Joget Inc
Discussion
• Curious on where the form data is actually stored?
Use your preferred SQL Client and try to look for the form
data submitted earlier.
All Rights Reserved © Joget Inc
Chapter Review
• Learn about Subform
• Control flow of process using Workflow Variable
mapping via the Form Field.
All Rights Reserved © Joget Inc
Module Review
We have learnt to:
1. Create Form and assign it to Process Activity with basic
Form Elements.
2. Understand the Subform concept.
3. Map Form Field to Workflow Variable for routing
purpose.
4. Verify Process with the Form attached.
All Rights Reserved © Joget Inc
Recommended Further Learning
• Improving your Form design and Presentation.
• Creating a Datalist based on the Forms designed.
All Rights Reserved © Joget Inc
Stay Connected with Joget Workflow
• www.joget.org
• community.joget.org
• twitter.com/jogetworkflow
• facebook.com/jogetworkflow
• youtube.com/jogetworkflow

Joget Workflow v6 Training Slides - 5 - Designing your First Form

  • 1.
    All Rights Reserved© Joget Inc Joget Workflow v6 Designing your first Form http://facebook.com/jogetworkflow http://twitter.com/jogetworkflow Last Revised on Oct 2018
  • 2.
    All Rights Reserved© Joget Inc Prerequisites • Appreciates the use of a form • Understanding on ER diagram is highly recommended • Created a Process
  • 3.
    All Rights Reserved© Joget Inc Content 1. Introduction to Form Builder 2. Designing your first forms 3. Controlling Process by using Form
  • 4.
    All Rights Reserved© Joget Inc Chapter 1 Introduction to Form Builder
  • 5.
    All Rights Reserved© Joget Inc
  • 6.
    All Rights Reserved© Joget Inc
  • 7.
    All Rights Reserved© Joget Inc Form Builder • Used as a mean to collect information/interact with the end user. • Drag and drop, and configure based form builder. • Little/No programming knowledge needed to operate. • Extensible functionalities through Joget Workflow’s plugin architecture.
  • 8.
    All Rights Reserved© Joget Inc Form Builder • Form elements. • Each element is a plugin • Extensible through Joget’s plugin architecture • Drag-and-drop
  • 9.
    All Rights Reserved© Joget Inc Plugin Types
  • 10.
    All Rights Reserved© Joget Inc Form Builder Advanced method for developer to edit the form design by changing its JSON definition
  • 11.
    All Rights Reserved© Joget Inc Where and How Form is used? • By itself – Each form record is distinctive by itself. – Made accessible through the use of Userview.
  • 12.
    All Rights Reserved© Joget Inc Form or CRUD in Userview
  • 13.
    All Rights Reserved© Joget Inc Where and How Form is used? • Part of a Process – Each form record relates to a process instance. – Made accessible through the process activity’s assignment view in the Inbox. • Inbox is made accessible via the App Center or Userview.
  • 14.
    All Rights Reserved© Joget Inc Form - Assignment - Inbox - Userview
  • 15.
    All Rights Reserved© Joget Inc Viewing a Form • In general, this is how a Form is loaded. Fetch Form Data Format Form Data View Form
  • 16.
    All Rights Reserved© Joget Inc Submitting a Form • In general, this is how a Form is handled when submitted. Submit Form Validate Form Elements Store Form Data Error
  • 17.
    All Rights Reserved© Joget Inc Good to know • It is not possible to run/view a Form without having Joget Workflow running as the server.
  • 18.
    All Rights Reserved© Joget Inc Chapter Review • General understanding on how Form and Form Builder works.
  • 19.
    All Rights Reserved© Joget Inc Chapter 2 Designing your first Form
  • 20.
    All Rights Reserved© Joget Inc Association with the Process flow • Designing the first form for the first activity in the flow.
  • 21.
    All Rights Reserved© Joget Inc Map Activities to Form • Go to App’s Processes -> Map Activities to Forms. • Click on “Add/Edit Form” on “Submit Request” activity.
  • 22.
    All Rights Reserved© Joget Inc Add/Edit Form • Click on “Create New Form”
  • 23.
    All Rights Reserved© Joget Inc Alternative way of creating new form • One can also go to the Forms & UI tab to create the new form and add the newly created form to the activity mapping later on.
  • 24.
    All Rights Reserved© Joget Inc Create a New Form, for “Submit Request” Activity a-z, A-Z, 0-9, _ Numbered form name according to process flow Table name with prefix Assign a prefix for every app
  • 25.
    All Rights Reserved© Joget Inc App Prefix for Table Name • By default, ALL form data will be stored into the same database that Joget Workflow is using. • All Apps are storing into the same database as well. • Therefore, it is very important to segregate the form data by App by declaring its own prefix before defining its designated table name. (e.g. purchase_requests )
  • 26.
    All Rights Reserved© Joget Inc Naming Convention •Use camel case for App ID, Process ID, Activity ID. For example:- –purchaseRequisition –purchaseRequestProcess –submitRequest •Do not use snake case as it conflicts with process instance ID naming convention:- 1_purchaseRequisition_purchaseRequestProcess_submitRequest •Maintain consistent naming convention that you have decided across the board.
  • 27.
    All Rights Reserved© Joget Inc Naming Convention •Use snake case for anything related to form data storage. •For example:- –purchase_requests •Just search for “database naming convention” for more information. E.g: http://stackoverflow.com/questions/7662/database-table-and- column-naming-conventions
  • 28.
    All Rights Reserved© Joget Inc Edit Section Purchase Request Details • Form Section serves as a placeholder for form input elements. Rename it to make it meaningful.
  • 29.
    All Rights Reserved© Joget Inc Insert Date Picker • Insert a Date Picker form element by dragging it into the section placeholder.
  • 30.
    All Rights Reserved© Joget Inc Edit The First Date Picker • Set the ID according to database naming convention – use underscore instead of camel case to separate words. a-z, A-Z, 0-9, _ Be cautious about the case used, be consistent!
  • 31.
    All Rights Reserved© Joget Inc Set The Date Picker as Mandatory Field
  • 32.
    All Rights Reserved© Joget Inc Set The Date Picker as Mandatory Field
  • 33.
    All Rights Reserved© Joget Inc Complete the design of “Submit Request” form Grid ID: items Label: Items Text Area ID: remarks Label: Remarks Text Field ID: name Label: Name • Add text field, grid, and text area.
  • 34.
    All Rights Reserved© Joget Inc Complete the design of “Submit Request” form Preview and Save • Preview and save.
  • 35.
    All Rights Reserved© Joget Inc How the Form looks like when you launch “Run Process” now?
  • 36.
    All Rights Reserved© Joget Inc Exercise 1 • Fill in the form, leave “requested date” empty to test out form validation. • Try to submit the form. • Now fill up all the fields and complete the assignment.
  • 37.
    All Rights Reserved© Joget Inc Exercise 2 • Add a new Select Box called “Category” with the following options:- – Stationery – Medical Equipment – Pantry Supplies
  • 38.
    All Rights Reserved© Joget Inc Exercise 3 - Optional • Customize the look and feel of how the form is rendered by modifying its CSS. – Add a Custom HTML form element into the bottom of the form. – Edit it, add the following code into Custom HTML property. <style type="text/css"> .form-cell .label, .subform- cell .label{ width: 100%; } </style>
  • 39.
    All Rights Reserved© Joget Inc Discussion • Do you know that you can still modify forms even after (your app has been published) and users started using them? • What will happen to the submitted data if you delete form elements that is previously added in the form?
  • 40.
    All Rights Reserved© Joget Inc Chapter Review • Associating activity with form • Creating Form and understanding the basic elements and validations. • Accessing assignment with a Form associated.
  • 41.
    All Rights Reserved© Joget Inc Chapter 3 Controlling Workflow Process by using Form
  • 42.
    All Rights Reserved© Joget Inc Association with the Workflow Process • Designing the second form for the second activity in the flow. • Form controls the next course of action in the process flow.
  • 43.
    All Rights Reserved© Joget Inc Create a New Form for “Approve / Reject Request” Activity • Click on “Add/Edit Form” on “Approve / Reject Request” activity. Fill in the following details.
  • 44.
    All Rights Reserved© Joget Inc Using Subform Approve / Reject Request Form Using “1-Submit Request” as Subform • Subform allows one to make reference to existing form without duplicating form design again.
  • 45.
    All Rights Reserved© Joget Inc Using Subform • Rename the section and add in Subform. • Edit the Subform to point to the first form. • Set it to read only.
  • 46.
    All Rights Reserved© Joget Inc Using “1-Submit Request” as Subform
  • 47.
    All Rights Reserved© Joget Inc What about the Approval status? “Approved” or “Rejected”?
  • 48.
    All Rights Reserved© Joget Inc Insert Radio Button • Insert a Radio into the bottom of the form. • Configure accordingly. Note: Value is CASE-SENSITIVE. Check your process design transition conditions to confirm.
  • 49.
    All Rights Reserved© Joget Inc Radio Button Options • Go to the next tab and set the Workflow Variable to “status”. • Upon submission of this form, value defined here will also set the respective workflow variable.
  • 50.
    All Rights Reserved© Joget Inc Workflow Process review • Recall what we have declared and set in the transition’s conditions.
  • 51.
    All Rights Reserved© Joget Inc
  • 52.
    All Rights Reserved© Joget Inc Request Approval Form
  • 53.
    All Rights Reserved© Joget Inc Continue with the Assignment Stationery
  • 54.
    All Rights Reserved© Joget Inc Exercise • Refresh your memory on module 3 - designing process! Design Form for “Acknowledge Approved” activity • Add an activity to your purchase request process, after the email tool in the “approved” lane. • Create a new Form named “3-Acknowledge Approved” form • Map the form to “Acknowledge Approved” activity. • Point it back to the same table used before. • In the form design, add a “Subform” and refer it to the “2- Approve / Reject Request” form
  • 55.
    All Rights Reserved© Joget Inc “Acknowledge Approved” activity added in process Note: Pay attention to WHERE you are placing the “Acknowledge Approved” activity.
  • 56.
    All Rights Reserved© Joget Inc Acknowledge Approved Form
  • 57.
    All Rights Reserved© Joget Inc Complete the Process Cycle • Go back to your Universal Inbox. • Open “Acknowledge Approved” assignment. Verify the form created and complete the process.
  • 58.
    All Rights Reserved© Joget Inc Complete the Process Cycle Stationery
  • 59.
    All Rights Reserved© Joget Inc Discussion • Curious on where the form data is actually stored? Use your preferred SQL Client and try to look for the form data submitted earlier.
  • 60.
    All Rights Reserved© Joget Inc Chapter Review • Learn about Subform • Control flow of process using Workflow Variable mapping via the Form Field.
  • 61.
    All Rights Reserved© Joget Inc Module Review We have learnt to: 1. Create Form and assign it to Process Activity with basic Form Elements. 2. Understand the Subform concept. 3. Map Form Field to Workflow Variable for routing purpose. 4. Verify Process with the Form attached.
  • 62.
    All Rights Reserved© Joget Inc Recommended Further Learning • Improving your Form design and Presentation. • Creating a Datalist based on the Forms designed.
  • 63.
    All Rights Reserved© Joget Inc Stay Connected with Joget Workflow • www.joget.org • community.joget.org • twitter.com/jogetworkflow • facebook.com/jogetworkflow • youtube.com/jogetworkflow