International Research Journal of Engineering and Technology (IRJET) e-ISSN: 2395-0056
Volume: 06 Issue: 06 | June 2019 www.irjet.net p-ISSN: 2395-0072
© 2019, IRJET | Impact Factor value: 7.211 | ISO 9001:2008 Certified Journal | Page 3914
Design and Modification in Clamping System
Khole Gourav1, Londhe Sagar2, Uttarwar Pratiksha3
1Sudent, RSCOE IIND Shift Polytechnic, Pune
2Lecturer, Mechanical Engineering, RSCOE IIND Shift Polytechnic Pune, Maharashtra, India
3Lecturer, Mechanical Engineering, RSCOE IIND Shift Polytechnic Pune, Maharashtra, India
---------------------------------------------------------------------***---------------------------------------------------------------------
Abstract – In clamping System/ Bench vice we can adjust
the part vertically or horizontally. When we canturnoradjust
the part in angle then chance to bend the part or change the
shape of part. In this paper we change the design of system so
that we can adjust the part 900 to 1400 for cutting or welding
part. Due to this system we can reduce the reworking, savethe
man power at the time of welding or cutting rod and also
increase the rate of production. It is used in Fabrication of
control panels and Making grills, Railings, windows, Door,
Frames.
Key Words: Nut, Screw, Friction Angle, Base plate and
Locating Plate
1. INTRODUCTION
A fixture is a special purpose tool which is used to facilitate
production (machining, assembling, and inspection
operations.) Fixtures provide a means of manufacturing
interchangeable parts since they eliminate the necessityofa
special setup for each individual part. Fixture is bolted or
clamped to the machine table. It is usually heavy in
construction.
To fulfill the basic function a fixture should possess the
following components:
 A sufficiently rigid body into which the work pieces
are loaded.
 Locating elements
 Clamping elements.
Elements for positioning or fastening the fixture on the
machine on which it is used.
2. Literature Review
Mr. R. M. Rupanawar [01] a bench vice or fixture is a
production tool. The main aim is to locate, support and hold
the work securely so wecan performthe requiredmachining
operations. Feeler or thickness gauges and set blocks are
also used to provide reference of the cutter with the work
piece. A bench vice must be easily fastened withthemachine
and the table. As a result, the work can be done. It can be
used for the other operations on most of the standard
machining tools like drilling machine. Bench Vices are
available in differentsizeandshapesrangingfromcheap and
simple devices to very expensive and complicated devices.
Bench Vices can also help to simplify the metalworking
operations which are performed on the special equipment.
Considering the advantages of fixture and jigs, a fixture was
designed to cater to our needs.
B.Logesh [02] reduction of human Effort and
enhancing safety plays a vital role while designing and
fabricating the Machine vice which is used to hold the
components during heavy machining works. In an ordinary
vice the human power requirement is more to tighten the
heavy jobs, but in this machine vice the cam is used in order
to tighten automatically. In Normal machine vice the human
labour involves in turning the handle to hold the component
tightly by giving more human effort whicheventuallyresults
in damage on work piece due to over tightening of the
handle. This may be avoided by involving cam acting
machine vice in which the work piece is cannot gets damage
while clamping where theoperationcanbemonitored by the
operator. A lever rotates a cam lock movable jaw their using
spring type puss back ramtoforwardandreversemovement
of the vice jaws to remove the work piece and to hold the
work piece.
P.Sivasankaran [03] in recent times there are many
modern advancements came in thearea offixturedesignand
assembly. In this paper attempt hasbeenmadetodesign and
analyze the modern screw less machine vice using CATIA
and ANSYS APDL package. The drawbacks of existing vice
were overcome by new screw less machine vice. In the
existing system of machine vice, the lead screw will tend to
undergo frequent wear and tear due to abrasion resistance
problem as a result jaw of vice lose its grip to hold the work
component. In order to overcome such type of problem
dowel pin type movable jaw was designed in such a way in
order to incorporate into the base block of movable jaw.
2.1 PROBLEM DEFINITION
During assembling operations,securinga quick andaccurate
fixturing of mating parts and components of product
assembly is absolutely essential. If the operator has to make
a joint by holding the mating parts by hand; he needs to
check & align the relative position time and again for each
individual job. This makes the process extremely hectic &
time consuming. More over the jointsarenotprecise,further
leading to misalignment, rework, time loss, making the
process uneconomical. Hence the needfordesignofa special
purpose assembly fixture for quick andaccurateassemblyof
mating parts & components of product assembly. Such
International Research Journal of Engineering and Technology (IRJET) e-ISSN: 2395-0056
Volume: 06 Issue: 06 | June 2019 www.irjet.net p-ISSN: 2395-0072
© 2019, IRJET | Impact Factor value: 7.211 | ISO 9001:2008 Certified Journal | Page 3915
fixtures are commonly used in welding, brazing, soldering,
riveting, gluing etc. One such problem thatcommonlyoccurs
in making welding frames and structures from angles,
channels, square or round pipes etc. Hence it is required to
make a “PERFECT RIGHT ANGLE JOINT”.
2.2 Methodology
1) Literature Review
2) Problem Definition
3) Approach to Solve the Problem
4) System Design
5) 2D/3D Drawing
6) Part & Material Selection
7) Fabrication
8) Test the Model
9) Conclusion
3. Design
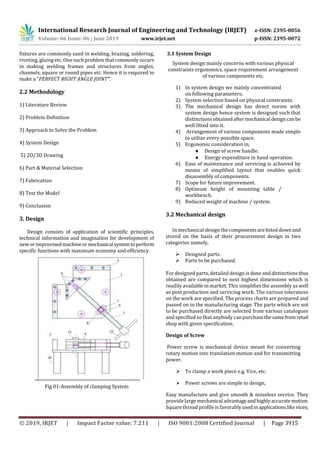
Design consists of application of scientific principles,
technical information and imagination for development of
new or improvisedmachineormechanicalsystemtoperform
specific functions with maximum economy and efficiency.
Fig 01-Assembly of clamping System
3.1 System Design
System design mainly concerns with various physical
constraints ergonomics, space requirement arrangement
of various components etc.
1) In system design we mainly concentrated
on following parameters;
2) System selection based on physical constraints.
3) The mechanical design has direct norms with
system design hence system is designed such that
distinctionsobtainedaftermechanical designcanbe
well fitted into it.
4) Arrangement of various components made simple
to utilize every possible space.
5) Ergonomic consideration in,
 Design of screw handle.
 Energy expenditure in hand operation.
6) Ease of maintenance and servicing is achieved by
means of simplified layout that enables quick
disassembly of components.
7) Scope for future improvement.
8) Optimum height of mounting table /
workbench.
9) Reduced weight of machine / system.
3.2 Mechanical design
In mechanical design thecomponentsarelisteddownand
stored on the basis of their procurement design in two
categories namely,
 Designed parts.
 Parts to be purchased.
For designed parts, detailed design is doneanddistinctionsthus
obtained are compared to next highest dimensions which is
readily available in market. This simplifies the assembly as well
as post production and servicing work. The various tolerances
on the work are specified. The process charts are prepared and
passed on to the manufacturing stage. The parts which are not
to be purchased directly are selected from various catalogues
and specified so that anybody can purchasethesamefromretail
shop with given specification.
Design of Screw
Power screw is mechanical device meant for converting
rotary motion into translation motion and for transmitting
power.
 To clamp a work piece e.g. Vice, etc.
 Power screws are simple to design,
Easy manufacture and give smooth & noiseless service. They
provide large mechanical advantageandhighlyaccurate motion.
Square thread profile is favorablyusedinapplicationslike vices;
International Research Journal of Engineering and Technology (IRJET) e-ISSN: 2395-0056
Volume: 06 Issue: 06 | June 2019 www.irjet.net p-ISSN: 2395-0072
© 2019, IRJET | Impact Factor value: 7.211 | ISO 9001:2008 Certified Journal | Page 3916
clamps etc., due to its property of maximum efficiency and
minimum radial or bursting pressure on nut.
Design of Nut
In design of nut the major dimensionistheheightor
length of the nut. It is decided by considering the bearing
criterion. Nut is also required to be safe under shearing. The
failure of nut in shearing takes place at its core diameterand
the area of core diameter of screw resistingshearislessthan
the area at the core diameter of nut.
Material Selection
Material Allowable tensile
stress N/mm2
Allowable shear stress
N/mm2
C45 420 180
AS ; n = no of the threads in contact.
Ln = length of nut, P = Pitch.
Normally it is recommended that ratio of length or height of
nut (n) to core diameter (dc) should be between 1.2 to 2.5
for solid nuts.
Shear stress due to axial load.
As < ; the nut is safe in shear.
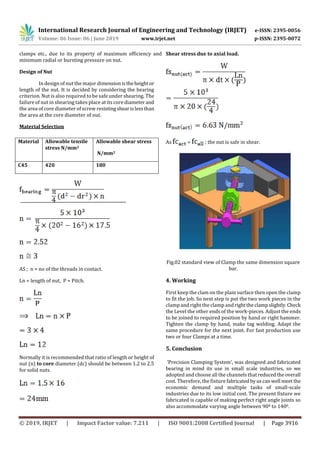
Fig.02 standard view of Clamp the same dimension square
bar.
4. Working
First keep the clam on the plain surface then open the clamp
to fit the job. So next step is put the two work pieces in the
clamp and right the clamp and righttheclampslightly.Check
the Level the other ends of the work-pieces. Adjust the ends
to be joined to required position by hand or right hammer.
Tighten the clamp by hand, make tag welding. Adapt the
same procedure for the next joint. For fast production use
two or four Clamps at a time.
5. Conclusion
‘Precision Clamping System’, was designed and fabricated
bearing in mind its use in small scale industries, so we
adopted and choose all the channels thatreducedtheoverall
cost. Therefore, the fixture fabricatedbyuscanwell meet the
economic demand and multiple tasks of small-scale
industries due to its low initial cost. The present fixture we
fabricated is capable of making perfect right angle joints so
also accommodate varying angle between 900 to 1400.
International Research Journal of Engineering and Technology (IRJET) e-ISSN: 2395-0056
Volume: 06 Issue: 06 | June 2019 www.irjet.net p-ISSN: 2395-0072
© 2019, IRJET | Impact Factor value: 7.211 | ISO 9001:2008 Certified Journal | Page 3917
6. REFERENCES
[01]. Mr. R. M. Rupanawar,DesignandmodificationofBench
Vice by Increasing the Degree of freedom, GRD journal,
Volume 1, Issue 11, October 2016, ISSN :2455-5703.
[2]. B.Logesh, A Systematic Design, Development and
Fabrication of Safe Cam Operated Machine Vice, IJRESM,
Volume-1, Issue-1, February 2018.
[3]. P.Sivasankaran, Design and Analysis of Modular Fixture
For Machine vice, International journal Of Industrial &
Production Engineering&Technology,Volume-8,Number-1,
ISSN: 2249-4219

IRJET- Design and Modification in Clamping System

  • 1.
    International Research Journalof Engineering and Technology (IRJET) e-ISSN: 2395-0056 Volume: 06 Issue: 06 | June 2019 www.irjet.net p-ISSN: 2395-0072 © 2019, IRJET | Impact Factor value: 7.211 | ISO 9001:2008 Certified Journal | Page 3914 Design and Modification in Clamping System Khole Gourav1, Londhe Sagar2, Uttarwar Pratiksha3 1Sudent, RSCOE IIND Shift Polytechnic, Pune 2Lecturer, Mechanical Engineering, RSCOE IIND Shift Polytechnic Pune, Maharashtra, India 3Lecturer, Mechanical Engineering, RSCOE IIND Shift Polytechnic Pune, Maharashtra, India ---------------------------------------------------------------------***--------------------------------------------------------------------- Abstract – In clamping System/ Bench vice we can adjust the part vertically or horizontally. When we canturnoradjust the part in angle then chance to bend the part or change the shape of part. In this paper we change the design of system so that we can adjust the part 900 to 1400 for cutting or welding part. Due to this system we can reduce the reworking, savethe man power at the time of welding or cutting rod and also increase the rate of production. It is used in Fabrication of control panels and Making grills, Railings, windows, Door, Frames. Key Words: Nut, Screw, Friction Angle, Base plate and Locating Plate 1. INTRODUCTION A fixture is a special purpose tool which is used to facilitate production (machining, assembling, and inspection operations.) Fixtures provide a means of manufacturing interchangeable parts since they eliminate the necessityofa special setup for each individual part. Fixture is bolted or clamped to the machine table. It is usually heavy in construction. To fulfill the basic function a fixture should possess the following components:  A sufficiently rigid body into which the work pieces are loaded.  Locating elements  Clamping elements. Elements for positioning or fastening the fixture on the machine on which it is used. 2. Literature Review Mr. R. M. Rupanawar [01] a bench vice or fixture is a production tool. The main aim is to locate, support and hold the work securely so wecan performthe requiredmachining operations. Feeler or thickness gauges and set blocks are also used to provide reference of the cutter with the work piece. A bench vice must be easily fastened withthemachine and the table. As a result, the work can be done. It can be used for the other operations on most of the standard machining tools like drilling machine. Bench Vices are available in differentsizeandshapesrangingfromcheap and simple devices to very expensive and complicated devices. Bench Vices can also help to simplify the metalworking operations which are performed on the special equipment. Considering the advantages of fixture and jigs, a fixture was designed to cater to our needs. B.Logesh [02] reduction of human Effort and enhancing safety plays a vital role while designing and fabricating the Machine vice which is used to hold the components during heavy machining works. In an ordinary vice the human power requirement is more to tighten the heavy jobs, but in this machine vice the cam is used in order to tighten automatically. In Normal machine vice the human labour involves in turning the handle to hold the component tightly by giving more human effort whicheventuallyresults in damage on work piece due to over tightening of the handle. This may be avoided by involving cam acting machine vice in which the work piece is cannot gets damage while clamping where theoperationcanbemonitored by the operator. A lever rotates a cam lock movable jaw their using spring type puss back ramtoforwardandreversemovement of the vice jaws to remove the work piece and to hold the work piece. P.Sivasankaran [03] in recent times there are many modern advancements came in thearea offixturedesignand assembly. In this paper attempt hasbeenmadetodesign and analyze the modern screw less machine vice using CATIA and ANSYS APDL package. The drawbacks of existing vice were overcome by new screw less machine vice. In the existing system of machine vice, the lead screw will tend to undergo frequent wear and tear due to abrasion resistance problem as a result jaw of vice lose its grip to hold the work component. In order to overcome such type of problem dowel pin type movable jaw was designed in such a way in order to incorporate into the base block of movable jaw. 2.1 PROBLEM DEFINITION During assembling operations,securinga quick andaccurate fixturing of mating parts and components of product assembly is absolutely essential. If the operator has to make a joint by holding the mating parts by hand; he needs to check & align the relative position time and again for each individual job. This makes the process extremely hectic & time consuming. More over the jointsarenotprecise,further leading to misalignment, rework, time loss, making the process uneconomical. Hence the needfordesignofa special purpose assembly fixture for quick andaccurateassemblyof mating parts & components of product assembly. Such
  • 2.
    International Research Journalof Engineering and Technology (IRJET) e-ISSN: 2395-0056 Volume: 06 Issue: 06 | June 2019 www.irjet.net p-ISSN: 2395-0072 © 2019, IRJET | Impact Factor value: 7.211 | ISO 9001:2008 Certified Journal | Page 3915 fixtures are commonly used in welding, brazing, soldering, riveting, gluing etc. One such problem thatcommonlyoccurs in making welding frames and structures from angles, channels, square or round pipes etc. Hence it is required to make a “PERFECT RIGHT ANGLE JOINT”. 2.2 Methodology 1) Literature Review 2) Problem Definition 3) Approach to Solve the Problem 4) System Design 5) 2D/3D Drawing 6) Part & Material Selection 7) Fabrication 8) Test the Model 9) Conclusion 3. Design Design consists of application of scientific principles, technical information and imagination for development of new or improvisedmachineormechanicalsystemtoperform specific functions with maximum economy and efficiency. Fig 01-Assembly of clamping System 3.1 System Design System design mainly concerns with various physical constraints ergonomics, space requirement arrangement of various components etc. 1) In system design we mainly concentrated on following parameters; 2) System selection based on physical constraints. 3) The mechanical design has direct norms with system design hence system is designed such that distinctionsobtainedaftermechanical designcanbe well fitted into it. 4) Arrangement of various components made simple to utilize every possible space. 5) Ergonomic consideration in,  Design of screw handle.  Energy expenditure in hand operation. 6) Ease of maintenance and servicing is achieved by means of simplified layout that enables quick disassembly of components. 7) Scope for future improvement. 8) Optimum height of mounting table / workbench. 9) Reduced weight of machine / system. 3.2 Mechanical design In mechanical design thecomponentsarelisteddownand stored on the basis of their procurement design in two categories namely,  Designed parts.  Parts to be purchased. For designed parts, detailed design is doneanddistinctionsthus obtained are compared to next highest dimensions which is readily available in market. This simplifies the assembly as well as post production and servicing work. The various tolerances on the work are specified. The process charts are prepared and passed on to the manufacturing stage. The parts which are not to be purchased directly are selected from various catalogues and specified so that anybody can purchasethesamefromretail shop with given specification. Design of Screw Power screw is mechanical device meant for converting rotary motion into translation motion and for transmitting power.  To clamp a work piece e.g. Vice, etc.  Power screws are simple to design, Easy manufacture and give smooth & noiseless service. They provide large mechanical advantageandhighlyaccurate motion. Square thread profile is favorablyusedinapplicationslike vices;
  • 3.
    International Research Journalof Engineering and Technology (IRJET) e-ISSN: 2395-0056 Volume: 06 Issue: 06 | June 2019 www.irjet.net p-ISSN: 2395-0072 © 2019, IRJET | Impact Factor value: 7.211 | ISO 9001:2008 Certified Journal | Page 3916 clamps etc., due to its property of maximum efficiency and minimum radial or bursting pressure on nut. Design of Nut In design of nut the major dimensionistheheightor length of the nut. It is decided by considering the bearing criterion. Nut is also required to be safe under shearing. The failure of nut in shearing takes place at its core diameterand the area of core diameter of screw resistingshearislessthan the area at the core diameter of nut. Material Selection Material Allowable tensile stress N/mm2 Allowable shear stress N/mm2 C45 420 180 AS ; n = no of the threads in contact. Ln = length of nut, P = Pitch. Normally it is recommended that ratio of length or height of nut (n) to core diameter (dc) should be between 1.2 to 2.5 for solid nuts. Shear stress due to axial load. As < ; the nut is safe in shear. Fig.02 standard view of Clamp the same dimension square bar. 4. Working First keep the clam on the plain surface then open the clamp to fit the job. So next step is put the two work pieces in the clamp and right the clamp and righttheclampslightly.Check the Level the other ends of the work-pieces. Adjust the ends to be joined to required position by hand or right hammer. Tighten the clamp by hand, make tag welding. Adapt the same procedure for the next joint. For fast production use two or four Clamps at a time. 5. Conclusion ‘Precision Clamping System’, was designed and fabricated bearing in mind its use in small scale industries, so we adopted and choose all the channels thatreducedtheoverall cost. Therefore, the fixture fabricatedbyuscanwell meet the economic demand and multiple tasks of small-scale industries due to its low initial cost. The present fixture we fabricated is capable of making perfect right angle joints so also accommodate varying angle between 900 to 1400.
  • 4.
    International Research Journalof Engineering and Technology (IRJET) e-ISSN: 2395-0056 Volume: 06 Issue: 06 | June 2019 www.irjet.net p-ISSN: 2395-0072 © 2019, IRJET | Impact Factor value: 7.211 | ISO 9001:2008 Certified Journal | Page 3917 6. REFERENCES [01]. Mr. R. M. Rupanawar,DesignandmodificationofBench Vice by Increasing the Degree of freedom, GRD journal, Volume 1, Issue 11, October 2016, ISSN :2455-5703. [2]. B.Logesh, A Systematic Design, Development and Fabrication of Safe Cam Operated Machine Vice, IJRESM, Volume-1, Issue-1, February 2018. [3]. P.Sivasankaran, Design and Analysis of Modular Fixture For Machine vice, International journal Of Industrial & Production Engineering&Technology,Volume-8,Number-1, ISSN: 2249-4219