JIS COLLEGE OF ENGINEERING
Mechanical Engineering
Department
Presented By-
1. Pradip Ghosh
2. Tanmoy Halder
3. Amit Banerjee
4. Aniket Pal
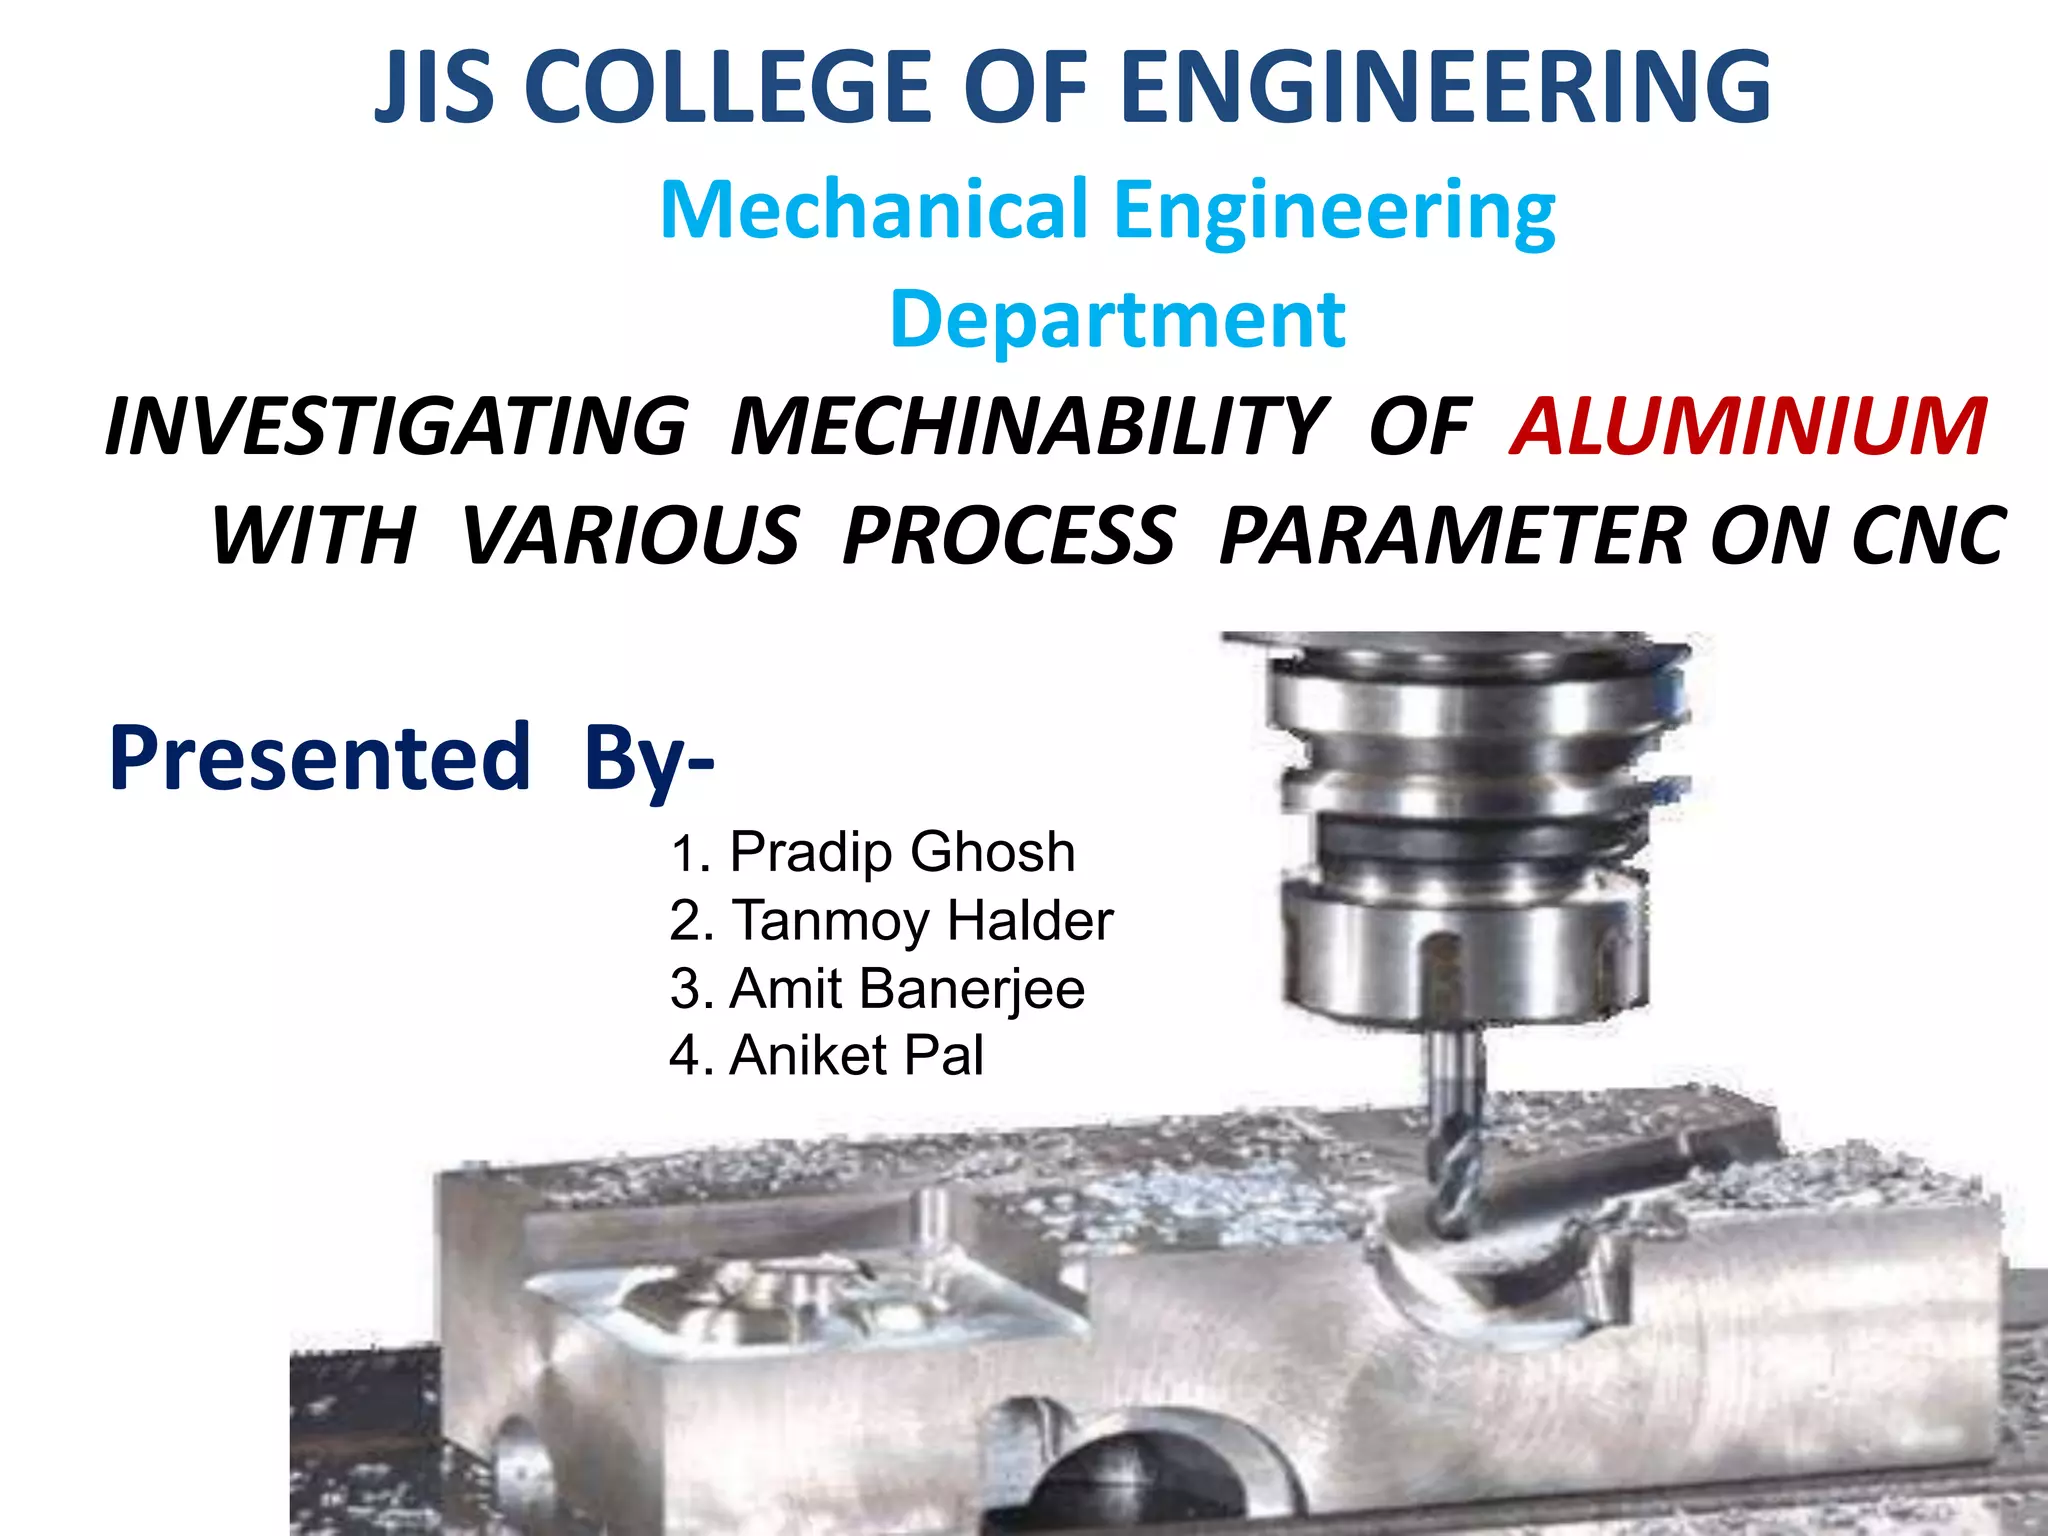
INVESTIGATING MECHINABILITY OF ALUMINIUM
WITH VARIOUS PROCESS PARAMETER ON CNC
Surface roughness and Hardness, an indicator of
surface quality is one of the most specified
customer requirements in a machining process. For
efficient use of machine tools, optimum cutting
parameters (speed, feed and depth of cut) are
required.
Aluminum is one of the metals, besides iron and
steel, which are widely used in many industrial
fields such as aviation, navigation and automotive.
INTRODUCTION
OBJECTIVE
Study on the Effects of Spindle speed ,
Feed rate and Depth of cut on surface
roughness of Aluminium-6061 alloy.
Study on the Effects of Spindle speed ,
Feed rate and Depth of cut on Hardness of
Aluminium-6061 alloy.
RavindraThamma [1] has found different models to obtain optimal machining
parameters for required surface roughness for an aluminum 6061 work pieces.
He concluded that Spindle speed, feed rate, and nose radius have significant
control factors for surface roughness. Smoother surfaces will be produced when
machined with a larger spindle speed, smaller feed rate, and nose radius Depth
of cut has a significant influence on surface roughness.
 H. M. Somashekaraet. al. [2] used control factors e.g. cutting speed, feed rate
and depth of cut to optimize Surface Roughness while machining Al 6351-T6
alloy with Uncoated Carbide tool. They used Taguchi Technique to optimize the
process parameters and confirmation test were also performed for finding main
factors influencing Surface Roughness. They concluded that Speed has a greater
influence on the Surface Roughness.
Gaurav Vohra et. al. [3] have optimized the machining parameters for boring
of aluminum material on CNC turning centre e.g. cutting speed, feed rate and
depth of cut, to obtain optimal material removal rate and minimum surface
roughness by using the Taguchi method. The conclusion found that the spindle
speed and depth of cut are the most affecting parameters for metal removal
rate and for roughness spindle speed and feed rate are the most affecting
parameters.
LITERATURE REVIEW
Cntd.
Ranganath M S et. al. [4] have studied the parameters, which affects surface
roughness produced during the machining process of aluminum 6061 on CNC
turning machine. They used Taguchi Methodology and confirmation test
ANOVA to analyze the experimental results. The conclusion found that the
feed rate and spindle speed are the most significant process parameters on
surface roughness.
Biswajit Das et. al. [5] has studied surface roughness affecting parameters on
turning operation using CNC turning machine. The mainly affected control
factors in experimentation were spindle speed, feed and depth of cut. They
found that, the feed rate is the affecting parameter for surface roughness.
Md. Tayab Ali et. al. [6] have optimized the machining parameters such as
spindle speed, feed rate, and depth of cut for optimization of material
Removal Rate (MRR) and Surface Roughness for machining of alloy of
Aluminum (AA6063-T6) using carbide tool in dry condition on CNC Lathe .They
concluded that the most affecting parameters for surface roughness are feed,
cutting speed and least affecting factor is depth of cut. For metal removal rate,
the depth of cut and the cutting speed is the most affecting parameters and
least affecting factor is feed.
Cntd.
 Ali Abdallah et. al. [7] had optimized machining parameters for the surface
roughness with aluminum alloy 6061 material in CNC Lathe. They uses „response
surface methodology‟ on control factors such as feed rate, spindle speed, and depth
of cut, and minimize surface roughness and maximize the material removal rate for
CNC turning operation. Based on the results of surface roughness it was found that
feed rate affects both surface roughness and metal removal rate. The spindle speed is
the most significant control factor for surface roughness than metal removal rate.
Larger spindle speed results minimum surface roughness and this result can be
explained along with other affecting parameters.
 S.V. Alagarsamyet. al. [8] has conducted experiment by turn aluminum Alloy 6061
using TNMG 115 100 tungsten carbide tool at three levels (Spindle speed, feed rate &
DOC) of cutting parameters and analyzed by employing Taguchi methodology and
respond surface methodology. Taguchi method and Response surface methodology
were applied for analyzing to get optimum surface roughness and material removal
rate for turning process of Aluminum Alloy 7075 using CNC machine via considering
three influencing input parameters- spindle speed, Feed rate and Depth of Cut. They
found that the input parameter feed rate has most influencing to the quality
characteristics of surface roughness and depth of cut being most affecting parameter
for MRR.
David et al. (2006)[9] described an approach to predict Surface roughness in a high
speed end-milling process and used artificial neural networks (ANN) and statistical
tools to develop different surface roughness predictors. Cntd.
 Srikanth and Kamala (2008) [10] proposed a real coded genetic algorithm
(RCGA) to find optimum cutting parameters and explained various issues of
RCGA and its advantages over the existing approach of binary coded genetic
algorithm (BCGA).
 Franic and Joze (2003) [11] used binary coded genetic algorithm (BCGA) for
the optimization of cutting parameters. This genetic algorithm optimizes the
cutting conditions having an influence on production cost, time and quality of
the final product.
 Suresh et al. (2002) [12] developed optimum surface roughness predictive
model using binary coded genetic algorithm (BCGA). This GA program gives
minimum and maximum values of surface roughness and their respective
optimal machining conditions.
Yang and Tarng (1998] [13] used Taguchi method for design optimization on
surface quality. An orthogonal array, the signal-to-noise (S/N) ratio and the
analysis of variance (ANOVA) were employed to investigate the cutting
characteristics.
Uros and Franci (2003) [14] proposed a neural network-based approach to
complex optimization of cutting parameters and described the multi-objective
technique of optimization of cutting conditions by means of the neural
networks taking into consideration the technological, economic and
organizational limitations.
Cntd.
Oktem et al. (2005) [15] utilized response surface methodology to create an
efficient analytical model for surface roughness in terms of cutting parameters:
Feed, cutting speed, axial depth of cut, radial depth of cut and machining tolerance.
Al-Ahmari (2007) [16] developed empirical models for tool life, surface
roughness and cutting force for turning operations. Two important data mining
techniques used were response surface methodology and neural networks.
 Huang and Joseph (2001) [17] predicted in-process surface roughness through
multiple regression model in turning operation via accelerometer.
 Hossain et al. (2008) [18] developed an artificial neural network algorithm for
predicting the surface roughness in end milling of Inconel 718 alloy.
Avisekh et al. (2009) [19] conducted a study of feasibility of on-line monitoring of
surface roughness in turning operations using a developed opto-electrical
transducer. Regression and neural network (NN) models were exploited to predict
surface roughness and compared to actual and on-line measurements.
 Groover and Mikell (1996) [20] depicted the impact of three factors, namely, the
feed, nose radius, and cutting-edge angles, on surface roughness.
Cntd.
Azouzi and Guillot (1997) [21] proposed an on-line prediction of surface finish and
dimensional deviation in turning using neural network based sensor fusion.
 Feng and Hu (2001) [22] addressed a comparative study of the ideal and actual
surface roughness in finish turning and also applied the fractional factorial
experimentation approach for studying the impact of turning parameters on the
roughness of turned surfaces and used analysis of variances to examine the impact of
turning factors and factor interactions on surface roughness.
 Muammer et al. (2007) [23] addressed regression analysis and neural network-
based models used for the prediction of surface roughness and compared for various
cutting conditions in turning.
Bajic et al. (2008) [24] focused on modeling of machined surface roughness and
optimization of cutting parameters in face milling and examined the influence of
cutting parameters on surface roughness in face milling.
Cntd.
Sakir et al. (2008)[25] worked on the prediction of surface roughness using
artificial neural network in lathe and investigated the effect of tool geometry on
surface roughness in universal lathe and carried out machining process on AISI
1040 steel in dry cutting condition using various insert geometry at depth of cut
of 0.5 mm. Optimization of machining parameters not only increases the utility
for machining economics, but also the product quality to a great extent. The
dynamic nature and widespread usage of turning operations in practice have
raised a need for seeking a systematic approach that can help to set-up turning
operations in a timely manner and also to achieve the desired surface roughness
quality. After a detailed literature survey, it is inferred that there are no
appropriate surface recognition models for machining Brass C26000 metal in
CNC turning. The experimental works were conducted in a leading pump
manufacturing company. The seamless pipe which is being manufactured in the
pump industry made up of B surface area that is considered in this work brass
C26000 requires more surface finish in the inner.
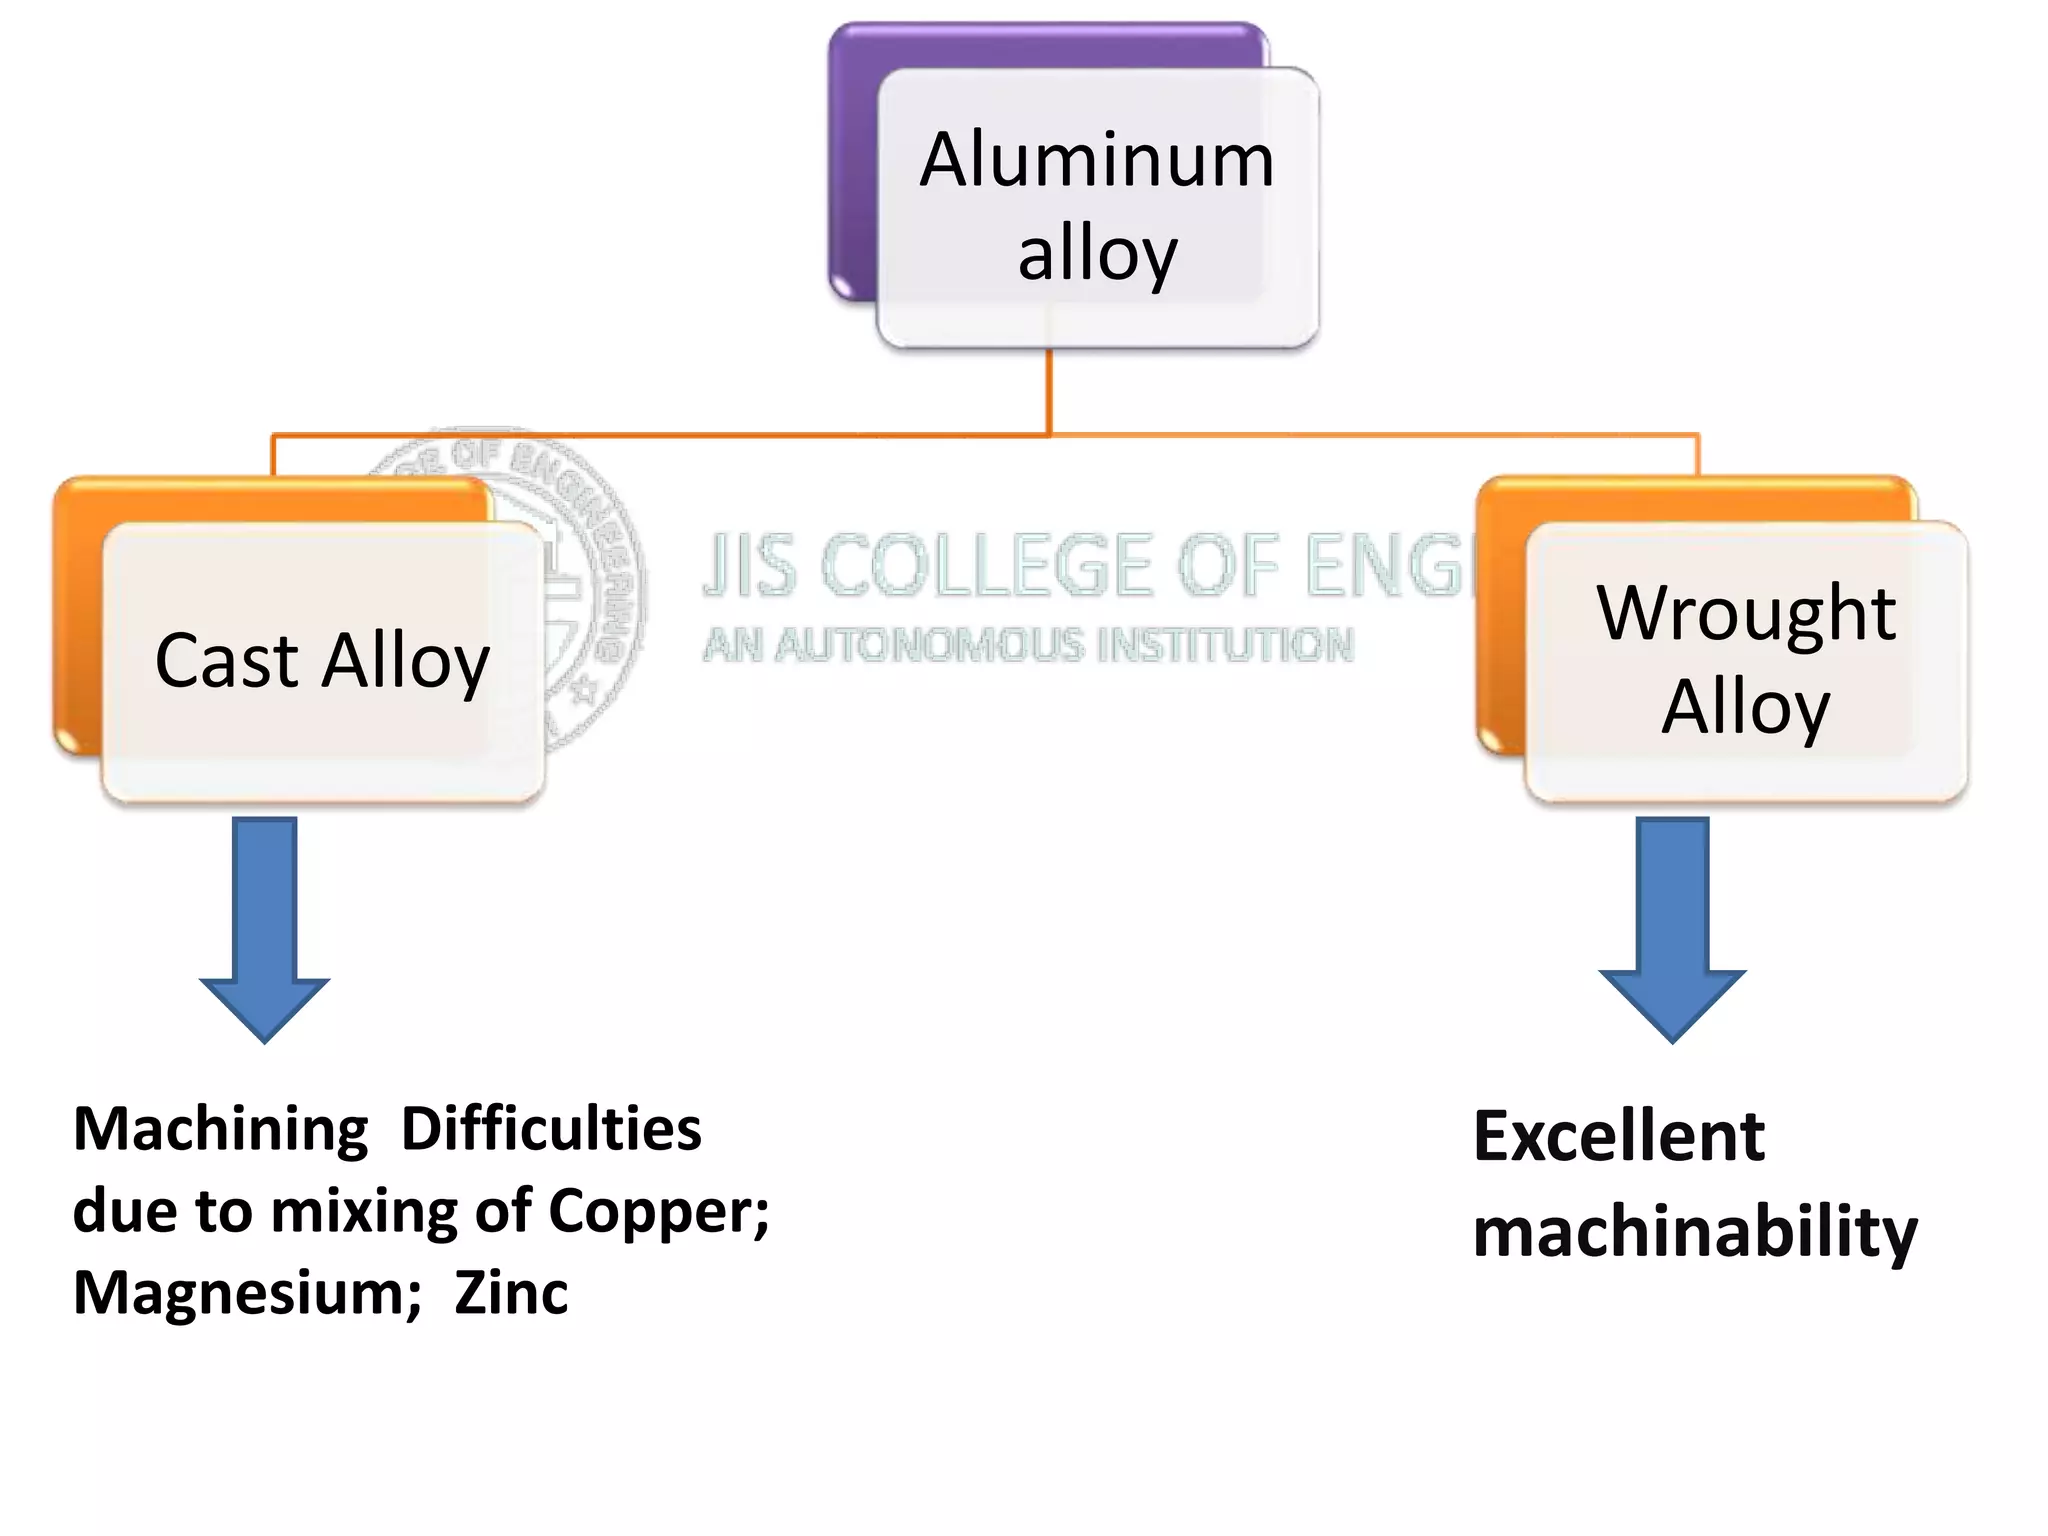
Aluminum
alloy
Cast Alloy
Wrought
Alloy
Excellent
machinability
Machining Difficulties
due to mixing of Copper;
Magnesium; Zinc
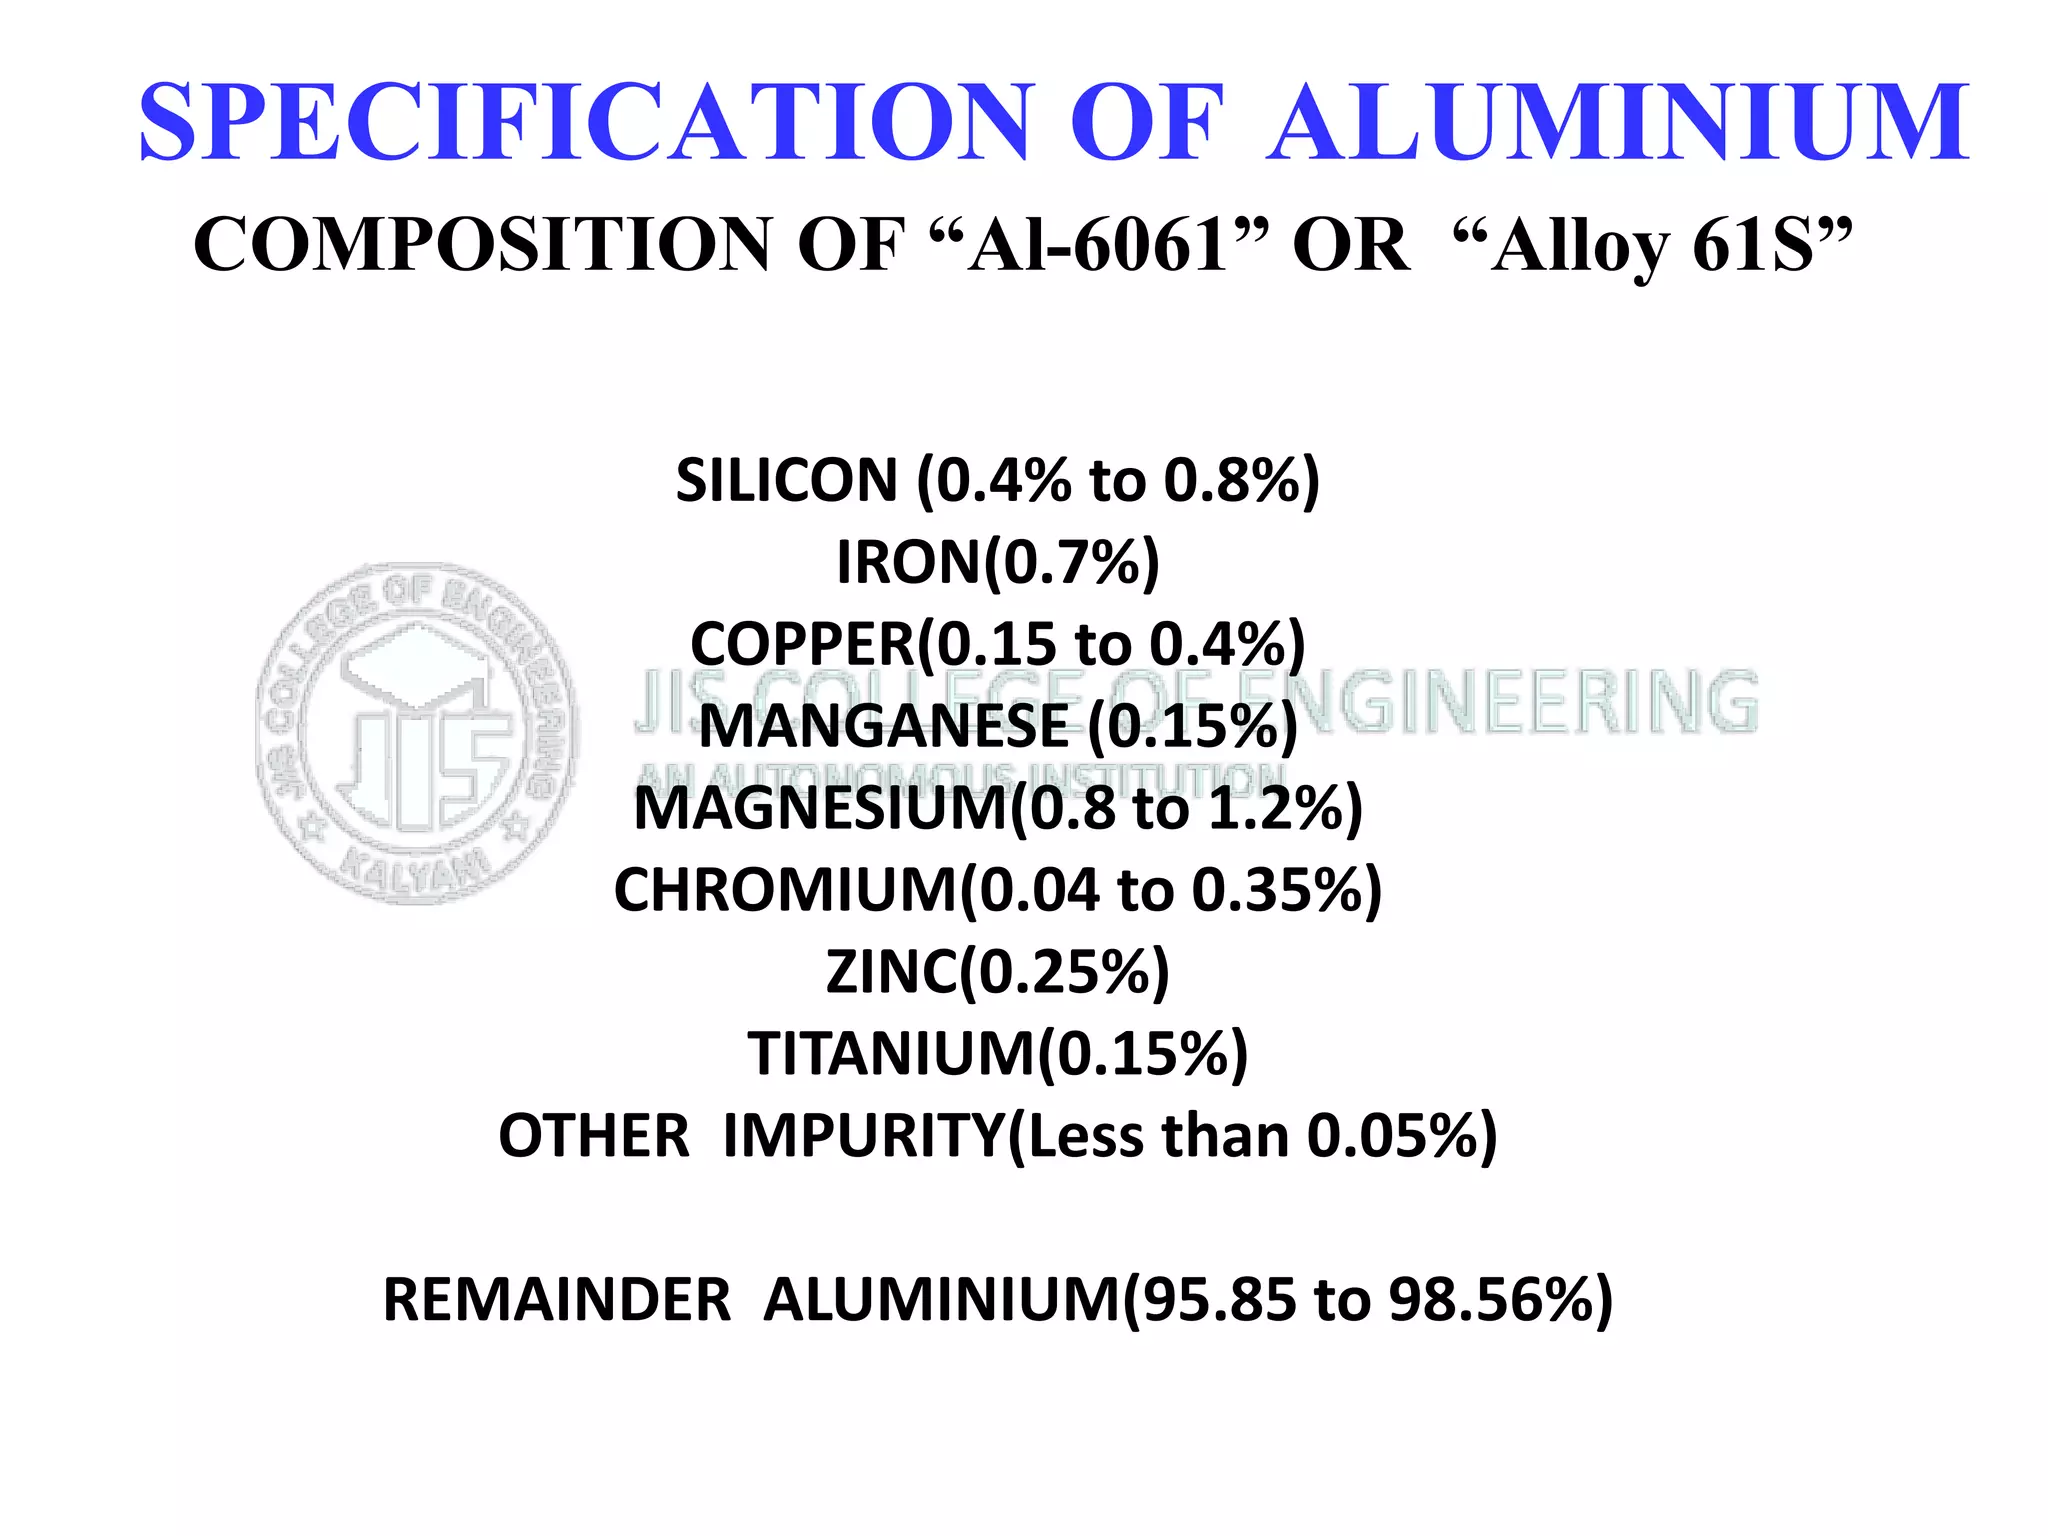
SPECIFICATION OF ALUMINIUM
COMPOSITION OF “Al-6061” OR “Alloy 61S”
SILICON (0.4% to 0.8%)
IRON(0.7%)
COPPER(0.15 to 0.4%)
MANGANESE (0.15%)
MAGNESIUM(0.8 to 1.2%)
CHROMIUM(0.04 to 0.35%)
ZINC(0.25%)
TITANIUM(0.15%)
OTHER IMPURITY(Less than 0.05%)
REMAINDER ALUMINIUM(95.85 to 98.56%)
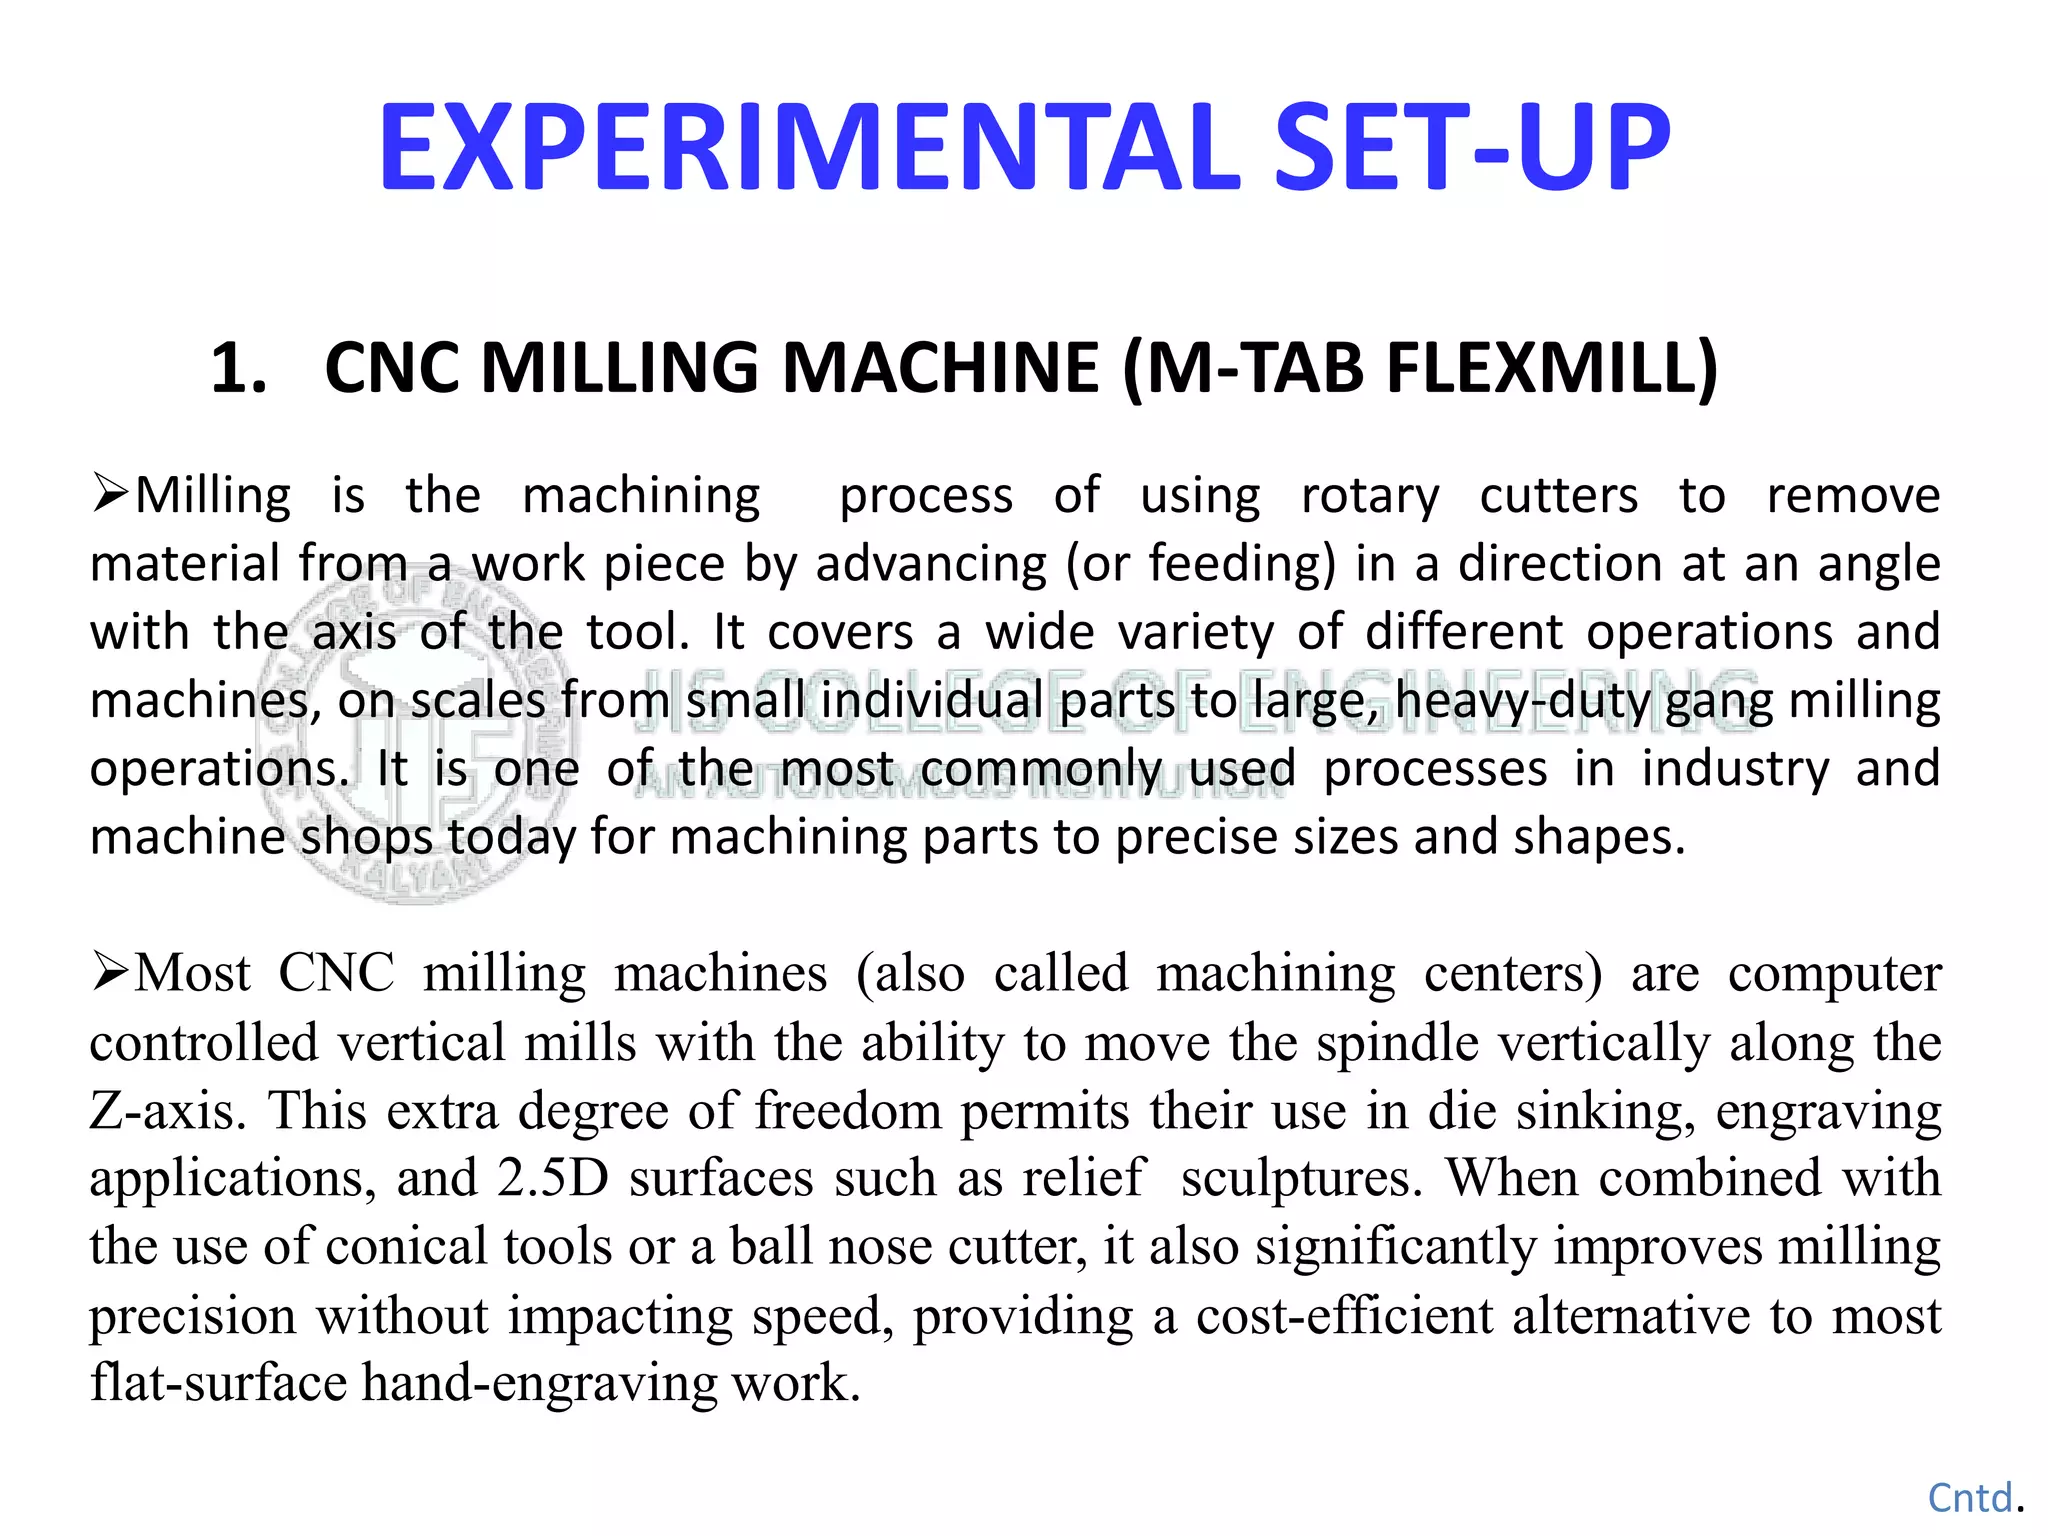
1. CNC MILLING MACHINE (M-TAB FLEXMILL)
Milling is the machining process of using rotary cutters to remove
material from a work piece by advancing (or feeding) in a direction at an angle
with the axis of the tool. It covers a wide variety of different operations and
machines, on scales from small individual parts to large, heavy-duty gang milling
operations. It is one of the most commonly used processes in industry and
machine shops today for machining parts to precise sizes and shapes.
Most CNC milling machines (also called machining centers) are computer
controlled vertical mills with the ability to move the spindle vertically along the
Z-axis. This extra degree of freedom permits their use in die sinking, engraving
applications, and 2.5D surfaces such as relief sculptures. When combined with
the use of conical tools or a ball nose cutter, it also significantly improves milling
precision without impacting speed, providing a cost-efficient alternative to most
flat-surface hand-engraving work.
Cntd.
EXPERIMENTAL SET-UP
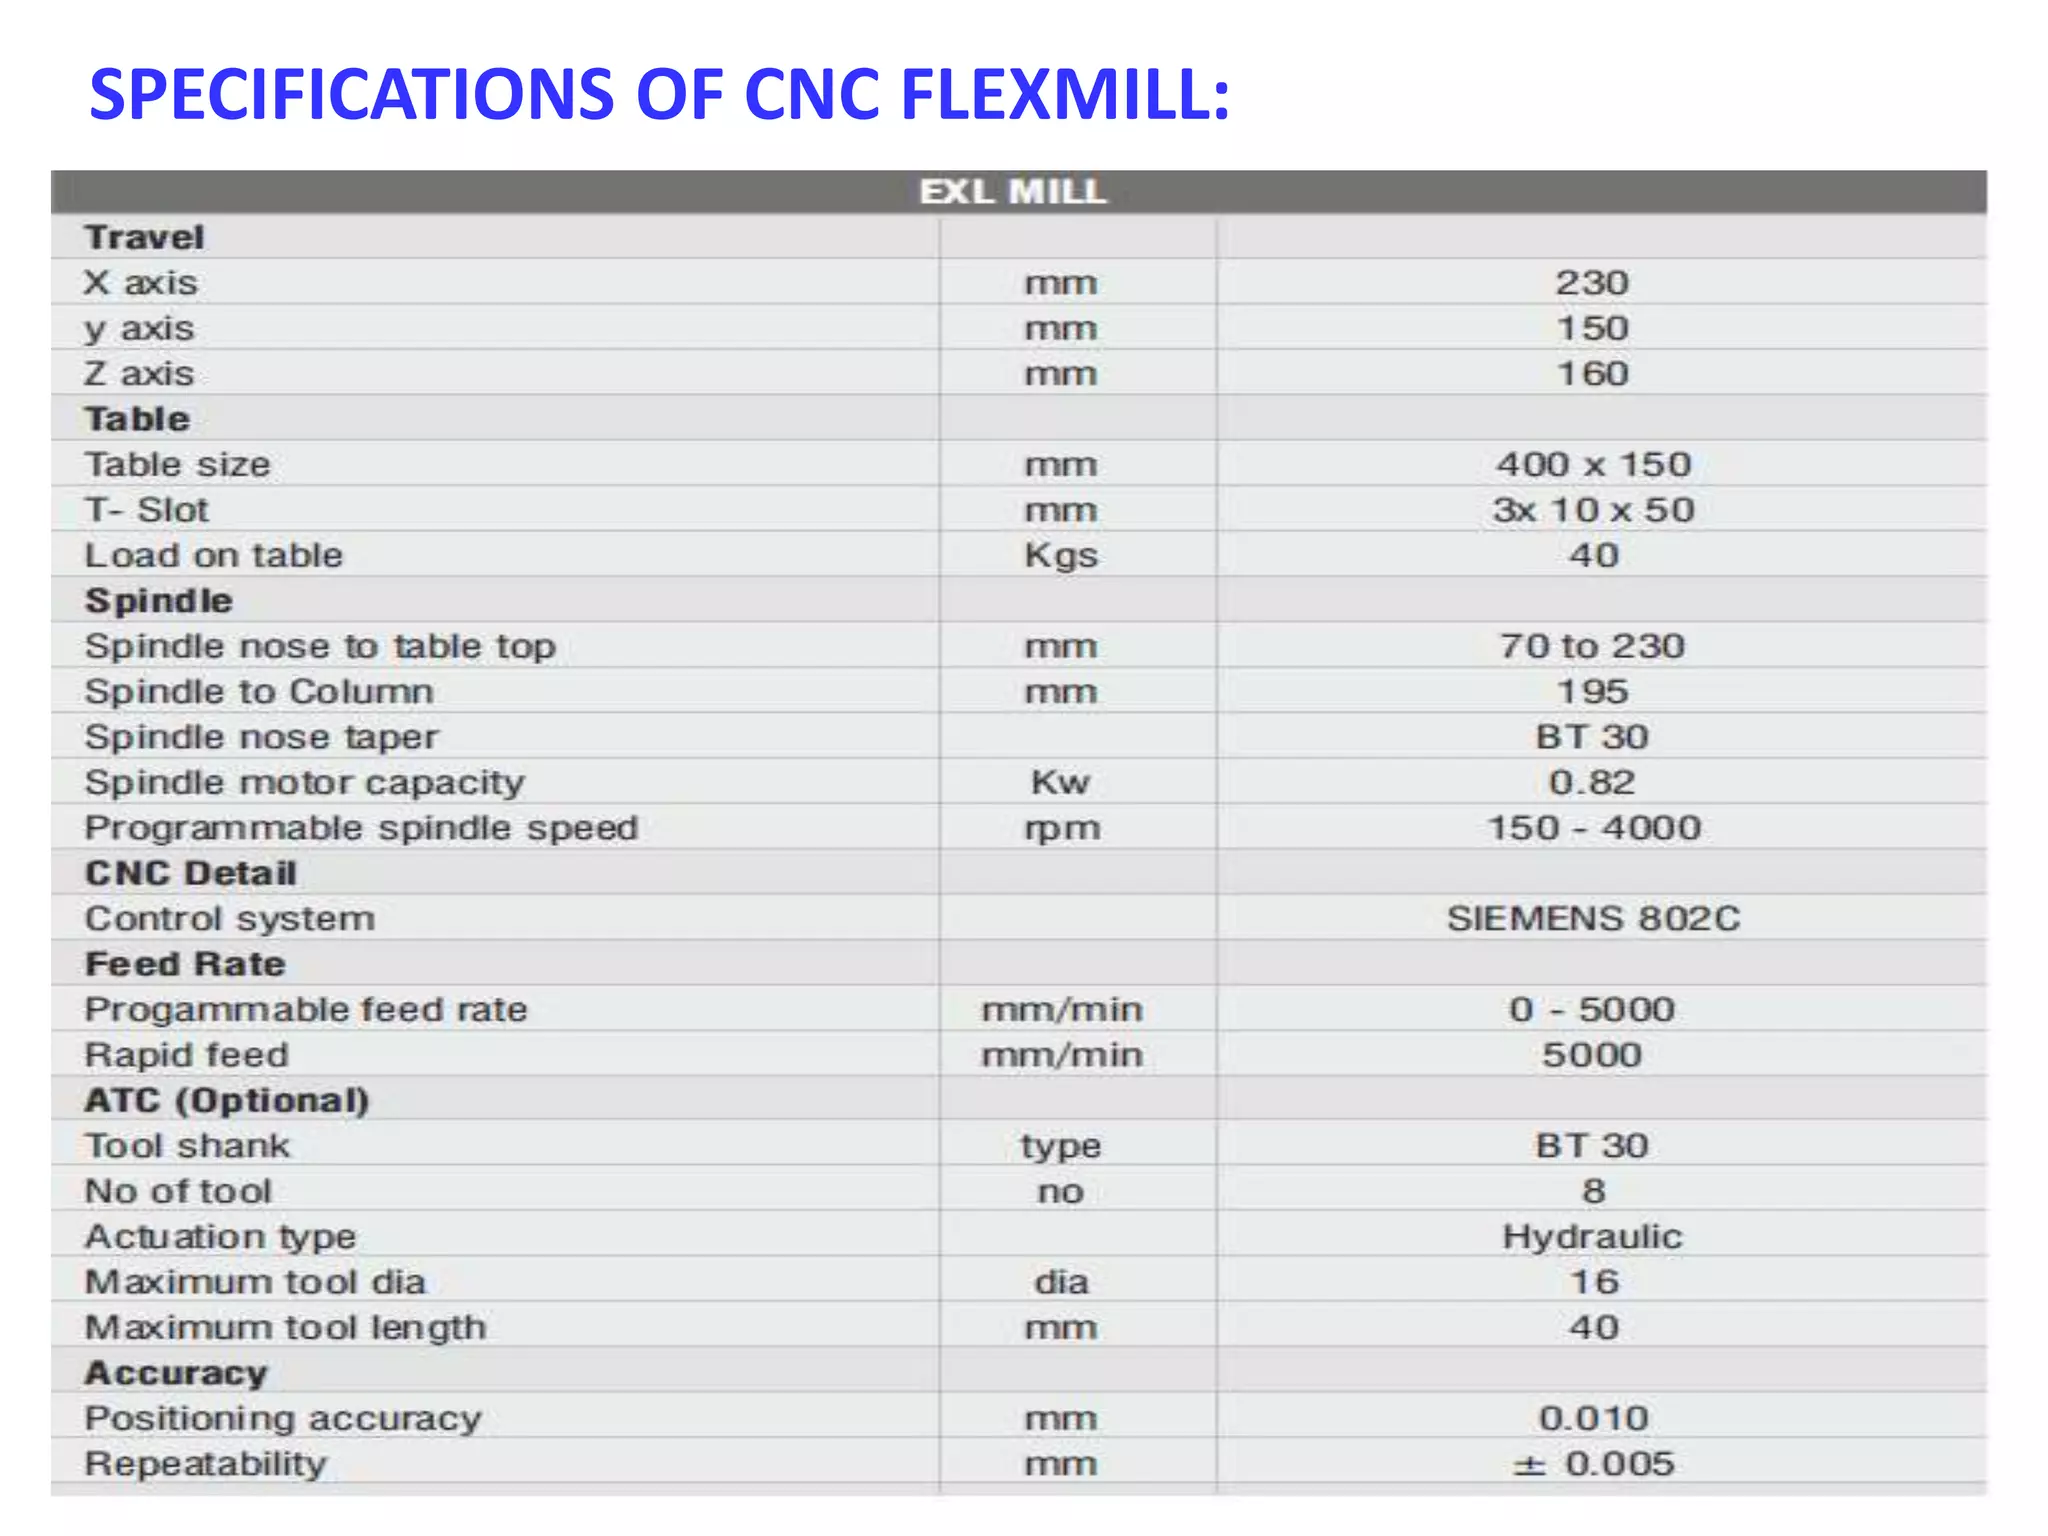
SPECIFICATIONS OF CNC FLEXMILL:
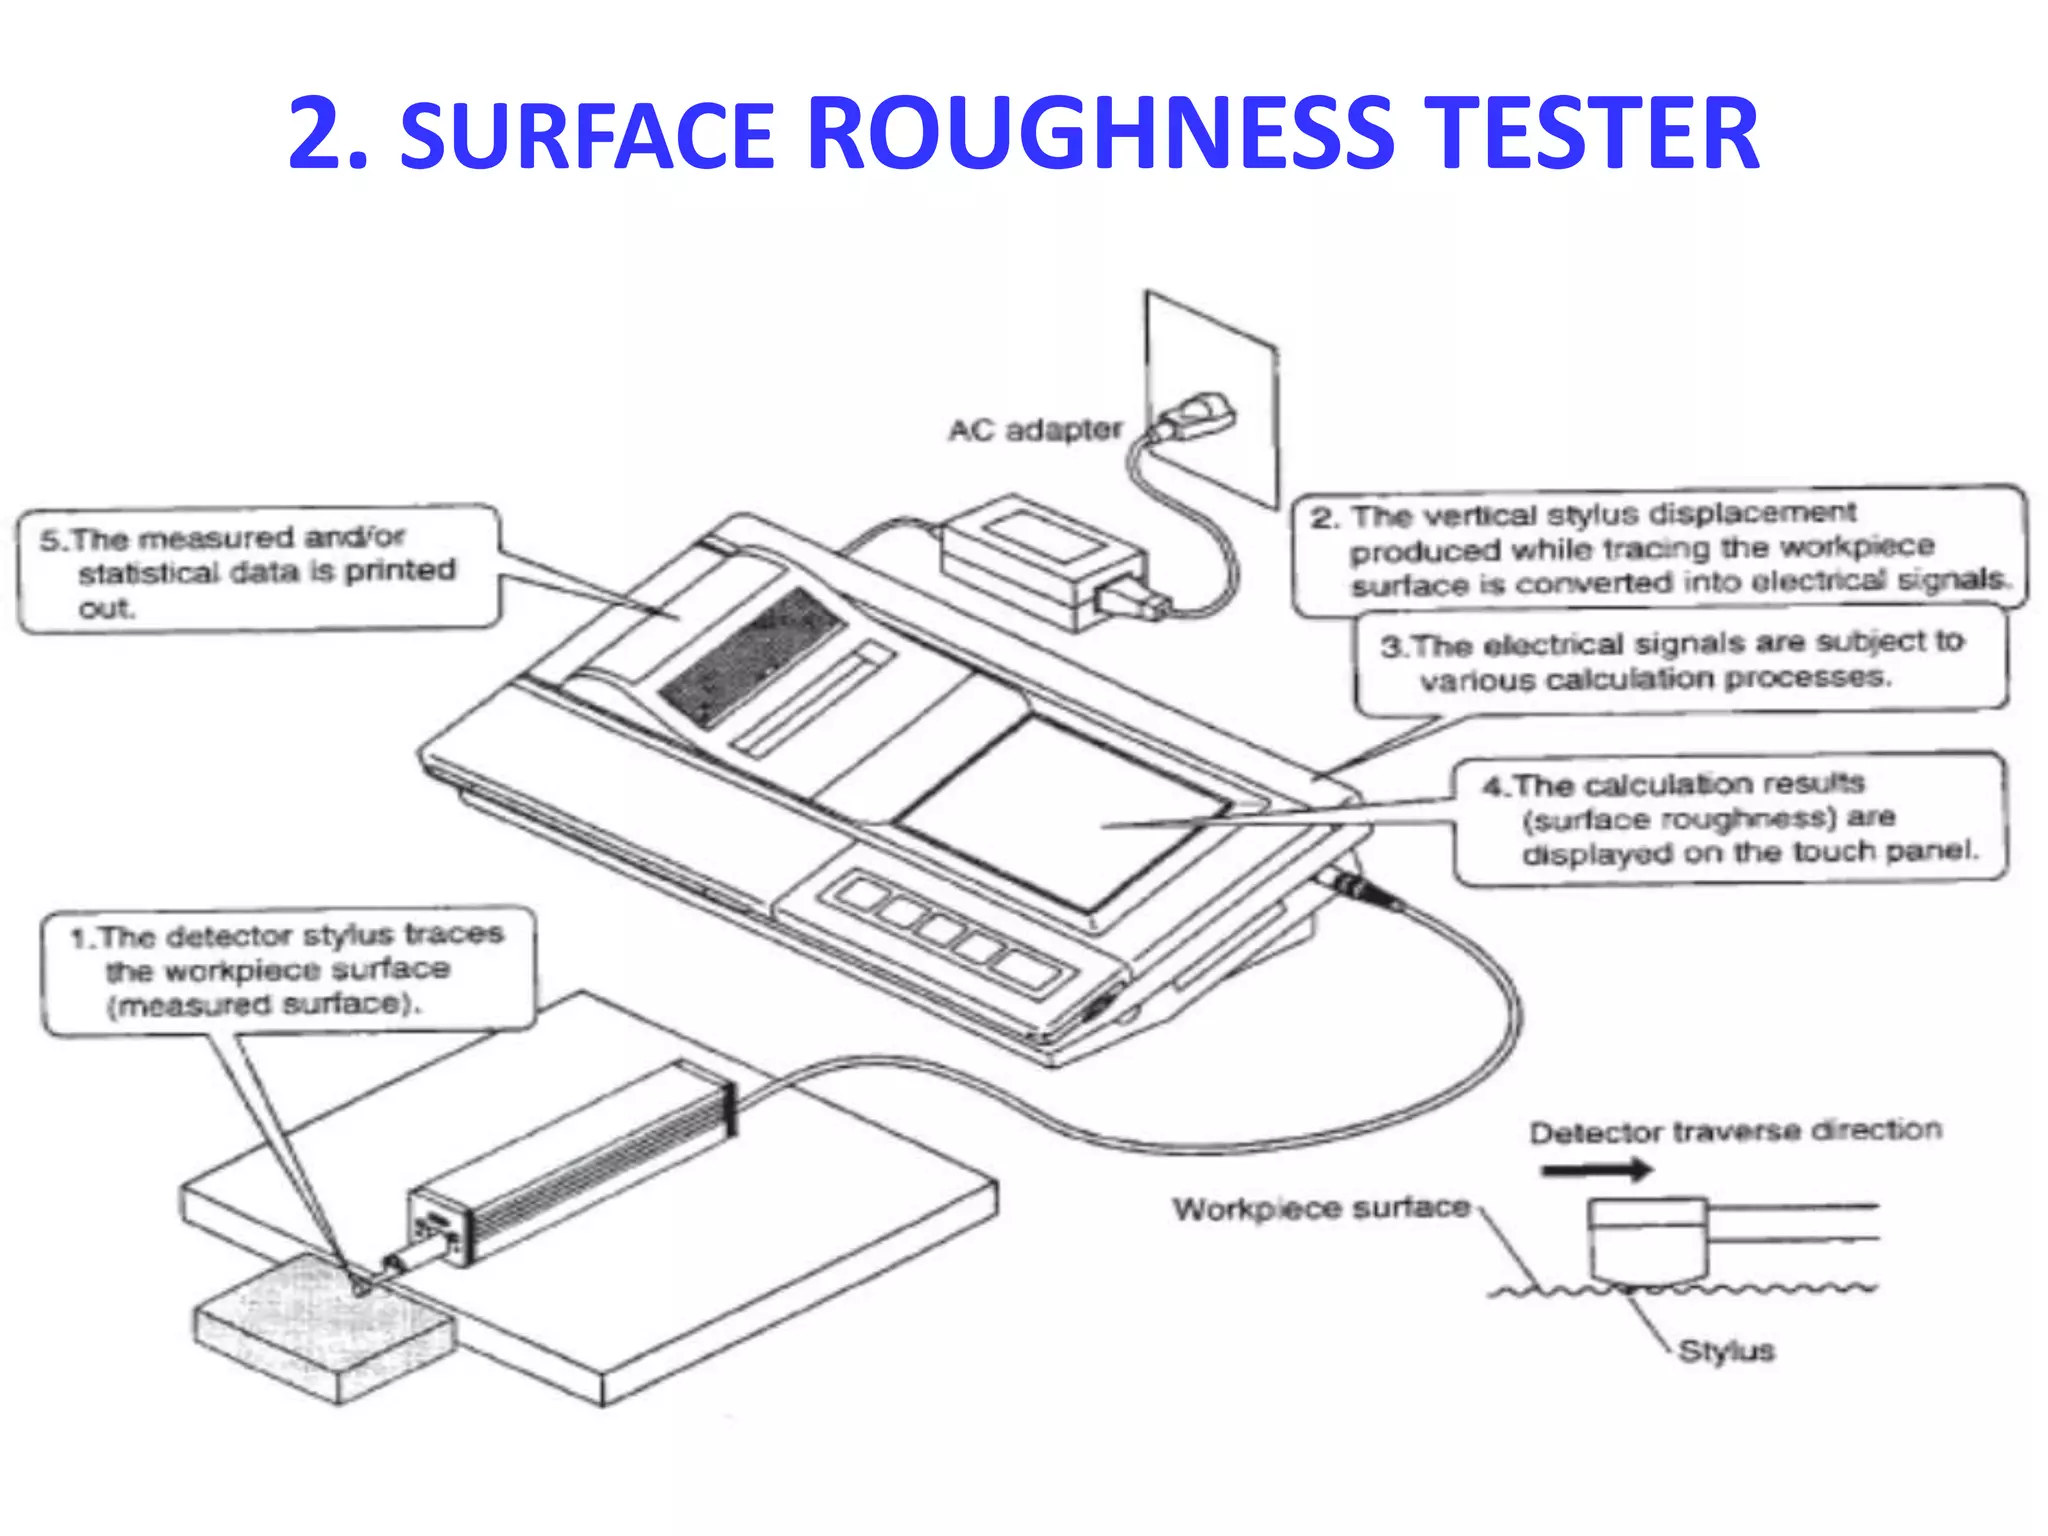
2. SURFACE ROUGHNESS TESTER
3. HARDNESS TESTING MACHINE
The machine is designed for
determining the Brinell
Hardness (BHN) of metals and
alloys. The load is applied by
manually and the indentation
is read with the help of a
Brinell Microscope.
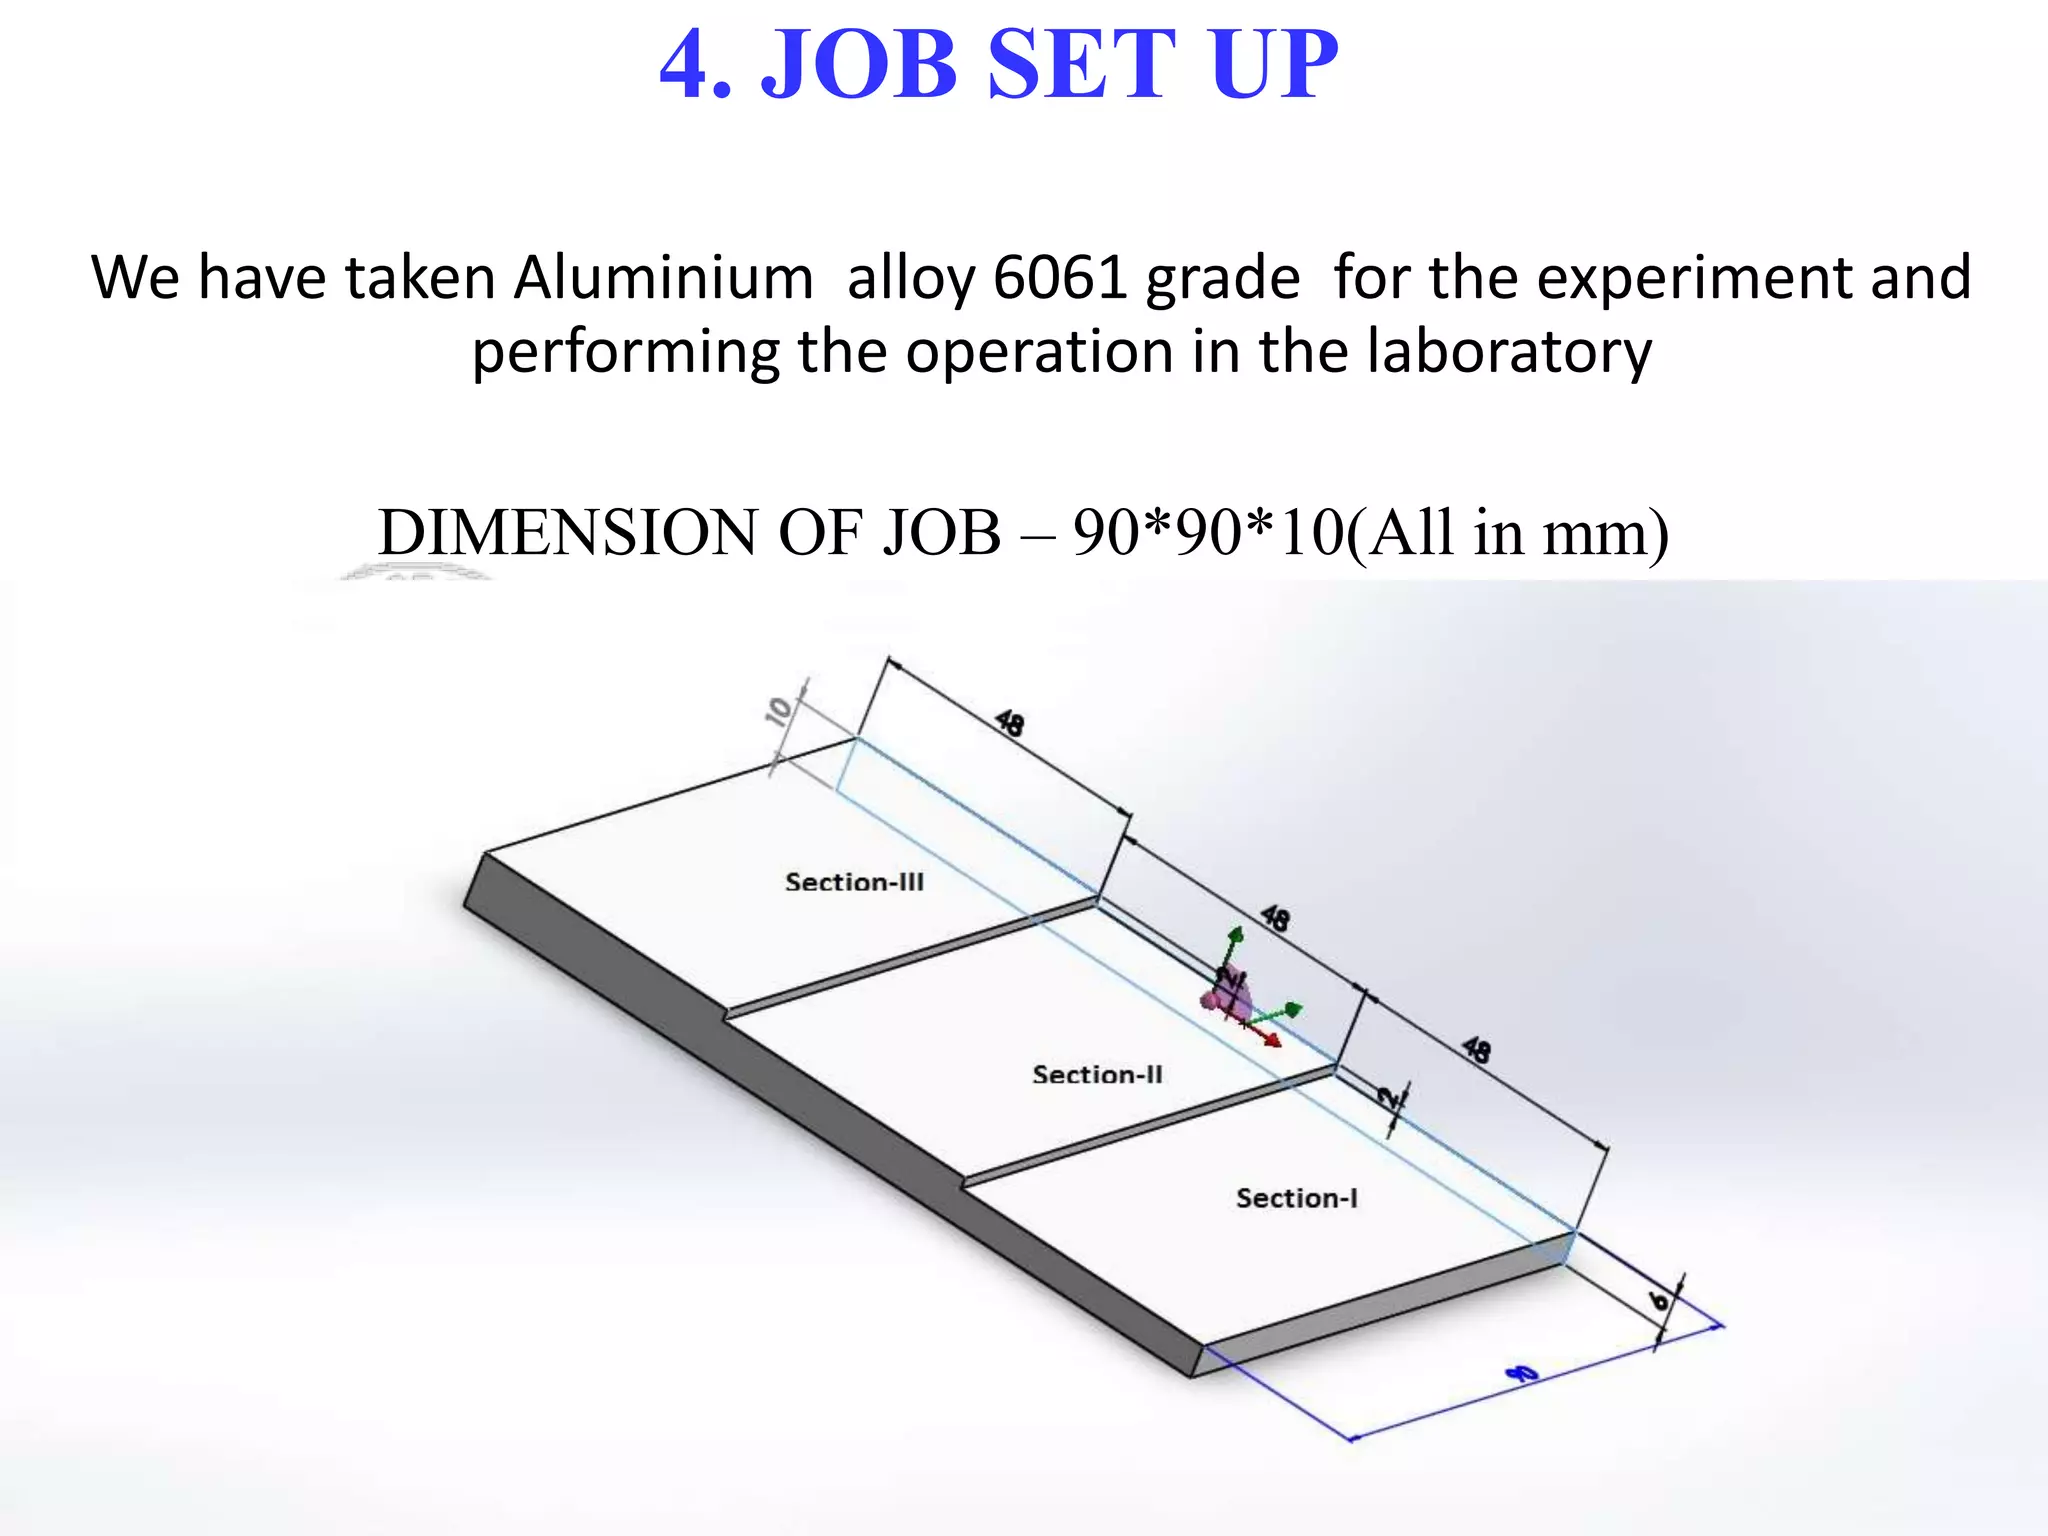
4. JOB SET UP
We have taken Aluminium alloy 6061 grade for the experiment and
performing the operation in the laboratory
DIMENSION OF JOB – 90*90*10(All in mm)
RESULTS AND ANALYSIS
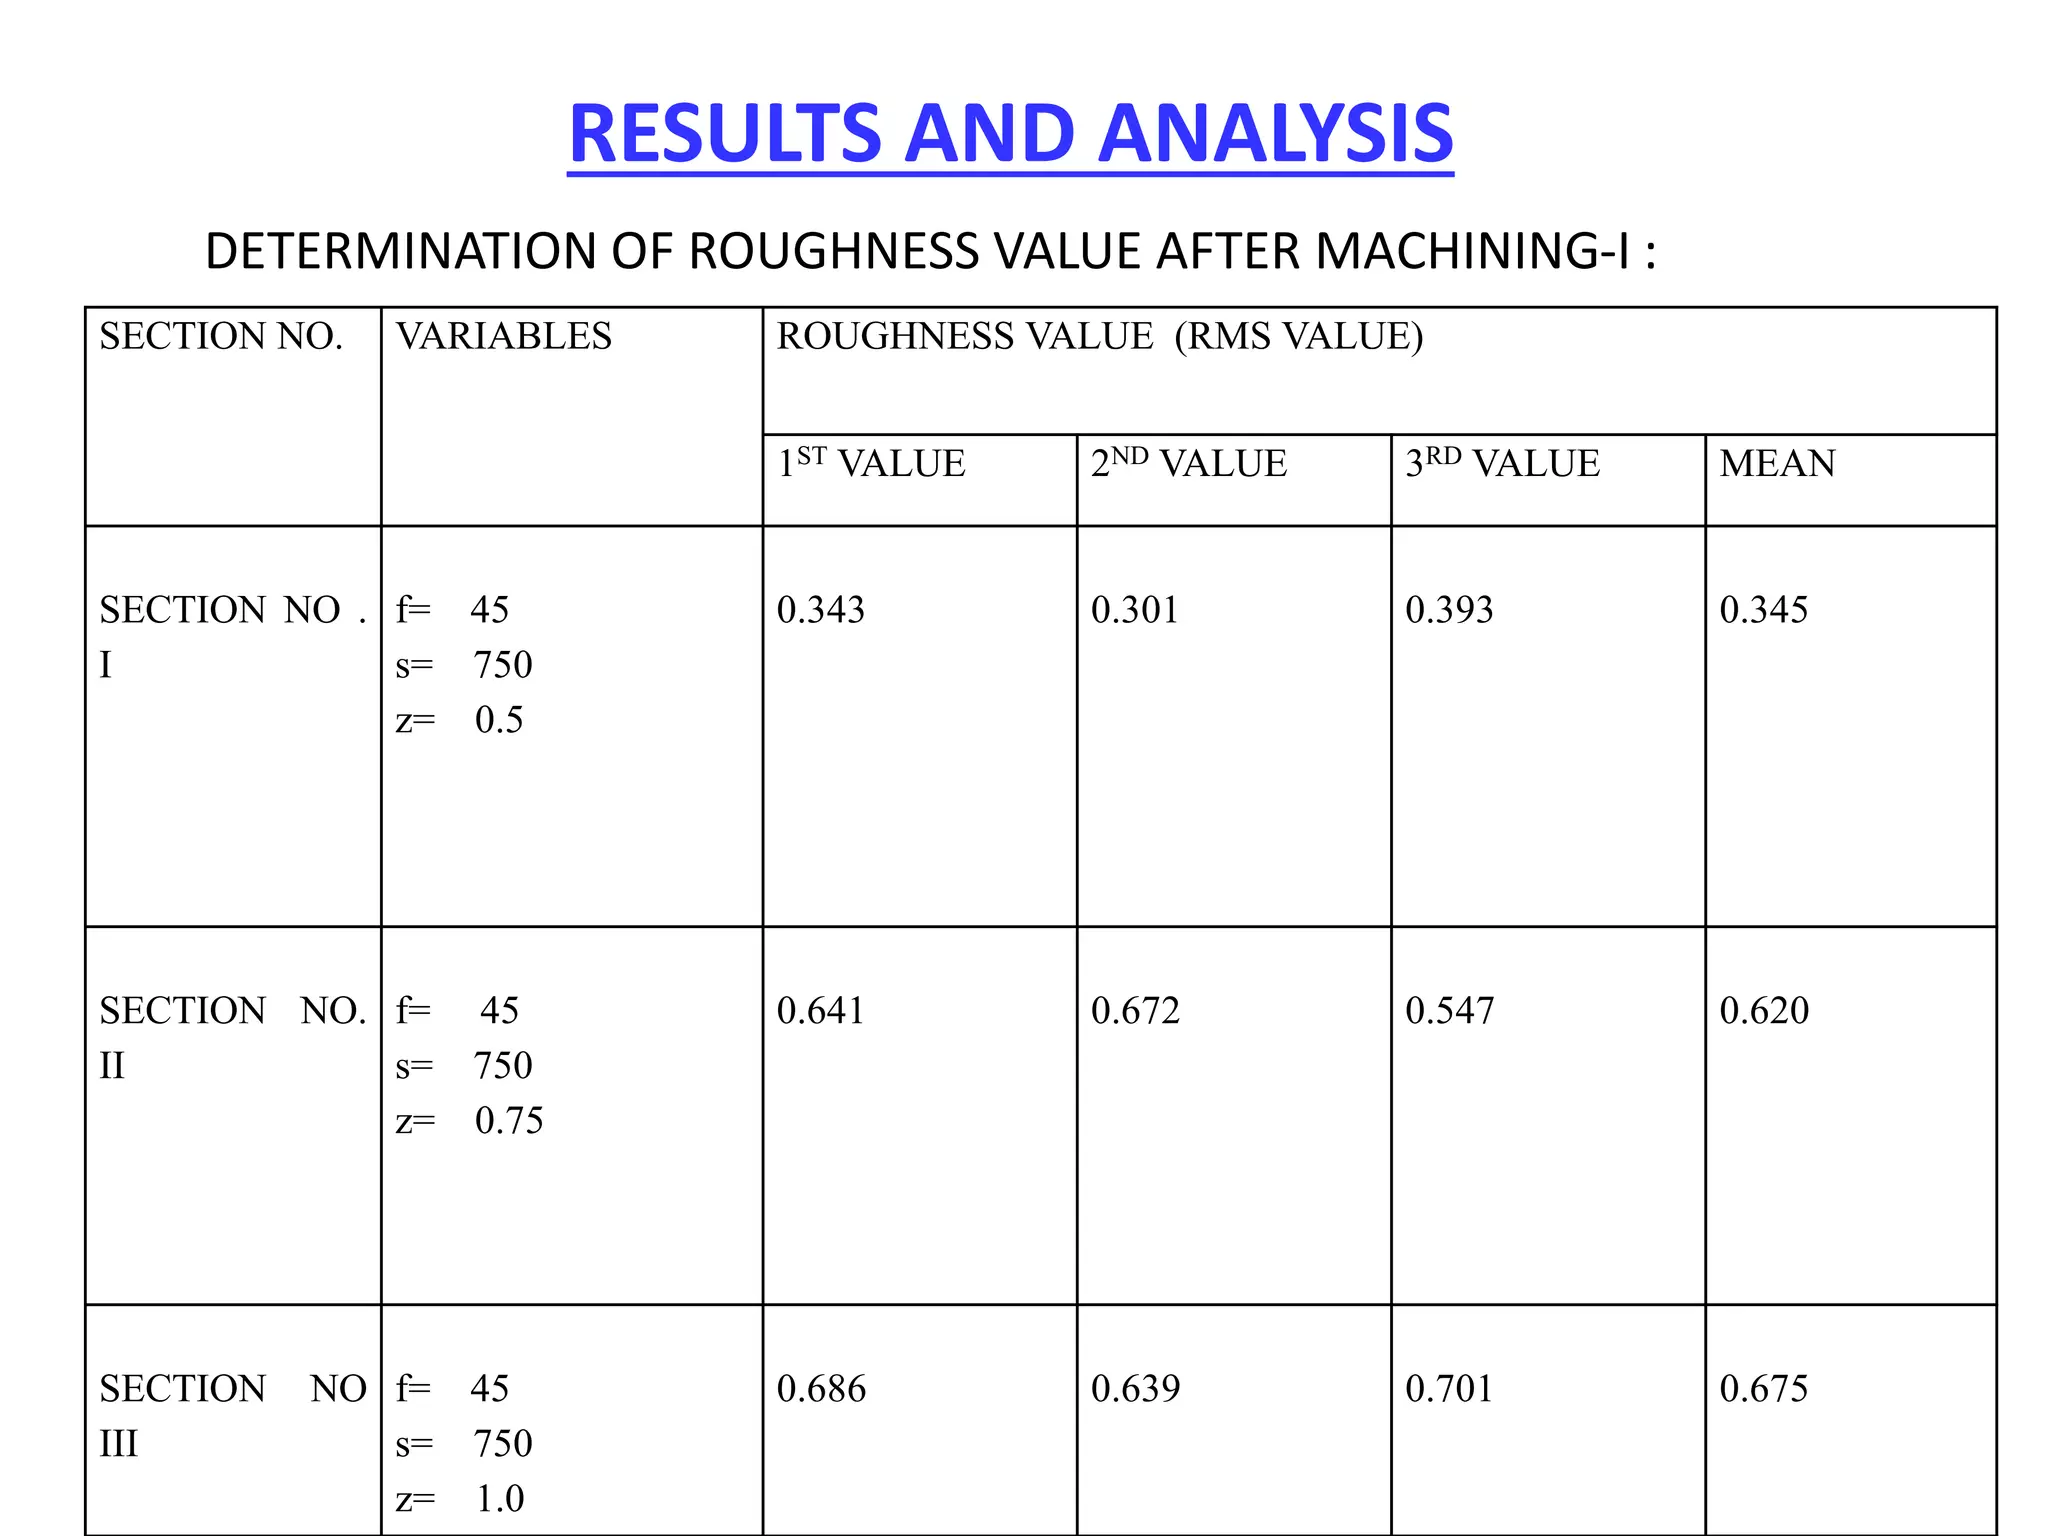
DETERMINATION OF ROUGHNESS VALUE AFTER MACHINING-I :
SECTION NO. VARIABLES ROUGHNESS VALUE (RMS VALUE)
1ST VALUE 2ND VALUE 3RD VALUE MEAN
SECTION NO .
I
f= 45
s= 750
z= 0.5
0.343 0.301 0.393 0.345
SECTION NO.
II
f= 45
s= 750
z= 0.75
0.641 0.672 0.547 0.620
SECTION NO
III
f= 45
s= 750
z= 1.0
0.686 0.639 0.701 0.675
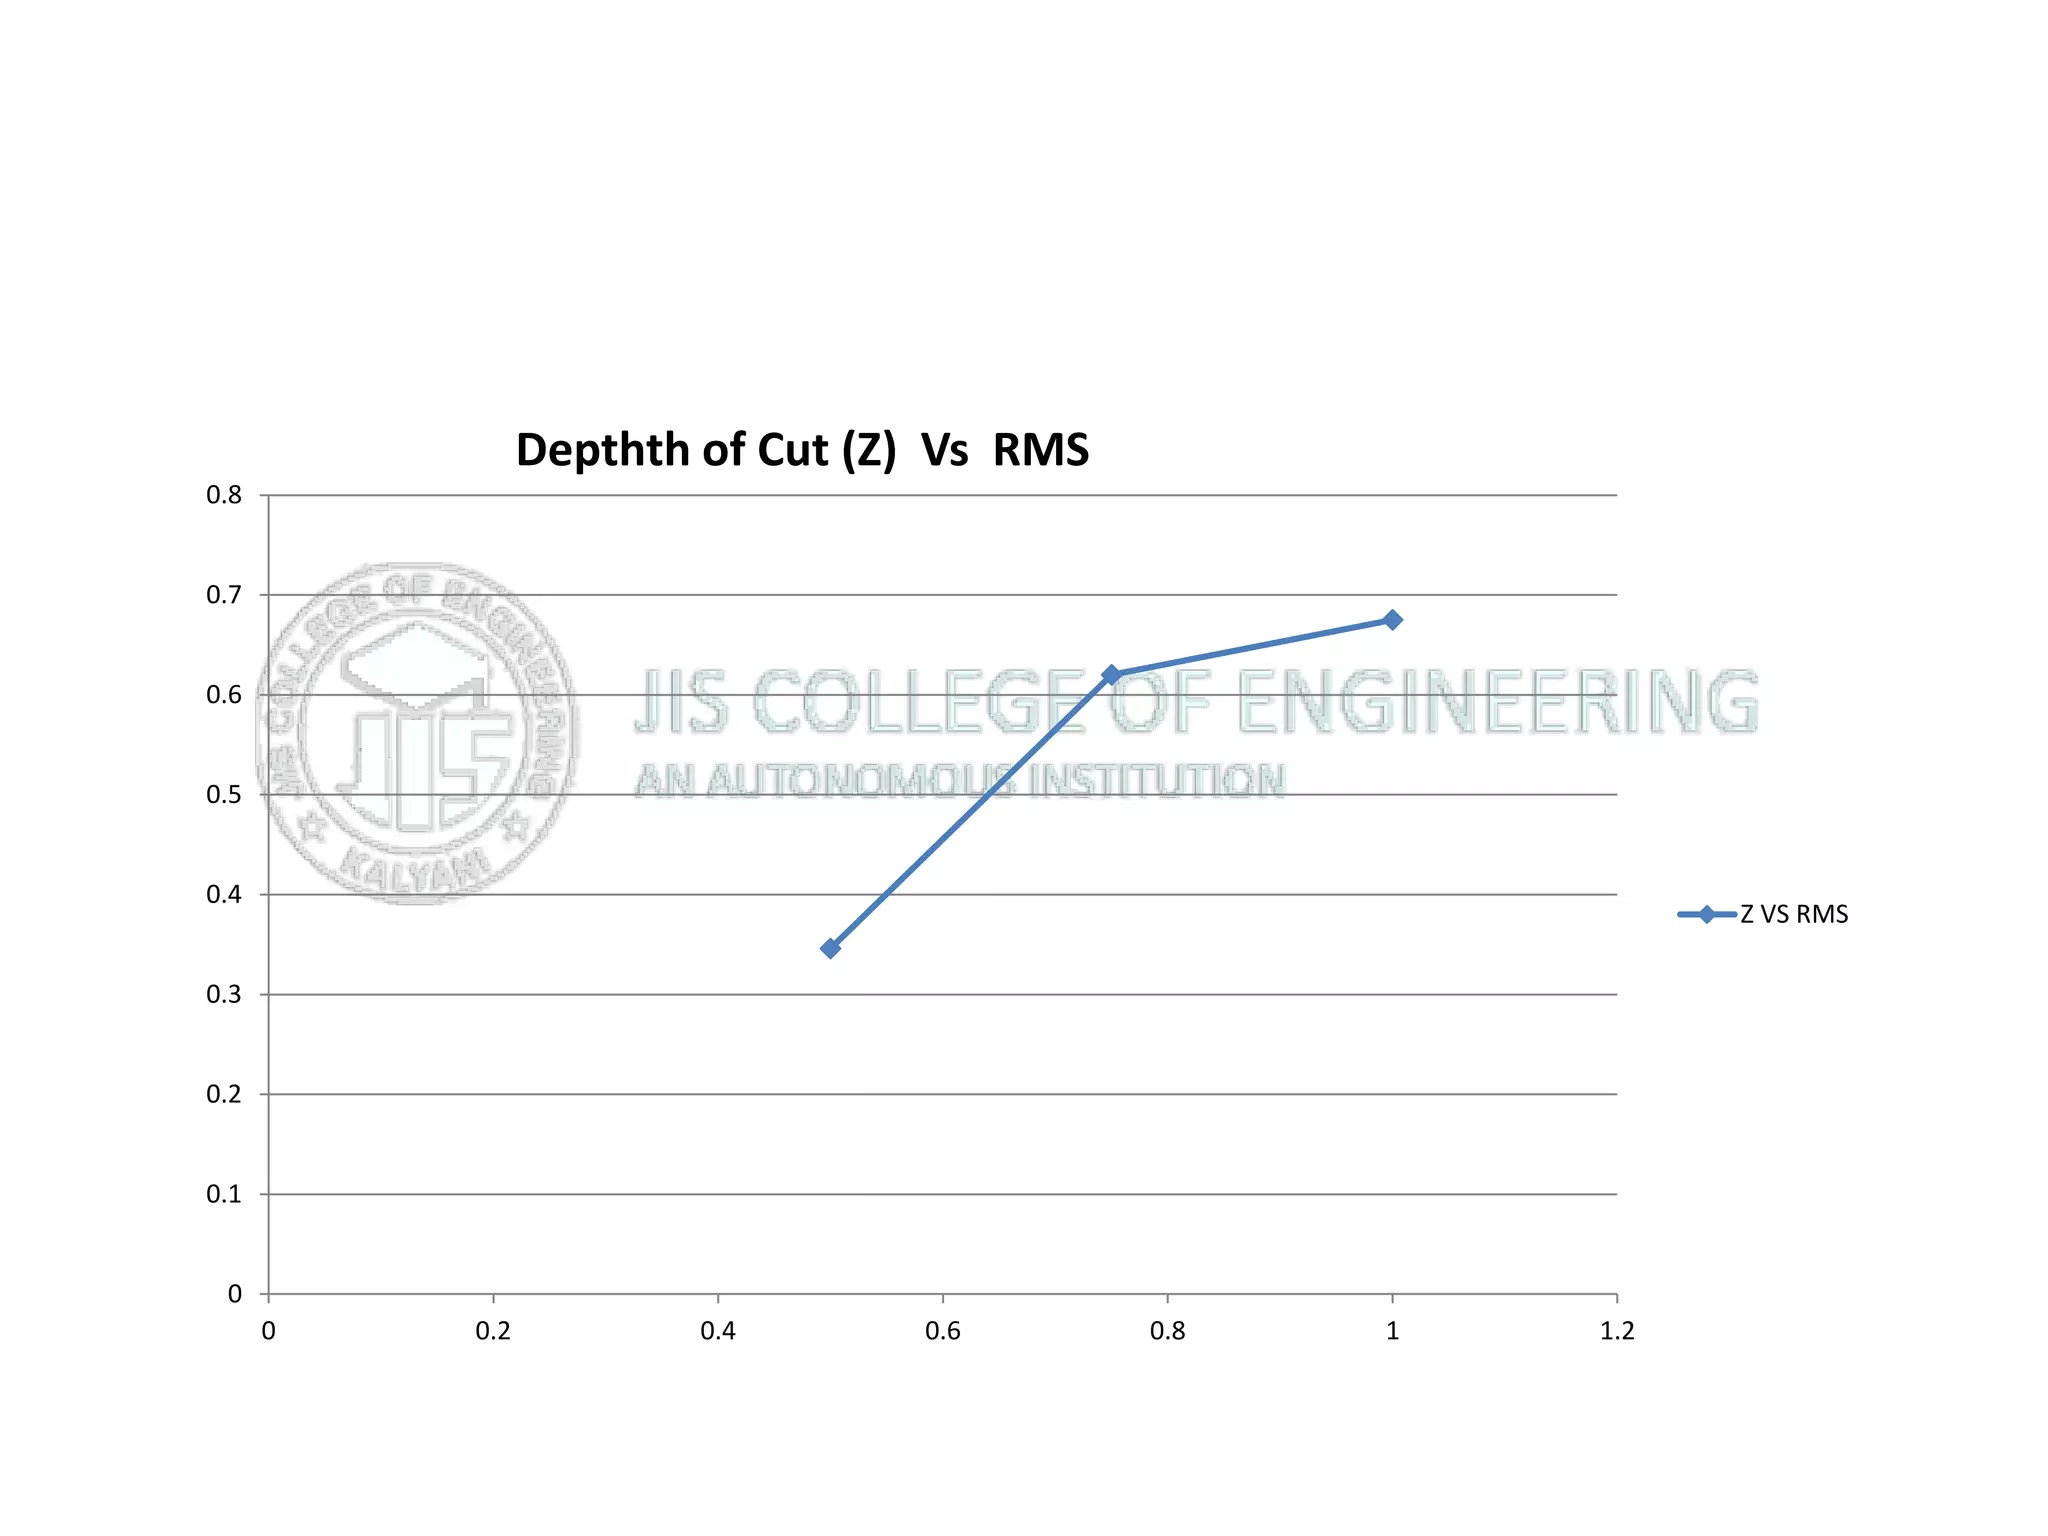
0
0.1
0.2
0.3
0.4
0.5
0.6
0.7
0.8
0 0.2 0.4 0.6 0.8 1 1.2
Depthth of Cut (Z) Vs RMS
Z VS RMS
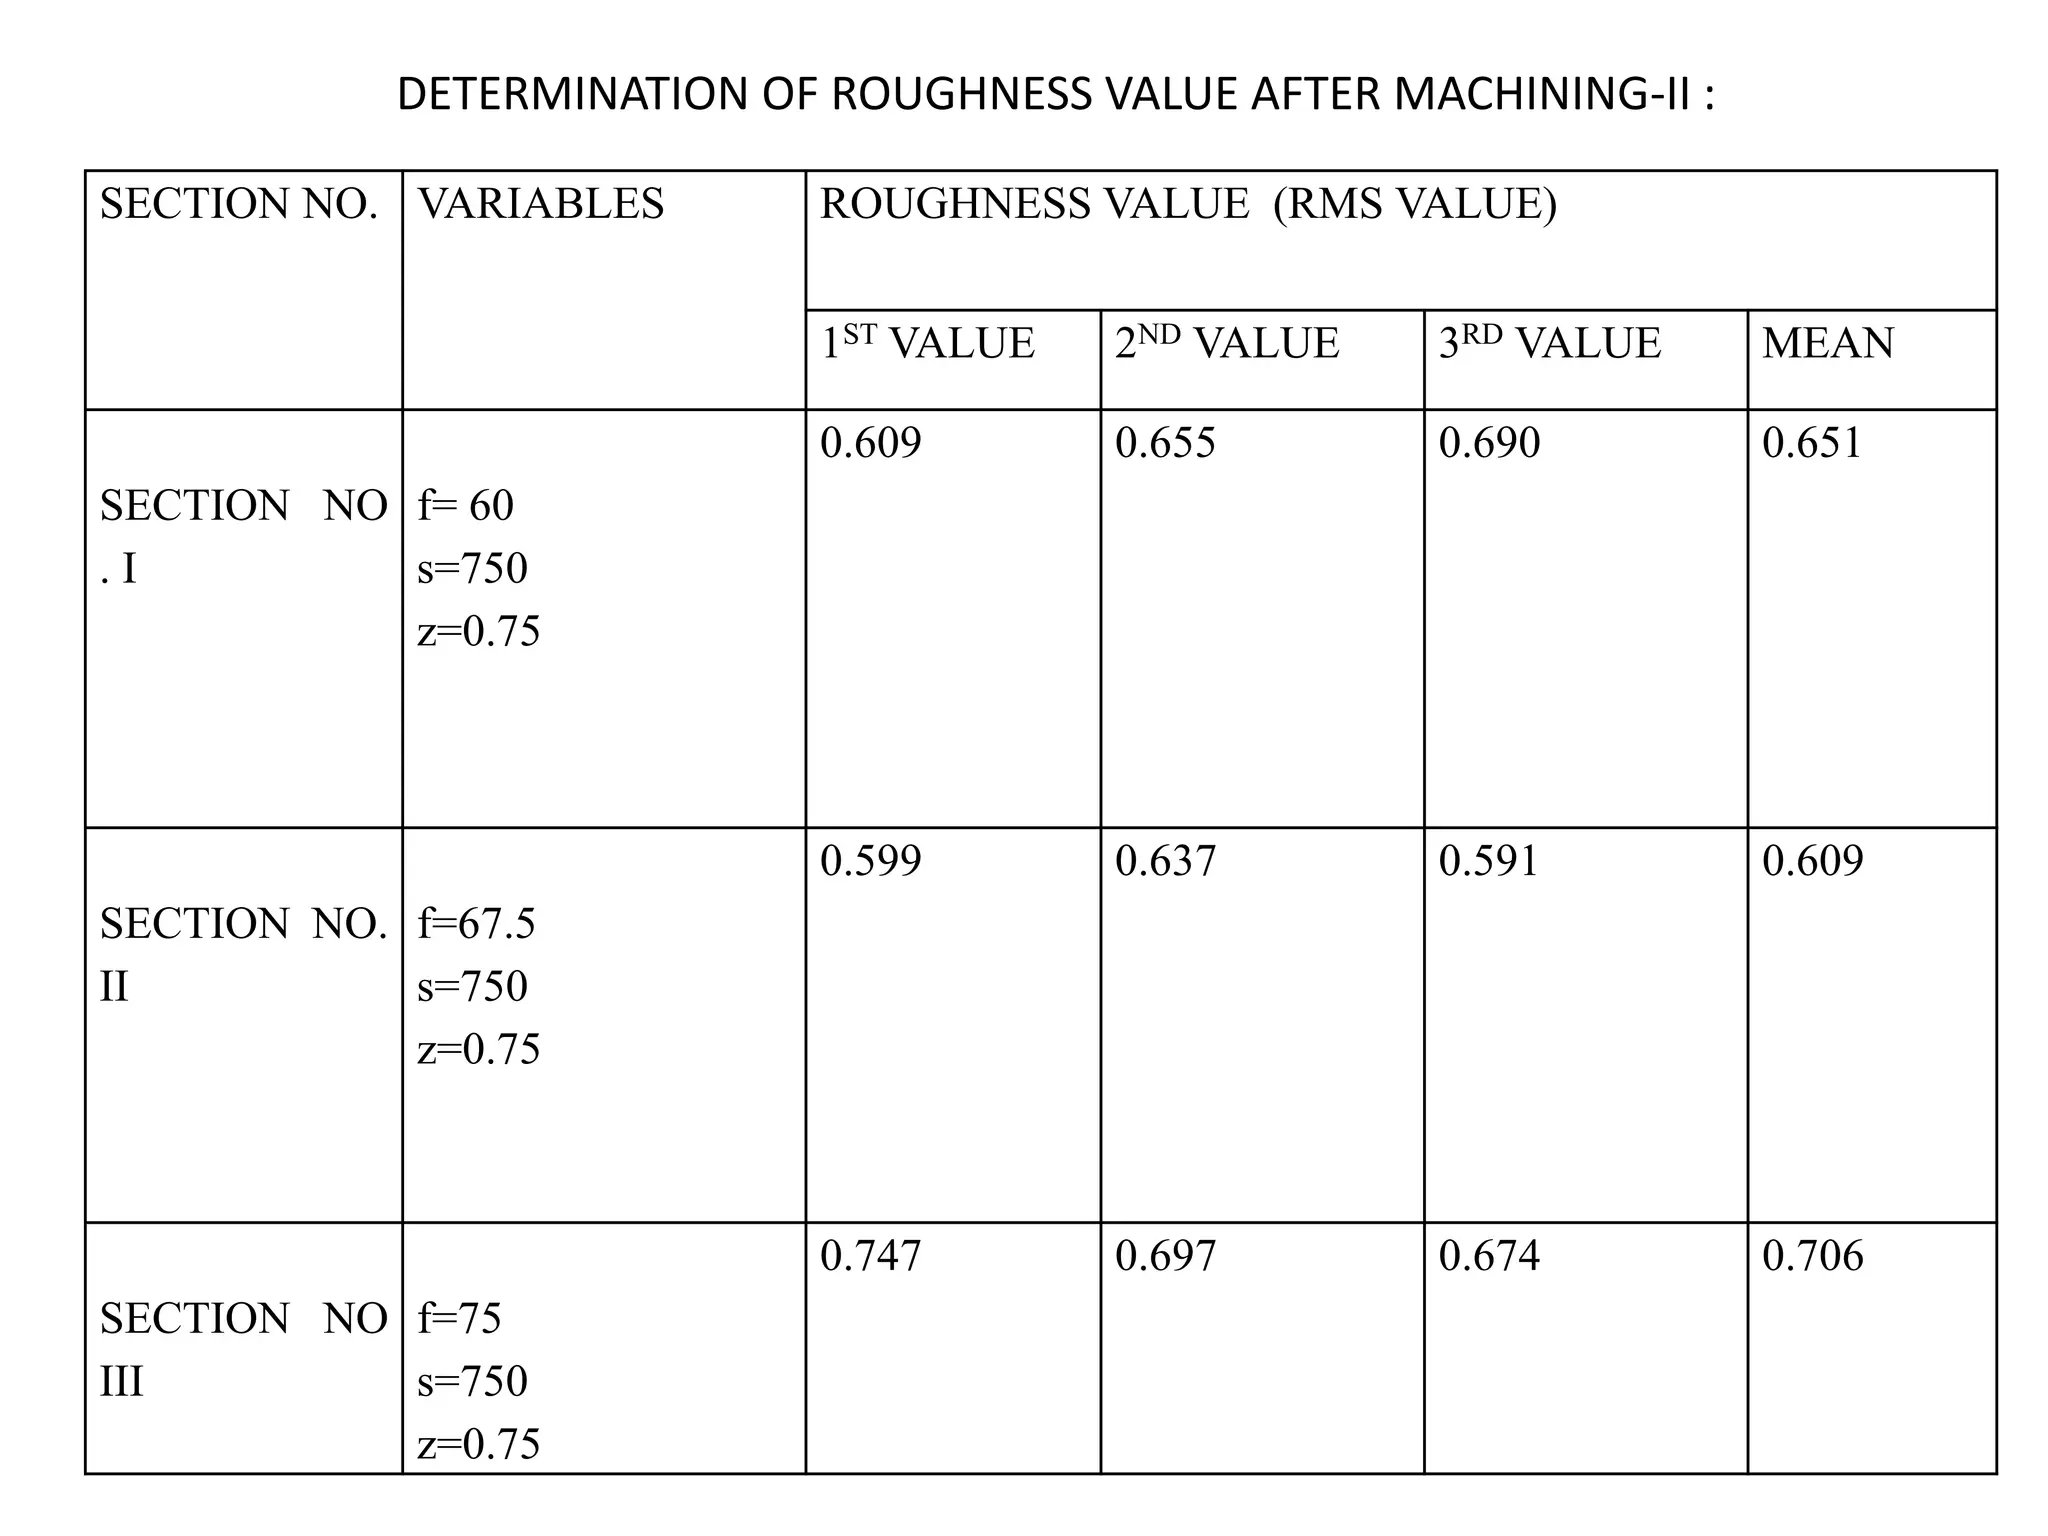
SECTION NO. VARIABLES ROUGHNESS VALUE (RMS VALUE)
1ST VALUE 2ND VALUE 3RD VALUE MEAN
SECTION NO
. I
f= 60
s=750
z=0.75
0.609 0.655 0.690 0.651
SECTION NO.
II
f=67.5
s=750
z=0.75
0.599 0.637 0.591 0.609
SECTION NO
III
f=75
s=750
z=0.75
0.747 0.697 0.674 0.706
DETERMINATION OF ROUGHNESS VALUE AFTER MACHINING-II :
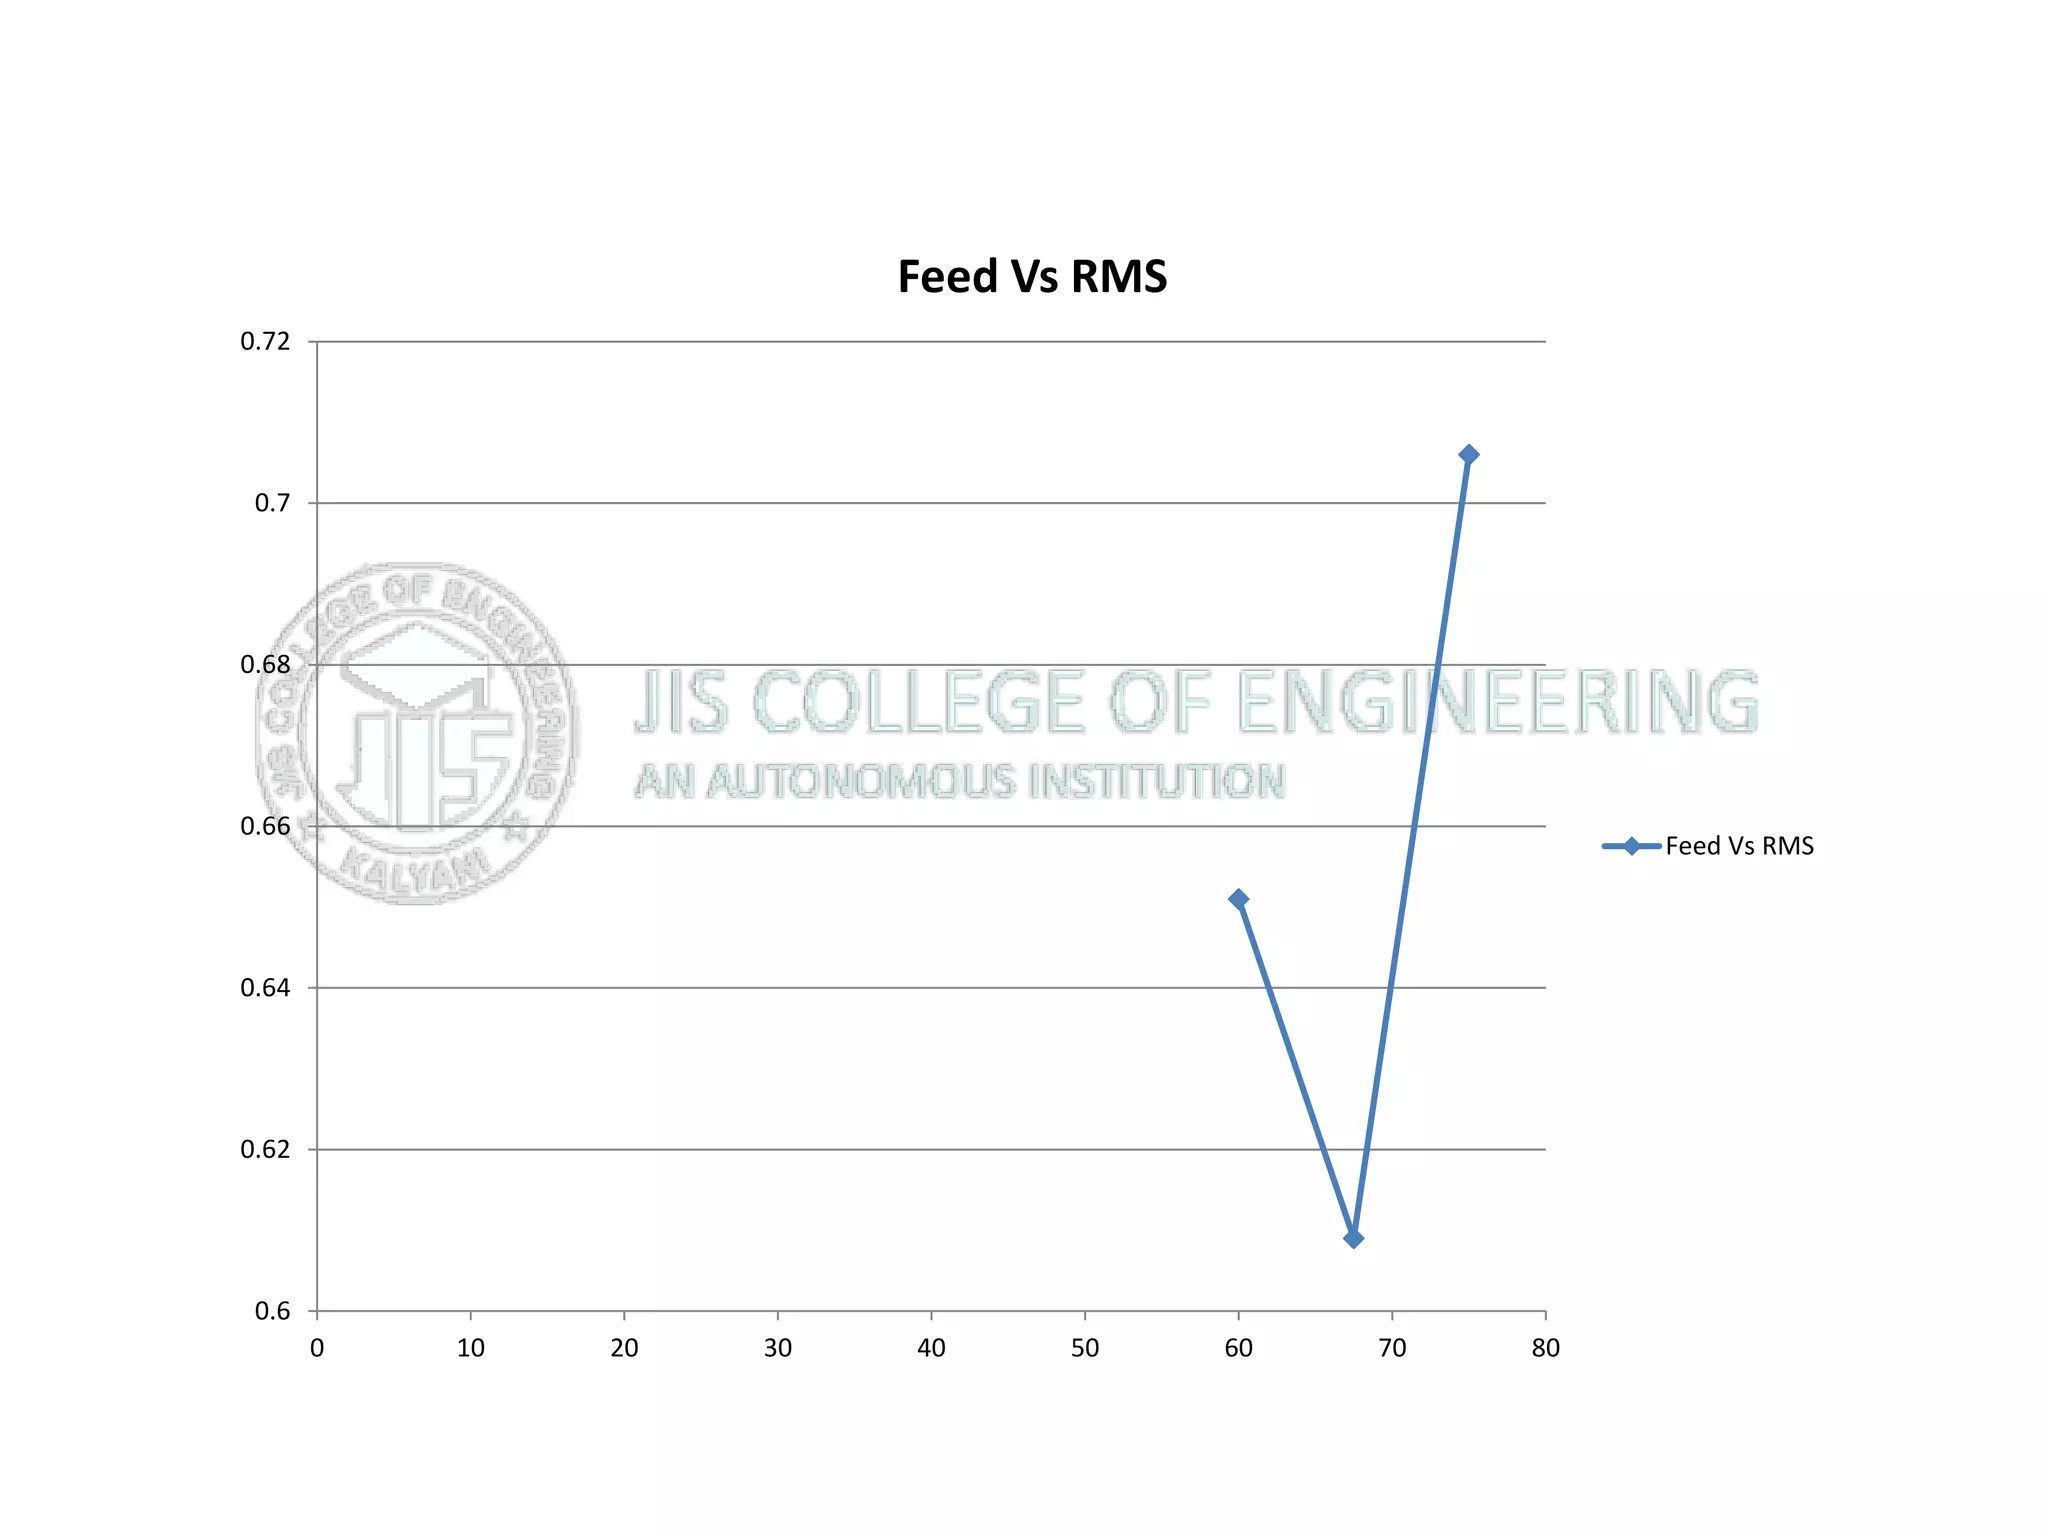
0.6
0.62
0.64
0.66
0.68
0.7
0.72
0 10 20 30 40 50 60 70 80
Feed Vs RMS
Feed Vs RMS
SECTION
NO.
VARIABLES ROUGHNESS VALUE (RMS VALUE)
1ST VALUE 2ND VALUE 3RD VALUE MEAN
SECTION
NO . I
f=67.5
s=800
z=0.75
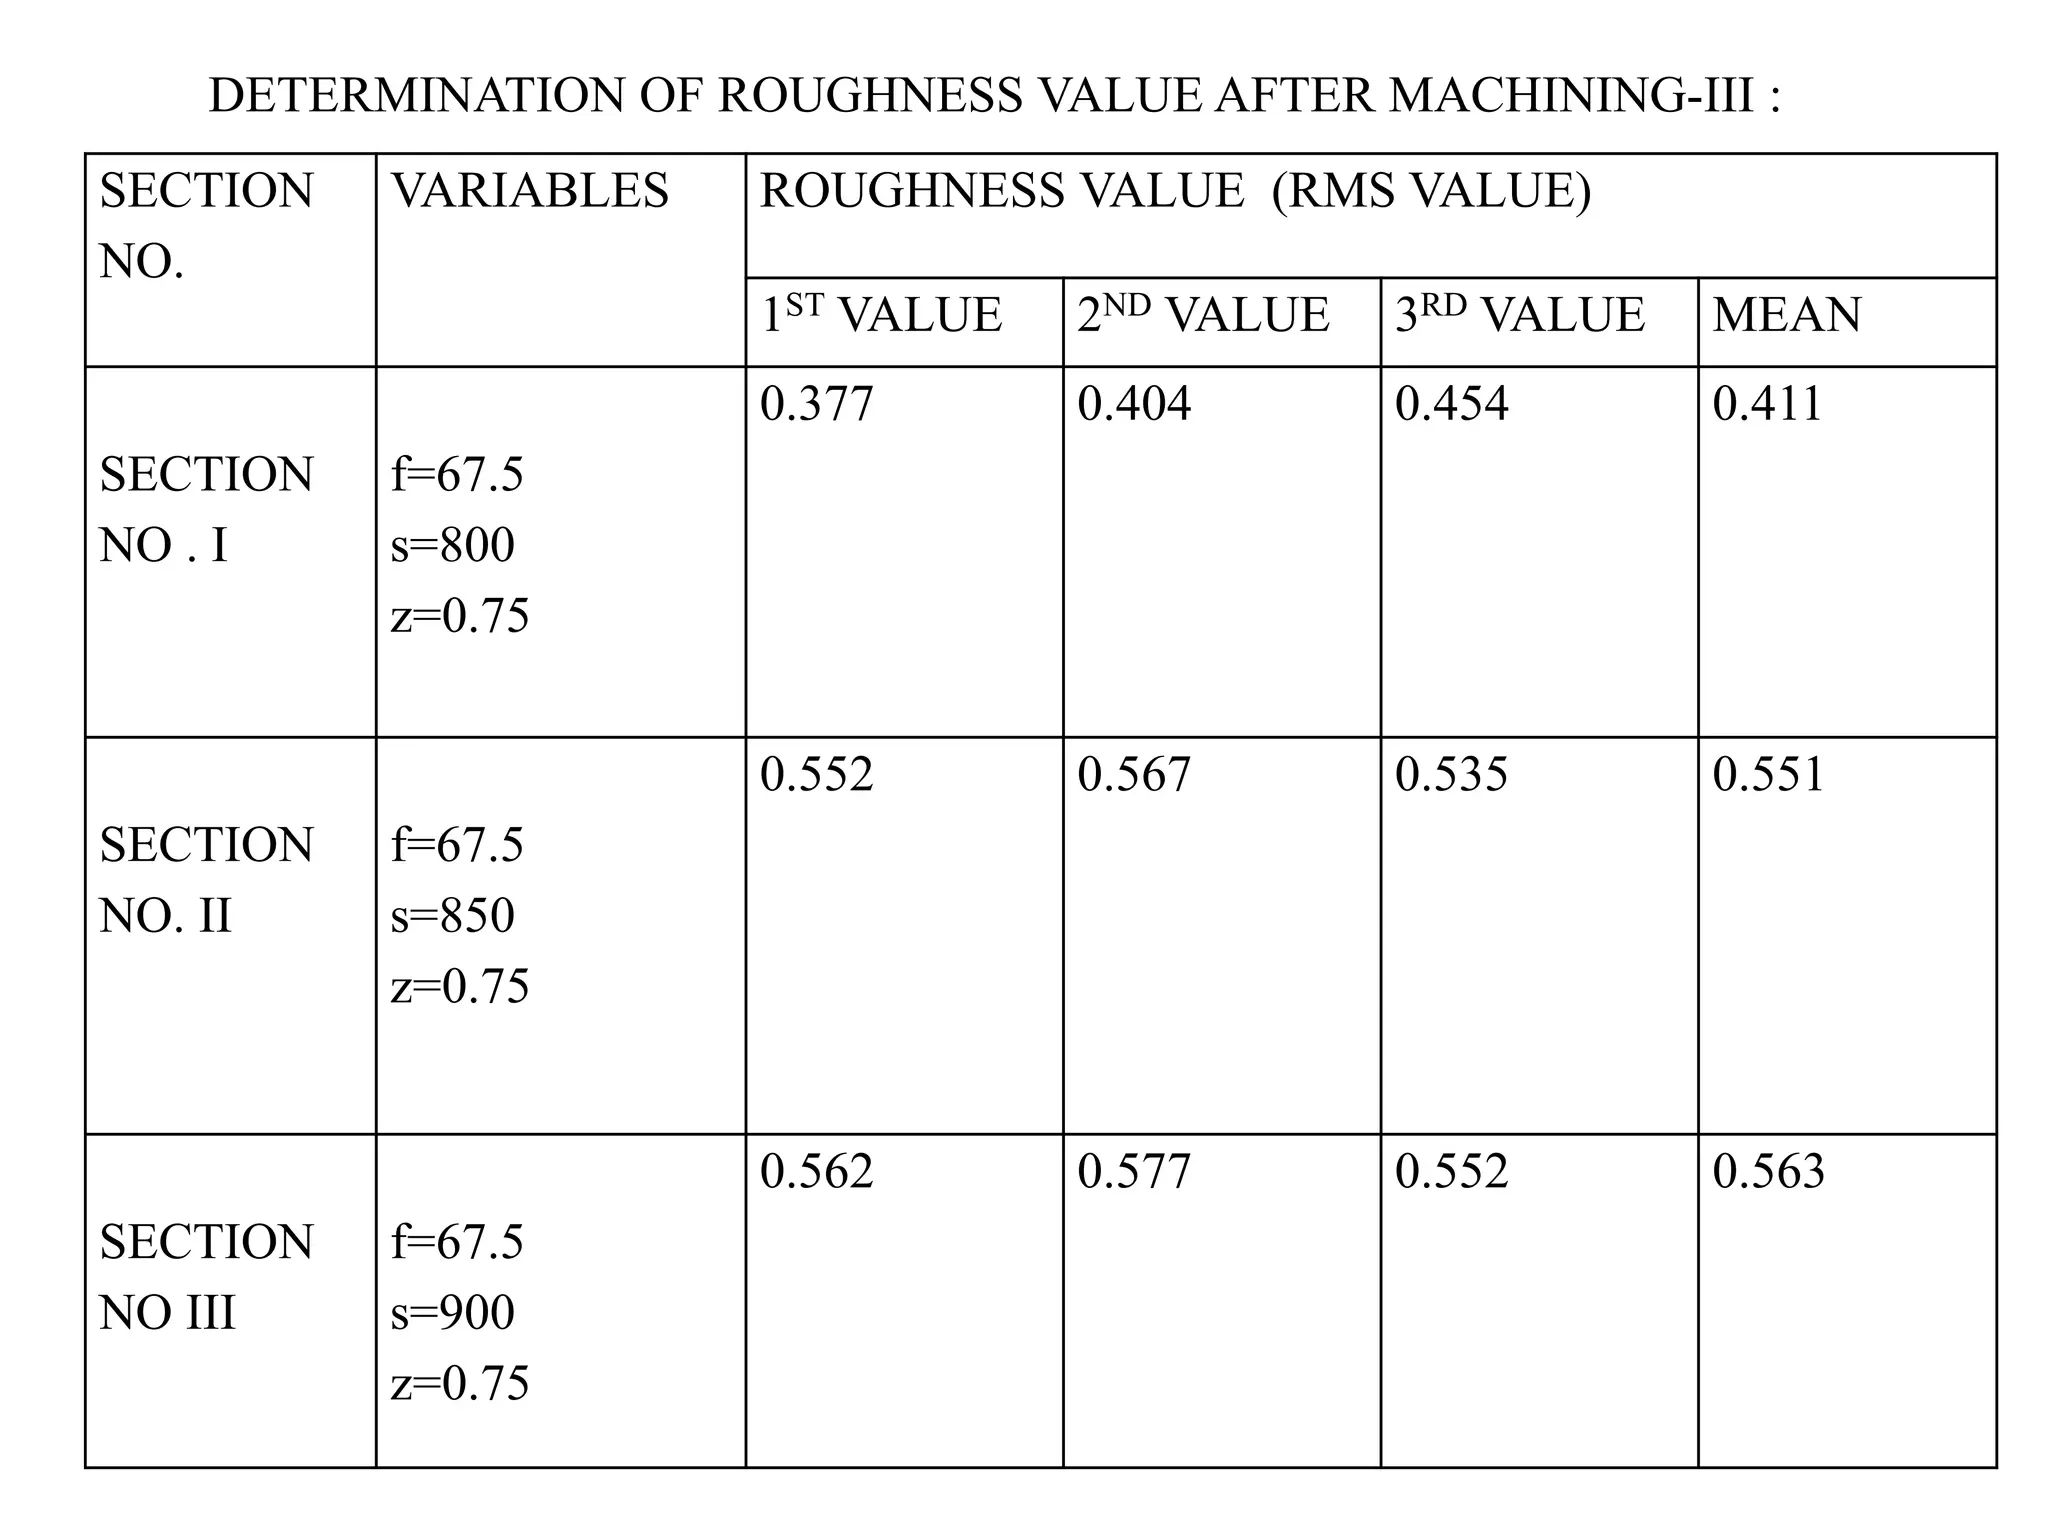
0.377 0.404 0.454 0.411
SECTION
NO. II
f=67.5
s=850
z=0.75
0.552 0.567 0.535 0.551
SECTION
NO III
f=67.5
s=900
z=0.75
0.562 0.577 0.552 0.563
DETERMINATION OF ROUGHNESS VALUE AFTER MACHINING-III :
0
0.1
0.2
0.3
0.4
0.5
0.6
780 800 820 840 860 880 900 920
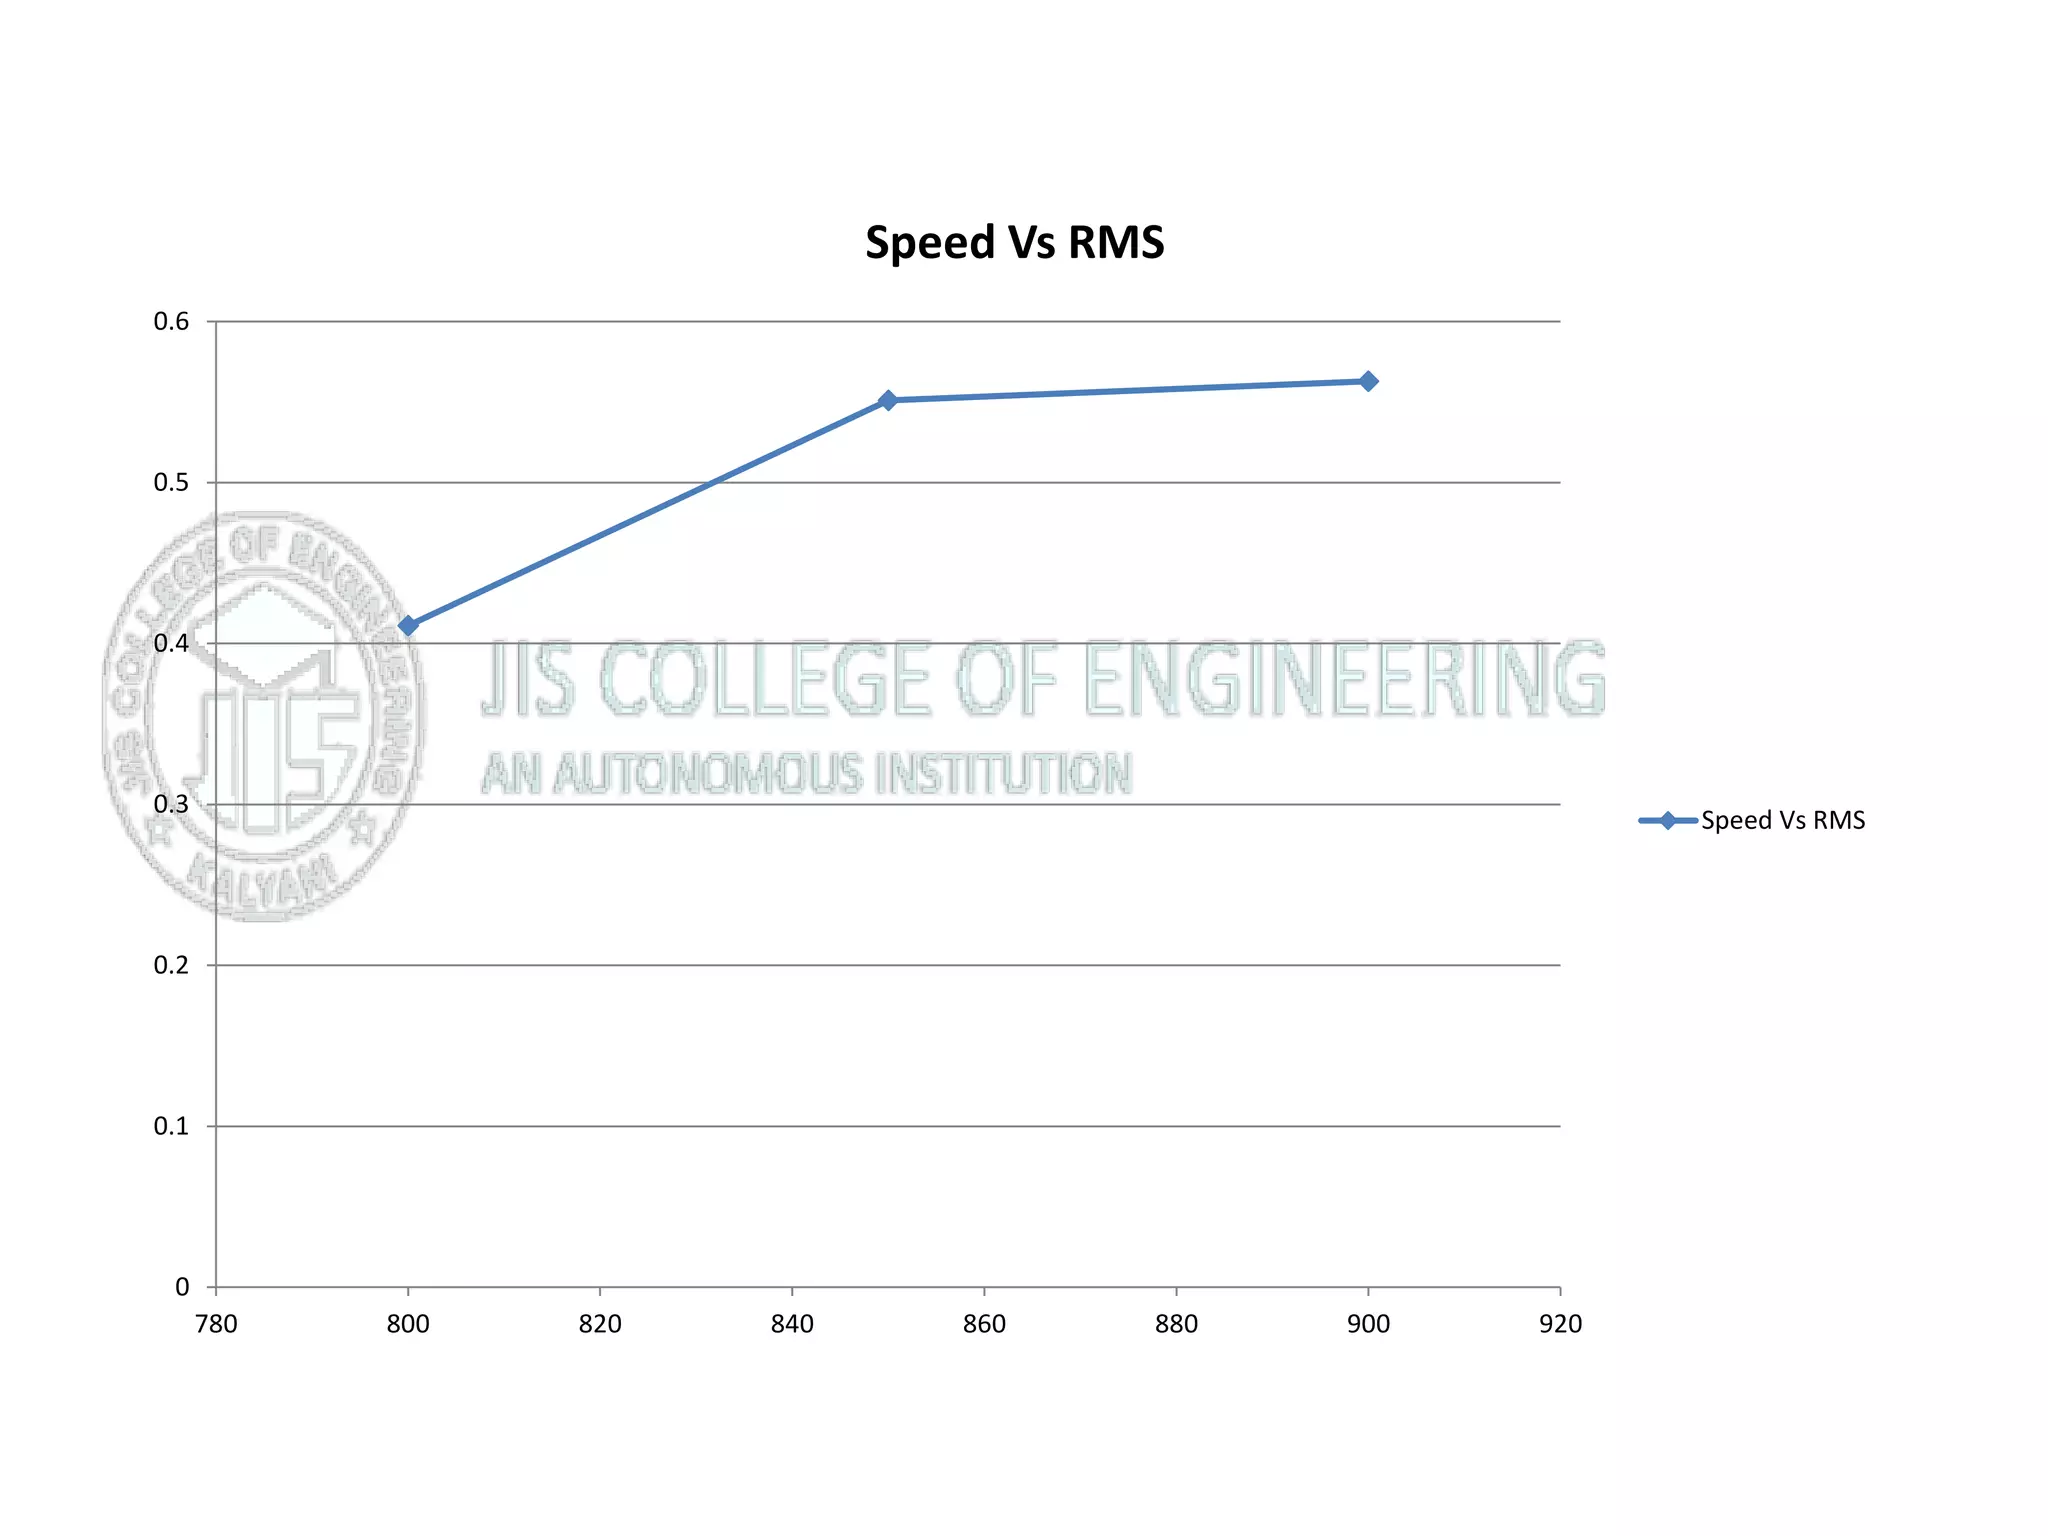
Speed Vs RMS
Speed Vs RMS
SURFACE ROUGHNESS GRAPH ANALYSIS
 we can state that, the optimum cutting will be Spindle
Speed 800 RPM, Feed rate 67.5 mm/min and Depth of cut
0.50 mm. The performance of Machining will be
maximum on these parameters and we can get the better
quality of product.
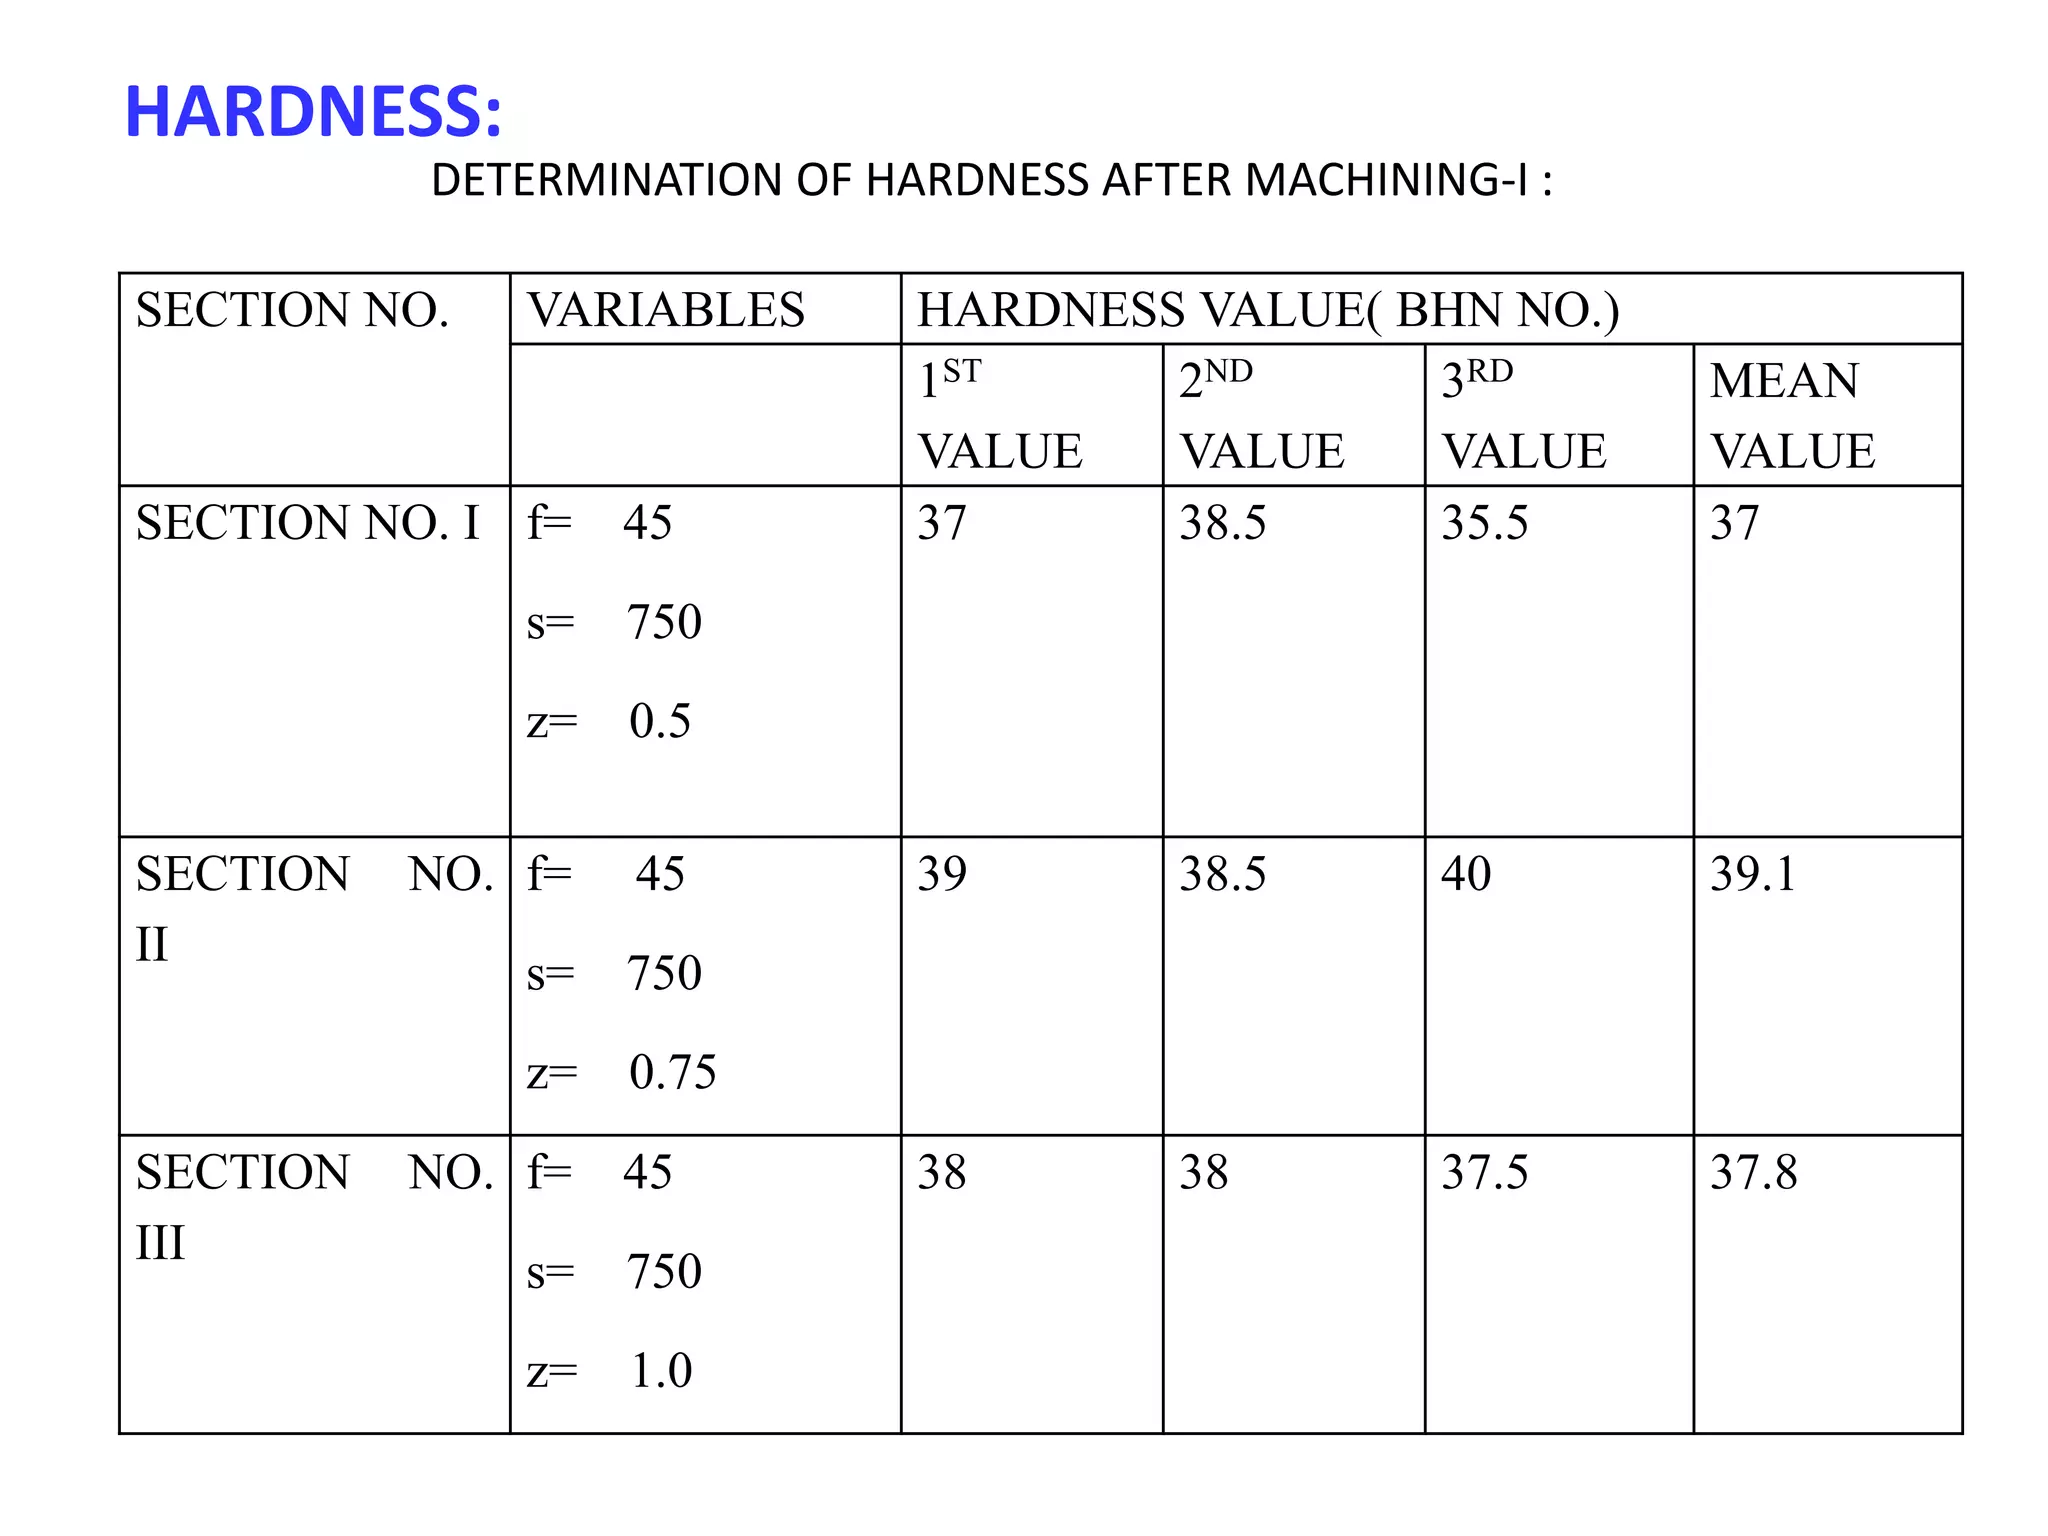
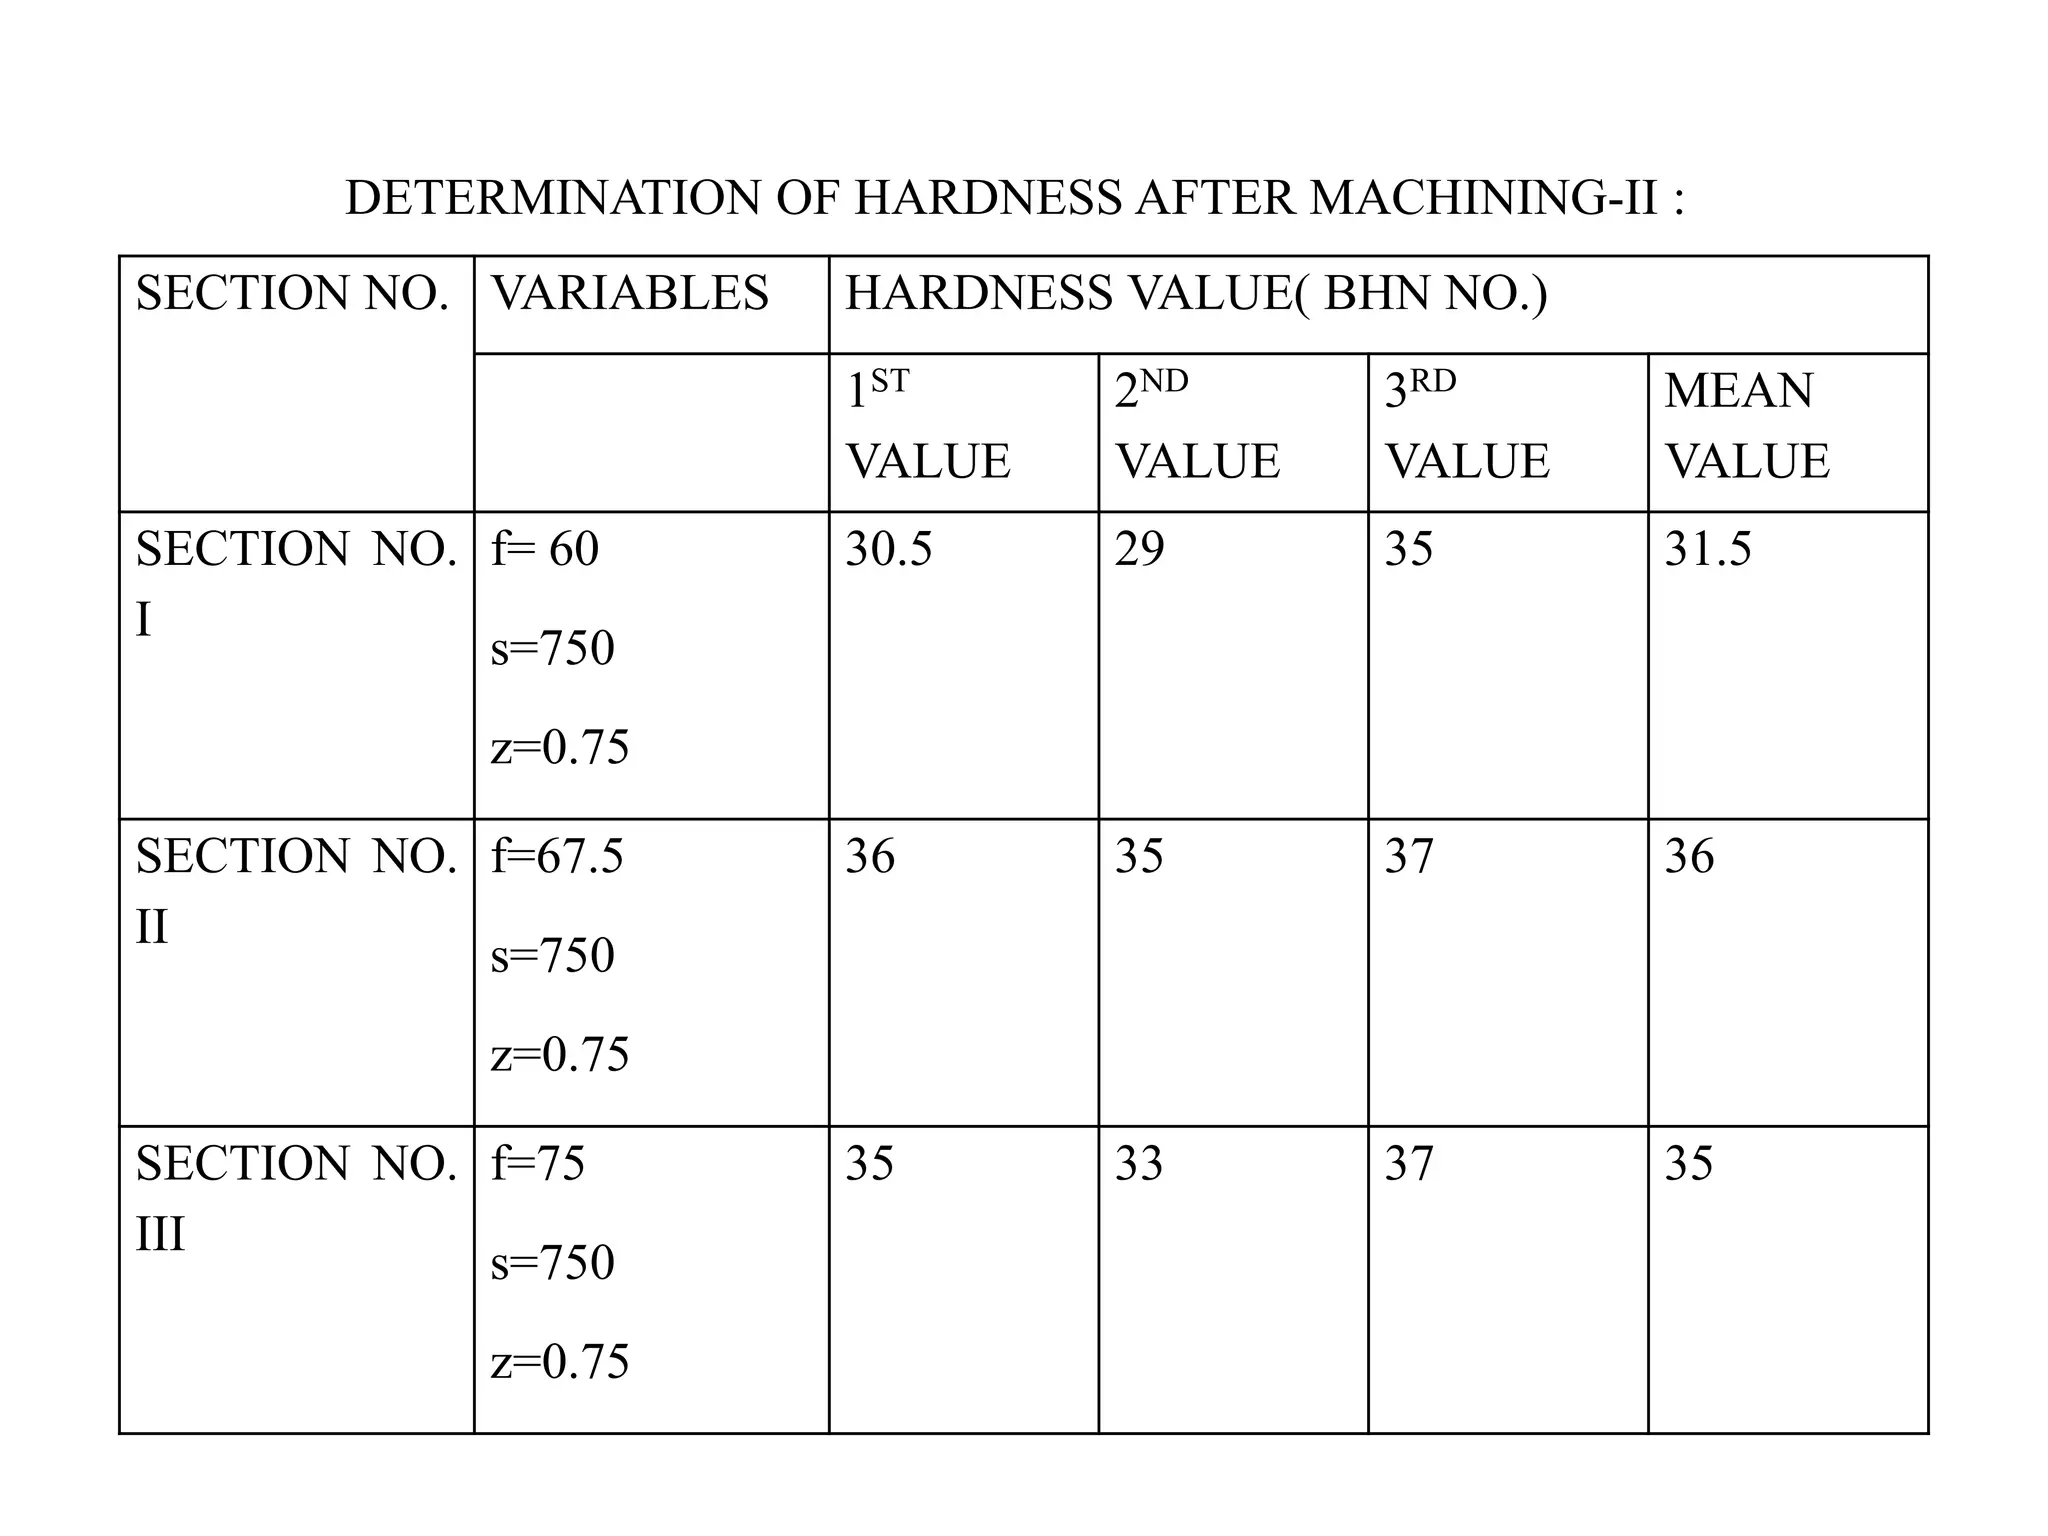
DETERMINATION OF HARDNESS AFTER MACHINING-I :
HARDNESS:
SECTION NO. VARIABLES HARDNESS VALUE( BHN NO.)
1ST
VALUE
2ND
VALUE
3RD
VALUE
MEAN
VALUE
SECTION NO. I f= 45
s= 750
z= 0.5
37 38.5 35.5 37
SECTION NO.
II
f= 45
s= 750
z= 0.75
39 38.5 40 39.1
SECTION NO.
III
f= 45
s= 750
z= 1.0
38 38 37.5 37.8
HARDNESS:
36.5
37
37.5
38
38.5
39
39.5
0 0.2 0.4 0.6 0.8 1 1.2
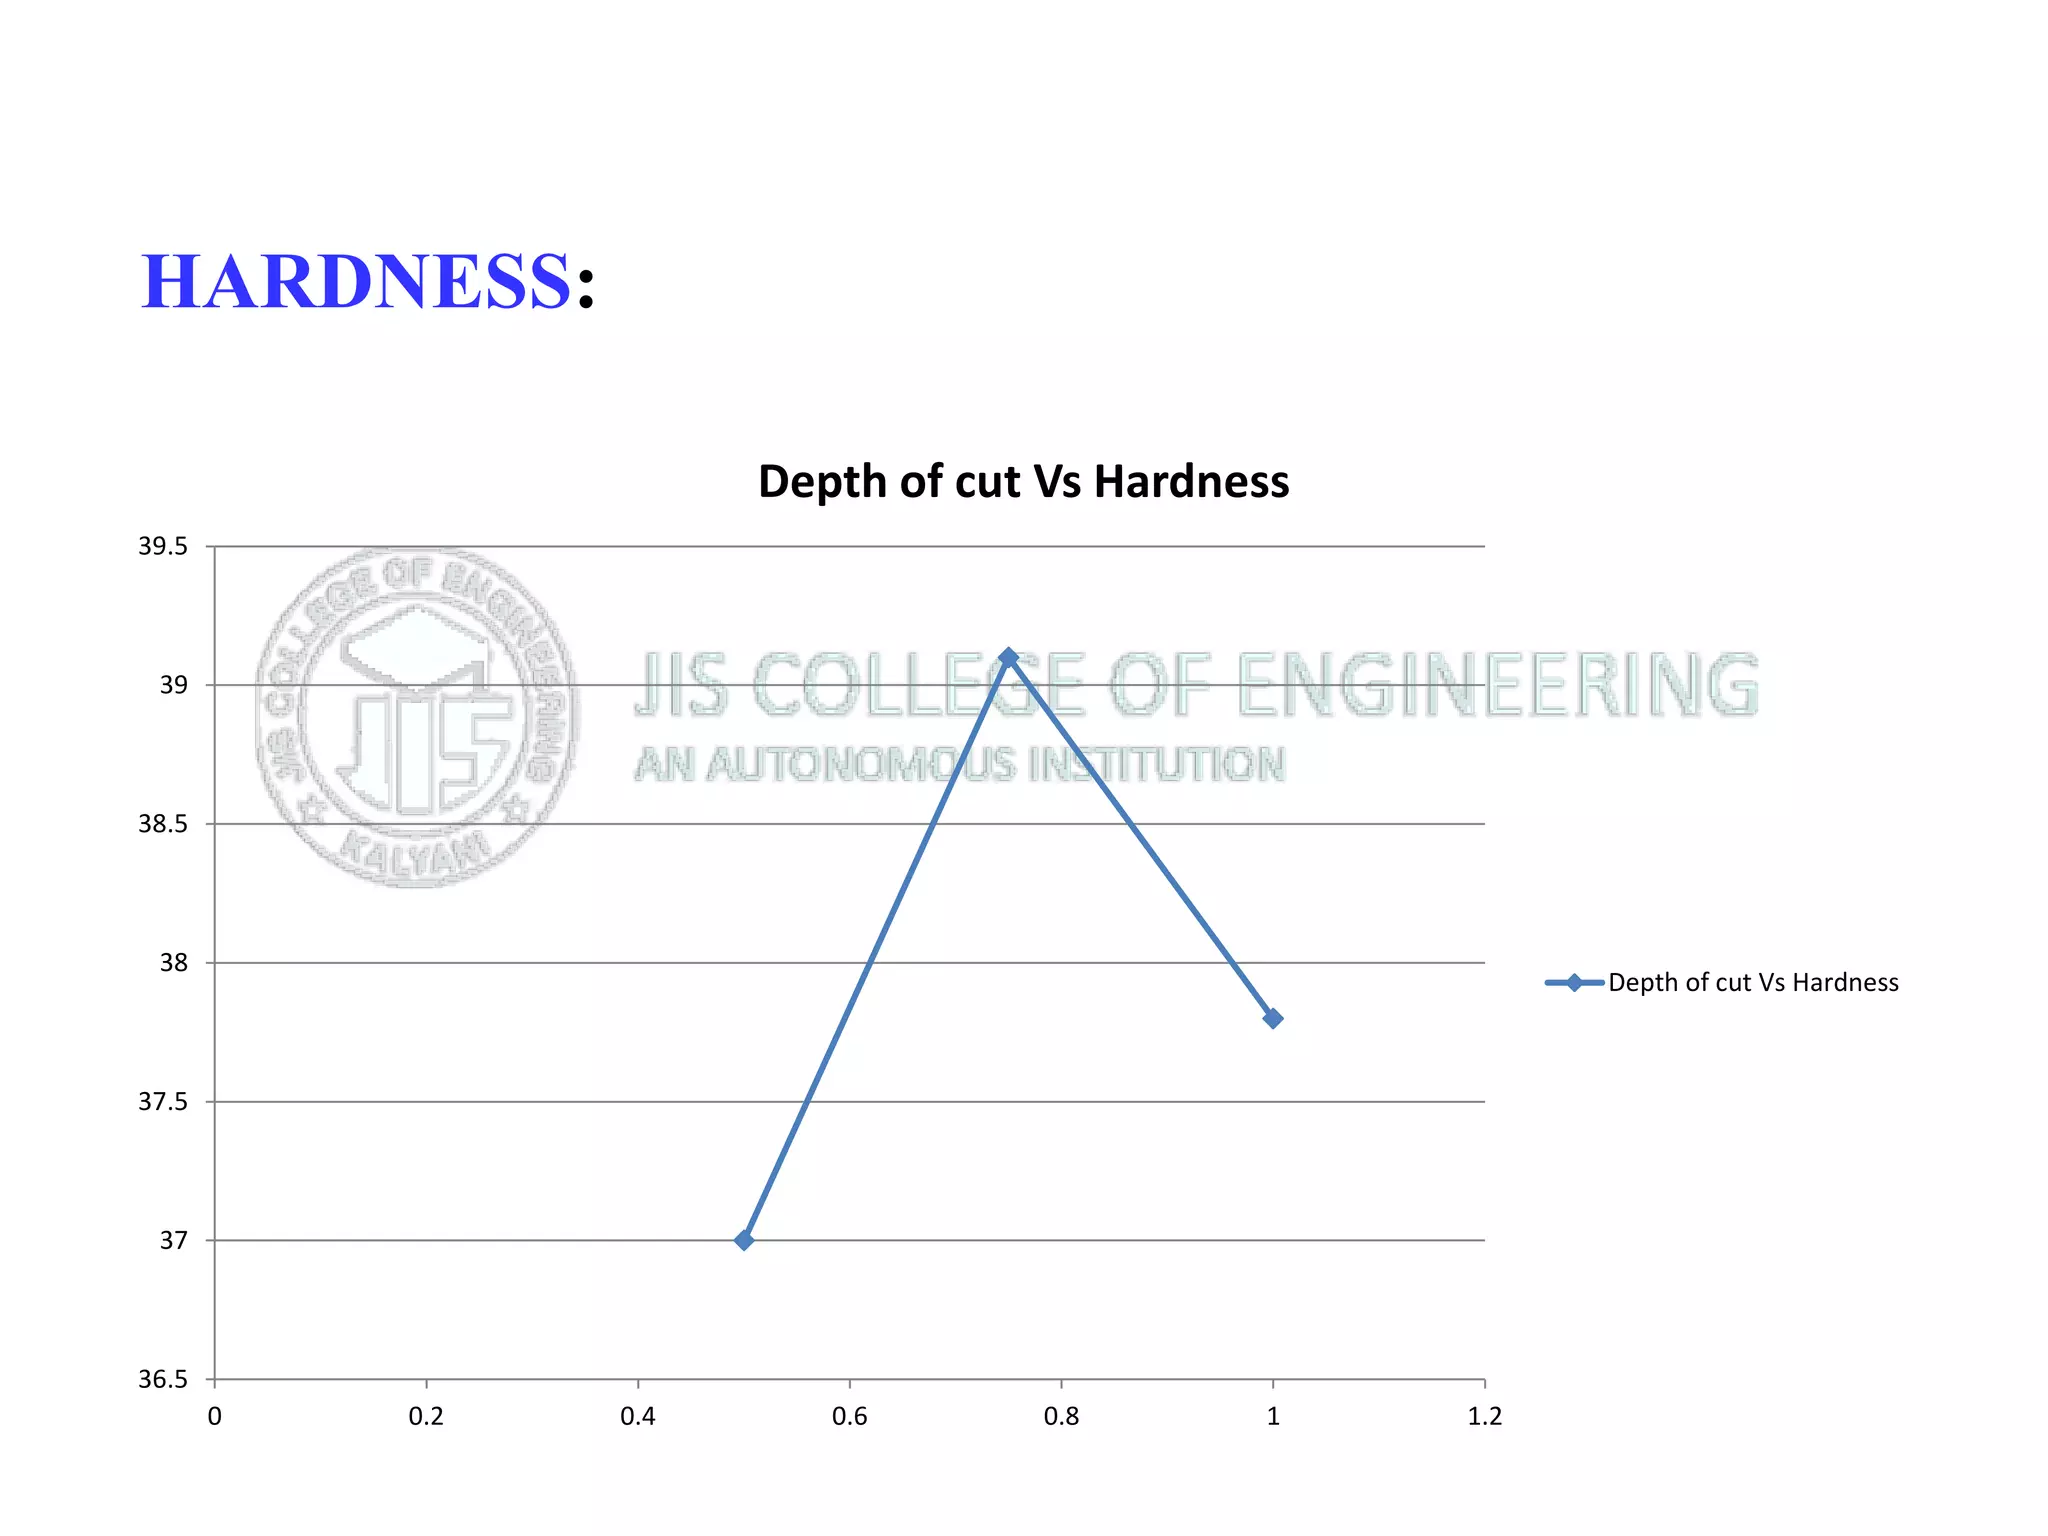
Depth of cut Vs Hardness
SECTION NO. VARIABLES HARDNESS VALUE( BHN NO.)
1ST
VALUE
2ND
VALUE
3RD
VALUE
MEAN
VALUE
SECTION NO.
I
f= 60
s=750
z=0.75
30.5 29 35 31.5
SECTION NO.
II
f=67.5
s=750
z=0.75
36 35 37 36
SECTION NO.
III
f=75
s=750
z=0.75
35 33 37 35
DETERMINATION OF HARDNESS AFTER MACHINING-II :
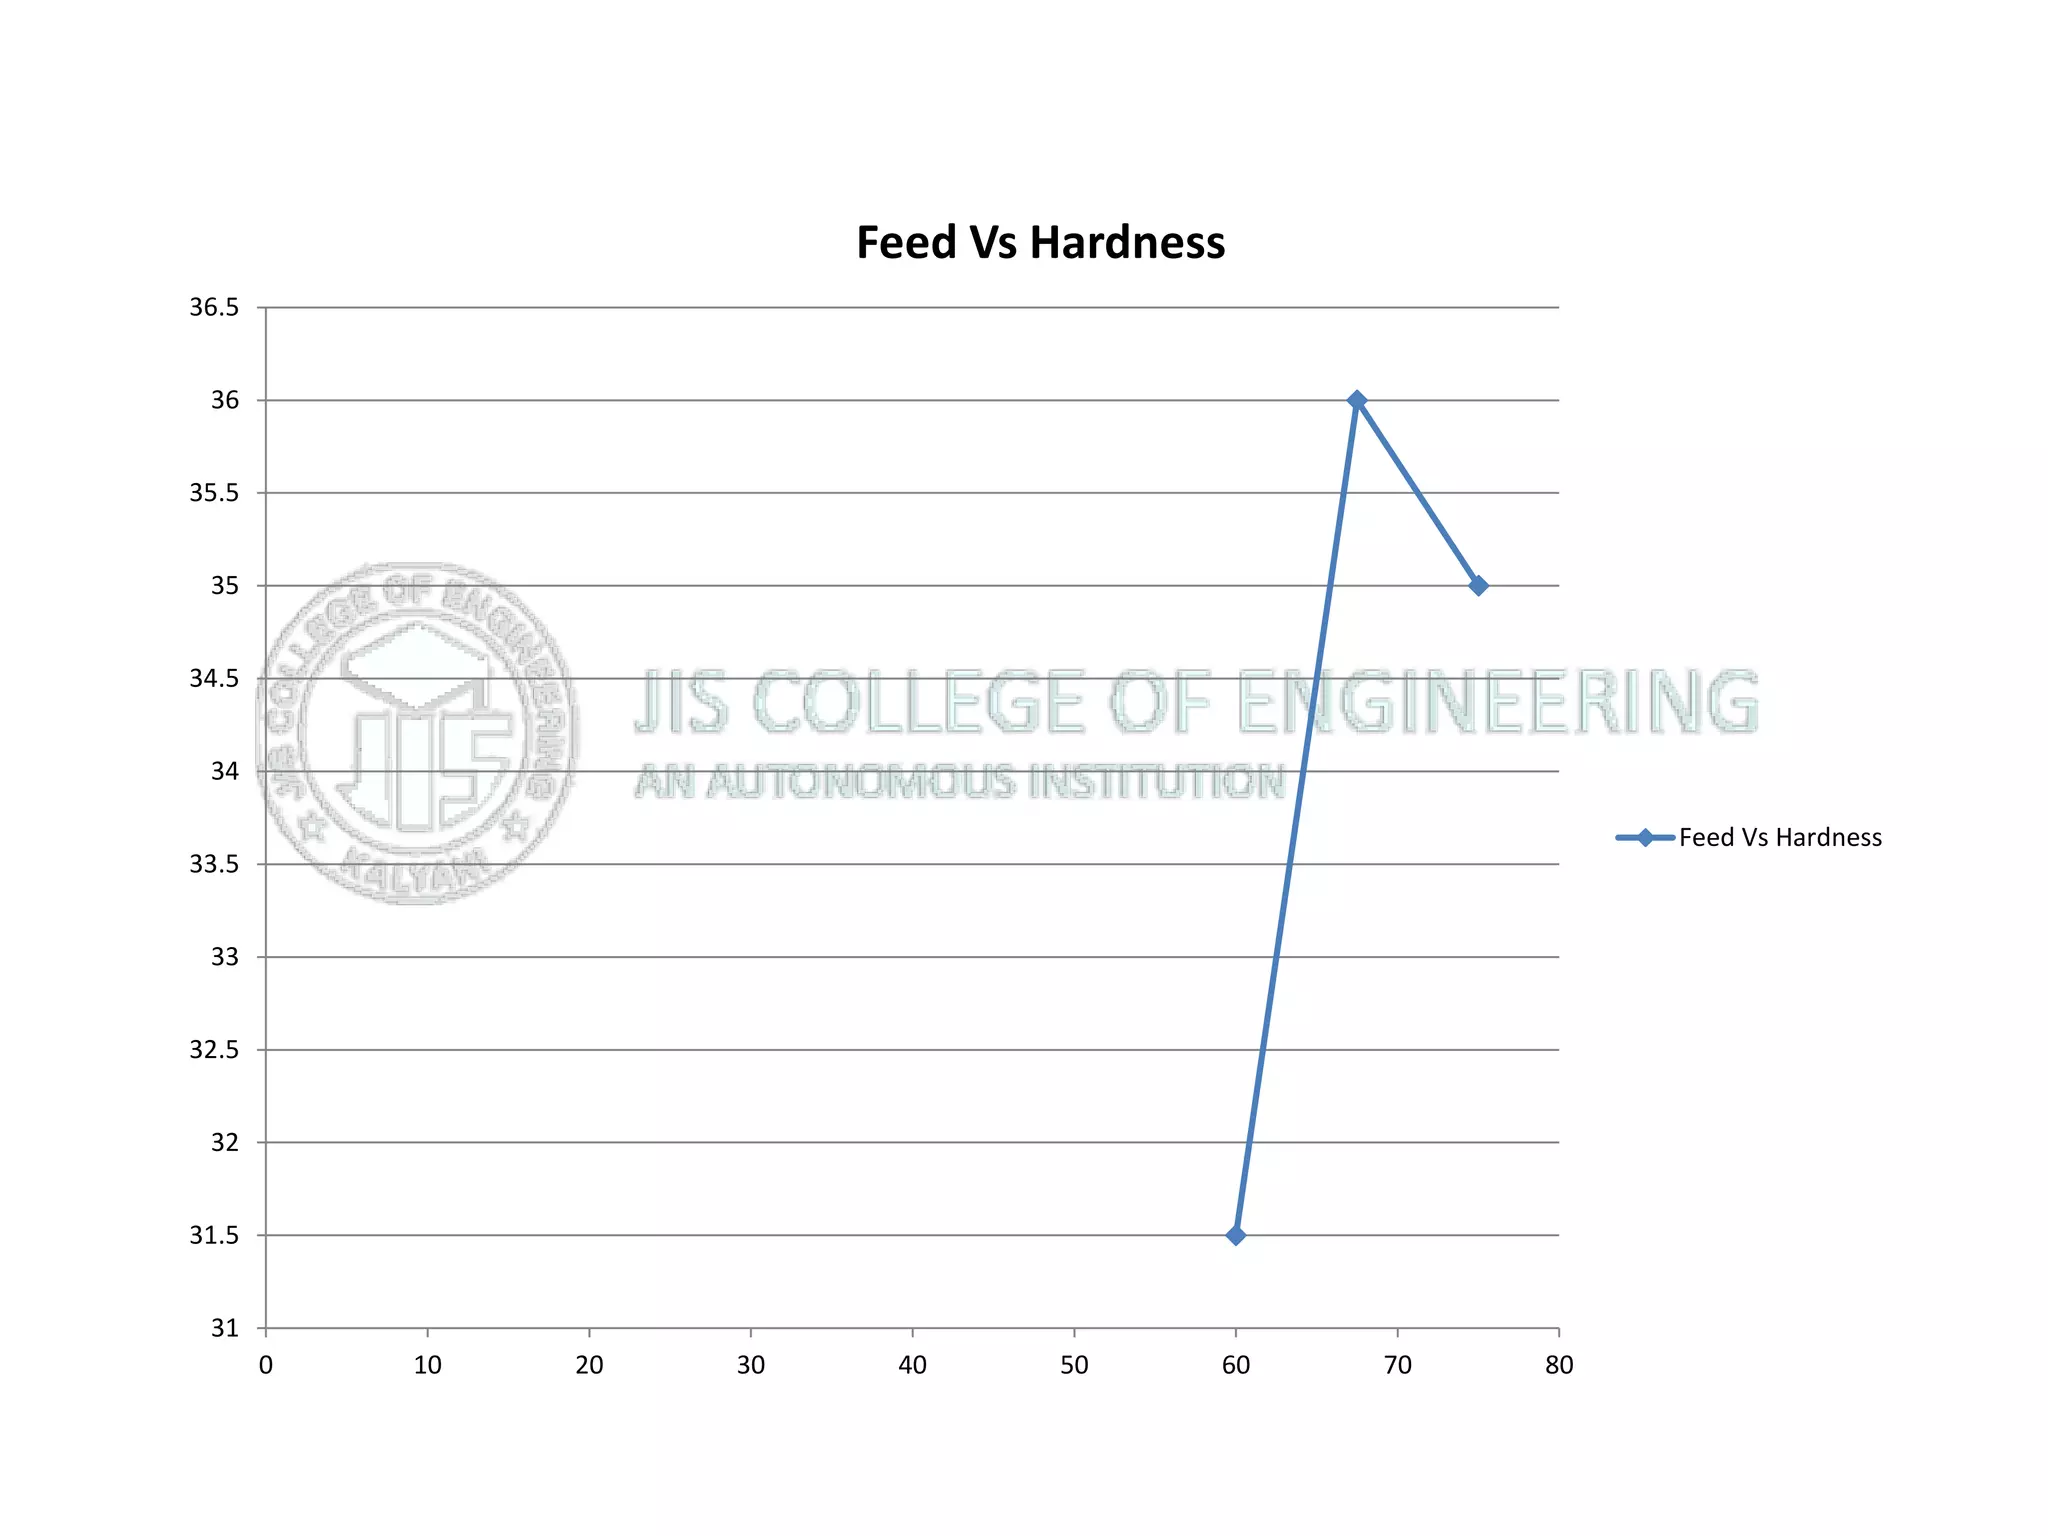
31
31.5
32
32.5
33
33.5
34
34.5
35
35.5
36
36.5
0 10 20 30 40 50 60 70 80
Feed Vs Hardness
Feed Vs Hardness
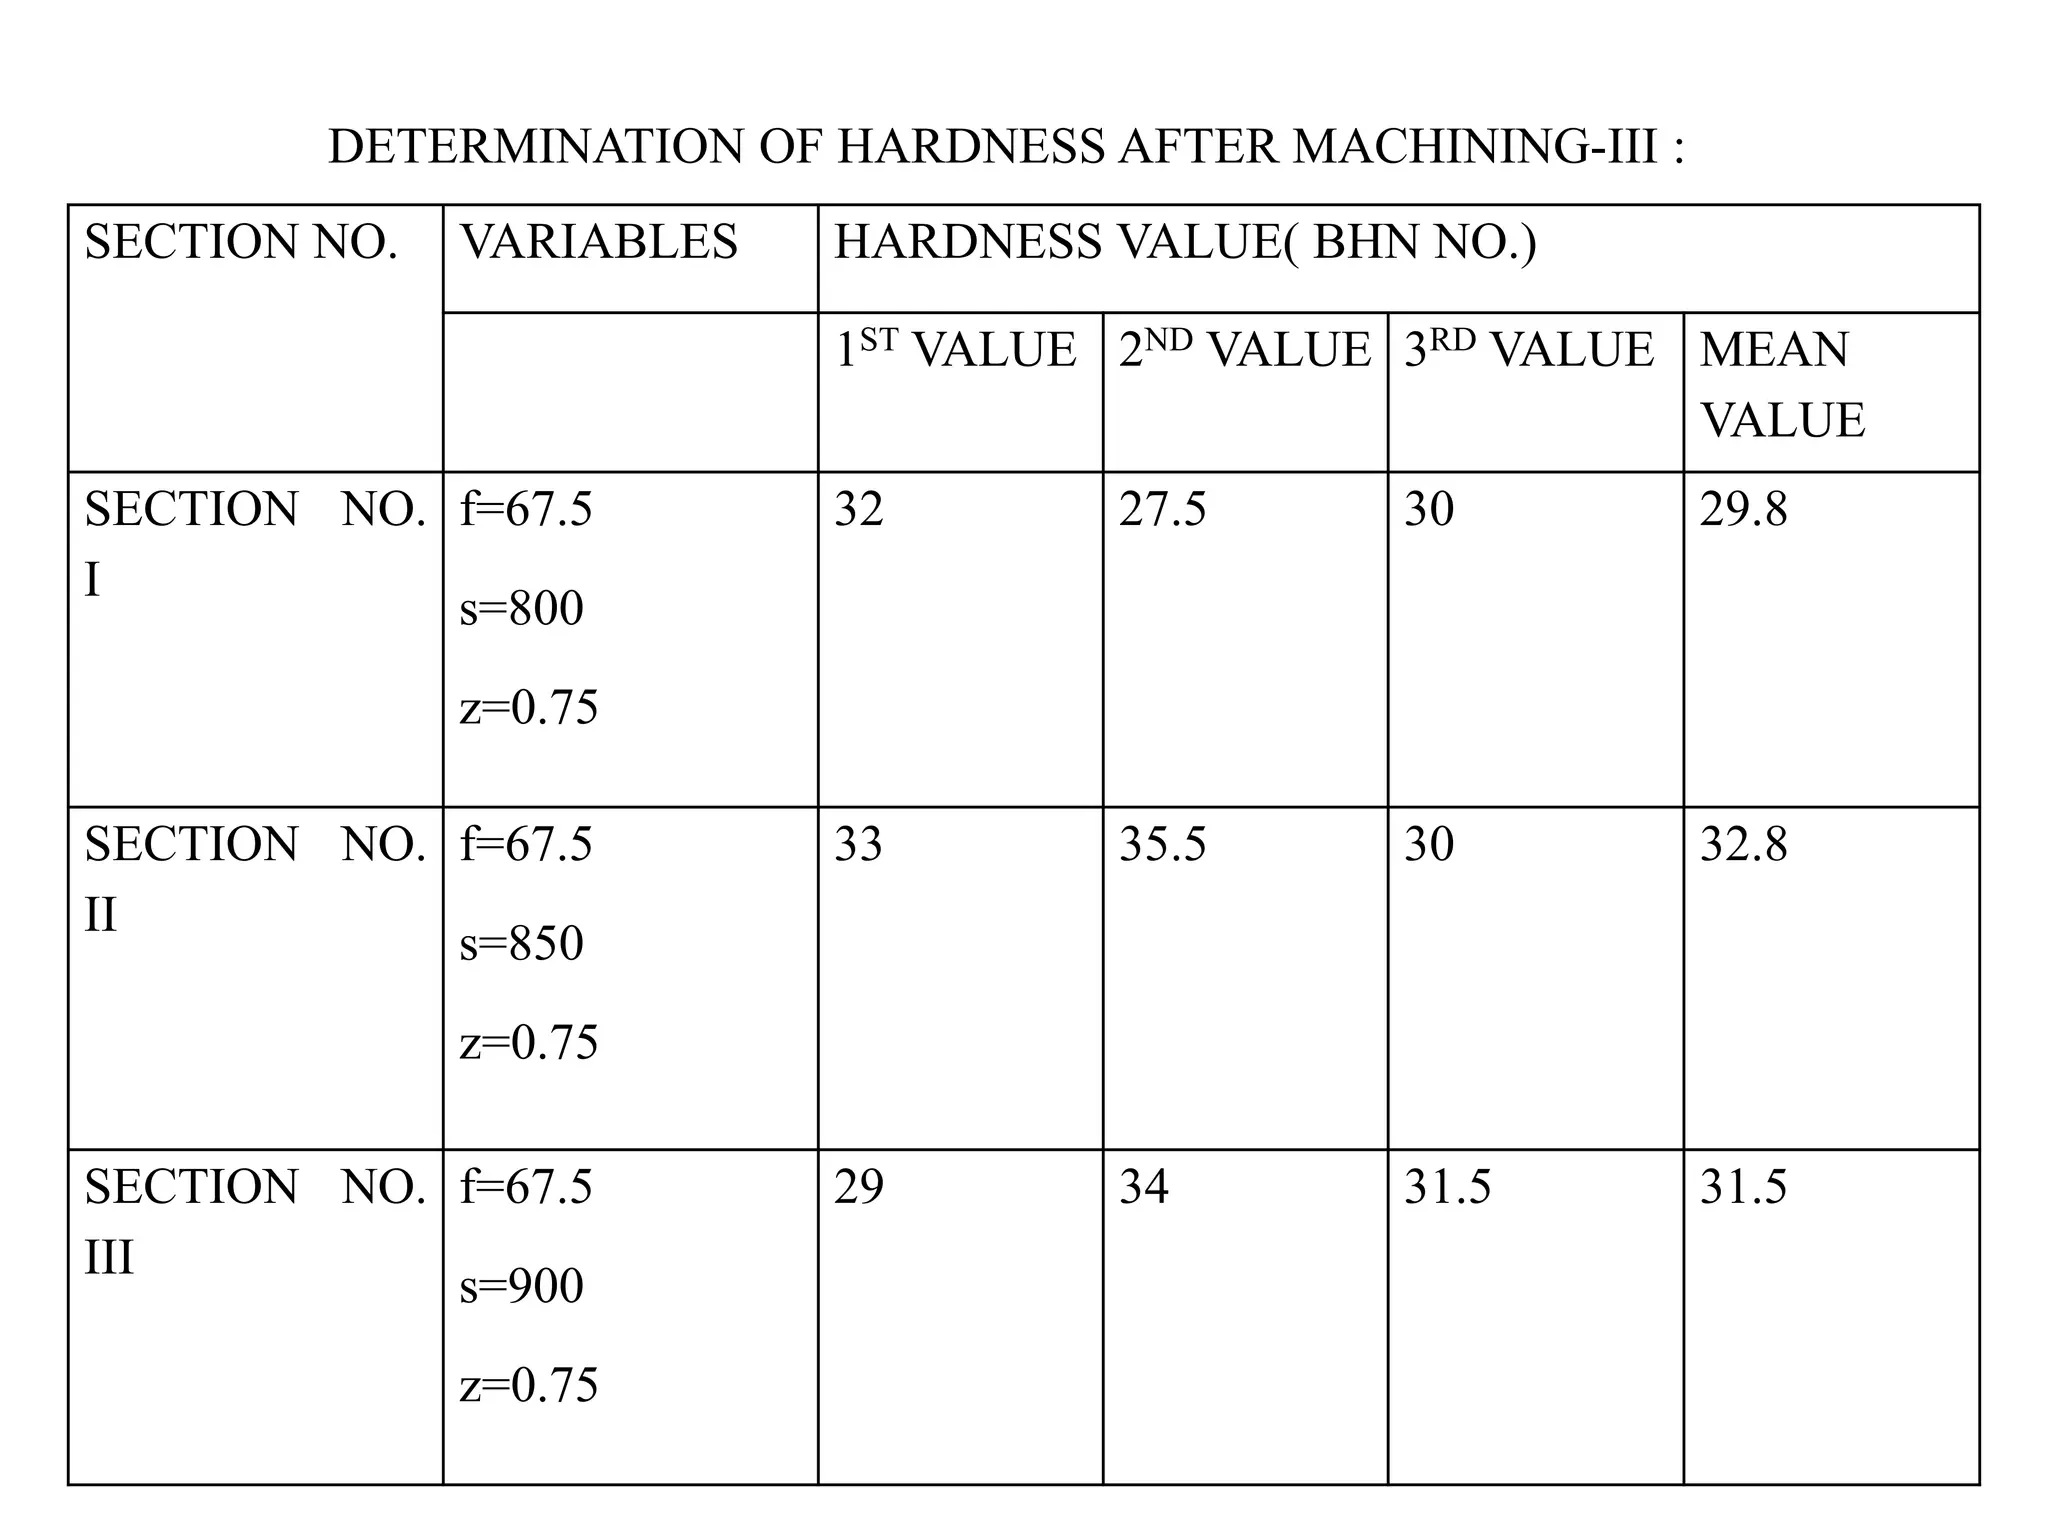
SECTION NO. VARIABLES HARDNESS VALUE( BHN NO.)
1ST VALUE 2ND VALUE 3RD VALUE MEAN
VALUE
SECTION NO.
I
f=67.5
s=800
z=0.75
32 27.5 30 29.8
SECTION NO.
II
f=67.5
s=850
z=0.75
33 35.5 30 32.8
SECTION NO.
III
f=67.5
s=900
z=0.75
29 34 31.5 31.5
DETERMINATION OF HARDNESS AFTER MACHINING-III :
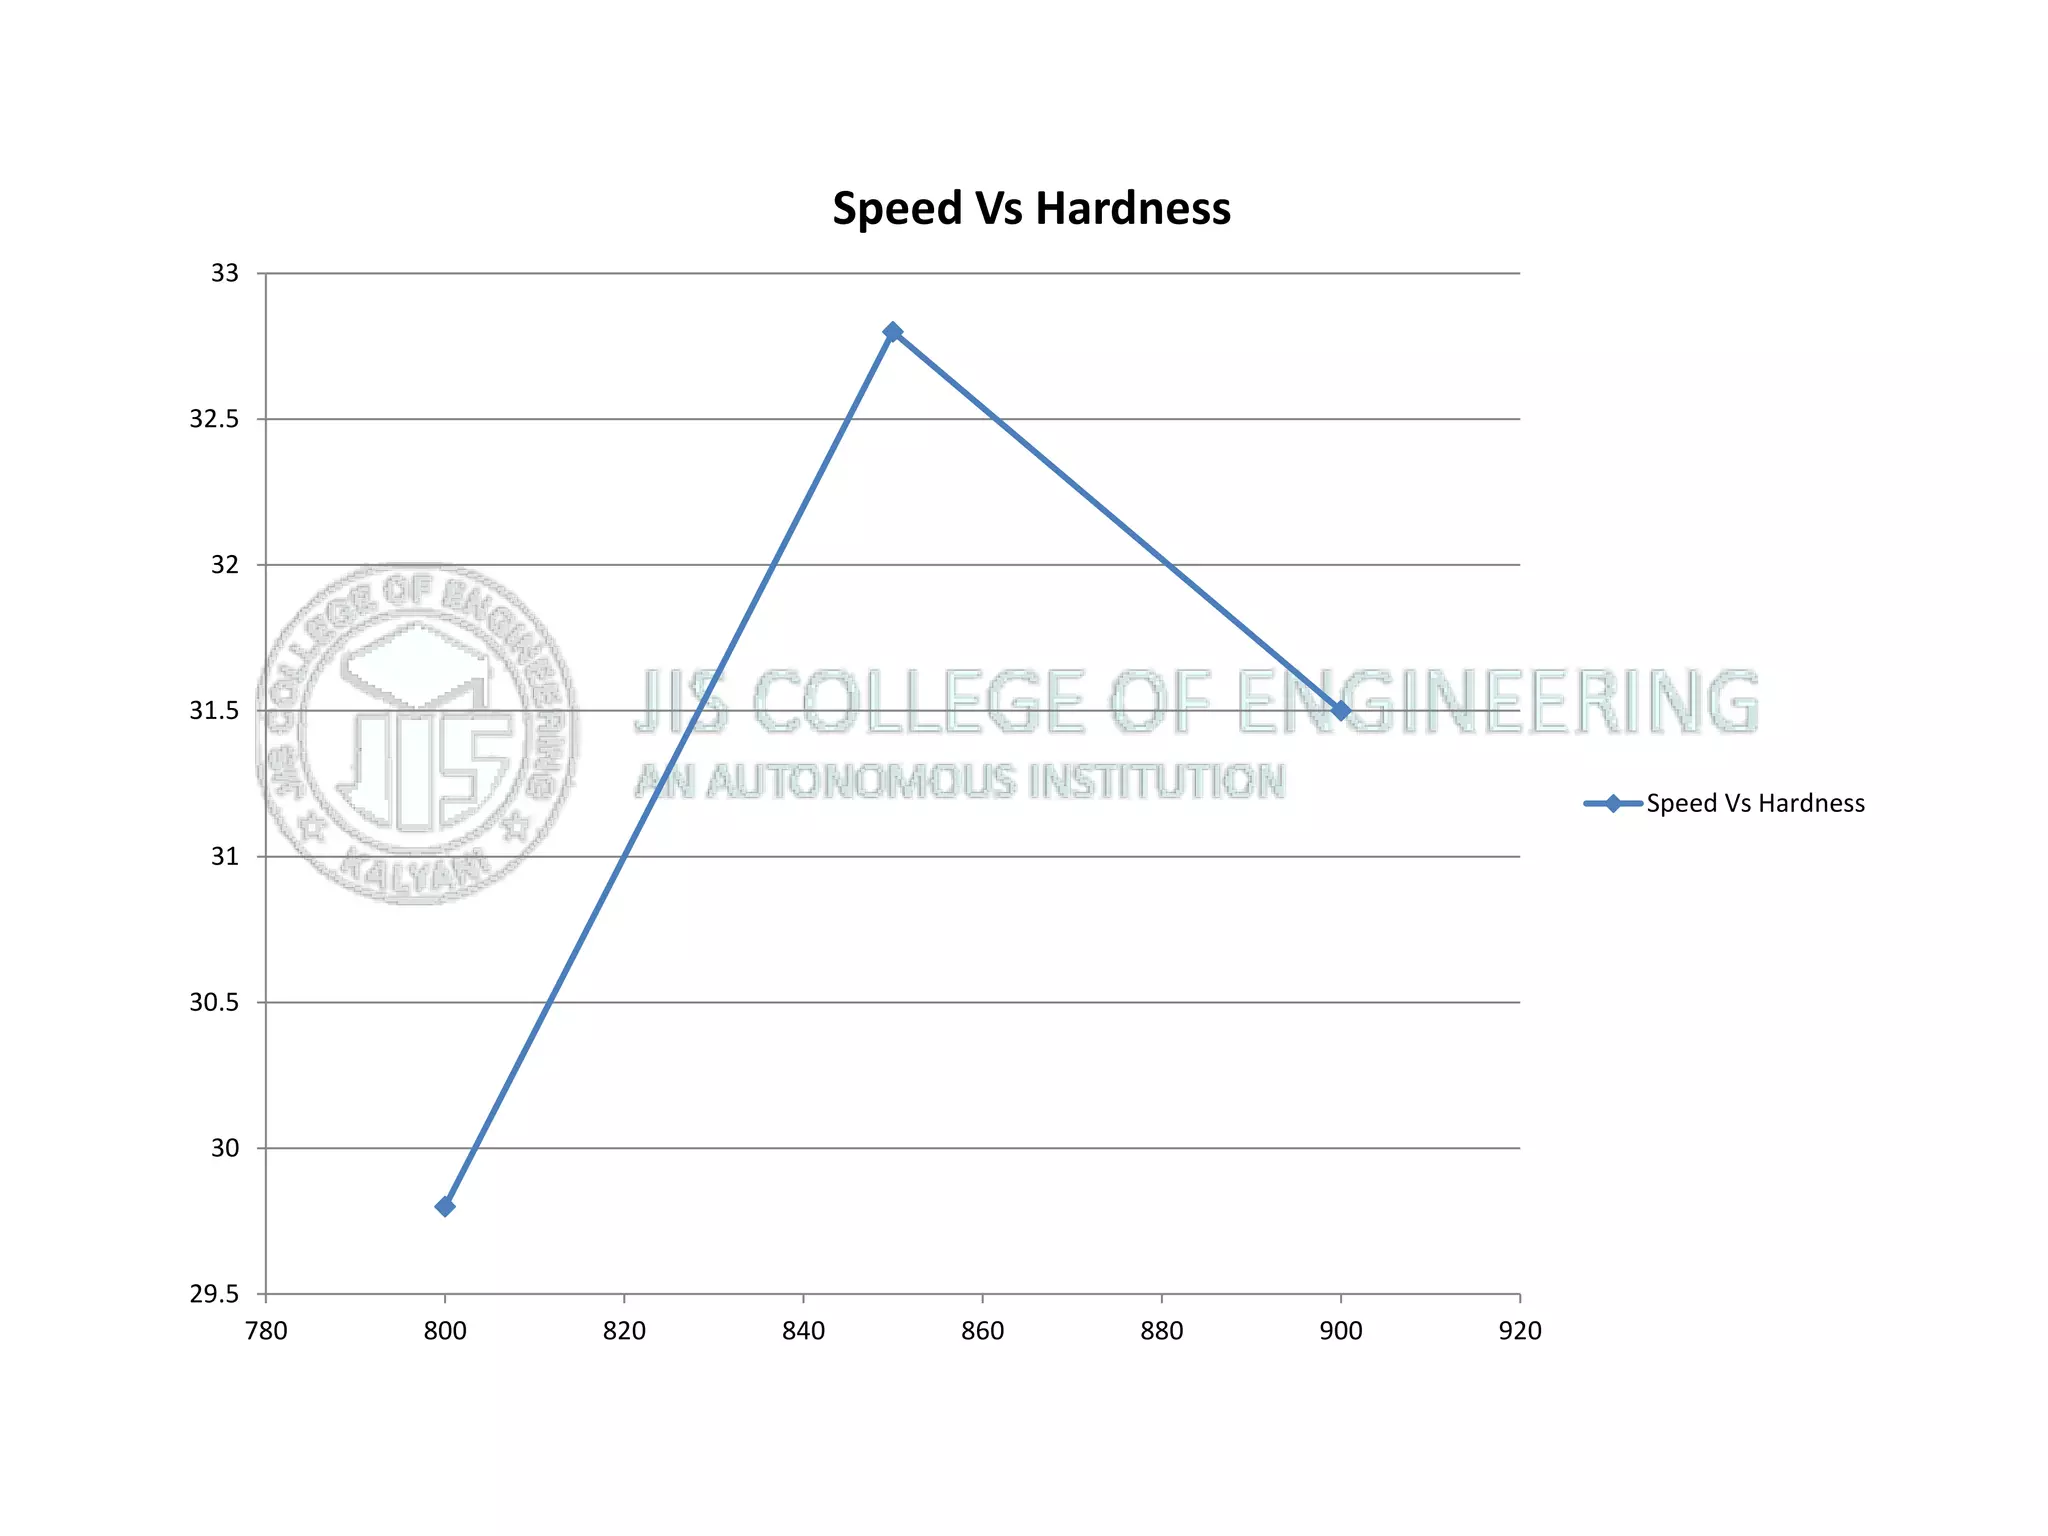
29.5
30
30.5
31
31.5
32
32.5
33
780 800 820 840 860 880 900 920
Speed Vs Hardness
Speed Vs Hardness
HARDNESS GRAPH ANALYSIS
 we can say that for the greater Hardness value after
machining Aluminium-6061 grade the machining parameters
should be like z=0.75mm, f=67.5mm/min and s=850 RPM and
then we could get better quality product.
The experimentation uses to obtain optimum machining
condition for surface roughness of aluminum in CNC milling
operation. The initial stage of experimentation consists of
evaluating the effect of control factors, which mainly affect the
output parameter.
The experimentation was carried out by varying control factors,
which results the control factors such as spindle speed, feed rate
and depth of cut mainly affect the output parameter surface
roughness. From this study the range of parameter also selected.
Cntd.
CONCLUSIONS
Total 9 experimental steps are performed for this experiment and
by using CNC Milling machine, the following Conclusion were
found:
For surface roughness (Ra) from the all selected parameters,
Feed Rate was most significantly affecting the Turning of
Aluminum. The result showed that the feed rate contributed
54.65%, cutting speed contributed only 34.67% and depth of cut
contributed was least with 10.47%.
 For surface roughness (Ra) optimum machining parameters are
spindle speed 800 rpm, feed rate 67.5 mm/min and depth of cut
0.50 mm.
For hardness optimum machining parameters are spindle speed
850 rpm, feed rate 67.5 mm/min and depth of cut 0.75 mm.
REFERENCE:
[1] RavindraThamma, “Comparison Between Multiple Regression Models to
Study Effect of Turning Parameters on the Surface Roughness”, Proceedings of
The 2008 IAJC-IJME International Conference,2008.
[2] H.M.Somashekara and Dr. N. Lakshmana Swamy, “Optimizing Surface
Roughness In Turning Operation Using Taguchi T echnique and
ANOVA”,International Journal of Engineering Science and Technology, Vol. 4
No.05 May 2012, pp. 1967- 1973.
[3] Gaurav Vohra, Palwinder Singh and Harsimran Singh Sodhi, “Analysis and
Optimization of Boring Process Parameters By Using Taguchi Method”,
International Journal of Computer Science and Communication Engineering,
2013, pp. 232-237.
[4] Ranganath M S, Vipin and R. S. Mishra, “Optimization of Process Parameters
in Turning Operation of Aluminium (6061) with Cemented Carbide Inserts Using
Taguchi Method and ANOVA”, International Journal of Advance Research and
Innovation, Volume 1, Issue 1, 2013, pp. 13-21.
[5] Biswajit Das, R. N. Rai & S. C. Saha, “Analysis Of Surface Roughness On
Machining Of Al-5cu Alloy In CNC Lathe Machine”, International Journal of
Research in Engineering and Technology, Volume: 02 Issue: 09, Sep-2013, pp.
296-299. Cntd.
[6] Md. Tayab Ali and Dr. ThuleswarNath, “Cutting Parameters Optimization for Turning
AA6063-T6 Alloy by Using Taguchi Method”, International Journal of Research in Mechanical
Engineering & Technology, Vol. 4, Issue 2, May - October 2014, pp. 82-86.
[7] Ali Abdallah, BhuveneshRajamony, and Abdulnasser Embark, “Optimization of cutting
parameters for surface roughness in CNC turning machining with aluminum alloy 6061
material”, IOSR Journal of Engineering, Vol. 04, Issue 10, October 2014, pp. 01-10.
[8] S.V.Alagarsamy and N.Rajakumar, “Analysis of Influence of Turning Process Parameters on
MRR & Surface Roughness Of AA7075 Using Taguchi‟s Method and RSM”, International
Journal of Applied Research and Studies, Volume 3, Issue 4, Apr-2014, pp. 1-8.
[9] David V, Rubén M, Menéndez C, Rodríguez J, Alique R (2006). Neural networks and
statistical based models for surface roughness prediction. International Association Of Science
and Technology for Development, Proceedings of the 25th IASTED international conference on
Modeling, indentification and control, pp. 326-331
[10] Srikanth T, Kamala V (2008). A Real Coded Genetic Algorithm for Optimization of Cutting
Parameters in Turning. IJCSNS Int. J. Comput. Sci. Netw. Secur,, 8(6):189-193.
[11] Franci C, Joze B (2003). Optimization of cutting process by GA approach. Robotics and
Computer Integrated Manufacturing, 19:113- 121
[12] Suresh PVS, Venkateswara RP, Deshmukh SG (2002). A genetic algorithmic approach for
optimization of surface roughness prediction model. Int. J. Mach. Tools Manuf, 42: 675-680.
Cntd.
[13] Yang WH, Tarng YS (1998). Design optimization of cutting parameters for turning
operations based on the Taguchi method. J. Mater. Process. Technol., 84: 122-129.
[14] Uros Z, Franci C (2003). Optimization of cutting conditions during cutting by using
neural networks. Robot. Comput. Integr. Manuf., 19: 189-199.
[15] Oktem H, Erzurumlu T, Kurtaran H (2005). Application of response surface
methodology in the optimization of cutting conditions for surface roughness. J. Mat.
Process. Technol., 170: 11-16.
[16] Al-Ahmari AMA (2007). Predictive machinability models for a selected hard material
in turning operations. J. Mat. Process. Technol., 190: 305-311.
[17] Huang L, Joseph C, Chen (2001). A Multiple Regression Model to Predict In-process
Surface Roughness in Turning Operation Via Accelerometer. J. Ind. Technol., 17(2): 1-8.
[18] Hossain MI, Amin AKM, Patwari AU (2008). Development of an artificial neural
network algorithm for predicting the surface roughness in end milling of Inconel 718 alloy.
International Conference on Computer and Communication Engineering, ICCCE (2008), 13-
15: 1321-1324.
[19] Avisekh B, Evgueni V, Bordatchev S, Kumar C (2009). On-line monitoring of surface
roughness in turning operations with optoelectrical transducer. Int. J. Manuf. Res., 4(1): 57-
73.
Cntd.
[20] Groover, Mikell (1996). Fundamentals of Modern Manufacturing. Prentice
Hall, Upper Saddle River, NJ (now published by John Wiley & Sons, New York
[21] Azouzi R, Guillot M (1997). On-line prediction of surface finish and
dimensional deviation in turning using neural network based sensor fusion. Int. J.
Mach. Tool Manuf., 37(9): 1201-1217.
[22] Feng C X, Hu ZJ (2001). A comparative study of the ideal and actual surface
roughness in finish turning,
[23] Muammer N, Hasan G, Iahsan T (2007). Comparison of regression and
artificial neural network models for surface roughness prediction with the cutting
parameters in CNC turning. Modelling and Simulation in Engineering, Hindawi
Publishing Corp. New York, NY, United States, 3: 2.
[24] Bajic D, Lela B, Zivkovic D (2008). Modeling of machined surface roughness
and optimization of cutting parameters in face milling, ISSN, 0543-5846.
[25] Sakir T, Süleyman N, Ismail S, Süleyman Y (2008). Prediction of surface
roughness using artificial neural network in lathe. International Conference on
Computer Systems and Technologies - CompSysTech’08.
Cntd.
INVESTIGATING  MECHINABILITY  OF  ALUMINIUM WITH  VARIOUS  PROCESS  PARAMETER BY CNC MILLING MACHIMNE

INVESTIGATING MECHINABILITY OF ALUMINIUM WITH VARIOUS PROCESS PARAMETER BY CNC MILLING MACHIMNE

  • 1.
    JIS COLLEGE OFENGINEERING Mechanical Engineering Department Presented By- 1. Pradip Ghosh 2. Tanmoy Halder 3. Amit Banerjee 4. Aniket Pal INVESTIGATING MECHINABILITY OF ALUMINIUM WITH VARIOUS PROCESS PARAMETER ON CNC
  • 2.
    Surface roughness andHardness, an indicator of surface quality is one of the most specified customer requirements in a machining process. For efficient use of machine tools, optimum cutting parameters (speed, feed and depth of cut) are required. Aluminum is one of the metals, besides iron and steel, which are widely used in many industrial fields such as aviation, navigation and automotive. INTRODUCTION
  • 3.
    OBJECTIVE Study on theEffects of Spindle speed , Feed rate and Depth of cut on surface roughness of Aluminium-6061 alloy. Study on the Effects of Spindle speed , Feed rate and Depth of cut on Hardness of Aluminium-6061 alloy.
  • 4.
    RavindraThamma [1] hasfound different models to obtain optimal machining parameters for required surface roughness for an aluminum 6061 work pieces. He concluded that Spindle speed, feed rate, and nose radius have significant control factors for surface roughness. Smoother surfaces will be produced when machined with a larger spindle speed, smaller feed rate, and nose radius Depth of cut has a significant influence on surface roughness.  H. M. Somashekaraet. al. [2] used control factors e.g. cutting speed, feed rate and depth of cut to optimize Surface Roughness while machining Al 6351-T6 alloy with Uncoated Carbide tool. They used Taguchi Technique to optimize the process parameters and confirmation test were also performed for finding main factors influencing Surface Roughness. They concluded that Speed has a greater influence on the Surface Roughness. Gaurav Vohra et. al. [3] have optimized the machining parameters for boring of aluminum material on CNC turning centre e.g. cutting speed, feed rate and depth of cut, to obtain optimal material removal rate and minimum surface roughness by using the Taguchi method. The conclusion found that the spindle speed and depth of cut are the most affecting parameters for metal removal rate and for roughness spindle speed and feed rate are the most affecting parameters. LITERATURE REVIEW Cntd.
  • 5.
    Ranganath M Set. al. [4] have studied the parameters, which affects surface roughness produced during the machining process of aluminum 6061 on CNC turning machine. They used Taguchi Methodology and confirmation test ANOVA to analyze the experimental results. The conclusion found that the feed rate and spindle speed are the most significant process parameters on surface roughness. Biswajit Das et. al. [5] has studied surface roughness affecting parameters on turning operation using CNC turning machine. The mainly affected control factors in experimentation were spindle speed, feed and depth of cut. They found that, the feed rate is the affecting parameter for surface roughness. Md. Tayab Ali et. al. [6] have optimized the machining parameters such as spindle speed, feed rate, and depth of cut for optimization of material Removal Rate (MRR) and Surface Roughness for machining of alloy of Aluminum (AA6063-T6) using carbide tool in dry condition on CNC Lathe .They concluded that the most affecting parameters for surface roughness are feed, cutting speed and least affecting factor is depth of cut. For metal removal rate, the depth of cut and the cutting speed is the most affecting parameters and least affecting factor is feed. Cntd.
  • 6.
     Ali Abdallahet. al. [7] had optimized machining parameters for the surface roughness with aluminum alloy 6061 material in CNC Lathe. They uses „response surface methodology‟ on control factors such as feed rate, spindle speed, and depth of cut, and minimize surface roughness and maximize the material removal rate for CNC turning operation. Based on the results of surface roughness it was found that feed rate affects both surface roughness and metal removal rate. The spindle speed is the most significant control factor for surface roughness than metal removal rate. Larger spindle speed results minimum surface roughness and this result can be explained along with other affecting parameters.  S.V. Alagarsamyet. al. [8] has conducted experiment by turn aluminum Alloy 6061 using TNMG 115 100 tungsten carbide tool at three levels (Spindle speed, feed rate & DOC) of cutting parameters and analyzed by employing Taguchi methodology and respond surface methodology. Taguchi method and Response surface methodology were applied for analyzing to get optimum surface roughness and material removal rate for turning process of Aluminum Alloy 7075 using CNC machine via considering three influencing input parameters- spindle speed, Feed rate and Depth of Cut. They found that the input parameter feed rate has most influencing to the quality characteristics of surface roughness and depth of cut being most affecting parameter for MRR. David et al. (2006)[9] described an approach to predict Surface roughness in a high speed end-milling process and used artificial neural networks (ANN) and statistical tools to develop different surface roughness predictors. Cntd.
  • 7.
     Srikanth andKamala (2008) [10] proposed a real coded genetic algorithm (RCGA) to find optimum cutting parameters and explained various issues of RCGA and its advantages over the existing approach of binary coded genetic algorithm (BCGA).  Franic and Joze (2003) [11] used binary coded genetic algorithm (BCGA) for the optimization of cutting parameters. This genetic algorithm optimizes the cutting conditions having an influence on production cost, time and quality of the final product.  Suresh et al. (2002) [12] developed optimum surface roughness predictive model using binary coded genetic algorithm (BCGA). This GA program gives minimum and maximum values of surface roughness and their respective optimal machining conditions. Yang and Tarng (1998] [13] used Taguchi method for design optimization on surface quality. An orthogonal array, the signal-to-noise (S/N) ratio and the analysis of variance (ANOVA) were employed to investigate the cutting characteristics. Uros and Franci (2003) [14] proposed a neural network-based approach to complex optimization of cutting parameters and described the multi-objective technique of optimization of cutting conditions by means of the neural networks taking into consideration the technological, economic and organizational limitations. Cntd.
  • 8.
    Oktem et al.(2005) [15] utilized response surface methodology to create an efficient analytical model for surface roughness in terms of cutting parameters: Feed, cutting speed, axial depth of cut, radial depth of cut and machining tolerance. Al-Ahmari (2007) [16] developed empirical models for tool life, surface roughness and cutting force for turning operations. Two important data mining techniques used were response surface methodology and neural networks.  Huang and Joseph (2001) [17] predicted in-process surface roughness through multiple regression model in turning operation via accelerometer.  Hossain et al. (2008) [18] developed an artificial neural network algorithm for predicting the surface roughness in end milling of Inconel 718 alloy. Avisekh et al. (2009) [19] conducted a study of feasibility of on-line monitoring of surface roughness in turning operations using a developed opto-electrical transducer. Regression and neural network (NN) models were exploited to predict surface roughness and compared to actual and on-line measurements.  Groover and Mikell (1996) [20] depicted the impact of three factors, namely, the feed, nose radius, and cutting-edge angles, on surface roughness. Cntd.
  • 9.
    Azouzi and Guillot(1997) [21] proposed an on-line prediction of surface finish and dimensional deviation in turning using neural network based sensor fusion.  Feng and Hu (2001) [22] addressed a comparative study of the ideal and actual surface roughness in finish turning and also applied the fractional factorial experimentation approach for studying the impact of turning parameters on the roughness of turned surfaces and used analysis of variances to examine the impact of turning factors and factor interactions on surface roughness.  Muammer et al. (2007) [23] addressed regression analysis and neural network- based models used for the prediction of surface roughness and compared for various cutting conditions in turning. Bajic et al. (2008) [24] focused on modeling of machined surface roughness and optimization of cutting parameters in face milling and examined the influence of cutting parameters on surface roughness in face milling. Cntd.
  • 10.
    Sakir et al.(2008)[25] worked on the prediction of surface roughness using artificial neural network in lathe and investigated the effect of tool geometry on surface roughness in universal lathe and carried out machining process on AISI 1040 steel in dry cutting condition using various insert geometry at depth of cut of 0.5 mm. Optimization of machining parameters not only increases the utility for machining economics, but also the product quality to a great extent. The dynamic nature and widespread usage of turning operations in practice have raised a need for seeking a systematic approach that can help to set-up turning operations in a timely manner and also to achieve the desired surface roughness quality. After a detailed literature survey, it is inferred that there are no appropriate surface recognition models for machining Brass C26000 metal in CNC turning. The experimental works were conducted in a leading pump manufacturing company. The seamless pipe which is being manufactured in the pump industry made up of B surface area that is considered in this work brass C26000 requires more surface finish in the inner.
  • 11.
  • 12.
    SPECIFICATION OF ALUMINIUM COMPOSITIONOF “Al-6061” OR “Alloy 61S” SILICON (0.4% to 0.8%) IRON(0.7%) COPPER(0.15 to 0.4%) MANGANESE (0.15%) MAGNESIUM(0.8 to 1.2%) CHROMIUM(0.04 to 0.35%) ZINC(0.25%) TITANIUM(0.15%) OTHER IMPURITY(Less than 0.05%) REMAINDER ALUMINIUM(95.85 to 98.56%)
  • 13.
    1. CNC MILLINGMACHINE (M-TAB FLEXMILL) Milling is the machining process of using rotary cutters to remove material from a work piece by advancing (or feeding) in a direction at an angle with the axis of the tool. It covers a wide variety of different operations and machines, on scales from small individual parts to large, heavy-duty gang milling operations. It is one of the most commonly used processes in industry and machine shops today for machining parts to precise sizes and shapes. Most CNC milling machines (also called machining centers) are computer controlled vertical mills with the ability to move the spindle vertically along the Z-axis. This extra degree of freedom permits their use in die sinking, engraving applications, and 2.5D surfaces such as relief sculptures. When combined with the use of conical tools or a ball nose cutter, it also significantly improves milling precision without impacting speed, providing a cost-efficient alternative to most flat-surface hand-engraving work. Cntd. EXPERIMENTAL SET-UP
  • 14.
  • 15.
  • 16.
    3. HARDNESS TESTINGMACHINE The machine is designed for determining the Brinell Hardness (BHN) of metals and alloys. The load is applied by manually and the indentation is read with the help of a Brinell Microscope.
  • 17.
    4. JOB SETUP We have taken Aluminium alloy 6061 grade for the experiment and performing the operation in the laboratory DIMENSION OF JOB – 90*90*10(All in mm)
  • 18.
    RESULTS AND ANALYSIS DETERMINATIONOF ROUGHNESS VALUE AFTER MACHINING-I : SECTION NO. VARIABLES ROUGHNESS VALUE (RMS VALUE) 1ST VALUE 2ND VALUE 3RD VALUE MEAN SECTION NO . I f= 45 s= 750 z= 0.5 0.343 0.301 0.393 0.345 SECTION NO. II f= 45 s= 750 z= 0.75 0.641 0.672 0.547 0.620 SECTION NO III f= 45 s= 750 z= 1.0 0.686 0.639 0.701 0.675
  • 19.
    0 0.1 0.2 0.3 0.4 0.5 0.6 0.7 0.8 0 0.2 0.40.6 0.8 1 1.2 Depthth of Cut (Z) Vs RMS Z VS RMS
  • 20.
    SECTION NO. VARIABLESROUGHNESS VALUE (RMS VALUE) 1ST VALUE 2ND VALUE 3RD VALUE MEAN SECTION NO . I f= 60 s=750 z=0.75 0.609 0.655 0.690 0.651 SECTION NO. II f=67.5 s=750 z=0.75 0.599 0.637 0.591 0.609 SECTION NO III f=75 s=750 z=0.75 0.747 0.697 0.674 0.706 DETERMINATION OF ROUGHNESS VALUE AFTER MACHINING-II :
  • 21.
    0.6 0.62 0.64 0.66 0.68 0.7 0.72 0 10 2030 40 50 60 70 80 Feed Vs RMS Feed Vs RMS
  • 22.
    SECTION NO. VARIABLES ROUGHNESS VALUE(RMS VALUE) 1ST VALUE 2ND VALUE 3RD VALUE MEAN SECTION NO . I f=67.5 s=800 z=0.75 0.377 0.404 0.454 0.411 SECTION NO. II f=67.5 s=850 z=0.75 0.552 0.567 0.535 0.551 SECTION NO III f=67.5 s=900 z=0.75 0.562 0.577 0.552 0.563 DETERMINATION OF ROUGHNESS VALUE AFTER MACHINING-III :
  • 23.
    0 0.1 0.2 0.3 0.4 0.5 0.6 780 800 820840 860 880 900 920 Speed Vs RMS Speed Vs RMS
  • 24.
    SURFACE ROUGHNESS GRAPHANALYSIS  we can state that, the optimum cutting will be Spindle Speed 800 RPM, Feed rate 67.5 mm/min and Depth of cut 0.50 mm. The performance of Machining will be maximum on these parameters and we can get the better quality of product.
  • 25.
    DETERMINATION OF HARDNESSAFTER MACHINING-I : HARDNESS: SECTION NO. VARIABLES HARDNESS VALUE( BHN NO.) 1ST VALUE 2ND VALUE 3RD VALUE MEAN VALUE SECTION NO. I f= 45 s= 750 z= 0.5 37 38.5 35.5 37 SECTION NO. II f= 45 s= 750 z= 0.75 39 38.5 40 39.1 SECTION NO. III f= 45 s= 750 z= 1.0 38 38 37.5 37.8
  • 26.
    HARDNESS: 36.5 37 37.5 38 38.5 39 39.5 0 0.2 0.40.6 0.8 1 1.2 Depth of cut Vs Hardness Depth of cut Vs Hardness
  • 27.
    SECTION NO. VARIABLESHARDNESS VALUE( BHN NO.) 1ST VALUE 2ND VALUE 3RD VALUE MEAN VALUE SECTION NO. I f= 60 s=750 z=0.75 30.5 29 35 31.5 SECTION NO. II f=67.5 s=750 z=0.75 36 35 37 36 SECTION NO. III f=75 s=750 z=0.75 35 33 37 35 DETERMINATION OF HARDNESS AFTER MACHINING-II :
  • 28.
    31 31.5 32 32.5 33 33.5 34 34.5 35 35.5 36 36.5 0 10 2030 40 50 60 70 80 Feed Vs Hardness Feed Vs Hardness
  • 29.
    SECTION NO. VARIABLESHARDNESS VALUE( BHN NO.) 1ST VALUE 2ND VALUE 3RD VALUE MEAN VALUE SECTION NO. I f=67.5 s=800 z=0.75 32 27.5 30 29.8 SECTION NO. II f=67.5 s=850 z=0.75 33 35.5 30 32.8 SECTION NO. III f=67.5 s=900 z=0.75 29 34 31.5 31.5 DETERMINATION OF HARDNESS AFTER MACHINING-III :
  • 30.
    29.5 30 30.5 31 31.5 32 32.5 33 780 800 820840 860 880 900 920 Speed Vs Hardness Speed Vs Hardness
  • 31.
    HARDNESS GRAPH ANALYSIS we can say that for the greater Hardness value after machining Aluminium-6061 grade the machining parameters should be like z=0.75mm, f=67.5mm/min and s=850 RPM and then we could get better quality product.
  • 32.
    The experimentation usesto obtain optimum machining condition for surface roughness of aluminum in CNC milling operation. The initial stage of experimentation consists of evaluating the effect of control factors, which mainly affect the output parameter. The experimentation was carried out by varying control factors, which results the control factors such as spindle speed, feed rate and depth of cut mainly affect the output parameter surface roughness. From this study the range of parameter also selected. Cntd. CONCLUSIONS
  • 33.
    Total 9 experimentalsteps are performed for this experiment and by using CNC Milling machine, the following Conclusion were found: For surface roughness (Ra) from the all selected parameters, Feed Rate was most significantly affecting the Turning of Aluminum. The result showed that the feed rate contributed 54.65%, cutting speed contributed only 34.67% and depth of cut contributed was least with 10.47%.  For surface roughness (Ra) optimum machining parameters are spindle speed 800 rpm, feed rate 67.5 mm/min and depth of cut 0.50 mm. For hardness optimum machining parameters are spindle speed 850 rpm, feed rate 67.5 mm/min and depth of cut 0.75 mm.
  • 34.
    REFERENCE: [1] RavindraThamma, “ComparisonBetween Multiple Regression Models to Study Effect of Turning Parameters on the Surface Roughness”, Proceedings of The 2008 IAJC-IJME International Conference,2008. [2] H.M.Somashekara and Dr. N. Lakshmana Swamy, “Optimizing Surface Roughness In Turning Operation Using Taguchi T echnique and ANOVA”,International Journal of Engineering Science and Technology, Vol. 4 No.05 May 2012, pp. 1967- 1973. [3] Gaurav Vohra, Palwinder Singh and Harsimran Singh Sodhi, “Analysis and Optimization of Boring Process Parameters By Using Taguchi Method”, International Journal of Computer Science and Communication Engineering, 2013, pp. 232-237. [4] Ranganath M S, Vipin and R. S. Mishra, “Optimization of Process Parameters in Turning Operation of Aluminium (6061) with Cemented Carbide Inserts Using Taguchi Method and ANOVA”, International Journal of Advance Research and Innovation, Volume 1, Issue 1, 2013, pp. 13-21. [5] Biswajit Das, R. N. Rai & S. C. Saha, “Analysis Of Surface Roughness On Machining Of Al-5cu Alloy In CNC Lathe Machine”, International Journal of Research in Engineering and Technology, Volume: 02 Issue: 09, Sep-2013, pp. 296-299. Cntd.
  • 35.
    [6] Md. TayabAli and Dr. ThuleswarNath, “Cutting Parameters Optimization for Turning AA6063-T6 Alloy by Using Taguchi Method”, International Journal of Research in Mechanical Engineering & Technology, Vol. 4, Issue 2, May - October 2014, pp. 82-86. [7] Ali Abdallah, BhuveneshRajamony, and Abdulnasser Embark, “Optimization of cutting parameters for surface roughness in CNC turning machining with aluminum alloy 6061 material”, IOSR Journal of Engineering, Vol. 04, Issue 10, October 2014, pp. 01-10. [8] S.V.Alagarsamy and N.Rajakumar, “Analysis of Influence of Turning Process Parameters on MRR & Surface Roughness Of AA7075 Using Taguchi‟s Method and RSM”, International Journal of Applied Research and Studies, Volume 3, Issue 4, Apr-2014, pp. 1-8. [9] David V, Rubén M, Menéndez C, Rodríguez J, Alique R (2006). Neural networks and statistical based models for surface roughness prediction. International Association Of Science and Technology for Development, Proceedings of the 25th IASTED international conference on Modeling, indentification and control, pp. 326-331 [10] Srikanth T, Kamala V (2008). A Real Coded Genetic Algorithm for Optimization of Cutting Parameters in Turning. IJCSNS Int. J. Comput. Sci. Netw. Secur,, 8(6):189-193. [11] Franci C, Joze B (2003). Optimization of cutting process by GA approach. Robotics and Computer Integrated Manufacturing, 19:113- 121 [12] Suresh PVS, Venkateswara RP, Deshmukh SG (2002). A genetic algorithmic approach for optimization of surface roughness prediction model. Int. J. Mach. Tools Manuf, 42: 675-680. Cntd.
  • 36.
    [13] Yang WH,Tarng YS (1998). Design optimization of cutting parameters for turning operations based on the Taguchi method. J. Mater. Process. Technol., 84: 122-129. [14] Uros Z, Franci C (2003). Optimization of cutting conditions during cutting by using neural networks. Robot. Comput. Integr. Manuf., 19: 189-199. [15] Oktem H, Erzurumlu T, Kurtaran H (2005). Application of response surface methodology in the optimization of cutting conditions for surface roughness. J. Mat. Process. Technol., 170: 11-16. [16] Al-Ahmari AMA (2007). Predictive machinability models for a selected hard material in turning operations. J. Mat. Process. Technol., 190: 305-311. [17] Huang L, Joseph C, Chen (2001). A Multiple Regression Model to Predict In-process Surface Roughness in Turning Operation Via Accelerometer. J. Ind. Technol., 17(2): 1-8. [18] Hossain MI, Amin AKM, Patwari AU (2008). Development of an artificial neural network algorithm for predicting the surface roughness in end milling of Inconel 718 alloy. International Conference on Computer and Communication Engineering, ICCCE (2008), 13- 15: 1321-1324. [19] Avisekh B, Evgueni V, Bordatchev S, Kumar C (2009). On-line monitoring of surface roughness in turning operations with optoelectrical transducer. Int. J. Manuf. Res., 4(1): 57- 73. Cntd.
  • 37.
    [20] Groover, Mikell(1996). Fundamentals of Modern Manufacturing. Prentice Hall, Upper Saddle River, NJ (now published by John Wiley & Sons, New York [21] Azouzi R, Guillot M (1997). On-line prediction of surface finish and dimensional deviation in turning using neural network based sensor fusion. Int. J. Mach. Tool Manuf., 37(9): 1201-1217. [22] Feng C X, Hu ZJ (2001). A comparative study of the ideal and actual surface roughness in finish turning, [23] Muammer N, Hasan G, Iahsan T (2007). Comparison of regression and artificial neural network models for surface roughness prediction with the cutting parameters in CNC turning. Modelling and Simulation in Engineering, Hindawi Publishing Corp. New York, NY, United States, 3: 2. [24] Bajic D, Lela B, Zivkovic D (2008). Modeling of machined surface roughness and optimization of cutting parameters in face milling, ISSN, 0543-5846. [25] Sakir T, Süleyman N, Ismail S, Süleyman Y (2008). Prediction of surface roughness using artificial neural network in lathe. International Conference on Computer Systems and Technologies - CompSysTech’08. Cntd.