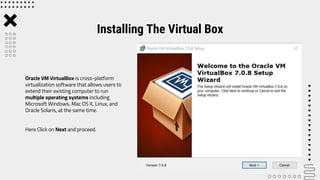
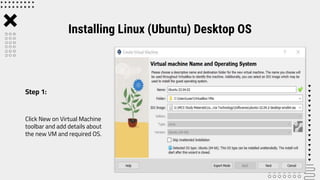
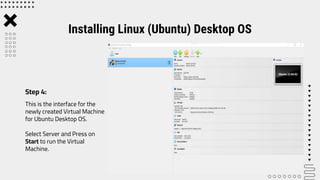
Topic : Install Linux Desktop OS
Oracle VM VirtualBox is cross-platform
virtualization software that allows users to
extend their existing computer to run
multiple operating systems including
Microsoft Windows, Mac OS X, Linux, and
Oracle Solaris, at the same time.
Here Click on Next and proceed.
Installing The Virtual Box
Once VitualBox is installed, we can create,
add or import new VMs using toolbar
buttons.
Installing The Virtual Box
Click New on Virtual Machine
toolbar and add details about
the new VM and required OS.
Installing Linux (Ubuntu) Desktop OS
Step 1:
Select the Base Memory and
Processors to be allocated to
the Virtual Machine.
Installing Linux (Ubuntu) Desktop OS
Step 2:
Select the size of memory to
be allocated for Virtual Hard
Disk.
Installing Linux (Ubuntu) Desktop OS
Step 3:
This is the interface for the
newly created Virtual Machine
for Ubuntu Desktop OS.
Select Server and Press on
Start to run the Virtual
Machine.
Installing Linux (Ubuntu) Desktop OS
Step 4:
Press Enter to install Ubuntu
Server.
Installing Linux (Ubuntu) Desktop OS
Step 5:
Select the preferred language
and click on Install Ubuntu.
Installing Linux (Ubuntu) Desktop OS
Step 6:
Select the preferred keyboard
layout and its variant, click on
Continue once finished.
Installing Linux (Ubuntu) Desktop OS
Step 7:
It will prompt us to choose updates
and other software to install
alongside Ubuntu.
We choose the options and click on
Continue.
Installing Linux (Ubuntu) Desktop OS
Step 8:
We will be asked to choose the
Installation type. Once selected we
can press Enter.
We will be informed about the
partitions being formatted or changed.
If it’s okay we press on Continue and
proceed.
Installing Linux (Ubuntu) Desktop OS
Step 9:
Select the location and press
Continue.
Installing Linux (Ubuntu) Desktop OS
Step 10:
Setup the profile for the user that
includes username, password,
computer’s name etc, once finished
press Enter.
Installing Linux (Ubuntu) Desktop OS
Step 11:
Upon the completion of the
installation process, the window on
the right will prompt, Restart Now.
Installing Linux (Ubuntu) Desktop OS
Step 12:
Now enter the Login details on
the screen and and press Enter
to login into the system.
Installing Linux (Ubuntu) Desktop OS
Step 13:
Now our system is ready and
Ubuntu is installed completely.
Installing Linux (Ubuntu) Desktop OS
Step 14:
Before installing OpenOffice4 on our
system we first need to remove the
LibreOffice and its libraries(as both
run on the same libraries and raise
conflict).
To complety remove LibreOffice:
$ sudo apt remove libreoffice-base-core libreoffice-
impress libreoffice-calc libreoffice-math libreoffice-
common libreoffice-ogltrans libreoffice-core
libreoffice-pdfimport libreoffice-draw libreoffice-
style-breeze libreoffice-gnome libreoffice-style-
colibre libreoffice-gtk3 libreoffice-style-elementary
libreoffice-help-common libreoffice-style-tango
libreoffice-help-en-us libreoffice-writer
Removing LibreOfiice
Step 15:
Now we will remove all the LibreOffice
libraries from our system by the
following command:
$ sudo apt autoremove
Now our system is ready for
OpenOffice Installation.
Removing LibreOfiice
Step 16:
We need to download OpenOffice as it is
not available in Ubuntu repository.
We can download form OpenOffice
website as follows :
https://www.openoffice.org/download/
index.html
Once downloaded we will proceed to
further steps.
Installing APACHE OpenOffice
Step 17:
Once the download is complete, we
will navigate into Downloads directory
and list files using the following
command:
$ cd Downloads
$ ls
We can see that the downloaded .tar
file is listed in downloads folder.
Installing APACHE OpenOffice
Step 18:
The downloaded file is a tar file, so we need to
extract it. Therefore, using the tar command-line
utility we will extract the downloaded file as follows:
$ tar -xvf Apache_OpenOffice_4.1.14_Linux_x86-
64_install-deb_en-US.tar.gz
This will create a directory named ‘en-US’ in the
Downloads.
Extracting the tar file
Step 19:
We will navigate into DEBS using the
following command:
$ cd en-US/DEBS/
We will install the deb packages using
the following command:
$ sudo dpkg -i *.deb
.
Installing DEB Packages
Step 20:
Once the deb package is installed we
will integrate all packages on our
desktop using the following command:
$ cd desktop-integration/
We will again install the previously
uninstalled DEB packages after
integrating all packages using :
$sudo dpkg -i *.deb
Installing DEB Packages
Step 21:
OpenOffice 4.1.14 has been installed on
our system now. We can verify it by
launching OpenOffice4 on our system
either by using the terminal or from the
desktop as shown in the figure.
From Terminal:
$ openoffice4
When we launch OpenOffice for the first
time, we will see the window as in the
figure on our system. Click on Next and
enter the required details then Click
Finish.
Launch OpenOffice
Step 22:
Launch OpenOffice
Step 23: We can launch it from the desktop if we search for OpenOffice as seen in the figure
below. So OpenOffice is now properly installed in the system.
ThankYou!!!

Install Linux OS in Virtual Box.pptx

  • 1.
    Topic : InstallLinux Desktop OS
  • 2.
    Oracle VM VirtualBoxis cross-platform virtualization software that allows users to extend their existing computer to run multiple operating systems including Microsoft Windows, Mac OS X, Linux, and Oracle Solaris, at the same time. Here Click on Next and proceed. Installing The Virtual Box
  • 3.
    Once VitualBox isinstalled, we can create, add or import new VMs using toolbar buttons. Installing The Virtual Box
  • 4.
    Click New onVirtual Machine toolbar and add details about the new VM and required OS. Installing Linux (Ubuntu) Desktop OS Step 1:
  • 5.
    Select the BaseMemory and Processors to be allocated to the Virtual Machine. Installing Linux (Ubuntu) Desktop OS Step 2:
  • 6.
    Select the sizeof memory to be allocated for Virtual Hard Disk. Installing Linux (Ubuntu) Desktop OS Step 3:
  • 7.
    This is theinterface for the newly created Virtual Machine for Ubuntu Desktop OS. Select Server and Press on Start to run the Virtual Machine. Installing Linux (Ubuntu) Desktop OS Step 4:
  • 8.
    Press Enter toinstall Ubuntu Server. Installing Linux (Ubuntu) Desktop OS Step 5:
  • 9.
    Select the preferredlanguage and click on Install Ubuntu. Installing Linux (Ubuntu) Desktop OS Step 6:
  • 10.
    Select the preferredkeyboard layout and its variant, click on Continue once finished. Installing Linux (Ubuntu) Desktop OS Step 7:
  • 11.
    It will promptus to choose updates and other software to install alongside Ubuntu. We choose the options and click on Continue. Installing Linux (Ubuntu) Desktop OS Step 8:
  • 12.
    We will beasked to choose the Installation type. Once selected we can press Enter. We will be informed about the partitions being formatted or changed. If it’s okay we press on Continue and proceed. Installing Linux (Ubuntu) Desktop OS Step 9:
  • 13.
    Select the locationand press Continue. Installing Linux (Ubuntu) Desktop OS Step 10:
  • 14.
    Setup the profilefor the user that includes username, password, computer’s name etc, once finished press Enter. Installing Linux (Ubuntu) Desktop OS Step 11:
  • 15.
    Upon the completionof the installation process, the window on the right will prompt, Restart Now. Installing Linux (Ubuntu) Desktop OS Step 12:
  • 16.
    Now enter theLogin details on the screen and and press Enter to login into the system. Installing Linux (Ubuntu) Desktop OS Step 13:
  • 17.
    Now our systemis ready and Ubuntu is installed completely. Installing Linux (Ubuntu) Desktop OS Step 14:
  • 18.
    Before installing OpenOffice4on our system we first need to remove the LibreOffice and its libraries(as both run on the same libraries and raise conflict). To complety remove LibreOffice: $ sudo apt remove libreoffice-base-core libreoffice- impress libreoffice-calc libreoffice-math libreoffice- common libreoffice-ogltrans libreoffice-core libreoffice-pdfimport libreoffice-draw libreoffice- style-breeze libreoffice-gnome libreoffice-style- colibre libreoffice-gtk3 libreoffice-style-elementary libreoffice-help-common libreoffice-style-tango libreoffice-help-en-us libreoffice-writer Removing LibreOfiice Step 15:
  • 19.
    Now we willremove all the LibreOffice libraries from our system by the following command: $ sudo apt autoremove Now our system is ready for OpenOffice Installation. Removing LibreOfiice Step 16:
  • 20.
    We need todownload OpenOffice as it is not available in Ubuntu repository. We can download form OpenOffice website as follows : https://www.openoffice.org/download/ index.html Once downloaded we will proceed to further steps. Installing APACHE OpenOffice Step 17:
  • 21.
    Once the downloadis complete, we will navigate into Downloads directory and list files using the following command: $ cd Downloads $ ls We can see that the downloaded .tar file is listed in downloads folder. Installing APACHE OpenOffice Step 18:
  • 22.
    The downloaded fileis a tar file, so we need to extract it. Therefore, using the tar command-line utility we will extract the downloaded file as follows: $ tar -xvf Apache_OpenOffice_4.1.14_Linux_x86- 64_install-deb_en-US.tar.gz This will create a directory named ‘en-US’ in the Downloads. Extracting the tar file Step 19:
  • 23.
    We will navigateinto DEBS using the following command: $ cd en-US/DEBS/ We will install the deb packages using the following command: $ sudo dpkg -i *.deb . Installing DEB Packages Step 20:
  • 24.
    Once the debpackage is installed we will integrate all packages on our desktop using the following command: $ cd desktop-integration/ We will again install the previously uninstalled DEB packages after integrating all packages using : $sudo dpkg -i *.deb Installing DEB Packages Step 21:
  • 25.
    OpenOffice 4.1.14 hasbeen installed on our system now. We can verify it by launching OpenOffice4 on our system either by using the terminal or from the desktop as shown in the figure. From Terminal: $ openoffice4 When we launch OpenOffice for the first time, we will see the window as in the figure on our system. Click on Next and enter the required details then Click Finish. Launch OpenOffice Step 22:
  • 26.
    Launch OpenOffice Step 23:We can launch it from the desktop if we search for OpenOffice as seen in the figure below. So OpenOffice is now properly installed in the system.
  • 27.