This document provides installation and configuration instructions for Oracle Business Intelligence Applications specifically for organizations using Informatica PowerCenter. It covers prerequisites for supported databases, best practices for optimizing performance on different databases, and partitioning guidelines for large fact tables. The document contains information about new features in the current release and how to navigate the Oracle BI repository documentation.


![Teradata-Specific Database Guidelines for Oracle Business Analytics Warehouse
– You may need to enable some databases, such as SQL Server, to use SQL-92
standards regarding quoted identifiers. Use connection environment SQL to
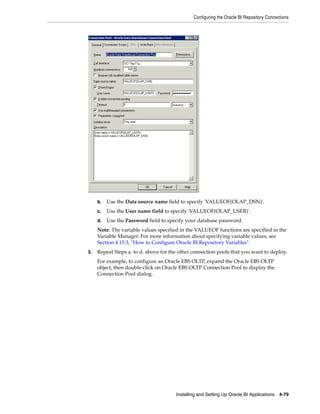
issue the command.
For example, use the following command with SQL Server: SET QUOTED_
IDENTIFIER ON Sample reswords.txt File.
To use a reserved words file, create a file named reswords.txt and place it in the
server/bin directory. Create a section for each database that you need to store
reserved words for. Add reserved words used in any table or column name. You
do not need to store all reserved words for a database in this file. Database names
and reserved words in reswords.txt are not case sensitive.
A sample reswords.txt file is listed below:
[Teradata]
MONTH
DATE
INTERVAL
Note: To avoid fatal deadlocks during ETL processes, make sure that
you select the 'Session Level Retry on Deadlock' option in Informatica.
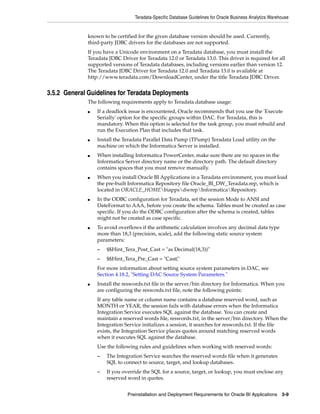
3.5.3 Best Practices For Teradata Deployments
This sections contains the recommended best practises for maximizing performance in
Teradata deployments, and contains the following topics:
■ Section 3.5.3.1, "Collect Statistics as a Prerequisite"
■ Section 3.5.3.2, "LEFT OUTER JOIN Issue"
■ Section 3.5.3.3, "Group By Versus Distinct"
■ Section 3.5.3.4, "Pruning of Mappings and Tables"
■ Section 3.5.3.5, "Loader Configurations"
Note: The following best practices should be treated as
customizations. You should follow standard customization
methodology, such as copying the mapping to a custom directory. You
should never make these changes directly in the default objects.
3.5.3.1 Collect Statistics as a Prerequisite
Once the tables have been created in the staging and target databases, you must run
the supplied statistics collection. Failure to do so can affect ETL performance and
possibly result in a spool space error (error number 2646).
DAC does the recollection of statistics as part of the ETL processes. However, DAC
issues the collect statistics statement at the table level only (for example, collect
statistics on w_org_d), and only for existing statistics.
3.5.3.2 LEFT OUTER JOIN Issue
Teradata code performance is highly dependent on the specific environment of each
installation. A high number of occurrences of a single (or few) values in columns that
are involved in joins, whether null or not, may cause skewing of data across Teradata
AMPs. The impact of this is increased likelihood of exceeding the "per AMP" spool
limit as well as increased CPU usage on one AMP while the other AMPs are much less
3-10 Oracle Business Intelligence Applications Installation Guide for Informatica PowerCenter Users](https://image.slidesharecdn.com/informaticainstallationguide-120809072752-phpapp02/85/Informatica-installation-guide-36-320.jpg)

![Preinstallation Tasks
database(s). For information about installing and configuring native connectivity
software for Integration Services, refer to Informatica PowerCenter Administrator Guide.
Also see System Requirements and Supported Platforms for Oracle Business Intelligence
Applications for information on certified database connectivity software used by
Integration Services to connect to the Oracle Business Analytics Warehouse.
The machine that hosts the PowerCenter Repository Service requires native
connectivity to communicate with the Informatica Repository database. For
information about installing and configuring the required software, refer to the section
"PowerCenter Repository Service" in Informatica PowerCenter Administrator Guide.
For additional information about database connectivity for Integration Services and
Repository Services, refer to PowerCenter Installation and Configuration Guide.
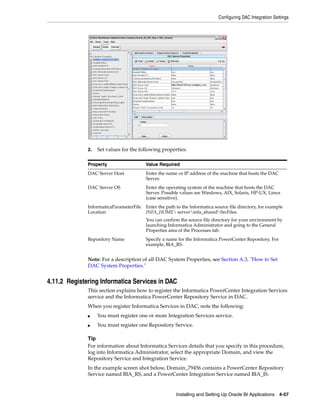
The machine or machines that host the DAC Client and DAC Server require
connectivity to the Oracle Business Analytics Warehouse (target) database,
transactional (source) database(s), and the DAC Repository database. For instructions
on configuring connectivity for DAC, see Section 4.7.3, "Installing JDBC Drivers for
DAC Database Connectivity" and Section 4.7.4, "Creating ODBC Database Connections
for the DAC Client"
Notes
■ For Oracle databases, set the NLS_LANG environment variable on the machines
where the Oracle client is installed, as described in Section 4.4.2.1, "How to Set the
NLS_LANG Environment Variable for Oracle Databases".
■ For DB2 databases, set the DB2CODEPAGE environment variable on the machines
where the DB2 client is installed, as described in Section 4.4.2.2, "How to Set the
DB2CODEPAGE Environment Variable for DB2 Databases".
4.4.2.1 How to Set the NLS_LANG Environment Variable for Oracle Databases
Follow this procedure to set the NLS_LANG environment variable for Oracle
databases.
Note: You need to set the NLS_LANG environment variable on each
machine that has the Oracle client installed.
To set the NLS_LANG environment variable for Oracle databases
1. Determine the NLS_LANG value.
a. In the data warehouse database, run the following command:
SELECT * FROM V$NLS_PARAMETERS
b. Make a note of the NLS_LANG value, which is in the format [NLS_
LANGUAGE]_[NLS_TERRITORY].[NLS_CHARACTERSET].
For example: American_America.UTF8
2. For Windows:
a. Navigate to Control Panel > System and click the Advanced tab. Click
Environment Variables.
b. In System variables section, click New.
c. In the Variable Name field, enter NLS_LANG.
Installing and Setting Up Oracle BI Applications 4-13](https://image.slidesharecdn.com/informaticainstallationguide-120809072752-phpapp02/85/Informatica-installation-guide-77-320.jpg)
![Preinstallation Tasks
d. In the Variable Value field, enter the NLS_LANG value that was returned in
Step 1.
The format for the NLS_LANG value should be [NLS_LANGUAGE]_[NLS_
TERRITORY].[NLS_CHARACTERSET].
For example: American_America.UTF8.
Note: The NLS_LANG character set should reflect the setting of the
operating system character set of the client. For example, if the
database character set is AL32UTF8 and the client is running on a
Windows operating system, then you should not set AL32UTF8 as the
client character set in the NLS_LANG parameter because there are no
UTF-8 WIN32 clients. Instead, the NLS_LANG setting should reflect
the code page of the client. For example, on an English Windows
client, the code page is 1252. An appropriate setting for NLS_LANG is
AMERICAN_AMERICA.WE8MSWIN1252.
Setting NLS_LANG correctly allows proper conversion from the client
operating system character set to the database character set. When
these settings are the same, Oracle assumes that the data being sent or
received is encoded in the same character set as the database character
set, so character set validation or conversion may not be performed.
This can lead to corrupt data if the client code page and the database
character set are different and conversions are necessary
3. For UNIX and Linux, set the variable as shown below:
setenv NLS_LANG <NLS_LANG>
For example: setenv NLS_LANG American_America.UTF8.
If your data is 7-bit or 8-bit ASCII and the Integration Service is running on UNIX
or Linux, then set NLS_LANG <NLS_LANGUAGE>_<NLS_
TERRITORY>.WE8ISO8859P1
Caution: Make sure you set the NLS_LANG variable correctly, as
stated in this procedure, or your data will not display correctly.
4.4.2.2 How to Set the DB2CODEPAGE Environment Variable for DB2 Databases
Follow this procedure to set the DB2CODEPAGE environment variable for DB2
databases on machines that have the DB2 client installed.
To set the DB2CODEPAGE environment variable for DB2 databases
1. Determine the DB2CODEPAGE value.
a. Connect to the Source database, using the following command:
SELECT CODEPAGE FROM SYSCAT.DATATYPES WHERE TYPENAME = 'VARCHAR'
b. Make a note of the result.
For example: 1208
2. For Windows:
a. Navigate to Control Panel > System and click the Advanced tab. Click
Environment Variables.
4-14 Oracle Business Intelligence Applications Installation Guide for Informatica PowerCenter Users](https://image.slidesharecdn.com/informaticainstallationguide-120809072752-phpapp02/85/Informatica-installation-guide-78-320.jpg)
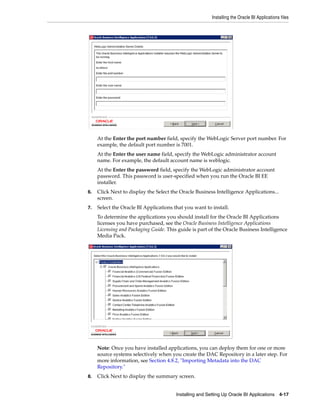

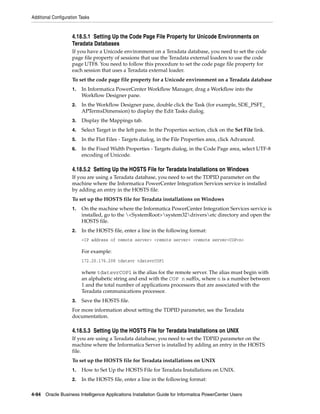
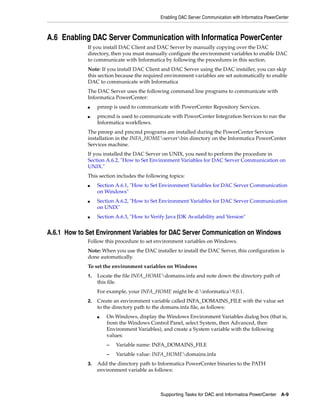
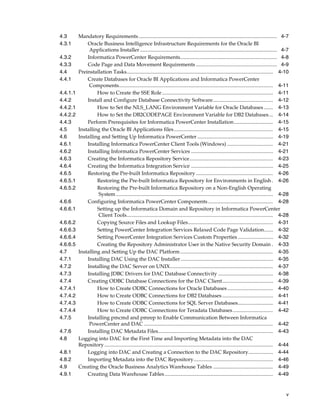
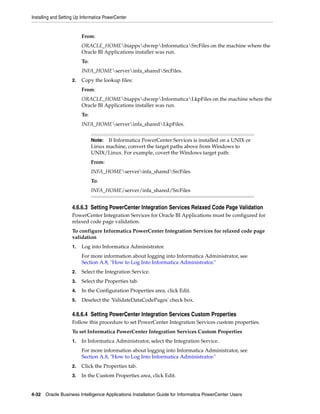
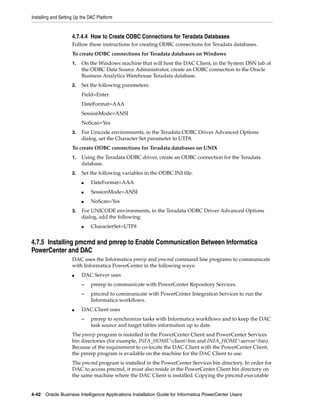
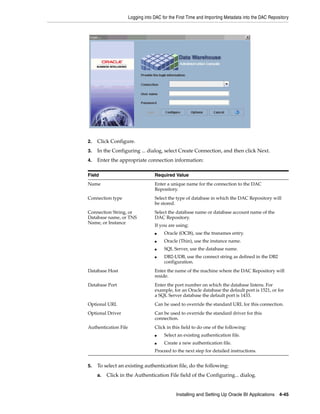
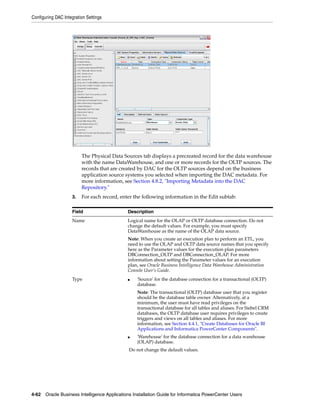
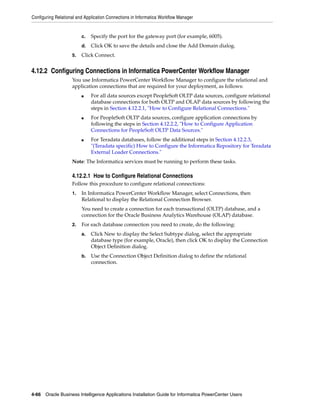
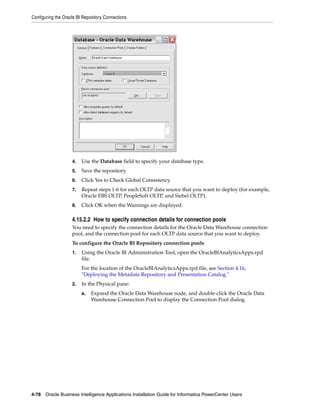
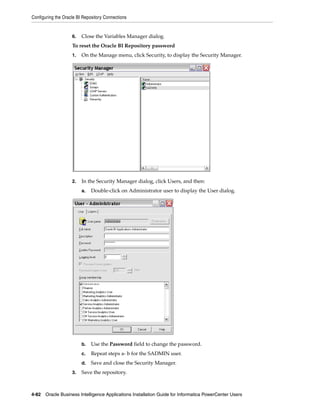
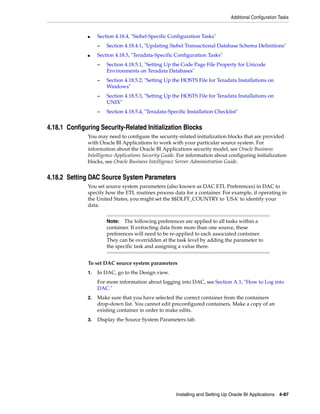
![Installing and Setting Up Informatica PowerCenter
For detailed information about creating a Repository Service, refer to the Informatica
documentation.
To create the Informatica Repository Service
Note: Before you log into Informatica Administrator, make sure that
the Informatica service is running. To start the Informatica Service, use
the Start Informatica Services program.
On Windows, you can also use the Windows Services dialog to start
the 'Informatica 9.0.1' service. On UNIX, use the infaservice [startup |
shutdown] command.
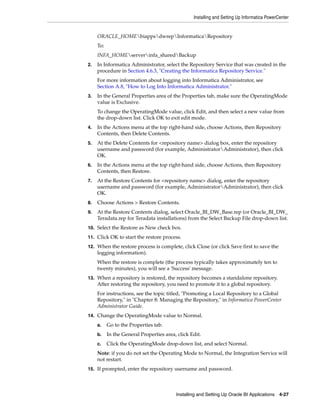
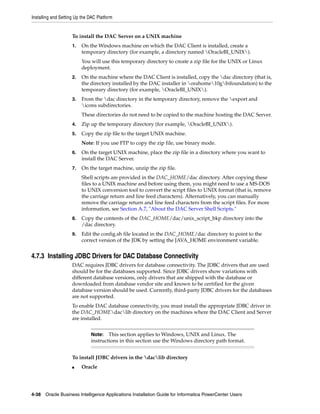
1. Open Informatica Administrator.
For more information about logging into Informatica Administrator, see
Section A.8, "How to Log Into Informatica Administrator."
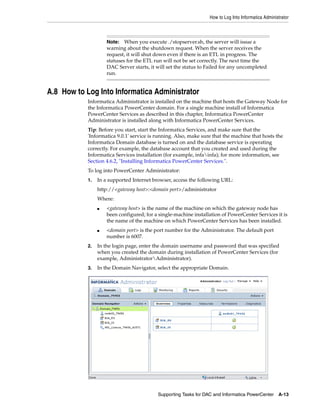
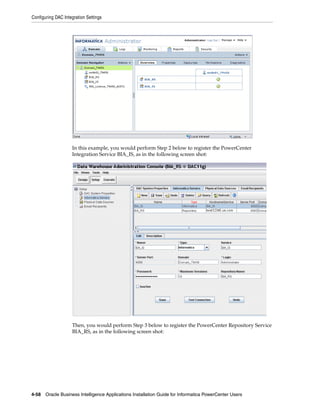
2. In the Domain Navigator, select the root Domain, then click Actions, then New,
then PowerCenter Repository Service, to display the New PowerCenter
Repository Service wizard.
3. Use the 'Specify the properties for this new PowerCenter Repository Service'
dialog to specify a Name (for example, BIA_RS), Location, License, and Node,
then click Next.
4. Use the 'Specify the database properties for this new PowerCenter Repository
Service' dialog to specify a Database Type, Username, Password, Connection
String, and Code Page.
Notes:
■ The Username and Password are for the database account that you created for
the Informatica repository (see Section Section 4.4.1, "Create Databases for
Oracle BI Applications and Informatica PowerCenter Components.").
■ If you specify the wrong code page, you cannot correct this later. If the code
page is incorrect, then you must create a new Repository Service.
5. In the 'Specify the creation options for the new PowerCenter Repository Service'
area, select the No content exists under specified connection string. Create new
content. radio button.
For detailed information about creating a Repository Service, refer to the
Informatica documentation.
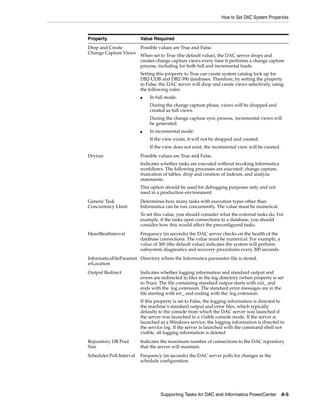
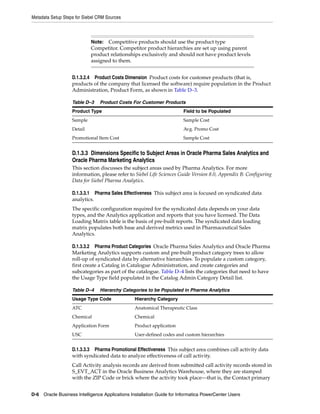
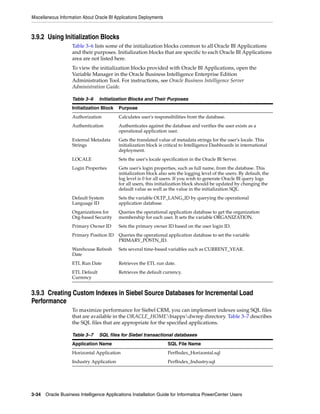
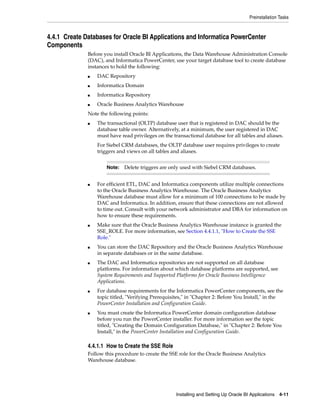
6. Click Finish.
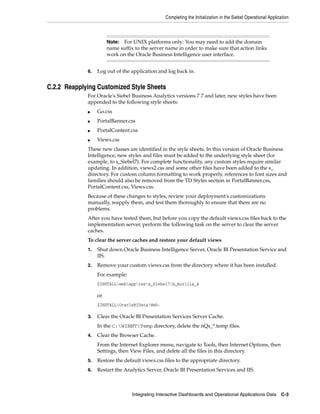
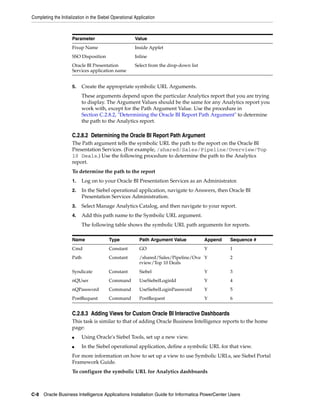
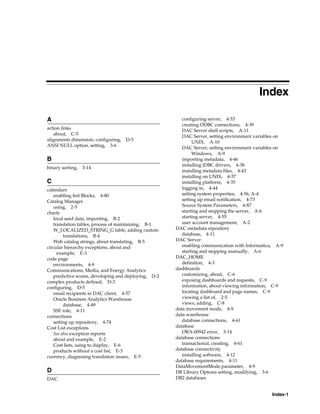
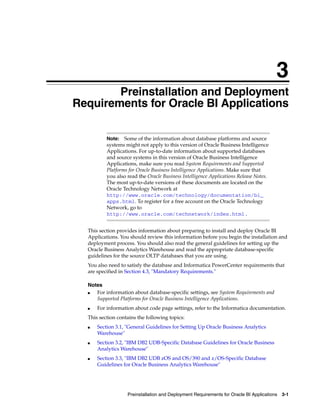
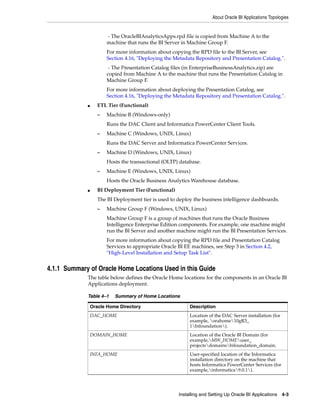
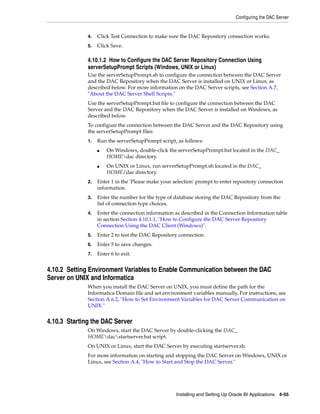
In the example screen shot below, Domain_79456 contains a PowerCenter Repository
Service named BIA_RS.
4-24 Oracle Business Intelligence Applications Installation Guide for Informatica PowerCenter Users](https://image.slidesharecdn.com/informaticainstallationguide-120809072752-phpapp02/85/Informatica-installation-guide-88-320.jpg)


![Configuring the SiebelUnicodeDB Custom Property
■ Error Database
■ Log Table Database
If the above attribute values are not inherited from the attributes defined at the
connection level, you must specify them.
9. In the Attributes list, specify values for Error Table and Log Table.
4.13 Configuring the SiebelUnicodeDB Custom Property
Note: This procedure is not specific to the Siebel source system. It
must be performed for all types of source systems.
If your source to target data movement configuration is Unicode to Unicode, you need
to create a custom property called SiebelUnicodeDB on Integration Services. If your
source to target data movement configuration is either Code Page to Code Page or
Code Page to Unicode, you do not need to create this property. For more information
on supported source to target configuration modes, and how to determine the source
to target configuration for your environment, see Section 4.3.3, "Code Page and Data
Movement Requirements."
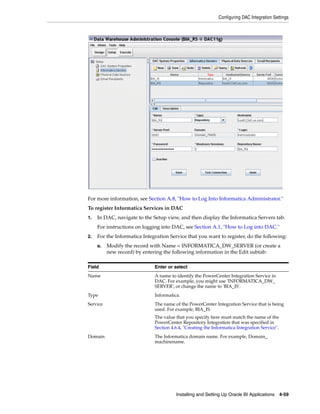
To create and set the SiebelUnicodeDB custom property on Integration Services
1. Log into Informatica Administrator. For information on how to log into
Informatica Administrator, see Section A.8, "How to Log Into Informatica
Administrator."
2. Select the Integration Service.
3. In the Properties tab, scroll down to the Custom Properties area, and click Edit.
4. In the Name field, enter the following:
SiebelUnicodeDB
5. In the Value field, enter the following:
[user_OLTP]@[connectString_OLTP] [user_OLAP]@[ConnectString_OLAP]
Where:
[user_OLTP] is the database user for the OLTP source database. It must match
exactly the value you entered for the User Name field when creating the relational
connection for the OLTP in Informatica Workflow Manager.
[ConnectString_OLTP] is the connect string for the OLTP. It must match exactly the
value you entered for the Connect String field when creating the relational
connection for the OLTP in Informatica Workflow Manager.
[user_OLAP] is the database user for the Oracle Business Analytics Warehouse
database. It must match exactly the value you entered for the User Name field
when creating the relational connection for the data warehouse in Informatica
Workflow Manager.
[ConnectString_OLAP] is the connect string for the data warehouse. It must match
exactly the value you entered for the Connect String field when creating the
relational connection for the data warehouse in Informatica Workflow Manager.
For example, oltp@db204007.host.com olap@db204008.host.com.
4-72 Oracle Business Intelligence Applications Installation Guide for Informatica PowerCenter Users](https://image.slidesharecdn.com/informaticainstallationguide-120809072752-phpapp02/85/Informatica-installation-guide-136-320.jpg)
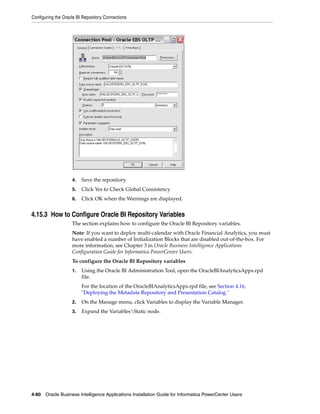
![Configuring the Oracle BI Repository Connections
4. Edit the following variables, which apply to all deployments:
■ GLOBAL_CURRENCY1
■ GLOBAL_CURRENCY2
■ GLOBAL_CURRENCY3
■ OLAP_DSN
■ OLAP_USER
■ OLAPTBO
Notes:
■ The global currency values must match the Source System Parameter values in
DAC.
■ In a SQL Server database environment, if you deploy an application that uses
Dim_W_ORDER_ITEM_F_Contact_First_and_Last_Order_Dates (for example,
Siebel Marketing 8.1.1.1), then you must set the value of the OLAPTBO session
variable to 'dbo'. If you do not set this value, then you get the an error message
similar to the following:
[SQL Server]Invalid object name @ 'SIEBEL.W_ORDERITEM_F'.. [nQSError:
16002]
5. Edit the following variables that are specific to your deployment:
For Oracle EBS OLTP data sources, edit the following variables:
■ ORA_EBS_OLTP_DSN (Oracle EBS-specific)
■ ORA_EBS_OLTP_USER (Oracle EBS-specific)
For PeopleSoft OLTP data sources, edit the following variables:
■ PSFT_OLTP_DSN (PeopleSoft-specific)
■ PSFT_OLTP_USER (PeopleSoft-specific)
For Siebel OLTP data sources, edit the following variables:
■ OLTP_DSN (Siebel-specific)
■ OLTP_USER (Siebel-specific)
Installing and Setting Up Oracle BI Applications 4-81](https://image.slidesharecdn.com/informaticainstallationguide-120809072752-phpapp02/85/Informatica-installation-guide-145-320.jpg)
![Additional Configuration Tasks
■ Section 4.18.4.1.1, "How to Run the DDLIMP Tool From The Command Line"
■ Section 4.18.4.1.2, "How to Apply Siebel CRM Schema Changes For Oracle,
DB2/UDB, MSSQL"
■ Section 4.18.4.1.3, "How to Apply Siebel CRM Schema Changes for DB2 on OS/390
and z/OS"
■ Section 4.18.4.1.4, "How to Apply the Siebel CRM Image Table to a Siebel
Transactional Database"
■ Section 4.18.4.1.5, "About Delete Triggers"
■ Section 4.18.4.1.6, "How to Verify Siebel (CRM) Schema Changes"
4.18.4.1.1 How to Run the DDLIMP Tool From The Command Line When you use the
DDLIMP utility from a command line to update schema definitions, refer to the
following notes:
To run DDLIMP from command line, run the following command:
ORACLE_HOMEbiappsdwrepbinDDLIMP /U <USER> /P <PASSWORD> /C <ODBC_DSN> /GSSE_
ROLE [/W Y] [/Z Y] /F <ORACLE_HOMEbiappsdwrepDDL_OLTP.CTL> /L <ORACLE_
HOMEbiappsdwrepDDL_OLTP.log>
Note: Where <ODBC_DSN> is the ODBC connection created as described in section
Section 4.7.4, "Creating ODBC Database Connections for the DAC Client".
Additionally you can use the following commands:
/W Y (if the OLTP database is Unicode).
/Z Y (if the OTTP database is DB2 and Unicode).
/B <TABLE_SPACE_NAME> if you want to create these table in a separate table
space.
/X <INDEX_TABLE_SPACE_NAME> if you want to create the indexes in a separate
table space.
/Y Storage File for DB2/390.
You can obtain a complete list of DDLIMP parameters by running DDLIMP in a
command line. DDLIMP is located in the ORACLE_HOMEbiappsdwrepbin.
4.18.4.1.2 How to Apply Siebel CRM Schema Changes For Oracle, DB2/UDB, MSSQL To enable
change capture for Oracle's Siebel adapters, you use the ddlimp control file to apply
Siebel CRM schema changes, which updates the required image tables in the OLTP.
Note: Using the ddlimp control file to apply schema changes
replaces the use of SIF files in Siebel Tools in previous product
releases.
To apply Siebel CRM schema changes for Oracle, DB2/UDB and MSSQL databases
1. On the machine where Oracle BI Applications is installed, run the following
command:
ORACLE_HOMEbiappsdwrepbinDDLIMP /U <USER> /P <PASSWORD> /C <ODBC connect
string> /G SSE_ROLE /F ORACLE_HOMEbiappsdwrepDDL_OLTP.CTL /L ORACLE_
HOMEbiappsdwrepDDL_OLTP.log
4-90 Oracle Business Intelligence Applications Installation Guide for Informatica PowerCenter Users](https://image.slidesharecdn.com/informaticainstallationguide-120809072752-phpapp02/85/Informatica-installation-guide-154-320.jpg)