Implementation of cisco wireless lan controller (multiple wla ns)
•Download as DOCX, PDF•
0 likes•932 views

This document provides guidance on implementing a Cisco Wireless LAN Controller to support multiple wireless LANs for a customer requiring guest and employee networks. It describes the necessary configurations including: 1. Creating VLANs and interfaces on the controller and core switches for management, AP management, guest, and employee networks. 2. Configuring wireless LANs, SSIDs, security, and assigning them to the proper interfaces. 3. Configuring RADIUS authentication and accounting servers. The document aims to complement Cisco's documentation and provide lessons learned from a practical implementation.

Recommended
Recommended
More Related Content
What's hot
What's hot (20)
Similar to Implementation of cisco wireless lan controller (multiple wla ns)
Similar to Implementation of cisco wireless lan controller (multiple wla ns) (20)
More from IT Tech
More from IT Tech (20)
Recently uploaded
Recently uploaded (13)
Implementation of cisco wireless lan controller (multiple wla ns)
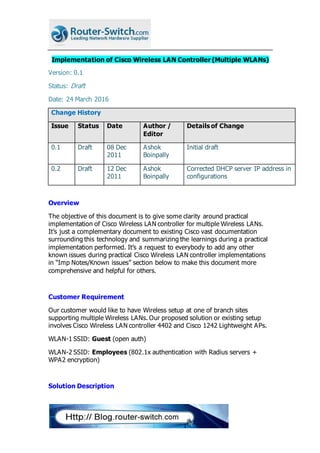
- 1. Implementation of Cisco Wireless LAN Controller (Multiple WLANs) Version: 0.1 Status: Draft Date: 24 March 2016 Change History Issue Status Date Author / Editor Details of Change 0.1 Draft 08 Dec 2011 Ashok Boinpally Initial draft 0.2 Draft 12 Dec 2011 Ashok Boinpally Corrected DHCP server IP address in configurations Overview The objective of this document is to give some clarity around practical implementation of Cisco Wireless LAN controller for multiple Wireless LANs. It’s just a complementary document to existing Cisco vast documentation surrounding this technology and summarizing the learnings during a practical implementation performed. It’s a request to everybody to add any other known issues during practical Cisco Wireless LAN controller implementations in “Imp Notes/Known issues” section below to make this document more comprehensive and helpful for others. Customer Requirement Our customer would like to have Wireless setup at one of branch sites supporting multiple Wireless LANs. Our proposed solution or existing setup involves Cisco Wireless LAN controller 4402 and Cisco 1242 Lightweight APs. WLAN-1 SSID: Guest (open auth) WLAN-2 SSID: Employees (802.1x authentication with Radius servers + WPA2 encryption) Solution Description
- 2. Cisco WLC 4402 device consists of 2 physical LAN ports (that’s the reason it is 4402) to be connected to the network. The 2 ports can be connected to different core switches for redundancy OR they can be configured as a channel group to load balance the traffic (LAG feature). Apart from Ports, there are mainly 3 types of interface types in Cisco WLC as described as below. 1. Management interface (created by default and can’t be deleted): The LWAPPs need to either discover dynamically or manually configured with this interface IP address as Cisco WLC IP address. DHCP Option 0x43 can also be configured with this interface IP Address in DHCP Server for LWAPP Subnet pool so that LWAPP can have the Cisco WLC IP address received directly in DHCP response packet along with assigned IP Address to LWAPP. The LWAPP can then UNICAST registration packets to this Management IP address. Otherwise, it would be a broadcast packet from LWAPP to discover a Cisco WLC. 2. AP Management interface (created by default and can’t be deleted): After successful registration of LWAPP with Cisco WLC 4402, all the Wireless clients’ traffic gets tunnelled from/to this interface IP address to/from LWAPP. New Wifi Infrastructure DNS/DHCP Server 192.168.2.254 VPN Concentrator 192.168.2.1 WLC 4402 10.1.1.11 SSID = Guest Port 1 DNS/DHCP server (192.168.2.254) Active DirectoryNetwork Radius Server Radius Servers 172.16.16.100/172.16.31.200 DNS/DHCP Server 172.16.1.1 Port 2 GigaEthernet 802.1q trunk SSID = Employees DNS/DHCP server (172.16.1.1) Wifi devices authenticate via Radius Servers Wifidevices Authentication path Vlan128 10.1.1.0/24 GigaEthernet 802.1q trunk 192.168.2.7 192.168.2.6 Vlan129 10.1.2.0/24 Vlan127 192.168.2.0/24
- 3. 3. Virtual interface: This should be created per each Wireless LAN network. This plays a crucial role in case of multiple Wireless LANs and especially to get IP address in correct subnet and VLAN for Wireless clients. All interfaces listed above can be associated with the physical ports in Primary and Backup mode. For eg: Management interface can have network configuration (IP address, subnet mask and Gateway) and finally get associated to Port-1 as Primary and Port-2 as Backup for traffic communications. In this case, it’s planned to connect Port-1 to Core Switch-1 (192.168.2.6) and Port-2 to another Core switch-02 (192.168.2.7). These are the following VLANs planned to get configured prior to implementation. Wireless Clients trying to join into “Employees” WLAN should get first authenticated (802.1x) with External RADIUS servers (172.16.16.100/172.16.31.200) in the network. Implementation Assuming DHCP servers are configured with the above subnets to provide IP Addresses for LWAPPs as well as Wireless Clients in their subnets accordingly. Core Switches 1. Assuming all Layer 2 VLANs created for 127-129. VLAN Subnet Purpose Assigned to? 127 192.168.2.0/24 For Guest WLAN Wireless Clients 128 10.1.1.0/24 For WLC Management IP for Radius Auth WLC-Mgmt Interface/AP Mgmt interface APs – DHCP (VLAN 128) 129 10.1.2.0/24 For Employees WLAN Wireless Clients
- 4. 2. You need to configure Core switch ports connecting to the Cisco WLC as 802.1q ports. Assuming Gig4/8 on each core switch is connected to Cisco WLC 4402. interface gi4/8 switchport encapsulation 802.1q switch port mode trunk switchport trunk allowed vlan 127-129 The last command is really important for Cisco Wireless LAN controller performance optimization. The Cisco WLC needs can transmit and receive the traffic of VLANs 127-129. No need to have any other VLAN traffic (like broadcast traffic from other VLANs). 3. Create Layer-3 VLAN interfaces for Inter VLAN routing on each Core switch OR apply the necessary configurations in the Cisco Router. Core Switch-01 interface vlan 128 ip address 10.1.1.3 255.255.255.128 standby 1 ip 10.1.1.1 standby 1 priority 105 standby 1 preempt ip helper-address 172.16.1.1 Core Switch-02 interface vlan 128 ip address 10.1.1.2 255.255.255.128 standby 1 ip 10.1.1.1 standby 1 priority 95 ip helper-address 172.16.1.1 4. Please repeat similar config for other VLANs. Cisco Wireless LAN Controller
- 5. It’s always strongly advisable to have access through Console ready as backup. All configuration changes can be done through Web GUI (https://<Cisco-WLC-Mgmt-IP>) LWAPP Mode 1. Click on “Controller” “General” on left hand side menu Set “LWAPP Transport mode” of APs to “Layer 3”. Layer 3 Mode is recommended to be enabled for LWAPPs. For details, please refer to the following link… http://www.cisco.com/en/US/docs/wireless/technology/controller/deployment /guide/dep.html#wp1052604 Trunking Now, how do you configure trunking on Cisco WLC? There is no explicit trunking configuration available on Cisco WLC. However, you need to change VLAN ID from “0” (default) to another VLAN ID (in this case, VLAN 127 or 128 or 129) on any WLC interface which changes the associated Port to TRUNK. Note: Please clearly note that the interface VLAN ID change will result changing the ASSSOCIATED port only to Trunk. If you have an interface configured to associate with just Port-1 and change VLAN ID to 127 from 0, then this will result change in the operational mode only for Port-1 to TRUNK. Port-2 will still be having in normal ACCESS mode. Changing Interface settings You can’t delete the Management and AP Manager interfaces but you can modify them. Management Interface 2. Click on “Controller” “Interfaces” on left hand side menu Select “management” interface 3. Assign IP address 10.1.1.11, mask: 255.255.255.0 and GW as 10.1.1.1. Change the VLAN ID to 128. Primary port as Port-1 and Backup port as Port-2. 4. Save the config. AP Manager Interface
- 6. 1. Click on “Controller” “Interfaces” on left hand side menu Select “ap-manager” interface 2. Assign IP address 10.1.1.12, mask: 255.255.255.0 and GW as 10.1.1.1. Change the VLAN ID to 128. Primary port as Port-1 and Backup port as Port-2. 3. Save the config. Note: Please try to configure Management, AP Manager and LWAPPs into a single VLAN. Guest Interface This interface is a dynamic and should be created. 1. Click on “Controller” “Interfaces” on left hand side menu Select “New” interface 2. Name it as “Guest”. 3. Assign IP address 192.168.2.10, mask: 255.255.255.0 and GW as 192.168.2.1. Change the VLAN ID to 127. Primary port as Port-1 and Backup port as Port-2. 4. Configure DHCP server IP address as 172.16.1.1. 5. Save the config. Employees Interface 1. This interface is a dynamic and can be created. 2. Click on “Controller” “Interfaces” on left hand side menu Select “New” interface 3. Name it as “Employees”. 4. Assign IP address 10.1.2.10, mask: 255.255.255.0 and GW as 10.1.2.1.. Change the VLAN ID to 129. Primary port as Port-1 and Backup port as Port-2. 5. Configure DHCP server IP address as 172.16.1.1. 6. Save the config. Radius Authentication/Accouting servers
- 7. 1. Click on “Security” “Radius Authentication” on left hand side menu Select “New” 2. Configure “172.16.16.100” and “172.16.31.200” with secret key shared by RADIUS team. 3. Click on “Security” “Radius Accounting” on left hand side menu Select “New” 4. Configure “172.16.16.100” and “172.16.31.200” with secret key shared by RADIUS team. 5. Save the config. WLANs Guest WLAN 1. Click on “WLAN” Click “New” interface 2. Configure WLAN ID as 1 and WLAN SSID as “Guest” 3. Assign “Guest” WLAN to “Guest” interface. 4. Save the config. Employees WLAN 1. Click on “WLAN” Click “New” interface 2. Configure WLAN ID as 2 and WLAN SSID as “Employees” 3. Assign “Employees” WLAN to “Employees” interface. 4. Click “Layer 2 Security” Select “WPA1+WPA2” Check all relevant encryption related boxes & choose “802.1x” for Auth Key Mgmt. 5. Check for “AAA servers” list under this WLAN SSID. Please choose AAA servers if not selected. 6. Save the config. Note: As soon as Cisco WLC receives the 1st frame from Wireless Client requesting for an IP Address, Cisco WLC checks the incoming interface and then creates and transmits a DHCP packet to get subnet from respective VLAN Subnet. For eg, if you configure the above “Guest” WLAN with “Employees” interface, then Guest Wireless client will get IP address in VLAN 129 instead of VLAN 127 so will not be able to connect to network
- 8. applications. The DHCP server configuration on Controller interfaces is as good as “ip helper-address” on Cisco Routers. Imp Notes/Known Issues 1. By default, Cisco WLC uses Management interface IP address as Source IP to connect to RADIUS server. So, please ensure that Management Interface IP address is routable as well as permitted in Radius server to accept authentication requests. 2. Sometimes, it’s desirable to have the Cisco WLC source IP address as the Wireless LAN dynamic interface IP address instead of Management interface. The workaround is enabling “Radius Server Overwrite Interface” on WLAN SSID. But, please note that this is available only from Cisco WCS software version 7.0 or above. 3. Static routes configuration on Cisco WLC would get routed through “Service-Port” interface ONLY for OOB management. 4. Utilize “AP Groups” feature if you want to enable some APs to serve a WLAN and some other APs to serve another WLAN. 5. Utilize “WLAN Override” feature on Access point configuration through WLC Web GUI if you want to restrict the advertised WLANs from specific AP. 6. While creating a dynamic interface, DON’T check “Dynamic AP management”. It would actually create another AP Manager interface; not a pure dynamic interface. 7. L3 LWAPP discovery requests get rejected if Management interface IP address and AP IP address are located in different VLANs. There are workarounds available from the following link. http://www.cisco.com/en/US/docs/wireless/technology/controller/deployment /guide/dep.html#wp1052604 But, the simple workaround would be putting all APs and WLC Management IP address into a single VLAN, if possible. Please note that AP Manager interface can be in another VLAN. 8. AP Manager Interfaces can NOT be assigned to any WLAN. 9. Useful debug commands on Cisco WLC CLI interface to troubleshoot security and DHCP issues…
- 9. debug dot1x events enable debug aaa events enable debug dhcp packets enable 10.In general, you will not see any response back from RADIUS server if secret key does not match. 11.If you want to change Management interface IP address through Console, utilize the following commands in the given order… config wlan disable 1 (disable other WLANs as well if you have) config interface address management 10.230.17.11 255.255.255.0 10.230.17.1 config interface port management 1 2 config interface vlan management 128 config wlan enable 1 (enable all other WLANs) Conclusion Hope this document would have helped the reader to get ready for Cisco WLC implementation with multiple VLANs and encourage adding any practical experience in Section 4.3 (Imp Notes/Known issues) section above after finishing similar implementations in future. More Topics you can visit here http://blog.router- switch.com/category/technology/wireless/