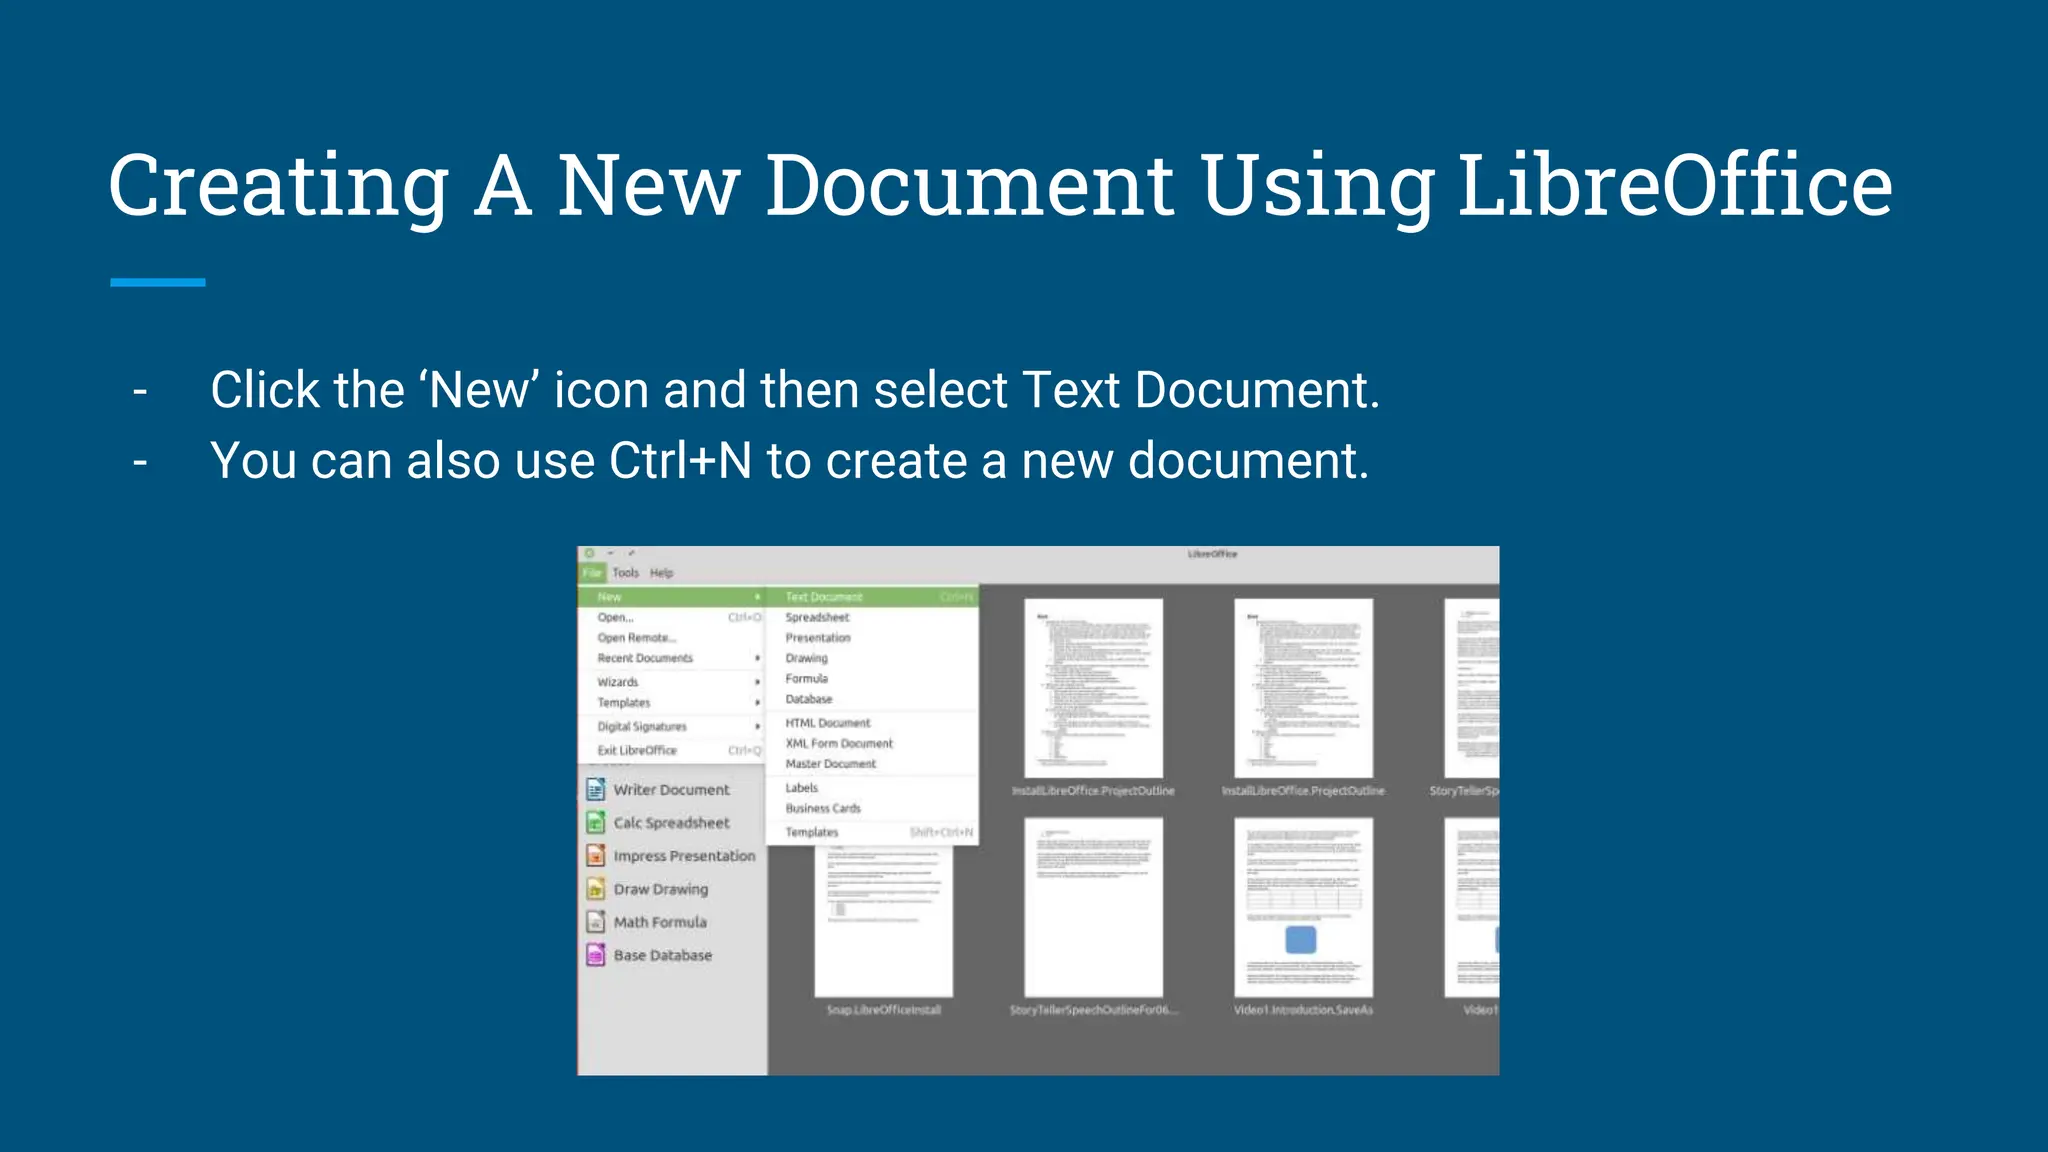
2. Session 1: Introduction to ICT
Word processor: A word processor is a software application that helps us create
documents by editing text, formatting it and printing it. We can use word
processors while making reports or writing important documents to easily avoid
error.
A few examples of word processors are:
Microsoft Word, OpenOffice Writer, Wordpad, etc.
3. Advantages Of Using A Word Processor
- It is easier to add and remove text in a document.
- While creating important documents (such as a resume), a word processor
checks your spelling, language and grammar.
- If you are writing a long report, you can save the document for several days
and resume whenever required. You can also print it if you need a hard copy.
- You can make the document attractive with colors, fonts and designs.
- Posters can be easily made by adding bullet points, charts, graphs, pictures,
etc.
4. Word Processors Available
Common word processors used are LibreOffice Writer, Google Docs, Microsoft
Word, OpenOffice Writer, and Notepad.
We will be using LibreOffice to understand how a processor works.
Most of the functions of all word processors are the same.
Can you name 3 of these functions?
5. Creating A New Document Using LibreOffice
- Click the ‘New’ icon and then select Text Document.
- You can also use Ctrl+N to create a new document.
6. Session 2: Basic Interface LibreOffice Writer
When we open LibreOffice there is a default screen which has menu options
such as File, Edit, View, etc. The toolbar provides shortcuts to commonly use
extensions. The Status Bar tell us our word count, page number, font, etc.
7. Menu Bar
The menu bar is found at the top of the LibreOffice window. It has many options
such as File, Edit, View, Insert, Format, Styles, Table, Form, Tools, Windows and
Help.
How many of these can you recognise? What do you think they do?
8. Menu Bar
File: Contains commands that apply to the entire document, such as New, Open, Close, Save, and
Print.
Edit: Contains commands which are used for editing a document. Some of these are Undo, Cut,
Copy, Paste, Find and Replace.
View: Contains commands used to change the display of a document in the LibreOffice Window,
for example Zoom in/out, Web, Status Bar, and Ruler.
Insert: Contains commands that help to add or insert various objects into a document, for
example, Image, Shape, Chart, Header, Footer, and Page Number.
Format: Contains commands to change the look of the text in the document, for example,
making the text bold, line spacing, aligning text and paragraph.
9. Menu Bar
Styles: Contains commands which set the common style of the document, i.e., it specifies the default
format of the document. It has commands to create a new style, load a style and access the Styles and
Formatting section.
Table: Contains commands to insert or delete a table in a document and format it.
Form: Contains commands to insert controls, such as text box, list box, check box, option, button etc.,
in a document.
Tools: Contains functions, such as Spelling and Grammar check, Mail merge and Macros, etc.
Window: Shows all the open LibreOffice windows and allows user to switch to any window by clicking
on it. It also contains commands to open a new window and close an existing one.
Help: Contains options to open the LibreOffice built-in help or go to online help.
10. Toolbar
There are 2 toolbars that are displayed by default, the standard toolbar (to create
a new file, save a file, print a file, insert a table) and the formatting toolbar (to
change the style of the text, font size, paragraph alignment).
11. Context Menu
We can also perform a function using context menu. Right click the mouse on a
paragraph or image, and a context menu is displayed.
12. Multiple Ways To Perform A Function
As shown before, there are various ways to perform a function, for eg: there are 4
ways to make a text bold.
- Click menu option Format, select Text from the drop-down and then select
Bold from the sub-menu.
- Click the Bold icon in the Formatting Toolbar.
- Right-click and select Character. This will open a Character dialog box.
Select Bold from the Stylebox and click OK.
- Press Ctrl+B on your keyboard.
13. Session 3: Saving, Closing, Opening And Printing
Document
Saving A Document:
- Click on File and then click Save or Save As.
- Type in the filename and click Save.
15. Opening An Already Existing Document
To open an already existing document, go to File Explorer and browse until you
find the document. Double click the file to open it.
16. Printing A Word Document
- To print a word document, click File and the click Print. This will display a
print dialog box.
- Next, select the printer connected to your device and the number of copies
you require. Click OK.
17. Session 4: Formatting Text In A Word Document
Changing text style and size - The font and size dropdown present in the toolbar is used.
Making text Bold, Italic or Underlined - Select the text and use shortcuts such as Ctrl+B, Ctrl+I,
and Ctrl+U respectively.
Aligning the Text - Select the text and use the icons on the top right to align it to the left, right or
center.
Cut, Copy and Paste text - Select the text and use shortcuts such as Ctrl+X, Ctrl+C and Ctrl+V
respectively.
Find and Replace text - Click on the magnifying glass icon in the toolbar and type in the text you
want to find. You can replace text by clicking on Replace All or do it one by one.
18. Session 5: Checking Spelling And Grammar
When an error is made while typing in a document, a red or blue wavy line shows
up.
What do you think these lines indicate?
Starting the Spell Checker: To start the spell checker, click on ‘Check Spelling’
icon in the toolbar or press on F7.
Autocorrect Option: We can set the Automatic Spell Checking option on or off by
clicking Tools, then Automatic Spell Checking or pressing Shift+F7
19. Spelling Dialog Box Option
It underlines the word in red. You can choose from these options what you want
to do with the underlined word.
- Ignore Once
- Ignore All
- Add to Dictionary
- Correct
- Correct All
Can you guess what these different options do?
20. Session 6: Inserting Lists, Tables, Pictures And
Shapes
Inserting Bulleted/Numbered
Lists
- Select all items in the
list, click Format, select
Lists and then click on
Bulleted/Numbered
Lists respectively. You
can also press on
Shift+F12 for bulleted
lists and F12 for
numbered lists.
Inserting Tables
-To insert a table, click
on the table icon or
press Ctrl+F12. Click
on More Options from
the drop down, this
opens an Insert Table
dialog box. Select the
number of rows and
columns required.
Inserting Pictures
-To insert an image,
click Insert, and then
Image. This will open
the Insert Image dialog
box, select the image
you want to insert and
then click open.
Inserting Shapes
-To insert a shape, click
Insert, and then Shape.
This will open a sub-
menu of the basic
shapes. Select a type
of shape and then drag
the mouse to specify
the size of the shape
and insert in into the
document.
21. Session 7: Header, Footer, And Page Number
Inserting A Header: To insert a header, first click the Insert menu option. Click
Header and Footer in the drop down menu and click Header. Header will be created at
the top of each page.
Inserting A Footer: To insert a footer, first click the Insert menu option. Click Header
and Footer in the drop down menu and click Footer. Footer will be created at the
bottom of each page.
Insert Title, Page Number and Page Count: To insert page numbers, first click on the
footer. Then click the Insert menu option. Click Field in the drop down menu and
select Page Number.
22. Session 8: Tracking Changes In LibreOffice Writer
How to Start/Stop Tracking Changes: To start tracking changes, click Edit and
then Track Changes. This will show a sub-menu of many options. To start
tracking, click Record or press Ctrl+Shift+E. Once you click on record, all changes
to the document will be tracked. To stop tracking the changes, click on Record
again.
23. Tracking Options
When Record is on, all changes are tracked. All deleted text will appear with a line through it. You
can move from one change to another using the Next and Previous options, and when a change
is selected you can use the Accept and Reject option.
If you are okay with all the changes, you can use the Accept All command, and if you want to go
back to the original text, you can use the Reject All command.
To see what the text would look like with all the changes you can use the Show option without
having to accept all changes.
You can protect the changes with a password by selecting Protect, which will open an Enter
Password dialog box.
24. Manage Option/ Compare Documents
Manage Option: The Manage option opens the Manage Changes dialog box. All
changes are provided in a list and you can choose whether to accept or reject
them.
Compare Documents: It compares the current file with the file you provide. This
will open the Manage Changes dialog box and show the differences between the
two files.You can accept or reject these changes and the current file will get
updated accordingly.