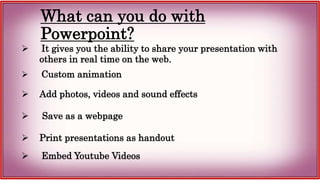
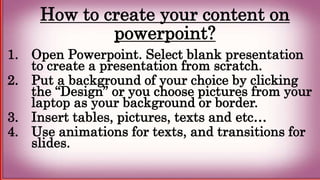
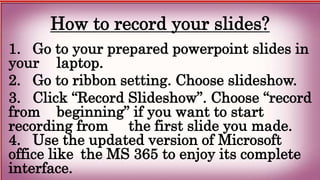
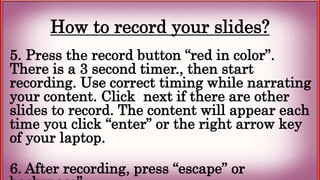
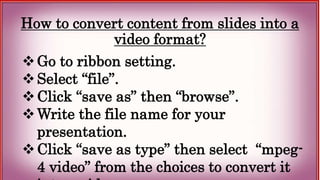
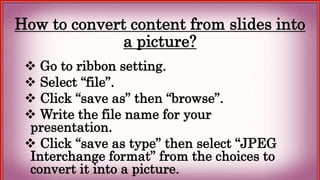
CREATING VIDEO
LESSONS USING
What is MS
Powerpoint?
 It is a powerful slide show
presentation program. The
program uses slides to convey
information rich in
multimedia.
What can you do with
Powerpoint?
 It gives you the ability to share your presentation with
others in real time on the web.
 Custom animation
 Add photos, videos and sound effects
 Save as a webpage
 Print presentations as handout
 Embed Youtube Videos
Example of Video and Audio Narration
How to create your content on
powerpoint?
1. Open Powerpoint. Select blank presentation
to create a presentation from scratch.
2. Put a background of your choice by clicking
the “Design” or you choose pictures from your
laptop as your background or border.
3. Insert tables, pictures, texts and etc…
4. Use animations for texts, and transitions for
slides.
How to record your slides?
1. Go to your prepared powerpoint slides in
your laptop.
2. Go to ribbon setting. Choose slideshow.
3. Click “Record Slideshow”. Choose “record
from beginning” if you want to start
recording from the first slide you made.
4. Use the updated version of Microsoft
office like the MS 365 to enjoy its complete
interface.
How to record your slides?
5. Press the record button “red in color”.
There is a 3 second timer., then start
recording. Use correct timing while narrating
your content. Click next if there are other
slides to record. The content will appear each
time you click “enter” or the right arrow key
of your laptop.
6. After recording, press “escape” or
How to convert content from slides into a
video format?
Go to ribbon setting.
Select “file”.
Click “save as” then “browse”.
Write the file name for your
presentation.
Click “save as type” then select “mpeg-
4 video” from the choices to convert it
How to convert content from slides into
a picture?
 Go to ribbon setting.
 Select “file”.
 Click “save as” then “browse”.
 Write the file name for your
presentation.
 Click “save as type” then select “JPEG
Interchange format” from the choices to
convert it into a picture.

How to Create Video Lesson Using Microsoft Powerpoint.pptx

  • 1.
  • 2.
    What is MS Powerpoint? It is a powerful slide show presentation program. The program uses slides to convey information rich in multimedia.
  • 3.
    What can youdo with Powerpoint?  It gives you the ability to share your presentation with others in real time on the web.  Custom animation  Add photos, videos and sound effects  Save as a webpage  Print presentations as handout  Embed Youtube Videos
  • 4.
    Example of Videoand Audio Narration
  • 5.
    How to createyour content on powerpoint? 1. Open Powerpoint. Select blank presentation to create a presentation from scratch. 2. Put a background of your choice by clicking the “Design” or you choose pictures from your laptop as your background or border. 3. Insert tables, pictures, texts and etc… 4. Use animations for texts, and transitions for slides.
  • 6.
    How to recordyour slides? 1. Go to your prepared powerpoint slides in your laptop. 2. Go to ribbon setting. Choose slideshow. 3. Click “Record Slideshow”. Choose “record from beginning” if you want to start recording from the first slide you made. 4. Use the updated version of Microsoft office like the MS 365 to enjoy its complete interface.
  • 7.
    How to recordyour slides? 5. Press the record button “red in color”. There is a 3 second timer., then start recording. Use correct timing while narrating your content. Click next if there are other slides to record. The content will appear each time you click “enter” or the right arrow key of your laptop. 6. After recording, press “escape” or
  • 9.
    How to convertcontent from slides into a video format? Go to ribbon setting. Select “file”. Click “save as” then “browse”. Write the file name for your presentation. Click “save as type” then select “mpeg- 4 video” from the choices to convert it
  • 10.
    How to convertcontent from slides into a picture?  Go to ribbon setting.  Select “file”.  Click “save as” then “browse”.  Write the file name for your presentation.  Click “save as type” then select “JPEG Interchange format” from the choices to convert it into a picture.