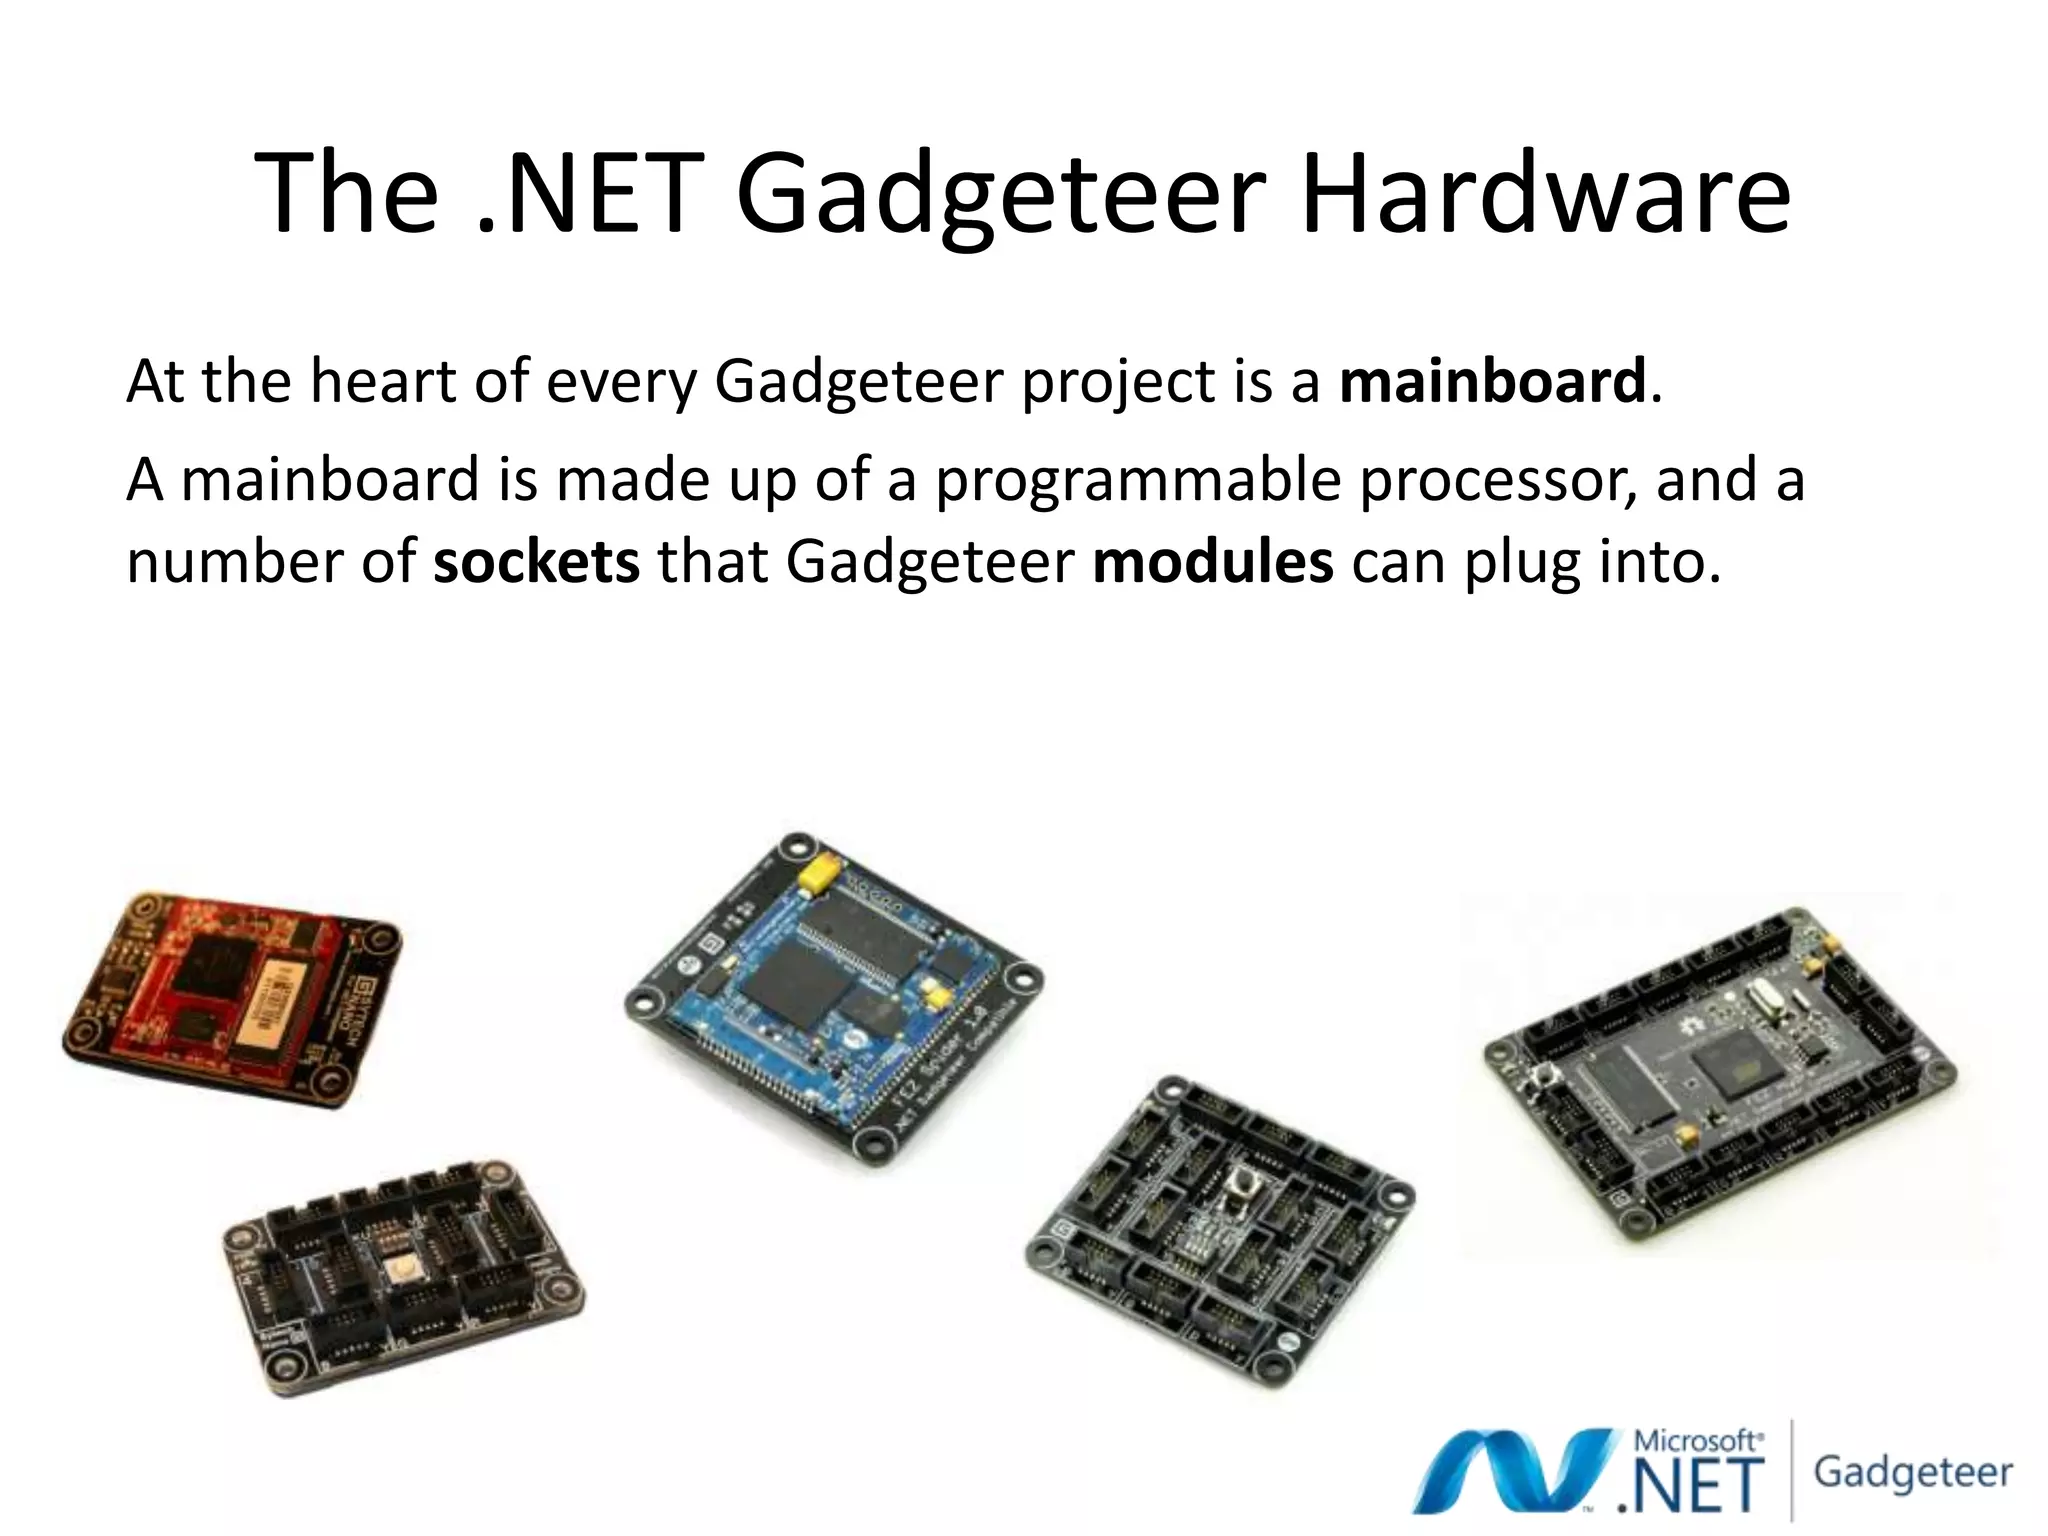
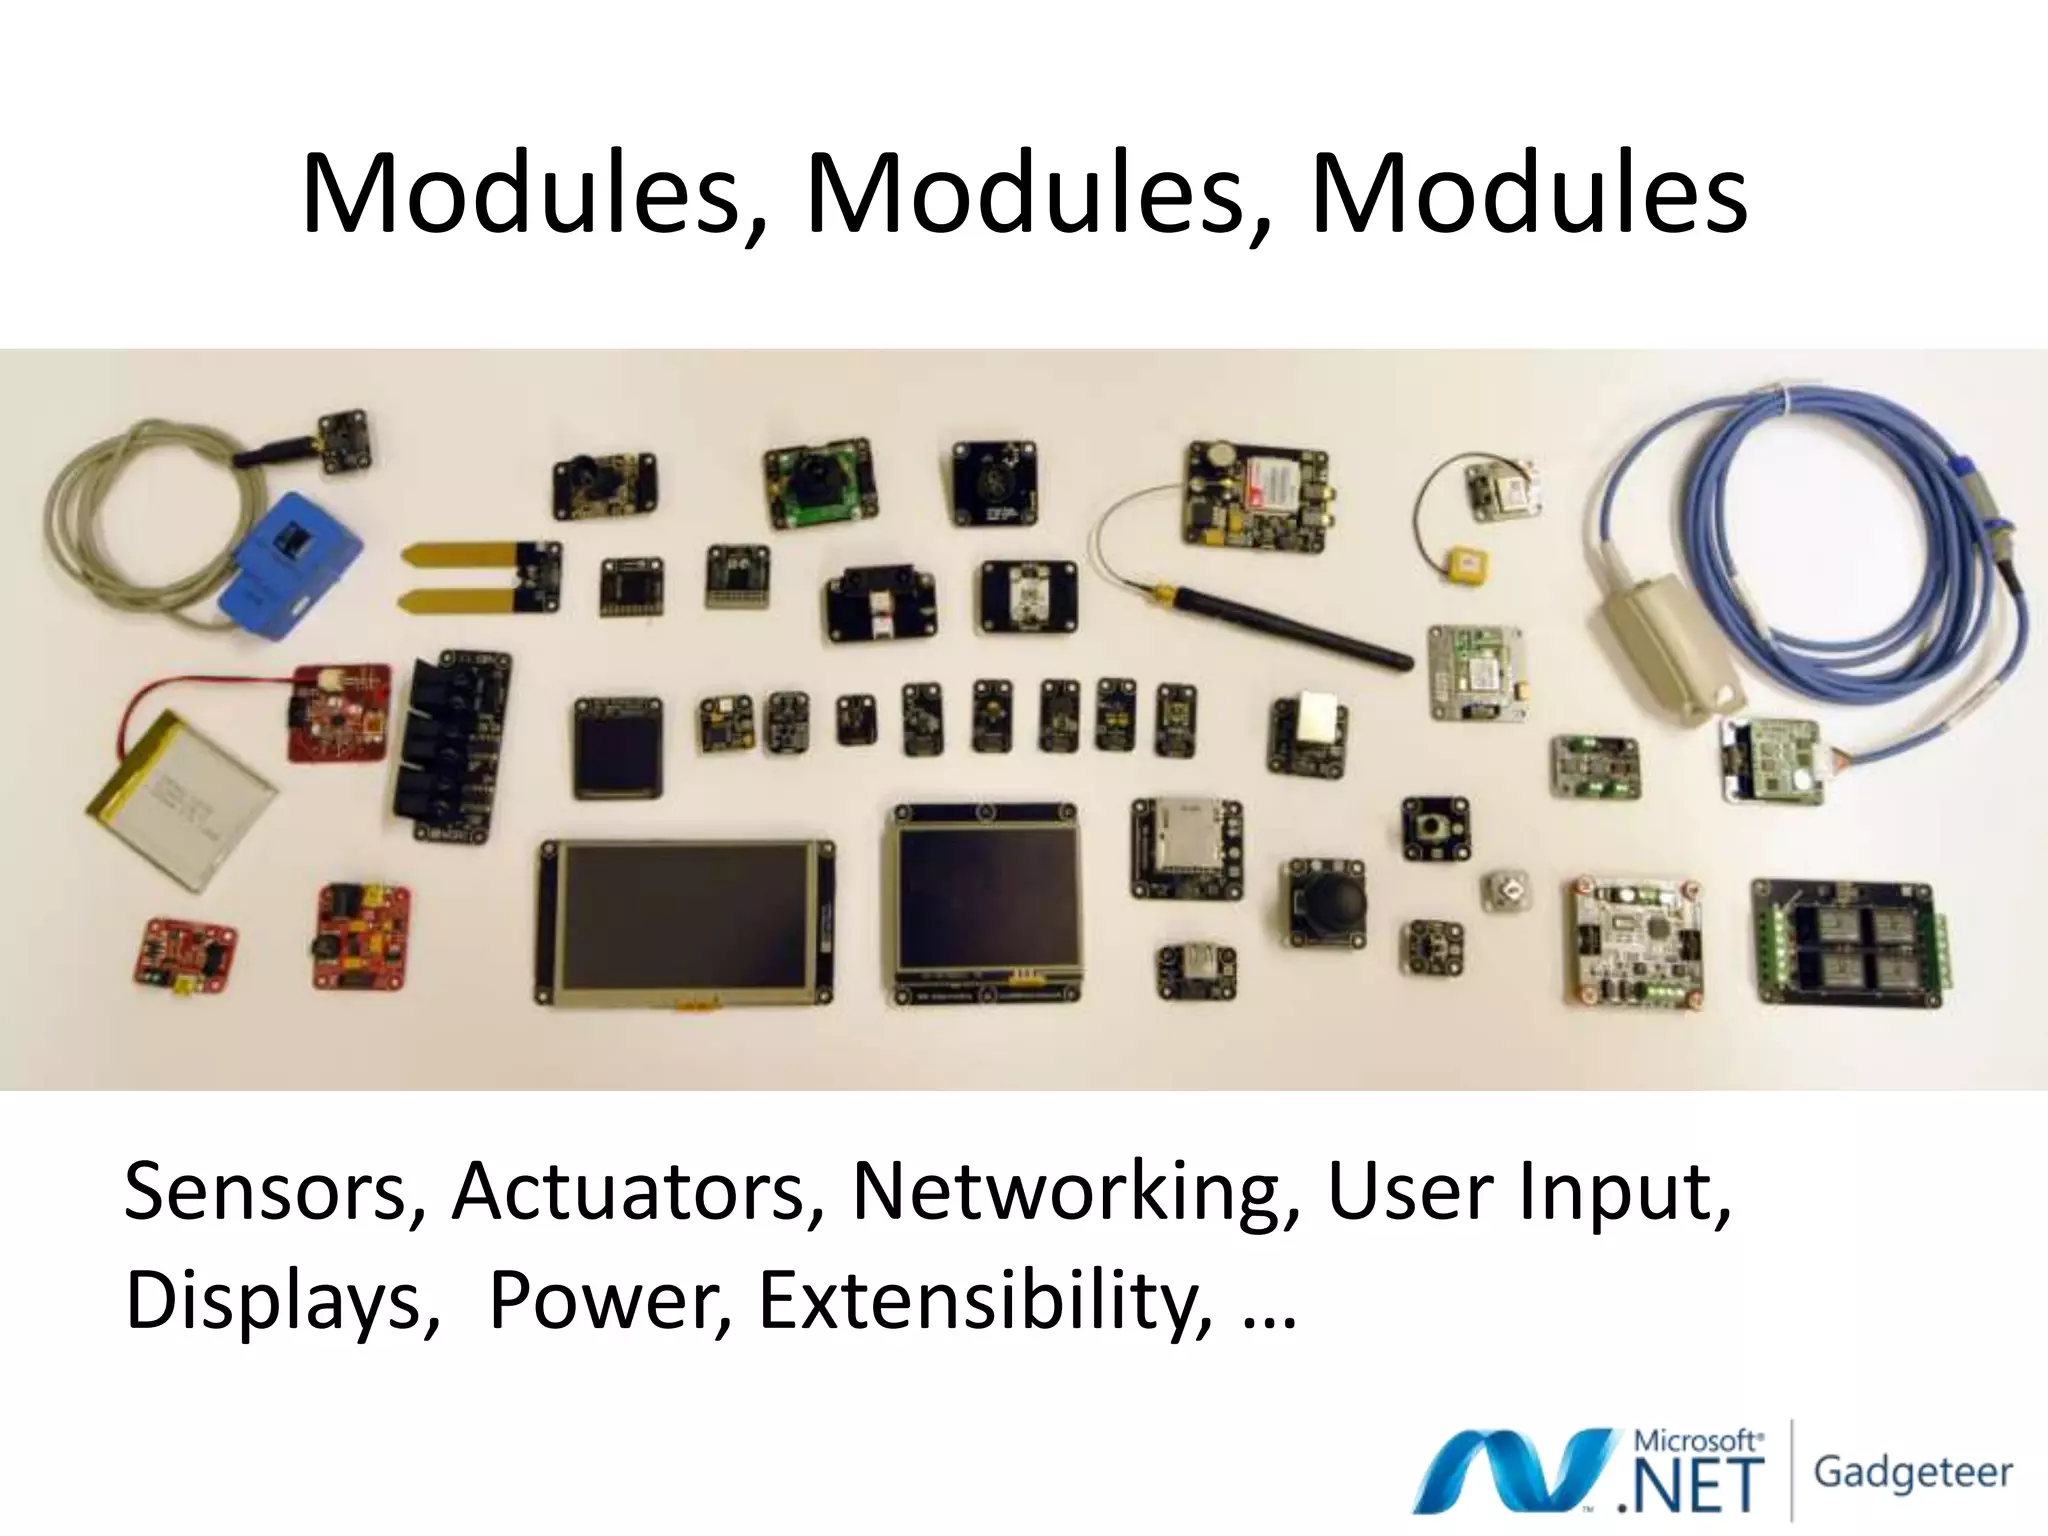
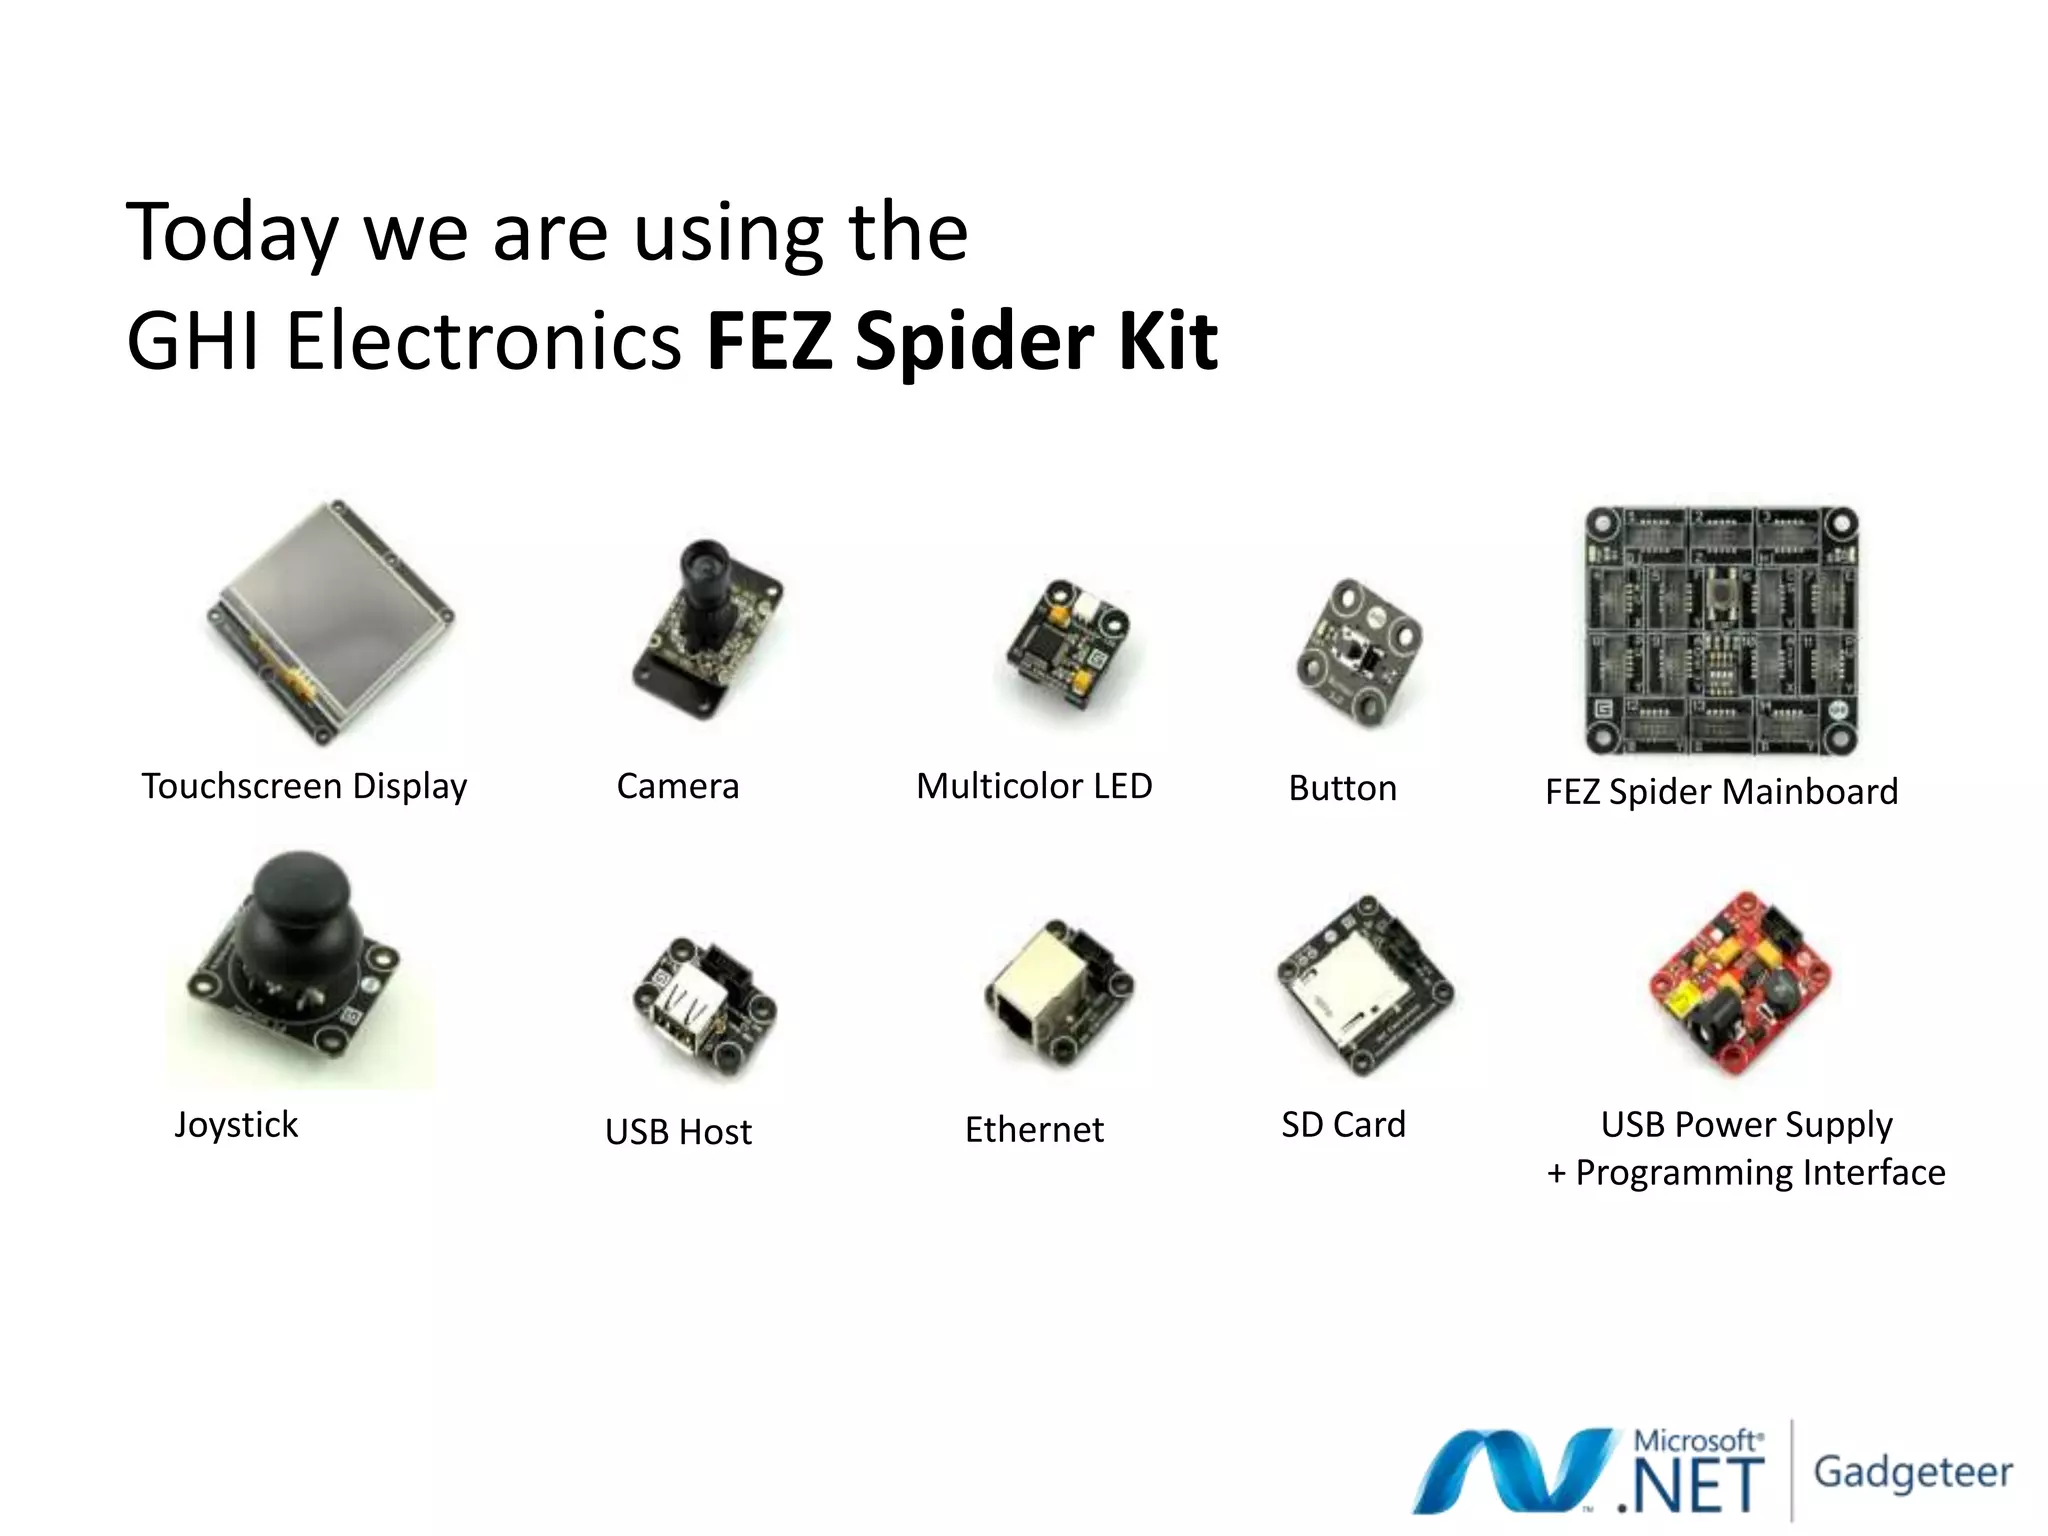
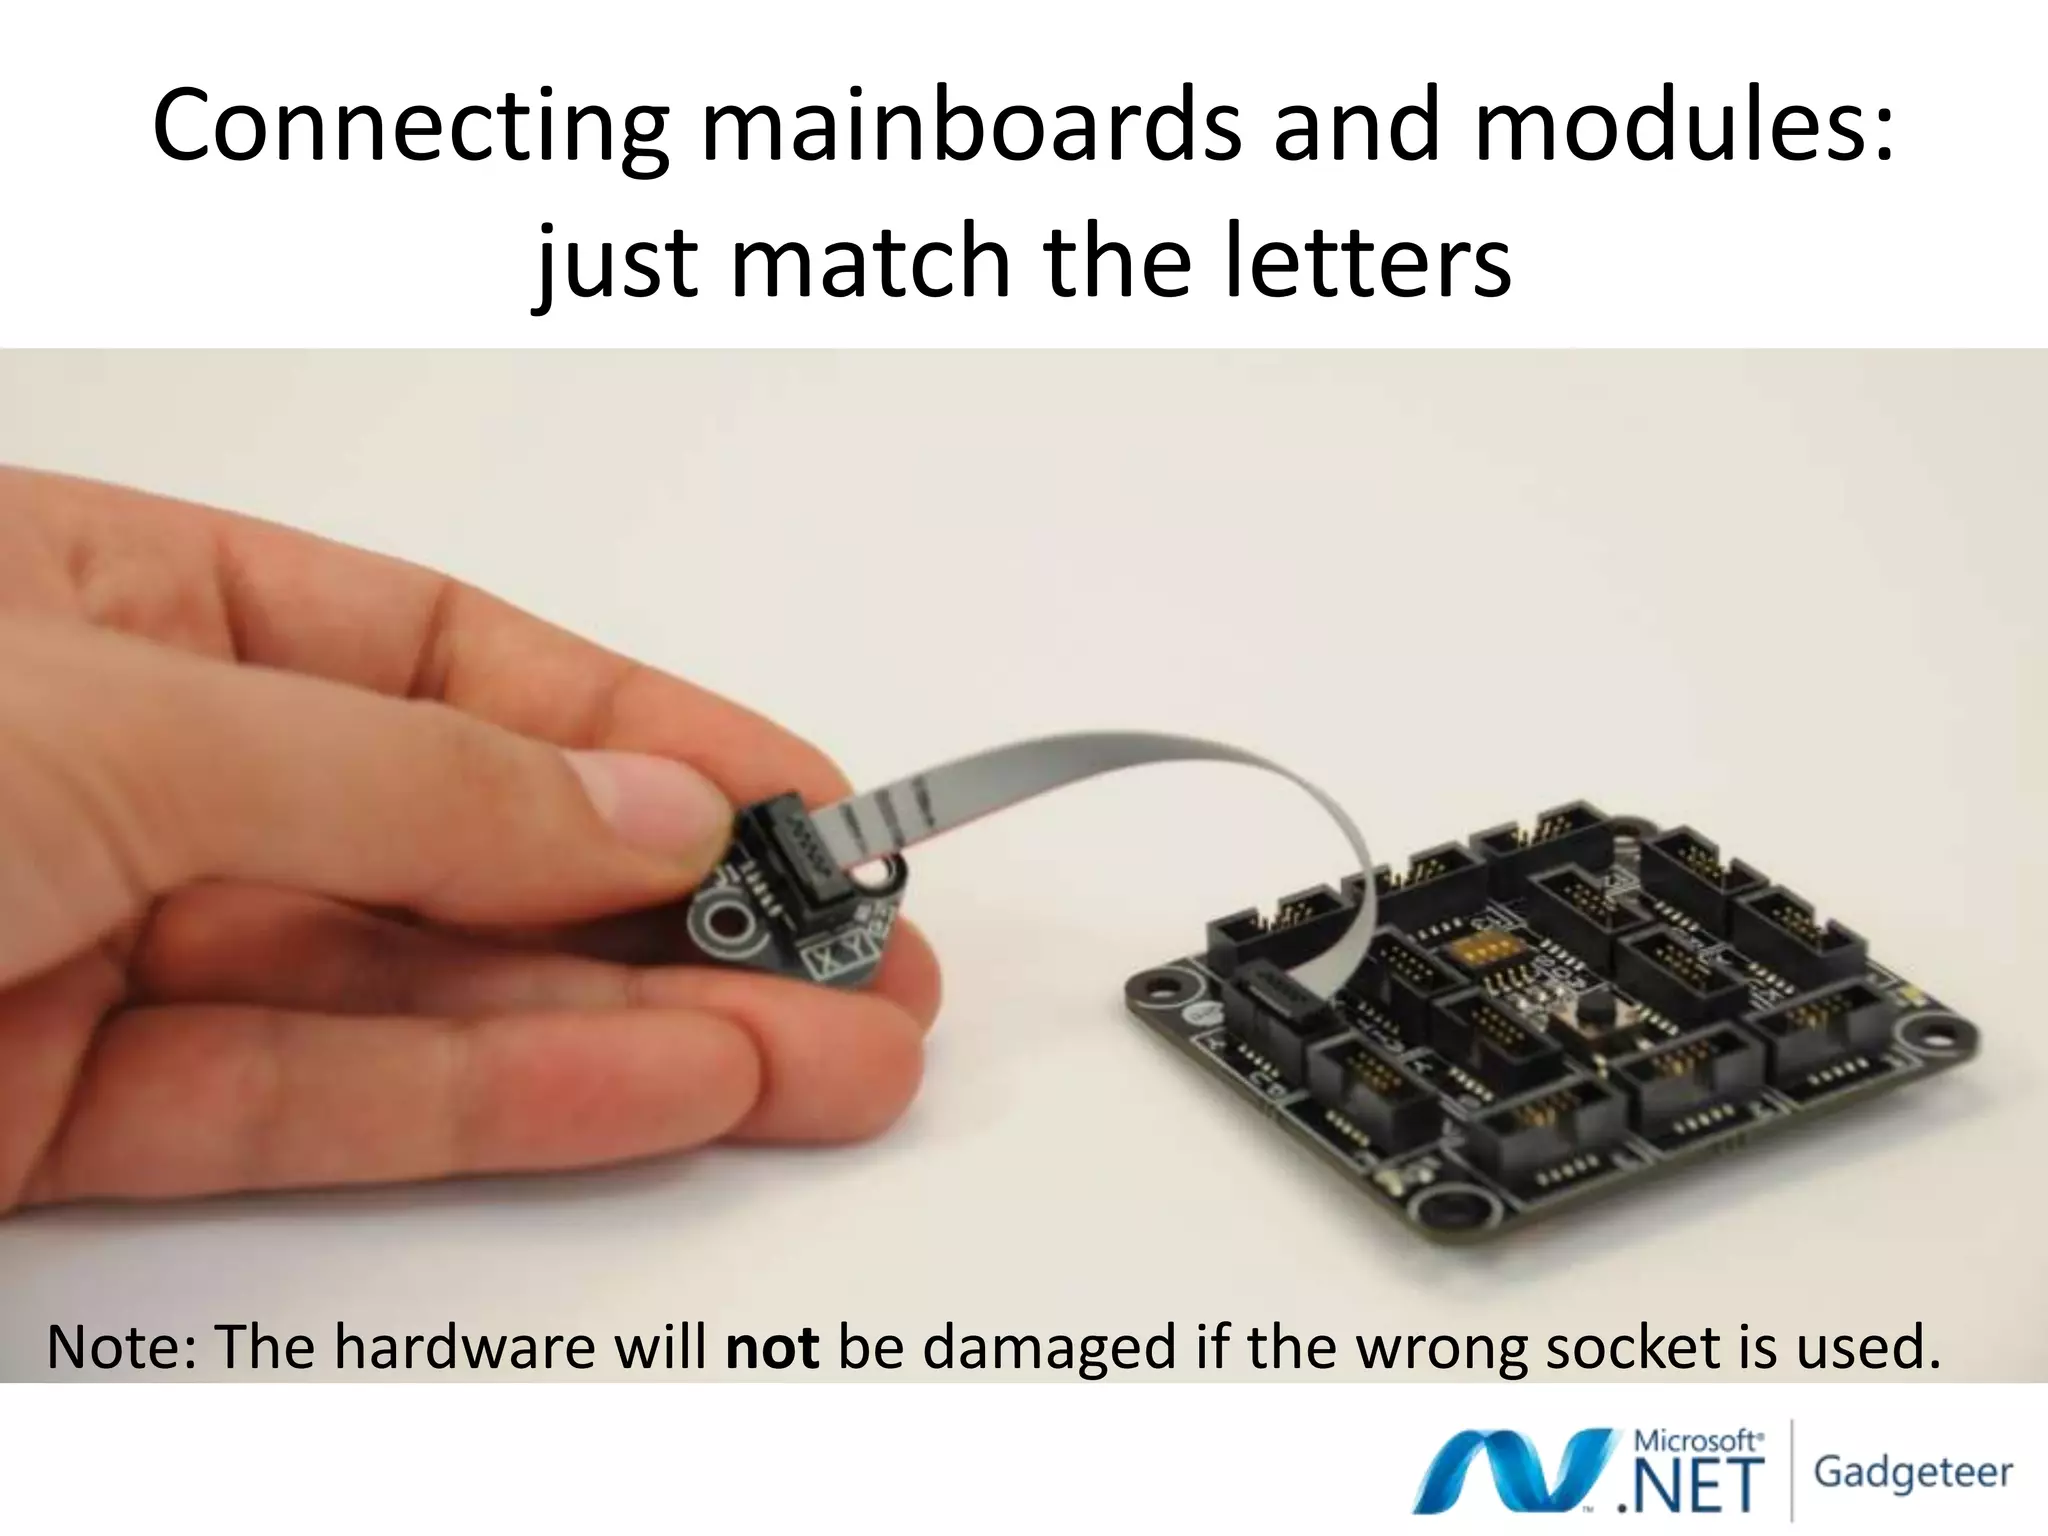
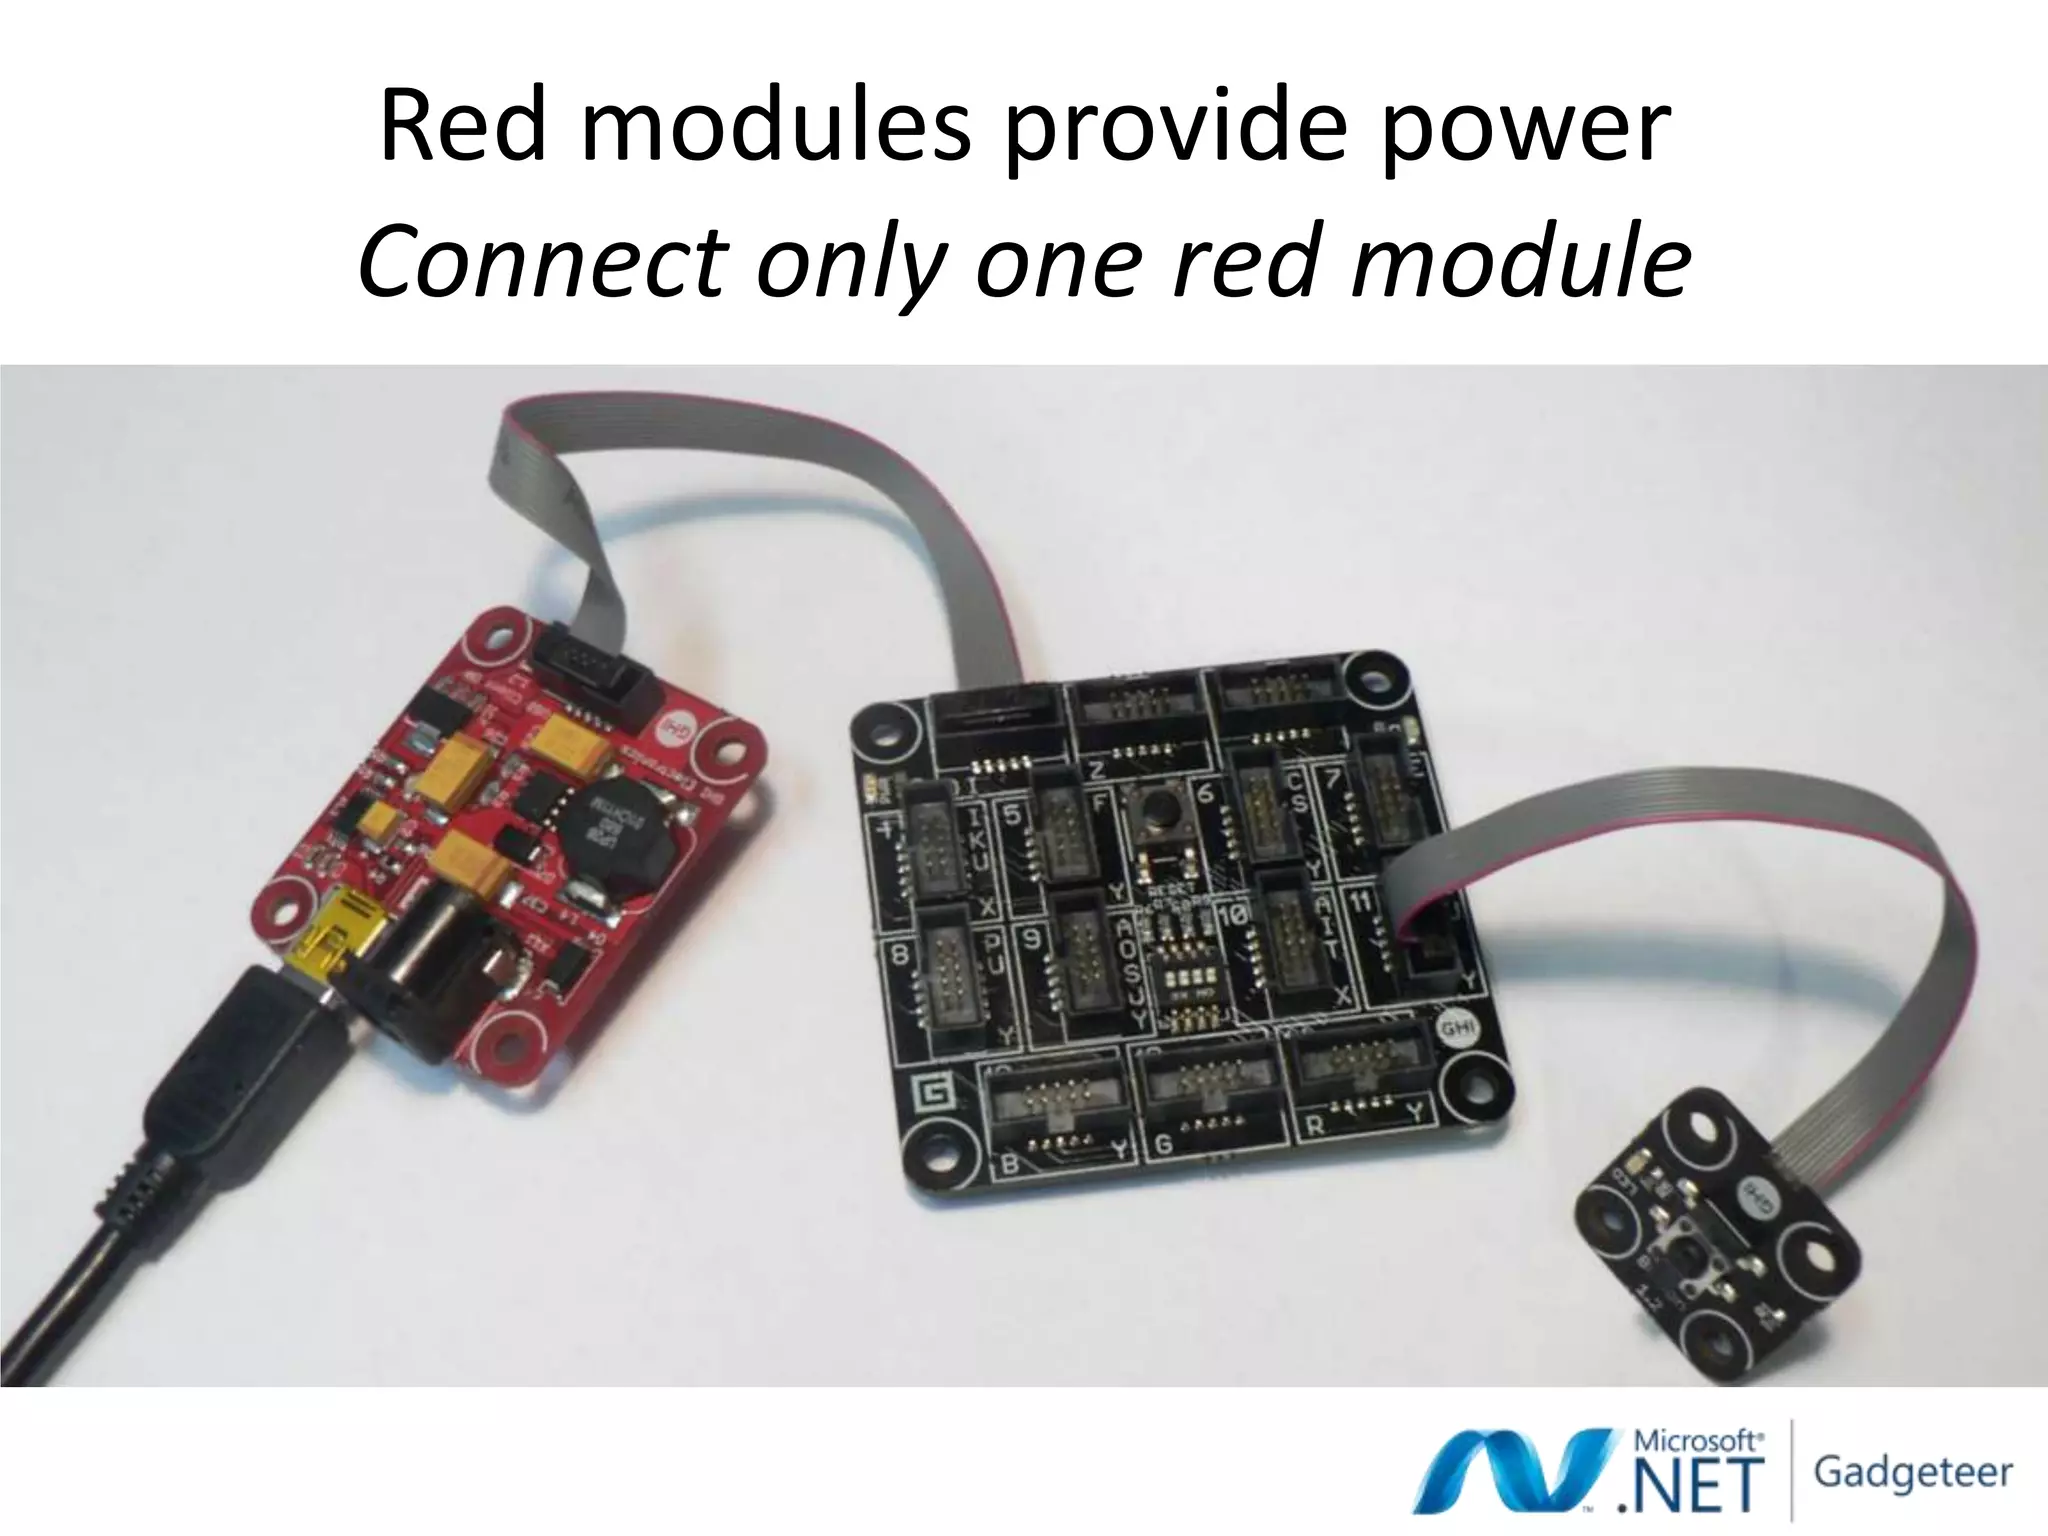
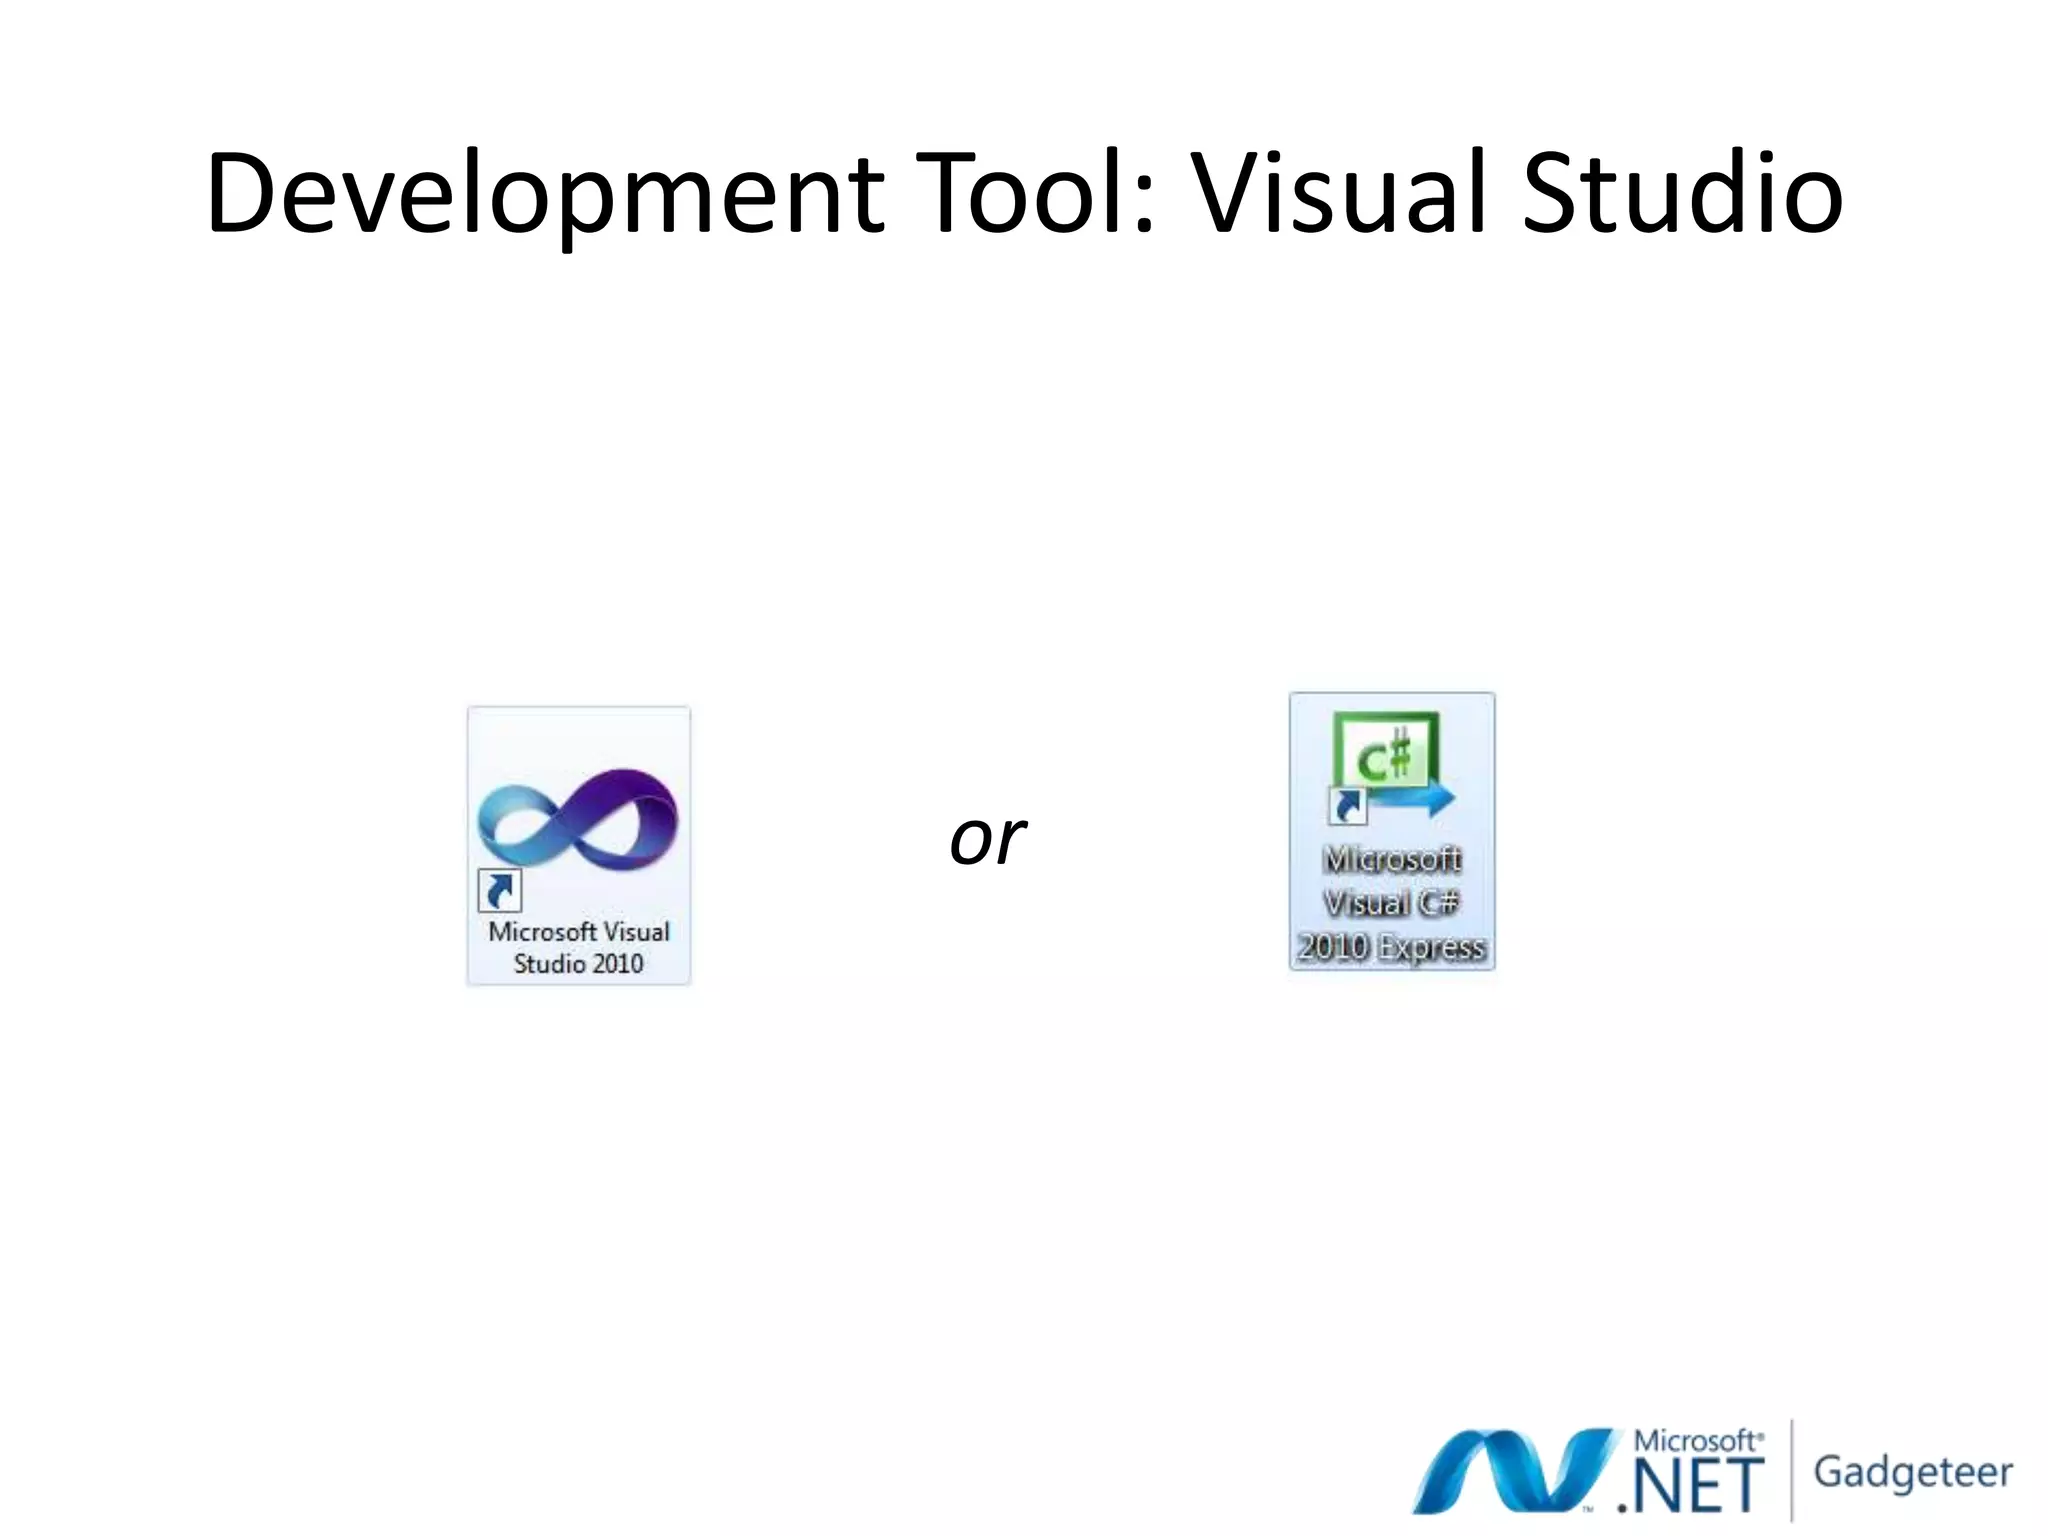
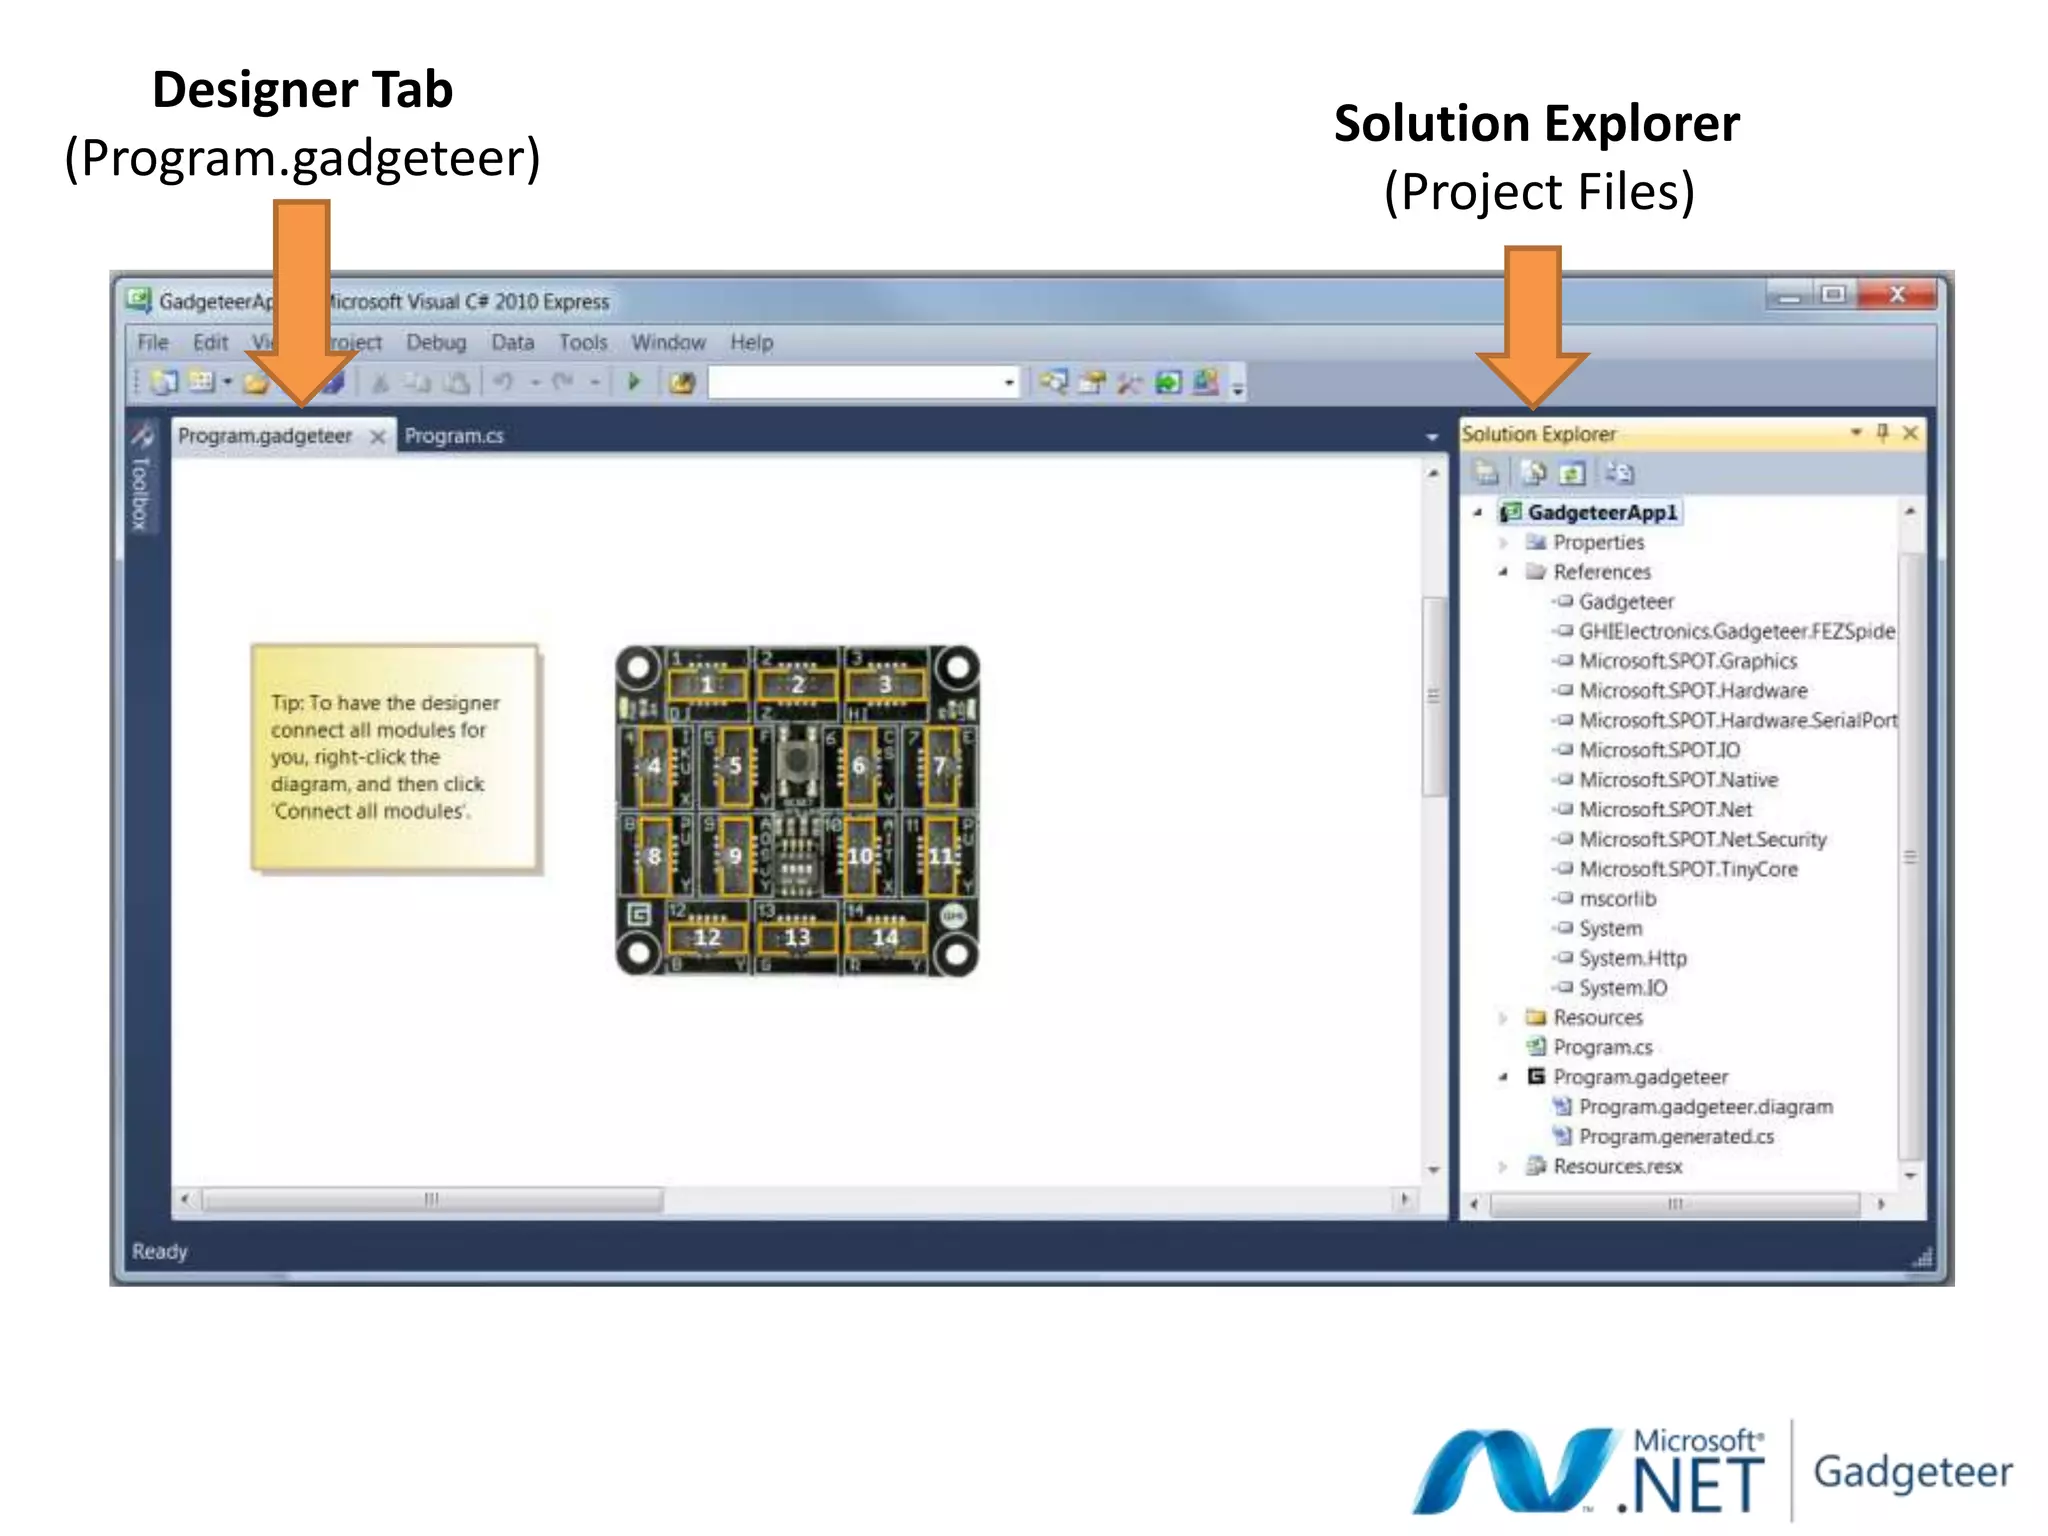
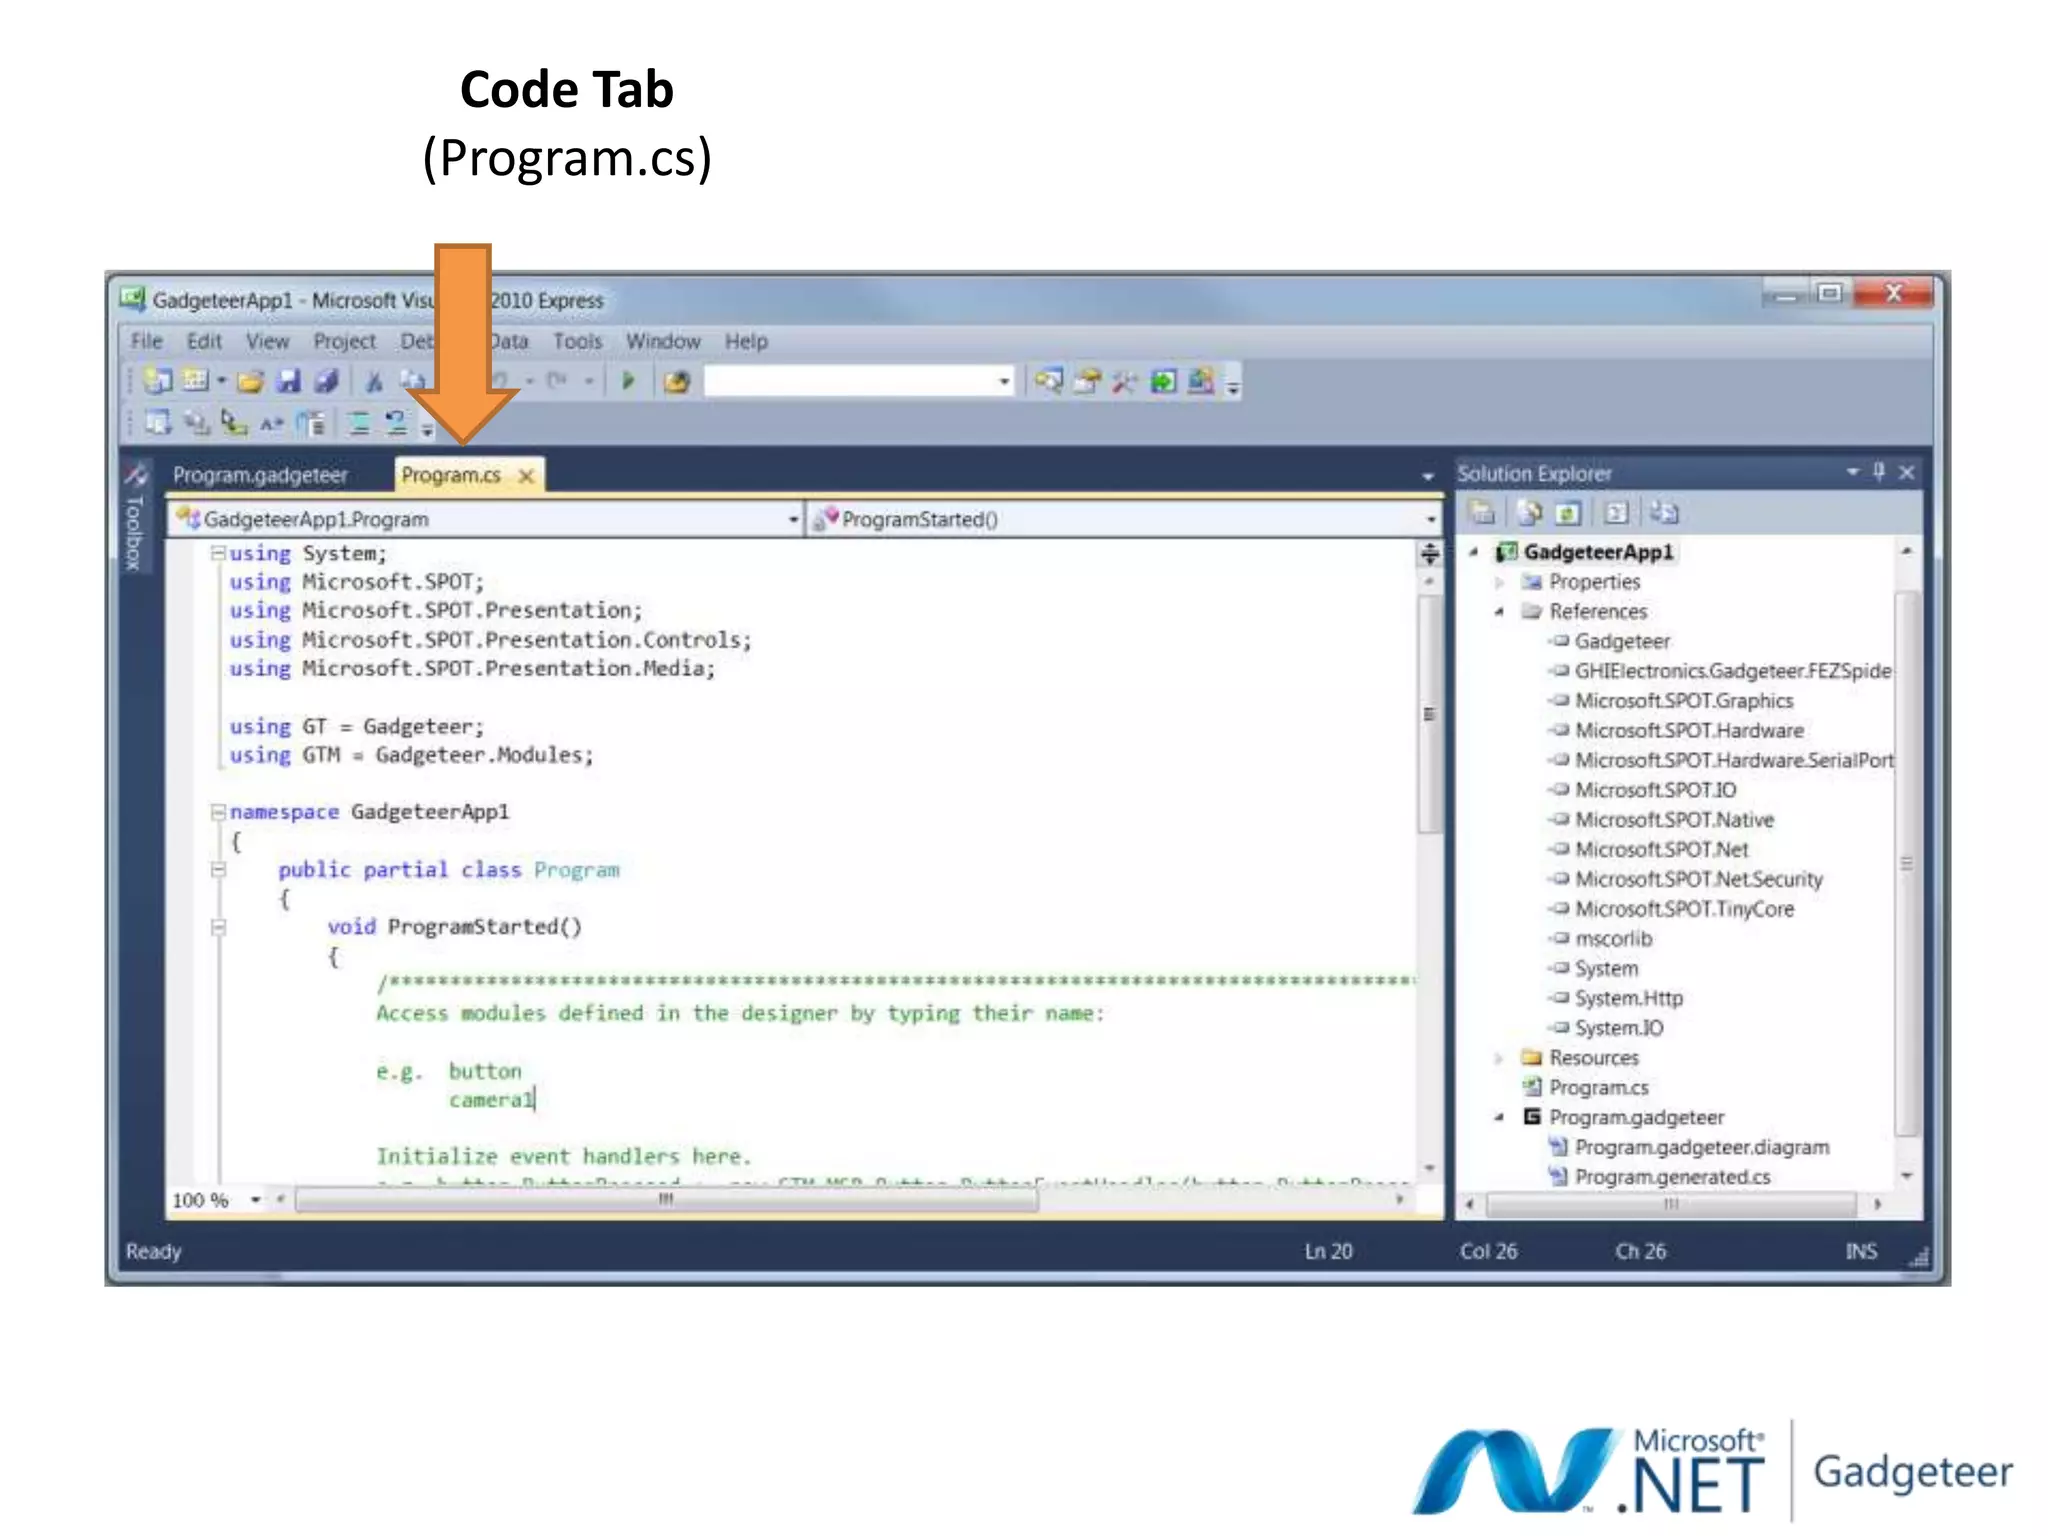
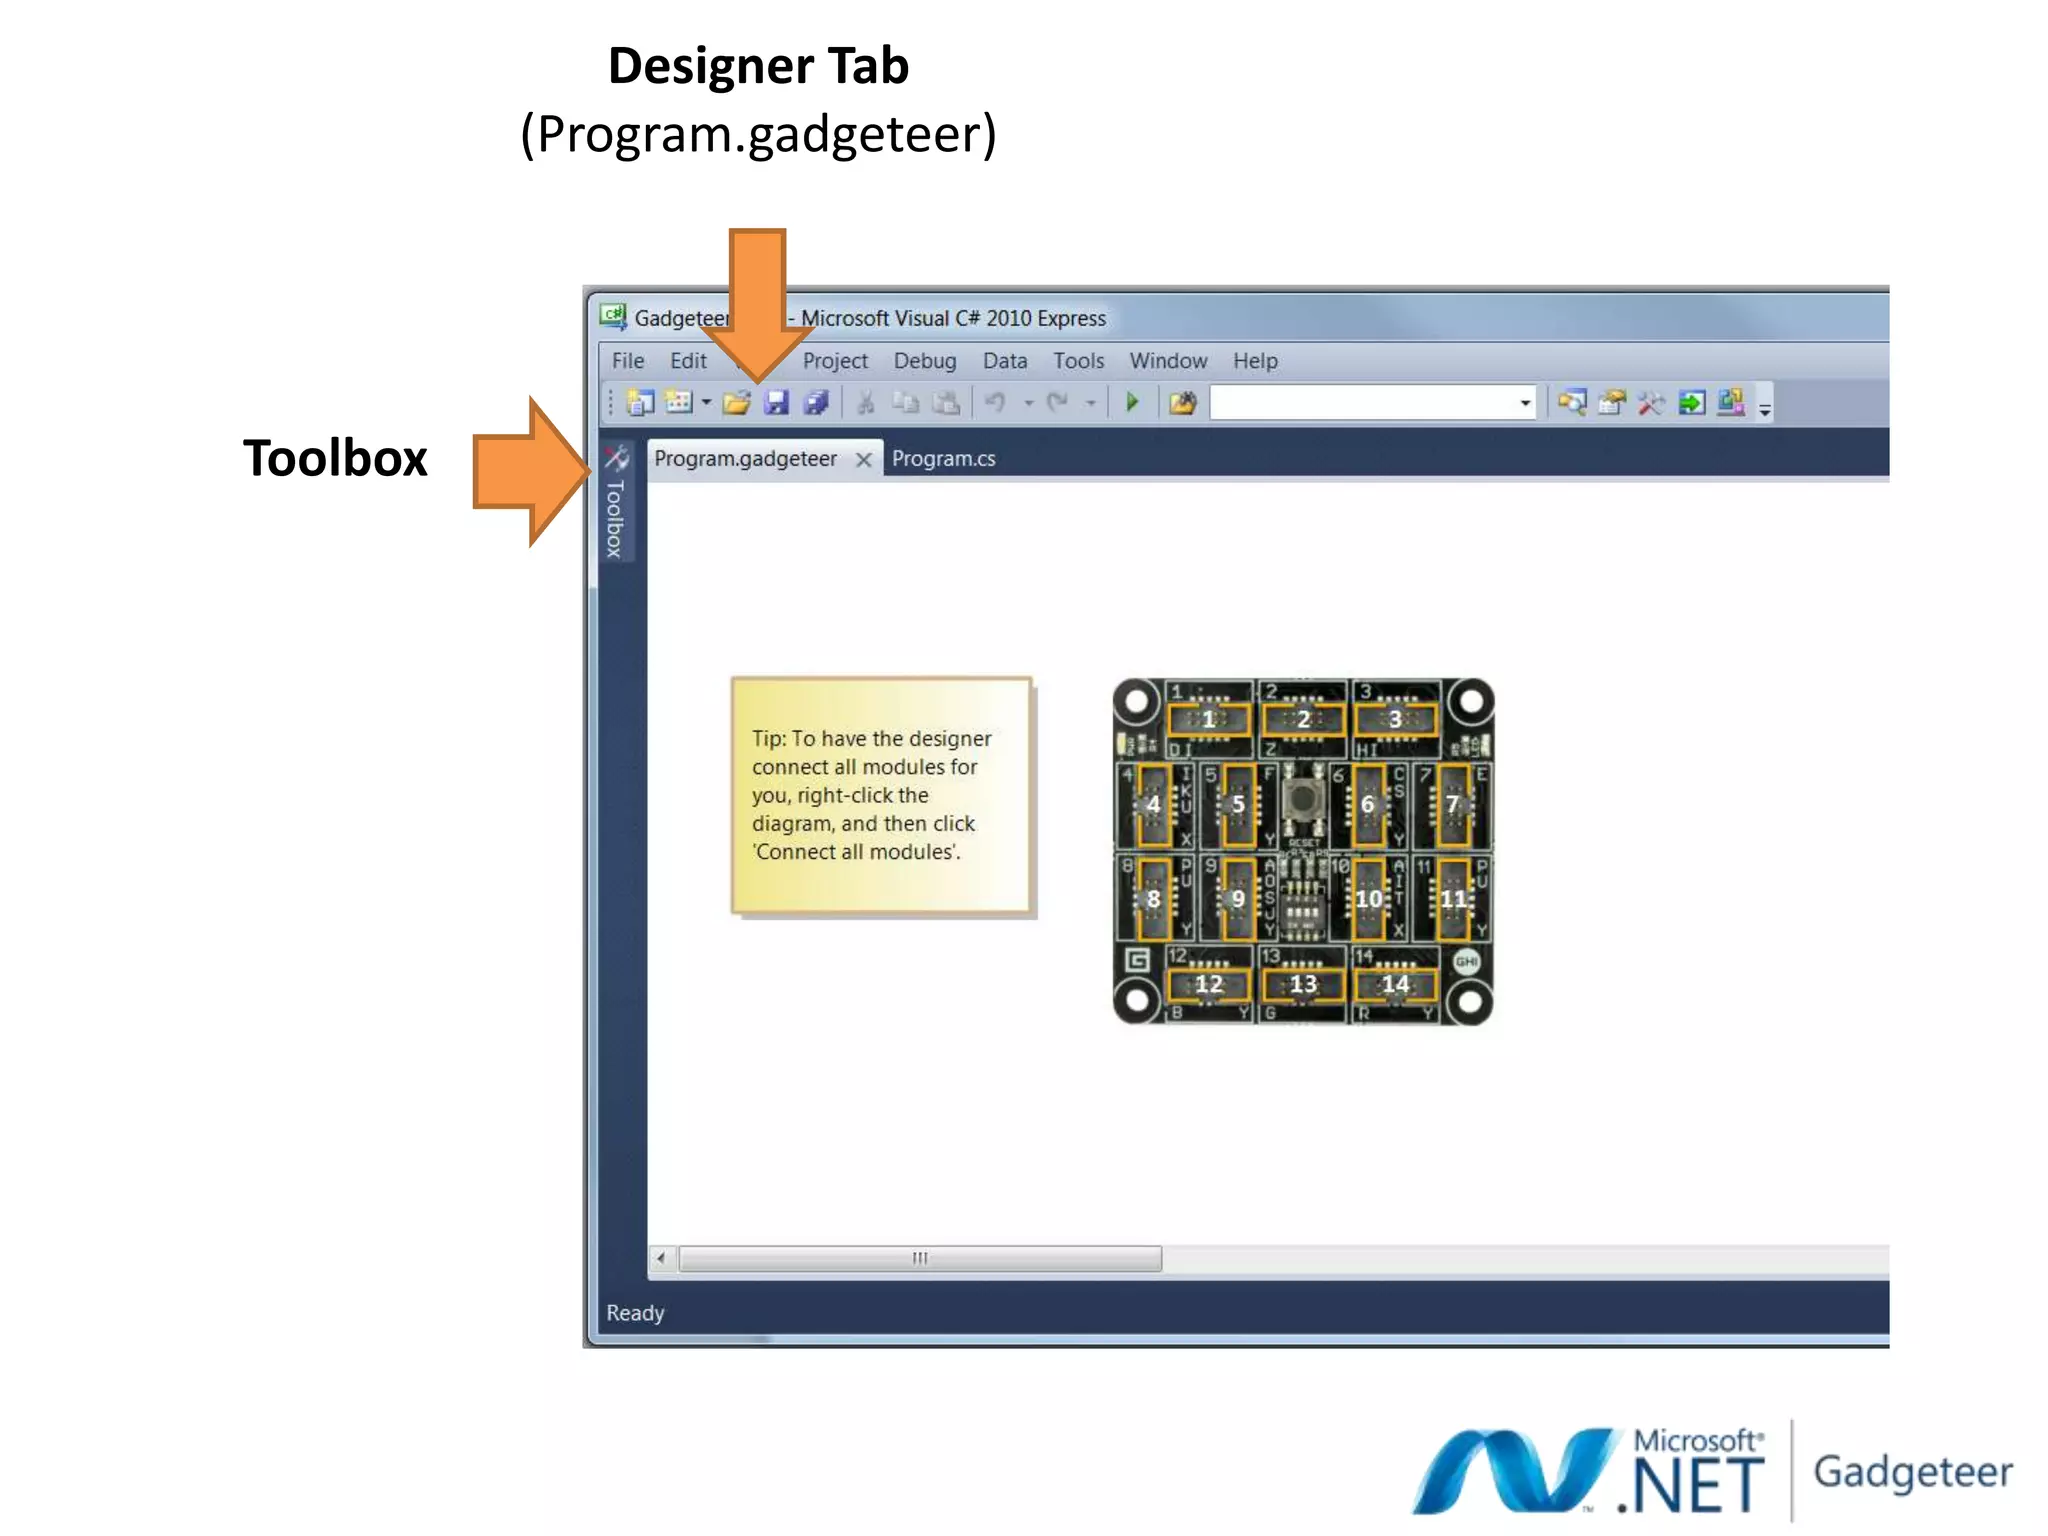
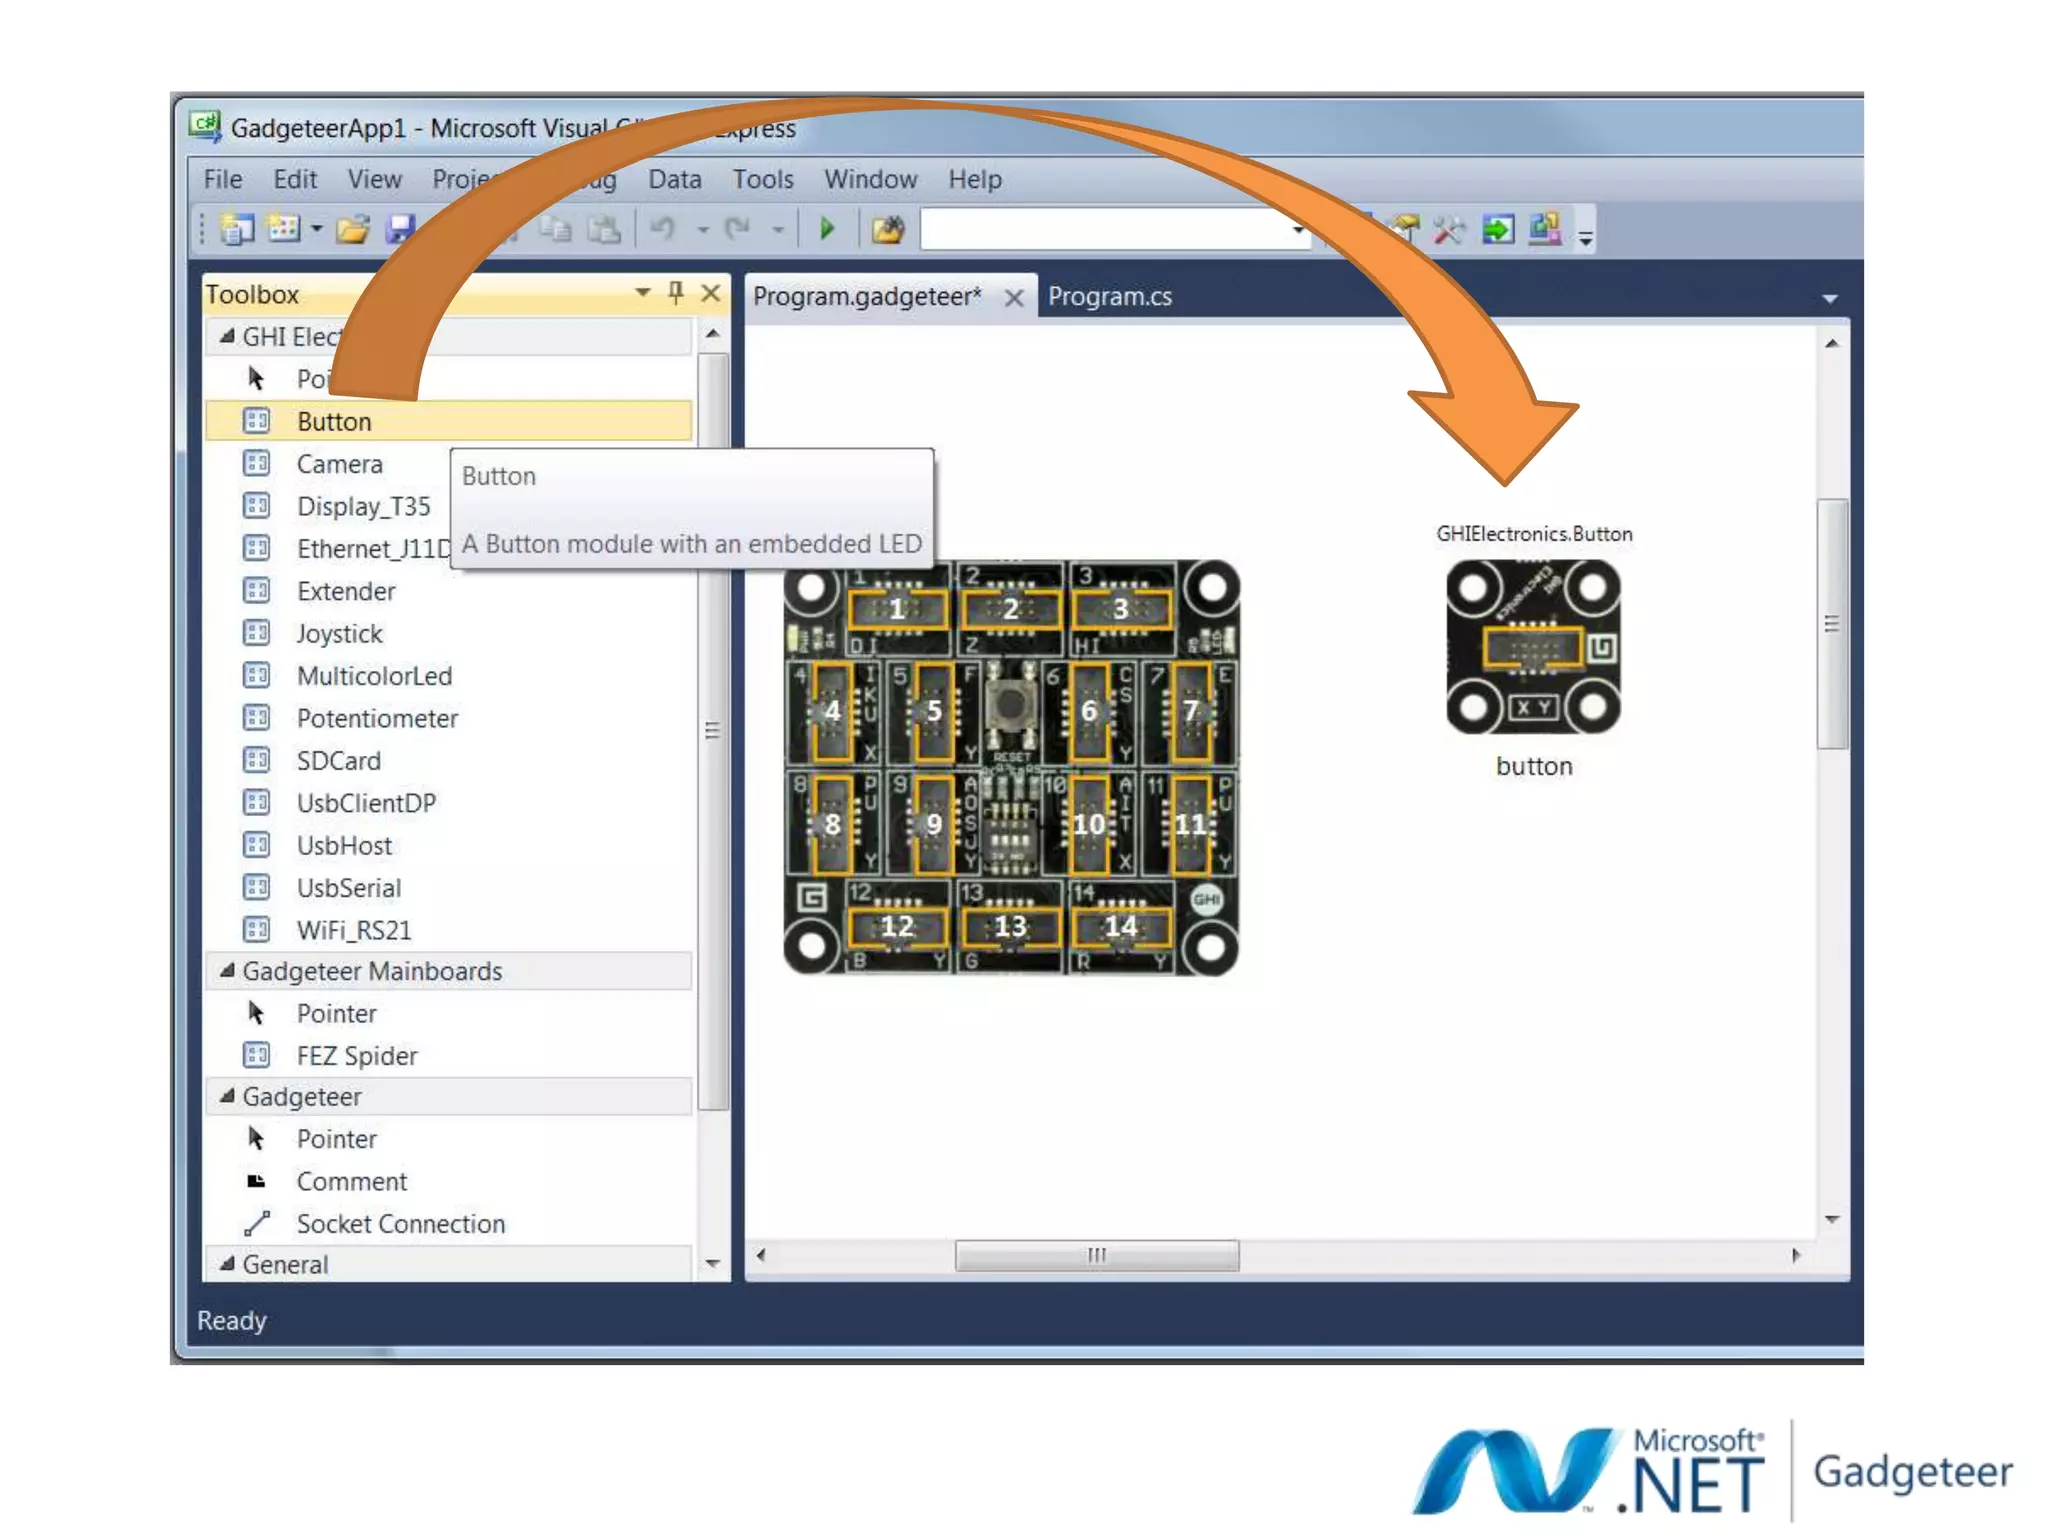
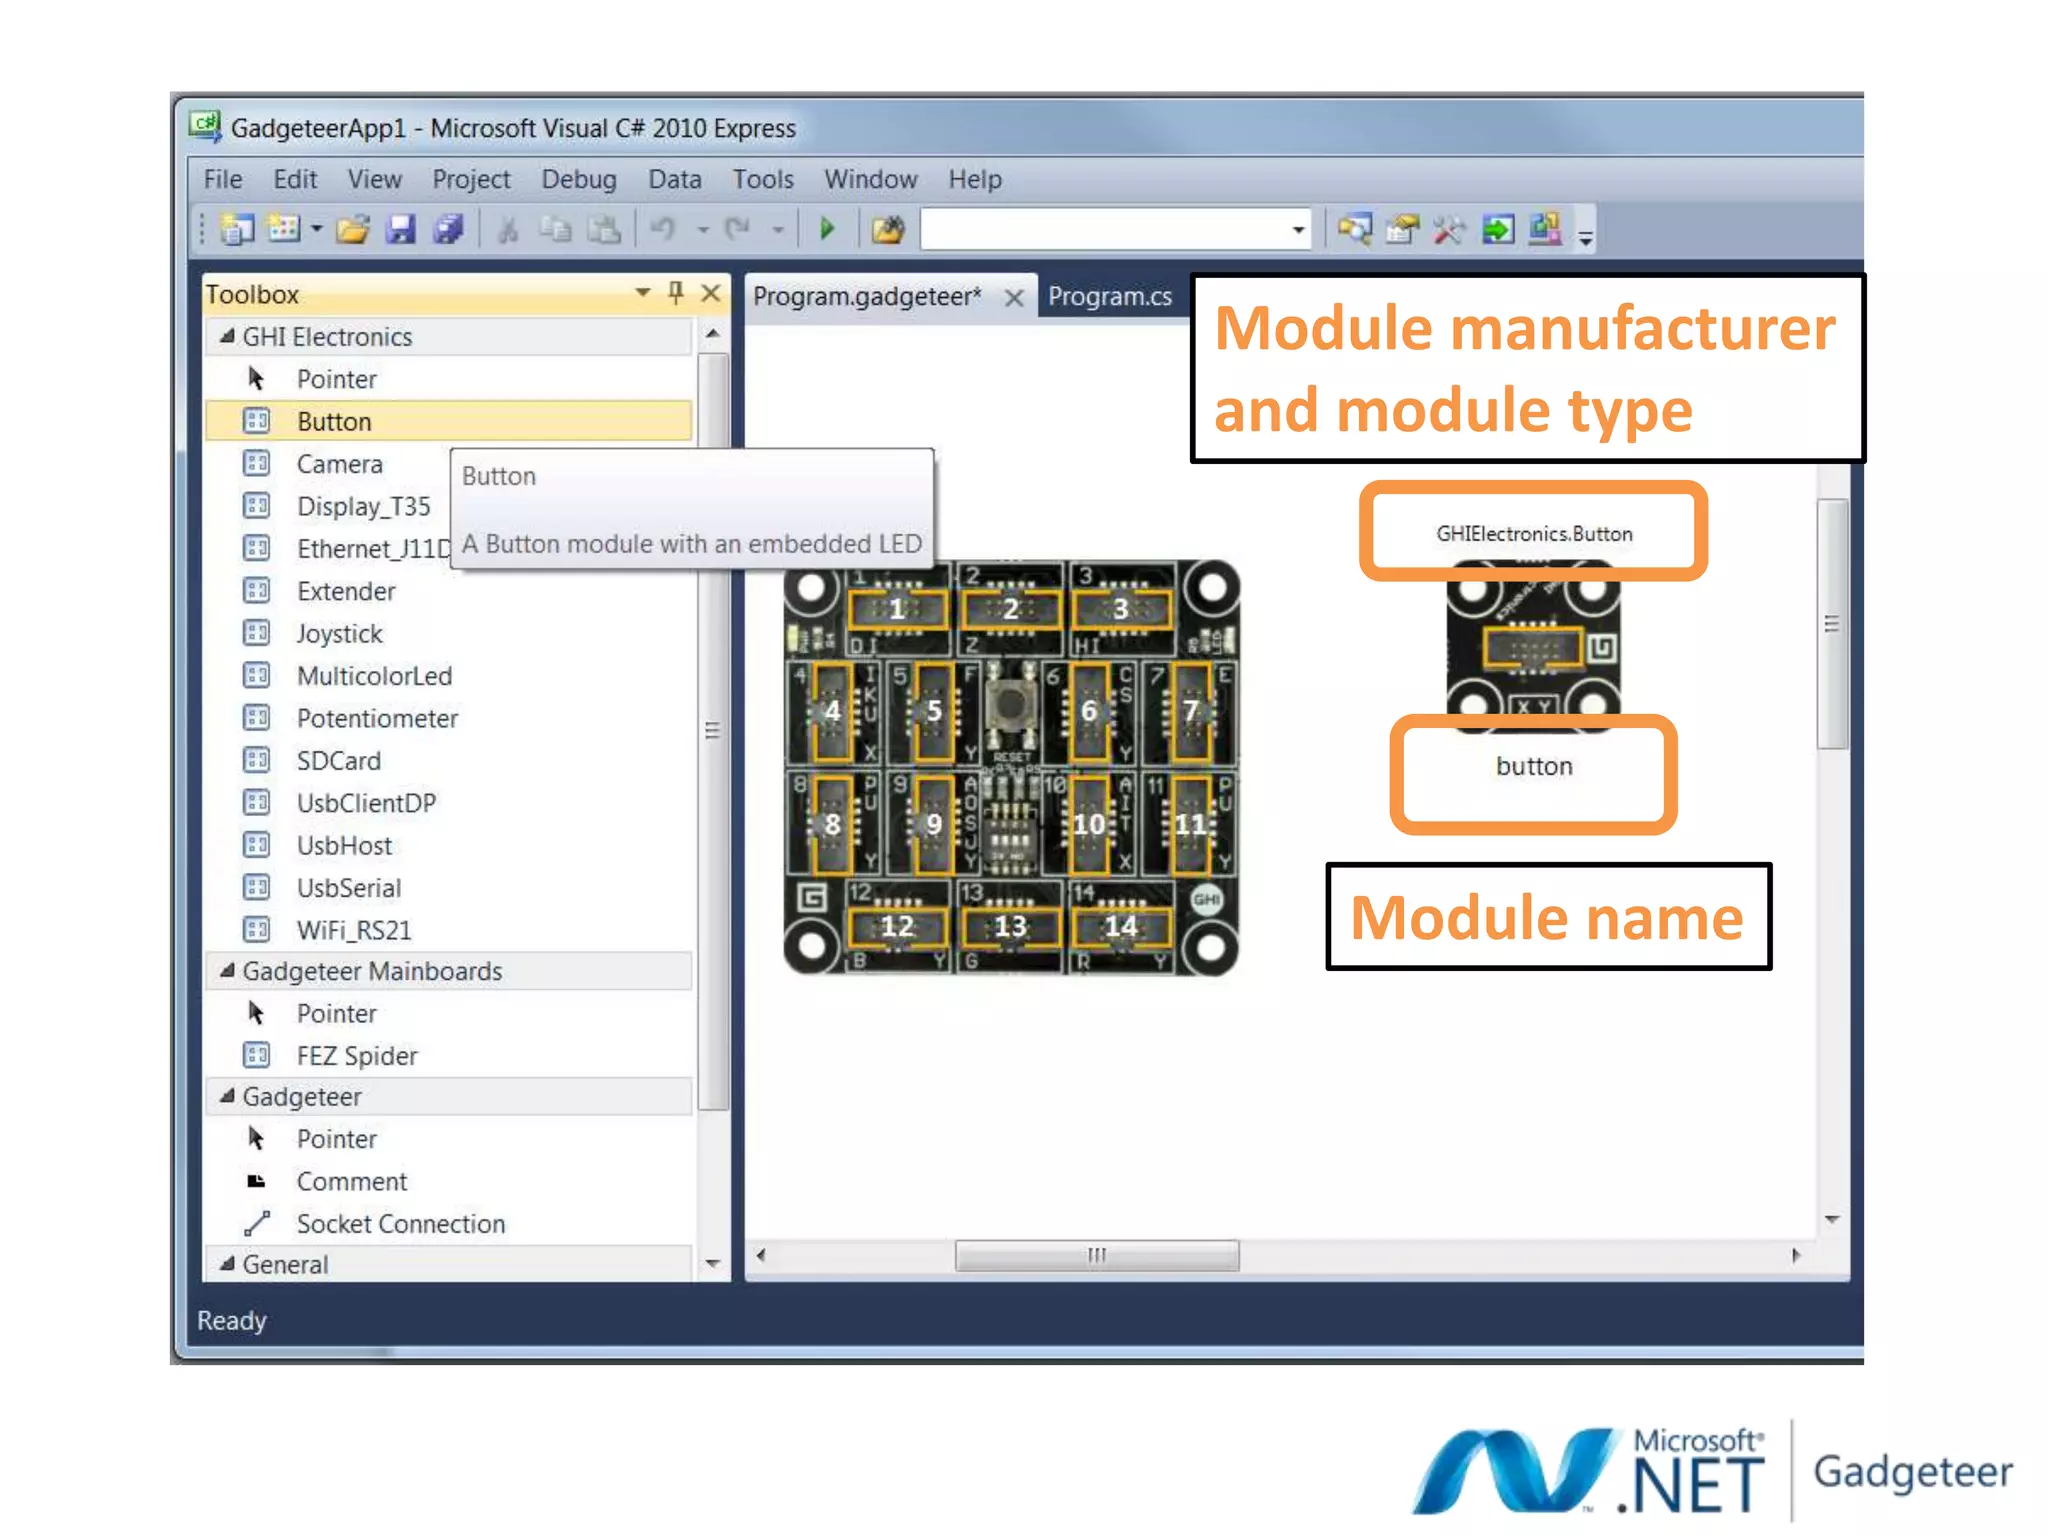
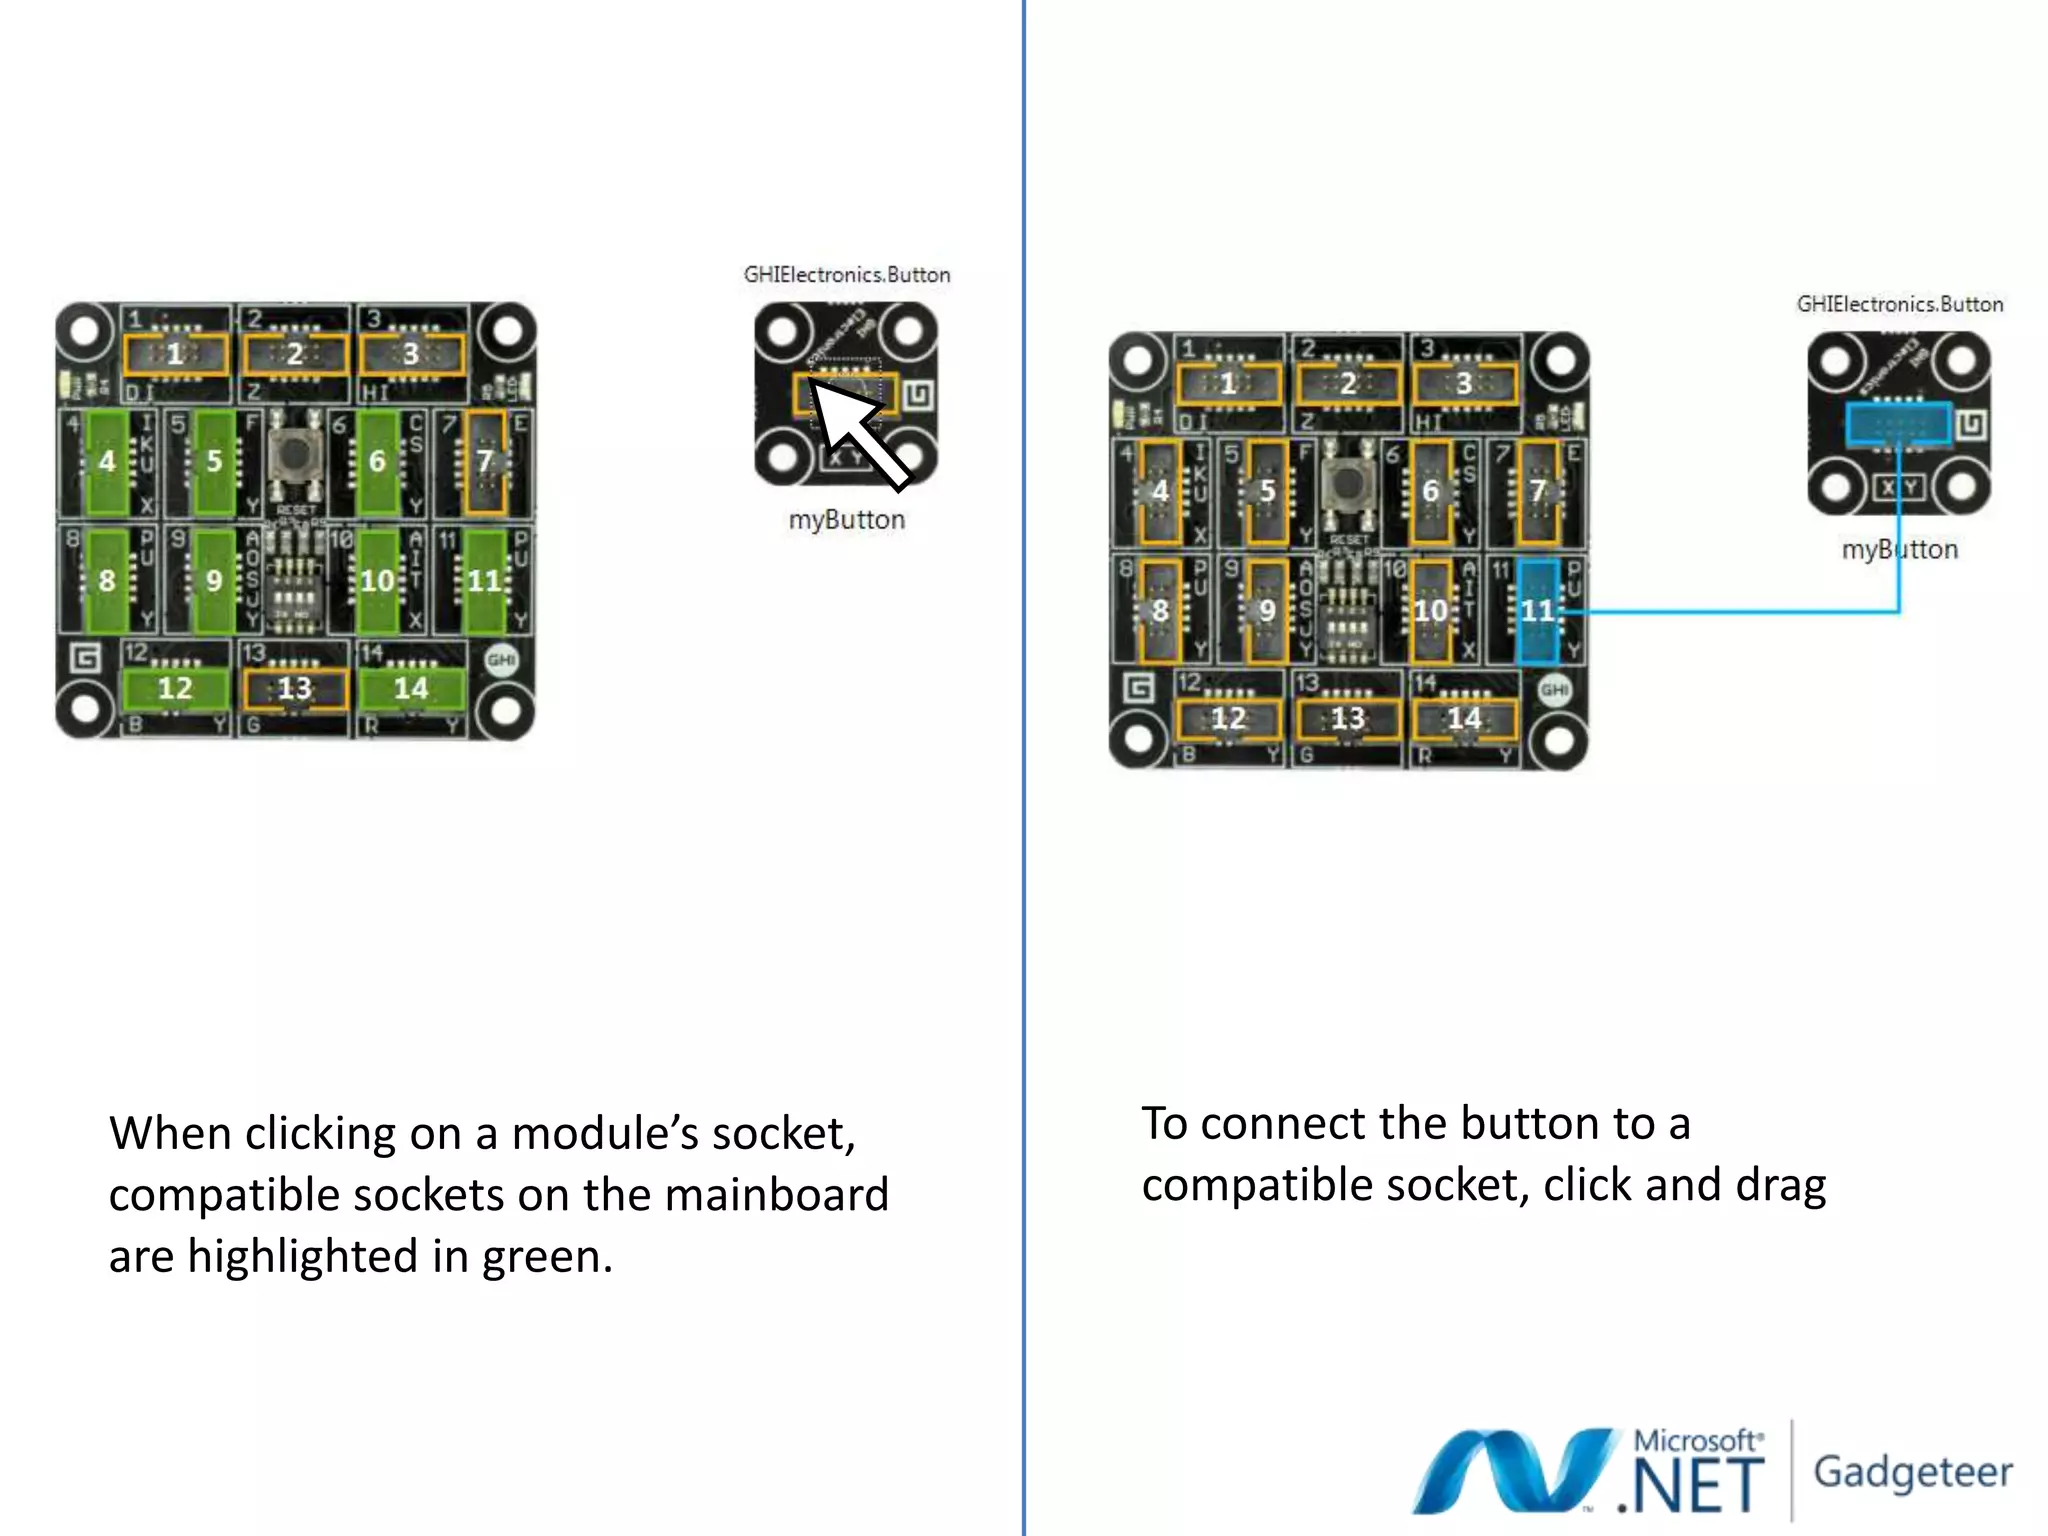
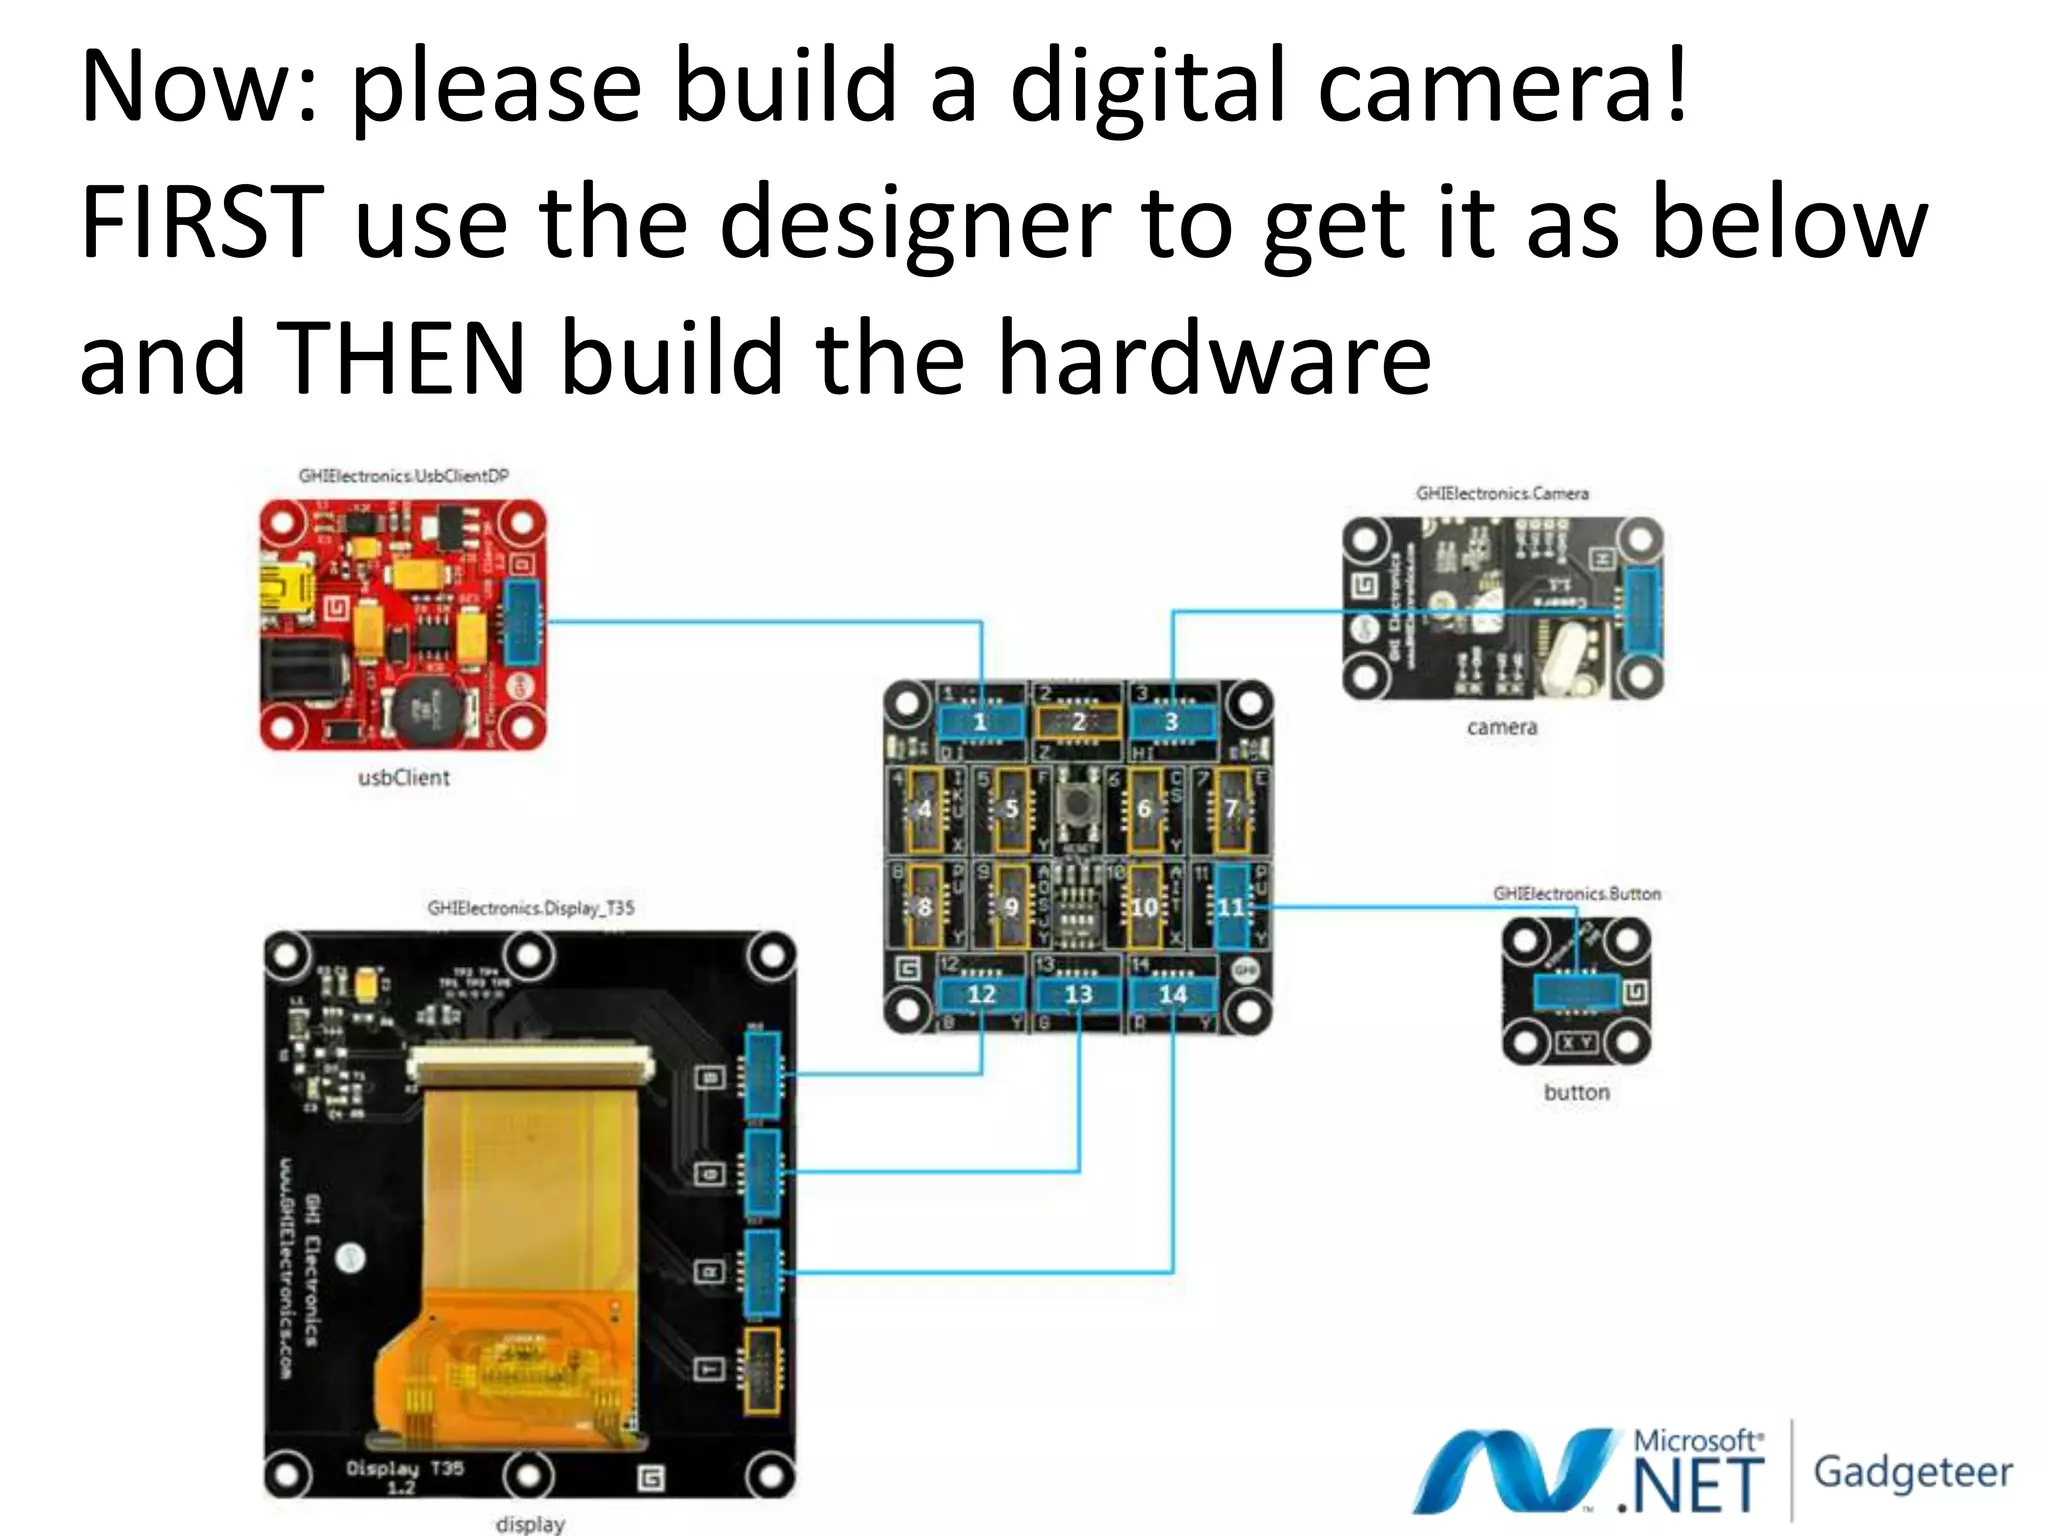
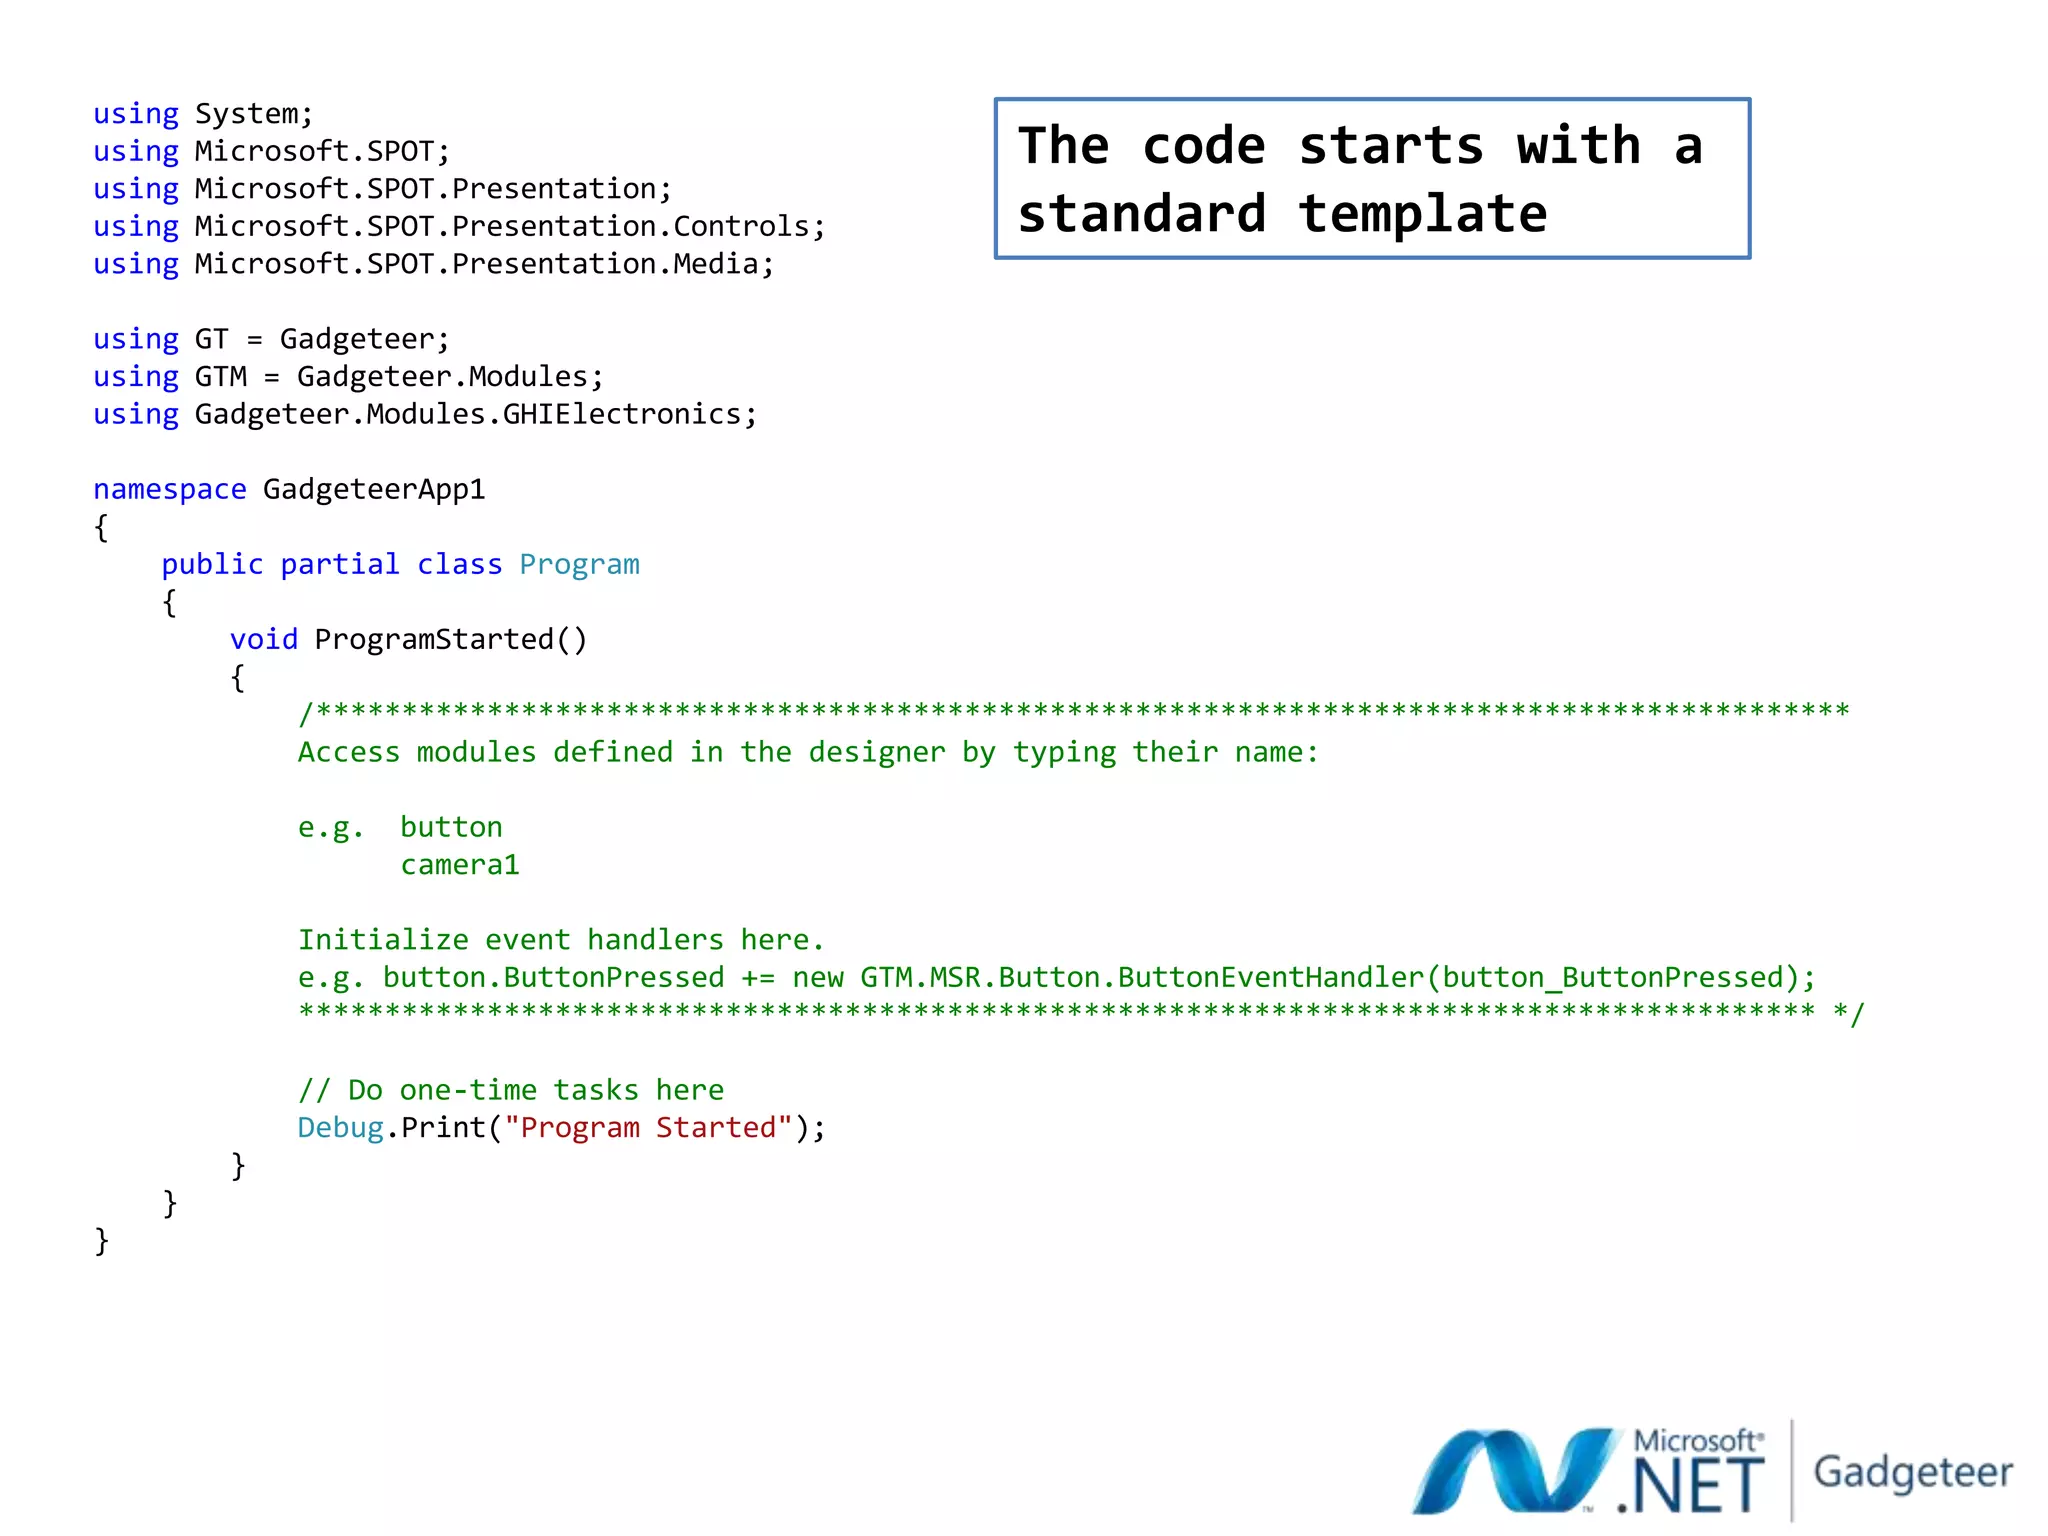
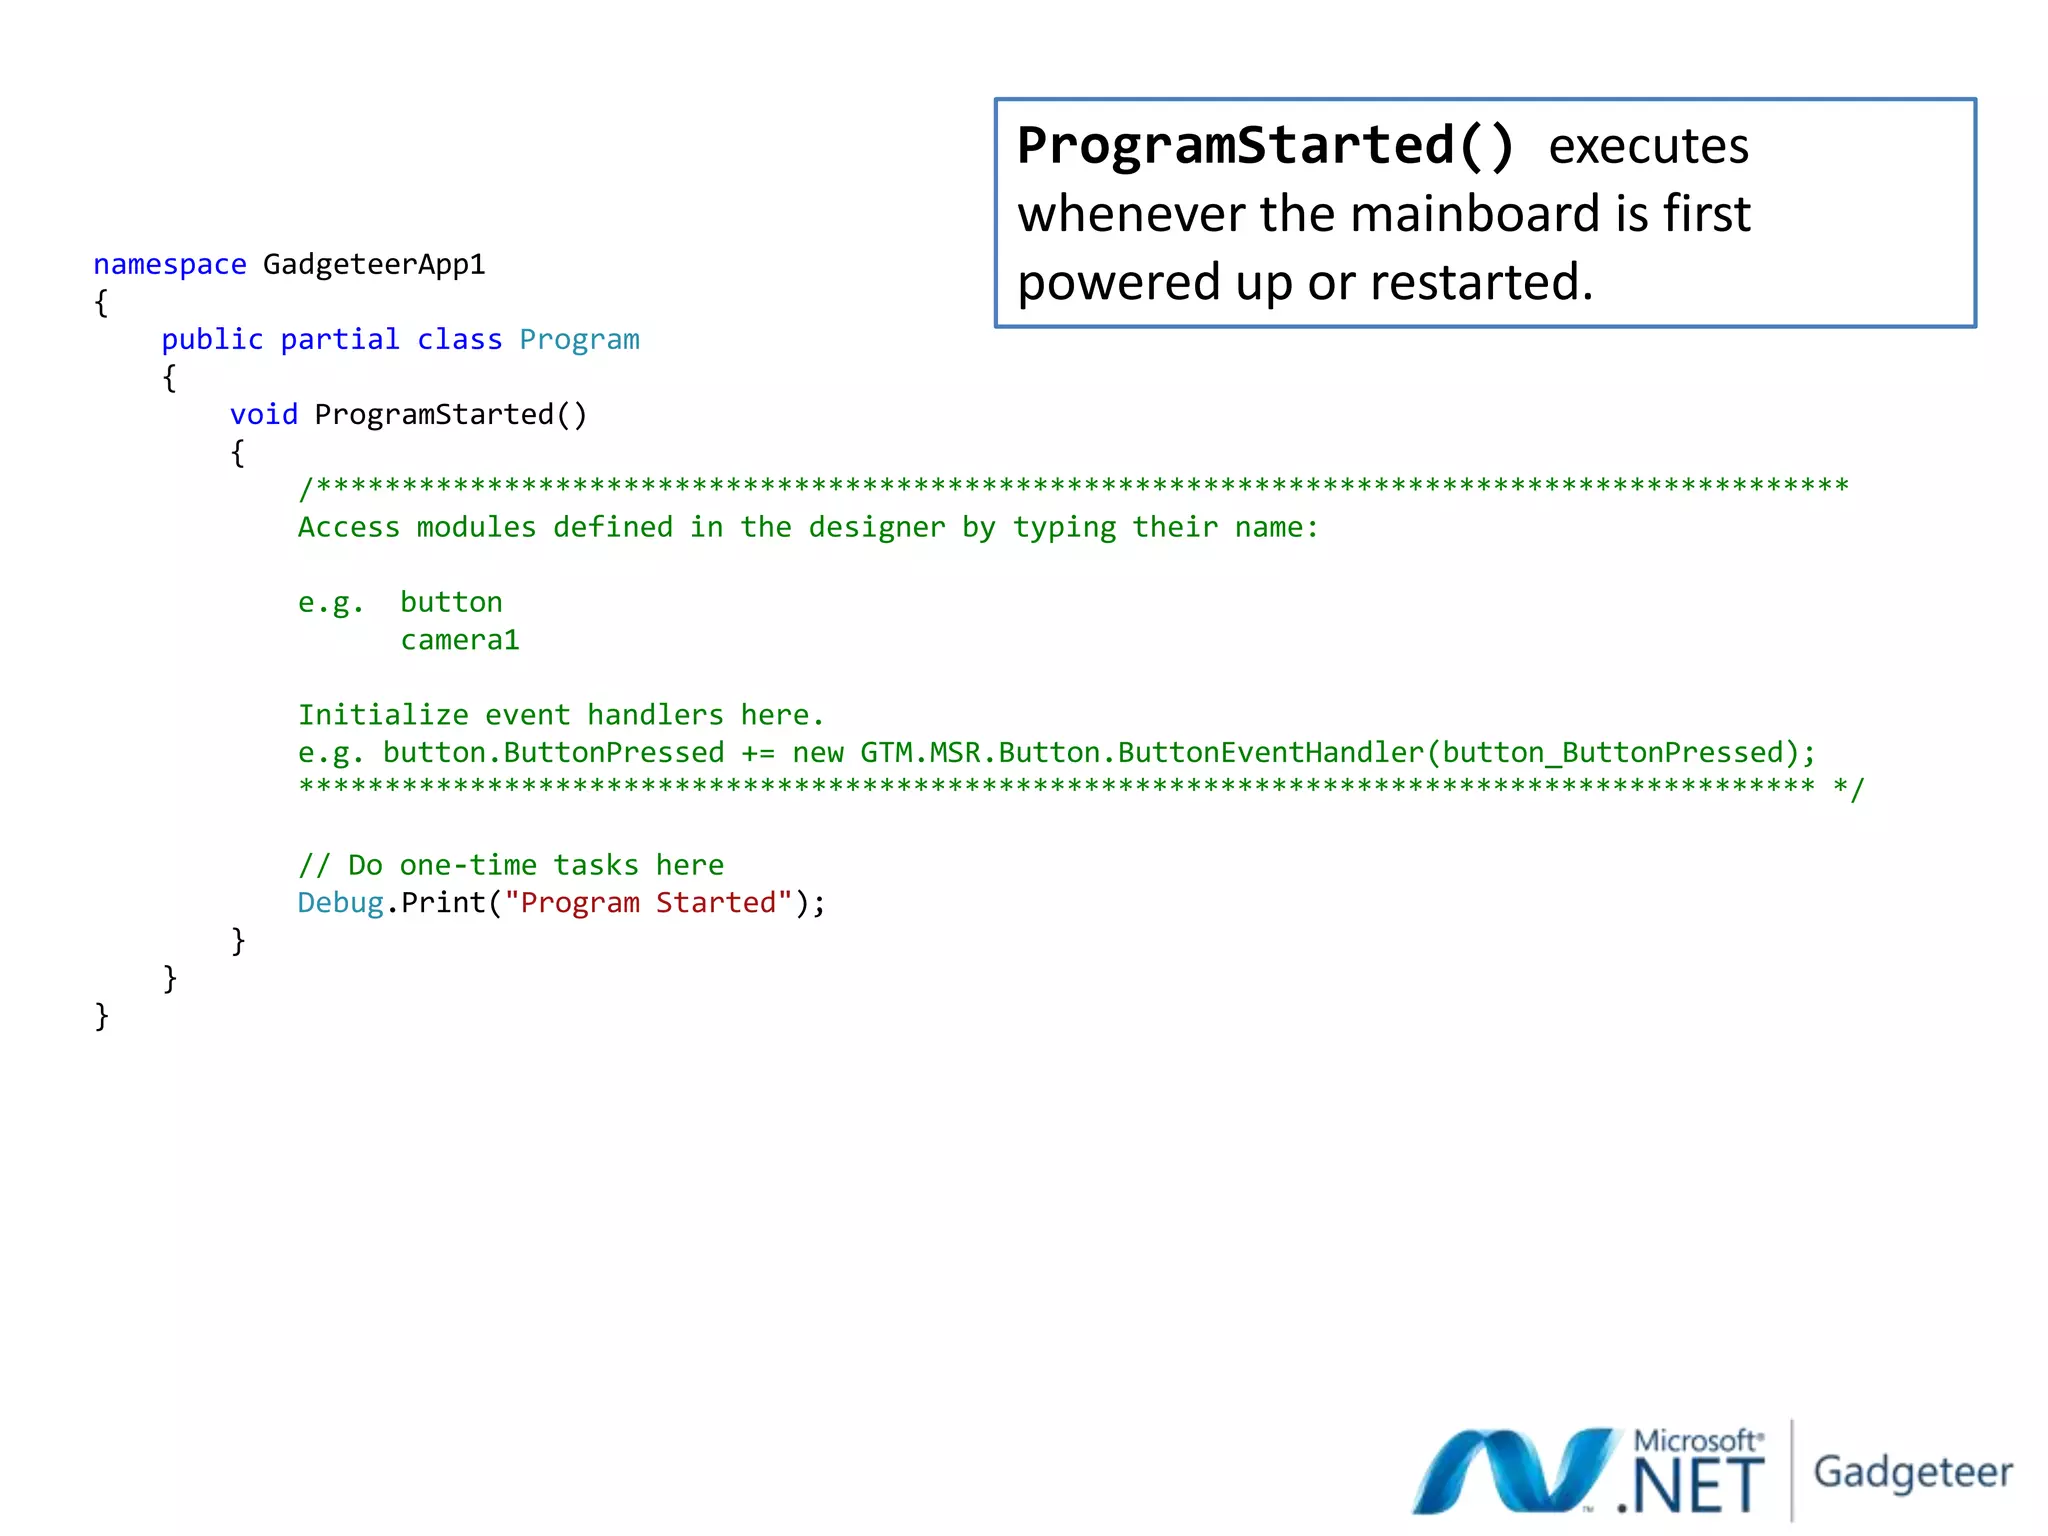
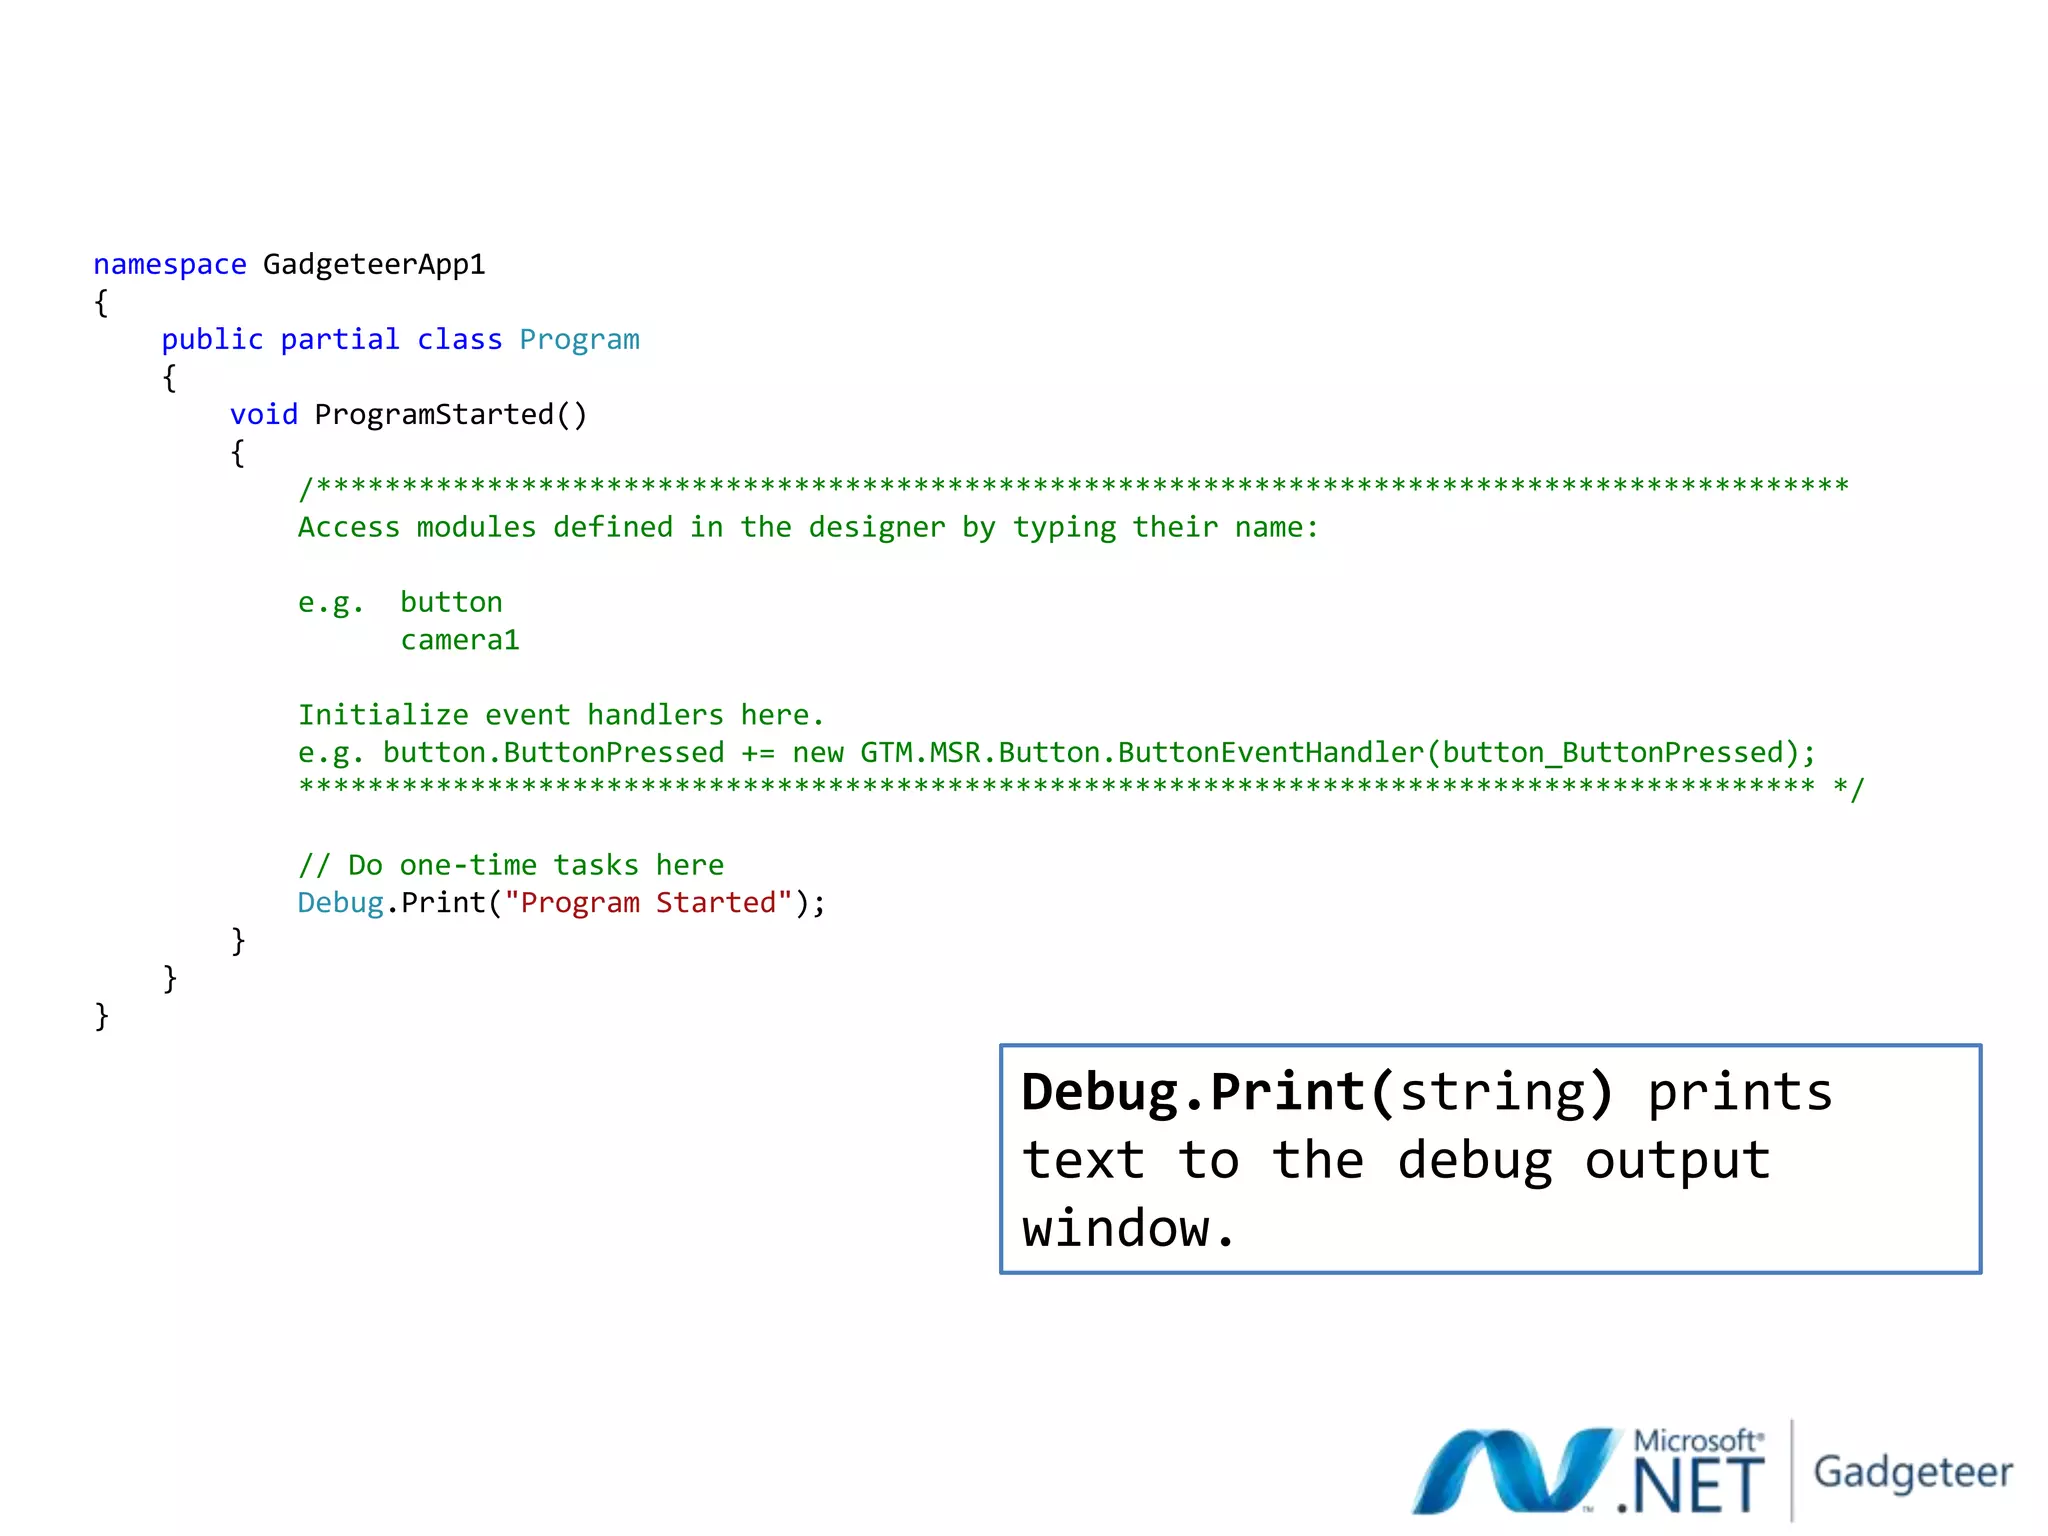
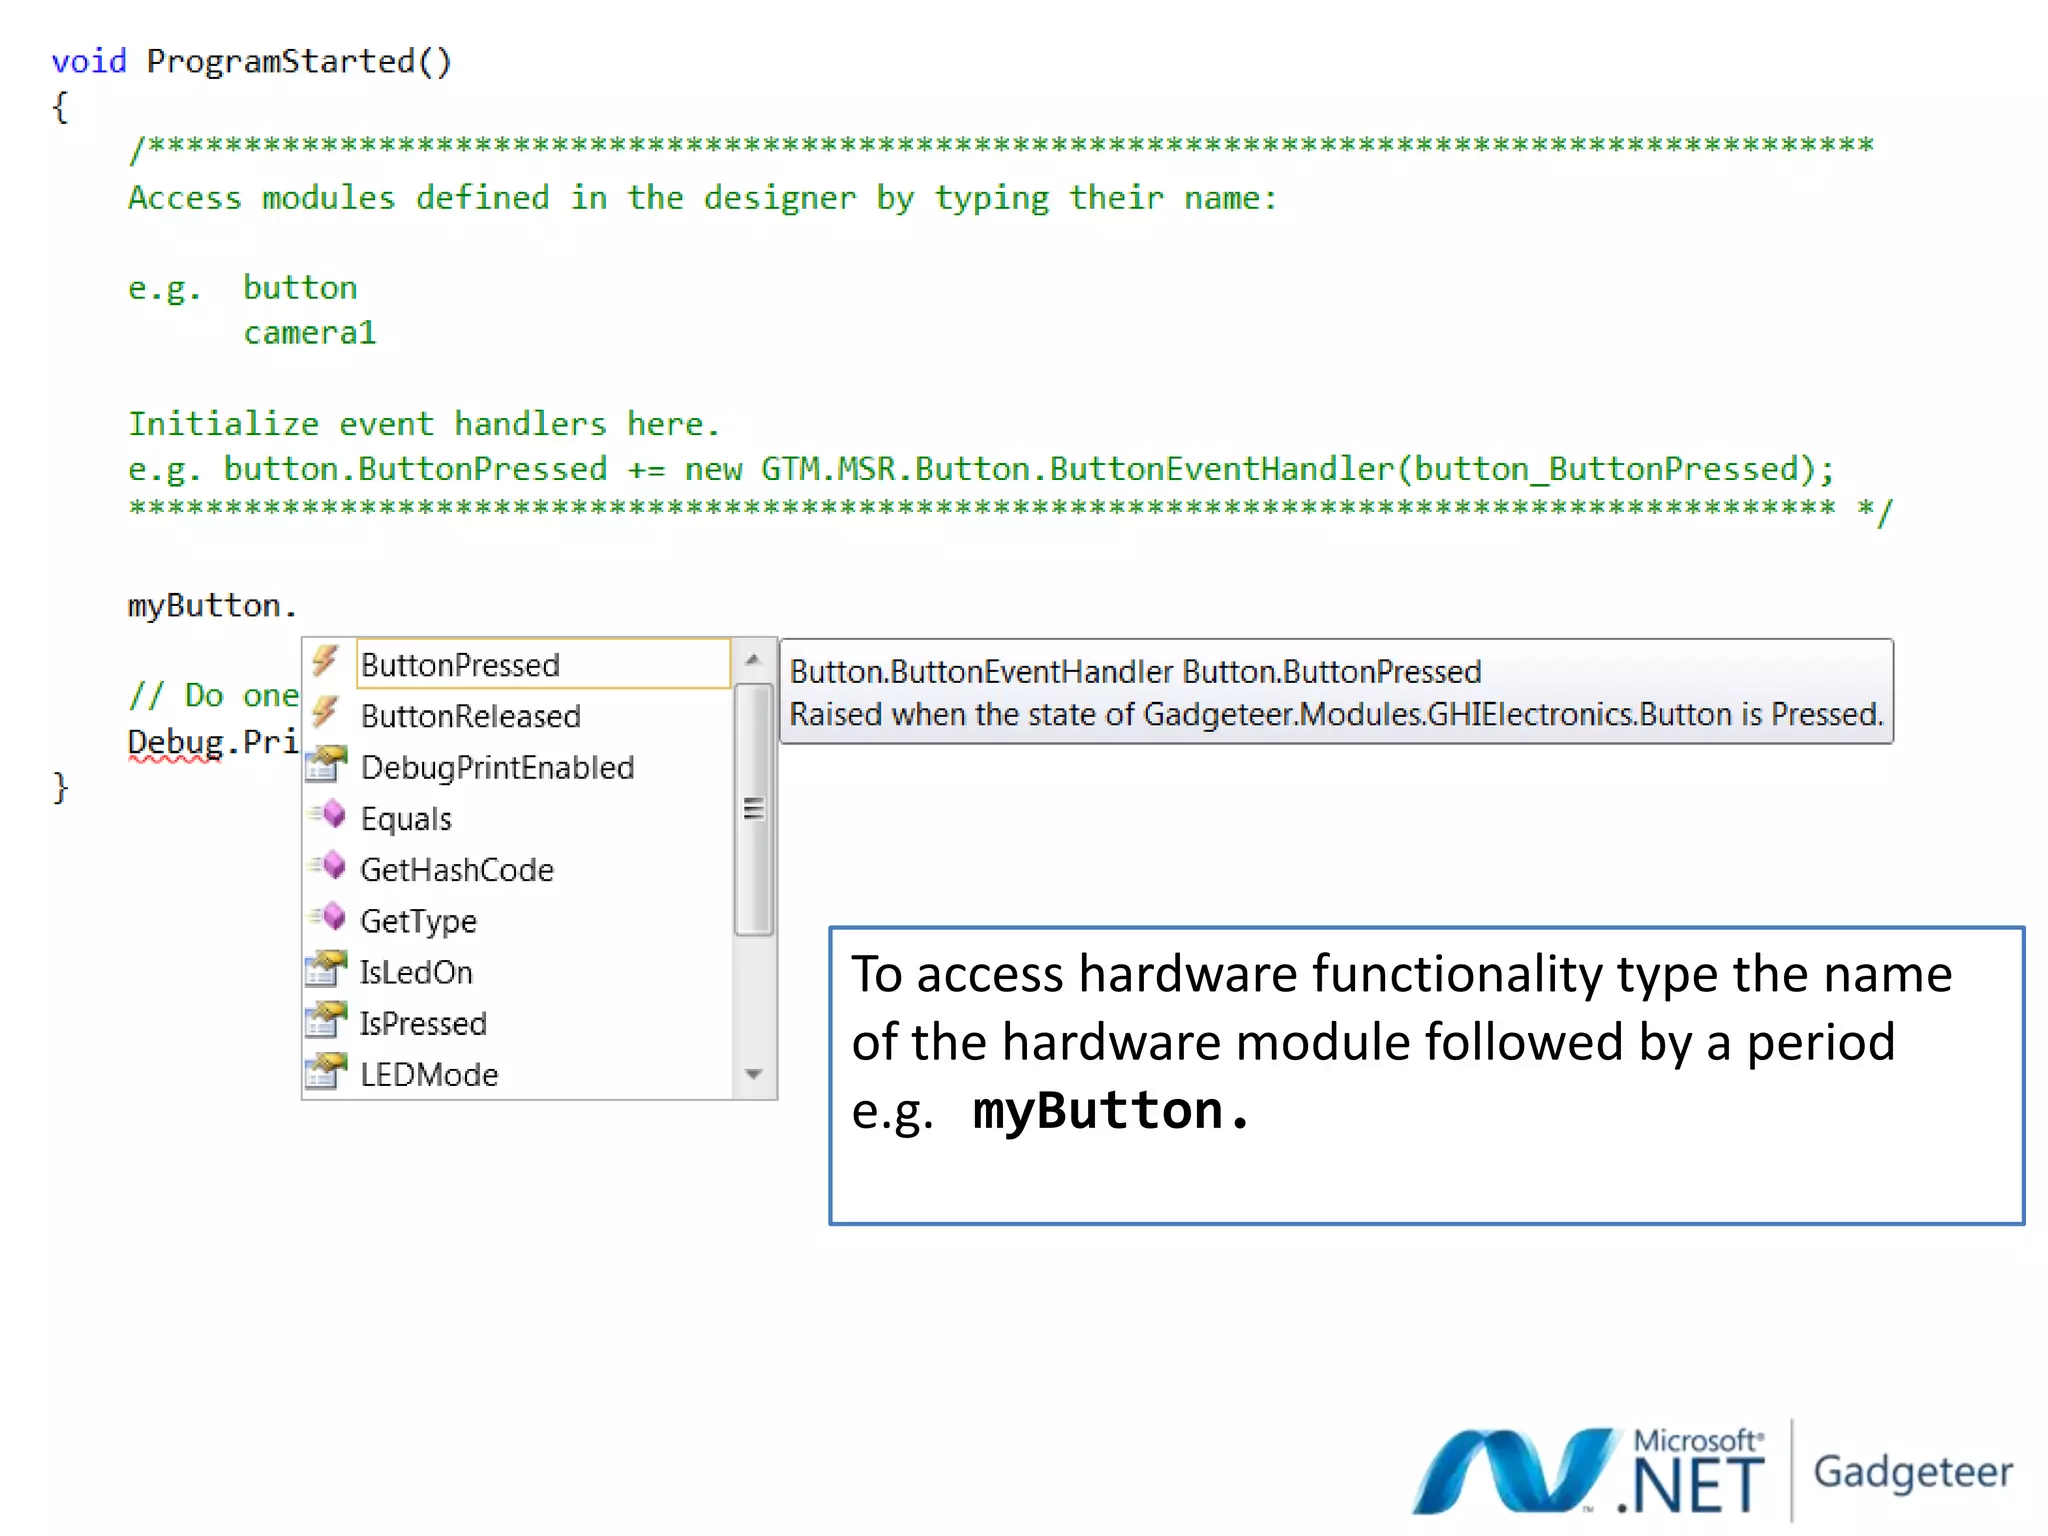
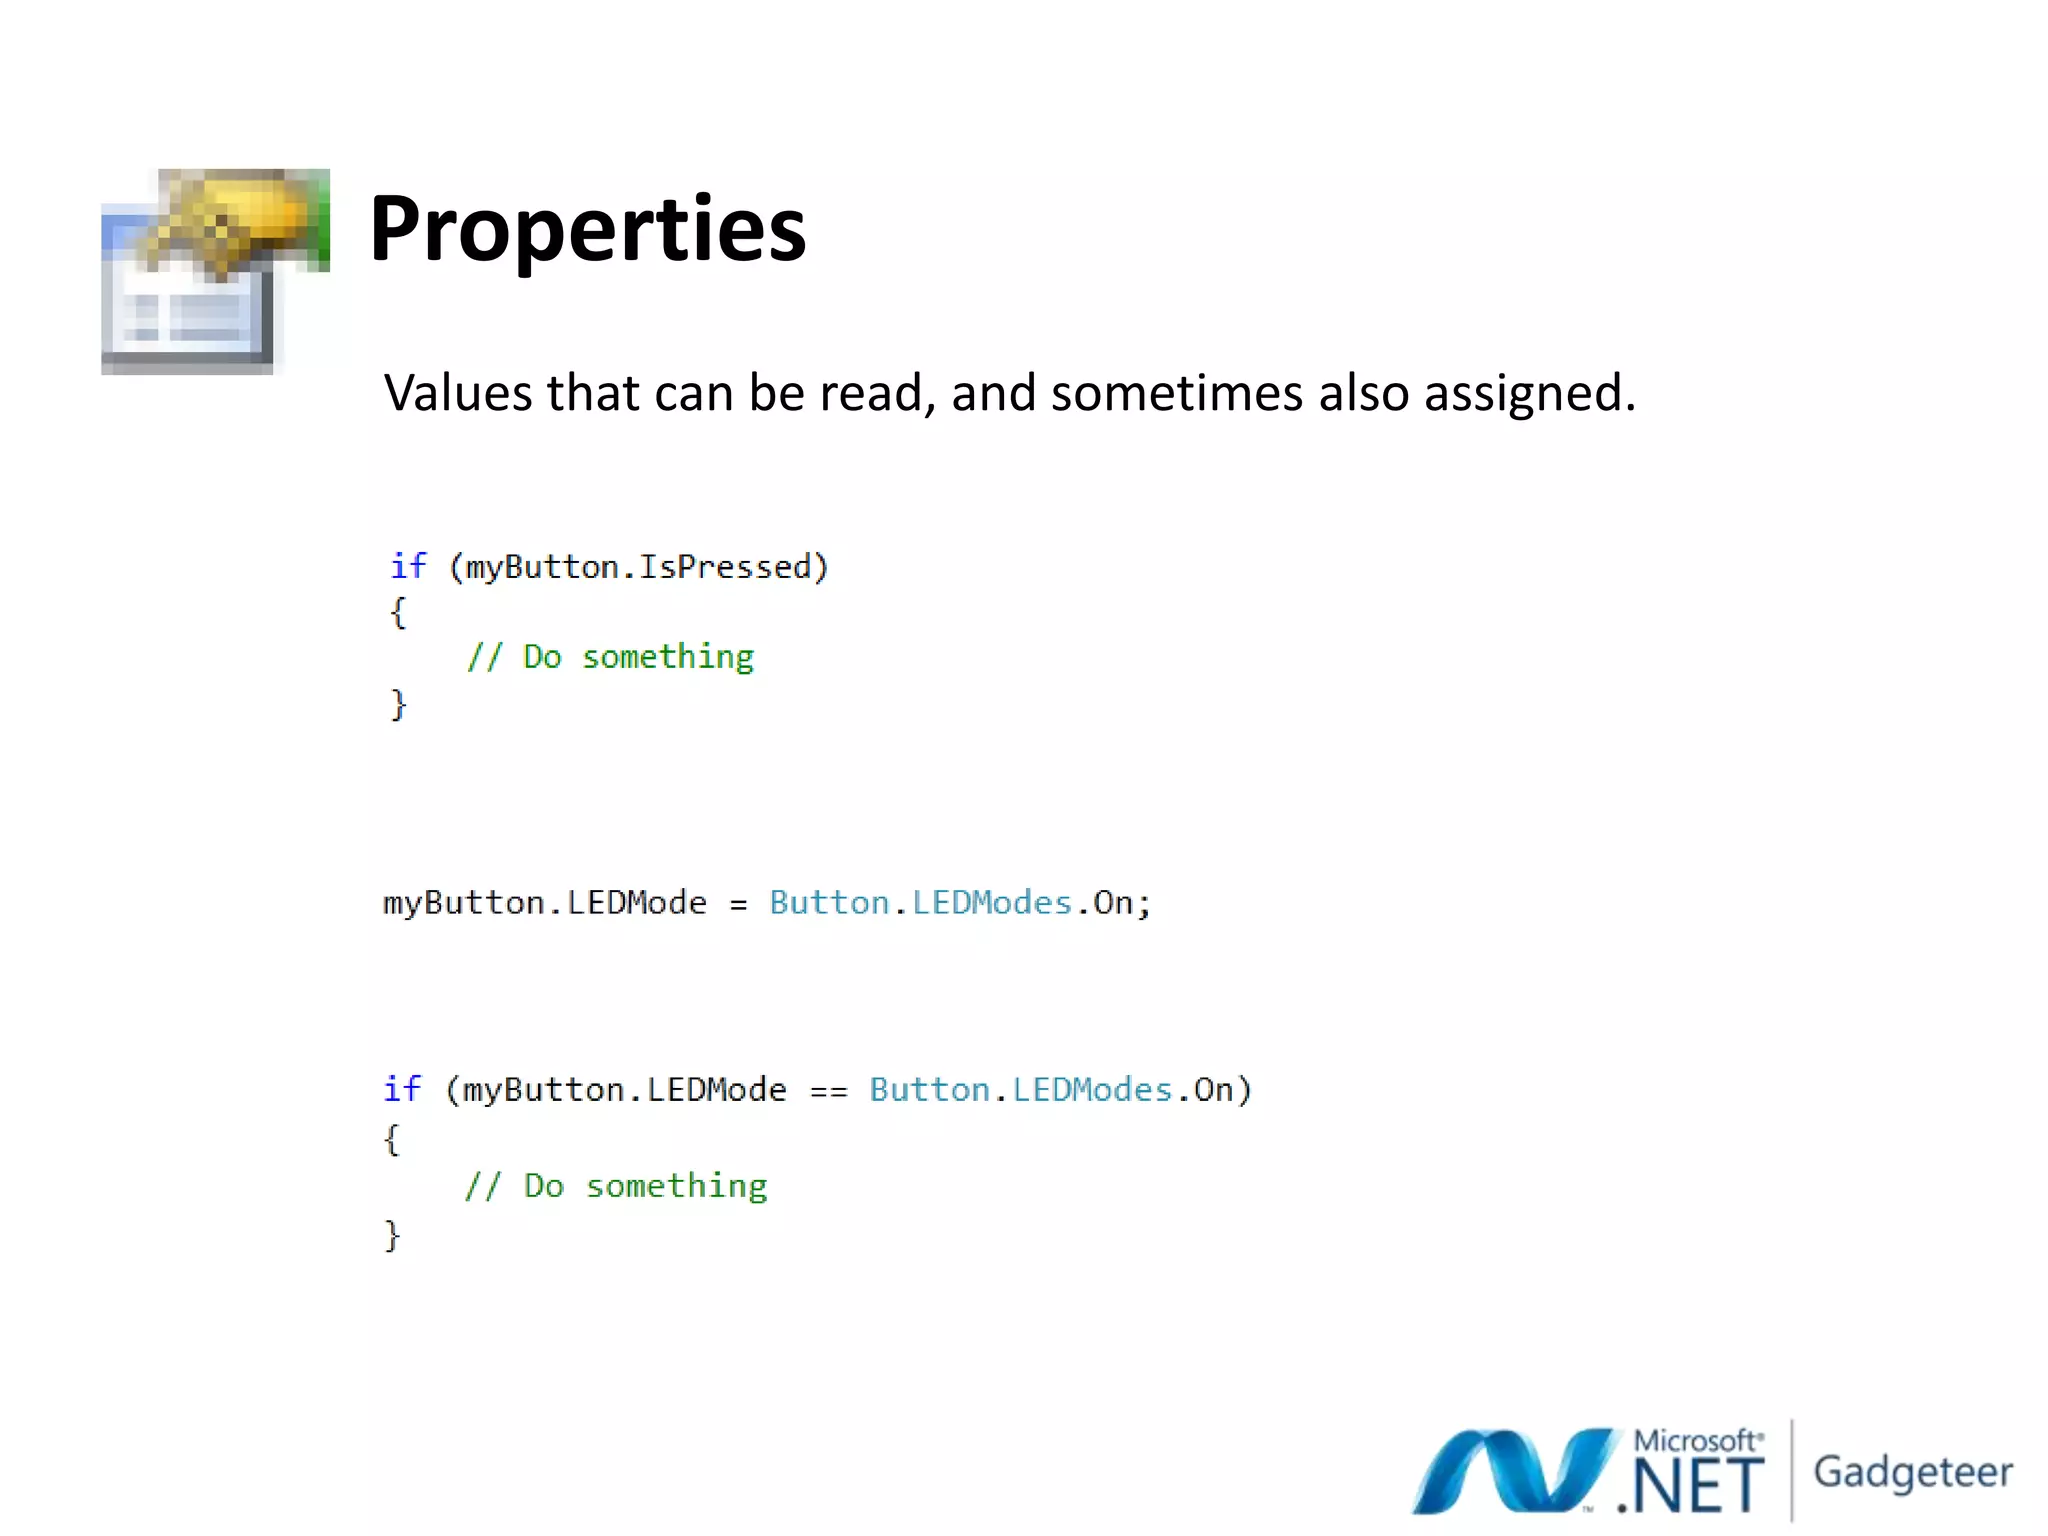
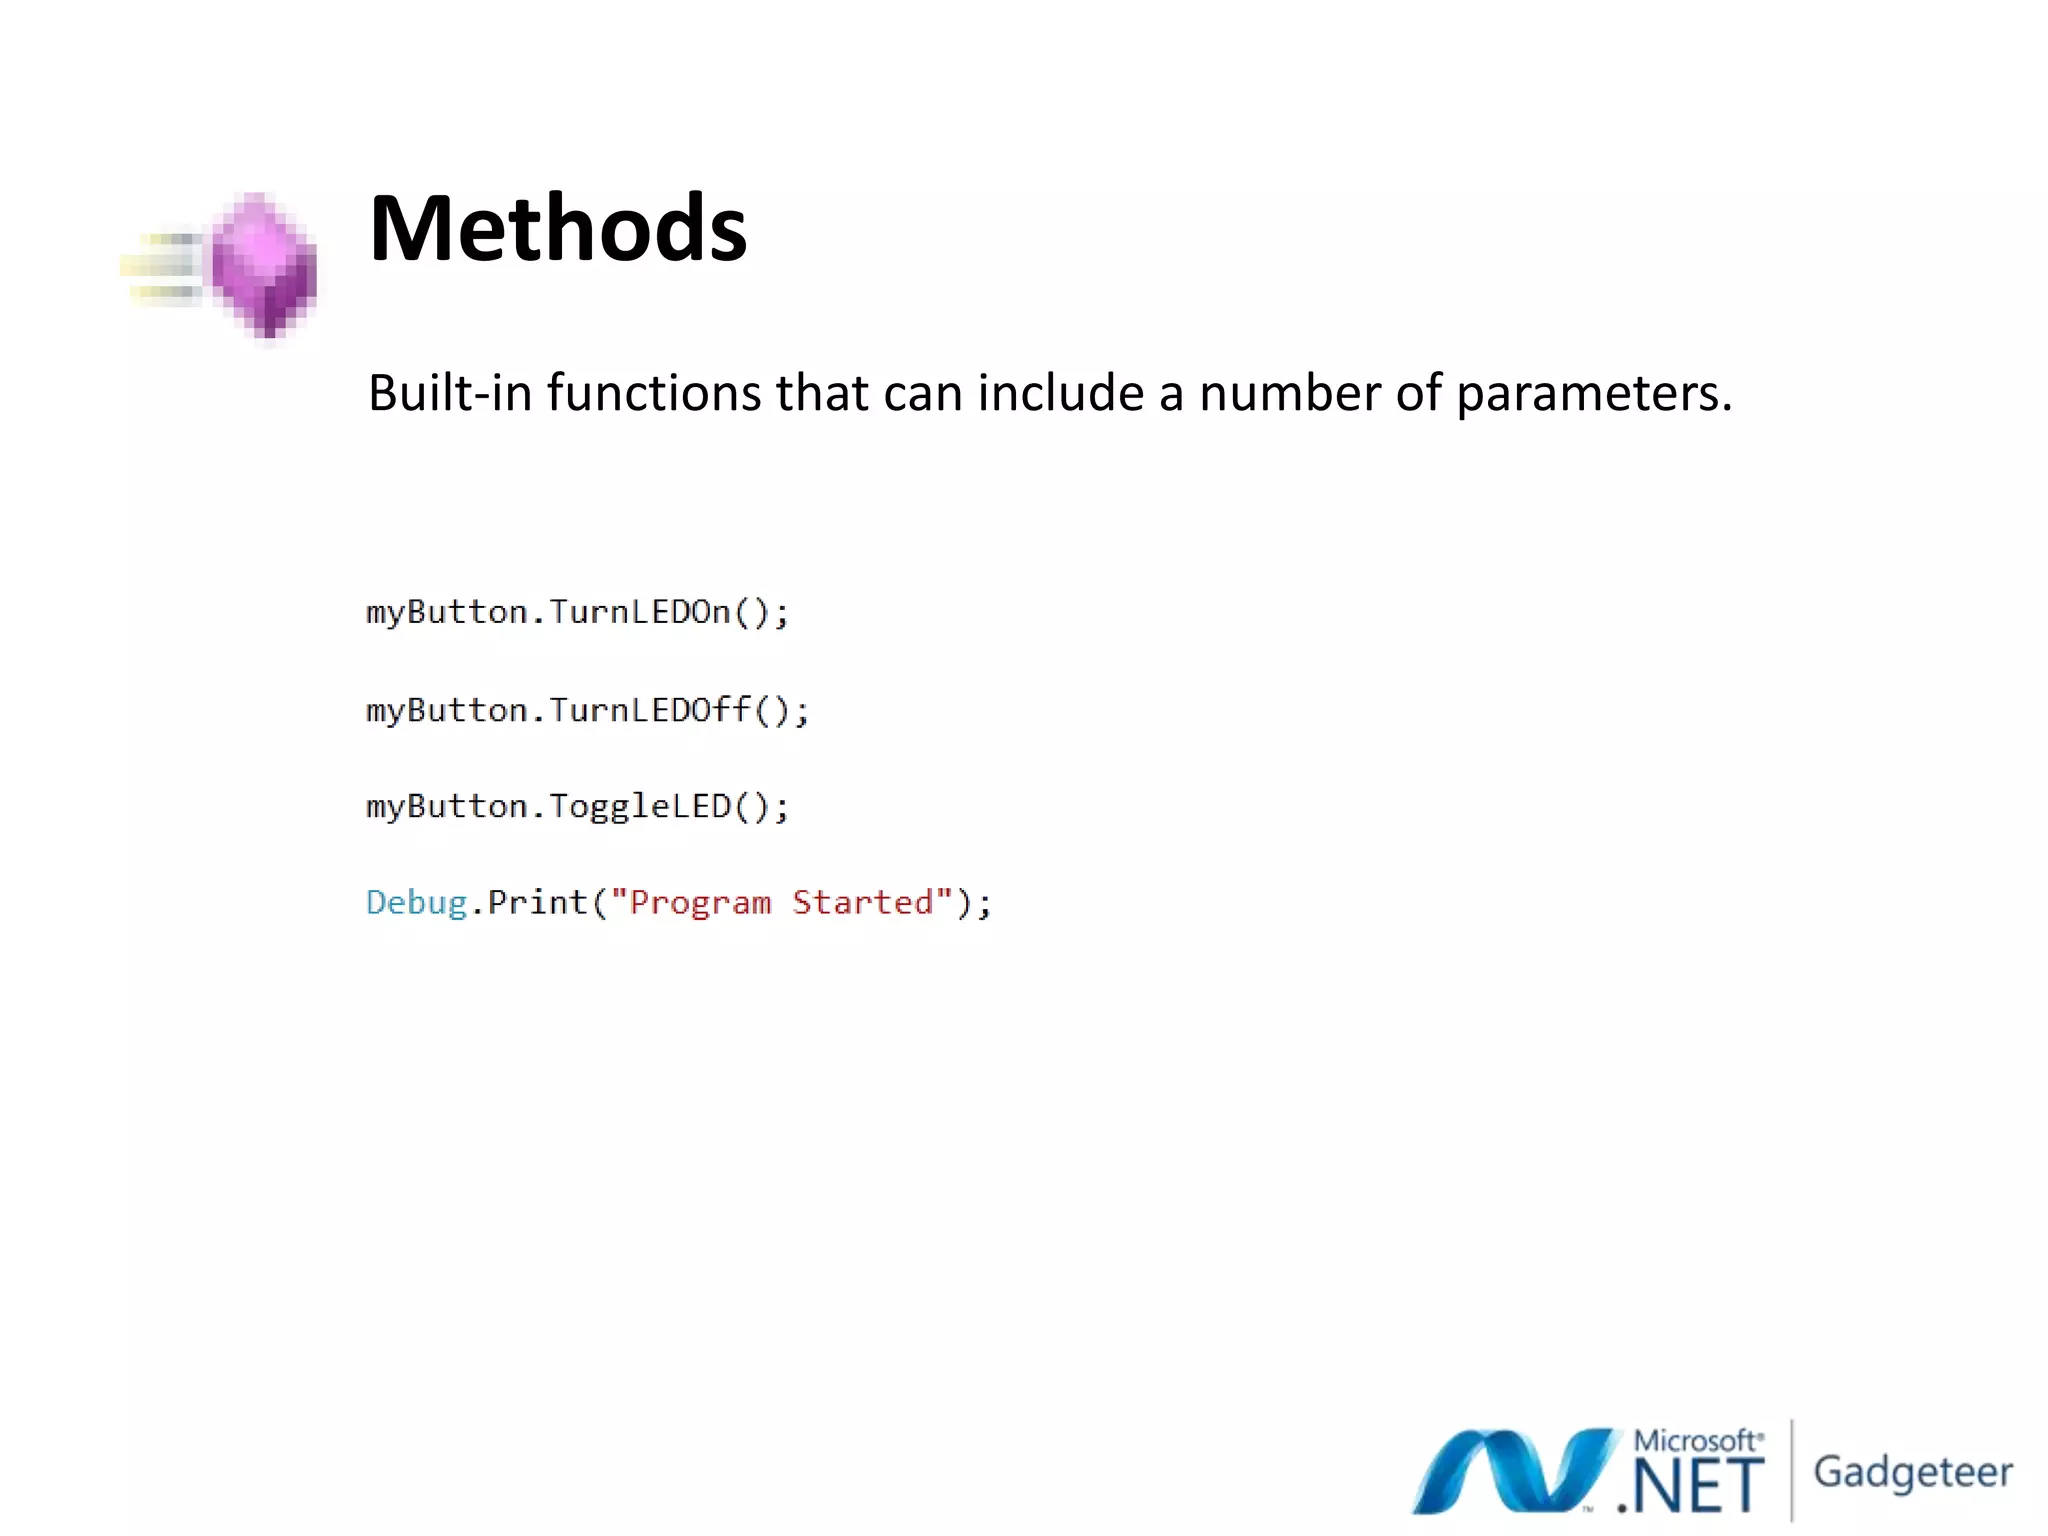
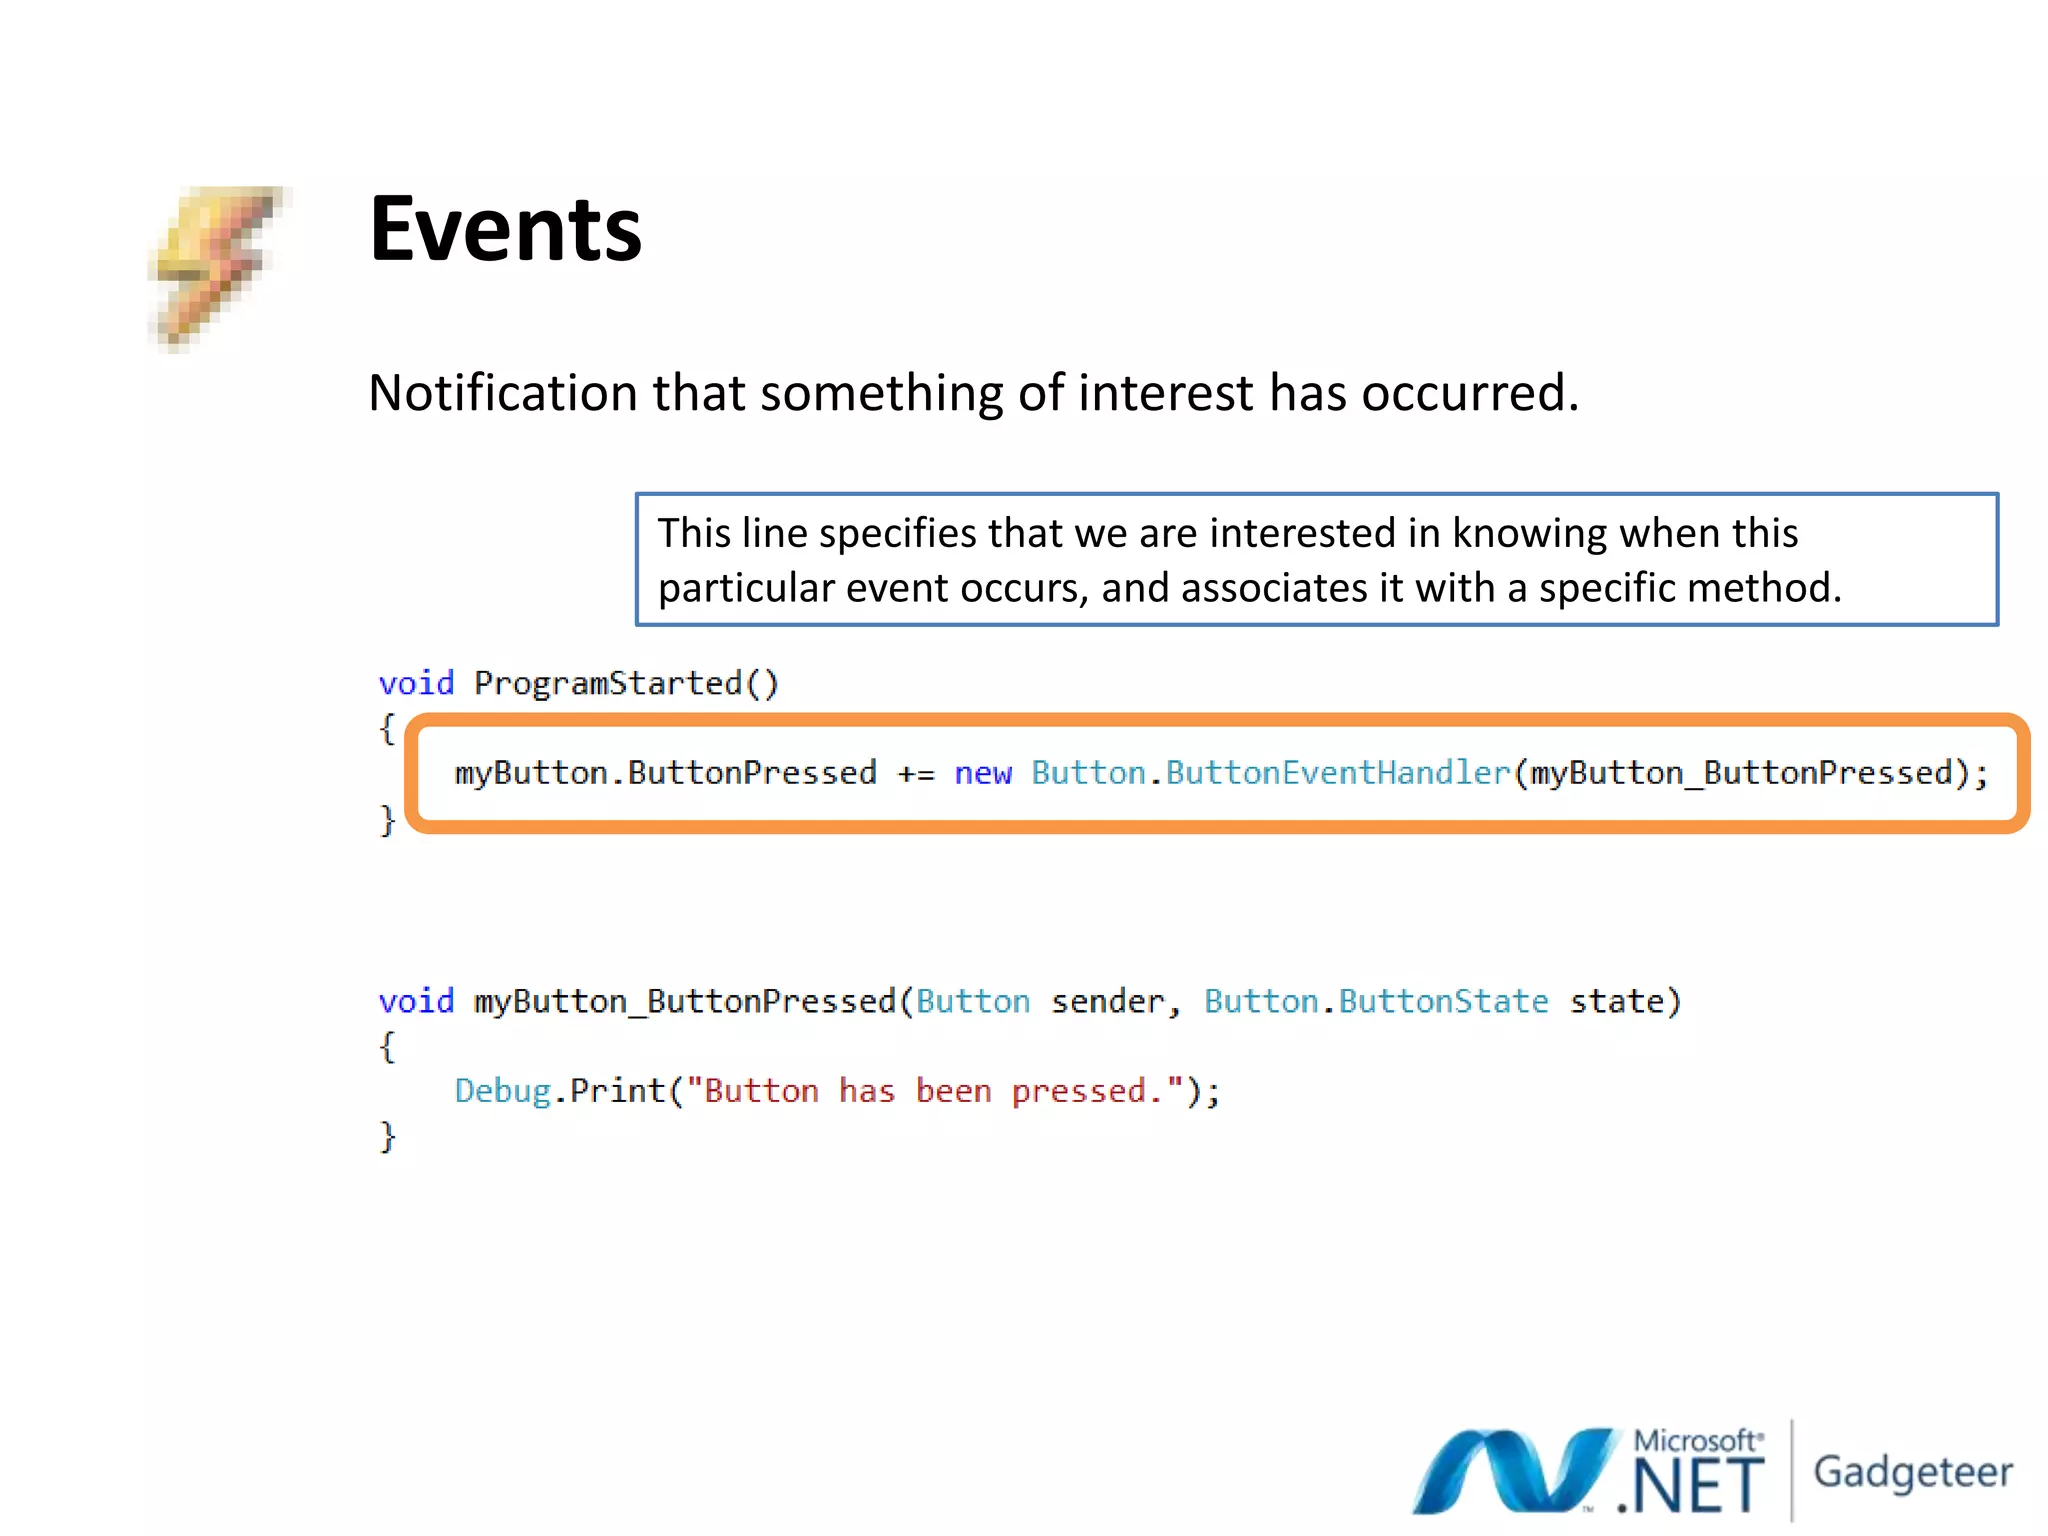
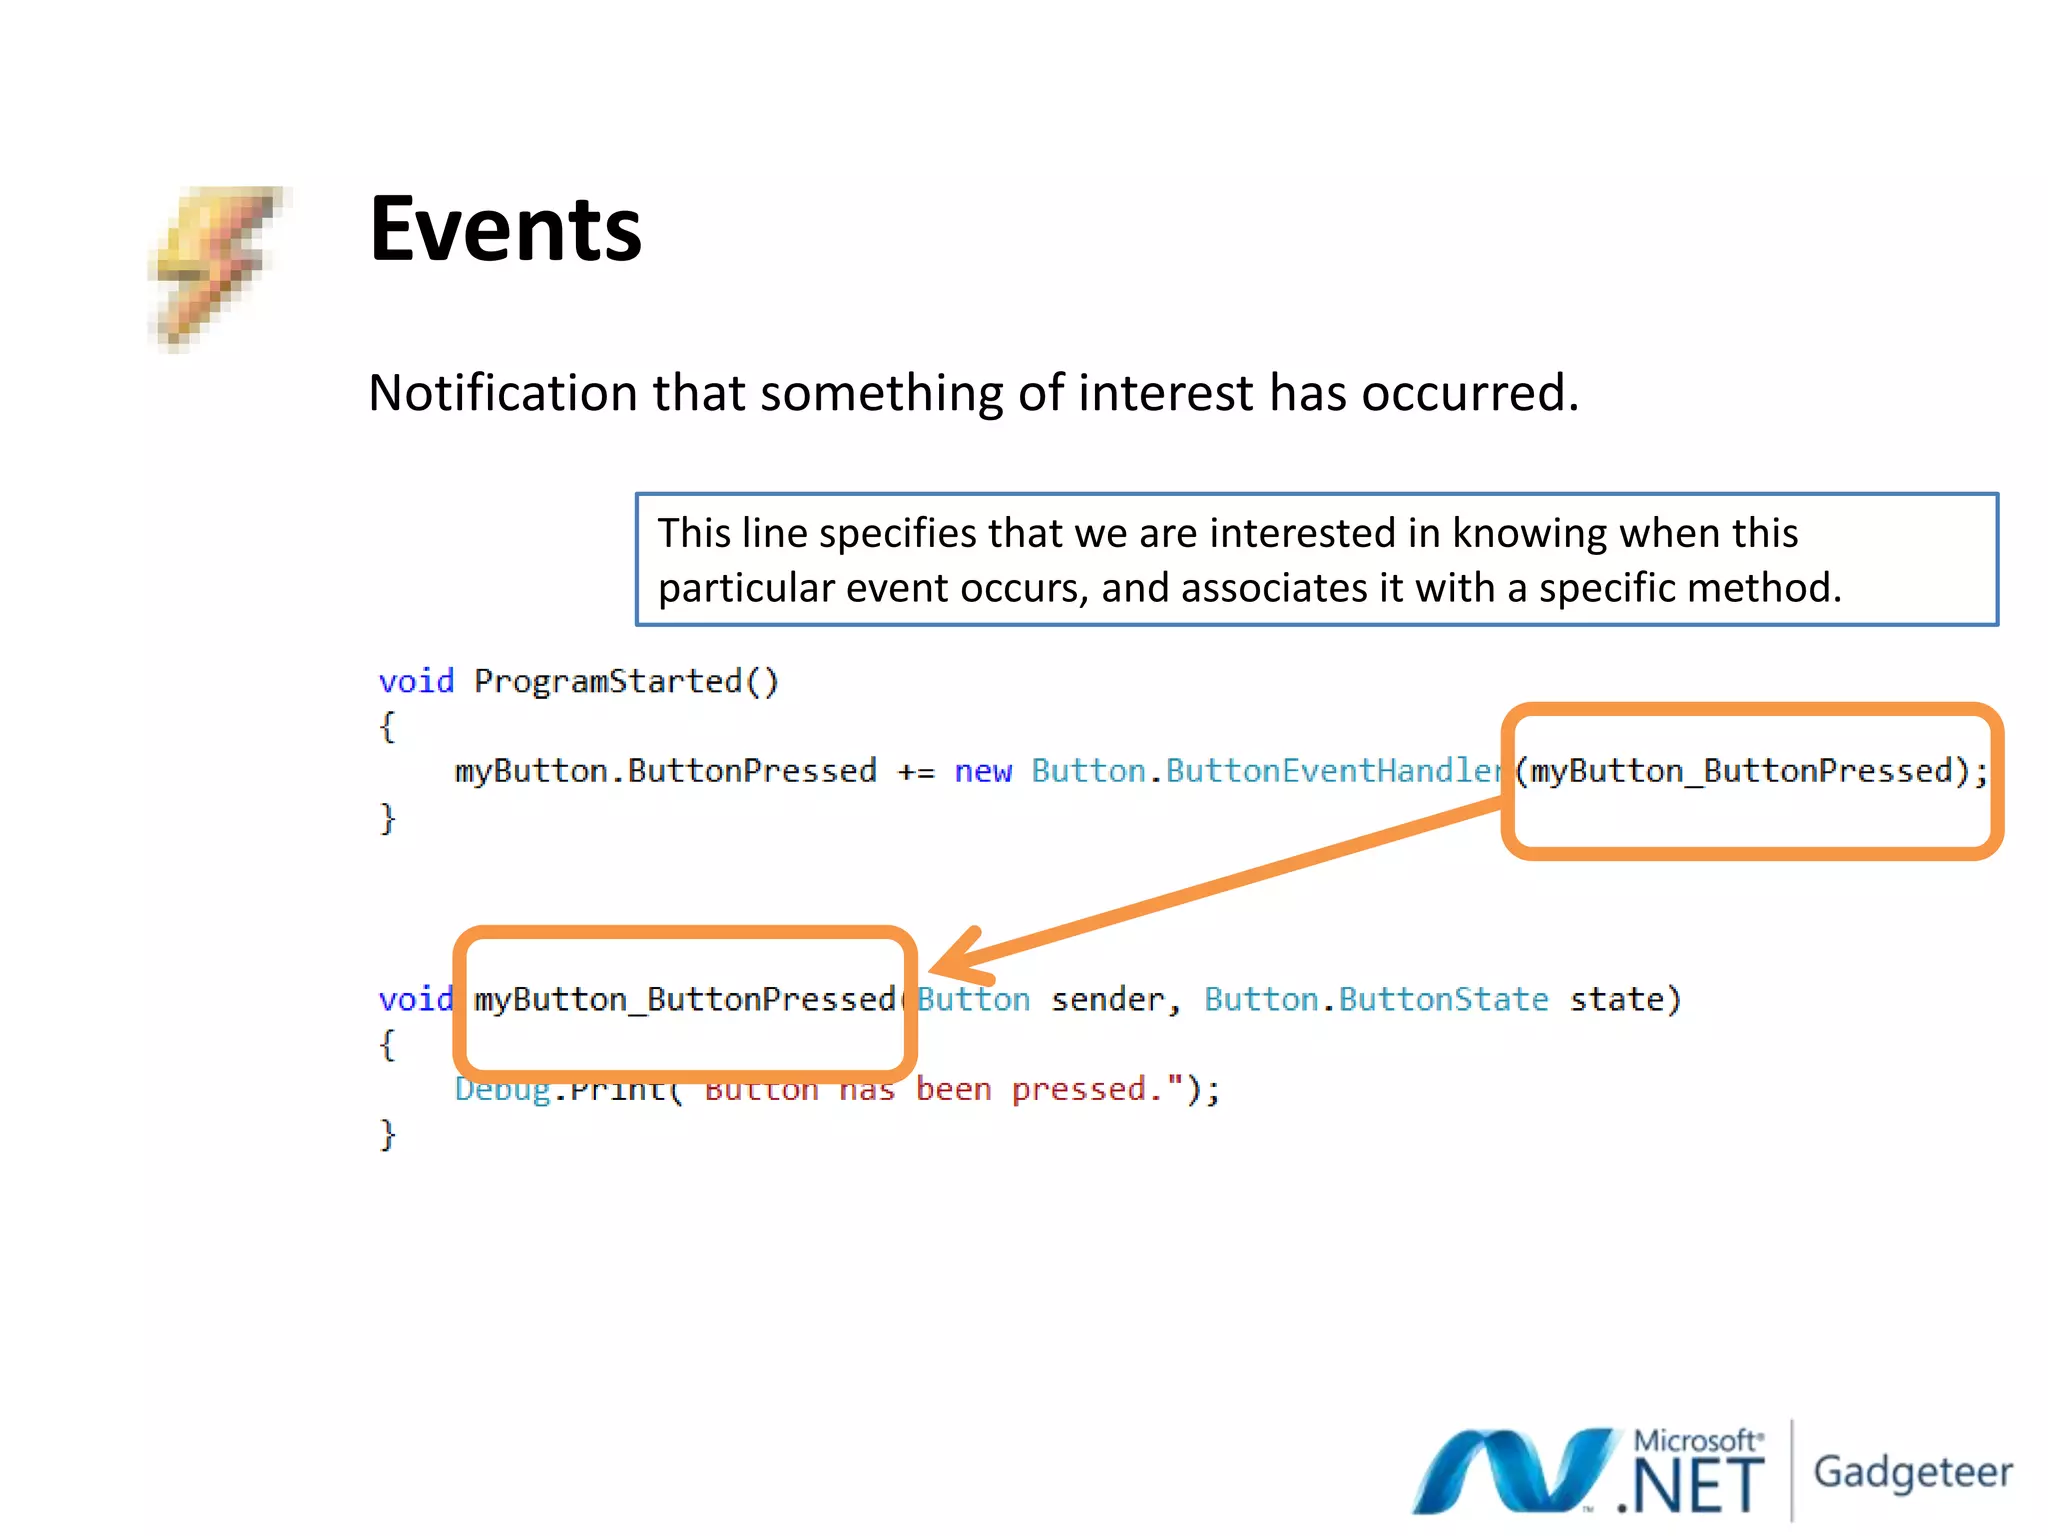
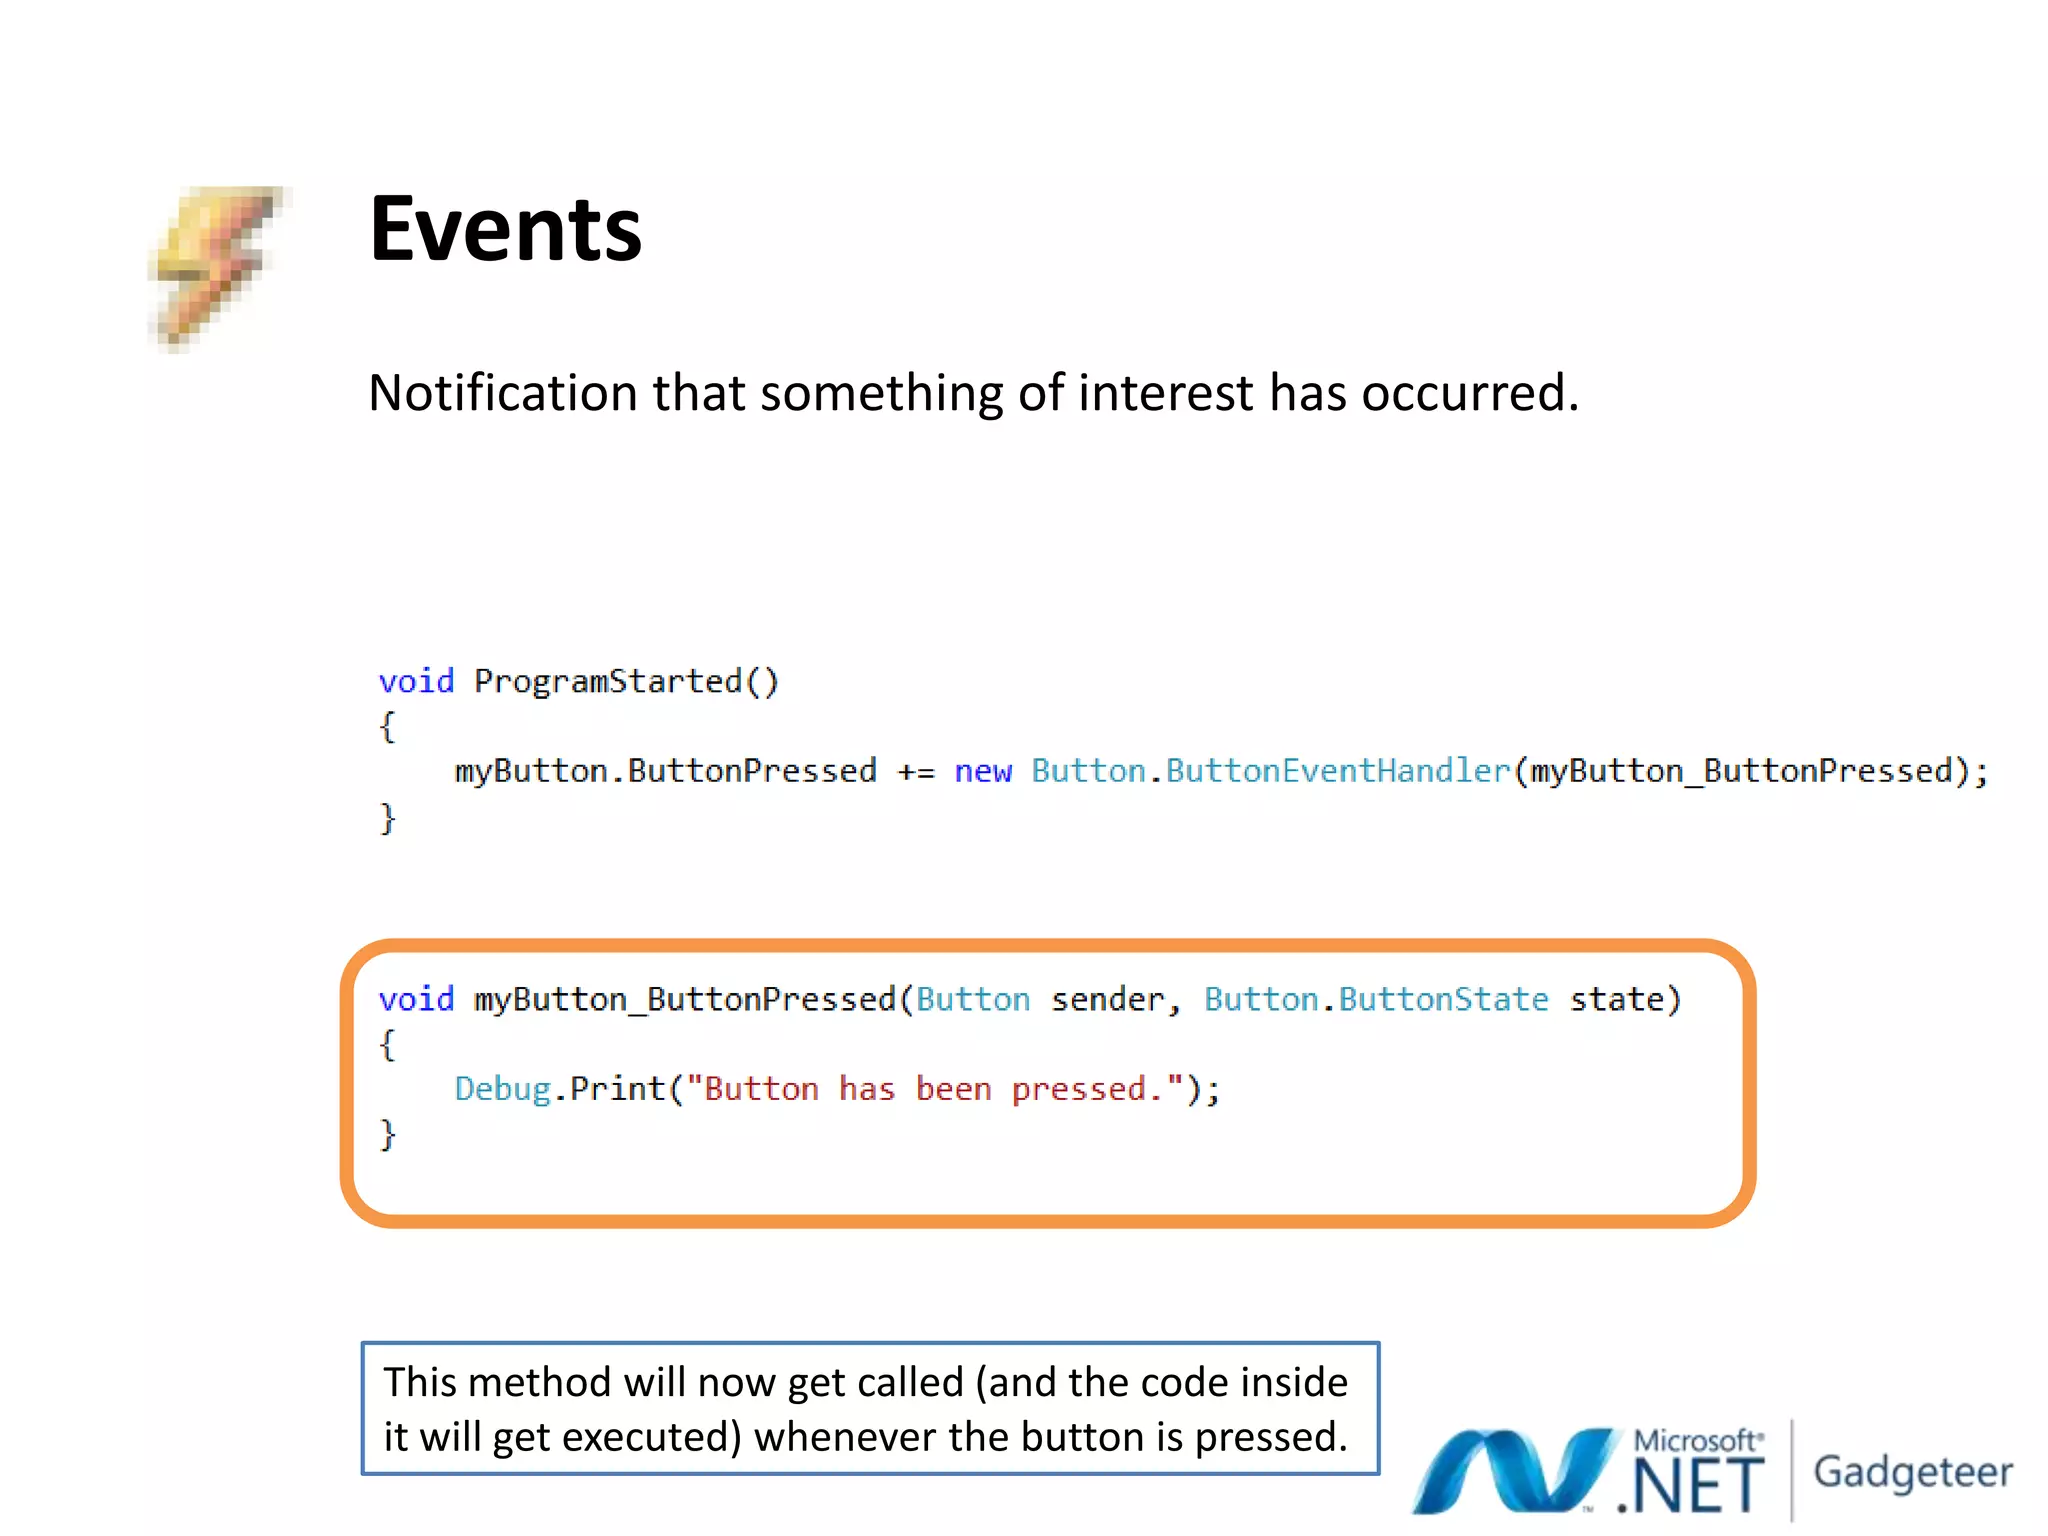
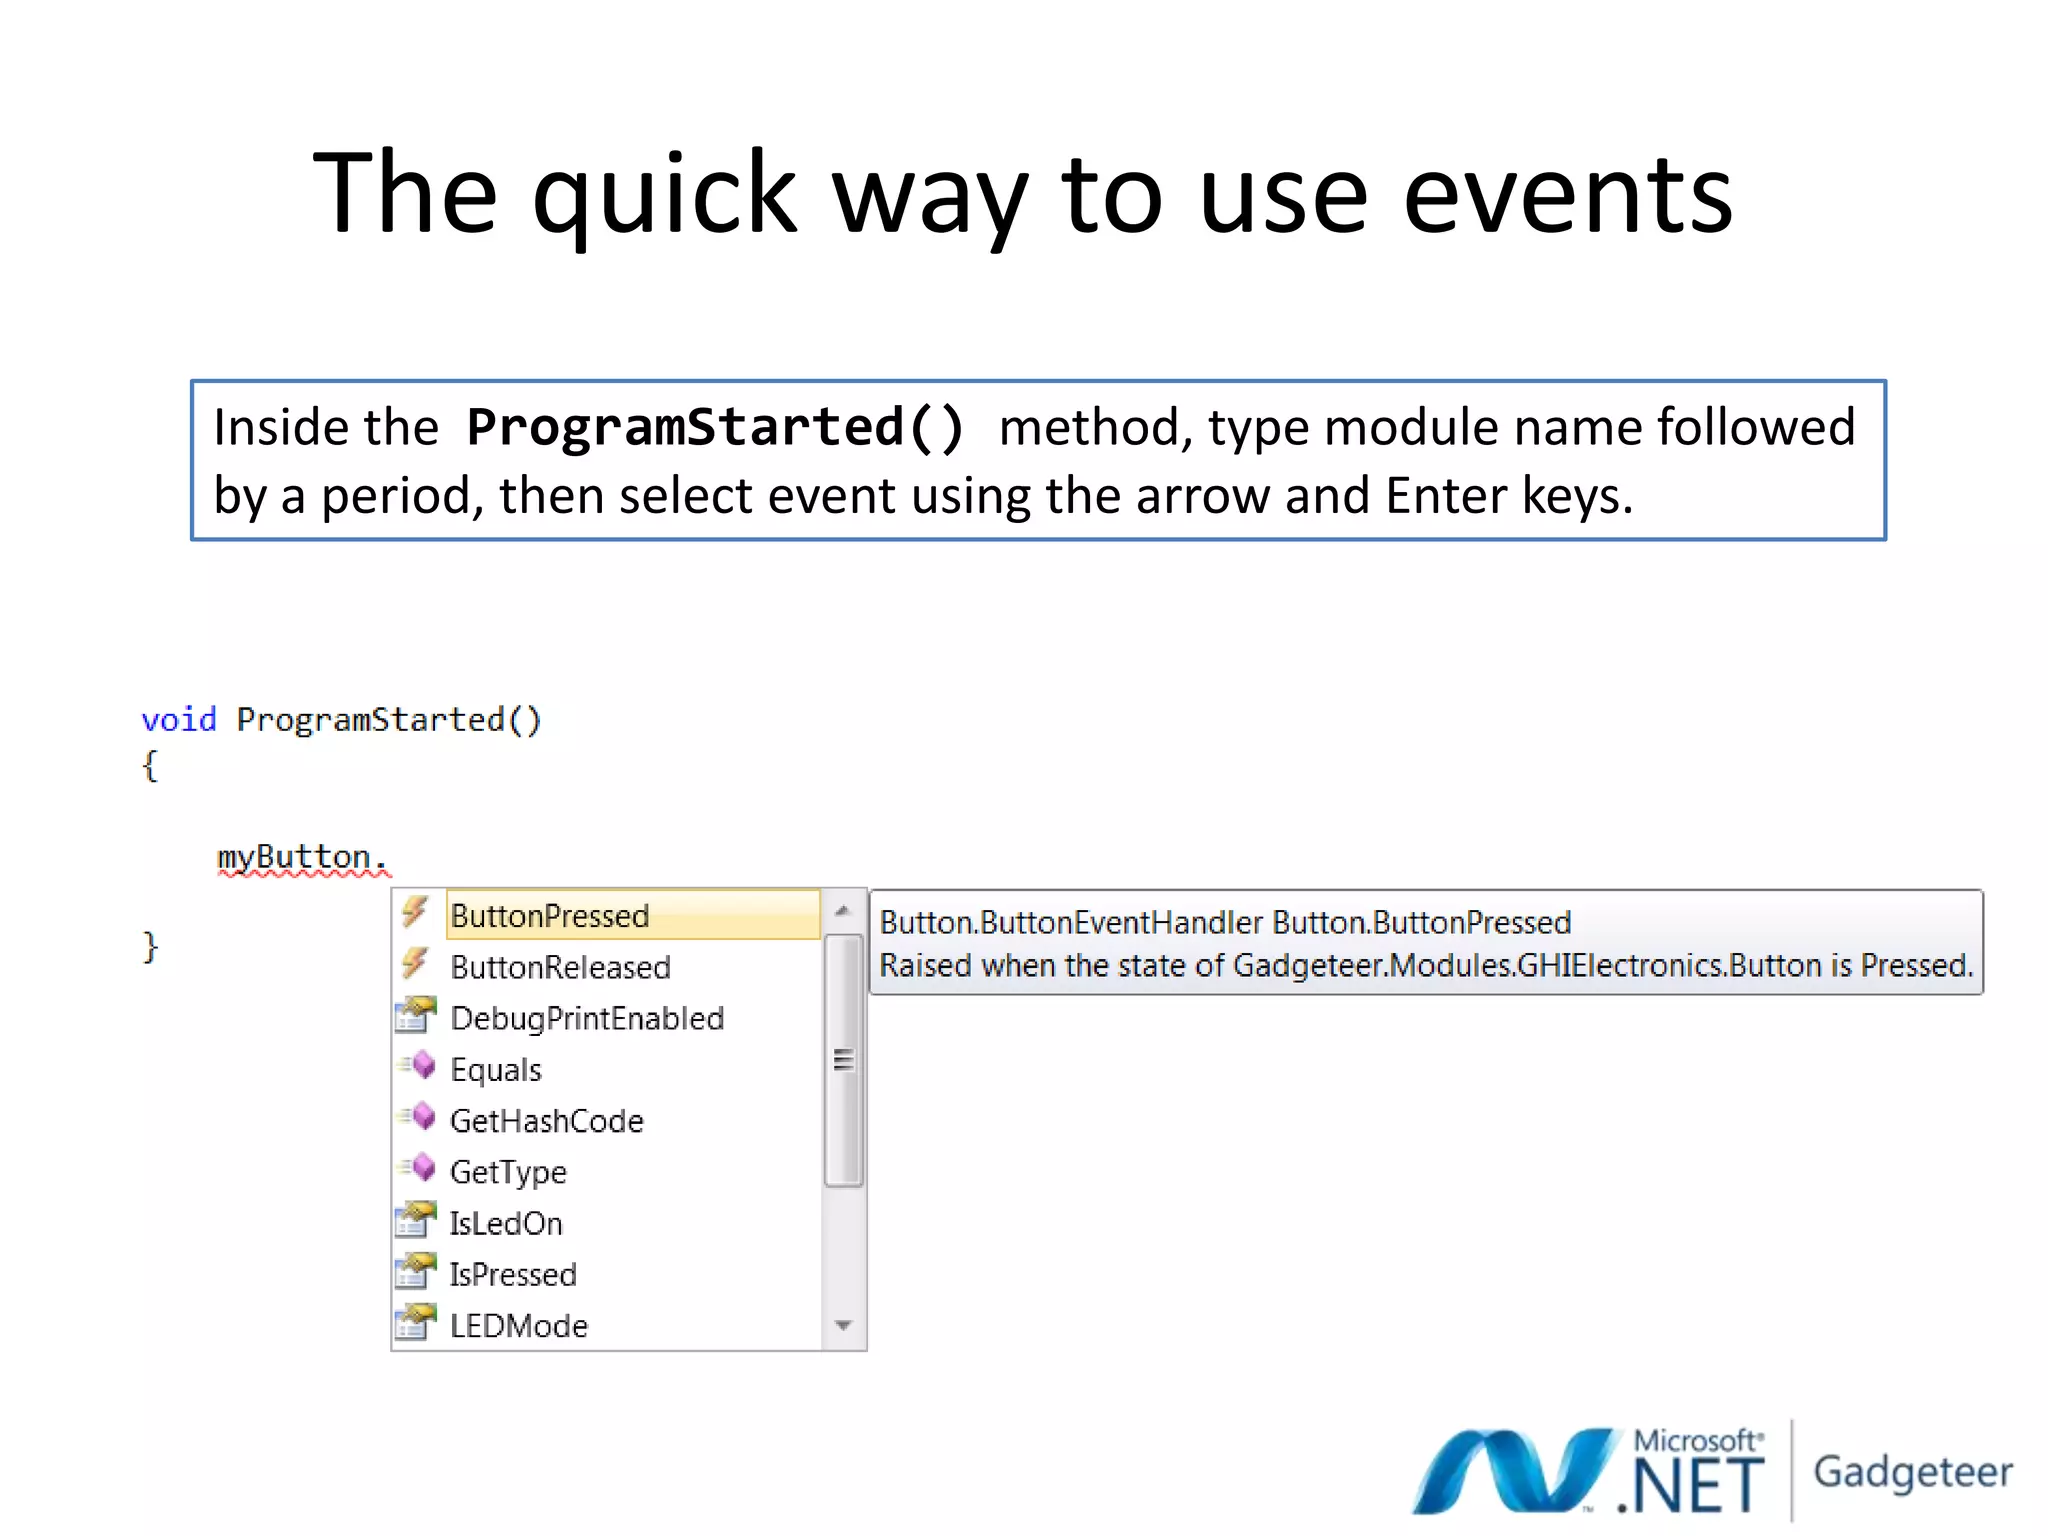
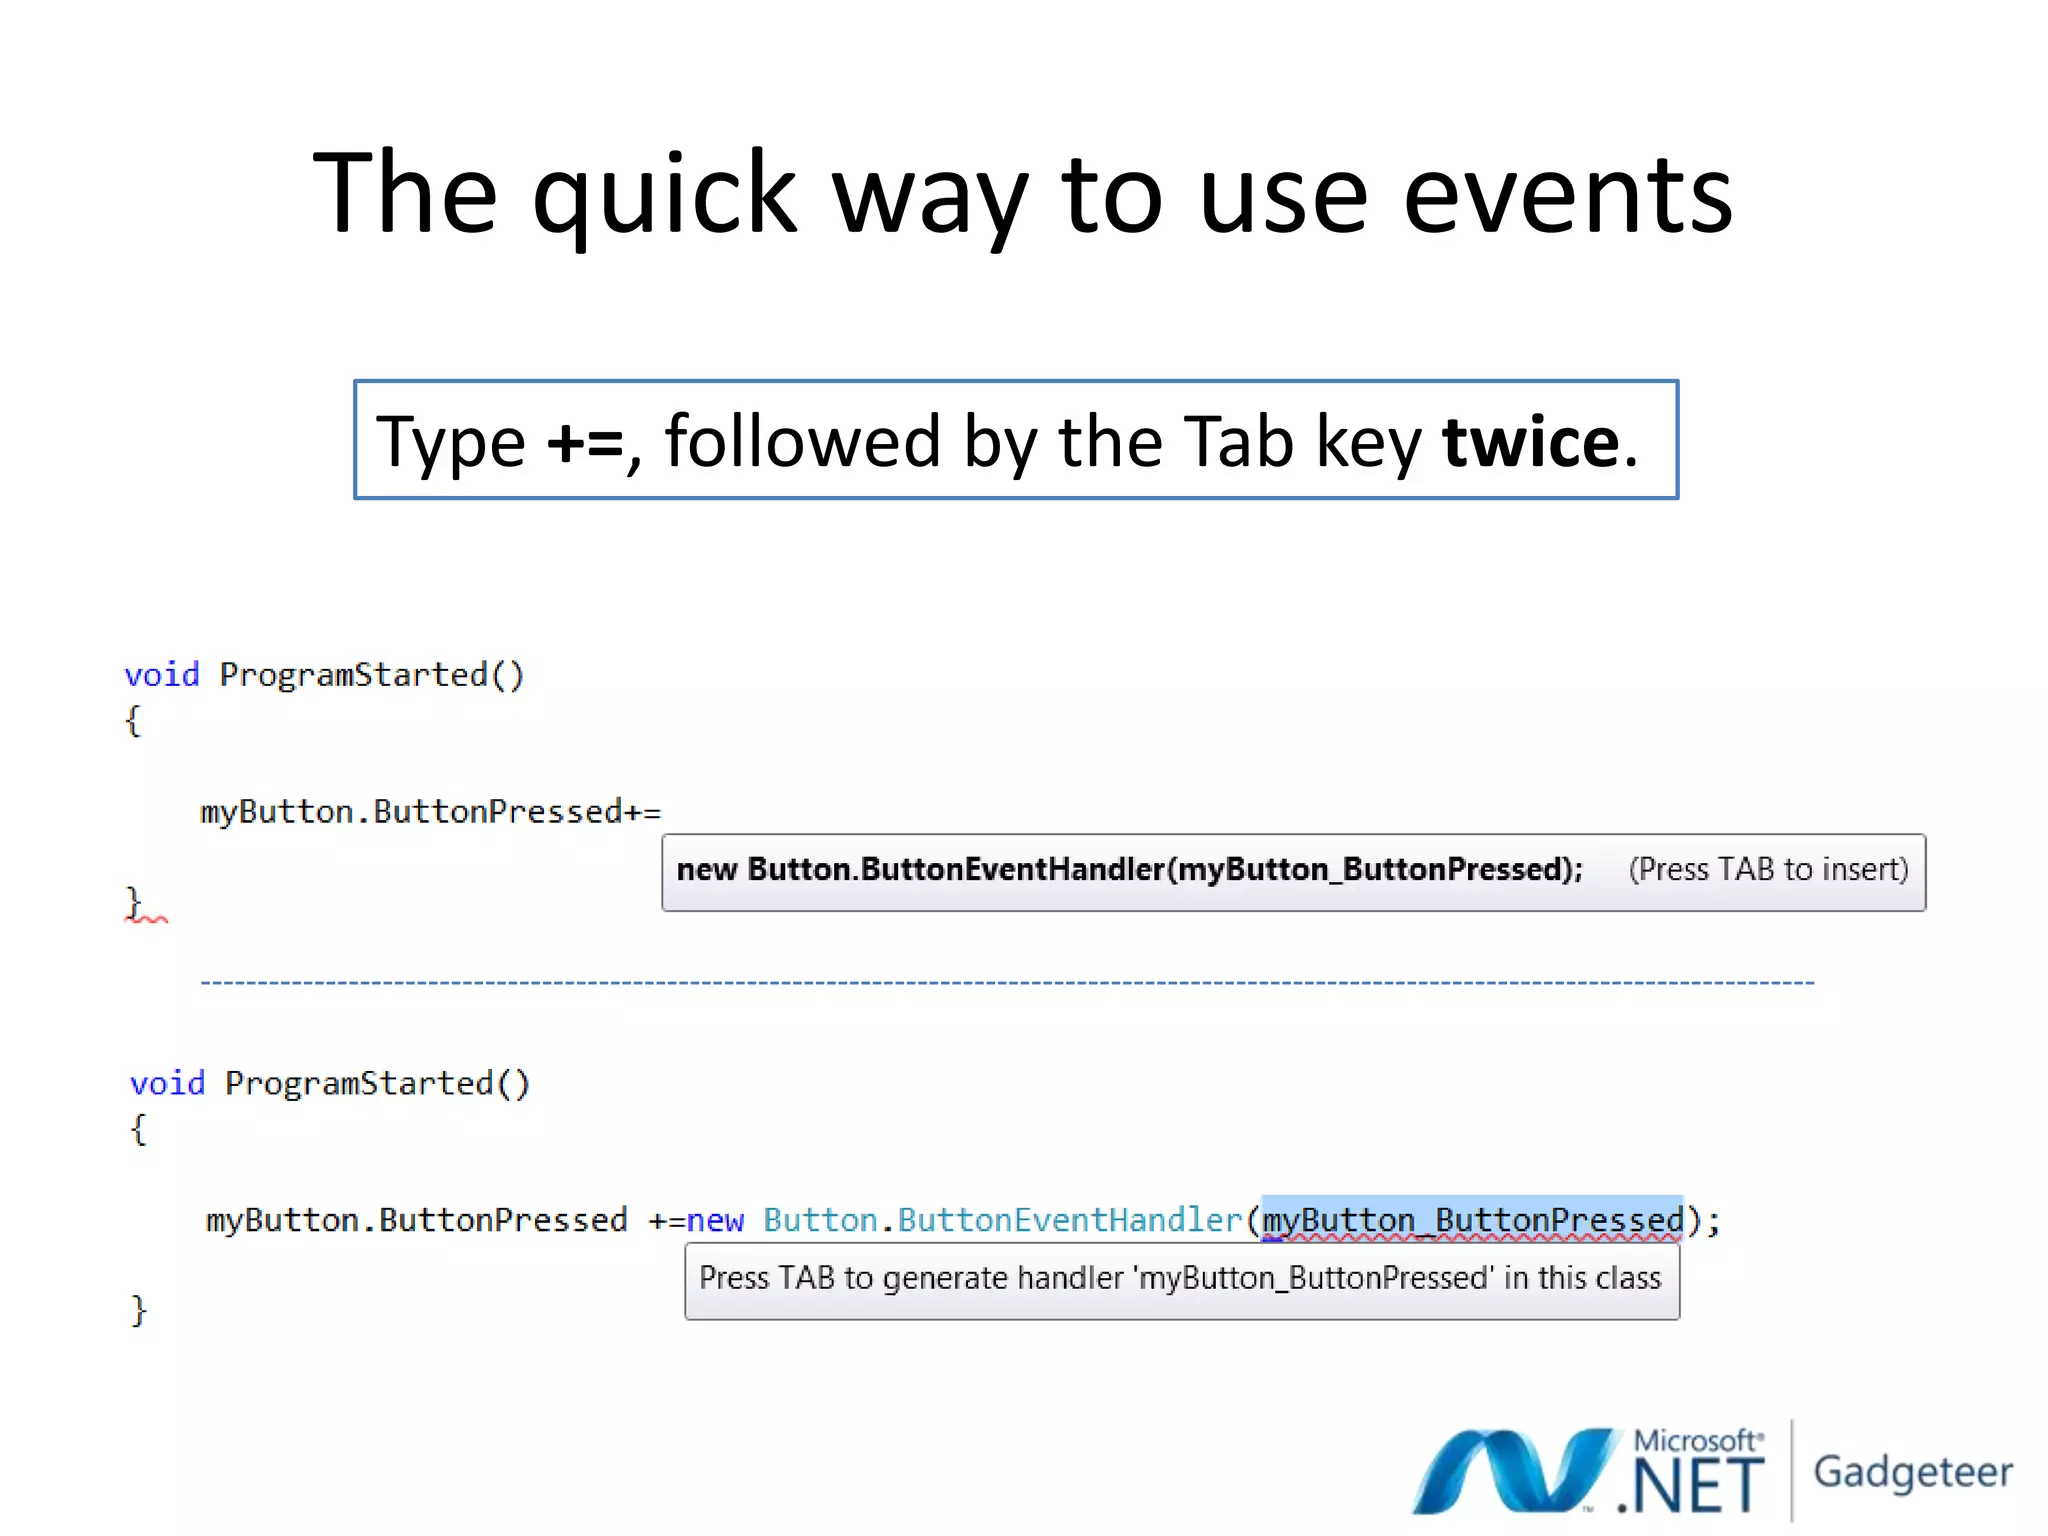
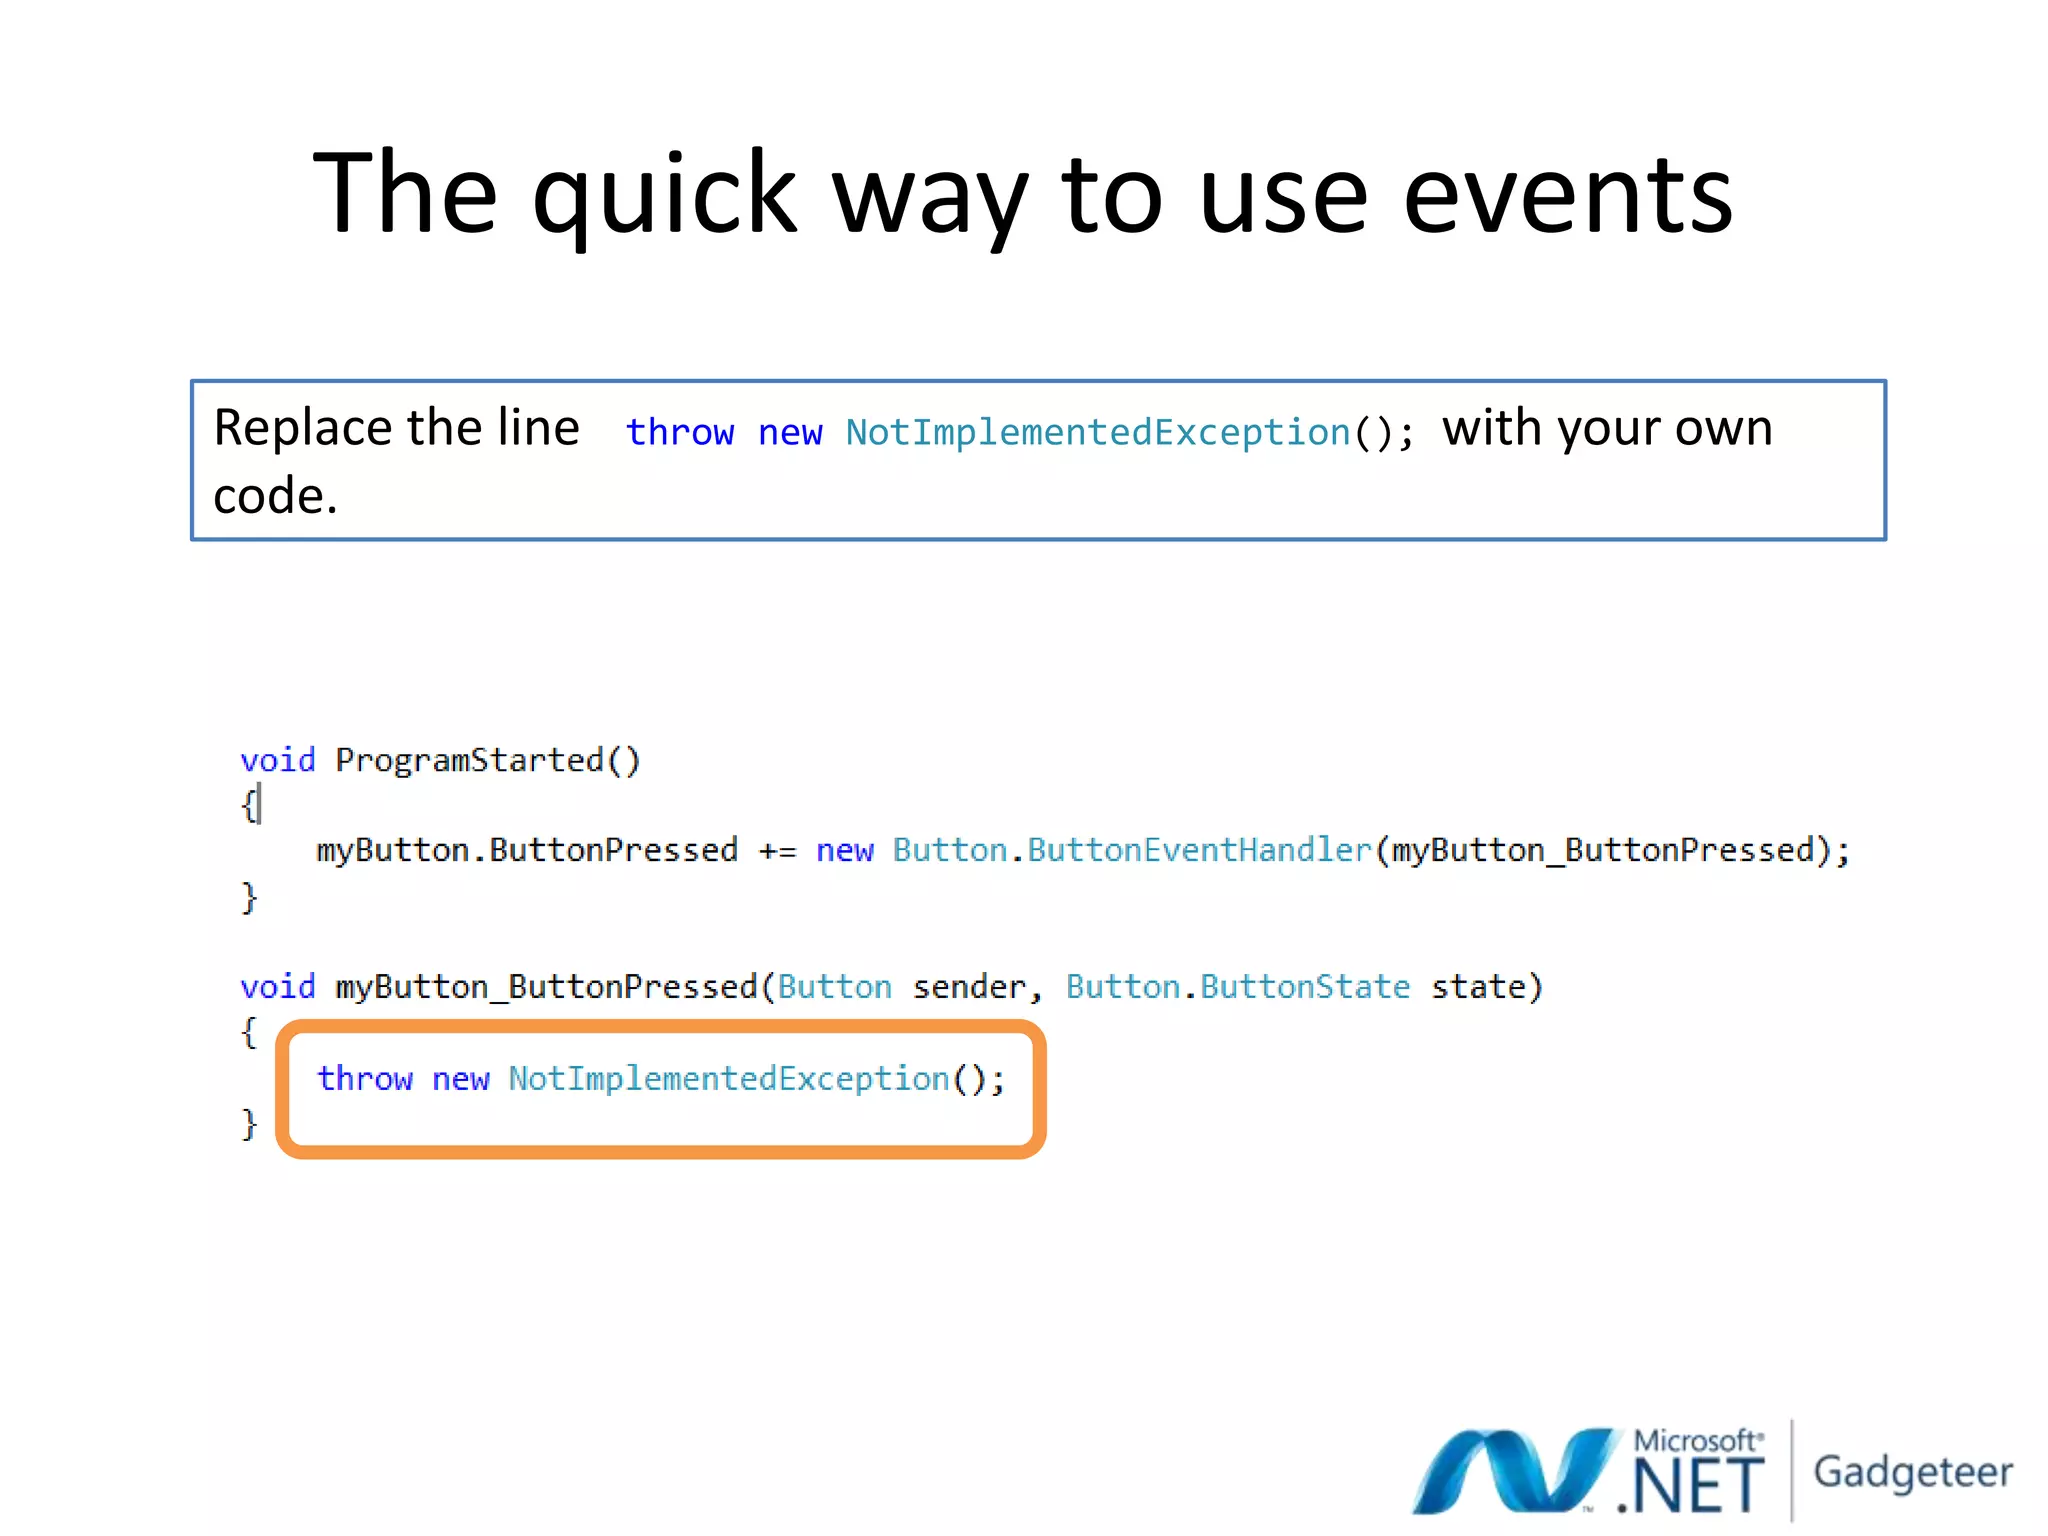
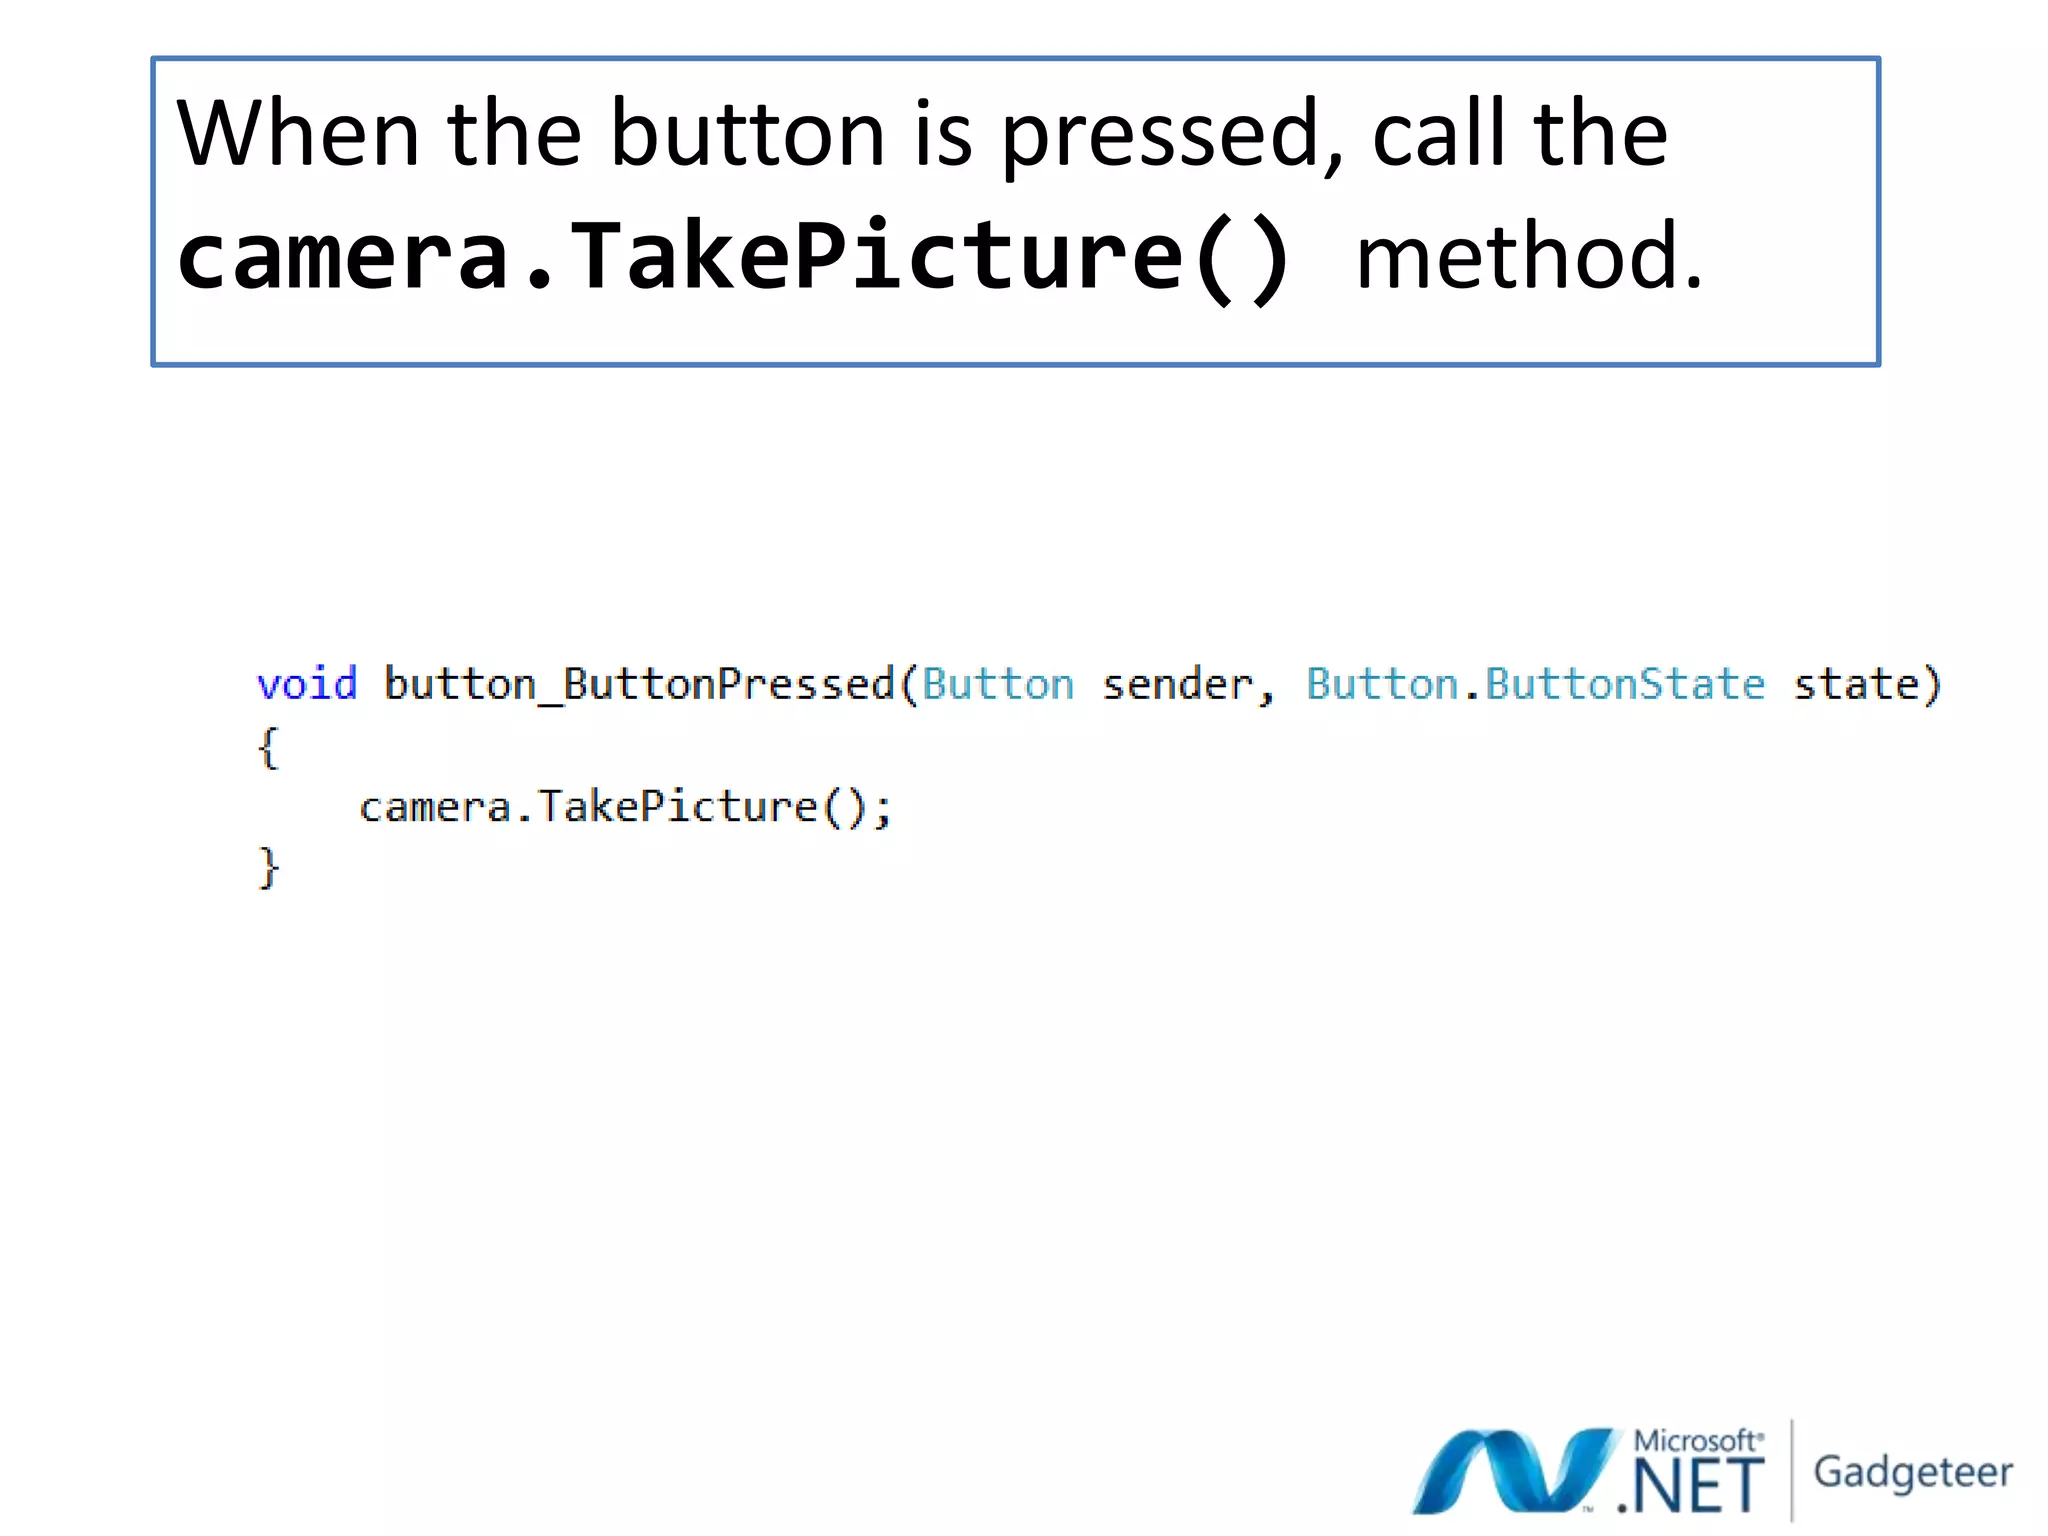
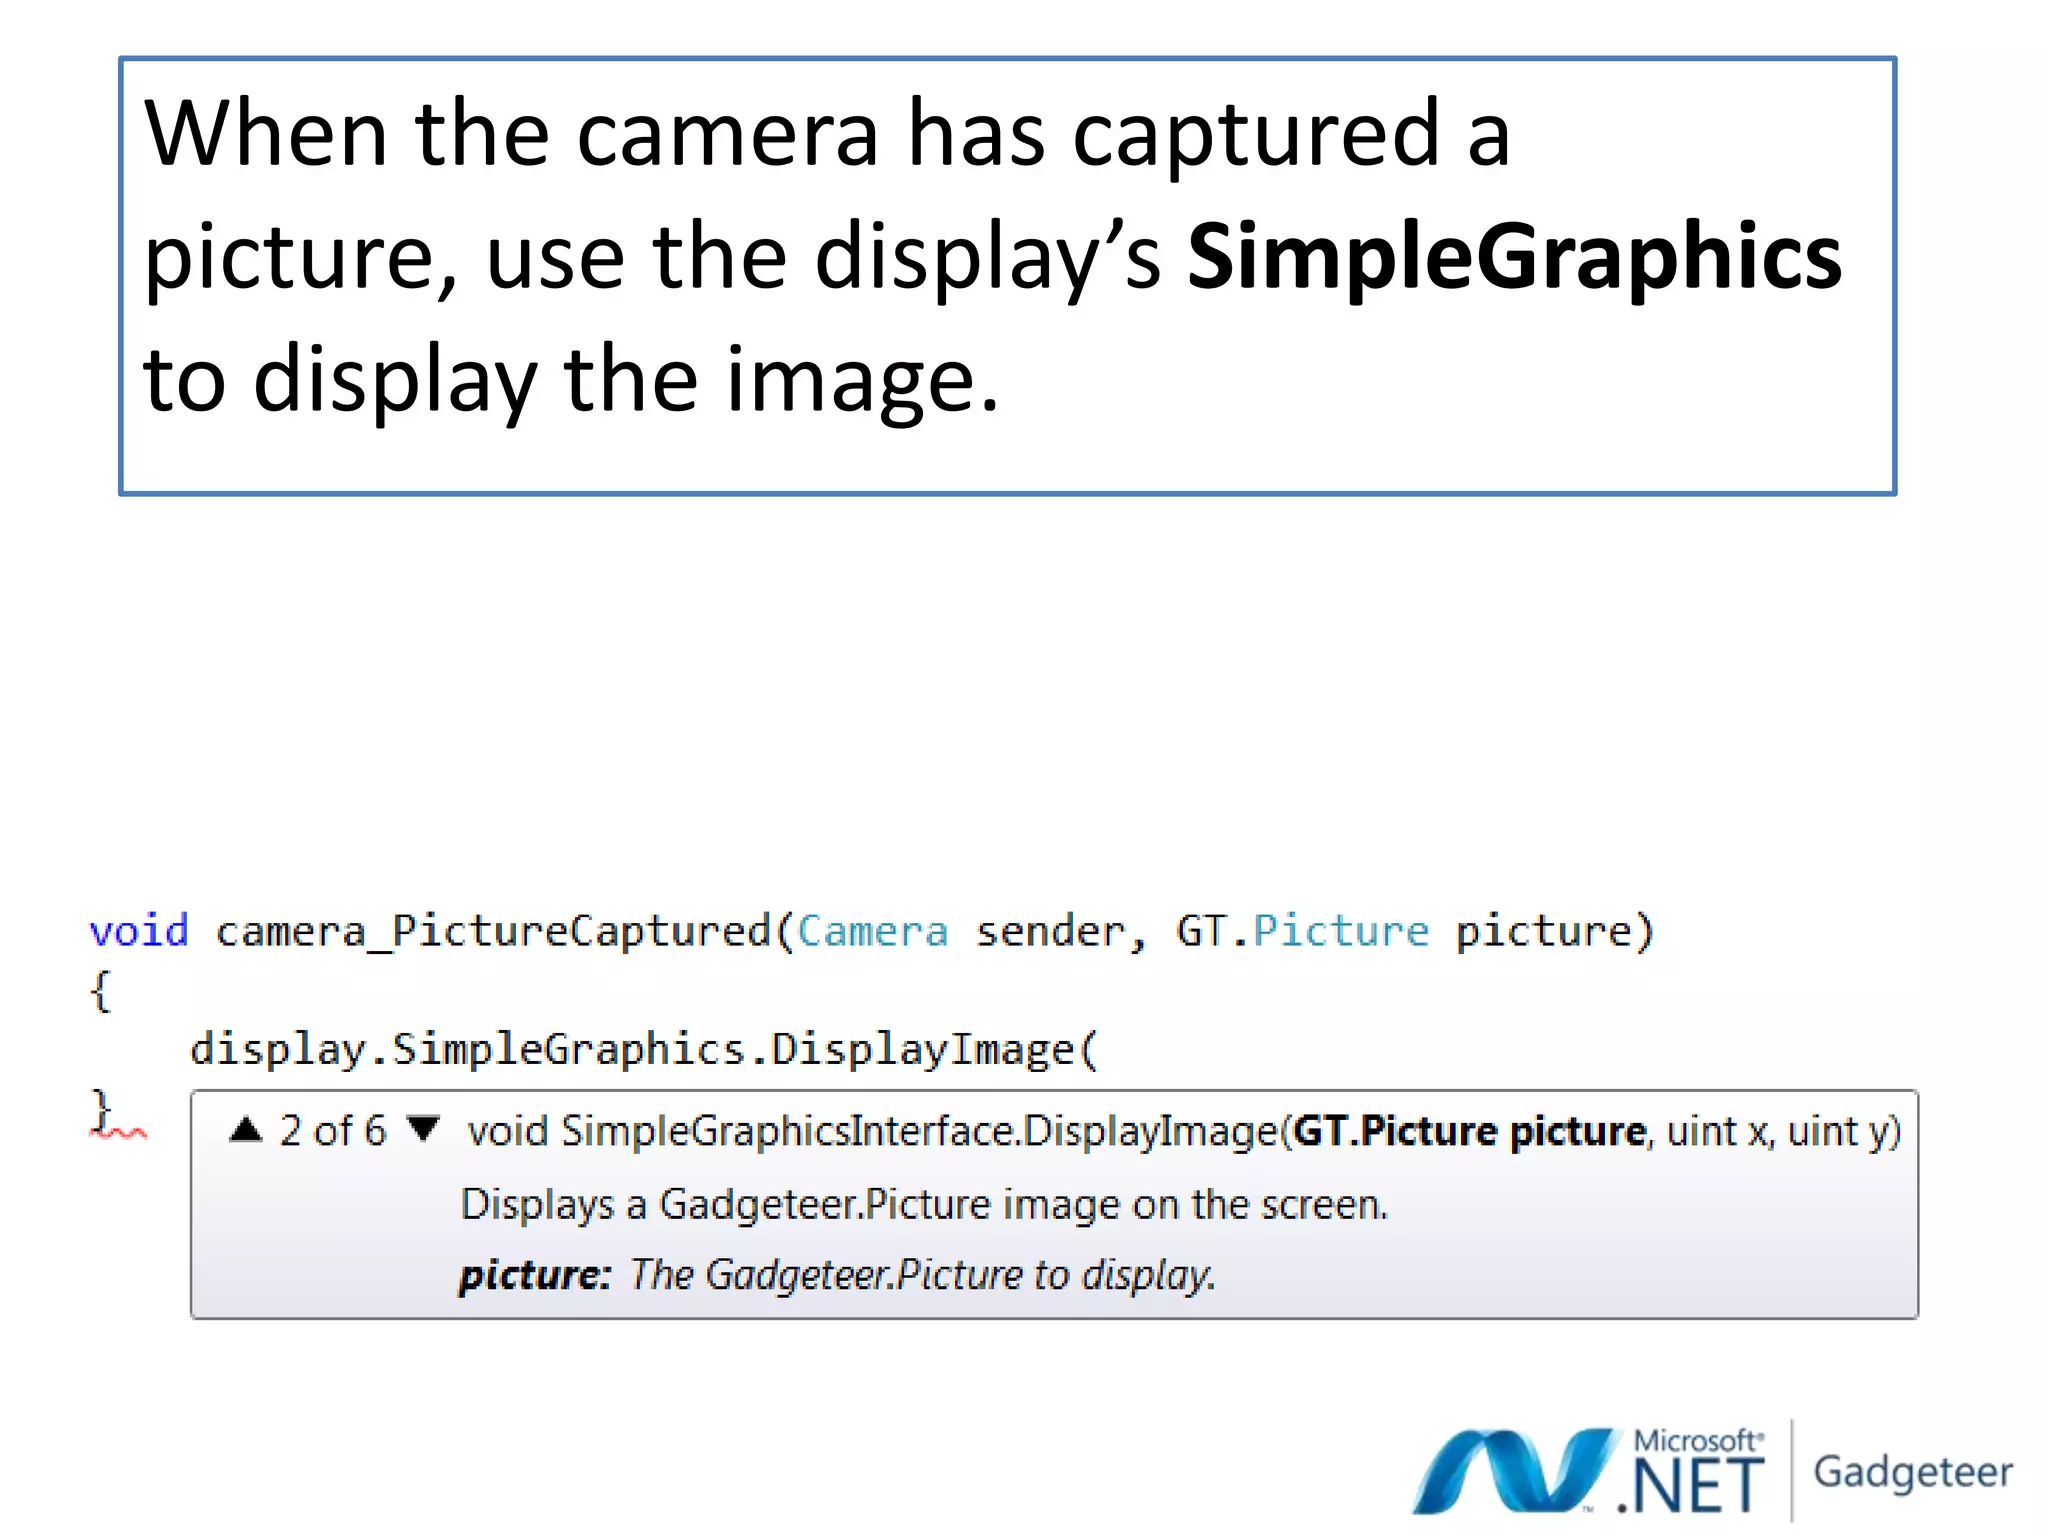
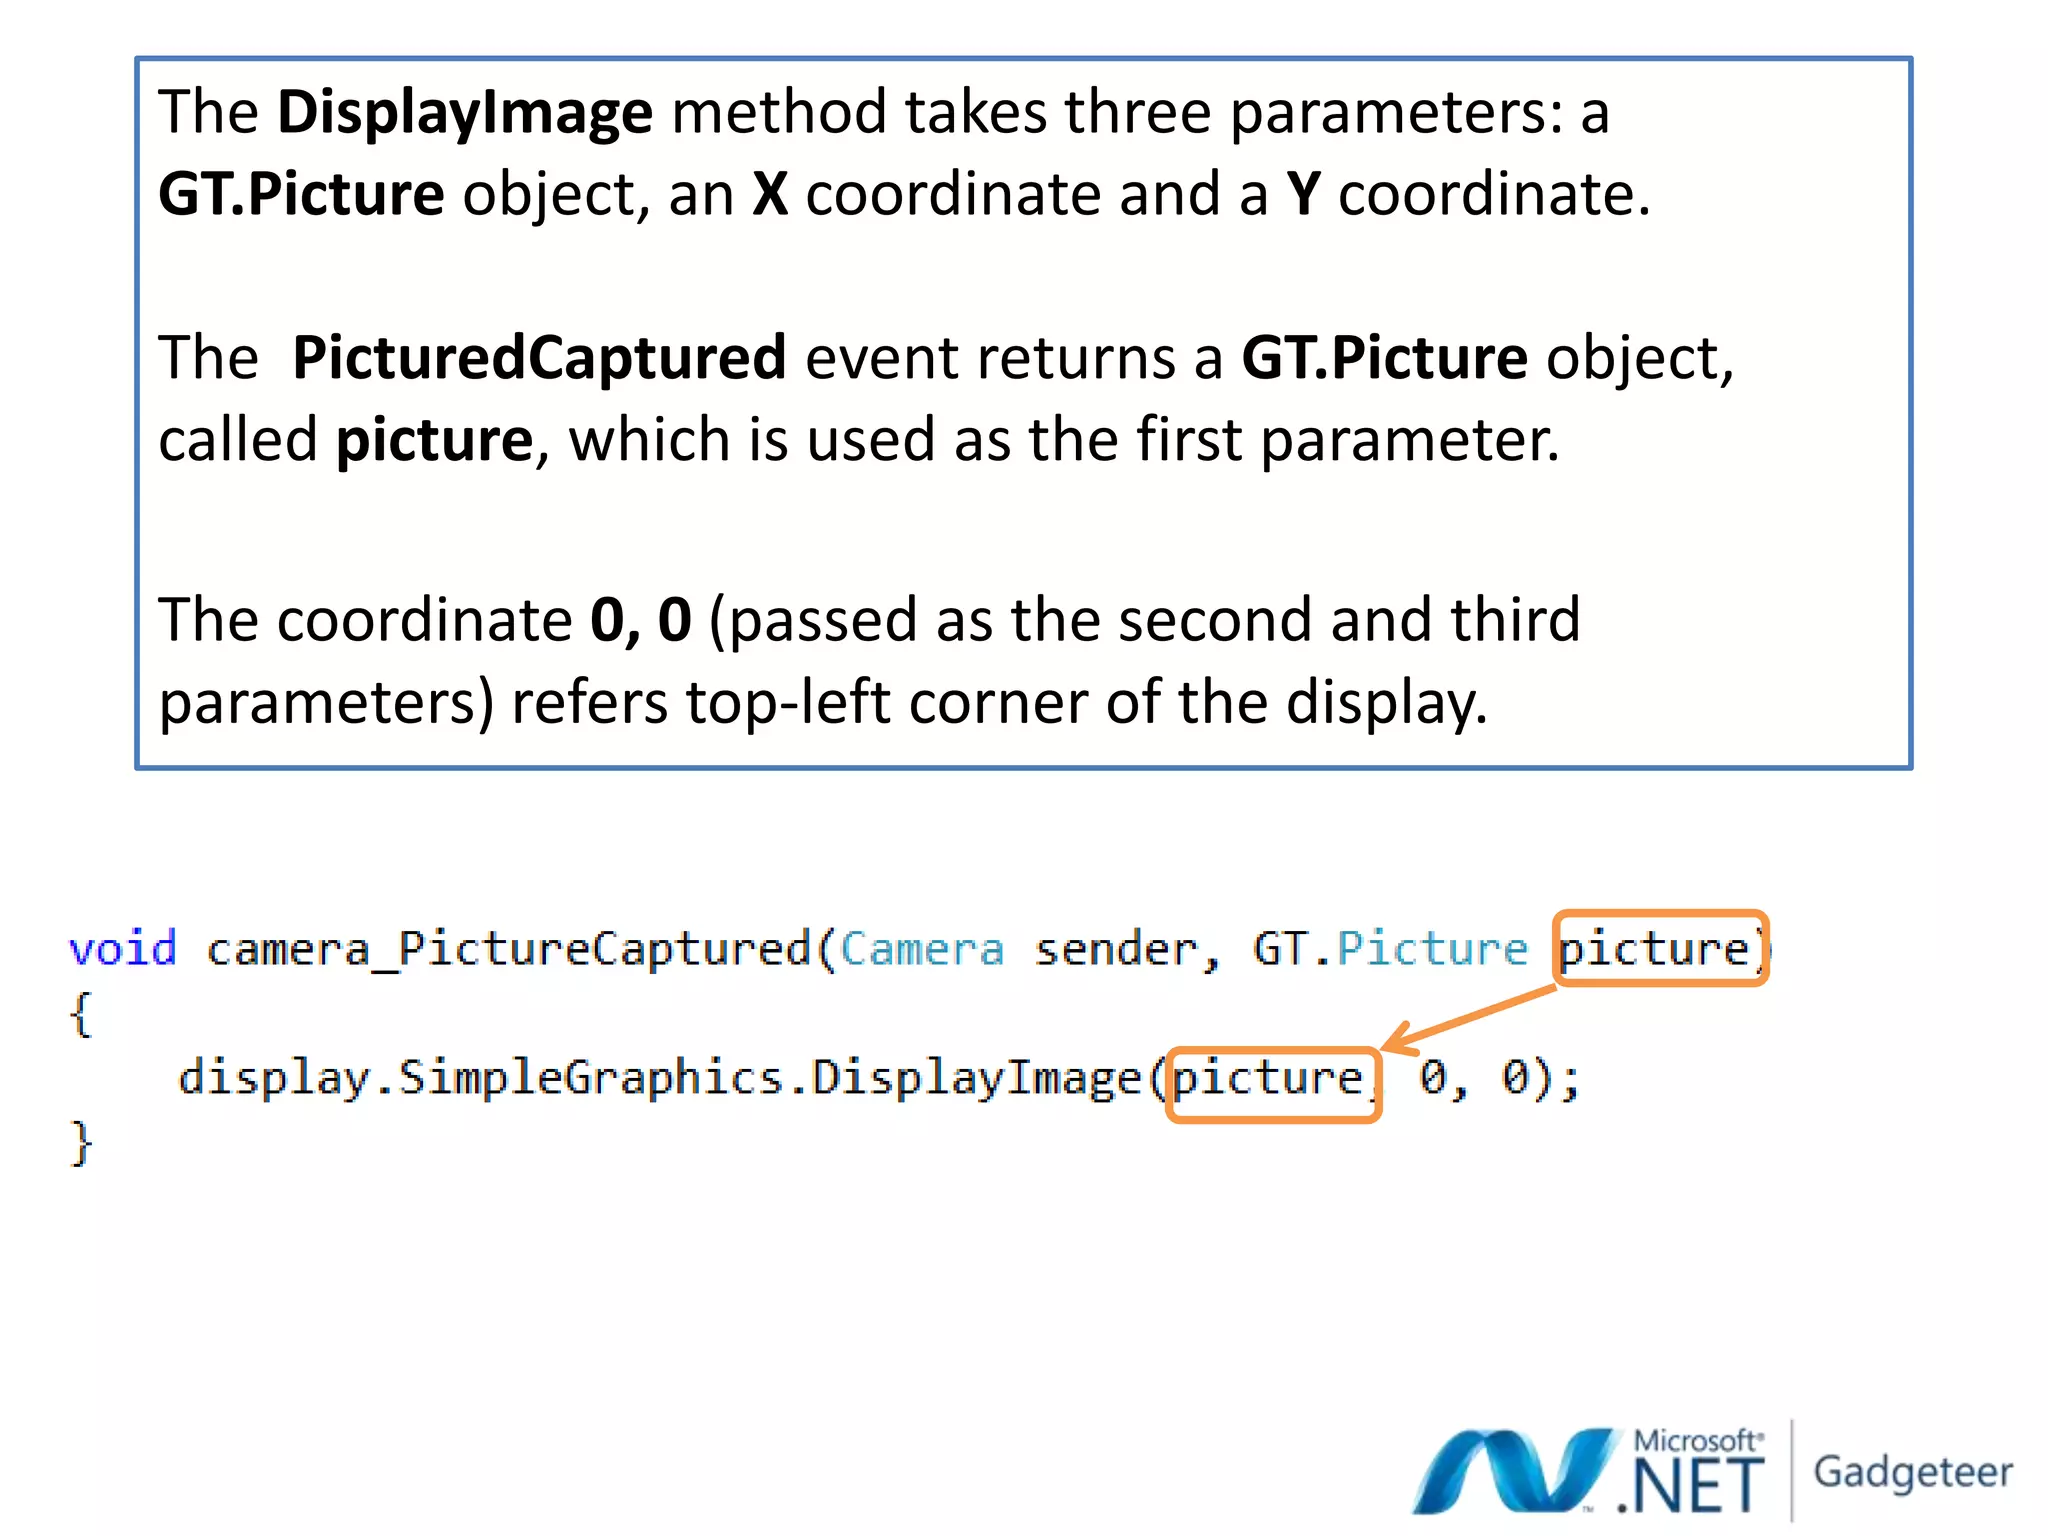
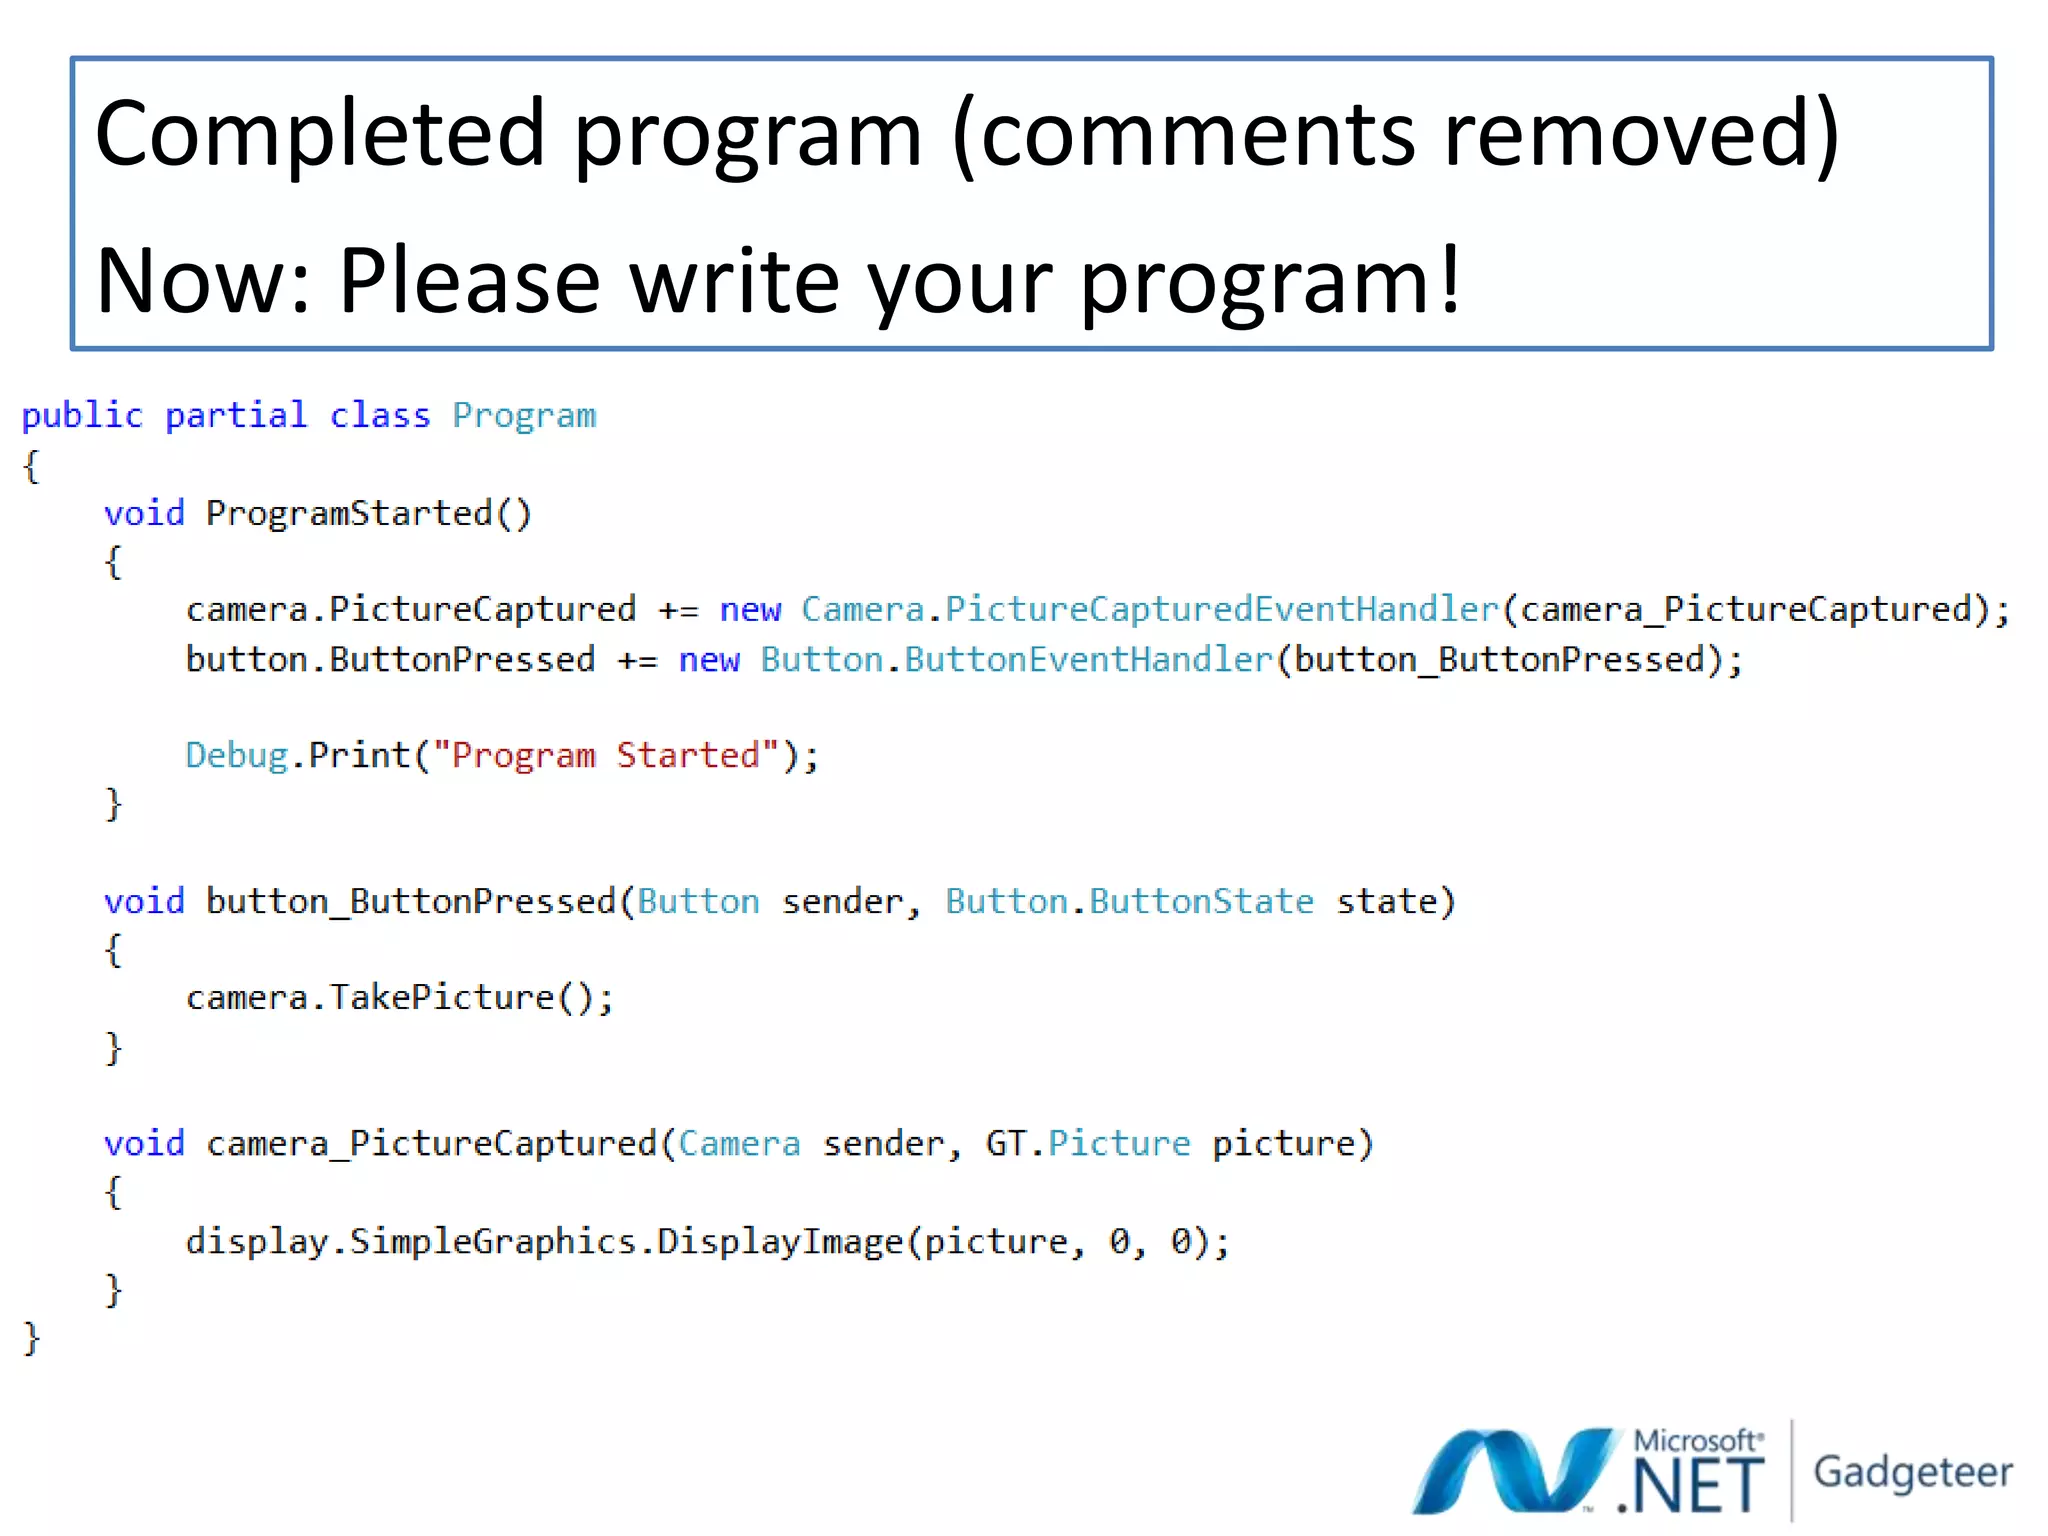
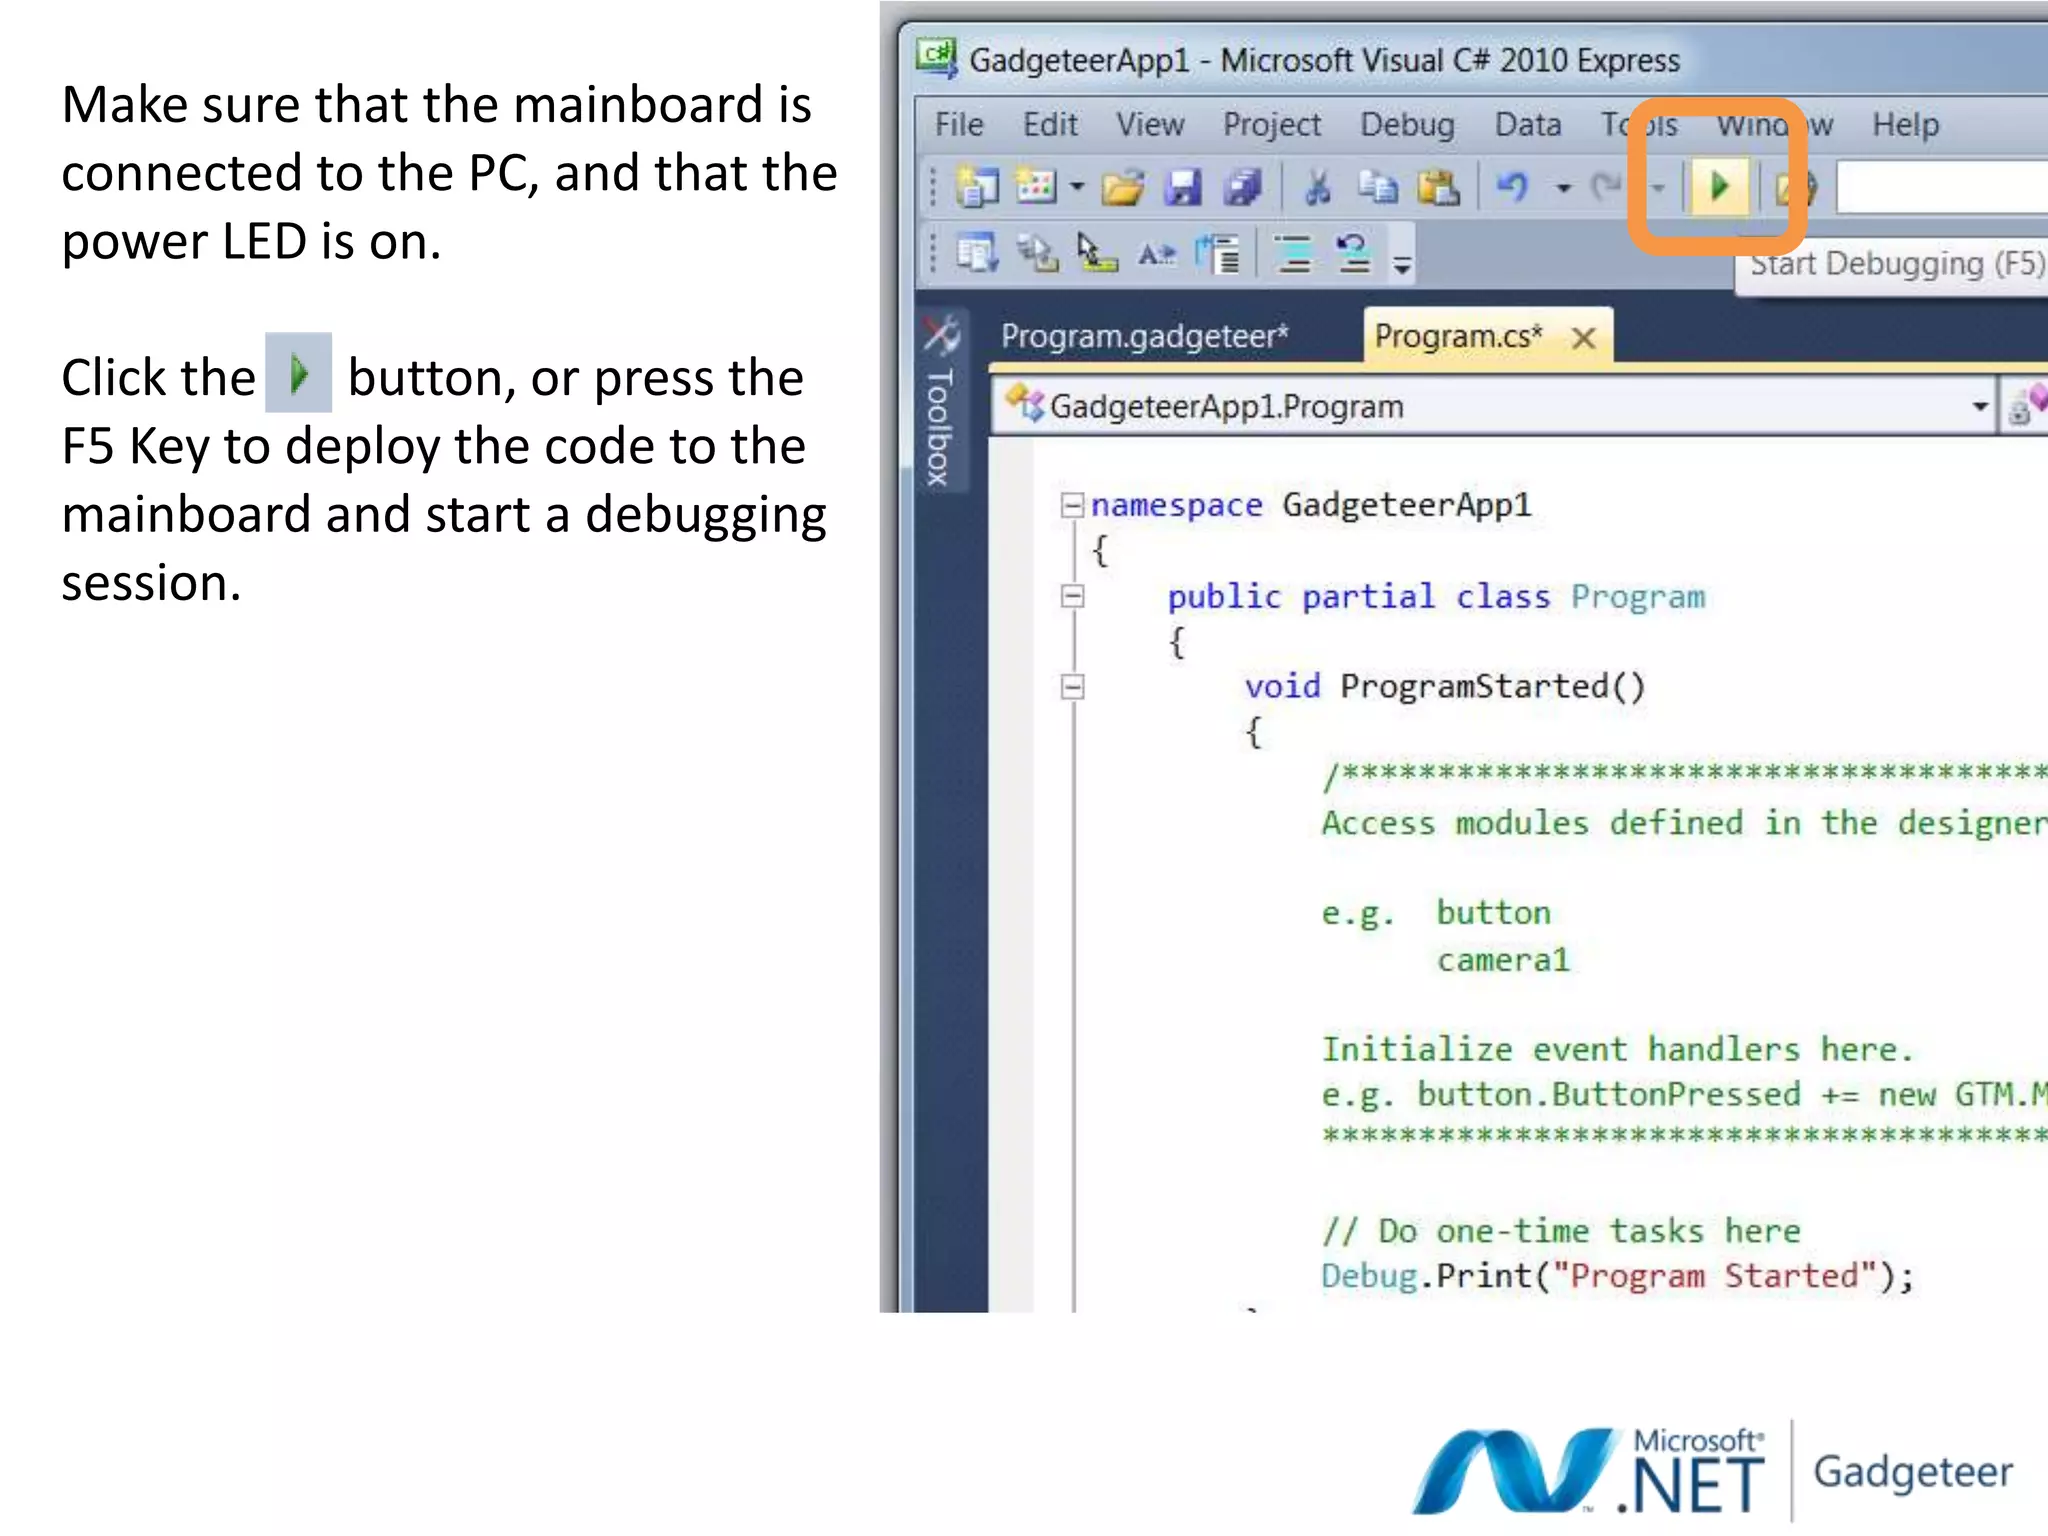
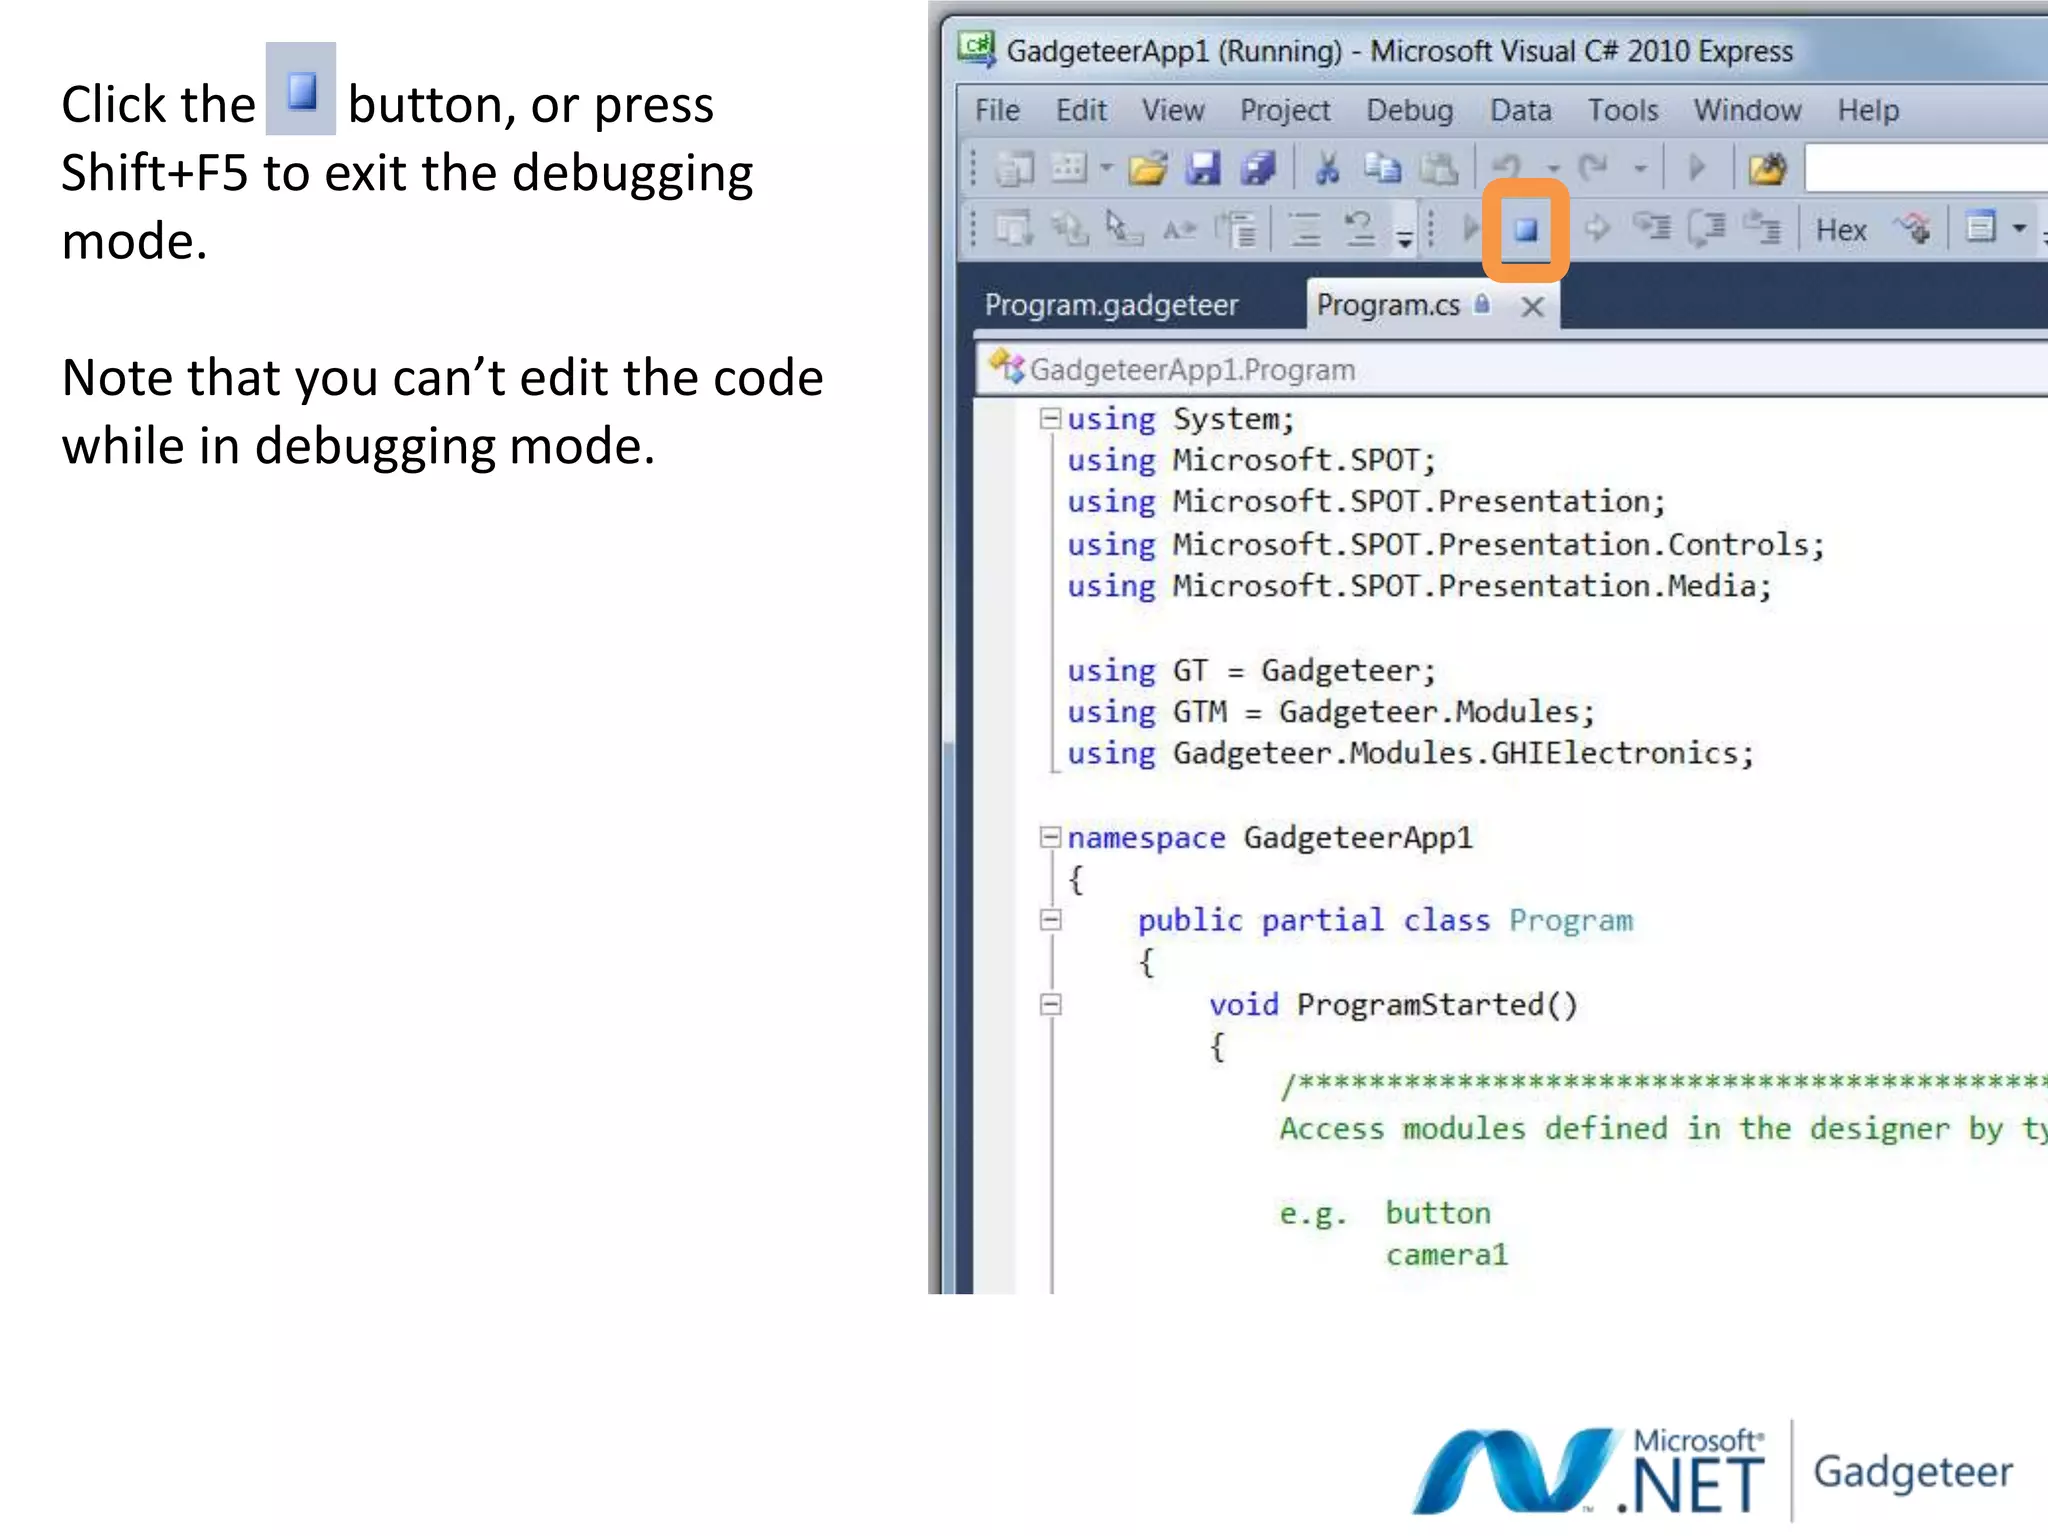
Teach computing with
Microsoft .NET Gadgeteer


   Lee Stott, Steven Johnston
.NET Gadgeteer is a new toolkit for quickly constructing,
programming and shaping new small computing devices
(gadgets)
History
• .NET Gadgeteer comes from Microsoft Research in
  Cambridge, UK
• Designed as a tool for researchers to make it faster and
  easier to prototype new kinds of devices
• Since then, it has proven to be of interest to hobbyists
  and for secondary and tertiary education
• Because of this interest, we have launched .NET
  Gadgeteer as open source software/hardware
The .NET Gadgeteer Hardware
At the heart of every Gadgeteer project is a mainboard.
A mainboard is made up of a programmable processor, and a
number of sockets that Gadgeteer modules can plug into.
Modules, Modules, Modules


Sensors, Actuators, Networking, User Input,
Displays, Power, Extensibility, …
Today we are using the
GHI Electronics FEZ Spider Kit


Touchscreen Display   Camera     Multicolor LED   Button    FEZ Spider Mainboard


 Joystick             USB Host     Ethernet       SD Card      USB Power Supply
                                                            + Programming Interface
Connecting mainboards and modules:
          just match the letters


Note: The hardware will not be damaged if the wrong socket is used.
Red modules provide power
Connect only one red module
LETS BUILD A DIGITAL CAMERA
FROM SCRATCH IN 30 MINUTES
Development Tool: Visual Studio


              or
Designer Tab
                      Solution Explorer
(Program.gadgeteer)
                        (Project Files)
Code Tab
(Program.cs)
Designer Tab
          (Program.gadgeteer)


Toolbox
Module manufacturer
and module type


    Module name
When clicking on a module’s socket,   To connect the button to a
compatible sockets on the mainboard   compatible socket, click and drag
are highlighted in green.
Now: please build a digital camera!
FIRST use the designer to get it as below
and THEN build the hardware
VERY BRIEF INTRODUCTION TO C#
using   System;
using   Microsoft.SPOT;                                 The code starts with a
using   Microsoft.SPOT.Presentation;
using   Microsoft.SPOT.Presentation.Controls;           standard template
using   Microsoft.SPOT.Presentation.Media;

using GT = Gadgeteer;
using GTM = Gadgeteer.Modules;
using Gadgeteer.Modules.GHIElectronics;

namespace GadgeteerApp1
{
    public partial class Program
    {
        void ProgramStarted()
        {
            /******************************************************************************************
            Access modules defined in the designer by typing their name:

              e.g.   button
                     camera1

              Initialize event handlers here.
              e.g. button.ButtonPressed += new GTM.MSR.Button.ButtonEventHandler(button_ButtonPressed);
              ***************************************************************************************** */

              // Do one-time tasks here
              Debug.Print("Program Started");
          }
    }
}
ProgramStarted() executes
                                                      whenever the mainboard is first
namespace GadgeteerApp1
{                                                     powered up or restarted.
    public partial class Program
    {
        void ProgramStarted()
        {
            /******************************************************************************************
            Access modules defined in the designer by typing their name:

            e.g.   button
                   camera1

            Initialize event handlers here.
            e.g. button.ButtonPressed += new GTM.MSR.Button.ButtonEventHandler(button_ButtonPressed);
            ***************************************************************************************** */

            // Do one-time tasks here
            Debug.Print("Program Started");
        }
    }
}
namespace GadgeteerApp1
{
    public partial class Program
    {
        void ProgramStarted()
        {
            /******************************************************************************************
            Access modules defined in the designer by typing their name:

            e.g.   button
                   camera1

            Initialize event handlers here.
            e.g. button.ButtonPressed += new GTM.MSR.Button.ButtonEventHandler(button_ButtonPressed);
            ***************************************************************************************** */

            // Do one-time tasks here
            Debug.Print("Program Started");
        }
    }
}

                                                      Debug.Print(string) prints
                                                      text to the debug output
                                                      window.
To access hardware functionality type the name
of the hardware module followed by a period
e.g. myButton.
Properties
Values that can be read, and sometimes also assigned.
Methods
Built-in functions that can include a number of parameters.
Events
Notification that something of interest has occurred.
Events
Notification that something of interest has occurred.

            This line specifies that we are interested in knowing when this
            particular event occurs, and associates it with a specific method.
Events
Notification that something of interest has occurred.

            This line specifies that we are interested in knowing when this
            particular event occurs, and associates it with a specific method.
Events
Notification that something of interest has occurred.


This method will now get called (and the code inside
it will get executed) whenever the button is pressed.
The quick way to use events
Inside the ProgramStarted() method, type module name followed
by a period, then select event using the arrow and Enter keys.
The quick way to use events
 Type +=, followed by the Tab key twice.
The quick way to use events
Replace the line   throw new NotImplementedException();   with your own
code.
SOFTWARE FOR A DIGITAL CAMERA
When the button is pressed, call the
camera.TakePicture() method.
When the camera has captured a
picture, use the display’s SimpleGraphics
to display the image.
The DisplayImage method takes three parameters: a
GT.Picture object, an X coordinate and a Y coordinate.

The PicturedCaptured event returns a GT.Picture object,
called picture, which is used as the first parameter.

The coordinate 0, 0 (passed as the second and third
parameters) refers top-left corner of the display.
Completed program (comments removed)
Now: Please write your program!
RUNNING THE PROGRAM
Make sure that the mainboard is
connected to the PC, and that the
power LED is on.

Click the   button, or press the
F5 Key to deploy the code to the
mainboard and start a debugging
session.
After loading messages, output window should display Program Started,

Note: If you can’t see the Output Window, press Ctrl+Alt+O
Click the    button, or press
Shift+F5 to exit the debugging
mode.

Note that you can’t edit the code
while in debugging mode.
If you see the following message in the output window,
stop debugging (Shift+F5) and try again (F5):
Updating display configuration. DEVICE WILL NOW REBOOT. Visual Studio might lose
connection, and debugging might need to be manually restarted.


If the output window is stuck displaying the following
message, press the reset button on the mainboard:
Rebooting...


Now: Please program your cameras!

Hack2the future Microsoft .NET Gadgeteer

  • 1.
    Teach computing with Microsoft.NET Gadgeteer Lee Stott, Steven Johnston
  • 2.
    .NET Gadgeteer isa new toolkit for quickly constructing, programming and shaping new small computing devices (gadgets)
  • 3.
    History • .NET Gadgeteercomes from Microsoft Research in Cambridge, UK • Designed as a tool for researchers to make it faster and easier to prototype new kinds of devices • Since then, it has proven to be of interest to hobbyists and for secondary and tertiary education • Because of this interest, we have launched .NET Gadgeteer as open source software/hardware
  • 4.
    The .NET GadgeteerHardware At the heart of every Gadgeteer project is a mainboard. A mainboard is made up of a programmable processor, and a number of sockets that Gadgeteer modules can plug into.
  • 5.
    Modules, Modules, Modules Sensors,Actuators, Networking, User Input, Displays, Power, Extensibility, …
  • 6.
    Today we areusing the GHI Electronics FEZ Spider Kit Touchscreen Display Camera Multicolor LED Button FEZ Spider Mainboard Joystick USB Host Ethernet SD Card USB Power Supply + Programming Interface
  • 7.
    Connecting mainboards andmodules: just match the letters Note: The hardware will not be damaged if the wrong socket is used.
  • 8.
    Red modules providepower Connect only one red module
  • 9.
    LETS BUILD ADIGITAL CAMERA FROM SCRATCH IN 30 MINUTES
  • 10.
  • 11.
    Designer Tab Solution Explorer (Program.gadgeteer) (Project Files)
  • 12.
  • 13.
    Designer Tab (Program.gadgeteer) Toolbox
  • 15.
  • 16.
    When clicking ona module’s socket, To connect the button to a compatible sockets on the mainboard compatible socket, click and drag are highlighted in green.
  • 17.
    Now: please builda digital camera! FIRST use the designer to get it as below and THEN build the hardware
  • 18.
  • 19.
    using System; using Microsoft.SPOT; The code starts with a using Microsoft.SPOT.Presentation; using Microsoft.SPOT.Presentation.Controls; standard template using Microsoft.SPOT.Presentation.Media; using GT = Gadgeteer; using GTM = Gadgeteer.Modules; using Gadgeteer.Modules.GHIElectronics; namespace GadgeteerApp1 { public partial class Program { void ProgramStarted() { /****************************************************************************************** Access modules defined in the designer by typing their name: e.g. button camera1 Initialize event handlers here. e.g. button.ButtonPressed += new GTM.MSR.Button.ButtonEventHandler(button_ButtonPressed); ***************************************************************************************** */ // Do one-time tasks here Debug.Print("Program Started"); } } }
  • 20.
    ProgramStarted() executes whenever the mainboard is first namespace GadgeteerApp1 { powered up or restarted. public partial class Program { void ProgramStarted() { /****************************************************************************************** Access modules defined in the designer by typing their name: e.g. button camera1 Initialize event handlers here. e.g. button.ButtonPressed += new GTM.MSR.Button.ButtonEventHandler(button_ButtonPressed); ***************************************************************************************** */ // Do one-time tasks here Debug.Print("Program Started"); } } }
  • 21.
    namespace GadgeteerApp1 { public partial class Program { void ProgramStarted() { /****************************************************************************************** Access modules defined in the designer by typing their name: e.g. button camera1 Initialize event handlers here. e.g. button.ButtonPressed += new GTM.MSR.Button.ButtonEventHandler(button_ButtonPressed); ***************************************************************************************** */ // Do one-time tasks here Debug.Print("Program Started"); } } } Debug.Print(string) prints text to the debug output window.
  • 22.
    To access hardwarefunctionality type the name of the hardware module followed by a period e.g. myButton.
  • 23.
    Properties Values that canbe read, and sometimes also assigned.
  • 24.
    Methods Built-in functions thatcan include a number of parameters.
  • 25.
    Events Notification that somethingof interest has occurred.
  • 26.
    Events Notification that somethingof interest has occurred. This line specifies that we are interested in knowing when this particular event occurs, and associates it with a specific method.
  • 27.
    Events Notification that somethingof interest has occurred. This line specifies that we are interested in knowing when this particular event occurs, and associates it with a specific method.
  • 28.
    Events Notification that somethingof interest has occurred. This method will now get called (and the code inside it will get executed) whenever the button is pressed.
  • 29.
    The quick wayto use events Inside the ProgramStarted() method, type module name followed by a period, then select event using the arrow and Enter keys.
  • 30.
    The quick wayto use events Type +=, followed by the Tab key twice.
  • 31.
    The quick wayto use events Replace the line throw new NotImplementedException(); with your own code.
  • 32.
    SOFTWARE FOR ADIGITAL CAMERA
  • 33.
    When the buttonis pressed, call the camera.TakePicture() method.
  • 34.
    When the camerahas captured a picture, use the display’s SimpleGraphics to display the image.
  • 35.
    The DisplayImage methodtakes three parameters: a GT.Picture object, an X coordinate and a Y coordinate. The PicturedCaptured event returns a GT.Picture object, called picture, which is used as the first parameter. The coordinate 0, 0 (passed as the second and third parameters) refers top-left corner of the display.
  • 36.
    Completed program (commentsremoved) Now: Please write your program!
  • 37.
  • 38.
    Make sure thatthe mainboard is connected to the PC, and that the power LED is on. Click the button, or press the F5 Key to deploy the code to the mainboard and start a debugging session.
  • 39.
    After loading messages,output window should display Program Started, Note: If you can’t see the Output Window, press Ctrl+Alt+O
  • 40.
    Click the button, or press Shift+F5 to exit the debugging mode. Note that you can’t edit the code while in debugging mode.
  • 41.
    If you seethe following message in the output window, stop debugging (Shift+F5) and try again (F5): Updating display configuration. DEVICE WILL NOW REBOOT. Visual Studio might lose connection, and debugging might need to be manually restarted. If the output window is stuck displaying the following message, press the reset button on the mainboard: Rebooting... Now: Please program your cameras!