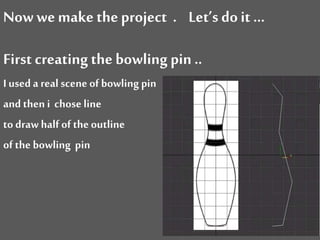
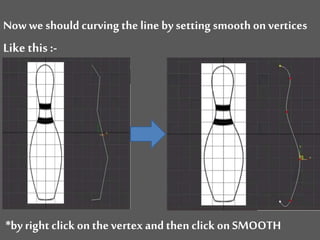
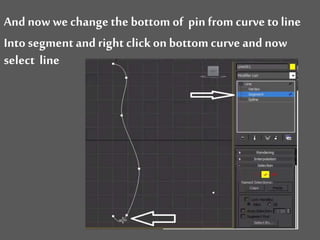
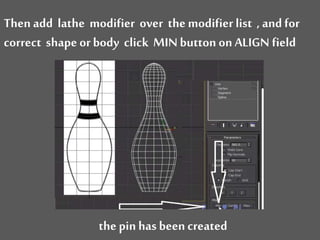
3-Dimentional Graphic
How to create the Bowling Pin
and Ball
By using Autodesk 3Ds MAX 2013
What is 3D ?
Three-dimensional computer graphics (3D
computer graphics, in contrast to 2Dcomputer
graphics) are graphics that use athree-
dimensional representation of geometric data
(often Cartesian) that is stored inthe
computer forthe purposes of performing
calculations and rendering 2D images.
Now wemake theproject . Let’s doit …
First creating the bowling pin ..
I used a real scene of bowling pin
and then i chose line
to draw half of the outline
of the bowling pin
Now we should curving the line by setting smooth on vertices
Like this :-
*by right click on thevertex and then click on SMOOTH
And now we changethe bottom of pin from curve to line
Into segment and right clickon bottom curve and now
select line
Then add lathe modifier over the modifierlist , and for
correct shape or body click MIN button on ALIGN field
the pin has been created
Ok , now we can make bowling ball
At first on the right-top of the screenin the PRIMITIVES
select the
graphic Design
graphic Design

graphic Design

  • 2.
    3-Dimentional Graphic How tocreate the Bowling Pin and Ball By using Autodesk 3Ds MAX 2013
  • 3.
    What is 3D? Three-dimensional computer graphics (3D computer graphics, in contrast to 2Dcomputer graphics) are graphics that use athree- dimensional representation of geometric data (often Cartesian) that is stored inthe computer forthe purposes of performing calculations and rendering 2D images.
  • 4.
    Now wemake theproject. Let’s doit … First creating the bowling pin .. I used a real scene of bowling pin and then i chose line to draw half of the outline of the bowling pin
  • 5.
    Now we shouldcurving the line by setting smooth on vertices Like this :- *by right click on thevertex and then click on SMOOTH
  • 6.
    And now wechangethe bottom of pin from curve to line Into segment and right clickon bottom curve and now select line
  • 7.
    Then add lathemodifier over the modifierlist , and for correct shape or body click MIN button on ALIGN field the pin has been created
  • 8.
    Ok , nowwe can make bowling ball At first on the right-top of the screenin the PRIMITIVES select the

Editor's Notes

  • #2 Darkened picture background with full-color circle (Intermediate) Tip: For best results with the picture overlay on this slide, use a picture that is the same dimensions as the slide: 10” wide and 7.5” high. If the picture is not the same width and height, resize or crop to those dimensions before following the instructions below. To reproduce the background effects on this slide, do the following: On the Home tab, in the Slides group, click Layout, and then click Blank. Right-click the slide and then click Format Background. In the Format Background dialog box, click Fill in the left pane. In the Fill pane, select Picture or texture fill, and then under Insert from, click File. In the Insert Picture dialog box, select a picture, and then click Insert. Also in the Format Background dialog box, click Picture in the left pane, and then do the following in the Picture pane: Click the button next to Recolor, and then under Color Modes, click Grayscale (first option from the left). In the Brightness box, enter -50%. In the Contrast box, enter -60%. On the Insert tab, in the Images group, click Picture. In the Insert Picture dialog box, select the same picture used for the background, and then click Insert. On the Home tab, in the Drawing group, click Shape Effects, point to Soft Edges, and then click 10 Point. Under Picture Tools, on the Format tab, in the Size group, click the down arrow under Crop, click Crop to Shape, and then under Basic Shapes, click Oval (first row, first option from the left). Select the oval. Under Picture Tools, on the Format tab, in the bottom right corner of the Size group, click the Size and Position dialog box launcher. In the Size and Position dialog box, on the Size tab, under Crop from, enter values into the Left, Right, Top, and Bottom boxes to crop the oval as needed.