Step 2. Registration& Sign In
Step 1. Open
downloaded ClassIn
software and click “Sign
Up”
9.
Step 2. Registration& Sign In
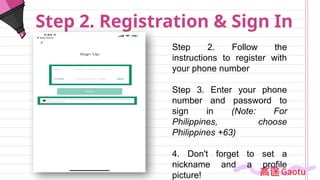
Step 2. Follow the
instructions to register with
your phone number
Step 3. Enter your phone
number and password to
sign in (Note: For
Philippines, choose
Philippines +63)
4. Don't forget to set a
nickname and a profile
picture!
10.
Personal Info
Step 3.BasicSettings
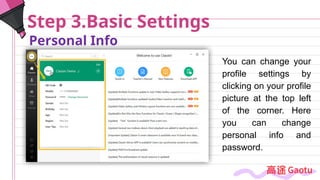
You can change your
profile settings by
clicking on your profile
picture at the top left
of the corner. Here
you can change
personal info and
password.
11.
Step 4. Lesson
Preparation
Uploadlearning resources
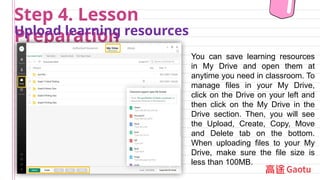
You can save learning resources
in My Drive and open them at
anytime you need in classroom. To
manage files in your My Drive,
click on the Drive on your left and
then click on the My Drive in the
Drive section. Then, you will see
the Upload, Create, Copy, Move
and Delete tab on the bottom.
When uploading files to your My
Drive, make sure the file size is
less than 100MB.
12.
Lesson Preparation Room
PrepareLessons
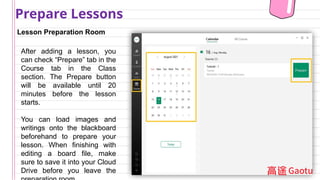
After adding a lesson, you
can check “Prepare” tab in the
Course tab in the Class
section. The Prepare button
will be available until 20
minutes before the lesson
starts.
You can load images and
writings onto the blackboard
beforehand to prepare your
lesson. When finishing with
editing a board file, make
sure to save it into your Cloud
Drive before you leave the
13.
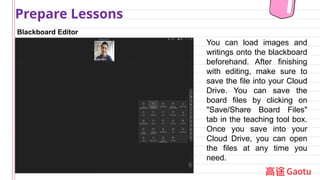
Blackboard Editor
Prepare Lessons
Youcan load images and
writings onto the blackboard
beforehand. After finishing
with editing, make sure to
save the file into your Cloud
Drive. You can save the
board files by clicking on
"Save/Share Board Files"
tab in the teaching tool box.
Once you save into your
Cloud Drive, you can open
the files at any time you
need.
14.
Step 5. Lesson
LessonPreparation
Enter Classroom
The “Enter” tab will
show up 20 minutes
before the lesson
starts. You can click
“enter” tab to enter
into the classroom.
Check your audio
and video settings
and preferences,
and then click
"Enter".
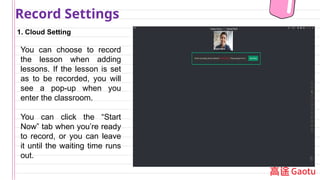
1. Cloud Setting
RecordSettings
You can choose to record
the lesson when adding
lessons. If the lesson is set
as to be recorded, you will
see a pop-up when you
enter the classroom.
You can click the “Start
Now” tab when you’re ready
to record, or you can leave
it until the waiting time runs
out.
17.
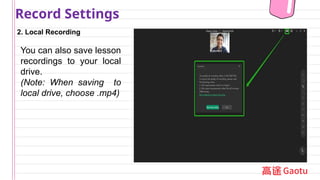
2. Local Recording
RecordSettings
You can also save lesson
recordings to your local
drive.
(Note: When saving to
local drive, choose .mp4)
18.
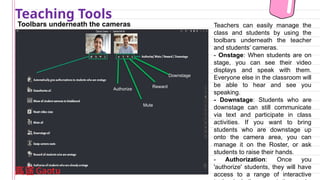
Toolbars underneath thecameras
Teaching Tools
Reward
Authorize
Mute
Downstage
Teachers can easily manage the
class and students by using the
toolbars underneath the teacher
and students’ cameras.
- Onstage: When students are on
stage, you can see their video
displays and speak with them.
Everyone else in the classroom will
be able to hear and see you
speaking.
- Downstage: Students who are
downstage can still communicate
via text and participate in class
activities. If you want to bring
students who are downstage up
onto the camera area, you can
manage it on the Roster, or ask
students to raise their hands.
- Authorization: Once you
'authorize' students, they will have
access to a range of interactive
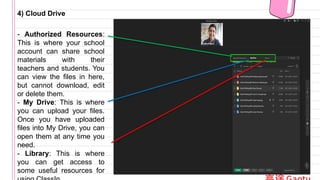
4) Cloud Drive
-Authorized Resources:
This is where your school
account can share school
materials with their
teachers and students. You
can view the files in here,
but cannot download, edit
or delete them.
- My Drive: This is where
you can upload your files.
Once you have uploaded
files into My Drive, you can
open them at any time you
need.
- Library: This is where
you can get access to
some useful resources for
23.
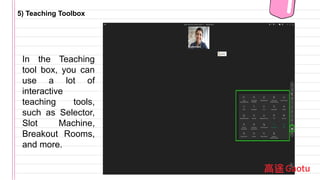
5) Teaching Toolbox
Inthe Teaching
tool box, you can
use a lot of
interactive
teaching tools,
such as Selector,
Slot Machine,
Breakout Rooms,
and more.
24.
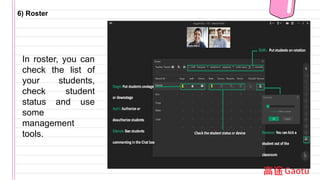
6) Roster
In roster,you can
check the list of
your students,
check student
status and use
some
management
tools.
25.
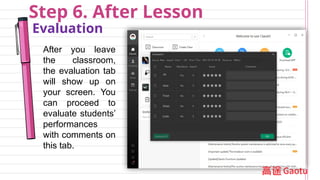
Step 6. AfterLesson
Evaluation
After you leave
the classroom,
the evaluation tab
will show up on
your screen. You
can proceed to
evaluate students’
performances
with comments on
this tab.
26.
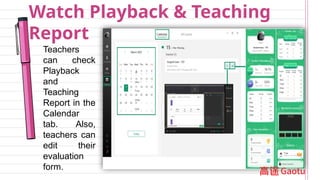
Watch Playback &Teaching
Report
Teachers
can check
Playback
and
Teaching
Report in the
Calendar
tab. Also,
teachers can
edit their
evaluation
form.
27.
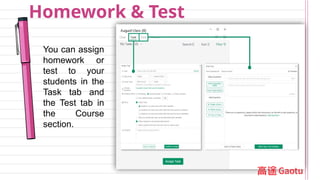
Homework & Test
Youcan assign
homework or
test to your
students in the
Task tab and
the Test tab in
the Course
section.
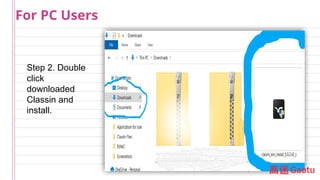
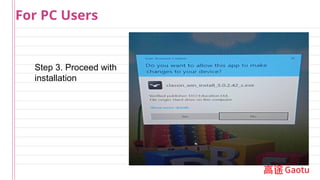
#5 It will be in your downloads folder, double click and install
#6 It will be in your downloads folder, double click and install
#7 It will be in your downloads folder, double click and install
#8 1. Open downloaded ClassIn software and click “Sign Up”
2. Follow the instructions to register with your phone number
3. Enter your phone number and password to sign in
4. Don't forget to set a nickname and a profile picture!
#9 1. Open downloaded ClassIn software and click “Sign Up”
2. Follow the instructions to register with your phone number
3. Enter your phone number and password to sign in
4. Don't forget to set a nickname and a profile picture!
#10 You can change your profile settings by clicking on your profile picture at the top left of the corner. Here you can change personal info and password.
#11 You can save learning resources in My Drive and open them at anytime you need in classroom. To manage files in your My Drive, click on the Drive on your left and then click on the My Drive in the Drive section. Then, you will see the Upload, Create, Copy, Move and Delete tab on the bottom. When uploading files to your My Drive, make sure the file size is less than 100MB.
#12 After adding a lesson, you can check “Prepare” tab in the Course tab in the Class section. The Prepare button will be available until 20 minutes before the lesson starts.
You can load images and writings onto the blackboard beforehand to prepare your lesson. When finishing with editing a board file, make sure to save it into your Cloud Drive before you leave the preparation room.
#13 You can load images and writings onto the blackboard beforehand. After finishing with editing, make sure to save the file into your Cloud Drive. You can save the board files by clicking on "Save/Share Board Files" tab in the teaching tool box. Once you save into your Cloud Drive, you can open the files at any time you need.
#14 The “Enter” tab will show up 20 minutes before the lesson starts. You can click “enter” tab to enter into the classroom. Check your audio and video settings and preferences, and then click "Enter".
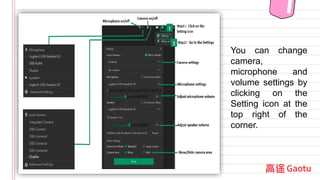
#15 You can change camera, microphone and volume settings by clicking on the Setting icon at the top right of the corner.
#16 You can choose to record the lesson when adding lessons. If the lesson is set as to be recorded, you will see a pop-up when you enter the classroom.
You can click the “Start Now” tab when you’re ready to record, or you can leave it until the waiting time runs out.
#17 You can also save lesson recordings to your local drive.
#18 Teachers can easily manage the class and students by using the toolbars underneath the teacher and students’ cameras.
※ Tips!
- Onstage: When students are on stage, you can see their video displays and speak with them. Everyone else in the classroom will be able to hear and see you speaking.
- Downstage: Students who are downstage can still communicate via text and participate in class activities. If you want to bring students who are downstage up onto the camera area, you can manage it on the Roster, or ask students to raise their hands.
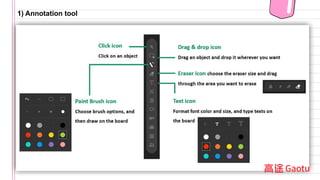
- Authorization: Once you 'authorize' students, they will have access to a range of interactive tools, including annotation tools, the ClassIn cloud drive, and more!
#22 - Authorized Resources: This is where your school account can share school materials with their teachers and students. You can view the files in here, but cannot download, edit or delete them.
- My Drive: This is where you can upload your files. Once you have uploaded files into My Drive, you can open them at any time you need.
- Library: This is where you can get access to some useful resources for using ClassIn.
#23 In the Teaching tool box, you can use a lot of interactive teaching tools, such as Selector, Slot Machine, Breakout Rooms, and more!using ClassIn.
#24 In roster, you can check the list of your students, check student status and use some management tools.
#25 After you leave the classroom, the evaluation tab will show up on your screen. You can proceed to evaluate students’ performances with comments on this tab.
#26 Teachers can check Playback and Teaching Report in the Calendar tab. Also, teachers can edit their evaluation form.
#27 You can assign homework or test to your students in the Task tab and the Test tab in the Course section.