The document outlines the curriculum for a Full Stack Development course offered by Malla Reddy College of Engineering & Technology, detailing course objectives, units of study, recommended textbooks, and expected outcomes for students. Key topics covered include web development basics, front-end and back-end technologies, React.js, Java development, and database management. The document emphasizes the importance of both theoretical knowledge and practical skills in deploying real-time web applications.


![81 | P a g e
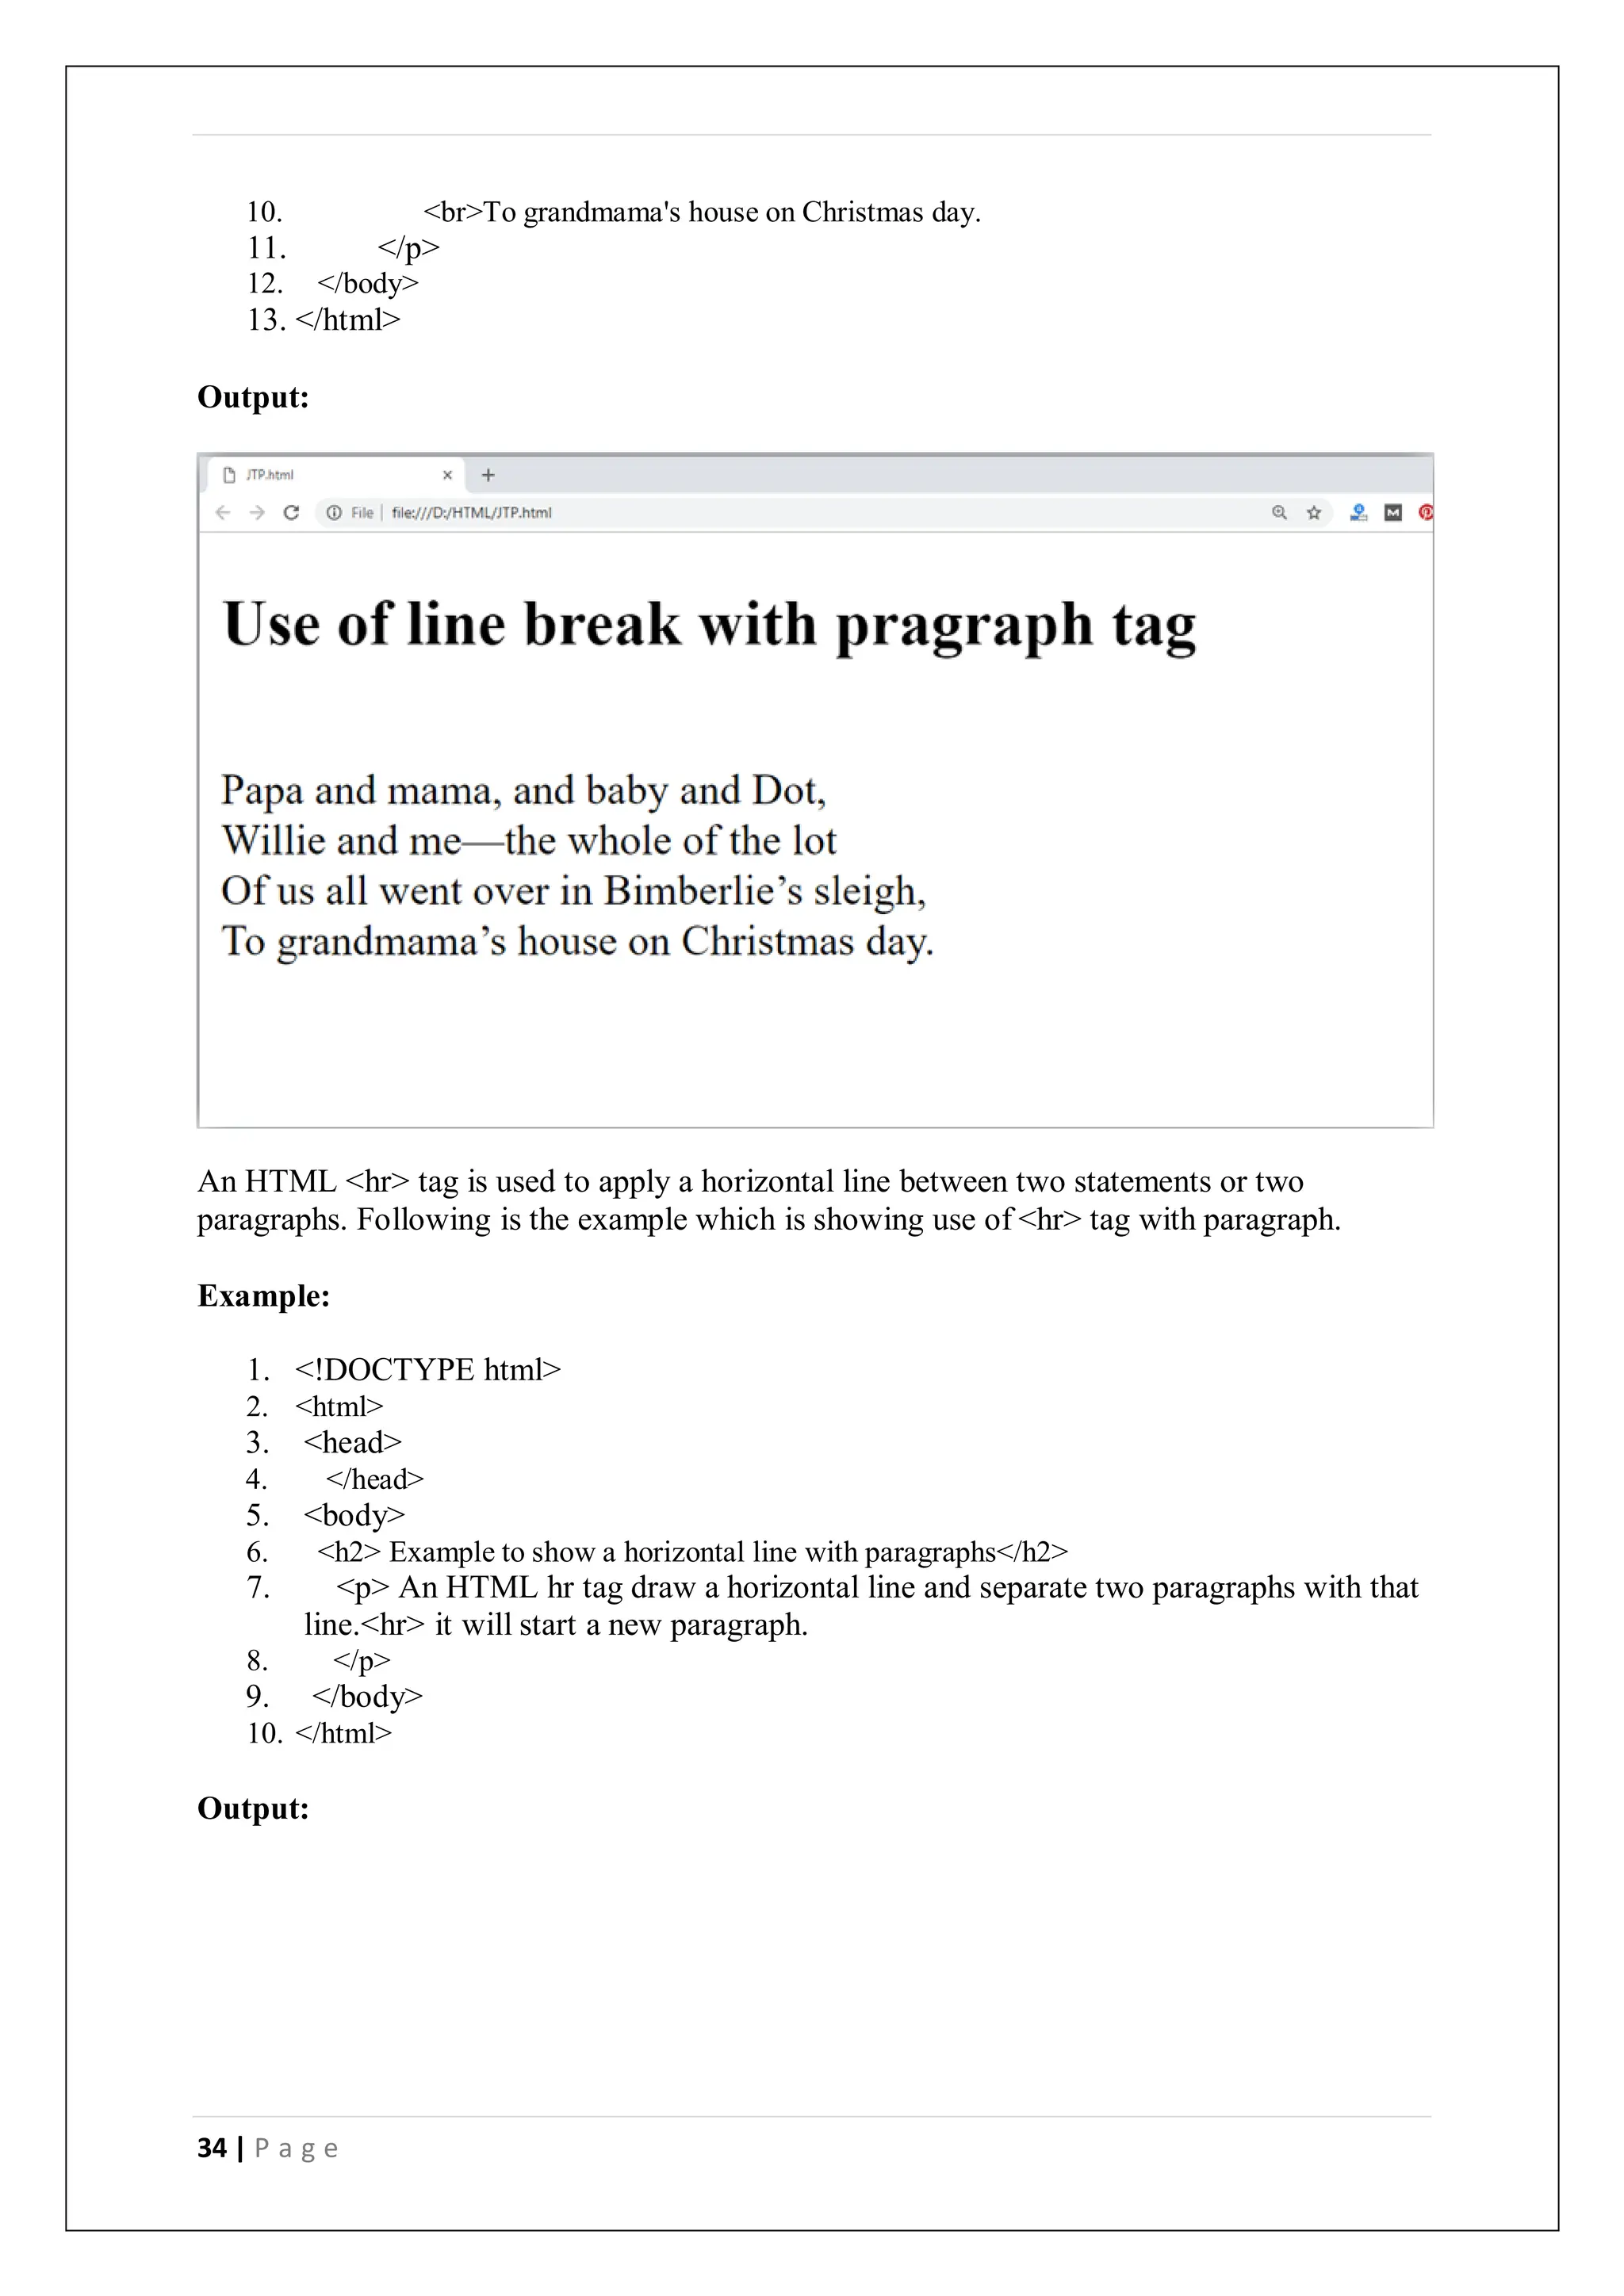
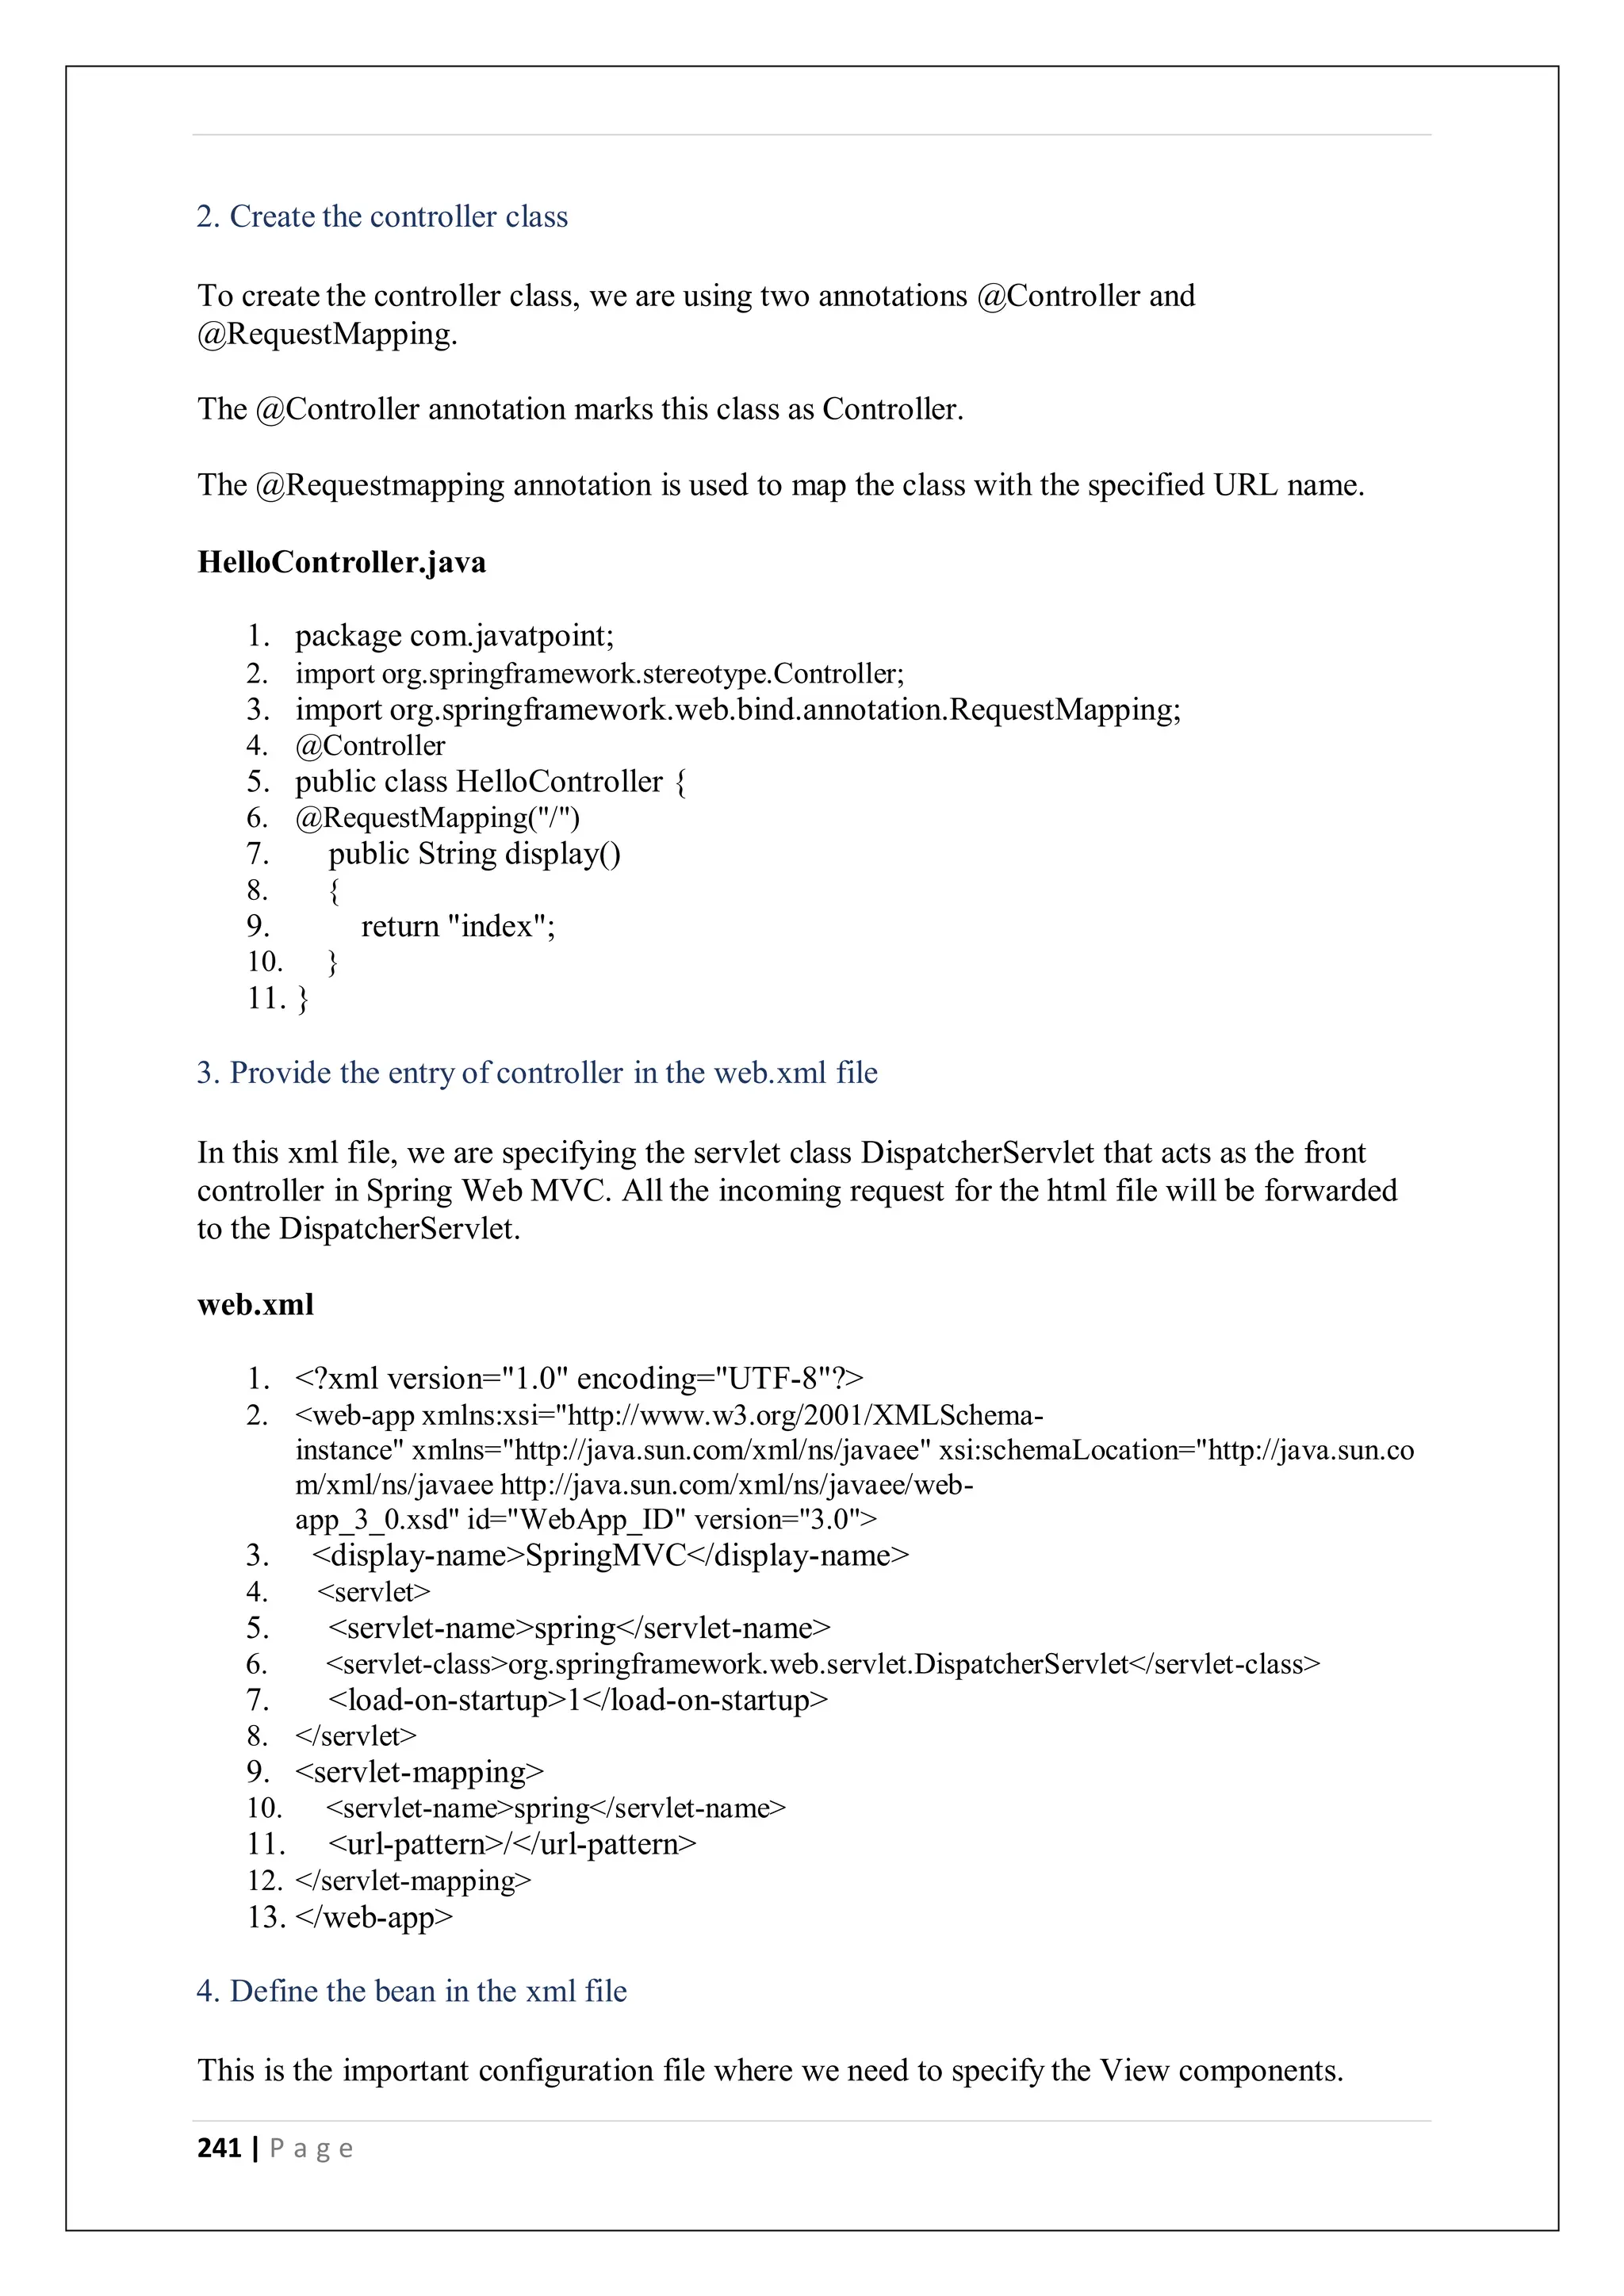
6. <p>Click the button, to hide all elements with the class name "fruit", with JavaScript:</p>
7.
8. <button onclick="myFunction()">Hide elements</button>
9.
10.
11. <h2 class="fruit">Mango</h2>
12. <p>Mango is king of all fruits.</p>
13.13.
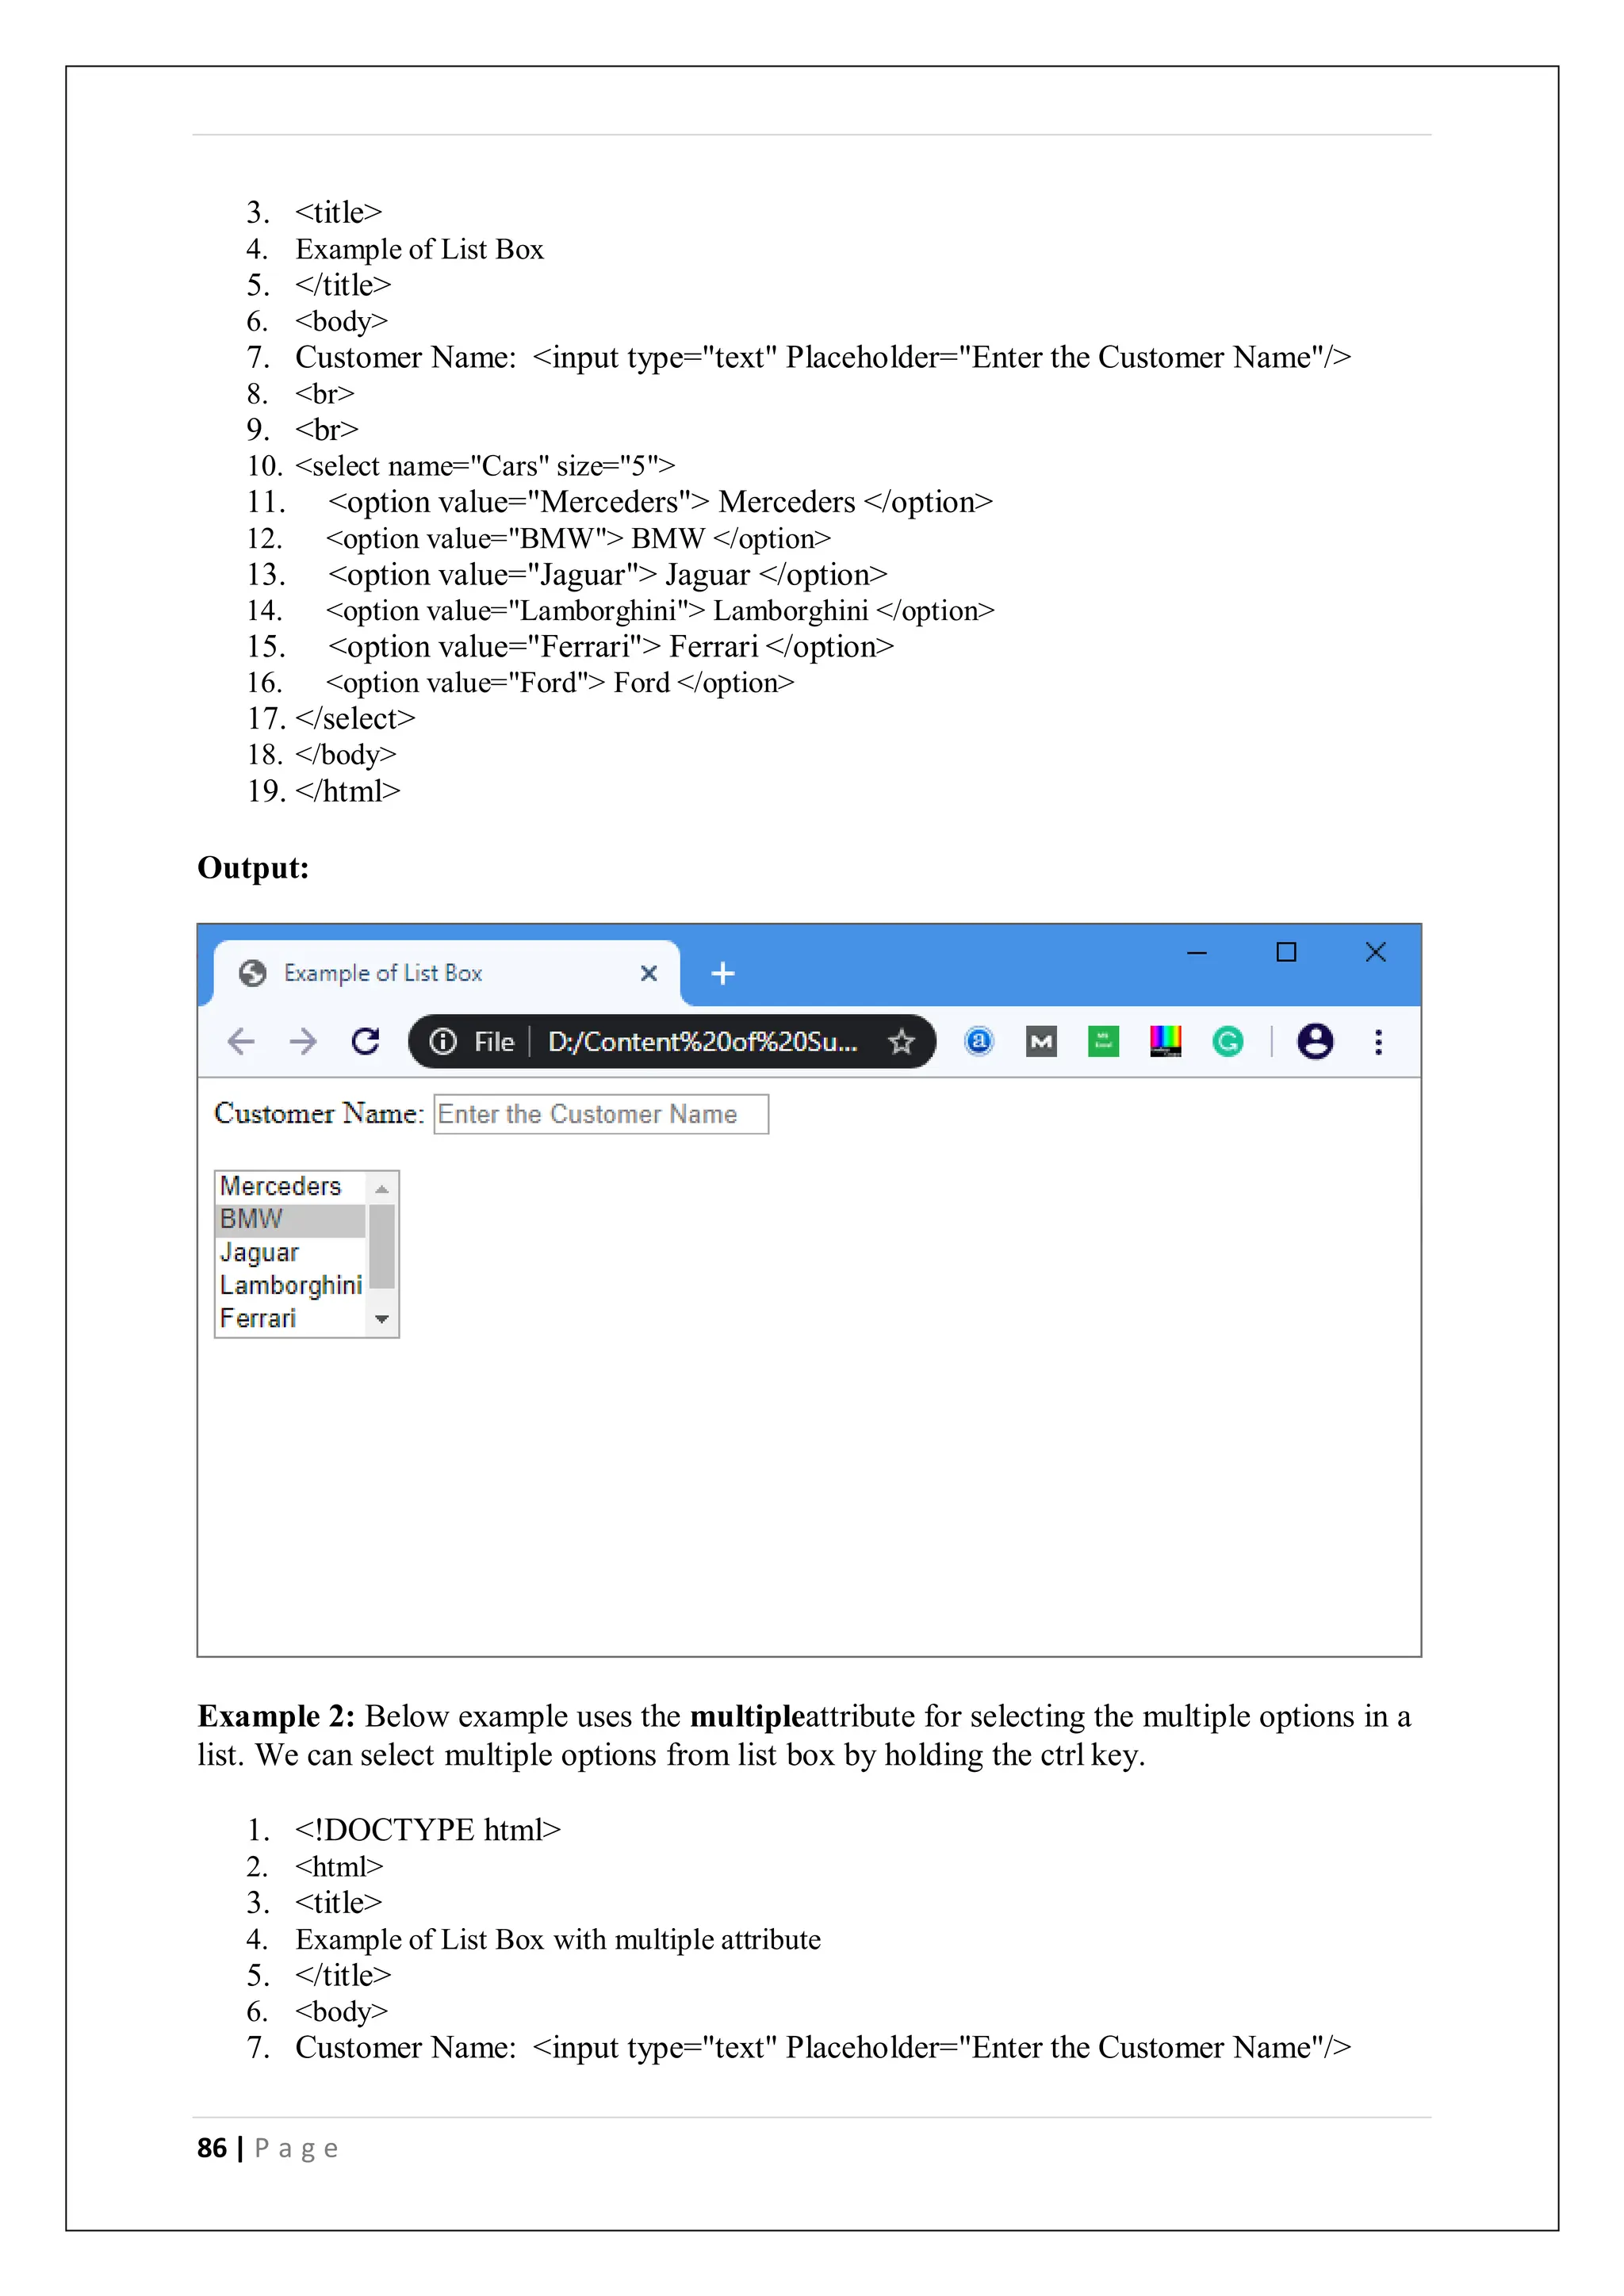
14. <h2 class="fruit">Orange</h2>
15. <p>Oranges are full of Vitamin C.</p>
16.16.
17. <h2 class="fruit">Apple</h2>
18. <p>An apple a day, keeps the Doctor away.</p>
19.19.
20. <script>
21. function myFunction() {
22. var x = document.getElementsByClassName("fruit");
23. for (var i = 0; i < x.length; i++) {
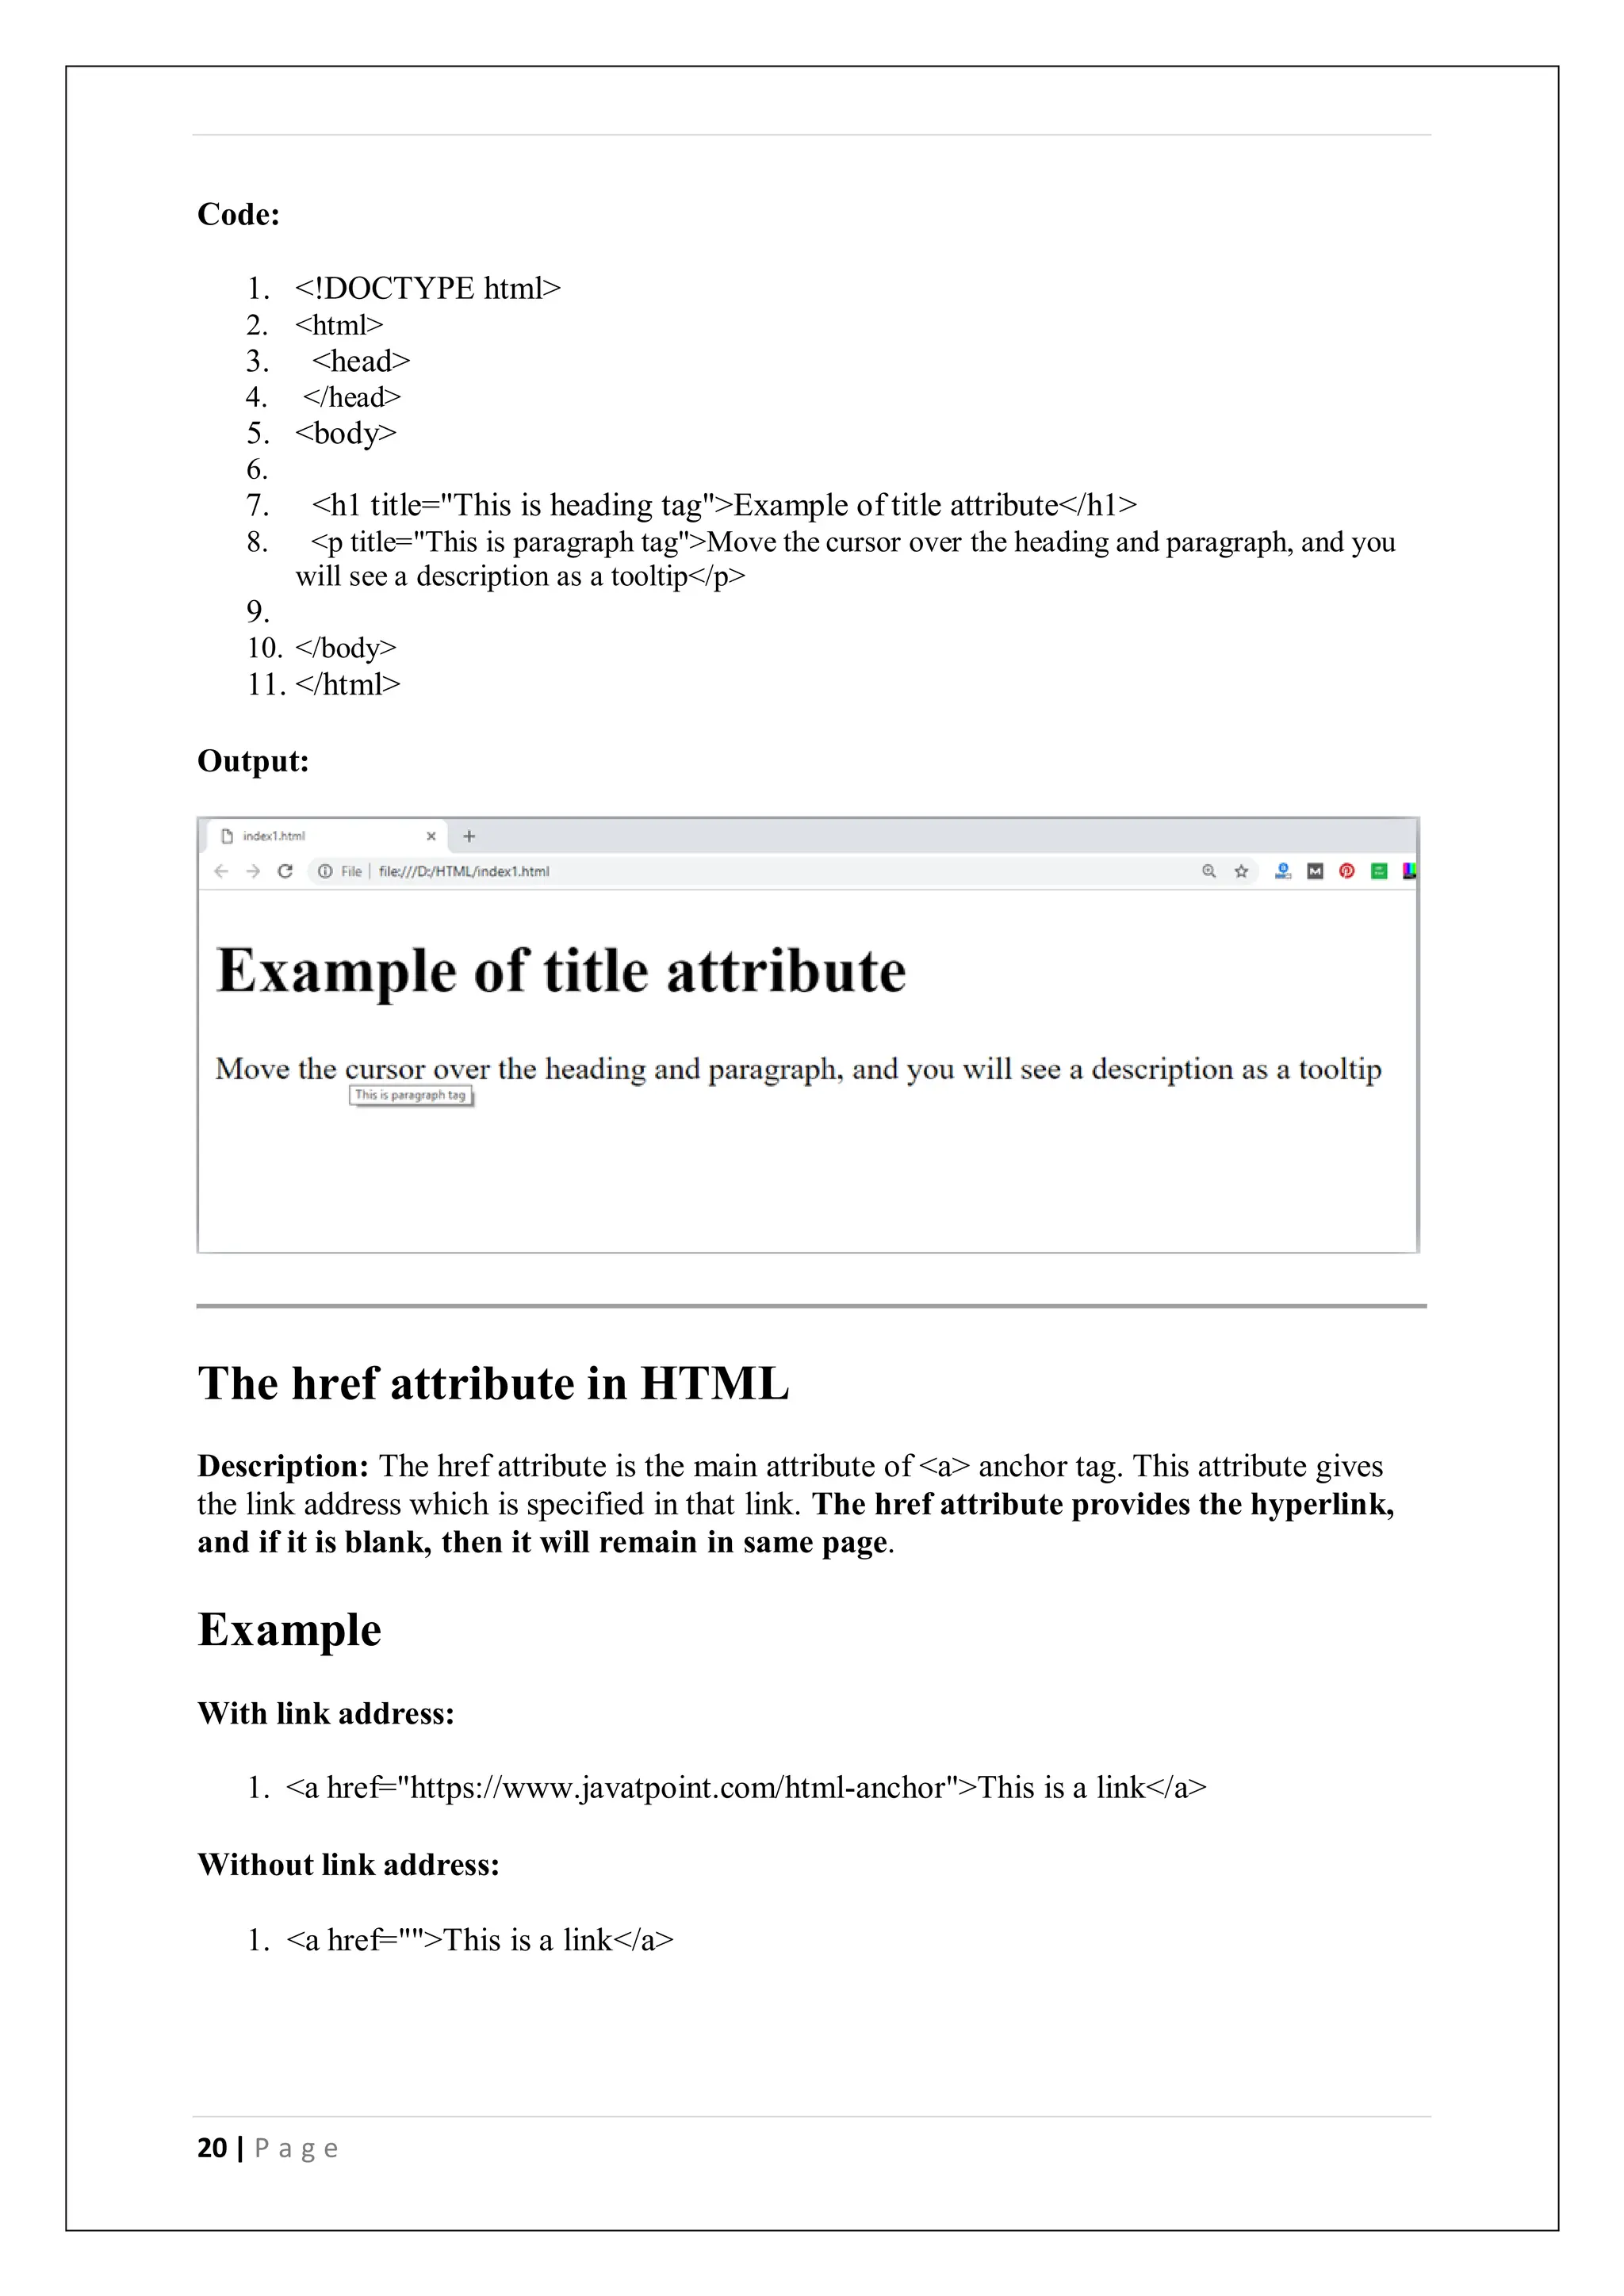
24. x[i].style.display = "none";
25. }
26. }
27. </script>
28.
29. </body>
30. </html>
Note: You will learn more about JavaScript in our JavaScript tutorial.
Multiple Classes
You can use multiple class names (more than one) with HTML elements. These class names
must be separated by a space.
Example:
Let's style elements with class name "fruit" and also with a class name "center".
1. <!DOCTYPE html>
2. <html>
3. <style>
4. .fruit {
5. background-color: orange;
6. color: white;
7. padding: 10px;
8. }
9.
10. .center {
11. text-align: center;
12. }
13. </style>](https://image.slidesharecdn.com/fullstackdevelopment-digitalnotes1-240426061109-24fb79ee/75/Full-Stack-Development-Course-in-Gurgaon-81-2048.jpg)


![91 | P a g e
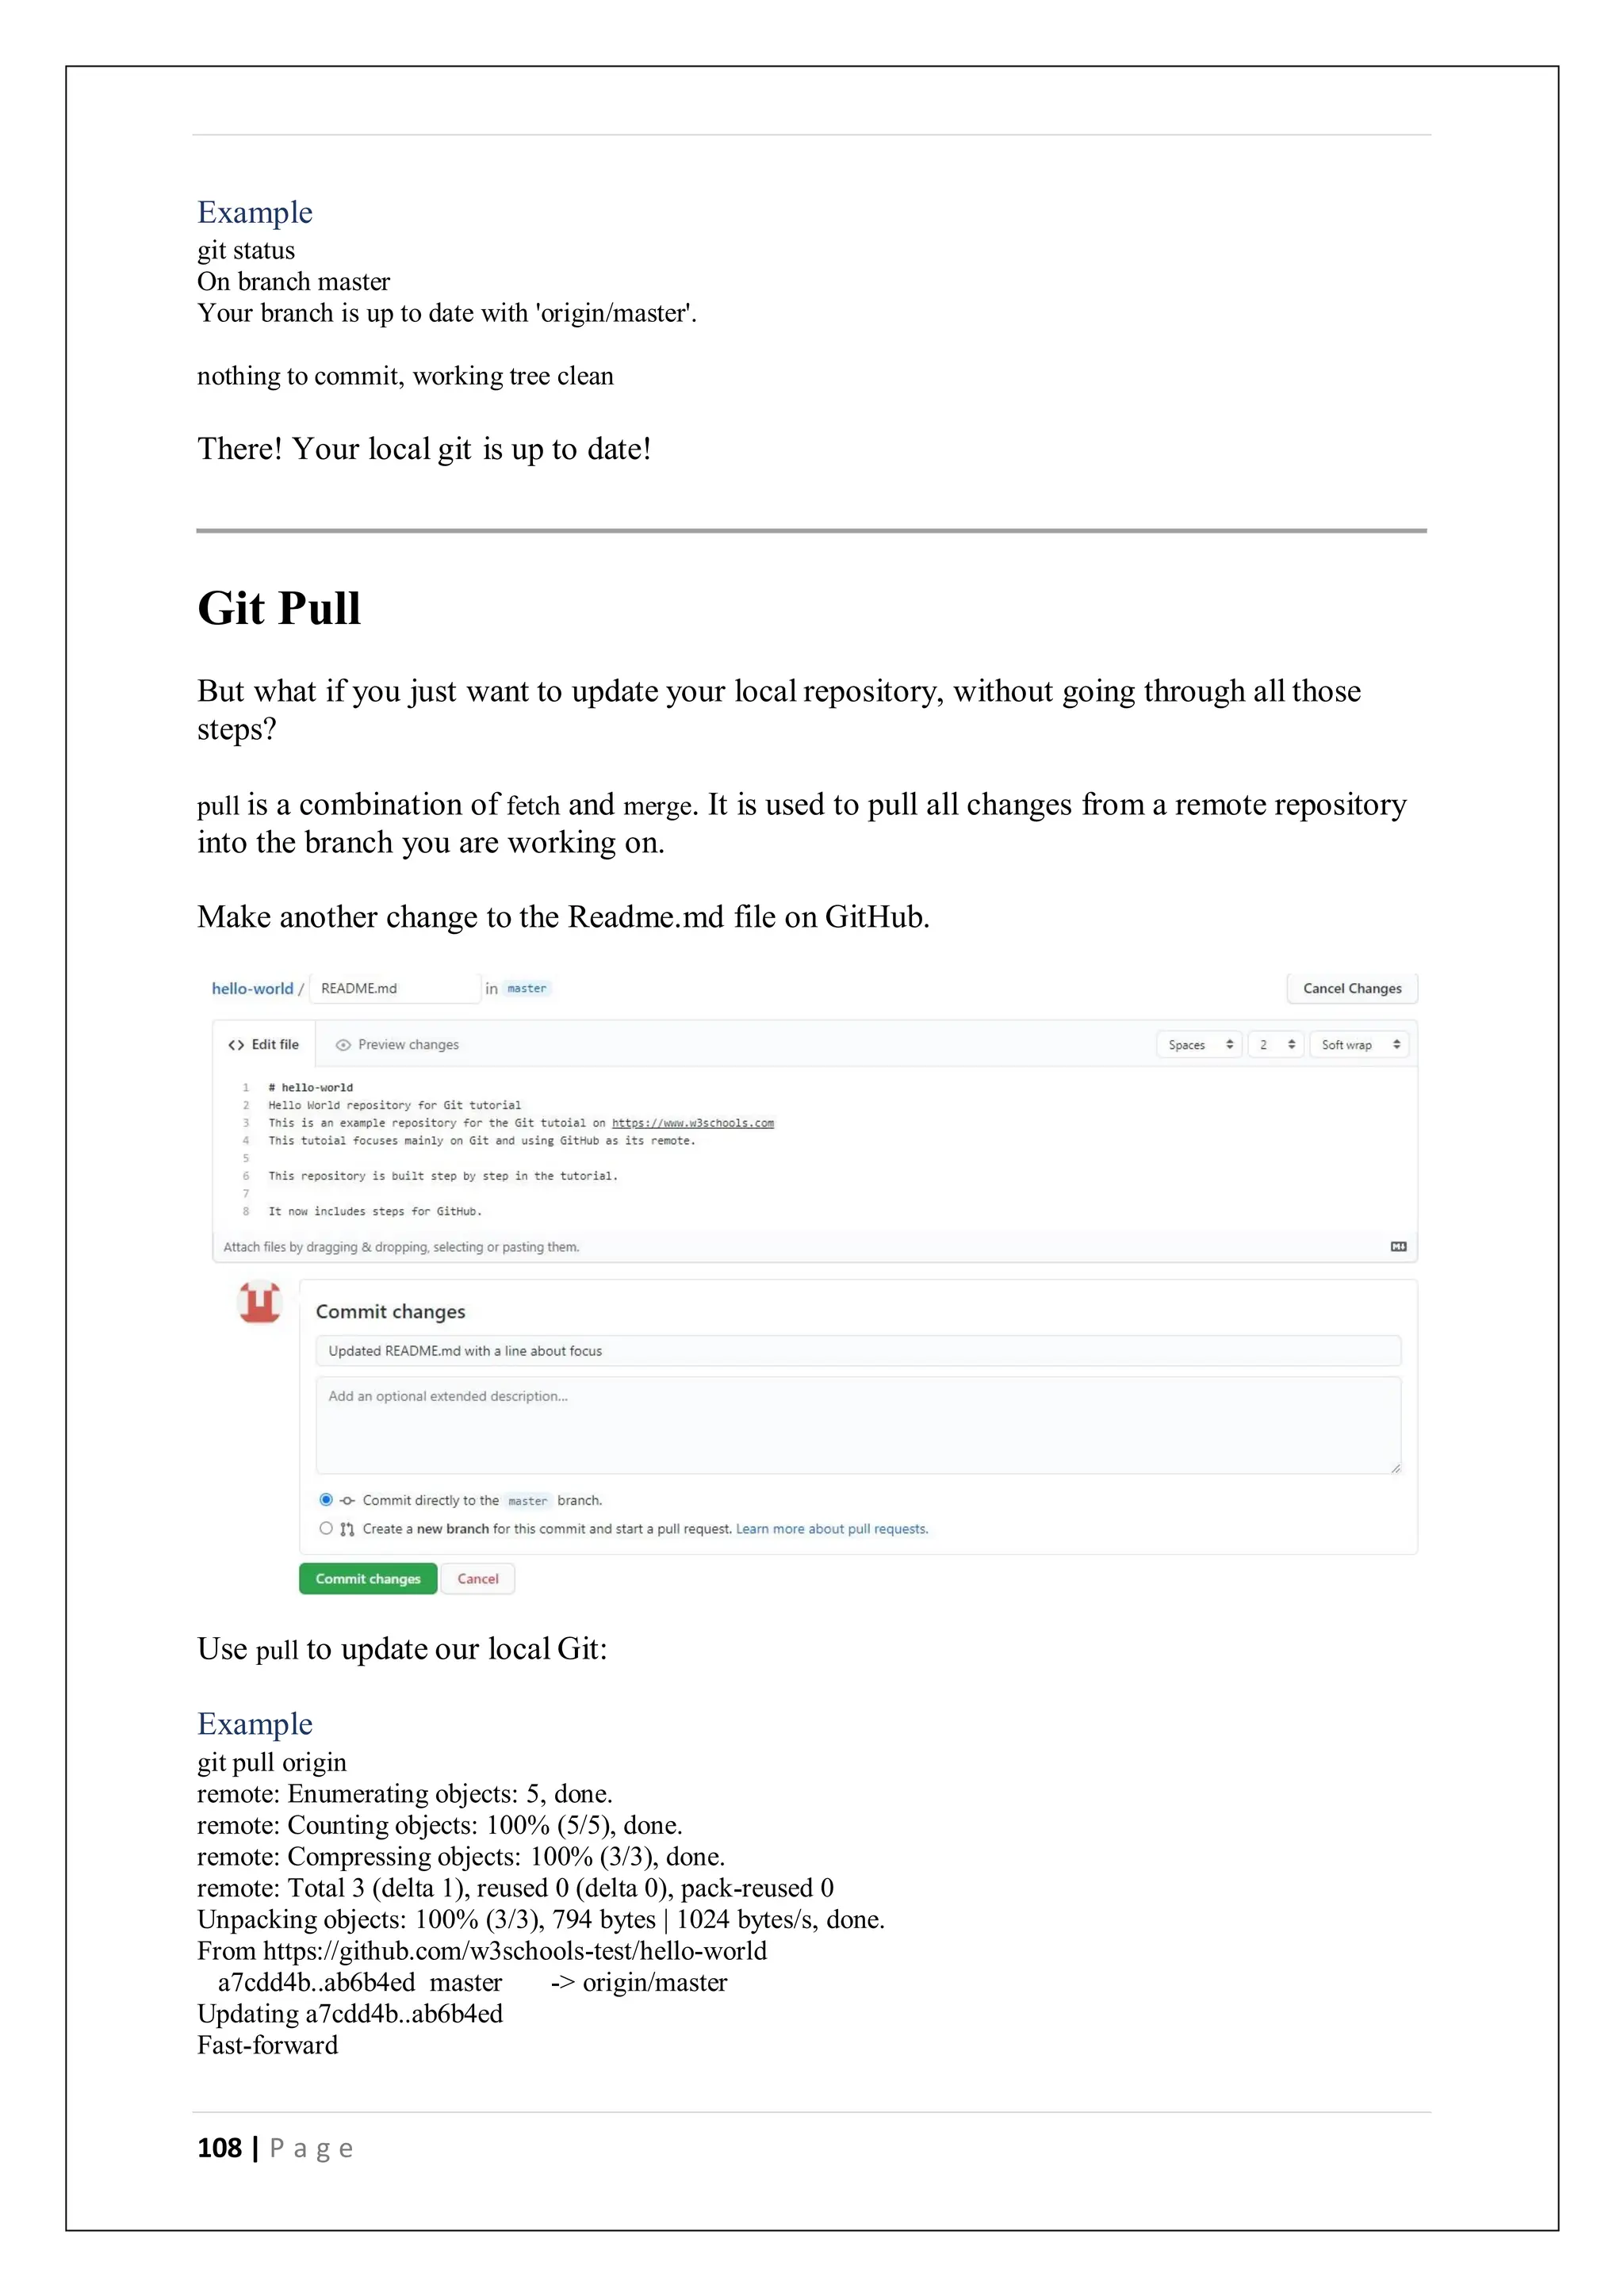
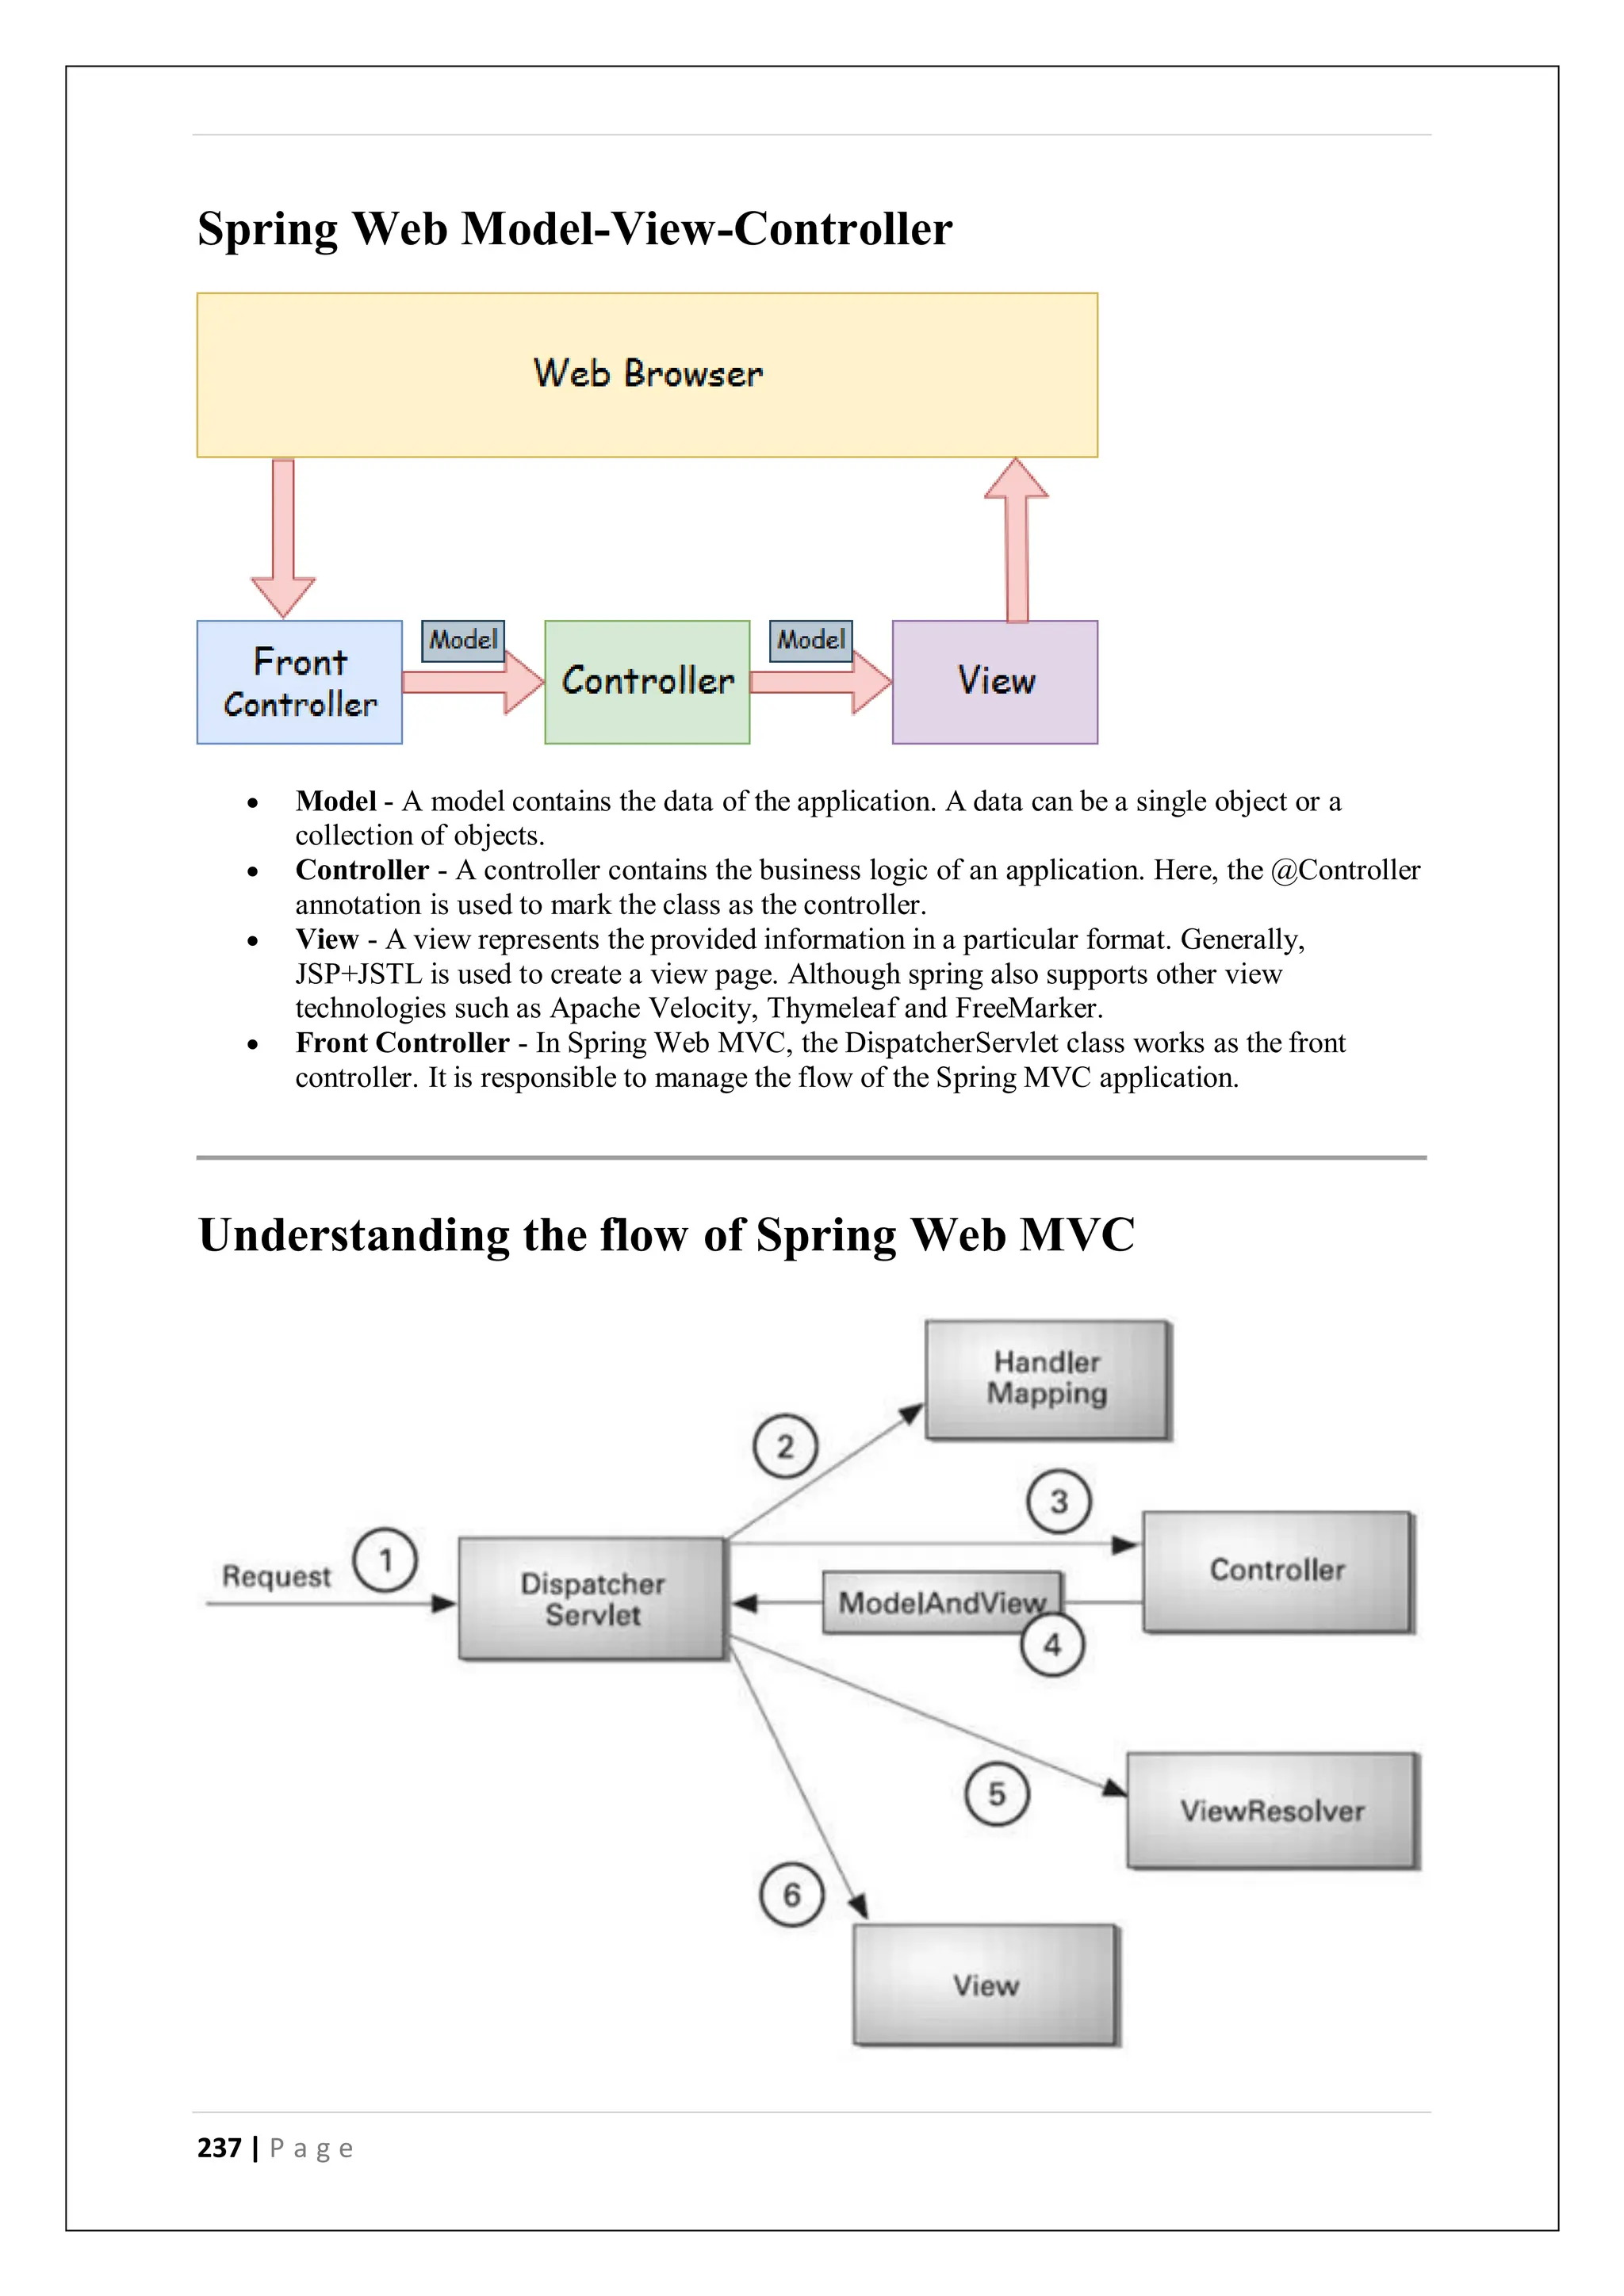
Push Local Repository to GitHub Pages
We add this new repository as a remote for our local repository, we are calling it gh-page (for
GitHub Pages).
Copy the URL from here:
And add it as a new remote:
Example
git remote addgh-page https://github.com/w3schools-test/w3schools-test.github.io.git
Make sure you are on the masterbranch, then push the masterbranch to the new remote:
Example
git push gh-page master
Enumerating objects: 33, done.
Counting objects: 100% (33/33), done.
Delta compression using up to 16 threads
Compressing objects: 100% (33/33), done.
Writing objects: 100% (33/33), 94.79 KiB | 15.80 MiB/s, done.
Total 33 (delta 18), reused 0 (delta 0), pack-reused 0
remote: Resolving deltas: 100% (18/18), done.
To https://github.com/w3schools-test/w3schools-test.github.io.git
* [new branch] master -> master
Note: If this is the first time you are connecting to GitHub, you will get some kind of
notification to authenticate this connection.
Check that the new repository has received all the files:](https://image.slidesharecdn.com/fullstackdevelopment-digitalnotes1-240426061109-24fb79ee/75/Full-Stack-Development-Course-in-Gurgaon-91-2048.jpg)


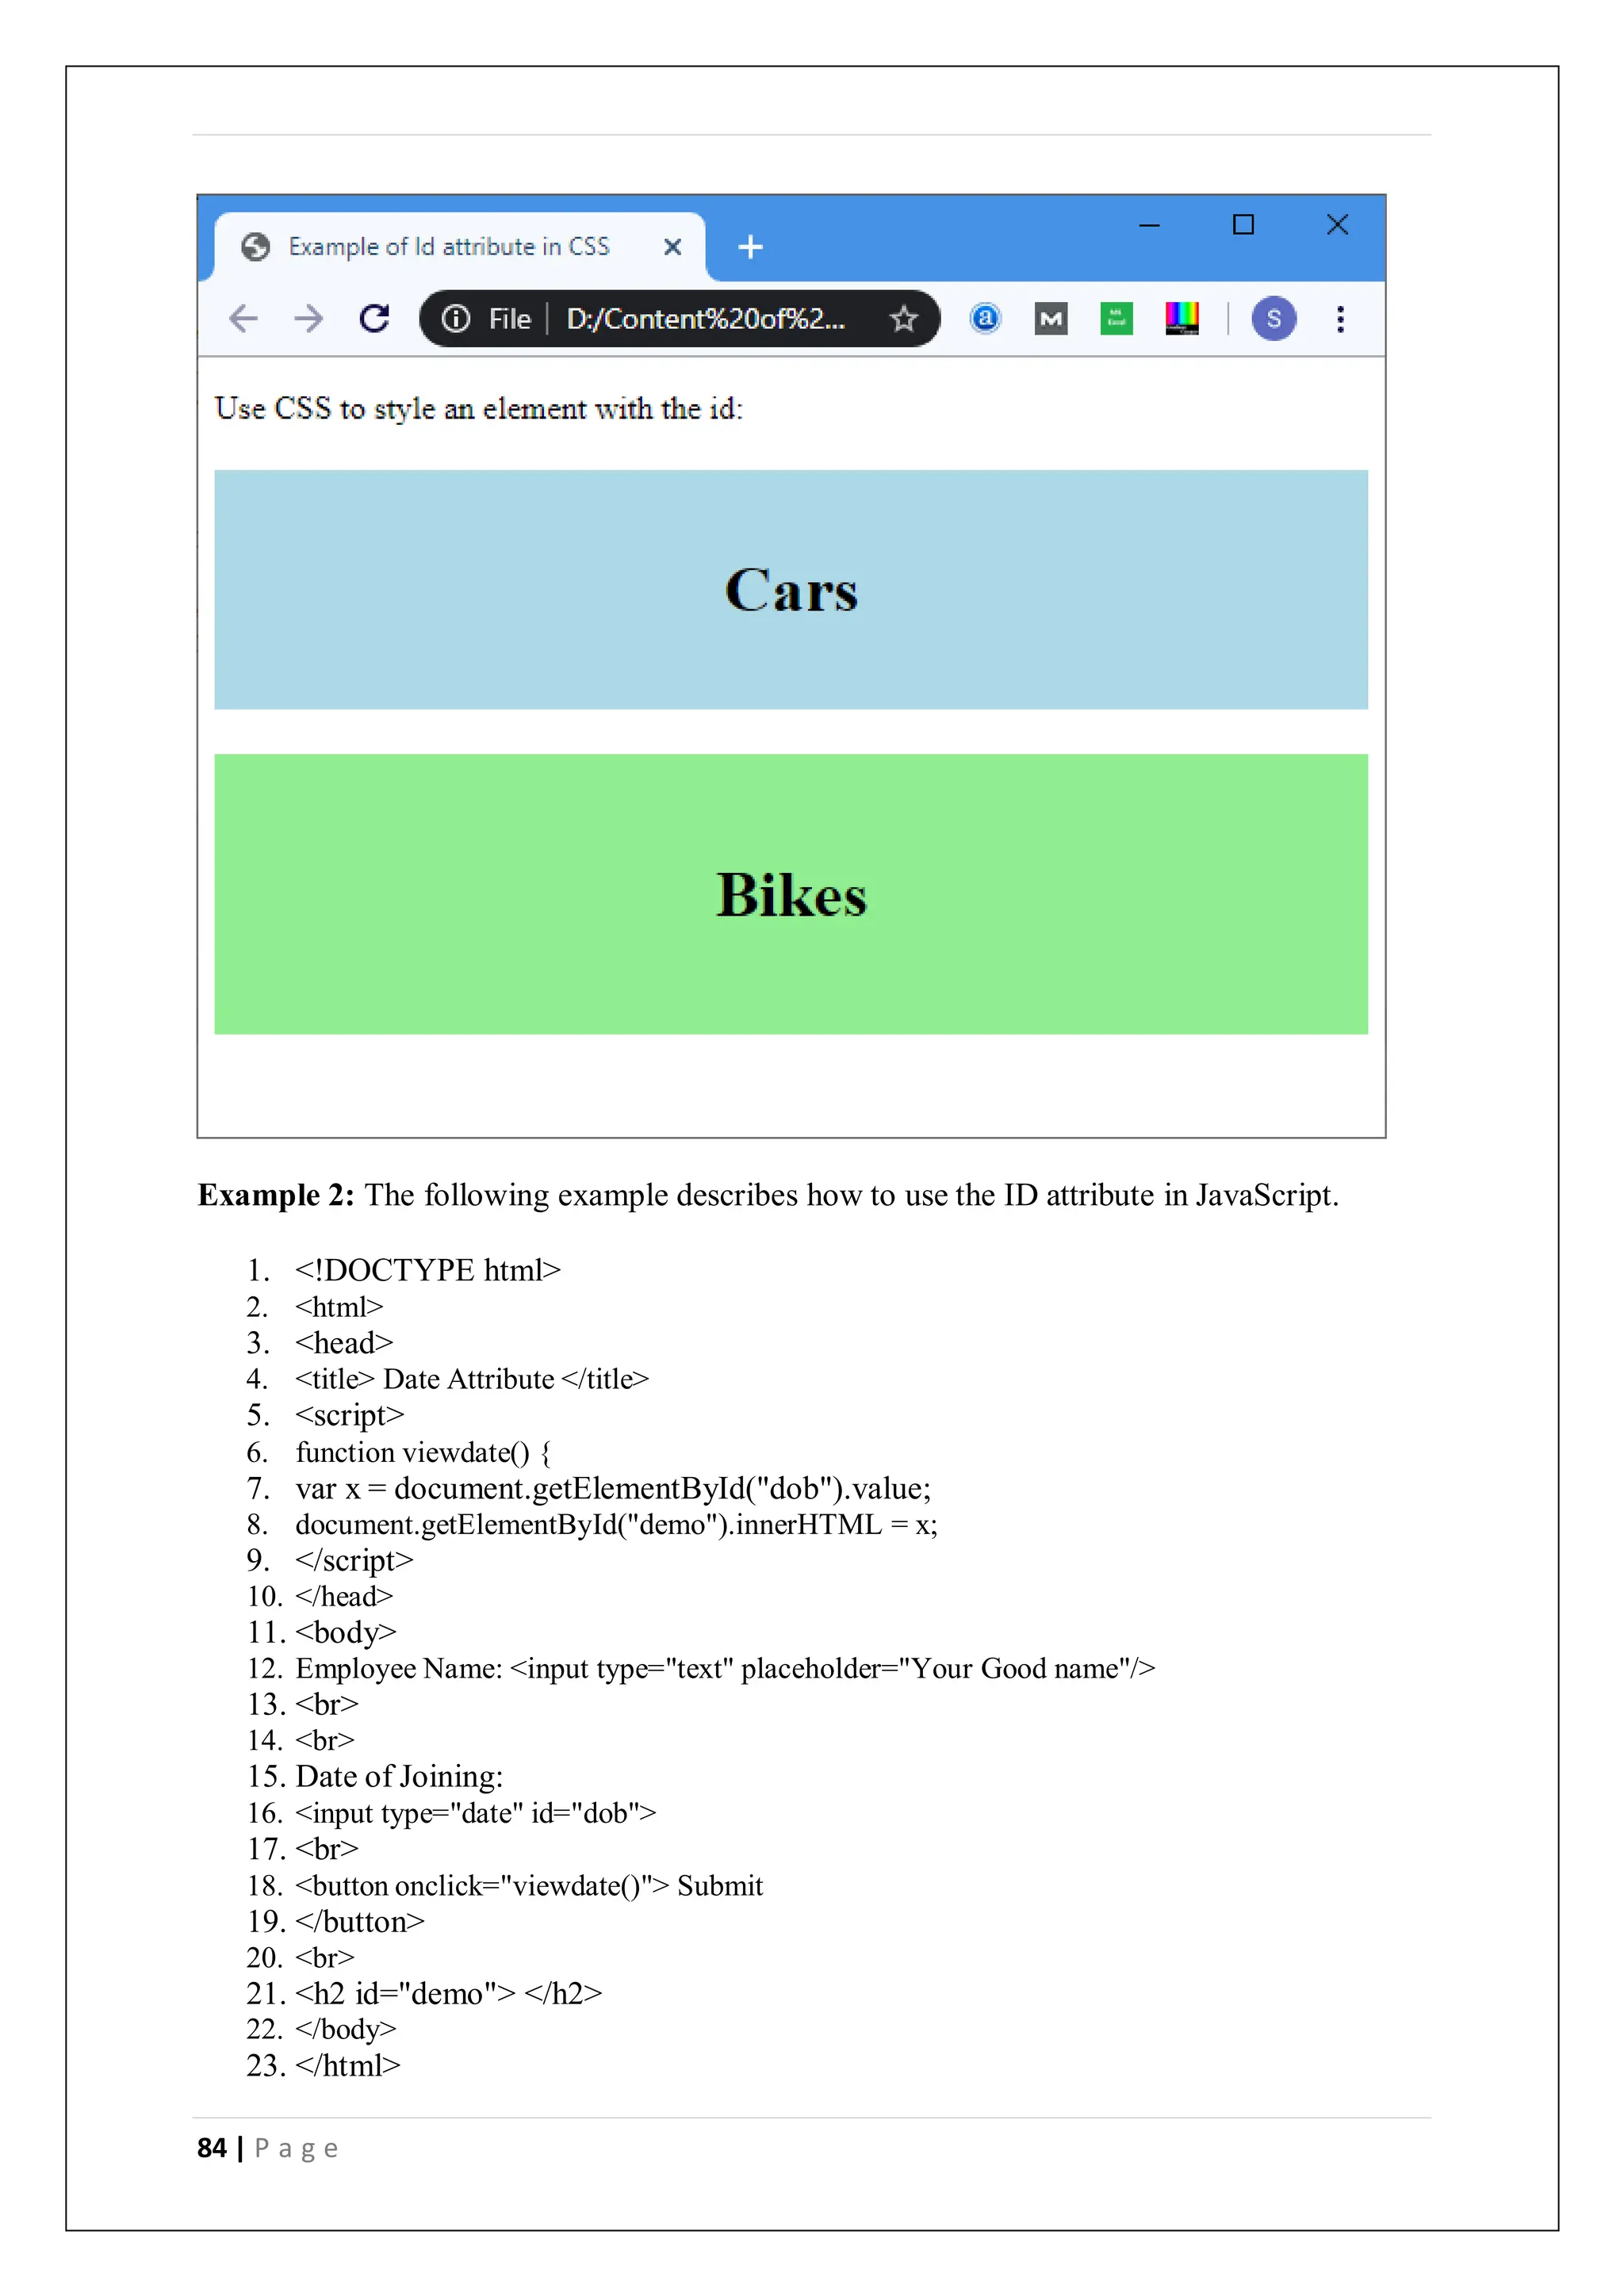
![99 | P a g e
(use "git rm --cached ..." to unstage)
new file: README.md
new file: bluestyle.css
new file: index.html
Now all 3 files are added to the Staging Environment, and we are ready to do our first commit.
Git Commit
Since we have finished our work, we are ready move from stage to commit for our repo.
Adding commits keep track of our progress and changes as we work. Git considers each
commit change point or "save point". It is a point in the project you can go back to if you find
a bug, or want to make a change.
When we commit, we should always include a message.
By adding clear messages to each commit, it is easy for yourself (and others) to see what has
changed and when.
Example
git commit -m "First release of Hello World!"
[master (root-commit) 221ec6e] First release of Hello World!
3 files changed, 26 insertions(+)
create mode 100644 README.md
create mode 100644 bluestyle.css
create mode 100644 index.html
The commit command performs a commit, and the -m "message" adds a message.
The Staging Environment has been committed to our repo, with the message:
"First release of Hello World!"
Git Commit without Stage
Sometimes, when you make small changes, using the staging environment seems like a waste
of time. It is possible to commit changes directly, skipping the staging environment. The -a
option will automatically stage every changed, already tracked file.
Let's add a small update to index.html:
Example
<!DOCTYPE html>
<html>
<head>
<title>Hello World!</title>
<linkrel="stylesheet"href="bluestyle.css">
</head>
<body>](https://image.slidesharecdn.com/fullstackdevelopment-digitalnotes1-240426061109-24fb79ee/75/Full-Stack-Development-Course-in-Gurgaon-99-2048.jpg)
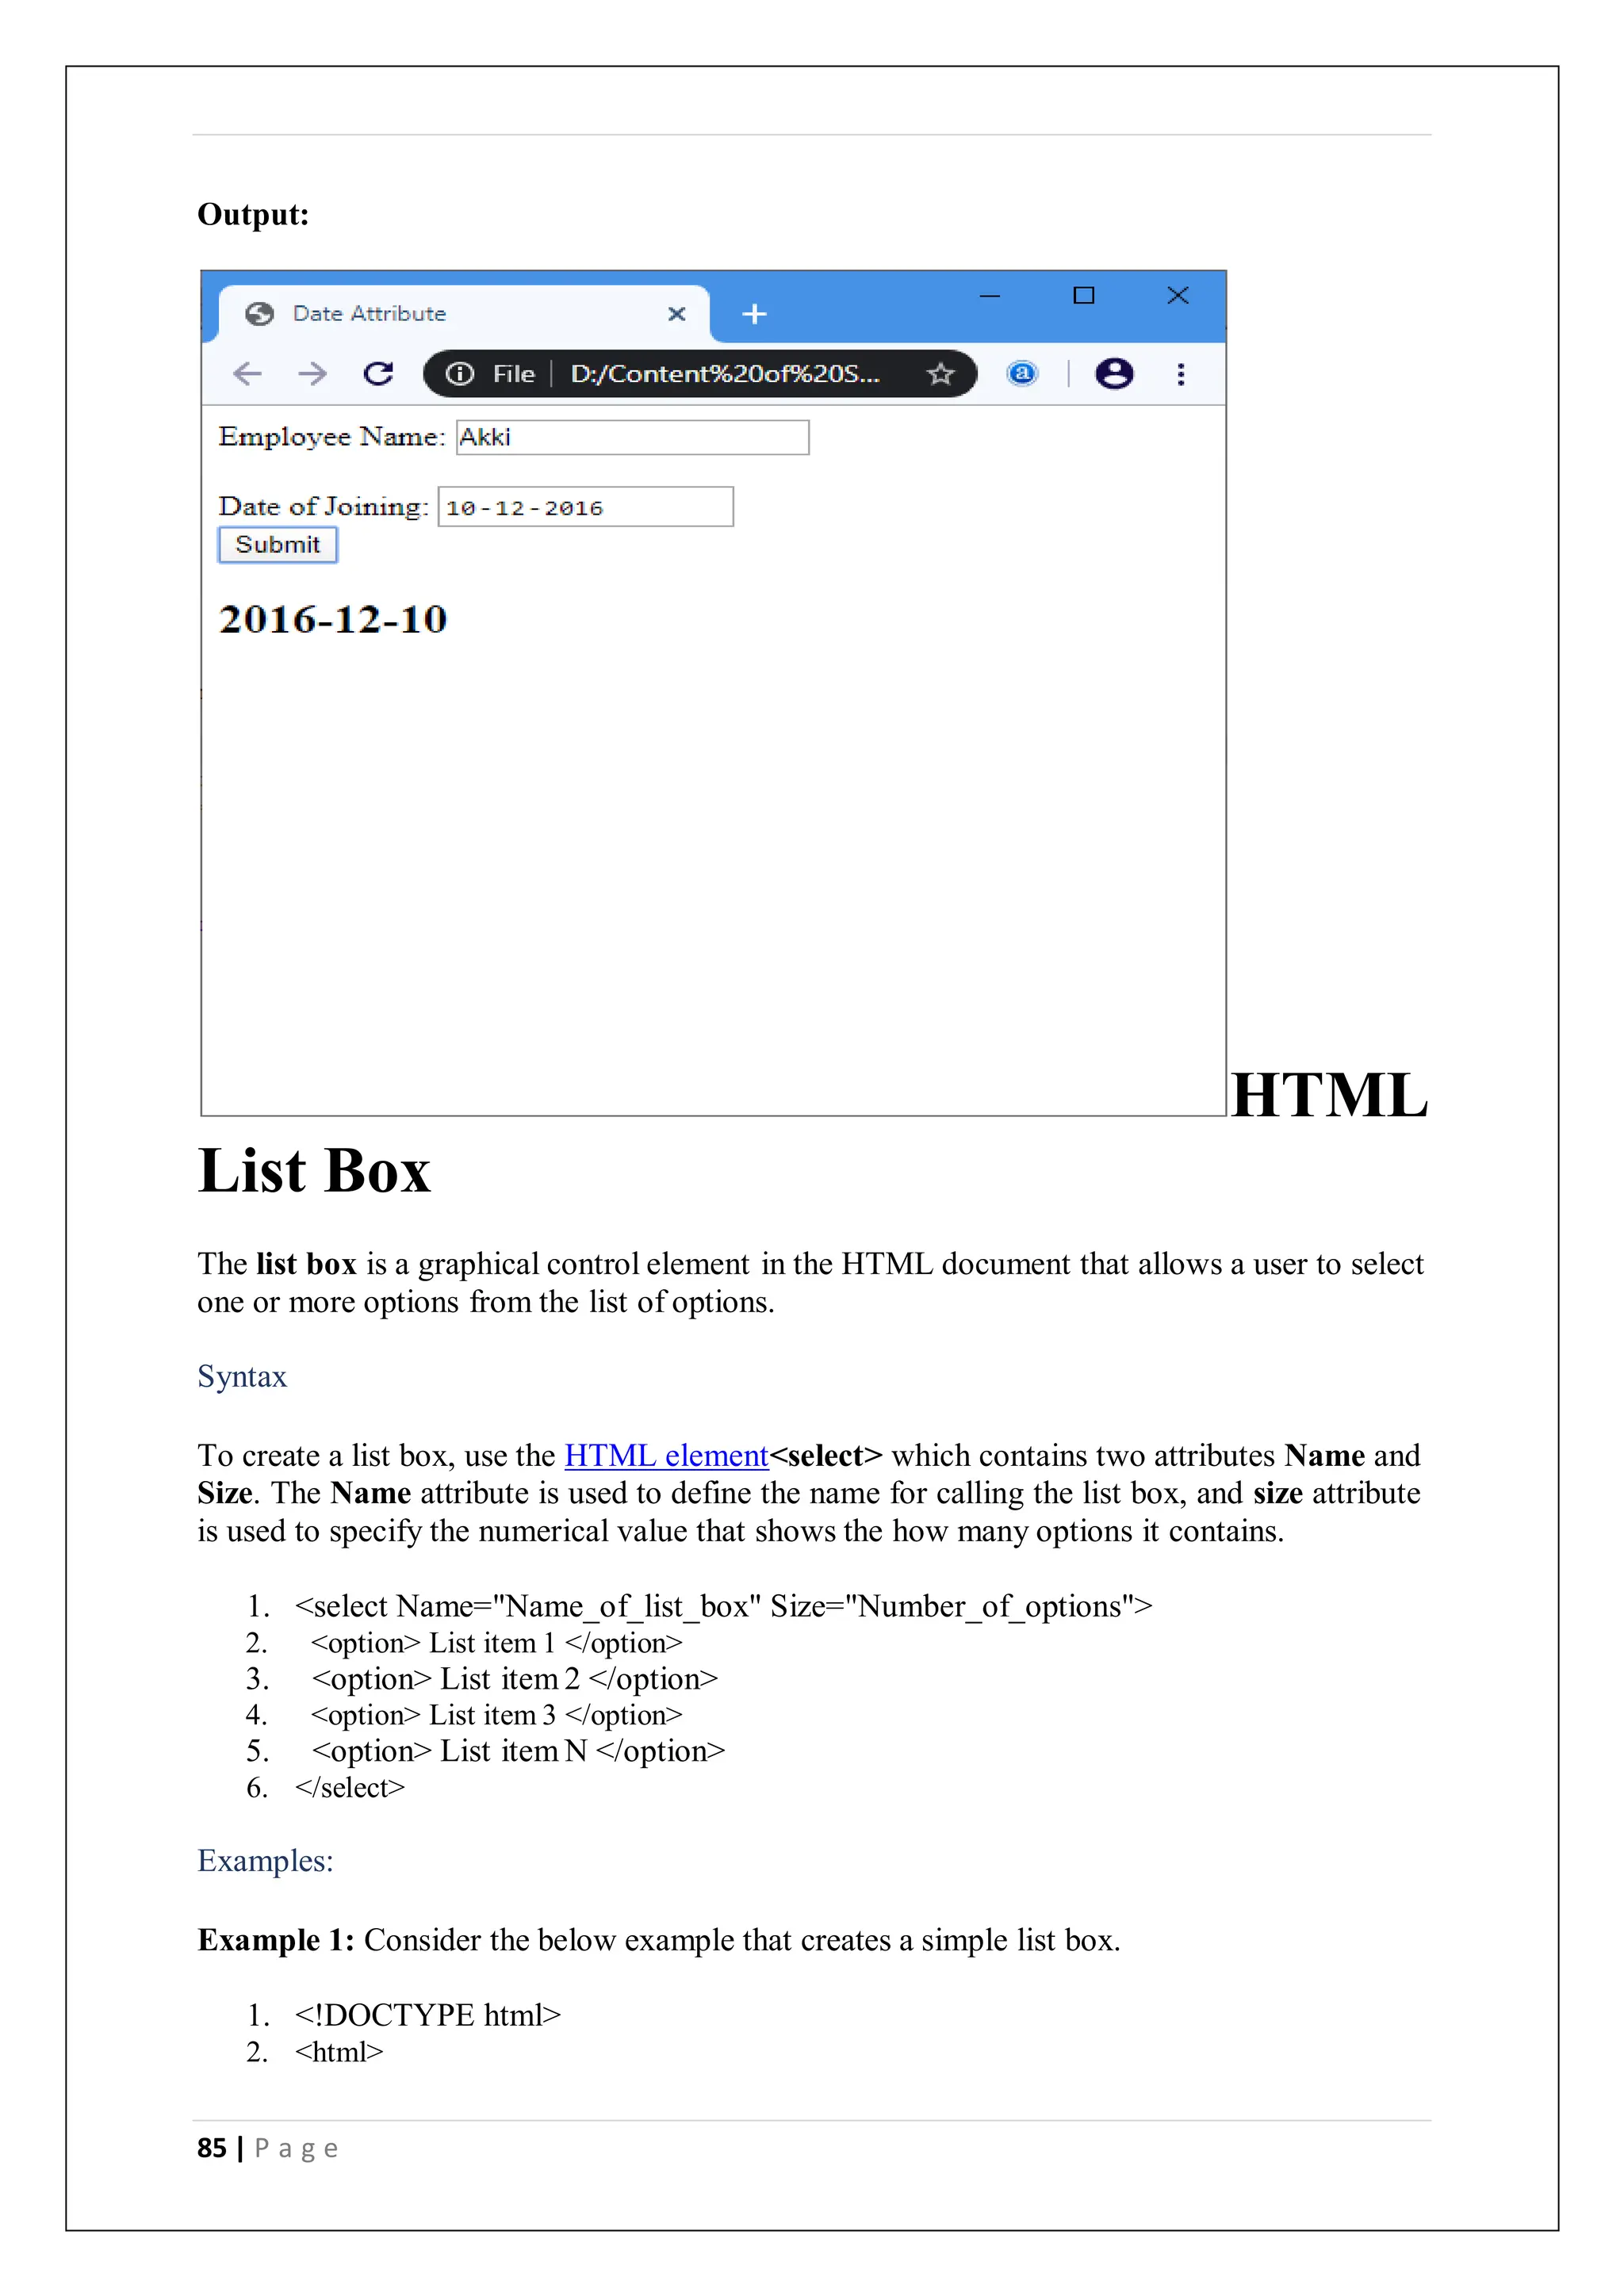
![100 | P a g e
<h1>Hello world!</h1>
<p>This is the first file in my new Git Repo.</p>
<p>A new line in our file!</p>
</body>
</html>
And check the status of our repository. But this time, we will use the --short option to see the
changes in a more compact way:
Example
git status --short
M index.html
Git Help
If you are having trouble remembering commands or options for commands, you can use Git
help.
There are a couple of different ways you can use the help command in command line:
git command -help- See all the available options for the specific command
git help --all- See all possible commands
Let's go over the different commands.
Git -help See Options for a Specific Command
Any time you need some help remembering the specific option for a command, you can use
git command -help:
Example
git commit -help
usage: git commit [] [--] ...
-q, --quiet suppress summary after successful commit
-v, --verbose show diff in commit message template
Commit message options
-F, --file read message from file
--author override author for commit
--date override date for commit
-m, --message
commit message
-c, --reedit-message
reuse and edit message from specified commit
-C, --reuse-message
reuse message from specified commit
--fixup use autosquash formatted message to fixup specified commit](https://image.slidesharecdn.com/fullstackdevelopment-digitalnotes1-240426061109-24fb79ee/75/Full-Stack-Development-Course-in-Gurgaon-100-2048.jpg)
![101 | P a g e
--squash use autosquash formatted message to squash specified commit
--reset-author the commit is authored by me now (used with -C/-c/--amend)
-s, --signoff add a Signed-off-by trailer
-t, --template
use specified template file
-e, --edit force edit of commit
--cleanup how to strip spaces and #comments from message
--status include status in commit message template
-S, --gpg-sign[=]
GPG sign commit
Commit contents options
-a, --all commit all changed files
-i, --include add specified files to index for commit
--interactive interactively add files
-p, --patch interactively add changes
-o, --only commit only specified files
-n, --no-verify bypass pre-commit and commit-msg hooks
--dry-run show what would be committed
--short show status concisely
--branch show branch information
--ahead-behind compute full ahead/behind values
--porcelain machine-readable output
--long show status in long format (default)
-z, --null terminate entries with NUL
--amend amend previous commit
--no-post-rewrite bypass post-rewrite hook
-u, --untracked-files[=]
show untracked files, optional modes: all, normal, no. (Default: all)
--pathspec-from-file
read pathspec from file
--pathspec-file-nul with --pathspec-from-file, pathspec elements are separated with NUL character
Note: You can also use --help instead of -help to open the relevant Git manual page
Git help --all See All Possible Commands
To list all possible commands, use the help --all command:
Warning: This will display a very long list of commands
Example
$ githelp --all
See 'git help ' to read about a specific subcommand
Main Porcelain Commands
add Add file contents to the index
am Apply a series of patches from a mailbox
archive Create an archive of files from a named tree
bisect Use binary search to find the commit that introduced a bug
branch List, create, or delete branches
bundle Move objects and refs by archive
checkout Switch branches or restore working tree files](https://image.slidesharecdn.com/fullstackdevelopment-digitalnotes1-240426061109-24fb79ee/75/Full-Stack-Development-Course-in-Gurgaon-101-2048.jpg)


![109 | P a g e
README.md | 2 ++
1 file changed, 2 insertions(+)
That is how you keep your local Git up to date from a remote repository. In the next chapter,
we will look closer at how push works on GitHub.
Git Push to GitHub
Push Changes to GitHub
Let's try making some changes to our local git and pushing them to GitHub.
Example
<!DOCTYPE html>
<html>
<head>
<title>Hello World!</title>
<link rel="stylesheet" href="bluestyle.css">
</head>
<body>
<h1>Hello world!</h1>
<div><imgsrc="img_hello_world.jpg" alt="Hello World from Space" style="width:100%;max-
width:640px"></div>
<p>This is the first file in my new Git Repo.</p>
<p>This line is here to show how merging works.</p>
<div><imgsrc="img_hello_git.jpg" alt="Hello Git" style="width:100%;max-width:640px"></div>
</body>
</html>
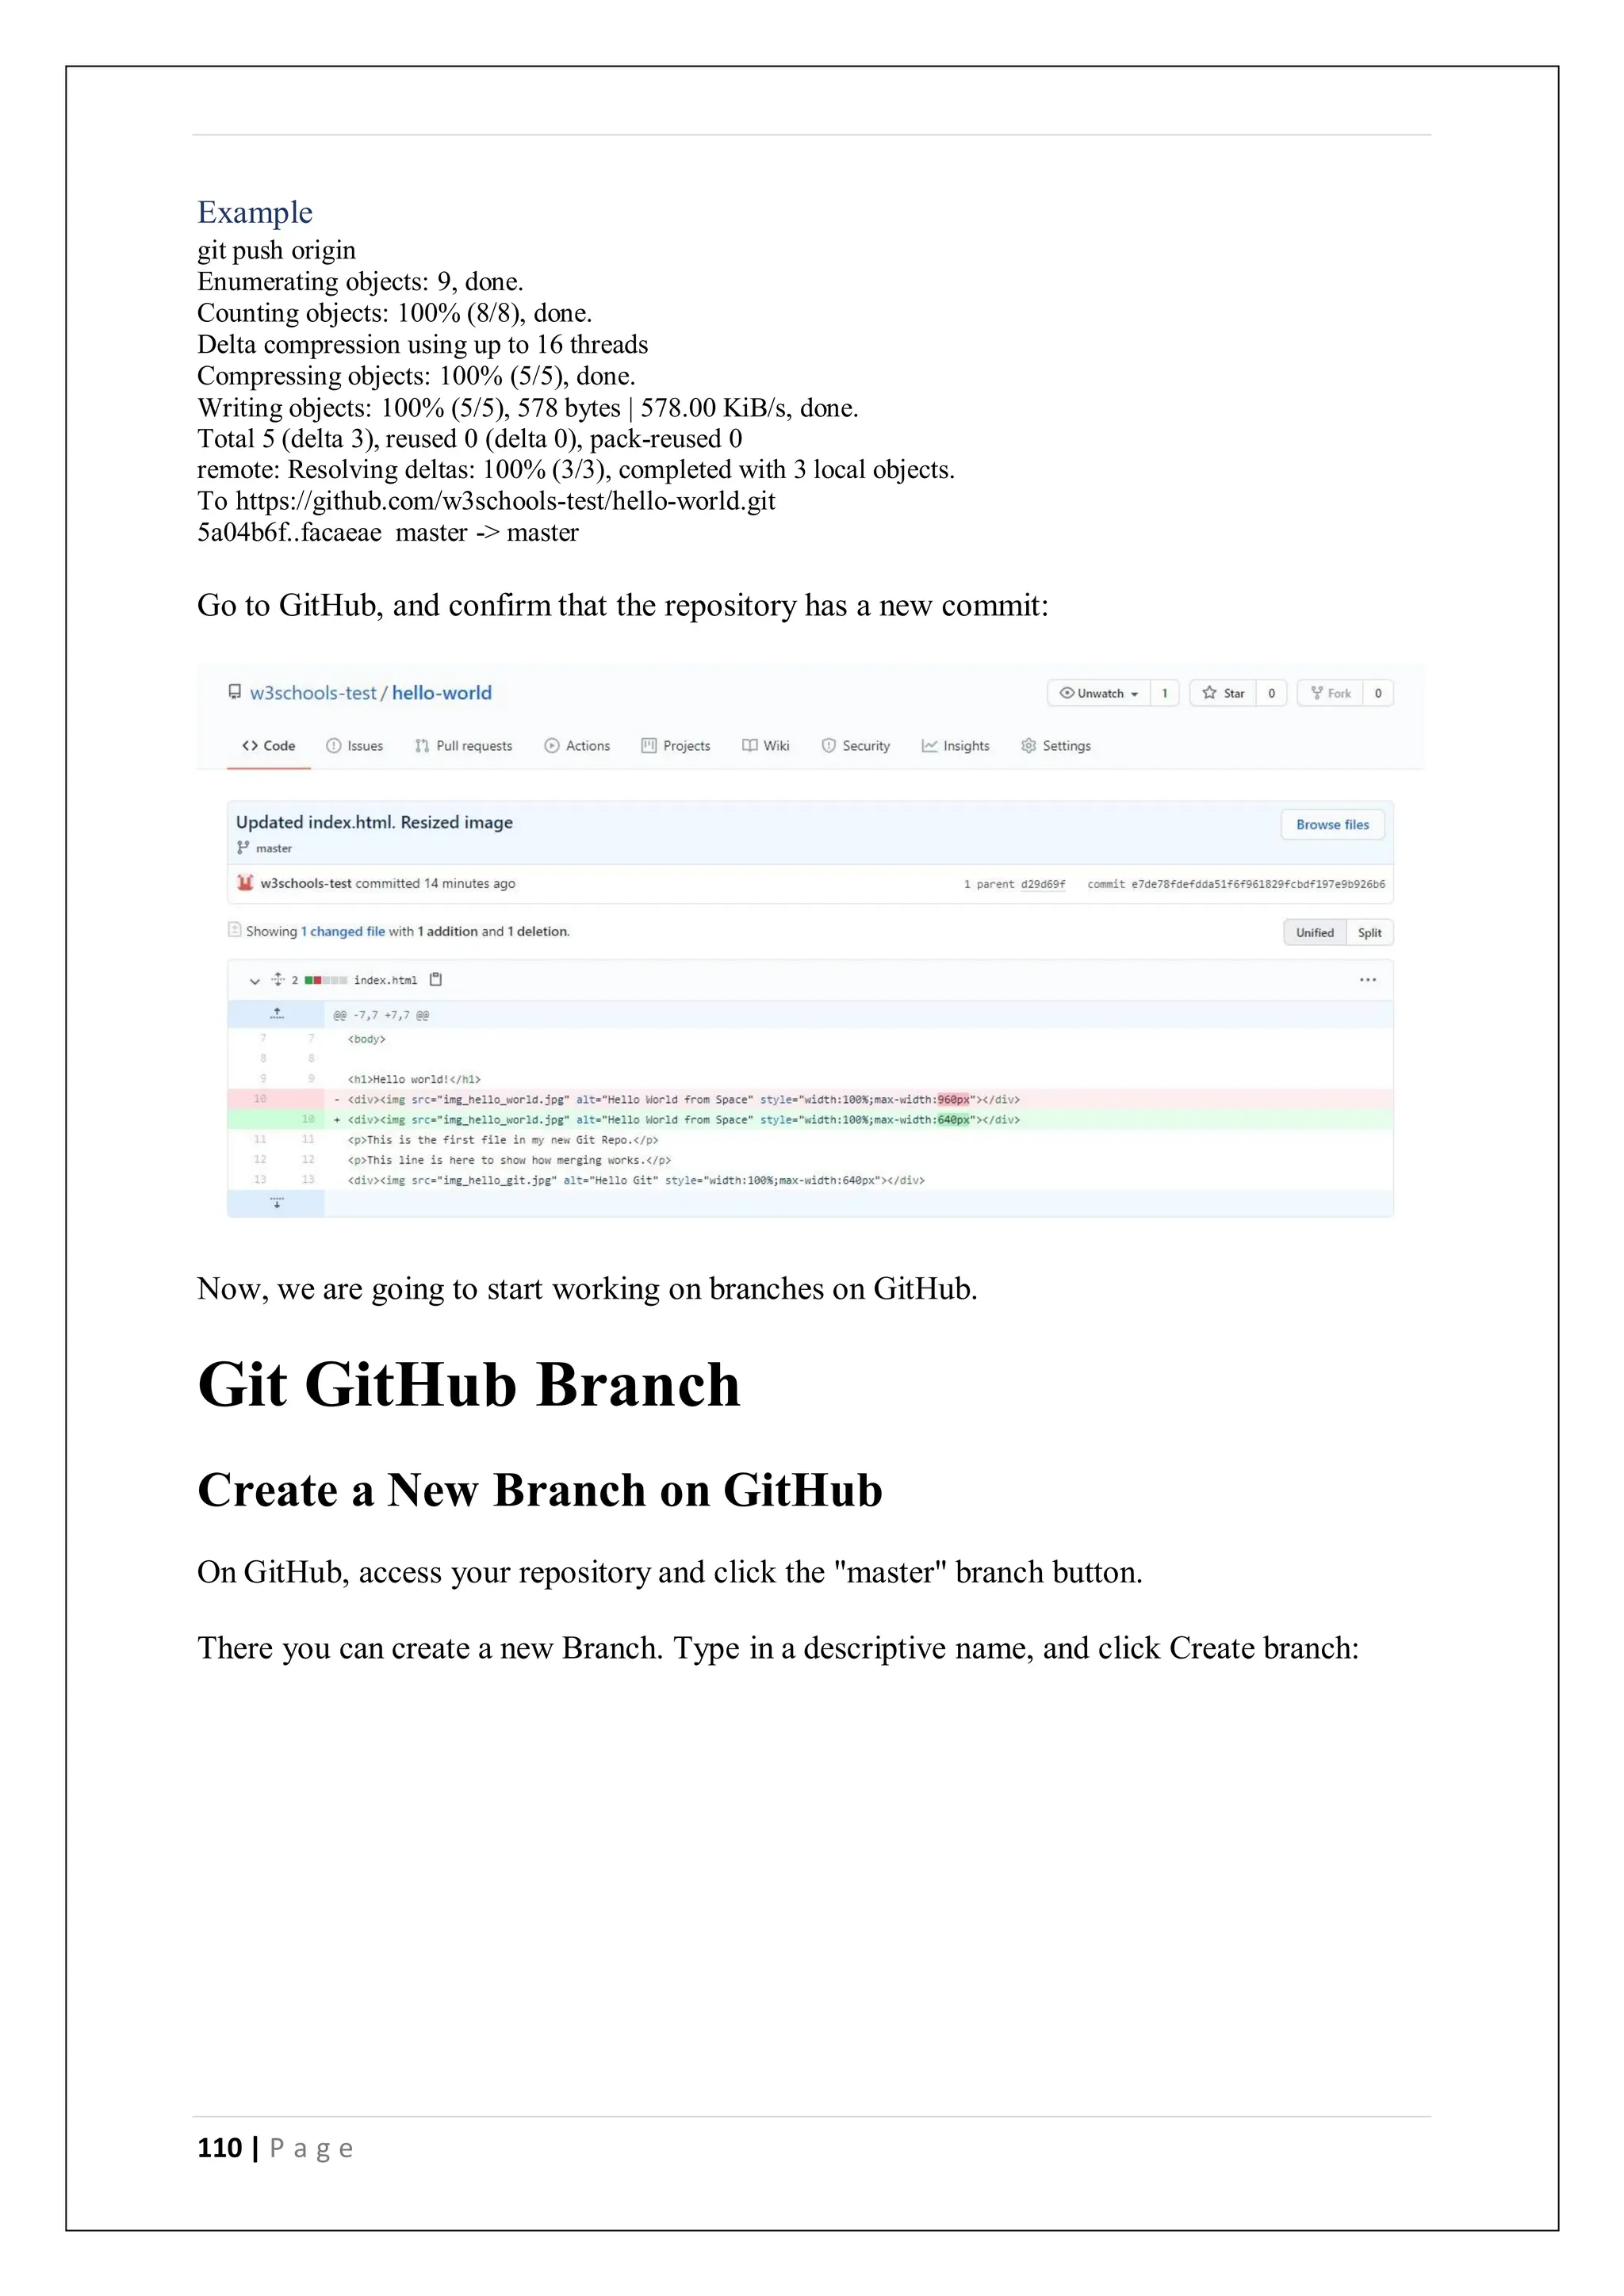
Commit the changes:
Example
git commit -a -m "Updated index.html. Resized image"
[master e7de78f] Updated index.html. Resized image
1 file changed, 1 insertion(+), 1 deletion(-)
And check the status:
Example
git status
On branch master
Your branch is ahead of 'origin/master' by 1 commit.
(use "git push" to publish your local commits)
nothing to commit, working tree clean
Now push our changes to our remote origin:](https://image.slidesharecdn.com/fullstackdevelopment-digitalnotes1-240426061109-24fb79ee/75/Full-Stack-Development-Course-in-Gurgaon-109-2048.jpg)

![113 | P a g e
Git Pull Branch from GitHub
Pulling a Branch from GitHub
Now continue working on our new branch in our local Git.
Letspull from our GitHub repository again so that our code is up-to-date:
Example
gitpull
remote: Enumerating objects: 5, done.
remote: Counting objects: 100% (5/5), done.
remote: Compressing objects: 100% (3/3), done.
remote: Total 3 (delta 2), reused 0 (delta 0), pack-reused 0
Unpacking objects: 100% (3/3), 851 bytes | 9.00 KiB/s, done.
From https://github.com/w3schools-test/hello-world
* [new branch] html-skeleton -> origin/html-skeleton
Already up to date.
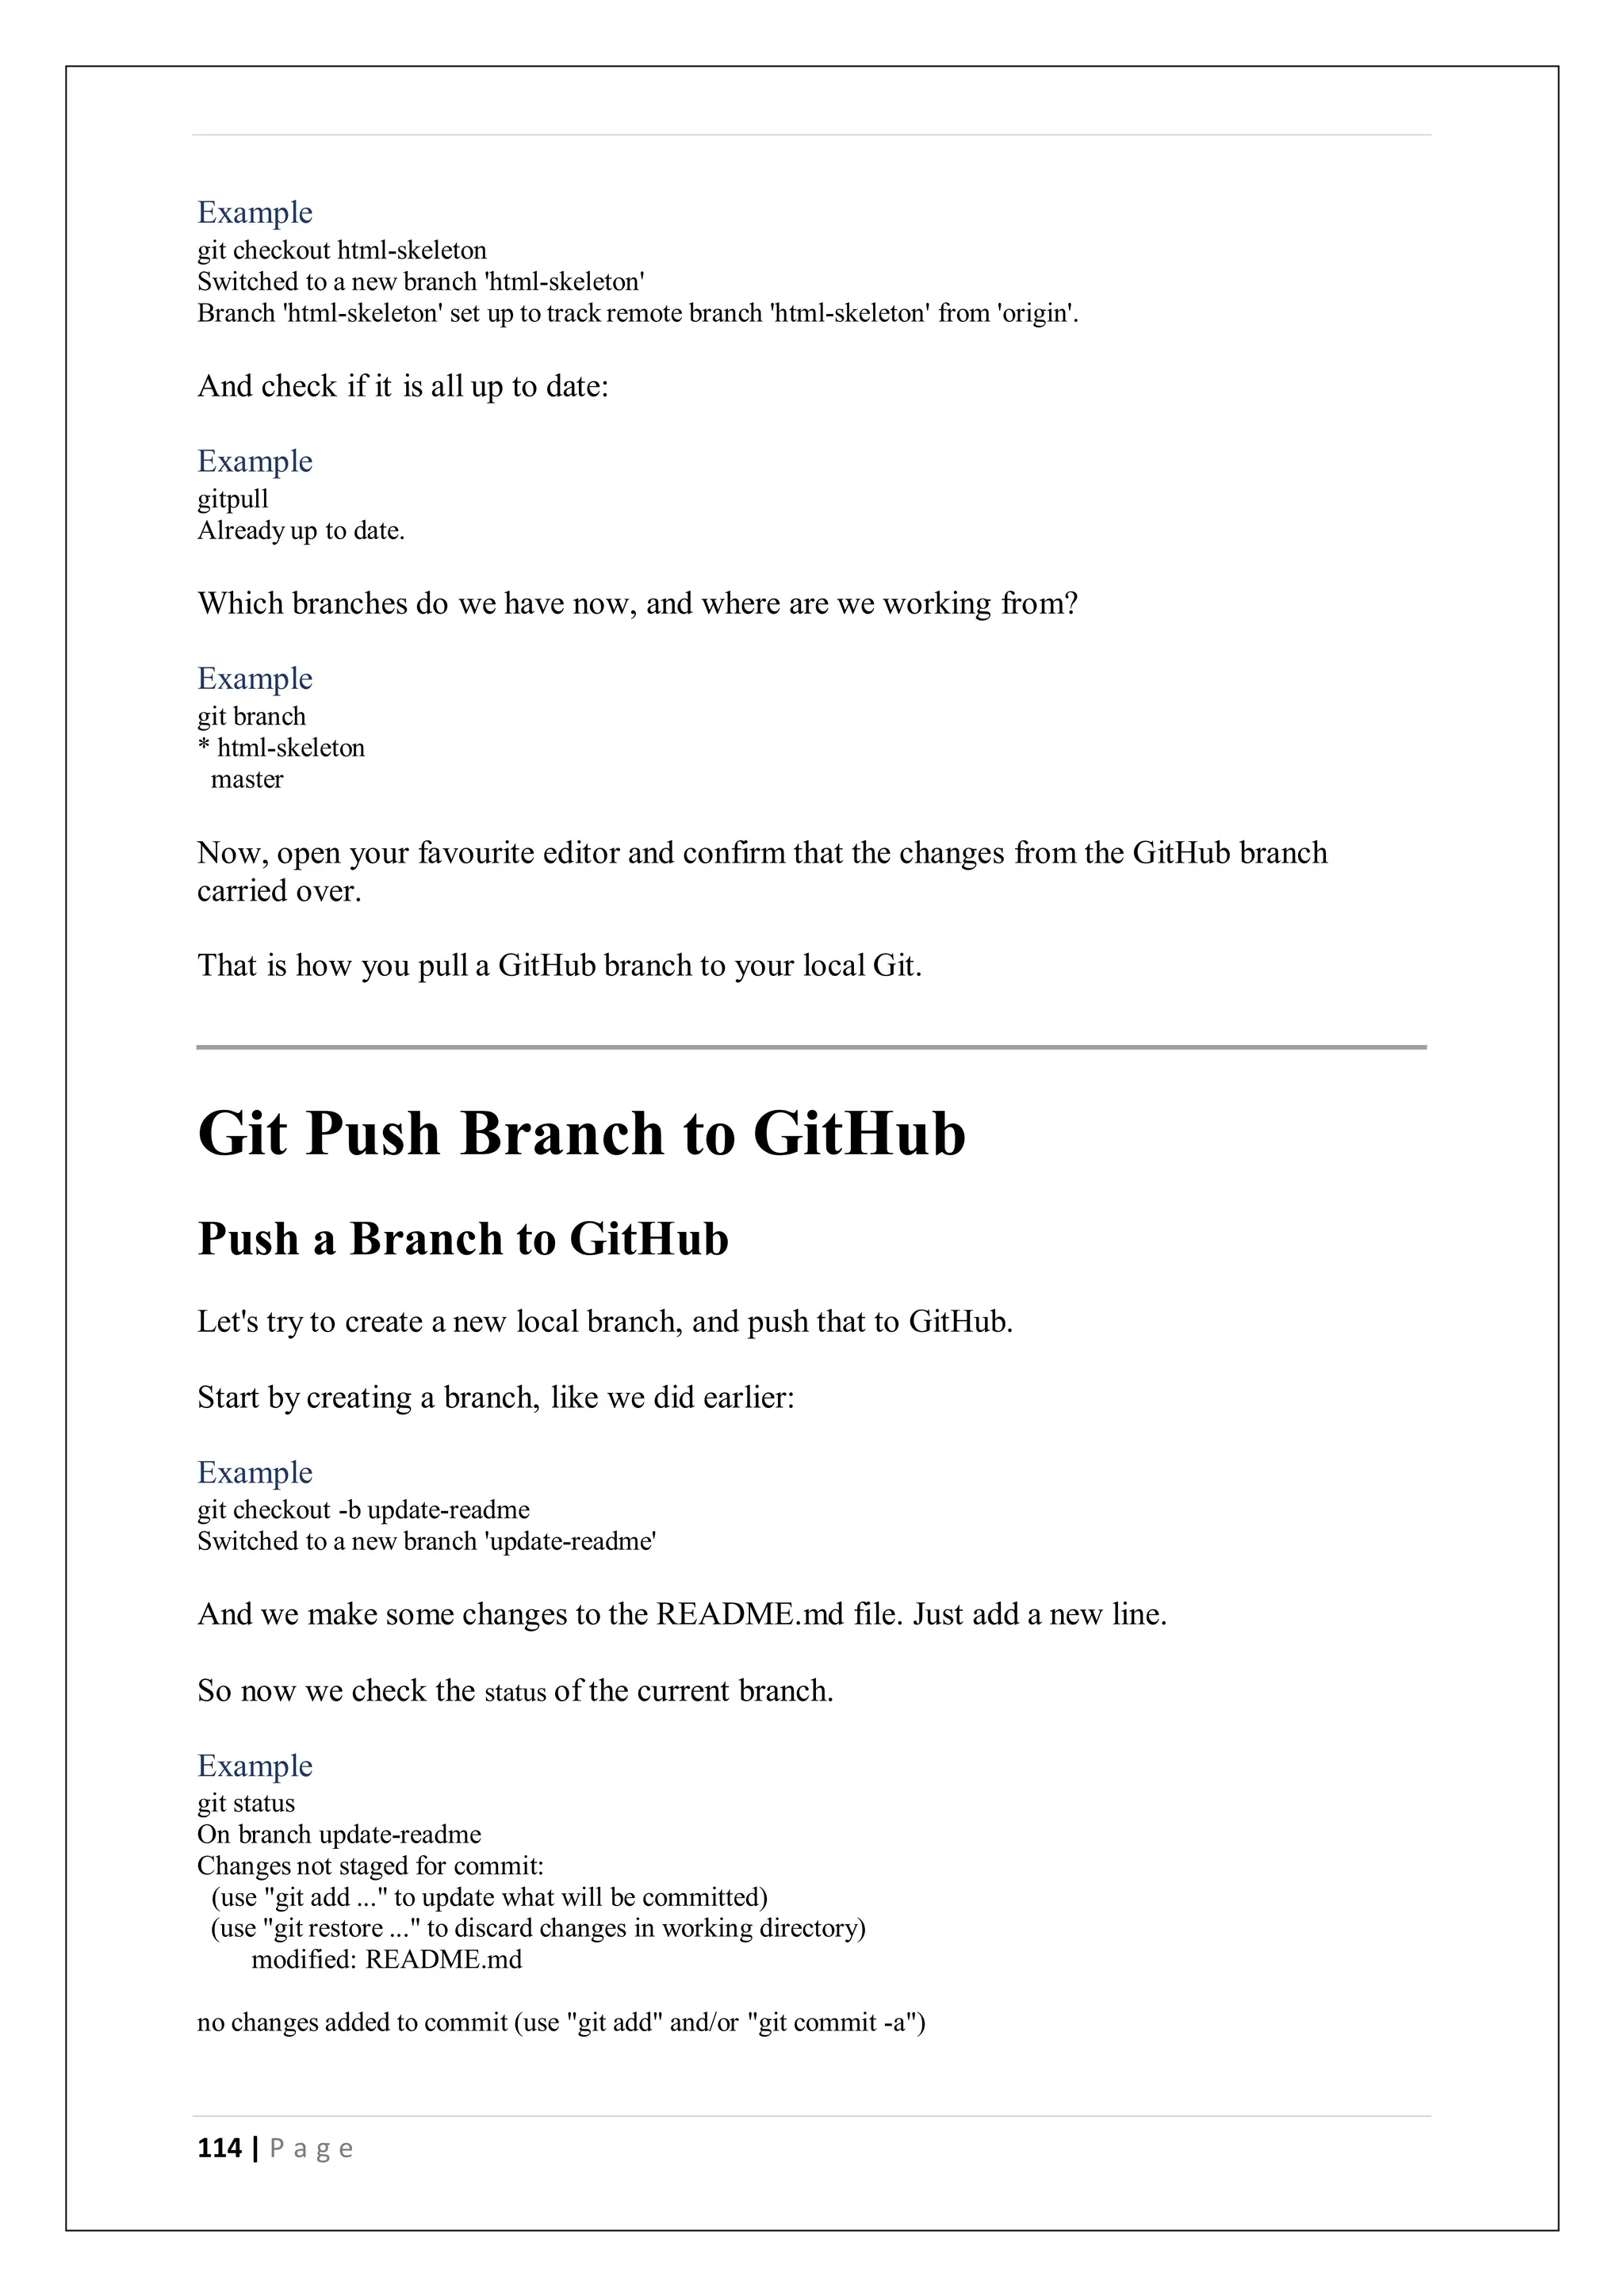
Now our main branch is up todate. And we can see that there is a new branch available on
GitHub.
Do a quick status check:
Example
git status
On branch master
Your branch is up to date with 'origin/master'.
nothing to commit, working tree clean
And confirm which branches we have, and where we are working at the moment:
Example
git branch
* master
So, we do not have the new branch on our local Git. But we know it is available on GitHub. So
we can use the -a option to see all local and remote branches:
Example
git branch -a
* master
remotes/origin/html-skeleton
remotes/origin/master
Note:branch -r is for remote branches only.
We see that the branch html-skeleton is available remotely, but not on our local git. Lets check
it out:](https://image.slidesharecdn.com/fullstackdevelopment-digitalnotes1-240426061109-24fb79ee/75/Full-Stack-Development-Course-in-Gurgaon-113-2048.jpg)
![115 | P a g e
We see that README.md is modified but not added to the Staging Environment:
Example
gitadd README.md
Check the status of the branch:
Example
git status
On branch update-readme
Changes to be committed:
(use "git restore --staged ..." to unstage)
modified: README.md
We are happy with our changes. So we will commit them to the branch:
Example
git commit -m "Updated readme for GitHub Branches"
[update-readme 836e5bf] Updated readme for GitHub Branches
1 file changed, 1 insertion(+)
Now push the branch from our local Git repository, to GitHub, where everyone can see the
changes:
Example
git push origin update-readme
Enumerating objects: 5, done.
Counting objects: 100% (5/5), done.
Delta compression using up to 16 threads
Compressing objects: 100% (3/3), done.
Writing objects: 100% (3/3), 366 bytes | 366.00 KiB/s, done.
Total 3 (delta 2), reused 0 (delta 0), pack-reused 0
remote: Resolving deltas: 100% (2/2), completed with 2 local objects.
remote:
remote: Create a pull request for 'update-readme' on GitHub by visiting:
remote: https://github.com/w3schools-test/hello-world/pull/new/update-readme
remote:
To https://github.com/w3schools-test/hello-world.git
* [new branch] update-readme -> update-readme
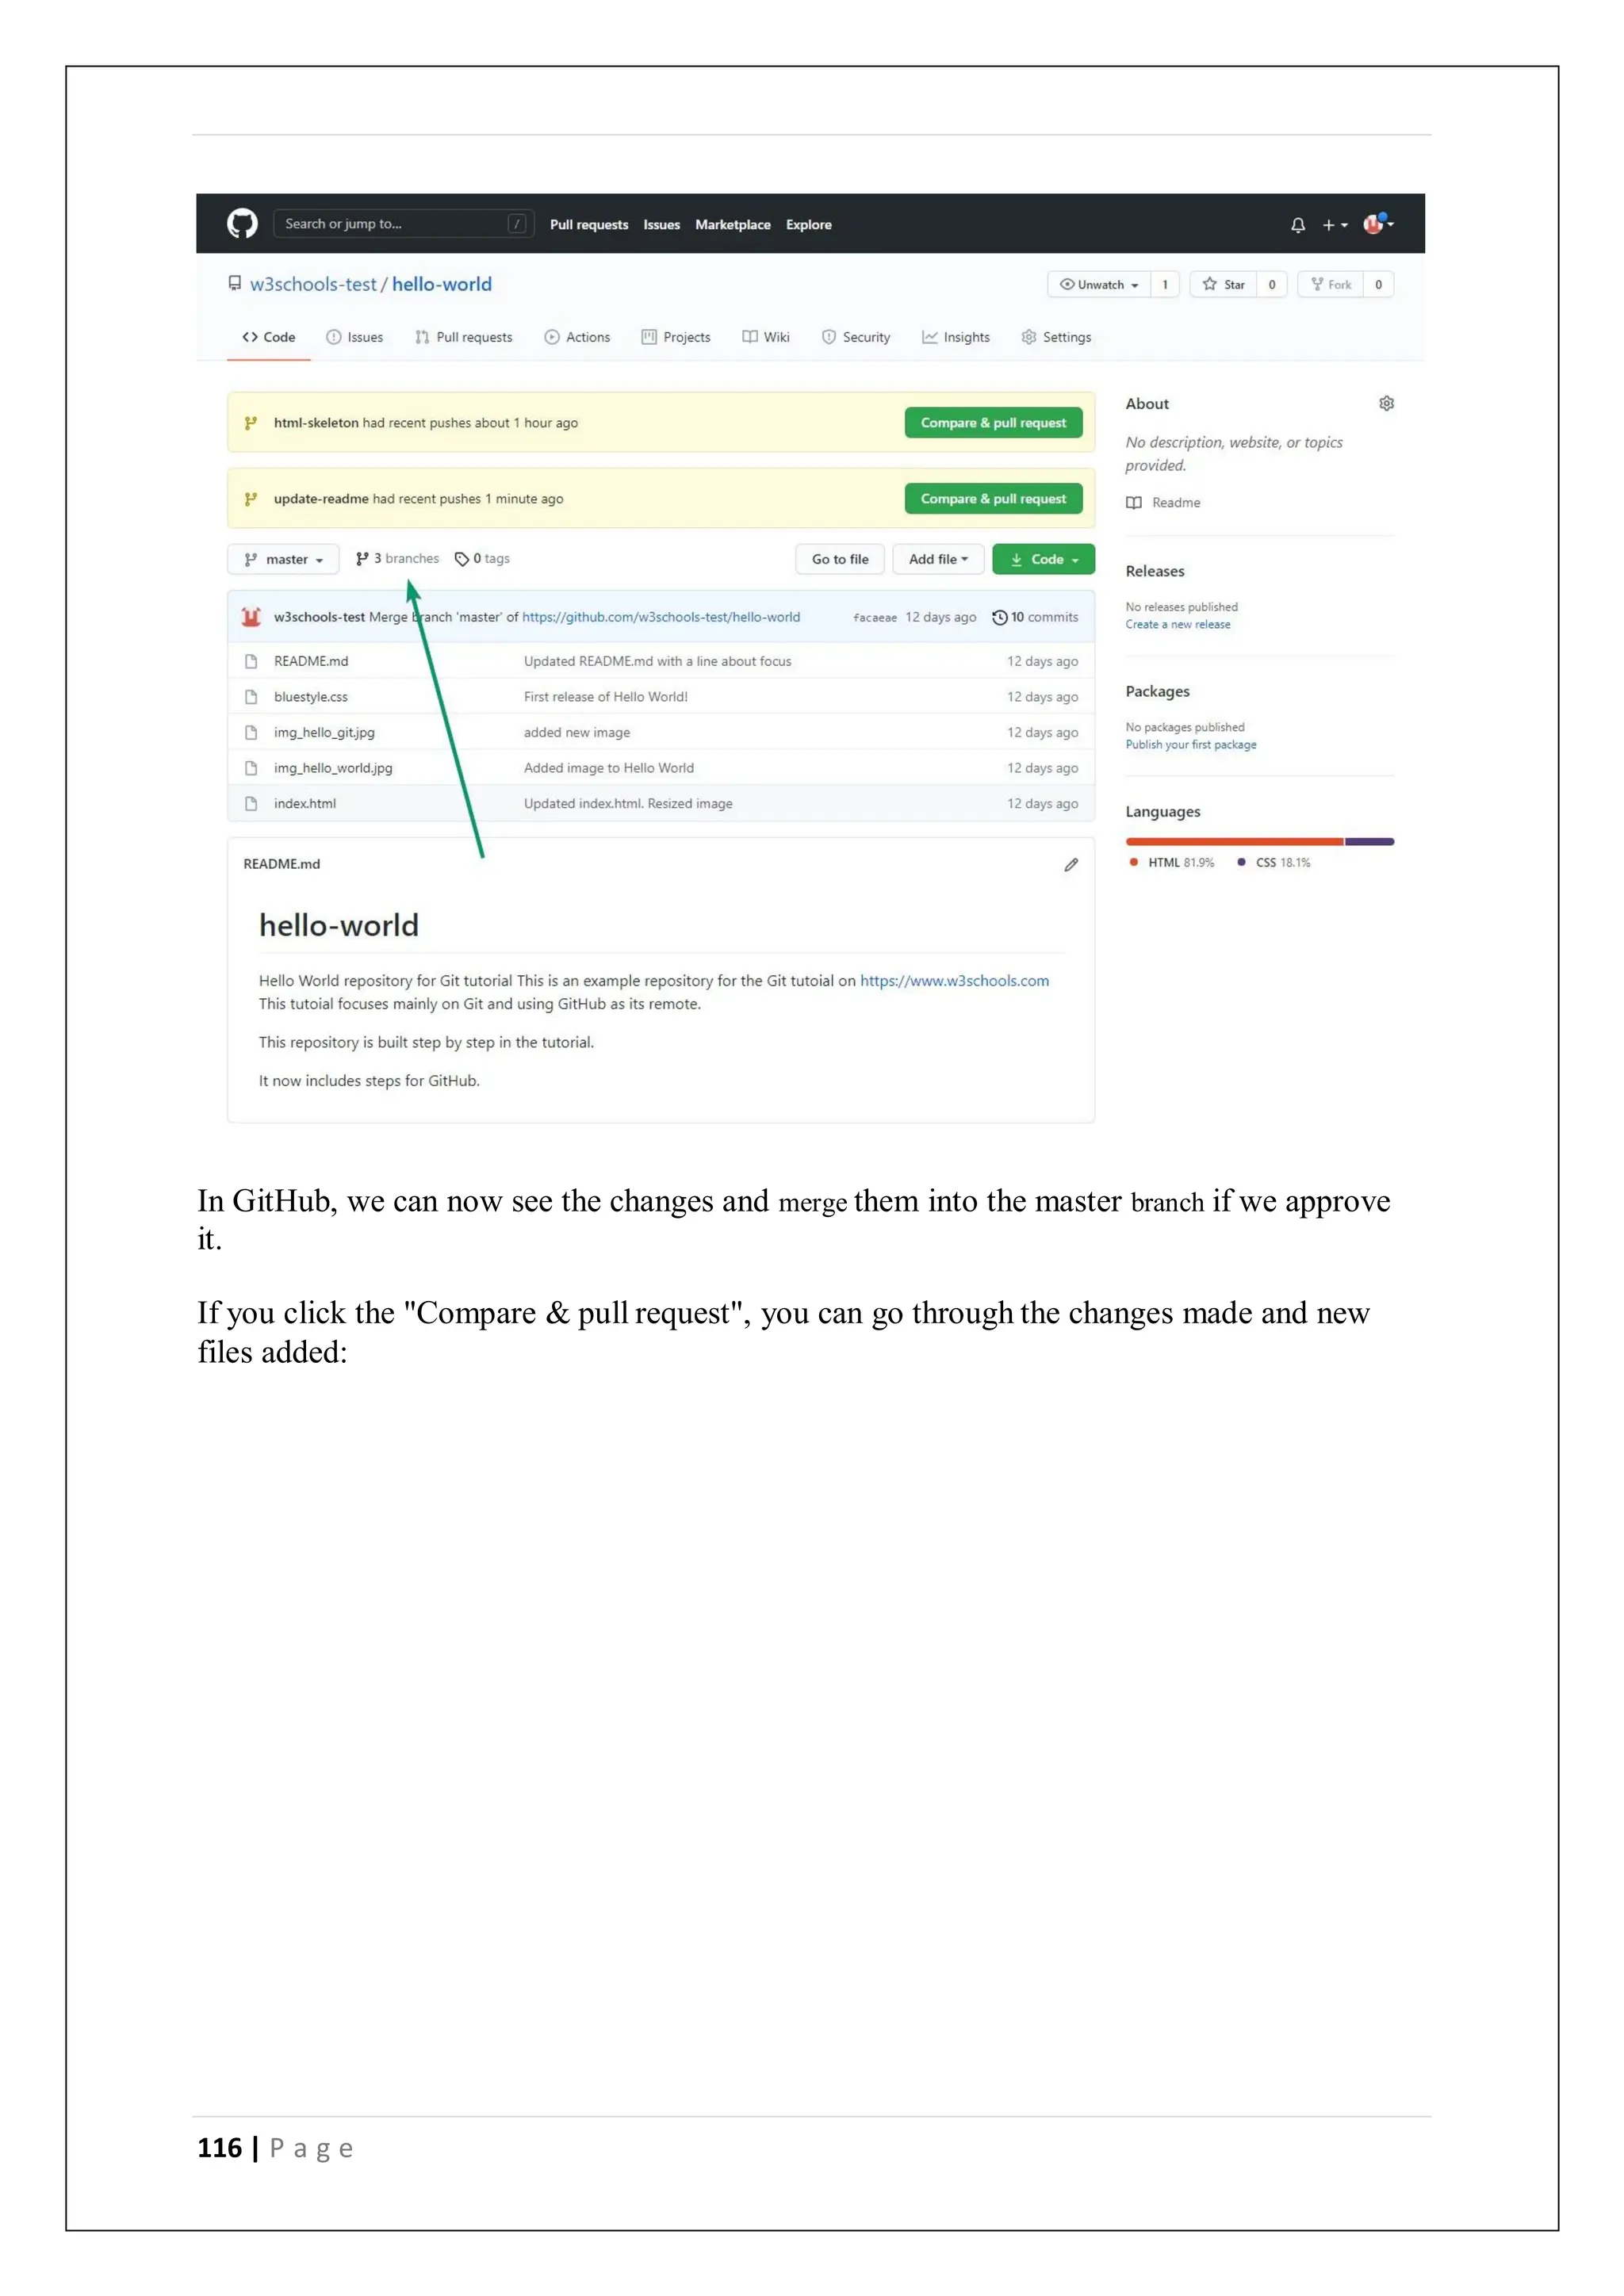
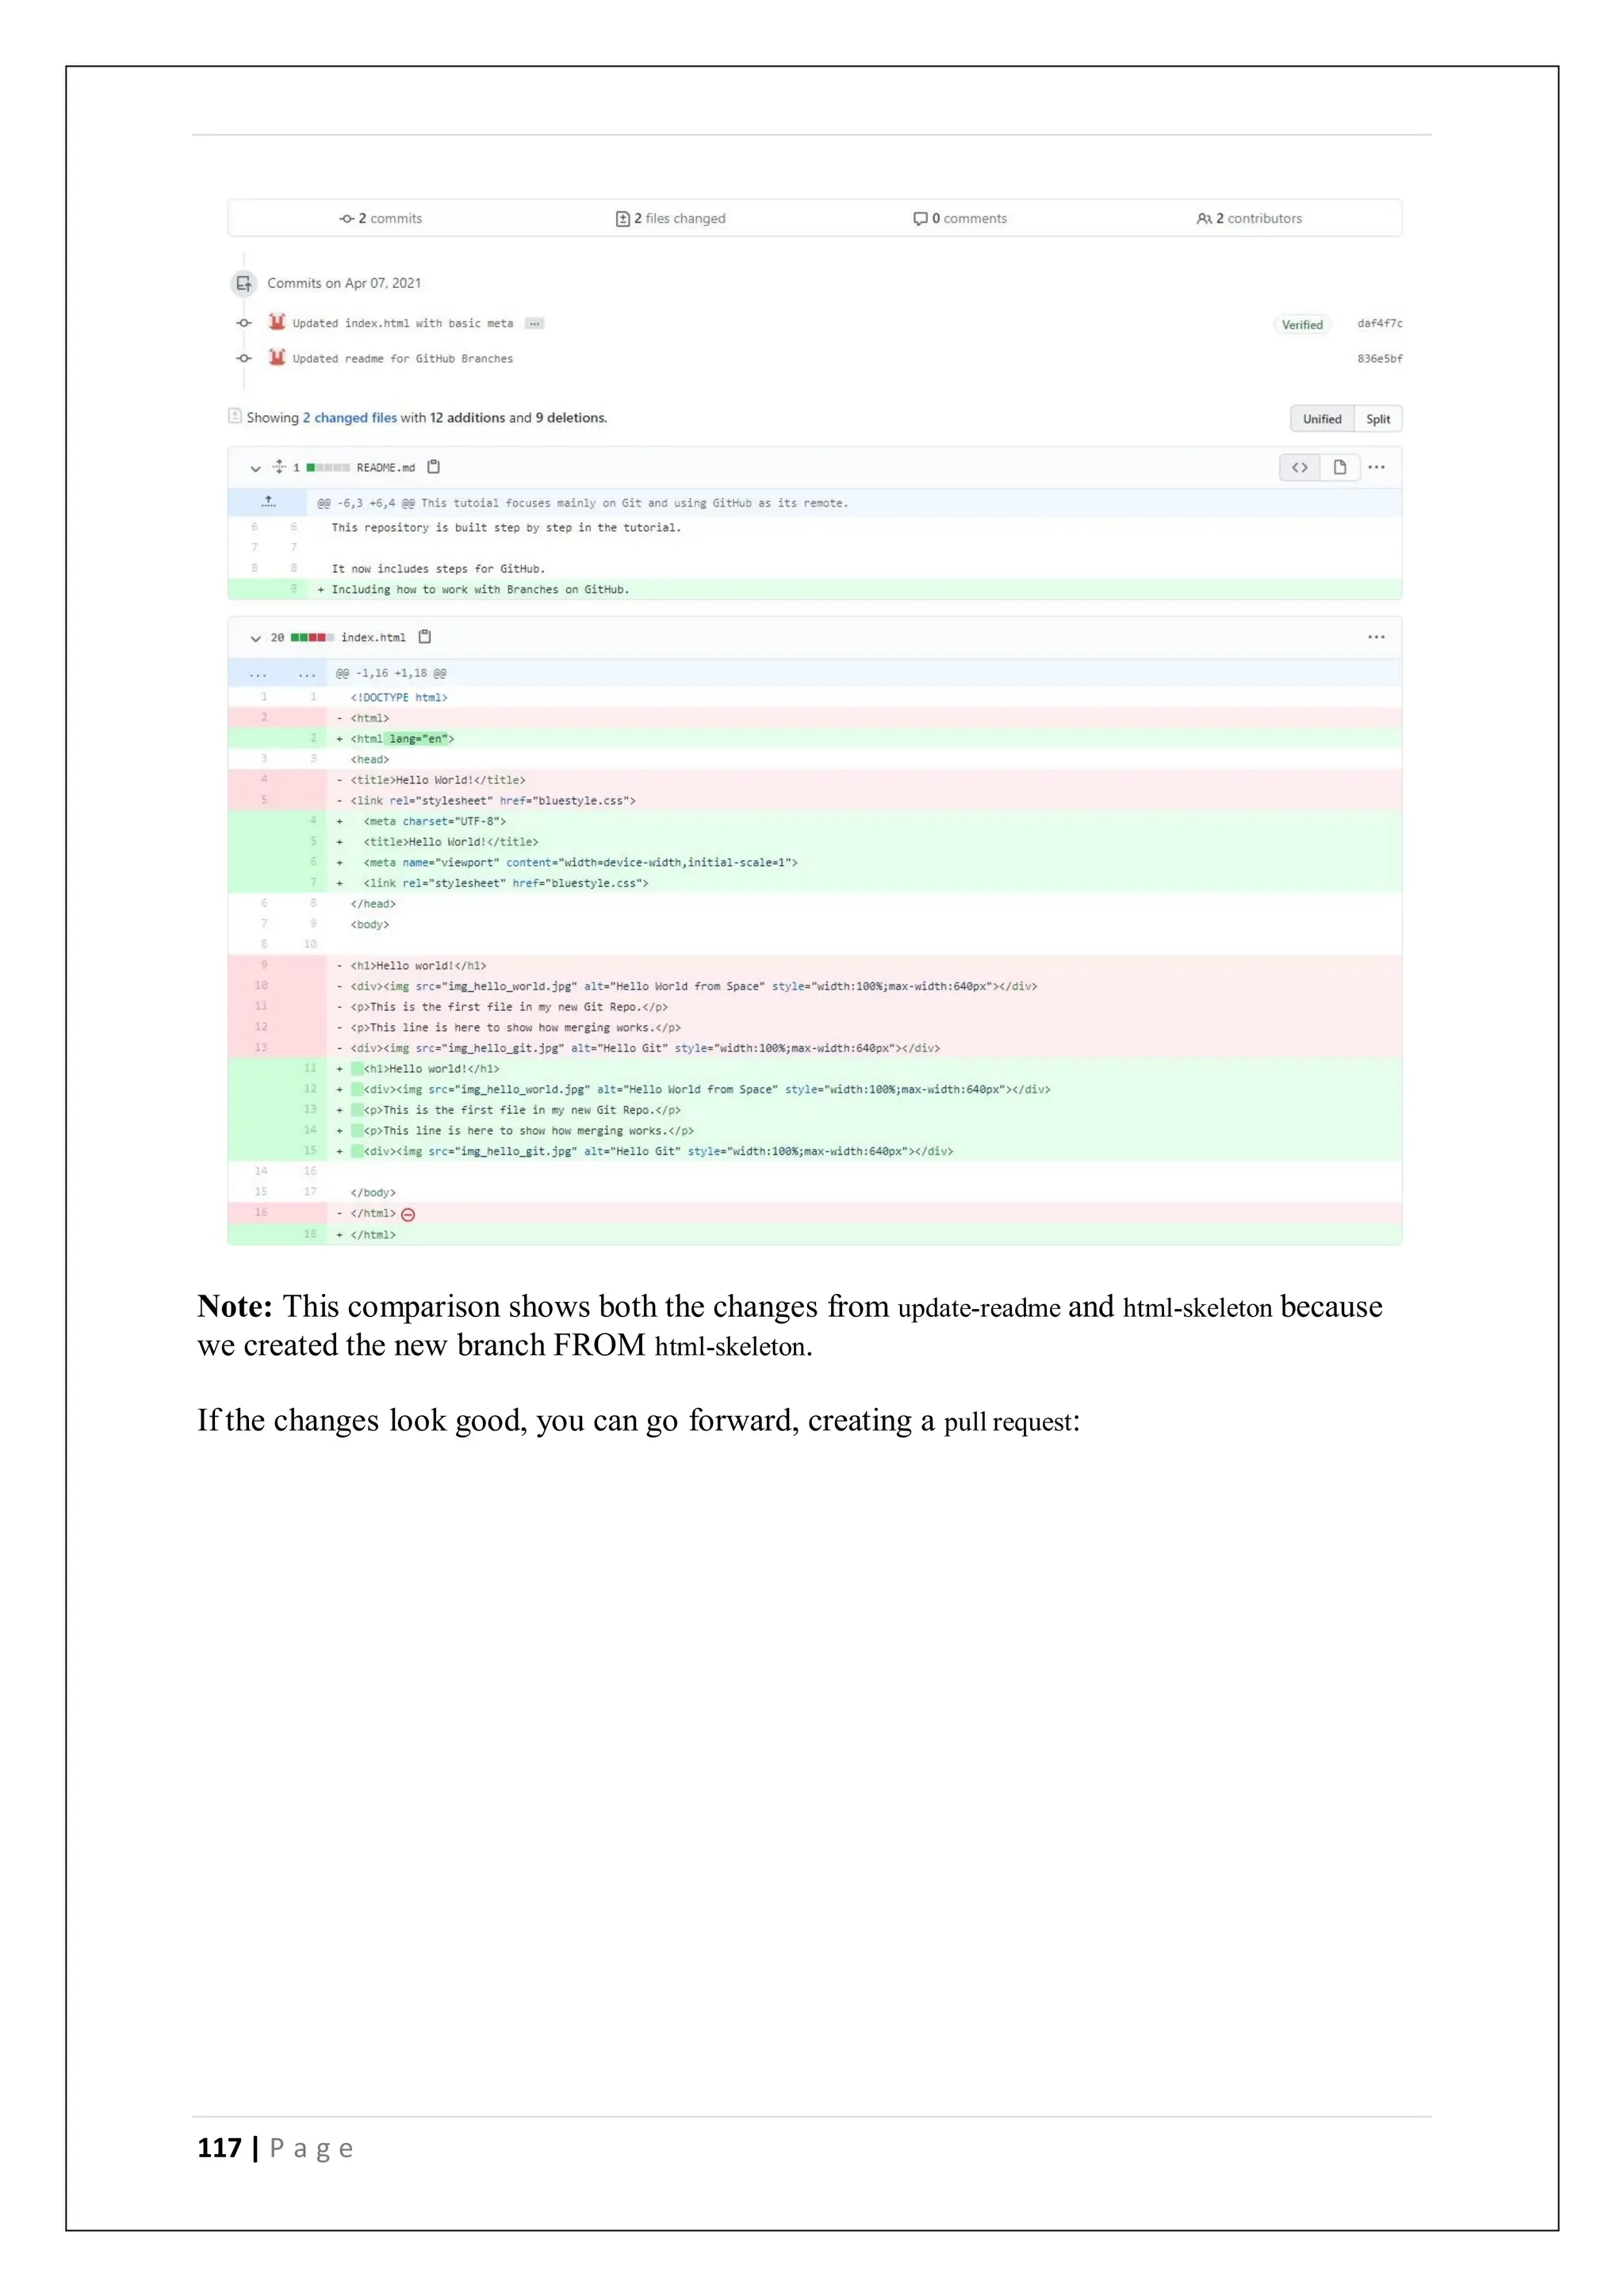
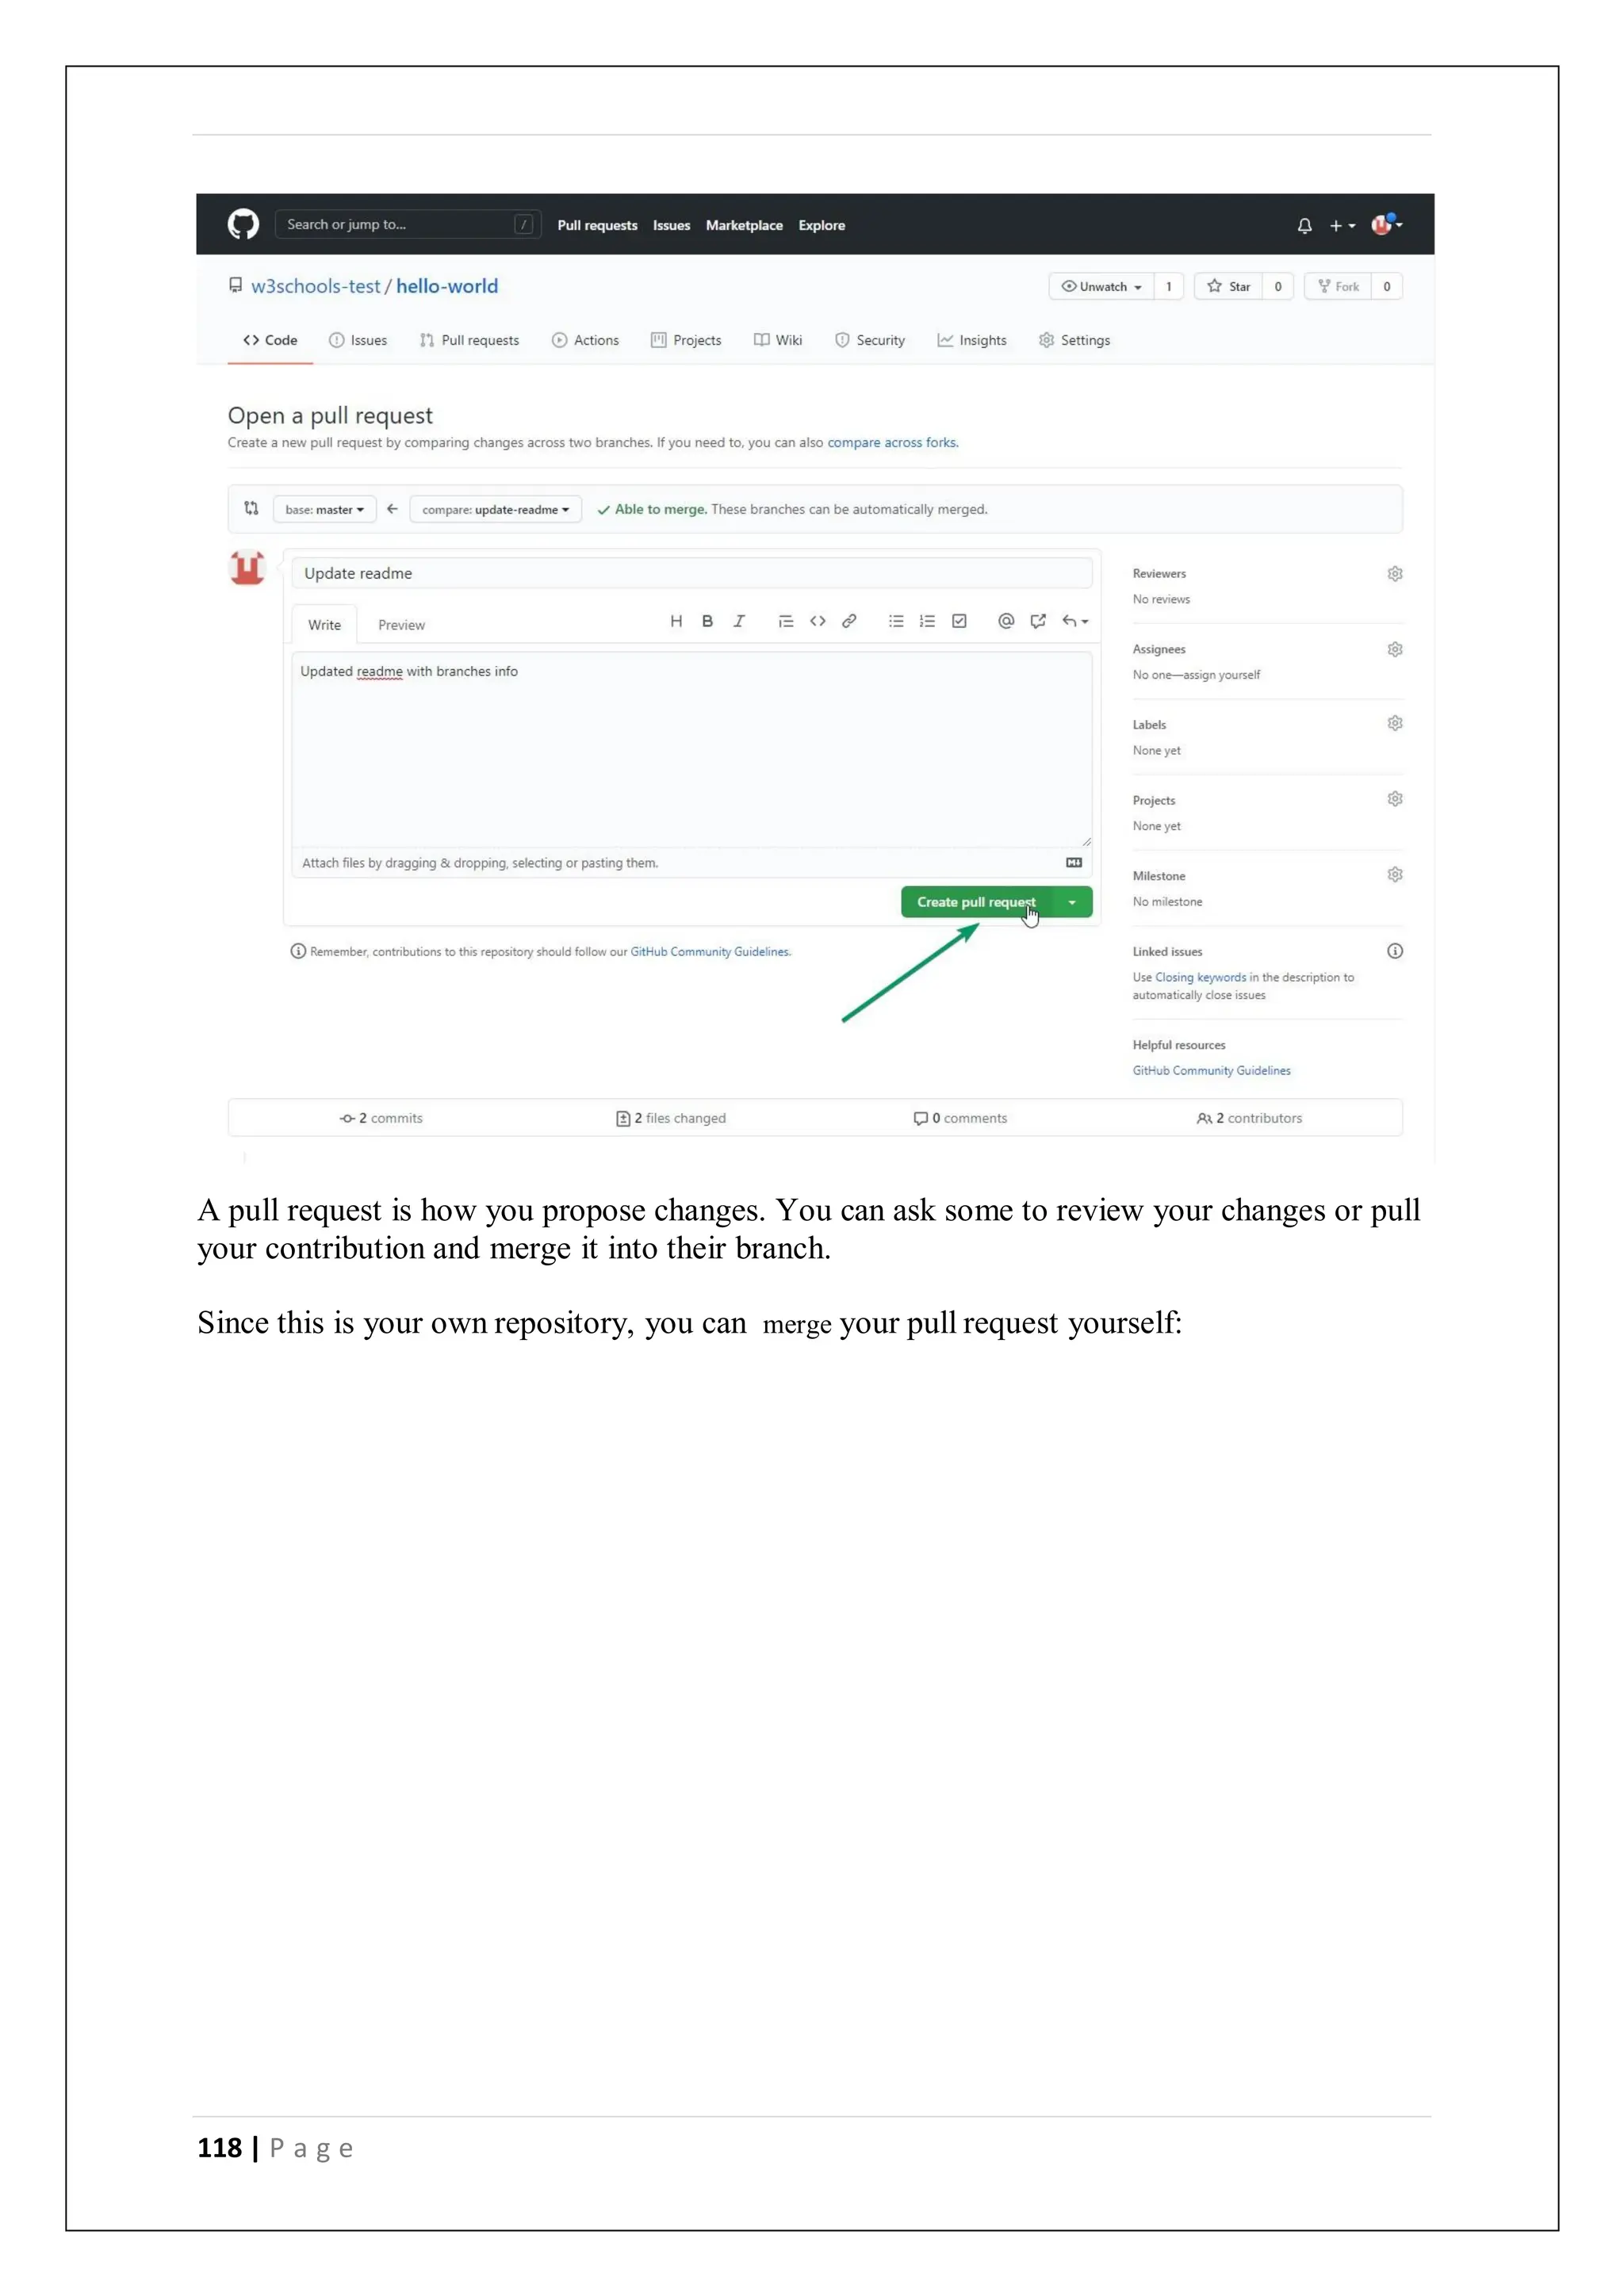
Go to GitHub, and confirm that the repository has a new branch:](https://image.slidesharecdn.com/fullstackdevelopment-digitalnotes1-240426061109-24fb79ee/75/Full-Stack-Development-Course-in-Gurgaon-115-2048.jpg)


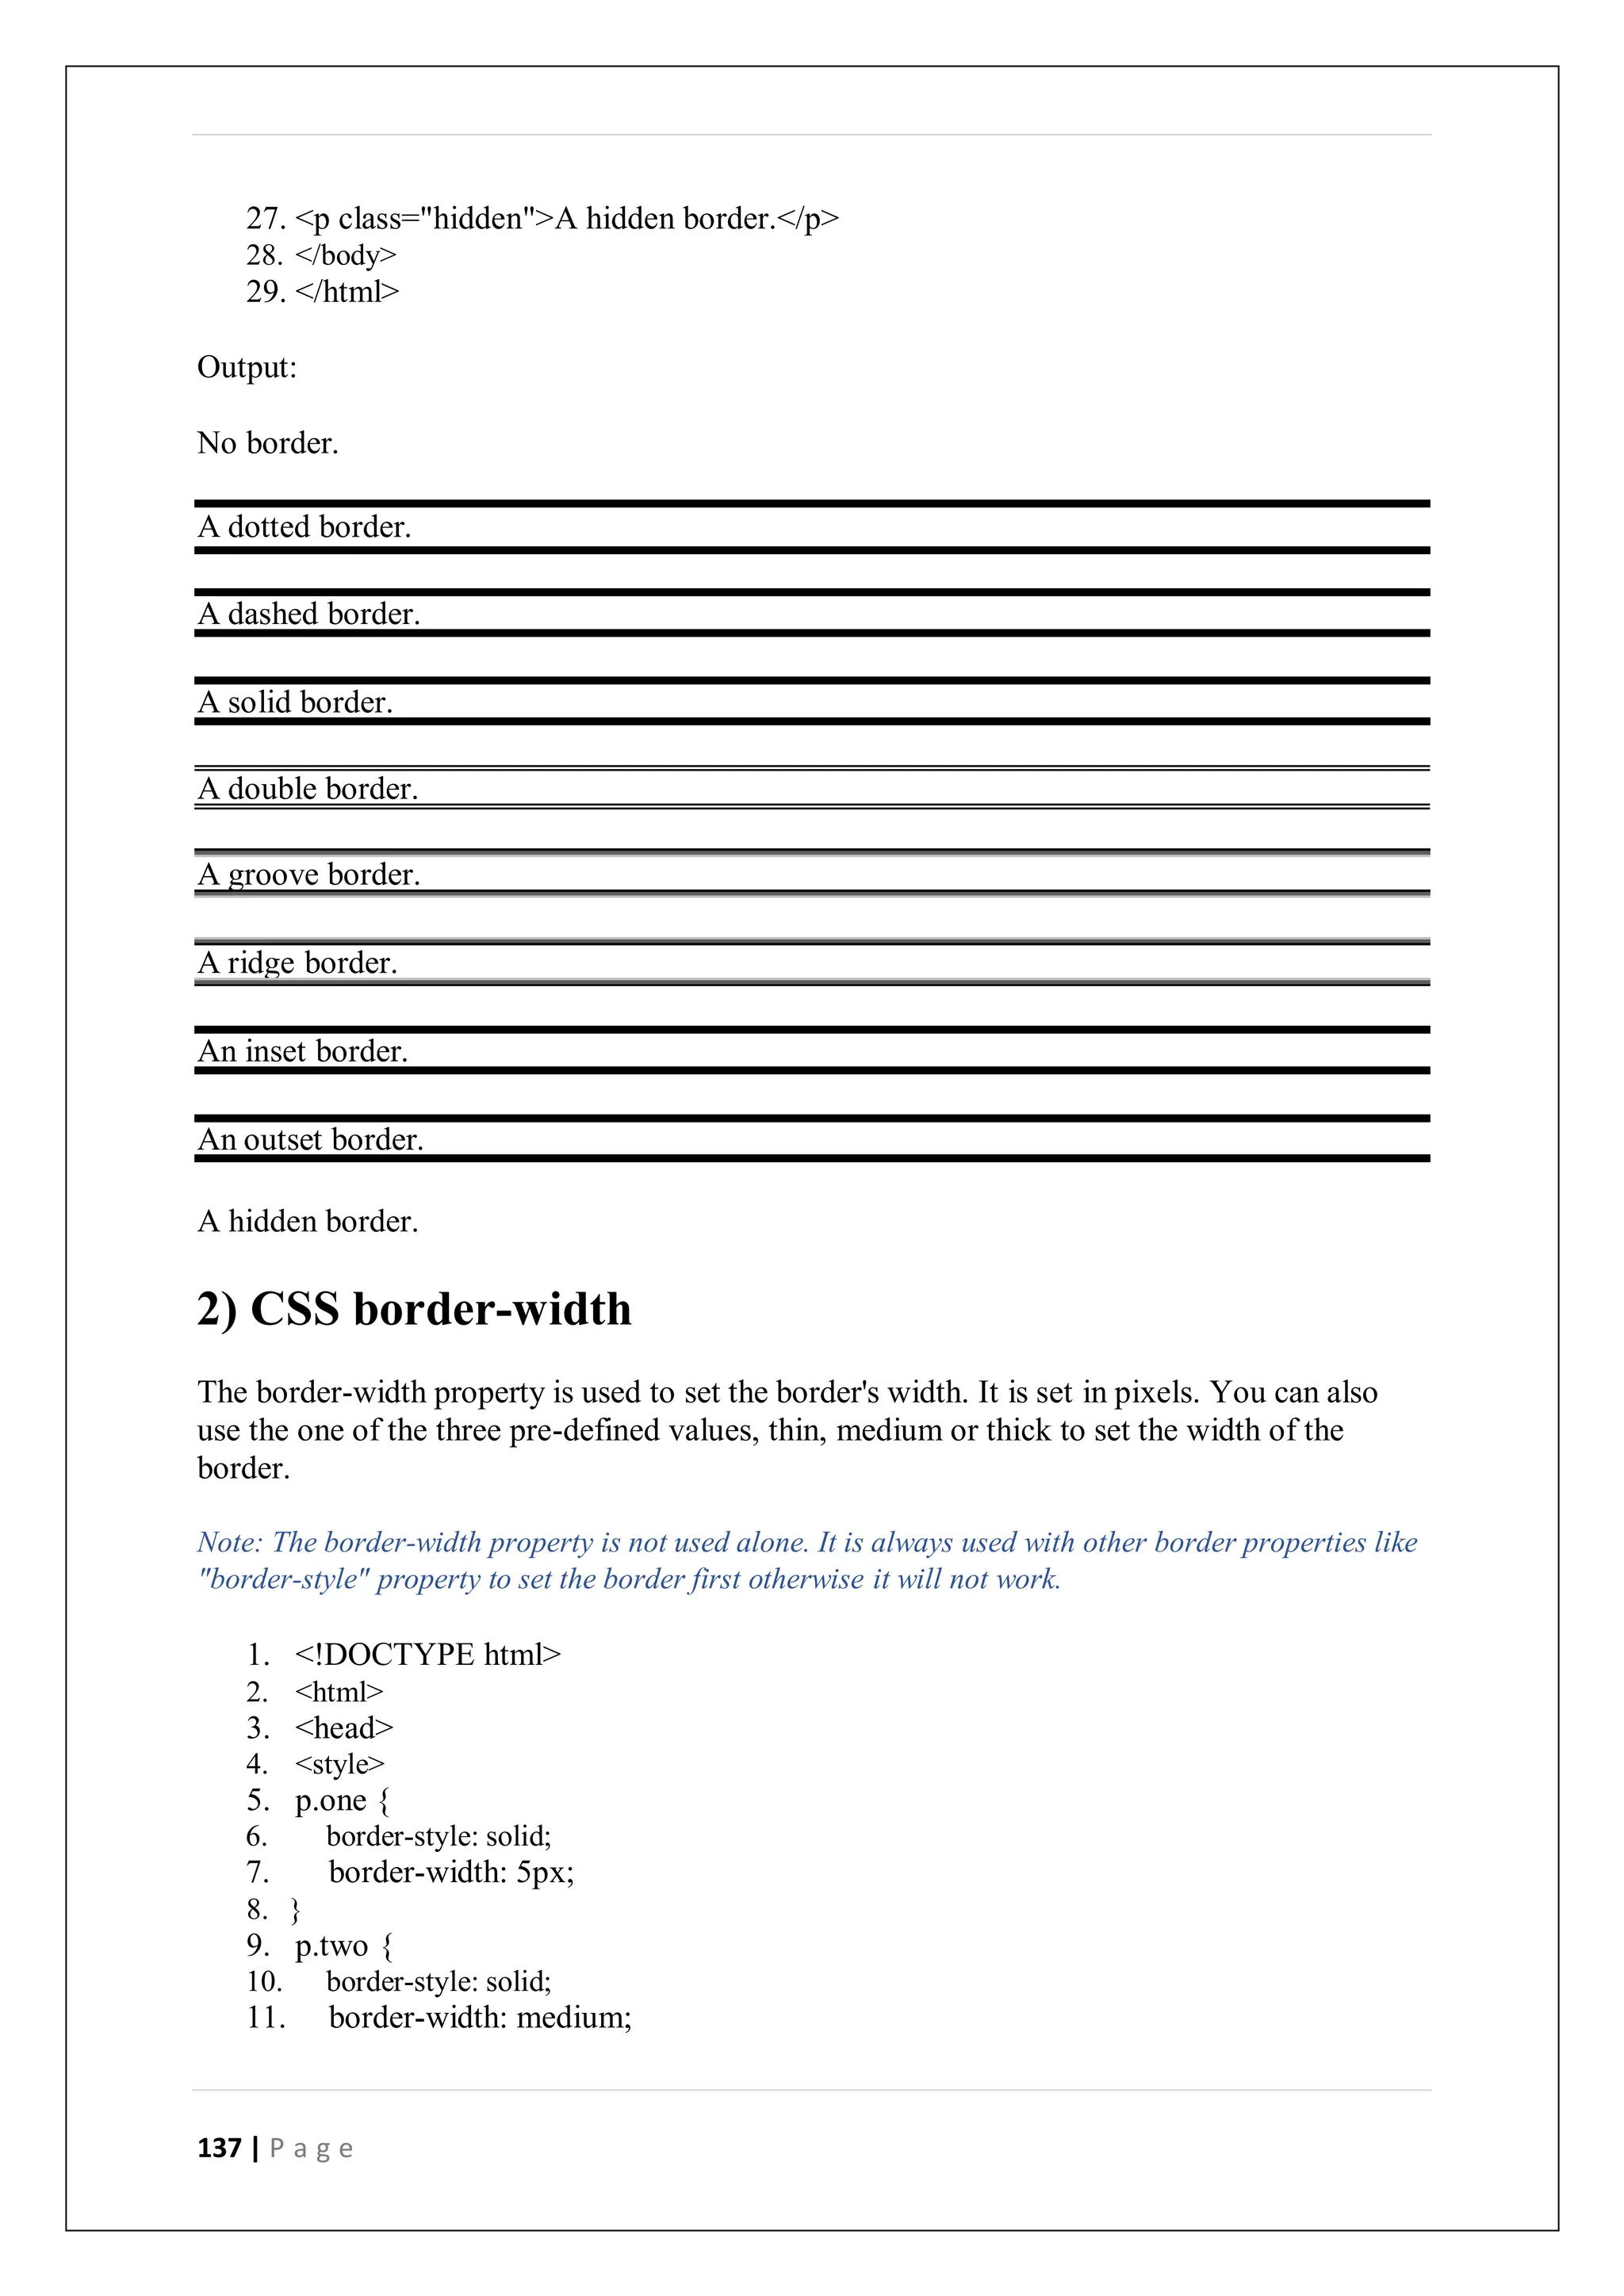


![156 | P a g e
28. color:black;
29. border:5px red groove;
30. border-radius: 10px;
31. }
32. .b4{
33. background-color:orange;
34. border: 5px red dashed;
35. border-radius: 20px;
36. }
37. .b5{
38. background-color: gray;
39. border: 5px black dotted;
40. border-radius: 30px;
41. }
42. .b6{
43. background-color: lightblue;
44. border:5px blue double;
45. border-radius: 25px;
46. }
47. </style>
48. </head>
49.
50. <body>
51. <h1>The border-radius property</h1>
52. <h2>Below there is the border name and border-radius</h2>
53. <button class="b1">none</button>
54. <button class="b2">solid 7px</button>
55. <button class="b3">groove 10px</button>
56. <button class="b4">dashed 20px</button>
57. <button class="b5">dotted 30px</button>
58. <button class="b6">double 25px</button>
59.
60. </body>
61. </html>
box-shadow
As its name implies, it is used to create the shadow of the button box. It is used to add the
shadow to the button. We can also create a shadow during the hover on the button.
Syntax
1. box-shadow: [horizontal offset] [vertical offset] [blur radius]
2. [optional spread radius] [color];
Example
1. <!DOCTYPE html>
2. <html>](https://image.slidesharecdn.com/fullstackdevelopment-digitalnotes1-240426061109-24fb79ee/75/Full-Stack-Development-Course-in-Gurgaon-156-2048.jpg)


![179 | P a g e
var number =52;
varst='my_string';
var student ={
name:'Smith',
roll:5,
age:23,
};
vararr=[15,null,'another_string'];
content +="Allocated memory for number: "+JSON.stringify(number)+'<br>'
content +="Allocated memory for string: "+JSON.stringify(st)+'<br>'
content +="Allocated memory for student: "+JSON.stringify(student)+'<br>'
content +="Allocated memory for array: "+JSON.stringify(arr)+'<br>'
}catch(err){
error += err
}finally{
// display on output console
opDiv.innerHTML= content
opErrDiv.innerHTML= error
}
</script>
</body>
</html>
From the above example, it is clear that numbers and strings are single values, and allocation
is also simple. But for objects and arrays, JavaScript can also easily allocate the memory
based on their values.
Allocating by Function Call
Like variable value assignment, we can also create some memory blocks by calling some
functions. For example, when a function returns a separate object it will automatically assign
a new memory block to the system.
Syntax
Memory_reference = <function call which returns any value>
Examples
The following example uses a function that works on an HTML document. So this program
will run on a browser or HTML editor.
Source Code
<!DOCTYPE html>
<html lang="en">
<head>
<meta charset="UTF-8"/>
</head>
<body>
<script>
var e =document.createElement('div');
e.innerHTML="<h1> Header from JavaScript </h1>"
document.body.appendChild(e);
</script>
</body>
</html>](https://image.slidesharecdn.com/fullstackdevelopment-digitalnotes1-240426061109-24fb79ee/75/Full-Stack-Development-Course-in-Gurgaon-179-2048.jpg)


![184 | P a g e
//The 4 state means for the response is ready and sent by the server.
if (xmlhttp.readyState == 4&&xmlhttp.status == 200) {
ResponseText = xmlhttp.responseText; //get text data in the response
ResponseXML = xmlhttp.responseXML; //get xml data in the response
ResponseHeaderJSON = xmlhttp.getResponseHeader
("CustomHeaderJSON"); // Extract Data in http header
ResponseHeaders = xmlhttp.getAllResponseHeaders(); //Get a string
//containing all http headers returned by server
// Make all the results available in the ReadyHandler via prototyping.
ReadyHandler.prototype.ResponseText = ResponseText;
ReadyHandler.prototype.ResponseHeaderJSON = ResponseHeaderJSON;
ReadyHandler.prototype.ResponseXML = ResponseXML;
ReadyHandler.prototype.ResponseHeaders = ResponseHeaders;
// Execute function passed as ReadyHandelr
ReadyHandler();
}
}
//If querystring is provided Attach it to the url
if (QueryString != "") {
varQueryStringData = "";
for (QueryStringAttributeinQueryString) {
QueryStringData = QueryStringAttribute + "=" +
QueryString[QueryStringAttribute] + "&" + QueryStringData;
}
QueryStringData = QueryStringData.substring(0,
QueryStringData.lastIndexOf('&'));
URL = URL + "?" + escape(QueryStringData); //Here is where the
//query string ia attached to the request url.
}
//POST or GET URL of the script to execute.true for asynchronous
//(false for synchronous).
xmlhttp.open(Method, URL, true);
xmlhttp.setRequestHeader("Content-type", "application/x-www-form-urlencoded");
if (HttpHeaders != "") {
varHttpHeadersData = "";
for (HttpHeaderNameinHttpHeaders) {
xmlhttp.setRequestHeader(HttpHeaderName,
HttpHeaders[HttpHeaderName]); // Here the custom headers are added
}
}
//Post data provided then assemble it into single string to be posted to server
if (Params != "") {
varParamsData = "";
for (ParamNamein Params) {
ParamsData = ParamName + "=" + Params[ParamName] + "&" + ParamsData;
}
ParamsData = ParamsData.substring(0, ParamsData.lastIndexOf('&'));
}
xmlhttp.send(ParamsData); //Send the request with the post data
}
}
[You can find the complete implementation with sufficient comments in the source code.]](https://image.slidesharecdn.com/fullstackdevelopment-digitalnotes1-240426061109-24fb79ee/75/Full-Stack-Development-Course-in-Gurgaon-184-2048.jpg)
![186 | P a g e
->URL: This parameter takes the URL to which the request is to be sent
->Method: Method of request "GET"/"POST"
->Params: POST data to be sent to server. Expects a JSON formatted name value pairs
->QueryString: Data to be sent to the server as QueryString. Expects a JSON formatted name
value pairs
->HttpHeaders: Data to be sent as HTTP Headers. Expects JSON formatted name value pairs
Note: While sending the data in headers, you have to take care only ASCII characters where charCode
ranging from 32 to 126 are sent or you may get unexpected results. See RFC documentation for
HTTP.
The ReadyHandlercan contain the code which will dynamically change the contents of the
webpage based on the response data.
For example, in the demo application, I have used 'ProcessRequest()' as the Ready handler
which sets the response in the respective <Div>.
JavaScript
functionProcessRequest() {
// // Assign the content to the form
document.getElementById('ResponseTextDiv').innerHTML = ResponseText;
document.getElementById('ResponseXMLDiv').innerHTML = ResponseHeaders;
eval("var CustomHeaders = { " + ResponseHeaderJSON + "};");
var header;
varallHeaders = "<br/>";
if (CustomHeaders != "") {
for (header inCustomHeaders) {
allHeaders = allHeaders + CustomHeaders[header] + "<br/>"
}
}
document.getElementById('ResponseHeadersDiv').innerHTML = allHeaders;
}
Example:
JavaScript
AjaxRequest(ProcessRequest, 'Handler.ashx','POST',
{ Param1: 'Param1Value', Param2: 'Param2Value', Param3: 'Param3Value' },
{ Query1: 'Q1', Query2: 'Q2', Query3: 'Q3' },
{ Header1: 'H1', Header2: 'H2', Header3: 'H3' }
);
For handling the client request, I have implemented a simple Generic Handler (.ashx).
You can access all the data (query string + Post Data + HTTP Headers) that is sent by the
client browser in AJAX request.](https://image.slidesharecdn.com/fullstackdevelopment-digitalnotes1-240426061109-24fb79ee/75/Full-Stack-Development-Course-in-Gurgaon-186-2048.jpg)
![187 | P a g e
In the Generic handler, the data is accessible via the context.Requestobject.
Though you can access all the data together in context.Request.Params[], you can access the data
separately as follows:
Query String: context.Request.QueryString[[index/string]]
Http Headers: context.Request.Headers[[index/string]]
In the example application, what I have done is just echo back the data which is received in
the request along with a custom HTTP header added.
JavaScript
foreach(string Param incontext.Request.Params)
{
ParamsData ="<br/>" + Param + " : " +
context.Request.Params[Param].ToString() + ParamsData;
}
context.Response.Write(ParamsData);
The above lines capture the data in the request and send it back in the response.
For adding an extra custom HTTP header in response:
C#
context.Response.AddHeader("CustomHeaderJSON", CustomHeaderJSON);
As you see, the context.Responseobject is used to assemble the response which is to be sent
back to the browser.
Different methods of context.Response can be used to do this.
'CustomHeaderJSON' can contain a string , but I have created a JSON format string for
supporting multiple values.The values are then parsed at client side using JavaScript.
I have just used string concatenate for creating it, but you can also use different JSON
parsers/Encoders available at http://www.json.org/.
You can also use JSON strings to exchange data through AJAX. It is sometimes better to use
JSON than XML. Using JSON results in less bytes transferred than XML.
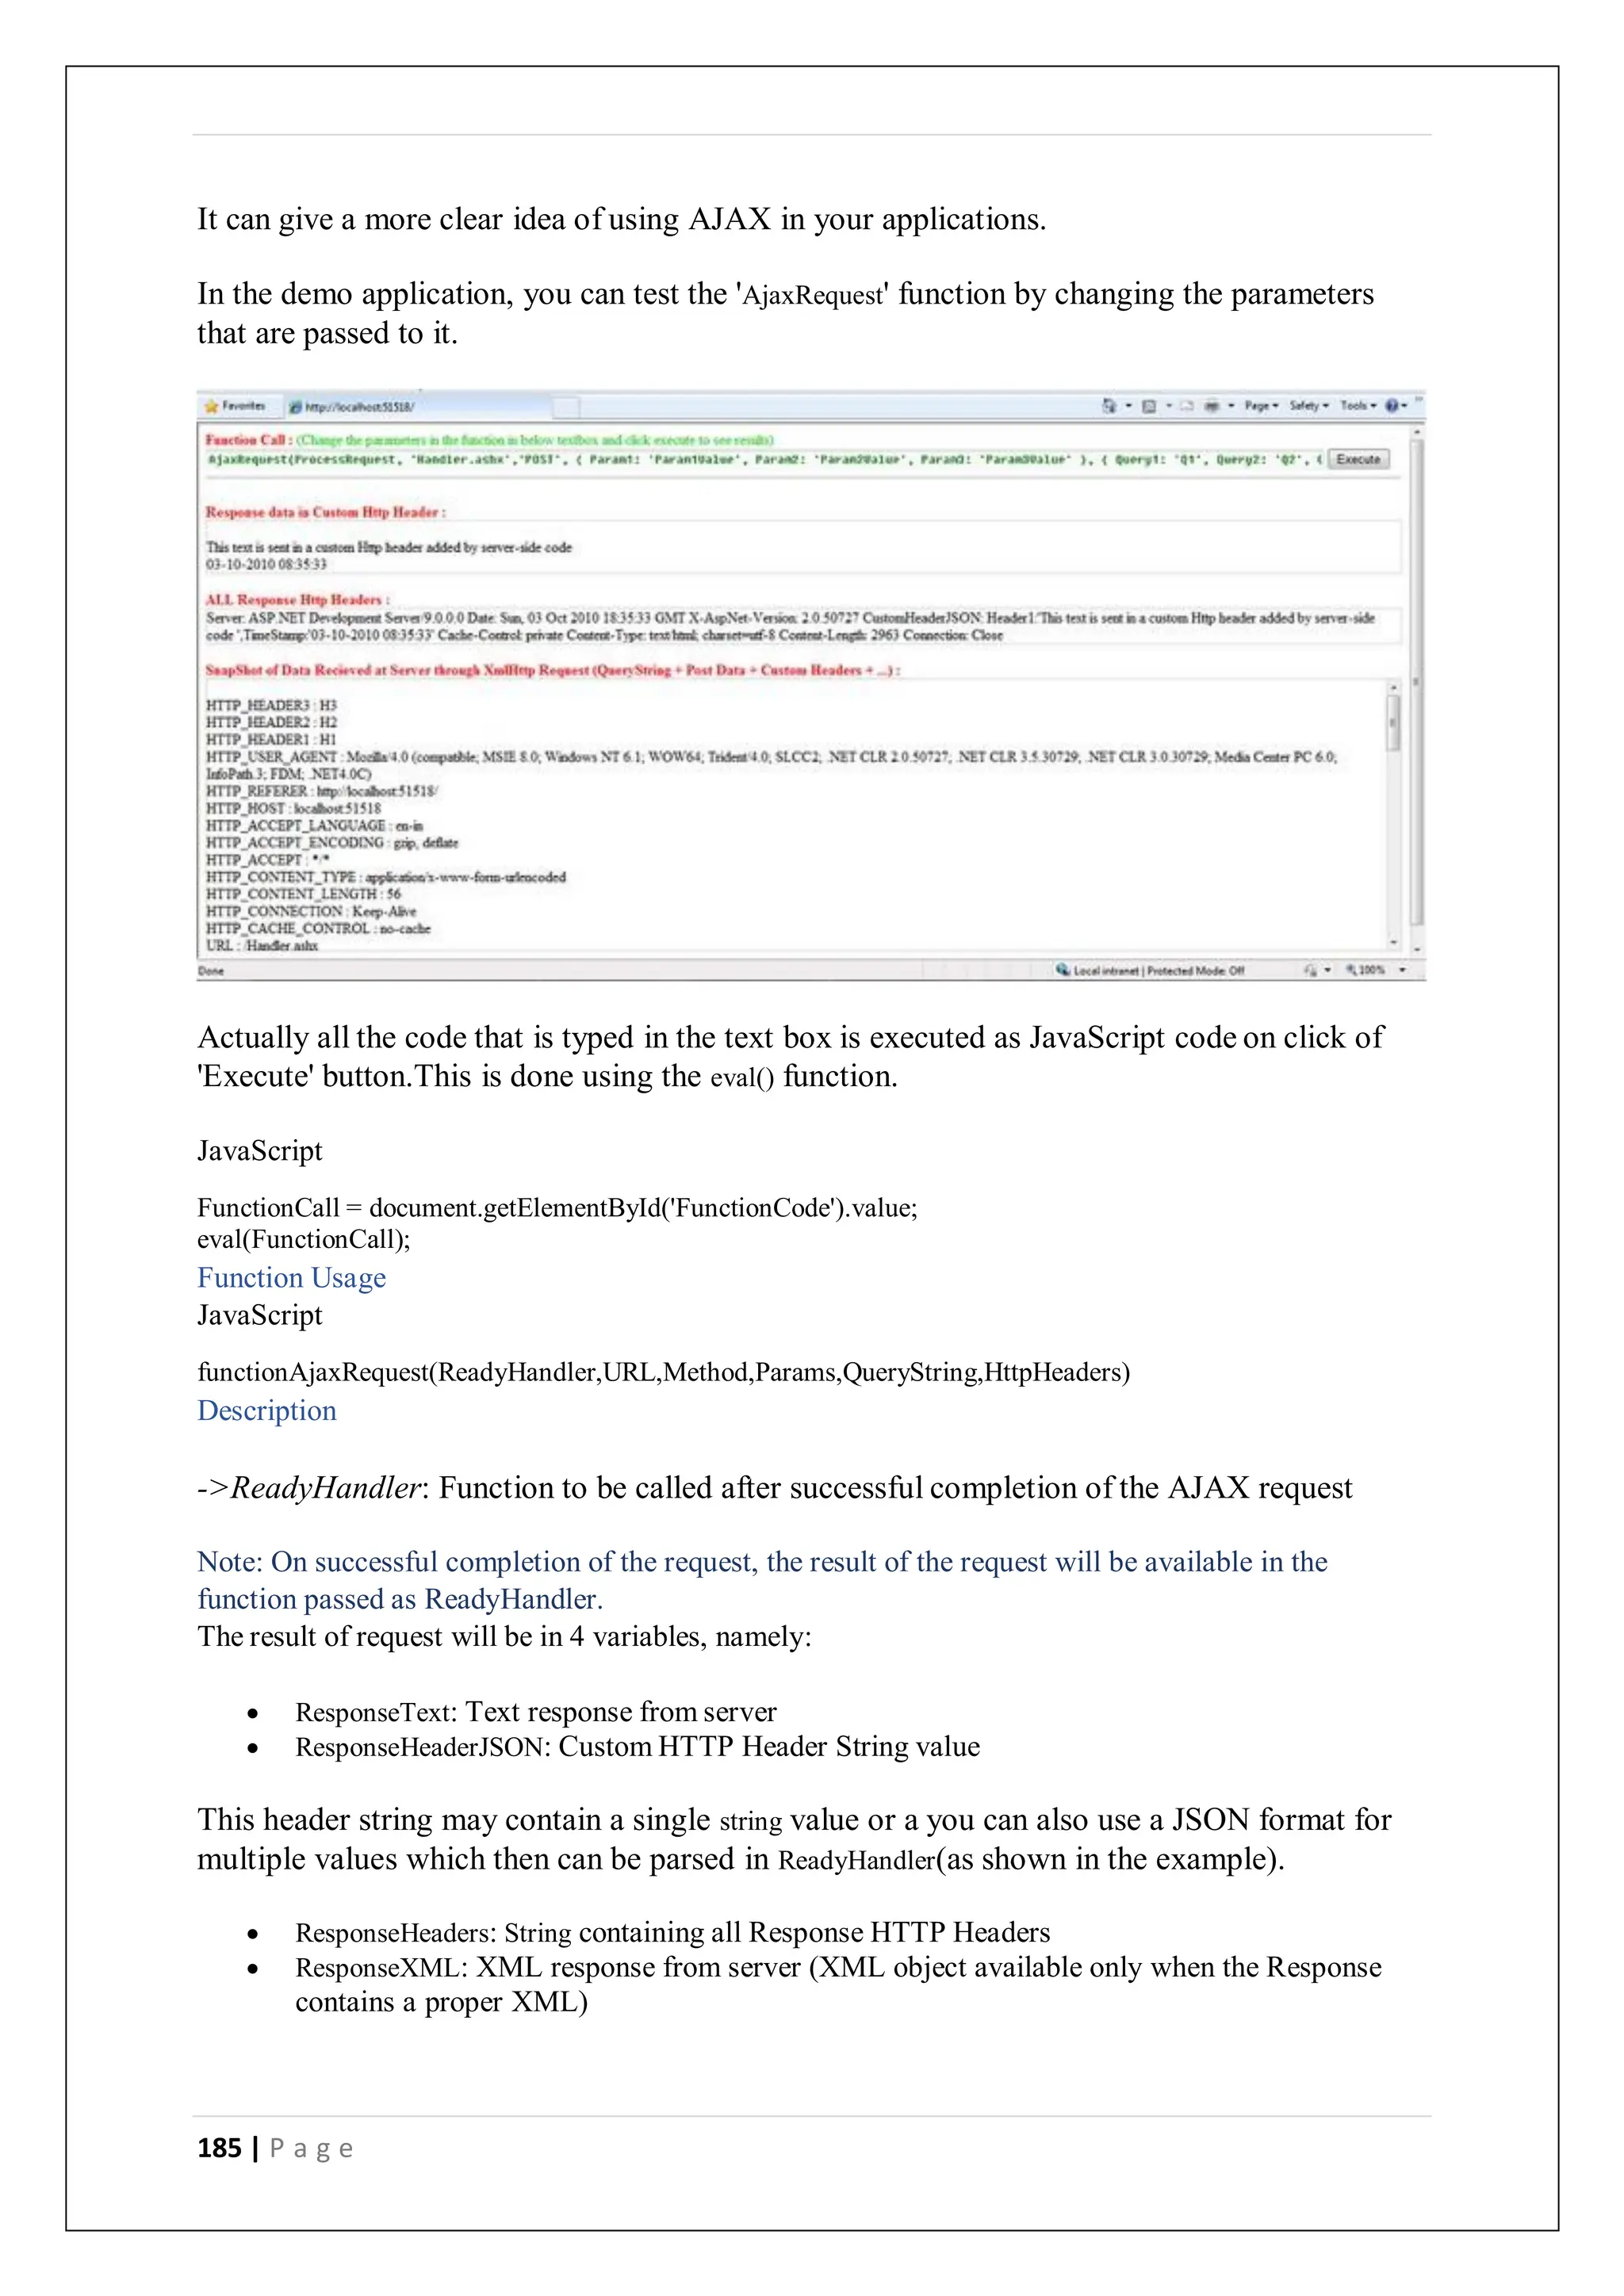
Points of Interest
This is a basic implementation of AJAX and the function can be tuned and modified
according to needs and reconfigurability.
Here is how the request and response looks like [HTTP request in Fiddler]:](https://image.slidesharecdn.com/fullstackdevelopment-digitalnotes1-240426061109-24fb79ee/75/Full-Stack-Development-Course-in-Gurgaon-187-2048.jpg)


![203 | P a g e
</select>
Note that the Coconut option is initially selected, because of the selected attribute. React,
instead of using this selected attribute, uses a value attribute on the root select tag. This is more
convenient in a controlled component because you only need to update it in one place. For
example:
classFlavorFormextendsReact.Component{
constructor(props){
super(props);
this.state={value:'coconut'};
this.handleChange=this.handleChange.bind(this);
this.handleSubmit=this.handleSubmit.bind(this);
}
handleChange(event){this.setState({value:event.target.value});}
handleSubmit(event){
alert('Your favoriteflavor is: '+this.state.value);
event.preventDefault();
}
render(){
return(
<form onSubmit={this.handleSubmit}>
<label>
Pick your favoriteflavor:
<select value={this.state.value} onChange={this.handleChange}><option
value="grapefruit">Grapefruit</option>
<option value="lime">Lime</option>
<option value="coconut">Coconut</option>
<option value="mango">Mango</option>
</select>
</label>
<input type="submit" value="Submit" />
</form>
);
}
}
Try it on CodePen
Overall, this makes it so that <input type="text">, <textarea>, and <select> all work very similarly -
they all accept a value attribute that you can use to implement a controlled component.
Note
You can pass an array into the value attribute, allowing you to select multiple options in a
select tag:
<select multiple={true} value={['B', 'C']}>
The file input Tag
In HTML, an <input type="file"> lets the user choose one or more files from their device storage
to be uploaded to a server or manipulated by JavaScript via the File API.](https://image.slidesharecdn.com/fullstackdevelopment-digitalnotes1-240426061109-24fb79ee/75/Full-Stack-Development-Course-in-Gurgaon-203-2048.jpg)
![204 | P a g e
<input type="file" />
Because its value is read-only, it is an uncontrolled component in React. It is discussed
together with other uncontrolled components later in the documentation.
Handling Multiple Inputs
When you need to handle multiple controlled input elements, you can add a name attribute to
each element and let the handler function choose what to do based on the value of
event.target.name.
For example:
classReservationextendsReact.Component{
constructor(props){
super(props);
this.state={
isGoing:true,
numberOfGuests:2
};
this.handleInputChange=this.handleInputChange.bind(this);
}
handleInputChange(event){
const target =event.target;
const value =target.type==='checkbox'?target.checked:target.value;
const name = target.name;
this.setState({
[name]: value});
}
render(){
return(
<form>
<label>
Is going:
<input
name="isGoing" type="checkbox"
checked={this.state.isGoing}
onChange={this.handleInputChange} />
</label>
<br />
<label>
Number of guests:
<input
name="numberOfGuests" type="number"
value={this.state.numberOfGuests}
onChange={this.handleInputChange} />
</label>
</form>
);
}
}
Try it on CodePen](https://image.slidesharecdn.com/fullstackdevelopment-digitalnotes1-240426061109-24fb79ee/75/Full-Stack-Development-Course-in-Gurgaon-204-2048.jpg)
![205 | P a g e
Note how we used the ES6 computed property name syntax to update the state key
corresponding to the given input name:
this.setState({
[name]: value});
It is equivalent to this ES5 code:
varpartialState={};
partialState[name]=value;this.setState(partialState);
Also, since setState() automatically merges a partial state into the current state, we only needed
to call it with the changed parts.
Controlled Input Null Value
Specifying the value prop on a controlled component prevents the user from changing the
input unless you desire so. If you’ve specified a value but the input is still editable, you may
have accidentally set value to undefined or null.
The following code demonstrates this. (The input is locked at first but becomes editable after
a short delay.)
ReactDOM.createRoot(mountNode).render(<input value="hi" />);
setTimeout(function(){
ReactDOM.createRoot(mountNode).render(<input value={null} />);
},1000);
Alternatives to Controlled Components
It can sometimes be tedious to use controlled components, because you need to write an event
handler for every way your data can change and pipe all of the input state through a React
component. This can become particularly annoying when you are converting a preexisting
codebase to React, or integrating a React application with a non-React library. In these
situations, you might want to check out uncontrolled components, an alternative technique for
implementing input forms.
Introduction to Redux
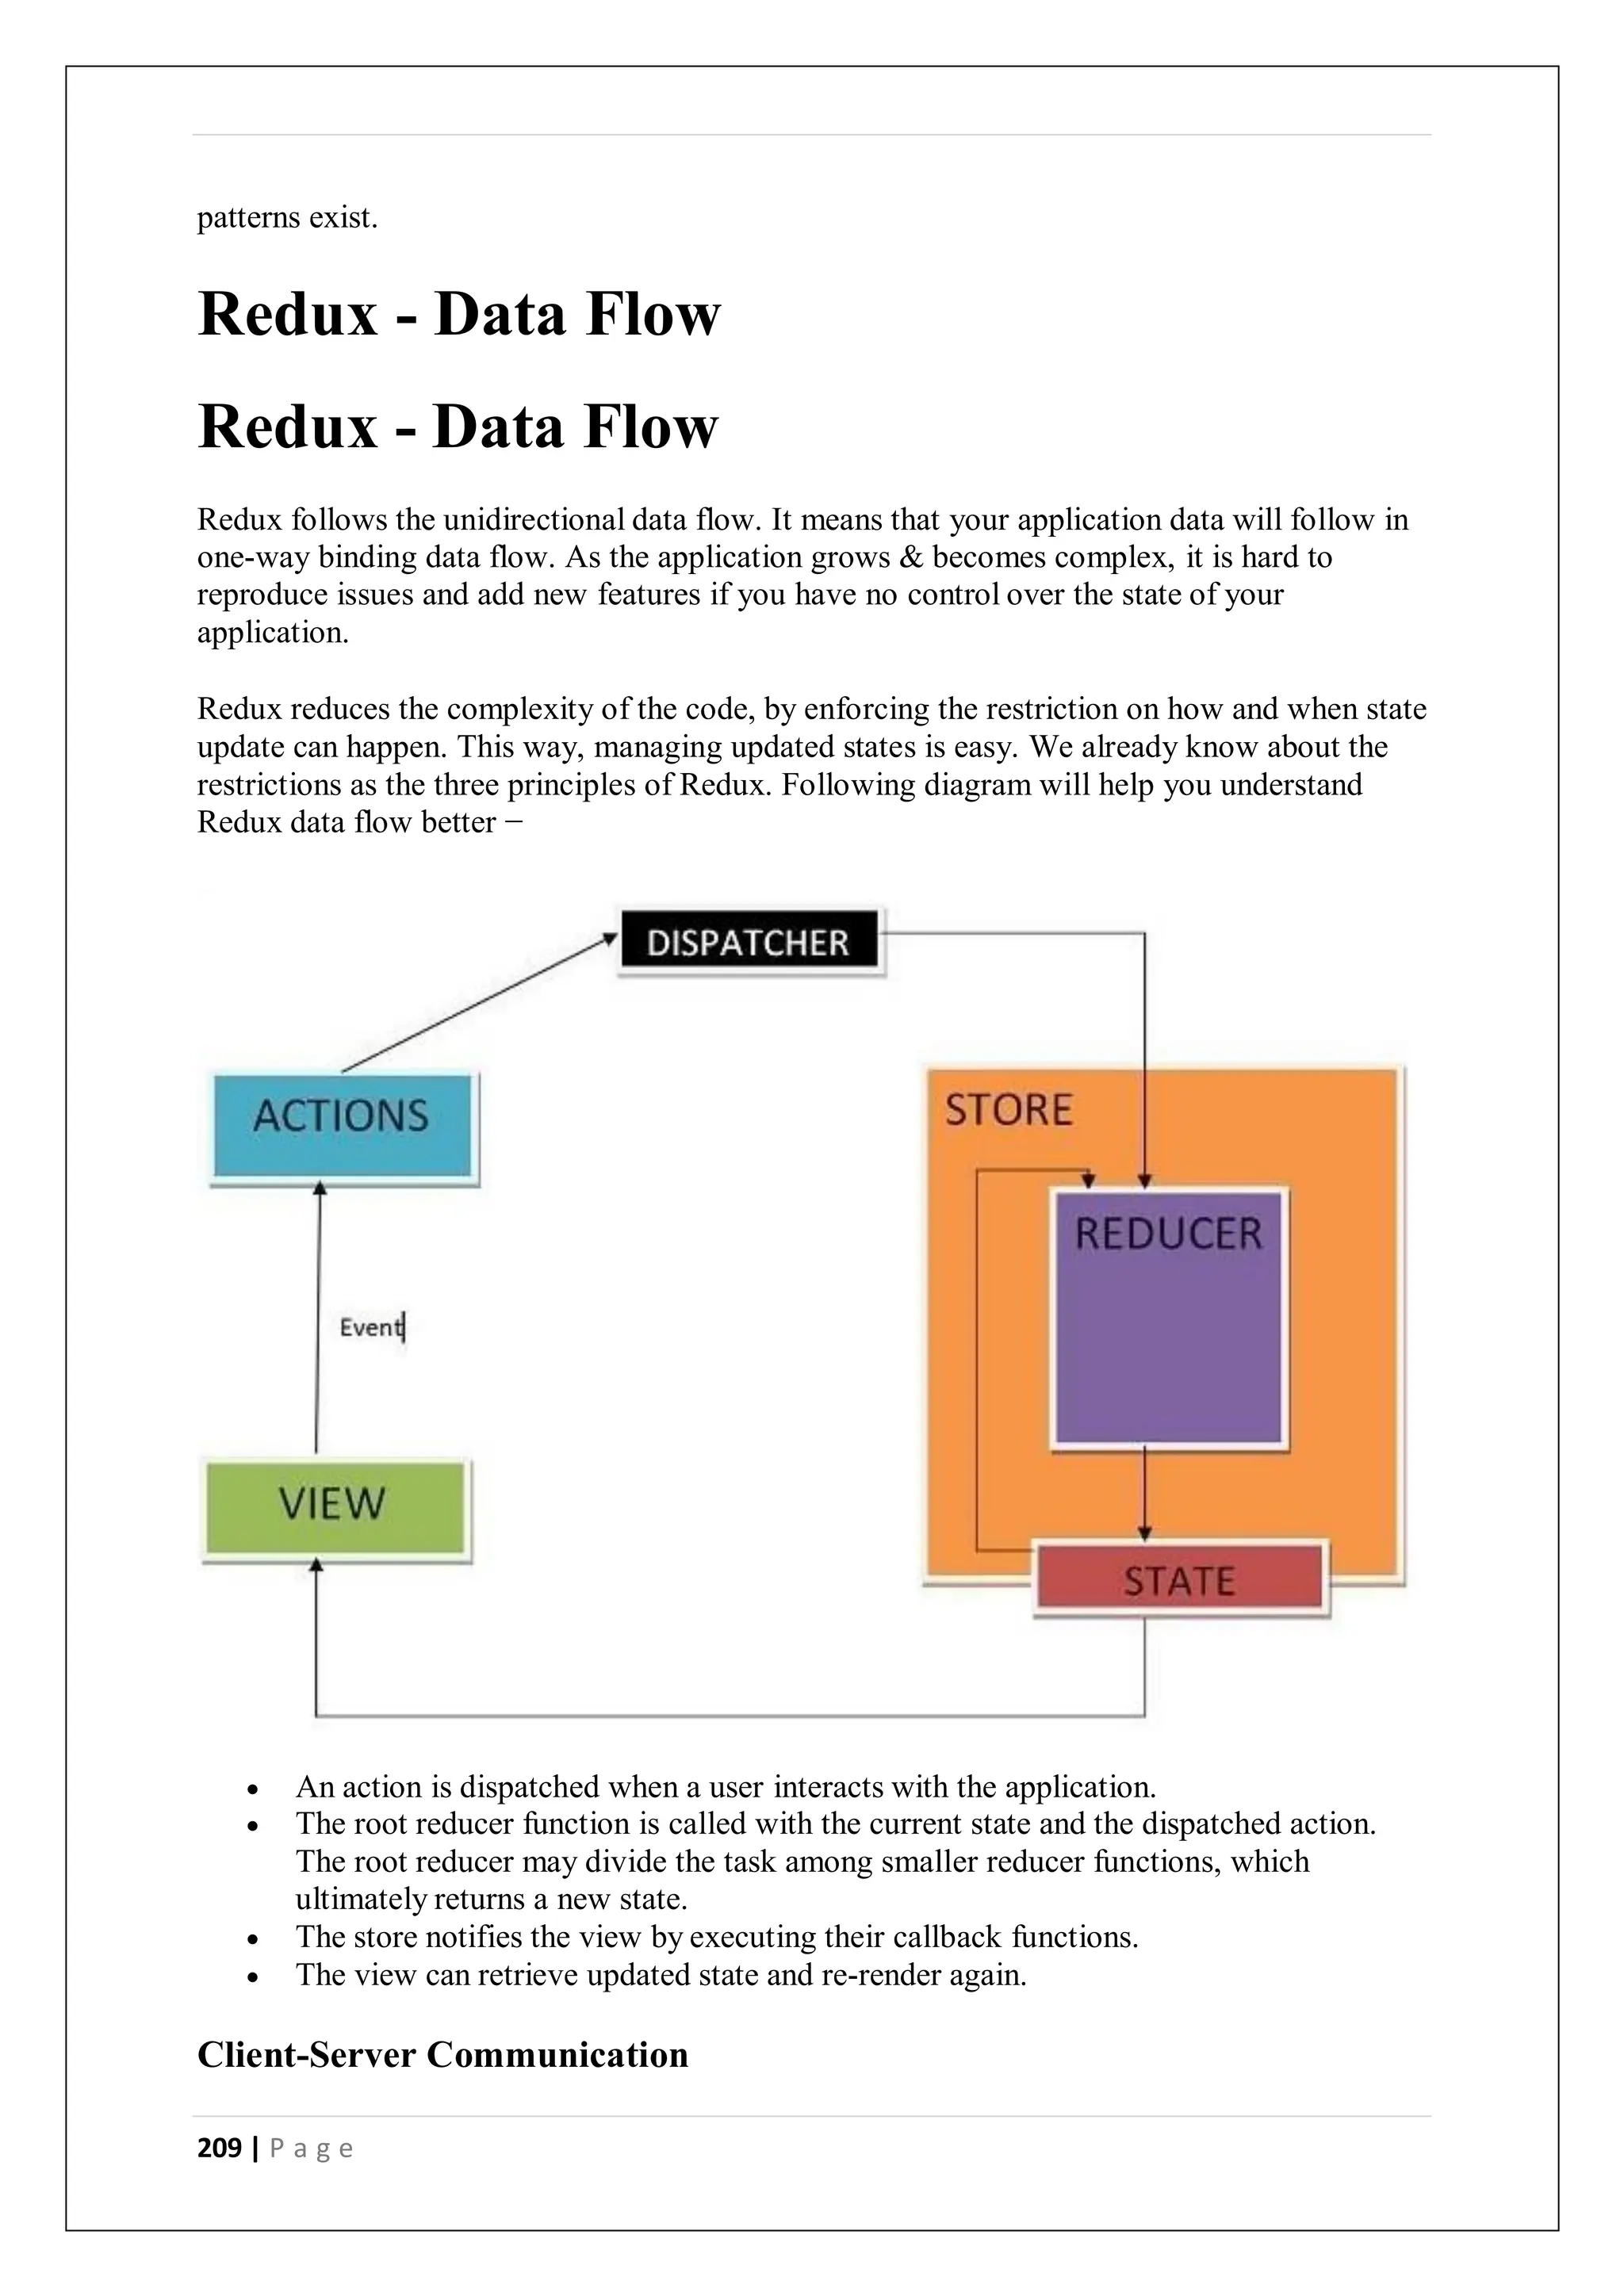
Redux Toolkit
Redux Toolkit is our official recommended approach for writing Redux logic. It wraps
around the Redux core, and contains packages and functions that we think are essential for
building a Redux app. Redux Toolkit builds in our suggested best practices, simplifies most
Redux tasks, prevents common mistakes, and makes it easier to write Redux applications.
RTK includes utilities that help simplify many common use cases, including store setup,
creating reducers and writing immutable update logic, and even creating entire "slices" of
state at once.](https://image.slidesharecdn.com/fullstackdevelopment-digitalnotes1-240426061109-24fb79ee/75/Full-Stack-Development-Course-in-Gurgaon-205-2048.jpg)

![210 | P a g e
Let's expand the application so that the notes are stored in the backend. We'll use json-server,
familiar from part 2.
The initial state of the database is stored in the file db.json, which is placed in the root of the
project:
{
"notes": [
{
"content": "the app state is in redux store",
"important": true,
"id": 1
},
{
"content": "state changes are made with actions",
"important": false,
"id": 2
}
]
}
We'll install json-server for the project...
npm install json-server --save-dev
and add the following line to the scripts part of the file package.json
"scripts": {
"server": "json-server -p3001 --watch db.json",
// ...
}
Now let's launch json-server with the command npm run server.
Next, we'll create a method into the file services/notes.js, which uses axios to fetch data from
the backend
import axios from 'axios'
constbaseUrl = 'http://localhost:3001/notes'
constgetAll = async () => {
const response = await axios.get(baseUrl)
return response.data
}
export default { getAll }
We'll add axios to the project
npm install axios
We'll change the initialization of the state in noteReducer, so that by default there are no
notes:](https://image.slidesharecdn.com/fullstackdevelopment-digitalnotes1-240426061109-24fb79ee/75/Full-Stack-Development-Course-in-Gurgaon-210-2048.jpg)
![211 | P a g e
constnoteSlice = createSlice({
name: 'notes',
initialState: [], // ...
})
Let's also add a new action appendNote for adding a note object:
constnoteSlice = createSlice({
name: 'notes',
initialState: [],
reducers: {
createNote(state, action) {
const content = action.payload
state.push({
content,
important: false,
id: generateId(),
})
},
toggleImportanceOf(state, action) {
const id = action.payload
constnoteToChange = state.find(n => n.id === id)
constchangedNote = {
...noteToChange,
important: !noteToChange.important
}
return state.map(note =>
note.id !== id ? note : changedNote
)
},
appendNote(state, action) { state.push(action.payload) } },
})
export const{ createNote, toggleImportanceOf, appendNote } = noteSlice.actions
export default noteSlice.reducer
A quick way to initialize the notes state based on the data received from the server is to fetch
the notes in the index.js file and dispatch an action using the appendNote action creator for
each individual note object:
// ...
import noteService from './services/notes'importnoteReducer, { appendNote } from './reducers/noteReducer'
const store = configureStore({
reducer: {
notes: noteReducer,
filter: filterReducer,
}
})
noteService.getAll().then(notes =>notes.forEach(note => { store.dispatch(appendNote(note)) }))
// ...
Dispatching multiple actions seems a bit impractical. Let's add an action creator setNotes
which can be used to directly replace the notes array. We'll get the action creator from the](https://image.slidesharecdn.com/fullstackdevelopment-digitalnotes1-240426061109-24fb79ee/75/Full-Stack-Development-Course-in-Gurgaon-211-2048.jpg)
![212 | P a g e
createSlice function by implementing the setNotes action:
// ...
constnoteSlice = createSlice({
name: 'notes',
initialState: [],
reducers: {
createNote(state, action) {
const content = action.payload
state.push({
content,
important: false,
id: generateId(),
})
},
toggleImportanceOf(state, action) {
const id = action.payload
constnoteToChange = state.find(n => n.id === id)
constchangedNote = {
...noteToChange,
important: !noteToChange.important
}
return state.map(note =>
note.id !== id ? note : changedNote
)
},
appendNote(state, action) {
state.push(action.payload)
},
setNotes(state, action) { return action.payload } },
})
export const{ createNote, toggleImportanceOf, appendNote, setNotes } = noteSlice.actions
export default noteSlice.reducer
Now, the code in the index.js file looks a lot better:
// ...
import noteService from './services/notes'
import noteReducer, { setNotes } from './reducers/noteReducer'
const store = configureStore({
reducer: {
notes: noteReducer,
filter: filterReducer,
}
})
noteService.getAll().then(notes =>
store.dispatch(setNotes(notes)))
NB: why didn't we use await in place of promises and event handlers (registered to then-
methods)?](https://image.slidesharecdn.com/fullstackdevelopment-digitalnotes1-240426061109-24fb79ee/75/Full-Stack-Development-Course-in-Gurgaon-212-2048.jpg)
![213 | P a g e
Await only works inside async functions, and the code in index.js is not inside a function, so
due to the simple nature of the operation, we'll abstain from using async this time.
We do, however, decide to move the initialization of the notes into the App component, and,
as usual, when fetching data from a server, we'll use the effect hook.
import { useEffect } from 'react'importNewNote from './components/NewNote'
import Notes from './components/Notes'
import VisibilityFilter from './components/VisibilityFilter'
import noteService from './services/notes'import { setNotes } from './reducers/noteReducer'import { useDispatch
} from 'react-redux'
const App = () => {
const dispatch = useDispatch() useEffect(() => { noteService .getAll().then(notes =>
dispatch(setNotes(notes))) }, [])
return (
<div>
<NewNote />
<VisibilityFilter />
<Notes />
</div>
)
}
export default App
Using the useEffect hook causes an eslint warning:
We can get rid of it by doing the following:
const App = () => {
const dispatch = useDispatch()
useEffect(() => {
noteService
.getAll().then(notes => dispatch(setNotes(notes)))
}, [dispatch])
// ...
}
Now the variable dispatch we define in the App component, which practically is the dispatch
function of the redux store, has been added to the array useEffect receives as a parameter. If
the value of the dispatch variable would change during runtime, the effect would be executed
again. This however cannot happen in our application, so the warning is unnecessary.](https://image.slidesharecdn.com/fullstackdevelopment-digitalnotes1-240426061109-24fb79ee/75/Full-Stack-Development-Course-in-Gurgaon-213-2048.jpg)
![214 | P a g e
Another way to get rid of the warning would be to disable ESlint on that line:
const App = () => {
const dispatch = useDispatch()
useEffect(() => {
noteService
.getAll().then(notes => dispatch(setNotes(notes)))
}, []) // eslint-disable-line react-hooks/exhaustive-deps
// ...
}
Generally disabling ESlint when it throws a warning is not a good idea. Even though the
ESlint rule in question has caused some arguments, we will use the first solution.
More about the need to define the hooks dependencies in the react documentation.
We can do the same thing when it comes to creating a new note. Let's expand the code
communicating with the server as follows:
constbaseUrl = 'http://localhost:3001/notes'
constgetAll = async () => {
const response = await axios.get(baseUrl)
return response.data
}
constcreateNew = async (content) =>{ const object = { content, important: false } const response = await
axios.post(baseUrl, object) return response.data}
export default {
getAll,
createNew,
}
The method addNote of the component NewNote changes slightly:
import { useDispatch } from 'react-redux'
import { createNote } from '../reducers/noteReducer'
import noteService from '../services/notes'
constNewNote = (props) => {
const dispatch = useDispatch()
constaddNote = async (event) =>{ event.preventDefault()
const content = event.target.note.value
event.target.note.value = ''
constnewNote = await noteService.createNew(content) dispatch(createNote(newNote)) }
return (
<form onSubmit={addNote}>
<input name="note" />
<button type="submit">add</button>
</form>
)
}
export default NewNote
Because the backend generates ids for the notes, we'll change the action creator createNote](https://image.slidesharecdn.com/fullstackdevelopment-digitalnotes1-240426061109-24fb79ee/75/Full-Stack-Development-Course-in-Gurgaon-214-2048.jpg)


![224 | P a g e
instances.
3) Static variable
A variable that is declared as static is called a static variable. It cannot be local. You can
create a single copy of the static variable and share it among all the instances of the class.
Memory allocation for static variables happens only once when the class is loaded in the
memory.
Example to understand the types of variables in java
1. public class A
2. {
3. static int m=100;//static variable
4. void method()
5. {
6. int n=90;//local variable
7. }
8. public static void main(String args[])
9. {
10. int data=50;//instance variable
11. }
12. }//end of class
Java Variable Example: Add Two Numbers
1. public class Simple{
2. public static void main(String[] args){
3. int a=10;
4. int b=10;
5. int c=a+b;
6. System.out.println(c);
7. }
8. }
Output:
20
Java Variable Example: Widening
1. public class Simple{
2. public static void main(String[] args){
3. int a=10;
4. float f=a;
5. System.out.println(a);
6. System.out.println(f);
7. }}
Output:
10](https://image.slidesharecdn.com/fullstackdevelopment-digitalnotes1-240426061109-24fb79ee/75/Full-Stack-Development-Course-in-Gurgaon-224-2048.jpg)
![225 | P a g e
10.0
Java Variable Example: Narrowing (Typecasting)
1. public class Simple{
2. public static void main(String[] args){
3. float f=10.5f;
4. //int a=f;//Compile time error
5. int a=(int)f;
6. System.out.println(f);
7. System.out.println(a);
8. }}
Output:
10.5
10
Java Variable Example: Overflow
1. class Simple{
2. public static void main(String[] args){
3. //Overflow
4. int a=130;
5. byte b=(byte)a;
6. System.out.println(a);
7. System.out.println(b);
8. }}
Output:
130
-126
Java Variable Example: Adding Lower Type
1. class Simple{
2. public static void main(String[] args){
3. byte a=10;
4. byte b=10;
5. //byte c=a+b;//Compile Time Error: because a+b=20 will be int
6. byte c=(byte)(a+b);
7. System.out.println(c);
8. }}
Output:
20
Java OOPs Concepts
1. Object-Oriented Programming
2. Advantage of OOPs over Procedure-oriented programming language](https://image.slidesharecdn.com/fullstackdevelopment-digitalnotes1-240426061109-24fb79ee/75/Full-Stack-Development-Course-in-Gurgaon-225-2048.jpg)

![235 | P a g e
13.
14. // getter and setter methods
15. public void setEmployeeName(String name){
16. model.setName(name);
17. }
18.
19. public String getEmployeeName(){
20. return model.getName();
21. }
22.
23. public void setEmployeeId(String id){
24. model.setId(id);
25. }
26.
27. public String getEmployeeId(){
28. return model.getId();
29. }
30.
31. public void setEmployeeDepartment(String Department){
32. model.setDepartment(Department);
33. }
34.
35. public String getEmployeeDepartment(){
36. return model.getDepartment();
37. }
38.
39. // method to update view
40. public void updateView() {
41. view.printEmployeeDetails(model.getName(), model.getId(), model.getDepart
ment());
42. }
43. }
Main Class Java file
The following example displays the main file to implement the MVC architecture. Here, we
are using the MVCMain class.
MVCMain.java
1. // main class
2. public class MVCMain {
3. public static void main(String[] args) {
4.
5. // fetching the employee record based on the employee_id from the database
6. Employee model = retriveEmployeeFromDatabase();
7.
8. // creating a view to write Employee details on console
9. EmployeeView view = new EmployeeView();
10.10.
11. EmployeeController controller = new EmployeeController(model, view);](https://image.slidesharecdn.com/fullstackdevelopment-digitalnotes1-240426061109-24fb79ee/75/Full-Stack-Development-Course-in-Gurgaon-235-2048.jpg)


![248 | P a g e
What happens when it gets loaded?
Spring Boot will run ALL CommandLineRunner beans once the application context is
loaded.
This runner will request a copy of the EmployeeRepository you just created.
Using it, it will create two entities and store them.
Right-click and RunPayRollApplication, and this is what you get:
Fragment of console output showing preloading of data
...
2018-08-09 11:36:26.169 INFO 74611 --- [main] payroll.LoadDatabase : Preloading Employee(id=1,
name=Bilbo Baggins, role=burglar)
2018-08-09 11:36:26.174 INFO 74611 --- [main] payroll.LoadDatabase : Preloading Employee(id=2,
name=Frodo Baggins, role=thief)
...
This isn’t the whole log, but just the key bits of preloading data. (Indeed, check out the whole
console. It’s glorious.)
HTTP is the Platform
To wrap your repository with a web layer, you must turn to Spring MVC. Thanks to Spring
Boot, there is little in infrastructure to code. Instead, we can focus on actions:
nonrest/src/main/java/payroll/EmployeeController.java
package payroll;
importjava.util.List;
importorg.springframework.web.bind.annotation.DeleteMapping;
importorg.springframework.web.bind.annotation.GetMapping;
importorg.springframework.web.bind.annotation.PathVariable;
importorg.springframework.web.bind.annotation.PostMapping;
importorg.springframework.web.bind.annotation.PutMapping;
importorg.springframework.web.bind.annotation.RequestBody;
importorg.springframework.web.bind.annotation.RestController;
@RestController
classEmployeeController{
privatefinalEmployeeRepository repository;
EmployeeController(EmployeeRepository repository){
this.repository= repository;
}
// Aggregate root
// tag::get-aggregate-root[]
@GetMapping("/employees")
List<Employee>all(){
returnrepository.findAll();](https://image.slidesharecdn.com/fullstackdevelopment-digitalnotes1-240426061109-24fb79ee/75/Full-Stack-Development-Course-in-Gurgaon-248-2048.jpg)
![249 | P a g e
}
// end::get-aggregate-root[]
@PostMapping("/employees")
EmployeenewEmployee(@RequestBodyEmployeenewEmployee){
returnrepository.save(newEmployee);
}
// Single item
@GetMapping("/employees/{id}")
Employeeone(@PathVariableLong id){
returnrepository.findById(id)
.orElseThrow(()->newEmployeeNotFoundException(id));
}
@PutMapping("/employees/{id}")
EmployeereplaceEmployee(@RequestBodyEmployeenewEmployee,@PathVariableLong id){
returnrepository.findById(id)
.map(employee ->{
employee.setName(newEmployee.getName());
employee.setRole(newEmployee.getRole());
returnrepository.save(employee);
})
.orElseGet(()->{
newEmployee.setId(id);
returnrepository.save(newEmployee);
});
}
@DeleteMapping("/employees/{id}")
voiddeleteEmployee(@PathVariableLong id){
repository.deleteById(id);
}
}
@RestController indicates that the data returned by each method will be written straight
into the response body instead of rendering a template.
An EmployeeRepository is injected by constructor into the controller.
We have routes for each operation (@GetMapping, @PostMapping, @PutMapping and
@DeleteMapping, corresponding to HTTP GET, POST, PUT, and DELETE calls). (NOTE:
It’s useful to read each method and understand what they do.)
EmployeeNotFoundException is an exception used to indicate when an employee is looked
up but not found.
nonrest/src/main/java/payroll/EmployeeNotFoundException.java
package payroll;
classEmployeeNotFoundExceptionextendsRuntimeException{
EmployeeNotFoundException(Long id){
super("Could not find employee "+ id);
}
}](https://image.slidesharecdn.com/fullstackdevelopment-digitalnotes1-240426061109-24fb79ee/75/Full-Stack-Development-Course-in-Gurgaon-249-2048.jpg)
![251 | P a g e
> Accept: */*
>
< HTTP/1.1 200
< Content-Type: application/json;charset=UTF-8
< Transfer-Encoding: chunked
< Date: Thu, 09 Aug 2018 17:58:00 GMT
<
* Connection #0 to host localhost left intact
[{"id":1,"name":"Bilbo Baggins","role":"burglar"},{"id":2,"name":"Frodo Baggins","role":"thief"}]
Here you can see the pre-loaded data, in a compacted format.
If you try and query a user that doesn’t exist…
$ curl -v localhost:8080/employees/99
You get…
* Trying ::1...
* TCP_NODELAY set
* Connected to localhost (::1) port 8080 (#0)
> GET /employees/99 HTTP/1.1
> Host: localhost:8080
> User-Agent: curl/7.54.0
> Accept: */*
>
< HTTP/1.1 404
< Content-Type: text/plain;charset=UTF-8
< Content-Length: 26
< Date: Thu, 09 Aug 2018 18:00:56 GMT
<
* Connection #0 to host localhost left intact
Could not find employee 99
This message nicely shows an HTTP 404 error with the custom message Could not find
employee 99.
It’s not hard to show the currently coded interactions…
If you are using Windows Command Prompt to issue cURL commands, chances are the
below command won’t work properly. You must either pick a terminal that support single
quoted arguments, or use double quotes and then escape the ones inside the JSON.
To create a new Employee record we use the following command in a terminal—the $ at the
beginning signifies that what follows it is a terminal command:
$ curl -X POST localhost:8080/employees -H 'Content-type:application/json' -d '{"name": "Samwise Gamgee",
"role": "gardener"}'
Then it stores newly created employee and sends it back to us:
{"id":3,"name":"Samwise Gamgee","role":"gardener"}](https://image.slidesharecdn.com/fullstackdevelopment-digitalnotes1-240426061109-24fb79ee/75/Full-Stack-Development-Course-in-Gurgaon-251-2048.jpg)


![261 | P a g e
i.e., a primary key or the candidate key. In the Context of Employee Table:
empId → { empName, skill, dependent, contract, project}
In the Context of Username Table:
userName → dateCreate
In the Context of Subject Table:
Consider Subject table which has sub_Code, subName sub_Code->subName
In the Context of Enrollment Table:
Considering the enrollment table which has the attributes like: enrollment Id, Name of
employee, field in which employee enrolled and date
c)
We have the following Employee and Username Tables:
In Context of Employee Table:
Employee table is not in normalize or the normal forms. Because the Attributes in it like:
Skill, project, contract and dependent attributes might have one or more values. According
to the 1NF principle every field must contain the atomic values if they don’t have the atomic
value. There is need to decompose the table since the table should have the 1 value in each
field.
In the Context of Username Table:
It is normalizing one Since it has two fields[UserName and dateCreate] in which both have
atomic values or data , is fully functional dependent, no transition dependency etc.
d)
Normalization, Decomposition process will be done.
Normalization is a process or technique of organizing or collecting the data in database. It is
mainly done for two purposes: Eliminating the redundancy or even the useless data
In 1st
NF:
Every field must contain the single atomic value and the attribute like: skill, project, contract
and dependent attribute has one or more than the decompose table so that the each and every
field has atomic value which will increase the number of tuples in the table name
“employee”.
In the 2nd
NF:](https://image.slidesharecdn.com/fullstackdevelopment-digitalnotes1-240426061109-24fb79ee/75/Full-Stack-Development-Course-in-Gurgaon-261-2048.jpg)
![262 | P a g e
Each table should be at 1st
NF.
There should not be any functional dependency. So, in this case, after it is in 1st
NF
table is in 2nd
NF Since the empId can find out all the attributes of the employees.
In 3rd
NF:
Table should be at 2nd
NF Form.
There should not be any transitive dependency in the table in which the non-primitive
attribute can find another non-primitive attribute i.e., empName, skill, dependent,
project is the non-primitive attribute and they cannot find the each other but the main
prime attribute can or able to find all of them.
In BCNF:
Table should be at 3rd
NF.
The LHS Side of attribute should have the candidate key or the super key. • So, In this
case empId → { empName, skill, dependent, contract, project}, The attribute empId
is a primary key and can find out all other attributes.
In the 4th
NF:
Table should be at BCNF Form.
There should not be any multivalued Dependency.
So, in current Employee Table context, Employee might contain the multivalued dependency
I.e.: skills, projects [0 or more], dependency [0 or more] and contract [1 or more]. So, there
is lots of multivalued attributes or dependency on the empId which might increase the no of
entries in the table which might increase the no of entries in the table after making it to
1st
NF.
In the case of making the Employee table in 4th
NF, it will decompose the employee table
into following tables: empId → { empName, skill, dependent, contract, project}
EmployeeSkils
empId, empName,
skill
EmployeeDependency empId, empName, dependent EmployeeContract empId,
empName,
contract
EmployeeProject empId, empName,
project](https://image.slidesharecdn.com/fullstackdevelopment-digitalnotes1-240426061109-24fb79ee/75/Full-Stack-Development-Course-in-Gurgaon-262-2048.jpg)


![269 | P a g e
if (this.entityManager == null) this.entityManager = entityManager();
this.entityManager.persist(this);
}
@Transactional
public Account merge() {
if (this.entityManager == null) this.entityManager = entityManager();
Accountmerged=this.entityManager.merge(this);
this.entityManager.flush();
return merged;
}
When I'm calling persist or merge, entityManager is obviously null.
I've also tried adding implements CrudRepository<Account, Long> to the Account class to see it'll
give me that functionality via a Default Implementation, but what I'm getting is simply empty
classes that needs to be filled in.
I've had a look at the Spring Boot docs, they cover it very briefly omitting just enough detail
to so that it's not obvious what I'm missing.
I have an Application class that bootstraps the application:
@Configuration
@ComponentScan
@EnableAutoConfiguration
publicclassApplication {
publicstaticvoidmain(String[] args)throws Exception {
SpringApplication.run(Application.class, args);
}
}
My properties file looks like this:
spring.application.name: Test Application
spring.datasource.url: jdbc:mysql://localhost/test
spring.datasource.username=root
spring.datasource.password=
spring.datasource.driverClassName=com.mysql.jdbc.Driver
spring.jpa.hibernate.ddl-auto=update
This database is automatically being created thanks to the ddl-auto=update property
What is the correct way to persist entities in Spring Boot + JPA and if what I've done is
correct so far, how do I "autowire" or auto-create the entityManager?](https://image.slidesharecdn.com/fullstackdevelopment-digitalnotes1-240426061109-24fb79ee/75/Full-Stack-Development-Course-in-Gurgaon-269-2048.jpg)