Decoding Kotlin - Your guide to solving the mysterious in Kotlin.pptx
Electrónica: Probador de LOPT/FBT Flyback
1. Text and illustrations courtesy of Electronics Australia
If you're reading this, then chances are
that you're a TV and/or computer mon-
itor repair technician - who doesn't need
to be told that horizontal output stage
faults cause more than their fair share of
headaches! Operating at high voltages,
frequencies and power levels, many
components in this part of the circuit are
highly stressed, and failures are not only
common but their cause is often hard to
identify.
The usual symptom of a major hori-
zontal output stage fault is a serious
overload of the DC power supply feeding
the primary winding of the line output
transformer, or `LOPT' for short (called
the `flyback' transformer or `FBT' in
North America). This is often accompa-
nied by a collector-to-emitter short cir-
cuit in the horizontal output transistor or
`HOT'.
(For consistency, we'll be referring to
the line output transformer as the `LOPT'
throughout this article - North American
readers please mentally substitute `fly-
back' for this term!)
Any of quite a few possible compo-
nents could be the cause of such a failure,
the more common being one of the high-
speed rectifier diodes fed by the LOPT's
secondary windings, including the diode
stack(s) which produce the extra-high-
tension (EHT) supply of around 25 kilo-
volts for the final anode circuit of the
cathode ray tube. It's also possible the
HOT has failed simply from old age or
overheating due to unevenly-
applied/solidified heatsink compound.
Another occasional culprit is an insula-
tion breakdown in the deflection yoke's
horizontal winding.
However the failure which service
technicians dread is a shorted winding in
the LOPT itself. Unfortunately LOPTs
tend to be specifically designed for the
make and model of the TV or monitor
they are used in, which can mean a lot of
hunting around for a replacement. In
addition they are hardly ever cheap, and
not always physically easy to replace.
In short the LOPT is not a component
which is easy to test by substitution, and
a service technician needs to be as cer-
tain as possible that the LOPT really is
defective, before tracking down a
replacement!
Identifying faults
Several techniques have been devel-
oped over the years for identifying faults
in horizontal output stages, and testing
LOPTs in particular for the presence of
shorted winding turns.
The components in the horizontal out-
put transistor's collector circuit, includ-
ing the LOPT's primary winding, deflec-
tion yoke horizontal winding, and tuning
capacitors form a reasonably low loss
(high Q) resonant circuit, especially at
low voltage levels.
Most testing techniques, including the
one used in this design, are based on the
fact that nearly all serious faults in the
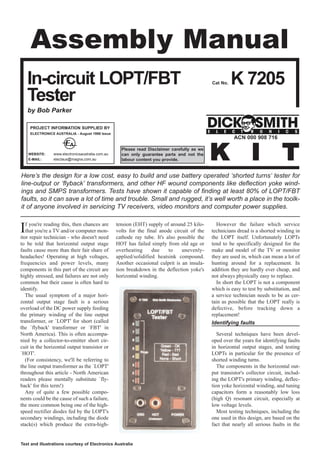
Assembly Manual
ACN 000 908 716
K
K I
I T
T
In-circuit LOPT/FBT
Tester
K 7205
Please read Disclaimer carefully as we
can only guarantee parts and not the
labour content you provide.
Cat No.
Here’s the design for a low cost, easy to build and use battery operated ‘shorted turns’ tester for
line-output or ‘flyback’ transformers, and other HF wound components like deflection yoke wind-
ings and SMPS transformers. Tests have shown it capable of finding at least 80% of LOPT/FBT
faults, so it can save a lot of time and trouble. Small and rugged, it’s well worth a place in the toolk-
it of anyone involved in servicing TV receivers, video monitors and computer power supplies.
WEBSITE: www.electronicsaustralia.com.au
E-MAIL: electaus@magna.com.au
PROJECT INFORMATION SUPPLIED BY
ELECTRONICS AUSTRALIA - August 1998 Issue
by Bob Parker
2. horizontal output stage will greatly
increase the losses in the LOPT's
primary circuit. That is, they lower
the Q.
We chose the principle of `ring'
testing as the basis for this instru-
ment because it's easy to implement
with relatively simple circuitry and
common components, and produces
predictable results with no need for
calibration.
`Ring' testing gets its name from
the fact that when a fast pulse is
applied to the primary winding of
the LOPT, the total inductance and
capacitance in the circuit will produce an
electrical `ring' - a decaying AC voltage
which can have a duration of a dozen or
more cycles before it reaches a low
value. It's the electrical equivalent of tap-
ping an empty glass; in each case, an
energy impulse generates damped oscil-
lations.
Waveform `A' in Fig.1 shows the HOT
collector voltage waveform in a typical
fault-free TV (a General Electric
TC63L1 in this case), in response to a
pulse from this tester. However if the
losses in the horizontal output circuit are
increased, the amplitude of the `ringing'
waveform will decay much more quick-
ly. Waveform `B' shows the effect of a
shorted rectifier diode on one LOPT sec-
ondary winding of the same TV, but note
that a shorted LOPT winding or several
other faults would have a similar effect.
A collector-emitter short in the HOT
or a shorted tuning capacitor will result
in no ringing at all, indicating a really
major fault.
So to do an initial check of a horizon-
tal output stage, with this tester, you first
make sure the TV or monitor is de-ener-
gised(!). Then you simply switch the
tester on, connect the ground lead to the
chassis and the `HOT Collector' lead to
the horizontal output transistor's collec-
tor. One LED will illuminate for each
`ring' cycle above about 15% of the ini-
tial pulse value, and in general if four or
more LEDs are glowing, the horizontal
output stage is OK.
We'll talk more about using the tester
later, after the circuit description. For the
moment though, it's worth mentioning
that because the tester uses a low-voltage
testing pulse, it is suitable for testing
LOPTs `in circuit' - i.e., without having
to disconnect the yoke or other connec-
tions.
Circuit description
At first glance the circuit in Fig.2
might look a bit complicated, but it real-
ly consists of three quite simple sections.
These are the low frequency pulse gener-
ator, the ring amplitude comparator and
the LED bar-graph display. We'll now
look at these in turn.
1. The low frequency pulse genera-
tor: Voltage comparator IC1a is set up as
a low frequency oscillator, whose output
on pin 7 is normally pulled up to essen-
tially the positive supply rail by R6 and
R7. Due to the time constants produced
by C2, R4 and R5/D1, pin 7 pulses
down to ground potential for about
2ms every 100ms, and it's during
these low-going 2ms pulses that
each ring test occurs.
When IC1 pin 7 drops low, Q1 is
driven into saturation by its base
current flowing in R7, and its col-
lector voltage jumps to the +6V
supply, which makes two things
happen. First, C6 in collaboration
with R16 sends a positive pulse of
about 5us duration to the reset pins
of four-bit shift registers IC2a and
IC2b, which drives all their outputs
to a low state - switching off all the
LEDs, in readiness for a new ring test.
At the same time, about 20mA flows
through R8, driving D2 into a low
impedance state and dropping about
650mV across it. The voltage step across
D2 is coupled via C3 to the test leads and
the LOPT primary winding, causing this
circuit to `ring' a bit below its natural res-
onant frequency due to the presence of
C3 (which functions as the resonating
capacitor when testing an LOPT on its
own).
2. The ring amplitude comparator:
The `ringing' waveform is coupled by C4
to the inverting input of comparator
IC1b, which is DC biased to about
+490mV by the junction of R11 and R12.
D3 is constantly forward-biased by about
1mA flowing through R10, and its entire
voltage drop of about 600mV is applied
to IC1b's non-inverting input as a refer-
ence voltage, via R13. R14 produces a
small amount of positive feedback
around IC1b, ensuring that its output
switches cleanly between its low and
high voltage levels.
The result of all this is that an inverted
and squared-up version of the ringing
waveform appears at the output of IC1b,
Text and illustrations courtesy of Electronics Australia
Page 2
LED4
YEL
LED5
YEL
LED1
RED
R18
1k
R19
1k
R20
1k
R21
1k
R22
1k
R23
1k
R24
1k
R17
1k
R14 1M
D3
1N4148
R12
150k
+
-
6V
(4xAAA)
SW1
POWER
C1
100uF
BATT
+
BATT
-
R2
1M
R1
1M
R3
1M
6
5
7
8
IC1a
R4 2.2M
IC1
LM393
IC2
4015
R5
D1
1N4148
C2
0.047uF
47k
D2
1N4148
R9
1k
C3
0.047uF
C4
0.01uF
R7
1k
R6
1k
Q1
BC328
C6
100pF
R11
33k
R8
270W
C5
0.047uF
R13
10k
3
2
1
4
IC1b
R10
4.7k
R15
4.7k
R16
47k
HOT
(Collector)
EARTH
LED2
RED
LED3
RED
LED6
GRN
LED7
GRN
LED8
GRN
13 12 11 2 7 5 4 3 10
15
14
6
1
9
16
8
C7
0.047uF
RESET A
RESET B
CLK A
CLK B
DATA
A
Q0A Q1A Q2A Q3A
DATA
B Q0B Q1B Q2B Q3B
Vss
Vcc
+
Fig.2: The circuit is simple, but elegant. IC2 shows clearly how many rings are supported by the inductor under test.
FIg.1: Ringing waveforms from ‘good’ (top) and
‘shorted winding’ line output transformers, in
response to the tester’s pulse.
3. until the ringing amplitude has decayed
down to about 15% of its initial value.
This square wave is connected straight to
the clock inputs of shift registers IC2a
and IC2b.
3. The LED bargraph display: IC2
consists of a pair of identical four-bit
serial-in/parallel-out shift registers, con-
nected to form a single eight-bit unit,
with each output driving one LED in the
`bargraph' display via resistors R17 to
R24. The serial data input of the first
stage (pin 15) is permanently connected
to the positive supply, or logic 1.
One measurement
For the first 5us after the commence-
ment of a new 2ms measuring pulse,
both shift registers are reset to zeroes on
all outputs, as described earlier. At the
same time the initial positive pulse
applied to the LOPT drives IC1b's out-
put, connected to both shift registers'
clock inputs, to a low (logic 0) level -
unless the test leads are shorted.
If the LOPT primary circuit is OK, it
will ring during the next several hundred
microseconds. For each ring above about
15% of its initial value, it will cause a
high-going pulse to be applied to the
shift register clock inputs, resulting in
the logic 1 on IC2 pin 15 being moved
one shift register stage further along. It
doesn't matter if the LOPT rings more
than eight times - all LEDs will still
remain illuminated.
So the overall result is that one LED
illuminates for each LOPT ring cycle
above 15% of the initial level, and this
condition remains until the start of the
next 2ms measuring pulse. Phew!
Usage & limitations
In order to assess the usefulness of this
design, we gave several prototype
LOPT/FBT testers to technician friends
to evaluate for many months, then asked
for their comments and thoughts on how
to put the tester to best use.
The first response is from Larry Sabo,
an experienced monitor technician in
Ottawa, Canada who also suggested the
front panel layout:
One of the first things I do to check out
a monitor is connect the tester between
the HOT collector and ground. If no or
only a few LEDs light, I check the HOT,
damper diodes and tuning caps for
shorts using a DMM. If these are OK, I
check for an open fusible resistor in the
circuit feeding B+ to the LOPT, and for
shorts/leakage in diodes on the LOPT
secondaries. I also check the bypass
capacitor on the DC supply to the LOPT
primary for excessive ESR.
If these check OK, I ring the horizontal
yoke with its connector unplugged. It will
normally ring seven times on its own. If
the yoke rings OK, I unsolder all but the
LOPT primary winding and ground pins,
and ring the primary. If the primary still
rings low with everything else discon-
nected, the LOPT is probably defective.
Most LOPTs on their own will ring 8+
times, but some ring only four or five,
even when they are perfectly normal. So
it is prudent to confirm the diagnosis by
ringing an identical known-good LOPT,
if at all possible.
Sometimes an LOPT is defective, but
still rings normally with the tester, e.g.
due to leakage or arcing that only occurs
at full operating voltage. The problem
will sometimes be manifest by heavy
loading of the B+ supply, spurious ring-
ing and/or reduced voltages on the HOT
Text and illustrations courtesy of Electronics Australia Page 3
Fig.3: Use this PCB overlay and the facing photo as a guide in assembling the
tester.
Resistors
(All 5% 0.25W carbon)
R1,2,3,14 1M
R4 2.2M
R5,16 47k
R6,7,9,
R17-24 1k
R8 270 ohms
R10,15 4.7k
R11 33k
R12 150k
R13 10k
Capacitors
C1 100uF 16/25VW
RB electrolytic
C2,3,5,7 0.047uF MKT
C4 0.01uF MKT
C6 100pF disc ceramic
Semiconductors
D1,2,3 1N914 / 1N4148 silicon
diode
IC1 LM393 dual comparator
IC2 4015 / MC14015 / CD4015
dual 4-bit shift register
LED1,2,3 Rectangular red LED
LED4,5 Rectangular yellow LED
LED6,7,8 Rectangular green LED
Q1 BC328 / 2N5819 PNP
silicon transistor
Miscellaneous
PCB, ZA1137 51 x 76mm; small (UB3)
plastic case, 130 x 68 x 41mm (DSE H-
2853); front panel; battery holder for 4 x
AAA cells; battery snap ; power switch,
push on/off; one DIP8 IC socket, one
DIP16; 4 x tapped spacers; screws,
nuts and washers (see Screw size and
allocation guide); 1 x red, 1 x black 4mm
banana sockets; test leads with 4mm
banana plugs; double-sided adhesive
tape; wire, PCB pins, solder and instruc-
tions.
Parts List
4. collector, or excessively high EHT result-
ing in HV shut-down.
Because this tester uses impulses of
only 650mV to minimize the forward
biasing of semiconductors, such defects
will not be reflected in the ring count.
Under these circumstances, I check for
measurable leakage resistance between
the EHT cap and the other LOPT pins. It
should be unmeasurable, otherwise the
LOPT is defective.
If I have gone through the above tests
and have these symptoms and a normal
ring count on the tester, the diagnosis
can usually be confirmed only by substi-
tuting a known-good identical LOPT, or
by testing with a chopper similar to the
one described in Sam Goldwasser's
Electronics Repair FAQ, located on
the Internet at http://www.repairfaq.org/
sam/flytest.htm.
Something else I do when testing a
LOPT is to supply it with a reduced B+
to enable scoping the HOT and measur-
ing EHT (in situations where the monitor
goes into HV shutdown). To reduce the
B+, I use two light bulbs in series, one
end to B+ supply, centre-tap to LOPT B+
connection, other end to ground. One
bulb is 60 watts, the other is 100, so I can
reverse the end leads and increase or
decrease the B+ value used in testing.
At the outset, when I have power sup-
ply cycling but have confirmed there are
no shorts from HOT-C to ground, I sub-
stitute a dummy load (60W bulb) for the
LOPT where the B+ enters, to see if the
power supply works with the LOPT out
of the equation.
Overall, the LOPT tester can identify
about 80% of LOPT failures. When try-
ing to solve a puzzle, if someone offers
information that is right 80% of the time,
it's a lot better than having to guess
100% of the time, especially if the ante is
the price of a LOPT and wasted, valu-
able time.
Michael Caplan does general electron-
ic servicing in Ottawa, and added the fol-
lowing useful points in relation to TVs:
It's pretty straightforward to use, with
the usual precautions of ensuring that
the under-test unit power is off and any
caps are discharged.
When testing an LOPT in circuit, it
might be necessary to disconnect some of
the LOPT terminals, and/or yoke plugs
that could load it down and upset the
readings. The tester will often not detect
bad HV diodes in integrated split-diode
LOPT units, nor shorts/arcing that is
voltage dependent - but then no other
passive tester does either.
I have found it useful for checking TV
deflection yokes, both horizontal and
vertical. A good yoke lights at least five
and typically the full eight LEDs.
However, many yokes have built-in par-
allel or series damping resistors, and
these must be temporarily disconnected.
Otherwise the reading will be low, even
though the winding itself is fine.
The tester can be used for checking
high-Q transformers such as those used
in SMPS's. However, my experience has
shown that it will not provide more than
a two or three LED indication for good
TV horizontal drive transformers. It can
be used for these, however - to indicate
shorts (no LEDs lit). On the other hand
the ESR Meter (Dick Smith catalog num-
ber K-7204) can do much the same with
these low resistance transformers.
Wayne Scicluna services TVs in
Sydney, and is the technician who talked
me into developing the tester in the first
place. Here are his hints:
If you've already checked for the more
obvious leaky and shorted semiconduc-
tors and capacitors etc., and are still get-
ting a low reading on the tester, there are
some other traps to avoid.
You need to get a good connection with
the test leads, because contact resistance
can cause a low reading. The same
applies to defective solder joints in the
horizontal output stage, especially on the
LOPT itself and HOT. In fact connecting
the tester with clip leads, flexing the
board and wiggling components is a
good way to show up bad solder joints in
this area.
Body conductivity can also cause a
lower than normal reading if you're
touching the test leads and your skin is
damp. Low readings can also be caused
by having the test leads reversed, i.e.,
connecting 'HOT Collector' to chassis,
and by faults in an external voltage
tripler.
How to build it
Before soldering anything to the print-
ed circuit board, hold it up to a bright
light and examine the copper side care-
fully for fine track breaks and especially
whiskers or bridges - particularly where
tracks pass close to component solder
pads.
Referring to the board overlay in Fig.3,
begin installing the components, starting
with the resistors and diodes and work-
ing your way up to the tall ones including
the four PCB pins for `GND', `HOT' and
`+6V' terminal connections- but leaving
Text and illustrations courtesy of Electronics Australia
Page 4
Value 4 Band (1%) 5 Band (1%)
270R Red-Vio-Brn-Brn Red-Vio-Blk-Blk-Brn
1K Brn-Blk-Red-Brn Brn-Blk-Blk-Brn-Brn
4.7K Yel-Vio-Red-Brn Yel-Vio-Blk-Brn-Brn
10K Brn-Blk-Org-Brn Brn-Blk-Blk-Red-Brn
33K Org-Org-Org-Brn Org-Org-Blk-Red-Brn
47K Yel-Vio-Org-Brn Yel-Vio-Blk-Red-Brn
150K Brn-Grn-Yel-Brn Brn-Grn-Blk-Org-Brn
1M Brn-Blk-Grn-Brn Brn-Blk-Blk-Yel-Brn
2.2M Red-Red-Grn-Brn Red-Red-Blk-Yel-Brn
Resistor Colour Codes
Printed Circuit Board to Spacers
4 x Screw M3 x 6mm (zinc plated)
Front Panel to Spacers
4 x Screw Countersunk M3 x 6mm (Blk)
Front Panel To Case
4 x Screw Countersunk No4 x 6mm (Blk)
Screw Size and Allocation
Guide
Value IEC Code EIA Code
100pF 100p 101K
0.01uF 10n 103K
0.047uF 47n 473K
Capacitor Codes
The assembled PCB, which supports
virtually all of the circuitry.
5. the LEDs off the board for now. Take
care with the orientation of the polarised
components, including the IC sockets.
With everything but the LEDs installed
on the PCB, once again illuminate it
from the top, and check for and correct
any solder bridges or other problems.
Now turn your attention to the front
panel, mounting the banana sockets and
the power switch in their respective
holes.
Attach the tapped spacers to the cor-
ners of the board using plain 3mm
screws, and solder long component lead
offcuts to the `GND', `HOT Collector'
and `+' solder pads, followed by the bat-
tery snap's black wire to the `-' pad.
Then, without soldering them, poke the
leads of all the LEDs through their
respective holes in the board. Make sure
the coloured LEDs are in their correct
places, and that all the (long) anode and
(short) cathode leads are correctly orient-
ed as shown in Fig.3.
Using black countersunk 3mm screws,
attach the front panel to the board assem-
bly and place the whole thing face-down
on a soft flat surface. Manoeuvre all of
the LEDs into their cutouts in the front
panel, and push each LED down slightly
to ensure its face is level with the front of
the panel. In the unlikely event that a
LED won't fit, use a small file or similar
to remove the excess powder coating
inside the hole.
Now solder all the LEDs into place,
then connect the test lead sockets and the
closest terminal of the power switch to
their respective wires from the board,
and finally the red battery snap wire to
the free switch contact (Ref. to Fig.4.
wiring diagram).
Snip off the battery holder's PCB
mounting pins, then install four `AAA'
cells into it. Connect the battery snap to
the terminals, and switch the unit on. If
everything's OK then the bottom red (`1')
LED will illuminate, and shorting the
test leads will cause it to go off.
An effective way to test the unit is to
connect the test leads to the primary
winding of a known good LOPT out of
circuit, which should bring all eight
LEDs on. Then thread a loop of solder
around the ferrite core of the LOPT
(simulating a single shorted turn), and
the LED count should drop to 1-3 as the
loop is closed.
If everything's OK, use double-sided
Text and illustrations courtesy of Electronics Australia Page 5
Fig.4: Shows how the battery snap (positive lead) is wired through the switch to
the printed circuit board. Note, as the component overlay shown is viewed from
the copper side of the PCB, wiring terminations for the Power and Hot
Collector/GND should be made to the PCB pins on the component side of the
board.