Downloaded 18 times


![A Guide to Growing School Gardens in Alberta 59
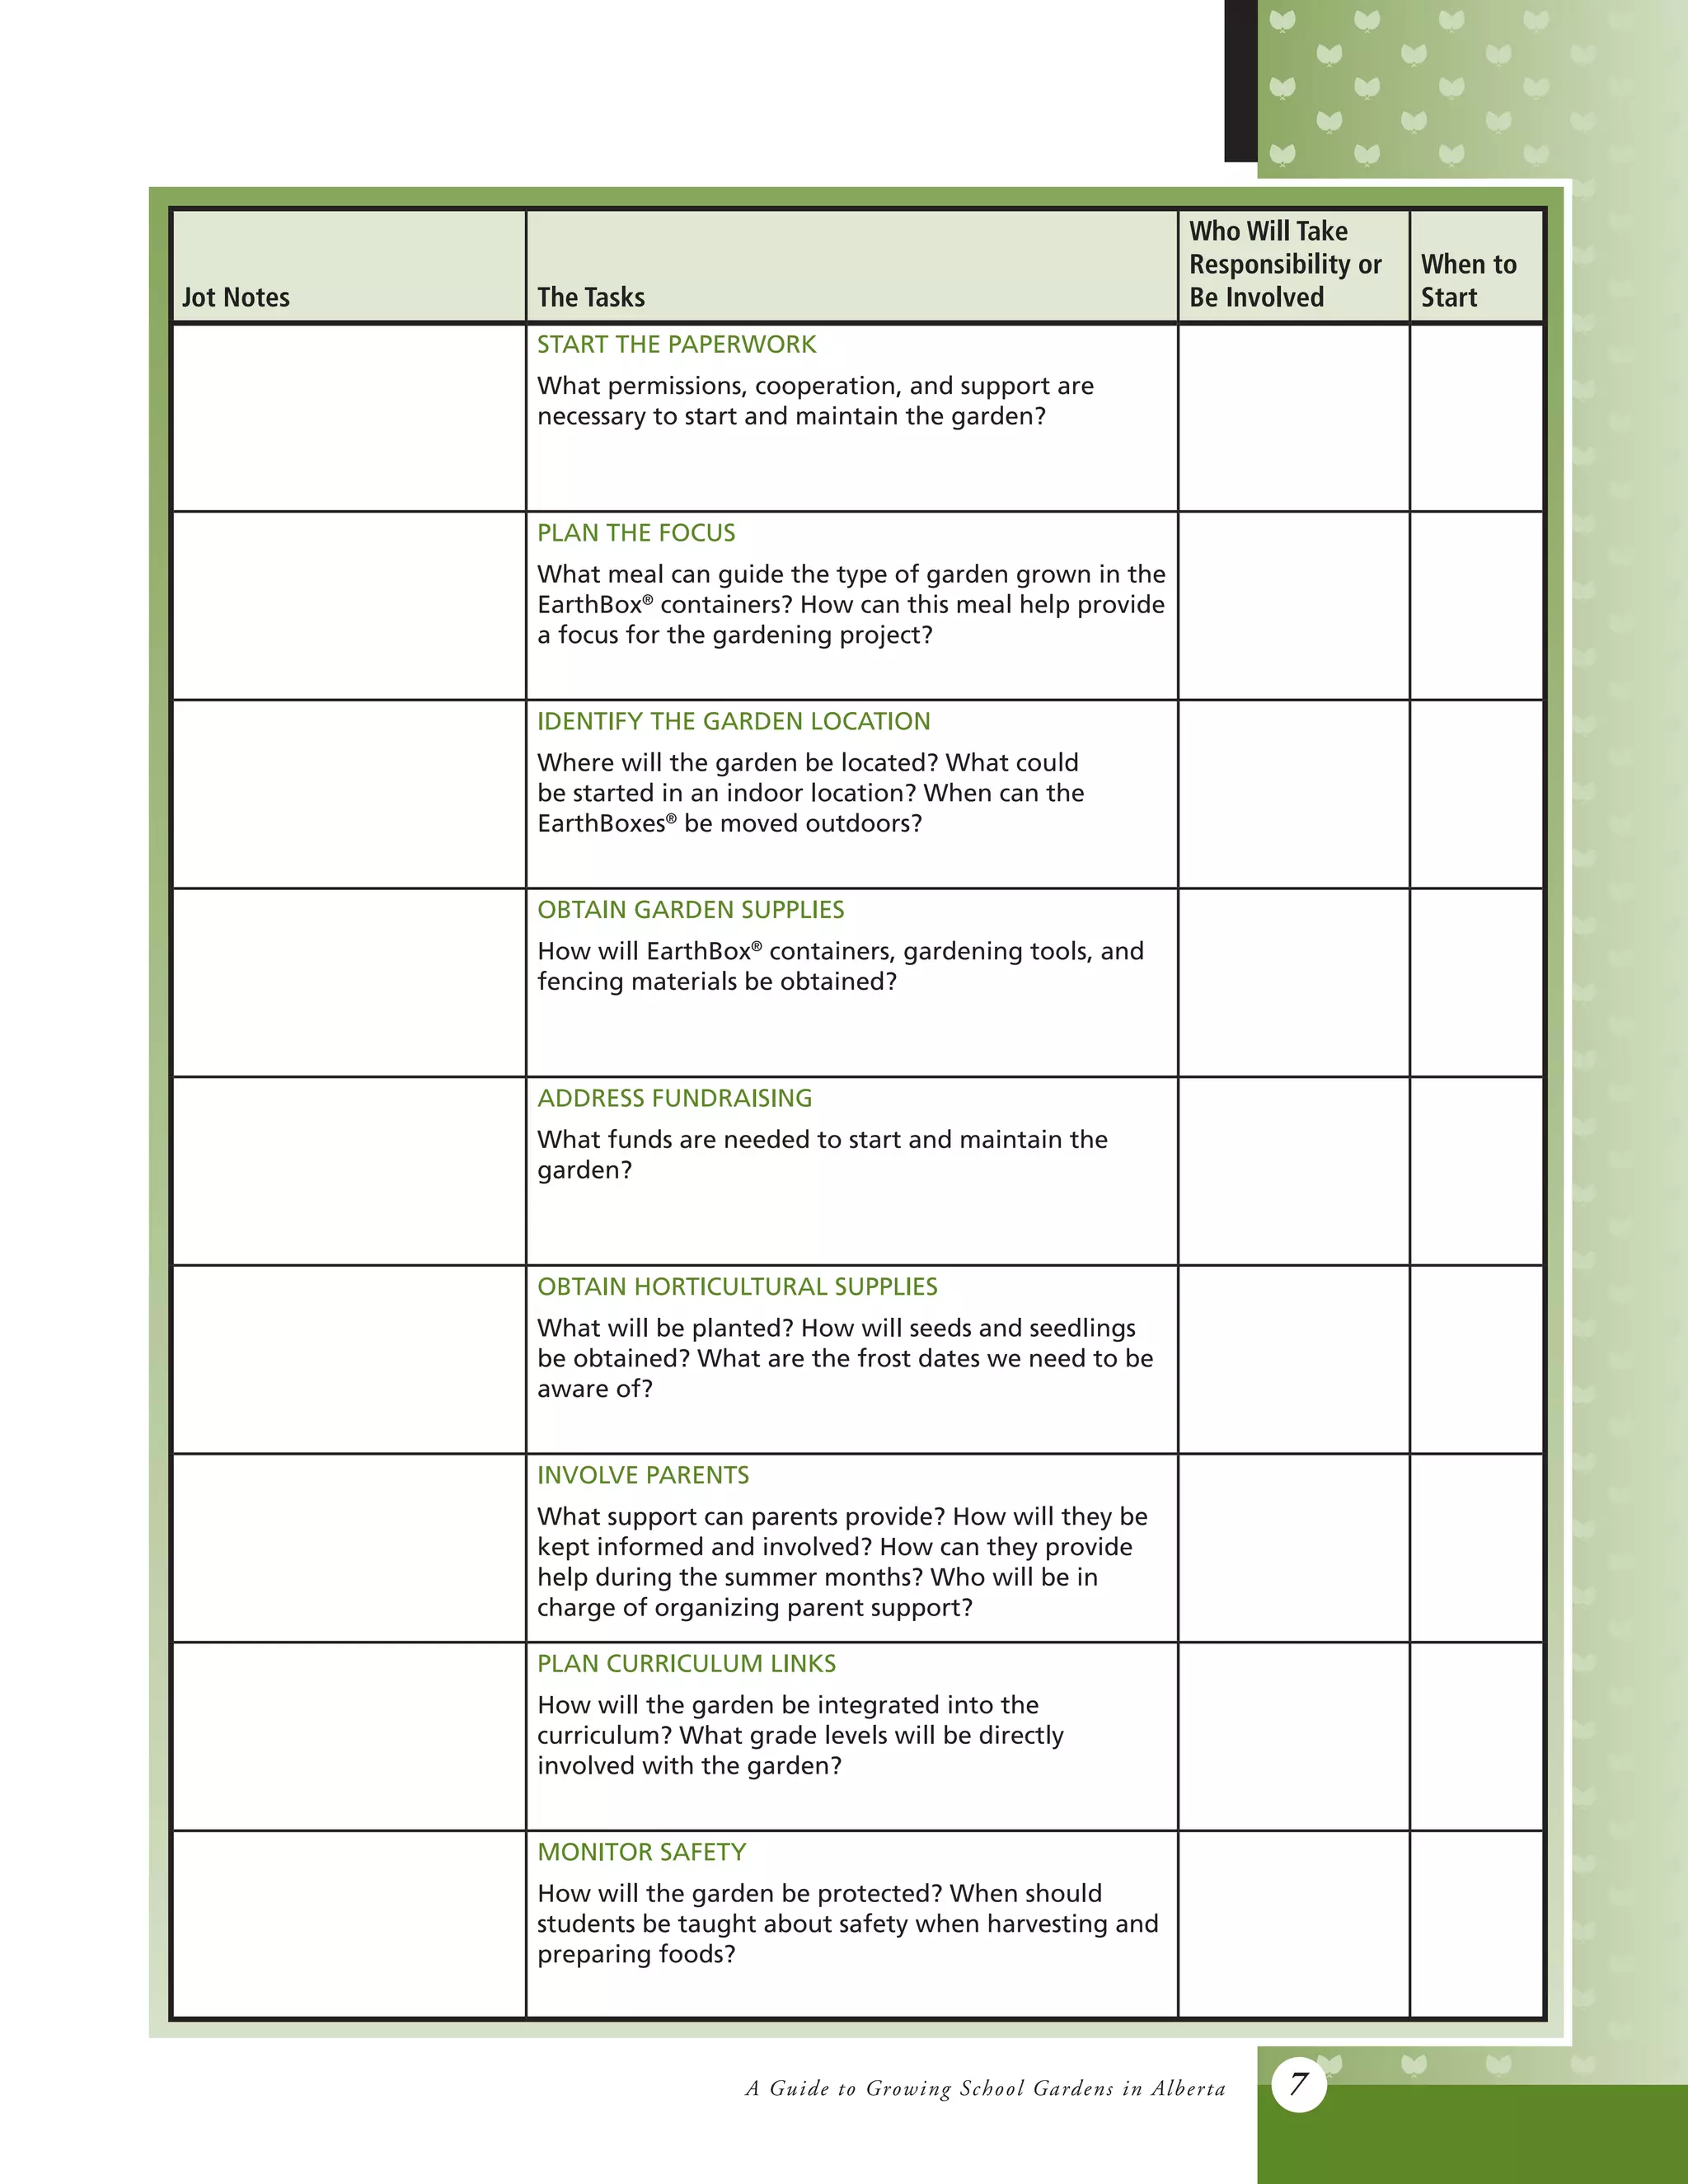
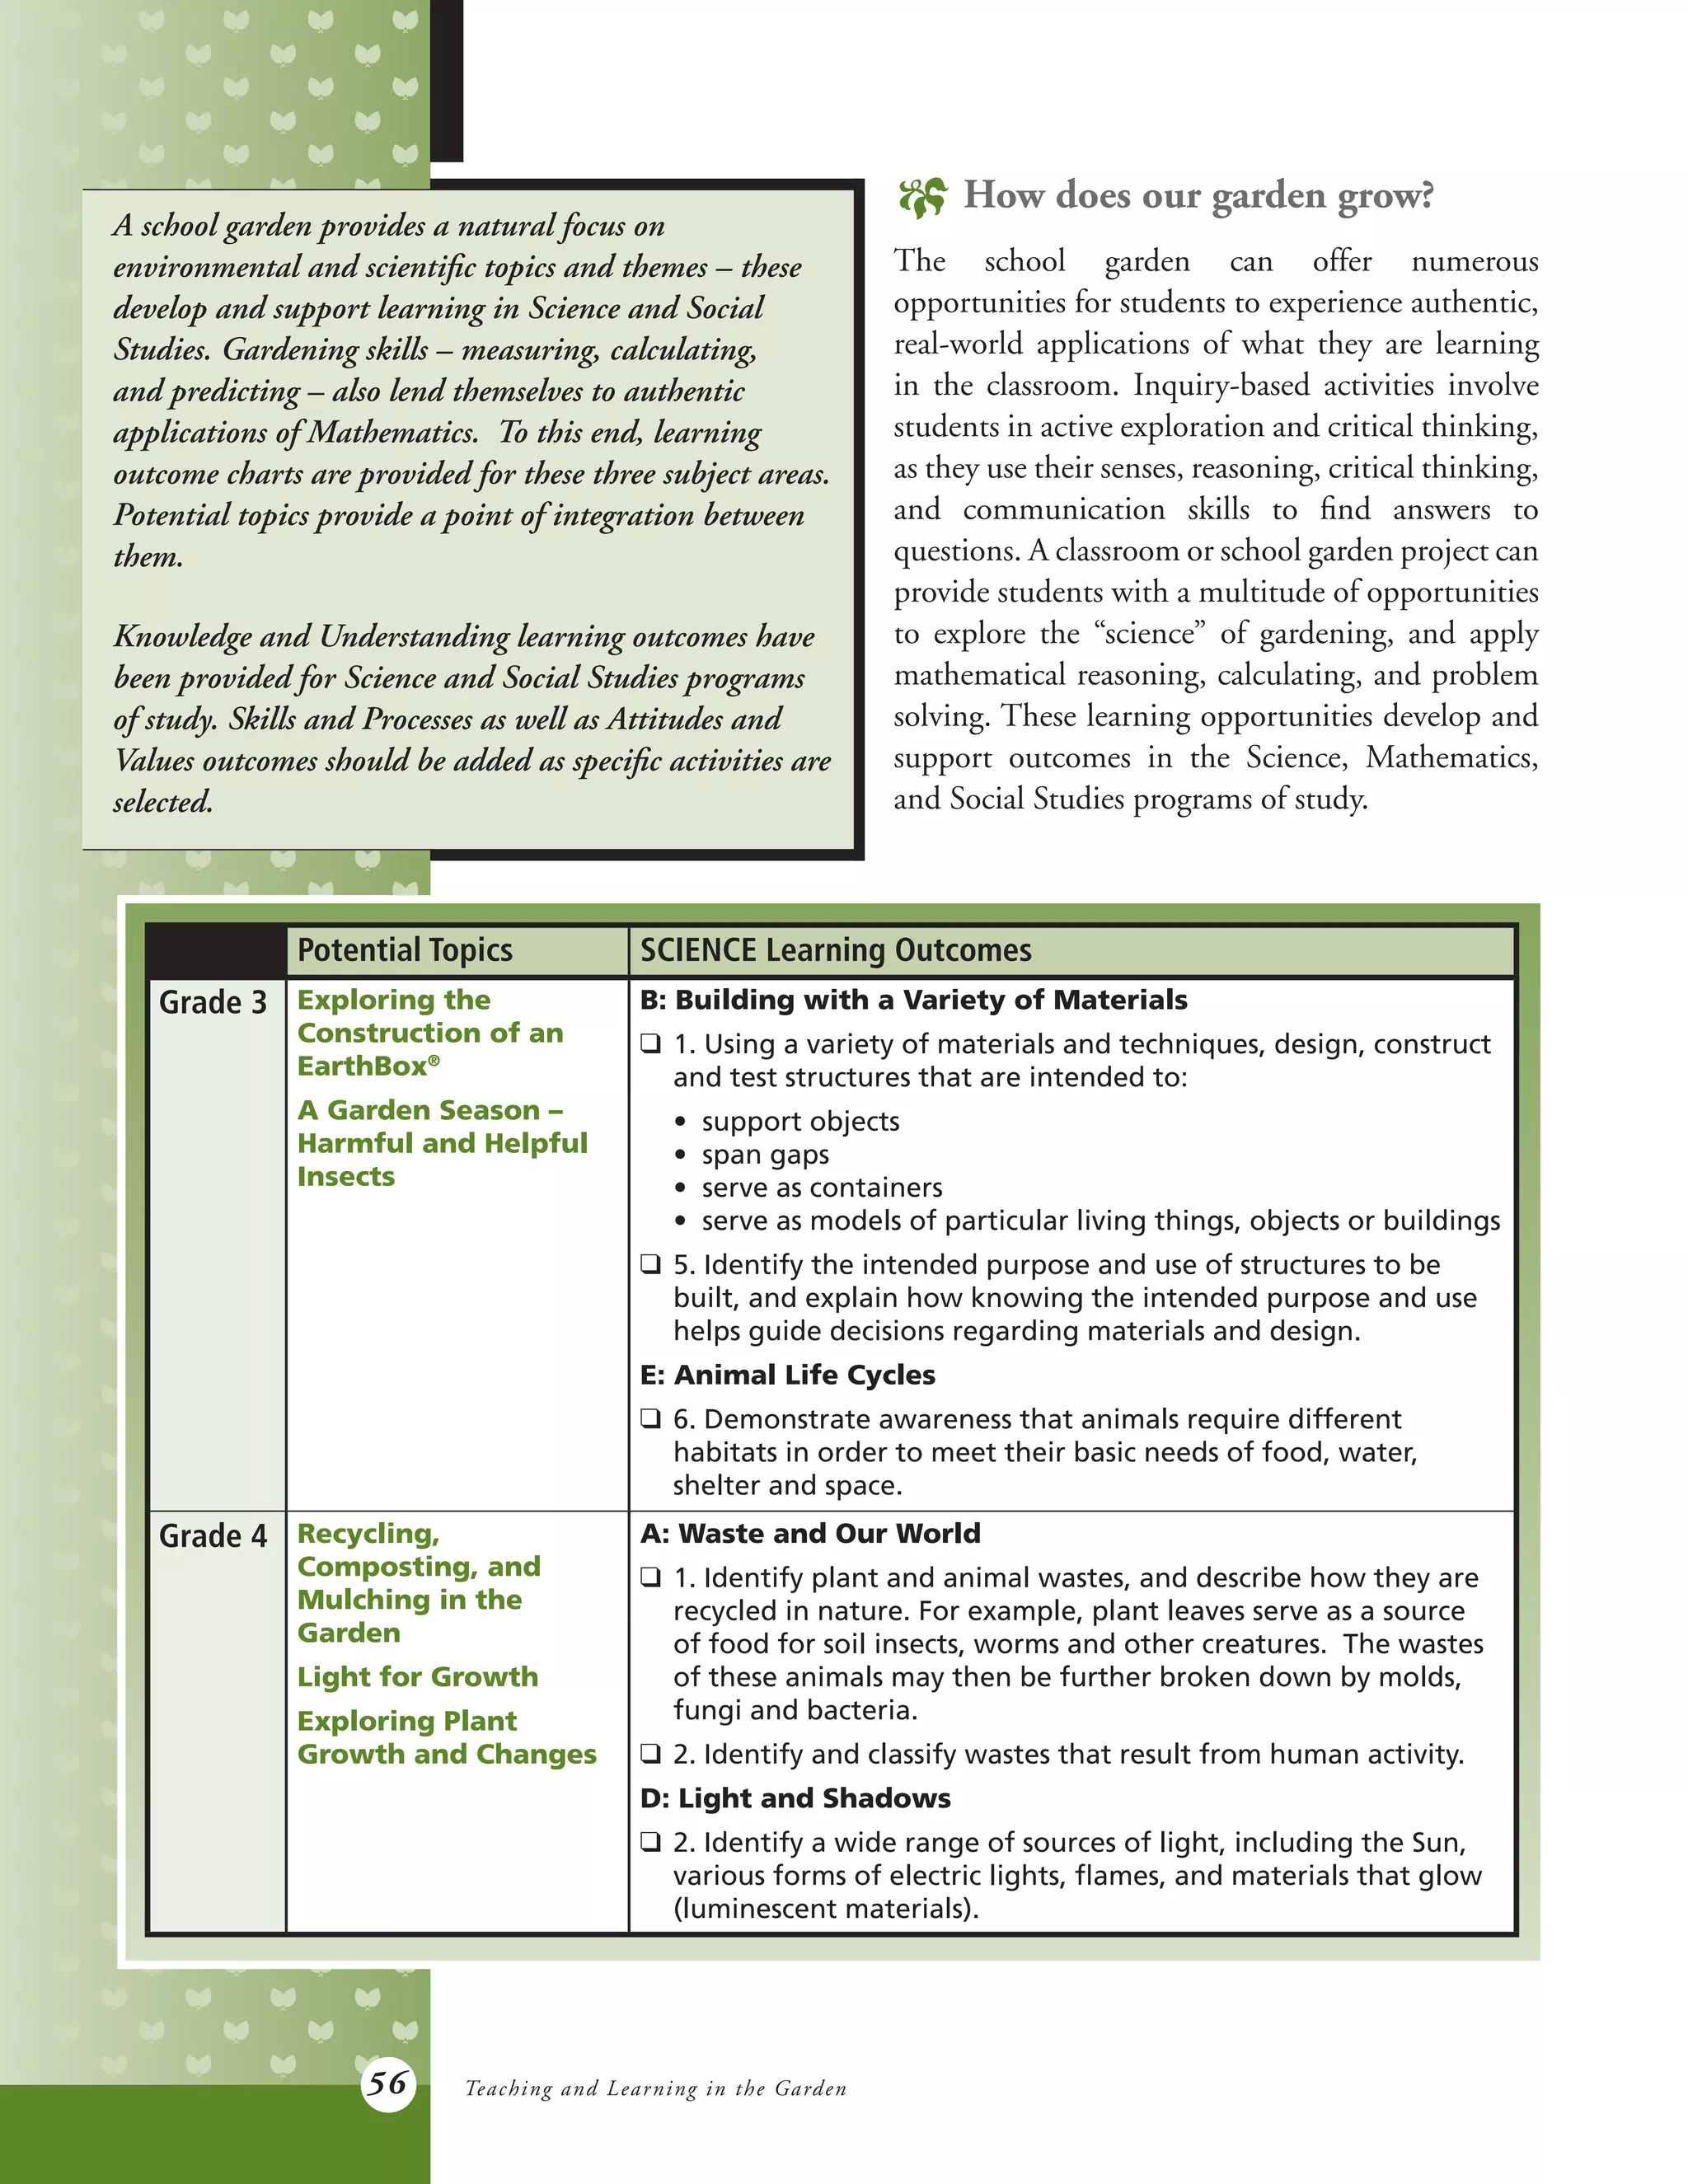
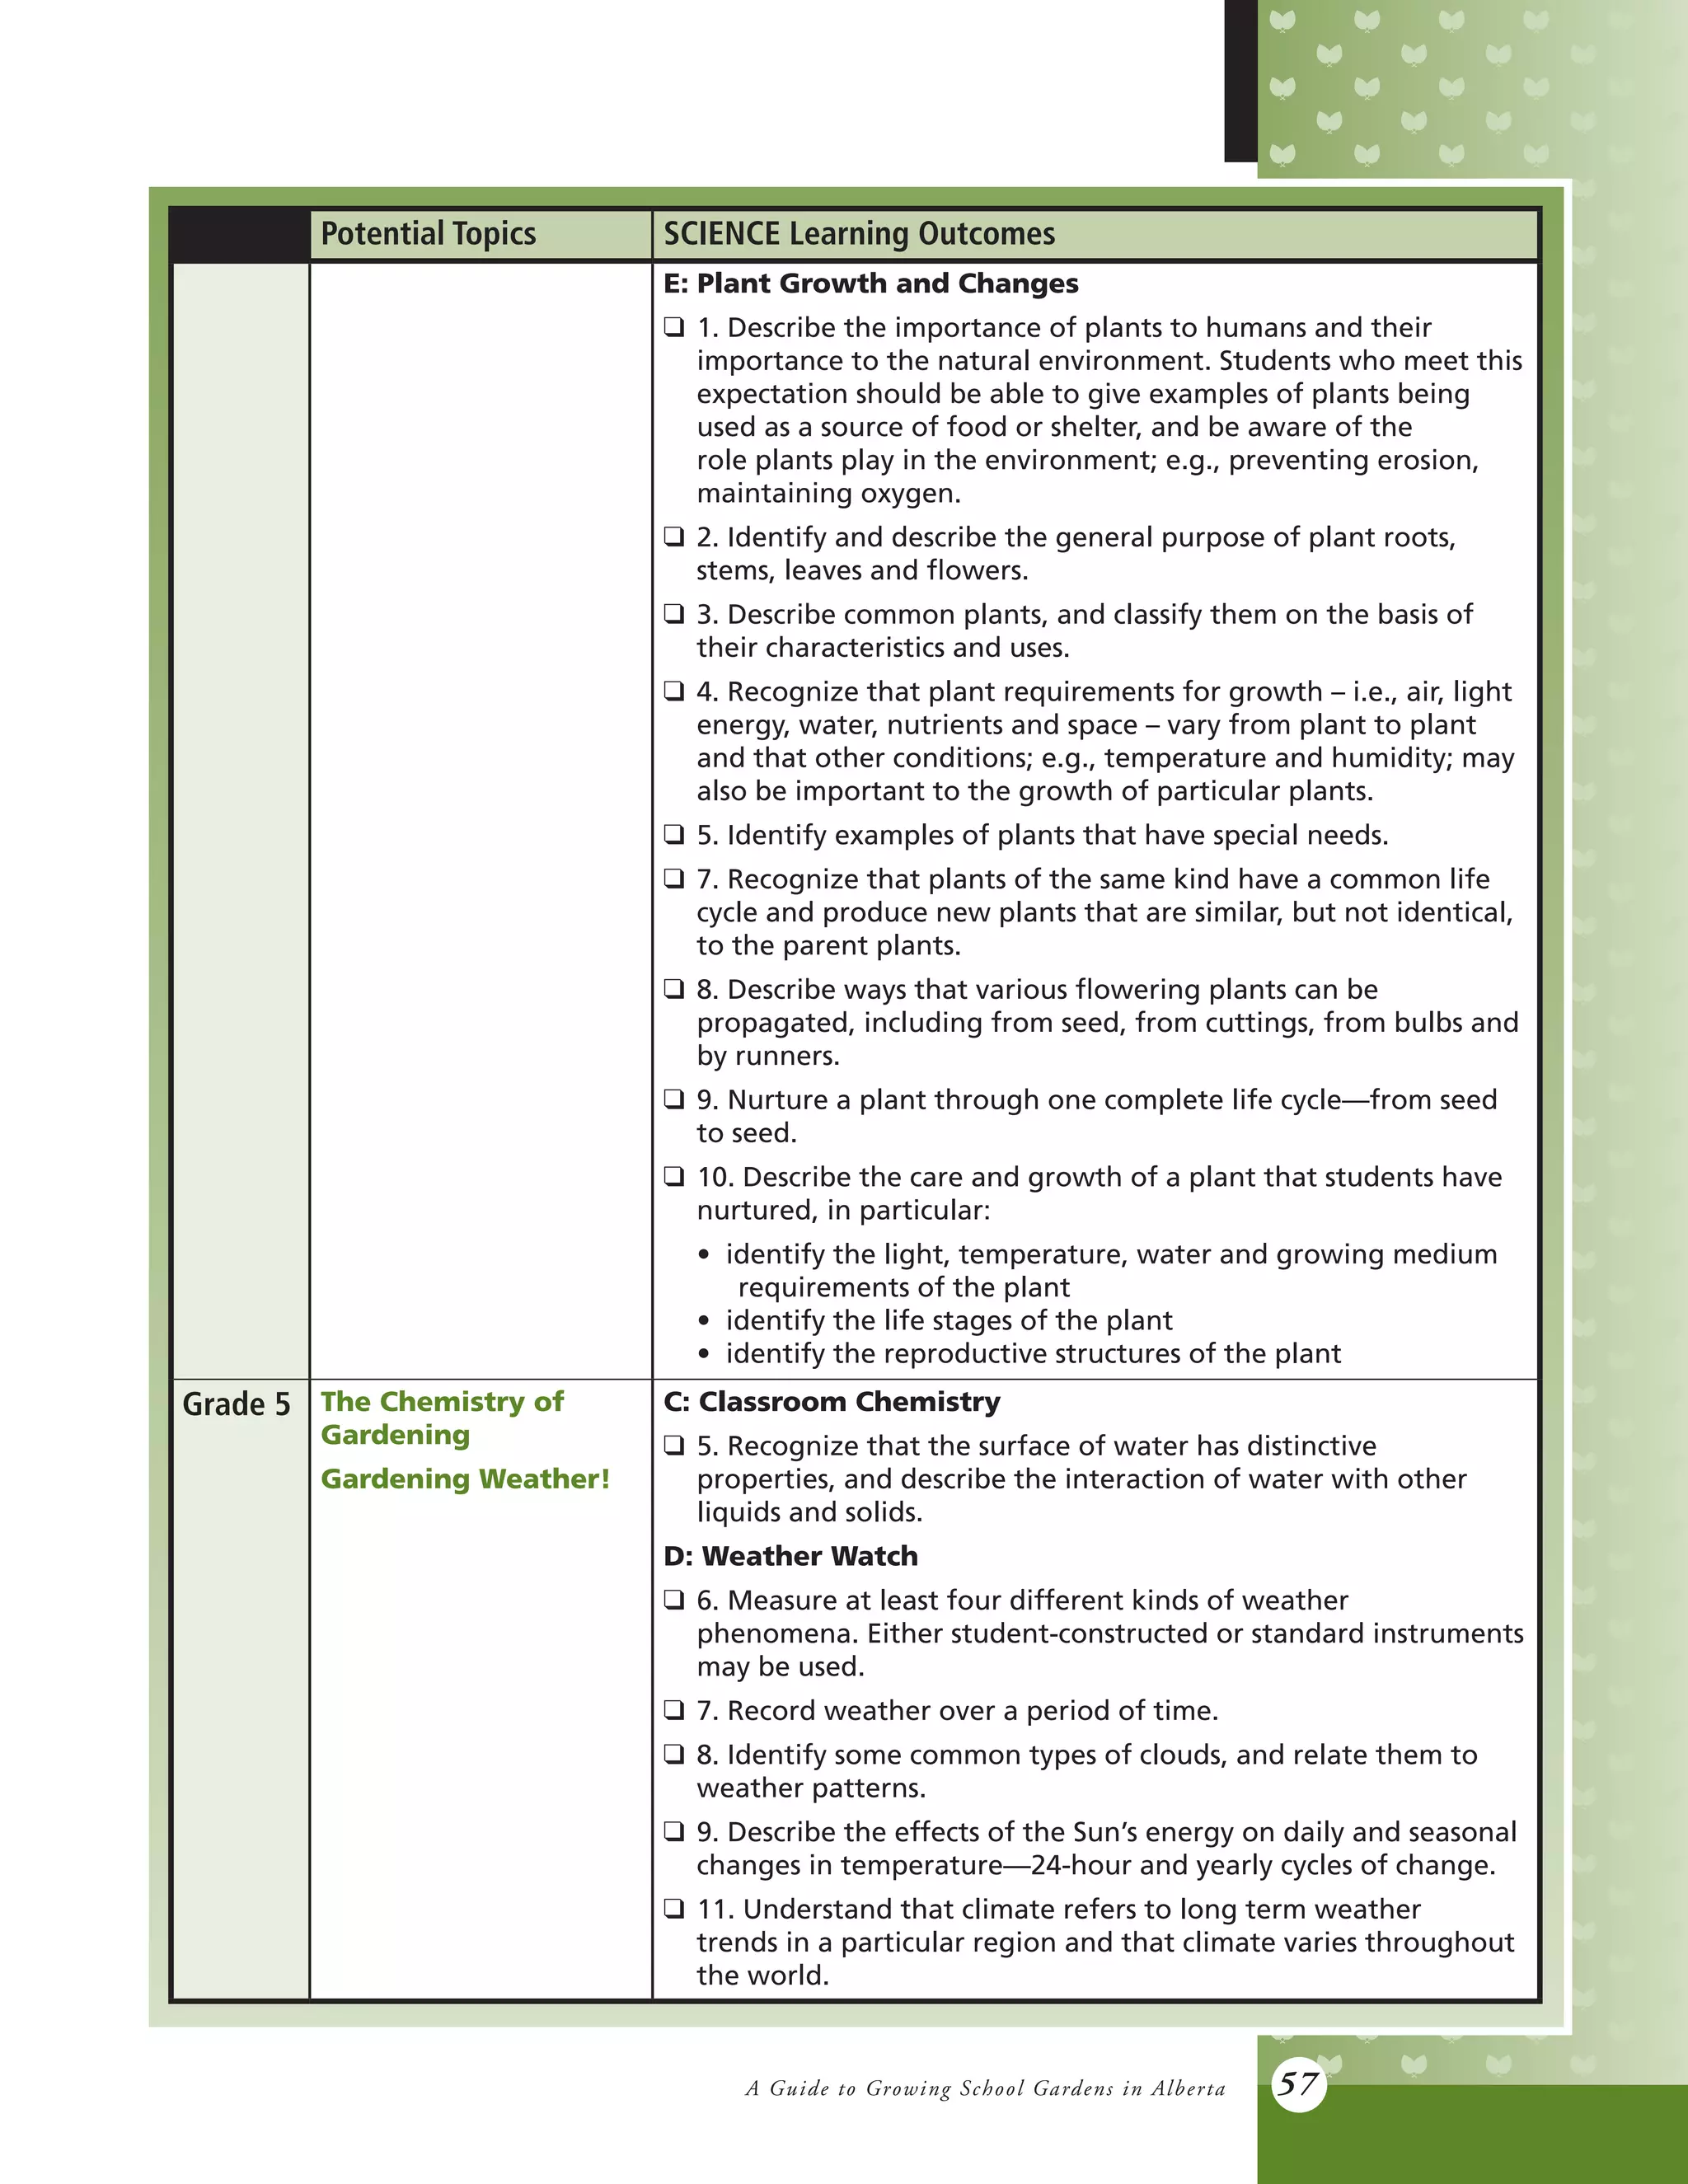
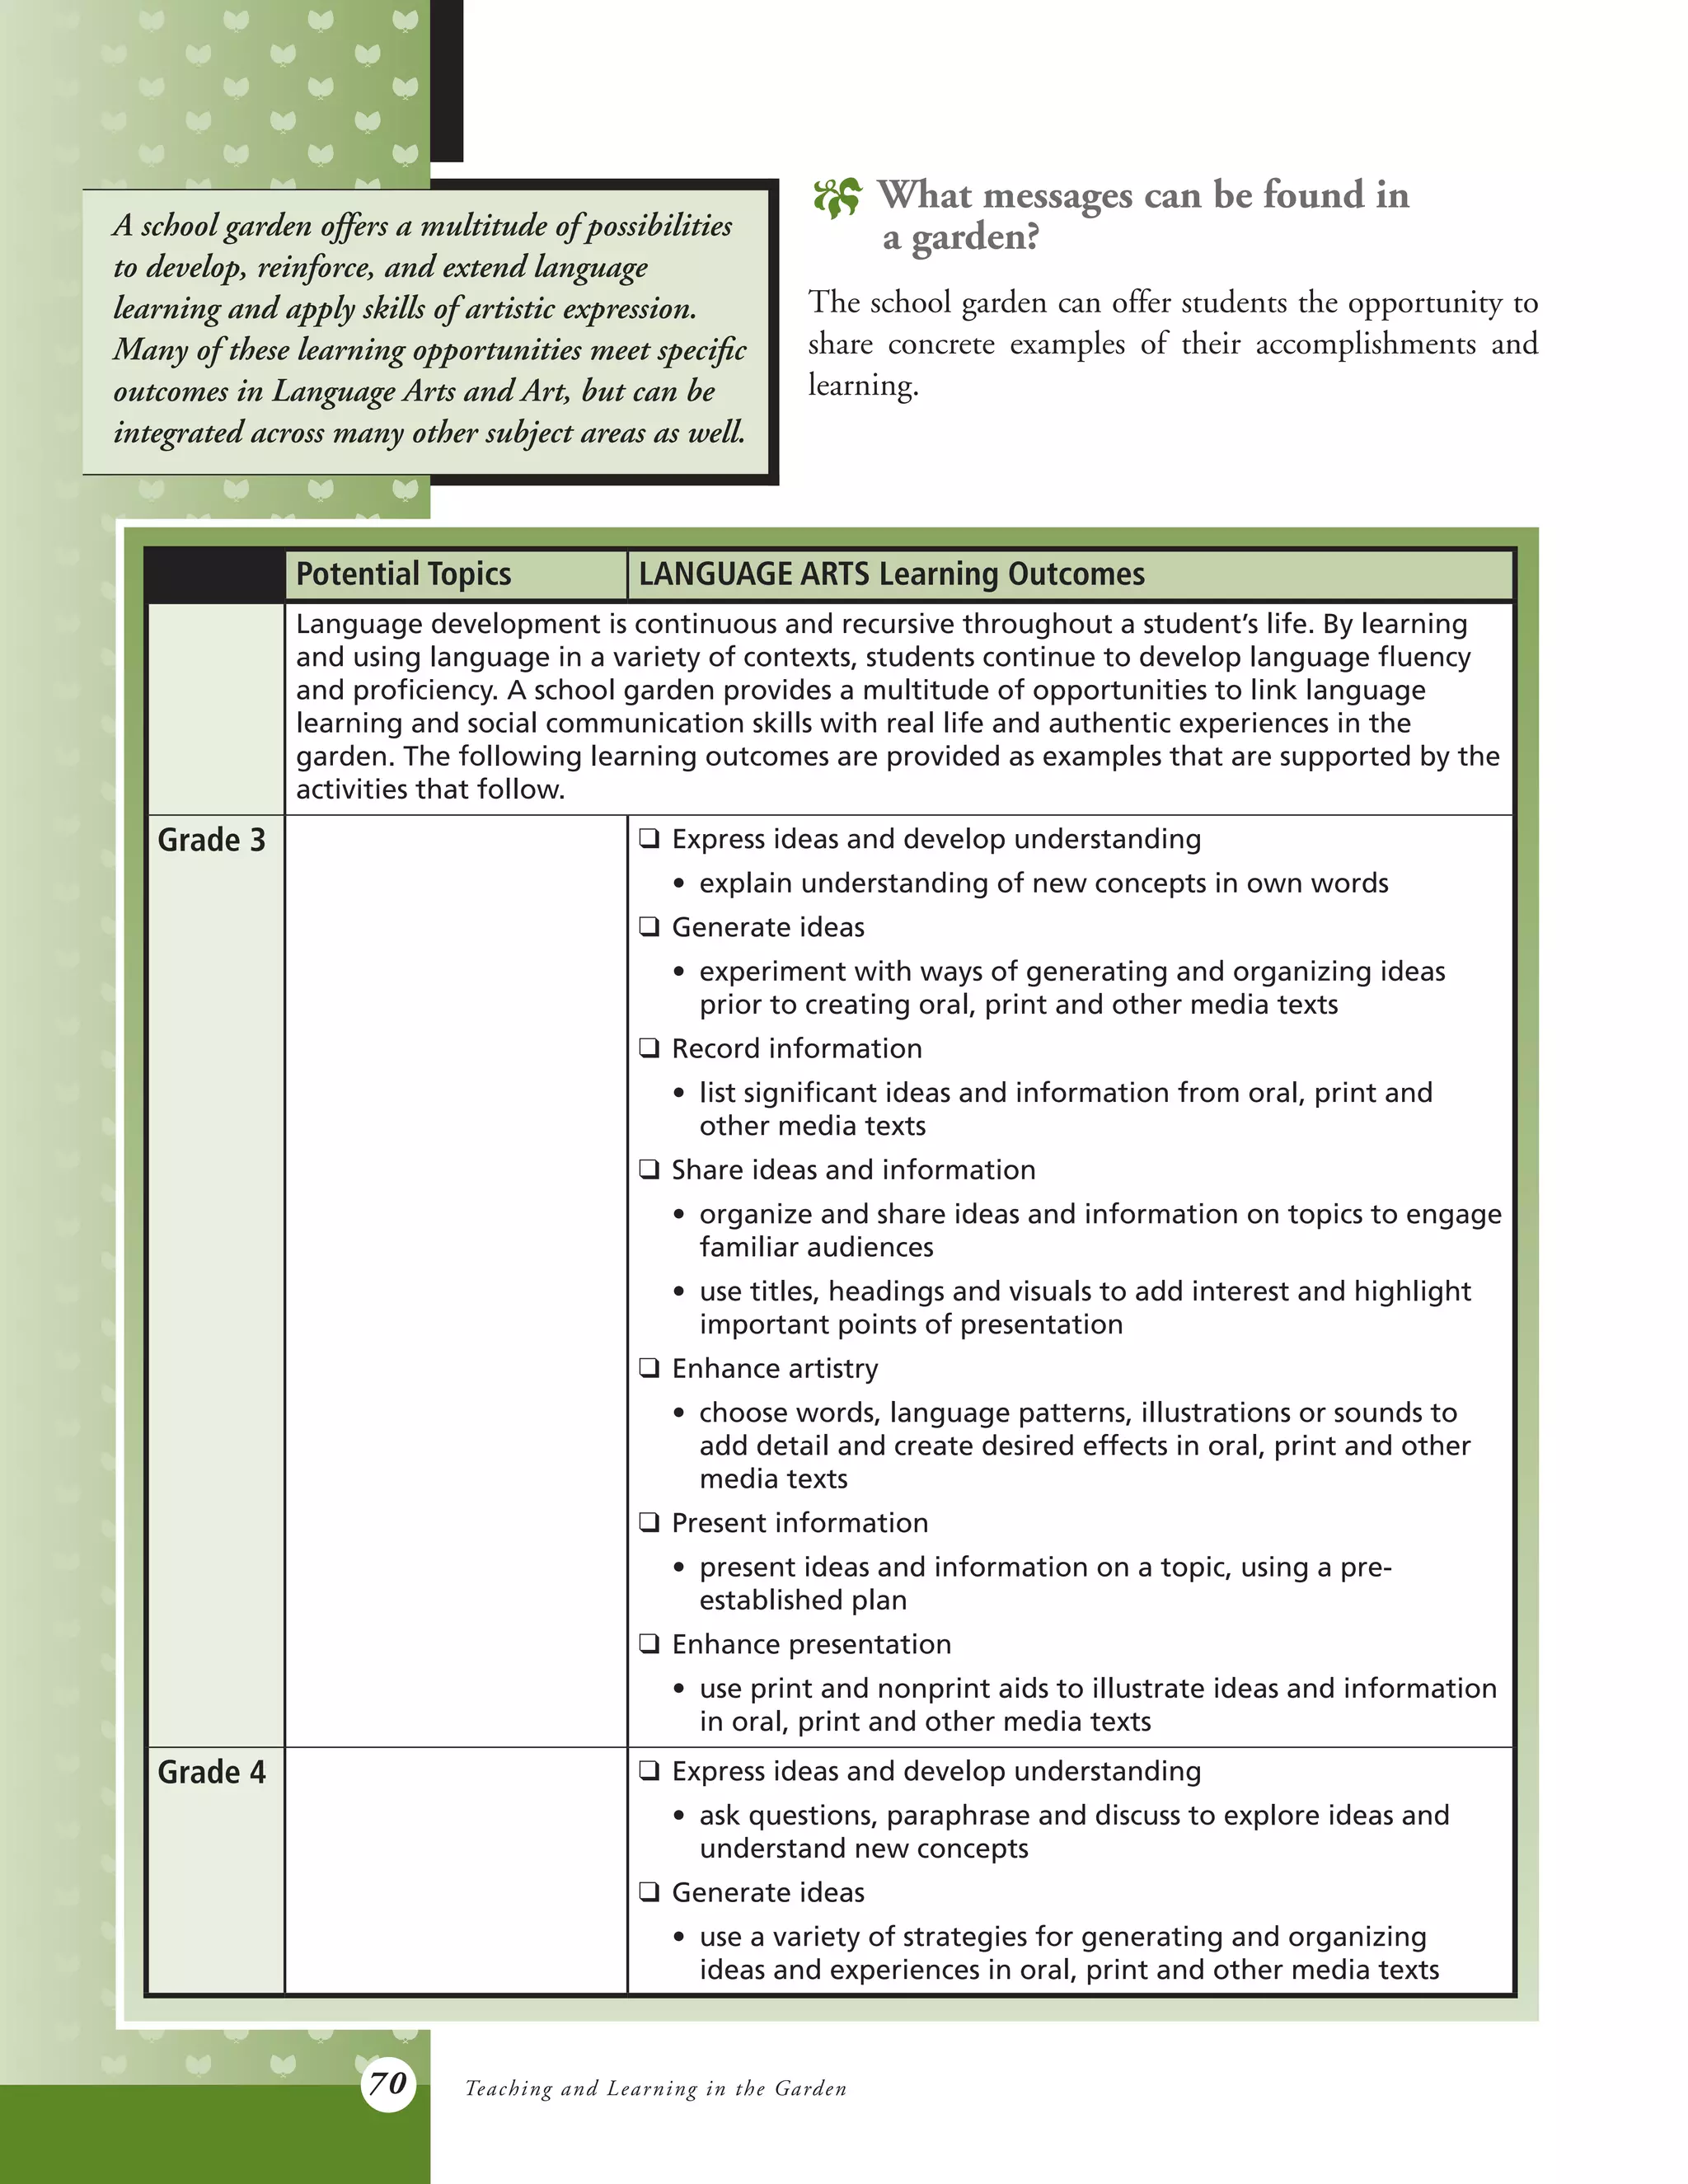
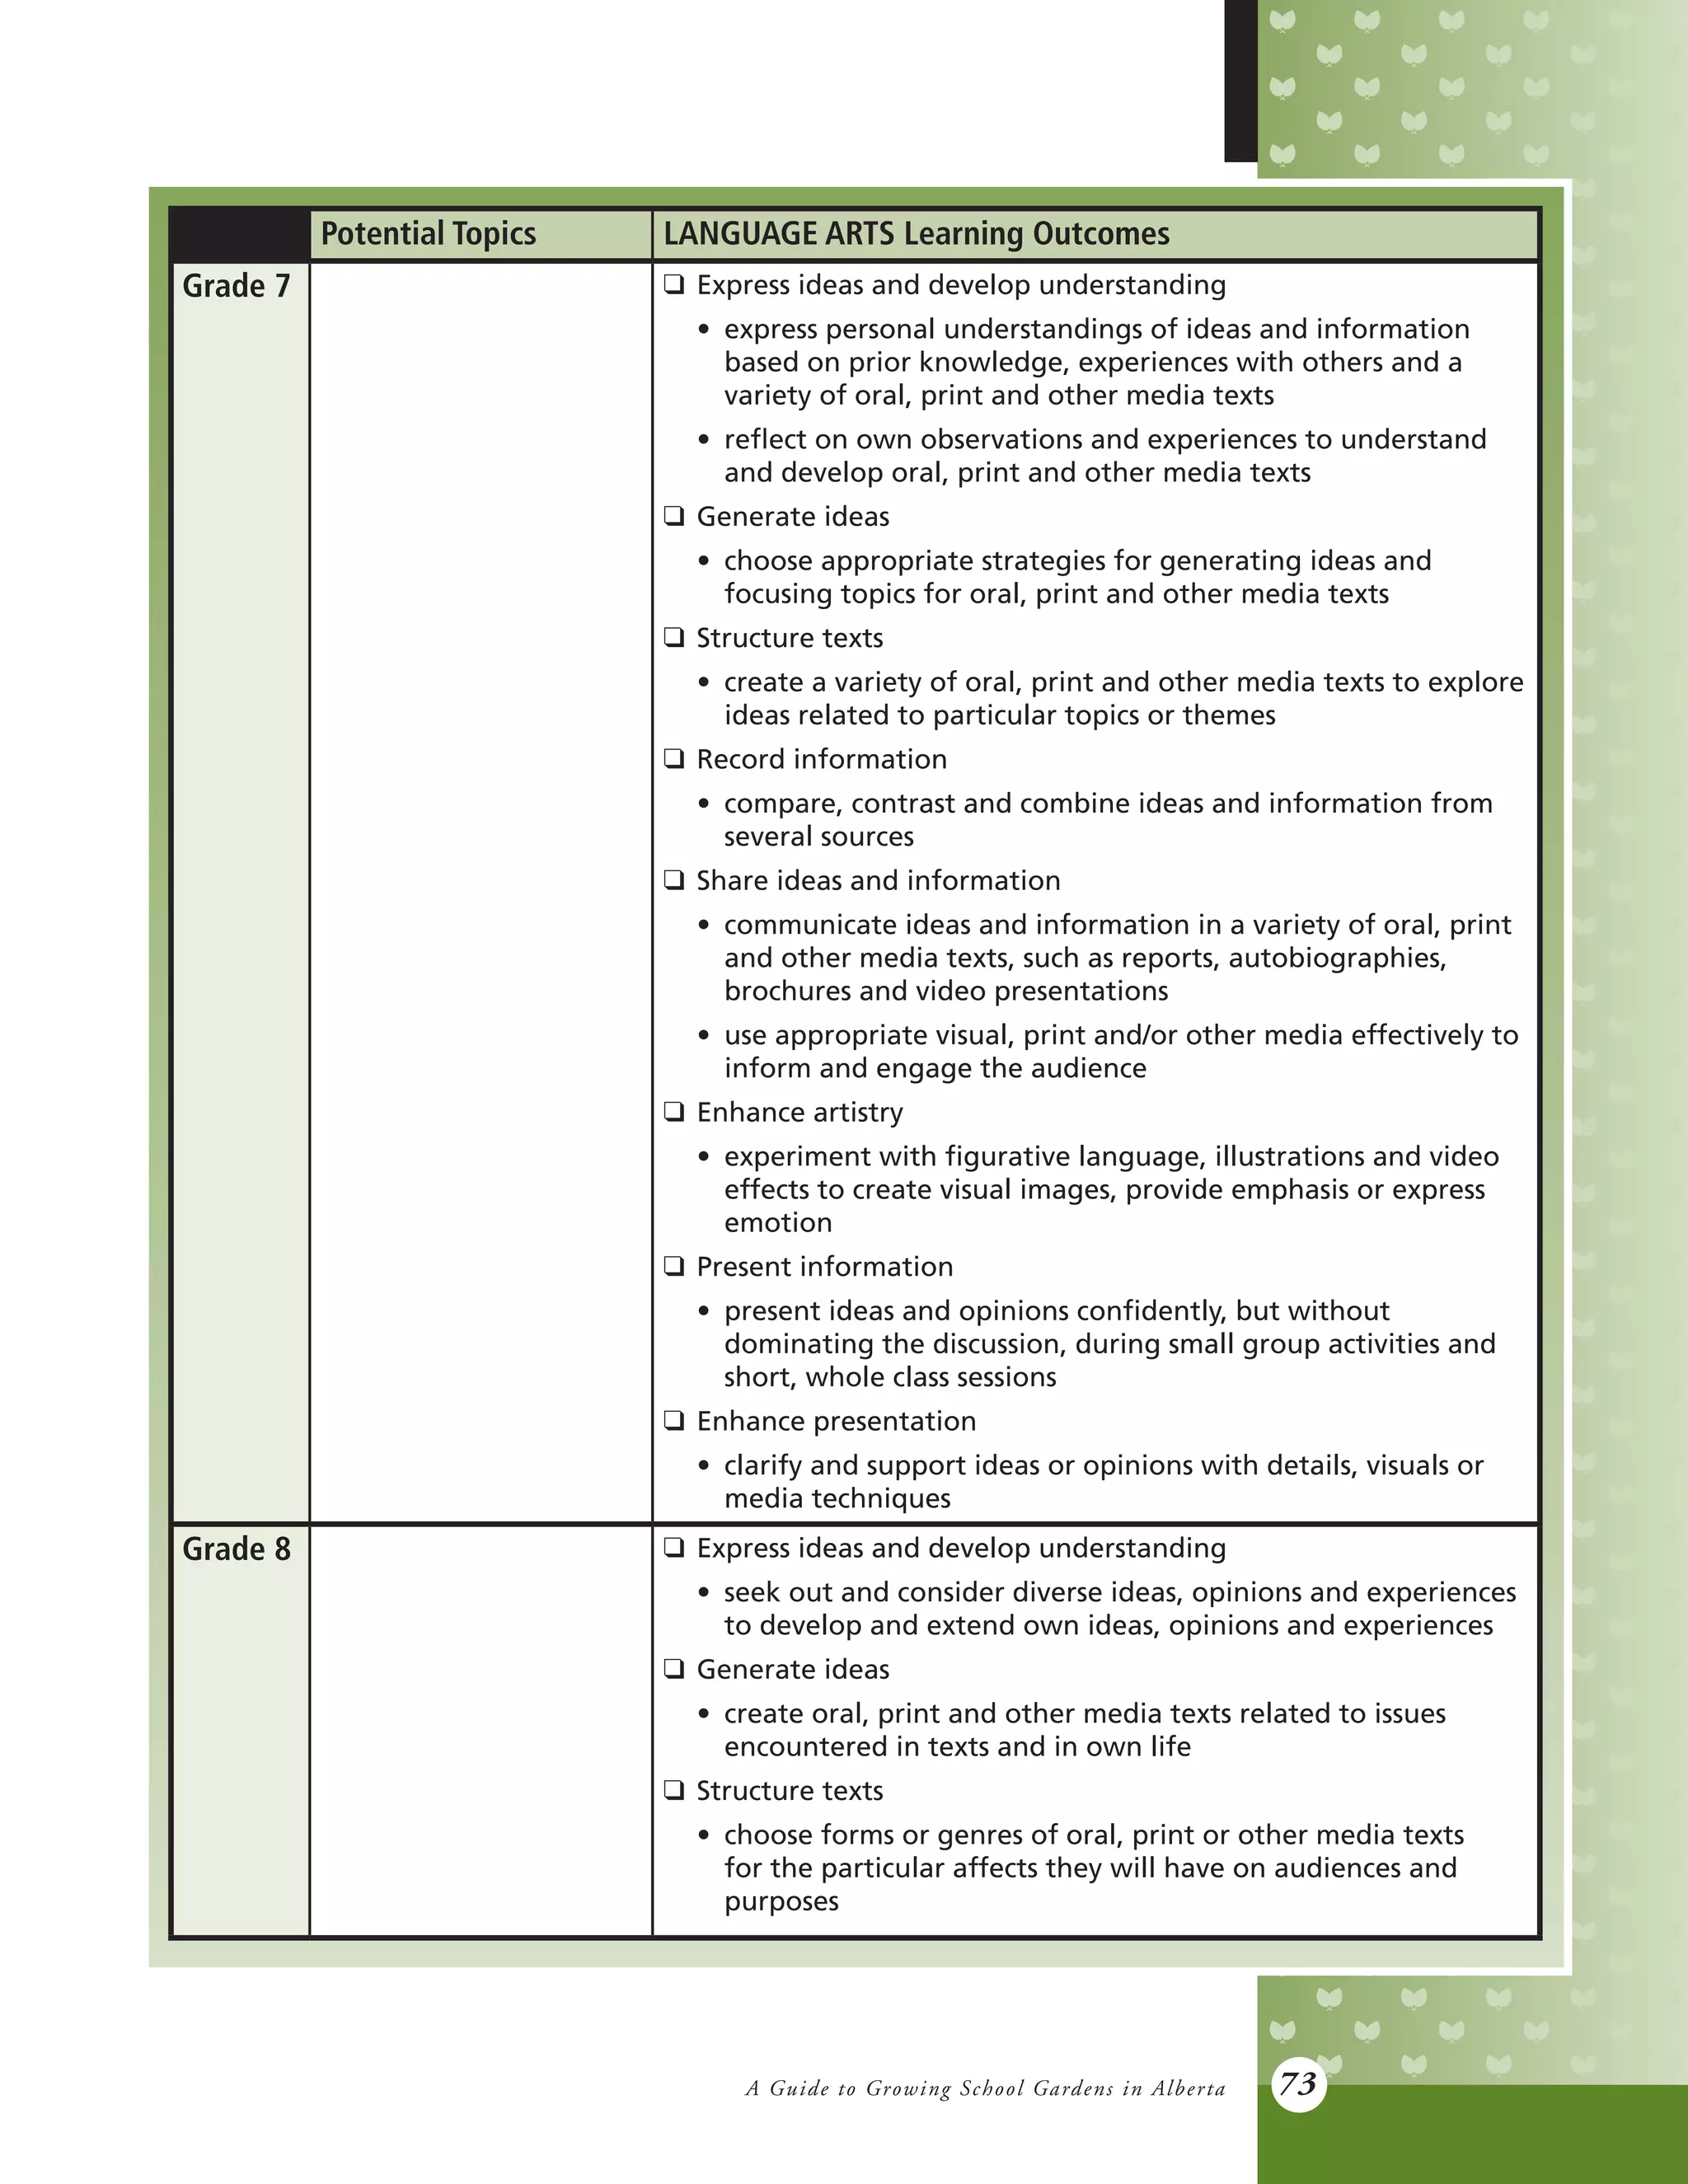
Potential Topics MATHEMATICS Learning Outcomes
Mathematics also provides a multitude of opportunities to support and extend learning with
a school garden project. All four Mathematics Strands – Number, Patterns and Relations,
Shape and Space, and Statistics and Probability – offer learning potential and real life
application of mathematics concepts to the school garden. The following learning outcomes
are provided as examples that are supported by the activities that follow.
Grade 3 Exploring the
Construction of an
EarthBox®
A Garden Season –
Harmful and Helpful
Insects
Shape and Space
q 1. Relate the passage of time to common activities, using
nonstandard and standard units (minutes, hours, days, weeks,
months, years). [CN, ME, R]
q 5. Demonstrate an understanding of perimeter of regular and
irregular shapes by:
• estimating perimeter, using referents for cm or m
• measuring and recording perimeter (cm, m)
• constructing different shapes for a given perimeter (cm, m) to
demonstrate that many shapes are possible for a perimeter.
[C, ME, PS, R, V]
Statistics and Probability
q 1. Collect first-hand data and organize it using:
• tally marks
• line plots
• charts
• lists to answer questions. [C, CN, PS, V] [ICT: C4–1.3]
q 2. Construct, label and interpret bar graphs to solve problems.
[C, PS, R, V] [ICT: C4–1.3, C7–1.3, C7–1.4]
Grade 4 Exploring Plant
Growth and Changes
Shape and Space
q 2. Read and record calendar dates in a variety of formats. [C, V]
q 3. Demonstrate an understanding of area of regular and
irregular 2-D shapes by:
• recognizing that area is measured in square units
• selecting and justifying referents for the units cm2 or m2
• estimating area, using referents for cm2 or m2
• determining and recording area (cm2 or m2).
Statistics and Probability
q 2. Construct and interpret pictographs and bar graphs involving
many-to-one correspondence to draw conclusions. [C, PS, R, V]
Grade 5 The Chemistry of
Gardening
Shape and Space
q 3. Demonstrate an understanding of measuring length (mm) by:
• selecting and justifying referents for the unit mm
• modelling and describing the relationship between mm and
cm units, and between mm and m units. [C, CN, ME, PS, R, V]
q 4. Demonstrate an understanding of volume by:
• selecting and justifying referents for cm3
or m3
units
• estimating volume, using referents for cm3
or m3
• measuring and recording volume (cm3
or m3
)
• constructing right rectangular prisms for a given volume.
[C, CN, ME, PS, R, V]](https://image.slidesharecdn.com/ed436-140402144825-phpapp01/75/Guide-to-Growing-School-Gardens-in-Alberta-63-2048.jpg)
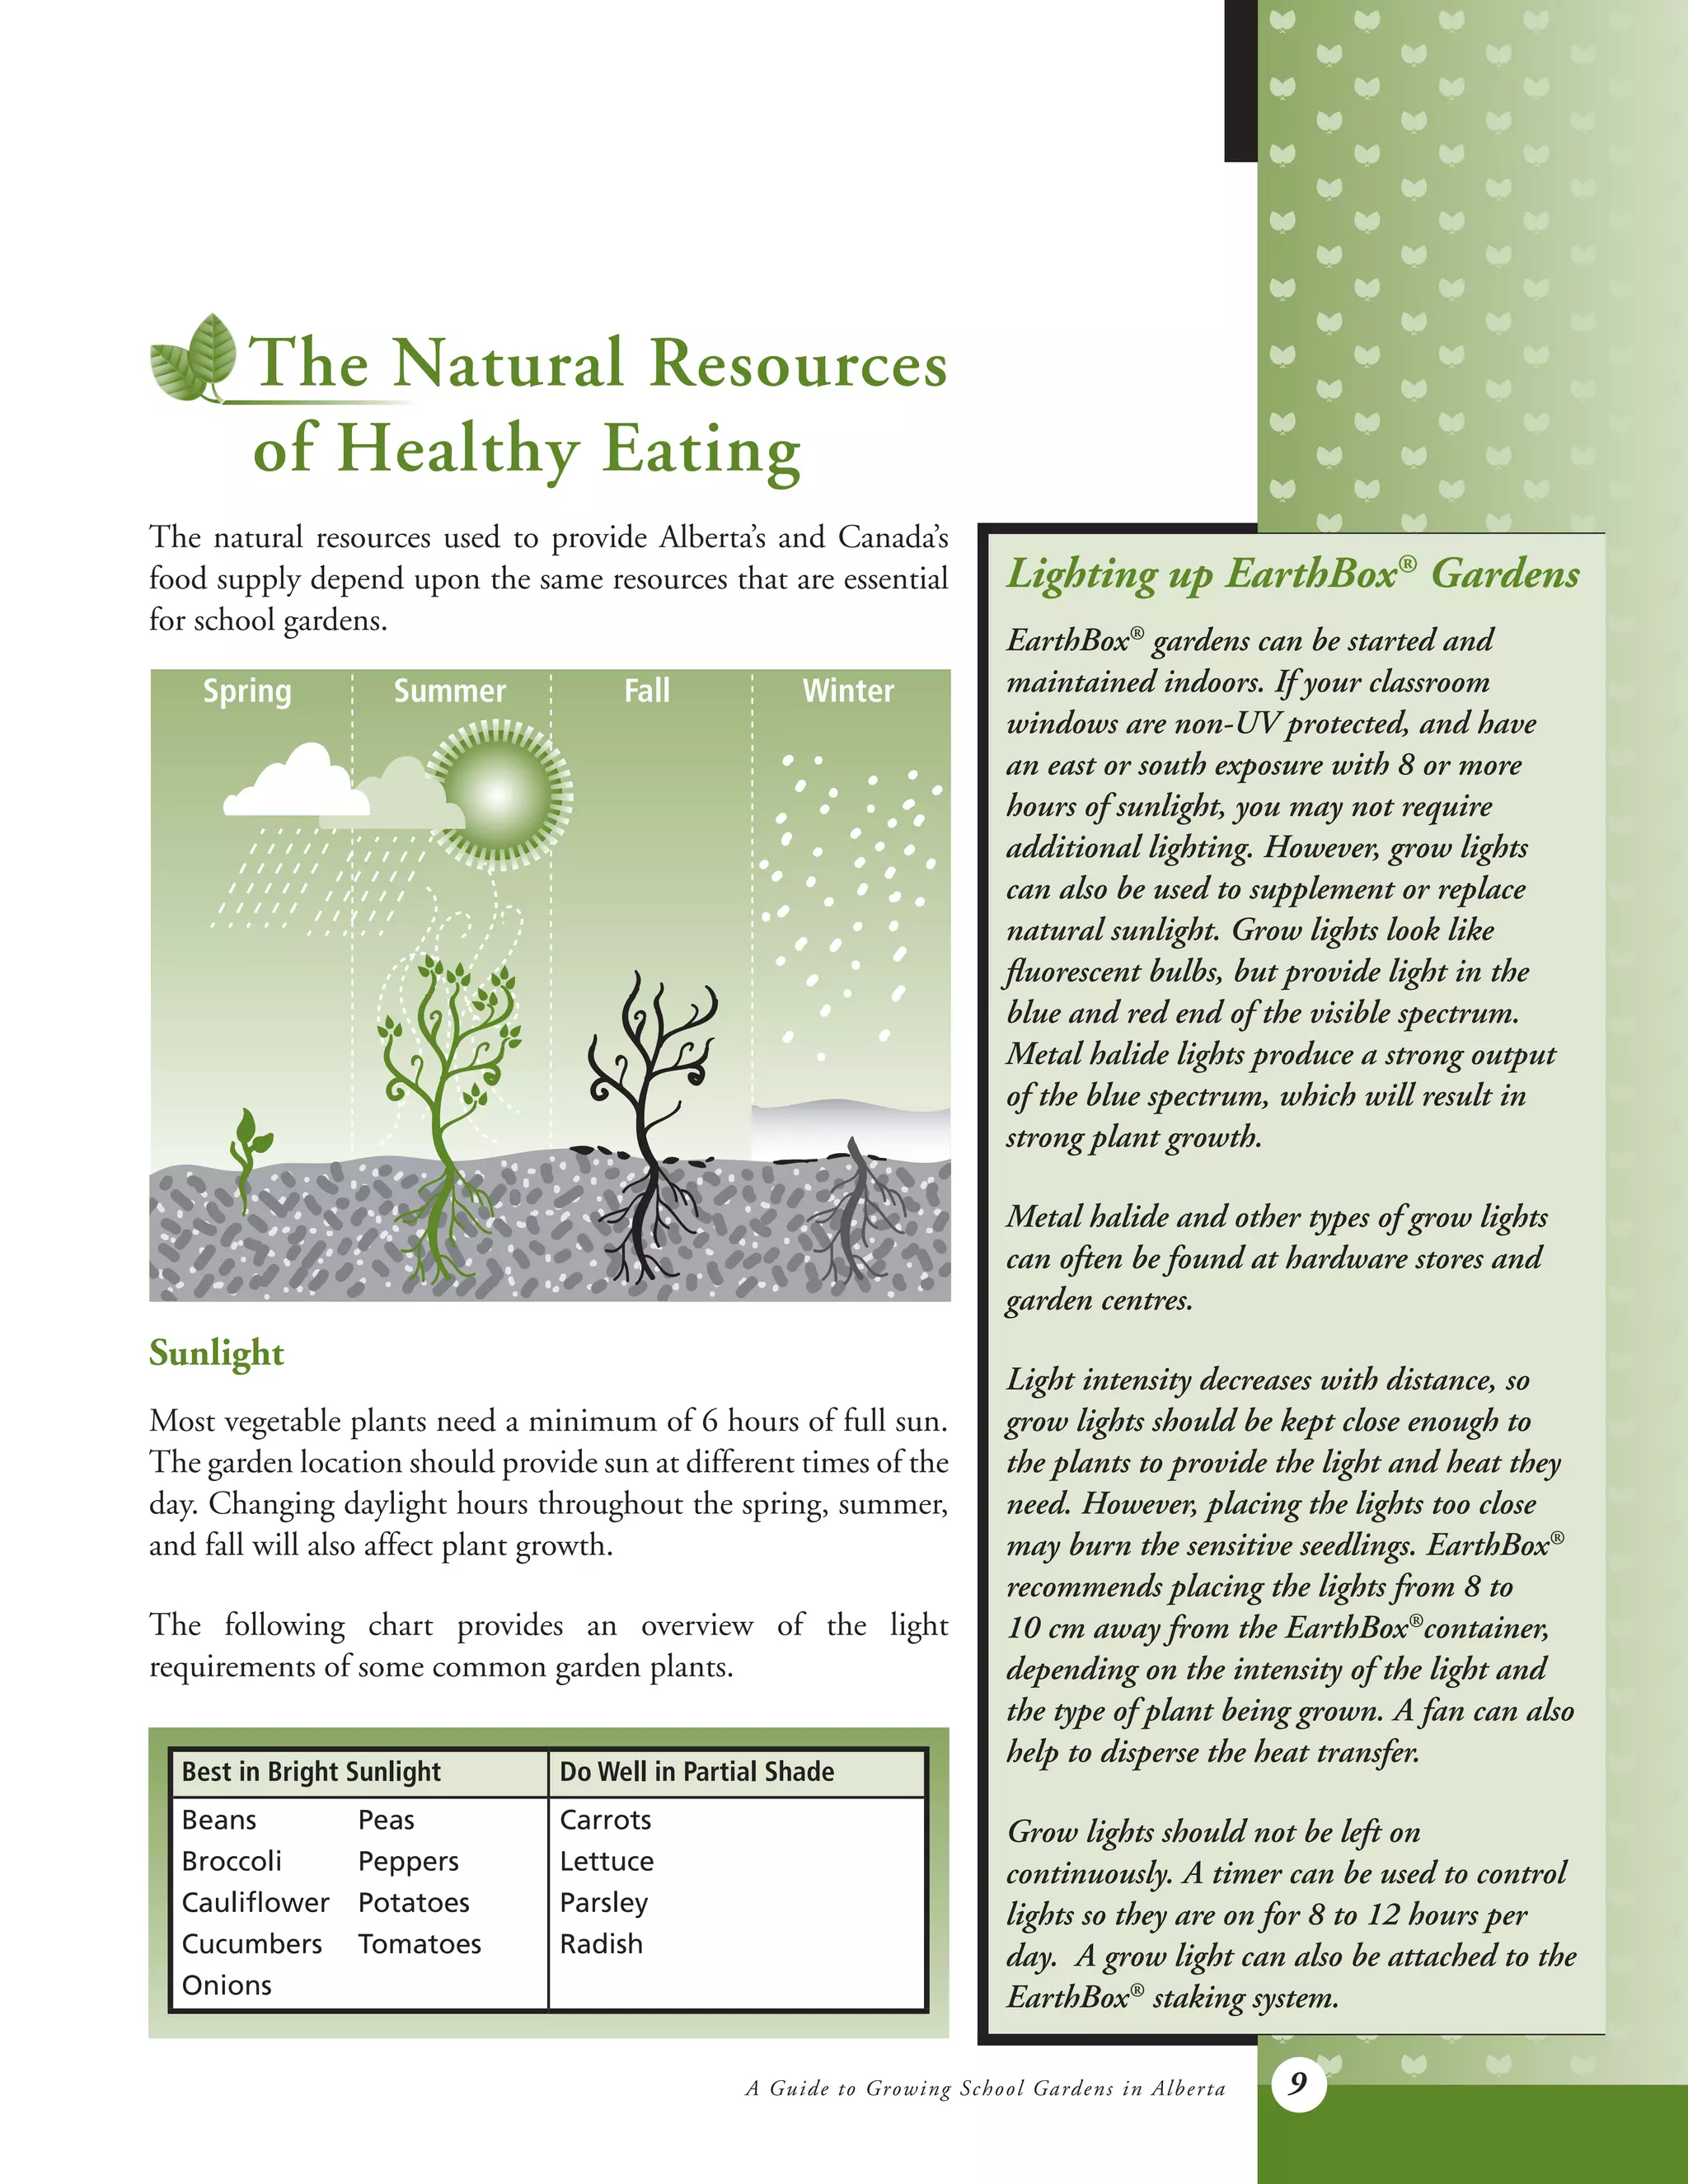
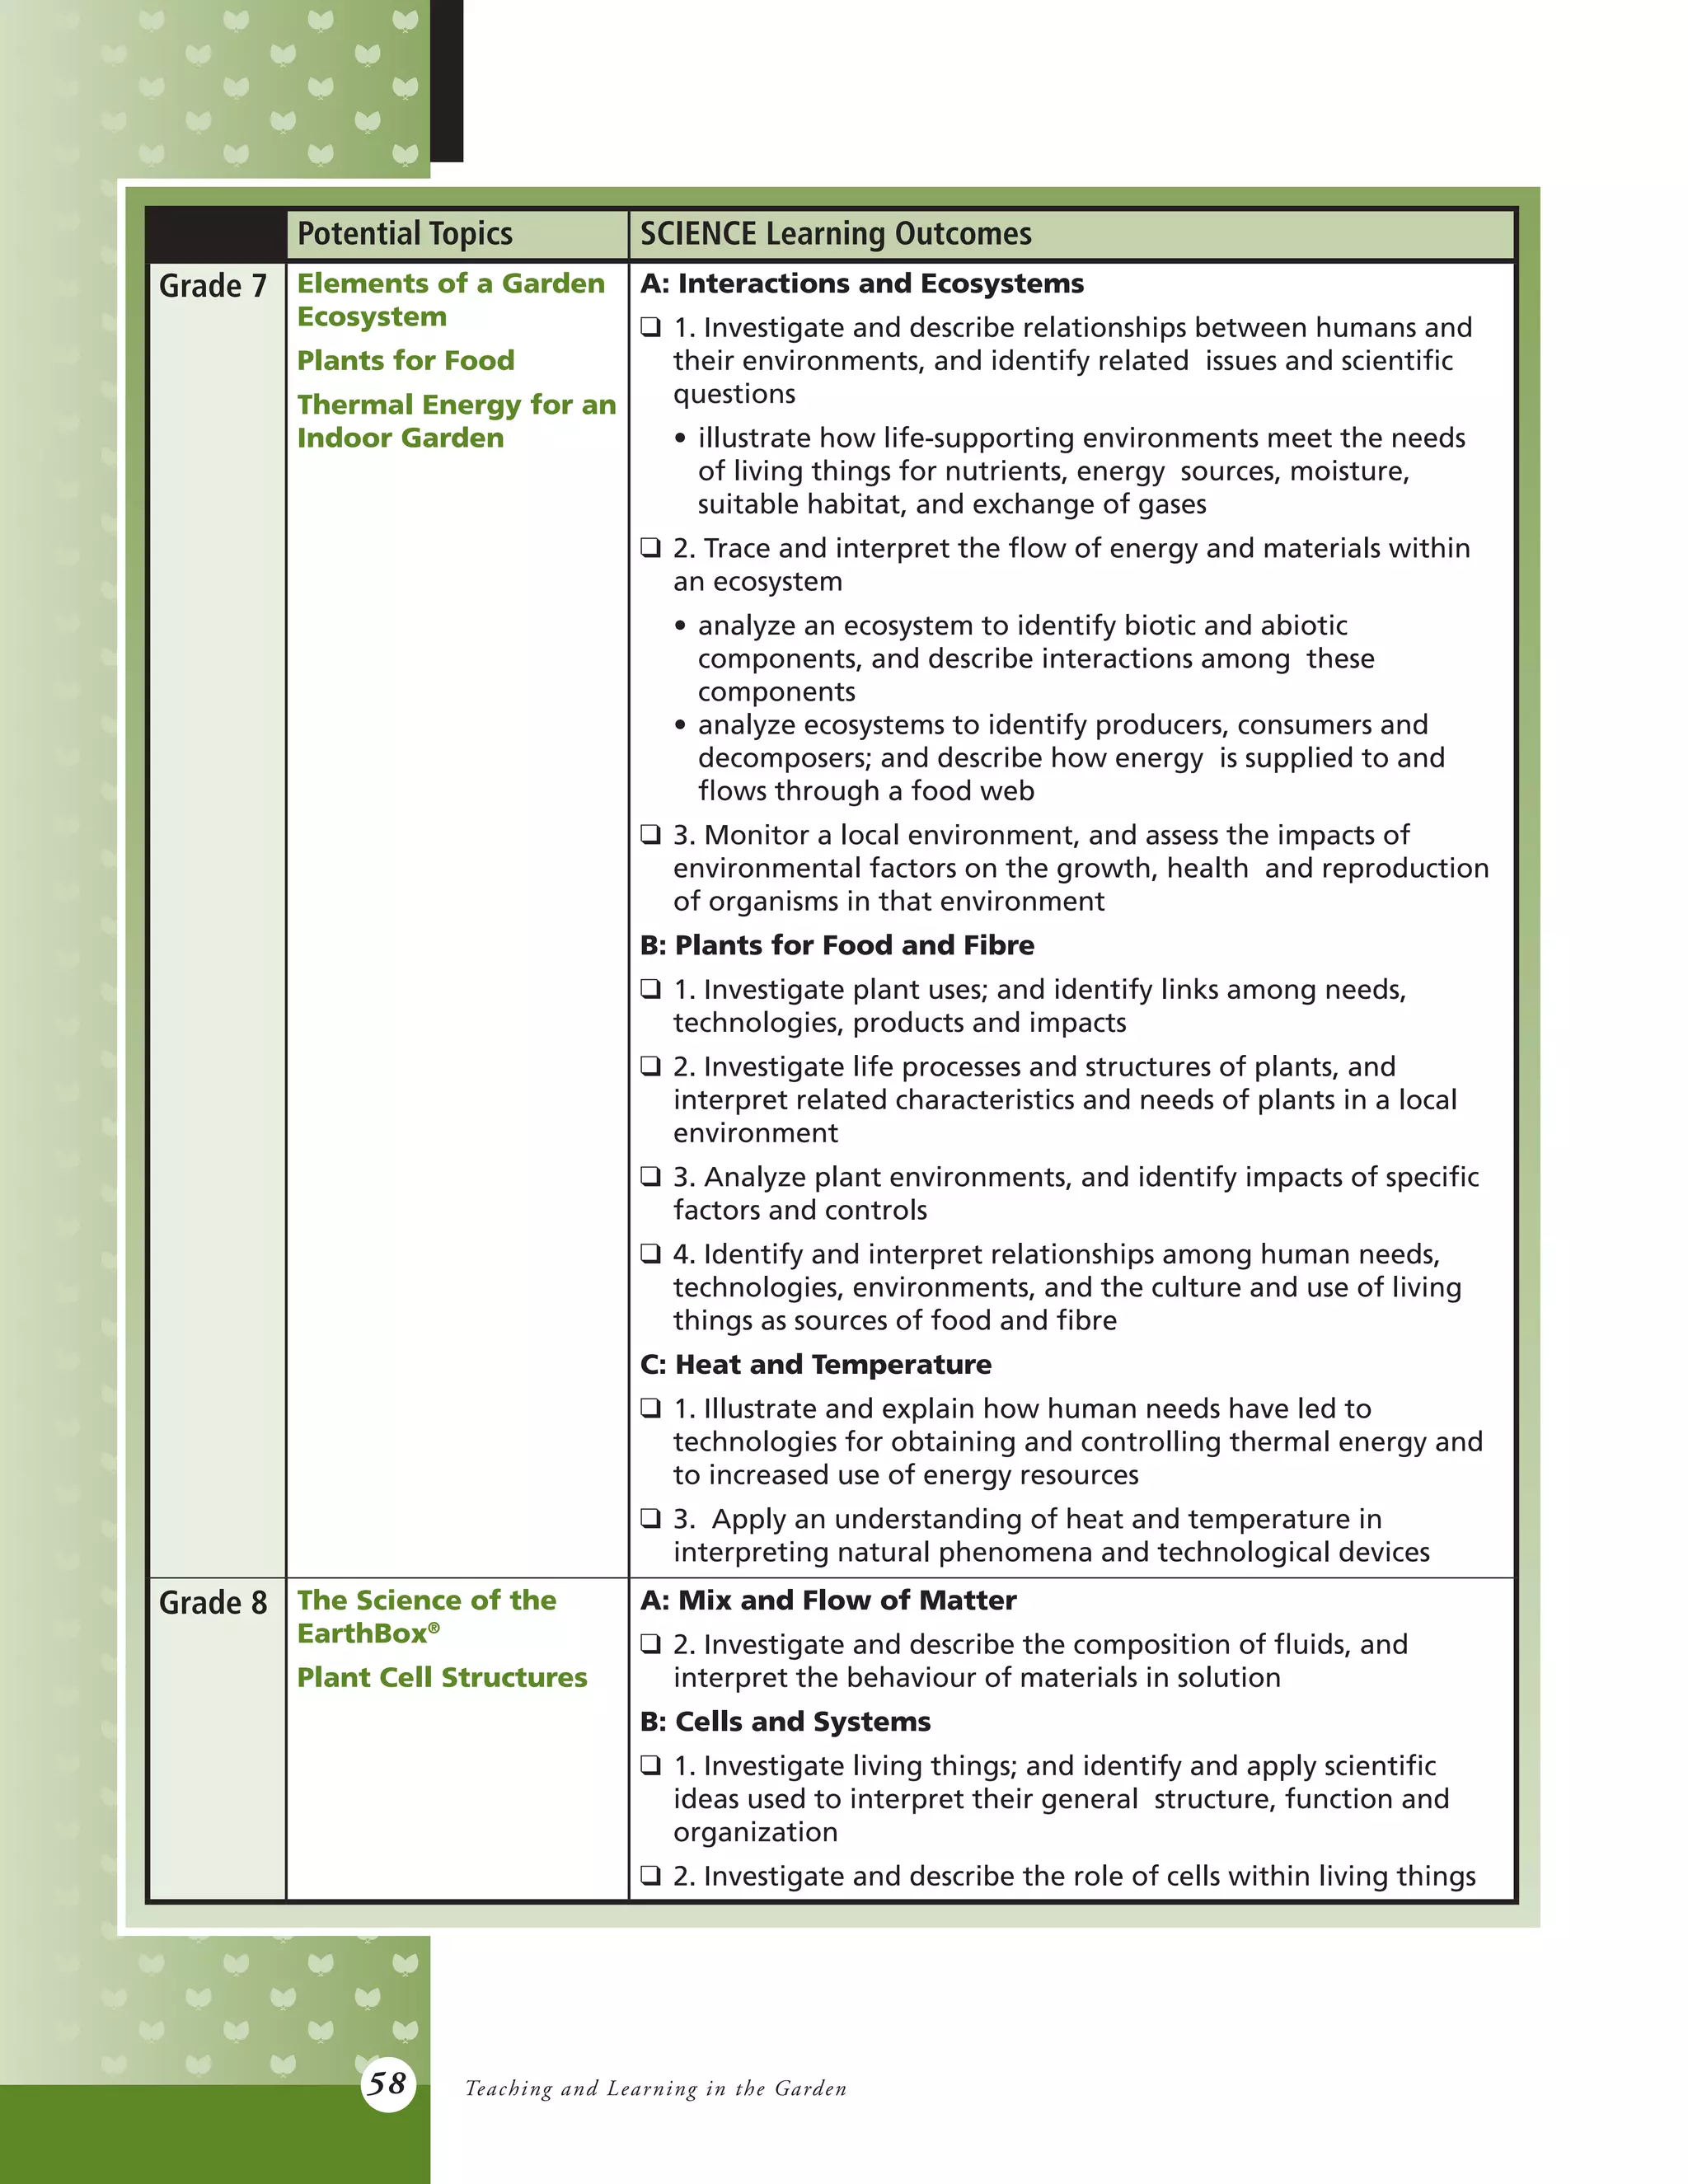
![60
Potential Topics MATHEMATICS Learning Outcomes
Grade 6 Garden Watch Statistics and Probability
q 3. Graph collected data, and analyze the graph to solve
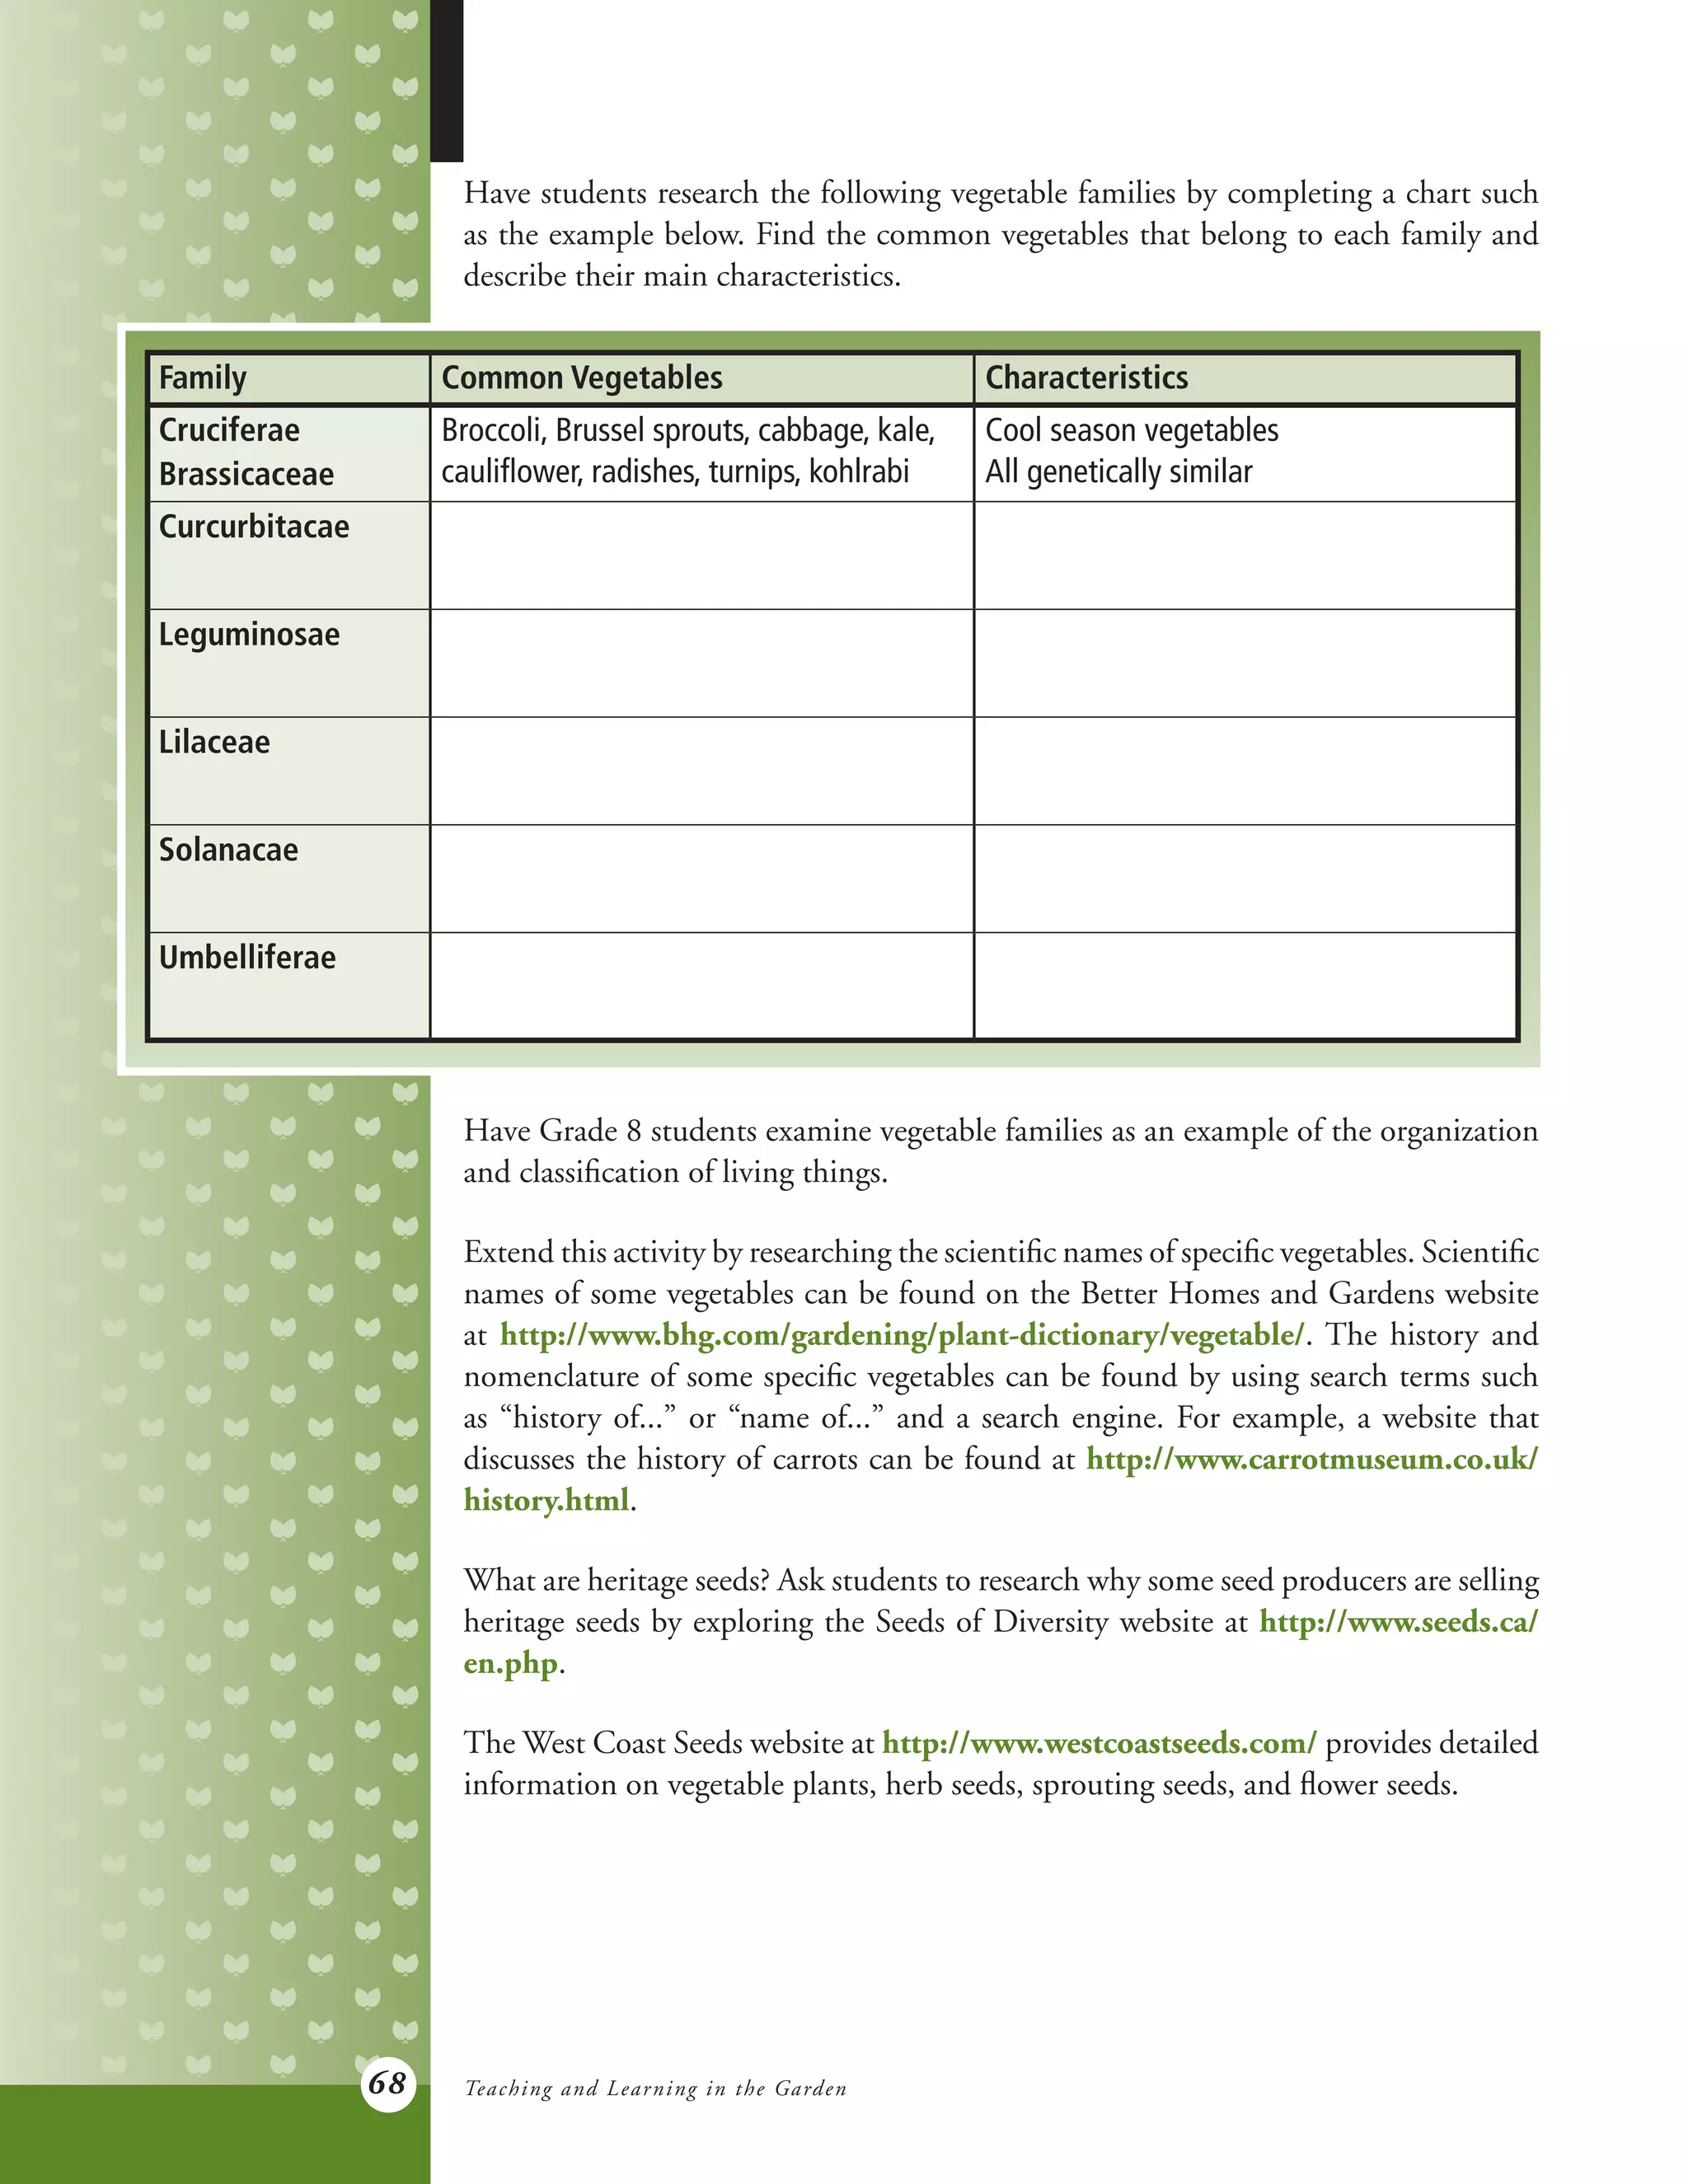
problems. [C, CN, PS, R, T] [ICT: C6–2.5, C7–2.1, P2–2.1, P2–2.2]
Grade 7 Elements of a Garden
Ecosystem
Thermal Energy for an
Indoor Garden
Statistics and Probability
q 1. Demonstrate an understanding of central tendency and
range by:
• determining the measures of central tendency (mean, median,
mode) and range
• determining the most appropriate measures of central
tendency to report findings. [C, PS, R, T] [ICT: P2–3.4]
q 3. Construct, label and interpret circle graphs to solve problems.
[C, CN, PS, R, T, V] [ICT: P2–3.3]
Grade 8 The Science of the
EarthBox®
Statistics and Probability
q 1. Critique ways in which data is presented in circle graphs, line
graphs, bar graphs and pictographs. [C, R, T, V] [ICT: C7–3.1,
C7–3.2, F4–3.3]
Potential Topics SOCIAL STUDIES Learning Outcomes
Grade 3 School Gardens in
Communities around
the World
q 3.1.2 examine the social, cultural and linguistic characteristics
that affect quality of life in communities in other parts of the
world by exploring and reflecting upon the following questions
for inquiry:
• (3) How does access to public services affect the
communities? (e.g., schools, hospitals, libraries, transportation
systems)? (ER, GC, PADM)
• (9) How do the individuals and groups in the communities
cooperate and share with other group members? (C, CC)
q 3.1.3 examine the geographic characteristics that shape
communities in other parts of the world by exploring and
reflecting upon the following questions for inquiry:
• (3) In what ways do the communities show concern for their
natural environment? (GC, LPP)
Grade 4 Using Alberta’s
Environment and
Natural Resources
School Agriculture
q 4.1.1 value Alberta’s physical geography and natural
environment:
• (5) appreciate how land sustains communities and quality of
life (ER, LPP)
• (6) demonstrate care and concern for the environment
through their choices and actions (LPP)
q 4.1.4 analyze how Albertans interact with their environment
by exploring and reflecting upon the following questions
and issues:
• How are natural resources used by Albertans (i.e., agriculture,
oil and natural gas, forests, coal)? (ER, LPP)
Teaching and Learning in the Garden](https://image.slidesharecdn.com/ed436-140402144825-phpapp01/75/Guide-to-Growing-School-Gardens-in-Alberta-64-2048.jpg)


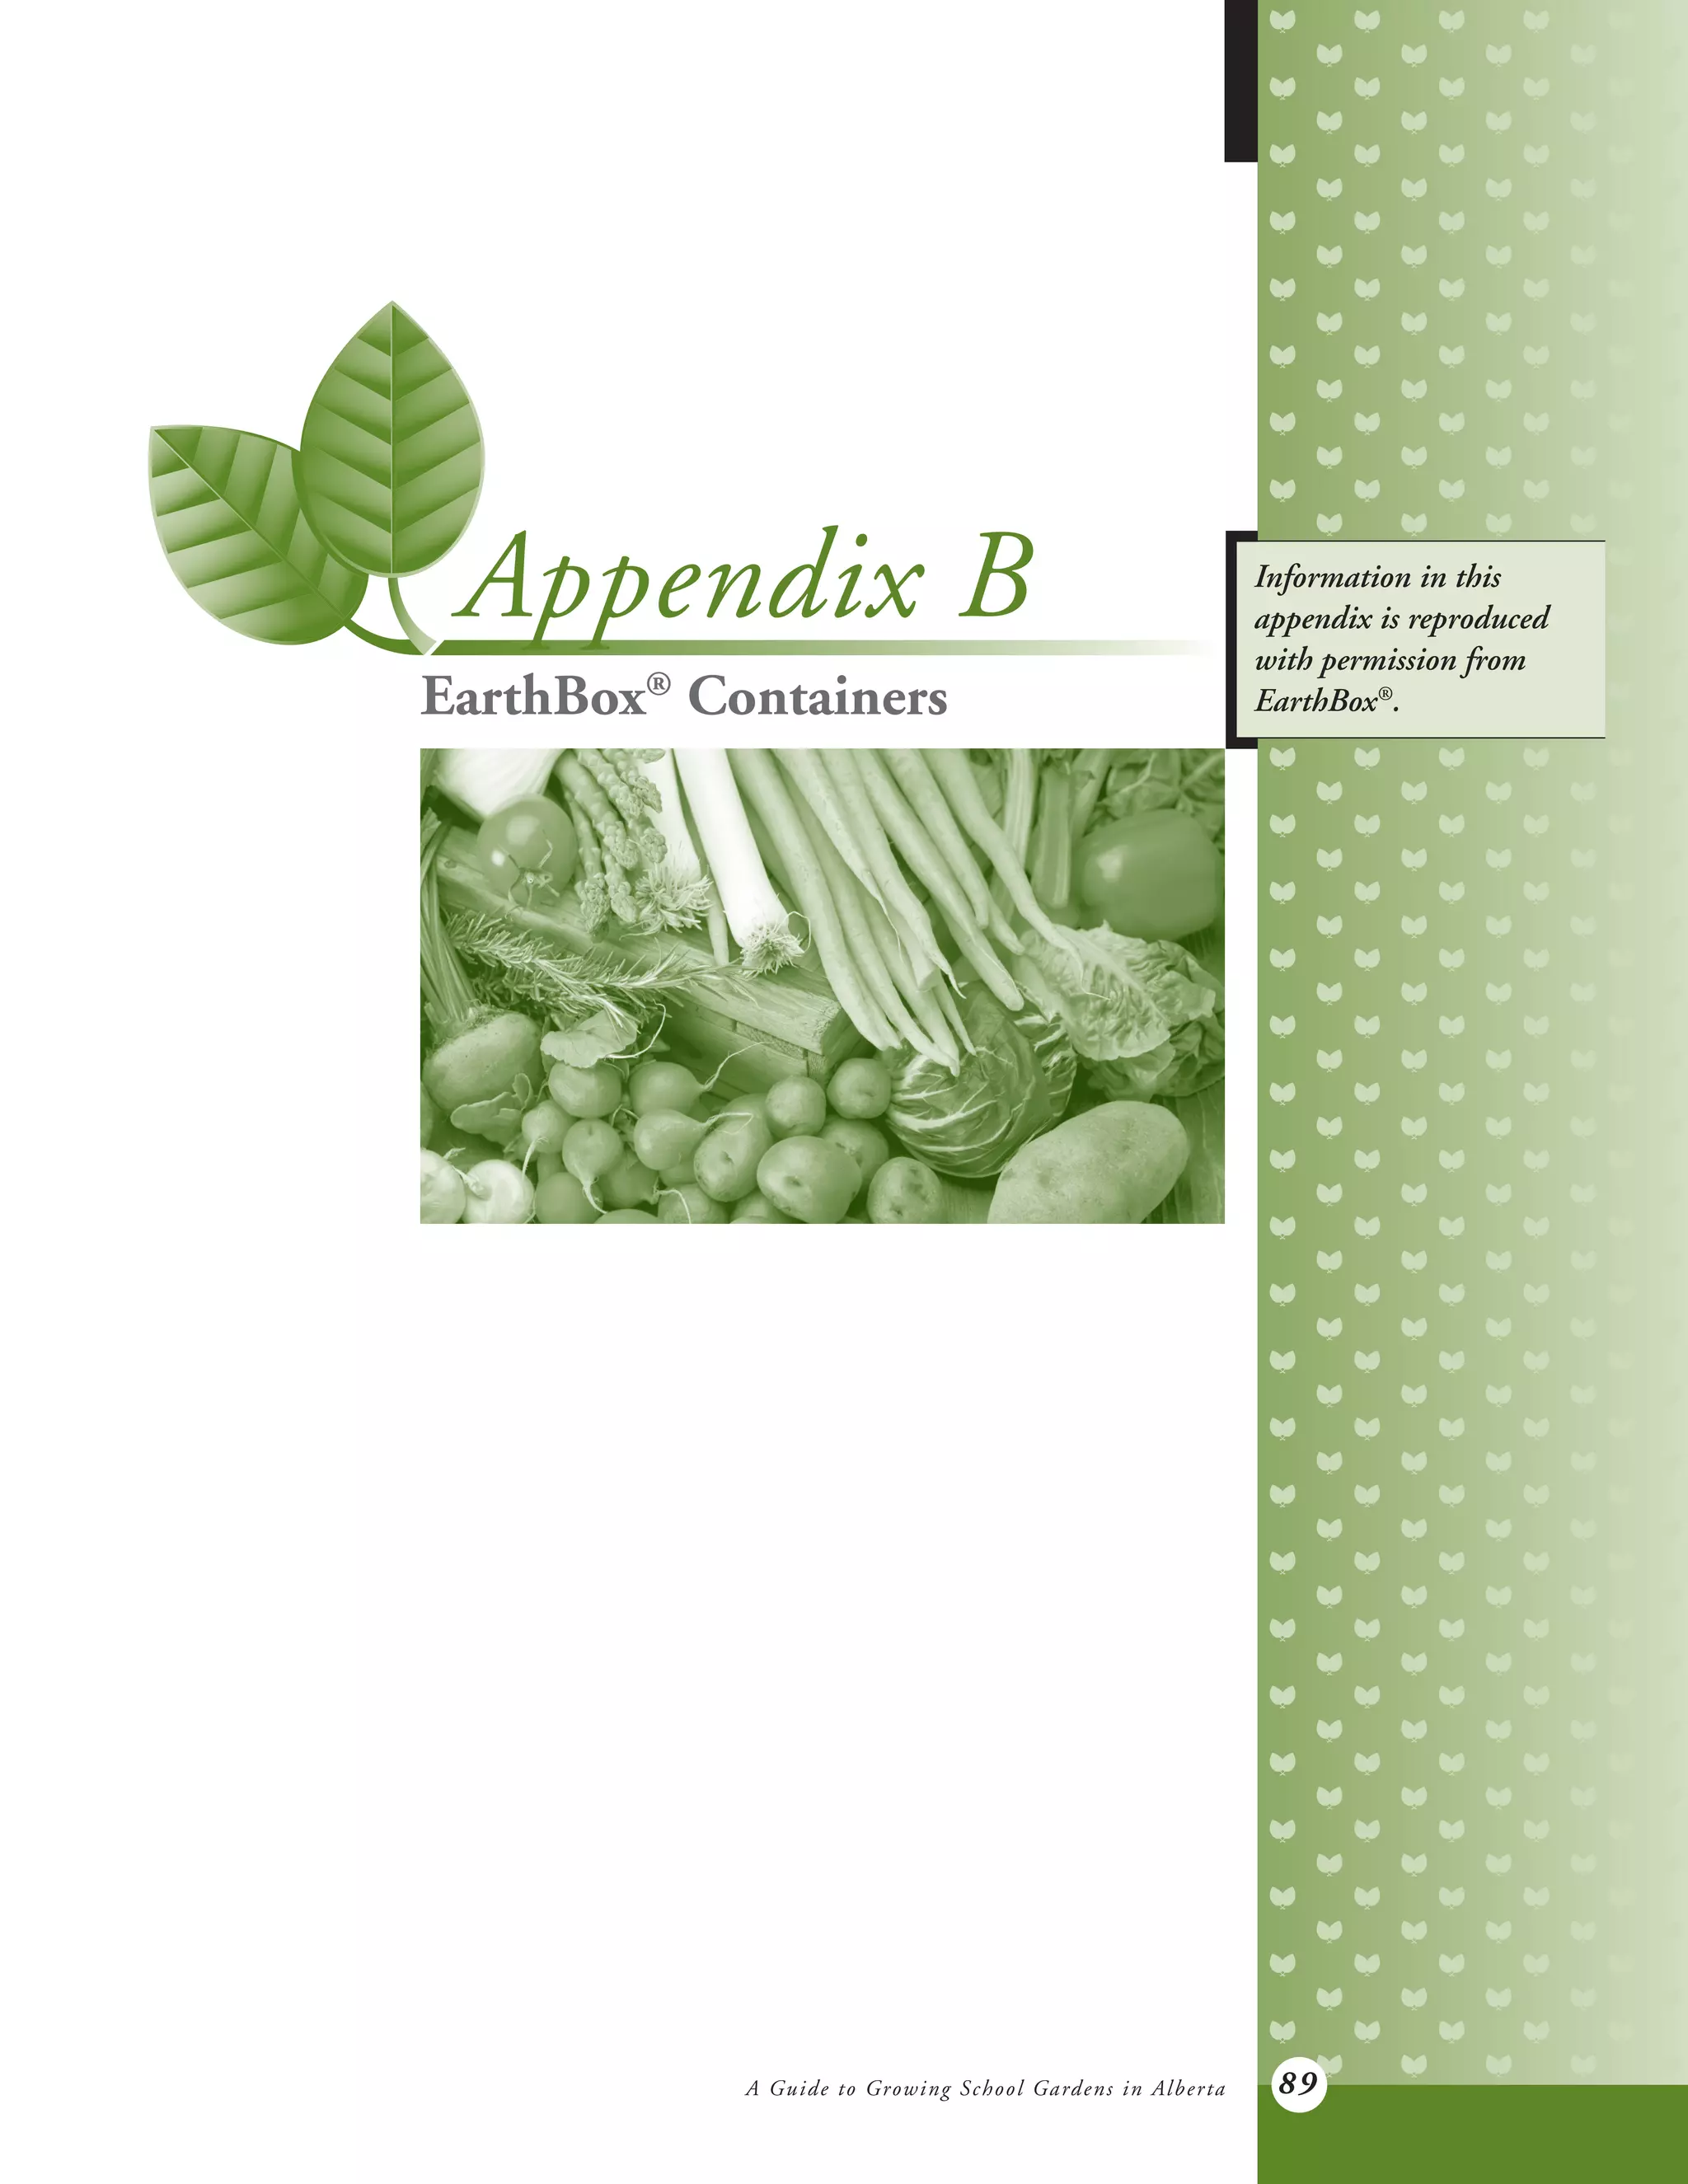

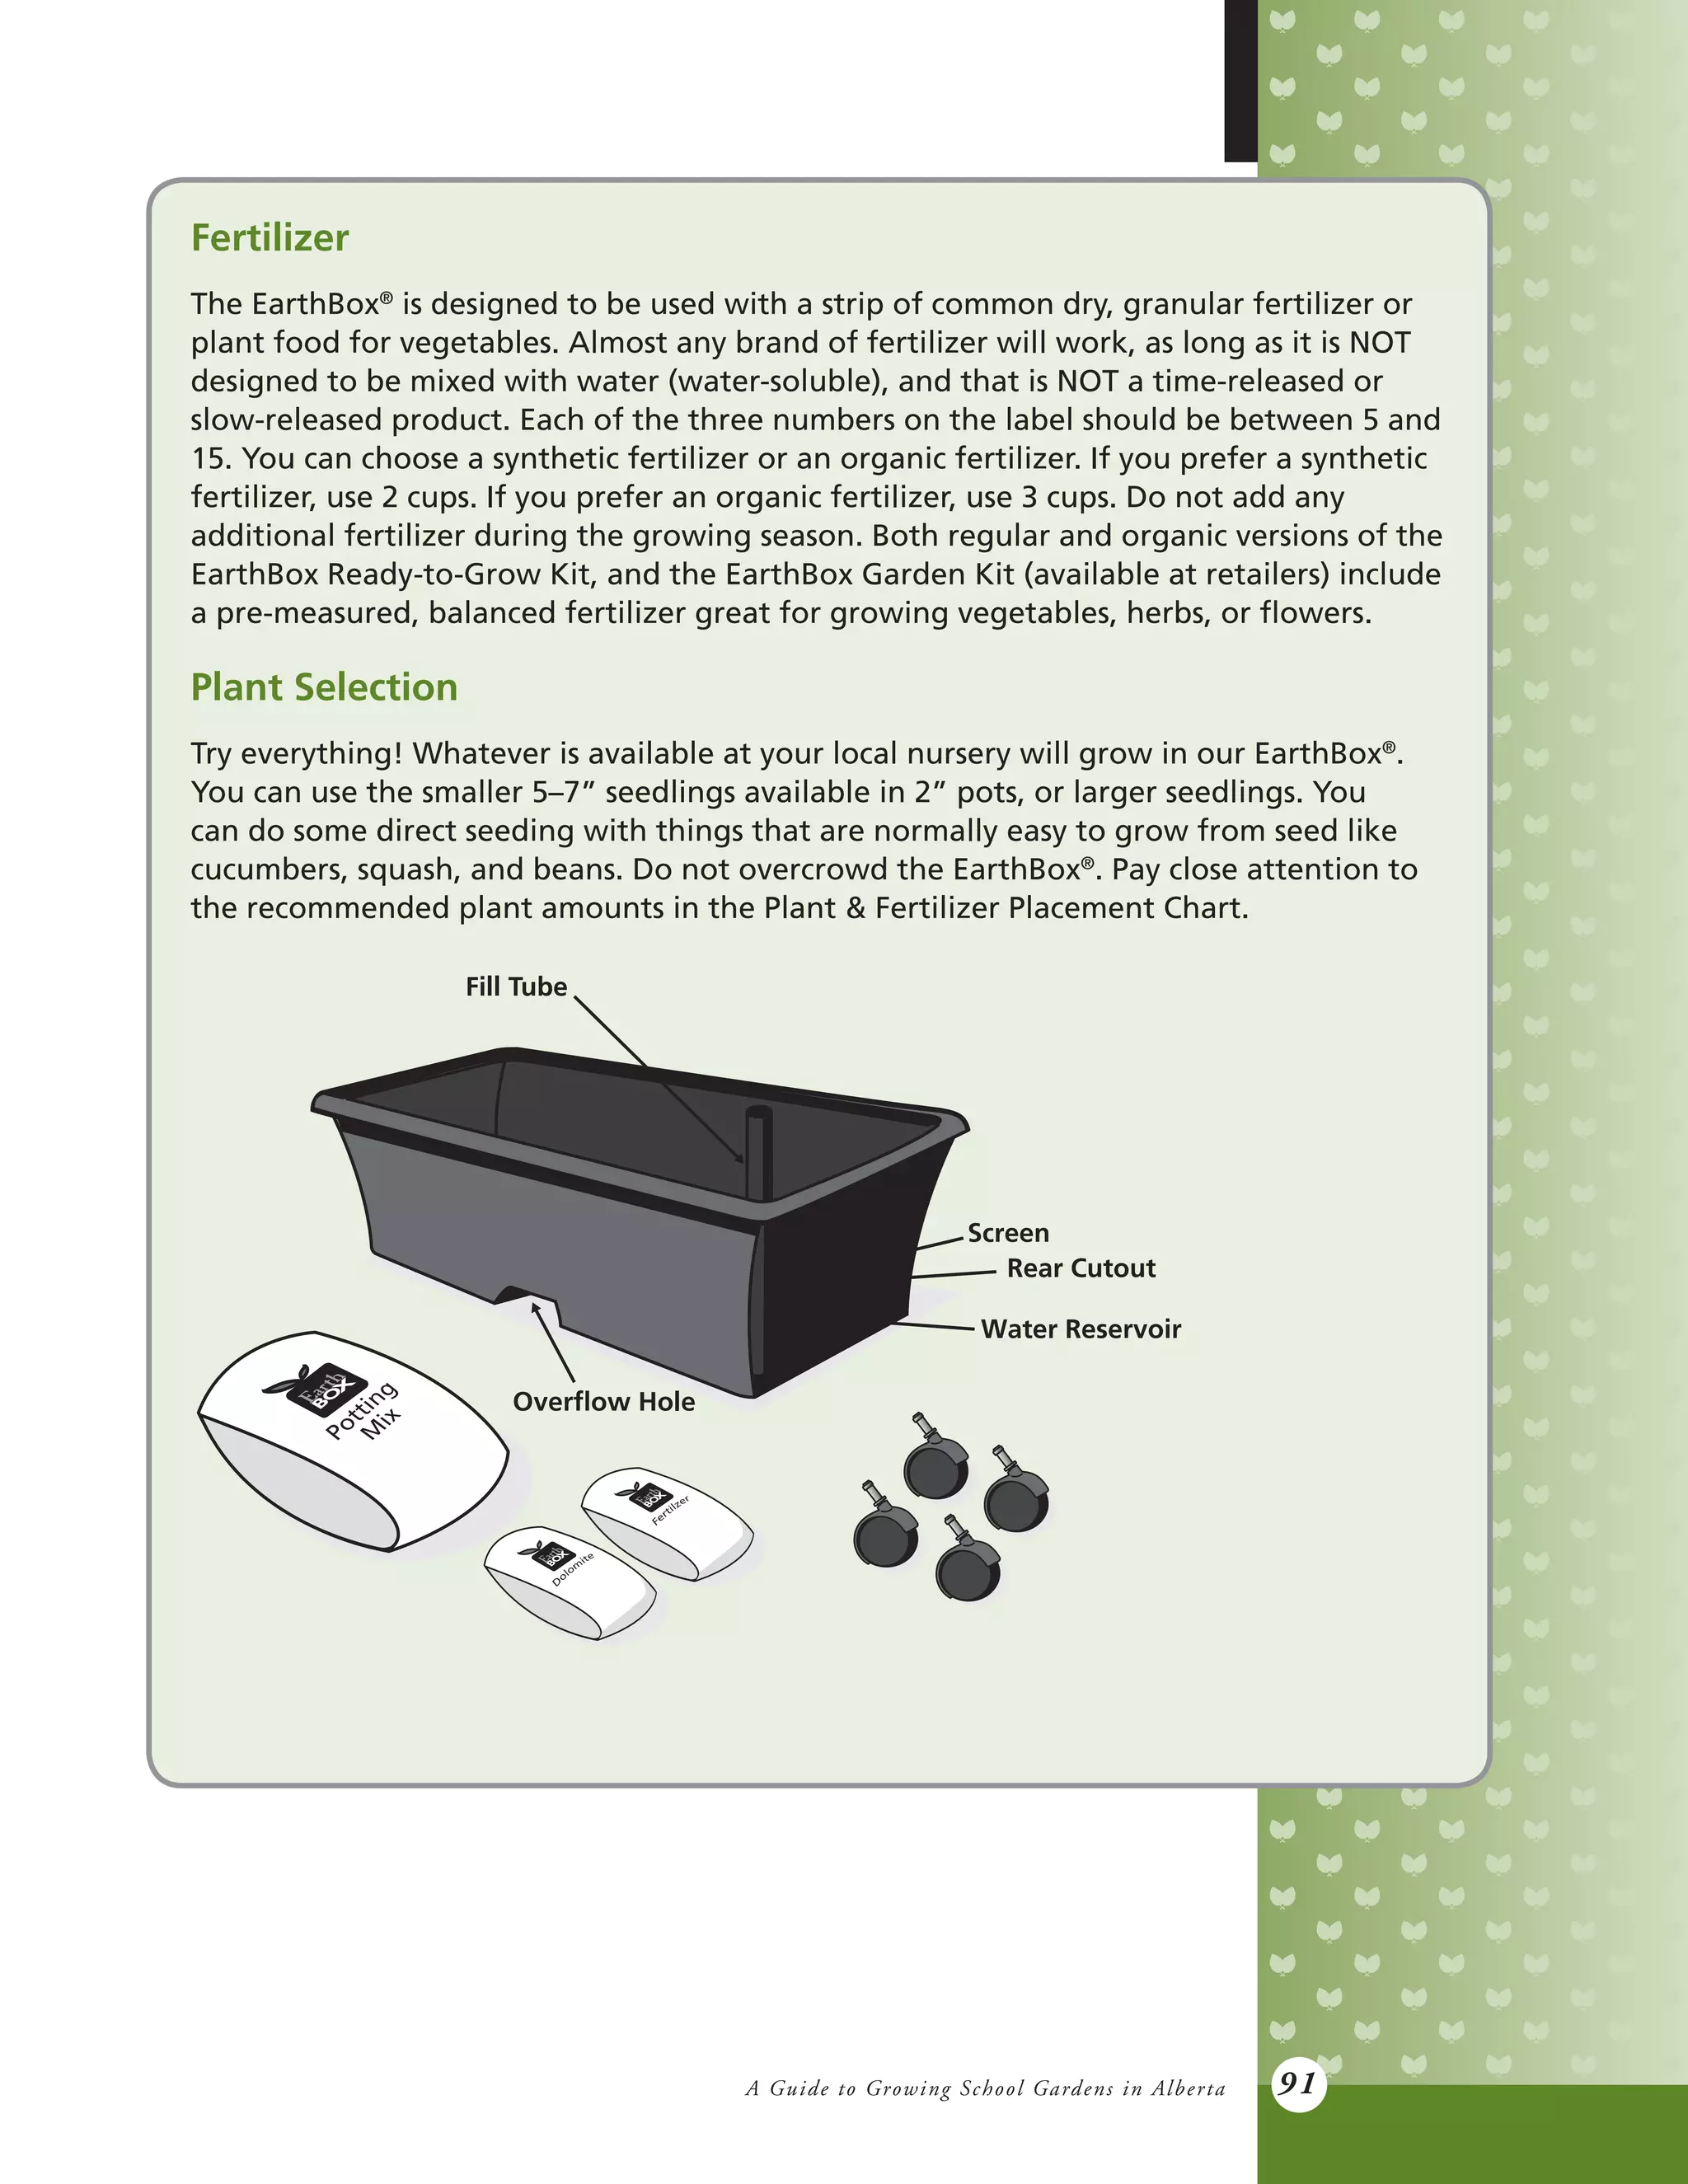
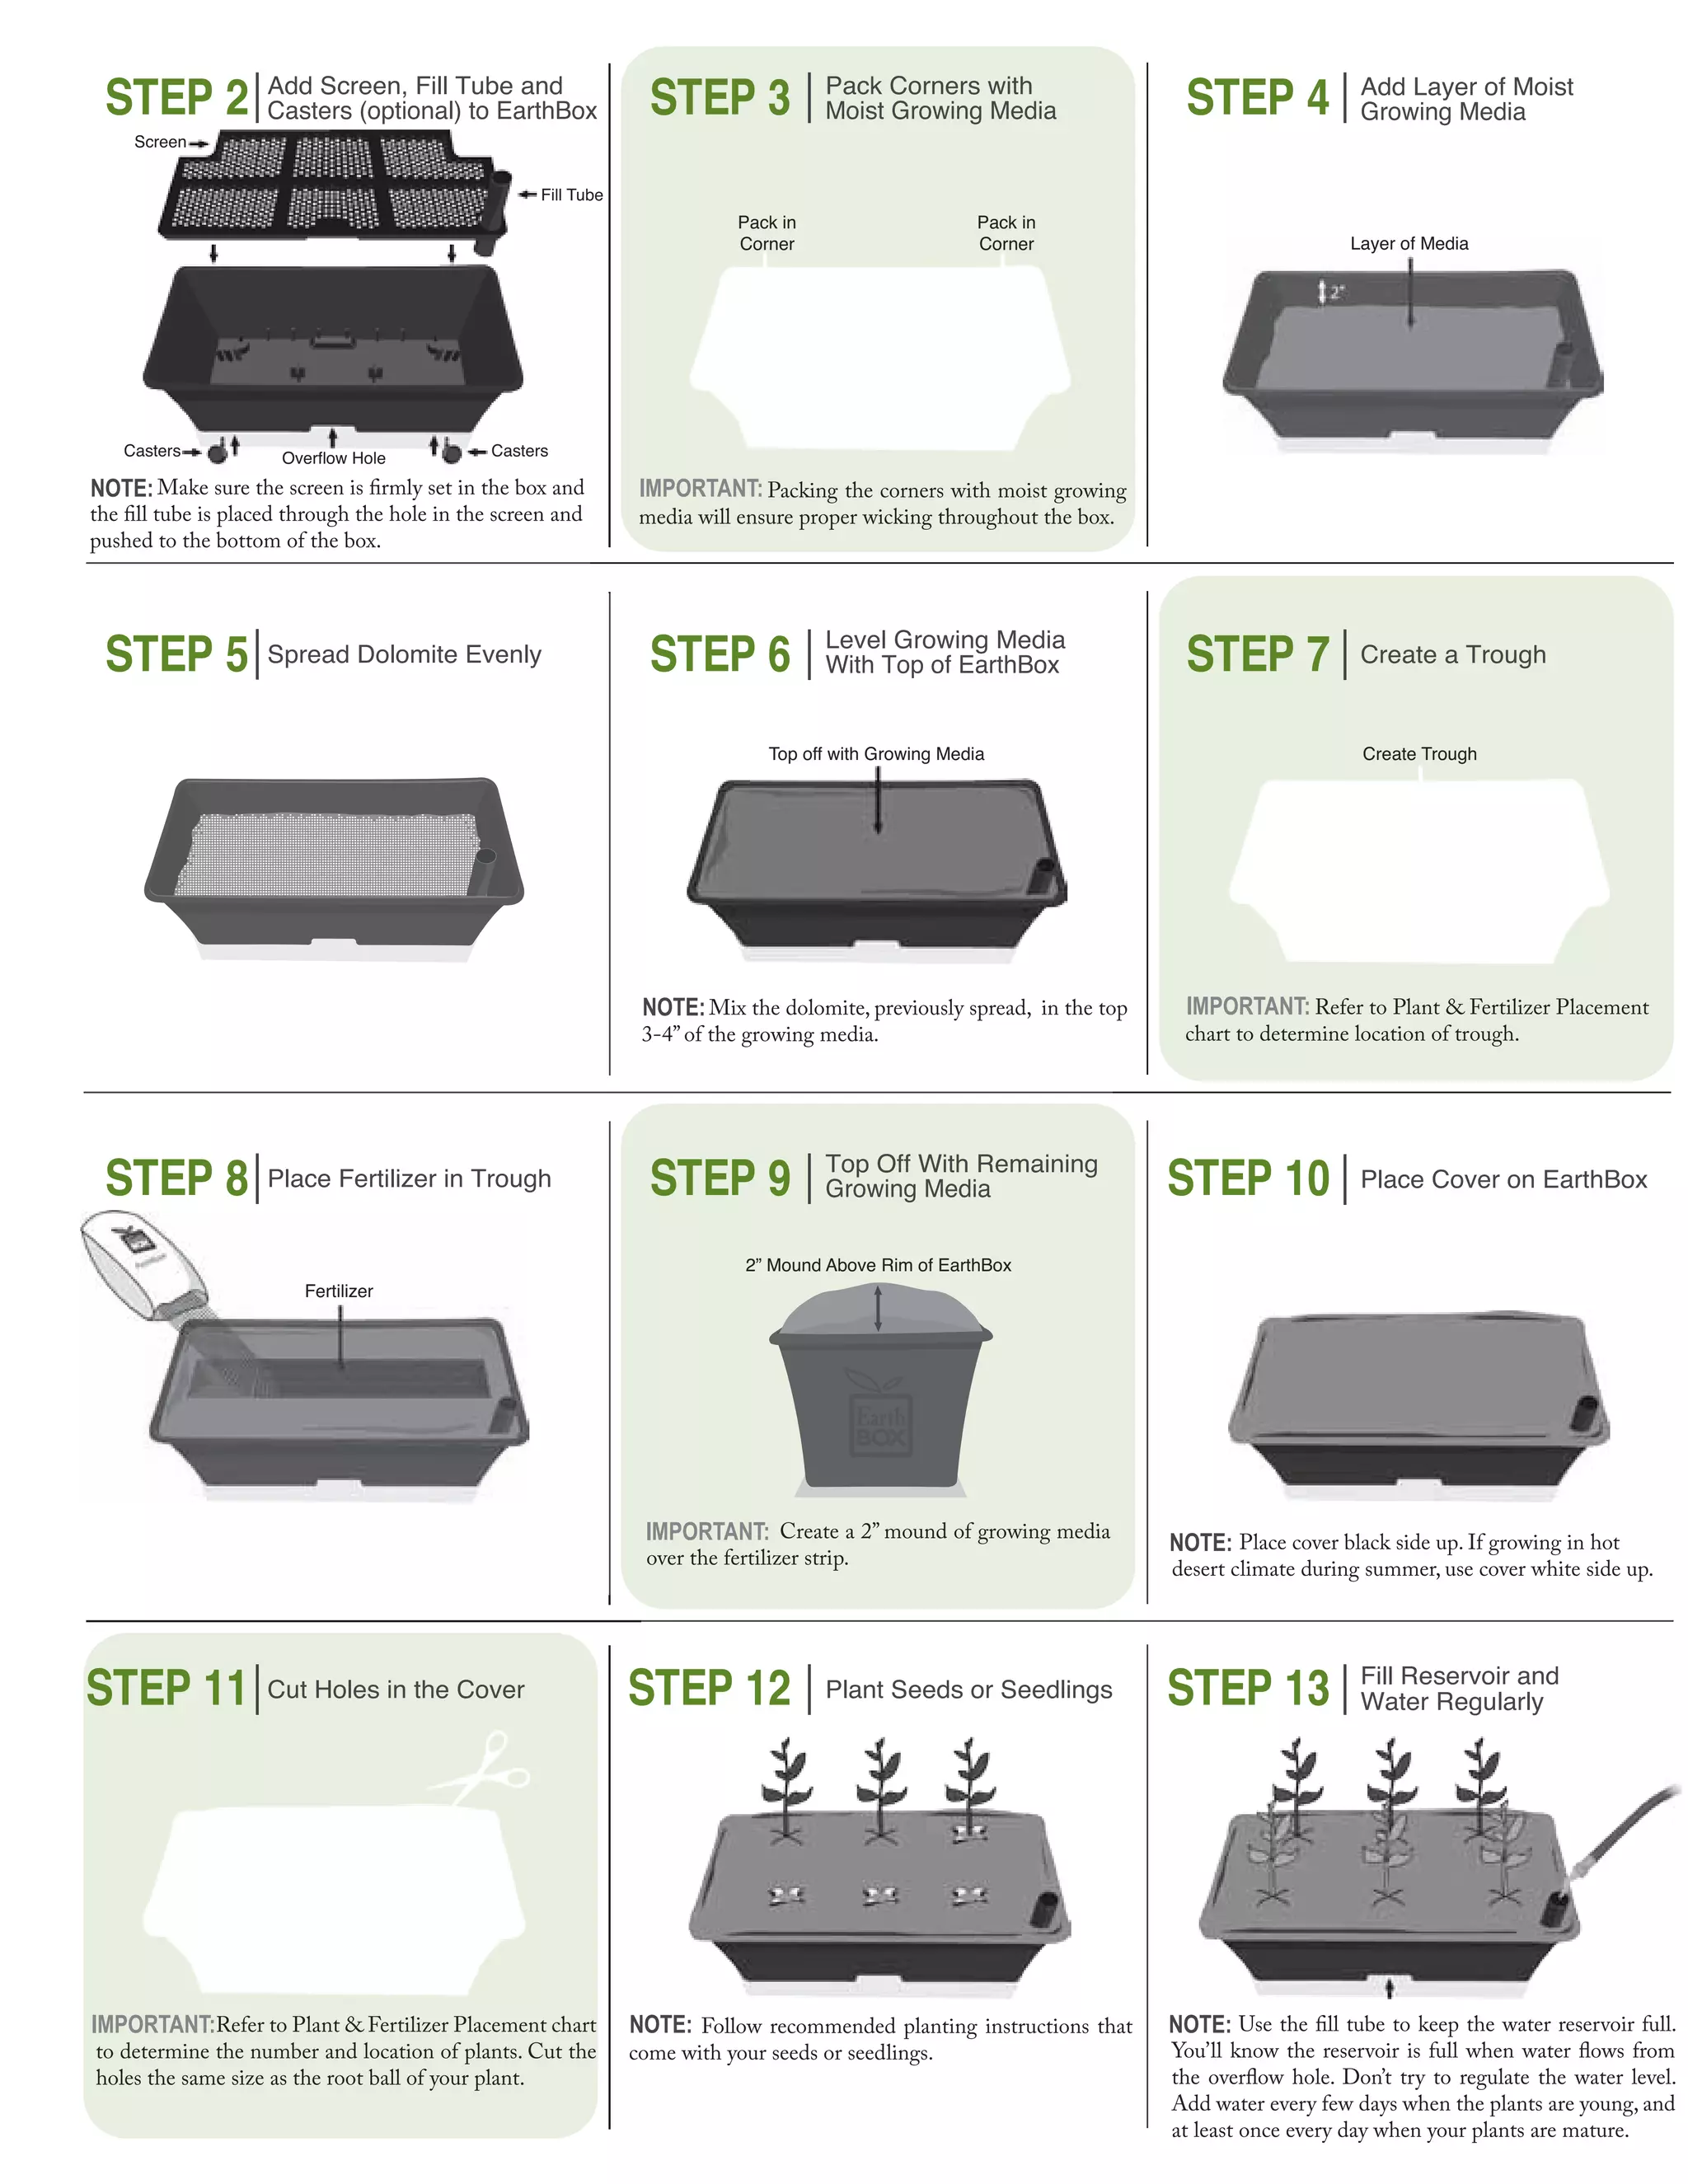
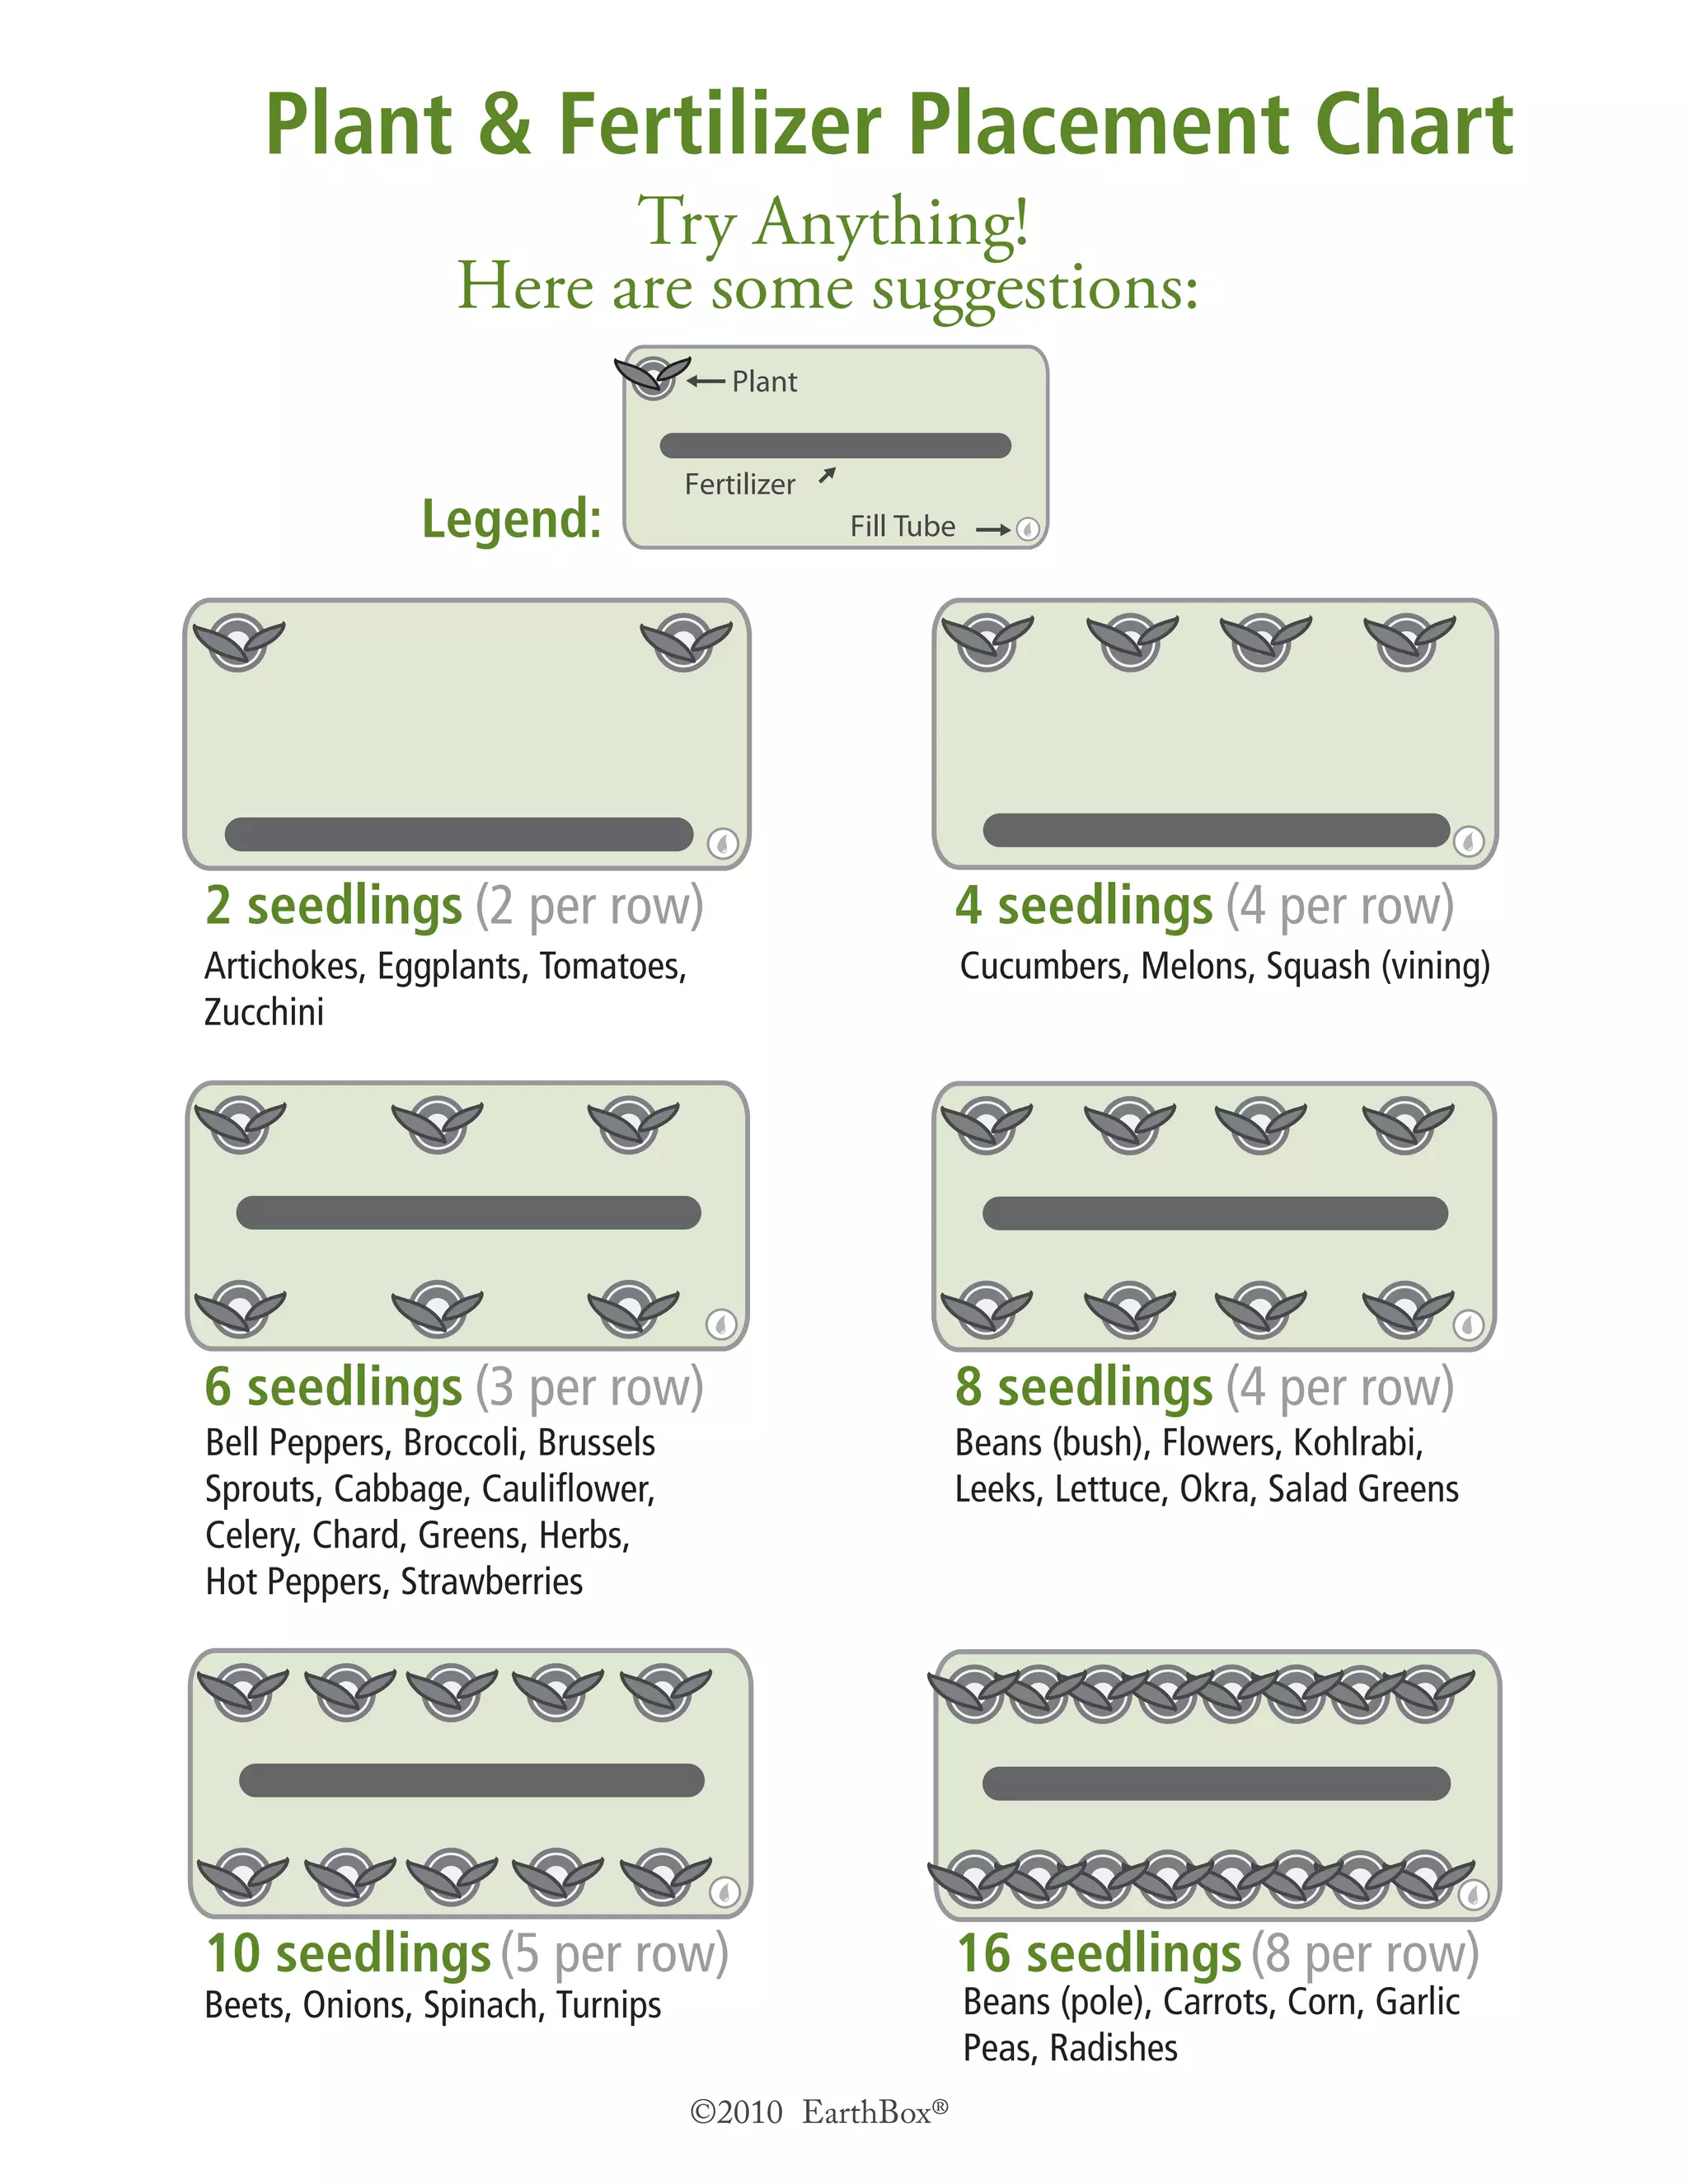


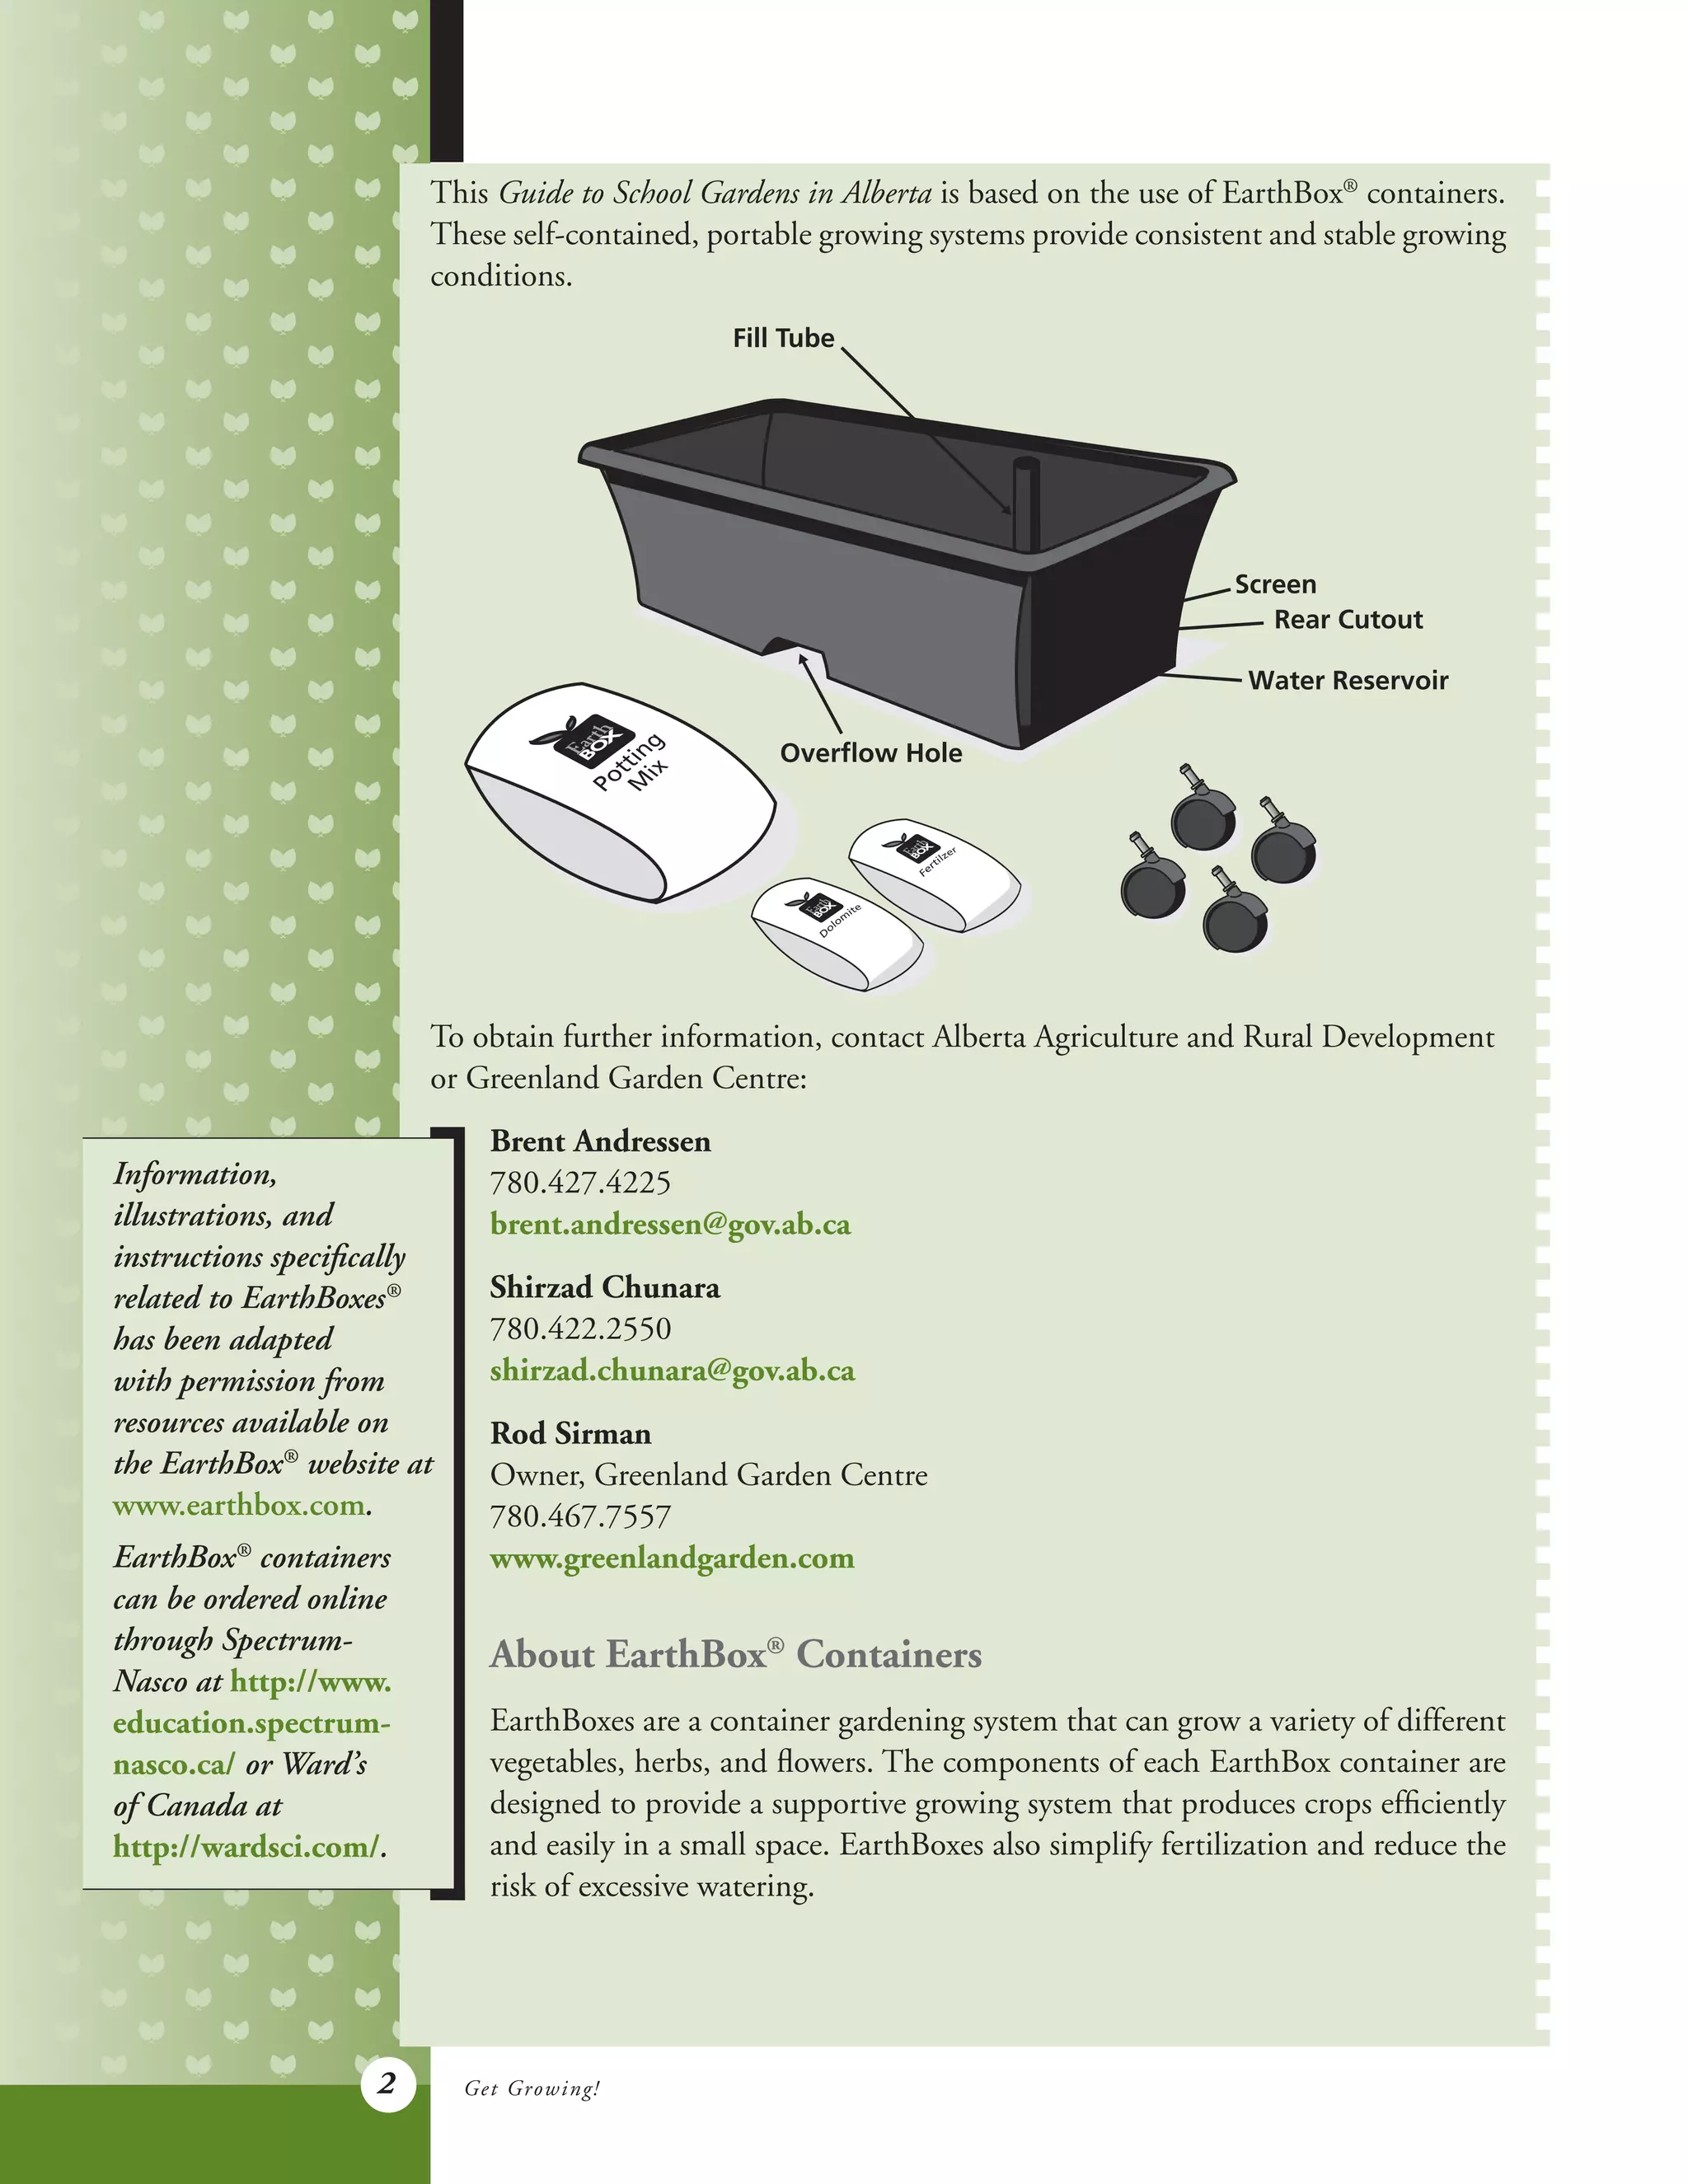
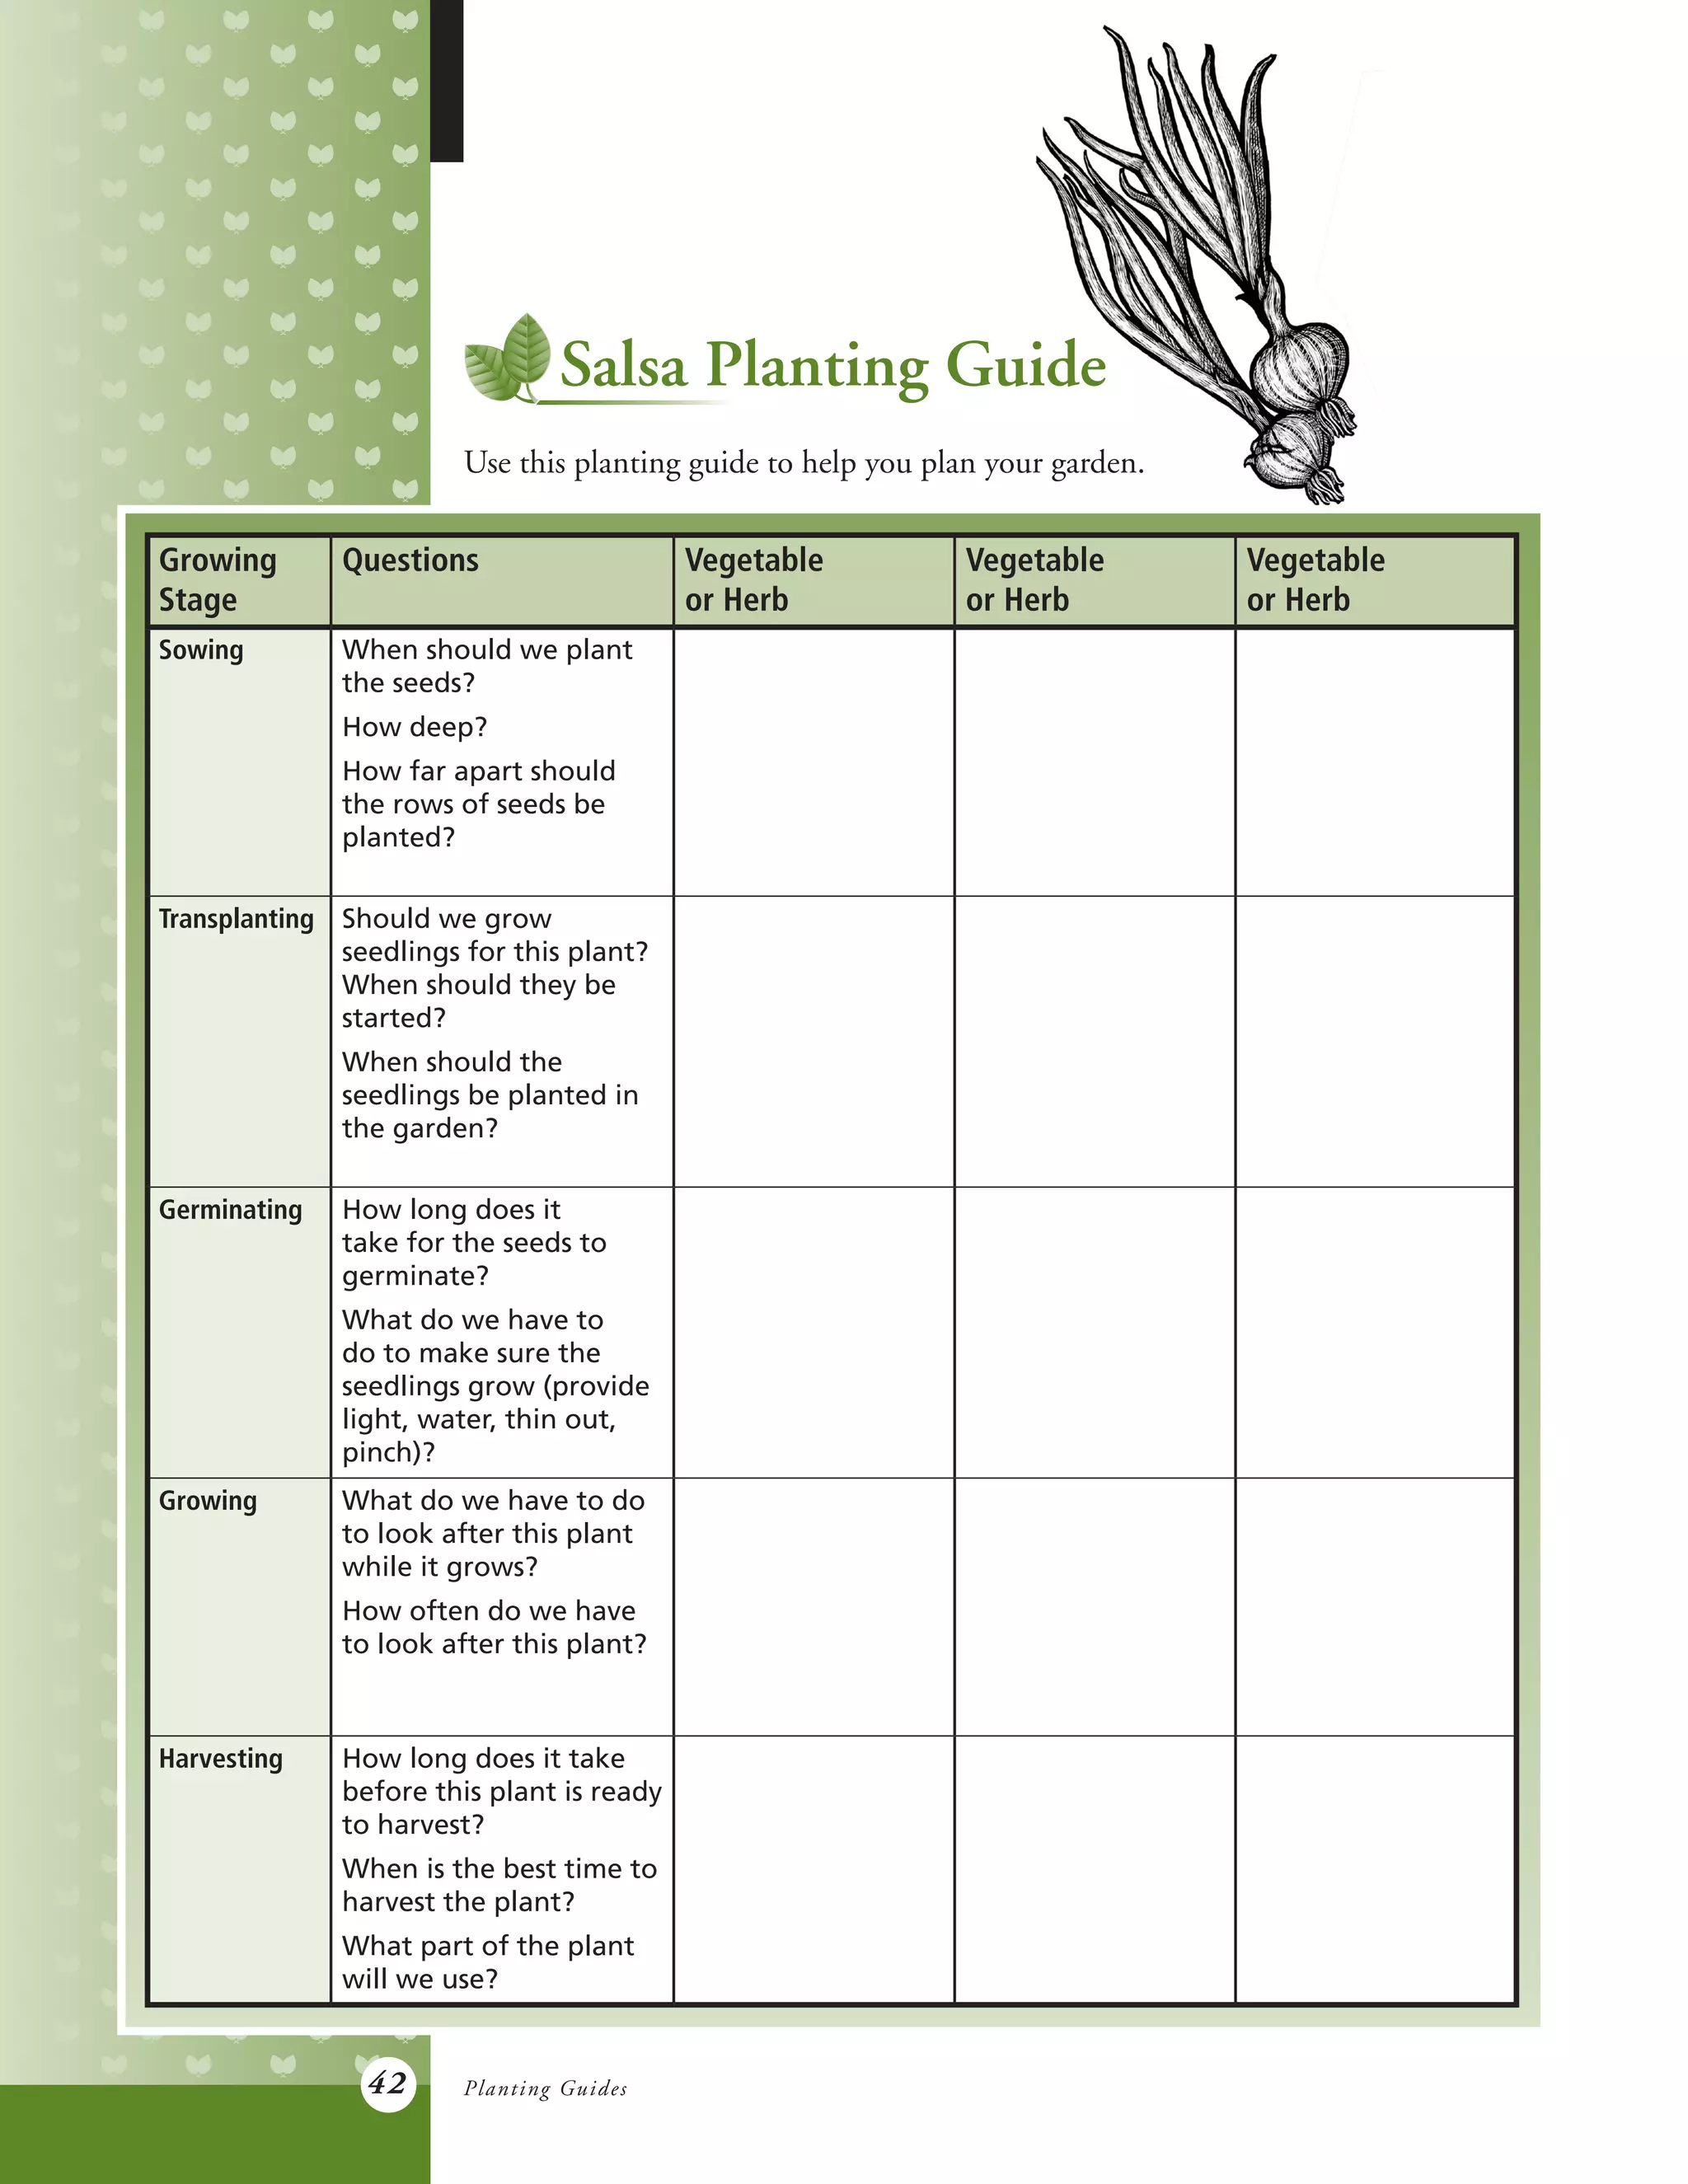
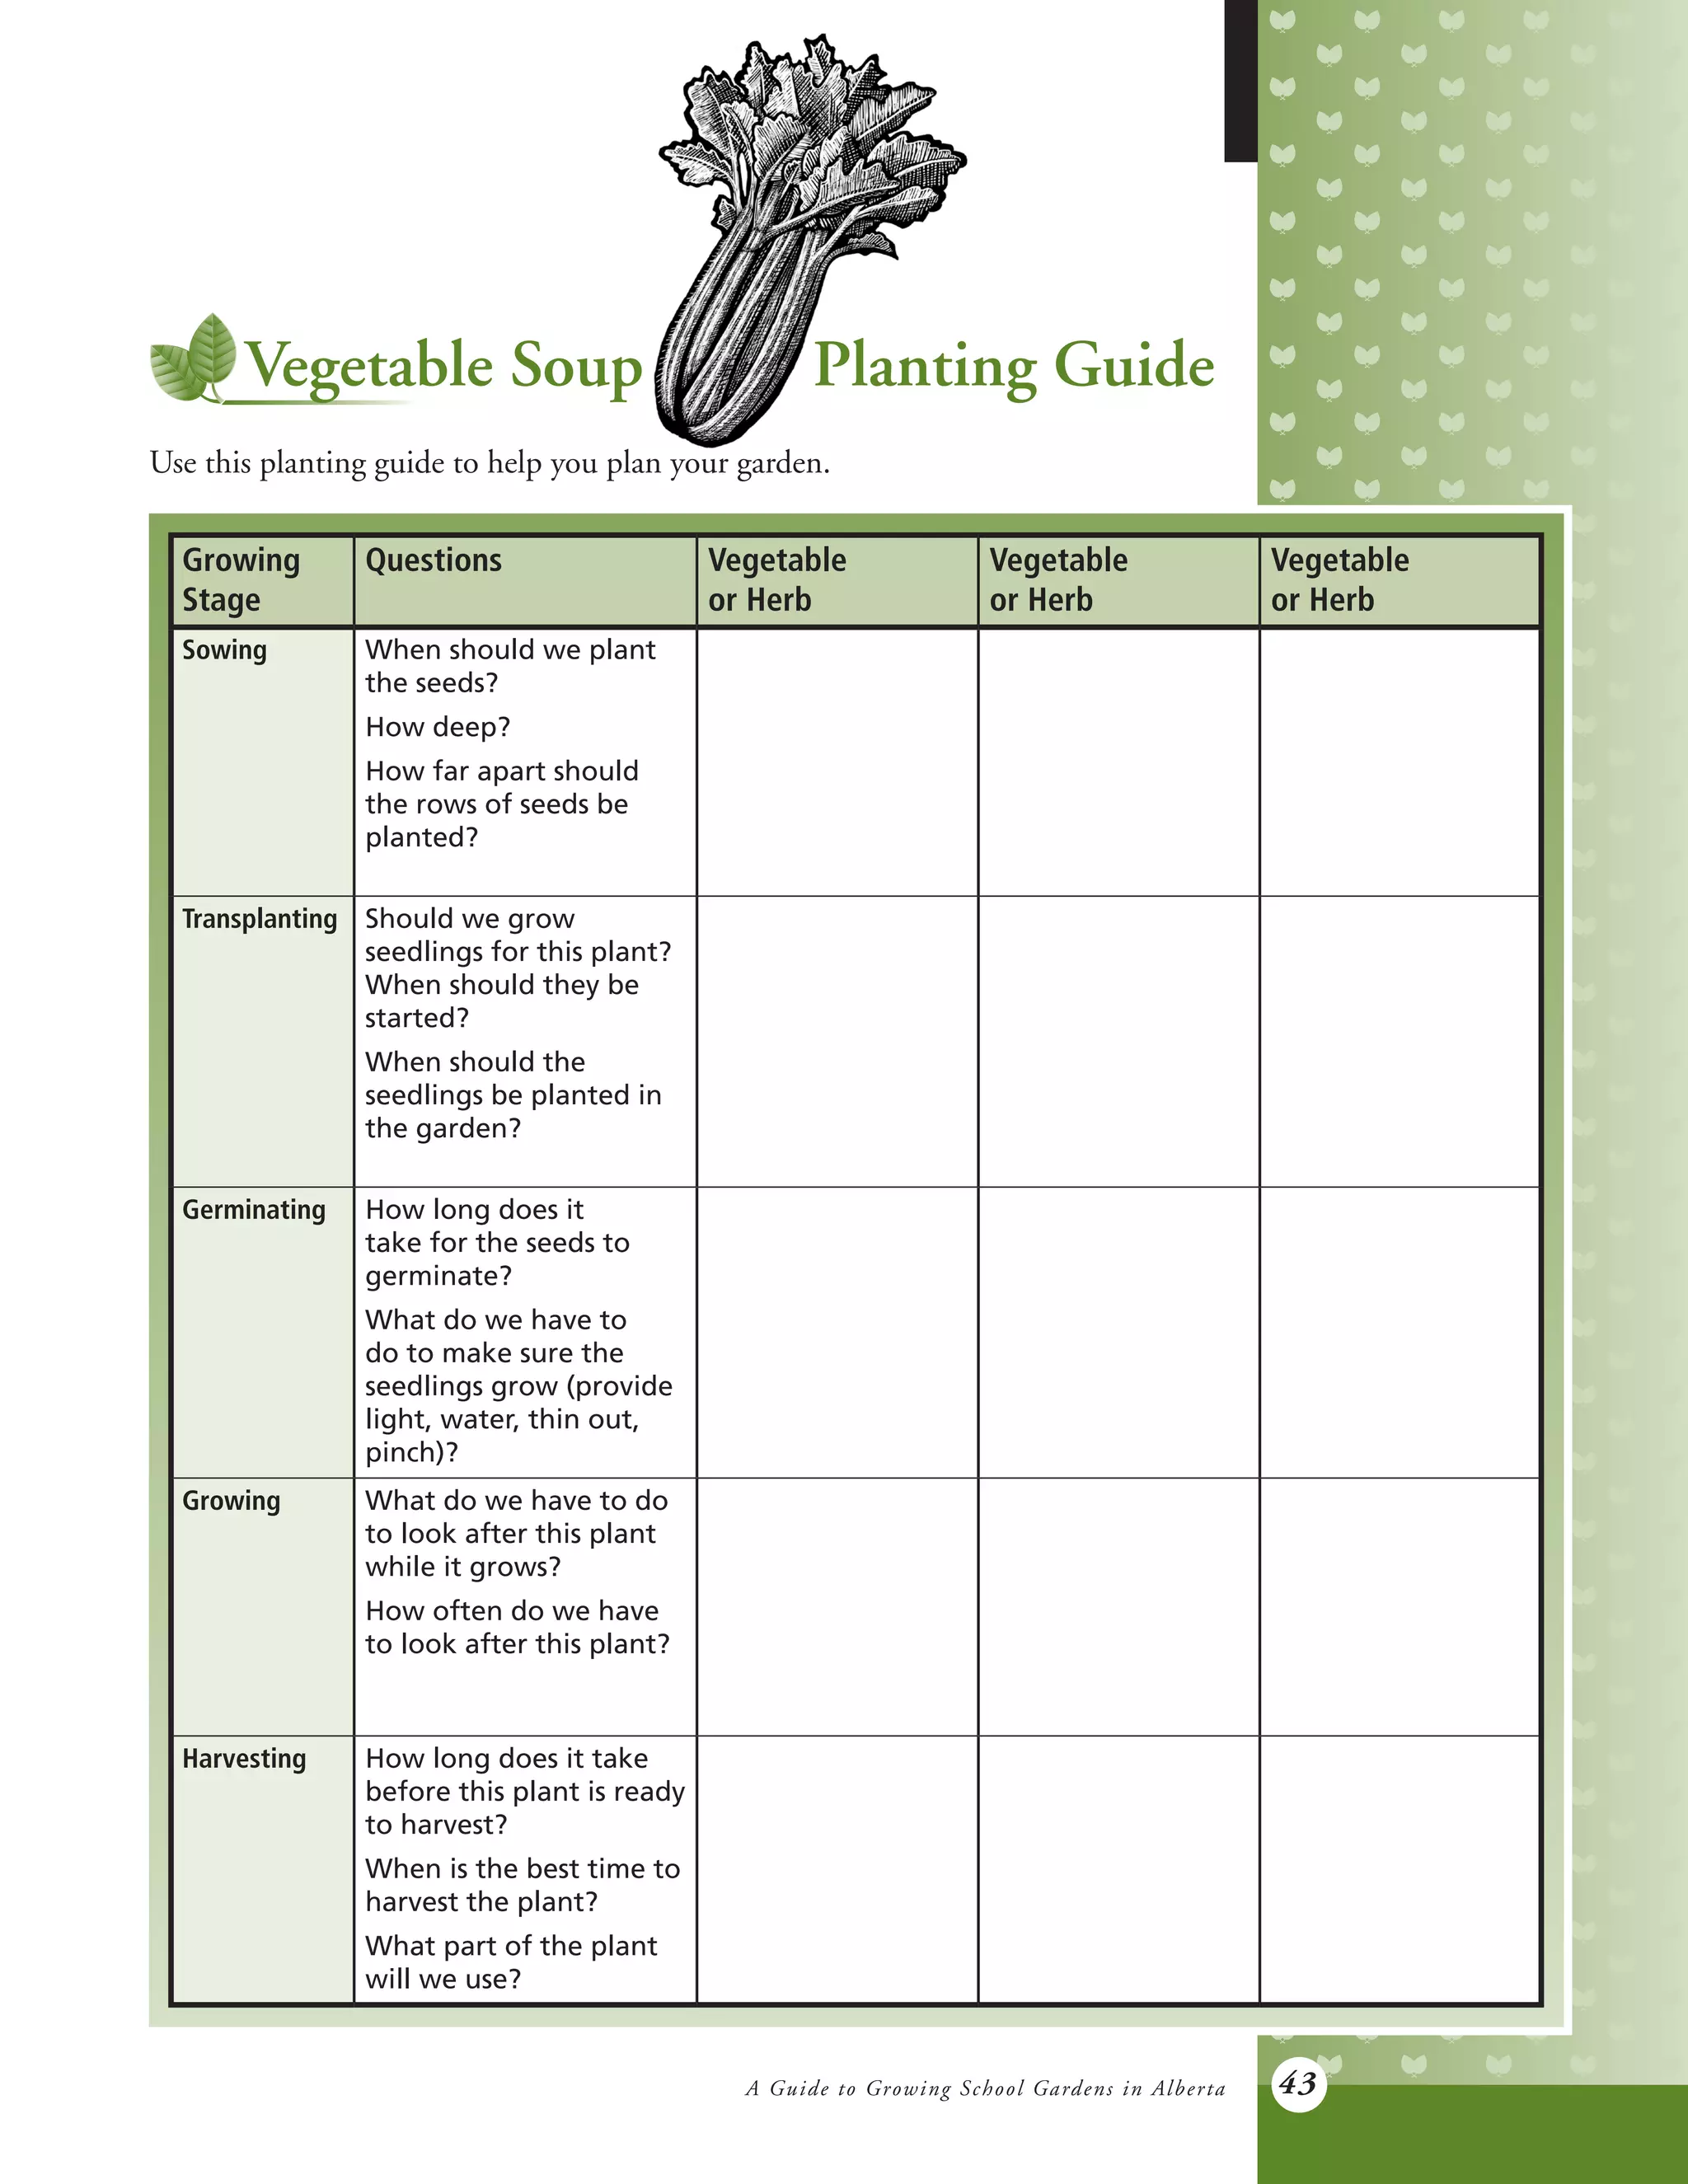
This guide provides comprehensive support for establishing and maintaining school gardens in Alberta, emphasizing the educational, nutritional, and community-building benefits of gardening for students. It highlights the use of EarthBox® containers for sustainable and efficient gardening, offering practical instructions, planning templates, and curriculum integration strategies. The document is intended for teachers and students to learn about healthy food choices, gardening practices, and related life skills.


![English4 florestabasco 1[1]](https://cdn.slidesharecdn.com/ss_thumbnails/english4florestabasco-11-170521224217-thumbnail.jpg?width=640&height=640&fit=bounds)


