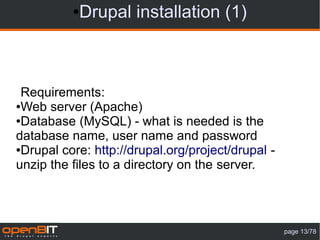
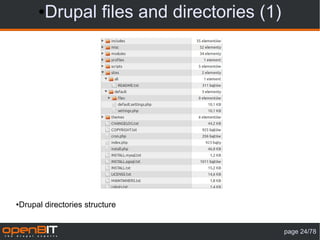
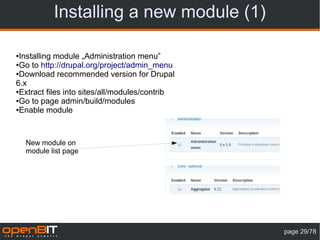
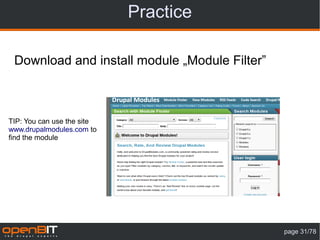
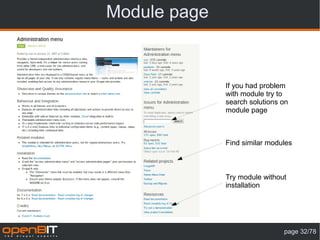
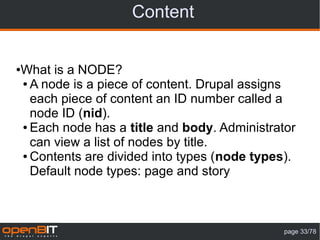
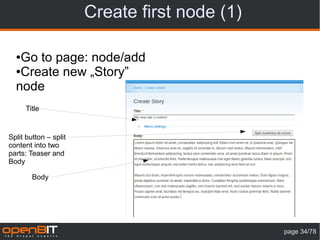
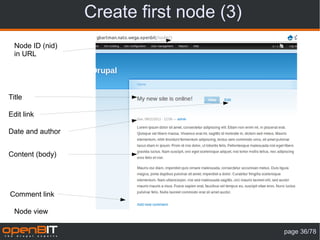
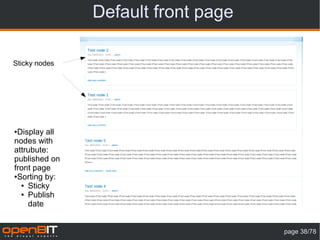
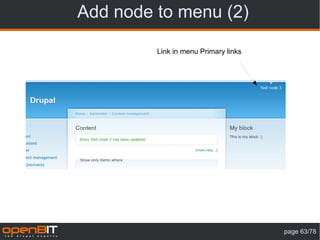
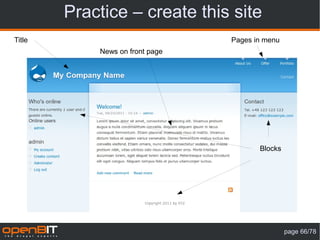
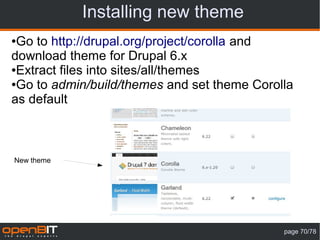
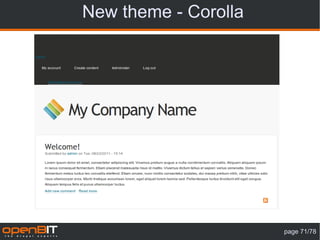
Drupal basics

   Part 1
Training plan
●   Web Pages architecture
●   About Drupal
●   Drupal installation
●   Installation of modules
●   Translations
●   Content management
●   Menu management
●   Blocks management
●   Themes management

                                    page 2/78
●Web page types (1)

              Web pages


   Static                         Dynamic
(HTML, CSS)               (PHP, ASP, JSP, Ruby, etc)


                                                   page 3/78
●Web page types (2)

              Web pages


   Static                         Dynamic
(HTML, CSS)               (PHP, ASP, JSP, Ruby, etc)


                                                   page 4/78
●PHP

●PHP is a general-purpose scripting language
originally designed for web development to
produce dynamic web pages.
●PHP was originally created by Rasmus Lerdorf in

1995.
●While PHP originally stood for "Personal Home

Page", it is now said to stand for "PHP: Hypertext
Preprocessor", a recursive acronym.
●Last stable release: 5.3.7 (August 18, 2011;)

●More: http://en.wikipedia.org/wiki/PHP,

http://php.net/
                                               page 5/78
● PHP code


<!DOCTYPE html>
<html>
  <head>
    <meta charset="utf­8" />
    <title>PHP Test</title>
  </head>
  <body>
  <?php
  echo 'Hello World';
  ?>
  </body>
</html>


                                 page 6/78
● PHP web pages architecture


                                          Page is requested
                          PHP
                       interpreter

Database server
                      Web Server                      Web Browser
   (MySQL)
                   (Apache, IIS, nginx)

                          PHP
                          files
                                          Dynamic web page


                                                                page 7/78
● PHP code interpretation
                                     HTML content sent
    PHP file on server
                                       to the browser


<!DOCTYPE html>
<html>                        <!DOCTYPE html>
  <head>                      <html>
    <meta charset="utf­         <head>
8" />                             <meta charset="utf­
    <title>PHP Test</title>   8" />
  </head>                         <title>PHP Test</title>
  <body>                        </head>
  <?php                         <body>
  $name = 'Joe';                Hi Joe
  echo 'Hi ' . $name;           </body>
  ?>                          </html>
  </body>
</html>


                                                         page 8/78
● PHP web pages architecture


                                                  Page is requested
                                  PHP
                               interpreter

Database server
                              Web Server                      Web Browser
   (MySQL)
                           (Apache, IIS, nginx)

                                  PHP
                                  files
                                                  Dynamic web page


                  Drupal


                                                                        page 9/78
●Drupal

●Drupal is a free and open source content
management system (CMS) and content
management framework (CMF) written in PHP
and distributed under the GNU General Public
License.
● It is used as a back-end system for at least 1.5%

of all websites worldwide ranging from personal
blogs to corporate, political, and government sites
including whitehouse.gov and data.gov.uk.
●It is also used for knowledge management and

business collaboration.
Source: Wikipedia

                                               page 10/78
Other open source CMS
●


                        page 11/78
●   Google Trends


                    page 12/78
●Drupal installation (1)


 Requirements:
●Web server (Apache)

●Database (MySQL) - what is needed is the

database name, user name and password
●Drupal core: http://drupal.org/project/drupal -

unzip the files to a directory on the server.


                                                   page 13/78
Drupal installation (2)
●


                     Use only stable releases
                     on production servers


    Older versions

                                     page 14/78
● Drupal installation (3)


Drupal installation page.


                                           page 15/78
● Drupal installation (4)


●Create directory files in sites/default
●Copy sites/default/default.settings.php to sites/default/settings.php

●Change file settings.php and directory files permissions so that it is writable by

the web server (Linux command: chmod 777 files settings.php)
●Click: try again


                                                                              page 16/78
● Drupal installation (5)


Database connection parameters.


                                          page 17/78
● Drupal installation (5)


                                  Database host – change if
                                  the database server
                                  is on another computer.


                                  Change if database server
                                  use non standard port


                                  Change if you have
                                  another Drupal installation
                                  In this database.
                                   We do not recommend
                                   sharing a database between
                                   Multiple Drupal installations

Database advanced options


                                                      page 18/78
●    Drupal installation (6)


                                      Administrator name. We
                                      recommend using the
                                      name „admin”
Site configuration

                                                           page 19/78
●    Drupal installation (7)


                                      For security reasons
                                      should be enabled

Site configuration

                                                             page 20/78
●Drupal installation (8)


Drupal installation complete

                                           page 21/78
● Drupal installation (9)


Drupal after installation

                                             page 22/78
●Drupal installation (10)


Practice:
●Do the installation again. Remove tables from the

database (use PHPMyAdmin) and delete the files
from server.


                                              page 23/78
● Drupal files and directories (1)


●   Drupal directories structure


                                              page 24/78
● Drupal files and directories (2)

●includes
●misc

●modules – core modules

●profiles – installation profiles

●scripts

●sites – in this directory you can put additional modules and themes

   ● all

     ● modules

        ● contrib – modules downloaded from www.drupal.org

        ● custom_project – custom modules dedicated for this project

        ● custom_universal – custom universal modules

        ● developer – developer modules, don't needed on production server

     ● themes

●themes – core themes

●cron.php - file is used to run periodic tasks such as indexing data to search and

calculation of statistics
●index.php – main file

●install.php – installation file

●update.php – run this file after update modules or Drupal core


                                                                                     page 25/78
Administration page
                                 Blocks
Content                          Menus
                                 Modules


 Users


                                Site
                                information


                                   page 26/78
Site information
Name –
displayed in
page header

These fields
are displayed
in different
places,
depending on
used theme

Footer
messages: for
example:
contact
information


                                   page 27/78
Modules page
Package name


Status (enabled or
disabled)

Module name

Module version

Module description


Depedencies


 Page: admin/build/modules

                                        page 28/78
Installing a new module (1)

●Installing module „Administration menu”
●Go to http://drupal.org/project/admin_menu

●Download recommended version for Drupal

6.x
●Extract files into sites/all/modules/contrib

●Go to page admin/build/modules

●Enable module


    New module on
    module list page


                                                page 29/78
Installing a new module (2)

 Administration
 menu


Confirmation
message


 Module status


                                             page 30/78
Practice

 Download and install module „Module Filter”


TIP: You can use the site
www.drupalmodules.com to
find the module


                                               page 31/78
Module page


              If you had problem
              with module try to
              search solutions on
              module page


              Find similar modules


              Try module without
              installation


                               page 32/78
Content


What is a NODE?
●

● A node is a piece of content. Drupal assigns

  each piece of content an ID number called a
  node ID (nid).
● Each node has a title and body. Administrator

  can view a list of nodes by title.
● Contents are divided into types (node types).

  Default node types: page and story


                                             page 33/78
Create first node (1)

  ●Go to page: node/add
  ●Create new „Story”

  node
      Title


Split button – split
content into two
parts: Teaser and
Body

        Body


                                               page 34/78
Create first node (2)
Published: each node
have status published
or unpublished. You
don't need to delete
node if you don't want
to publish it on
website

Promoted to front page


 Sticky


          Node publishing options

                                                 page 35/78
Create first node (3)
  Node ID (nid)
  in URL


Title

Edit link

Date and author


Content (body)


Comment link

  Node view

                                          page 36/78
Practice

Create 5 Story nodes
●

● Test node 1 (published, promoted to front page,

  sticky)
● Test node 2 (published, promoted to front page,

  sticky)
● Test node 3 (published, promoted to front

  page)
● Test node 4 (published, promoted to front

  page)
● Test node 5 (published, promoted to front

  page)

                                              page 37/78
Default front page

Sticky nodes


●Display all
nodes with
attrubute:
published on
front page
●Sorting by:

  ● Sticky

  ● Publish

    date


                                    page 38/78
Content management page
Filter
options


 Actions


 Title                                               Edit link


                                     Type   Status


          Page: admin/content/node


                                                             page 39/78
Page vs Story
   Story                            Page


Page and Story default attributes


                                           page 40/78
New content type (1)
      Create new content type link


Page: admin/content/types


                                        page 41/78
New content type (2)


Displayed name


Type:
identificator
in database


Content type
description


 Page: admin/content/types/add


                                        page 42/78
New content type (3)

Title field label

Body field label


 Page: admin/content/types/add


                                           page 43/78
New content type (4)


Create new version on
every edit – user can
restore older version of
node.


    Note:
    Users with the administer nodes permission will be able to override these options.

   Page: admin/content/types/add


                                                                                         page 44/78
New content type (5)


Comments
disabled


 Page: admin/content/types/add


                                        page 45/78
New content type (6)


New conent type - Car


                                       page 46/78
New content type (7)

Labels


Page: node/add/car


                                      page 47/78
Summary


 What you should know after this stage?
●Installing

●Create new content

●Edit and delete content

●Create new content type


                                          page 48/78
Blocks (1)
●Block is information that can be inserted in a
region (left or right column, header, footer,
under content – number of regions depends on
theme)
●Deafult blocks:

 ● Menu (navigation, primary links, secondary

   links)
 ● Users online


                                              page 49/78
Blocks (2)


Block


                     page 50/78
Blocks (3)
   Region: left sidebar                         Region: right sidebar
                          Create custom block


                                                     Blocks position
                                                     settings


Page: admin/build/block

                                                                page 51/78
Create custom block (1)
Block description.
Used on page
admin/build/block

Block title


Block content


Page: admin/build/block/add

                                           page 52/78
Create custom block (2)

Allow users to
control block visibility


Show block for
specific roles


Show block on
specific pages


  Page: admin/build/block/add

                                               page 53/78
Create custom block (3)
                             Region   Configure link Delete link


New block


 Page: admin/build/block

                                                             page 54/78
Create custom block (4)


                Custom block in right sidebar

                                         page 55/78
Input formats (1)
      INPUT


Text transformation


    OUTPUT


                                          page 56/78
Input formats (2)
            <span style=”color: red”><strong>Drupal</strong></span>


                                Filtered HTML
Allowed HTML tags: <a> <em> <strong> <cite> <code> <ul> <ol> <li> <dl> <dt> <dd>


                            <strong>Drupal</strong>


                                                                            page 57/78
Input formats (3)
Create new format


Default format – all
roles may use this
format


                                       Configure options
Page: admin/settings/filters

                                                           page 58/78
Input formats (4)


Change allowed HTML
tags


Page: admin/settings/filters/1/configure

                                              page 59/78
Filter modules
●Latex filter: http://drupal.org/project/latex_filter
●Video filter: http://drupal.org/project/video_filter

●BB Code: http://drupal.org/project/bbcode

●Smiles (emoticons): http://drupal.org/project/smileys

●PEAR Wiki Filter: http://drupal.org/project/pearwiki_filter


More at http://drupalmodules.com/


                                                               page 60/78
Menus
                       Create new menu


Drupal default
menus


  ●   Page: admin/build/menu


                                           page 61/78
Add node to menu (1)


Menu settings


  ●   Page: node/*/edit


                                             page 62/78
Add node to menu (2)

         Link in menu Primary links


                                      page 63/78
Primary links management
                                      Add new item        Edit menu description


Change order
– drag and
drop


                                            Edit and delete links
      Save configuration after
      change order

 Page: admin/build/menu-customize/primary-links

                                                                                  page 64/78
Summary


 What you should know after this stage?
●Installing

●Content management

●Blocks management

●Menu management


                                          page 65/78
Practice – create this site
Title                            Pages in menu
            News on front page


                                        Blocks


                                                 page 66/78
Themes

                                    All themes
                                    configuration


                                     Enabled
                                     theme


                                     Default
                                     theme

                                     Enabled
                                     theme
                                     configuration


Page: admin/build/themes

                                               page 67/78
Themes configuration


Global settings
or selected
theme settings


Configuration
options


   Page: admin/build/themes/settings

                                         page 68/78
Garland theme configuration


Some themes has
special settings, like
color scheme in
Garland


 Page:admin/build/themes/settings/garland

                                            page 69/78
Installing new theme
●Go to http://drupal.org/project/corolla and
download theme for Drupal 6.x
●Extract files into sites/all/themes

●Go to admin/build/themes and set theme Corolla

as default


New theme


                                             page 70/78
New theme - Corolla


                      page 71/78
Corolla – blocks settings
                               New region names – other
     Block settings for each   than in Garland
     enabled theme


                                                          page 72/78
Corolla – new blocks settings


                                page 73/78
Practice

●Go to http://drupal.org/project/Themes
●Chose any theme and download it

●Install new theme

●Change some theme settings and blocks

settings


                                          page 74/78
Administration theme
●Drupal allow to set different theme
for administration pages
●Go to

http://drupal.org/project/rootcandy,
download and extract theme into
sites/all/themes
●Go to admin/settings/admin and set

administration theme to RootCandy
(Dark)


                                       page 75/78
Administration themes
●Other administration themes:
 ● http://drupal.org/project/seven

 ● http://drupal.org/project/rubik

 ● http://drupal.org/project/polpo

 ● http://drupal.org/project/berylizer

 ● http://drupal.org/project/fruity

 ● http://drupal.org/project/nerdalistic

 ● http://drupal.org/project/strix

●Administration module (alternative to Administration menu):

http://drupal.org/project/admin


                                                        page 76/78
Summary


 What you should know after this stage?
●Installing

●Content management

●Blocks management

●Menu management

●Theme management


Now you can create your own web page :)


                                          page 77/78
Thank you for your attention


             Contact:
E-mail: grzegorz.bartman@openbit.pl
       Tel: +48 882 515 514


                                      strona 78/78

Drupal 6 - podstawy - www.openbit.pl

  • 1.
  • 2.
    Training plan ● Web Pages architecture ● About Drupal ● Drupal installation ● Installation of modules ● Translations ● Content management ● Menu management ● Blocks management ● Themes management page 2/78
  • 3.
    ●Web page types(1) Web pages Static Dynamic (HTML, CSS) (PHP, ASP, JSP, Ruby, etc) page 3/78
  • 4.
    ●Web page types(2) Web pages Static Dynamic (HTML, CSS) (PHP, ASP, JSP, Ruby, etc) page 4/78
  • 5.
    ●PHP ●PHP is ageneral-purpose scripting language originally designed for web development to produce dynamic web pages. ●PHP was originally created by Rasmus Lerdorf in 1995. ●While PHP originally stood for "Personal Home Page", it is now said to stand for "PHP: Hypertext Preprocessor", a recursive acronym. ●Last stable release: 5.3.7 (August 18, 2011;) ●More: http://en.wikipedia.org/wiki/PHP, http://php.net/ page 5/78
  • 6.
  • 7.
    ● PHP webpages architecture Page is requested PHP interpreter Database server Web Server Web Browser (MySQL) (Apache, IIS, nginx) PHP files Dynamic web page page 7/78
  • 8.
    ● PHP codeinterpretation HTML content sent PHP file on server to the browser <!DOCTYPE html> <html> <!DOCTYPE html>   <head> <html>     <meta charset="utf­   <head> 8" />     <meta charset="utf­     <title>PHP Test</title> 8" />   </head>     <title>PHP Test</title>   <body>   </head>   <?php   <body>   $name = 'Joe';   Hi Joe   echo 'Hi ' . $name;   </body>   ?> </html>   </body> </html> page 8/78
  • 9.
    ● PHP webpages architecture Page is requested PHP interpreter Database server Web Server Web Browser (MySQL) (Apache, IIS, nginx) PHP files Dynamic web page Drupal page 9/78
  • 10.
    ●Drupal ●Drupal is afree and open source content management system (CMS) and content management framework (CMF) written in PHP and distributed under the GNU General Public License. ● It is used as a back-end system for at least 1.5% of all websites worldwide ranging from personal blogs to corporate, political, and government sites including whitehouse.gov and data.gov.uk. ●It is also used for knowledge management and business collaboration. Source: Wikipedia page 10/78
  • 11.
    Other open sourceCMS ● page 11/78
  • 12.
    Google Trends page 12/78
  • 13.
    ●Drupal installation (1) Requirements: ●Web server (Apache) ●Database (MySQL) - what is needed is the database name, user name and password ●Drupal core: http://drupal.org/project/drupal - unzip the files to a directory on the server. page 13/78
  • 14.
    Drupal installation (2) ● Use only stable releases on production servers Older versions page 14/78
  • 15.
    ● Drupal installation(3) Drupal installation page. page 15/78
  • 16.
    ● Drupal installation(4) ●Create directory files in sites/default ●Copy sites/default/default.settings.php to sites/default/settings.php ●Change file settings.php and directory files permissions so that it is writable by the web server (Linux command: chmod 777 files settings.php) ●Click: try again page 16/78
  • 17.
    ● Drupal installation(5) Database connection parameters. page 17/78
  • 18.
    ● Drupal installation(5) Database host – change if the database server is on another computer. Change if database server use non standard port Change if you have another Drupal installation In this database. We do not recommend sharing a database between Multiple Drupal installations Database advanced options page 18/78
  • 19.
    Drupal installation (6) Administrator name. We recommend using the name „admin” Site configuration page 19/78
  • 20.
    Drupal installation (7) For security reasons should be enabled Site configuration page 20/78
  • 21.
    ●Drupal installation (8) Drupalinstallation complete page 21/78
  • 22.
    ● Drupal installation(9) Drupal after installation page 22/78
  • 23.
    ●Drupal installation (10) Practice: ●Dothe installation again. Remove tables from the database (use PHPMyAdmin) and delete the files from server. page 23/78
  • 24.
    ● Drupal filesand directories (1) ● Drupal directories structure page 24/78
  • 25.
    ● Drupal filesand directories (2) ●includes ●misc ●modules – core modules ●profiles – installation profiles ●scripts ●sites – in this directory you can put additional modules and themes ● all ● modules ● contrib – modules downloaded from www.drupal.org ● custom_project – custom modules dedicated for this project ● custom_universal – custom universal modules ● developer – developer modules, don't needed on production server ● themes ●themes – core themes ●cron.php - file is used to run periodic tasks such as indexing data to search and calculation of statistics ●index.php – main file ●install.php – installation file ●update.php – run this file after update modules or Drupal core page 25/78
  • 26.
    Administration page Blocks Content Menus Modules Users Site information page 26/78
  • 27.
    Site information Name – displayedin page header These fields are displayed in different places, depending on used theme Footer messages: for example: contact information page 27/78
  • 28.
    Modules page Package name Status(enabled or disabled) Module name Module version Module description Depedencies Page: admin/build/modules page 28/78
  • 29.
    Installing a newmodule (1) ●Installing module „Administration menu” ●Go to http://drupal.org/project/admin_menu ●Download recommended version for Drupal 6.x ●Extract files into sites/all/modules/contrib ●Go to page admin/build/modules ●Enable module New module on module list page page 29/78
  • 30.
    Installing a newmodule (2) Administration menu Confirmation message Module status page 30/78
  • 31.
    Practice Download andinstall module „Module Filter” TIP: You can use the site www.drupalmodules.com to find the module page 31/78
  • 32.
    Module page If you had problem with module try to search solutions on module page Find similar modules Try module without installation page 32/78
  • 33.
    Content What is aNODE? ● ● A node is a piece of content. Drupal assigns each piece of content an ID number called a node ID (nid). ● Each node has a title and body. Administrator can view a list of nodes by title. ● Contents are divided into types (node types). Default node types: page and story page 33/78
  • 34.
    Create first node(1) ●Go to page: node/add ●Create new „Story” node Title Split button – split content into two parts: Teaser and Body Body page 34/78
  • 35.
    Create first node(2) Published: each node have status published or unpublished. You don't need to delete node if you don't want to publish it on website Promoted to front page Sticky Node publishing options page 35/78
  • 36.
    Create first node(3) Node ID (nid) in URL Title Edit link Date and author Content (body) Comment link Node view page 36/78
  • 37.
    Practice Create 5 Storynodes ● ● Test node 1 (published, promoted to front page, sticky) ● Test node 2 (published, promoted to front page, sticky) ● Test node 3 (published, promoted to front page) ● Test node 4 (published, promoted to front page) ● Test node 5 (published, promoted to front page) page 37/78
  • 38.
    Default front page Stickynodes ●Display all nodes with attrubute: published on front page ●Sorting by: ● Sticky ● Publish date page 38/78
  • 39.
    Content management page Filter options Actions Title Edit link Type Status Page: admin/content/node page 39/78
  • 40.
    Page vs Story Story Page Page and Story default attributes page 40/78
  • 41.
    New content type(1) Create new content type link Page: admin/content/types page 41/78
  • 42.
    New content type(2) Displayed name Type: identificator in database Content type description Page: admin/content/types/add page 42/78
  • 43.
    New content type(3) Title field label Body field label Page: admin/content/types/add page 43/78
  • 44.
    New content type(4) Create new version on every edit – user can restore older version of node. Note: Users with the administer nodes permission will be able to override these options. Page: admin/content/types/add page 44/78
  • 45.
    New content type(5) Comments disabled Page: admin/content/types/add page 45/78
  • 46.
    New content type(6) New conent type - Car page 46/78
  • 47.
    New content type(7) Labels Page: node/add/car page 47/78
  • 48.
    Summary What youshould know after this stage? ●Installing ●Create new content ●Edit and delete content ●Create new content type page 48/78
  • 49.
    Blocks (1) ●Block isinformation that can be inserted in a region (left or right column, header, footer, under content – number of regions depends on theme) ●Deafult blocks: ● Menu (navigation, primary links, secondary links) ● Users online page 49/78
  • 50.
  • 51.
    Blocks (3) Region: left sidebar Region: right sidebar Create custom block Blocks position settings Page: admin/build/block page 51/78
  • 52.
    Create custom block(1) Block description. Used on page admin/build/block Block title Block content Page: admin/build/block/add page 52/78
  • 53.
    Create custom block(2) Allow users to control block visibility Show block for specific roles Show block on specific pages Page: admin/build/block/add page 53/78
  • 54.
    Create custom block(3) Region Configure link Delete link New block Page: admin/build/block page 54/78
  • 55.
    Create custom block(4) Custom block in right sidebar page 55/78
  • 56.
    Input formats (1) INPUT Text transformation OUTPUT page 56/78
  • 57.
    Input formats (2) <span style=”color: red”><strong>Drupal</strong></span> Filtered HTML Allowed HTML tags: <a> <em> <strong> <cite> <code> <ul> <ol> <li> <dl> <dt> <dd> <strong>Drupal</strong> page 57/78
  • 58.
    Input formats (3) Createnew format Default format – all roles may use this format Configure options Page: admin/settings/filters page 58/78
  • 59.
    Input formats (4) Changeallowed HTML tags Page: admin/settings/filters/1/configure page 59/78
  • 60.
    Filter modules ●Latex filter:http://drupal.org/project/latex_filter ●Video filter: http://drupal.org/project/video_filter ●BB Code: http://drupal.org/project/bbcode ●Smiles (emoticons): http://drupal.org/project/smileys ●PEAR Wiki Filter: http://drupal.org/project/pearwiki_filter More at http://drupalmodules.com/ page 60/78
  • 61.
    Menus Create new menu Drupal default menus ● Page: admin/build/menu page 61/78
  • 62.
    Add node tomenu (1) Menu settings ● Page: node/*/edit page 62/78
  • 63.
    Add node tomenu (2) Link in menu Primary links page 63/78
  • 64.
    Primary links management Add new item Edit menu description Change order – drag and drop Edit and delete links Save configuration after change order Page: admin/build/menu-customize/primary-links page 64/78
  • 65.
    Summary What youshould know after this stage? ●Installing ●Content management ●Blocks management ●Menu management page 65/78
  • 66.
    Practice – createthis site Title Pages in menu News on front page Blocks page 66/78
  • 67.
    Themes All themes configuration Enabled theme Default theme Enabled theme configuration Page: admin/build/themes page 67/78
  • 68.
    Themes configuration Global settings orselected theme settings Configuration options Page: admin/build/themes/settings page 68/78
  • 69.
    Garland theme configuration Somethemes has special settings, like color scheme in Garland Page:admin/build/themes/settings/garland page 69/78
  • 70.
    Installing new theme ●Goto http://drupal.org/project/corolla and download theme for Drupal 6.x ●Extract files into sites/all/themes ●Go to admin/build/themes and set theme Corolla as default New theme page 70/78
  • 71.
    New theme -Corolla page 71/78
  • 72.
    Corolla – blockssettings New region names – other Block settings for each than in Garland enabled theme page 72/78
  • 73.
    Corolla – newblocks settings page 73/78
  • 74.
    Practice ●Go to http://drupal.org/project/Themes ●Choseany theme and download it ●Install new theme ●Change some theme settings and blocks settings page 74/78
  • 75.
    Administration theme ●Drupal allowto set different theme for administration pages ●Go to http://drupal.org/project/rootcandy, download and extract theme into sites/all/themes ●Go to admin/settings/admin and set administration theme to RootCandy (Dark) page 75/78
  • 76.
    Administration themes ●Other administrationthemes: ● http://drupal.org/project/seven ● http://drupal.org/project/rubik ● http://drupal.org/project/polpo ● http://drupal.org/project/berylizer ● http://drupal.org/project/fruity ● http://drupal.org/project/nerdalistic ● http://drupal.org/project/strix ●Administration module (alternative to Administration menu): http://drupal.org/project/admin page 76/78
  • 77.
    Summary What youshould know after this stage? ●Installing ●Content management ●Blocks management ●Menu management ●Theme management Now you can create your own web page :) page 77/78
  • 78.
    Thank you foryour attention Contact: E-mail: grzegorz.bartman@openbit.pl Tel: +48 882 515 514 strona 78/78