
Recommended
Recommended
More Related Content
What's hot
What's hot (20)
Similar to Do-It-Yourself Fruit Picker Using Thread Clipper Scissor
Similar to Do-It-Yourself Fruit Picker Using Thread Clipper Scissor (20)
More from Manohar M Hegde
More from Manohar M Hegde (6)
Recently uploaded
Recently uploaded (7)
Do-It-Yourself Fruit Picker Using Thread Clipper Scissor
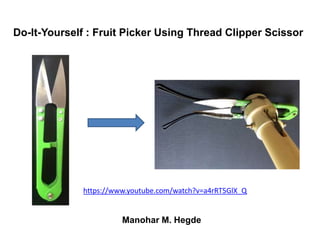
- 1. Do-It-Yourself : Fruit Picker Using Thread Clipper Scissor Manohar M. Hegde https://www.youtube.com/watch?v=a4rRT5GlX_Q
- 2. Do-It-Yourself : Fruit Picker Using Thread Clipper Scissor Why Make it Yourself ? Fruits come in various sizes and shapes, and it is difficult to find one single tool in the market which can do picking of all types of fruits. Moreover, harvest season for any one variety of fruit lasts only for a few weeks at the most. Hence it is not economical for fruit growers, who grow many different types of fruits, to buy readily available tools in the market. Fruit growers can make a fruit picker themselves, without much effort, using easily available common and inexpensive items.
- 3. What Kind of Scissors Are Suitable To Make This? Not SuitableSuitable Do-It-Yourself : Fruit Picker Using Thread Clipper Scissor
- 4. Items required 1. Thread Clipper Scissor, length approx. 120-130 mm. 2. PVC pipe, outside dia 22 mm, length as required (Choose the pipe diameter such that D-d = 0.2 to 0.5 mm, where ‘D’ is inside dia of neck of the PVC reducer, and ‘d’ is the outside dia of the pipe) 3. Screw, M3 x 30 mm long,2 nos, along with nuts Do-It-Yourself : Fruit Picker Using Thread Clipper Scissor
- 5. 5. PVC reducer, size : smaller side inside dia (‘D’) – 22 mm , bigger side inside dia – 29 mm, Length - 44 mm 6. Steel curtain rod pipe, corrugated, size : inside dia - 25mm , length – 110mm, or, length to suit user’s grip. 7. Steel cable, dia of cable – 1 mm approx., (used commonly in brake system of bicycle, auto-rikshaw).Take the longest available in the market (3-4 meters) ; cut and use as per the requirement. 8. Soft and flexible steel wire, size 0.5mm to 0.8mm (used commonly for tying barbed wire to the fence pole) Items required (cont’d ) Do-It-Yourself : Fruit Picker Using Thread Clipper Scissor
- 6. 9. General purpose elastic cords (used as a tension spring) 10. Thin walled plastic sleeve, inside dia 3.5 to 4.0 mm. ( ball point pen empty re-fills can be used) 11. Steel or Aluminium tubes, size : inside dia 2.5 to 3.5 mm, length as required. (can be taken from discarded bicycle front brake cables) 12. Hair Pins (2 Nos),75 - 85 mm length Do-It-Yourself : Fruit Picker Using Thread Clipper Scissor Items required (cont’d )
- 7. 14. Structural Adhesive (Example : ARALDITE) 13. Adhesive (Example : FEVICOL) 15. Safety Pin (small sized, 1 No ) 16. Ballpoint pen metal tip (1 No), cut to approx. 5 mm length Do-It-Yourself : Fruit Picker From Thread Clipper Scissor Items required (cont’d )
- 8. Tools required 1. Paper cutting knife 5. A pair of Cutting pliers 4. Steel rod, 3 - 4 mm dia,100 - 150mm long 3. Files(flat, round, etc) 2. Screw driver Do-It-Yourself : Fruit Picker Using Thread Clipper Scissor
- 9. Tools required (cont’d ) 6. A pair of scissors 9. Gas Stove as a source of flame 8. Soldering Iron, Solder alloy and flux 7. Emery Paper Do-It-Yourself : Fruit Picker Using Thread Clipper Scissor In addition to the above, Hacksaws – big and small sized – can also be useful.
- 10. Steps in Making The Fruit Picker 1. Check and Inspect the Thread Clipper Scissor 2. Check and Inspect the PVC reducer 1.2 Modify the Thread Clipper Scissor to enable mounting 1.1 Mark the Thread Clipper Scissor to enable modifying 2.2 Mark the PVC reducer... hints for marking 2.1 Mark the PVC reducer to enable modifying 2.3 PVC reducer... dimensions for marking 2.4 PVC reducer... after modification 2.5 PVC reducer... correction after cutting 3. Making of Bell crank Lever…material Do-It-Yourself : Fruit Picker Using Thread Clipper Scissor
- 11. Steps in Making The Fruit Picker 5. Modify the blades of the Scissor 5.1 Modify the blades of the Scissor…clamping method 5.2 Modify the blades of the Scissor…checking 3.1 Making of Bell crank Lever…marking the mould base 3.2 Making of Bell crank Lever…cutting the mould base 3.3 Making of Bell crank Lever…preparing the mould 3.4 Making of Bell crank Lever…molding 4. Assemble the Scissor in the PVC Reducer body 4.1 Assemble the Scissor …inserting the Steel wire 4.2 Assemble the Scissor …tying down the Scissor Do-It-Yourself : Fruit Picker Using Thread Clipper Scissor
- 12. Steps in Making The Fruit Picker 10. Assemble the Steel pipe 11. Assemble the Cable 12. Assemble the Elastic Cord 8. Prepare the Steel pipe 9.1 Prepare the Cable…determine the Cable length required 9. Prepare the Cable…soldering upper end of the Cable 9.2 Prepare the Cable…soldering lower end of the Cable 6. Assemble the Bell crank Lever in the PVC Reducer 7. Prepare the PVC pipe…upper end 7.1 Prepare the PVC pipe…lower end Do-It-Yourself : Fruit Picker Using Thread Clipper Scissor
- 13. 1. Check and Inspect the Thread Clipper Scissor 126 mm Note : Smaller length scissors can also be used. Do-It-Yourself : Fruit Picker Using Thread Clipper Scissor
- 14. 1.1. Mark the Scissor to enable modifying Make markings on one side as shown Do-It-Yourself : Fruit Picker Using Thread Clipper Scissor Approximate positioning of scissor in the PVC Reducer body
- 15. 1.2 Modify the Scissor to Enable Mounting Make 2 Holes, 2 - 2.5 mm dia as shown, using steel nail and hammer Note : It is easier to make the holes, if the scissor is opened temporarily and spread as shown Do-It-Yourself : Fruit Picker Using Thread Clipper Scissor
- 16. 2. Check and Inspect the PVC Reducer 22 44 29 Do-It-Yourself : Fruit Picker Using Thread Clipper Scissor
- 17. 2.1 Mark the PVC Reducer to Enable modifying VIEW FROM LEFT SIDE VIEW FROM FRONT VIEW FROM REAR VIEW FROM RIGHT SIDE Note : Use permanent marker pen to make the markings Do-It-Yourself : Fruit Picker Using Thread Clipper Scissor
- 18. 2.2 Mark the PVC Reducer… Hints For Marking Paper strip 28 mm X 7 mm Paper strip 28 mm X 5 mm Do-It-Yourself : Fruit Picker Using Thread Clipper Scissor
- 19. 2.3 PVC Reducer… Dimensions for Marking VIEW FROM LEFT SIDE VIEW FROM FRONT VIEW FROM REAR VIEW FROM RIGHT SIDE 28 5 8 (3) (8) HOLE DIA 3 mm CUTOUT 28 6 7 HOLE DIA 3 mm CUTOUT (5) (8)(6) (7) (8) 3 CUTOUT 14 8 (8) CUTOUT 14 8 12 Do-It-Yourself : Fruit Picker Using Thread Clipper Scissor
- 20. 2.4 PVC Reducer...After Modification VIEW FROM LEFT SIDE VIEW FROM FRONT VIEW FROM REAR VIEW FROM RIGHT SIDE Note : By running a thin heated metal strip along the markings, cut-outs can be easily made. Use hot round wire for making holes. Finish the rough edges using a flat file Do-It-Yourself : Fruit Picker Using Thread Clipper Scissor
- 21. 2.5 PVC reducer… Correction After Cutting Note : If necessary, make local corrections in the cut-out shapes using files (flat /round) while assembling the Scissor, so that the Scissor fits properly in the PVC Reducer Do-It-Yourself : Fruit Picker Using Thread Clipper Scissor
- 22. 3. Making of Bell crank Lever (From Non-Metallic Material) Note : This can be prepared either by cutting 5-6 mm thick laminated electrical insulator boards (Bakelite, Phenolic Bonded, Epoxy Bonded ,etc., commonly available in electrical shops) using appropriate tools, or, can be moulded using structural adhesives like Araldite “ Caution : It is advised NOT TO make this from metal, as otherwise there is a likelihood of user getting electrical shock when the picker is used in the vicinity of uncovered electrical power conductors. “ Do-It-Yourself : Fruit Picker Using Thread Clipper Scissor
- 23. Point X mm Y mm 1 5 0 2 30 0 3 39 1 4 39 6 5 30 6 6 18 9 7 12 14 8 10 18 9 8 28 10 0 28 11 0 4 A 6 7 B 4 24 Step-1. Mark points 1 to 11, ‘A’, and ‘B’ on a graph paper as per the dimensions given in the table. Step-2. Join the points to form a closed shape. Step-3. Cut along the line to get the required shape. 3.1 Making of Bell crank Lever… Marking The Base Do-It-Yourself : Fruit Picker Using Thread Clipper Scissor
- 24. 3.2 Making of Bell crank Lever… Cutting The Mould Base Step-1. Using the shape cut on the graph paper as a template, mark the shape on a 2 or 3 mm thick cardboard. (Make sure that mark for points ‘A’ and ‘B’ are retained) Step-2. Cut the card board to the same shape. Step-3. Mark points A and B (if not retained) Step-4. Make 2 holes, one of 3mm (point ‘A’) and another of 2 mm (point ‘B’) B A Do-It-Yourself : Fruit Picker Using Thread Clipper Scissor
- 25. 3.3 Making of Bell crank Lever...Preparing The Mould Step-1. Use small paper rolls to fix the metal tubes (diameter 2.5 to 3mm, and 1.5 to 2 mm; length about 5mm),as shown. Do not push the metal tubes inside the card board. Step-2. Paste a thick paper around the shape, about 2 layers, using adhesive like Fevicol. Keep the depth of the mould about 5mm Step-3. Keep a piece of safety pin on the longer side of the mould. This will act as a re- inforcement in the body after casting Do-It-Yourself : Fruit Picker Using Thread Clipper Scissor
- 26. 3.4 Making of Bell crank Lever…Molding Step-1. Mix the two elements of a good structural adhesive (example ARALDITE) on a piece of paper. Step-2. Pour slowly into the mould, making sure that all the nooks and corners of the mould cavity are properly filled-up. Step-3. Allow the adhesive to solidify. Step-4. The paper wall around the moulded shape, as well as the paper rolls inside the two small metal tubes (now embedded into the adhesive matrix), can be easily removed by keeping the bell crank in water for some time, and then scraping. Inside of the holes can be cleaned and cleared by using sharp metal pointer / large needle. Step-5. Remove the sharp edges using small flat file. Do-It-Yourself : Fruit Picker Using Thread Clipper Scissor
- 27. 4. Assemble the Scissor in the PVC Reducer body Insert the Thread Clipper Scissor in the slots from the bladed end. Do-It-Yourself : Fruit Picker Using Thread Clipper Scissor
- 28. 4.1 Assemble the Scissor…Inserting the Steel Wire Step-3. Twist tie on the sideStep-1. Take a flexible Steel wire, 80-90 mm long Step-2. Run the Steel wire through the holes provided on the leg of the Scissor, bring the ends out through the slots Do-It-Yourself : Fruit Picker Using Thread Clipper Scissor
- 29. 4.2 Assemble the Scissor…Tying Down the Scissor Step-4. Twist the Steel wire tightly and cut the excess length. Do-It-Yourself : Fruit Picker Using Thread Clipper Scissor
- 30. 5. Modify the Blades of The Scissor Attach the Hair Pins on the blades using a structural adhesive like Araldite Note : One Clip should be attached on one side of the Scissor, and the other Clip on the other side of the scissor. This will ensure smooth sliding the blades even after the Clips are attached Do-It-Yourself : Fruit Picker Using Thread Clipper Scissor
- 31. 5.1 Modify the Scissor ... Clamping Method Note : The Hair Clips should be held in position firmly for sufficient duration (sometimes up to 24 hours) for complete setting. Commonly available paper clips can be used for this purpose. Do-It-Yourself : Fruit Picker Using Thread Clipper Scissor
- 32. 5.2 Modify the Blades of the Scissor…Checking After the Hair Clips are firmly attached to the blades, move the blades by fingers to check for smooth movement and complete closure. Do-It-Yourself : Fruit Picker Using Thread Clipper Scissor
- 33. Do-It-Yourself : Fruit Picker From Thread Clipper Scissor 6. Assemble the Bell crank Lever in the PVC Reducer Insert the Bell crank Lever through the side cut-out (left picture). Then insert the screw through the side holes in the PVC Reducer and hole in the Bell crank Lever. Secure with Nut NOTE : The final assembly of Bell crank Lever has to be done only after the cable has been attached to the Bell crank Lever and assembly of the Cable In the PVC pipe. View from the Top View from the Bottom
- 34. 7. Prepare the PVC pipe…Upper End HOLES DIA 3 mm 6 6 83 12 17 17 7 Make cut-outs, slot and holes as shown, using melting out method and cutting with small hacksaws Do-It-Yourself : Fruit Picker Using Thread Clipper Scissor
- 35. 7.1 Prepare the PVC pipe…Lower End 150 mm Hole 4mm Dia 30 mm 15 mm 4 2 Slots, 30mm Long, 4mm Width (on both sides) 15 mm Make hole and slots as shown, using melting out method and cutting with small hacksaws Do-It-Yourself : Fruit Picker Using Thread Clipper Scissor
- 36. 8. Prepare the Steel pipe HOLES DIA 3 mm (both sides) 110 mm 25mm(ID) 10 mm Cut the pipe to the required length using hack saw, and make holes using hammer and nail, or hand drill / drilling machine Do-It-Yourself : Fruit Picker Using Thread Clipper Scissor
- 37. 9. Prepare the Cable…Soldering Upper End of the cable Solder Joint Metal Tube ( 3 mm dia, length 7- 8mm) Create a loop by taking the cable end through the hole provided in the Bell crank Lever, and insert the cable into the metal tube. Create a solder joint between the cable end and metal tube, using soldering iron , or , simply inserting soldering alloy inside the tube and heating over a flame. Do-It-Yourself : Fruit Picker Using Thread Clipper Scissor
- 38. 9.1 Prepare the Cable…Determine the cable length required Total Length of Cable Required Lower End –Marked up for soldering Upper End –Soldered Badminton racket string can be used for taking more accurate measurement of cable length required. Marking Do-It-Yourself : Fruit Picker Using Thread Clipper Scissor Note : Before marking on the cable, hold the cable taught between the screw at the bottom , and the Bell crank Lever, so that, there is no cable slackness during the actual operation Screw at the end of the slot
- 39. 9.2 Preparing the Cable…Soldering Lower End of The Cable Solder Joints Metal Tube If necessary, the Cable length can be increased by soldering and joining two cable pieces. Create a loop at the lower end of the Cable, insert in the metal tube as per the marking made ,and join the cable to the metal tube by soldering, or by heating over a flame. Do-It-Yourself : Fruit Picker Using Thread Clipper Scissor
- 40. 10. Assemble the Steel pipe Step-1 : Assemble the Steel pipe on the PVC pipe and insert the screw partially. Step-2 : Now on the screw inside the PVC pipe, assemble the plastic sleeve, elastic cord, and the lower end of the Cable as shown. Step-3 : Push the screw further until it comes out of the hole on the other side of Steel pipe. Secure it with nut. The view inside the PVC pipe after the assembly of the Steel pipe. Do-It-Yourself : Fruit Picker Using Thread Clipper Scissor
- 41. 11. Assemble the Cable Step-1 : Mount the PVC Reducer assembly on the upper end of the PVC pipe. Insert the lower end of the Cable through the top slot of the PVC pipe. Step-2 : Push the Cable completely down into the PVC pipe Step-3 : Insert the free end of the Bell-crank Lever into cut-out of the PVC Reducer, and push it until it enters the gap between one leg of the Scissor and the wall of the Reducer Step-4 : Insert the screw and secure with Nut (Now, the screw is holding the PVC Reducer body, the PVC pipe and the Bell crank Lever together.) Do-It-Yourself : Fruit Picker Using Thread Clipper Scissor
- 42. 12. Assemble the Elastic Cord Step-1 : Take a thin string, about 300mm long. Step-2 : Insert the string from the middle hole (shown on the left side) and allow it to come out from the end of the PVC pipe (on the right side). Step-3 : Pull the elastic cord, which was hung around the screw, out. Step-4 : Tie the end of the string to the elastic cord. Step-5 : Pull the other end of the string until the elastic cord is visible. Step-6 : Pull the cord out and insert a small piece of plastic, about 12 mm long, into the loop of the visible elastic cord. Do-It-Yourself : Fruit Picker Using Thread Clipper Scissor
- 43. Now The Fruit Picker is Ready For Use https://www.youtube.com/watch?v=0YsDtfSR-Q0 Do-It-Yourself : Fruit Picker Using Thread Clipper Scissor